1
V
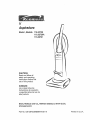
Aspiradora
Model, Modelo
/
116.32720
116,32720A
116.32721
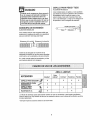
CAUTION:
Read and follow all
safety and operating
instructions before first
use of this product
CUIDADO:
Lea y sigue todas las
instrucciones de operaci6n
y seguridad antes dei uso de
este producto.
Sears, Roebuck and Co., Hoffman Estates, IL 60179 U.S.A.
www.sears.com
Part No, CO1ZBRS30000-8192110
Printed in U.S.A,
Vacuum
Before Using Your New Vacuum .........
2
Kenmore Vacuum Cleaner Warranty .... 2
Important Safety instructions ...........
Parts and Features
..................
Assembly
Instructions
...............
Care
12
................
Vacuum Storage ...................
12
Cleaning Exterior and Attachments ....... 12
Dust Bin Cleaning ................
I3-14
Secondary Filter Cleaning .............
15
Filter Changing/Cleaning ..............
17
Belt Changing and Agitator Cleaning . , 16-17
Clog Removal ........................
18
Agitator Servicing ...................
20
Agitator Assembly ................
20
3
4
5-6
Operating Instructions
....................
Pile Height Selection and Setting ........
Releasing the Handle ...............
ONIOFF Switch ......................
Attachments ........................
Attachment Use Chart ...............
Vacuuming Tips ....................
Performance Features ....................
Cleaner
7
7
8
8
9-10
10
11
t1
Troubleshooting
Requesting
Or Service
Please read this guide.. It will help you assemble
the safest and most effective way.
....................
Assistance
....................
and operate your new Kenmore
21
(back page)
vacuum in
For more information about vacuum cleaner care and operation, call your nearest Sears store_
You will need the complete model and serial numbers when requesting information,'Your vacuum's model and serial numbers are located on the Model and Serial Number Plate..
Use the space below to record the model number and serial number of your new Kenmore
vacuum.
Model No..
Serial No,.
Date of Purchase
Keep this book and your sales check (receipt) in a safe place for future reference°
LIMITED
ONEYEAR
WARRANTY
ON KENMORE
VACUUM CLEANER
This warranty is for one year from the date of purchase, and includes only private household
vacuum cleaner use. During the warranty year, when this vacuum cleaner is operated and
maintained according to the owner's manual instructions, Sears will repair any defects in
material or workmanship free of charge°
This warranty excludes vacuum bags, belts, light bulbs, and filters, which are expendable
and become worn during normal use.
parts
For warranty service, return this vacuum cleaner to the nearest Sears Service Center in
the United States.
This warranty applies only while this product is in use in the United States_ This warranty gives
you specific legal rights, and you may also have other rights which vary from state to state_
Sears, Roebuck
and Co., D/817 WA, Hoffman
Estates, IL 60t79
WARNING
Your safety
is important
to us. To reduce
to persons or damage when using
cautions including the following'.
Read this manual before assembling
using your vacuum cleaner
or
Use your cleaner only as described in
this manual Use only with Sears recommended attachments,
To reduce the risk of electrical shock Do not use outdoors or on wet surfaces.
Disconnect
electrical supply before any
serwcrng or cleaning
Failure to do so
could result in electrical shock or personal injury.
Always
gingo
the risk of fire, electrical
your vacuum
turn cleaner off before unplug-
Do not unplug by pulling on cord To
unplug, grasp the plug, not the cord
Do not use with damaged cord or plug.
tf cleaner is not working as it should,
has been dropped, damaged, left outdoors, or dropped into water, return it to
a Sears Service Center°
Do not pull or carry by cord, use cord
as a handle, close door on cord, or pull
cord around sharp edges or corners.
Do not run cleaner over cord. Keep cord
away from heated surfaces.
cleaner, follow
shock,
injury
basic safety
pre-
Do not use with any opening blocked;
keep free of dust, lint, hair and anything
that may reduce air flow.
Keep hair, loose clothing, fingers, and
all parts of body away from openings
and moving parts.
Do not use cleaner without dust bin
and/or filters in place°
Always clean the dust bin after vacuuming carpet cleaners or freshener, powders and fine dust. These products clog
the filters, reduce airflow and can cause
damage to the cleaner Failure to clean
the dust bin could cause permanent
damage to the cleaner
Do not tjse the cleaner to pick up sharp
hard objects, small toys, pins, paper
clips, etc They may damage the cleaner or dust bin
Do not pick up anything that is burning
or smoking, such as cigarettes, matches, or hot ashes.
Do not leave cleaner when plugged in
Unplug from outlet when not in use and
before servicing.
Do not use cleaner to pick up flammable or combustible liquids (gasoline,
cleaning fluids, perfumes, etco), or use in
areas where they may be present The
fumes from these substances can create
a fire hazard or explosion°
Do not allow to be used as a toy Close
attention is necessary when used by or
near children.
Use extra care when cleaning on stairs
Do not put on chairs, tables, etc Keep
on floor.
Do not handle plug or cleaner with wet
hands,
Do not put any objects into openings_
SAVE THESE
You are responsible for making sure that
your vacuum cleaner is not used by anyone unable to operate it properly
INSTRUCTIONS
Proper assembly and safe use of your vacuum cleaner are your responsibilities_ Your
cleaner is intended only for household use. Read this Owner's Manual carefully for
important use and safety information. This guide contains safety statements under
warning and caution symbols. Please pay special attention to these boxes and follow
any instructions given. WARNING statements alert you to such dangers as fire, electrical shock, burns and personal injury CAUTION statements alert you to such dangers as personal injury and/or property damage
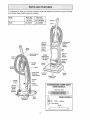
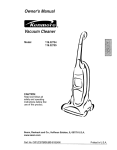
It is importantto knowyourvacuumcleaner'sparts andfeaturestoassureits properandsafe
use,Reviewthesebeforeusingyourcleaner.
Beforeassemblingvacuum,checkthe
PACKING
LISTon the coverof the separate
RepairPartsList,Usethis list to verifythat
youhavereceivedallthe componentsof
yournewKenmorevacuum.
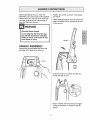
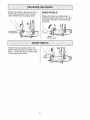
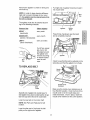
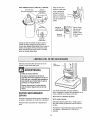
Position the handle as shown in the iliustration below
While holding the power cord out of the way,
slide the handle into the opening at the top
of the vacuum
Electrical Shock Hazard
Do not plug into the electrical supply until the assembly is complete.
Failure to do so could result in electrical
shock
or injury.
Handle
HANDLE ASSEMBLY
Remove the screw located just below the
top edge of the back of the vacuum.
Handle
Screw
Hole
Insert the screw so it passes through the
handle into the vacuum°
Begin to tighten the screw with your fingers.
It may be necessary to adjust the handle
slightly.
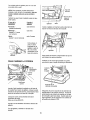
1
After the handle has been assemNed
to the
body and the power cord has been wrapped
around the cord hooks, the attachments can
be placed in their holders.
Do not overtighten.
Overtightening
holes.
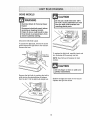
ATTACHMENT STORAGE
could strip the screw
1. Snap the suction inlet end of the hose
into the back of the vacuum cleaner,,
Do not operate the cleaner without
the screw in place,
2. Place the hose behind the handle and
over the hose holder,
3. Place the hose in the front slot of the
tool holder, twisting and pushing down over
the short hose to assure a good connection,,
4. Place the extension
of the tool holder,,
wand in the rear slot
5, Slide the crevice toot into the slot beside
the wand_
6. Place the dusting brush or combination
brush on the wand with the brush portion
up.
CORD ASSEMBLY
Make sure the quick release cord hook is in
the upright position. Remove the wire tie
from the power cord°
Lock the cord into
place by forcing it
into the locking
notch on the body
of the quick
release cord hook
as shown° This
Notcl7
Dusting
Brush
helps keep the
power cord out
from under the
vacuum cleaner
--
Extension
Wand
agitator.
Quick
Re/ease
Cord
Hook .,_,
Power
Cord --_
Lower
Cord
Wrap the
power cord
around the
Suction
Inlet
quick release
cord hook
and lower
cord retainer,
then lock the
Tool
Holder
power cord
plug onto the
power cord.
6
Tool
HOW TO START
_i!ill
Quick
_._--
Release
hook to either
side and down
Hook
WARNING
1. Turn the quick
release cord
to release the
power cord,_
2. Release the power cord plug from the
power cord and pull the cord off the quick
release cord hook° Check to be sure the
power cord is still locked into the locking
notch in the quick release cord hook°
Personal
Damage
Injury and Product
Hazard
• DO NOT plug in if switch is in
the ON position. Personal injury
or damage could result.
• DO NOT use outlets above
counters. Damage from cord to
items in surrounding area could
occur.
NOTE: To reduce the risk of electric shock,
this vacuum cleaner has a polarized plug;
one blade is wider than the other. This plug
will fit in a polarized outlet only one way. If
the plug does not fit fully in the outlet,
reverse the plugo If it still does not fit, contact a qualified technician to install the proper outlet. Do not change the plug in any
way.
3. Plug the polarized power cord into a
t20 "Volt outlet located near the floor.
SOME MODELS
SUGGESTED
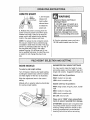
To select a pile height setting:
Turn off cleaner° Select a pile height setting
by tilting the cleaner back until front wheels
are lifted slightly off the floor as illustrated.
Slide the adjustment
setting_
lever to the correct
Models with no selector adjust automatically
for varying carpet heights.
!
PILE HEIGHT SETTINGS
You may need to raise the height to make
some jobs easier, such as scatter rugs and
longer pile carpets.. Suggested settings are:
Models
with two (2) positions:
HIGH: medium to long pile,
LOW: short to medium pile.
Models
with four (4) positions:
HIGH: shag carpet, long pile, plush, scatter
rugs
MED: medium to long pile_
LOW: short to medium pile.
EX LOW: very low pile,.
Place unit in "HIGH" when using attachments to prevent possible floor damage.
ATTENTION: Special care is required when
vacuuming certain types of carpet or floor
covering. Always check the carpet or floor
covering manufacturer's recommended
cleaning instructions before vacuuming_
Releasethe handleby placingyourfooton
thefootrestandpull backonthe handle
untilit releasesfromits uprightposition.
Release the handle by pressing down on
the handle release pedal with your foot and
pulling back and down on the handle with
your hand.
\
Foot Rest For
Handle
Handle
Release Pedal
To start the vacuum cleaner, step on the
ONIOFF switch located on the back of the
vacuum, To,stop the vacuum cleaner, step
on the switch a second time.
On!Off
8
E
!
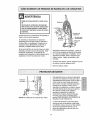
WARNING
Personal
Hazard
Injury
Hazard and Property
DO NOT place hands or feet underneath the unit at any time. When
using attachments,
the agitator continues rotating.
Do not allow the
cleaner to remain in just one place
for a period of time as the agitator
may damage the floor surface.
Avoid placing the cleaner on furniture, the fringed area of rugs, deep
pile carpeting, or carpeted stairs.
The ideal position for the cleaner
when using attachments
is for the
unit to be on a level area with the
handle
•
in the full upright
CAUTION
I
When using attachments,
be careful
not to overextend
the hose length
when reaching.
Trying to reach
beyond the hose reach could cause
the cleaner to tip over.
SOME MODELS
An extra wand, without tabs, is included.
This extra wand can be added to the
wand with tabs for extra reach, insert
wand and twist a quarter of a turn to
secure fit
position.
Crevice Tool
TO USE ATTACHMENTS
Dusting
Brush
_
Wand
(Some Models)
Place the cleaner on a fiat surface, and
move the height adjustment to HIGH,
Models)
The attachments
will fit on the hose or the
wand.. In addition, the dusting brush or
combination brush will also fit on the crevice
tool.
The hose and wand can be puiled off the
short hose by grasping the cuff and twisting
while pulling upo
If the dusting brush/combination
brush is
being used and more distance is
needed, the crevice tool can be added to
the wand, then the dusting
brush/combination
brush can be added
to the crevice tool
TO STORE
ATTACHMENTS
Return the hose to its position on the
short hose and the attachments to their
holders.
The attachments can be added to the hose
if the item to be cleaned is not far from the
cleaner.. The hose on some models will
expand.
NOTE: When cleaner is turned on, the hose
on some models will have a tendency to
collapse due to suction of the cleaner.
if more reach is needed, the wand can be
attached to the hose and the attachments
can be added to the wand_
!
•
CAUTI0N
.............
Attachments
used in dirty areas,
such as under a refrigerator,
should
not be used on other surfaces until
they are washed. They could leave
marks.
FLOOR BRUSH AND WAND
SOME
MODELS
Some models have an extra brush and wand
When using the regular hose or with
the extension hose attached, the
cleaner should be on a solid surface
on the same level or below the level
of the user's feet. DO NOT use the
hoses when the cleaner is above the
level of the user's feet.
for cleaning bare floors. Twist one end of the
adaptor into the floor brush and the other
end into the straight wand. Connect the
straight wand to the telescopic wand and
then to the vacuum hose or extension hose.
Floor Brush
EXTENSION HOSE
SOME
_
0 ))
MODELS
Some models include an extra hose which
connects to the stretch hose on the vacuum
for a longer cleaning reach_
Unit Hose
_
Extension Hose
Insert the two tabs on the end of the
extension hose into the two "J" shaped slots
on the unit hose and twist to connect,
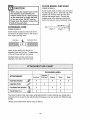
All attachments
and the wand can be
attached to the open end of the hose.
HMEN
CLEANING
ATTACHMENT
..............
DUSTING
BRUSH
CREVICE TOOL
COMBINATION
Between
Cushions*
Furniture*
<_
,
_
BRUSH
X
_,_
Drapes*
.....
X
AREA
X
X
Stairs
.....
X
Walls
X
X
X
X
X
i
Handi-Mate
® jr.
_
X
x
The motor protector may open when using attachments
reduced air flow caused by the attachments themselves
quickly°
*Always clean attachments
before using on fabric&
I0
or when cleaning new carpet due to
or by new carpet fuzz filling the bag
UMING
Carpet edges
Guide either side or the front of the nozzle
along a baseboard. The full length brushes
help remove trapped dirt at carpet edges
Personal Injury Hazard
Use care if vacuum cleaner is
placed on stairs. If it falls, personal
injury or property damage could
result.
Stairs
Put handle in full upright position
Use the
crevice tool or dusting brush_ Set the On/Off
switch to ON
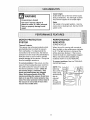
MOTOR PROTECTION
SYSTEM
PERFORMANCE
INDICATOR
SOME
Thermal Protector
This vacuum has a thermal protector which
automatically trips to protect the vacuum
from overheating
If a clog prevents the
normal flow of air to the motor, the thermal
protector turns the motor off automatically to
allow the motor to cool in order to prevent
possible damage to the vacuum. During this
time the headlight remains on,
MODELS
When the unit is running with normal air
flow, the light on the performance
indicator
is off_ The light comes on whenever the
airflow becomes blocked. If that occurs,
check the dust bin, clean/replace
clogged
filters, and check other possible clog
locations shown in CLOG REMOVAL
To correct problem:
SHOOTING chart
To correct problem: If this occurs, turn the
vacuum off and unplug the power cord from
the outlet to allow the vacuum to coot and
the thermal protector to reset Check for
and remove clogs, if necessary.
Also
check and clean/replace
any clogged
filters. Wait approximately
thirty (30)
minutes and plug the vacuum in and turn
back on to see if the motor protector has
reset.The motor protector will not reset if
the vacuum is not turned off even if the
vacuum has cooled down.
See the TROUBLE-
NOTE: The
light may
also come on
when using
attachments,
due to
reduced
airflow
through the
attachmenL
11
Indicator
Always follow all safety precautions
cleaning and servicing the vacuum
cleaner.
EwARNJ j G
when
Electrical Shock And Personal
Hazard
Injury
Disconnect electrical supply before
servicing or cleaning the unit.
Failure to do so could result in electrical shock or personal injury from
cleaner suddenly starting,
Gather the power cord and wrap it loosely
around the quick release cord hook and
lower cord retainer°
\ ,\
-u" •
\ \\
_e/leca%e \\\_
Cord
j t\
Hook _I_i
Store the cleaner in a
dry, indoor area, on
the floor with the handie locked in the
I
Electrical
Hazard
Shock And Personal injury
Wrapping the cord too tightly puts
stress on the cord and can cause
upright
cord damage. A damaged cord is an
electrical shock hazard and could
cause personal
OcOoW_
r___t!
Lower
_1_?'/
injury
or damage.
pOsitiOn"
l!lll_
i
Unplug cord from wall outlet,
DO NOT drip water on cleaner,
Do not use attachments
if they are
wet. Attachments
used in dirh/
areas, such as under a refrigerator,
should not be used on other
To reduce static electricity and dust buildup, wipe outer surface of cleaner using a
clean, soft cloth that has been dipped in a
solution of mild liquid detergent and water,
then wrung dry. Wipe dry after cleaning,
surfaces
until they are washed.
They could leave marks.
Wash attachments in warm soapy water,
rinse and air dry, Do not clean in dishwasher.
12
TO EMPTY DUST BIN
Always empty the dust bin when dirt
level reaches the "MAX FILL" line.
Turn This Direction
TO REMOVE DUST BIN
Closed
(For Use)
To Open For Emptying
Lift dust bin handle located at the
top of the dust
bin_
Open
(For Emptying)
Pull the handle
forward and lift
Rotate dust bin lid assembly counterclockwise as indicated on the lid and lift off.
dust bin up and
out of the vacuum cleaner_
Dust
Bin
Pour dust bin contents
into a trash container•
Remove any
clogs that
might be
located in the
dust bin port
or the sec-
TO CLEAN
ondary filter_
FILTER
The filter may be cleaned
by tapping it on a firm _._.
surface or by rinsing _
(
_ ",_.
Filter
Cover
(see Filter
L"_,_=_"
J
ChanginglCleaning
Rinse with water
only, do not use any
111!11!1It111I;2
detergent or soap.
Allow the filter todry
_!lltlillIH_
for 24 hours before
II1111Iitf111!I11
putting it back into the vacuum.
13
TO REPLACE
//
DUST BIN
Turn This Direction
To Close For Use
Place dust bin
back into vacuum
cleaner by insert-
Open
(For Emptying)
/'_
/ t_:%'V
_--_/
__
ing the bottom first _
and tilt back with
_
the dust bin han- ""_'-_
_--_\
die raised,
_
Manija de
soltar et cubo
de/a basura
Cubo de
la basura
,alll
Push forward and
lower the dust bin
handle to lock
dust bin in place,
Closed
(For Use)
Place dust bin lid assembly back onto top of
dust bin., Align lid marks with bin marks as
shown above in Open (For Emptying),.
Rotate lid clockwise while pressing downward so that marks align as shown in
Closed (For Use).
Check secondary
when dirty,,
filter frequently
, WARNiNG
Electrical
Secondary
Filter--_
and clean
!
Shock Hazard
Do not operate the cleaner without
the motor safety filter. Be sure the
filter is properly installed to prevent
motor failure and/or electrical
shock,
Always unplug power cord from
electrical outlet before performing
any service on vacuum.
Wash the secondary filter in warm soapy
water; rinse and dry thoroughly by squeezing the filter in your hand and letting it air
dry
SECONDARY FILTER
FOAM
DO NOT wash in the dishwasher.
DO NOT install damp.
Remove the dust bin as outlined in the
DUST BIN CLEANING section,
Remove secondary
cleaner.
Replace dry secondary filter., Ensure filter is
properly installed over filter opening°
filter from vacuum
Replace the dust bin as outined in the
DUST BIN CLEANING section.
14
EXHAUST FILTER
, WARNING
Electrical
ELECTROSTATIC
Shock Hazard
The exhaust filter must be replaced when
dirty. It should be replaced regularly
depending on use conditions.
Unplug power cord from electrical
outlet. Do not operate the cleaner
without the primary or exhaust filters.
Be sure the filters are properly
installed to prevent motor failure
and!or electrical shock,
The filter CANNOT
PRIMARY FILTER
Check primary
when dirty,
filter frequently
be washed
lose its dust trapping
as it will
ability,
Press inward on each side of
I _
exhaust filter cover and pull out 1
to remove from vacuum
Press
cleaner,
Inward
and clean
TO REMOVE PRIMARY FILTER
Remove the dust bin and dust bin lid
assembly as outlined in the DUST BIN
CLEANING section, While holding the primary filter over a trash container grasp filter,
rotate and lift off.
Remove the
frame and filter°
Exhaust
Clean primary filter by
Filter.._ _
gently tapping over a trash
container
Locking
Tab
Tap on several
sides to
ensure best Filler
cleaning,
Replace the
exhaust filter,
carefully positioning it so
that it fits into
the frame°
Slot
c_ vet
Rinse with water only as needed
Dust Bin Cleaning),
(see
The white side
of the filter
should be fac-
When cleaning the filter no longer restores
vacuum suction to full power you need to
replace the filter..
TO REPLACE PRIMARY
Make sure that the slots
of the filter
the locking
filter cover.
and rotate
White
Side
ing towards the
operator.
FILTER
Push only on filter frame, not on filter itself.
line up with
tabs on the
Replace filter
filter until
slots lock onto tabs
in cover.,
i=lt[er
Filter
Filter
Frame
Exhaust
Filter
Cover
\
Slo
C01tef
Replace the
exhaust filter
cover by placing
tabs in slots and
pushing in until
cover snaps into
place.
hocking
Tab
Note: Under normal use and care, your filter can be expected to last up to 3 years.
Re-attach the filter cover and filter to dust
bin (see Dust Bin Cleaning)° Place dust bin
back into cleaner
t5
Carefully remove any residue that may exist
in the belt area,
•::WARNI.G
.........
Electrical
Hazard
Shock Or Personal
•WARNiNG
............
injury
Disconnect electrical supply before
servicing or cleaning the unit.
Failure to do so could result in electrical shock or personal injury
cleaner suddenly starting.
Personal Injury Hazard
Always unplug the vacuum cleaner
before cleaning the brush area as
agitator may suddenly restart,
Failure to do so can result in personal injury,
from
Frequently check and remove hair, string
and lint build-up in the brush area_ If buildup becomes excessive, follow the steps
below,. Should the belt become loose or
should it break, follow the Belt Removal
Instructions_
TO REMOVE NOZZLE
Disconnect
TO REMOVE BELT/CLEAN
AGITATOR
COVER
electrical supply.
To protect the floor surface, always place
paper under the nozzle any time the nozzle
cover is removed.
Release the nozzle cover by rotating the
nozzle cover retainers to the UNLOCK
Agitator
position,, Grasp back of nozzle on each side
and lift up to remove it from nozzle cover.
Position hands on the agitator, If the belt is
still attached to the agitator, there will be
tension on it.
Carefully lift the right end of the agitator and
then lift the left end.
Nozzle
Remove the worn or broken belt from the
motor drive shaft,
. WA.N iNG
...................
Personal Injury Hazard
Be careful when removing the agitator as the belt tension is high.
Failure to do so could result in personal injury from the agitator releasing quickly and snapping away.
16
Remove the agitator to check for string and
hair build-up.
Pull right end of agitator forward and seat it
into nozzle base
NOTE: In order to keep cleaning efficiency
high and to prevent damage to your vacu+
urn, the agitator must be cleaned every time
the belt is changed+
--Base
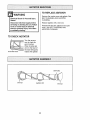
The agitator must also be cleaned according to the following schedule:
Vacuum Use
Clean Agitator
HEAVY
every week
-
Slot
Agitator
(used daily)
MODERATE
-
Nozzle
Base
Press firmly, checking to see that each
end is completely inserted
every month
(used 2-3 times/week)
LIGHT -
every 2 months
(used 1time/week)
ett
End
Cap
_" -_
Cut off any carpet
pile, hair or lint
entangled around
the agitator and
remove any string
or debris located
near the end
..............
Agitator
Check to see that the belt is centered on the
caps.
belt pulley and that the agitator turns freely.
TO REPLACE BELT
Nozzle
Cover
Shaft
New
Belt
Nozzle Cover
Retainers
Belt
Pullev
Make sure the nozzle cover retainers are in
the UNLOCK position+ Hook the front of the
nozzle cover on to the nozzle base and
Seat left end of agitator into nozzle baser To
seat agitator end, place rounded portion of agitator end cap down into slot in nozzle base,
rotate downward. Once in place, rotate the
nozzle cover retainers to the LOCK position_
Loop the new belt on the motor shaft,
NOTE: See Parts and Features for belt
number.
Loop the other end of belt onto the belt
pulley on the right end of agitator+
17
E. WARNiNG
...............................................
Electrical
Hazard
Shock Or Personal
Injury
Hose
Disconnect electrical supply before
servicing
or cleaning the unit,
Failure to do so could result in elec-
Tabs
trical shock or personal injury from
cleaner suddenly starting.
Inlet
Always follow all safety precautions when
cleaning and servicing the vacuum cleaner.
Motor
Holder
_ort
If the cleaner does not seem to have ade-
Hose
quate suction, first check if the dust bin is
full or if a filter is clogged. See DUST BIN
CLEANING and FILTER CLEANING I
CHANGING.
Replace the suction inlet and remove the
other end of the hose from the tool holder,,
If the dust bin and filter areas are free of
clogs, check the hose area., Remove the
suction inlet by depressing the two tabs that
secure it to the back of the vacuum and
Plug in the vacuum and turn it on. While
running the vacuum cleaner, stretch the
hose in and out to remove the clog,
Turn the unit off and unplug the unit,
check for clogging in this area.
If the clog still exists, pull the short hose out
of the tool holder and inspect the short
hose.
Remove any visible clogs.
Motor
Protector
NOTE:
This vacuum has a motor protector by-pass
valve which automatically opens to provide
cooling air to the motor when a clog
prevents the normal flow of air. If the bypass valve opens to prevent motor
overheating and possible damage to the
vacuum, a change of sound will be noticed
as air rushes through the valve opening, If
this occurs, turn the vacuum off and unplug
the power cord from the outlet° Then check
for clogs as described under the CLOG
REMOVAL section_
_"..........
--- @
Do not block motor protector,
The motor protector by-pass valve may open
when using attachments or when cleaning
new carpet, due to reduced air flow caused
by the attachments themselves or by new
carpet fuzz filling the dust bin quickly.
18
SOME MODELS
E
•
i
CAUTION
i
Do not use a bulb rated over '130 V
AC-15 W. During extended use, heat
from the bulb could overheat sur-
Electrical Shock Or Personal Injury
Hazard
rounding
plastic parts.
Disconnect electrical supply before
servicing or cleaning the unit.
Failure to do so could result in electrical shock or personal injury from
cleaner suddenly starting.
Disconnect
electrical supply.
To access the light bulb, remove the screw
which secures the light lens to the vacuum,
Remove the lens.
Screw
. Push Here
_'\
To Remove
To replace the light bulb, carefully insert and
turn clockwise to fit securely into slot,
NOTE: See Parts and Features for bulb
number.
!
IoN
..................
Do not plug in or turn on until completely reassembled.
Remove the light bulb by pushing the bulb in
while turning counterclockwise to release
from the slot Pull the light bulb straight ouL
Position the light lens back on the vacuum,
Replace the light lens screw,
19
TO REPLACE
• WARNING
...................
AGITATOR
Remove the nozzle cover and agitator° See
BELT CHANGING AND AGITATOR
CLEANING°
Electrical Shock Or Personal Injury
Hazard
Disconnect electrical supply before
servicing or cleaning the unit. Failure
to do so could result in electrical
shock or personal injury from cleaner suddenly starting.
Replace agitator with a new one,
Reassemble the belt, agitator and nozzle
cover. See BELT CHANGING AND
AGITATOR CLEANING°
TO CHECK AGITATOR
Base
Turn the vacuum
over to check for
worn brushes..
When brushes are
worn to the level of
the base belt guard,
repiace the agitator.
Belt Guard
Belt Pulley
End Cap
Agitator
20
Unit
End Cap
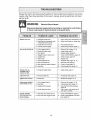
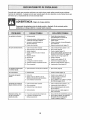
Review this chart to find do-it-yourself solutions for minor performance problems. Any service
needed, other than those described in this owner's manual, should be performed at a Sears
service center.
WARNING
Electrical Shock Hazard
Disconnect electrical supply before servicing or cleaning the unit. Failure
to do so could result in electrical shock or personal injury.
Cleaner won't run.
Poor job of dirt pick-up.
1. Unplugged at wal!outlet
2. Tripped circuit breaker/blown fuse
at household service panel.
3. Onfoff switch not turned on.
1,
2.
Plug in firmly, push onloff switch to on.
Reset circuit breaker or replace fuse.
3.
Push on/off swttch to on
4. Thermal protectortripped
4.
Resel Ihermal protector, (page 1t)
1. Full or clogged dust bin,
1,
Clean dust bin, (pages 13, 14)
2.
3.
4.
5o
6.
2.
3.
4.
5.
Adjust setting, (page 7).
Replace agitator, (page 20),
Check CLOG REMOVAL, (page I8),,
Check for clogs, (page 18)
6.
7.
8.
Replace hose
Replacelfix belt, (pages 16, 17)
Insert hose fully, (page 6)
9.
t0.
Check for clogs, (page t8)
Cleantchange fillers, (page 15)
Wrong pile height setting
Worn agitator
Clogged nozzte or dust bin port
Clogged hose.
Hole in hose
7. Brokenfmisplaced belt,
8. Hose not inserted fully
9. Motor protection system aclivated
t0. Dirty filters,
Cleaner picks up
moveable rugs or
pushes too hard.
1. Wrong pile height setting
1.
Adjust setting, (page 7)
Light won't work.
1. Burned out Ilght bulb
1,
Change light bulb, (page 19)
Agitator does not turn.
1. Broken belt
1.
Replace belt, (pages 16, 17).
Performance Indicator,
some models, is red.
I. Full or cloggeddust bin
2o Dirty filters
1o Clean dust bin, (pages 13, t4)
2. Cleanlchange fillers, (page t5)
3. Clogged airflow passage
3.
4,
4.
Air flow restricted
with attachment use.
Certain altachmenl
tools.
1. Attachment usa restricts air flow
2. New carpet fuzz clogged air path
Sound changes.
21
1,
2.
Clear clog from airflow passage,
(page 18)
This is normal Light should go off
when tool is remove&
Check ATTACHMENTS, (page 9).
Check CLOG REMOVAL and clean
hose, (page 18)
22
Antes de usar su aspiradora nueva
.....
Garantia de la aspiradora de Kenmore
Instrucciones importantes de
seguridad
..........................
Piezas y caracteristicas
.........
lnstrucciones
de ensamblamiento
.....
Instrucciones de operaci6n ...........
Ajuste y selecci6n de nivel de pelo de fa
alfombra .......................
Desprendimiento del mango ............
Interruptor de encendidotapagado .........
Accesonos ..............................
Cuadro de uso de los accesorios ........
Sugerencias para aspirar ...............
Caractedsticas de rendimiento ...........
2
2
3
4
5-6
6
6
7
7
8-9
9
I0
t0
Cuidado de la aspiradora ..........
11
Atmacenamiento de ]a aspiradora ..........
11
Limpieza del exterior y de los accesorios _., 11
Limpiando el cubo de la basura ........
12-13
Limpieza del _tro secundario ...........
13
Cambioftimpie del filtros .............
14
Cambio de la correa y limpieza def
agitador
15-16
C6mo eliminar los residuos de basura
en los conductos .....................
17
Cambio de la bombilla ................
18
.........................
Cuidado del agitador .................
Ensamble det agitador .................
Reconocimiento
19
19
de problemas .........
lnformaci6n de assistancia
o servicio ...................
20
(back page)
Por favor lea esta guia que le ayudara a assemblar y operar su aspiradora nueva de Kenmore en una manera
m_s segura y effectiva.
Para mas informaci6n acerca det cuidado y operaci6n de esta aspirador, llame a su tienda Sears mas cercana.
Cuando prequnte por informaci6nusted necisitar_ el n0mero complelo de serie y modelo de la aspiradora que
est& tocado en la placa de los n0meros de modeto y sede
Use et espacio de abajo para registrar el n0mero de modefo y serie para su nueva aspiradora de Kenmore.
N0mero de Modelo
Nl)mero de Serie
Fecha de Compra
Matenga este libro y su recibo en u lugar seguro para referencias futuras
GARANTiA LIMITADA DE UN AI_ODE LA ASPIRADORA KENMORE
Esta garantta es por un afio desde fa fecha de compra, e incluye solamente el uso de la aspiradora en
hogares privados Durante el afio de garantia, cuando la aspiradora es operada y mantenida de acuerdo af
manual de instrucciones del dueno, Sears reparar_ cuatquier defecto en materiales o fabricaci6n libre de
cargo
Esta garantia excluye las bolsas de colecci6n, correas, lamparillas, y filtros, las cuales son partes gastables
que se deterioran con el uso normal
Para el servicio de garant[a, retorne esta aspiradora al Centro de Servicio Sears m_s cercano en los
Estados Unidos.
Esta garantia se apfica solamente mientras este producto est& en uso en los Estados Unidos. Esta garantia
le da a usted derechos legales especIficos,y usted puede tener lambi6n otros derechos los cuales varian de
estado a estado
Sears, Roebuck and Con,D/817 WA, Hoffman Estates, IL 60179
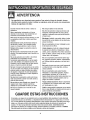
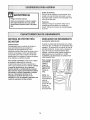
ADVERTENCIA
Su seguridad es muy importante para nosotros, Para reducir el riesgo de incendio, choque
el_ctrico, lesi6n corporal o daSos al utilizar su asptradora, actLiede acuerdo con precauciones
b_sicas de seguridad, entre ellas:
Lea este manuaf antes de armar o utilizar su
aspiradora,
Use su aspiradora unicamente en la forma
descrita en este manual. Use flnicamente con
accesorios recomendados per Sears.
Para reducir el riesgo de choque el6ctrico, no use
su aspiradora al aire libre ni sobre superficies
mojadas
Desconecte la fuenle de electricdad antes de
dar servicio o limpiar. De 1ocontrario podfla
causar un choque el_ctrico o lesi6n corporal.
Siempre debe apagar su aspiradora antesde
desconectarla.
No desconecte ia aspiradora tirandodet cordSn
eLactrico.Para desconectarta, hale et enchufe, no
el cord6n.
No use la aspiradora si el cord6n o el enchufe
est_ dafiado, Si la aspiradora no est_
funcionando adecuadamente o si se ha dejado
caer, est& dafiada, se ha dejado expuesta a ta
intemperieo se ha dejado caer en agua, devu6lvala aun Centro de servicio de Sears
No hate ni transporte la aspiradorapor el cord6n;
no use el cordSn como mango; no cierre puertas
sobre el cord6n; no hale el cord6n sobre rebordes agudos ni esquinas. No pase la aspiradora
sobre et cord6n, Mantenga el cord6n alejado de
superficies calientes_
No abandone la aspiradora cuando est_ conectada. Descon_ctela cuando no la est_ usandoy
antes de darle ser;icio.
No coloque ob)etos en Ins aberturas
No utitice la aspiradora si alguna abertura esta
bloqueada;mant_ngata libre de polvo, pelusa,
cabetlos y cualquiera cosa que podria disminuir
el flujo de aireo
Mantenga et cabetlo,ropa suelta, dedos y todas
tas partes del cuerpo alejados de Ins aberturas y
piezas mec_nicas
No use fa aspiradora sin tenet instalada la cubo
de fa basuray/o los filtros,.
Limpte stempre el cube de la basura despu6s
de aspirar de la affombra limpiadores o refrescantes, polvos y depOsitosfinos Estos productos
tapan los fittros, reducen el flujo de aire y pueden
causar daSo a Ia limpiadora
No use ta aspiradora para levanlarobjetos agudos, juguetes pequeSos,alfileres, sujetapapeles,
etc Podrian daSar la aspiradora o la cubo de la
basura+
No levante ninguna cosa que se est6 quemando
o emitiendo humo, como cigarriIIos,cerillos o
cenizas calientes
No use ta aspiradora para aspirar liquidos
inflamableso combustibles(gasolina, liquidos
para limpieza, perfumes, etc.) ni la use en
lugares donde _stos podrfan estar presentes, Los
vapores de estas sustancias pueden crear un
peligro de incendio o explosi6n.
No permila que sea utilizada como juguete_Se
requiere tener mayor cuidado cuando sea
utilizada en Ia proximidad de niSoso pot niSos
Tenga cuidado especial al utilizar la aspiradora
en escalones No la coloque sobre sillas, mesas,
etc, Mant_ngala en e! pisoo
No toquela aspiradora ni el enchufe con ins
manos mojadas,
Usted es responsabte de asegurar que su aspiradera no sea utilizada per ninguna persona que no
pueda manejarla correctamente.
GUARDE ESTAS INSTRUCCIONES
El armado y uso seguro de su aspiradorason su responsabilidad_Esta aspiradora ha sido dise_,ada
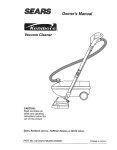
exclusivamente para uso dom_stico.La aspiradoradeber,_almacenarse en un lugar seco yen el interior,Lea este Manual del propietario detenidamente, pues contiene informaci6n importante sobre seguridad y uso. Esta quia contiene informaci6n sobre seguridad debajo de simbolos de advertiencia
cuidado. Por favor ponga atenci6n especial a estasinstrucciones dadas. Advertencla: Este
informaci6n le alertar,_con el poligro de fuego, choques electricos, quemadas y lesioneso Cuidado'
Este informaci6n fe alertara a peligros como lesiones y dafios de propiedad.
Esimportante
concer
laspiezas
y caractedsticas
desuaspiradora
paraasegurar
suusoadecuado
yseguro
Examinelas
antesdeusarsuaspiradora,
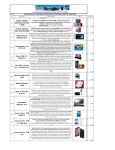
Objeto
Pieza N-°
Pieza N°
en EUA
en Canad_
MaB_
correa
.....
20-5275'
'20-40096
Manguera
\
Manija de
soltar el
cubo de la
basura
/ndtcador de
rendimiento
(Algunos
modelos)
Fittro
Cubo de
la basura
Palanca
Soporte para
la manguera
,Fittro de
escape
(dentro)
para ajustar
/a a/tufa
(AIgunos
modelos)
Luz
blnos
liberaci6n
Cord6n
rapide
cord6n
del
modelos)
de la
boqui/la
para
sacudir
Tornillo
de mango
Tubo
Base de
boqui/la
Protector
de meubles
Soportes de ta
cubierta de boquilla
inferior
para
el cord6n/Mango
para transportar
interruptor de
encendido/
apagado
\
- Herramienta
para tapices
Protector
de motor
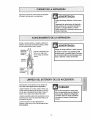
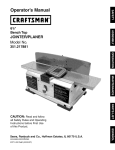
JUEGOS DE MANGUERA
DE EXTENSION
ALGUNOS
Manguera
MODELOS
de extensi6n
!(lItlCt(!lltff((lftd
fiberaci6n
del mango
(Algunos
modelos)
",,,,
MODELOS
/
NOmeros de
series de! modelo
Manguera
corta
_"_--
Adaptador
epii/o paraTPui;:s
l
,)))
Antes de armar la aspiradora, chequee la LISTA
DE EMBALAJE en la cubierta separada de la Lista
de Pades para Reparacibn° Use esta lista para verificar que ha recibido todas tas componentes de su
nueva aspiradora Kenmore,,
Coloque el mango como se ve en el diagrama
abajo,
AI mantener fa manguera de manera que no interfera, mueva el mango a la abertura en la parte
superior de ta aspiradora
Peligro de choque el_ctrico
No conecte la aspiradora hasta que termine de armada. De to contrario podria
causar un choque el_ctrlco o lesi6n corporal.
Mango
MONTAJE DEL MANGO
Quite el torniliodel mango locafizadojusto debajo
del borde superior de la parte posterior de la aspiradora, ver ilustraciSnde arriba,
Tornillo
Orificio para
el tornillo del
mango
lnserte el tornillopara que pase par el mango de la
aspiradora,
Empiece a apretar el tornillocon los dedos, Quiz_
sea necesario ajustar un poco e! mango
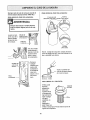
CUIDADO
COLOCACl6N DE LOS
ACCESORIOS
...................................
No apriete demasiado el tornillo.
Si Io aprieta demasiado podria arrutnar los
orific{os para el tornillo,
Una vez que haya colocado el mango ell la unidad, y
el cord6n hayasido enrollado en los sujeladores,
podra proceder a colocar los accesorios en sus
respeclivos receptaculos
No opere la asptradora sin tener instalai:io
el tornilloo
1. Cierre el fin para aspiraci6n de la manguera en la
parte detrasera de ia aspiradora,
Apriete el tornillo con un deslornillador,
2, Co]oque la manguera detr_s del mango y encima
det soporte de manguera.
\
3. Coloque la manguera en la ranura delanlera en
el soporte de herramientas, girando y empujando
hacia abajo hacia Ia manguera corta para asegurar
una conexci6n buena,
4, Coloque el tubo de extensi6n en la ranura
detrasera en el soporte de herramientas,
\
5, Mueva la herramienta para hendiduras hacia la
ranura al ]ado del tubo,
6o Conecte el cepitlo de polvo o el cepillo de uses
muftiptescon el tubo con los cepillos hacia arriba
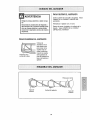
COLOCACION DEL CORDON
Asegt_resede que el sujetador superior dei cordbn
de liberaci6n r_pida se encuentre en posici6n vertical Quite el alambre con el que est& atado el cord6n
el_ctrico,
Fije el cord6n en
posici6n, forz&ndolo
en ta ranura de
btoqueoubicada en el
cuerpo de! sujetador
de tiberaci6n r;_pida
det cord6n, como se
muestra, Esto ayuda a
que el cord6n no se
enrede debajo de!
agitador de la
aspiradora
Sujetador de
liberaci6n
rapide del
cord_n._._,
e/_ctrico
miento
inferior para
el cord6n
Mango
Soporte para
manguera
Manguera
\
btoqueo
- Cepi/lo para
sacudir
A1mantener el
cord6n el_ctricode
una manera que
no inteffera, ponga
el cord6n el_clrico
alrededor dei sujetador de liberai6n
rapida del cord6n y
alrededor del
Compartimiento
inferior para el
cord6n y luego
cierre el enchufe
def cord6n el_ctrico en el cord6n
electrico
Q
Abertura de
aspiraciSn
Tenador de
herramientas
uera
PARA COMENZAR
. ADV ERTENClA
r de
liberaci6n
rapide del
I. Gire el
sujetador del
cord6n de
lado a lado y
hacia abajo
para liberar
el cord6n
el_ctrico.
.....
Peligrode lesi6n personaly dafio al producto
• NO conecte la aspiradora si el tnterruptor
est_ en ia posiciSnON, Podria resultar en
iesi6n personal o dafio,
, NO use los enchufes Iocalizados sobre los
mueblesoLos objetos cercanos podr[an resultar dafiados.
I
2. Desprenda el enchufe del cord6n et6ctrico y quite
el cord6n del sujetador superior Compruebe que el
cord6n electrico sigue fijado en ta ranura de bloqueo
del sujetador superior,
'
! II1%,.' '.'"11
_
_
........
-_
3. Conecte el cord6n ef_ctrico polarizado en un
enchufe de 120 voltios que se encuentre cerca del
piso
NOTA:Para reducir el riesgo de choque el6ctrico,
esta aspiradora cuenta con una claviia polarizada,
uno de los contactos es m,_sancho que el otto La
clavija sSto puede introducirse de una manera en el
enchufe Si la clavija no cabe bien en el enchufe,
invi6rtala. Si a_n no cabe, flame a un electricista
para que instale un enchufe correcto. No altere la
clavija de ninguna manera.
ALGUNOS
SUGERENClAS DE AJUSTE DE NIVEL DE PELO
ALFOMBRA
iVIODELOS
Para seleccionar un ajuste de nivel de pelo de la
alfombra:
Para que se ie faciliten atgunas tareas de limpieza,
como pot ejemplo tapetesaueltos y alfombras de
peto large, puedeque sea necesario elevar ajuste
de nivet de pelo de la alfombra. Los ajustes sugeridos son los suguientes.
Apague la aspiradora, Seleccione un nivel de ajuste
inctinandola aspiradora hacia arras hast que las
ruedas delanteras est6n un poso despegadas del
piso.
Deslice la palanca de ajuste de nivet de pelo de ta
alfombra a fa posici6n deseada.
Los modelos de dos (2) posiciones:
HIGH: pelo corto o mediano_
Los modelos sin selector ajustan autom_licamente
para el peluso de alfombra de vadas alluras.
LOW: peto meidano o poco large.
Los modelos de cuatro (4) postciones:
HIGH: pelo &spero y tanudo,pelo largo, felpa, alfombras o tapetes irregu[ares.
MED: pelo mediano o poco largo.
LOW: pelo corto o meiano,
EX LOW: pelo muy corto,.
Ponga la unldad en "HIGH" cuando utilice los
accesorios para prevenlr posibles dafios al plso,
Atenci6n: Se requiere el cuidado especial cuando
pasa la aspiradora sobre ciertas clases de affombra
o cubierta de piso.,Siempre revise las instrucciones
de la limpieza recomendada de fabricante para la
alfombra o la cubierta de piso antes de pasar la
aspiradora
6
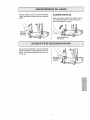
Suelte e! mango por pisar en el pedal de liberaci6n
y tirarlo hacia atr&s hasta que libere de su posici6n
vertical
ALGUNOS MODELOS
Suelte et mango por apretar hacia abajo con ef pie
en e_pedal de liberaci6n y tirar del mango hacia
atr&s y hacia abajo con la mano,
Pedal de la
tiberaci6n
det mango
Pedal de liberaci6n
det mango
Para encenderta aspiradora, pise en e] control de
ONIOFF colocado en la parle detrasera de fa aspiradora. Para apagar la aspiradora, pise en el control otra vez
_terruptorde
encendido/
I
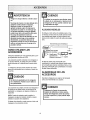
Peligro de cheque el_ctrico o lesi6n corporal
A! utilizar los accesorios para limpiar, tenga
cuidado de no sobrepasar el alcance de la
manguera. St 1o hace, podr_a ocasionar que
ia aspiradora se catga.
No ponga las manes o los pies debajo de ta
m_quina cuando afiade la manguera.
Mientras se usan los accesorios, la
agitador empieza a girar. No deje que la
asplradora se quede en un s61olugar per
un periodo extendido, porque la agttador
puede hacer daSo a ia superficie del suelo.
No ponga ia aspiradora enclma de
muebles, en el fleco de la alfombra, en una
aifombra de pelo largo, ni en escaleras
alfombradas. La posici6n ideal para la
aspiradora cuando se usan los accesorios
est_ en un _rea plana con el mango en la
posici6n vertical,
ALGUNOS MODELOS
Se incluyeun tube extra, sin pestaSas, pare un mayor alcance E1tube extra se puede conectar al tube
con pestaSaspara lograr un mayor atcanceoIntroduzca el tube y d61eun cuarto de vuelta para asegurarlo.,
Herramienta para hendiduras
COMe UTILIZAR LOS
ACCESORIOS
,
_
(AtCepiflo
para sacudir
gunos
Coloque Ia aspiradora en una supe_cie plana y penga el graduador de altura en HIGH,
#I1#1
Los accesories podr,_ncolocarse en la manguera o
en el tubo=Adem&s, el cepillo pare polvo tambi6n
podr#,colocarse en la boquilla para huecos reduci_
dos_
Tube
modelos)
_
Cembinaci6n
_ _
I
(A/gun6smode/os)L_ Cepi//o
Si utilize elcepitlo para polvolcepi!lo para
combinaci6n y necesita m_s alcance, puede conectar fa boquilla pare huecos reducidos al tube y el cepiflo para polvolcepillo para combinaci6nen [a boquF
tla para huecos reducidos,
La manguera y et tuba pueden sacarse de la manguera corta tom&ndotosper el extreme y tirando hacia arrib&
ALMACENAJE DE LOS
ACCESORIOS
Devuelvala mangueraa su lugar en la manguera
corta y las herramientas a su soporte
NO tire de la asplradora per la manguera
en la habitaci6n. Podr_anocurrir defies a
sus pertenencias.
..............
i
Los accesorios se pueden conectar ala manguera si
el objeto que se desea [impiar no est_ lejos de la
aspiradora. La manguera, en algunos modelos, se
expandir&
Aseg_rese de limptar los accesorios
despu_s de utilizarios en _reas suctas,
debajo del refrigerador,antes de usarios
en otras superficies, ya que podrian dejar
marcas.
NOTA: Cuando [a aspiradora est_ prendida, fa
manguera, en algunos modelos, tender,_a caerse
debido aia succi6n de la aspiradora,
Si desea m&s extensi6n, puede conectar el tube ala
manguera y los accesorios al tube
8
!
CEPILLO PARA PISOS Y TUBO
ALGUNOS MODELOS
cuIDADO
...................
Cuando use la manguera en forma normal o
con la manguera de extensi6n instalada, la
aspiradora debe mantenerse sobre una
superficie firme al mismo nivel o a un nivel
inferior que los pies del usuario. NO use las
mangueras cuando la aspiradora est_ a un
nivel m_s alto que los pies del usuarlo.
MANGUERA
Unos modelos tienen un cepillo y un tuboauxiiiares
para Iimpiar lossuelos sin atfombras Gire el extremo
del adaplador hacia el cepillo de suelo y elotto
extremo hacia el tubo recto, Conecle el tubo recto
con el tubo telesc6picoy luegocon ia manguera en
la aspiradora o con la manguera de extensi6no
DE EXTENSION
ALGUNOS MODELOS
Unos mode!os incluyen una mangueraauxiliar que
conecta con la manguera de estirar en la aspiradora
para una extensi6n m&s larga para fimpiar,
Manguera
de la unidad
Manguera
de extensi6n
Inserte fas dos lengee[as en el extremo de la
manguera de extensi6n en las dos ranuras formadas
como la tetra J en la aspiradoray gire para conectar,
Se puede conectar todas las herramientasy et tubo
con el exlremo abierto de la manguera
AREA A LIMPIAR
Entre
ACCESORIO
auebies" coijines*
CEPILLO PARA SACUDIR <_
X
HERRAMIENTA
HENDIDURAS
X
PARA
CEPILLO PA_RA
COMBINACION
Handi-Mate ® Jr.
_
_
_
X
Cortinas*
Escalones
X
X
Paredes
X
X
X
X
x
La v_lvula de desviaci6n puedeestarabierta mientras se usan los accesorios opera Iimpiar una alfombra
nueva a causa de un flujo reducido de aire pot los accesorios mismos o pot la pelusa de la alfombra que llene
la bolsa rapidamente,
* Siempre limpielos accesorios antes de usar sobre tetas
Orillas de alfombras,
Guie uno de los costados o la parte anterior de la
boquilla a 1olargo del borde de la pared. Los cepiIlos largos ayudan a asplrar ta tierra atrapada en las
orillas de las alfombras.
Peligro de lesi6n personal
Actfie con precauci6n si coloca la aspiradora sobre escalones, St se cae, podria
causar lest6n personal o dafio a la propiedad.
Escalones.
Coloque el mango en la posici6n vertical. Use la
herramienta para hendiduras o el cepil[o para
sacudir Coloque el interruptor de encendido/apagado en ON.
SISTEMA DE PROTECTION
DE MOTOR
INDiCADOR
ALGUNOS
DE RENDIMIENTO
MODELOS
ProtectorTermal
Esta aspiradora tiene un protector termalque se
ajusta automfiticamente para proieger a la
aspiradora del sobrecatentamiento.Si una
obstrucci6n impide el flujo normal de aire at motor, el
protectortermal apaga el motor automfiticamente
para permitir que el motor se enfrle a fin de evitar
posibles dafios a ta aspiradora, Durante este tiempo
la luz defantera se mantiene prendida
Cuando ta unidad est6 funcionando con el flujo
normal de aim, el indicador de rendimiento est_
apagado. Se enciende ta luz cuando el flujo de
aire est_ obstrutdo. S[ eso ocurre, chequee el
cubo de la basura, limpie/reemplace fiftros
tapados, y chequee otros lugares posibles de
atascaduras que se muestran en COMO
ELIMINAR LOS RESIDUOS DE BASURA EN
LOS CONDUCTOS.
Para corregir el problema: Si esto ocurre, apague
la aspiradora y desenchufe el cord6n del
bmacorriente para permitir qua la aspiradorase
enfrfe y que el protectortermal se reajuste. Busque
y saque las obstrucciones, sf es necesado.
Examine tambi_n y reemplace/limpie cualquier
filtro obstruido. Espere aproxlmadamentetreinta
(30) minutos y enchufe la aspiradora y volt6ela
para ver si el protector del motor se ha
reajustadoo El protector del motor no se
reajustar,_ si no se ha apagado la aspiradora aun
cuando la aspiradora se haya enfriado,
Para corregtr
el problema'
Vefise el
diagrama
RECONOCIMIENTO DE
PROBLEMAS
NOTA: Es
poslble
que ia
{uzenciendaal
usar Jos
acoesorios
porque el flujo
de aire es
reducido por
los accesorios
10
Indlcador de
rendimiento
Sigasiempre
todaslasinstrucciones
deseguridad
allimpiar
ydarleservicio
a suaspiradora
ADVER3"ENCiA
Peligro de choque et6ctrico o lest6n corporal
Desconecte la unidad antes de fimpiarla o
darle servicio. De Io contrario podda productrse un choque el_ctrico o causar
lesi6n corporal si la aspiradora arranca de
manera imprevista,
..................................................
Recoja el cord6n el6cEricoy p6ngaio sueltamente
alrededor dei soporte de [iberaci6n r&pida y alrededot del soporte inferior para el cord6n.
Sujetador
:....::
ADVERTENcIA
Peligrode choque el_ctrico o lesi6n corporal
de
liberaci6n
rapide del
cord6n.._._.
..............
{
Guarde la aspiradora bajo
techo en un iugar seco,
con el mango en posici6n
vertical
Si enmlla el cord6n muy apretado puede
tensarlo mucho y causarle dafios. De da5arse, et cord6n podfia causar descargas el6ctricas y lestones o daSos personales.
el_ctrico
miento
inferior para
el cord6n
E
Desconecteel cord6n ef_ctricode la ctavija de la
pared. NO choree agua sobre la aspiradora,
Limpieel exterior con un trapo suave y limpio, que
ha sido exprimido despues de remojar en una solu*
ci6n de agua y detergente liquido iigero, Seque et
exterior con un trapo seco despu_s de limpiar.
CUIDADO
....
No use los accesodes si estan mojados. Los accesorios que se utilicen en
_reas sucias, debajo del refrigerador,
no deben usarse en otras superficies
sin antes ser lavados. Podr{an dejar
marcas.
Limpiela superficie exterior del recept&culoy de los
accesorios para reducir Ia electricidad est_tica y la
acumulaci6n de polvo
Lavelos accesorios en agua tibia jabonosa,
enjuague y deje secar al aire. No los lave en lavadora de ptatos
11
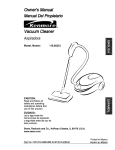
PARA VACIAR EL CUBO DE LA BASURA:
Siempre vacfe el cubo de la basura cuando el
nivel de basura alcanza la tinea "MAX FILL."
Torne en esta
Abierto
direcci6n para abrir y vaciar (Para vaciar)
PARASACAR EL CUBO DE LA BASURA:
Levante ia manF
ja del cubo de ]a
basura ubicada
al tope del cubo
de la basura_
Cerrado
(Para usar)
i
hacia adelante y
levante el cubo de
la basura hacia
arriba
afuera
Tire
dey fa
manija
de la aspiradora,
Rote el montaje de ta tapa dee canasto de basura
contra las agujas del retoj como est& indicado en la
tapa y levfintelahacia afuera.
Remueva
cualquier
obstficulo que
pueda estar
Iocalizado en
la entrada del
cubo de ta
basura o en el
filtro secundario
Vacie el contenido del
cube de la basura adentro
det tarro de basura
PARA LIMPIAR EL PRE-FILTRO
Et filtro puede
timpiarse
Cubierta
golpeandolo
filtro
solore una
superficie firme
o enjuagandolo
bajo una !late de
agua Enjuagar
con agua
solamente, no
utitizar
detergente o
jabSn, Dejar que
el fittro se seque por 24 horas antes de poner de
regreso en la aspirdora
12
PARA REEMPLAZAR EL CUBO DE LA BASURA
Tor/ze en esta
Ponga el cubo de la
basura de vuelta adentro de la aspiradora
insertando el rondo
Abierto
direcci6npara cerrary usar (Para vaciar)
primero e inciinando
atr,_scon ia manija del
cubo de la basura levantada
Manija de
soltar el cubo
de/a basura--_
Cubo de
la basura-
Baje la manija
del cubo de la
basura para
ajustar el cubo
de la basura en
su lugar
Cerrado
(Parausar)
Cotoque ta tapa del canasto de basura sobre el
canasto de basurarAtinee las marcas como se
muestra bajo Abierto (Para Vaciar) Rote la tape en
sentido de fas agujas del reloj presionando hacia
abajo hasta alinear las marcas como se muestra
arriba de Cerrado (Para Usar)
Examine el secondary filter det motor de vez en
cuando y limpie cuando est6 sucio
Filtro
secundario
Peltgro de choque el_ctrico
No opere la asptradora sin el filtro de
seguridad del motor.Asegdurese de que el
filtro est_ seco e instalado adecuadamente
para impedir que el motor falle ylo que se
pmduzca un choque el_ctrico.
Siempre desconecte el cord6n dlectrico
antes de reparar alguna parte de la aspiradora.
Lave el filtro secundario con agua caliente y
jab6n, enju_guelo y s6quelo bien apretfindo!o con la
mano y dejando que se seque al aire libre
FILTRO SECUNDARIO
ESPUMO
NO Io lave en la lavadora de platos.
Remueva el cubo de la basura como se describe en
la secci6n LIMPtANDO EL CUBO DE LA BASURA
NO !o instale h_medo.
Remueva e! filtro secundario de la aspiradora de
potvo
Reemplace fillrosecundado seco, Asegure que el
fittro est_ instatado propiamente sobre la abertura
del filtro,
Reemplace et cubo de la basura como se describe
en la secci6n LIMPIANDO EL CUBO DE LA
BASURA,
t3
!
FILTRO DE ESCAPE
ADVERTENCIA
Este cartucho del fittro escapese tiene que cambiar
est6 sucio Debe cambiarse peri6dicamente segfln
las condiciones de uso_
Peligro de choque el_ctrtco
Desenchufe el cable de poder del tomacorriente. No opere la limpladora sin el filtro primario o el filtm de escape. Est_ seguro que
el filtros est_ tnstalado propiamentepara prevenir falla del motor y/o sacudida el_ctrtca.
El filtro no se puede iavar pues perdert_ su
capacidad para atrapar altrapar potvo.
II
Apriete hacia adentro de cada lade de
la cubierta de1filtro
de escape y tire
hacia afuera para
remover de la aspiradora de pofvo,.
FILTRO PRIMARIO
Examine el filtro primafio de vez en cuando y limpie
cuando est_ sucio.
PARA SACAR EL FILTRO PRIMARIO
Saque el montaje de la tapa
del canasto de
Ftltro
_..x_
basura come
Taa,,]acf_a
/._//_y
se muestra en
\
uuaten
u_!t-,t_-_
w*
Remueva el cartucho del fiitro de escape.
_
Reemplace el fiftro de
escape, posicionandoIo cuidadosamente
para que quepa dentro
del marco.
Fi/tro de
LIMP1EZA DEL
BASUR CLEANING section,
ApHete
hacia adentro
"
El lade bfanco
debe encararse
hacia el operador.
Mientras mantiene el fittro primado sobre un
recipiente de basura tome el filtro, r6telo y lev&ntelo
Limpie el filtro primado golpe_ndolo suavemente
sobre un recipiente de basura.
Filtro
Cap[rule
Del Filtro
Golpee en varies tados para asegurar la mejor
limpiez&
Cara Blanca
Fuera de
Enjuague con agua solamente come sea
necesario (ver Limpieza de! Canasto de Basura)..
Cuando limpiando el filtro no se reestablece ta
succi6n de vacio a su poder total, usted necesita
reemplazar el filtro.
Cublerta
del filtm
de esca
PARA REEMPLAZAR EL
F#tro..-__._ _'_
FILTRO PRIMARIO
_
,
Est6 seguro que las ranuras del
_
filtro est,_n alineadas con ..r_'_.. !!_
las ,engl3etas de
f_-_
Empuje unicamente el cartucho
de filtro, no el filtro
mismo.
z
cierre en la cubier'_v _._._)
Ranura
ta del filtro,
cut_ier_a_"",_.-_7"'ra_,l,_o,
Reemptace el fit- uel F#tro
_ #nc.,me.,
troy h_gaio rotar hasta que las ranuras calzan
con las lengLietas en ta cubierta.
Reemptace la cubierta del filtro de escape poniendo
las lengLietasen las ranuras y empujando adentro
basra que la cubierta calza en su lugar.
Nota: Bajo use normal y cuidado, su filtro puede
durar hasta 3 aSos.
Reajuste la cubierta del filtro y el filtro al canasto
14
i
i,
Cepille o quite cualquier residuo que est_ en al area
de correas,
i
ADVERTENCiA
F
Peligro de choque el_ctrico o lest6n corporal
Desconecte la unidad antes de Ilmptarla o
darle servtcio. De 1ocontrario podrfa producirse un choque el_ctrico o causar lesibn
corporal si la asplradora arranca de manera
imprevista.
ADVERTENCIA
Peligro de lesi6n personal
Siempre desenchufe la aspiradora antes de
limpiar e! &rea del cepillo, ya que _ste
podria empezar a funcionar repentinamente. No hacerlo podria resultar en una
lesi6n personal.
Frecuentementerevise el &rea det cepillo y quite
todo pelo, cord6n o pelusa que se haya acumulado,
Di la acumulaci6n es excesiva, siga las instrucciones a continuaci6n Si la correa se aflojara o
rompiera, siga las instruccionespara quitar la cor-
PARA QUITAR LA CORREA!
LIMPIAR EL AGITADOR
re&
PARA QUITAR LA CUBIERTA DE
LA BOQUILLA
Desenchufe la unidad de la corriente el_ctrica
Para proteger la superficie del sue!o, siempre ponga
papet debajo de la boca de la m,_quinacuando se
saca la cubierta de la boquilla,
Libere la cubierta de boquitta par girar los soportes
de la cubierta de boquilta a la posici6n UNLOCK,
Agarre arnbos lados la parte trasera de la boquilla y
levante ia cubierta para quitarla de la base de la
boquilla
Agitador
Cotoque las manos en el agitador, Si la correa ya
est#,instalada en el agitador, babr& tensi6nen el
agitadon Tenga cuidado cuando levanta el agitador
de la boquill&
Soportes
de la
cubierta de
Cubierta
de la
bo(
boquilla
Quite la correa desgastadao rota del eje de transmisi6n del motor,
Quite toda basura o restos det _rea que recorre la
correa o del &readet cepillo cilindrico
E
•
ADVERTENCIA
Peligro de lesi6n personal
Tenga cuidado ai quitar el cepillo ilindrico, la tensi6n de la correa es grande. Si
no tiene precauci6n podrfa sufrlr una
lesi6n personal si el ceptllo se libera r_pidamente y sale disparadoo
15
Con cuidado quite la agitador para ver si se han
acumutado hilos y pete
NOTA: Para mantener una atta eficiencia de
limpieza y evitar el da_o a la aspiradora,
limpiar el agitador cada vez que se cambia la
correa
Ranura de la
base de
boquilla
Tambi6n hay que limpiar el agilador segt_nel siguiente horatio:
El uso de la
aspiradora
Limpie et
aqitador
Frecuente (usada dirariamente)
carla semana
Moderado (usada 2 o 3 veces
per semana)
cada rues
Ltgero (usada 1 vez per semana)
cada 2 meses
lnserte el agilator per insertar la parte redonda de la
tapa en la ranura de la base de fa boquilla,
Corte pelusa, el
pe]o o la borra
enredados en el
agitador y guite el
hilo o los restos
ubicacados en las
tapas del extremo.
....
extreme
Correa
Haga presi6n firmemente, asegun_ndosede que hayah entrado bien ambos extremes
Verifique que la correa este centrada en el polea
para correa y que el cepillo cilindrico gire librementeo
PARA CAMBIAR LA CORREA
Cubierta
de la
boc
transmisiSn
del motor
Polea para
correa
I
SopoHes de/a
cubierfa de boquilla
lnserte el tado izquierdode agitador en la base de
la boquiilaPara insertarel agitador, coloque la parte
redonda de la tapa del extreme, presionando[o hacia
dentro de la ranura de la base de la boqui!la.
As_gurese de que los soportes de la cubierta de la
boquilla est6n en la posici6n UNLOCK. Conecte la
parle delantera de cubierta de bequilla con la base
de la boquilla y gire hacia abajoo Cuando est{_en su
lugar apropiado,gire los soportes de la cubierta de
la boquitla a la posici6n LOCK.
Coloque la nueva correa alrededer del eje de
transmisionde motor.
Nota: use correa #20-5275
lnserte la correa alrededor del extreme derecho del
agilador.
Tire del agilador y asientelo en ta base de la
boquilla.
16
ADVERTENCIA
Peligro de choque el_ctrico o iesibn corporal
Desconecte la unldad antes de limptarla o
darle servicio. De Io contrario podria producirse un choque eldctrico o causar lesi6n
corporal si la asptradora arranca de rnanera
imprevista,
LengQeta
aspiraci6n
Proceda siempre con precaucienesde seguridad al
limpiar y dar servicio la aspiradora.
_ara
Protec_r
Si considera que la aspiradora no aspira bien
aseg0rese primero de que la bolsa no est_ ]lenay
de que el filtro no est_ atascado.Consulte tas instruccionessobre L]MPIANDO EL CUBO DE LA
BASUPA y CAMBIO/LfMPIE DES FILTROS.
herramientas
uer_
corta
Si tas zonas det filtro y ta cube de fa basura no est_n
atascadas, examine la zona de la manguera Quite
la abertura de aspiraciOn pot apretar las des
leng_etas que la aseguran a la parte detrasera de la
aspiradora y revise si hay residuos en el &rea
Reemplaza ]a abertura de aspiraciOn y saque el
otto fin de la manguera del soporte de herramientas. Enchufe la aspiradora y encibndala.Con la
aspiradora encendida, estire la manguera para
quitar et residuo. Apague la aspiradoray desench_fela.
Si todavia hay residuos, quite la manguera corta de
su soporte y revise la manguera corta.
Quite los residuos visibles
Esta aspiradora tiene una v&lvula de desviaciOn
que sirve como protector de motor que se abre
automaticamente para proveer un flujo de aire al
motor cuande un zueco impida que circule el
aire at motor.Si se abre ]av_fvula bypass para
impedir que se recalenle el motor y que no
haga dafio a la aspiradora, se notar,_un cambio
de son]do mienlras el aire pasa pot la abertura
de la v&Ivula.Cuando ocurre, apague la
aspiradora y desenchufe el cerdOnde]
tomacorriente, DespuOs,inspecciOnelapara
encontrar zuecos como se describe bajo la
secciOnCOMO ELIM]NAR LOS RESIDUOS DE
BASURA EN LOS CONDUCTOS
Protector
de motor
"'
NOTE: No obstruye
i_
el protector
de motor°
La v&tvulade desviaci6n puede estarabierta
mientras se usan los accesorios o para limpiar
una alfombra nueva a causa de un ftujoreducide
de aire por los accesorios mismos o pot la
pelusa de la a]fombraque Ilene ]a cubo de la
basura rapidamente
17
F
ALGUNOS MODELOS
ADVERTENCIA
...........
r................
No use una ampolleta de m_s de 130 V
AC-15 W. Durante use extendido, el calor
de la ampolleta puede sobrecalentar las
partes de pl_stico cercanas,
_
Peligro de choque et6ctrico o lesi6n corporal
Desconecte la unidad antes de timpiarla o
darle servicio. De Io contrario podria producirse un choque el6ctrlco o causar iesi6n
corporal si la aspiradora arranca de manera
imprevista.
Desenchufe ta unidad de la corriente el_ctrica
Para alzar la bombilla, quite el torniflo que asegura el
tente a la aspiradora. Quite el lente.
Tornillo
\_\
Empuje aqu[
para sacar
Par remplacar la bombilla, cuidadosamente inserte y
de vuetta hacia la derecha hasta aseguaria en ta
abertura.
NOTA:Use bombilia #20-5240
Remueva la bombilla empujandola y valia dandola
vuelta para la izquierda para sacarla de la abertura.
Despu_s saque Fabombilla para afuera.
Coloque otra vez el lente en la aspiradora Cofoque
otra vez el tornillo
18
!
ADVERTENCIA
Petigro de choque el_ctrico o lesi6n corporal
PARAQUITAR EL AGITADOR
Quite fa cubierta de la boquilla y el agitador. V_ase
CAMBIO DE LA CORREAY LIMPIEZA DEL
AGITADOR.
Reemplazca el agitador con un nuevo,
Desconecte la unldad antes de limpiarla o
darle aervicio. De Io contrario podr|a producirse un choque el_ctrico o causar lesi6n
corporal si la asptradora arranca de manera
imprevista.
Rearme la correa, el agitador y la cubierta de la
boquil]a. V_ase CAMBIO DE LA CORREAY
LIMPIEZA DEL AGITADOR
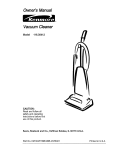
PARA EXAMINAR EL AGITADOR
f
Protectorde la
correa
de/a base
Coloque ta
aspiradora con ta
base hacia afriba
para revisar si los
cepiltos est_n en
malas condiciones
Cuando tos cepillos
esten gastados af
hive5de! protector de
base, reemplazca el
agitador_
i
Polea para correa
Tapa de!
extremo
Unidad
del agitador
'19
Tapa de/
extremo
Consulte este cuadro para encontrar soluciones que usted mismo puede realizar cuando tenga problemas
menores de rendimiento, Cualquier servicio qua necesile aparte de arras descritos en este manual tienen qua
ser hechos par un represetante de servicio autorizado Sears
No asplre eatlsfactor|amenle.
1. Est& desconecteda
I.
2. Cortacircui_os botada o fusible quemado en
el 1ablate de servicio de la residencta
2o Restablezca el codacircuitos o
cambie el f_slble
3. Interrupter de encendidolapagado
esta en la posici6n ON
3. Co!oque el inletruptor de encendido/epagade
en la posicl6n ON.
no
Conecte bien, optima selecler de
encendidolapogado aie poslcibn ON
_. P_aleclor textual activado
4. Reajuste el prolector lermai. (p_gina 10]
1. Cuba de la basu_a llano o atascado
1. Cuba de la basura limpio, (p_gines 12. I3)
2. Ajosle Incorreclo de ntvel de pelode la atfombra
2. AjusIe e! nivel, (p&gina 6}
3o Agilador desgastado
3. Cambie el egilader, (p_gina 19)
4. Boquil/a, o portille de Ia cuba de la basura
atascada
4o Revise CaM0 ELIM[NAR LOS REStDUOS DE
BASURA EN LOS CONDUCTOS, {p_gina 17)
5. Mengueta al_scado
5. Limp|at tuba pare e[ mugre, (p_gina 17)
6. Manguera _'ote
6. Cambie le manguera
7. Correa rata
7. Cambie la correa, (p_.ginas t5, !6)
8. La mang_era no asia bien insettada
Be inserts bien la manguera, [pAgtna 6)
9. Activaci_n del sis|area de prolecti6n del motor
I0.
Fi_l_osde seguridad
9. Determine st e×isten bloqueos, (p_gtn_ I7')
t0_ Limpielcambie
el t_ltros, (p_gina 14)
La aspiradora levanta tapetes
o as dllicul empujar.
1. Ajusle incor_eclo de nivel _e polo de la alfembra
I.
Ajusteel nive_,(p_gina6)
La luz no funclona.
1, Bombi!ta fund|de
t.
Cambie la bombilla, (p_,glna 18)
E1 ensemble del aglledor
t.
I.
Cambie la co,tea, (p_gtnas 14, 15),
no gfra.
2. Selector de plso con aifombra y _]so sin
alfombra en la setecct6n de ptso sin al[ombra
2. Cambie el selector en la seleccibn
con a!fombra, (p_gina 6}
3. Correa inslalada incor_eclamenle
3. Revise CAMBtO DE LA CORREAY
Correa rola
LIMP[EZA
DEL CEPILLO, (peg|has I546},
Ettndicedorderendtmlenlo,
algunoemodelos,est_roJoo
1. Cuba _a la basura llano o atascado
2o Umplelcamb_e et i'i!l_os.(p_gina !4)
3. Conduclo de flujo de Bite atascado
3_ Relite et material bloqueenie dot conduclo
de airs, (p_gina17)
4, C_edosaccesorios
Realrtcel6ndel fluJo de el
usa de los aceesortos.
Camblode sonldo.
Cuba de la basura Ilmpio, (p_,ginas 12, 13),
2. Filt_os de seguri_Jad
4_
1, El use de los accesorioslimila el fiujo de airs
2., LBpelt_sa_e una all'ombranueva
obsb'uyeel pesode _ire
2O
2.
Esfo es normal LB |uz debe apegarse el
quitar la herramtenta
Reviseusa DE LOSACCESORIOS,(p_gina9)
ReviseCOMO ELIMINARLOS RESIDUES
DE BASURA EN LOS CONDUCTOS
y Iimpiela menguere.(p_gtnat7)
21
Your Home
For repair - in your home - of all major brand appliances,
lawn and garden equipment, or heating and cooling systems,
no matter who made it, no matter who sold it!
For the replacement parts, accessories and
owner's manuals that you need to do-it-yourself.
For Sears professional installation of home appliances
and items like garage door openers and water heaters.
1-800-4-MY-HOME
(1-800-469-4663)
www:sears.com
_
Anytime, day or night
(U_S_A.and Canada)
www.sears.ca
Our Home
For repair of carry-in products like vacuums, lawn equipment,
and electronics, call or go on-line for the nearest
Sears Parts and Repair Center.
1-800-488-1222
Anytime, day or night {U.S.A_ only)
www.sears.com
To purchase a protection agreement (U.S.A,)
or maintenance agreement (Canada) on a product serviced by Sears:
1-800-827-6655
(usJ_)
1-800-361-6665
Para pedir servicio de reparaciSn
a domicilio, y para ordenarpiezas:
1.888-SU-HOGAR _
(1-888-_
TM
_M
(car',aria)
Au Canada pour service en franP_,,ais:
1-800-LE-FOYER Mc
(1._)-533-c_7)
www.searsoca
® Registered'Trademark t
Trademark /
Service Mark of Sears, Roebuck and Co.
® Marca Registrada I TM Marca de F&brica f sMMama de Servicio de Sears, Roebuck and Co.
ttC
' Marque de commerce / MD Marque d_posee de Sears, Roebuck and Co,