1
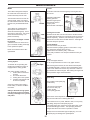
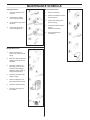
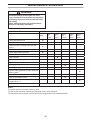
OPERATOR’S MANUAL
BRAVO 65 Blower
Model: 65-101
Operator’s Manual
Read these instructions carefully and make sure you
understand them before using the BRAVO 65.
P/N 990020-1
Rev. 08/2009
INTRODUCTION
Careless or improper use of this blower can cause serious or even fatal injury.
Carefully read, understand and follow ALL instructions in this manual before using
the BRAVO 65 Blower.
Allow only competent adults to operate this blower. It is the owner’s responsibility to
ensure that all operators of this blower have read and understand the content of this
manual.
Common sense:
The focus of this manual is HOW to operate and service the equipment safely. It is not possible to cover every conceivable situation you can face when using this blower. Therefore use this product only in a manner described in
this manual. Operation or handling the machine in any other manner can lead to serious injury or death. If a
situation is not described in this manual it should be considered dangerous - and not be done.
If you are unfamiliar with this product make sure that you carefully understand how it functions and practice all
operations and handling before putting the machine to use. Familiarize yourself in the presence of an experienced
operator. Avoid all situations that are beyond your capability.
If you still feel uncertain about the operating procedures after reading these instructions DO NOT operate the
machine until you have consulted an experienced operator.
If you have further questions you can contact - Ybravo.com, by writing or calling, see information below. You may
also find a dealer close to you by searching the internet at: www.ybravo.com
Ybravo.com, will willingly be of service and provide you with advice as well as help you to use your product both
efficiently and safely. Additional manuals are available at NO CHARGE and can also be obtained on the internet site.
Ybravo.com, LLC
P.O.Box 2209
Livermore CA 94551
USA
Toll Free #:
Phone #:
Fax #:
Internet Site:
888 ybravo1 (888 927 2861)
925 961 8750
925 961 8770
www.ybravo.com
PERSONAL SAFETY EQUIPMENT
When working and operating garden equipment - approved personal safety items should be used:
Hearing
Protection
Eye
Protection
Respiratory
Protection
Protective
Gloves
Protective
Shoes
WARNING
NOTICE
CALIFORNIA
Proposition 65 Warning
The engine is equipped with a spark arrester in
the muffler.
It is a violation of California Public Resource Code
Section 4442 to use or operate the engine on any
forest-covered, brush-covered, or grass-covered
land. Other states or federal areas may have similar
laws. Be aware of local laws and regulations. Spark
arresters are available from Ybravo.com.
The engine exhaust from this product
contains chemicals known to the State
of California to cause cancer, birth
defects or other reproductive harm.
2
SAFETY DEFINITIONS
In this manual a Safety Alert Symbol
followed by the signal words WARNING and CAUTION are used to
identify safety information about hazards which can result in death, serious injury and/or property damage.
These signal words mean:
WARNING indicates a hazard which, if not avoided, could result in death or serious injury.
CAUTION indicates a hazard which, if not avoided, might result in minor or moderate injury.
NOTICE indicates a message not related to personal injury.
SAFETY HAZARDS
WARNING
DO NOT MODIFY THE PRODUCT
Under no circumstances may the design of the machine be modified without the permission of the manufacturer. Always use genuine parts and accessories. Unauthorized modifications, parts and/or accessories can result in serious personal injury or the death of the operator or others. Your warranty may not
cover damage or liability caused by the use of unauthorized accessories or replacement parts.
WARNING
CAUTION
ASPHYXIATION HAZARD
Running an engine in a confined or badly ventilated area can result in injury or death due to
asphyxiation or carbon monoxide poisoning.
HEARING HAZARD
During the normal use of this machine, operator may be exposed to a noise level equal to or
higher than 85 dB(A). Use hearing protection.
REGISTER THE PRODUCT
Please register your new blower with Ybravo.com, by mailing in a copy of this page together with your
address information or (better) register the blower online at the internet site:
www.ybravo.com
Registration will allow us to contact you in case of any critical updates or recalls on this machine.
Product registration has been found helpful in tracing stolen equipment.
Record the following information for your records:
PURCHASE DATE: ________________
MODEL No: _______________________
SERIAL No: ________________________
The blower model and serial number are critical in order to obtain the correct service parts. Ybravo.com has service parts
available as listed in the spare parts list. All engine parts are available from Ybravo.com and through the Kawasaki engine
dealer network.
Mail information:
Name: ______________________________________________
Street Address: _______________________________________
City, State, Zip Code: ___________________________________
3
EMISSION CONTROL
CONTENTS
Content
Page
Introduction, personal safety ......................
General safety message.............................
2
2-3
Registration of the product .........................
3
Table of contents ........................................
Emission control information.......................
4
4
Maintenance and Warranty
Proper maintenance is necessary to ensure that your engine
will continue to have low emission levels. This Operator’s
Manual contains those maintenance recommendations for
your engine. Those items identified in the maintenance section are necessary to ensure compliance with the applicable
standards.
As the owner of the blower, you have the responsibility to
make sure that the recommended maintenance is carried out
according to the instructions in this Operator’s Manual at your
own expense.
The Ybravo.com Warranty requires that you return your blower
to an authorized Kawasaki or Ybravo.com dealer for remedy
under warranty. Please read the warranty carefully, and keep
it valid by complying with the owner’s obligations it contains.
The machine’s safety equipment ................ 5
General safety precautions ........................ 5-6
General working instructions ...................... 6
What is what on the blower ......................... 7
Assembly of the blower ............................... 7
Engine Emissions Compliance Period
Fuel handling ............................................... 8
Fuel mixture ................................................. 8
Fueling ......................................................... 8
California
Model Year – 2000 and later
Durability Period – 300 hours
Start and stop .............................................. 9
Maintenance ................................................ 10
Muffler
Cooling system
Air filter
Spark plug
All Other States
Engines 50cc and more
Model Year – 2004 and later
Durability Period – 300 hours
(Category A)
If your engine has an assigned emissions durability period it
will be located on the certification label attached to the engine.
Tampering with emission controls system prohibited
Federal law and California State law prohibits the following
acts or the causing thereof: (1) the removal or rendering inoperative by any person other than for purposes of maintenance,
repair, or replacement, of any device or element of design
incorporated into any new engine for the purposes of emission
control prior to is sale or delivery to the ultimate purchaser or
while it is in use, or (2) the use of the engine after such device
or element of design has been removed or rendered inoperative by any person.
Among those acts presumed to constitute tampering are the
acts listed below:
Do not tamper with the original emission related parts:
Maintenance schedule ................................ 11-12
Technical data ............................................. 13
Warranty statement ..................................... 15
EMISSION CONTROL
EMISSION CONTROL INFORMATION
-
Fuel information
THIS ENGINE IS CERTIFIED TO OPERATE ON UNLEADED
REGULAR GRADE GASOLINE ONLY.
Use a minimum of 87 octane. The engine will not operate on
gasoline marketed as E-85 (85% ethanol)
Emission control information
To protect the environment in which we all live, Kawasaki has
incorporated an exhaust emission control system in compliance with applicable regulations of the United States Environmental Protection Agency and the California Air Resources
Board. Also, depending on when your engine was produced, it
may have an assigned emission durability period. See below
for the engine emissions durability period that applies to your
engine.
Exhaust emission control system
This system reduces the amount of pollutants discharged into
the atmosphere by the exhaust of this engine. The fuel, ignition and exhaust systems of this engine have been carefully
designed and constructed to ensure an efficient engine with
low exhaust pollution levels.
4
Carburetor and internal parts
Spark plug
Magneto or electronic ignition system
Fuel filter
Muffler or any internal portion of the muffler
Air cleaner element
SAFETY INSTRUCTIONS
General safety precautions
2. Vibration damping system
IMPORTANT INFORMATION
- Never use the machine if you are tired, if you have drunk
alcohol, or if you are taking medication that could affect your
vision, your judgement or your coordination.
Your machine is equipped with a vibration damping system,
which is designed to give as vibration-free and comfortable
use as possible.
The machine’s vibration damping system reduces the transfer
of vibrations.
- Wear personal protective equipment. See instructions under
the heading Personal Safety Equipment page 2.
WARNING
- Never use a machine that has been modified in any way
from its original design.
Over exposure to vibrations can result in blood-vessel
or nerve injury to persons suffering from blood circulation problems. Seek medical attention if you experience physical symptoms that can be related to over
exposure to vibrations. Examples of such symptoms
are “numbness”, “lack of feeling”, “tickling”, “pricking”, “pain”, lack of or a reduction in normal strength,
changes in the color of the skin or its surfaces. These
symptoms normally appear in the fingers, hands, or
wrists. Never use a machine with defective safety
equipment. Follow the inspection, maintenance and
service instructions described in this section.
- Never use a machine that is faulty. Follow the checks,
maintenance and service instructions described in this
manual. Some maintenance and service must be carried out
by trained and qualified specialists. See instructions under the
heading Maintenance page 10.
- All covers and guards must be fitted before starting the
blower. Make sure the spark plug cap and high tension wire
lead are not damaged. An electric shock can result from if the
components are damaged.
- The operator of the blower must ensure that no people
or animals are any closer than 50 feet (15 meters) to the
work area. Never point the blower nozzle toward people or
animals.
Inspection:
Check the vibration damping element
regularly for material cracks and
distortion.
- The blower may throw objects at high velocity that can
ricochet and hit the operator. This can cause serious eye
damage.
Check that the vibration damping
element is undamaged and securely
attached.
The machine’s safety equipment
3. Muffler
This section describes the machine’s safety equipment, its
function and how checks and maintenance are carried out to
ensure that it operates correctly. See the chapter “What is
what” page 10 to locate where this equipment is positioned on
your machine.
The muffler is designed to give the lowest possible noise level
and to direct the engine’s exhaust fumes away from the operator. In warm and dry climate, the risk of fire is obvious. Therefore the muffler has a spark arrestor screen. Always make
sure that your muffler is fitted with the spark arrestor screen.
Follow the instructions for the maintenance of the muffler
described in this manual.
WARNING
Never use a machine with defective safety equipment.
Follow the inspection, maintenance and service
instructions described in this section.
Inspection:
Never use a machine that has a defective muffler.
1.Stop switch
Check regularly that the muffler is secure.
The stop switch should always be used to stop the engine.
A blocked screen can cause the engine to overheat with serious damage as a result. Never use a muffler with a defective
spark arrestor screen.
Verify function:
Start the engine and make sure that the engine stops when the
stop switch is pushed into the OFF position.
5
SAFETY INSTRUCTIONS
General working instructions
Fuel safety
Show consideration to persons in your surroundings by
avoiding using the machine at unsuitable times, such as late in
the evening or early in the morning. Read through and follow
the simple directions so that you disturb your surroundings as
little as possible.
- Always use a fuel container with an anti-spill valve.
- Never refuel the machine while the engine is running.
Always stop the engine and let it cool for a few minutes
before refuelling.
- Use the blower with the lowest possible throttle. It is seldom
necessary to use full throttle, and many work procedures can
be done at half throttle. A lower throttle means less noise and
less dust, and it is also easier to keep control over the rubbish
collected together/moved.
- Make sure there is plenty of ventilation when refuelling or
mixing fuel (petrol and 2-stroke oil).
- Avoid all skin contact with fuel. Fuel is a skin irritant and
may even cause injury to the skin.
- Use a rake or a brush to release rubbish stuck to the ground.
- Move the machine at least 10 feet (3 meters) from the
refuelling point before starting it.
- Hold the opening of the blower as close to the ground as
possible.
- Observe your surroundings. If anyone approaches your
work area, set the throttle control to the lowest throttle until
the person is at a safe distance. Direct the blower away from
people, animals, play areas, and cars etc.
- Clean up afterwards. Make sure that you have not blown
rubbish into someone’s garden.
- No unauthorized persons or animals may be present in the
working area, which is 50 feet (15 meters).
Never start the machine if:
- If you spill fuel on the blower. Wipe off any spillage and
allow remaining fuel to evaporate.
- If you spill fuel on yourself or your clothes, change your
clothes. Wash any part of your body that has come in
contact with fuel. Use soap and water.
- If the machine is leaking fuel. Check regularly for leaks
from the fuel cap and fuel lines.
- The powerful currents of air can move objects at such a
speed that they can bounce back and cause serious eye
injuries.
Transport and storage
- Store and transport the machine and fuel so that there is no
risk of any leakage or fumes coming into contact with sparks or
naked flames, for example, from electrical machinery, electric
motors, electrical relays/switches or boilers.
- Do not direct the air jet towards people or animals.
- Stop the engine before assembling or dismantling
accessories or other parts.
- Do not use the machine in bad weather, such as dense fog,
heavy rain, strong wind, intense cold, etc. Working in bad
weather is tiring and can lead to dangerous conditions, e.g.
slippery surfaces.
- When storing and transporting fuel always use approved
containers intended for this purpose.
- When storing the machine for long periods the fuel tank must
be emptied. Contact your local petrol station to find out where
to dispose of excess fuel.
- Make sure you can move and stand safely. Check the area
around you for possible obstacles (roots, rocks, branches,
ditches, etc.) in case you have to move suddenly. Take great
care when working on sloping ground.
- Ensure the machine is cleaned and that a complete
service is carried out before long-term storage.
- Never put the machine down with the engine running unless
you have it in clear sight.
- Engine exhaust fumes contain carbon monoxide, which can
cause carbon monoxide poisoning. For this reason you should
not start or run the machine indoors, or anywhere that is poorly
ventilated.
- The blower must not be used
while on a ladder or scaffolding.
6
WHAT IS WHAT
What is what on the blower?
1.
2.
3.
4.
5.
6.
7.
8.
9.
10.
11.
12.
13.
Spark plug
Choke
Air filter
Starter handle
Fuel tank
Harness
Muffler/Spark arrestor screen
Throttle control arm
Nozzle
Blow tube
Throttle control
Stop switch
Operator’s Manual
Assembly of the blower
1.
2.
3.
4.
Connect the flexible hose (A) to the fan’s outlet tube (B) with a hose clamp.
Fit the control handle (D) on the operating tube (C) with the enclosed hose clamp.
Connect the operating tube (C) to the flexible hose with a hose clamp.
Connect the intermediate tube (E) and air nozzle tube (F)
Push the tubes together and turn them so that they lock together.
7
FUEL HANDLING
Mixing
- Always mix the gasoline and oil in a clean container intended
approved for gasoline.
WARNING
Taking the following precautions will lessen the risk
of injury and property damage.
Use extreme care in handling gasoline. Gasoline is
extremely flammable and the vapors are explosive.
- Always start by filling half the amount of the gasoline to be
used, then add the entire amount of oil.
Add the remaining amount of gasoline.
- Extinguish all cigarettes, cigars, pipes, and other
sources of ignition.
- Use only approved gasoline container.
- Never remove gas cap or add fuel with the engine
running. Allow engine to cool a minimum of 3
minutes before refueling.
- Never fuel the machine indoors.
- Never store the machine or fuel container where
there is an open flame, spark, or pilot light such as
on a water heater or other appliances.
- Never fill containers inside a vehicle or on a truck
or trailer bed with a plastic liner. Always place containers on the ground away from your vehicle when
filling.
- Remove the blower from the truck or trailer and
refuel it on the ground. If this is not possible, then
refuel the equipment with a portable container, rather
than from a gasoline dispenser nozzle.
- Keep the nozzle in contact with the rim of the fuel
tank or container opening at all times until fueling is
complete. Do not use a nozzle lock-open device.
- If fuel is spilled on clothing, change clothing
immediately.
- Never overfill fuel tank. Always wipe off any spilled
fuel or oil. Replace fuel cap and tighten
Gasoline
U.S. gallon
1
2.5
5
Two-stroke oil
50:1 (2%)
U.S. fl.oz
2.5 oz
6.5 oz
13 oz
- Mix (shake) the fuel mixture thoroughly before filling the
machine’s fuel tank.
- Do not mix more than one month’s supply of fuel at a time.
- If the machine is not used for some time, the fuel tank should
be emptied and cleaned.
NOTICE
- Move the blower at least 10 feet (3 meters) from the
refuelling point before starting .
The machine is equipped with a two-stroke engine and
must always been run using a mixture of gasoline and
two-stroke engine oil
It is important to accurately measure the amount of oil to
be mixed to ensure that the correct mixture is obtained.
- Clean the area around the fuel cap. Contamination in the
tank can cause operating problems.
Gasoline
Use a minimum of 87 octane gasoline purchased within 4
weeks of usage The engine will not operate on gasoline
marketed as E-85 (85% ethanol)
- The lowest recommended octane rating is 87. If you run the
engine on a lower octane rating than 87, “knocking” can occur.
This leads to an increased engine temperature, which can
result in a serious engine failure.
- When working at continuous high RPM’s a higher octane
rating is recommended.
Two-stroke oil
- Use ONLY two-stroke oil specially formulated for air cooled
small engines at a mixture of 50:1 (2%).
- Never use two-stroke oil intended for water-cooled outboard
engines, sometimes referred to as outboard oil.
- Never use oil intended for four-stroke engines.
8
STARTING AND STOPPING
When starting
Following the procedure for cold and warm engine start;
- Press the machine body against the ground using your left
hand (NOTE! Not your foot).
- Grip the starter handle, slowly pull out the cord with your right
hand until you feel some resistance (the starter pawls grip)
- Quickly and powerfully pull the cord.
Starting a cold engine
Ignition:
Set the stop switch to the
“ON” position
(button in the upper position)
Choke Lever:
Push the choke lever up to
set the choke
Notice:
Do not release the starter cord from the fully extended
position. This can damage the machine.
Air purge bulb:
Press the air purge bulb
repeatedly until fuel begins to
flow through the overflow tube
typically after 5 to 10 times.
Throttle control:
Open the throttle control to about
1/3 throttle
Starting a warm engine;
Ignition:
Set the stop switch to the
“ON” position
(button in the upper position)
Air purge bulb:
Press the air purge bulb
repeatedly until fuel begins to
flow through the overflow tube
typically after 5 to 10 times.
Notice:
In hot conditions the fuel can evaporate out of the carburetor after shutting off the machine. This results
in hard starting even if the engine
is warm. By using the air purge the
carburetor is refilled with fuel. The
engine will not get flooded by using
the air purge.
Stopping the engine
Ignition:
Push the stop switch to the “OFF” position.
Notice:
Always let the engine return to an idle speed for 10 seconds
before pushing the stop button. This allows the engine to cool
down gradually. This prolongs the life of some engine
components.
9
MAINTENANCE
Muffler
Air Filter
The muffler is designed to dampen
the noise level and to direct the exhaust fumes away from the user.
The air filter should be cleaned regularly removing dust and
dirt to avoid:
The exhaust fumes are hot and can
contain sparks, which can result in
fire if the exhaust fumes are directed
towards a dry and flammable material.
The mufflers are equipped with a
special spark arrestor screen. It
should be cleaned regularly. This is
done using a wire brush. The screen
should be cleaned weekly, or replaced if necessary.
If the screen is damaged it should
be replaced.
A blocked screen can cause the engine to overheat resulting in damage
to the cylinder and piston.
Never use a machine with a damaged muffler
Cooling System
To maintain as low operating temperature as possible, the engine is
equipped with a cooling system.
The cooling system consists of:
1. An air intake on the blower
housing.
2. Fins on the blower fan.
3. Cooling fins on the cylinder.
4. Cylinder cover (directs cold
air onto the cylinder).
- Carburetor malfunction
- Starting problems
- Reduced engine power
- Unnecessary wear to
engine parts
- Abnormal fuel consumption
Cleaning the Air Filter
Dismantle the air filter cover and remove the air filter element.
An air filter element used for a long period of time can never be
cleaned completely. Therefore, it is necessary to replace the
filter from time to time with a new filter element. A damaged air
filter must always be replaced.
Air Filter Element
Clean the element every 20 hours.
Clean the element by tapping gently to remove dust. If very
dirty, replace the element with a new one.
Replace with a new element yearly – 200 hours.
In very dusty conditions more frequent maintenance may be
required.
Notice:
Do not wash paper-element.
Do not use pressurized air to clean or dry paper element.
After servicing the air cleaner, be sure all the removed parts
are reinstalled properly. Failure to secure the fastening of the
air filter cover with the two screws may cause dirt or other foreign materials to enter the engine. Dirt entering the engine will
cause premature engine wear and failure.
Spark Plug
The condition of the spark plug
is affected by:
Clean the cooling system using a
brush weekly. In severe conditions
more often.
- An incorrect fuel mixture
(too much or faulty oil).
- A dirty air filter.
- Poor quality gasoline.
A dirty or blocked cooling system
can cause the engine to overheat,
resulting in damage to the cylinder
and piston.
These factors cause deposits on the spark plug electrode that
may result in malfunction or starting difficulties.
If the machine is low on power, difficult to start, or runs poorly
while idling, always check the spark plug first.
If the spark plug is dirty, clean it and, at the same time, check
that the electrode gap is 0.030”. The spark plug should be
changed after about one month of operation or earlier.
Always use the recommended type of spark plug. An incorrect spark plug can damage the cylinder/piston.
10
MAINTENANCE SCHEDULE
Daily Maintenance
Monthly Maintenance
1.
Clean the outside of the
machine.
1.
Clean the fuel tank.
2.
2.
Check that the throttle
control functions safely.
Clean the carburetor and the
area surround it.
3.
3.
Check that the stop switch
functions.
Clean the air intake of the
blower housing.
4.
4.
Check that all nuts and
screws are tightened.
Check the fuel filter and the
fuel line.
Replace if necessary.
5.
Check all cables and
connections.
Weekly Maintenance
1.
Check the starter, the
starter cord, and the return
spring.
2.
Make sure that the vibration
damping elements are not
damaged.
3.
Clean the outside of the
spark plug. Remove and
check the electrode gap.
Adjust the gap to 0.030” or
change the spark plug.
4.
Clean the air intake of the
blower housing.
5.
Clean or replace the muffler’s spark arrestor screen
6.
Clean the carburetor area.
7.
Clean the cooling fins on
the cylinder.
11
MAINTENANCE SCHEDULE
WARNING
Accidental starting of the engine can cause
injury. Always remove the spark plug cap before
performing any service work to prevent accidental starting.
When starting the blower the machine should
always be completely assembled.
Maintenance
Intervals
First
20
hours
Daily
Check and replenish fuel
z
Check for fuel leakage
z
Check for loose or missing bolts, nuts and
screws
z
Check throttle lever operation
z
Check engine switch operation
z
Check shoulder harness condition
z
Every
50
hours
Every
100
hours
Every
200
hours
z
Clean fuel filter
Clean air filter element *
Every
20
hours
z
1
z
Tighten bolts, nuts and screws
z
z
Clean spark plug and adjust electrode gap
z
Remove dust and dirt from cylinder fins
Remove carbon deposits on piston head and
inside cylinder *2
z
z
Remove carbon deposits in the muffler
z
Clean spark arrestor screen
Check the condition of the crankshaft connecting rod etc. *2
z
Fuel line
It is recommended to replace every 3 years
Notice:
The service intervals should be used as a guide.
(*1) The air filter should be cleaned more frequently in very dusty conditions.
(*2) These items require proper tools and should only be performed by an authorized dealer.
12
TECHNICAL DATA
Technical data
BRAVO 65
Engine
Cylinder displacement, cm3
Cylinder bore, mm
Stroke, mm
Idle speed, rpm
Recommended max. speed
Max. engine output, acc. to ISO 8893, kW/ rpm
Catalytic converter muffler
64.7
48.5
35
2,500
7,000
3.0kW / 8000 (4.1 HP )
No
Ignition system
Type of ignition system
Spark plug
Electrode gap
CDI Electronic
NGK BPMR 7A - 9
0.030” (0.85 mm)
Fuel system
Manufacturer/type of carburetor
Fuel tank capacity, U.S. Qt/Liter
Walbro, diaphragm
2.1 / 2.0
Weight
Weight without fuel and attachments Lbs/Kg
21.4 / 9.7
Noise emissions
Equivalent noise pressure level at the
operator’s ear, measured according
to EN 31806 and ISO 7917 dB(A)
97
Equivalent noise power level at the
operator’s ear, measured according
to EN31806 and ISO 10884 dB(A)
105
Vibration levels
Vibration levels at handles, measured
according to EN 31806 and ISO 7916, m/s2
When idling, left/right handles, max:
At maximum speed, left/right handles max:
1.2
1.2
13
NOTES
14
PRODUCT REGISTRATION &
WARRANTY STATEMENT
All Ybravo.com products can be registered online at www.ybravo.com quickly and easily.
Click on the Product Registration tab and fill out the electronic form and submit.
SECTION 1: LIMITED WARRANTY
Ybravo.com (Ybravo) warrants the original purchaser of Ybravo branded product to which this warranty applys (the “Product”) that the
Product shall be free from defects in material and workmanship from the date of purchase for the period of the applicable “Warranty
Schedule” of the Product as set forth below. Additional limitations are described in Section 2 through Section 6, inclusive.
Product Category
Commercial Blowers
Commercial Mowers
Replacement Parts (Excludes components which are part of engine
systems manufactured by third party engine manufacturers for which the
purchaser has received a separate warranty with product at time of purchase.)
Commercial Use
Warranty Schedule
1 Year
1 Year
Rental Warranty
Schedule
90 Days
90 Days
60 Days
30 Days
SECTION 2: YBRAVO’S OBLIGATIONS UNDER THE WARRANTY
Ybravo.com will repair or replace defective components without charge for parts or labor if a component fails because of a defect in
material or workmanship during the warranty period.
SECTION 3: ITEMS NOT COVERED BY THIS WARRANTY
The following items are not covered by this warranty:
1) Normal customer maintenance items which become worn through normal regular use, including, but not limited to, belts, blades,
blade adapters, cables, clutches, clutch drums, filters (fuel line, fuel filters, air filters, oil filters), lubricants, rewind springs, spark
plugs, and starter ropes.
2) Natural discoloration of material due to ultraviolet light;
3) Engine and drive systems not manufactured by Ybravo; these items are covered by the respective manufacturer’s warranty as
provided in writing with the product information supplied at the time of purchase; all claims must be sent to the appropriate
manufacturer.
4) Commercial mowing decks with sand abrasion damage.
5)
Emission Control System components necessary to comply with CARB-TIER II and EPA regulations which are manufactured by
third party engine manufacturer.
SECTION 4: EXCEPTIONS AND LIMITATIONS
This warranty shall be inapplicable to defects resulting from the following:
1) Accident, abuse, misuse, negligence and neglect, including stale fuel, dirt, abrasives, moisture, rust, corrosion, or any adverse
reaction due to incorrect storage or use habits;
2) Failure to operate or maintain the unit in accordance with the Owner’s/Operator’s manual or instruction sheet furnished by
Ybravo.com;
3) Alterations or modifications that change the intended use of the product or affects the product’s performance, operation, safety, or
durability, or causes the product to fail to comply with any applicable laws; or:
4) Additional damage to parts or components due to continued use occurring after any of the above.
REPAIR OR REPLACEMENT AS PROVIDED UNDER THIS WARRANTY IS THE EXCLUSIVE REMEDY OF THE PURCHASER.
YBRAVO SHALL NOT BE LIABLE FOR ANY INCIDENTAL OR CONSEQUENTIAL DAMAGES FOR BREACH OF ANY EXPRESS OR
IMPLIED WARRANTY ON THESE PRODUCTS EXCEPT TO THE EXTENT PROHIBITED BY APPLICABLE LAW. ANY IMPLIED
WARRANTY OF MERCHANTABILITY OR FITNESS FOR A PARTICULAR PURPOSE ON THESE PRODUCTS IS LIMITED IN
DURATION TO THE WARRANTY PERIOD AS DEFINED IN THE LIMITED WARRANTY STATEMENT. YBRAVO RESERVES THE
RIGHT TO CHANGE OR IMPROVE THE DESIGN OF THE PRODUCT WITHOUT NOTICE, AND DOES NOT ASSUME OBLIGATION
TO UPDATE PREVIOUSLY MANUFACTURED PRODUCTS.
Some states do not allow the exclusion of incidental or consequential damages, or limitations on how long an implied warranty lasts, so
the above limitations or exclusions may not apply to you. This warranty gives you specific legal rights, and you may also have other rights
which vary by state.
SECTION 5: CUSTOMER RESPONSIBILITIES
The product must exhibit reasonable care, maintenance, operation, storage and general upkeep as written in the maintenance section of
the Owner’s/Operator’s manual. Should an operational problem or failure occur, the product should not be used. Failure caused by
continued use is not covered by warranty. Product should be delivered, at owners’ expense, as is, to an authorized Ybravo Dealer for
evaluation. Proof of purchase, as explained in section 6, rests solely with the customer.
SECTION 6: PROCEDURE TO OBTAIN WARRANTY CONSIDERATION
It is the Owner’s and Dealer’s responsibility to make certain that the Product Registration was completed on-line at www.ybravo.com. Product Registration
should be completed within ten (10) days from the date of purchase in order to confirm the warranty and to facilitate post-sale service. Proof of purchase
must be presented to the authorized Ybravo dealer in order to obtain warranty service. This proof must include date purchased, model number, serial
number, and complete name and address of the selling dealer. To obtain the benefit of this warranty, the product believed to be defective must be delivered
to an authorized Ybravo dealer in a timely manner, no later than thirty (30) days from date of the operational problem or failure. The product must be
delivered at the owner’s expense. Downtime, pick-up and delivery charges are not covered by this warranty. An authorized Ybravo dealer can be located by
calling 1-888-YBRAVO-1 or by visiting www.ybravo.com. Subject to change without notice.
15