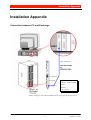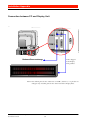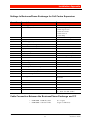
1
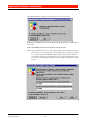
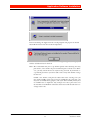
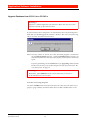
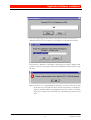
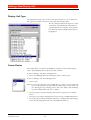
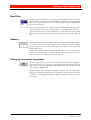
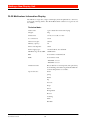
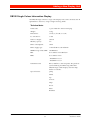
bu sin es sphone
...it’s your business
Installation Guide
CALL CENTRE SUPERVISOR
Standard Edition
Call Centre Management
BUSINESSPHONE
CALL CENTRE SUPERVISOR - STANDARD
INSTALLATION GUIDE
EN/LZTBS 102 063/S R2C
Copyright © 2000. Ericsson Austria AG. All rights reserved.
This document contains proprietary information which is protected by copyright. No part of this document
may be reproduced or transmitted in any form or by any means, electronic or mechanical, including photocopying, recording, or by any information storage and retrieval system, or translated into another language,
without prior written consent of Ericsson Austria AG.
NOTICE
The information in this document is subject to change without notice.
ERICSSON MAKES NO WARRANTY OF ANY KIND WITH REGARD TO THIS MATERIAL,
INCLUDING, BUT NOT LIMITED TO, THE IMPLIED WARRANTIES OF MERCHANTABILITY AND FITNESS FOR A PARTICULAR PURPOSE. Ericsson shall not be liable for errors contained herein nor for incidental or consequential damages in connection with the furnishing,
performance or use of this material.
■
■
■
Microsoft and Microsoft Logos are registered trademarks of Microsoft Corporation.
Windows is a registered trademark of Microsoft Corporation.
Acrobat and Acrobat Reader are registered trademarks of Adobe Systems Inc., USA.
All other brand names or product names may be trademarks or registered trademarks of their respective owners and are used here for editorial purposes, with no intention to infringe.
Ericsson Austria AG
Pottendorfer Strasse 25 - 27
A-1121 Vienna, Austria
Telephone: +43-1-81 100-5450
Telefax:
+43-1-81 100-5437
BusinessPhone Call Centre Supervisor - Standard
Installation Guide
EN/LZT BS 102 063/S R2C
ii
:HOFRPHWRWKH%XVLQHVV3KRQH
&DOO&HQWUH6XSHUYLVRU
The BusinessPhone Call Centre Supervisor
Standard version 2 continuously receives real
time call event data from the exchange and
monitors, displays and records the activities of
the BusinessPhone ACD facility. Data is
processed and used to provide a real time display
of ACD and Agent resources with up-to-date
statistics.
BusinessPhone Call Centre Supervisor is a
Windows based application that enables you to
efficiently
manage
and
monitor
the
BusinessPhone Call Centre functions
This package supports the following features:
■
■
■
■
■
■
Real Time Views of call handling
performance
Historical Reports with flexible and
automated report generation
Basic Man Power Planning Module
External Information Display Units
supporting multi-line/multi colour on line
messaging
Reports
Flexible and efficient management
All important Call Centre Supervisor functions
are User based and thus provide an interface to
the user that can be individually set up and
controlled to match just the precise needs of the
current user.
In addition to real time information statistical
data is archived at regular intervals, to allow the
generation of statistical reports.
EN/LZT BS 102 063/S R2C
iii
BusinessPhone Call Centre Supervisor - Standard
Installation Guide
:HOFRPHWRWKH%XVLQHVV3KRQH&DOO&HQWUH6XSHUYLVRU
BusinessPhone Call Centre Supervisor - Standard
Installation Guide
EN/LZT BS 102 063/S R2C
iv
7DEOHRI&RQWHQWV
:HOFRPHWRWKH%XVLQHVV3KRQH
&DOO&HQWUH6XSHUYLVRU
,QWURGXFWLRQ
What’s new in Release 2.4............................................................................................. 9
Combined Installation Setup .............................................................................................. 9
Supporting Windows 95, 98 for all versions....................................................................... 9
&'520'HOLYHUHGZLWK&&63DFNDJH
%DVLF+DUGZDUH5HTXLUHPHQWV
Exchange
Requirements............................................................................................................... 13
Computer
Requirements............................................................................................................... 13
%DVLF6RIWZDUH5HTXLUHPHQWV
3&,QVWDOODWLRQ3URFHGXUHV
Serial Ports................................................................................................................... 16
Exchange to
PC Connection ............................................................................................................. 16
Adaptation Unit............................................................................................................. 16
System Printer.............................................................................................................. 16
$SSOLFDWLRQ6RIWZDUH,QVWDOODWLRQ
Borland Database Engine (DBE) ................................................................................. 17
BusinessPhone Call Centre Supervisor ....................................................................... 20
Upgrade Database from CCS V1.x to CCS V2.x ............................................................. 24
Restart the System .......................................................................................................... 26
3RVW,QVWDOODWLRQ&RQILJXUDWLRQ
Database Configuration ............................................................................................... 28
Setting Aliases ............................................................................................................. 29
Paradox Driver ............................................................................................................. 31
,QLWLDO6WDUW8S
Start Up Group ............................................................................................................. 32
EN/LZT BS 102 063/S R2A
v
BusinessPhone Call Centre Supervisor - Standard
Installation Guide
7DEOHRI&RQWHQWV
Initial Checks ................................................................................................................ 34
Start Up ........................................................................................................................ 34
Minimum Configuration ................................................................................................ 34
/DQJXDJH8SGDWH
Installing Language Files.............................................................................................. 35
*HQHUDO
Display Unit Connection ............................................................................................... 37
Broadcast Function ...................................................................................................... 37
Display Unit Drivers...................................................................................................... 38
Standard Information Display Units.............................................................................. 38
Other Display Units ...................................................................................................... 38
,QVWDOOLQJD'LVSOD\8QLW
Serial Connection ......................................................................................................... 40
Connecting Multiple Units............................................................................................. 42
'LVSOD\8QLW&RQQHFWLRQ
Management Functions................................................................................................ 44
$GGLQJD1HZ'LVSOD\8QLW
Display Unit Name........................................................................................................ 45
Display Unit Type ......................................................................................................... 46
Comm Device............................................................................................................... 46
Baud Rate .................................................................................................................... 47
Address ........................................................................................................................ 47
Changing Connection Parameters ............................................................................... 47
Testing Connections..................................................................................................... 48
Deleting a Connection .................................................................................................. 48
DL20 Single Colour Information Display ...................................................................... 49
DL20 Multicolour Information Display........................................................................... 50
DB320 Single Colour Information Display .................................................................... 51
DB320 Multicolour Information Display ........................................................................ 52
7URXEOH6KRRWLQJ7LSV
VxD (Virtual Device Driver) Settings ............................................................................ 53
BusinessPhone Call Centre Supervisor - Standard
Installation Guide
EN/LZT BS 102 063/S R2A
vi
7DEOHRI&RQWHQWV
Default Printer and Reports.......................................................................................... 54
Display Units ................................................................................................................ 54
Missing ACD Queues or Agent Groups ....................................................................... 55
Database Problems...................................................................................................... 55
No Data in Reports....................................................................................................... 56
Wrong Scheduled Actions............................................................................................ 56
,QVWDOODWLRQ$SSHQGL[
Connection between PC and Exchange ...................................................................... 57
Connection between PC and Display Unit ................................................................... 58
Settings In BusinessPhone Exchange for Call Centre Supervisor............................... 59
Cable Connection Between the BusinessPhone Exchange and PC............................ 59
EN/LZT BS 102 063/S R2A
vii
BusinessPhone Call Centre Supervisor - Standard
Installation Guide
7DEOHRI&RQWHQWV
BusinessPhone Call Centre Supervisor - Standard
Installation Guide
EN/LZT BS 102 063/S R2A
viii
,QWURGXFWLRQ
,QWURGXFWLRQ
The CCS runs on a PC which receives data from the BusinessPhone 150 or BusinessPhone 250/50 exchange via an RS232 interface (V.24). The system software
is installed by transferring the system files from the software release set onto the
PC hard disk. The installer must then carry out some basic configuration to leave
the system in a working condition for the user. Any future changes to the initial
configuration may be carried out by the user following the detailed instructions
given in the User’s Guide.
:KDW
VQHZLQ5HOHDVH
Combined
Installation Setup
In the past there were two different versions existing:
CCS V1.x
BusinessPhone 150 (Windows for Workgroups 3.11)
CCS V2.x
BusinessPhone 50/250 (Windows 95)
Now CCS 2.4 includes both, an updated version of CCS 1.6 and an updated version of CCS 2.3. In addition CCS 2.4 supports BusinessPhone 150 as well as BusinessPhone 50/250 (up to V4.0). The installation script includes the following
options:
(a) BusinessPhone 150 or BusinessPhone 50/250 (up to V2.0)
(b) BusinessPhone 50/250 from V2.1 onwards
By default option (b) will be installed.
Supporting Windows
95, 98 for all versions
Both CCS Releases (CCS Version 1.x and CCS Version 2.x) are running now on
• Windows for Workgroups 3.11
• Windows 95 and
• Windows 98.
EN/LZT BS 102 063/S R2B
9
BusinessPhone Call Centre Supervisor - Standard
Installation Guide
&'520'HOLYHUHGZLWK&&63DFNDJH
&'520'HOLYHUHGZLWK&&63DFNDJH
You will find a great variety of information on the CD-ROM which consists not
only of CCS software and CCS documentation:
Install Acrobat Reader
Acrobat Reader is the display software from Adobe to view all documentation
which is stored in the Acrobat PDF format. The display software is installed on
the CD-ROM, therefore it is not necessary to install the display software. But it
is recommended to install the software on your computer’s hard-disk in case of
update information or other Ericsson-specific information stored in this format.
Install CCS (software)
This part on the CD-ROM will be explained in this Installation Guide step-by-step.
CCS Documentation
The CCS Documentation is divided into several parts, each part consisting of a
print version and a screen version.
Both, the print and the screen version, have the same approved content, but with
specifically designed layout depending on whether the documentation is used to
make paper print-outs or only to view the documentation on screen. Therefore
you are prompted to choose between these two possibilities.
All documentation is stored in the Acrobat PDF (Portable Printer File) format on
the CD-ROM. The tool for displaying PDF files (Acrobat Reader plus Search freeware) is provided on the CD-ROM.
The following parts are available on the Call Centre CD-ROM:
&&6
2SWLRQ
2SWLRQ
• CCS Standard Software
• CCS Standard Software
(English | Spanish | Svedish)
(English | German | Spanish)
• User’s Guide
• User’s Guide
(English)
(English | German | Spanish)
Print and Screen version
Print and Screen version
• Installation Guide
• Installation Guide
(English)
(English)
Print and Screen version (option 1 and 2 combined)
• Quick Reference Guide
• Quick Reference Guide
(English)
(English)
printed on paper and as screen version (option 1 and 2 combined)
*.... The installation script for CCS 2.4 offers the option to select between two
different installation types. For detailed information please refer to “Exchange
Requirements” on page 13.
BusinessPhone Call Centre Supervisor - Standard
Installation Guide
EN/LZT BS 102 063/S R2B
10
&'520'HOLYHUHGZLWK&&63DFNDJH
Installation of CCS Documenation
If you want to provide each CCS user with the documentation you have the option
to install the complete range of documentation files onto a local hard-disk or a
network drive.
To install the CCS Documentation use the installation setup for Documentation
located on the CD-ROM. You can either install it manually or by using the CCS
Intro.
manually:
..\Docu\Install\readme_en.txtEnglish
..\Docu\Install\readme_de.txtGerman
..\Docu\Install\readme_es.txtSpanish
..\Docu\Install\setup.exe
CCS Intro:
Start CCS Intro Sequence
read the Installation notes
Click on “customer documentation” | “install customer
documentation” and follow the instructions
By using the CCS Documentation Setup for installing the display software (Acrobat Reader) you will have a big advantage:
The setup will install a plug-in for the Acrobat Reader. The plug-in creates a
“start-button” in the toolbar of the Acrobat Reader. With this button it is possible to return alway to the start page of the documentation by clicking on the button.
Additionally the setup creates a new entry in the program group for quick and
easy starting of the documentation directly from your PC - anytime you want:
Dimensioning Tool for ACD
This program has been designed to produce lists of dimensioning values and service level characteristics from parameters that define call characteristics of an ACD
system (Automatic Call Distribution - Call Centre). The lists show the basic values, the balance between Service Level and Effectiveness, and Service Level characteristics that are a necessary input for Call Centre dimensioning.
The program covers the following three areas of BusinessPhone ACD dimensioning:
• Dimensioning based on business calls
• Dimensioning based on available agents
• Dimensioning of BusinessPhone
It is possible to directly start the Dimensioning Tool from the CD-ROM or to
install it on any desired PC.
EN/LZT BS 102 063/S R2B
11
BusinessPhone Call Centre Supervisor - Standard
Installation Guide
&'520'HOLYHUHGZLWK&&63DFNDJH
Standard PC Specification for Using Documentation on CD-ROM
•
•
•
•
•
•
•
•
100% IBM compatible PC
CPU 486 DX2 66 MHz processor
8 MB RAM (16 MB recommended)
Bus mouse
SVGA video card, non interlaced with at least 1 MB of memory
Colour monitor with 800 * 600 or higher resolution and True colours
1 CD-ROM drive
Sound card (recommended)
BusinessPhone Call Centre Supervisor - Standard
Installation Guide
EN/LZT BS 102 063/S R2B
12
%DVLF+DUGZDUH5HTXLUHPHQWV
%DVLF+DUGZDUH5HTXLUHPHQWV
([FKDQJH
5HTXLUHPHQWV
CCS 2.4 supports BusinessPhone 150 as well as BusinessPhone 50/250 (up to
V4.0). The installation script now includes the options:
(a) BusinessPhone 150 or BusinessPhone 50/250 (up to V2.0)
(b) BusinessPhone 50/250 from V2.1 onwards
By default option (b) will be installed.
&RPSXWHU
5HTXLUHPHQWV
Standard PC Specification
•
•
•
•
•
•
•
•
•
•
•
•
100% IBM compatible PC
Pentium 133 MHz processor
16 MB RAM (minimum)
Bus mouse
1 internal 3.5” diskette drive
1 internal 800 MB hard disk drive, ( SCSI or IDE )
1 standard serial port for connection to exchange
1 parallel port for the adaptation unit and system printer
SVGA video card, non interlaced with 1 MB of memory
Colour monitor with 800 * 600 or higher resolution and 16 colours
1 inkjet or laser printer
1 CD-ROM drive
Note: If the basic system is to be enhanced with Information Display Units then
additional serial ports will be required.
Certain printers using EPP/EPC modes cause a conflict with the adaptation unit and in these cases a second parallel port will be required for the
connection of the printer.
Adaptation Unit (Software Protection)
An adaptation unit is required for every software release. This determines the
number of agents supported by the system according to the structure of the product. The different units are shown in the table below.
EN/LZT BS 102 063/S R2B
13
BusinessPhone Call Centre Supervisor - Standard
Installation Guide
%DVLF+DUGZDUH5HTXLUHPHQWV
Number of Agents
1-10
11-20
21-30
31-40
Adaptation Unit - 10
Adaptation Unit - 20
Adaptation Unit - 30
Adaptation Unit - 40
The adaptation unit is fitted to the parallel port. If the adaptation unit is removed
the CCS will not function. The unit has no effect on printing, and will work if
the printer is off line, turned off altogether, or not connected. When a printer is
fitted the printer cable PC connector is fitted into the adaptation unit.
Exchange to PC Connection
The PC is connected to the exchange for event data capture via a serial port.
PC side:
The standard port for the connection is COM1, however, it is possible to configure any available port for the connection.
Exchange side:
Use a free V.24 port on CPU-D_ or on the AUX-board. The used Exchange port
must be stated in the Exchange by means of commands (see Settings in BusinessPhone Exchange for Call Centre Supervisor).
Line Driver
Where the distance between PC and exchange exceeds 15 metres a line driver or
short haul modem must be incorporated in the link. Follow the manufacturer’s
instructions for setting up and connecting the line driver. The line driver chosen
should ideally have a selectable baud rate to allow for any reconfiguring of the line
speed. The default system settings are 1200 baud, 8 data bits, 1 stop bit, and no
parity (see Settings in BusinessPhone Exchange for Call Centre Supervisor).
System Printer
The CCS will print to any connected printer which is supported by Windows.
Some printers have limited font support under Windows and using these printers
may affect the layout of certain reports generated by the CCS. Recommended
printers include HP laserjet and inkjet printers, Epson 850 dot-matrix printers,
and Canon inkjet printers.
Note: Certain printers using EPP/EPC modes cause a conflict with the adaptation unit and in these cases a second parallel port will be required for the
connection of the printer.
BusinessPhone Call Centre Supervisor - Standard
Installation Guide
EN/LZT BS 102 063/S R2B
14
%DVLF6RIWZDUH5HTXLUHPHQWV
%DVLF6RIWZDUH5HTXLUHPHQWV
The PC should be prepared for installation using the manufacturer’s instructions
to format the hard disk and install MS Windows 3.11 (Windows for Workgroups) or MS Windows 95/98 if necessary. Any checks suggested by the
PC Manufacturer should be carried out to ensure the correct functioning of the
PC and the monitor.
Operating System Software
One of the following System Software is required to run CCS on a PC:
• Windows for Workgroups 3.11
• Windows 95 and
• Windows 98.
Application Software
The application software is supplied on the CD-ROM. A setup utility is provided
to correctly unpack the packed software, create directories and aimed .INI files
(Windows for Workgroups 3.11) or .REG files (Windows 95) as required.
The application requires the Borland Database Engine and Crystal Reports v4.0
(v5.0 for CCS V2.x) runtime. The Borland Database Engine is provided on the
CD-ROM and has to be installed manually before installing CCS software. The
required Crystal Reports software is automatically installed with the CCS.
Registration
Please register your copy of the CCS, so that Ericsson can provide you with technical support.
To register your CCS product, complete the enclosed Software License Agreement and forward the information to your distributor or to the next Ericsson
company by fax or via mail.
About Ericsson
More information about Ericsson services and our Local Companies are available
on the Ericsson Database on Demand on the World Wide Web. To open the Ericsson Home Page, use the URL:
http://www.ericsson.com
EN/LZT BS 102 063/S R2B
15
BusinessPhone Call Centre Supervisor - Standard
Installation Guide
3&,QVWDOODWLRQ3URFHGXUHV
3&,QVWDOODWLRQ3URFHGXUHV
The PC should be prepared for installation using the manufacturer’s instructions
to format the hard disk and install Windows if necessary. For best performance
Windows for Workgroups 3.11 should be set up for 32 bit file and disk access.
The required set up procedure is a normal Windows procedure accessed via the
386 Enhanced icon in the Control Panel. To set up 32 bit access follow the relevant set up procedure described in Windows documentation /Online Help.
Any checks suggested by the PC Manufacturer should be carried out to ensure the
correct functioning of the PC and the monitor.
6HULDO3RUWV
Serial ports should be set up as COM1 and COM2. The CCS setup program will
allow you to choose which of the available COM ports the connection to the exchange should use.
([FKDQJHWR
3&&RQQHFWLRQ
All cables and link hardware should be checked for correct functioning before installation. Good quality screened cables should be used for all connections.
Connect the PC COM port to the exchange CPU or AUX card V24 port
Make sure all connections are secure
$GDSWDWLRQ8QLW
Fit the adaptation unit to the parallel port
Make sure the connection is secure
6\VWHP3ULQWHU
Connect the system printer to the adaptation unit (or second parallel port)
Make sure all connections are secure
Ensure the printer has paper which is loaded properly
BusinessPhone Call Centre Supervisor - Standard
Installation Guide
EN/LZT BS 102 063/S R2B
16
$SSOLFDWLRQ6RIWZDUH,QVWDOODWLRQ
$SSOLFDWLRQ6RIWZDUH,QVWDOODWLRQ
The system is divided into two parts, the Database Engine and the CCS itself.
Each part is installed separately. The Database engine must be installed before
the CCS can be installed.
Power up the PC and wait for Windows to load
Insert CD-ROM into your computer’s drive
• If the Autostart function of your operating system is activated, a special program - called Introsequence - will start automatically.
• It the Autostart function is not active or not available (Windows 3.x), double-click the filename INTROCCS.EXE in the root directory of the CDROM in your MS Explorer or File Manager.
When the loading procedure of the CCS Introsequence is finished you will see a
menu from which you have full access to all information on your CD-ROM.
%RUODQG'DWDEDVH(QJLQH'%(
To install the Borland Database Engine:
In the CCS Intro click on "install software"
In the following menu click on "install database engine"
EN/LZT BS 102 063/S R2B
17
BusinessPhone Call Centre Supervisor - Standard
Installation Guide
$SSOLFDWLRQ6RIWZDUH,QVWDOODWLRQ
The Borland Database Engine setup-routines has now been started.
Follow the installation instructions and enter the parameters requested as
necessary
When the BDE installation has finished, install the CCS
Note: We recommend that you accept default options when choosing directory
path names, as this makes the post-installation process much easier. However, you may install the BDE to any directory you wish. If you do not accept default parameters you must make a note of any non-default settings
for later use. The following Dialogs will be displayed during the install
process:
BusinessPhone Call Centre Supervisor - Standard
Installation Guide
EN/LZT BS 102 063/S R2B
18
$SSOLFDWLRQ6RIWZDUH,QVWDOODWLRQ
EN/LZT BS 102 063/S R2B
19
BusinessPhone Call Centre Supervisor - Standard
Installation Guide
$SSOLFDWLRQ6RIWZDUH,QVWDOODWLRQ
%XVLQHVV3KRQH&DOO&HQWUH6XSHUYLVRU
To install the CCS application software:
Click on "install software"
Click on “install ccs standard”.
The installation wizard will be opened. Follow the instructions of the installation
wizard.
The CCS application uses a normal Windows Install Shield Wizard to direct installation.
BusinessPhone Call Centre Supervisor - Standard
Installation Guide
EN/LZT BS 102 063/S R2B
20
$SSOLFDWLRQ6RIWZDUH,QVWDOODWLRQ
Prior to installing the Application the install program will prepare the Install
Shield Wizard and search for installed components.
If the Borland Database is not found then a warning message will be displayed
and the installation will be aborted.
Note: We recommend that you accept default options when choosing directory
path names, as this makes the post-installation process much easier. However, you may install the CCS to any directory you wish. If you do not accept default parameters you must make a note of any non-default settings
for later use.
COM1 is the default serial port for connection to the exchange, but you
may choose COM2 if you wish. If you use COM1 for the serial port, you
may not use COM3 for any purpose, and if you choose COM2 you may not
use COM4. This is important. Any attempt to use these ports will cause
the Call Processor/Windows communications to fail and the link to the exchange will be lost.
EN/LZT BS 102 063/S R2B
21
BusinessPhone Call Centre Supervisor - Standard
Installation Guide
$SSOLFDWLRQ6RIWZDUH,QVWDOODWLRQ
During Installation the Install Shield Wizard will display message dialogs as required.
Enter the information necessary and continue installation by clicking Next on
the current dialog. If necessary you may step back to previous dialogs to change
settings. To step back click Previous on the current dialog.
You will also be prompted to read Installation Notes and Readme files during installation. You may choose to either view the files when the prompt is shown or
continue installation without viewing the files.
If you choose to skip viewing the files, and have not previously read the files, you
should read the files. To open the files after installation click on the required
file icon in the CCS Program Group.
BusinessPhone Call Centre Supervisor - Standard
Installation Guide
EN/LZT BS 102 063/S R2B
22
$SSOLFDWLRQ6RIWZDUH,QVWDOODWLRQ
During installation you will be required to set the following parameters:
You may choose to install either the Program files, the Data files or both, Program and Data files.
1HZ,QVWDOODWLRQ
If you are perform a new installation program and data files have to be installed
on the system.
8SJUDGLQJIURP&&69[
If you perform an upgrade from a version between CCS V1.0 and 1.6 to CCS V2.4
you need to install the program and the data files due to considerable changes
in the database structure.
After the installation you have the option to migrate the all the customer’s data
from CCS V1.x into the new database. Please refer to the section “Upgrade Database from CCS V1.x to CCS V2.x” on page 24.
8SJUDGLQJIURP&&69[
If you perform an upgrade from a version between CCS V2.0 and 2.3 to CCS V2.4
you need to install the program files only. The database with the customer’s
daata will be migrated automatically.
Select the path where the Database configuration file IDAPI.CFG shall be installed (directory where you have installed the Database)
You can select the serial Comm Port to be used.
Select the Type of PBX System the CCS will be
connected.
Click Next.
You can select the directories where the installation shall take place. You are
however recommended to leave the default setting unchanged, as this will simplify Post Installation, Maintenance and future upgrades.
Default value:
C:\CCS
As soon as the required parameters have been entered installation will start to
copy the Application files to the designated directories.
Click Next. The Setup will start copying the files.
EN/LZT BS 102 063/S R2B
23
BusinessPhone Call Centre Supervisor - Standard
Installation Guide
$SSOLFDWLRQ6RIWZDUH,QVWDOODWLRQ
8SJUDGH'DWDEDVHIURP&&69[WR&&69[
Warning !!
CCS V2.x is NOT compatible with CCS V1.x data. You may not restore
CCS V1.x backed up data into CCS V2.x.
If you install CCS V2.x and you have an installed CCS V1.x on your Computer’s
hard-disk, you should upgrade the CCS V1.x database. This is necessary for being
able to use CCS V1.x data with CCS V2.x.
Note: You may choose to convert later. The conversion program is installed in
the CCS\PROGRAMS directory, called CONVERT.EXE. If you have to
reload the CCS data files for any reason you may wish to run the conversion
again.
If you are performing a new installation or just upgrading a CCS system
from V2.x you may click on No and proceed with the instructions “Restart the System” on page 26.
Warning !!
Remember, you CANNOT run the conversion utility if version 2.x
of the CCS has been run even once.
Start the Converting Program
Click the START button and conversion will start. This may take some time, a
progress gauge informs you of how much has been done and how much is left.
BusinessPhone Call Centre Supervisor - Standard
Installation Guide
EN/LZT BS 102 063/S R2B
24
$SSOLFDWLRQ6RIWZDUH,QVWDOODWLRQ
The conversion program will automatically find the version 1.x database if
default locations were used, otherwise you will have to identify the location.
If the CCS V1.x Database is not found, a warning message will be displayed and
you have to enter the correct path name of the DATA directory for Version 1.x of
the CCS.
Note: CCS V2.x uses a slightly different directory structure to CCS V1.x. This
means that you can install CCS V2.x on a PC with CCS V1.x already having been installed. All data and programs of CCS V1.x will be safe. Nothing will be overwritten or deleted by the installation procedure for CCS
V2.x.
EN/LZT BS 102 063/S R2B
25
BusinessPhone Call Centre Supervisor - Standard
Installation Guide
$SSOLFDWLRQ6RIWZDUH,QVWDOODWLRQ
Click Close to complete the Conversion.
Restart the System
At the end of the CCS setup (CCS V1.x and CCS V2.x with or without Database
upgrade) you will be asked if you want to restart your computer or continue without restarting.
Important:
• If you chose the defaults:
Restart your computer and follow the instructions in the Initial Startup section.
BusinessPhone Call Centre Supervisor - Standard
Installation Guide
EN/LZT BS 102 063/S R2B
26
$SSOLFDWLRQ6RIWZDUH,QVWDOODWLRQ
• If you have not chosen the default directories then:
Do not restart your computer. Instead, follow the instructions in the Post Installation Configuration section.
EN/LZT BS 102 063/S R2B
27
BusinessPhone Call Centre Supervisor - Standard
Installation Guide
3RVW,QVWDOODWLRQ&RQILJXUDWLRQ
3RVW,QVWDOODWLRQ&RQILJXUDWLRQ
When the CCS has been installed, and before you run the CCS up for the first
time, changes will need to be made to the system if you have not chosen the default directories during installation.
If you have installed the Borland Database Engine and the CCS to the supplied,
default directories, you may continue and start up the CCS for the first time.
'DWDEDVH&RQILJXUDWLRQ
In the CCS ‘Aliases’ are used when building path names for data files. An Alias is
another name given to pre-set file paths names that the application uses. By using
aliases changes to directory structures and directory names can be accommodated
very easily. However, if the aliases have the wrong path name then the CCS will
not be able to find data files and will not function.
When defaults are chosen during installation, the configured aliases which are
also shipped will be correct. However, if you chose to change the directory in
which the CCS is installed, you must set the Alias path names that are to replace
the standard default settings. Changes to Aliases are carried out using the Borland Database Configuration Utility.
BusinessPhone Call Centre Supervisor - Standard
Installation Guide
EN/LZT BS 102 063/S R2B
28
3RVW,QVWDOODWLRQ&RQILJXUDWLRQ
6HWWLQJ$OLDVHV
The utility is accessed via an Icon in the Ericsson CCS Program Group which has
been created by the setup program. If you are not familiar with the Borland Database Configuration Utility we recommend that you run the Configuration Utility and become familiar with it before attempting any changes (use the help to
see what each field is and how the utility expects you to enter data and acknowledge changes).
The following list identifies all of the Aliases required by the System. The ? in
each alias must be set with the absolute path name that defines the correct data
files directory.
CCAppConfig
?\data\config
CCAppHistoric
?\data\historic
CCAEventProc
?\data\schedule
CCAppDynamic
?\data\dynamic
CCAppPrograms
?\data\programs
CCAppSystem
?\data\system
CCAppUsers
?\data\users
CCAppReports
?\data\reports
CCAppTemp
?\data\temp
CCAppGrpViews
?\data\views\acdques
CCAppQueViews
?\data\views\groups
CCAppWboard
?\data\wboard
CCAppReportScripts
?\reports
When the utility starts the Drivers page is displayed as the default page.
EN/LZT BS 102 063/S R2B
29
BusinessPhone Call Centre Supervisor - Standard
Installation Guide
3RVW,QVWDOODWLRQ&RQILJXUDWLRQ
Click the Aliases tab to open the Aliases page
The page comprises a list of all current Aliases on the left of the page and the current alias parameters for the selected (Highlighted) Alias on the right of the page.
Editing Alias parameters is carried out directly in the parameter fields on the
right side of the page.
BusinessPhone Call Centre Supervisor - Standard
Installation Guide
EN/LZT BS 102 063/S R2B
30
3RVW,QVWDOODWLRQ&RQILJXUDWLRQ
To change an Alias:
Select the required Alias in the list
Change the Alias parameters as required
Example
For Example, if the installation of the CCS was done to a drive other than the C:\
drive but the default CCS directory was retained.
You must replace the ? in the alias with the chosen drive letter and the directory name the CCS
was installed into, for example D:\CCS\DATA\CONFIG.
If you used another directory name, such as
C:\MIS then you would have to set the same
alias to c:\mis\data\config.
Important
It is extremely important to be careful when changing aliases, as any mistake will cause the CCS to fail.
3DUDGR['ULYHU
If necessary you will be required to set the Paradox Driver NETDIR parameter
to match the drive that the driver is installed to.
To set the NETDIR Parameter:
Open the Drivers page
Select the PARADOX driver in the Driver Names list
Set the NETDIR parameter to the correct drive
EN/LZT BS 102 063/S R2B
31
BusinessPhone Call Centre Supervisor - Standard
Installation Guide
,QLWLDO6WDUW8S
,QLWLDO6WDUW8S
Once the installation is complete using default settings, or after Post Installation
is complete following installation using non default settings, the Initial Start Up
phase can be carried out.
6WDUW8S*URXS
When the application is installed an Ericsson CCS Program Group is created. In
this group the CCS User Client program is installed, along with icons for help
and either readme.txt or install.txt notepad files.
There is also a icon for Begin CCS. This is the program which automatically starts
the whole of the CCS, including the Call Processor, the report and display unit
programs. We recommend that you move this icon and place it in the Start Up
group of the PC. Then, whenever the PC is started the CCS will start automatically.
If you choose not to install the Begin CCS program in the start up group, you
must inform the Users that they should always start the CCS by running.
Begin CCS, not by starting the individual programs separately. See the Database
Troubleshooting tips for more details.
Click on the Ericsson CCS Standard Edition icon to start the application
Toolbar
Windows 95
In Windows 95 you can see the Ericsson CCS Program Group:
• via MS Explorer ?:\Windows\Start Menu\Programs. You can move this Program Group to your Desktop as shortcut for quick access.
BusinessPhone Call Centre Supervisor - Standard
Installation Guide
EN/LZT BS 102 063/S R2B
32
,QLWLDO6WDUW8S
• via Windows taskbar:
Click Start on the taskbar
Point to Programs
Point to Ericsson CCS
Windows for Workgroups 3.11
In Windows for Workgroups 3.11 you can see the Ericsson CCS Program Group
in the MS File Manager.
/LQN6WDWXV
To check the status of the connection between the exchange and the PC after having started the Call Processor, you can use the following function (only available
in CCS V2.x):
Click on Call Processor on the Windows taskbar by using the right mouse
button.
The Link Status will be displayed.
Time / Date Format
It is strictly recommended to set up the time and date format of your operating
system in the following format:
Time:
Date:
HH:MM:SS(e.g. 17:04:34)
DD/MM/YY(e.g. 02/03/98 for March 2, 1998)
Make sure that you have configured 4 digits for the "Year digits" in the date
format after the Year 1999 (Millenium).
Date:
DD/MM/YYYY
You can check and/or change your settings in the Windows Control Panel under
country settings.
This time and date format is used in several menus to set actions to take place or
to generate reports.
EN/LZT BS 102 063/S R2B
33
BusinessPhone Call Centre Supervisor - Standard
Installation Guide
,QLWLDO6WDUW8S
,QLWLDO&KHFNV
It is suggested that a minimum configuration is be carried out by the installation
engineer to ensure that the system is working and displaying accurate and relevant data. To enable configuration to be carried out liaison with the site administration will be necessary to ascertain agent names, PIN codes, Call Codes, Agent
Group and ACD Group names, etc.
Directions for carrying out configuration functions can be found in the CCS User’s Guide.
6WDUW8S
When the CCS starts up the Log On dialog will be displayed. To Log on, you
must enter the default system user name and password which is configured by default during installation.
No other User exists in the CCS at this time.
The default user is systemuser with a password of systemuser.
0LQLPXP&RQILJXUDWLRQ
The minimum configuration to ensure correct working and data presentation
should include the following:
•
•
•
•
•
•
System Reset Times
Users
System Parameters
ACD Group Names
Agent Details
Call Codes
Note: Before ACD Groups and Agent Groups can be displayed by a User it is
necessary to select the groups as accessible to the User. This even applies
to the System User.
BusinessPhone Call Centre Supervisor - Standard
Installation Guide
EN/LZT BS 102 063/S R2B
34
/DQJXDJH8SGDWH
/DQJXDJH8SGDWH
After a complete installation (English version) it is possible to update the CCS
system with different languages. The language settings are user dependent,
which means that each user can be assigned one of the installed languages. A user
with a non english language assisgned will see the respective language only after
the log on sequence.
Following languages are available:
CCS Version 1.x
English (default)
Spanish
Swedish
CCS Version 2.x
English (default)
German
Spanish
,QVWDOOLQJ/DQJXDJH)LOHV
Following procedure is only valid for CCS V2.x. If you want to update an
older CCS version please read the corresponding readme file.
Click on "install software"
In the following menu, click on "update ccs with language files"
By clicking on the “update ccs with language files” button a readme file and an
explorer window showing the files for the selected language will open.
EN/LZT BS 102 063/S R2B
35
BusinessPhone Call Centre Supervisor - Standard
Installation Guide
/DQJXDJH8SGDWH
Note: German and Spanish Intro application will show directly the readme file
and the folder with setup files belonging to the already chosen language.
Please read the readme file and then click on setup.exe
The setup file will install the language DLLs and the localised Help file.
Reboot your system.
After restarting the ccs system you will be able to create new users and to assign
them one of the previously installed language.
To create new users see the user’s guide under “Adding a new User” in chapter 2.
Make sure that you have been logged on to the system as systemuser for creating
new users.
After logging on to the CCS system with the new user the application will appear
in the desired language.
BusinessPhone Call Centre Supervisor - Standard
Installation Guide
EN/LZT BS 102 063/S R2B
36
*HQHUDO
*HQHUDO
The CCS Information Display system can handle the presentation of messages on
both physical Display Units and Screen Display Units.
Screen Display Units are ‘virtual’ Display Units and messages sent to Screen Display Units are displayed in separate ‘window’ on the CCS PC.
'LVSOD\8QLW&RQQHFWLRQ
Physical Display Units are driven through serial ports, either individually or in
chained links. There is no limit to the number of physical Display Units that can
be connected to the system, however each Display Unit connected to a Comm
Port must have a unique address. The maximum number of Display Units that
can be connected to one link will depend on the type of unit connected and the
transfer band rate.
Note: At present it is only possible to connect Display Units that use the same
driver to the same chained link.
If more Display Units than can be supported by a single link are to be connected, or if Display Units using different drivers are to be used it may be
necessary to add extra serial ports to the CCS PC.
The CCS can address any board on a link and send as many messages to
that board as the board supports. There is no limit to the numbers messages in the CCS.
Review the manufacturer’s guidelines for details of limits of connected
units on a single link and message maximums.
%URDGFDVW)XQFWLRQ
Also, when adding physical Display Units to a COM port, one Display Unit may
have a designated address of 0. This then becomes a ‘broadcast’ Display Unit that
will display every messages sent to all Display Units on the same COM port. This
facility is not available when adding a Screen Display Unit.
EN/LZT BS 102 063/S R2B
37
BusinessPhone Call Centre Supervisor - Standard
Installation Guide
*HQHUDO
'LVSOD\8QLW'ULYHUV
The CCS is shipped with the following drivers to support the standard Information Display Units that can be delivered with the system.
Dataline-20
Single Line Single Colour (DL20)
Single Line Multi Colour (DL20)
Dataline-320
Three Line Single Colour (DB320)
Three Line Multi Colour (DB320)
Dataline-816
Eight line Multi Colour Displays (DB 816)
6WDQGDUG,QIRUPDWLRQ'LVSOD\8QLWV
The CCS package supports the following Display Unit products:
•
•
•
•
•
DL20 Single colour
DL20 Multicolour
DB320 Single colour
DB320 Multicolour
DB816 Multicolour
The DL20 Single colour is a single-line, single-sided display with 20 alphanumeric characters, using red light emitting diodes.
The DL20 Multicolour is a single-line, single-sided display with 20 alphanumeric characters, using light emitting diodes. The DL20 Multicolour combines
red, green or amber colours.
The DB320 Single colour is a single-sided display with 3 lines. Each line has 20
alphanumeric characters, using red light emitting diodes.
The DB320 Multicolour is a single-sided display with 3 lines. Each line has 20
alphanumeric characters, using light emitting diodes. The DB320 Multicolour
uses a combination of red, green or amber colours.
The DB816 Multicolour is a single-sided display with 8 lines. Each line has 16
alphanumeric characters, using light emitting diodes. The DB816 Multicolour
uses a combination of red, green or amber colours.
All Display Unit products mentioned above can be ordered at Ericsson as Operation and Maintenance products and are listed in the price list.
2WKHU'LVSOD\8QLWV
Ericsson Austria AG has started a Certification Program with different Display
Unit (Wallboard) suppliers. Therefore, several Display Unit products from different suppliers have been tested with BusinessPhone. In contrast to the Display
Unit products listed in the Ericsson price list the certified products are supported
directly by the supplier.
Please ask for the current list of BusinessPhone exchange approved Display Unit suppliers.
BusinessPhone Call Centre Supervisor - Standard
Installation Guide
EN/LZT BS 102 063/S R2B
38
*HQHUDO
Design
The display is intended for indoor use, and can be wall mounted or suspended
from a ceiling. The software used in this display is a dumb-mode terminal program (1200 bauds or 9600 bauds), designed to interface with ACD-type systems.
The casing is made from industrial aluminium painted with a polyester powderpaint. It has M6 nut inserts on top and at the back for wall mounting or ceiling
suspension. The power supply is built internally into the casing. Each display is
supplied with installation directions and mounting details. Each display is individually tested, under ISO 9001 conditions, in the factory before dispatch.
Note: Support is also provided for the existing Display Units KNH831/834.
EN/LZT BS 102 063/S R2B
39
BusinessPhone Call Centre Supervisor - Standard
Installation Guide
,QVWDOOLQJD'LVSOD\8QLW
,QVWDOOLQJD'LVSOD\8QLW
When connecting Information Display units, remember that only Information
Displays which use the same driver can be connected onto a single link. For instance, you cannot mix single line and three line boards on the same. You can,
however, put single colour and multi colour boards on the same link.
The following information refers to the standard DL and DB.
The display unit is supplied complete with power supply and a set of mounting
brackets for wall/ceiling mounting. The power supply is connected to the socket
at the rear right hand end of the display.
To mount the unit, attach the brackets at the selected location and carefully slide
the display unit between the two protruding flanges. With two screws provided,
attach the display to the brackets. Tighten the screws and adjust the viewing angle of the display so as to achieve maximum visibility.
(see also Installation Appendix)
6HULDO&RQQHFWLRQ
Connection of the serial link to the Information Display is via a female 3.5mm
stereo mini-jack socket mounted on the display unit.
Terminal Box
D Type Connector
25 way
9 way
Pin 2
Pin 3
Pin 7
Pin 5
Pin 3
Pin 2
Red - Serial Out
Black - Ground
White - Serial In
Screw
Serial Plug
Ground
Serial in to Unit
3
4
2
5
1
Serial out from Unit
The connection between the male 3-conductor mini plug that connects to the
socket and the PC serial port connector is made via a Terminal Box. on the display
unit.
The male 3-conductor mini plug that connects to the socket must be wired to the
PC serial output as follows:
BusinessPhone Call Centre Supervisor - Standard
Installation Guide
EN/LZT BS 102 063/S R2B
40
,QVWDOOLQJD'LVSOD\8QLW
25 way D Type Connector
Connect the sleeve pin of the 3.5mm plug to the cable shield. Connect the other
end of the shield to PIN 7 of the DB25 connector.
Connect the data-out signal from the display to the tip of the 3.5mm plug. Connect the other end to PIN 3 of DB25 connector.
Connect the data-in signal from the display to the centre ring of the 3.5mm plug.
Connect the other end to PIN 2 of DB25 connector.
25 way D Type Connector
Pin 2 - Serial Out
Pin 7 - Ground
Pin 3 - Serial In
9 way D Type Connector
Connect the sleeve pin of the 3.5mm plug to the cable shield. Connect the other
end of the shield to PIN 5 of the DB9 connector.
Connect the data-out signal from the display to the tip of the 3.5mm plug. Connect the other end to PIN 2 of DB9 connector.
Connect the data-in signal from the display to the centre ring of the 3.5mm plug.
Connect the other end to PIN 3 of DB9 connector.
9 way D Type Connector
Pin 3 - Serial Out
Pin 5 - Ground
Pin 2 - Serial In
EN/LZT BS 102 063/S R2B
41
BusinessPhone Call Centre Supervisor - Standard
Installation Guide
,QVWDOOLQJD'LVSOD\8QLW
&RQQHFWLQJ0XOWLSOH8QLWV
When more than one unit is being used the connections must be repeated in multi drop mode i.e. receive of all Display Units in the system is connected to the
transmit of the computer and the ground is common to all devices.
The Serial In (White) wire is not needed in most applications.
Terminal Box
Terminal Box
Red - Serial Out
Black - Ground
PC Serial Port
Connector
Display Unit
Display Unit
Address Selection
Each Display Unit includes a network communication Eprom and address switch
module. This module plugs into the keyboard connector socket adjacent to the
power connector and enables you to set an address for the associated unit. When
the Display Unit is powered up, it reads the network address from the switch
module.
4
5
4
6
3
7
3
2
8
2
1
0
9
Most significant
address bit
5
6
7
8
1
0
9
Power
Connector
Least significant
address bit
Addresses are set by setting the required values on the two rotary switches of the
address module. An address can be any value between 01 and 99 and each display
in the network should have a different address number.
The maximum number of displays that can be connected to a single PC Serial
Port will depend on the type of display and baud rate used to transfer information.
BusinessPhone Call Centre Supervisor - Standard
Installation Guide
EN/LZT BS 102 063/S R2B
42
'LVSOD\8QLW&RQQHFWLRQ
'LVSOD\8QLW&RQQHFWLRQ
Before any messages can be sent to a Display Unit, the Display Unit must be correctly connected to the system.
Information Display Unit Connection is carried out via the Display Unit Connection Dialog. Only the System User and Users that are allowed access to the Display Unit Connection menu are able to carry out Information Display Unit
Connection functions.
The Display Unit Connection Dialog is accessed by clicking the Connections item in
the System menu, or pressing Alt + S | C | W,
or clicking the Connections button on the
System toolbar.
The Display Unit Connection Dialog comprises a list of all current Display Units
connections shown in a grid.
EN/LZT BS 102 063/S R2B
43
BusinessPhone Call Centre Supervisor - Standard
Installation Guide
'LVSOD\8QLW&RQQHFWLRQ
0DQDJHPHQW)XQFWLRQV
The four control buttons situated at the bottom right of the page provide access
to Test, New, Edit and Delete function.
BusinessPhone Call Centre Supervisor - Standard
Installation Guide
EN/LZT BS 102 063/S R2B
44
$GGLQJD1HZ'LVSOD\8QLW
$GGLQJD1HZ'LVSOD\8QLW
The parameters needed to set up a Display Unit are entered via the Add a New
Display Unit Dialog. The Dialog is accessed from the Display Unit Connection
Dialog by clicking the New button or by pressing Alt + N.
New Display Unit are added by setting the following parameters:
•
•
•
•
•
Display Unit Name
Display Unit Type
Device (The device that the Display Unit is connected to)
Baud Rate
Display Unit Address
After all parameters have been correctly set the connection is added by clicking
OK
'LVSOD\8QLW1DPH
Each Display Unit must be assigned a unique name.
When adding a new Display Unit a warning will be displayed if you enter a name
that is already in use. Once assigned a Display Unit name cannot be edited, if a
new name is required then the original Display Unit connection should be deleted and a new connection with the new name established.
EN/LZT BS 102 063/S R2B
45
BusinessPhone Call Centre Supervisor - Standard
Installation Guide
$GGLQJD1HZ'LVSOD\8QLW
'LVSOD\8QLW7\SH
The Display Unit type refers to the actual type of unit that is to be connected.
The type selected must match the actual type of the Display Unit.
To select a Display Unit in the Type list, either
click on the required Display Unit Name or
step through the list using the cursor control
keys until the required Display Unit Name is
highlighted.
&RPP'HYLFH
The Comm Device list shows all COM ports available to the CCS for Display
Units. Any COM port that is not listed is not available.
If you are adding a new physical Display Unit:
• Select the COM port that the new Display Unit is connected to.
If you are adding a new Screen Display Unit:
• Select Screen.
Note: It is necessary that the correct Comm Device setting is selected with reference to the Display Unit type. Making conflicting selections will result
in a warning message advising you to correct the conflict. The following
selection combinations will cause a conflict:
• Selecting a physical Type of Display Unit and selecting the Screen Comm
Device.
• Selecting a Screen Type of Display Unit and selecting a COM Comm Device.
• Selecting a physical Type of Display Unit that is incompatible with Display
Units already configured on the selected COM Comm Device.
BusinessPhone Call Centre Supervisor - Standard
Installation Guide
EN/LZT BS 102 063/S R2B
46
$GGLQJD1HZ'LVSOD\8QLW
%DXG5DWH
If adding a physical Display Unit you must set the Baud Rate for the transfer between the PC and the new unit. The Baud Rate list shows all the supported Baud
Rates for the type of Display Unit selected. The default rate will be highlighted.
Select the required rate.
If you enter a Baud Rate that is different from the Baud Rates of Display Units
already configured on the selected Comm Device, a warning dialog will be displayed and you will be given the opportunity to either choose the existing Baud
Rate or to set the rate for all Display Units on the Comm Device to the same new
rate.
$GGUHVV
All Display Units must have an address which is unique for the COM or GUI device they are connected to. Enter an address in the Address field. When adding
physical Display Units, the address entered must match the actual setting of the
Display Unit itself.
If you enter an Address that is already used by Display Units already configured
on the selected Comm Device, a warning dialog is displayed and an unused address is entered in the Address field for you to accept.
&KDQJLQJ&RQQHFWLRQ3DUDPHWHUV
At times it may be necessary to alter certain connection parameters. Changing
connection parameters is carried out via the Edit Display Unit Configuration dialog which is accessed by highlighting the Display Unit to be edited in the grid
and clicking the Edit button.
The Edit Display Unit Configuration dialog is similar to the New Display Unit
Configuration dialog and enables you to edit Display Unit parameters. Remember, however, that a Display Unit name cannot be edited once a Display Unit has
been added.
EN/LZT BS 102 063/S R2B
47
BusinessPhone Call Centre Supervisor - Standard
Installation Guide
$GGLQJD1HZ'LVSOD\8QLW
7HVWLQJ&RQQHFWLRQV
The Test button allows you to test the connection between the CCS and a Display
Unit.
To carry out a test:
Select the Display Unit to test in the grid
Click the Test button
An information window on the PC will inform you that a message will be displayed on the selected Display Unit momentarily.
The system takes the first configured message and attempts to display it immediately on the selected Display Unit. If there are no messages configured then the
test cannot be made.
'HOHWLQJD&RQQHFWLRQ
To delete a connection simply select the Display Unit name in the name list and
click the Delete button.
BusinessPhone Call Centre Supervisor - Standard
Installation Guide
EN/LZT BS 102 063/S R2B
48
$GGLQJD1HZ'LVSOD\8QLW
'/6LQJOH&RORXU,QIRUPDWLRQ'LVSOD\
The DL20 is a single-line, single-sided display with 20 alphanumeric characters,
using red light emitting diodes.
7HFKQLFDOGDWD
Connection:
5-pin cannon for connection of plug
Weight:
8 kg
Dimensions:
964 (L) x 155 (H) x 75 (D)
L.e.d. diameter:
5 mm
Character height:
50 mm
Memory capacity:
6k
Power consumption:
30 W
Power supply type:
220 V/60 Hz or 110 V/60 Hz
MTBF average of the LED:
50.000 hours
RFI:
In accordance with EN6950
EMC:
In accordance with
- EN50081-1:1992
- EN50082-1:1992
Communication:
RS232 (RS485 is also an option). The possibility of networking and addressing Individual
DL20’s in multi-drop format is available.
Special features:
Shoot
Jump
Down
Up
Vertical
Wipe
Freeze
Background
Reverse
Scrolling
Flash
Random
EN/LZT BS 102 063/S R2B
49
BusinessPhone Call Centre Supervisor - Standard
Installation Guide
$GGLQJD1HZ'LVSOD\8QLW
'/0XOWLFRORXU,QIRUPDWLRQ'LVSOD\
The DL20 is a single-line, single-sided display with 20 alphanumeric characters,
using light emitting diodes. The DL20 Multicolour combines red, green or amber colours.
7HFKQLFDOGDWD
Connection:
5-pin cannon for connection of plug
Weight:
8 kg
Dimensions:
964 (L) x 155 (H) x 75 (D)
L.e.d. diameter:
5 mm
Character height:
50 mm
Memory capacity:
6k
Power consumption:
50 W
Power supply type:
220 V/60 Hz or 110 V/60 Hz
MTBF average of the LED:
50.000 hours
RFI:
In accordance with EN6950
EMC:
In accordance with
- EN50081-1:1992
- EN50082-1:1992
Communication:
RS232 (RS485 is also an option). The possibility
of networking and addressing Individual DL20’s
in multi-drop format is available.
Special features:
Shoot
Jump
Down
Up
Vertical
Wipe
Freeze
Background
Reverse
Scrolling
Flash
Random
BusinessPhone Call Centre Supervisor - Standard
Installation Guide
EN/LZT BS 102 063/S R2B
50
$GGLQJD1HZ'LVSOD\8QLW
'%6LQJOH&RORXU,QIRUPDWLRQ'LVSOD\
The DB320 Single colour is a single-sided display with 3 lines. Each line has 20
alphanumeric characters, using red light emitting diodes.
7HFKQLFDOGDWD
Connection:
5-pin cannon for connection of plug
Weight:
15 kg
Dimensions:
964 (L) x 341 (H) x 75 (D)
L.e.d. diameter:
5 mm
Character height:
50 mm
Memory capacity:
6k
Power consumption:
90 W
Power supply type:
220 V/60 Hz or 110 V/60 Hz
MTBF average of the LED:
50.000 hours
RFI:
In accordance with EN6950
EMC:
In accordance with
- EN50081-1:1992
- EN50082-1:1992
Communication:
RS232 (RS485 is also an option). The possibilityof networking and addressing Individual
DB320 Single colour displays in multi-drop
format is available.
Special features:
Jump
Down
Up
Vertical
Wipe
Freeze
Flash
Random
EN/LZT BS 102 063/S R2B
51
BusinessPhone Call Centre Supervisor - Standard
Installation Guide
$GGLQJD1HZ'LVSOD\8QLW
'%0XOWLFRORXU,QIRUPDWLRQ'LVSOD\
The DB320 Multicolour is a single-sided display with 3 lines. Each line has 20
alphanumeric characters, using light emitting diodes. The DB320 Multicolour
uses a combination of red, green or amber colours.
7HFKQLFDOGDWD
Connection:
5-pin cannon for connection of plug
Weight:
15 kg
Dimensions:
964 (L) x 341 (H) x 75 (D)
L.e.d. diameter:
5 mm
Character height:
50 mm
Memory capacity:
6k
Power consumption:
130 W
Power supply type:
220 V/60 Hz or 110 V/60 Hz
MTBF average of the LED:
50.000 hours
RFI:
In accordance with EN6950
EMC:
In accordance with
-EN50081-1:1992
-EN50082-1:1992
Communication:
RS232 (RS485 is also an option). The possibility of networking and addressing Individual
DB320 multicolour displays in multi-drop format is available.
Special features:
Jump
Down
Up
Vertical
Wipe
Freeze
Flash
Random
BusinessPhone Call Centre Supervisor - Standard
Installation Guide
EN/LZT BS 102 063/S R2B
52
7URXEOH6KRRWLQJ7LSV
7URXEOH6KRRWLQJ7LSV
9['9LUWXDO'HYLFH'ULYHU6HWWLQJV
The Call Centre Supervisor uses what is called a ‘virtual device driver’, or
‘VxD’, to control communications between the exchange and the application.
This is a Windows specific device and must be used to ensure pre-emptive communications processing even when windows is busy on another activity. The VxD
has to be configured to use a communications port. Normally it must be COM1,
although COM2 can be used.
During installation the VxD default comm port COM1 is displayed and the installer asked to confirm. At this point the installer can choose COM2.
After installation, if you wish to change the comm port that the VxD uses, you
must edit the SYSTEM.INI file. The information is placed in the Ericsson section, which is identified as :
[EricssonBP250]
Immediately after the installation this section will be found at the end of the .INI
file.
There are four entries in the section, as follows.
COMPORT=
COMBASE=
COMIRQ=
COMSPEED=
The following values are accepted:
COMPORT=1
COMPORT=2
( use COM1 )
( use COM2 )
COMBASE=03F8
COMBASE=02F8
( base address of COM1 )
( base address of COM2 )
COMIRQ=4
COMIRQ=3
( IRQ of COM1 )
( IRQ of COM2 )
COMSPEED=1200
( BAUD rate of exchange )
WINDOWS must be restarted for any changes to the system.ini file to be implemented.
DO NOT CHANGE THE SYSTEM.INI FILE UNLESS YOU ARE SURE
YOU KNOW THAT WHAT YOU ARE CHANGING IS CORRECT.
EN/LZT BS 102 063/S R2B
53
BusinessPhone Call Centre Supervisor - Standard
Installation Guide
7URXEOH6KRRWLQJ7LSV
'HIDXOW3ULQWHUDQG5HSRUWV
Crystal Reports Run Time requires a DEFAULT PRINTER to be configured on
the PC. If you attempt to generate a report in the MIS without having a default
printer configured this may cause an ’Out of System Resources’ error to occur. To
get round this problem make sure that there is a default printer configured in
WINDOWS. If there is no physical printer actually connected, you can install
the ’generic / text only’ printer supplied with Windows and make that the default
printer.
'LVSOD\8QLWV
During the configuration of Display Units into the Call Centre Supervisor a
test button is provided to allow the installer to send text directly to the Display
Unit.
If the test text does not appear on the Display Unit there is a mistake somewhere
in the configuration of the Display Unit or in the hardware connection of the Display Unit.
Verify the configuration. If any of the following pieces of information are incorrect the CCS will not be able to send messages to the Display Unit.
•
•
•
•
•
•
•
•
Type
Address
Comm Port
Baud Rate
Data Bits
Stop Bits
Flow Control
Parity
To further verify the configuration, change the address of the Display Unit to 0.
Setting this address causes the ‘Testing’ message to appear on all of the wallboards connected to the CCS by the comm port specified, regardless of their actual address. If the ‘Testing’ text appears on the wallboards you can be sure that
the configuration is correct, and it is most likely that the address you have previously chosen does not match the actual address set in the Display Unit address
module. If the text does not appear, and all the settings above are correct, then
the hardware connection is most likely incorrect.
Verify the hardware connection. The settings of the address module must match
the number configured into the CCS. The cabling should be correctly wired and
installed. Refer to the hardware instructions for details of how to correctly install
the Display Unit units.
BusinessPhone Call Centre Supervisor - Standard
Installation Guide
EN/LZT BS 102 063/S R2B
54
7URXEOH6KRRWLQJ7LSV
0LVVLQJ$&'4XHXHVRU$JHQW*URXSV
Often, when logging onto the Call Centre Supervisor, a user will not be able to
view details for certain ACD Queues or Agent Groups, either in the real time
screen or the reports generator. This is a common problem, and is usually caused
by the user not having permission to access that group or queue.
Whenever a user complains of missing queues or groups, always check permissions for that user first.
'DWDEDVH3UREOHPV
If any of the Borland aliases are incorrect, the Call Centre Supervisor will not
function correctly. Once the application is installed and running there should be
no problems, as the aliases will not change, but when initially installing the installer has the option to install to a directory other than the default chosen, and
must then change the database aliases. If after changing these aliases there are any
database exceptions during the operation of the application, the most likely cause
will be the alias path names. Check and double check the path names entered. All
the alias path names must be correct, a mistake in even one can cause the application to fail. Remember also that the failure need not be immediate, but only
when a specific portion of the application attempts to use the incorrect alias.
When running the database engine the program uses a series of files to control
access and record locking. If the whole system fails for some reason or other, the
user must use Begin CCS to restart it. If for any reason they do not, some of the
files used to control database access may not be cleaned up properly, and access
could be denied to the current CCS session. Using Begin CCS ensures that all old
access files are removed before the application is started.
If there should be a problem at restarting a specific program, not the whole CCS,
e.g. at restarting the report scheduler process, you must close the whole application and restart it by using Begin CCS. It is not possible to delete the control
files as long as any part of the application is still running, because those programs
might attempt to use the files that have been deleted and re-created, and thus destroy all current control and lock information.
EN/LZT BS 102 063/S R2B
55
BusinessPhone Call Centre Supervisor - Standard
Installation Guide
7URXEOH6KRRWLQJ7LSV
1R'DWDLQ5HSRUWV
The CCS cannot distinguish between time formats as a.m. and p.m. The CCS
does not know the difference between time after midnight and afternoon. If CCS
generates Reports for the time 2:00 a.m. and 5:00 a.m. instead of between 14:00
and 17:00, empty Reports may result.
Therefore it is strictly recommended to configure the Windows operating system
in 24 hours mode.
see under "Time / Date format"
:URQJ6FKHGXOHG$FWLRQV
see under "No data in Reports" and under "Time / Date format"
BusinessPhone Call Centre Supervisor - Standard
Installation Guide
EN/LZT BS 102 063/S R2B
56
,QVWDOODWLRQ$SSHQGL[
,QVWDOODWLRQ$SSHQGL[
&RQQHFWLRQEHWZHHQ3&DQG([FKDQJH
Cable connection
V.24 port 0
V.24 port
V.24 port 2
Use a free V.24 port of
CPU-D_ or one of AUX
board.
CPU-D_ :
3 V.24 ports
Note: Configure in the BusinessPhone which V.24 port do you have used.
EN/LZT BS 102 063/S R2B
57
BusinessPhone Call Centre Supervisor - Standard
Installation Guide
,QVWDOODWLRQ$SSHQGL[
&RQQHFWLRQEHWZHHQ3&DQG'LVSOD\8QLW
&20
&20
%XVLQHVV3KRQHH[FKDQJH
Cable shipped
with Display
Unit product.
Note: The default port for the connection is COM 2, however, it is possible to
configure any available port for the connection of the Display Unit.
BusinessPhone Call Centre Supervisor - Standard
Installation Guide
EN/LZT BS 102 063/S R2B
58
,QVWDOODWLRQ$SSHQGL[
6HWWLQJV,Q%XVLQHVV3KRQH([FKDQJHIRU&DOO&HQWUH6XSHUYLVRU
&RP1R
'HVFULSWLRQ
3DUDPHWHUV
1101
0301
Answering pos. Day
Function of key
0302
0303
0304
3708
3711
3712
3816
3817
3819
3820
3821
3822
3824
3828
3829
3830
5407
6006
Associated number
Ringing alternative
ACD Group priority
ACD I/O port for management system
Non ACD Callcode Request?
Display clerical time?
Max queue length
Dynamic queue
No answer time
Clerical time
ID-code required?
Call Code required?
ACD re-route position
Enter multiple callcode during clerical state allowed
No. of time-outs before log-out
Cleical time ended by key
Create ACD Group
Device type local
(Trunk to ACD Group No.)
16 ACD Group
17 ACD Supervision
29 ACD Activation
31 ACD Clerical
32 ACD Help
(0) for first ACD Group, (1) for next,
6007
6009
6010
6011
6012
Character set local
Baud rate local
Master/slave local
Auto select allowed
Request local
(0-7)
Yes/No
Yes/No
(Max number of calls in queue)
(Time before Agent set passive)
(Yes à PIN code)
(Yes/No)
(Overflow answer position)
Yes/No
0 ... 255
Yes/No
(11) = O&M centre with RASC and
MS or CTI
(0) = PABX internal
(8) = 1200 baud
(0) = Master
(No)
(2) = ACD (for ASB 15002)
(3) = ACD (for ASB 15001)
&DEOH&RQQHFWLRQ%HWZHHQWKH%XVLQHVV3KRQH([FKDQJHDQG3&
• ASB 15001 RPM 603 308/x
• ASB 15002 TSR 902 0448/1
EN/LZT BS 102 063/S R2B
59
(X = length)
(length is 5000 mm)
BusinessPhone Call Centre Supervisor - Standard
Installation Guide
,QVWDOODWLRQ$SSHQGL[
Connection between the BusinessPhone exchange’s V.24 port (CMU or AUX
unit) and PC COM port. Use max. 15 m, then use a line driver.
BusinessPhone Call Centre Supervisor - Standard
Installation Guide
EN/LZT BS 102 063/S R2B
60
Communication is our business
Ericsson’s 100,000 employees are active in more
than 130 countries. Their combined expertise in
fixed and mobile phones and infocom systems
makes Ericsson a world leading supplier in telecommunications.
Subject to alteration without prior notice. This is a part of FAS BS 203 01/CD R3C
Ericsson’s Information on demand Database can
be addressed at:
http//www.ericsson.com
Ericsson Austria AG
Pottendorfer Strasse 25 - 27
A-1121 Vienna, Austria
Telephone:+43-1-81 100-5450
Telefax: +43-1-81 100-5437
© Ericsson Austria 03/2000
EN/LZTBS 102 063/S R2C