1
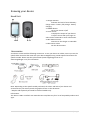
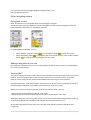
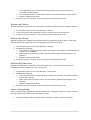
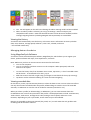
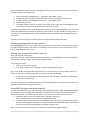
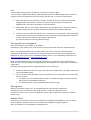
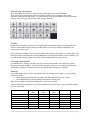
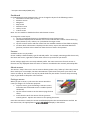
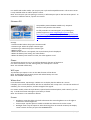
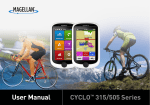
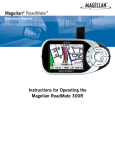
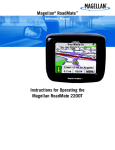
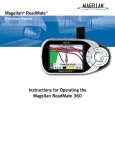
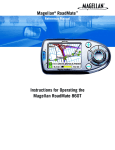
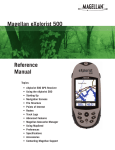
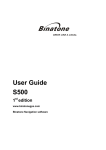
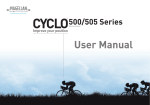
MAGELLAN CYCLO 500 / 505
USER MANUAL
1|Page
Welcome
Thank you for purchasing this Magellan Cyclo. Please read this manual carefully before using your
Magellan for the first time. Keep this manual in a safe place and use as your first point of reference.
Disclaimer
Not all models are available in all regions.
Depending on the specific model purchased, the colour and look of your device and accessories may
not exactly match the graphics shown in this document.
Magellan operates a policy of ongoing development. Magellan reserves the right to make changes
and improvements to any of the products described in this document without prior notice. Magellan
does not warrant that this document is error-free. The screenshots and other presentations shown
in this manual may differ from the actual screens and presentations generated by the actual
product. All such differences are minor and the actual product will deliver the described functionality
as presented in this User Manual in all material respects.
Copyright
© 2014 MiTAC International Corporation. Magellan is a registered trademark of MiTAC International
Corporation. All rights reserved. All other trademarks and registrations are the property of their
respective owners.
ANT+™ is a trademark of Dynastream Innovations Inc. or its subsidiaries.
2|Page
Knowing your device
Head Unit
1. Charge Indicator
Indicates the level of internal battery
charge: Green - battery full; Orange - battery
charging.
2. POWER button
Turns your device on/off.
3. Touch screen
• Displays the output of your device.
• Tap the screen with your finger to
select menu commands or enter information.
4. Mini-USB connector
Connects to the charger or USB cable.
5. Bike mount socket
For the device mount.
Accessories
Your device comes with the following accessories. To use your device on a bike, ensure you use the
specific bike mount kit that came with your device. Magellan may provide optional accessories for
specific models. Please visit the Cyclo website (www.magellangpd.com.au or
www.magellangps.co.nz) for information.
Note: Depending on the specific model purchased, the colour and look of your device and
accessories may not exactly match the graphics shown in this document.
* May be sold separately and used for selected models only.
Information:
This device is ANT+ certified. Visit www.thisisant.com/directory for a list of compatible products and
apps.
3|Page
Getting started
Charging the battery
Your device has an internal battery that may not be fully charged when you purchase it. You should
charge the battery for at least 8 hours before you start using it for the very first time.
To charge the battery:
Using a power socket
• Plug the home charger cable into the USB connector on the back of your device and the
charger into the AC outlet.
Via the computer
• Connect your device to the computer by using the provided USB cable. For more
information, see "Connecting your device to the computer" in this section.
CAUTION:
For optimal performance of the lithium battery, note the following:
• Do not charge the battery where the temperature is high (e.g. in direct sunlight).
• The battery will stop charging when the ambient temperature is less than -10ºC (14ºF) or
more than 60ºC (140ºF).
• Recharge the battery when it is nearly discharged. When recharging, make sure that the
battery is fully charged. Doing so can extend the battery life.
• If you will not use the product for a long period of time (over one month) or find the
discharge/recharge time has been shortened, be sure to fully discharge the battery first
before recharging it. You are also advised to fully discharge and recharge the battery once
every 1~2 months.
• Failure to follow the battery usage instructions could cause damage to your device, battery
and even bodily injury or property damage and will void the warranty.
Performing the initial start-up
1. Mount the device and accessories on to your bike.
2. Press and hold the POWER button for 3 seconds to turn your device on.
3. Follow the prompts to personalize your device, including:
• Select your preferred language.
• Set the date and time.
• Set the units format.
• Create your user profile.
Note: You can change these settings later by tapping Main menu > Settings.
4. Once your device is turned on, it will search for satellite signals automatically. This may take
several seconds depending on the location.
When GPS is fixed, the GPS signal icon
on the screen indicates the GPS status.
4|Page
5. Depending on your device model, it will also automatically scan for heart rate monitor and
cadence/speed sensor and prompt to pair them with Cyclo.
See the following section for sensor installation and pairing.
You can also scan the accessories manually by tapping Main menu > Settings > Sensors.
Connecting your device to the computer
1. Turn on the computer.
2. Turn on your device. Connect the mini-USB end of the USB cable to the back of your device and
the other end to a USB port on your computer.
3. Select the desired connection type from the pop-up message window:
• Connect to PC: Your device will be recognised as two external mass storage drives:
Mgn_system and Mgn_data. You can use Windows File Explorer to copy/move the files from
the computer to your device. A USB Connection screen appears to prevent you from using
your device.
DO NOT delete any files that are pre-installed on the device. Deleting the files can cause the
device to crash. Magellan is not responsible for product quality caused by file deletion.
•
Charge only: You will be able to continue using your device with the battery in charging
mode via the computer.
Installing the device
Follow the instructions in this section to mount the device and the cadence/speed sensor kit (for
selected models only) on your bike. In addition, you will need to put on the heart rate monitor
during your workouts.
Provided Mounts
Two styles of mounts may be provided for the device. These are the forward mount and the cabletie mount. If both are included with your kit, you may use either, or mount them on two different
bikes.
Installing the Cable-Tie mount
The bike mount kit includes two types of rubber pads, allowing you to attach the bike mount to your
bike securely.
1. Select the rubber pad that best fits the handle bars on your bike and then attach it using the two
plastic straps.
5|Page
2. Align the latch on the back of the device with the slot on the bike mount, and then rotate the
device clockwise to lock the device to the bike mount.
You can choose to mount the device on the handlebar (a) or on the stem (b).
Installing the sensors on your bike
The cadence/speed sensor kit is used for selected models only.
1. Follow the instruction below to install the cadence/speed sensor kit on your bike.
For both sensors (crank and wheel):
Set clearance between magnet and sensor
3-5 mm (1/8 - 3/16 inch)
6|Page
2. Ensure that the magnets are aligned with the sensing area on the sensors.
3. When done, you can pair the sensor with your device by tapping:
Main menu > Settings > Sensors > Cadence/Speed
Note: the sensors “sleep” when not in use to conserve battery power. They “wake up” when they
receive their usual input - the Speed/Cadence sensor must “see” a magnet passing it a few times to
wake up. The sensor can only be paired within a few minutes of “waking up”, or it goes back to
sleep.
Putting on the heart rate monitor
The ANT+ heart rate monitor is used for Magellan Cyclo 505 only. A Bluetooth heart rate monitor
can be used for both Magellan Cyclo 500 and 505.
Note: Please note the heart rate monitor is not a medical device and its readings are not a substitute
for obtaining measurements that require medical precision. It is strongly recommended to consult a
doctor if you have a pacemaker or other implanted devices before using the heart rate monitor.
1. Before using the heart rate monitor, wet the contacts on the back of the chest strap. You can also
use an electrolyte gel (usually available in local sports stores) to ensure good contact.
2. Adjust the elastic strap so it’s snug while you are putting it on. Ensure that you can take a good
deep breath after putting on the strap.
3. Follow the instructions below to wrap the strap around your back, and then secure it on the other
side with the buckle.
7|Page
4. When done, you can pair the monitor with your device by tapping
Main menu > Settings > Sensors > Heart rate.
Note: the sensors “sleep” when not in use to conserve battery power. They “wake up” when they
receive their usual input - the Heart Rate Monitor’s pads must firmly touch your skin to wake up.
The sensor can only be paired within a few minutes of “waking up”, or it goes back to sleep.
Battery Replacement
The cadence sensor and heart rate monitor each contain a replaceable
CR2032 battery. Follow the instructions below to replace the battery:
1. Locate the battery cover on the back of the unit, and then twist the cover counterclockwise (e.g.
by using a coin) to remove the cover and battery.
2. Insert the new battery into the battery chamber .
3. Making sure the rubber ring is in place, replace the cover.
4. Twist the cover clockwise (e.g. by using a coin) to close the cover.
Operating basics
Using the POWER button
• Turning on the device
Press and hold the POWER button for 3 seconds to turn on your device.
• Turning off the device
Press and hold the POWER button for 3 seconds to pop up the Power Off/Cancel screen.
Choose Power Off to turn off the device or Cancel to continue operating the device.
Note: Press and hold the POWER button for 5 seconds to force power off if the device doesn’t
respond.
Your device will automatically turn off after 10 minutes (by default) of inactivity. The Power
Off/Cancel screen will pop up and the device will be turned off if you do not make a selection.
Note: You can change the auto power off setting by tapping Main menu > Settings > Screen > Auto
Power Off Timer.
8|Page
Using the touch screen
To operate your device, touch the screen with your finger. You can perform the following actions:
• Tap
Quick touch the screen once to open menus or select onscreen button/option.
• Drag
While navigating on the map, tap and hold on the screen without releasing your finger to
move the map to the desired position.
• Slide
Drag your finger vertically or horizontally across the screen.
• Drag to the left/right to switch to another menu screen.
• Drag to the top/bottom to scroll up/down a list.
Note: Not all slide gestures are applicable to all screens.
Unlocking the screen
Your device will automatically lock the screen after 5 minutes (by default) of inactivity. When the
screen is locked, press the POWER button briefly to unlock the screen.
Note: You can change the screen lock setting by tapping Main menu > Settings > Screen > Screen
Lock Timer.
• Navigating through the screens
While the device is turned on and you are navigating through the menu screens, press the POWER
button briefly to return to the previous screen.
Main menu
The Main menu is your starting place for various tasks, providing quick access to applications and
settings. Tap a button to start a task or open another menu.
The System icons
Various System icons on the title bar at the top of the screen provide the status information of your
device. Depending on your settings, the icons may be different to provide various information of
your device. Please note that these icons will not be always displayed during your trip/training.
9|Page
1.
2.
3.
4.
5.
6.
7.
8.
9.
10.
Time Display
User Profile
Heart Rate Connection
Speed / Cadence Connection
Power Meter Connection
Shimano Di2 Connection
Bluetooth Connection
Activity Recording Status
GPS Signal
Battery Status
Keyboard screen
The Keyboard screen will display when you are required to enter text, such as when searching for a
street name. Search results will be listed in matching order, with the closest matches appearing on
the screen. The Keyboard screen can display with various layouts depending on the information you
need to enter.
The keyboard features the “Predictive text” technology that allows addresses to be searched easily
and quickly. As you enter a letter of an address, your device will compare all possible combinations
against the maps.
Changing the keyboard layout
The device also supports Russian, Bulgarian, and Greek keyboards. You can enable/disable them
from Main menu > Settings > Keyboard. The enabled keyboards are available in addition to the
English and numeric keyboards.
The keyboard selection keys will then include ABC, 123, and the additional keyboard(s) enabled.
Viewing Dashboard screens
The Dashboard provides the extended screens that can be used to assist you in your travels,
trainings, and workouts. The layout of the dashboard screens can be customized to display the
information (e.g. speed, distance, time, calories, etc.) you want to know.
10 | P a g e
Depending on your device model, certain information may not be available on the Dashboard
screens.
• Tap Dashboard from the Main menu screen.
• The Dashboard function is made of screens placed next to each other: information 1 & 2,
elevation, navigation/map, and workout (when started) screens.
Slide the screen to the left or right using your finger to change between the Dashboard screens.
• On the Elevation screen, the device will analyse the route and display it as the elevation plot. Use
the buttons upon the plot to zoom in/out and scroll through the plot.
• From the Navigation screen, you will be directed to your destination by visual instructions. The
Map screen is displayed when navigation has stopped. The Map screen’s compass can be
enabled/disabled in Settings.
11 | P a g e
Starting navigation
Your device is equipped with maps that provide street-level detail for navigation, including locations
of POIs (Point of Interest) such as bike stores, restaurants, emergency facilities, and more. The
Navigate wizard allows you to search the location easily.
By using the Navigate wizard, there are several ways to select your destination. For example, you can
tap the Address button to find the location by searching for an address.
1. Tap Navigate from the Main menu screen.
2. Slide the screen to the left or right using your finger to scroll through the Navigate wizard screens
and select the desired navigation function.
3. When searching is complete, the Searching Result screen displays the information of the route
(e.g. the total distance, elevation plot, and more).
Searching Result screen
4. From the Searching Result screen, you can do one of the following:
• Start navigating.
• Add the location to your Favourite.
• Display the route to the destination.
• Zoom in/out the elevation plot. Tap the Left/ Right button to scroll through the plot when it
is zoomed in.
• Assess the difficulty level of the route.
• Change routing to car navigation instead of bike.
Note: The Car navigation mode will only change the route by using roads appropriate for a car (e.g.
the motorways or highways); it will not provide additional information for driving such as traffic
status and speed limits.
12 | P a g e
Tracks
Tracks are the recorded routes that give the best experience for cycling provided by other users and
official institutes. There are popular scenic tracks by Bicycling Australia preinstalled in the device.
They consist of both on-road and off-road bike tracks. You can download all the Top WhereToRide
tracks at www.MagellanCyclo.com.
1. Tap Tracks on the Navigate screen and then you can navigate and choose from individual
tracks downloaded to your device.
2. Slide the screen to the left or right using your finger to display more information of the track.
Tap GO to start navigating.
3. Tap the Sort by button at the bottom of the screen to change the sorting order of the
entries: by distance; by name; distance from the current location.
GPX Data Information
GPX (GPS eXchange Format) is a XML data format that allows you to transfer GPS data (including
waypoints, routes, and tracks) between your device and the computer.
When you record your travels, they are stored in GPX format. You can retrieve the recordings from
your device to the computer and then share them on the website.
If you have downloaded a GPX file from a third party website, you can install this file to your device.
To transfer GPX files between your device and the computer:
1. Ensure the track you have downloaded from the website is saved as a GPX file on the
computer.
2. Turn on your device and then connect it to the computer. When prompted, select the
Connect to PC option. Once connected, you can find two external mass-storage drives on the
computer: Mgn_system and Mgn_data.
1. In the Mgn_data drive, each profile will have its own directory under
2. Dodge > Tracks
3. Do one of the following:
4. To install the track to your device, copy/paste the gpx file to Mgn_data
a. Dodge > Tracks. (Don’t put it in any of the profile folders.)
5. To retrieve recordings from your device, find the gpx file in Mgn_data > Dodge >
Tracks>Profile(user folder). Move or Copy/Paste as desired.
6. Example: The default profile’s folder is
7. \Dodge\Tracks\Profile1_Default_City bike
13 | P a g e
For more information about uploading/downloading tracks, visit:
http://magellancyclo.com
Other navigating options
Going back to start
Note: This feature is only available when the recording is in progress.
The Back to start function enables the device to navigate you back to the starting point after you
have reached the destination or completed your ride.
In the Navigation mode field, you can:
•
•
Select the Bike navigation mode ( ) or Car navigation mode ( ) to plan your route.
Select the Nearby mode ( ) to navigate to the nearest point of your track, or Back-to-Start
mode ( ) to navigate to the starting point of your track.
Adding a waypoint to your trip
One waypoint is allowed for your trip. Use the Navigate wizard to select a location as the waypoint
(or as the new destination).
Surprise Me™
The device features the Surprise Me™ function that will offer up to three exciting routes around your
location. If you’ve already taken a route from the same location, the device will try to propose
different routes, based on the possible and available roads around your current location.
From the Main menu, select Surprise Me™ and then you can plan the routes randomly by selecting
the following five functions: Loop, Address, POI, Favourite, and Point on map.
When you choose any of the Surprise Me functions to plan the routes, you can:
• Generate the route by Distance mode or Time mode.
• Assign the desired amount of distance/time to ride in the Distance or Time field.
While generating the routes using Time mode, you can set the estimated average speed of your trip
in the Average Speed field. The device will calculate the estimated distance of it.
On the Searching Result screen, select one route (by colour buttons) and then tap GO to start
navigating.
14 | P a g e
Loop
The device will generate up to three routes from your current location such that the start/end point
will be the same as your current location.
A to B (Address, POI, Favourite, or Point on map)
The device will generate up to three routes from your current location to the following destination
type: Address, POI, Favourite, or Point on map.
Workout mode
Workout mode allows you to set workouts by entering your goals (Distance, Time, Calories) or
conditions (HR Zone, Power Zone).
When you start a workout, you can monitor the workout status through the Dashboard screens. The
device will notify you when you’ve reached your target.
Workout by Distance
Set how long the workout session should be exactly.
1. From the Main menu screen select Workout > Distance.
2. Complete the following:
• In the Distance field, set the desired distance to go.
• In the Speed field, set the estimated average speed of your trip to calculate the
estimated workout time.
• The estimated workout session time will be calculated and shown on the screen.
• Enable or disable Surprise Me.
3. Tap GO to start your workout. To stop, tap Stop from the Workout screen.
Workout by Time
Workout by Time is the perfect tool if you want to set how much time you would like to spend on
the workout.
1. From the Main menu screen select Workout > Time.
2. Complete the following:
• In the Time field, set the desired time to go.
15 | P a g e
•
In the Speed field, set the estimated average speed of your trip to calculate the
estimated workout distance.
• The estimated workout session distance will be calculated and shown on the screen.
• Enable or disable Surprise Me.
4. Tap GO to start your workout. To stop, tap Stop from the Workout screen.
Workout by Calories
Workout by Calories allows you to set the amount of calories you want to burn during the workout.
1. From the Main menu screen select Workout > Calories.
2. In the Calories field, set the desired amount of calories to burn in the workout.
3. Tap GO to start your workout. To stop, tap Stop from the Workout screen.
Workout by HR Zone
Workout by HR Zone is available for selected models only, depending on BT or ANT+ connectivity.
Select a profile with paired heart rate monitor before you start this workout.
1. From the Main menu screen select Workout > HR Zone.
2. Complete the following:
• In the Zone field, select the proper heart rate range for the workout. The default setting
is Zone 2 (121 - 138 BPM).
• Select Time mode or Distance mode. The route will be generated according to your
selection.
• Enable or disable Surprise Me.
3. Tap GO to start your workout. To stop, tap Stop from the Workout screen.
Workout by Power Zone
Workout by Power Zone is available for selected models only. Connect the power meter (not
provided) to the device before you start this workout.
1. From the Main menu screen select Workout > Power Zone.
2. Complete the following:
• In the Zone field, select the desired power range for the workout. The default setting is
Zone 2 (166 – 225 W).
• Select Time mode or Distance mode. The route will be generated according to your
selection.
• Enable or disable Surprise Me.
3. Tap GO to start your workout. To stop, tap Stop from the Workout screen.
Indoor training mode
Indoor training mode is available for selected models only. Configure a profile as “Indoor” and pair
the appropriate sensors before you start indoor training.
1. Create the Indoor profile from Main menu > Settings > Profiles > Create new profile.
16 | P a g e
2. The icon will appear on the title bar indicating the Indoor training mode has been enabled.
3. When an Indoor profile is selected, you can go to Settings > Sensors and pair your
compatible indoor trainer. Note that the GPS functions of the device are disabled, and the
routing/navigating features (including Navigate and Surprise Me) are unavailable.
Viewing the History
Your device will automatically save the history as the timer starts. Information in History includes
date, time, distance, average speed, cadence*, heart rate*, altitude, and more.
* For selected models only.
Managing data on the device
Using MagellanCyclo Software
Your device comes with a desktop PC software, MagellanCyclo, which allows you to register your
device, update software and maps, share experiences, and more.
Note: Make sure you have an active Internet connection for this feature.
1. Turn on the computer.
2. Turn on your device and then connect it to the computer. When prompted, select the
Connect to PC option.
•
•
•
To view the history data, from the Main menu screen, tap History. A list of recorded events
will be shown. To view details of an entry, tap it.
Slide the screen to the left or right using your finger to view details of the trip (or training).
Tap GO to use the selected recording as a route and start navigating.
Viewing recorded data
On the History screen, tap the Summary button to select the data to view. You can select a Profile to
see only the activities recorded under that profile, All Recordings to view the sum of all recorded
activities, or Odometer to view the sum of all device activities (recorded or not).
When you select a profile (or All Recordings, or Odometer), you can view statistics about the
recorded data over various time periods for that profile. The displayed items include: Total Distance,
Total Calories, Total Ascent, Average Heart Rate, Average Active Speed, and Active Time.
However, depending on your Cyclo model, certain items may not be available.
Buttons are provided to select time periods (day, week, etc.) or total. Note that only profiles with
recordings will be listed for selection.
17 | P a g e
Note: The Odometer displays all the training data existing on the device from first use, whether the
recording function was used or not.
3.
4.
5.
6.
7.
Find the setup file "MagellanCyclo _Setup.exe" under Mgn_system.
Double-click the setup file and then follow the prompts to install the desktop tool.
5. After installation, the Magellan Cyclo icon ( ) will appear in the
Windows system tray.
To update software, back up or restore your Cyclo device, right-click on the Magellan Cyclo
icon and then select the desired option from the pop-up menu.
To upload or download tracks, go to MagellanCyclo website (http:// www.MagellanCyclo .com) and
create your MagellanCyclo account. By signing in your account, you can upload the saved tracks on
your device to your MagellanCyclo account and download the available tracks on MagellanCyclo to
your device.
Caution: Do not disconnect your device from the computer while transferring data.
Sharing your experience on the Internet
By using MagellanCyclo, you can easily share your experiences with other cyclists around the world
through the Internet when your device is connected to the computer. For more information, visit:
http:// www.MagellanCyclo .com/
Sharing your route with friends in the trip
Note: For selected models only.
Your device features ANT-FS (ANT File Share) technology for exchanging data records (between the
Cyclo devices within RF range), bypassing the need for cables.
To transfer your route:
1. Plan your route on the device.
2. You can go to Main menu > Settings > Transfer and directly tap Send.
Or you can enable the Shake & Share function first. To send a route to a friend, simply shake your
device up and down, and then select Send on the pop-up message window.
3. The friend must activate Receive through Main menu > Settings > Transfer or Shake & Share
(if enabled on that device).
If you are navigating, you will be prompted to stop navigating before receiving a route, (Must cancel
existing route before accepting a new route.)
Using WiFi (wireless local area network)
You can synchronize data (e.g. upload recordings and download saved tracks) with MagellanCyclo by
accessing the Internet through WiFi. WiFi allows your device to connect to the Internet through a
wireless connection. To use WiFi on your device, you need access to a wireless access point.
1. Enable the WiFi function from Main menu > Settings > WiFi Sync.
Note: The WiFi function of the device is disabled by default.
2. The device will automatically scan for available wireless networks. The network names and
security settings (public network or secured with WEP/WPA-PSK/WPA2-PSK) of the detected
wireless networks will be displayed on the WiFi settings screen.
Note: At this time, CYCLO can’t connect to wireless networks that use MAC filtering.
18 | P a g e
Note:
• On the WiFi settings screen, tap Refresh to search the networks again.
• You can add a network manually by tapping Add Network on the WiFi settings screen. Enter the
network name and complete the security setting, and then tap to connect to the network.
3. When your device is connected to a wireless network, it starts to synchronize data with
MagellanCyclo automatically. Please note that you need to register your device on
MagellanCyclo.com before using WiFi to synchronize data.
4. When done, the sync result will be displayed in the message window. Tap OK to return to
the WiFi settings screen. The WiFi connection will be disconnected automatically.
5. The next time you enable the WiFi function, it will connect to a previously accessed network
automatically. You will not be prompted to enter the password (if needed) again unless you
(i) tap on the network and then tap Forget this Network; or
(ii) reset the device to its factory default settings.
Pairing with your smartphone
Note: This feature is not available on all models.
Depending on your model, your Cyclo device can be connected with iPhone or Android phones.
Note: The compatible phone types include: iPhone 4 or above, and certain Android phones
equipped with Bluetooth LE. Note that not all Android phones will necessarily be equipped with
Bluetooth LE, even if they have a compatible software version. For compatibility information see
www.magellangps.com.au or www.magellangps.co.nz.
Note: For Android phone users, the CycloSmart application is required for your Cyclo device to
perform music control and SMS messaging with your Android phone. The application is available on
Google Play.
See https://play.google.com/store/apps/details?id=com.ivt.cyclosmart
1. Enable the Bluetooth function on your Cyclo device from Main menu > Settings > Phone and
tap Pair with New Phone.
2. You can do one of the following on your smartphone for your Cyclo device to communicate
with your phone.
• For iPhone, turn on the Bluetooth function in the iPhone settings and select the Cyclo
device from a list of Bluetooth devices.
• For Android phones, open CycloSmart and tap Start Pairing.
Playing music
When a connection is made, tap on the Main Menu to open the music application.
Depending on your smartphone, tap a song and then to open the playback screen.
Use the on-screen icons to control the playback, switch songs or adjust the volume (for Android
phones only).
Audible Alerts
By pairing your Cyclo device with an Android phone and a Bluetooth headphone, you can receive
audio navigation and beep alerts from your Bluetooth headphone during navigation.
Note: This feature is only available for Android phones.
19 | P a g e
Customizing your device
Note: Depending on your Cyclo model, certain setting options may not be available.
There are various customization options available to enhance your navigation and cycling
experience. With the Settings menu, you will be able to customise your device such as the system
settings, sensor settings, user profiles, map settings, and more.
Profiles
Profiles let you configure the device for multiple types of bikes and trainers, each with their own
sensors. Each profile contains information about the user, the type of bike or equipment, the
sensors used, and so forth.
As an example, you might have two or more bikes, each having its own profile. You might also have a
running profile. Each of the bikes would probably have its own speed/cadence sensor. However, any
of those profiles that use a heart rate sensor would probably share the same sensor.
Creating a new profile
From Main menu > Settings > Profiles you can create and edit profiles. The Profile entry screen
displays the existing profile(s). You can set up to 6 profiles. Note that the profile type cannot be
edited after creating and saving the profile. All other profile information is editable.
Routing
This setting allows you to set the routing preference by selecting Prefer, Allow, or Try to avoid in
each route option.
• Select the desired routing type: City bike, Race bike, Mountain bike, Car, or Run.
• The available options vary according to the selected routing type:
Note: These setting can make a big difference in how a trip is routed.
These are the default settings pre-set on the Cyclo devices out of the box. You can however modify
it to suit your needs.
Major Roads
Cycle Routes
Unpaved Roads
Cobblestone *
Highway
Ferries
Walking Routes
City
Bike
Y
Y
Y
Y
Race
Bike
Y
Y
Y
Mountain
Bike
Y
Y
Y
Y
Car
Run
Y
Y
Y
Y
Y
Y
Y
20 | P a g e
* For Open Street Maps (OSM) only.
Dashboard
In the Dashboard Layout Change screen, you can change the layout of the following screens:
• Information screens (Info 1, Info 2)
• Elevation screen
• Navigation
• Map screen
• Workout screen
• History screen
• Trainer screen
Note: You can enable or disable the Info 2 and Elevation screens.
To change the screen layout:
1. Tap the corresponding button in the Dashboard Layout Change screen.
2. The number displayed at the bottom of the screen indicates the number of data fields (e.g.
speed, distance, time, calories, etc.) included in the target screen.
3. Tap the numeric button and then select from the available number of data fields to display.
4. To select which information is displayed on the screen, tap on each individual data field
(position) and then select a data item from the list to show in that position.
Sensors
Available sensors vary by model.
Sensor visibility is determined by type of selected profile - for example, a Running profile shows only
the heart rate sensor, regardless of what other sensors may work with your device.
Sensor settings apply to the currently selected profile. The main screen icons for each sensor or
function are only displayed when the sensor or function is enabled in the currently selected profile.
About sensors
The sensors “sleep” when not in use to conserve battery power. They “wake up” when they receive
their usual input. For example, the Heart Rate Monitor’s pads must firmly touch your skin for the
sensor to wake up. The sensor can only be paired while they are awake. If a sensor stops receiving
input, it goes back to sleep after a few minutes.
Pairing a sensor
When you pair a sensor, Cyclo stores the sensor ID and the
name you assign it for connection purposes.
1. To pair a sensor, go to the Settings > Sensors screen,
and make sure the desired sensor is enabled. (Green
checkmark)
2. Tap the sensor button to see the Sensors page for that
sensor.
3. It will show the ID for the sensor of that type most
recently paired. Tap Pair new sensor to start pairing the sensor.
Once the connection is made, the sensor ID will be displayed in the Connected Sensor ID field. On
the main screen, the appropriate icon / / / will display in the title bar.
21 | P a g e
For models with Indoor mode, you can pair your Cyclo with compatible trainers. The Trainer sensor
is only available when an Indoor profile is active.
Note: The next time you start pairing to a sensor, it will attempt to pair to the last sensor paired. To
connect to a different sensor, tap Pair new sensor.
Shimano Di2
Compatibility: 505 and 505HC models only. Requires
Shimano’s DFly wireless transmitter.
For full procedure to connecting DFly to Cyclo505 go to
product support on www.magellangps.com.au or click:
http://www.magellansupport.com.au/All%20Magellan%20FA
Qs/Software/Cyclo%20Series/Cyclo%20505/CYC5_29___803.h
tm
Settings
• Cassette model: Select the proper cassette model.
• Cassette type: Select the proper cassette type.
• Crankset type: Select the proper crankset type.
• Battery status:
• When the Di2 sensor is connected, the current battery level is displayed.
• When the battery level is 50%, the value flashes.
• When the battery level is 30% or lower, the value appears in red.
Phone
Tap the Phone option to turn on and off the Bluetooth function of the device.
For more information, see the "Pairing with your smartphone" section.
Note: For selected models only.
WiFi sync
Tap the WiFi sync option to turn on the WiFi function of the device.
Note: Enabling WiFi will consume power and reduce battery run time.
Note: For selected models only.
Where Am I
From the Main Menu, tap Settings > Where Am I to display the The Where Am I screen.
It displays your current GPS position with the co-ordinates info in map view. It shows the number of
satellites, your current position, and the strength of the signals.
For certain models, when the Cyclo device is paired with an Android phone, with a GPS fix, you can
tap to send the location message to your family or friend.
Note: This feature is not available on iPhone.
Screen
•
•
•
Brightness: Drag the slider to the left to decrease the screen brightness or to the right to
increase the screen brightness.
Screen swipe: Tap the option to enable or disable the slide controls on the screen.
Backlight Timer: Tap the option to select how long (from 15 seconds to Never) the display
screen remains lit after you press the POWER button.
22 | P a g e
•
•
Screen Lock Timer: Tap the option to select how long of inactivity (from 5 minutes to Never)
will lock the device screen.
Auto Power Off Timer: Tap the option to select how long of inactivity (from 10 minutes to
Never) will turn off the device automatically.
Transfer
Tap Send/Receive to exchange route with friends and tap Disable/Enable to turn on and off the
Shake & Share function.
Maps
•
•
•
•
•
Auto Zoom: Enable or disable automatic zooming during navigation.
If selected, the Map screen will automatically zoom in or out, depending on your speed, to
allow optimal viewing of your route.
Show Cities: Display or hide the current city name on the navigation/map screen.
Orientation: Enable or disable displaying North at the top of the map screen.
Map scheme: Multiple colour schemes are available. Select the preferred map display style.
Bike Map: Select the preferred set of maps to load: OSM (Open Street Map) or HERE (from
NAVTEQ).
Bike Map Selection Recommendation:
1. Use HERE maps for all on-road bike navigation. It uses NAVTEQ’s verified bike network
Australia-wide. They include dedicated bike tracks, shared bike tracks and informal tracks.
2. OSM uses crowd-sourced unverified bike network data. It also covers off-road (unsealed)
network. However, use them with caution as they are largely not verified for safety.
3. Cyclo is also preinstalled with 100 scenic bike tracks, highly recommended by Bicycling
Australia – Australia’s most popular bike publisher, including WhereToRide titles. You may
download the remaining bike tracks from www.MagellanCyclo.com.
Alerts
•
•
•
•
On screen tap: Enable or disable the feedback sound while tapping on the screen.
Instructions: Enable or disable the sound while getting instructions.
HR Zone Alerts: Enable or disable the alert sound by HR Zone during your workout.
Power Zone Alerts: Enable or disable the alert sound by Power Zone during your workout.
Manage
This setting allows you to manage the recorded data on the device, including: History, Tracks,
Favourites, Addresses, and POI.
Define Zones
Heart Rate Zones
Use Heart Rate Zones to target a specific heart rate and help you reach your training goals.
1. In the Define Zones field, select By Age (BPM or %) or Custom (BPM or %).
• By Age: The maximum heart rate value will be calculated (BPM or %) by the system
based on the data in your profile.
• Custom: You can input the maximum heart rate value manually.
2. Define the heart rate range in Zone 1 ~ 6 fields according to your personal training purpose.
Otherwise, you can just keep the default settings:
23 | P a g e
Zone
1
2
3
Range
(as % of Maximum)
60 ~ 65 %
66 ~ 75 %
76 ~ 82 %
Zone
4
5
6
Range
(as % of Maximum)
83 ~ 89 %
90 ~ 94 %
95 ~ 100 %
Power Zones: Setting the power zones will help you better understand how intense a workout might
be.
1. In the Define Zones field, select FTP from History or Custom (W or %).
• FTP from History: The FTP (Functional Threshold Power) value will be calculated by the
system based on the data in your training history.
• Custom: You can input the Maximum power value manually.
2. Define the heart rate range in Zone 1 ~ 6 fields according to your personal training purpose.
Otherwise, you can just keep the default settings:
Zone
1
2
3
Range
(as % of FTP)
< 55 %
56 ~ 75 %
76 ~ 90 %
Zone
4
5
6
Range
(as % of FTP)
91 ~ 105 %
106 ~ 120 %
> 121 %
Note: Each zone has a different purpose and, generally speaking, the higher value of % means the
harder of the workout.
Compass
The Compass calibration function allows you to calibrate the built-in compass of the device.
To calibrate the compass:
1. Tap Enable.
2. Move away from any sources of interference such as microwave oven and magnetic devices.
3. Tap Start calibration.
4. Move the device by waving your arm in a figure ∞ pa]ern (as shown on the screen) for
several seconds.
5. When done, the message “Compass calibration succeeded” will appear on the screen. An
audible alert will also sound when complete. (If enabled)
If you see the message “Compass calibration failed”, redo the movement again until calibration
succeeds.
Note: While using the built-in electronic compass, place the device away from the objects that
generate magnetic fields, such as electric appliances, magnets or high-voltage tower. This might
cause your device point to the wrong direction.
Language
You can select the preferred language displayed for the menus and other interface features while
operating the device.
Keyboard
The device provides Russian, Bulgarian, and Greek keyboard for local users.
24 | P a g e
Date & Time
The device will display the date and time based on the current GPS location. The Date & Time screen
lets you set the date/time format.
Units
The Units screen lets you select Metric or Imperial according with your preferences.
Selecting Imperial units will display distances as feet, yards, and miles, with weight in pounds, etc.
Product Info
The Product Info screen provides the general information of the device, including software and ROM
versions, the End User License Agreement, and copyright information.
• You can reset the device to the factory default settings by tapping Back to factory. When
you select the function, all of the recorded data on the device will be cleared.
• You can also just restore factory default settings by tapping Restore Default, allowing you
to restore default settings but will not delete the recorded data.
For more information
Online support
For 24/7 help and support with Magellan products, visit our Technical Support website at:
www.MagellanGPS.com.au/support
Caring for your Cyclo
Taking good care of your Magellan will ensure trouble-free operation and reduce the risk of damage
to your Cyclo:
• Keep your Cyclo away from excessive moisture and extreme temperatures.
• Avoid exposing your Cyclo to direct sunlight or strong ultraviolet light for extended periods
of time.
• Do not place anything on top of your Cyclo or drop objects on your Cyclo .
• Do not drop your Cyclo or subject it to severe shock.
• Do not subject your Cyclo to sudden and severe temperature changes. This could cause
moisture condensation inside the unit, which could damage your Cyclo. In the event of
moisture condensation, allow your Cyclo to dry out completely before use.
• The screen surface can easily be scratched. Avoid touching it with sharp objects. Nonadhesive generic screen protectors designed specifically for use on portable devices with
LCD panels may be used to help protect the screen from minor scratches.
• Never clean your Cyclo when it is turned on. Use a soft, lint-free cloth to wipe the screen
and the exterior of your Cyclo.
• Do not use paper towels to clean the screen.
• Never attempt to disassemble, repair or make any modifications to your Cyclo. Disassembly,
modification or any attempt at repair could cause damage to your Cyclo and even bodily
injury or property damage and will void any warranty.
• Do not store or carry flammable liquids, gases or explosive materials in the same
compartment as your Cyclo, its parts or accessories.
• Do not expose your Cyclo to extreme heat or direct sunlight for prolonged periods.
Overheating may damage your Cyclo.
About your heart rate monitor and accessories:
• Clean with a mild soap and water solution, dry with towel.
• Do not use alcohol or any abrasive material when cleaning the accessories.
25 | P a g e
•
•
•
•
•
Rinse the strap under running water.
Do not expose the accessories to extreme heat or direct sunlight for prolonged periods.
Store the accessories in a cool and dry place.
The estimated average battery lifespan is 2 years.
Remove the battery from the accessories before long-term storage.
Regulatory information
For regulatory identification purposes, Magellan Cyclo 500/505 is assigned a model number of N429.
Marking labels located on the exterior of your device indicate the regulations that your model
complies with. Please check the marking labels on your device and refer to the corresponding
statements in this section. Some notices apply to specific models only.
Products with the CE marking comply with Radio & Telecommunication Terminal Equipment
Directive (R&TTE) (1999/5/EC), the Electromagnetic Compatibility Directive (2004/108/EC) and the
Low Voltage Directive (2006/95/EC) - issued by the Commission of the European Community.
Compliance with these directives implies conformity to the following European Standards:
EN301489-3, EN301357
EN 300 440-1/-2(ANT+): Electromagnetic compatibility and Radio spectrum Matters (ERM); Short
range devices; Radio equipment to be used in the 1 GHz to 40 GHz frequency range; Part 1: Technical
characteristics and test methods/ Part 2: Harmonized EN covering the essential requirements of
article 3.2 of the R&TTE Directive.
EN 301 489-1: Electronic compatibility and Radio spectrum Matters (ERM), Electromagnetic
Compatibility (EMC) standard for radio equipment and services; Part 1: Common technical
requirements.
EN 301 489-3(ANT+): Electromagnetic compatibility and Radio spectrum Matters (ERM);
ElectroMagnetic Compatibility (EMC) standard for radio equipment and services; Part 3: Specific
conditions for Short-Range Devices (SRD) operating on frequencies between 9 kHz and 40 GHz.
EN 301 489-17: Electronic compatibility and Radio spectrum Matters (ERM), Electromagnetic
Compatibility (EMC) standard for radio equipment and services; Part 17: Specific conditions for 2.4
GHz wideband transmission systems and 5 GHz high performance RLAN equipment.
EN 300 328: (Bluetooth) Electromagnetic compatibility and Radio spectrum Matters (ERM);
Wideband Transmission systems; Data transmission equipment operating in the 2.4 GHz ISM band
and using spread spectrum modulation techniques; Harmonized EN covering essential requirements
under article 3.2 of the R&TTE Directive.
EN 55022: Radio disturbance characteristics
EN 55024: Immunity characteristics
EN 61000-3-2: Limits for harmonic current emissions
EN 61000-3-3: Limitation of voltage fluctuation and flicker in low-voltage supply system
EN 62209-2(SAR): Human exposure to radio frequency fields from hand- held and body mounted
wireless communication devices. Human models, instrumentation, and procedures. Procedure to
determine the specific absorption rate (SAR) for wireless communication devices used in close
proximity to the human body (frequency range of 30 MHz to 6 GHz).
IEC 60950-1:2005: Product Safety
26 | P a g e
The manufacturer cannot be held responsible for modifications made by the User and the
consequences thereof, which may alter the conformity of the product with the CE Marking.
Declaration of Conformity
Hereby, MiTAC declares that this N429 is in compliance with the essential requirements and other
relevant provisions of Directive 1999/5/EC.
Bluetooth QD ID B021873
27 | P a g e