1
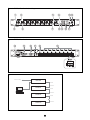
AT-MX381 SmartMixer ®
8 Channel Automatic Mixer
8 Channel Automatic Mixer
Installation and Operation
Warning
Important Safety Instructions
To prevent fire or shock hazard, do not expose the unit to rain or moisture.
To avoid electrical shock, do not open the cabinet. Refer servicing to qualified
personnel only.
1)
Read these instructions.
2)
Keep these instructions.
3)
Heed all warnings.
Caution
4)
Follow all instructions.
5)
Do not use this apparatus near water.
6)
Clean only with dry cloth.
7)
Do not block any ventilation openings. Install in accordance with the manufacturer’s instructions.
8)
Do not install near any heat sources such as radiators, heat registers,
stoves, or other apparatus (including amplifiers) that produce heat.
9)
Do not defeat the safety purpose of the polarized or grounding-type plug.
A polarized plug has two blades with one wider than the other. A grounding type plug has two blades and a third grounding prong. The wide blade
or the third prong are provided for your safety. If the provided plug does
not fit into your outlet, consult an electrician for replacement of the obsolete outlet.
CAUTION
RISK OF ELECTRIC SHOCK
DO NOT OPEN
CAUTION: TO REDUCE THE RISK OF ELECTRIC SHOCK,
DO NOT REMOVE COVER (OR BACK)
NO USER-SERVICEABLE PARTS INSIDE
REFER SERVICING TO QUALIFIED SERVICE PERSONNEL
The lightning flash with arrowhead symbol within an equilateral
triangle is intended to alert the user to the presence of
uninsulated "dangerous voltage" within the product's enclosure
that may be of sufficient magnitude to constitute a risk of
electric shock to persons.
10) Protect the power cord from being walked on or pinched particularly at
plugs, convenience receptacles, and the point where they exit from the
apparatus.
The exclamation point within an equilateral triangle is intended to
alert the user to the presence of important operating and
maintenance (servicing) instructions in the literature
accompanying the product.
11) Only use attachments/accessories specified by the manufacturer.
12) Use only with the cart, stand, tripod, bracket, or table
specified by the manufacturer, or sold with the apparatus. When a cart is used, use caution when moving the
cart/apparatus combination to avoid injury from tip-over.
Safety Cautions
13) Unplug this apparatus during lightning storms or when
unused for long periods of time.
Prior to use of this product, review all safety markings and instructions.
14) Refer all servicing to qualified service personnel. Servicing is required
when the apparatus has been damaged in any way, such as power-supply cord or plug is damaged, liquid has been spilled or objects have fallen
into the apparatus, the apparatus has been exposed to rain or moisture,
does not operate normally, or has been dropped.
Warning: This apparatus must be grounded.
This product is a safety class 1 product. There must be an uninterruptible safety earth ground from the main power source to the product’s AC input.
Whenever it is likely that the protection has been impaired, disconnect the
power cord until the ground has been restored.
Notice
The apparatus shall not be exposed to dripping or splashing and that no
objects filled with liquids, such as vases, shall be placed on the apparatus.
Installation place
Please install this model in the place where ventilation is good.
Use with Rack Mounting
Caution for FCC
If you install the unit into a rack, select the rack having an all-pole mains
switch (with a contact separation of at least 3mm in each pole) in its front.
In case of emergency, turn off the mains switch on the rack, or disconnect the
plug of the rack quickly.
You are cautioned that any changes or modifications not expressly approved in
this manual could void your authority to operate this equipment.
Warning for FCC
About Power Cord
This equipment has been tested and found to comply with the limits for a Class B
digital device, pursuant to Part 15 of the FCC Rules. These limits are designed to
provide reasonable protection against harmful interference in a residential
installation. This equipment generates, uses, and can radiate radio frequency
energy and, if not installed and used in accordance with the instructions, may
cause harmful interference to radio communications. However, there is no guarantee that interference will not occur in a particular installation. If this equipment
does cause harmful interference to radio or television reception, which can be
determined by turning the equipment off and on, the user is encouraged to try to
correct the interference by one or more of the following measures:
This model does not include AC power cord.
Therefore, you have to purchase it at your local store.
You can confirm it at “ Power Cord List ”.
Power Cord List
— Reorient or relocate the receiving antenna.
Manufacturer
H.R.SILVINE-CMC Co., LTD.
Parts No.
CAT-009
N.M. SVT
EF-28
Electrical Rating
Approval No.
50/60Hz, Plug: UL (E69228) CSA (LL93534)
125V,
Cord: UL (E69167) CSA (LL97391)
10A
Connector: UL (E69228)
CSA (LL93534)
Country
U.S.A
Canada
Kawasaki Electric Wire
Co., LTD.
KP-610
H05VV-F
KS-31A
50/60Hz,
250V,
10A
Plug: BSI (KM14544)
Cord: Demko (95-0272/95117)
Connector: Demko
(98-01458/124208)
UK
Kawasaki Electric Wire
Co., LTD.
KP-4819D
H05VV-F
KS-31A
50/60Hz,
250V,
10A
Plug: Demko (130778-01)
Cord: Demko (95-0272/95117)
Connector: Demko
(98-01458/124208)
EU
— Increase the separation between the equipment and receiver.
— Connect the equipment into an outlet on a circuit different from that to
which the receiver is connected.
— Consult the dealer or an experienced radio/TV technician for help.
50/60Hz,
H.R.SILVINE-CMC CO., LTD. CAT-209
H05VV-F 3G 250V,
EF-28
10A
IC statement
HWAJIN KDK CO., LTD.
This Class B digital apparatus complies with Canadian ICES-003.
Cet appareil numérique de la classe B est conforme á la norme NMB-003 du
Canada.
2
KKP-4819KA 50/60Hz,
250V,
KKS-16K
KS KCCE-3 7A
Plug: PSB (CPA JIR PLR 026158-00) Singapore
Cord: VDE (129752)
Connector: ASTA (14119)
Plug: KSC 3304 (8698)
Cord: KTL (SA04001-3004)
Connector: KSC 8305 (8697)
Korea
Introduction
Please Note!
This manual assumes use of microphone-level inputs and line-level output, the
most typical SmartMixer application. However, all inputs and the output may be
individually switched via the included SmartMixer Software to achieve any
combination of mic- and line-level input/output. Refer to Software Manual for
more information.
Priority Pre-select
About the AT-MX381 SmartMixer
Last Mic On
Audio-Technica’s AT-MX381 SmartMixer is a microprocessor-controlled, programmable, automatic-switching eight-channel audio mixer. It can be used
with low-impedance dynamic and condenser microphones (including wireless
microphone systems), as well as with line-level sources.
In any of the three modes of operation, the last microphone “on” will remain
“on” when talking ceases, to provide continuous room ambience. This feature
is cascaded throughout all linked mixers so that only one microphone in the
entire system will remain on.
The AT-MX381 is designed to improve audio quality in broadcast, sound-reinforcement and recording applications. One of the ways it achieves this is by
keeping the number of open microphones to a minimum, thus reducing background noise, feedback and other distractions, while providing instant, completely transparent switching between channels.
Gate Attenuation
To custom-tailor conferencing needs, the mode of each microphone channel
can be independently switched. The combination of switch settings results in
three different modes of priority selection/operation. (See page 6, “Priority
Microphones and the Lockout Bus.”)
When a microphone is “off,” its input is only attenuated. This attenuation is
factory set at -36 dB. The amount of “off ” attenuation (gate attenuation) can
be adjusted via SmartMixer Software. (See page 6, “Adjusting Gate
Attenuation.”)
Each of the AT-MX381 SmartMixer’s eight balanced inputs provides switchable
48-volt phantom power; attenuation is also selectable on each input to allow
use with line-level signals. The mixer’s main output is balanced and non-inverting. In addition to a single main output, individual direct outputs are provided
for each input channel. All audio connections terminate in block screw connectors.
Manual (Non-automatic) Mode
If the automatic functions are not desired, the SmartMixer can be placed in
manual mode, bypassing the mixer’s automatic switching and attenuation
functions, causing the unit to behave like a conventional mixer. In manual
mode, the level of each input is controlled via its front panel gain and level
controls.
Up to 16 AT-MX381 SmartMixers (a total of 128 channels) can be daisy-chained
via the included Link Cable, which carries control bus, audio, and configuration
data between mixers. Multiple mixers linked in this way will operate as if they
were a single mixer. Therefore, microphones activated on any mixer will cause
the appropriate switching functions to occur. Due to the link data protocol
(used for computer control and external RS232 control), AT-MX351 and ATMX341a SmartMixers cannot be linked to AT-MX381 SmartMixers.
NOMA (Number of Open Microphones Attenuated)
In a multiple-microphone system, as more microphones are turned on
(opened), the increased system gain can be a potential source of feedback.
The NOMA feature helps control feedback by compensating for the increase
in system gain. A built-in algorithm in the AT-MX381 recognizes how many
microphones are “on” and automatically adjusts the system gain accordingly.
Because use of NOMA is not always appropriate or desired, the AT-MX381 is
shipped with the NOMA function disabled. Refer to Software Manual for
instructions on enabling NOMA.
The AT-MX381 includes two separate external control systems: Individualchannel contact closures (via DB25 connector) and PC control (via RS232 connector). The RS232 connector can also be used to connect an external control
system (Crestron® or AMX®) using “open disclosure communication protocol” to control the SmartMixer.
External Control Connector (25 Pin D-Sub)
Overview of AT-MX381 Features
To increase the integration flexibility of the AT-MX381 with external control
and indicator devices, a rear panel connector (25-pin) is provided. Three functions are available for each input channel via this connector:
• Eight balanced inputs allow use with both mic and line-level signals. Each
input provides:
° 48V phantom power (individually selectable)
° Individual gain and sound volume controls
° Gate attenuation adjustable (0 dB to full mute in steps of 12 dB)
° Low-cut filter (individually selectable via SmartMixer Software) to
minimize the pickup of undesirable noise
1. “Force-On” – allows an external contact closure to force its
associated input to turn on.
2. “Force-Off – allows an external contact closure to force its
associated input to turn off.
3. “Control Voltage Out” – a voltage appears when the associated
input’s gate opens or turns “on”.
• NOMA (Number of Open Mics Attenuated) (selectable)—Automatic gain
adjustment as each microphone is activated
Note: External contact closures override PC control.
• Selectable manual mode overrides automatic functions
• Selectable hold time allows mics to stay on during brief pauses in conversation
Refer to the section “External Logic Switching & Control Voltage” on page 7
for additional information.
• Linking capability for 16 units (up to 128 channels)
RS232 Control Port
• External control capability enables the SmartMixer to activate other
devices
A rear panel RS232 port (9-pin) is provided to allow for the connection of a
computer running the SmartMixer Software application or external control
system (Crestron® or AMX®) using open disclosure communications protocol. Refer to Control Function Table on Page 5 for information on items controlled by the computer.
• An RS232 data port provides a connection point for a PC computer running
the SmartMixer Software to configure key operating functions.
• Compatible with Crestron® or AMX® systems
• Output level meter
• Monitor headphone output with level control
• Basic functions are set on the main unit; detailed setting through
SmartMixer Software
• Mounts in a single 19" rack space; includes rack mount adapters
3
b. P48 – LED lights green when channel phantom power is on.
AT-MX381 Front Panel
c. PRIORITY – LED lights green when channel is set for priority mode.
(Note: When input attenuator is on (Line level input), the P48 phantom
power supply is disabled.)
Figure 1 - AT-MX381 Front Panel - Control Layout (Page 9)
1.
Input Trim Control – (Outer knob)
11. Headphone Jack (1/4” stereo type)
Adjusts the input signal sensitivity for the channel.
Connect stereo headphones to monitor mixer’s output.
2.
Input Level Control – (Inner knob)
WARNING: do not connect MONO 1/4” plug, as it can damage the
mixer’s headphone amp.
Adjusts the channel’s level.
12. Headphone Level Control
Priority Select – (Push inner knob)
Push the Input Level Control to set priority for the channel. When priority is
set, the associated priority LED illuminates in the Channel Status Display.
Push Input Level Control again to turn off priority. Refer to section on
Priority Microphones and the Lock Out Bus (Page 6) to learn more.
13. Power “on” indicator
AT-MX381 Rear Panel
*Lock mode Select – (Push inner knob for over a second)
Push the Input Level Control (CH1) and Master Volume Control [5] at the
same time to select Lock mode (Key-Lock on) or Normal operation (KeyLock off). Manual/Auto Mode Indicator [7] blinks when Lock mode is select.
3.
Figure 2 - AT-MX381 Rear Panel (Page 9)
14. Power Switch
Gate Active/Overload LED indicator
15. External Control Connector (25 pin D-Sub Female)
LED lights green when the associated channel’s gate is open (“on”) and
red when the signal may potentially overload.
4.
Provides connection points for controlling AT-MX381 from external
contact closures and control voltage output per channel. Refer to
“External Logic Connections” for more information on this connector.
P48/ATT. Input attenuator – (Recessed button)
This recessed button is used to select between input attenuation options
and phantom power level for the associated input. Use a small tool to
press the button and cycle between selections in the following progression:
16. Serial Data Connector (PC Control)
RS232 data port. Use with PC for configuring internal mixer settings or as
input point for CRESTRON®, AMX® or other control system using open
communications protocol.
0 dB (MIC)/Phantom OFF → 0 dB/(MIC)/Phantom ON → -35 dB (LINE)/Phantom OFF
The Channel Status Display LEDs illuminates according to selection.
17. Link In/Link Out connectors
5.
Master Volume Control – (Inner knob)
Provides for daisy-chaining of multiple mixers when more than eight
microphones are used. (Use included link cable to connect to another
AT-MX381.)
Adjusts the mixer’s overall output. Turn clockwise to increase output.
Push to select Manual or Auto Mixer mode.
6.
Threshold Level Control – (Outer knob)
18. Output Connector (4-pin block screw connector)
Adjusts the threshold point at which the gates open and activate a channel.
When the outer knob is set at MIN, the threshold level is down and relatively
low levels of sound activate a channel; when set at MAX, the threshold
level is high. Turn clockwise to increase threshold; counterclockwise to
decrease threshold.
7.
Pin-1: Hot, Pin-2: Cold, Pin-3: Ground, Pin-4: Line Out
Provides balanced main mixer output (selectable with or without 35 dB of
attenuation) along with second unbalanced output (line level) with no
attenuation available.
19. Input Con0nector (4-pin block screw connector)
Manual/Auto Mode Indicator
Pin-1: Hot, Pin-2: Cold, Pin-3: Ground, Pin-4: Direct Out
This LED lights green when AT-MX381 is in automatic mode; it lights red
when the mixer is in manual mode; it blinks when the mixer is locked (KeyLock on).
8.
Input connection for each channel. Also provides DIRECT OUT for given
channel.
Output Attenuator – (Recessed Button)
Switches the output attenuator on (-35 dB of attenuation) or off (0 dB of
attenuation). (Use a small tool to press the button and cycle between
selections.) ATT. LED illuminates in Output Status Display.
9.
Output Status Display
LED level display indicates output level of mixer.
ATT. Lights green when the output attenuator is on (-35 dB of attenuation)
LEVEL: Indicates output level. This display can be set via SmartMixer
Software to indicate output level before or after the Master Volume
Control. (Default setting is “before” master control.)
10. Channel Status Display
LEDs indicate channel settings for each input.
a. ATT. – LED lights green when the attenuator is on (LINE level input).
4
Control Function Table
Many AT-MX381 functions can be configured and accessed over the RS232
data port by a PC running the SmartMixer Software (included) or by an external control system (Crestron® or AMX®) using “Open Disclosure Protocol.”
This capability along with the contact closure inputs and control voltage outputs accessed through the External Control Connector provides for maximum
flexibility when interfacing the AT-MX381 to other equipment.
The table below lists the AT-MX381’s controllable functions and their factory
default settings.
Function accessibility
From RS232
From Unit
Data (PC)
Yes
No
Function
Channel Trim
Default setting
Minimum
Channel Level
Minimum
Yes
No
Input Attenuation
0 dB
Yes
Yes
Phantom Power (Per Input)
Off
Yes
Yes
Channel Priority Select (Per Input)
Off
Yes
Yes
Threshold Level
Minimum
Yes
Yes
Mode (Manual/Auto Mixer)
Auto Mixer
Yes
Yes
Output Attenuation
0 dB (no attenuation)
Yes
Yes
PC Control Force – ON**
Off
No
Yes
PC Control Force – OFF**
Off
No
Yes
Force – ON Override (Per Input)
Off
Yes*
No
Force – OFF Override (Per Input)
Off
Yes*
No
Direct Output Select (Pre/Post Gate)
Post Gate
No
Yes
(No attenuation; no attenuation P48; attenuation)
NOMA
Off
No
Yes
Gate Hold Time (Per Input)
1.0 Second
No
Yes
Gate Attenuation (Per Input)
36 dB
No
Yes
Low Cut Filter (Per Input)
Off
No
Yes
“Last Mic On”
On
No
Yes
Output Limiter (Overall)
Off
No
Yes
Output Level Indicator (Pre/Post Master)
Pre Master
No
Yes
Lock Mode (Control Lockout)
Disabled
Yes
Yes
* Can only be accessed via 25-Pin D-sub
External Control Connector on unit.
** Note: Force-ON/OFF contact closures
override PC control fuctions. Channels
forced ON or OFF using these control
points will NOT be reflected in the PC
control system.
Refer to the section on Computer
Control for information on connecting a
PC computer, installing the SmartMixer
Software control software and using the
software.
Installation and Setup
Out of the box, the AT-MX381 comes configured for most common applications. Here are some basic SmartMixer setup tips to help quickly get up and
running: (Items in brackets [ ] refer to control locations on the diagram.) Note
an audio line level source may be substituted for any “microphone”.
7.
Turn the Input 1 Trim control to the “twelve o’clock” position. The channel
1 LED will light green if the microphone is operational and red if the trim
control is set too high.
8.
Adjust the Input 1 Level control and observe the Output Status Level
Display for proper meter indication when speaking into microphone
(peaks at 0). [9]
9.
Plug in up to seven other microphones and adjust the Attenuation, Trim
and Level controls for each microphone until proper meter indication is
obtained. Select NOMA, if desired.
AT-MX381 SmartMixer quick setup tips:
Figure 1 - AT-MX381 Front Panel - Control Layout (Page 9)
1.
Turn the Master Volume control (inner knob) to the minimum position
(counterclockwise). [5]
2.
Turn the Threshold control (outer knob) to the minimum position (counterclockwise). [6]
3.
Turn all eight Input Trim and Input Level controls to their minimum position
(fully counterclockwise). [1,2]
4.
Connect the power cord to the mixer and plug into an AC outlet. (The ATMX381 will automatically detect and select the proper AC voltage setting
based on line voltage connected.)
5.
Turn Power switch “on.” The mixer will perform a self-test and flash each
input’s Gate LED. (Power switch is on rear of SmartMixer.)
10. Priority can be assigned to one or more microphones by pressing its Level
control; observe the priority indicators on the Channel Status Indicator
Display.[10] Any microphone(s) assigned in this manner cannot be locked
out by any other microphone.
11. “Manual” mode can be selected at any time by pressing the Master
Volume control and observing the Manual/Auto mode indicator. In this
mode, the unit will behave like a conventional mixer (all automatic functions are bypassed except for limiting and NOMA if selected). [10]
12. Adjust the Master Volume control for desired output level. This control is
at the last stage in the mixer signal chain, and does not affect microphone
gain, threshold setting, meter indication, monitor or direct outputs. [5]
Adjusts the mixer’s overall output. Turn clockwise to increase output.
Push to select Manual or Auto Mixer mode.
6.
13. Adjust the Threshold control as desired. If signal does not open the gates,
reduce threshold level. If undesirable sounds open the gates, increase
threshold level. [6]
Connect a microphone to Input 1. Select the proper input attenuation and
phantom power with the P48/ATT button. (Use a small-tipped tool to push
the recessed button.) [4]
5
Priority Microphones and the Lockout Bus (Channels 1-8)
Preamplifier Gain
Once the Input Level controls have been properly adjusted, an audio signal
appearing in any channel causes the lockout control bus to activate. The priority settings associated with each input channel then determine whether or not
a particular mic is affected by lockouts caused by other mics.
The SmartMixer has a substantial gain range, allowing it to accept a wide variety of microphones and line level input sources. However, if in some instances
higher-output microphones are used for close talking, it may be necessary to
reduce the preamplifier gain. Turn the Input Trim control associated with each
input channel counterclockwise (CCW) to reduce the gain. Likewise, turning
the control clockwise (CW) will increase the gain for lower-output sources. In
addition for Line Level sources, the input can be attenuated by 35 dB by pushing the recessed “Input Attenuator Select” button twice; this will light the ATT.
LED for the selected channel. (Note, when attenuation is selected, phantom
power is automatically turned off.)
When a channel’s Priority is OFF, other channels can lock out its mic.
When a channel’s Priority is set to ON, it will not allow lockout of its mic.
* Note that any mic that is described as “locked out” or “off “ is really just
being attenuated by between 6 dB and 96 dB from the level otherwise determined by its Level and Trim control setting, sensitivity and placement. See the
“Daisy-chaining Mixers” section on Page 7 for further details.
Phantom Power
How Priority is assigned for the input channels determines the overall automatic mixing operation. By incorporating the priority settings along with external control and computer PC (RS232) Control, complex applications are easily
handled by the SmartMixer. The three most common “modes” of priority preselect automatic operation are:
Each of the SmartMixer’s inputs can supply +48V DC phantom power (default
off). To turn phantom power on or off for a given input, simply push the
recessed P48/ATT. button associated with each channel (using a small tool).
When phantom power is turned on for a given channel, the P48 LED associated with the channel illuminates in the Channel Status Display. Note that,
although they do not require phantom power for operation, most balancedoutput dynamic microphones can be used without disabling the SmartMixer’s
phantom power.
Mode 1… None of the inputs have Priority selected.
In this mode, only one mic can be “on” at a time. The lockout bus shuts
down all other mics until the first speaker pauses. As soon as the controlling microphone goes silent, the lockout bus goes inactive and any
other mic can come on. All switching takes place without any syllablegrabbing delay, pops or clicks.
Output Limiter
The AT-MX381 includes a switchable output limiter circuit. When engaged, the
limiter helps prevent distortion caused by loud audio peaks. The limiter is factory configured for optimum operation (no user settings) and is turned ON or
OFF (default is OFF) from a PC running the SmartMixer Software.
This mode is very useful when the gain setting of the overall sound system must be close to the threshold of feedback, and additional microphones coming on could throw the system into feedback. The
SmartMixer will not allow multiple microphones to be on at the same
time in this mode. The switching is so fast and silent that the meeting
can still be completely interactive.
Output Level
The SmartMixer’s output is factory set to no output attenuation (line level).
Should attenuated output be desired (mic level), simply push the recessed
ATT. button located next to the Master Level/Threshold control (using a small
tool). The ATT. LED will illuminate in the Output Display.
Mode 2… One or more inputs have Priority selected
The selected priority microphone(s) can come on at any time and can
override any other mics (that are not priority mics). (Note that there may
be circumstances where more than one mic can be set to priority; the
priority speakers talk whenever desired, and override the non-priority
mics.)
Output Level LED Meter
The Output Level LED meter is factory set to indicate audio level before the
Master Level control. This allows the meter to be used for setting up the
SmartMixer with the Master Level control turned down and no audio appearing at the main output. If it is desired to have the meter affected by the master
volume control, it can be changed using a PC via the RS232 port. (Refer to
SmartMixer Software Master Control Section.)
Mode 3… All of the inputs have Priority selected.
The lockout bus will activate with any audio input, but no mic will be
locked out…because none are connected to the lockout bus.
Note: If multiple AT-MX381SmartMixers are used with AT8325/1.0 Link Cables,
Priority Pre-select switches on all channels in use will have the control effects
described above for the entire system.
Last Mic On
It is often desirable to have the most recently used microphone remain “on” to
provide continuous room ambiance. This feature is software selectable
(default – on) and is cascaded throughout all linked mixers so that only one
microphone in the entire system will remain on.
NOMA
Number of Open Microphones Attenuated
In a multiple-microphone system, as more microphones are turned on
(opened), the increased system gain can be a potential source of feedback.
The NOMA system helps control feedback by compensating for the increase
in system gain. A built-in matrix in the AT-MX381 recognizes how many microphones are “on” and automatically adjusts the system gain accordingly.
Adjusting Gate Attenuation (“OFF”)
When a microphone is “off,” its input is only attenuated. The attenuation level
(gate attenuation) is adjustable (0 dB to full mute) via the SmartMixer Software.
Because use of NOMA is not always appropriate or desired, the AT-MX381 is
shipped with the NOMA function factory set in the “off ” position. NOMA can
be enabled though the RS232 interface by using a PC running the SmartMixer
Software.
In instances when the number of microphones in use is high, it may be necessary to increase the amount of gate attenuation (“OFF”) per microphone to
keep the total ambient noise level low. Each input channel can have its gate
attenuation set individually via a PC running the SmartMixer Software. The
gate attenuation can be set anywhere from 0 dB to -96 dB and full mute in 12
dB steps. (Default setting is –36 dB.) (Refer to SmartMixer Software Channel
Setting Section.)
NOMA serves to maintain overall system gain by proportionately reducing the
mixer output level as the number of open microphones increases. (Typically,
attenuation is about 3 dB per additional open microphone.) In a sound reinforcement system, this can tend to preserve the feedback margin and system
stability. However, this action necessarily reduces the sound level of each
individual person speaking, which may not be desired. In the end, use of
NOMA often comes down to the preferences of the system’s designer and/or
operator. Generally speaking, use of NOMA is not desirable in applications
such as teleconferencing, recording or broadcasting.
Adjusting Gate Hold Time
Some applications may require that a microphone remain on for a longer period after a person stops speaking. If, for instance, the speaker pauses frequently, it may be undesirable for the system to switch the mic off. Each channel’s Gate Hold Time can be adjusted in .5-second (half-second) steps from .5
seconds to 3 seconds. (The default is 1 second.) (Refer to SmartMixer
Software System Setting Section.)
6
Preamp Outputs
Using Force-on/Force-off
Each microphone channel has an independent unbalanced preamp output that
is separate from the main mixer output. This is the Direct Output pin on the
block screw connector for each input. This is helpful when it is necessary to
record the output of each individual channel, whether or not it is the active
mixer output (as is required, for example, in some courtroom proceedings).
These outputs can be configured before or after the channel’s gate (default is
before gate). (Refer to SmartMixer Software Channel Setting Section.)
To activate force-on/force-off, install a closure between the appropriate pin and
Ground Reference on the External Control
connector on back of unit.
Using Control Voltage Out
The AT-MX381 is provided with external logic switching and control voltage
connections for each of the input channels, allowing the unit to be interfaced
with a wide variety of control and monitoring systems. By creatively using the
external control connections, the flexibility of the AT-MX381 can be expanded
far beyond basic automatic mixing. The following logic functions are provided
for each input channel.
When a microphone channel
turns “on,” as indicated by a
Selected Channel LED on the
front panel, the channel’s associated Control Voltage Out goes
“high” (+4VDC). See chart pin
connection. This signal can be
OUT
used to light indicator lamps,
switch speakers zones on and
GND
off, select video cameras, etc.
The control voltage should not
be connected directly to an
inductive load such as a relay coil, as damage to the mixer may result.
Force-on
When a contact closure is provided between the Ch * - Force On connection and ground (* indicates the channel number), that input is
“forced on” and will override any priority settings (front panel or software).
Force-off
When a contact closure is provided between the Ch * - Force Off connection and ground (* indicated the channel number), that input is
“forced off” overriding any priority settings (front panel or software).
Gate Status Voltage Out
When a microphone channel turns “on,” as indicated by its Gate LED on
the front panel, the channel’s associated Gate Status (control voltage
out) goes “high” (+4 VDC). This signal can be used to light indicator
LED’s or drive logic circuitry to, switch speaker zones on and off, select
video cameras, etc.
When more than eight microphones are needed, it is possible to daisy chain
multiple AT-MX381 SmartMixers together through the Link In/Out connectors
on their back panels (Fig. 2). Each AT-MX381 is supplied with a Link Cable that
carries control bus, audio, and configuration data between mixers. When
linked, all microphones in a multi-mixer system can be controlled by one
microphone connected to any mixer. Up to 16 AT-MX381 SmartMixers may be
daisy chained for a total of 128 input channels. However, due to the link data
protocol (used for the SmartMixer Software computer control and external
RS232 control), AT-MX351 and/or AT-MX341a SmartMixers cannot be linked to
an AT-MX381.
External Logic Connections
Connections for the external logic and control voltage appear on the rear
panel 25-Pin D-sub connector. It is designed to mate with a standard 25-Pin
Male D-sub connector (not provided). For connector pin-out assignments refer
to Table #1 below.
When running the provided link cables from one unit to another, connect the
cable from the LINK IN jack on Mixer #1 to the LINK OUT jack on Mixer #2, the
cable from the the LINK IN jack on Mixer #2 to the LINK OUT jack on Mixer #3,
etc. DO NOT connect a link cable from the last AT-MX381 back to the Master.
Note: External contact closures override PC control.
When linked, Mixer #1 becomes the Master; its output contains audio from all
mixers in the chain (Slaves). Each subsequent mixer in the chain will output its
eight inputs along with the inputs of those after it. The combined output is
then taken from the first mixer (Master) in the chain. Because lockout information is passed between mixers through Link In/Out, the last-microphone-on
condition is not violated.
Table #1 DB-25 Connector Pin-outs
I /O
Logic Function
Pin #
I /O
Input
Ch. 1 Force ON
13
Input
Ch. 5 Force ON
2
Input
Ch. 1 Force ON
14
Input
Ch. 5 Force ON
3
Output
Ch. 1 Gate Status
Voltage OUt
15
Output
Ch. 5 Gate Status
Voltage OUt
4
Input
Ch. 2 Force ON
16
Input
Ch. 6 Force ON
5
Input
Ch. 2 Force ON
17
Input
Ch. 6 Force ON
6
Output
Ch. 2 Gate Status
Voltage OUt
18
Output
Ch. 6 Gate Status
Voltage OUt
7
Input
Ch. 3 Force ON
19
Input
Ch. 7 Force ON
8
Input
Ch. 3 Force ON
20
Input
Ch. 7 Force ON
9
Output
Ch. 3 Gate Status
Voltage OUt
21
Output
Ch. 7 Gate Status
Voltage OUt
10
Input
Ch. 4 Force ON
22
Input
Ch. 8 Force ON
11
Input
Ch. 4 Force ON
23
Input
Ch. 8 Force ON
12
Output
Ch. 4 Gate Status
Voltage OUt
24
Output
Ch. 8 Gate Status
Voltage OUt
25
LED
Daisy-chaining Mixers
NOTE: The control voltage should not be connected directly to an inductive
load such as a relay coil, as damage to the mixer may result.
1
GND
Note: Force-ON/OFF contact closures override PC control fuctions. Channels
forced ON or OFF using these control points will NOT be reflected in the PC
control system.
External Logic Switching and Control Voltage
Pin #
IN
Logic Function
Example using three AT-MX381 SmartMixers:
Mixer #1 is the Master and receives all audio. Mixer #2 (Slave 1) receives
audio from Mixer #2 and Mixer #3 (Slave 2). Mixer #3 receives audio only from
its eight inputs. (Refer to Figure 3 on page 9)
Since the link cables pass control data along with audio, each mixer in the
chain is assigned an address upon power up. To ensure proper address
assignment, always power up Slave AT-MX381 units before applying power to
the Master. Alternatively, a power distribution scheme that applies power to
all connected devices at the same time may be used (i.e. a switched plug
strip).
Note that one or more mixers can be switched to “Manual” mode without
affecting the automatic operation of any other mixers in the chain.
Ground (common)
NOMA information is passed between AT-MX381 mixers through Link In/Out. If
one or more of the linked AT-MX381 units has NOMA switched off, its microphones will not be included in the NOMA calculation. Refer to NOMA section
for more information.
NOTE: This connector is NOT a computer data port. Connecting a computer or
other data device directly to it may cause damage to the device or the
SmartMixer.
7
S p e c i f i c a t i o n s†
RS232 Data Port
The RS232 data port provides a place to connect a PC computer for system
configuration using the included SmartMixer Software. (Refer to the Software
Section for installing/using the software.) Alternatively, the data port may be
used to connect to an external control system such as Crestron® or AMX®
running “open disclosure communications protocol”. Refer to information from
control system manufacturer regarding using this feature.
Input Impedance
Mic Level
Line Level
Output Impedance
Balanced
Line Level
Mic Level
Unbalanced
Direct Output
Maximum Input Level
Maximum Output Level
Equivalent Input Noise Level
Total Harmonic Distortion
Maximum Gain
Frequency Response
Microphone Phantom Power
Control Voltage Out
Maximum Monitor Output
Power Supply
Dimensions
In a system with multiple linked AT-MX381’s, connect the PC or control system
to the first (Master) unit in the chain. This will allow access to all of the linked
units for configuration and control programming.
Rack Mounting
The AT-MX381 is designed to mount in a standard equipment rack occupying
a single rack space. For tabletop mounting, attach the included feet to the bottom of the unit.
Control Lockout
Weight
For permanent installations where microphone selections, positions and
acoustic conditions are constant, it may be advantageous to lock out the front
panel knobs and functions to prevent unauthorized adjustments. To initiate
Lockout, activate the lock switch or activate the lock function via the
SmartMixer Software. (PC)
†
6600 ohms
8500 ohms
300 ohms
350 ohms
400 ohms
60 ohms
-50 dBu (gain at Max)
22 dBm (THD+N at 1%)
-130 dBu *
>0.3% (Channel gain at max)
69 dB
20 to 20,000 Hz (±3 dB)
+48V DC
+4V DC
50mW (@ 1% THD+N) with 16 ohms load
100 – 240V AC, 50/60 Hz, 20W
16.93” (430 mm) W x 9.05” (230 mm) D x
1.75” (44 mm) H
(not including feet, knobs and connectors)
3.4 kg (8 lb 6 oz)
In the interest of standards development, A.T.U.S. offers full details on its test methods to other industry
professionals on request.
* Input terminated with 150 Ohm, A-Weighted using Audio-Precision System Two
*Specifications are subject to change without notice.
AMX® is registered trademarks of AMX Corporation.
Crestron® is registered trademarks of Crestron International.
8
Figure 1 - AT-MX381 Front Panel - Control Layout
①
②
Input 1
⑤
Input 2
Input 3
Input 4
Input 5
Input 6
Input 7
Input 8
⑥
⑬⑫
8 CHANNEL AUTOMATIC MIXER AT-MX381
Master
Mas
ter
AT T.
LEVEL
GATE
GA
MIN
LEVEL
MAX
P48/
P4
AT T.
GAIN
③
GATE
GA
MIN
LEVEL
MAX
P48 /
P4
ATT.
T.
GATE
GA
GAIN
MIN
LEVEL
MAX
GAIN
P48 /
P4
ATT.
T.
GATE
GA
MIN
LEVEL
MAX
GAIN
P48 /
P4
ATT.
T.
GATE
GA
MIN
LEVEL
MAX
GAIN
P48 /
P4
ATT.
T.
GATE
GA
MIN
LEVEL
MAX
P48 /
P4
AT T.
GATE
GA
GAIN
MIN
LEVEL
④
MAX
GAIN
P48 /
P4
AT T.
GATE
GA
MIN
LEVEL
MAX
P48/
P4
AT T.
AUTO
GAIN
⑦
MIN
LEVEL
MAX
AT T.
AT T.
THRESHOLD
+10
+6
+3
0
-3
-6
-10
-20
20
OUTPUT
OUT
PUT
P48
P4
PRIORITY
PRIORI
CH 8
CH 7
CH 6
CH 5
CH 4
CH 3
CH 2
CH 1
POWER
MIN
MAX
LEVEL
CHANNEL STA
STATUS
US
MONITOR
⑧⑨ ⑩ ⑪
Figure 2 - AT-MX381 Rear Panel
⑭
⑮
⑯ ⑰ ⑱
⑲
1Pin 2Pin 3Pin 4Pin
Figure 3
FINAL OUTPUT
MASTER
LINK IN
LINK OUT
SLAVE #1
LINK IN
RS-232C
PC
LINK OUT
SLAVE #2
LINK IN
LINK OUT
SLAVE #n
9