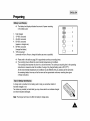
1
[ENGLISHI
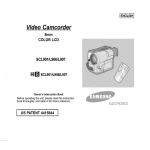
Video Camcorder
8ram
COLOR LCD
SCL810/L860/L870
Hi[] SCL810/L860/L870
Owner's Instruction Book
Before operating the unit, please read
this instruction book thoroughly, and retain it for
future reference.
El
IENGLISHI
Contents
Features .........................................................................................................................................................................................
Descd ptions
• Front View/Side View/Rear View .............................................................................................................................. 13, 14,
• OSD (On Screen Display._...................................................................................................................................................
Accessories Supplied with the _.amcorder.....................................................................................................................................
Remote Control (S_CL860/L870only) .............................................................................................................................................
• Sett Timer Recording ...........................................................................................................................................................
12
Adiustin£ the Hand Strap and Shoulder Strap ...............................................................................................................................
Lithium #attery Installation .............................................................................................................................................................
Connecting the Power Source ........................................................................................................................................................
• To use the AC Power Adapter ..............................................................................................................................................
• To use the Battery Pack.......................................................................................................................................................
Using the Battery Pack...................................................................................................................................................................
• Continuous Recording time table .........................................................................................................................................
• Battery Level Display ...........................................................................................................................................................
Inserting andEjecting a Cassette .................................................................................................................................................
20
21
22
22
23
24
24
25
26
Makin_ Your First Recording ..........................................................................................................................................................
Hints TorStable Image Recording .................................................................................................................................................
• Recording wit_ LCD Mooi[or ................................................................................................................................................
• Recording with Viewfinder ....................................................................................................................................................
Adustingajthe LCD ..........................................................................................................................................................................
Adjustin_ Focus of the VIEWFINDER ............................................................................................................................................
Playingr_ack a tape on the LCD.....................................................................................................................................................
• -Ad usting the LCD daring PLAY...........................................................................................................................................
• Controlling the Sound from the Speaker .............................................................................................................................
• Viewing a Still Picture ..........................................................................................................................................................
• Picture Search .....................................................................................................................................................................
27
29
29
29
30
31
32
33
33
33
33
Zooming In and Oat .......................................................................................................................................................................
Digital Zoom ...................................................................................................................................................................................
EASY mode for beginners ...........................................................................................................................................................
CUSTOM-Creatingyour own customized recording settings .........................................................................................................
DIS (Digital Image Stabilizer, SCL860/L870 only) .........................................................................................................................
MFIAF (ManualFocuslAuto Focus) ................................................................................................................................................
BLC.................................................................................................................................................................................................
34
35
37
38
39
40
41
,A
15
16
18
19
19
[ENGLISH 1
Contents (continued)
Program AE (Automatic Exposure) ................................................................................................................................................
DSE (Digital Special Effects) in CAMERA mode ...........................................................................................................................
Setting and Recording DATE/TIME................................................................................................................................................
Selecting and Recording a Title .....................................................................................................................................................
Fade In and Out .............................................................................................................................................................................
PIP (SCL860/L870 only) .................................................................................................................................................................
Snap Shot (SCL860/L870 only) .....................................................................................................................................................
While Balance ................................................................................................................................................................................
Demonstration ................................................................................................................................................................................
Setting the Date/Tgle color .............................................................................................................................................................
Lighting Techniques ........................................................................................................................................................................
42
44
46
48
50
51
52
53
54
55
56
To watch with LCD ........................................................................................................................................................................
To watch with TV monitor ...............................................................................................................................................................
Various Functions in PLAYER mode ..............................................................................................................................................
Adjusting the LCD ..........................................................................................................................................................................
Setting the Speaker ON/OFF .........................................................................................................................................................
DSE in PLAYER mode ...................................................................................................................................................................
Multi Playback (Using the PAL60 System) .....................................................................................................................................
57
57
59
60
60
60
61
Installing USB Media 2.0 Program .................................................................................................................................................
63
Cleaning and Takingcare of the Camcorder ..................................................................................................................................
• Cleaning theViewfinder ......................................................................................................................................................
• Cleaning the LCD Panel.......................................................................................................................................................
• Cleaning the Video Heads ..................................................................................................................................................
• Storing the Camcorder .........................................................................................................................................................
66
66
66
66
66
Self Diagnosis Display ...................................................................................................................................................................
Checking .........................................................................................................................................................................................
Moisture Condensation ..................................................................................................................................................................
68
69
71
A
[ENGLISH
Notices
1
and Safety
Instructions
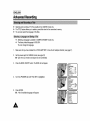
Please rotatethe LCD screen carefullyas illustrated.
Unintended rotationmay cause damageto the inside of the
hinge that connects the LCD screen to the Camcorder.
1) LCD screen closed.
1)
2)
2) Standard recordingby using the LCD screen.
3) Makinga recordingby looking at the LCD screen from the top.
4)
4) Makinga recordingby looking at the LCD screen from the front.
96 °
5) Makinga recordingwith the LCD screen closed.
•t,
Donot let the LENS point toward the sun.
Direct sunlightcan damage the CCD
(Charge Coupled Device).
A
5)
[ENGLISH 1
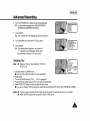
Notices and Safety Instructions
1) Do not place the camcorderso that the
viewfinder is pointingtowards the sun.
Direct sunlight can damage the inside of the
viewflnder,Be carefulwhen placingthe
camcorderunder sunlight or by a window.
2) Do not pick up the camcorderby the viewfinder,
3) Unintended rotationmay causedamage to the
viewflnder,
1)
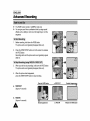
A sudden rise in atmospheric temperature may cause condensation to
form inside the camcorder,
for example:
•
When you take the camcorder from cold temperature outside to
warm temperature inside during the winter.
•
When you take the camcorder from cool temperature inside to
hot temperature outside during the summer.
X
X
[
2) If the "DEW" protectionfeature is activated,leave the camcorder in a
dry,warm roomwith the cassette compartmentopened and the battery
removed.
3)
If the "DEW" protection feature is activated unexpectedly,
and you want to override it, detach, then reinstall the battery pack
and lithium battery.
Please make sure that the condensation has disappeared
completely. (see page 71)
_'_
DEW
A
[ENGLISH
1
Notices and Safety Instructions
÷ Make sure that the battery pack is charged beforerecordingoutdoors,
4" Topreserve battery power,keep your camcorderturned off when you are not operatingit.
÷ When your camcorder is in CAMERAmode, if it is left in STANDBYfor more than 5 minutes withoutoperation,
it will automaticallyturn off to protect against unexpectedbattery discharge.
÷ It is a good idea to use the viewrinderinstead of the LCD when recordingfor a long time becausethe LCD uses
more battery power.
÷ Make sure that the battery pack is fitted firmly into place.
Droppingthe battery pack might damage it.
÷ When the battery reachesthe end of its life, pleasecontact your localdealer.
The batterieshave to be dealt with as chemicalwaste.
Warning:.'Keepthe LITHIUMBATTERYout of the reachof children.Should the battery be swallowed,
consulta doctor immediately.
•t, The lithium battery maintainsthe dock function,TITLE, CUSTOMfunction and presetcontentsmemory;
even if the battery pack or AC power adapter is removed,
•t, The lithium battery for the camcorder lastsabout 8~10 monthsunder normal operationfrom time of installation.
•t, When the lithium battery becomesweak or dead, the date/time indicatorflashes about 5 secondswhen
you set the power switchto CAMERA.In this case, replacethe lithium battery with type CR2025.(see page 21)
WARNING:
LITHIUM BATTERY MUST BE
RECYCLED OR DISPOSED
OF PROPERLY.
A
[ENGLISH 1
Notices and Safety Instructions
1) The LCD monitor is manufacturedby using high precision technology.
However,there may be some tiny specks (red, blue or green in color)
that appear on the LCD monitor.These specks are normal and do not
affect the recorded picture in any way,
2) When using the LCD monitoroutdoors in direct sunlight,
it may be difficult to view.If this occurs, use the viewfinder.
3) The LCD monitor's OSD is turned off when the LCD is placed in the
forwarddirection,
÷
÷
÷
÷
÷
It is very importantto adjust the hand strap for better recording.
(see page 20)
Do not insert your hand in the hand strap forcibly,
the buckle may be damaged,
Toensure normal recordingand clear picture,clean the video heads.When playingback the pictures,
if they are noisy or hardly visible, the video heads may be dirty, If this happens, clean the video heads with a dry
type cassettecleaner.
Do not use a wet type cassette cleaner.It may damage the video heads. (see page 66)
Toprotectagainst tape and head-drum wear,your camcorderwill automaticallyturn off if it is left in STANDBY
mode without operationfor more than 5 minutes.
,A
IENGLISHI
Notices
and Safety
CAUTION:
TO REDUCE THE RiSK OF ELECTRIC
SHOCK, DO NOT REMOVE COVER(OR
BACK) NO USER SERVICEABLE
PARTS
iNSIDE, REFER SERVICING TO
QUALIFIED
SERVICE PERSONNEL
Instructions
,_
This symbol is intended to alert the user to the presence of uninselated
dangerous voltage within the product's enclosure that may he of sufficient
magnitude to constitute a risk of fire or electric shock.
,_
This symbol is intended to alert the user to the presence of important
operating and maintenance instructions in the literature accompanying
this product.
To prevent electric shock, match wide
blade of plug to wide slot and fully
insert.
1. READ INSTRUCTIONS:
All the safety and operating instructions should be read
before the CAMCORDER is operated.
2. RETAIN INSTRUCTIONS:
The safety and operating instructions should be retained
for future reference.
3. HEED WARNINGS:
AII warnings on the CAMCORDER and in the operating
instructions should be adhered to.
4. FOLLOW INSTRUCTIONS:
All operating and maintenance instructions should
be followed.
5. CLEANING:
Unplug this CAMCORDER from the wall outlet before
cleaning. Do not use liquid or aerosol cleaners.
Use a dry cloth used for dusting cabinets.
6. ATTACHMENTS:
Do not use attachments not recommended by the
CAMCORDER product manufacturer as they may be
hazardous.
A
7. WATER AND MOISTURE:
Do not use this CAMCORDER near water;
for example,near a bathtub, wash bowl, kitchen sink, laundry
tub, in a wet basement, near a swimming pool or lake.
8. ACCESSORIES:
DOnot pfaca this CAMCORDER on an unstable cart, stand,
tripod, bracket or table.
The CAMCORDER may fall, causing serious injury to a child
or adag, and serious damage to the unit.
Use only with a cart, stand, tripod, bracket, or table
recommended by the manufacturer or sold with the
CAMCORDER. Any mounting of the unit should follow the
manufacturer's instructions and should use a mounting
accessory recommended by the manufacturer.
A. An appliance and cart combination
should be moved with care.
Quick stops, excessive force and uneven surfaces may
cause the appiianca and cart combination to overturn.
PORTABLE CART WARNING
(Symbol provided by RETAC)
[ENGLISH 1
Notices and Safety Instructions
9. VENTILATION:
Slots and openings in the cabinet are provided for
ventilation to ensure reliable operation of
the CAMCORDER and to protect it from overheating.
These openings must not be biockod or covered,
Never place your CAMCORDER on a bed, sofa, rug, or
other similar surface: on or near a radiator or heat
register.
This CAMCORDER should not be placed in a built-in
installation such as a bookcase or rack unless
proper ventilation is providedor the manufacturer's
instructions have been adhered to.
10. POWER SOURCES:
The CAMCORDER should be operated only from the type
of power source indicatedon the label
If you are not sure of the type of power supply at your
home, consult your appliance dealer or local power
company.
A CAMCORDER is intended to be operated from battery
power,or other sources, refer to the operating instructions,
13. OUTDOOR ANTENNA GROUNDING:
If an outside antenna or cable system is connected to the
CAMCORDER, be sure the antenna or cable system is
grounded to provide some protection against voltage
surges and built-up static charges, Section 810 of the
National Electrical Code, ANSI/NFPA No, 70-1984,
provides information with respect to proper grounding of
the mast and supporting structure, grounding of the
lead-in wire and supporting structure, grounding of the
mast and supporting structure, grounding of the leaddn
wire to an antenna discharge unit, size of grounding to
conductors, location of antenna-discharge unit, connection
to grounding electrodes and requirements for the
grounding electrode,
See figure below,
1 I.GROUNDING OR POLARIZATION:
This CAMCORDER may be equipped with either a
polarized2-wire AC line plug (a plughaving one blade
wider than the other) or a 3-wire grounding type plug,
a plug having a third (grounding) pin,
If you are unable to insert the plug fully into the outlet,
try reversing the plug.If the plug still fails to fit,
contact your electrician to replace your outlet.
Do not defeat the safety purpose of the polarized plug.
12.POWER-CORD PROTECTION:
Power-supplycords should be routed so that they are not
likely to be walked on or pinched by items placed upon or
against them, paying particularattention to cords or plugs,
convenient receptacles, and the point where they exit from
the unit.
A
[ENGLISH 1
Notices and Safety Instructions
14. LIGHTNING:
For added protection of this CAMCORDER during a
lightning storm or when it is left unattended and unused
for long periods of time, unplug it from the wall outlet and
disconnect the antenna or cable system.
This will prevent damage to the CAMCORDER due to
lightning and power-line surges.
15. POWER LINES:
An outside antenna system should not be located in the
vicinity of overhead power lines or other electric light or
power circuits where it can fall into such power lines or
circuits,
When installing an outside antenna system, extreme care
should be taken to keep h_m touching such power lines
or circuits as contact with them might be fatal,
16. OVERLOADING:
Do not overload wall outlets and extension cords as this
can result in a risk of fire or electric shock.
17. OBJECTS AND LIQUIDS:
Never push objects of any kind into this CAMCORDER
through openings as they may touch dangerous voltage
points or short out a part that could result in a fire or
electric shock.
Never spill liquids of any kind onto the CAMCORDER,
Should spillage occur, unplug uni and have it checked by
a technician before use.
18. SERVICING:
Do not attempt to service this CAMCORDER yourself.
Opening or removing covers may expose you to
dangerous voltage or other hazards.
Refer all servicing to qualified service personnel,
A
19. DAMAGE REQUIRING SERVICE:
Unplug this CAMCORDER from the wail outlet and
refer servicingto qualified service personne{ under the
following conditions:
a. When the power-supply cord or plug is damaged,
b, If any liquidhas been spilled onto, or objects have
fallen into the CAMCORDER.
c. If the CAMCORDER has been exposed to rain or water,
d. If the CAMCORDER does not operate normally by
following the operating instructions, adjust only these
controls that are covered by the operating instructions,
improperadjustment of other controls may result in
damage and will often require extensive work by a
qualified technician to restore the CAMCORDER to its
normal operation,
e, If the CAMCORDER has been dropped or the cabinet
has been damaged.
fi When the CAMCORDER exhibits a distinct change in
performance,this indicatesa need for service,
20. REPLACEMENT PARTS:
When replacement parts are required, be sure the service
technician has used replacement parts specified by the
manufacturer and having the same characteristics as the
original part.
Unauthorized substitutions may result in fire,
e{ectricshock or other hazards.
21. SAFETY CHECK:
Upon completion of any service or repairs to this
CAMCORDER, ask the service technician to perform
safety checks to determine that the CAMCORDER is
in safe operating order,
[ENGLISH 1
Notices and Safety Instructions
NOTE TO CATV SYSTEM INSTALLER:
This reminder is provided to call the CATV system instal_er's
attention to Article 82040 of the NEC that provides guidelines
for propergrounding and, in particular, specifies that the
cable ground sha_lbe connected to the grounding system of
the building as close to the point of cable entry as practical.
USER INSTALLER CAUTION:
Your authority to operate this FCC certified equipment could
be voided if you make changes or modifications not expressly
approved by this party responsible for compliance to part 15
FCC rules,
,A,
ENGLISH]
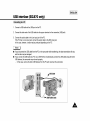
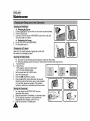
Getting to Know Your Camcorder
Yourcamcorderhas many features for recordingand playing back,
The Snap Shot function lets you record an object at a standstill for a limited time in Camera mode,(see page 52)
The PiP functionshowswherethe centerof the imageis whilerecordinginDig_alZoomof the Cameramode,(seepage51)
Wfen you recorda subjectwith the light source behind the subject or a subjectwith a light background,
use the BLC function.(see page 41)
The DSE enables you to give a creative look to your films by addingvarious special effects.(see page 44)
The ProgramAE enables you to adapt the shutter speed and aperture to the type of scene to be filmed. (see page 42)
The DiS compensatesfor unstableimages caused by hand shake, particularlyat high magnification.(see page 39)
Zooming is a recording echniqaetha le s you chanqethe size of the sabjec in the picture,
For more professionaIrecordings, use the zoomfunction. (see page 34)
Zooms more than 22x are performeddigitally.(see page 35)
The macrofunction allowsyou to record yoursubject at dose range,
Youhaveto adjustthe zoom fully wide for macrorecording.(see page 34)
This mode enables eventhe beginner to easily make a recording.(see page 37)
PAL6Oi_ a special output signal format with which a tape recorded on this camcorder(NTSCformat) can be viewed
on a PALTV.
Hi8 is an enhanced 8ramformat.
When a Hi8 cassette is inserted, the camcorderwill automaticallyselect the Hi-8 formatfor record or playback,
A
[ENGLISH]
Getting to Know Your Camcorder
3. REC SEARCH _
(REW)
4. REC SEARCH _ (FF)
2. PLAY/STILL (LIGHT),
5. DATE/TIME (STOP)
6.TAPE EJECT'
7. EVF
13. VIDEO LIGH1
I. LENS
9. Remote Sensor
10. LCD
8. MIC
11. CUSTOM
12. EASY
1.
Lens (see page 72)
6.
TAPE EJECT (see page 26)
Use when ejectingthe tape,
2.
PLAY/STILL (LIGHT) (see page 58)
PLAY/ST_LLworks in PLAYER mode.
LIGHT works in CAMERA mode.
7.
EVF (Electronic Viewfinder)
8.
MIC
MIC works in CAMERA mode.
g.
Remote Sensor (SCL860/L870
3.
4.
5.
REC SEARCH _ (REW)
REC SEARCH _ works in STANDBY mode.(see page 28)
REW works in PLAYER mode. (see page 59)
REC SEARCH _ (FF)
REC SEARCH (_ works in STANDBY mode.(see page 28)
FF works in PLAYER mode, (see page 59)
DATE/TIME (STOP)
DATE/TIME works in CAMERA mode.
(see page 47)
STOP works in PLAYER mode. (see page 58)
only)
10. LCD (see page 29)
11. CUSTOM
CUSTOM works in CAMERA mode.
12. EASY
EASY works in CAMERA mode,
13. VIDEO LIGHT
,A,
IENGLISHI
Getting to Know Your Camcorder
24. BLC
J ON/OFF
23, FADE
15. ENTER (MF)
16. UP/DOWN Dial (VOLUME)
20. SPEAKER
22. LCD Open --
17. S-VIDEO out
18. P.AE
19. DSE
21. Lithium Battery
14. MENU ON/OFF(see page 30)
MENUON/OFFworks in CAMERAand
PLAYERmode.
15. ENTER (MF) (see page 30)
ENTER works in MENU mode.
MF works in CAMERA mode. (see page 40)
16. UP/DOWNdial (VOLUME)
UP/DOWNdial works in MENU mode.(see page 30)
VOLUMEworks in PLAYERmode.(see page 60)
19. DSE (see page 44)
DSEworksin CAMERAand PLAYERmode,
20. SPEAKER (see page 60)
Speaker worksin PLAYERmode.
21. Lithium Battery (see page 21)
22. LCD open
23. FADE (see page 50)
FADE works in CAMERA mode.
17. S-VIDEO out
18. PROGRAMAE (see page 42)
PROGRAMAE (Auto Exposure)worksin
CAMERA mode,
A
24. BLC (see page 41)
BLC works in CAMERA mode
[ENGLISH 1
Getting to Know Your Camcorder
25. ZOOM
36. BATTERY EJECT
26. CASSETTE
Compartment
27. Hooks for s
39. USB JACK
(SCL870 only)
32. START/STOP
35. Batter
(SCL860/L870 only)
S Cap
38. Recharging Indicator
34. DC Jack
30. Hand Strap
31. POWER Switch
25. ZOOM (see page 34)
33. External MIC (SCLS60/L870 only) (see page 72)
26. Cassette Compartment
34. DC Jack (see page 22)
27. Hooks for Shoulder Strap (see page 21)
35. Battery Pack Compartment (see page 23)
28. AUDIONIDEO
36. BATTERY EJECT
out (see page 57)
29. LENS Cap
30. Hand Strap (see page 20)
31. POWER Switch (see page 22)
- CAMERA : Select to record.
- OFF : Select to turn off the camcorder.
- PLAYER : Select to playback.
32. START/STOP (see page 28)
START/STOP works in CAMERA mode,
37. SNAP SHOT/D.ZOOM
SNAP SHOT works in CAMERA mode,
(SCL860/L870 only, see page 52)
D,ZOOM works in CAMERA mode,
(SCL810 only, see page 36)
38. Recharging Indicator (see page 23)
39. USB Jack (SCL870 only) (see page 65)
A
[ENGLISH
1
Getting to Know Your Camcorder
•t, Youcan turn the OSD on/off by setting the Displaymenu on/off.
•t, The TITLE, DATE/TIME,EASY and CUSTOMfunctions can be operated evenafter the OSD is turned off,
•t, The OSD is displayed in the viewfinder and the LCD monitor.
a.
Zoom position (see page 34)
Indicates zoom position.
b.
DIS (SCL860/L870 only)
(see page 39)
Indicates DIS is activated.
C.
Battery level (see page 25)
Indicates the power left in the battery.
d.
Manual Focus (see page 40)
Indicates manual focus is on.
Auto Focus is not displayed,
e.
BLC (see page 41)
Indicates BLC is activated.
f.
Program AE (see page42)
IndicatesProgramAE mode is
activated.(_, _ ,_, _, _7 )
g. Self recordwaitingtimer.
(SCL860/L870only) (see page 19)
Indicates 10 second timer.
h, Self record recordingtimer.
(SCL860/L870only) (seepage19)
(30 secondsor END).
L
Date (see page 46)
Indicatesthe date of the recording.
A
bat
r
sq
[ENGLISH 1
Getting to Know Your Camcorder
j.
Time (see page 46
Indicates the tmmeyou are recording,
k.
Title (see page 48
Indicates the recorded title you have set.
It is superimposed on the scene,
I. Self diagnosis (see page 68
Displays different diagnostic indicatorsconcerning the camcorder's operation,
m. DSE (Digital Special Effect see page 44
Indicates the DSE mode is activated.
The operation modes are GHOST, STROBE, SEPIA, B&W, NEG. MIRROR, ART, MOSAIC, 16:9(WIDE) and CINEMA.
n. White Balance mode see page 53
Indica es he Whi e BaIance mode is ac iva ed.
The White Balance modes are AUTO, INDOOR( _- ) and OUTDOOR(_._- ).
O.
p.
q.
r.
s.
t.
u.
v.
w.
x.
y.
z.
Talpee counter
Indicates amount of the tape used.
Operation mode
Indicatesthe operation mode is activated.
The operation modes are STBY, REC •, STOP, PLAY( _- ), FF( m-m), REW(<<),
EJECT.
Hi8 see page 58
nd cates you are us ng H 8 tape when recording or playing back.
DEW [_
condensation see page 71
Moni ors the moisture condensation.
Digital zoom see page 35)
ndicates d g ta zoomis achvated.
Snap Shot see page 52)
Indicates the time left during Snap Shot Recording.
Zero return SCL860/L870 only see page 59
nd cates that the zero return s act vated.
PB DSE
Shows that the PB DSE mode is active,
VOLUME
EASY & CUSTOM
Shows when the easy or custom mode is active.
LIGHT
Shows when the Light is switched on,
Remocon (((<rJIIOFF) (SCL860/L87g only)
Indicates the remocon off mode is activated.
A
ENGLISH]
Getting to Know Your Camcorder
Make sure that the following basic accessoriesare
supplied with your camcorder,
1,
2,
3,
4,
5.
6,
7,
AC PowerAdapter.(see page 22)
AC cord. (see page 22)
BatteryPack. (see page 23)
Audio/VideoCable. (see page 57)
Shoulder strap, (see page 21)
InstructionBook.
RemoteControl, (see page 19)
(SCL860/L870only)
8, LithiumBattery for Remote Control,
(see page 19) (SCL860/L870only)
LithiumBattery for Clock,
(TYPE: CR2025,see page 21)
9, Software CD (SCL870only)
10, USBCable (SCL870only)
11, USBAUDIO Cable(SCL870 only)
"_. AC Power
Adapter
AD44-00038A
4. AUD]ON[DEO
ConttoZ
A
5. Shoulder
Pack
AD43_O0065A
Strap
6. Instruction
Book
AD63_30202A
8. Lffhium
Batteries
9. Software
CD
©
AD59-00062A
10. USB Cable
12. $-V_DEO
cane
AC3E_42001Z
AD46_0033B
AD43-10_30H
11. USB AUDIO
AD39_30073A
12, S-VIDEO cable,(see page 58)
3. Battery
AD39-00028A
Cable
AD39-40200A
7. Remote
2. AC cor_
CaNe
AD39_O0074A
[ENGLISH 1
Getting to Know Your Camcorder
1.
2.
3.
4.
5.
6.
7.
8.
9.
10,
11,
12,
Start!Stop (see page 27)
SettTimer
Still (see page 59)
WIDE (see page 34)
TELE (see page 34)
Display(see page 16)
_- (Play) (see page 58)
m-m(FF) (see page 59)
<4 (REW) (see page 59)
• (Stop) (see page 58)
Counter Reset (see page 59)
Zero Return (see page 59)
÷
÷
÷
÷
÷
6--
11
_,_
_4
5
8-9-7--
--
12
--
10
Youmust insert or replacethis battery when:
- Youpurchase the camcorder,
- The remote control doesn't work.
Insert Lithium Battery,following the + and - markings.
Be carefu)not to reversethe polarity of the battery.
The Self Timer function on the remote control allows you to start and
stop recording automatically.
recordingyourself
Two options are available
- WNT-10S/SELF-30S:wait 10 seconds,foUowedby 30 seconds of recording.
- WNT-f0S/SELF-END: wait 10 seconds,followed by recordingunti( you press the
START/STOPbuttonagain.
A
IENGLISHI
Preparing
1,
Set power switch to CAMERA mode.
2,
PressSelf Timer button until the appropriateindicator is
displayedon the LCD:
• WAIT-10S/SELF-30S
• WAIT-10S/SELF-END
3,
2
PressSTART/STOPbuttonto start the timer,
f
:After waitingfor 10 seconds, recordingstarts.
3
: If you have selected SELF-30S,recording stops automatically
after 30 seconds,
:If you have selected SELF-END,press START/STOPagain
when you wish to stop recording,
[
Note: When recordingwith the timer, you can press START/STOPbuttonagain to cancel the function,
÷
÷
It is very important to adjustthe hand strap for better recording.
The hand strap enables you to:
- Holdthe camcorder in a stable,comfortable position.
- Pressthe Zoom and the red Record buttonwithout
having to changethe positionof your hand,
1. Pullopen the Hand Strap coverand releasethe Hand Strap,
adjust its length and stick it back onto the Hand Strap cover,
2. Close the Hand Strap cover back up again.
A
[ENGLISH]
Preparing
4" The Shoulder Strap allows you to carry your camcorder with complete safety,
1, Insert each end of the strap into the hookson the camcorder.
2, Put the end of each strap through the buckle,adjustthe length
of the strap, then pull it tight in the buckle.
!,
4" The lithium battery maintains the clock function, title and preset contents of the memory; even if the battery pack or
AC power adapter is removed.
4. The lithium battery for the camcorder lasts about 8~10 months under normal operation from the time of installation.
4" When the lithium battery becomes weak or dead, the date/time indicator flashes for about 5 seconds when you set
the power switch GoCAMERA.
When this occurs, replace the lithium battery with type CR2025,
1. Takeoat the holder from the lithium battery compartment,
2. Insert the _ side of the lithium batterytoward the bottom
of the holder.
3. Reinsert the holder into the lithium battery compartment,
Note: If the holder is inserted in the wrong direction,
it will not fit correctly,
Warning:
Keep the LITHIUM BATTERY out of the reach of
the children,
Should the battery be swallowed, consult a doctor
immediately,
A
[ENGLISH]
Preparing
•t, There are two waysto connect powersource,
Usingthe AC PowerAdapter : usedfor indoorrecording,
Usingthe BatteryPack: usedfor outdoor recording,
2
CAMERA
1, Connect the AC PowerAdapter to the AC cord,
2, Connect the AC cord to a wall socket.
Note: The plug andwall socket type may be different dependingon regional conditions.
3, Connect the other end of the DC cable to DC jack of the camcorder.
4, To set the camcorderto the CAMERAmode,
a, Holddown the tab of the powerswitch and push the switchto CAMERAmode,
b, Makesure that the LensCap is open.
c. Open the LCD monitor and make sure that the image appears in the LCD monitor,
The LCD monitor is turned on automaticaltywhen it's opened more than 30 degrees,
Note:
if the adapter is used next to a TV or the camcorder,
it may cause the TV or camcorder to emit noise.
Move the adapter away from the TV, camcorder or the antenna cable,
[ENGLISH 1
Preparing
•t,
Depends on how often zoom is used in recording. Prepare as many battery packs as possible.
1,
Attach the battery pack to the camcorder,
1
2,
Connectthe AC PowerAdapter to the AC cord
and connect the AC cord to a wall socket,
3, Connectthe DC cable to the DC jack of the camcorder,
4,
Turnoff the camcorderpower,and the recharging indicator
will start blinking and begin recharging,
Blinking once a second : indicates lessthan
50% has been charged.
Blinking twice a second : indicates50% ~ 75%
has been recharged.
Blinking three times a second : Indicates75% ~ 100%has been recharged,
Blinking stops and stays on : Recharginghas been completed,
On for a second and off for a second: Indicatesthere is an error, Reset the battery pack and DC cable,
5, If recharging is completed,separate the camcorder,AC poweradapter, and battery pack,
• Even if the power is turned off, battery will be discharged.
Note:
Battery pack may be charged a little at the time of purchase,
A
ENGLISH 1
Preparing
¸II
Model
_el
SCL810
SCL860/L870
LCD ON,
LCD OFF,
LCD ON,
LCD OFF,
EVF OFF
EVF ON
SS-L110A
Approximately
90 minutes
Approximately
130 minutes
Approximately
80 minutes
Approximately
120 minutes
SB-L160
Approximately
130 minutes
Approximately
190 minutes
Approximately
120 minutes
Approximately
160 minutes
SB-L320
Approximately
260 minutes
Approximately
390 minutes
Approximately
240 minutes
Approximately
340 minutes
Type
_
EVF OFF
EVF ON
4" The continuous recording times given in the table are approximate.
Actual recording time depends on usage,
Notes:
÷
÷
÷
÷
The battery pack should be rechargedin a room temperaturethat is between0°C(32°F)and 40°C(104°F),
It should never be charged ina room temperaturethat is below 0°C(32°F),
The lifeand capacity of the battery pack will be reduced if it is used in temperatures below 0°C,
evenwhen it is fully recharged.
The lifeand capacity of the battery pack will be reduced if the battery pack is left in temperatures above
40°C(104°F)for a long period,evenwhen it is fully recharged.
Do not put the battery pack near any heat source (fire or ftames,for example).
,A,
[ENGLISH 1
Preparing
÷
The battery level display indicatesthe amount of power remaining
in the battery pack,
1.
2.
3.
4.
Fully charged
10-40% consumed
40-60% consumed
60-80% consumed
(preparea charged one)
5. 80-95% consumed
(changethe battery)
6. 100% consumed
(camcorderwill turn off soon, changethe batteryas soon as possible)
÷
÷
_/_
t
1
_
2
t
I
,T,,_,,..II!_
6
Please referto the table on page 24 for approximatecontinuous recordingtimes.
The recordingtime is affected by environmentaltemperatureand conditions.
The recordingtime becomesvery short in a cold environment.The continuousrecordingtime in the operating
instructionsis measuredunder the condition of using a fully charged battery pack at 25°C(77°F).
As the environmentaltemperature and conditions may be differentwhen you actually use the camcorder,
the remaining battery time may not be the same as the approximatecontinuous recordingtimes given
in these instructions.
A charge mark is providedon the battery pack to help you rememberwhether it
has been charged or not.
Two colors are provided (red and black)-youmay choosewhich one indicatescharged
andwhich indicatesdischarged.
Note: The charge mark does not affect the battery's charge status.
A
IENGLISHI
Preparing
4" There are several cassette types,dependingon:
Color systemused
Recording/playbacktime.
HI8
÷
Checkto see if the battery pack is in place or the AC adapter is
connected.
TAPE
EJECT
1. Press the EJECT button,
The compartmentopens automatically.
insertthe cassettewiththe transparentwindowfacingoutward
and the protection tab toward the top.
2.
Press the PUSHmark until the compartmentclicks into place.
a=
Note: When you have recordeda cassette that you wishto keep,
you can protectit from being accidentallyerased,
a. Recording Impossible (Protection):
Push the red tab on the cassette to cover up the opening,
b_
b. Recording possible:
If you no longerwish to keep the recordingon the cassette,
push the red tab back so that it no longercovers up the opening.
A
[ENGLISH 1
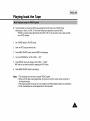
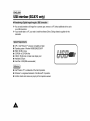
Basic Recording
Please make these preparations before recording.
•
Did you connect a power source?
(Battery Pack or AC Power Adapter)
•
Did you set the power switch to CAMERA position?
•
•
Did you insert a cassette?(see page 26)
Open the LCD monitorand makesure that STANDBYis displayedin the OSD
(if the red tab of the cassette is opened, STANDBYwill not be displayed)
Did you open the LENS CAP?
Make sure the imageyou want to record appears in the LCD monitor,
Make sure the battery leveIindicatesthatthere is enough remaining powerfor recording,(see page 25)
We recommendthat beginners,who are using the camcorderfor the first time,
switchthe EASYmode on. (see page 37)
•
•
•
•
a. Tostart recording,press the red START/STOPbutton,
Recordingstarts and REC should be displayedon the LCD.
A
ENGLISH
1
Basic Recording
b. Tostop recording,press the red START/STOPbutton
again,
When Recordingstops,STANDBYshould be displayed
on the LCD,
[
•t, Youcan view a recordedpicture withthe REC SEARCH _, G function
in STANDBYmode,REC SEARCH G allowsyou to reverseand
REC SEARCH _ allows you to forward,for as long as you keep pressing.
•t,
A
If you pressthe REC SEARCH (_ button briefly in STANDBYmode,
your camcorderwill play back in reversefor 3 secondsand return to
the original position aatomatica{ly.
REC SEARCH_,_
[ENGLISH 1
Basic Recording
•
While recording, it is very important to hoedthe camcorder correctly,
•
For stable recording, fix the LENS cap firmly by clipping it on the hand strap,
(refer to figure)
1. Hold the camcorderfirmly using the hand strap, (see page 20)
2. Place your right elbow against your side.
3. Place your left hand under or next to the LCD to support and adjust it.
Do not touch the built-in microphone.
4. Choose a comfortable,stable position forthe shots that you are taking.
Youcan lean against a watI or on a tablefor greater stability,
Do not forgetto breathegently.
5. Use the LCD frame as a guide to determinethe horizontalplane,
6. Wheneverpossible,use a tripod.
1. Hold the camcorderfirmly with the hand strap, (see page 20)
2. Place your right elbow against your side,
3. Place your left hand under the camcorder to support it.
Do not touch the built-in microphone.
4. Choose a comfortable,stable position forthe shots.
Youcan lean against a wall or on a tablefor greater stability,
Do not forget to breathegently.
5. Put your eye firmly against the eyecap.
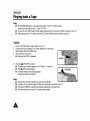
6. Use the viewfinderframe as a guide to determinethe horizontal plane.
7. Wheneverpossible,use a tripod.
A
IENGLISHI
Basic Recording
4" Yourcamcorder is equipped with a 2.5 inch color Liquid Crystal Display(LCD)screen,which allowsyou to view
recordingor playbackdirectly.
4, Dependingon the conditions in which you are using the camcorder (indoors or outdoors for example),
you can adjust:
• Brightness
• Color
1,
2,
3,
4,
Make sure that the battery pack is in peace.
Set the powerswitchto CAMERAmode.(seepage 22)
Open the LCD monitor,then the LCD will turn on.
Press the MENU ON/OFFbutton,the MENUlist will be displayed,
_15
[}ZOOM
P_P
OISP_Ay
WHITE_AL
WL _D,',OCO_
OFF
OFF
OFF
ON
AUTO
ON
t,,JXT_MENU
5, Turnthe UP/DOWNdial to LCD ADJUST,
6.
Press ENTER.
•
The LCD ADJUST MENU will be displayed.
7, Turnthe UP/DOWNdial to adjust the LCD brightness,
EXIT: MENU
CO£OR
_
EXIT: MENU
8. Press ENTER.
• The cursorwill moveto the next item,
BRIGHT
coD_
EXIT: MENU
,A
1
[ENGLISH 1
Basic Recording
9, Turnthe UP/DOWNdial to adjust the LCD color setting.
f0. Press ENTER.
• For further adjustment, repeatsteps 7, 8, 9.
11. Pressthe MENU ON/OFFbuttonto end the setting.
Notes:
• If you don't press a button within 30 seconds, the setting will disappear.
• The MENU ON/OFFfunction will not operate in EASY mode,
Use the focus adjustment knobof the VIEWFINDERto focus the picture,
A
IENGLISHI
Basic Recording
÷
÷
You can monitor the playback picture on the LCD monitor,
Make sure that the battery pack is in place,
1, Holddown the tab of the power switchand push the switchto
PLAYERmode.
2,
insert the tape you have just recorded,
3, Open the LCD monitor and make sure that STOP is displayedon the OSD,
Adjust the angle of the LCD monitor and set the brightnessor the color
if necessary.
4,
Pressthe "<< (REW) buttonto rewindthe tape to the beginning,
• To stop REWIND,pressthe • (STOP) button.
•
Camcorderstops automaticallyafter rewinding,
5,
Press the IHI(PLAY/STILL) button to start playback.
•
You can see the video you recorded on the LCD,
•
To stop the PLAY operation, press the • (STOP) button.
Note: You can a(so monitor the picture on a TV screen,
after connecting the camcorder to a TV or VCR. (see page 57)
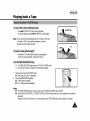
[ENGLISH 1
Basic Recording
The LCD adjustment method in PLAYERmode is identicalto step number 4 of page 30, exceptthe powerswitch must
be set to PLAYER.
÷
÷
When you use the LCD monitor while playing back,
you can hear sound from the Speaker,
Volume of the Speaker is controlled by the UP/DOWN dial tab
on the camcorden
4"
If you close the LCD monitor, the LCD monitor and Speaker are
turned off.
4"
If the speaker does not work properly, check the following:
• Is the LCD monitor closed?
Notes:
•
•
•
•
•
•
Is the volume adjusted to a low level?
Is the speaker off? (see page 60)
•
Lower the volume if vibration from the built-in speaker
causes screen disturbance.
•
Volume display will automatically disappear 2 seconds
after adjusting.
Press IHI (PLAY/STILL)button during playback.
To resume playback,press the it'll (PLAY/STILL)button
again.
PLAY/STILL
REW
FF
Keeppressing I_,,_(FF)or "_(REW) buttonduring playback.
To resume normalplayback, releasethe button.
,A
[ENGLISHI
Advanced
÷
÷
÷
÷
1,
Recording
Zoom works in CAMERAmode only.
Zooming is a recordingtechnique that lets you change the size of the sub)ectin the picture.For more professional
lookingrecordings,do not use the zoom function too often.
Youcan also choose from two zoom speeds to suit different needs :
•
Gradualzoom (9~12 seconds from TELE/WlDEto WIDE/TELE)
•
High-Speedzoom (3~6 seconds from TELE/WlDEto WIDE/TELE)
Usethese features for different shots; pleasenote that overuse of the zoomfeature can lead to unprofessional
lookingresults and a reductionof battery pack usage time.
Move the zoom lever a little for a gradual zoom,
move it further for a high-speed zoom.
Your zooming is monitored on the OSD.
2. T (Telephoto)side:
Subjectappears closer.
3. W (Wide angle) side:
Subjectappears further away.
Note: MACRO
If you cannot get a sharp focus in telephoto zoom, move the leverto the "W"side until the focus is sharp.
Youcan record a subjectthat is at least 1 mm awayfrom the lens surface in the wide angle position.
A
[ENGLISH 1
Advanced
4,
4,
4,
4,
Recording
Digital Zoomworks in CAMERAmode only.
Zooms morethan 22x are performeddigitally,
The picture quality deterioratesas you go towards the "T"side,
We recommendthat you use the DiS (SCL860/L870)feature with the DIGITALZOOM for picture stability.
(see page 39)
1, Set the power switchto CAMERAmode,(see page 22)
• Open the LCD monitor and adjust the LCD monitor so as to see comfortably,
2, Make sure thatthe DIGITALZOOM feature is on, (see page 36)
3, When you movethe ZOOM leverto the "T" side, the picture will be enlarged
within 22x minimumto 880x maximumZOOM.
This is the DIGITALZOOM boundary,
m_
_shows
H880 []
the digital zoom area
shows the optical zoom area
4,
If you do not want to use the DIGITALZOOM,set the DIGITALZOOM function to OFF in the MENU list.
(see page 36)
A
IENGLISHI
Advanced
÷
Recording
The DIGITALZOOM feature is explainedon page 35,
1, Set the power switchto CAMERAmode.(see page 22)
2,
Pressthe MENU ON/OFFbutton,
• The MENU list will appear.
DIS ..................
DZOOM ............
PIP ...................
DISPLAy ............
I
MENU
WL
REMOCON
OFF
OFF
OFF
ON
¸¸¸¸ON
]
NEXT¸ MENU
3, Turnthe UP/DOWNdial to D. ZOOM.
LCD ADSUST
_)IS
!D
_i_ .....................
M_'i'i_ii_ii_ii_i'_,_i
__F _!
DISPLAY ............ ON
WHITE 8AL AUTO
WL REMOCON ¸¸¸¸ON
LPIP
...................
NEXT¸
MENU
4,
5,
PressENTER,
• The DIGITALZOOM setting will change,
Pressthe MENU ON/OFFbuttonto end setting.
LCZI AD,JUST
Note:
A
The D,ZOOM ON/OFF function will not operate in EASY mode,
1
_lS
!D
_i_.............
M_'i'i_ii_ii_ii_i'_,_i
_ F_ii_
I)ISPLA¥ ............ ON
WHITE BAL_ _____UTO
WL REMOCON _,_,ON
N£×T_ MENU
1, Set the power switchto CAMERAmode.
2, PressD. ZOOM ON/OFF button,
• The DIGITALZOOM indicatorswill be displayed on the screen,
and DIGITAL ZOOM function will operate,
3, Todeactivatethe DIGITALZOOMfunction,pressthe D.ZOOMbuttonagain.
• The DIGITALZOOM indicatorsdisappear from the screen,
OFF J
[ENGLISH 1
Advanced
÷
Recording
Evena beginner can easily make a recording using the EASY mode.
• The EASY mode only operates in CAMERA mode,
1. Set the powerswitchto CAMERAmode (see page22),
2. By pressingthe EASYbutton, all the functions of the camera willbe
set to off and the recording settingswill be set to the following basic mode,
• Battery level,recording mode,counter,date/time,
DiS ( E_] ) willbe displayedas the camcorderstarts to run.
• The word "EASY"will appear on the LCD at the same time,
However,the Date/Timewill only be seen if it has been
previouslyset.
(DiS ( _] ) wilt be displayedon SCL860/L870only)
XXXXX
EASY
_
F
STB_
JAN 31
3. Pressthe START/STOPbuttonto start recording,
• Recordingwill begin using the basic automatic environmentsettings,
4. Pressing the EASY buttonagain turns the EASY mode off.
• The camera will return to the settingsthat were set priorto
the EASYmode being switched on.
[
Note: The Easy mode settings are stored in the camera (provideda good lithium battery has been installed).
A
[ENGLISHI
Advanced
Recording
•t, Youcan customizethe settingsand save them for future use,
• The CUSTOMfunction only operates in CAMERAmode,
1, Set the power switchto CAMERAmode.
2, Pressthe MENU ON/OFFbutton, to bring up the MENU list.
3, Turn the UP/DOWNdial until CUSTOM SET is highlighted.
I
5, To exitthe menu,press the MENU ON/OFF buttontwice.
6, By pressingthe CUSTOMbutton,the Customsettings will come up.
• Date/Timeand Title will only appear if these havebeen
set in advance.(see page 46)
• The word "CUSTOM"will be displayed on the LCD at the same time,
CLOCK SET
TITLE SET
T_TLE ............
D_ITLE COLOR
MENU
the CUSTOMSET is set as follows;
D_S .................
ON
Pip ...............
ON
r CUSTOM
DZOOM
SETTINGON
]
DATE]TIM£
DATEYFIME
/ TITLE ..............
C2_TINUE
/ displays
SELECT
S_FA
/ DSE
P"°G'M"
kEX_T
MENU
/
J
880x
_HrTEBA_:::
:rNDooa_Pressing the CUSTOMbutton,
-0:0003
SEPIA
CUSTOM
CONGRATULATIONS
(TLE ,, Aoj
CON'rINUE
JAN 12003
7, Pressthe START/STOPbuttonto start recording,
• Recordingwill begin using the new CUSTOMsettings,
8, To switchCustom off, pressthe CUSTOM buttononce.
• The camera will revert to the settingsthat were set prior to the CUSTOMmode being switched on.
•
•
•
In CUSTOMmode,the DIS and PIP functions are not available,
If you want to use these, you must first switch the EASYor CUSTOMmode off.
The CUSTOMsettings will be stored in the camera (provideda good lithium battery has been installed).
,A
OFF
OFF
OFF
ON
AUTO
ON
1
NEXT MENU
4, Pressthe ENTER button,the CUSTOMmenu will appear.
• Set the statusof each item to what you want.
E_Whee
_)l_ ..................
DZOOM .............
PIp ....................
DISPLAY ..........
WHITE }3AL
MENU
WL
REMOCON
OFF
WHITE
]
[ENGLISH 1
Advanced
÷
÷
÷
Recording
The DISfunction works in CAMERA mode only.
DIS (Digital Image Stabilizer)is a handshake compensationfunction that compensatesfor any shakingor moving
of the hand holding the camcorder(within reasonablelimits).
It providesmorestable pictures when:
• Recordingin the Zoom In mode
• Recordinga small object close-up
• Recordingand walking at the same time
• Recordingthrough the window of a vehicle
1. Set the powerswitchto CAMERAmode,(See page 22)
• Open the LCD monitorand adjust it to see comfortably.
2. Pressthe MENU ON/OFFbutton.
• The MENU listwill appear,
3. Turnthe UP/DOWNdial to DIS.
4.
D_S ..................
OFF
DZOOM .............. OFF
p_F' ..................
OFF
D_SF'LAy .......... ON
WHITE BAL • ¸¸¸¸AUTO
WL REMOCON ¸¸¸¸ON
NEXT
MEN_J
Press ENTER.
• The DIS settingwillchange.
5. Pressthe MENU ON/OFFbuttonto end the setting.
• When the DIS is set, the DIS mark ( _ ) will be displayedon the OSD,
Notes: 1, It is recommendedyou deactivate the handshakecompensation
function when using a tripod.
2, The DiS function will not operate in the DSE mode.
3, The MENU ON/OFFfunction will not operate in EASY mode,
A
]
[ENGLISH]
Advanced
Recording
•t, The MF/AF function works in the CAMERAmode only.
•t, In most situations, it is betterto use the AutomaticFocusfeature, as it enables you to concentrateon the creative
side of your recording.
•t, Manualfocusing may be necessaryunder certain conditionsthat make automatic focusinginadequate.
÷
÷
The AF (Auto Focus) mode is set automatically when you switch on the Power switch,
If you are inexperienced with camcorders, we recommend that you use
the Auto Focus mode.
÷
In the following situations,you should obtain better results by adjusting
the focus manually.
a. A picture containingseveralobjects, some close to the camcorder,
others further away.
b. A personenveloped in fog or surroundedby snow.
c. Very shiny or glossy surfaceslike a car.
d. Peopleor objects movingconstantly or quicklylike an athlete or crowd.
1. Set the power switchto CAMERAmode.(see page 22)
2. Pressthe MF button.
MF icon will appear in display.
3. Zoom in the subject to be recordedby pushing the ZOOM tab to the "T" side.
A
[ENGLISH 1
Advanced
Recording
4. Turnthe UP/DOWNdial up or down until the object is focused.
5. Youwill obtain a sharp picture after zoomingout.
6. TOreturn to AF(Auto Focus),press the MF buttonagain.
MF iconwill disappear.
Note:
The MF function will not operate in EASY mode,
BLCworks in the CAMERA mode.
Back lightingexists when the subjectis darker than the background:
The subject is placed in front of a window.
The person to be recordedis wearing white or shiny
clothesand is placedagainst a bright background;
the person'sface is too dark to distinguishtheir features.
The subject is outdoors and the backgroundis overcast.
The light sources are too bright.
The subject is against a snowy background.
f.
2.
* BLC off
* BLC on
Set the power switchto CAMERAmode.(see page 22)
Press BLC button.
• Normal - BLC - Normal
• BLC enhancesonly the subject.
Note:
BLC function will not operate in RAE or EASY mode.
A
IENGLISHI
Advanced
Recording
4. The PROGRAMAE function works inthe CAMERAmode only.
4. The PROGRAMAE modes allow you to adjust shutter speeds and apertureto suit different recordingconditions,
They give you creative controIover the depth of the field,
4. There are 6 automatic exposure modes,
1. AUTO mode
• Auto balance betweenthe subject and the background.
• To be used in normal conditions.
• The shutter speed automaticallyvariesfrom 1/60to 1/250 second, dependingon the picture.
2. SPORTS mode ( _ )
•
For recordingpeopleor objects moving quickly;you should able to playback the picture in slow motion on an
8 mm VCR or stop on a given image with very little blur.
3. PORTRAIT mode( _ )
•
For focusing on the backgroundof the subject,the backgroundbeing out of focus.
The PORTRAITmode is most effectivewhen used outdoors.
• The shutter speed automaticallyvariesfrom 1/60to 1/1000 second, dependingon the picture.
4. SPOTLIGHTmode ( _ )
• To record correctlywhen there is only light on the subjectand not the restof the picture,
• The shutter speed is 1/60 second.
5. SAND/SNOWmode ( _ )
•
For recordingwhen the people or objects are darker than the backgroundbecauseof reflectedlight from sand
or snow,
• Theshutterspeedautomaticallyvariesfrom1/60to1/250second,
dependingonthepicture.
6. HSS (High Speed Shutter) mode (_)
•
For recordingfast-movingsubjectssuch as the players in goif or tennisgames,
• Youmay need to light the recordingarea.
A
[ENGLISH 1
Advanced
Recording
1.
Set the power switch to CAMERA mode,
2.
Press the PAE button, the ( _
) symbol will be displayed,
3. Pressthe PAE buttonuntilthe appropriatesymbolis displayed,
•
No Display: Full Auto mode.
Notes:
• The £AE mode chosen will be recordedon the tape.
• Toend the I_AEfunction, pressthe £AE buttononce or several times,
until the FtAEIcon is no longerdisplayed.
• The £AE function will not operate in EASY mode.
• The BLC function will not operate in £AE mode.
A
[ENGLISHI
Advanced
Recording
The digital effects enable you to give a creative look to your recording by adding various special
effects,
4" Se(ectthe appropriate digital effect for the type of picturethat you wish to record,
4, There are severalDSE modes.
(SCL8f0; 8 modes,SCL86O/L870:10modes)
1. Normal picture.
2. GHOST:This mode gives the image a dragging effect,
(SCL860/L870only)
3. STROBE:This mode works by insertinga cutting effect on the image.
There are 50 fields in a normal recordedpicture.(SCL860/L870only)
4. SEPIA:This mode gives the image a SEPIA effect.
5. B&W(Black& White):This mode allowsthe imageto be recorded in black
and white.
6. NEG.(Negative):This mode allowsimages to be recordedby reflectingthe
color of the image.
7. MIRROR:This mode cuts the image in half, using the mirror effect.
8. ART:Adds a paint-like effect, called solarization,to the image.
9. MOSAIC:This mode gives the image a checkereddesign.
10, 16:9(WlDE):This mode providesa 16:9(WIDE)televisiondisplay.
11, CINEMA:This mode coversthe upper/lower portionof the screen to give a
movie-likeeffect.
Notes: •
•
A
DIS, PIP functions will not operate in DSE mode.
DSEfunction will not operate in EASY or CUSTOMmode,
L",,IL£]
8
[ENGLISH 1
Advanced
Recording
1, Set the powerswitchto CAMERA mode.
2,
Pressthe DSE button,GHOST or SEPIAwill be displayed,
IHOS
T
3, Keep pressingthe DSE button, untilthe desired mode is
displayed.
4,
Pressthe START/STOPbutton to start recording,
5, To exit the DSE functions,press the DSE buttononce or several
times until no DSE mode is displayedon the LCD.
Notes: •
•
it is recommendedthat you set the DSE mode in STBY mode.
DSE functions will not operate in EASY or CUSTOMmode,
,SL
[ENGLISH 1
Advanced
÷
÷
Setting and recording the date/time feature works in the CAMERA mode only.
You can record the date/time on your tapes, so you will know when it was made, The date and time are recorded
whenever they are displayed on the viewflnder or LCD.
•t,
1,
Recording
Setting the DATE/TIME is possible in CAMERA STANDBY mode only.
Make sure that you have installed the LITHIUM BATTERY. (see page 21)
The LiTHiUM BATTERY is needed to maintain the clock.
2,
Set the power switch to CAMERA mode. (see page 22)
3,
Press the MENU ON/OFF button, then the MENU list will appean
MENU
I
[° j
PIP .....................
OFF
DISP£AY .......... ON
WHITE BAL
• • AUTO
WL REMOCON
• ON
NEXT: MENU
MENU
TITLE ..........
OFF
D/TITLE COLOR WHITE
C RESET .........
0:00 O0
DEMO .............
OFF
4, Turn the UP/DOWNdial until CLOCK SET is highlighted.
EXT: MENU
12:00 AM
5,
Press ENTER.
•
CLOCKSETTING is possiblewhen the DATEandTIME appear.
•
BLINKINGindicatesthe possiblechangesfor the setting.
The year will be the first to blink.
CLOCK SETTING
_X_T
12_00 AM
6, Turn the UP/DOWNdial to set the desired year.
JAN1_o#_
I
,A.
MENU
kOCK SETTING
_EXIT
MENU
}
[ENGLISH 1
Advanced
Recording
7. Press ENTER.
• The monthto be reset will blink.
8. Turnthe UP/DOWNdial to set the desired month.
9. Press ENTER.
• The day to be reset will b{ink.
10. Youcan set the day. hour and minute followingthe same procedure
used for setting the year and month.
11. Press ENTER after setting the minute and the clocksetting screenwiil
disappear.The selected date andtime will then be displayed.
1. Make sure thatyou haveset the DATE/TIME.
2. Set the power switchto CAMERAmode.(see page 22)
• Open the LCD monitor and adjust it to see comfortably.
3. Press the DATE/TIMEbuttonthe requirednumber of times.
• To recordthe date only, pressthe DATE/TIMEbuttononce.
• To recordthe date and time, press the DATE/TIMEbuttontwice.
4. Press the START/STOPbuttonto record the DATE/TIMEon your recording.
Notes;
•
If your date and timesettings are not maintained in the camcorder,
it means the installedLITHIUM BATTERYis discharged.(see page21)
• Youcannot concealthe recordeddate or time during playback.
• The DATE/TIMEfunction cannot be turned off in EASYor CUSTOM mode.
A
[ENGLISH
1
Advanced
÷
÷
÷
Recording
Selectingand recordinga TITLE is possiblein the CAMERA modeonly,
The TITLE feature allowsyou to se{ecta preset tiUestored in the camcorder'smemory.
Youcan also select the languageof the tittes.
•t, SeIectinga language is possiblein CAMERASTANDBYmode only.
•t, The factory default languageis ENGLISH.
Youcan changethe language,
1, Makesure that you have installedthe LITHIUM BATTERYor havethe AC adapter attached, (see page 21)
2,
Set the power switchto CAMERA mode.(see page 22)
•
Open the LCD monitor and adjust it to see comfortably,
3,
PresstheMENUON/OFFbutton, TheMENUlistwillappear.
4, Turn the UP/DOWNdial until TITLE SET is highlighted,
5,
Press ENTER.
•
A list of available languages will appear,
FRENCH
GERMAN
_TALIAN
SPANISH
LANGUAG£
RUSSIAN
A
EXIT
MENU
SELECT
[ENGLISH 1
Advanced
Recording
6. Turnthe UP/DOWNdial to select the appropriatelanguage,
• Youmay select languagesfrom ENGUSH/FRENCH/
GERMAN/ITALIANISPANISH/RUSSIAN.
7. Press ENTER.
• Then, the titte fist in the language you chose witl appear.
8. Turn UP/DOWNdial to whicheverTITLE you desire,
9. Press ENTER.
• The selectedtitte will appear on the screen for
2 ~ 3 seconds and will disappear.At the same,
the camcorderwill return to the menu mode,
Note:
•
Make sure that you have selected a TITLE from
the TITLE list.
1. Set power switchto CAMERAmode.
• Open the LCD monitor and adjust it to see comfortably.
2. Press MENU,
3. Turnthe UP/DOWNdial untiITITLE,,..._.OFFis highlighted.
4. Press ENTER to choose betweenOFF,AUTO-10S and CONTINUE.
5. Press START/STOPbuttonto record the title with your picture,
• If you want to changeTITLE recordingtime, select title recordingtime (OFF,AUTO-lOS,CONTINUE)on MENU.
Notes: •
•
The title moves horizontallyfrom the right side to the left side 10 seconds after you turn on the title.
MENU ON/OFFfunction will not operate in EASY or REC mode,
A
IENGLISHI
Advanced
÷
÷
Recording
The FADE function works in CAMERA mode only.
You can give your films a professional look by using special
effects such as fading in and out at the beginning or end of a
sequence.
1, Beforerecording,hold down the FADEbutton,
The picture and sound gradually disappear (fadeout).
2,
Pressthe START/STOPbutton and at the same time release
the FADEbutton.
Recordingstarts and the picture and sound gradually appear
(fadein).
3, When you wish to stop recording,hold down the FADEbutton,
The picture and sound gradually disappear (fadeout).
4, When the picture has disappeared,
pressthe START/STOPbuttonto stop recording,
Press
a.
the FADE
button
a. FADEOUT
Gradualdisappearance
FADEOUT
(Approx.4 seconds)
b. FADEIN
(Approx.4 seconds)
b, FADE IN
A
Gradual appearance
Release the FADE button
[ENGLISH 1
Advanced
Recording
•t,
The PIP(Picture-in-Picture)feature works in combinationwith the DIGITALZOOM function by using a small,
superimposedscreen to showan imagethat is wider than the image being recorded.
This should help you to get a more clear idea of what you are recording,
The PiP function works in CAMERAmode on{y.
1.
Set the power switch to CAMERA mode.
2. Turnon DIGITALZOOM.(see page 35)
3. Press the MENU ON/OFFbutton,the MENUList
will be displayed.
[
[
MENU
4. Turnthe UP/DOWNdial until PIIR.........OFF is highlighted,
5. Press ENTER, PiP ON and a small screen
should appear.
LCD ADJUST
DIS ...............
DZOOM .......
OFF
OFF
WHITE BAL
AUTO
WL REMOCON ON
£X_T: MENU
6. Check which part you are recordingon the PIP screen,and turn the
Zoom buttonto "T" positionto activatethe DIGITALZOOM mode,
• Start recordingby pressingthe START/STOPbutton
when the portion you want to recordappears,
_
MENU
£CD
7. Setting PIR..._ONto OFF in the MENUwillmake the small
screen disappear and switchthe PIP mode off,
Notes: •
•
•
When you use the PIP function whilemakinga recording,
the PIP screen will be recorded on the Tape.
The MENU ON/OFFfunction will not operate in EASY mode,
PIP function will not operate in DSE mode,
ENTER
ADJUST
DIS ...................
OFF
# ZOQM....
OFF
[IISPkAy ...........
ON
WHITE BAk
AUTO
WL REMOCON
ON
EXIT: MENU
A
[ENGLISH
1
Advanced
÷
Recording
With the SNAP SHOTfeature, your camcorderfunctions like a regular film camera,
al{owingyou to take singlestill pictures.
The SNAP SHOTfunction operates in the CAMERAmode,
1, Set the power switchto CAMERA mode,
2, Aim the Cameraat the image you want to record and
pressthe SNAP SHOT button,
• At this time, be careful not to shakeyour camcorderbecausethe
imagewill be blurred,
3, After the SNAP SHOTbutton has been pressed.
your camcorderwiII record the still image for 6 seconds,
then automaticallyreturn to STANDBYmode.
• Youcan check the remaining time for SNAP SHOT recordingby
lookingat the time displayed on the screen.
• To stop SNAP SHOTrecording, pressthe SNAP SHOTbutton
again,
Notes:
•
•
•
A
If the carncorder is knocked or shaken while taking a SNAP SHOT, the image may be blurred.
The SNAP SHOT function wilI not operate in MENU mode,
SNAP SHOT function will not operate in DSE mode,
[ENGLISH 1
Advanced
Recording
•I. WHITE BALANCEis a recordingfunction that preservesthe uniquecolor of the object in any recordingcondition,
•I. Youmay select the appropriateWHITE BALANCEmode to obtain good image color quality.
AUTO:This mode is generallyused to control the WHITE BALANCEautomatically.
INDOOR (-,o:):Controls WHITE BALANCEaccording to the indoor ambience.
OUTDOOR(-:_-):Controls WHITE BALANCEaccordingto the outdoor ambience,
1, Set the power switchto CAMERA mode.
2, Pressthe MENU ON/OFF button,then the MENU list will appear,
3, Turnthe UP/DOWNdial antil
WHITE BAL........ AUTOis highlighted.
• MENU
4,
PressENTER.
•
Yoacan set it to INDOORor OUTDOOR
by pressingthe ENTER button.
5,
Pressthe MENU ON/OFF buttonto exit
the WHITE BALANCEsetting screen,
LCD ADJUST
DIS ...................
&ZOOM .............
OFF
OFF
Note: The MENUON/OFFfunction will not operate in EASY or REC mode,
A
[ENGLISH
1
Advanced
+
Recording
+
+
Demonstrationautomaticallyshows you the major functions that are includedwith your camcorderso that
you may use them more easily.
The DEMO function is only availablein CAMERA modewhen tape is not in the camcorder.
The Demonstrationoperates repeatedlyuntil the POWERswitchis set to OFE
1,
Set the power switch to CAMERA mode.
2,
Press the MENU ON/OFF button, then the MENU list will appear.
DIS .................
OFF
DZOOM ............ OFF
PIP ..................
OFF
DISpLAy ........... ON
¸¸¸¸¸AUTO }
I WHITE
M£NU BAL
WL REMOCON ¸¸¸¸ON
3. Turnthe UP/DOWNdial so that DEMO is higMighted.
EXIT¸ MENU
4. PressENTER to select ON.
• Demonstrationwill start.
5,
Set the POWER switch to OFF to end the Demonstration,
SAMSUNG }
DEMONSTRATION
Note: The MENU ON/OFFfunction will not operate in EASYor REC mode,
A
[ENGLISH 1
Advanced
Recording
1. Set the powerswitchto CAMERA mode.(see page 22)
2.
Pressthe MENU ON/OFFbutton,
• The MENUlist will appear,
3. Turn the UP/DOWNdial to D/TITLE COLOR...__WHITE.
DIS ...................
OFF
DZOOM ............
OFF
PIP ..................
OFF
DISPLAy ........... ON
WHITE BAL ¸¸¸¸¸¸AUTO 1
I MENU
WL REMOCON ¸¸¸¸ON
NEXT¸ MENU
MENLI
CUSTOM SET
CLOCK SET
T TLE
......
OFF
WHITE
C RESET ...........
_TITLE
DEMO SET
..............
4.
Press ENTER.
• A listof availablecolorswill appear,
000;00
OFF
[ ,
[ DATEJTITk_ COLOR SELECT
iT_IWHrTE
YELLOW
CYAN
MAGENTA
RED
GREEN
13LUE
5. Turn the UP/DOWNdial to select the appropriatecolor.
EXIT; MENU
_TErrlT[N
6.
Press ENTER,
COLOR SELECT
MAGENTA
RED
GREEN
13LUE
EXIT; MENU
7.
I
Pressthe MENU ON/OFFbuttonto end setting.
• The titleand Date/timewill appear in the color you chose,
A
_
IENGLISH]
Advanced
Recording
4. When you use your camcorder,there are only two possiblerecordingenvironments,
Youwill be recordingoutdoors (Normal recordingor through an ND(NeutralDensity)filter),
Youwill be recordingindoors (Video light recommendedor required).
4. The single greatest influence on picture quality is the level of brightness, measuredin lux.
4. The foUowingtable lists a few common situations,the corresponding levelof brightnessand any associated
recommendations.
1,
2,
3,
4,
5,
•
Snow-coveredmountainsor fields.
•
•
•
•
•
•
•
Sandy beach on a hot summer'sday,
On a sunny day in the middleof the afternoon,
On a gloomy day, an hour after the sunrise.
Office with fluorescent lighting near
to a window,
On a sunny day,an hour before the sunset.
Department store counter.
Room lit bytwo 30W fluorescent lights.
100,000
100,000
35,000
2,000
1,000
1,000
500to 700
3O0
•
•
Arcadeat night.
Candlelight.
150to 200
10 to 15
ND filter recommended,
Normal recording,
Video light recommended,
Video light required,
Eject the tape that you have recorded, (see page 26)
If you want to protect accidental erasure of the tape you have recorded, push the red tab on the cassette,
Set the POWER switch to OFE
Close the LENS cover.
Remove the BATTERY PACK from the camcordec
A
[ENGLISH 1
Playing back a Tape
+
+
Toview a tape that you haverecorded,
Ptaybackfunction works in PLAYERmode only.
There are two waysto see a tape;
• Towatch with LCD:recommendedfor outdoor use.
• Towatch withTV monitor: recommendedfor indooruse.
+
Toviewa tape using the LCD monitor,(see page 32)
+
+
It is practicalto use a TV monitor to viewtapes indoors.
To play a tape back, the TV mustfeature a compatiblecolor system,(see page 67)
+
Use the AudioNideo cable suppliedwith yourcamcorder,
• The yellowplug:Video
• The white plug:Audio(L)
+
i
Youcan connect your camcorderto a TV through a VCR.
• Set the input selector on the VCR to UNE.
• The yellowplug:Video
• The white plug:Audio(L)
Toview the cassette on the televisionscreen,
select the channel reservedfor yourVCR on the television,
(Referto your VCR or televisioninstruction book)
-®
A
[ENGLISHI
Playing back a Tape
Notes:
•
SCL810/L860/L870feature a monauralaudio system.If your TV or VCR are stereo,
connectthe audio cable to input "ISof yourTV or VCR.
• Youcan use an S-VIDEOcable to obtain better quality pictures if you have an S-VIDEO connector on yourTV.
• While playing back on aTV screen,close the LCD panel Otherwise,picture distortion may occur.
1,
2,
3,
Use the TV/VIDEO bufton to select VIDEO on your TV.
Connect power soume (battery or AC Power Adapter) to the camcorder.
Set the power switch to PLAYER mode.
Insert a tape you want to see.
•
4.
Make sure that STOP is displayed.
PLAYER
Pressthe INI (PLAY/STILL)button.
• The picture you recordedappears on the TV after 2 to 3 seconds.
•
Press• (STOP) to stop playing.
•
If the tape reaches its end during playback,
the tape will rewindautomatically.
Notes:
•
•
•
Vibration from the built-in speaker can cause picture distortion.
It is best to turn the built-in speaker off when your camcorder is connected to the TV.
The system (Hi8/Smm) is selected automatically, depending on the tape format.
•
This camcorder does not support LP recording and playback.
,A
[ENGLISH 1
Playing back a Tape
Press INI (PLAY/STILL)button during playback.
To resumeplayback, press INI (PLAY/STILL)buttonagain.
Note: Your camcorderwill automaticallystop if it is left for morethan
5 minutes in STILL mode withoutoperation in order to
preventtape and head-drumwear,
FF
Press m-m(FF) or <.4 (REW) buttonsduring playback.
To resumenormal playback, releasethe buttons,
÷ The ZERO RETURNfunction works in STOP of PLAYERmode,
4" Youcan Fast Forwardor Rewindto 0:00:00 automatically.
1, Set the power switchto PLAYERmode,
•
Makesure that STOP is displayed.
2, Press the ZERO RETURNbutton,
• Z,RETURNis displayed.
•
FF or REWworks automatically.
Notes:
• The ZERO RETURNbuttondoes not work when the TAPE COUNTERreads 0:O0:00,
• Set the COUNTERRESET to "C.RESET0:00:00" in MENU mode at the start of the cassetteor the required
sequence,
When you wish to find this point on the tape again, pressZ,RETURN buttonwhen playbackis stopped,
A
[ENGLISH]
Playing back a Tape
÷
The LCD control in PLAYERmode is identicalto step 3 of page 30, except the power switchmust be
set to PLAYERmode,
+
+
The speaker is turned ON/OFF by opening/closingthe LCD.
The speakerON/OFF seftingoperates when the LCD is opened.
When it is set to OFF,the speakerwon't turn on evenafter opening
the LCD,
1, Set the powerswitchto PLAYERmode,
2, Pressthe MENUON/OFF button,
then the MENU list will appear,
3, Turn the UP/DOWNdial to SPEAKER.
4, PressENTERto switch the selection.
5, Pressthe MENUON/OFF buttonagain to endthe SPEAKERsetting.
DISP_Y .......... ON
_LCON_OFF
WLREMOCONON
MENU
CRESET ........... 0_00
EXIT: MENU
DISP_Y
..........
_LCON_OFF
WLREMOCONON
CRESET
...........
EXIT: NENU
]
ON
0_00
Speakervolume can be controlled by turning
the MENUdial during playback,
Note: When the MENU list is on, volume will not be changed,
÷
The procedurefor using DSE in PLAYERmode is the same as the procedure for using DSE in CAMERAmode,
except that the power switch mustbe set to PLAYERinstead of CAMERA.Pleaserefer to pages 44 and 45,
Note:
÷
The GHOST,STROBE, NEG., MIRROR,MOSAIC,CINEMA and 16:9(WIDE)effectswill not operate when your
camcorder is in PLAYERmode,
Pressingthe DSE buttonwill scroUthrough the availablesettings,
pat the one you require,
[ENGLISH 1
Playing
back
the Tape
4, This Camcordercan convertan NTSC tape recorded in the SP mode to the "PAL60"format,
allowing you to view it on a PALTV which has Verticalsync adjustmentcircuitry for 60Hz.
"PAL60"is a special output signalformat withwhich a PALTV can be usedto view a tape recorded
by an NTSC recorder.
1. Set POWERswitchto PLAYERmode,
2. Insert an NTSCtape you want to see.
3. Press MENU ON/OFFbutton,then the MENU list will appear,
4.
Turnthe UP/DOWNdial to "PAL CONV...,,,OFF"
5. Press ENTER,then it will change to "PAL CONV......PAL60"
• Now you can see the picture by pressingthe PLAY button,
6. Press MENU ON/OFFbuttonto end setting.
Notes: 1,This Camcordercan not record using the "PAL60"system,
2, When an NTSC tape is being played back, the picture on the PAL monitor screen may shrink in
the Vertical direction,
3, If the signal recorded on the tape is in bad condition,the PAL60playbacksystem may malfunction,
4, A PAL recordedtapecan not be played back on this camcorder,
A
ENGLISH
1
USB interface (SCL870 only)
•_ YOUcan easilytransfer a still image from a camera,tape, memory to a PC without additionaladd-on cards
via a USB connection.
•_ If you transfer data to a PC,you need to install the software(Driver,Editing software)supplied with the
camcorder,
•
•
•
•
•
•
•
CPU : Intel®PentiumIP processor compatib(eor better
Operating system : Windows®98/98SEIME/2OOOIXP
RAM : 64 MB or more
CD-ROM; 4x CD-ROM drive
VIDEO : 65,000-coloror bettervideo display card
AvailableUSB port
HardDisc :4GB (8GB recommended)
•
InteP Pentium II_Mis a trademark of the Intel Corporation,
•
Windows ® is a registered trademark of the MicrosofP Corporation.
•
All other brands and names are property of their respective owners.
A
[ENGLISH 1
USB interface (SCL870 only)
Do not connect the camcorderto PC before installing the program.
If another camera or scanner is connected, please disconnectit in advance,
This explanationis based on Windows®98SEOS.
1, The installprogram automaticallyoperate when the CD is inserted into CD-ROM
If the installprogramdoes not operate,please double click InstalLexein CD-ROM Drive,
2. Click _ito
installthe program,
3. Follow the instructionto install,
A
IENGLISHI
USB interface (SCL870 only)
4. The below window displays the folder to install the program,
• Basically the program is installed in the following folder,
C:\Programfiles\Samsung\USB Media 2.0
•
Click
4,
to change the folder,
5. Connect the camcorder to PC,
6,
6. PC finds a new hardware and install a driver automatically.
7. If the driver is installed, the install is completed.
8. Execute USB Media 2.0 player on the Windows wall paper.
•
USB Media 2,0 User's Manual is included on the accompanying CD in Adobe's Portable Document Format (PDF),
The user's manual can be viewed using Acrobat Reader software,which is also included on the CD,
(The Acrobat Reader is a freeware product of Adobe Systems, Inc,)
A
[ENGLISH 1
USB interface (SCL870 only)
1. Connect a USB cable to the USB port on the PC.
2. Connect the other end of the USB cable into the proper terminal on the camcorder. (USB jack)
3. Connect the audio cable to the Line input jack of the PC.
if the PC has no Line input jack, connect the audio cable to the MIC input jack.
In this case, however, a noise may be produced depending on the PC.
•
•
If you disconnect the USB cable from the PC or the camcorder while transferring, the data transmission will stop
and the data may be damaged.
If you connect the USB cable to a PC via a USB HUB or simultaneously connect the USB cable along with other
USB devices, the camcorder may not work properly.
- In this case, remove the other USB devices from the PC and reconnect the camcorder.
USB CaNe
USB AUDIO Cable
A
IENGLISHI
Maintenance
• Releasing the Eyecap
1, Pull the VIEWFINDERup and then turn the screw counter-clockwise.
2. Pullthe EYECAP out,
3, Clean the EYECAPand the VIEWFINDERscreen with a soft cloth
and cotton swab or a blower,
• Reattachingthe Eyecap
4. Pat the EYECAPon the VIEWFINDER,
5. Pat the screw back on.
Open the LCD monitorand wipe it gentlywith a soft cloth.
Be careful not to damagethe panel
•t, To ensure normal recordingand clear pictures,clean the video heads.
•t, When the playbackpictures are noisy or hardly visible,the video heads may be dirty,
a.
Normal Picture
a
b, c. Noisy Picture
If this happens, clean the video heads
with a dry type cassette cleaner,
1. Set the power switchto PLAYERmode,
2. insert the cleaning tape,
3, Pressthe IHI (PLAY/STILL)button,
4, Pressthe • STOP)buttonafter about 30 seconds.
Check the qua ty of the p cture us ng a v deo cassette,
if it is still bad, repeatthe operation, If the problem
continues,contact your local authorizedservicecenter,
..I,
1, Youmust detach the BATTERYPACKfrom the
camcorderwhen storing.
2, Keepthe camcorder in a ventilated,dry andwarm place.
3, Donot keep the camcorder in a place where the
temperatureoften changes,such as ina car,
pthe camcorder in a stable place.
..I,
J
[ENGLISH 1
Using Your Camcorder
Abroad
Each country or area has its own electric and TV color system,
Before using your camcorder abroad, check the following:
•
•
Youcan use your camcorder in any countryor area that uses 100V to 240V,50/60 Hz.
Use a commerciallyavailableAC plug adapter,if necessary,dependingon the power used,
•
Youcan view your recordingon the LCD or viewfinder.
However,to view a recordingon a televisionor to make a copy to a video cassetterecorder,
the televisionor VCR must be NTSC or PAL60(Playermode only) compatibleand have the appropriate
audio/videojacks.
A
ENGLISH 1
Troubleshooting
4" Before contacting a service center, perform the following simple checks.They
of an unnecessary call
might save you the time and expense
slow
the battery pack is almost
discharged
Change it to a charged
one.
fast
the battery pack is fully
discharged,
Change it to a charged
battery,
TAPE END!
slow
the tape has almost reached
its end.
Prepare a new one,
TAPE END!
no
the tape reached its end
Change to a new one,
TAPE[
slow
there is no tape in the camcorder,
Insert a tape.
PROTECTION!
slow
the tape is protected
from recording,
If you want to record,
release the protection,
D.EMG
C.EMG
R,EMG
L,EMG
slow
the camcorder has some
mechanical fault,
1. Eject the tape.
2. Set to OFF
3. Detach the battery,
4. Reattach the battery.
* Please contact your local authorized
service center if the problem
continues,
slow
moisture
condensation
has formed
in the camcorder.
see page 71,
[J_
A
[ENGLISH 1
Troubleshooting
+
+
+
If you run into any problem using the camcorder, use the following tableto troubleshoot the problem.
Ifthese instructionsdo not allowyou to solvethe probIem,take a note of:
• The model and serial number marked on the bottomof the camcorder.
• Your warranty,if applicable.
Then contact your nearest authorizedservicecenter.
You cannot switch the
camcorder on,
•
Check the battery pack (see page 23)
or the AC power adapter, (see page 22)
Start/Stop does not
operate while recording
•
•
•
Check the POWER, set it to CAMERA.
You have reached the end of the cassette,
Check the record protection tab on the cassette. (see page 26)
The camcorder goes
off automatically,
•
You have left the camcorder set to STANDBY
for more than 5 minutes without using ib(see page 28)
The battery pack is fully used up, (see page 25)
•
The battery pack is
quickly exhausted,
•
•
•
The
The
The
Use
atmospheric temperature is too low, (see page 25)
battery pack has not been charged fully,(see page 23)
battery pack is completely dead, and cannot be recharged,
another battery pack.
You cannot eject the
cassette from the
compartment,
•
•
The battery pack is fully used up,
A mechanical fault might have occurred. (see page 68)
The DATEmME indicator
flashes more than 2 times
when you set the
camcorder to CAMERA,
•
The lithium battery is not installed or is fully used up. (see page 21)
The playback picture
is poor.
•
The video heads might be dirty, (see page 66)
You cannot operate any
functions on the camcorder.
•
A mechanical fault might have occurred (see page 68),
A
[ENGLISH
1
Troubleshooting
A vertical stripe appears when
you recorda bright subject
against a dark background
(candleflame, for example).
*
The contrastbetweenthe subjectand the backgroundis too greatfor the
camcorderto operate normally.Make the backgroundbright to reduce the
contrast or use the BLCfunction while you are recording.(see page 41)
The image quality on the LCD
is poor.
*
The use of VIEWFINDERis recommendedwhen recordingunder sunlight.
(see page 7)
Adjust the LCD.(see page 30)
•
The image in the viewfinder is
blurred.
•
The viewfinderlens has not been adjusted.
Turn the viewfinder focus ring until the screen comes into sharp focus.
(see page 31)
The tape does not movewhen
you pressthe Play, Fast
Forwardor Rewind buttons.
•
•
Set the POWERswitchto PLAYER.
Youhave reached the beginningor end of the cassette.
The picture does not appear in
the viewfinder.
•
The LCD monitoris opened.
There is no sound from the
SPEAKERwhen playingback
the tape.
•
Makesure the SPEAKER is ON.(see page 60)
The Date/Timeor Title disappeared eventhough you had it
set.
•
The lithium battery is not installedor isfully used up.
(see page 21)
A
[ENGLISH 1
Troubleshooting
÷
÷
÷
If the camcorder is brought directlyfrom a cold place to a warm place, moisture may condense inside the
camcorder,on the surfaceof the tape, or on the lens, In this condition,the tape may stick to the head drum and be
damagedor the unit may not operate correctly,
Toprevent possibledamage underthese circumstances,
the camcorderhas a built-inmoisture sensor,
If there is moisture inside the camcorder,DEW [J_ is displayed,
If this happens, none of the functions except cassette ejectionwill work,
Open the cassette compartmentand removethe batteryfor at leasttwo
hours in a warm dry room.
Pleasefollow this procedure when the DEW protection feature is
unexpectedlyactivated and you want to override it:
(Please make sure that the condensationhas disappearedcompletely.)
1. Takethe battery packout.
2.
Take the lithium battery out.
3.
Put the lithium battery back,
4.
Putthe bakery pack back,
,A,
[ENGLISH]
Specifications
•I,
These technical specifications and design may be changed without notice,
Recordingsystem
Video signa!
Usable cassette
Tapespeed
Speed mode
Recordingtime
FF or REW time
image device
Optical zoom ratio
Focal length:f
F
Filter diameter
Focus system
Macro
Min. Illumination
__ _
i_ _,
Size/Pic,cell
Method
2,5 inch/!12k
TFT
Video out
Audioout
Mini jack, 1Vp-p, 75 ohms, Unbalanced
Mini jack, 7,7 dBs, imp.:less than 820 ohms
Power requirements
Power consumption
*Recording, LCD ON
Built-in mic
Built-in speaker
DC &4 V (1,5 A)
SCL810 : 5.4 W, SCL860/L870:5.9W
Operating temperature
Dimension (WxHxD)
Weight
AI
Video: 2 rotary heads Helical scanning FM
Audio: FM monauralsystem
NTSC color, EIA standard
Hi8 or 8ram
SP: 14.345mm/sec
Record: SP only Playback:SP only
P6-120:120 rain,
P6-120: approx.6.5 rain.
CCD (Charge Coupled Device)
22x
3,6~79.2 mm
1,6
46 mm
inner
Auto wide macro
0.3 lux (visible)
Condenser mic, omni-directional
Dynamic,0.5 W standard
0°C to 40°C (32°F to 104°F)
101x104x174mm(3,98x4,09x6,85inches)
780 g (1.716 Ibs)
ENGLISH 1
Index
il!!_;
i iiii!i;i;i!!i
illiiiiiiiii_
iii_i:i
i lii!ii;i!!iiii!
!i;!!!!!!
ill!
!!!
iii!!i!_!:iA!ii_
ii_ili_:
i i i i i i i i!!:!ii!
i lii¸iii!iilli ilii!ii!!i;!
i!iiiiii
¸I!
¸!_!iiiii!i!i_iii_iiii!ili!i!i
¸ii!i!_i!!i;!_iiii!i!i!i!_!!iii!i!!i!i!i_!i
¸
ABROAD .............................................................................. 67
AC POWER ADAPTER ........................................................ 22
ADJUSTING ........................................................................ 30
AF ........................................................................................ 40
AUDIO .................................................................................. 56
AUTO FOCUSING .............................................................. 40
AUTO MODE ........................................................................ 42
AUTO POWER OFF ............................................................ 28
EASY ....................................................................................
EJECT ..................................................................................
ENTER ..................................................................................
EXTERNAL MIC ..................................................................
37
26
30
72
FADE IN ................................................................................
FADE OUT............................................................................
FAR ......................................................................................
FF (FAST FORWARD)..........................................................
FILTER DIAMETER ..............................................................
FOCAL LENGTH ..................................................................
50
50
40
59
72
72
BATTERY ..............................................................................
BATTERY LEVEL ................................................................
BATTERY PACK ..................................................................
BLC ......................................................................................
BRIGHTNESS ......................................................................
25
23
41
30
ii!! i! if!i il;!i ili¸!i!i !ii¸!!_i
i ii_;!
i ¸!!;Jil
i_!IG
i_;ii!i !_i
ill!!_i!i!!ii
!i;i!ii!il !!_!i
i ii Jil;i !_!!!
!ii
GHOST ................................................................................ 44
i!!!i!!il!iii!!
!iiii¸ilii
il_ii
i_i¸iiiiiil;i
i!i¸I;I!
i¸!i!i
i!¸iil
i¸ii ii!¸¸I
ii!i i!!!!¸¸i!¸¸¸
Cii!iiii!i!!!f!i!
i!i!i!i!i!
iilii_
!ii :!:!:!:!:!::!!:!:!:!:!i!!ii
i!!ii
¸¸iil
!
CAMERA .............................................................................. 22
CASSETTE ..........................................................................
CASSETTE HOLDER ..........................................................
CLEANING .......................................................................... 66
COLOR ................................................................................ 30
CONTENTS ............................................................................ 2
COUNTER ............................................................................ 59
CUSTOM .............................................................................. 38
i!i!!i:iil¸!!i
¸i!i!i !!!!!i:;_ !!i!!i;
!_i_
!i_
!i_
!i_
!i_
!i!ii
¸_ii!
ii!i¸ii¸Ill
!ii_;
_I!ID
¸i¸_ii
!!_ii!
ii!ii!!_i_;;il
¸i;;i;
¸i;;i;
¸i;;i;
¸i;;i;
¸i;;i;
¸i;;i;
¸i;;i;
¸i;;i;
¸i;;i;
¸i;;i;
¸i;!!i!
iiii
DATE ....................................................................................
DATE/TIME ..........................................................................
DC CABLE ............................................................................
DEMO ..................................................................................
DEW ....................................................................................
DIGITAL ZOOM ....................................................................
DIMENSIONS ......................................................................
DIS........................................................................................
DISPLAY ..............................................................................
DSE ......................................................................................
46
46
22
54
71
35
72
39
16
44
iii!¸iiilil _¸
!! iii i i¸!ii ; i!!ii!i iil!!ii i ! _!Hi¸4¸¸¸!iil
! !iiii i ! ii !;;!¸!i i iii;ii!i!i! !!iiiil
HAND STRAP ...................................................................... 20
Hi8 ........................................................................................ 58
!i iiii!¸¸ill
ii i;ii;! i!_!iii !!i_i!
ii ii ii¸¸¸iiiiI
! !¸¸¸i!i¸¸
L !_i!_ii!!i!!i!!i!!i!!i!!i!!i!!i!!i!!i!!i!!i!!i!!i!!i!!i!!i!!i!!i!!i!!i!!i!!i!!i!
_ iii!i_
i
LCD ...................................................................................... 30
LENS .................................................................................... 13
LITHIUM BATTERY .............................................................. 21
il!i i¸!!i¸;I!I
!il¸¸ i !;;ii!i i ;iii!;;iiiii!i¸¸;;i!_;
_iM!i_!i!!i¸!!!!!!ii !!i¸!!!!!!ii !!i!¸i i¸iii¸!!! !i !!i¸!i i;
MIRROR..............................................................................
44
MOISTURE..........................................................................
71
MOSAIC................................................................................
44
ENGLISH 1
Index
ND FILTER .......................................................................... 56
NEAR
....................................................................................
NEG ...................................................................................... 44
NTSC .................................................................................... 67
OPERATION MODE ............................................................ 17
OSD .................................................................................... 16
PIP ...................................................................................... 51
PLAY .................................................................................... 58
PLAYER .............................................................................. 58
PORTRAIT MODE .............................................................. 42
POWER CONSUMPTION .................................................... 72
POWER REQUIREMENT .................................................... 72
POWER SWITCH ................................................................ 22
PROGRAM AE .................................................................... 42
RECHARGING .................................................................... 23
REC SEARCH .................................................................... 28
REMOTE CONTROL ............................................................ 19
REW (REWIND) .................................................................. 59
SNAP SHOT ........................................................................
SPEAKER ............................................................................
SPECIFICATIONS ................................................................
SPORTS MODE ..................................................................
SPOTLIGHT MODE ............................................................
START/STOP ......................................................................
STILL ....................................................................................
STOP ..................................................................................
STROBE ..............................................................................
SYSTEM ..............................................................................
S-VIDEO ............................................................................
52
60
70
42
42
27
59
58
44
72
58
TAPE COUNTER ................................................................ 17
TAPE EJECT ........................................................................ 26
TAPE END ............................................................................ 68
TIME .................................................................................... 46
TITLE .................................................................................. 48
TROUBLESHOOTING ........................................................ 69
TV MONITOR ...................................................................... 57
VIDEO .................................................................................. 57
VIDEO HEAD ...................................................................... 66
VOLUME .............................................................................. 60
i!ii!iiil!!i ii !i!!:ii!i!i!if!!!
iif!ill
_!!_!ii!iii_i!_ii!_
!iiliii:i: i !!!!!!!!!!!!!!!!!!!!!!!!!!!!!!!!!!!!!!!!!!!!ii!!
:i
SAFETY INSTRUCTIONS .................................................... 4
SAND/SNOW MODE .......................................................... 42
SELF-30S ............................................................................ 19
SELF-END .......................................................................... 19
SELF DIAGNOSES .............................................................. 68
SELF RECORD .................................................................... 19
SELF TIMER ........................................................................ 19
SEPIA .................................................................................. 44
SHOULDER STRAP ............................................................ 21
WEIGHT .............................................................................. 72
WHITE BALANCE ................................................................ 53
ZERO RETURN .................................................................. 59
ZOOM .................................................................................. 34
[ENGLISH 1
Warranty
SAMSUNG
LIMITEDWARRANTY
SAMSUNGElectronicsAmerica Inc, (SEA), warrantsthat this product is free from defectivematerial and
workmanship.
SEA further warrantsthat if product failsto operate properlywithin the specified warrantyperiod and the failure is
due to improperworkmanship or defectivematerial, SEA will repairor replacethe product at it's option.
All warranty repairs must be performedby a SEA authorizedservice center,The name and addressof the
location nearestyou can be obtained by calling toll free: 1-800 SAMSUNG(1-800-726-7864).
Labor
90 days carry-in
Parts
1 year
On carry-in models, transportation
to and from the service center is the customer's responsibility.
The odginal dated sales receipt mustbe retained by the customer and is the only acceptable proofof purchase.
It must be presentedto the authorizedservice center,
EXCLUSIONS (WHAT IS NOT COVERED)
This warranty does not cover damage due to accident, fire, flood and/or other acts of God; misuse,
incorrect line voltage, improperinstallation, improperor unauthorizedrepairs,commercial use,
or damage that occurs in shipping.
Exterior and interiorfinish, lamps,and glass are not covered underthis warranty.
Customeradjustments which are explainedin the instruction manualare not covered underthe terms of this
warranty.This warranty will automaticallybe voidedfor any unit found with a missingor altered serial number.
This warranty is valid only on products purchasedin the United Statesand Puerto Rico.
Some States do not allowthe exclusionsor limitationsof incidentalor consequentialdamages,or allow
limitationson how longan impliedwarranty lasts, so the above limitationsor exclusions may net apply to you.
This warranty gives you specificlegal rights, and you may also haveother rights which vary from State to State,
A
THIS CAMCORDER IS MANUFACTURED BY:
SAMSUNG
Electronics
America Inc.
400 VaUey Road, Suite 201, Mount Arlington, NJ 07856
Tel: 1-800-SAMSUNG (1-800-726-7864)
*Samsung Electronics'InternetHome Page
http:/h,vww.sa
msangusa,com
AD68-00607B