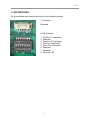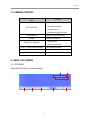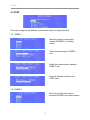
1
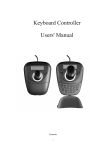
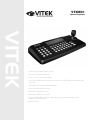
VT-KBD1
Xpress Keyboard
VITEK
• 3-Axis 64 Step Variable-Speed Joystick
• Auto Focus with Manual Override
• Large 1 1/2" x 5 3/16" LCD display
• Control up to 256 Devices including Xpress Domes and VITEK Saga Series Digital Video
Recorders
• Digital Flip to follow objects (Enable/Disable)
• 3 X 6 Programmable function keys
• Recall 8 Pre-Programmed tours
• Recall up to 248 Preset Positions
• Built-in RS-485/422 half-duplex mode supports up to 64 devices. Simplex mode
supports up to 256 devices.
• Real-time Clock
VT-KBD1
VT-KBD1
CONTENT VERIFICATION
Prior to installation of the Xpress Series Dome camera, please verify that the packaging
contains the following contents:
1.
2.
3.
4.
5.
6.
One Xpress Keyboard.
One Data Junction Box.
This Instruction Manual.
Two data cables.
One AC Adaptor.
One Power Cable.
If any of the contents are missing, please contact the Vitek Customer Help Desk
immediately.
1
VT-KBD1
RISK OF ELECTRICK SHOCK WARNING
WARNING
TO REDUCE THE RISK OF FIRE OR ELECTRIC SHOCK, DO NOT EXPOSE THIS PRODUCT TO RAIN
OR MOISTURE. DO NOT INSERT ANY METALLIC OBJECTS THROUGH THE VENTILATION GRILLS OR
OTHER OPENINGS ON THE EQUIPMENT.
CAUTION
EXPLANATION OF GRAPHICAL SYMBOLS
The lightning flash with arrowhead symbol, within an equilateral triangle, is intended to
alert the user to the presence of uninsulated "dangerous voltage" within the product's
enclosure that may be of sufficient magnitude to constitute a risk of electric shock to
persons.
The exclamation point within an equilateral triangle is intended to alert the user to the
presence of important operating and maintenance (servicing) instruction in the literature
accompanying the product.
2
VT-KBD1
DISCLAIMER
•
•
•
•
While every effort has been made to ensure that the information contained in this
guide is accurate and complete, no liability can be accepted for any errors or
omissions.
Vitek Industrial Video Products, Inc. reserves the right to change the
specifications of the hardware and software described herein at any time without
prior notice.
No part of this guide may be reproduced, transmitted, transcribed, stored in a
retrieval system, or translated into any language in any form, by any means,
without prior written permission of Vitek Industrial Video Products, Inc.
Vitek makes no warranties for damages resulting from corrupted or lost data due
to a mistaken operation or malfunction of the Xpress Domes, the software,
keyboard joystick controller, personal computers, peripheral devices, or
unapproved/unsupported devices.
Trademark Acknowledgements
•
•
Xpress Keyboard is a trademark of Vitek Industrial Video Products, Inc.
Other names and products not mentioned above may be registered trademarks
or trademarks of their respective companies.
Copyright ©2006 Vitek Industrial Video Products, Inc. All rights reserved.
3
VT-KBD1
FCC NOTICE
Xpress Keyboard, VT-KBD1
This device complies with Part 15 of the FCC Rules.
following two conditions;
Operation is subject to the
1. This device may not cause harmful interference, and
2. This device must accept any interference received, including interference that
may cause undesired operation.
Note: This equipment has been tested and found to comply with the limits for Class B
digital devices, pursuant to Part 15 of the FCC rules. These limits are designed to
provide reasonable protection against harmful interference in a residential installation.
These equipments generate, use and can radiate radio frequency energy and, if not
installed and used in accordance with the instructions, may cause harmful interference
to radio communications. However, there is no guarantee that interference will not
occur in a particular installation. If this equipment does cause harmful interference to
radio or television reception, which can be determined by turning the equipment off and
on, the user is encouraged to try to correct the interference by on or more of the
following measures:
•
•
•
•
Reorient or relocate the receiving antenna.
Increase the separation between the equipment and receiver.
Connect the equipment into an outlet on a circuit different from that to which the
receiver is connected.
Consult the dealer or an experience radio/TV technician for help.
Do not make any changes or modifications to the equipments unless otherwise
specified in the manual. If such changes or modifications should be made, you could be
required to stop operation of the equipments.
Vitek Industrial Video Products, Inc.
28492 Constellation Road
Valencia, CA 91355
Phone: (888) VITEK-70 / (818) 771-0300
Fax: (818) 771-0400
www.vitekcctv.com | [email protected]
Canadian Radio Interference Regulations
This is a Class A apparatus complies with Canadian ICES-003.
Cet Appareil numérique de la Classe A conforme à la norme NMB-003 du Canada.
4
VT-KBD1
READ THIS FIRST
Test Sessions
Before you try to record important subjects, we highly recommend that you make
several test sessions to ensure that the Xpress Keyboard is operating and being
operated correctly.
Please note that Vitek Industrial Video Products, Inc., its
subsidiaries and affiliates, and its distributors are not liable for any consequential
damages arising from any malfunction of the Xpress keyboard or its accessories.
The Privacy act of 1974 (5 U.S.C. § 552a)
Please note that the Xpress keyboard is intended for surveillance use and should never
be used in a manner that invades other people’s privacy or contravenes international or
domestic privacy act and its regulations. Please be advised that in certain cases the
monitoring of individuals, private properties, or commercial properties may contravene
legal rights of such individuals even if the images were recorded for personal use.
Warranty Limitations
This equipment’s warranty is only effective in the country of sale. If a problem arises
while the Xpress Keyboard is in use abroad, please convey it back to the country of sale
before proceeding with a warranty claim to Vitek customer help desk.
5
VT-KBD1
SAFETY PRECAUTIONS
z Before using the Xpress Keyboard, please ensure that you read and understand
the safety precautions described below. Always ensure that the Xpress
Keyboard is operated correctly.
z The safety precautions noted on the following pages are intended to instruct you
in the safe and correct operation of the Xpress Keyboard and its accessories to
prevent injuries or damage to the self, other persons and equipment.
z In this Instruction Manual, the term “Keyboard”, “Joystick”, “equipment” and
“device” refers primarily to the Xpress Keyboard and its accessories such as
power supply, data junction box and cables.
WARNING
z Do not attempt to disassemble or alter any part of the equipment that is not
expressly described in this guide. Disassembly or alteration may result in high
voltage electrical shock. Internal inspections, alterations and repairs should be
conducted by qualified service personnel authorized by the equipment distributor
or Vitek customer help desk.
z Stop operating the equipment immediately if it emits smoke or noxious fumes.
Failure to do so may result in fire or electrical shock. Immediately remove the
power cable from the power outlet. Confirm that smoke and fume emissions
have ceased. Please consult the Xpress Keyboard distributor or the closest
Vitek customer help desk.
z Stop operating the equipment if a heavy object is dropped or the casing is
damaged. Do not strike or shake. Failure to do so may result in fire or electrical
shock. Immediately unplug the power cord from the power outlet. Please
consult the Xpress Keyboard distributor or the closest Vitek customer help desk.
z Do not allow the equipment come into contact with, or become immersed in,
water or other liquids. Do not allow liquids to enter the interior. The Xpress
Keyboard has not been waterproofed. If the exterior comes into contact with
liquids or salt air, wipe it dry with a soft, absorbent cloth. In the event that the
water or other foreign substances enter the interior, immediately unplug the
power cord from the power outlet. Continued use of the equipment may result in
fire or electrical shock. Please consult the Xpress Keyboard distributor or the
closest Vitek customer help desk.
z Do not use substances containing alcohol, benzene, thinners or other flammable
substances to clean or maintain the equipment. The use of these substances
may lead to fire. Use a dry cloth on a regular periodic basis and wipe away the
dust and dirt that collects on the device. In dusty, humid or greasy environments,
the dust that collects around the ventilation or the slots on the outer casing over
long periods of time may become saturated with humidity and short-circuit,
leading to fire.
z Do not cut, damage, alter or place heavy items on the power cord. Any of these
actions may cause an electrical short circuit, which may lead to fire or electrical
shock.
6
VT-KBD1
z Do not handle the device or power cord if the hands are wet. Handling it with
wet hands may lead to electrical shock. When unplugging the cord, ensure that
you hold the solid portion of the plug. Pulling on the flexible portion of the cord
may damage or expose the wire and insulation, creating the potential for fires or
electrical shocks.
z Use only the recommended power accessories. Use of power sources not
expressly recommended for this equipment may lead to overheating, distortion
of the equipment, fire, electrical shock or other hazards.
z The supplied AC power adaptor and power cable are designed for exclusive use
with the Xpress Keyboard. Do not use it with other products or battery. There is
a risk of fire and other hazards.
7
VT-KBD1
CAUTION
z Avoid using, placing or storing the equipment in places subject to strong sunlight
or high temperatures, such as the greenhouse or trunk of a car. Exposure to
intense sunlight and heat may cause the battery to leak, overheat or explode,
resulting in fire, burns or other injuries. High temperatures may also cause
deformation of the casing. Ensure that there is good ventilation when using the
equipment.
z Do not store the equipment in humid or dusty areas. Storage in such areas
could lead to fire, electrical shock or other damage.
z Do not operate the Xpress Keyboard beyond its specified temperature, humidity
or power source ratings. Do not use the Xpress Keyboard in an extreme
environment such as in high temperature or high humidity. Use the device at
temperatures within 41°F - 104°F and humidity below 90 %. The normal
operating power source for this device is 12VDC 3 amps.
PREVENTING MALFUNCTION
z Avoid strong magnetic fields. Never place the Xpress Keyboard in close
proximity to electric motors or other equipment generating strong
electromagnetic fields. Exposures to strong magnetic fields may cause
malfunctions or corrupt image data.
z Avoid condensation related problems. Moving the equipment rapidly between
hot and cold temperatures may cause condensation (water droplets) to form on
its external and internal surfaces. You can avoid this by placing the equipment
in an airtight, re-sealable plastic bag and letting it adjust to temperature changes
slowly before removing it from the bag.
z If condensation forms inside the Xpress Keyboard, stop using the equipment
immediately if you detect condensation. Continued use may damage the
equipment. Remove the power cord from the power outlet and wait until the
moisture evaporates completely before resuming use.
8
VT-KBD1
I. INTRODUCTION
FEATURES
The Xpress Keyboard is designed to control up to 64 Xpress Dome cameras in duplex
control mode, and up to 255 Xpress Dome cameras in simplex control mode. Rollover
function buttons allow controlling a variety of external switching devices such as a
SAGA series digital video recorder.
Joystick
The joystick controls a camera’s pan, tilt and zoom movements. The pan and tilt
speed’s movement speed varies from 0.1° per second to 90° per second, for a total
of 65 speed steps. With the TURBO function enabled, the maximum speed is 360°
per second.
Functions
Store and recall up to 248 Preset, reflecting own view settings, such as zoom,
focus, iris and so on.
Store and recall up to 4 Patterns which comprise of a sequential series of pan,
tilt, zoom and focus movements.
Store and recall up to 16 Scans with smooth Vector Scan.
Store and recall up to 8 tours, each consisting 64 functions including Preset,
Pattern, Scan and other Tours.
Global Preset recalls the Preset of all Xpress Dome cameras.
Manual override for focus, iris, and day/night function.
Manual override will be reverted back to automatic mode with a slight movement
of the joystick.
System
Two levels of passwords: administrator and user.
One master and up to seven additional slave Xpress Keyboards.
Digital Video Recorder control, up to 99 units.
Convenience
One Xpress Dome camera settings can be downloaded and saved to transfer
settings to another.
9
VT-KBD1
II. XPRESS KEYBOARD CONTROLLER LAYOUT
1.1 TOP LAYOUT
1
2
3
6
7
8
4
9 10 11
5
13
12
14 15
1. ESCAPE
Exits from a menu and cancel any changes made.
2. SYSTEM
Select the PTZ camera control mode.
3. DVR
Select the DVR control mode.
4. LCD DISPLAY
Displays information regarding the functions, modes, and menu.
5. JOYSTICK
Controls the PTZ camera or navigate through menus.
6. CAMERA
Selects a PTZ camera when used in combination with numeric buttons.
7. NUMERIC BUTTONS
Selects numeric values of various functions, such as selecting a camera, DVR,
Preset, Pattern, Scan and Tour.
10
VT-KBD1
8. MONITOR
Displays a single DVR channel in full screen mode when used in combination with
numeric buttons.
9. FUNCTION BUTTONS
Function buttons provide access to multiple key features of the PTZ camera or DVR.
10. DVR CONTROLS
Toggle between different multichannel display modes of the DVR
Access the DVR menu screen
Rewind
Play / Pause
Fast Forward
Stop
Record
11. PTZ CONTROLS ROW 2
Number +
Access the Preset menu
Recall Presets
Number +
Access the Tour menu
Recall Tours
Deactivated any alarms
Activate Relay Output
Deactivate Relay Output
Select previous PTZ camera
Select next PTZ camera
11
VT-KBD1
12. PTZ CONTROLS ROW 2
Number +
Access the Scan menu
Recall Scans
Number +
Access the Pattern menu
Recall Patterns
Activate Home Function
+
Enter the PTZ menu
Enter the Keyboard menu
Control all PTZ cameras functions simultaneously
Activate the secondary functions for various buttons
Executes highlighted functions.
13. MANUAL IRIS CONTROL
Manually adjust the iris of the PTZ camera.
14. MANUAL FOCUS CONTROL
Manually adjust the focus of the PTZ camera.
15. TURBO
Toggle between Turbo movement and normal movement speed.
1.2 REAR LAYOUT
Data Port 2
Data Port 1
12
VT-KBD1
1.3 DIP SWITCHES
The Dip switches are located at the bottom of the Xpress Keyboard.
J1 Connector
Reserved
S1 Dip Switches
1.
2.
3.
4.
5.
6.
7.
8.
Data Port 1 Termination
Reserved
Data Port 2 Termination
DVR Port Termination
Slave Port Termination
Reserved
Reserved
Slave On / Off
13
VT-KBD1
II. SYSTEM CONFIGURATION AND CONNECTION
2.1 BASIC INSTALLATION DIAGRAM
14
VT-KBD1
2.2 SINGLE DVR CONFIGURATION
POWER
AC 24V
POWER
AC 24V
POWER
AC 24V
AWG # 24
VIDEO
4 ALARM INPUT
1 AUX OUTPUT
Tx+(DOME1+)
Tx-(DOME1 -)
4 ALARM INPUT
1 AUX OUTPUT
SPOT MONITOR
AC-
AC+
TXB
TXA
RXB
RXA
BNC
MAIN MONITOR
TXB TXA RXB RXA
FGND AC- AC+
SW1
BNC
15
TXB(TX-)
TXA(TX+)
TXB
TXA
RXB
RXA
RS-485 or
RS-422 HALF DUPLEX MODE
RXB(RX -)
RXA(RX+)
TXB(TX-)
TXA(TX+)
RS-422
FULL DUPLEX MODE
TXB
TXA
RXB
RXA
BNC
VT-KBD1
2.3 SINGLE XPRESS KEYBOARD WITH TWO DVR CONFIGURATION
POWER
AC 24V
POWER
AC 24V
POWER
AC 24V
AWG # 24
VIDEO
Camera 1~16
4 ALARM INPUT
1 AUX OUTPUT
Tx+(DOME1+)
Tx-(DOME1 -)
4 ALARM INPUT
1 AUX OUTPUT
Camera 17~12( 15)
SPOT MONITOR
FGND AC- AC+
AC+
TXB TXA RXB RXA
2ND MAIN MONITOR
SW1
16
AC-
1ST MAIN MONITOR
TXB
TXA
RXB
RXA
BNC
VT-KBD1
2.4 MULTIPLE XPRESS KEYBOARD CONFIGURATION
POWER
AC 24V
POWER
AC 24V
POWER
AC 24V
AWG # 24
VIDEO
Camera 1~16
4 ALARM INPUT
1 AUX OUTPUT
Tx+(DOME1+)
Tx-(DOME1 -)
4 ALARM INPUT
1 AUX OUTPUT
Camera 17~12( 15)
1ST MAIN MONITOR
SPOT MONITOR
AC-
AC+
TXB
TXA
RXB
RXA
BNC
2ND MAIN MONITOR
TXB TXA RXB RXA
SW1
17
FGND AC- AC+
VT-KBD1
2.5 TERMINATION AND DIP SWITCH SETTINGS
S1:Dome1 port Termination ON
DVR Termination ON
SW1:Termination ON
SW1:Termination ON
S1:Dome1 port Termination ON
DVR Termination ON
SW1:Termination ON
SW1:Termination ON
SW1:Termination ON
SW1:Termination ON
S1:Dome1 port Termination ON
S4:DVR port Termination ON
DVR Termination ON
DVR Termination ON
SW1:Termination ON
S3:Dome2 port Termination ON
SW1:Termination ON
18
TERMINATION ON
S1:Dome1 port Termination ON
SW!:Termination ON
SW1:Termination ON
SW1:Termination ON
VT-KBD1
III. OPERATION
3.1 FIRST TIME POWER ON
When the Xpress Keyboard is powered on for the first time, the password prompt will
appear.
Please enter the password for the proper user level. The default passwords are:
z Administrator:
z User:
9999
1111
The LCD screen will display the Log On confirmation accordingly.
z Admin Log On.
z User Log On.
19
VT-KBD1
20
VT-KBD1
3.2 CAMERA CONTROL
Button or Joystick movement in
Menu
Function
1. Go into submenus
2. Execute a command
LEFT OR RIGHT
3. Change Values
4. Navigate through menu items
UP OR DOWN
Navigate through menu items
DOWN
Complete Title editing
1. Change Value
TWIST LEFT OR RIGHT
2. Enter Title Edit mode
SHIFT + JOYSTICK MOVEMENT
ESC
Turbo Speed Movement
Exit without making changes
HOME OR OFF BUTTON
Delete Value or Name of a Field.
3.3 MAIN LCD SCREEN
3.3.1 PTZ MODE
Press the SYS button to control cameras.
1
3
4
5
6
21
2
7
VT-KBD1
8
9
11
12
10
13
14
1. CAMERA SELECTION
Displays the current camera being controlled.
2. TIME
Displays the current time.
Functions 3 through 14 are toggled by pressing the F button.
3. WRITE PRESET
Select a camera view position then press this button to save as a preset.
4. AUTOMATIC FOCUS
Enable / disable automatic focus.
5. AUTOMATIC IRIS
Enable / disable automatic iris control.
6. DIGITAL ZOOM ON / OFF
Enable / disable digital zoom.
7. AUTOMATIC IRIS
Enable / disable automatic iris control.
8. AUTOMATIC PAN
Enable / disable automatic pan.
22
VT-KBD1
9. BACK LIGHT COMPENSATION ON / OFF
Enable / disable back light compensation.
10. WIDE DYNAMIC RANGE ON / OFF
Enable / disable wide dynamic range.
11. ON SCREEN DISPLAY ON / OFF
Enable / disable On Screen Display.
12. WRITE / RECALL ALIAS PRESET
Write and recall alias presets.
13. KEYBOARD LOCK
Lock / unlock the Xpress Keyboard.
14. FLIP
Flip the view of the camera to the opposite direction by 180 degrees.
3.3.2 DVR MODE (SAGA SERIES DVRS)
1
2
3
4
5
6
7
8
9
10
11
12
13
14
23
VT-KBD1
15
16
17
18
19
1. CAMERA SELECTION
Displays the current camera being controlled.
2. TIME
Displays the current time.
Functions 3 through 20 are toggled by pressing the F button.
3. SEARCH
Enter search menu.
4. COPY
Enter copy menu.
5. AUDIO
Select the audio channel with a combination with a numerical button.
6. RESET
Reset the alarm notification.
7. BOOKMARK
Bookmark a desired section during playback.
8. STATUS
Display the status window.
9. LIVE / PLAYBACK
Toggle between live display mode and paused playback mode.
10. AUTOMATIC SEQUENCE
Activate the automatic sequencing of various display modes.
11. FREEZE
Digitally freeze a single channel or multiple channels.
12. PICTURE-IN-PICTURE
24
20
VT-KBD1
Activate picture-in-picture mode.
13. SPOT MONITOR
Activate spot monitor mode.
14. DIGITAL ZOOM
Activate digital zoom mode.
15~20. RESERVED
25
VT-KBD1
IV. MENU
Press the SHIFT and the MENU button simultaneously to access the keyboard
configuration menu screen. There are 11 categories:
* The menu screen has been stacked to illustrate all options
4.1 CONFIGURATION
Configuration menu sets some basic Xpress Keyboard settings
4.1.1 KEY BEEP
Select the beeping response of the
buttons when pressed on or off.
4.1.2 KEY LOCK
Select the automatic keyboard lock
option on or off. The timer can be set
up to 30 minutes after the last press of
the button.
26
VT-KBD1
4.1.3 CHANGE USER PASSWORD
Move the joystick to the right to
access the user password change
screen.
Enter the current user password, and
then the new password, and then
confirm the new password. Up to
eight digits can be entered for the
password.
4.1.4 CHANGE ADMIN PASSWORD
Move the joystick to the right to
access the administrator password
change screen.
Enter the current administrator
password, and then the new
password, and then confirm the new
password. Up to eight digits can be
entered for the password.
4.1.5 FACTORY DEFAULT
Revert back to the factory default.
4.1.6 SAVE AND EXIT
Save the settings and return to the
main menu screen.
27
VT-KBD1
4.2 PORT
Port menu configures the different communication ports on the junction box.
4.2.1 DOME 1
Move the joystick to the right to
access the DOME 1 port setup
screen.
Select the device type of DOME 1
port.
Select the communication speed of
DOME 1 port.
Save the settings and exit to the
PORT menu.
4.2.2 DOME 2
Move the joystick to the right to
access the DOME 2 port setup screen.
28
VT-KBD1
Select the device type of DOME 2
port.
Select the communication speed of
DOME 1 port.
Save the settings and exit to the
PORT menu.
4.2.3 SLAVE
Move the joystick to the right to
access the SLAVE port setup screen.
Select the device type of SLAVE port.
Select the communication speed of
SLAVE port.
Save the settings and exit to the
PORT menu.
29
VT-KBD1
4.2.4 DVR
Move the joystick to the right to
access the DVR port setup screen.
Select the device type of DVR port.
Select the communication speed of
DVR port.
Save the settings and exit to the
PORT menu.
4.2.5 ALARM
Move the joystick to the right to
access the ALARM port setup screen.
Select the device type of ALARM port.
Select the communication speed of
ALARM port.
30
VT-KBD1
Save the settings and exit to the
PORT menu.
4.2.6 EXIT
Exit to the main menu screen.
4.3 CAMERA
Camera menu configures the cameras connected to the Xpress Keyboard.
4.3.1 DOME SCAN
Dome scan automatically scans any
Xpress Domes connected through the
DOME ports on the junction box of
the Xpress Keyboard.
4.3.2 CAMERA CONFIGURATION
Move the joystick to the right to
access the camera configuration
screen.
Select the ID of the PTZ camera.
31
VT-KBD1
Select the protocol of the PTZ camera.
Select the Port connection of the PTZ
camera.
Select the communication speed to
the PTZ camera.
Select the option to receive alarm
notifications from the PTZ camera.
4.3.3 EXIT
Exit to the main menu screen.
4.4 TIME / DATE
Time / Date menu configures time and date related settings for the Xpress Keyboard.
32
VT-KBD1
4.4.1 DISPLAY
Select Time / Date display on or off.
4.4.2 DATE FORMAT
Select the date display format
4.4.3 TIME FORMAT
Select the time display format.
4.4.4 DAY LIGHT SAVING
Select day light saving time on or off.
4.4.5 DAY LIGHT SAVING
Configure the day light starting date /
time and the end date / time.
4.4.6 SAVE AND EXIT
Save the changes and exit to the
main menu.
33
VT-KBD1
4.5 ALARM
4.5.1 ALARM BEEP
Select alarm beep on or off.
4.5.2 ALARM DWELL
Select the alarm extension on for the
duration of programmed time, or off.
4.5.3 ALARM ACTION
Move the joystick to the right to
access the alarm action configuration
screen.
Select the PTZ dome to configure the
alarm action. Up to 500 different
configurations can be programmed.
Select the alarm input which would
trigger the alarm action.
34
VT-KBD1
Select the alarm output up to 999 dry
contacts.
Select up to 999 alias presets to
execute. Please see Alias Preset for
more information.
When finished configuring alarm actions, press the SHIFT button to save the settings.
4.5.4 ALARM HISTORY
Move the joystick to the right to
access the alarm history screen.
Up to 5000 alarms will be listed, from
the most recent to the oldest.
4.5.5 SAVE AND EXIT
Save settings and exit to the main
menu.
4.6 ALIAS PRESET
35
VT-KBD1
The alias presets that are
programmed will be displayed in
ALIAS PRESET screen. Move the
joystick around to select the PTZ ID
and then press the alarm button to
view programmed position.
4.7 SCHEDULE
4.7.1 NIGHT SHOT
Move the joystick to the right to
access the night shot configuration
screen.
Select automatic night mode switching
of the PTZ camera on or off.
Define the night mode starting time.
Define the night mode end time.
36
VT-KBD1
37
VT-KBD1
Save the settings and exit to the
schedule configuration screen.
4.7.2 EXIT
Exit to the main menu screen.
4.8 DATA
4.8.1 DATA BANK
The settings of a PTZ camera can be
downloaded and saved onto the
keyboard, and then transferred to
another PTZ camera at a later time if
desired.
4.9 SLAVE CONTROLLER SETUP
38
VT-KBD1
4.9.1 NUMBER OF CONTROLLERS
Define the number of total Xpress
Keyboards, including one master and
up to seven slave units.
4.9.2 DOME HOLDING TIME
Define the master controller’s PTZ
control holding time, from 1 to 200
seconds, or infinite.
4.9.3 DVR CONTROL
Enable or disable DVR control from
slave controllers.
4.9.4 CAMERA MENU CONTROL
Enable or disable PTZ camera’s
menu access from slave controllers.
4.9.5 SAVE AND EXIT
Save the settings and exit to the main
menu.
39
VT-KBD1
4.10 DVR
4.10.1 DVR MODEL
Select the DVR model.
4.10.2 SAVE AND EXIT
Save the changes and exit to the
main menu.
4.11 EXIT
Exit to the main LCD screen.
4.12 CONFIGURATION – SLAVE MODE
Please see 4.1 CONFIGURATION.
40
VT-KBD1
4.13 NETWORKS – SLAVE MODE
4.13.1 SLAVE ID
Select the ID of the slave controller.
4.13.2 BAUD RATE
Select the communication speed of
the slave controller.
4.13.3 SAVE AND EXIT
Save changes and exit to the main
menu screen.
4.14 TIME / DATE – SLAVE MODE
Please see 4.4 TIME / DATE
41
VT-KBD1
4.15 EXIT – SLAVE MODE
Exit to the main LCD screen.
42
VT-KBD1
43
VT-KBD1
44
VT-KBD1
45
28492 CONSTELLATION ROAD VALENCIA, CA 91355
WWW.VITEKCCTV.COM | 888-VITEK-70