1
Users Manual
PCL
Printer Control Language
Users Guide and
Reference Manual
AVERY DENNISON
Manual Edition 7.4
25 November 2009
Manual Part Number 800116
This Page Intentionally Left Blank
2 • Introduction
PAXAR PCL
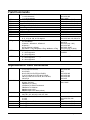
Contents
Introduction
1
Users Guide
2
Overview ................................................................................................................................... 2
Building a Format...................................................................................................................... 3
Format Header............................................................................................................. 4
Field Description......................................................................................................... 6
Alpha-Numeric Field Definition ................................................................................. 7
Barcode Field Definition............................................................................................. 8
Box / Underline Field Definition................................................................................. 8
Logo Field Definition.................................................................................................. 8
Care Symbol Field Definition ..................................................................................... 9
Batch Data Description ............................................................................................... 9
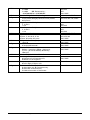
Reference Guide
11
Format Header ......................................................................................................................... 11
Field Information..................................................................................................................... 20
Special Codes for Alphanumeric Fields .................................................................................. 24
Special Codes for Barcode Fields............................................................................................ 31
Special Codes for Box / Underline Information ...................................................................... 37
Special Codes for Logo Information ....................................................................................... 39
Special Codes for Care Symbol Information........................................................................... 41
Special Codes for Special Symbol Information....................................................................... 44
Special Codes for Graphic Image information ........................................................................ 46
Special Codes for RFID Fields................................................................................................ 46
Special Codes for Secure Batches ........................................................................................... 47
Control Codes for Data............................................................................................................ 47
Configuration Commands ....................................................................................................... 50
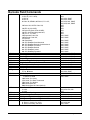
Connection Guide
52
Serial Connection Specifications............................................................................................. 52
AS/400 Communications Information for a AVERY DENNISON PCL Printer .................... 53
AS/400 Local Settings: (OS Ver 2 Rel 1 Mod 1)...................................................... 53
AS/400 Remote Settings: (OS Ver 2 Rel 1 Mod 1)................................................... 55
Interlynx/400 or Interlynx 5251 Protocol Converter Configuration: ........................ 55
IBM 3270 Connection using Interlynx 3287............................................................. 56
Connecting to an AVERY DENNISON SNAP Printer using USB......................................... 56
Connecting to an AVERY DENNISON SNAP Printer using Ethernet................................... 56
Glossary of Terms
58
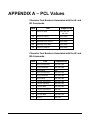
APPENDIX A – PCL Values
59
Character Font Numbers Associated with the AL and BL Commands. .................... 59
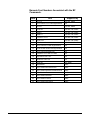
Character Font Numbers Associated with the AF and BA Commands..................... 59
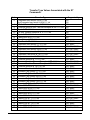
Barcode Font Numbers Associated with the BF Commands. ................................... 60
Transfer Type Values Associated with the XT Commands. ..................................... 61
Barcode Segmentation Values Associated with the BG Commands......................... 64
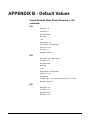
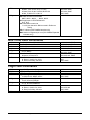
APPENDIX B - Default Values
65
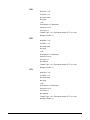
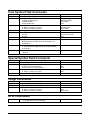
Format Defaults When Printer Receives a ~XA command:...................................... 65
Format Defaults When Printer Receives a ~FA Command: ..................................... 68
Format Defaults When Printer Receives a ~FB Command:...................................... 69
Format Defaults When Printer Receives a ~FS Command: ...................................... 70
Format Defaults When Printer Receives a ~FG Command: ..................................... 71
Format Defaults When Printer Receives a ~FL Command: ...................................... 72
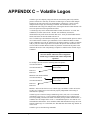
APPENDIX C – Volatile Logos
73
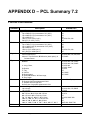
APPENDIX D – PCL Summary 7.2
75
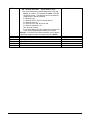
Format Commands .................................................................................................................. 75
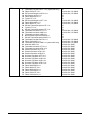
Field Commands...................................................................................................................... 80
Alphanumeric Field Commands.............................................................................................. 80
Barcode Field Commands ....................................................................................................... 82
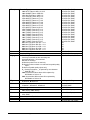
Box / Line Field Commands.................................................................................................... 83
Logo Field Commands ............................................................................................................ 83
Care Symbol Field Commands................................................................................................ 84
Special Symbol Field Commands............................................................................................ 84
Image Commands.................................................................................................................... 84
RFID Commands..................................................................................................................... 84
Batch Commands .................................................................................................................... 85
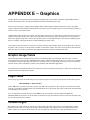
APPENDIX E – Graphics
86
Graphic Image Fields .............................................................................................................. 86
Logo Fields.............................................................................................................................. 86
Volatile Logos ......................................................................................................................... 86
APPENDIX F – RFID Operation
89
Introduction
AVERY DENNISON PCL stands for AVERY DENNISON Printer Control Language.
AVERY DENNISON PCL is a set of commands, which allows data to be transferred to
the AVERY DENNISON 630, 650, 960, 636, 656, 676, 686, 545, and SNAP printers.
In this documents, the AVERY DENNISON 630, 650, 960, 636, 656, 676, 686, 545,
and SNAP printers will be referred to as PCL Printers.
AVERY DENNISON PCL was developed to allow any device that can transmit data
through an RS232 connection to transfer information to the AVERY DENNISON PCL
Printer. This capability allows the PCL Printer to be driven by many different types of
computer equipment. The SNAP printers also support communications via USB and
Ethernet.
ii • Error! No text of specified style in document.
PAXAR PCL
Users Guide
Overview
AVERY DENNISON PCL is a description language for the AVERY DENNISON PCL
printers. PCL allows a user to describe a tag layout to a printer. Also PCL allows a
user to send multiple sets of information to a printer. These sets of information will be
printed using either a tag layout that was sent to the printer using PCL or a tag layout
that is stored on the printer.
PCL is based on the concept of formats and batches. The format describes what the
label will look like, while a batch contains the actual data to be printed. A single
format can be used with multiple batches to create labels that have a common
appearance, but different data. A batch set is a group of batches that are associated with
the same format and are printed at the same time, usually on the same material.
A format contains all the physical descriptions of a tag or label. The format consists of
a Format Header followed by one or more field definitions. The Format Header
contains information about the tag in general, such as tag size, sense mark type, print
speed, material and ink type, etc. Fields are individual pieces of information that are to
be printed on the tag. Each field has a field definition that defines the type of data
(alphanumeric, barcode, logo, etc.) and the information about the field that the printer
needs to print it properly, such as the field position, size, rotation, etc.
The actual information to be printed is sent in a Batch. Each batch contains the
information to print one or more tags. The formats can be sent to a printer using a
communications channel just prior to the information that is to be printed or the formats
can reside in the printer. If the format resides in the printer then only the batch data
needs to be sent via the communications channel.
This manual describes the PCL commands that are used to create formats and batches.
There is also a set of commands used to control the PCL printers. These commands are
included in the AVERY DENNISON Printer Control Language Reference Manual.
The following sections in this document explain how to make a format and send it to
the printer and also explain how to present the batch data to the printer. These sections
give realistic examples that can be referred to when making a format.
Each PCL command starts with a Command Identifier. This is a single character that
tells the printer that a PCL command follows. Generally, the ~ (tilde) is used as the
Command Identifier. However, some mainframe systems cannot generate the tilde
character, so the printer will also accept the ASCII ESC (1B hex, 27 decimal) character
or the up caret (^)Whatever Command Identifier is used must be consistent throughout
the format or batch. For example, if the first Command Identifier in a format is a tilde,
the entire format must use the tilde. Also, the Command Identifier character may not be
used as data. For example, if a batch uses the tilde as the Command Identifier, the tilde
may not appear in a ~D field.
PAXAR PCL
Users Guide • 3
Building a Format
There are some important terms that are used when building a format which are defined
here.
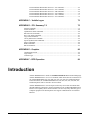
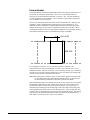
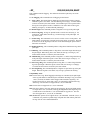
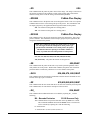
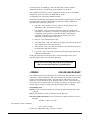
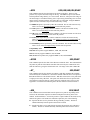
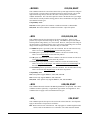
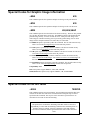
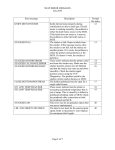
Pull Direction - The pull direction is used to describe one side or dimension of a
tag/label. The pull direction is the direction that the stock travels through the
printer.
Web Direction - The web direction is used to describe another side or dimension of a
tag/label. The web direction is best illustrated by the width of a roll of stock.
The web direction is the dimension that is directly related to the print head.
INSIDE EDGE
PULL
WEB
WEB
The pull and web directions are very important when laying out a tag / label. If these
dimensions are not determined correctly then the orientations of the fields that are
placed on the tag/label will be incorrect.
4 • Users Guide
PAXAR PCL
Format Header
The Format Header contains information that pertains to the physical characteristics of
the tag and any other print characteristics. There are several commands that are
necessary for the format header information. The first is ~XA. The XA command is
the start command for a format header. This command is required at the beginning of
every format that is sent to a printer.
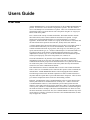
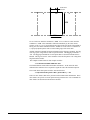
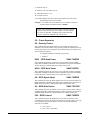
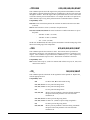
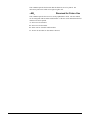
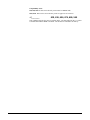
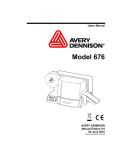
The next two commands which must follow the XA command are the ~XW and ~XP
commands. These commands tell the printer the tags web size and pull size. It is
important that these commands are included in the format header because the printer
cannot print the tags correctly if these commands are omitted or are incorrect. These
commands should also be the first format header commands sent to the printer because
other header commands use the size information from these commands.
PULL SIZE
WEB SIZE
For a tag that has a web size of 3" the command would be ~XW3000. (All
measurements are in units of thousandths of an inch.) For a pull size of 2-1/4", the
command would be ~XP2250. If the tag is a sense mark tag, the best way to determine
the pull size is to measure from the leading edge of one sense mark to the leading edge
of the next sense mark on a continuous roll of stock.
Note: When using Pressure Sensitive stock you must use the distance from sense mark
to sense mark for the tag's pull length but remember when you are laying out
the fields that the actual sticker area which is printed on is smaller.
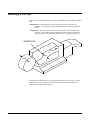
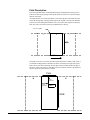
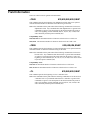
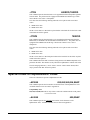
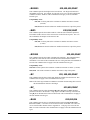
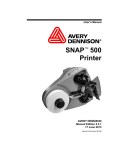
If the information which is to be printed on the stock is to be registered to a sense mark,
the command ~XM must be used to tell the printer what type of sense mark is being
used and the distance from the sense mark to the cut position. The cut position is
determined by measuring from the leading edge of the sense mark to the trailing edge
of the tag/label in the pull direction (see the drawing below). (The "leading edge" and
"trailing edge" are determined by the path of the stock through the printer. The leading
edge arrives at the printhead first and the trailing edge arrives at the printhead last.)
This distance is referred to as the “sense to cut” distance.
PAXAR PCL
Users Guide • 5
SENSE MARK
POSITION
WEB
PULL
If it is a hole sense mark the command is ~XMH. If it is a reflective sense mark the
command is ~XMR. This command is followed immediately by the sense mark's
position. If the 3" X 2-1/4" tag described above had a hole sense mark in the middle of
the tag, the sense mark command would be ~XMH1125. If the sense to cut distance is
0, a properly adjusted printer will cut at the leading edge of the sense mark.
Another common command for header information is the flagging command. The flag
is the tag or pair of tags that are made to separate batches. The flagging command is
~XF. The flagging command has several options that are described in the Reference
Manual. This tag will use the ~XFL command. This tells the printer to do a long/short
flag between the batches.
The complete format header for this example would be:
~XA~XP2250~XW3000~XMH1125~XFL
The field definitions would follow the header information. At the end of the field
definitions the command ~XZ is required to signal the end of the format description.
The overall format description would be structured like this:
~XA{Format Header}{Field 1 Desc.}{Field 2 Desc.}...~XZ
There are more features that can be presented in the format header information. These
other features are specific to certain printer and tag characteristics. The commands for
these features are described in the Reference manual.
6 • Users Guide
PAXAR PCL
Field Description
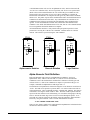
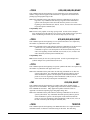
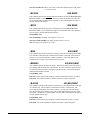
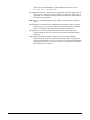
The most important item to understand when doing a field description is the point of
reference on the tag for placing a field and the point of reference on a field for doing a
rotation of the field.
All field positions are referenced from the corner of the tag that is formed at the point
where the trailing edge of the tag and the edge of the tag that is closest to the machine
as the stock travels through the machine meet. The corner of the tag that is formed by
these two sides is referred to as the top left hand corner of the tag.
TOP LEFT CORNER
WEB
PULL
The point of reference to a field is also the top left hand corner. When a field of text is
in a normal reading position so that the text can be read from left to right, the top left
hand corner is the corner formed by the left edge of the first letter and the top edge of
the letters. This is the point of a field that is used to position a field on a tag and also is
the pivot point for a field when it is rotated.
PULL
WEB
POSITION
PULL
POSITION
TEXT
WEB
PAXAR PCL
Users Guide • 7
A field definition starts with ~FA for an alphanumeric field, ~FB for a barcode field,
~FL for a box / underline field, ~FG for a logo field, and ~FS for a care symbol field.
(Refer to the section Field Information for a list of all field types available for each
printer model.) Once the printer receives one of these commands, it considers the
format header information to be complete and will ignore any other header commands
that are sent. The printer expects all the commands that follow the field definition start
command to be information for that field. Any commands that are sent that are not
commands for the field type specified in the field definition start command will be
ignored. To start the definition of another field, send another field definition start
command. Once all the field definitions have been sent, then an ~XZ command should
be sent to signal that the format definition is complete.
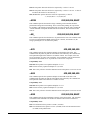
All field definitions must have a web position and a pull position specified. These
positions are set using the ~FW and ~FP commands. Another feature for a field is
rotation. The rotation is specified using the ~FR command.
PULL
PULL
PULL
270
270
180
270
180
180
TEXT
0
0 1234567890 5
WEB
90
0
WEB
90
Alphanumeric Rotation
Barcode Rotation
0
WEB
90
Logo Rotation
Alpha-Numeric Field Definition
Each field definition will consist of a Field Definition command (~FA for an
alphanumeric field, ~FB for a barcode field, etc.) and one or more field attribute
commands. Some of the field attribute commands are common to all field types and
will start with a ~F, while some commands are unique to a particular field type. For
example, commands for alphanumeric fields begin with ~A.
The definition of an alphanumeric field with a length of seven characters would start as
~FA07. The field is to be placed at a position that is 1/2" in the web direction and 1/2"
in the pull direction. These commands would be ~FW0500 and ~FP0500. The rotation
of the field is zero degrees which would be ~FR0. The field would be printed with the
top left of the first character in the field starting 1/2" in from the trailing edge of the tag
and 1/2" in from the inside edge of the stock as it traveled through the printer. A 10point font size could be selected for the field by using the command ~AP10 and font 8
selected by using the command ~AF08. The full field definition would be:
~FA07~FW0500~FP0500~FR0~AF08
There are more features which can be implemented for alphanumeric fields described in
the Reference manual under the ~A commands.
8 • Users Guide
PAXAR PCL
Barcode Field Definition
The definition of a barcode field with a length of twelve would start with an ~FB12.
The field is to be placed at a position that is 1" from the inside edge in the web direction
and 1/2" in from the trailing edge in the pull direction. The commands for these
positions would be ~FW1000 and ~FP0500. The top left corner of a barcode includes
the quiet zone area of the barcode. The rotation for this field is zero degrees so the
command would be ~FR0. This barcode is to be a UPCA Barcode so the command
~BF01 is to be used with the barcode type 01. The barcode is to have Human Readable
Information underneath it, so the command ~BA08, is used to specify an HRI using a
10 point font for the numbers. Also the barcode is to be 1/2" tall so the command
~BH0500 is used to specify a bar height of 1/2".
This barcode field definition will look like:
~FB12~FW1000~FP0500~FR0~BF01~BA08 ~BH0500
There are more features which can be implemented for barcode fields described in the
Reference manual under the ~B commands.
Box / Underline Field Definition
The definition of a box / underline field starts with an ~FL. There is not a field length
associated with a box / underline field. Starting point for a box / underline field is the
initial web and pull position. This position is presented with the ~FW command and
the ~FP command. The web position for the end web coordinate is specified with the
~LW command. The pull position for the end pull coordinate is specified with the ~LP
command. The LW command and LP command should always contain values greater
than the FW and FP commands. The width in dots of the lines used to make the box /
underline field is specified using the ~LV for the lines in the web direction and the ~LH
command for the width of the lines in the pull direction.
A box that started at web position 1/2" and pull position 1/2" and had a web size of 1"
and pull size of 1" and line widths of 2 dots would have the command string of:
~FL~FW0500~FP0500~LW1500~LP1500~LV02~LH02
Logo Field Definition
The definition of a logo field with one logo would have a starting command of ~FG01.
The logo is to be placed at web position 1" and pull position 1-1/2". The position
commands would be ~FW1000 and ~FP1500.
The logo type would be in the command ~GT. The logo type is determined by the logo
size class which the logo is in. The logo's must reside on the printer and the logo type
information must be presented with the logo files (650 type) or IC card (630 type) when
they are received. In this case the logo type will be one.
The logo command string would be:
~FG01~FW1000~FP1500~GT01
PAXAR PCL
Users Guide • 9
Care Symbol Field Definition
The definition of a care symbol field is very similar to a logo field. The start command
~FS04 specifies the start of a care symbol field which contains four symbols. The
symbols can be placed at web position 2" and pull position 1" using the commands
~FW2000 and ~FP1000. The care symbols reside on the printer and the care symbol
type is usually a fixed type whose number should be included with the care symbol
information that's with the printer. For a care symbol type of nine the care symbol type
command is ~ST09.
The care symbol command string is:
~FS04~FW2000~FP1000~ST09
The last field definition in a format is followed by the command ~XZ. This command
signals to the printer that the format description is complete. Once this information is
transferred to the printer multiple groups of information known as batches can be sent
to the printer to be printed.
The commands discussed in this section are the basic commands required to make a
format using PCL. These commands are the MINIMUM commands required to create
a format. There are more field types and commands that allow other features to be
utilized in the printers. These commands are described in the Reference manual.
Batch Data Description
The batch data is the information that will be printed on a tag. The format description
for a tag must have already been sent to a printer or must already reside in the printer
before batch data can be sent to the printer.
There are two choices for selecting the format to be used: the format may be sent to the
printer in the same way that the batch is (via the printer’s serial port, USB or Ethernet,
depending on the printer), or the format may be stored in the printer’s memory.
If the format is sent to the printer via a communications channel, it is considered to be
Format number 00. Formats stored on the printer may be formats 01 through 99 (see
below for details about the format name).
Formats sent to the printer must be sent before the corresponding batch. The
downloaded format will be deleted if the printer loses power, or if the all the batches
are cleared. (In the SNAP printers, this will occur if the Clear All Batches function is
used, or the Clear Batch function is used and there is only one batch in the printer.) If a
batch is received that calls out the downloaded format and no downloaded format
exists, the batch will be ignored.
The command ~ZD is the start of data command. If the format was sent to the printer
using PCL or if the format from the previous batch is the same as the one for this batch
the ZD command uses zero for the format number. If the batch data is to be used with a
specific format that already resides on the printer, then the format number follows the
ZD command. So if the batch data is to be printed using the same format as the
previous batch or if the format was sent to the printer using PCL the batch data start
command would be ~ZD00. If the batch data is to be printed using format two which
resides in the printer the batch data start command would be ~ZD02.
Formats stored in the printer must have a file name FORMAT99.PCL, where 99 is the
format number specified in the ~ZD command. For example, if the format stored in the
printer is named FORMAT02.PCL, the batch must begin with the ~ZD02 command.
The specific field information for the batch follows the batch data start command. For
all field types except graphic fields, the data field information is preceded by a ~D. If
the first field in the format was an alphanumeric field that specified the color of an item
10 • Users Guide
PAXAR PCL
the data field might be ~DBLUE. The printer would then print BLUE at the position
defined by the field definition in the format, using the attributes specified in that field
definition.
The data fields must be sent to the printer in the same order that they are described in
the format. Box / underline fields which don't have any data associated with them are
automatically skipped so an ~D command should not be sent for a box / underline field.
Graphic data fields are preceded by a ~I followed by the image data in either BMP or
PCX format.
Once the last field data has been sent it should be followed by the ~ZZ command. This
command means that the batch information is complete and the printer can print the
batch. The ZZ command also includes the quantity. If ten tags were to be printed using
the data which preceded the ZZ command, the command would be ~ZZ0010~. The
~ZZ command must ALWAYS be followed by a ~. The final ~ character signals the
end of the quantity string. The printer will not start printing a batch until it receives the
final ~ character.
An example of a batch of data would be:
~ZD00~DBLUE~D012345678905~D01~D23,32,33,42~ZZ0010~
The ~D command has some built in safety features. If a format describes a field as
having seven characters and then that field receives data from an ~D field which
contains nine characters the last two characters of the data in the ~D command will be
dropped. If a field is described as being seven characters long and the ~D command
only sends six characters the field will be padded out with spaces to seven characters
before it is printed. Also if there are more ~D data fields sent in a batch then there are
fields described in the format, the extra data fields at the end of the batch data will be
dropped.
The ~D command has a few useful variations. If an ~D command is followed
immediately by another ~D or ~ZZ so that no data follows the ~D command, then the
data from the previous batch will be used for that field. If the ~D command is followed
by one space character and then followed by another ~D or ~ZZ, then that field will be
blank for the current batch.
Carriage Returns may be used freely throughout the format and batch data to enhance
readability. However, it is good practice to only use carriage returns between
commands and data fields. In most cases, carriage returns are ignored within data fields.
However, the carriage return is a valid character in some field types such as the
Datamatrix bar code.
PAXAR PCL
Users Guide • 11
Reference Guide
NOTE: In the Reference Guide, 6X6 refers to the 636, 656, 676,
686, and 545 printers as a group. Where differences between
these printers exist, they will be defined individually.
Format Header
~XA
630,650,960,6X6,SNAP
This command specifies the beginning of a format. This command precedes any tag or
field commands. When the PCL Printer receives this command it automatically sets the
current format to the default settings. Default settings can be found in Appendix B. All
of the ~X commands must be sent before any field commands are sent.
~XW9999
630,650,960,6X6,SNAP
This command specifies the web of the tag in thousandths of an inch. For example: If
the tag web size is 3-1/4 inches the command would be ~XW3250.
Compatibility Note:
630 The 630 maximum web size of a tag is 5000 or 5” (127mm). The actual resolution
or smallest increment is 0.0042” (0.206mm).
650 The 650 maximum web size of a tag is 4800 or 4.8” (122mm). The actual
resolution or smallest increment is 0.0042” (0.206mm).
960 The 960 maximum web size of a tag is 4000 or 4” (101.6mm). The largest print
area is 3.55" (90.2mm). The resolution is 0.007” (0.18mm).
636, 656, 676, 686 The maximum web size of a tag is 5125 or 5.125” (130.2mm). The
actual resolution or smallest increment is 1/dpi of the printer.
-
240 DPI = 0.004” (0.1mm)
-
300 DPI = 0.0033”(0.084mm)
545 The 545 maximum web size of a tag is 1500 or 1.5” (38.1mm). The largest print
area is 1375 or 1.375" (34.9mm) and this value should not be exceeded with the
~XW command. The actual resolution or smallest increment is 0.005”
(0.127mm).
SNAP 500, SNAP 600 The maximum web size is 2000 or 2” (50.8mm). The actual
resolution is 0.0033” (1/305”) or 0.083mm (1/12mm).
SNAP 700 The maximum web size is 5000 or 5” (127mm). The resolution is the same
as SNAP 500 and SNAP 600.
12 • Reference Guide
PAXAR PCL
~XP99999
630,650,960,6X6,SNAP
This command specifies the pull length of the tag in thousandths of an inch. For
example: If the tag pull length is 4-1/8 inches the command would be ~XP4125.
Note: If the stock that is being printed on has sense marks for print registration then
special care should be taken in determining a tag's pull length. The pull length
of the tag should be determined by measuring from the leading edge of one
sense mark to the leading edge of the next sense mark on a continuous roll of
stock. If the pull length is incorrect, the result may be Missed Sense Mark
errors.
Compatibility Notes:
630 The 630 maximum pull length of a tag is 7000 or 7” (177.8mm). The actual
resolution or smallest increment is 0.0042” (0.206mm)..
650 The 650 maximum pull length of a tag is 14000 or 14” (355.6mm). The actual
resolution or smallest increment is 0.0042” (0.206mm)..
960 The 960 maximum pull length of a tag is 6000 or 6” (152.4mm). The resolution is
0.014” (0.36mm).
636, 656, 676, 545 The maximum pull length of a tag is 14000 or 14” (355.6mm). The
actual resolution or smallest increment is 1/dpi of the printer.
-
240 DPI = 0.0042” (0.206mm)
-
300 DPI = 0.0033” (0.084mm)
-
545 = 0.005” (0.127mm)
SNAP 500, SNAP 600, SNAP 700 – The maximum pull length is 28” (711.2mm). The
actual resolution is 0.0033” (0.084mm).
~XM_9999
630,650,960,6X6,SNAP
This command specifies that the format is a sense mark format. Replace the '_' with an
H if a hole sense mark is used or an R if a Reflective sense mark is used. Specify the
sense to cut distance in thousandths of an inch. The sense to cut distance is measured in
the pull direction from the leading edge of the sense mark to the trailing edge of the tag
as it passes through the printer. For example: A particular tag stock is using a punched
hole as a sense mark. The distance from the leading edge of one hole to the leading
edge of another hole is 4 inches. Therefore the tag pull length is 4 inches. The sense
mark occurs in the middle of what will be the finished tag after it has been printed and
cut. This distance from the leading edge of one hole to where the cut will occur at the
trailing edge of the tag is 2 inches. The sense to cut value is 2 inches. The command
for the printer is ~XMH2000. The H specifies that a punched hole is used for the mark
and the 2000 is the 2 inch sense to cut value sent in thousandths of an inch.
Compatibility Notes:
630, 650 These printers resolution or smallest increment for the sense to cut distance is
33 thousandths.
960 The 960 resolution or smallest increment is 7 thousandths in the web direction and
14 thousandths in the pull direction. The 960 only supports reflective sensing.
6X6, SNAP The actual resolution or smallest increment is 1/dpi of the printer.
Replace the ‘_’ with an H if a hole sense mark is used, an R if reflective sense
mark is used on the bottom, a T if reflective sense mark is used on the top, or a C
for the contrast sensor.
PAXAR PCL
Reference Guide • 13
~XF_
630,650,960,6X6,SNAP
This command controls flagging. The underscore should be replaced by one of the
following.
N - No Flagging This command turns off flagging for this format.
L – Long / Short This means that two blank tags will appear after a batch is printed
when the tag has a sense mark. The first blank tag is cut long by .23 inches and the
second is cut short by the same amount. These blank tags act as a separator when
the tags are in the printer’s stacker. When there is no sense mark on the tag, the
blank tag is longer by .23 inches than the printed tags.
D - Double length This command produces a flag that is two tags in the pull length.
T - Stock Saving Flag All tags are printed but the cut on the next to last tag is .125
inches short, which makes the last tag .125 inches longer in the pull length. All
tags can be used.
V - Verifier Flag This command is to be used if a verifier is active on the printer. The
batch quantity is increased by 2 and the stock saving feature is activated. The print
is carried over to the flag that prevents the verifier from halting the printer when a
barcode is not scanned.
B - Double blank Flag This command produces a flag that is blank and two tags in the
pull length.
S - Small Flag This command produces a flag that is .078 inches longer than the tag in
the pull length. When the tag has a sense mark, the first tag is cut long by .078
inches and the second is cut short by the same amount.
M - Medium Flag This command produces a flag that is .15 inches longer than the tag
in the pull length. When the tag has a sense mark, the first tag is cut long by .15
inches and the second is cut short by the same amount.
X - Extra Large Flag This command produces a flag that is .31 inches longer than the
tag in the pull length. When the tag has a sense mark, the first tag is cut long by
.31 inches and the second is cut short by the same amount.
Z - Zero length Flag This command produces a flag that is equal to the tag in the pull
length. When the tag has a sense mark, only one tag is generated for the flag.
Compatibility Notes:
630 The 630 does Long / Short flagging but the flags are controlled by the pull length
of the tag and cannot be controlled by this command. Meaning if a tag is less than
1.400” (35.6mm), the batches will be flagged with a Double Length flag. All
batches whose tags are greater than 1.400” (35.6mm)will be flagged with Long /
Short flags. The 630 does not support the B, S, M, X commands.
650 The 650 does not support the T, S, M, X commands.
960 If the 960 is doing a non-sense mark tag and is flagging, the tag pull length cannot
be longer than 5.756” (146.2mm). This tag pull length allows the longer flag to be
created and to be less than the 6” (152.4) maximum for tag pull size. The 960
does not support the T, V, B, S, M, X commands.
6X6, SNAP These printers do not support the D, V, B commands. With the S, M, L, X
commands, it is possible to produce flags with print other than what is printed on
the tags. See the ~FD command definition.
14 • Reference Guide
PAXAR PCL
~XG_
PcMate Plus Display
This command assists PCMate Plus in distinguishing whether a graphic field is
alphanumeric or logo during import. The printers ignore the command. The
underscore should be replaced by one of the following:
A - Specifies that the graphic field is an alphanumeric field.
L - Specifies that the graphic field is a logo field.
P - Specifies the point size of a graphic alphanumeric field. Not required for graphic
logo fields.
Compatibility Notes:
Only formats exported using PCMate Plus version 3.02 alpha or later will contain this
command in the PCL stream. Earlier versions of PCMate Plus will not export this
command.
Restrictions:
If manually editing the PCL stream to add this command, the command MUST
immediately precede the ~FM command which defines the graphic field. Otherwise,
the field will not import properly.
~XL9
630, 650, 960, 636, 656, 676, 686
This command specifies how many tags to print across the web. This is often referred to
as “X-up”, e.g. “2-up” or “3-up”. When this command is used the printer accepts
information for the layout of a tag as if the printer was printing only one tag across the
web of the stock. The printer then duplicates this one tag multiple times across the
web. Extreme care should be taken when specifying the tag web size for this type of
format. Also it should be determined that the total width of the number of tags across
the web is less than or equal to the capabilities of the printer.
Note: The use of this command requires special stock. If multiple up formats are
desired, your AVERY DENNISON representative should be contacted to help
you with this type of layout.
Compatibility Note:
630, 636, 656, 676, 686, SNAP 700 These printers are capable of producing up to 4
tags across the web as long as the width of all four tags combined is less than 4.8”
(121.9mm).
SNAP 500, SNAP600 Because of the narrow web capabilities of these printers, X-up
printing is impractical. However, these printers do support this command.
650, 960 The 650 and 960 printers are only capable of producing 2 tags across the web.
PAXAR PCL
Reference Guide • 15
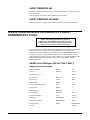
~XS99
630, 650, 636, 656, 676, 686, 545
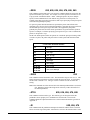
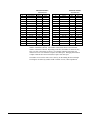
This command sets the Print Speed. The 99 in the command should be replaced by the
speed in tenth inches per second.. For example: To set the speed for 5.0 inches/sec for
a tag layout the command would be ~XS50. Although a printer may have multiple
speeds, certain combinations of stock and ink may print best at certain speeds, For
example, most fabrics print best at speeds less than 6 ips. Specifying a faster print speed
will result in degraded print quality.
If a speed of greater than the maximum is specified, the printer will still run at the
maximum speed. If a speed of less than the minimum is specified, the printer will run at
the minimum speed. If a speed is specified that is not supported by the printer,
generally the printer will run at the nearest speed that is not greater than the specified
speed. For example, if a format specifying a print speed of 5 ips is sent to a SNAP 500
printer, it will print at 4.5 ips.
NOTE: The SNAP printers allow the operator to override the print speed setting. If this
override is in place, the printer will print at the override speed rather than the format
speed.
AVAILABLE PRINTER SPEEDS
630
3, 4, 5 ips
650
2.5, 3, 3.5, 5.5, 6, 6,5 ips
636
3, 4.5, 6 ips
656
3, 4.5, 6, 7 ips
676
3, 4, 5 ips
686
7, 10, 12 ips
545
4, 6, 8, 10 ips
SNAP 500
3, 4.5, 6, 7 ips
SNAP 600,
SNAP 700
3, 4.5, 6, 7, 8,10,12 ips
~XH99
630
This command sets the head strobe value. The head strobe range is from 1 to 15. This
adjusts the amount of heat that is used to transfer the ink to the stock. A good setting
for this value is around 5 or 6. The type of stock or ink that is used can effect this
setting.
Note: This command can effect the head life of the thermal printhead that is used in the
630. Running a format with a high strobe value may reduce the head life of
the thermal printhead.
~XT99
650, 636, 656, 676, 686
This command sets the transfer type. The transfer types are designed so that the
printhead is driven properly for a combination of stock and ink. The 99 in the
command should be replaced with the correct value found in the transfer type table in
Appendix A.
~XI
650, 656, 676
This command tells the printhead to attempt to do head lift with the format. Head lift
allows for ink saving on the printer. When there is an area in the format which is at the
16 • Reference Guide
PAXAR PCL
beginning or end of the tag that does not have any fields printed in it - and the area is
greater than the minimum amount required on the printer, the printer will lift the head
and stop the ink while this area of the tag is moving under the printhead.
Compatibility Notes:
650 The 650 requires an area of 5/8 inches with no print in the area.
656, 676 The printer requires an area of 9/10 inches with no print in the area.
~XC99
630,6X6,SNAP
This command tells the printer how many tickets to print before it makes a cut. The
maximum number of tickets that the printer can wait between cuts is 99. If no cuts are
needed within the batch a value of 00 should be sent. If 00 is sent then a cut only
occurs at the beginning of a batch. For example: A format calls for only cutting once
every 3 tags. The command would be ~XC03.
~XV_..._
636,656,676,686,SNAP
This command tells the printer the setup information that is to be passed to the verifier.
A verifier must be attached to the printer. As many options as are necessary can be
placed after the command. For example: If a barcode command has these settings ~XVRSCC00A00 then the verifier will reject barcodes with a grade C or lower. The
options consist of:
N - Halt the printer on a no read only.
B - Halt the printer on both a no read and a symbol quality reject.
W - Halt the printer on warnings generated by the barcode.
R - Halt the printer on barcode symbol quality rejects only.
S_ - Quality level of the barcode is checked. The _ is replaced by the grade of
B, C, D, or F.
C99 - Consecutive failures of a barcode where 99 is replaced by 00 for
Disable, or 01 thru 10.
A99 - Accumulative failures of a barcode where 99 is replaced by 00 for
Disable, or 01 thru 20.
~XR_
636 Beige,656 Beige
This command tells the printer the color of the ink.
R - Allows red ink to be used in the printer. Without this command the sensor
sees through red ink, indicating there is no ink in the printer.
B - Black ink is used in the printer. This is the default.
~XN_
676,545,SNAP
This command tells the printer to select the print station designated in the command.
All print station dependent PCL commands will affect only the designated print station.
The print station dependent commands include the ~XT command for transfer type.
The ~XA command will set the defaults for all the print stations, then to change the
default, precede the command with the ~XN command selecting the print station.
1 - Selects print station #1 (Bottom)
2 - Selects print station #2 (Top or Top Left for 676)
3 - Selects print station #3 (Top Right for 676 only)
PAXAR PCL
Reference Guide • 17
~XO
6X6
This command tells the printer to print a mirror of the image. The image is mirrored on
the axis that is parallel to the printhead. Fields will be printed right to left with the
characters facing to the left as the fields go underneath the printhead.
~XD9999
PcMate Plus Display
This command refers to the dpi that was used to design the format. This is not a printer
command and can not be used to change the dpi of the printer. This command is used
for display purposes by the application that designs the formats for the printers.
240 - The format was designed for a 240-dpi printer.
300 - The format was designed for a 300-dpi printer.
~XX9999
PcMate Plus Display
This command refers to the specific printer the format was designed for. This is not a
printer command. This command is used for display purposes by the application that
designs the formats for the printers.
NOTE: This command is used by the SNAP printers to emulate
the font engine used in the 6X6 printers. If the printer type
specified in this command is not a SNAP printer, the printer
will add intercharacter spacing to text field to emulate as
closely as possible the same label printed on a 6X6 printer.
636, 656, 676, 686, 545, 500 (SNAP 500), 600 (SNAP 600),
700 (SNAP 700) - The printer the format was designed for.
~XE
6X6,SNAP
This command tells the printer to halt after every batch is printed regardless of how
many batches are in the printer. Without this command, the printer does not halt but
prints the batches continuously until there are no more batches in the printer.
~XJ99
636,656,676, 686,SNAP
This command specifies the number of minimum scans that must be obtained for each
barcode on the tag to pass verification.
~XZ
630,650,960,6X6,SNAP
This command tells the PCL Printer that this is the end of the format layout description.
This command must be sent after the description of the last field.
~XU_
6X6,SNAP
This command allows additional features to be added by replacing the _ with the
following;
B9 – Barcode Exclusion
SV100 Scanner Only
This command allows for specified barcodes on the tag NOT to be verified.
This command is ONLY valid with the SV100 verifier. The barcodes
can be excluded by replacing the 9 with the following;
0 = Exclude none
1 = Exclude UPC-A, UPC-E, EAN-8, EAN-13
18 • Reference Guide
PAXAR PCL
2 = Exclude Code 39
4 = Exclude Code 128, EDI Code 128
8 = Exclude Interleave 2 of 5
16 = Exclude Code 93
To exclude multiple barcodes, replace the 9 with the sum of the values
designating the barcodes to exclude.
Example: To exclude code 39 and Interleave 2 of 5, add the 2 and the 8
together and the command would be ~XUB10.
NOTE: This command does not allow the exclusion of specific
barcodes, only barcode types. For example, if a label contains
two Code 128 barcodes, excluding Code 128 barcodes will
stop the verification of BOTH Code 128 barcodes
C9 – Future Expansion
S9 – Security Feature
This command indicates that the batch is a secure batch. The printer will
maintain a count of the number of tags actually printed and return that count to
the host upon request. See Appendix F Secure Batch Feature for details. The 9
will be replaced as follows:
0 – Disabled (default if command is not present)
1 – Enabled
R999 - RFID Read Power
SNAP 700RFID
This command specifies the read power to be used when reading an RFID
transponder embedded in the label. If this command is not present in an RFID
format, the printer’s default read power setting will be used.
W999 - RFID Write Power
SNAP700RFID
This command specifies the write power to be used when writing to an RFID
transponder embedded in the label. If this command is not present in an RFID
format, the printer’s default write power setting will be used.
A9 – RFID Signal Adjust
SNAP 700RFID
This command specifies the Signal Adjust level to be used when writing to an
RFID transponder embedded in the label. If this command is not present in an
RFID format, the printer’s default signal adjust setting will be used.
X9 – RFID Write Retries
SNAP 700 RFID
This command specifies the number of write retries to be used when writing to
an RFID transponder embedded in the label. If this command is not present in
an RFID format, the printer’s default Write Retries setting will be used.
P99 – RFID Protocol
SNAP 700RFID
This command specifies the RFID protocol to be used for the label. If this
command is not present, the printer’s default Protocol setting will be used. The
99 is replaced by the protocol number. As of this writing, the following
protocols are available:
1 – Class 1 Gen 2
2 – Class 1 Gen 1 96 bit EPC
PAXAR PCL
Reference Guide • 19
3 – Class 1 Gen I EPC64/96
4 – EM4122
20 • Reference Guide
PAXAR PCL
Field Information
These are control codes for general field information.
~FA99
630,650,960,6X6,SNAP
This command specifies the beginning of an alphanumeric field where 99 is replaced
with the maximum number of characters in the data string for the field.
Note: This command tells the printer that all the following commands are for this new
alphanumeric field. Any commands other than alphanumeric or general field
commands are ignored. The description of this field ends when the printer is
sent a new beginning of field command (FB, FL, FS, FY, FG, or FM) or the
end of format layout description command (XZ).
Compatibility Notes:
630, 650, 960 The maximum number of characters which can be in a field is 64.
6X6,SNAP The maximum number of characters which can be in a field is 128.
~FB99
630,650,6X6,SNAP
This command specifies the beginning of a barcode field where 99 is replaced with the
maximum number of characters in the data string for the field.
Note: This command tells the printer that all the following commands are for this new
barcode field. Any commands other than barcode or general field commands
are ignored. The description of this field ends when the printer is sent a new
beginning of field command (FA, FL, FS, FY, FG, or FM) or the end of format
layout description command (XZ).
Compatibility Notes:
630, 650 The maximum number of characters which can be in a field is 64.
6X6, SNAP The maximum number of characters which can be in a field is 128.
~FL
630,960,6X6,SNAP
This command specifies the beginning of a box / underline field.
Note: This command tells the printer that the following commands are for this new box
/ underline field. Any commands other than box / underline or general field
commands are ignored. The description of this field ends when the printer is
sent a new beginning of field command (FA, FB, FS, FY, FG, or FM) or the
end of format layout description command (XZ).
PAXAR PCL
Reference Guide • 21
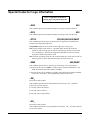
~FG99
630,650,960,6X6,SNAP
This command specifies the beginning of a logo field where 99 is replaced with the
number of logos that will appear in this field. Refer to Appendix E for details about
printing logos and graphic image fields.
Note: This command tells the printer that the following commands are for this new
logo field. Any commands other than logo or general field commands are
ignored. The description of this field ends when the printer is sent a new
beginning of field command (FA, FB, FS, FY, FL, or FM) or the end of format
layout description command (XZ).
Compatibility Note:
650 The 650 is only capable of one logo per logo field. In order to have multiple
logos, multiple logo fields will have to be created. If the number of logos specified
in the command is greater than one, the 650 will map only the one logo.
~FS99
630,650,960,6X6,SNAP
This command specifies the beginning of a care symbol field where 99 is replaced by
the number of symbols that will appear in the field.
Note: This command tells the printer that the following commands are for this new care
symbol field. Any commands other than care symbol or general field
commands are ignored. The description of this field ends when the printer is
sent a new beginning of field command (FA, FB, FG, FY, FL, or FM) or the
end of format layout description command (XZ).
Compatibility Note:
650 The 650 can only do one care symbol per field. In order to print multiple care
symbols multiple care symbol fields must be used.
~FY99
960
This command specifies the beginning of a special symbol field where 99 is replaced by
the number of symbols that will appear in the field.
Note: This command tells the printer that the following commands are for this new
special symbol field. Any commands other than special symbol or general
field commands are ignored. The description of this field ends when the
printer is sent a new beginning of field command (FA, FB, FG, FS, FL, or FM)
or the end of format layout description command (XZ).
~FM
630,6X6,SNAP
This command specifies the beginning of a graphic image field. Graphic images
supported are PCX and BMP. The graphic image must follow industry standards for
PCX and BMP file structures. Many applications produce both files. Refer to
Appendix E for details on printing logos and graphic image files.
Note: This command tells the printer that the following commands are for this new
special symbol field. Any commands other than special symbol or general
field commands are ignored. The description of this field ends when the
printer is sent a new beginning of field command (FA, FB, FG, FS, or FL) or
the end of format layout description command (XZ).
~FK99
700RFID
This command specifies the beginning of an RFID field where 99 is replaced with the
maximum number of characters in the data string for the field. The data string
22 • Reference Guide
PAXAR PCL
represents an EPC for a RFID tag. This is the data will be written to a RFID
transponder on the tag. The data string for the field must be ASCII hex
This command works only on a printer equipped for writing to Class 1 Gen 2 RFID
transponders. There may be only one RFID field per format.
See Appendix G for a description of RFID operation.
The data field in the batch corresponding to this field will contain the data to be written
to the transponder. The field is divided into the following subfields. Subfields are
separated by the ASCII pipe (|) character.
•
EPC Data – this is the EPC code to be written to the EPC register in the
transponder. This is an ASCII hex data string.
•
User Memory – This is the data in ASCII hex format to be written to the
transponder’s user memory. User memory is transponder dependent; it is the
responsibility of the operator to ensure that the data in this subfield is
appropriate. If the data does not match the user memory space of the
transponder, undesired operation may result.
•
Reserved – This subfield must be empty.
•
Access Password – This is an 8 character ASCII hex value that will be written
to the transponder’s Access Password space.
•
Kill Password – This is an 8 character ASCII hex value that will be written to
the transponder’s Kill Password space.
•
Lock Code – This is a five digit value that specified the locking method to be
applied to the transponder.
NOTE: The printer does not check the data. It is the responsibility of the user to
determine that the data is correct for their application.
NOTE: As of this writing, the printers only accept EPC
data. The other data fields are not implemented.
~FW9999
630,650,960,6X6,SNAP
This command specifies the field origin for the web direction in thousandths of an inch.
This distance is measured from the edge of the web that is on the inside of the machine
as the stock runs through the machine. This same edge would be the top edge of a
finished tag. The field origin is the top left-hand corner of a field. This corner is also
the reference point for field rotation. For example: If a field is to be placed two inches
from the edge of a tag in the web direction the command would be ~FW2000.
Compatibility Notes:
630, 650 For the 630 and 650 printers the resolution or smallest increment is 0.0042”
(0.11mm).
960 The 960 resolution is 0.007” (0.18mm) in the web direction.
636, 656, 676, 686, 545, SNAP The actual resolution or smallest increment is 1/dpi of
the printer.
-
-
240 DPI = 0.0042 “ (0.11mm)
-
545 = 0.005” (0.13mm)
300/305 DPI = 0.0033” (0.084mm)
NOTE: For an RFID field (~FK), this value is not used.
PAXAR PCL
Reference Guide • 23
~FP99999
630,650,960,6X6,SNAP
This command specifies the field origin for the pull position in thousandths of an inch.
This distance is measured from the trailing or left hand edge of the tag as the stock runs
through the machine. The field origin is the top left-hand corner of a field. This corner
is also the reference point for field rotation. For example: If a field is to be placed two
inches from the edge of a tag in the pull direction the command would be ~FP2000.
Compatibility Notes:
630, 650 For the 630 and 650 printers the resolution or smallest increment is 0.0042”
(0.11mm).
960 The 960 resolution is 0.014” (0.36mm) in the pull direction.
636, 656, 676, 686, 545, SNAP The actual resolution or smallest increment is 1/dpi of
the printer.
-
240 DPI = 0.0042 “ (0.11mm)
-
300 DPI = 0.0033” (0.084mm)
-
545 = 0.005” (0.13mm)
NOTE: For an RFID field, this value specifies the distance from the leading edge of the
label to the leading edge of the transponder.
~FR9
630,650,960,6X6,SNAP
This command specifies the rotation of a field. The rotations can be performed in
increments of 90 degrees. The increments are 0 degrees, 90 degrees, 180 degrees, 270
degrees. These rotations are represented in the command by 0, 1, 2, and 3 respectively.
A field is rotated about its top left corner. The direction of rotation is clockwise.
Compatibility Note:
960 The 960 will accept 0,1,2,and 3 for rotations and will also accept 0, 90, 180, 270 as
values for the rotation.
~FD_
960,6X6,SNAP
This command specifies which side of the tag that the field is printed on. Replace the _
with the appropriate letter.
Compatibility Note:
960
Use F for front, B for back and A for flag.
676, 545, SNAP Use 1 to print field using head 1
676, 545 , SNAP Use 2 to print field using head 2
676
Use 3 to print field using head 3.
636, 656, 686
All have just one printhead – therefore all field commands
will print on the same printhead. The correct default
command is 2.
676, 545, SNAP Use A1 to print on flag using head 1
676, 545 , SNAP Use A2 or A - (default) to print on flag using head 2
24 • Reference Guide
676
Use A3 to print on flag using head 3.
636, 656, 686
All have just one printhead – therefore all flag commands
will print on the same printhead. The correct default
command is A.
PAXAR PCL
~FTR9
600RFID,700RFID
This command specifies that this field is to be populated with the transponder signature
from the label. The printer must be equipped with an RFID unit and the tags / labels
must contain a Class 0 Gen 1 transponder.
The value 9 has the following meaning and needs to be replaced with one of these
values.
1 – RFID 64 bit value
2 – RFID 96 bit value
NOTE: There must be a data field as a place holder in the batch file for this field. Data
in the batch file will be ignored.
~FTRP9
700RFID
This command specifies that this field is to be populated with the EPC data from the
RFID field (see the RFID ~FK field definition command above). The printer must be
equipped with an RFID unit and the tags / labels must contain a Class 1 Gen 2
transponder.
The value 9 has the following meaning and needs to be replaced with one of these
values.
1 – RFID 64 bit value
2 – RFID 96 bit value
NOTE: There must be a data field place holder in the batch file for this field. Any data
in this field will be ignored.
This command allows the EPC code that is being written to the RFID transponder to be
printed on the label. This attribute is only allowed for alphanumeric and bar code fields.
The sub-stringing attributes (~A199/~A299/~A399 or ~B199/~B299/~B399) allow
only a portion of the EPC field to be printed.
Special Codes for Alphanumeric Fields
These are codes that are special to alphanumeric fields.
~AF9999
630,650,960,6X6,SNAP
This command specifies the font number for the characters in the alphanumeric field.
Available character fonts are listed in Appendix A.
Compatibility Note:
636, 656, 676, 686, 545 This is only effective when the emulation mode on the printer
is set to 630 or 650.
~AL9999
6X6,SNAP
This command specifies the scaleable font number for the characters in the
alphanumeric field. Available scaleable fonts are listed in Appendix A.
PAXAR PCL
Reference Guide • 25
~AC999
960,6X6,SNAP
This command selects the code page that is to be used for character translations. For
example: To select code page 850 - send the command ~AC850. Currently available
code pages are AVERY DENNISON Code Pages 000, 001 (Compatible with older
AVERY DENNISON printers.), Code Page 437, Code Page 850, Code Page 851, Code
Page 852, Code Page 857 and 866.
~AP99
6X6,SNAP
This command specifies the point size of the printed text in the field. This command
only applies to the scaleable fonts.
Compatibility Note:
636, 656 (240 dpi) The range for the point size is 6 to 96.
636, 656, 676, 686 (300 dpi) The range for the point size is 4 to 96.
545 The range for the point size is 6 to 96.
~A199
630,650,6X6,SNAP
This command specifies the printed field order number for a source field in a Data
Copy. (See note in command A3)
~A299
630,650,6X6,SNAP
This command specifies the start character for a Data copy. (See note in command A3)
~A399
630,650,6X6,SNAP
This command specifies the number of characters to be copied for a Data Copy.
Note: This group of Data Copy commands allows duplicate data to be sent just once
and the printer will take care of copying the data into other fields.
The A1 command specifies the field number of the field containing the data to
be copied. (The field number is determined by the order that the fields are
listed in the format, with the first field being field one.)
The A2 command specifies the character position within the specified field to
start copying. (The first character in the data string is character one.)
The command A3 specifies how many characters to be copied. This count
includes the start character.
For example, if field number 2 contains the data AVERY DENNISON
CORPORATION and this field should contain AVERY DENNISON, the
commands ~A102 (Data source is field 2), ~A201 (starting character is the
first character), and ~A314 (14 characters are to be copied) would be sent to
the printer.
~AS99
630,650,6X6,SNAP
This command activates auto-incrementing. Auto-incrementing means that this field
will start at the data value which it is sent and increment using the step size that is
specified in this command. The step size of the increment is specified in 99. An
increment of zero turns off auto-incrementing.
Compatibility Note:
26 • Reference Guide
PAXAR PCL
630 The 630 printer allows the field to be sequenced by a value of 1 to 255.
650 The 650 printer allows the field to be sequenced by a value of 1 to 254. A value of
255 allows the field to be decrement by 1.
6X6, SNAP These printers allow the field to be sequenced by a value of
- 2,147,483,647 to + 2,147,483,647.
~AD99
630,960,6X6,SNAP
This command specifies the number of tags containing each count that should be
printed when doing auto-incrementing. This is useful when printing an X-up format.
For example, if the format is being printed 4-up (4 copies across the web), sending the
~AD04 command would print the same data on all for labels, then increment for the
next set.
~AE_
630,650,960,6X6,SNAP
This command specifies how the data is to be justified in the field. The available codes
are L for Left justified, R for Right justified, C for Centered, A for Print as is (the
string is printed just as it was sent to the printer).
~AV9
630,650,960,6X6
This command specifies the expansion multiple for the height of the field. This
command tells the printer to print the field with the font selected by the command AF
and expand the height of the characters '9' number of times. For example, if the font
size is specified as 12 point (~AF12) and the ~AV2 command is sent, the field will be
printed with a horizontal size of 12 points and a vertical size of 24 points.
Compatibility Note:
630, 960 These printers can expand in multiples of 1 to 9.
650 The 650 can only expand in multiples of 2, 4, and 8.
6X6 This is only effective when the emulation mode on the printer is set to 630 or 650.
~AH9
630,650,960,6X6
This command specifies the expansion multiple for the width of the field. This
command tells the printer to print the field with the font selected by the command AF
and expand the width of the characters '9' number of times.
Compatibility Note:
630, 960 These printers can expand in multiples of 1 to 9.
650 The 650 can only expand in multiples of 2, 4, and 8.
6X6 This is only effective when the emulation mode on the printer is set to 630 or 650.
~AI99
630,960,6X6,SNAP
This command specifies the intercharacter spacing of the selected font. The value that
is included in this command is the number of dots that will be between characters.
Compatibility Notes:
630 The resolution for these printers is 0.004” (0.10mm).
960 The resolution for this printer is 0.007” (0.18mm) in the web direction and 0.014”
(0.36mm) in the pull direction.
PAXAR PCL
Reference Guide • 27
6X6,SNAP The actual resolution or smallest increment is 1/dpi of the printer.
28 • Reference Guide
PAXAR PCL
~AR9
630,650,960,6X6,SNAP
This command specifies how the field will be drawn on the label. There are four
possible ways to place the field's image on the tag. The DIRECT option is the default
and will print the image directly, as it was created. However, when part of the image or
the entire image is coincident with any part of a previously printed image, the two field
images will be compared in those areas where they are coincident. Using the DIRECT
option can cause one field to clip an earlier field if they overlap.
The DIRECT option is specified by a 0 in the command. The dot will remain on only
when it is on in the last mapped image for that same dot position.
The AND option is specified by a 1 in the command. The dot will remain on only
when it is on in both images for that same dot position.
The OR option is specified by a 2 in the command. The dot will remain on if the dot is
on in either or both images for that same dot position.
The XOR option is specified by a 3 in the command. The dot will remain on only
when it is on in one of the images - but will not be on if it is on in both images for
that same dot position.
The INVERSE option is specified by a 3 in the command. The dot will remain on only
when it is off in the last mapped image for that same dot position.
Compatibility Note:
630, 960 These printers support DIRECT, AND, OR, and XOR.
650 The 650 only supports DIRECT, OR, and XOR.
6X6, SNAP These printers only supports DIRECT, OR, and INVERSE.
~AO99
6X6,SNAP
This command specifies the slant of the characters within the field. This command tells
the printer to print the field with the scaleable font selected by the command AL and
slant the characters giving the field an italic look. The range of the slant is -90 to 90.
~AT_
6X6,SNAP
This command specifies the character orientation. With this command, the scaleable
font defined by the command AL is oriented as defined within the field. The option of
H for Horizontal text is the default selection. With this selection, the text is printed left
to right just as it always has been. The option of V allows the text to be printed with
each character rotated 90 degrees counter clockwise within the field. This gives the
appearance of each character following below the last character instead of beside it.
~AM_
6X6,SNAP
This command causes internal data from the printer to be printed. Depending on the
selection, the information requested is obtained and printed on the tag in the field
defined. In the batch data, a ~D must be present as a place holder for this field, but any
data will be ignored. The underscore should be replaced by one of the following.
D - Specifies the date is to be printed on the tag (mm/dd/yy format). The date is
obtained internally from the printer and can not be edited.
E - Specifies the date is to be printed on the tag using the European style (dd/mm/yy
format). The date is obtained internally from the printer and can not be edited.
PAXAR PCL
Reference Guide • 29
T - Specifies the time is to be printed on the tag (hh:mm:ss AM/PM format). The time
is obtained internally from the printer and can not be edited.
Q - Specifies the quantity of the batch is to be printed on the tag. The value printed is
obtained from the command ZZ.
I - Specifies the Batch ID is to be printed on the tag. The Batch ID printed is obtained
from the command ZI.
600RFID
L - Specifies the contract or order number to be embedded in the log filename of the
file that will contain RFID values. This command is used for a customer-specific
application and is not for general use. It is listed here for reference only.
~AW9999
6X6,SNAP
This command specifies the width of the field. If this command is not present, the field
will be printed with the character proportions as defined in the font file. If this
command is present, the width of the characters may be modified according to the
method specified in the ~AQ command (below) to fit the text to the width specified
Some of the scaleable fonts are variable widths, which means that each batch can look
slightly different due to the text printed. This command gives the text a uniform width
requirement for the batches. This command is needed in order to justify the field using
the command AE when the font selected is scaleable. Also, this command is needed in
order to fit the text within the field using the command AQ when the font selected is
scaleable. The actual resolution or smallest increment is 1/dpi of the printer.
~AQ_
6X6,SNAP
This command specifies how the characters printed are to be sized within the width
defined in the command AW. The underscore should be replaced by one of the
following.
0 - Squeeze to fit With this option, if the width of the characters in the text exceeds the
width defined in the command AW then the characters are squeezed (reduced in
width) into the width defined in the command AW. If the width of the characters in
the text does not exceed the width defined in the command AW then the characters
are mapped as is.
1 - Proportion to fit With this option, the widths of the characters in the text are
proportioned within the width defined in the command AW.
2 - Stretch to fit With this option, if the width of the characters in the text is less than
the width defined in the command AW then the characters are stretched into the
width defined in the command AW. If the width of the characters in the text
exceeds the width defined in the command AW then the characters are squeezed
into the field width defined in the command AW.
3 - Regular fit With this option, the characters are printed with the proportion defined
in the font file.
CAUTION: Use of commands that modify the
appearance of the characters (such as the ~AW and ~AQ
commands) can result in labels that appear slightly
different when printed on different types of printers.
~AA_
Reserved for Future Use
Reserved for future printers.
30 • Reference Guide
PAXAR PCL
This command specifies the direction that the characters are to be printed. The
direction of print can be either left to right or right to left.
~AB_
Reserved for Future Use
This command specifies the area to be used by alphanumeric fields. The area defined
can be configured with ascenders and descenders. If the area is not defined then the full
character will not be printed.
A - Allow area for ascenders.
D - Allow area for descenders.
B - Allow area for ascenders and descenders.
O - No area for ascenders or descenders is allowed.
PAXAR PCL
Reference Guide • 31
Special Codes for Barcode Fields
These control codes are special for barcode fields.
~BF99
630,650,6X6, SNAP
This command specifies the barcode type. The barcode types are listed in Appendix A.
~B199
630,650,6X6,SNAP
This command specifies the printed field order number for a source field in a Data
Copy. (See note in command B3)
~B299
630, 650, 636, 656, 676, 686, 545
This command specifies the start character for a Data copy. (See note in command B3)
~B399
630, 650, 636, 656, 676, 686, 545
This command specifies the number of characters to be copied for a Data Copy.
Note: This group of Data Copy commands allows duplicate data to be sent just once
and the printer will take care of copying the data into other fields.
The A1 command specifies the field number of the field containing the data to
be copied. (The field number is determined by the order that the fields are
listed in the format, with the first field being field one.)
The A2 command specifies the character position within the specified field to
start copying. (The first character in the data string is character one.)
The command A3 specifies how many characters to be copied. This count
includes the start character.
For example, if field number 2 contains the data AVERY DENNISON
CORPORATION and this field should contain AVERY DENNISON, the
commands ~A102 (Data source is field 2), ~A201 (starting character is the
first character), and ~A314 (14 characters are to be copied) would be sent to
the printer.
~BS99
630,650,6X6,SNAP
This command activates auto-incrementing. Auto-incrementing means that this field
will start at the data value which it is sent and increment using the step size that is
specified in this command. The step size of the increment is specified in 99. An
increment of zero turns off auto-incrementing.
630 The 630 printer allows the field to be sequenced by a value of 1 to 255.
650 The 650 printer allows the field to be sequenced by a value of 1 to 254. A value of
255 allows the field to decrement by 1.
6X6,SNAP These printers allow the field to be sequenced by a value of
- 2,147,483,647 to + 2,147,483,647.
~BD99
630,6X6,SNAP
This command specifies the number of tags containing each count that should be
printed when doing auto-incrementing.
32 • Reference Guide
PAXAR PCL
~BH9999
630,650,6X6,SNAP
This command specifies the height for the barcode bars. The height is described in
thousandths of an inch. For example: If a barcode is to be 3/4 of an inch in height the
command would be ~BH0750. This command does not apply to the GS1 Databar
barcode types.
Compatibility Notes:
630, 650 For these printers the resolution or smallest increment is 0.0042”
(011mm).
6X6,SNAP The actual resolution or smallest increment is 1/dpi of the printer.
~BW9
630,6X6,SNAP
This command specifies the module width for a barcode (also called the expansion).
The module width is the size of the narrowest bar in the barcode in pixels. The '9' in
this command is the multiple of the narrowest bar.
Compatibility Notes:
630, 650 For these printers the resolution or smallest increment is 0.004”
(0.1mm).
6X6,SNAP The actual resolution or smallest increment is 1/dpi of the printer.
~BX9999
630,6X6,SNAP
This command specifies the length of the Barcode guard bars. This command allows
the guard bars of the barcode to be extended down around the human readable
information. The '9999' of this command is the size of the guard bars in thousandths of
an inch. This command does not apply to the GS1 Databar barcode types.
Compatibility Notes:
630, 650 For these printers the resolution or smallest increment is 0.0042” {0.11mm).
6X6,SNAP The actual resolution or smallest increment is 1/dpi of the printer.
~BC
630, 650,6X6,SNAP
This command specifies that a check digit should be calculated for the barcode. This
command does not apply to the GS1 Databar barcode types.
Note: If the check digit calculation command is used then the data string that is sent for
this field should not include a check digit.
~BZ_
630,6X6,SNAP
This command specifies where the Human Readable Information (HRI) should be
printed in reference to the barcode. Using T places the HRI on the top of the barcode,
using B places the HRI on the bottom of the barcode. This command does not apply to
the GS1 Databar barcode types.
~BA99
630,650,6X6
This command specifies the text font that should be used for the Human Readable
Information (HRI). A selection of zero for the font turns off the HRI. The values for
'99' are located under character fonts in Appendix A. Code page 437 is used for the
HRI of a Code 128 barcode. This command does not apply to the GS1 Databar barcode
types.
PAXAR PCL
Reference Guide • 33
636, 656, 676, 686, 545 This is only effective when the emulation mode on the printer
is set to 630 or 650.
~BL9999
6X6,SNAP
This command specifies the scaleable font that should be used for the Human Readable
Information (HRI). A selection of zero for the font turns off the HRI. The values for
'99' are located under scaleable fonts in Appendix A. This command does not apply to
the GS1 Databar barcode types.
~BP99
6X6,SNAP
This command specifies the point size of the printed text for the Human Readable
Information (HRI). This command only applies to the scaleable fonts. This command
does not apply to the GS1 Databar barcode types.
Compatibility Note:
636, 656 (240 dpi) The range for the point size is 6 to 96.
636, 656, 676, 686 (300 dpi) The range for the point size is 4 to 96.
545 The range for the point size is 6 to 96.
~BI99
6X6,SNAP
This command specifies the intercharacter spacing of the selected font used in the HRI.
The value that is included in this command is the number of dots that will be between
characters. The actual resolution or smallest increment is 1/dpi of the printer. This
command does not apply to the GS1 Databar barcode types.
~BB9999
630,6X6,SNAP
This command specifies the barcode margin. The barcode margin is the white space at
the beginning and end of the bars in the barcode. This area is known as quiet area and
is required for barcode scanners to properly scan the barcodes. The barcode margin is
defined in thousandths of an inch.
Compatibility Notes:
630, 650 For these printers the resolution or smallest increment is 0.0042” (0.11mm).
6X6,SNAP The actual resolution or smallest increment is 1/dpi of the printer.
~BJ9999
630,6X6,SNAP
This command controls the horizontal movement of the system digit and the check digit
of a UPC barcode. The movement is performed in reference to the barcode. The
system digit and check digit always start out at the very edge of the barcode margin.
The value in '9999' is the distance to move the system digit and check digit in towards
the barcode. The distance is in thousandths of an inch. This command does not apply to
the GS1 Databar barcode types.
Compatibility Notes:
630, 650 For these printers the resolution or smallest increment is 0.004” (0.1mm).
6X6,SNAP The actual resolution or smallest increment is 1/dpi of the printer.
34 • Reference Guide
PAXAR PCL
~BK9999
630,6X6,SNAP
This command controls the vertical movement of the system digit and the check digit of
a UPC barcode. The movement is performed in reference to the barcode. The system
digit and check digit always start out at the same vertical position as the human
readable information. The value that is placed in '9999' is the distance the system digits
will be moved vertically from the starting position. This command does not apply to the
GS1 Databar barcode types.
Compatibility Notes:
630, 650 For these printers the resolution or smallest increment is 4 thousandths.
6X6,SNAP The actual resolution or smallest increment is 1/dpi of the printer.
~BR9
630,650,6X6,545
This command specifies how the field will be drawn on the label. There are four
possible ways to place the field's image on the tag. The DIRECT option is the default
and will print the image directly, as it was created. However, when part of the image or
the entire image is coincident with any part of a previously printed image, the two field
images will be compared in those areas where they are coincident.
The DIRECT option is specified by a 0 in the command. The dot will remain on only
when it is on in the last mapped image for that same dot position.
The AND option is specified by a 1 in the command. The dot will remain on only
when it is on in both images for that same dot position.
The OR option is specified by a 2 in the command. The dot will remain on if the dot is
on in either or both images for that same dot position.
The XOR option is specified by a 3 in the command. The dot will remain on only
when it is on in one of the images - but will not be on if it is on in both images for
that same dot position.
The INVERSE option is specified by a 3 in the command. The dot will remain on only
when it is off in the last mapped image for that same dot position.
Compatibility Note:
630 These printers support DIRECT, AND, OR, and XOR.
650 The 650 only supports DIRECT, OR, and XOR.
6X6,SNAP These printers only supports DIRECT, OR, and INVERSE.
~BG9
650,6X6,SNAP
This command allows the format of the HRI Segmentation to be specified. The 9 in the
command would be replaced by a segmentation type number from Appendix A. This
command does not apply to the GS1 Databar barcode types.
~BM_
6X6,SNAP
This command specifies the option to be used on the selected barcode. Not all options
apply to all barcodes. The options are as follows:
R99 Wide to narrow ratio of the barcode. The only applies to variable length barcodes
such as Code 39 and Interleave 2 of 5 barcodes. The valid values that should
PAXAR PCL
Reference Guide • 35
replace the '99' are 20, 21, 22, 23, ..., 28, 29, 30 for the ratio values of 2.0:1,
2.1:1, 2.2:1, 2.3:1, ..., 2.8:1, 2.9:1, 3.0:1.
S9 Supplement to the UPC / EAN barcodes. Supplemental bars can be appended to the
main barcode by selecting the values of 2 for the +2 supplement, and 5 for the +5
supplement. The number of characters must be increased in the command FB to
accommodate the supplement.
D99 Matrix size for the Data Matrix barcode. Replace 99 with one of the following
values;
X9 Specifies the X undercut for the GS1Databar barcodes. Each bar will be reduced in
width by this value ( in pixels) to compensate for thermal blooming. Must be at
least 1 less than the specified expansion (X Dimension). Default is 0.
Y9 Specifies the Y undercut for the GS1 Databar barcodes. The barcode will be
reduced in height by this value (in pixels)to compensate for thermal blooming.
Default is 0.
N99 Specifies the maximum number of segments per row for the GS1 Databar
Expanded barcode. If the data required more than this number of segments, the
barcode will be split into 2 or more rows (referred to as a GS1 Databar Expanded
Stacked barcode). Must be an even value from 2 to 22. Default is 22, which will
print the barcode as a single row.
36 • Reference Guide
PAXAR PCL
Value
0
1
2
3
4
5
6
7
8
9
10
11
12
13
14
15
Maximum Number
of Characters
Row x Column Alpha Numeric
Auto Detect
2335
2710
10 x 10
3
6
12 x 12
6
10
14 x 14
10
16
16 x 16
16
24
18 x 18
25
36
20 x 20
31
44
22 x 22
43
60
24 x 24
52
72
26 x 26
64
88
32 x 32
91
124
36 x 36
127
172
40 x 40
169
228
44 x 44
214
288
48 x 48
259
348
52 x 52
304
408
Value
16
17
18
19
20
21
22
23
24
25
26
27
28
29
30
Maximum Number
of Characters
Row x Column Alpha Numeric
64x64
418
560
72 x 72
550
736
80 x 80
682
912
88 x 88
862
1152
96 x 96
1024
1392
104 x 104
1222
1632
120 x 120
1573
2100
132 x 132
1954
2608
144 x 144
2335
2710
8 x 18
6
10
8 x 32
13
20
12 x 26
22
32
12 x 36
31
44
16 x 36
46
64
16 x 48
72
98
The matrix size is data dependent - which means the data entered determines the
number of characters allowed. The number of characters shown is the maximum
number of characters allowed. Depending on the data, the number of characters may
have to be less or the matrix size larger. For example, changing from upper case
characters to lower case characters requires extra data space. Changing from numeric
to alpha within the data stream would also require extra data space.
The number of rows in the matrix size is also key in determining the barcode height.
The height is calculated by (module width * number of rows) / DPI of printhead.
PAXAR PCL
Reference Guide • 37
Special Codes for Box / Underline Information
~LW9999
630,960,6X6,SNAP
This command specifies the end web position of a box / underline field. The web
position is in thousandths of an inch.
Note: The starting web coordinate is the position that is specified in the FW command.
Compatibility Notes:
630, 650 For these printers the resolution or smallest increment is 33 thousandths.
6X6,SNAP The actual resolution or smallest increment is 1/dpi of the printer.
~LP99999
630,960,6x6,SNAP
This command specifies the end pull position of the box / underline field. The pull
position is in thousandths of an inch.
Note: The starting pull coordinate is the position that is specified in the FP command.
Compatibility Notes:
630, 650 For these printers the resolution or smallest increment is 33 thousandths.
6X6,SNAP The actual resolution or smallest increment is 1/dpi of the printer.
~LV99
630,6X6,SNAP
This command specifies the width of the vertical lines in dots.
Compatibility Notes:
630, 650 For these printers the resolution or smallest increment is 4 thousandths.
6X6,SNAP The actual resolution or smallest increment is 1/dpi of the printer.
~LH99
630,6X6,SNAP
This command specifies the width of the horizontal lines in dots.
Compatibility Notes:
630, 650 For these printers the resolution or smallest increment is 4 thousandths.
6X6,SNAP The actual resolution or smallest increment is 1/dpi of the printer.
~LT_
960,6X6,SNAP
This command specifies what type of shape is being drawn. An L means draw a line
using the two points. A B means draw a box using the two points.
~LF9
630,960,6X6,SNAP
This command specifies the mode in which the box / underline image is created on the
tag. The 0 mode displays the box / underline as a normal box or underline. The 1
mode clears the box even if the box overlays another fields image. The 2 mode fills the
box.
Compatibility Note:
38 • Reference Guide
PAXAR PCL
630 The 630 has an additional mode 3 that XOR's the box.
~LR9
960,6X6,SNAP
This command specifies how the field will be drawn on the label. There are four
possible ways to place the field's image on the tag. The DIRECT option is the default
and will print the image directly, as it was created. However, when part of the image or
the entire image is coincident with any part of a previously printed image, the two field
images will be compared in those areas where they are coincident.
The DIRECT option is specified by a 0 in the command. The dot will remain on only
when it is on in the last mapped image for that same dot position.
The AND option is specified by a 1 in the command. The dot will remain on only
when it is on in both images for that same dot position.
The OR option is specified by a 2 in the command. The dot will remain on if the dot is
on in either or both images for that same dot position.
The XOR option is specified by a 3 in the command. The dot will remain on only
when it is on in one of the images - but will not be on if it is on in both images for
that same dot position.
The INVERSE option is specified by a 3 in the command. The dot will remain on only
when it is off in the last mapped image for that same dot position.
Compatibility Note:
960 These printers support DIRECT, AND, OR, and XOR. If the LF1 function for
clearing a box is selected the LR command will be ignored.
6X6,SNAP These printers only supports DIRECT, OR, and INVERSE.
PAXAR PCL
Reference Guide • 39
Special Codes for Logo Information
Refer to Appendix E for details on
printing logos and graphic image files.
~GH9
630
This command specifies the expansion multiple for the logo in the pull direction.
~GV9
630
This command specifies the expansion multiple for the logo in the web direction.
~GT99
630,650,960,6X6,SNAP
This command specifies the logo set number. Refer to Appendix E for details about
printing logos and graphic image files.
Compatibility Note: The 630 is limited to only eight types of logo types.
630 The logo images reside on the I.C. card which plugs into the side of the 630
printer. In order for a logo type to be chosen the logo type must be present on the
I.C. card and the I.C. card must be plugged into the printer in order for a format
layout that contains a logo field to work.
650 The 650's logo images reside in a file on the hard disk drive in the 650. In order for
the logo type to be chosen and printed the logo's file must on the 650.
~GM9
6X6,SNAP
This command specifies the file structure type of the image. The valid values are
3 Specifies the file type to be BMP. Currently logos are prepared as BMP files. The
BMP file structure must follow industry standards.
4 Specifies the file type to be PCX. The graphic image must follow industry standards
for the PCX file structure. Many applications produce the PCX files.
~GE_
Reserved for future printers.
This command specifies the horizontal justification of the logo. The '_' should be
replaced by one of the options.
L The logo will be left justified.
C The logo will be centered.
R The logo will be right justified.
~GU_
Reserved for future printers.
This command specifies the vertical justification of the logo. The '_' should be replaced
by one of the options.
40 • Reference Guide
PAXAR PCL
T The logo will be top justified.
C The logo will be centered vertically.
B The logo will be bottom justified.
~GR9
630, 650, 960, 636, 656, 676, 686, 545
This command specifies how the field will be graphically placed on the tag. There are
four possible ways to place the field's image on the tag. The DIRECT option is the
default and will print the image directly, as it was created. However, when part of the
image or the entire image is coincident with any part of a previously printed image, the
two field images will be compared in those areas where they are coincident.
The DIRECT option is specified by a 0 in the command. The dot will remain on only
when it is on in the last mapped image for that same dot position.
The AND option is specified by a 1 in the command. The dot will remain on only
when it is on in both images for that same dot position.
The OR option is specified by a 2 in the command. The dot will remain on if the dot is
on in either or both images for that same dot position.
The XOR option is specified by a 3 in the command. The dot will remain on only
when it is on in one of the images - but will not be on if it is on in both images for that
same dot position.
The INVERSE option is specified by a 3 in the command. The dot will remain on only
when it is off in the last mapped image for that same dot position.
Compatibility Note:
630, 960 These printers support DIRECT, AND, OR, and XOR.
650 The 650 only supports DIRECT, OR, and XOR.
636, 656, 676, 686, 545 These printers only supports DIRECT, OR, and INVERSE.
~GI99
630
This command specifies the intercharacter spacing of the selected logo. The value that
is included in this command is the number of dots that will be between the logos.
These dots are equivalent to 4 thousandths.
PAXAR PCL
Reference Guide • 41
Special Codes for Care Symbol Information
~SH9
630
This command specifies the expansion multiple for the care symbol in the horizontal
direction.
~SV9
630
This command specifies the expansion multiple for the care symbol in the vertical
direction.
~ST99
630,960,6X6,SNAP
This command specifies the care symbol type.
Compatibility Note:
630 The care symbol images reside on the I.C. card which plugs into the side of the
630 printer. In order for a care symbol type to be chosen the care symbol type
must be present on the I.C. card and the I.C. card must plugged into the printer in
order for a format layout that contains a care symbol field to work. The standard
type for care symbols on the 630 is type 9. The 630 will default to type 9 when
the care symbol field is created. This command is only necessary if the care
symbols are stored as a non-standard type number.
960 On the 960, a symbol type of 1 is printed as large care symbols and a symbol type
of 2 is printed as small care symbols.
6X6,SNAP On these printers, a symbol type of 1 is printed as small care symbols and a
symbol type of 2 is printed as large care symbols.
~SR9
630,650,960,6X6,SNAP
This command specifies how the field will be drawn on the tag. There are four possible
ways to place the field's image on the tag. The DIRECT option is the default and will
print the image directly, as it was created. However, when part of the image or the
entire image is coincident with any part of a previously printed image, the two field
images will be compared in those areas where they are coincident.
The DIRECT option is specified by a 0 in the command. The dot will remain on only
when it is on in the last mapped image for that same dot position.
The AND option is specified by a 1 in the command. The dot will remain on only
when it is on in both images for that same dot position.
The OR option is specified by a 2 in the command. The dot will remain on if the dot is
on in either or both images for that same dot position.
The XOR option is specified by a 3 in the command. The dot will remain on only
when it is on in one of the images - but will not be on if it is on in both images for
that same dot position.
The INVERSE option is specified by a 3 in the command. The dot will remain on only
when it is off in the last mapped image for that same dot position.
Compatibility Note:
630, 960 These printers support DIRECT, AND, OR, and XOR.
42 • Reference Guide
PAXAR PCL
650 The 650 only supports DIRECT, OR, and XOR.
636, 656, 676, 686, 545 These printers only supports DIRECT, OR, and INVERSE.
~SI99
630,960,6X6,SNAP
This command specifies the inter-character spacing of the selected care symbols. The
value that is included in this command is the number of dots that will be between the
care symbols.
Compatibility Notes:
630, 650 For these printers the resolution or smallest increment is 4 thousandths.
6X6,SNAP The actual resolution or smallest increment is 1/dpi of the printer.
~SP99
6X6,SNAP
This command specifies the point size of the printed symbols. This command only
applies to the scaleable fonts. The range for the point size is 4 to 96.
~SW9999
6X6,SNAP
This command specifies the width of the field. If this command is not defined, then the
scaleable symbol is printed as is. This command gives the symbols a uniform width
requirement for the batches. This command is needed in order to fit the symbols within
the field using the ~SQ command. The actual resolution or smallest increment is 1/dpi
of the printer.
~SQ_
6X6,SNAP
This command specifies how the symbols printed are to be sized within the width
defined in the ~SW command. The underscore should be replaced be one of the
following:
0 = Squeeze to fit With this option, if the width of the symbols in the text exceeds the
width defined in the command SW then the symbols are squeezed
into the width defined in the command SW. If the width of the
symbols in the text does not exceed the width defined in the
command SW then the symbols are printed as is.
1 = Proportion to fit With this option, the width of the symbols in the text are
proportioned within the width defined in the command SW.
2 = Stretch to fit With this option, if the width of the symbols in the text is less than
the width defined in the command SW then the symbols are
stretched into the width defined in the command SW. If the width of
the symbols in the text exceeds the width defined in the command
SW then the symbols are squeezed into the field width defined in the
command SW.
3 = Regular fit With this option, the field is printed as is using the width given for
each symbol.
~SE_
6X6,SNAP
This command specifies how the text will be justified. This edit code specifies a format
for the symbol that will appear in the field. The available codes are L for Left justified,
R for Right justified, C for Centered, A for Print as is (the string is printed just as it was
sent to the printer).
PAXAR PCL
Reference Guide • 43
~SO99
6X6, SNAP
This command specifies the slant of the symbols within the field. This command tells
the printer to print the field with the scaleable symbols and slant the characters giving
the field an italic look. The range of the slant is -90 to 90.
44 • Reference Guide
PAXAR PCL
Special Codes for Special Symbol Information
~YH9
Reserved for Future Printers
This command specifies the expansion multiple for the special symbol in the horizontal
direction.
~YV9
Reserved for Future Printers
This command specifies the expansion multiple for the special symbol in the vertical
direction.
~YT99
960
This command specifies the special symbol type. The 960 has the following special
symbol types.
Type
Description
1
Trademark symbol (Tm)
2
Registered symbol
3
10pt Fractions
4
12pt Fractions
5
Size Symbols
6
Centimeter symbol (cm)
~YR9
960
This command specifies how the field will be graphically placed on the tag. There are
four possible ways to place the field's image on the tag. The DIRECT option is the
default and will print the image directly, as it was created. However, when part of the
image or the entire image is coincident with any part of a previously printed image, the
two field images will be compared in those areas where they are coincident.
The DIRECT option is specified by a 0 in the command. The dot will remain on only
when it is on in the last mapped image for that same dot position.
The AND option is specified by a 1 in the command. The dot will remain on only
when it is on in both images for that same dot position.
The OR option is specified by a 2 in the command. The dot will remain on if the dot is
on in either or both images for that same dot position.
The XOR option is specified by a 3 in the command. The dot will remain on only
when it is on in one of the images - but will not be on if it is on in both images for
that same dot position.
The INVERSE option is specified by a 3 in the command. The dot will remain on only
when it is off in the last mapped image for that same dot position.
PAXAR PCL
Reference Guide • 45
~YI99
960
This command specifies the intercharacter spacing of the selected special symbols. The
value that is included in this command is the number of dots that will be between the
special symbols.
46 • Reference Guide
PAXAR PCL
Special Codes for Graphic Image information
~MH9
630
This command specifies the expansion multiple for the logo in the pull direction.
~MV9
630
This command specifies the expansion multiple for the logo in the web direction.
~MR9
630,6X6,SNAP
This command specifies how the field will be drawn on the tag. There are four possible
ways to place the field's image on the tag. The DIRECT option is the default and will
print the image directly, as it was created. However, when part of the image or the
entire image is coincident with any part of a previously printed image, the two field
images will be compared in those areas where they are coincident.
The DIRECT option is specified by a 0 in the command. The dot will remain on only
when it is on in the last mapped image for that same dot position.
The AND option is specified by a 1 in the command. The dot will remain on only
when it is on in both images for that same dot position.
The OR option is specified by a 2 in the command. The dot will remain on if the dot is
on in either or both images for that same dot position.
The XOR option is specified by a 3 in the command. The dot will remain on only
when it is on in one of the images - but will not be on if it is on in both images for
that same dot position.
The INVERSE option is specified by a 3 in the command. The dot will remain on only
when it is off in the last mapped image for that same dot position.
Compatibility Note:
630 These printers support DIRECT, AND, OR, and XOR.
636X6,SNAP These printers only supports DIRECT, OR, and INVERSE.
Special Codes for RFID Fields
~KS99
700RFID
This command activates auto-incrementing. Auto-incrementing means that this field
will start at the data value which it is sent and increment using the step size that is
specified in this command. The step size of the increment is specified in 99. An
increment of zero turns off auto-incrementing.
NOTE
The printer does not check the formatting of the EPC field. It is the user’s
responsibility to ensure that incrementing is limited to the serialized portion of
the EPC field. For example, if the last 4 characters of the EPC field are
reserved for serialization, batches greater than 9999 will overflow the serial
field.
PAXAR PCL
Reference Guide • 47
Special Codes for Secure Batches
~QRS – Secure Batch Count
6X6,SNAP
This command is used by the host and printer to transfer the Secure Batch Count to
secure storage. See Appendix F Secure Batch Operation for details. The format of the
~QRS command is:
~QRS,XXXXXXXX,99999
where XXXXXXXX is the Batch ID and 99999 is the number of tickets printed.
Control Codes for Data
~ZD99
630,650,9606X6,SNAP
This command denotes the start of a batch and specifies the number of the format to be
used. If the format number is 00, the last format received by the printer is used., and
the printer will retain all of the data from the previous batch (if any). This means that
only the data that has changed from the previous batch needs to be sent for the current
batch (see the description for the data field ~D for details of how data is retained from
the previous batch). If no format was received since the printer was turned on, the batch
will be ignored.
If the format number is other than 00, then the printer will use the format stored in the
printer with the filename FORMAT99.PCL, where 99 is the format number included
with the ~ZD command. For example, if the batch starts with the command ~ZD37,
then the format FORMAT37.PCL will be used to print the data using the batch data. If
the format does not exist, the batch will be ignored.
~D_______
630,650,960, 6X6, SNAP
This command specifies the start of a data string. The end of the data string is marked
by the ~ of the command following the data string. If this command is sent without any
data then the data for this field will be the same as the previous batch unless the ZD
command for the current batch specified a format number other than zero. If the ZD
command specified the format number of a format that resides on the printer then the
data for this field will be precanned data from the format description. If this command
is sent with one space as its data, then the field will be blank instead of using the data
from the previous batch. For example: For the regular transmission of data string
'HELLO', the command would be ~DHELLO. If in the next batch hello is also to be
printed the command would be ~D followed by the ~D for the next fields data. In order
to print a blank field send ~D<SPACE> and then the ~D for the next field. (<SPACE>
stands for the single character Space.)
48 • Reference Guide
PAXAR PCL
Compatibility Notes:
630, 650, 960 All data sent to the PCL printer must be UPPERCASE.
6X6,SNAP Data can be sent to the PCL printer as uppercase or lowercase.
~I_______
630, 636, 656, 676, 686, 545
This command specifies the start of a graphic image. The data following the ~I is either
a standard monochrome BMP or PCX file. The file must be included in its entirely.
PAXAR PCL
Reference Guide • 49
~ZB9999
630,6X6,SNAP
This command tells the printer to take the batch that is being sent and print it as
multiple batches of size 9999. For example: If 1000 tickets need to be printed with the
same information but the tickets need to be grouped in batches of 100, the ZB
command would be sent with a value of 100 (~ZB0100) and the ZZ command would be
sent at the end of the batch with a value of 1000 (~ZZ1000~). If the ZZ quantity is not
an even multiple of the ZB quantity then the remainder of the total quantity will be
printed as the final batch.
Note: This command must be sent before the ZZ command. The ZZ signifies the end
of a batch and all other commands must be sent before the ZZ command.
~ZZ9999
630,650,960,6X6,SNAP
This command specifies the end of the batch. Included in this command is the number
of tags or quantity of tags to be printed with this information. This data set constitutes a
batch. This is the last command the PCL Printer receives before it prints a batch. This
command must be followed by an ~. The final ~ tells the PCL Printer that it is at the
end of the quantity data. For example: If 100 tickets of the current batch are to be
printed then the command would be ~ZZ0100~.
~ZI________
6X6, SNAP
This command specifies the Batch ID that is to be associated with the batch. The
feature always the batch to be tracked if a Batch ID has been assigned. The Batch ID
can be up to 8 characters. The Batch ID is not required, but it is displayed on the printer
control panel and can be printed on the label.
~ZE ……….
SNAP
This command specifies the extended batch information that is to be associated with the
batch, most likely to be used with a secure batch. This command allows the batch to be
tracked by the batch information assigned. The extended batch information is variable
in length. The command character of the next command denotes the end of the
extended batch information. For this reason, the extended batch information may not
contain any of the valid command characters, which at this time are the tilde (~), the up
carat (^) and the ESC (ASCII 0x1b). The extended batch information is not required in
the batch. But when this command is present, the content in the command not the
Batch ID is sent back to the host for a secure batch.
50 • Reference Guide
PAXAR PCL
Configuration Commands
NOTE: These command are included in the
batch and allow control of some aspects of
printing on a batch by batch basis.
~CC
630
This command instructs the printer to return the ASCII character 'FS' ( Hexadecimal
1C, Decimal 28 ) every time a tag is printed. This feature allows the connected
computer to maintain a count. This command must be sent with every batch. It is
cleared upon completion of the batch.
~CF_
630,650,960,6X6,SNAP
This command controls flagging in the current batch. The underscore should be
replaced by one of the following.
N - No Flagging This command turns off flagging for this format.
L = Long / Short This means that two blank tags will appear after a batch is printed
when the tag has a sense mark. The first blank tag is cut long by .23 inches and
the second is cut short by the same amount. These blank tags act as a
separator when the tags are in the printers stacker. When there is no sense
mark on the tag, the blank tag is longer by .23 inches than the printed tags.
D = Double length This command produces a flag that is two tags in the pull length.
T = Stock Saving Flag All tags are printed but the cut on the next to last tag is .125
inches short, which makes the last tag .125 inches longer in the pull length.
All tags can be used.
V = Verifier Flag This command is to be used if a verifier is active on the printer. The
batch quantity is increased by 2 and the stock saving feature is activated. The
print is carried over to the flag which prevents the verifier from halting the
printer when a barcode is not scanned.
B = Double blank Flag This command produces a flag that is blank and two tags in
the pull length.
S = Small Flag This command produces a flag that is .078 inches longer than the tag in
the pull length. When the tag has a sense mark, the first tag is cut long by .078
inches and the second is cut short by the same amount.
M = Medium Flag This command produces a flag that is .15 inches longer than the
tag in the pull length. When the tag has a sense mark, the first tag is cut long
by .15 inches and the second is cut short by the same amount.
X = Extra Large Flag This command produces a flag that is .31 inches longer than the
tag in the pull length. When the tag has a sense mark, the first tag is cut long
by .31 inches and the second is cut short by the same amount.
Z = Zero length Flag This command produces a flag that is equal to the tag in the pull
length. When the tag has a sense mark, only one tag is generated for the flag.
F = Flag According to the Format Returns the flagging mode to whatever was
defined in the format.
PAXAR PCL
Reference Guide • 51
Compatibility Notes:
630 The 630 does Long / Short flagging but the flags are controlled by the pull length
of the tag and cannot be controlled by this command. Meaning if a tag is less than
1.400 inches, the batches will be flagged with a Double Length flag. All batches
whose tags are greater than 1.400 inches will be flagged with Long / Short flags.
The 630 does not support the B, S, M, X commands.
650 The 650 does not support the T, S, M, X options.
960 If the 960 is doing a non-sense mark tag and is flagging, the tag pull length cannot
be longer than 5.756 inches. This tag pull length allows the longer flag to be
created and to be less than the 6-inch maximum for tag pull size. The 960 does
not support the T, V, B, S, M, X options.
636, 656, 676, 686, 545 The 636/656 does not support the D, V, B options. With the S,
M, L, X options, it is possible to produce flags with print other than what is
printed on the tags.
~CI
6X6,SNAP
This command indicates to the printer that the Batch ID assigned to the batch is to be
sent to the host upon completion of the batch. The Batch ID will be sent when the last
ticket of the batch is cut.
~CK_
6X6,SNAP
This command controls cuts in the current batch. This command is a configurable
command and must be included in every batch that the cut is to be suppressed. The
underscore should be replaced by one of the following options.
A - All cuts for this batch are suppressed. These cuts include flag and cut count
requests along with the cut at the beginning of the batch.
B - The cut at the beginning of the batch is suppressed. This will also suppress the cut
between the batch and the flag if flagging is active as the flag is treated as a
separate batch.
~CE
6X6,SNAP
This command specifies to the printer that the printer is to halt after printing the batch.
This is a configuration command and is placed with the batch data commands between
the ~ZD and ~ZZ commands. The start button on the printer must be pressed to resume
printing. If a flagging is active, printing halts after the flag.
52 • Reference Guide
PAXAR PCL
Connection Guide
Serial Connection Specifications
All AVERY DENNISON PCL printers can communicate through an RS232 port. The
Baud rates that are supported vary by printer. However, all printers are set to 8 data
bits, 1 stop bit, No Parity.
The 6X6 serial port is configured as a DCE (Data Communications Equipment) and the
computer serial port is configured as a DTE (Data Terminal Equipment), Therefore, a
straight-through serial cable is required to connect the host with the printer.
The SNAP serial port is configured as a DTE (Data Terminal Equipment). Therefore, a
null modem is required to connect the host with the printer. Pinout for a null model
serial cable is shown below.
When using serial communications, flow control is used to control the transmission of
data from the host to the printer. The printer has an input buffer than holds data from
the host until it can process it. The host computer can send data much faster than the
printer can print it, so the printer must tell the host to stop sending data when the buffer
is almost full. Otherwise, data can be lost. Once the printer has processed the data, it
then tells the host to start sending again.
PCL printers can use either XON/XOFF or RTS/CTS as a Flow Control Protocol. If
the host does not provide this type of flow control then a different type of host must be
used. XON/XOFF flow control uses control characters that are sent over serial data
lines from the printer to the host. RTS/CTS use special lines between the host and the
printer for controlling data flow. It is important to use a serial cable that contains all the
standard RS232 signals for proper operation.
AVERY DENNISON Printer Specific Connection
Information
AVERY DENNISON 630
In order for the 630 to receive PCL commands the printer must be set for PCL mode.
Look in the 630 Operation / Maintenance Guide under Direct Downloading for
information on how to set the printer for this mode.
The 630 can be placed in a PCL command Debug mode by setting the printer up for
Direct Downloading and then holding the Test button down while powering on the
printer. Once the printer is in PCL Debug mode every command that is sent to the
printer is printed out on the current stock that is in the printer.
AVERY DENNISON 650
The 650 must have the AVERY DENNISON PCL program running with the 650's
display and keyboard connected to receive PCL Commands from the host. The PCL
program will display a "Waiting for Host" screen.
Currently a debug mode is not available on the 650 printer.
PAXAR PCL
Connection Guide • 53
AVERY DENNISON 960
The 960 printer must have the PCL option installed on the printer in order to accept
PCL Commands.
Currently there is not a debug mode available on the 960 printer.
AVERY DENNISON 6X6,SNAP
Currently there is not a debug mode available on the 636, 656, 686 or 545 printers.
AS/400 Communications Information for a AVERY
DENNISON PCL Printer
NOTE: The following information is for legacy
applications. The equipment mentioned may not be
available and the information may be obsolete. Please
contact your IT specialist for more information.
Listed below are the settings required by an IBM AS/400 using Andrew Corporation's
Interlynx protocol converter. These settings must be correct in order for the
communications and batching to work properly with a AVERY DENNISON 630 or
650 printer using PCL. The communications with an AS/400 has only been tested
using an Interlynx protocol converter. This example uses a straight thru RS232 cable
that is unmodified between the Interlynx protocol converter and the AVERY
DENNISON Printer.
AS/400 Local Settings: (OS Ver 2 Rel 1 Mod 1)
Display Device Description
Device description . . . . . . . .
DEVD
PX
Option . . . . . . . . . . . . . . . . .
OPTION
*ALL
Category of device . . . . . . . .
Device class . . . . . . . . . . . .
DEVCLS
*LCL
Device type . . . . . . . . . . . .
TYPE
5225
Device Model . . . . . . . . . . . .
MODEL
4
Advanced function printing . .
AFP
*NO
Port Number . . . . . . . . . . . . .
PORT
5
Switch Setting . . . . . . . . . . . .
SWTSET
3
Online at IPL . . . . . . . . . . . .
ONLINE
*YES
Attached controller . . . . . . .
CTL
CTL01
Form feed . . . . . . . . . . . . . .
FORMFEED
*CONT
Printer error message . . . . . .
PRTERRMSG
*INQ
Message queue . . . . . . . . . . .
MSGQ
RDSP040CB
Library . . . . . . . . . . .
54 • Connection Guide
*PRT
*LIBL
PAXAR PCL
Text . . . . . . . . . . . . . . . . . . .
DENNISON - 630
PAXAR PCL
TEXT
AVERY
Connection Guide • 55
AS/400 Remote Settings: (OS Ver 2 Rel 1 Mod 1)
Display Device Description
Device description . . . . . . . .
DEVD
PX
Option . . . . . . . . . . . . . . . . .
OPTION
*ALL
Category of device . . . . . . . .
*PRT
Device class . . . . . . . . . . . . .
DEVCLS
*RMT
Device type . . . . . . . . . . . . .
TYPE
5225
Device Model . . . . . . . . . . . .
MODEL
4
Advanced function printing . .
AFP
*NO
Local location address . . . . .
LOCADR
08
Online at IPL . . . . . . . . . . . .
ONLINE
*YES
Attached controller . . . . . . .
CTL
RCTL04B
Form feed . . . . . . . . . . . . . .
FORMFEED
*CONT
Printer error message . . . . . .
PRTERRMSG
*INQ
Message queue . . . . . . . . . . .
MSGQ
RDSP040CB
Library . . . . . . . . . . .
*LIBL
Maximum length of request unit.
MAXLENRU
*CALC
Pacing . . . . . . . . . . . . . . . . .
PACING
7
Text . . . . . . . . . . . . . . . . . . .
DENNISON - 630
TEXT
AVERY
Interlynx/400 or Interlynx 5251 Protocol Converter
Configuration:
56 • Connection Guide
1. Device Type
PRINT-
2. Associated Work Station Address
1+
3. Bit Rate
9600
4. Number of Bits/Char (Excluding Parity)
8
5. Parity
NONE
6. Number of Stop Bits
1
7. Communications Interface
DTE
8. Auto Answer Mode
No
9. Flow Control From Converter
XON
10. Flow Control From Device
XON
11. Device Ready Signal
NONE
PAXAR PCL
IBM 3270 Connection using Interlynx 3287
The Interlynx 3287 can connect to a AVERY DENNISON PCL printer using a straight
thru RS232 cable and the following settings;
- Interface = Serial
- DCE/DTE switch set to DTE
- 9600 baud, 8 data bits, Parity=NONE (Interlynx uses 1 stop bit, not
configurable)
- Ready Signal = NONE
- Busy Signal = NONE
- Auto-Hold Print = NONE
- Printer Error Timeout = NONE, Retry Forever
Connecting to an AVERY DENNISON SNAP Printer using
USB
NOTE: The standard SNAP printer has a USB host
connector in the connector panel on the back of the
printer. This CANNOT be used to connect the
printer to a computer. USB only supports host to
peripheral communications. Host to host connections
are not supported. An optional USB peripheral
board is available to support USB.
The AVERY DENNISON SNAP printers can optionally be equipped with a USB
peripheral connector. This option allows the printer to be connected to a host computer
using USB, which gives much higher data transmission rates, reducing the time it takes
to transmit large formats and batches to the printer. This is particularly useful with
graphics intensive formats.
The major drawback to USB is that the printer must be location close to the host
computer. The USB specification limits the maximum cable length to 5 meters (16 feet
5 inches). This can be extended my using USB hubs. Up to 5 hubs can be connected in
series for a total length of 30 meters (98 feet), but this become expensive and unwieldy.
A USB driver is included with PCMate Platinum. Instructions for installing the driver
can be found in Engineering Bulletin 06_025_SNAP_USB_Setup.doc.
Connecting to an AVERY DENNISON SNAP Printer using
Ethernet.
The SNAP printer line supports communications via Ethernet to a Local Area Network
(LAN). This allows the printer to be located remotely from the host computer, allows
communicating with the printer from multiple host computers, and allows much faster
communications.
To set up the SNAP printer, you must have the IP address and possibly a Gateway
address and Sub-Mask address. These values are unique for each network and can be
PAXAR PCL
Connection Guide • 57
obtained from your IT specialist. Avery Dennison cannot provide this information since
it is unique for your network.
You will need to connect a standard PC monitor and keyboard to the printer. To set up
the printer IP address, perform the following steps:
1. Turn on the printer. During the initialization, the message “Press F1 to Enter Setup”
will appear on the monitor. Press the F1 key on the keyboard. This message will only
appear for about one second. If you don’t press F1 key in time, simply turn off the
printer and try again.
2. A window will appear asking for a password. Enter IP, then press the Enter key.
3. A menu will appear with options to view or enter the IP, Gateway and Sub-Mask
addresses. To view the current IP address, enter IP, then press Enter. The current IP
address will be displayed. To set the IP address, type IP followed by the IP address,
then press Enter. For example, if your IP address is 198.68.1.1, you would enter
IP 198.68.1.1 <Enter>
4. Repeat step 3 for the Gateway and Sub-Mask addresses.
5. To exit, type EXIT followed by the Enter key. The printer will restart.
For more information, see Engineering Bulletin 06_019_Ethernet_Configuration.doc.
58 • Connection Guide
PAXAR PCL
Glossary of Terms
Batch
Groups of tags with the same information.
DPI
Dots per inch
Format
Describes all the physical descriptions of a tag or label
HRI
Human Readable Information - This is the human interpretation of the barcode.
PCL
Printer Control Language
Pull
The direction which the stock travels through the machine
Tag
Printed information describing an item
Web
The width of a roll of stock
PAXAR PCL
Glossary of Terms • 59
APPENDIX A – PCL Values
Character Font Numbers Associated with the AL and
BL Commands.
Value
5
Font
Supported by
Swiss 721 Bold
636, 656, 676,
686, 545
102
Swiss 721 Heavy
6X6, SNAP
173
Swiss 721 Black Condensed
6X6, SNAP
596
Monospace 821 Roman
6X6, SNAP
598
Monospace 821 Bold
6X6, SNAP
759
Swiss 721 Medium
6X6, SNAP
Character Font Numbers Associated with the AF and
BA Commands.
Value
60 • APPENDIX A – PCL Values
Font
Supported by
1
6 Point Condensed
630, 650, 960
2
6 Point Standard
630, 650, 960
3
6 Point Bold
630
4
8 Point Condensed
630, 650, 960
5
8 Point Standard
630, 650, 960
6
8 Point Bold
630, 650, 960
7
10 Point Condensed
630, 650, 960
8
10 Point Standard
630, 650, 960
9
10 Point Bold
630, 650, 960
10
12 Point Condensed
630, 650
11
12 Point Standard
630, 650, 960
12
12 Point Bold
630, 650, 960
13
OCR A
630, 650
PAXAR PCL
Barcode Font Numbers Associated with the BF
Commands.
Value
PAXAR PCL
Font
Supported by
1
UPC-A
650, 6X6, SNAP
1
UPC-A with 1-5-5-1 HRI segmentation
650
3
UPC-E
630, 6X6, SNAP
4
Code 39
630, 650, 6X6, SNAP
5
EAN-8
630, 650, 6X6, SNAP
6
EAN-13
630, 650, 6X6, SNAP
7
Interleave 2 of 5
630, 650, 6X6, SNAP
10
Code 128
630, 650, 6X6, SNAP
11
EDI Code 128
630, 650, 6X6, SNAP
12
UPC-A with 4-4-4 HRI segmentation
630
13
Code 39 with Sears HRI segmentation
630
14
UPC-A with extended bars
650
14
Interleave 2 of 5 with 3:1 Ratio
630
15
Expanded Code 128
650
16
Reduced Code 128
650
17
Code 93
6X6, SNAP
18
Data Matrix
SNAP
19
GS1 Databar Omnidirectional
SNAP
20
GS1 Databar Stacked Omnidirectional
SNAP
21
GS1 Databar Truncated
SNAP
22
GS1 Databar Stacked
SNAP
23
GS1 Databar Limited
SNAP
24
GS1 Databar Expanded
SNAP
APPENDIX A – PCL Values • 61
Transfer Type Values Associated with the XT
Commands.
Value
Transfer Type
0
Topcoated card stock & HR-4111 Ink
NonTopcoated card stock & HR-4111 Ink
4
PS Non Thermal Receptive & TT-1111 Ink
5
Pressure Sensitive Non Thermal Receptive & HR-1111 Ink
8
Tyvek & TT-1111 Ink
10
PS Non Thermal Receptive & TF-1111 Ink
11
Tyvek & TF-1111 Ink
14
Fabric 2800 & HC-3111 Ink
15
Size Stickers & TW-1111 Ink
51
Heat Seal & SD-1111 Ink
52
Topcoated card stock & TT-3111 Ink
53
Topcoated card stock & TT-1111 Ink
54
Topcoated card stock & HR-3111 Ink
55
Topcoated card stock & HR-1111 Ink
56
Topcoated Card Stock & TW-1111 Ink
57
Topcoated card stock & TW-1151 Ink
58
Pressure Sensitive & TT-3111 Ink
59
Pressure Sensitive Thermal Receptive & TT-1111 Ink
60
Pressure Sensitive Thermal Receptive & TW-1111 Ink
61
Pressure Sensitive & TW-1151 Ink
62
Pressure Sensitive & HR-3111 Ink
63
Uncoated Tag Stock & TT-3111 Ink
64
Uncoated Tag Stock & TT-1111 Ink
65
Uncoated Tag Stock & HR-3111 Ink
66
Uncoated Tag Stock & HR-1111 Ink
67
Uncoated Tag Stock & TW-1111 Ink
68
Uncoated Tag Stock & TW-1151 Ink
69
Fabric 2800 & TT-1111 Ink
70
Fabric 2800 & HR-3111 Ink
71
Fabric 2800 & TT-3111 Ink
72
Fabric 2800 & HC-3111 Ink
73
Fabric 2800 & HR-1111 Ink
74
Fabric 2795 & TT-1111 Ink
75
Fabric 2795 & HR-3111 Ink
76
Fabric 2795 & TT-3111 Ink
77
Fabric 2795 & HC-3111 Ink
78
Fabric 2795 & HR-1111 Ink
62 • APPENDIX A – PCL Values
Supported by
650
650
650
650
650
650
650
650
650
6X6, SNAP
6X6, SNAP
650, 6X6, SNAP
650, 6X6, SNAP
650, 6X6, SNAP
650, 6X6, SNAP
6X6, SNAP
6X6, SNAP
650, 6X6, SNAP
650, 6X6, SNAP
6X6, SNAP
6X6, SNAP
6X6, SNAP
6X6, SNAP
6X6, SNAP
6X6, SNAP
6X6, SNAP
6X6, SNAP
650, 6X6, SNAP
6X6, SNAP
6X6, SNAP
6X6, SNAP
650, 6X6, SNAP
650, 6X6, SNAP
6X6, SNAP
6X6, SNAP
6X6, SNAP
650, 6X6, SNAP
PAXAR PCL
Value
79
80
81
82
83
84
85
86
87
88
89
90
91
92
93
94
95
96
97
98
99
100
101
102
103
104
105
106
107
108
109
110
111
112
113
114
115
116
117
118
PAXAR PCL
Transfer Type
Coated Tag Stock & HR-4111 Ink
Pressure Sensitive & HR-4111 Ink
Uncoated Tag Stock & HR-4111 Ink
Fabric 2800 & HR-4111 Ink
Fabric 2795 & HR-4111 Ink
New Pressure Sensitive (no xfer) & TT-3111 Ink
New Pressure Sensitive (no xfer) & TT-1111 Ink
New Pressure Sensitive (no xfer) & TW-1111 Ink
New Pressure Sensitive (no xfer) & TW-1151 Ink
New Pressure Sensitive (no xfer) & HR-1111 Ink
New Pressure Sensitive (no xfer) & HR-3111 Ink
New Pressure Sensitive (no xfer) & HR-4111 Ink
Coated Tag Stock & GP-1111 Ink
Uncoated Tag Stock & GP-1111 Ink
New Pressure Sensitive (no xfer) & GP-1111 Ink
2800 Fabric & GP-1111 Ink
2795 Fabric & GP-1111 Ink
2795 Fabric & CT-1111 Ink
4800 Fabric & CT-1111 Ink
4800 Fabric & CT-1114 (Blue)
4800 Fabric & GP-1111
2395NWT Fabric & CL-1111 (UK)
2395NWT Fabric & XC-3111 (UK)
2395NWT Fabric & HR-1111 (UK)
2495NWT Fabric & CL-1111 (UK)
2495NWT Fabric & XC-3111 (UK)
2495NWT Fabric & HR-1111 (UK)
4000NWT Fabric & CL-1111 (UK)
4000NWT Fabric & XC-3111 (UK)
4000NWT Fabric & HR-1111 (UK)
4002NWT Fabric & CL-1111 (UK)
4002NWT Fabric & XC-3111 (UK)
4002NWT Fabric & HR-1111 (UK)
G.S. Satin & XC-3111 (UK)
2012T Fabric & XC-3111 (UK)
1021T Fabric & XC-3111 (UK)
2800 Fabric & CT-1111
591SST Fabric & CT-1111
591SST/601SST Fabrics & CT-1114
601SST Fabric & CT-1111
Supported by
6X6, SNAP
6X6, SNAP
6X6, SNAP
6X6, SNAP
6X6, SNAP
6X6, SNAP
6X6, SNAP
6X6, SNAP
6X6, SNAP
6X6, SNAP
6X6, SNAP
6X6, SNAP
650, 6X6, SNAP
650, 6X6, SNAP
650, 6X6, SNAP
6X6, SNAP
6X6, SNAP
6X6, SNAP
6X6, SNAP
6X6, SNAP
6X6, SNAP
6X6, SNAP
6X6, SNAP
6X6, SNAP
6X6, SNAP
6X6, SNAP
6X6, SNAP
6X6, SNAP
6X6, SNAP
6X6, SNAP
6X6, SNAP
6X6, SNAP
6X6, SNAP
6X6, SNAP
6X6, SNAP
6X6, SNAP
6X6, SNAP
6X6, SNAP
6X6, SNAP
6X6, SNAP
APPENDIX A – PCL Values • 63
Value
119
120
121
122
155
156
157
158
159
160
161
162
163
164
165
166
167
168
169
170
171
172
173
174
175
176
177
178
179
180
181
182
183
184
185
201
202
203
204
205
Transfer Type
591SST/601SST Fabrics & CT-1115
591SST/601SST Fabrics & CT-1117
591SST Fabric & CT-1112
601SST Fabric & CT-1112
4900NWT / 4900HSA & HS1111
1800FRA & TW1111
1800FRA & GP1111
2085NWT / 2495NWT / 2360NWT & HS1111
2360NWT / 2800NWT & XC3111
2895NWT / 2800NWT & HS1111
2895NWT & XC3111
2895NWT & HC3111
1800MWA & GP1111
1800MWA & TW1111
604LKP / 601LKP & DS7501 / 7502 / 7504
604LKP / 601 LKP & DS7503
4800NBC Fabric & HS1011
2012T Fabric & HS1111/1112
4360NBT Fabric & SD1011
4041THS Fabric & HS1111
4700TWT Fabric & PL1111
4800TST Fabric & CT1111
4800TST Fabric & CT1112
4800TST Fabric & CT1114
4800TST Fabric & CT1115
4800TST Fabric & CT5137
4800TST Fabric & HS1111
770SWT Fabric & CT1112
770SWT Fabric & CT1114
770SWT Fabric & CT1115
770SWT Fabric & CT5137
772SWT Fabric & CT1112
772SWT Fabric & CT1114
772SWT Fabric & CT1115
772SWT Fabric & CT5137
New Tag Stock A & GN - 1111
New Tag Stock B & GN - 1111
New Tag Stock C & GN - 1111
New Tag Stock D & GN - 1111
New Tag Stock E & GN - 1111
64 • APPENDIX A – PCL Values
Supported by
6X6, SNAP
6X6, SNAP
6X6, SNAP
6X6, SNAP
6X6, SNAP
6X6, SNAP
6X6, SNAP
6X6, SNAP
6X6, SNAP
6X6, SNAP
6X6, SNAP
6X6, SNAP
6X6, SNAP
6X6, SNAP
6X6, SNAP
6X6, SNAP
6X6, SNAP
6X6, SNAP
6X6, SNAP
6X6, SNAP
6X6, SNAP
6X6, SNAP
6X6, SNAP
6X6, SNAP
6X6, SNAP
6X6, SNAP
6X6, SNAP
6X6, SNAP
6X6, SNAP
6X6, SNAP
6X6, SNAP
6X6, SNAP
6X6, SNAP
6X6, SNAP
6X6, SNAP
686
686
686
686
686
PAXAR PCL
Barcode Segmentation Values Associated with the
BG Commands.
Value
0
1
2
3
4
5
6
7
8
9
PAXAR PCL
Font
None
4-4-4 UPC (3 of 4)
1-5-5-1 UPC
Sears Code 39
1-6-6 EAN
UCC128
2&4
1&6
3-3-3-3 UPC (4 of 3)
4-4
Supported by
650, 6X6, SNAP, 686, 545
650, 6X6, SNAP, 686, 545
650, 6X6, SNAP, 686, 545
650, 6X6, SNAP, 686, 545
650, 6X6, SNAP, 686, 545
650, 6X6, SNAP, 686, 545
650, 6X6, SNAP, 686, 545
650, 6X6, SNAP, 686, 545
650, 6X6, SNAP, 686, 545
650, 6X6, SNAP, 686, 545
APPENDIX A – PCL Values • 65
APPENDIX B - Default Values
Format Defaults When Printer Receives a ~XA
command:
630:
Web Size = 0
Pull Size = 0
No Sense mark
No Flags
1-UP
Head Strobe = 6
Print Speed = 5.0 inches/sec
Sense to Cut = 0
Cut count = 1
Number of fields = 0
650:
Web Size = 5.0" (Max Value)
Pull Size = 7.0"
No Sense mark
No Flags
1-UP
Print Speed = 6.5 inches/sec
Sense to Cut = 0
No Head Lift
Transfer Type = 0 (Topcoat card stock & TT-1111 Ink)
Number of fields = 0
960:
Web Size = 2.0"
Pull Size = 1.0"
No Sense mark
Sense to Cut = 0
66 • APPENDIX B - Default Values
PAXAR PCL
636:
Web Size = 1.0"
Pull Size = 1.0"
No Sense mark
No Flags
1-UP
Print Speed = 5.5 inches/sec
Sense to Cut = 0
Cut count = 1
Transfer Type = 91 (Topcoat card stock & TT-1111 Ink)
Number of fields = 0
656:
Web Size = 1.0"
Pull Size = 1.0"
No Sense mark
No Flags
1-UP
Print Speed = 7.0 inches/sec
Sense to Cut = 0
Cut count = 1
No Head Lift
Transfer Type = 91 (Topcoat card stock & TT-1111 Ink)
Number of fields = 0
676:
Web Size = 1.0"
Pull Size = 1.0"
No Sense mark
No Flags
1-UP
Print Speed = 5.0 inches/sec
Sense to Cut = 0
Cut count = 1
No Head Lift
Transfer Type = 91 (Topcoat card stock & TT-1111 Ink)
Number of fields = 0
PAXAR PCL
APPENDIX B - Default Values • 67
686:
Web Size = 1.0"
Pull Size = 1.0"
No Sense mark
No Flags
1-UP
Print Speed = 12.0 inches/sec
Sense to Cut = 0
Cut count = 1
No Head Lift
Transfer Type = 201 (New Tag Stock A & GN - 1111 Ink)
Number of fields = 0
545:
Web Size = 1.0"
Pull Size = 1.0"
No Flags
1-UP
Print Speed = 10.0 inches/sec
Cut count = 1
Number of fields = 0
68 • APPENDIX B - Default Values
PAXAR PCL
Format Defaults When Printer Receives a ~FA
Command:
630:
No Datacopy
No Increment
Font = 8 Point Standard
Field Position = 0, 0
No Expansion
Inter Character Spacing of 3
Field Rotation = 0 degrees
650:
No Datacopy
No Increment
Font = 8 Point Standard
Field Position = 0, 0
No Expansion
Field Rotation = 0 degrees
960:
Side = Front
Web = 0.250"
Pull = 0.250"
Field Rotation = 0 degrees
No Edit codes
No Expansion
Font = 8 Point Standard
636 / 656 / 676 / 686 / 545:
Web = 0.062"
Pull = 0.062"
No Increment
Length = 1
Font = Monospace 821 Bold
Pointsize = 8
Field Rotation = 0 degrees
Code Page = 437
Justification = Left
Inter Character Spacing of 3
PAXAR PCL
APPENDIX B - Default Values • 69
Format Defaults When Printer Receives a ~FB
Command:
630:
No Datacopy
No Increment
Barcode Type = UPC-A
Barcode height = 1/2"
Module width = 1
No Guard bars
Field Position = 0, 0
Field Rotation = 90 degrees
No Check Digit
No Human Readable Information
Barcode margin (Quiet Zone) = 0
System Digit position = 0,0
650:
No Datacopy
No Increment
Barcode Type = UPC-A
Barcode height = 1/2"
Field Position = 0, 0
Field Rotation = 90 degrees
No Check Digit
No Human Readable Information
70 • APPENDIX B - Default Values
PAXAR PCL
636 / 656 / 676 / 686 / 545:
No Datacopy
No Increment
Barcode Type = UPC-A
Length = 12
Barcode height = 1/2"
Module width = 0.13"
No Guard bars
Web = 0.062"
Pull = 0.062"
Field Rotation = 90 degrees
No Check Digit
No Human Readable Information
Barcode margin (Quiet Zone) = 0
System Digit position = 0,0
HRI Font = Monospace 821 Bold
HRI Point size = 8
HRI Code Page = 437
HRI segmentation = 1-5-5-1
HRI Position = bottom
Justification = Left
Inter Character Spacing of 3
Format Defaults When Printer Receives a ~FS
Command:
630:
Field Position = 0, 0
No Expansion
Spacing between symbols = 5 dots
Field Rotation = 0 degrees
Symbol type = 9
650:
Field Position = 0, 0
No Expansion
Field Rotation = 0 degrees
PAXAR PCL
APPENDIX B - Default Values • 71
960:
Side = Front
Web = 0.250"
Pull = 0.250"
Field Rotation = 0 degrees
No Expansion
636 / 656 / 676 / 686 / 545:
Web = 0.062"
Pull = 0.062"
Length = 1
Image Type = BMP
Justification = Left
Inter Character Spacing of 3
Format Defaults When Printer Receives a ~FG
Command:
630:
Field Position = 0, 0
No Expansion
Spacing between symbols = 5 dots
Field Rotation = 0 degrees
Logo type = 1
650:
Field Position = 0, 0
No Expansion
Field Rotation = 0 degrees
Logo type = 1
960:
Side = Front
Web = 0.250"
Pull = 0.250"
Field Rotation = 0 degrees
No Expansion
Logo type = 1
636 / 656 / 676 / 686 / 545:
Web = 0.062"
Pull = 0.062"
Image Type = BMP
72 • APPENDIX B - Default Values
PAXAR PCL
Format Defaults When Printer Receives a ~FL
Command:
630:
Field Start Position = 0, 0
Field End Position = 0,0
Line Width Horizontal and Vertical = 2 dots
960:
Field Start Position = 0.250", 0.250"
Field End Position = 0.250", 0.250"
Line Width Horizontal and Vertical = 1 dot
636 / 656 / 676 / 686 / 545:
Web = 0.062"
Pull = 0.062"
End Web = 1.062"
End Pull = 1.062"
Line Width Horizontal and Vertical = 3 dots
Shape = Box
PAXAR PCL
APPENDIX B - Default Values • 73
APPENDIX C – Volatile Logos
Volatile Logos are temporary image files that are stored in the printer only until the
printer is turned off or until they are deleted. Volatile logos are useful when multiple
batches use the same image files. By downloading a volatile logo, it can be used by
multiple batches simply by referencing its number. This eliminates the need to
download the same image file multiple times, reducing the amount of data that has to be
sent to the printer and reducing transmission time.
A volatile logo may not be downloaded within a format (between the ~XA and ~XZ
commands) or a batch (between the ~ZD and ~ZZ commands), and must be
downloaded to the printer before the batch that uses it. It may be downloaded after the
format, but before the first batch that references it.
Once a volatile logo is downloaded to the printer, it is retained until the printer is turned
off or until a Delete Volatile Logos command is received. When the Delete Volatile
Logos command is received, all volatile logos are deleted. However, if there are batches
ready to print, the volatile logos that were stored in the printer when the batches were
received will be retained until the batches are printed or cleared from the printer. This
eliminates the need to wait until printing is complete to send the Delete Volatile Logos
command.
NOTE: Sending two volatile logos with the same
reference number without an intervening Delete
Volatile Logos command will result in unspecified
operation.
For example, the host sends the following data to the printer:
VOLATILE LOGO 1
VOLATILE LOGO 2
These logos go with
these batches
BATCH 1
BATCH 2
DELETE VOLATILE LOGOS
VOLATILE LOGO 1
VOLATILE LOGO 2
These logos go with
these batches
BATCH 3
BATCH 4
Batches 1 and 2 will use the first set of volatile logos, and batches 3 and 4 will use the
second set of volatile logos. This will work properly independent of the timing of
transmission or printing.
Volatile logos are referenced using a standard logo field (~FG). The ~GT command
will indicate a logo type V (~GTV) to denote that the field will use a temporary logo.
The corresponding ~D field in the batch will identify the logo number defined in the ~V
command. See the example below in the ~V command description. Note that the ~FG
field definition included the ~GTV command, which indicated that the image will come
from the volatile logo set. In the batch, the ~D42 indicates that volatile logo number 42
will be used.
Volatile Logos use the following commands:
74 • APPENDIX C – Volatile Logos
PAXAR PCL
~VVV999
500, 600, 600RFID, 700
This command allows graphics to be transmitted to the printer and kept for printing
until the printer is powered off. This is referred to as volatile or temporary graphics.
The graphic will exist in the printer’s memory until either the printer is powered off or
the ~VD command is received.
The graphic received can be either a BMP or a PCX. The 999 is replaced by a unique
number that is used to reference the volatile logo in the batch.
This command can be sent either before the ~XA and after the ~XZ or before the ~ZD
and after the ~ZZ but not between those commands. The graphic must be downloaded
before it can be used for printing. It must be downloaded before the batch in which it is
referenced. If a graphic with the graphic number specified is not found, the label will
print with no logo.
To be able to print this graphic, a field type defining the graphic needs to be present in
the format. Using the option V in the ~GT command will indicate the graphic is in the
volatile queue. In the batch, the data for the graphic field will be the graphic number
assigned to the graphic from the ~V command. For an example, a format to print a
temporary graphic would look like:
~VVV42<GRAPHIC DATA>~
~XA~XP2250~XW3000~XMH1125~XFL
~FG01~FW1000~FP1500~GTV
~XZ
~ZD00~D42~ZZ0010~
~VD
500, 600, 600RFID, 700
This command deletes all volatile graphics that have previously been downloaded to the
printer since the printer has been powered on. Any batches that have been received by
the printer prior to receiving this command will use the volatile logos in place when
those batches were received (see the example in the text above).
PAXAR PCL
APPENDIX C – Volatile Logos • 75
APPENDIX D – PCL Summary 7.2
Format Commands
Command
~XA
~XW9999
~XP99999
~XM_9999
~XF_
Description
Start of Format
Tag Web Size
Up to 5000 (5.0") by increments of 33 (.033")
Up to 4800 (4.8") by increments of 33 (.033")
Up to 4000 (4.0")
1000 (1.0") to 5125 (5.125")
500 (0.5") to 1375 (1.375")
Tag Pull Size
Up to 7000 (7.0") by increments of 33 (.033")
Up to 14000 (14.0) by increments of 33 (.033")
Up to 6000 (6.0")
1000 (1.0") to 14000 (14.0")
625 (.625") to 14000 (14.0")
Sense Mark Format
H:Hole, R:Reflective
H:Hole, T:Top Reflective, R:Reflective (back option), C:
Contrast sensor
Flagging
N: None
L: Long / Short,
~XG
~XL9
~XS99
~XUC9
D: Double,
T: Tag,
V: Verifier,
B: Double blank
S: Small, M: Medium, X: Extra Large,
Z: Zero length
Graphic Field Designation
A: Graphic field is an alphanumeric field.
L: Graphic field is a logo field.
P:Point size of a graphic alphanumeric field.
Number of Tags Across the Web
Up to 4 tags
Up to 2 tags
Print Speed
50: 5.0"/sec, 40: 4.0"/sec, 30: 3.0"/sec
65: 6.5"/sec to 25: 2.5"/sec by .5"/sec
70: 7.0", 60: 6.0", 45: 4.5", 30: 3.0"/sec
120: 12", 100: 10", 70: 7.0", 30: 3.0"/sec
100: 10", 80: 8", 60: 6.0", 40: 4.0"/sec
120: 12’, 100: 10”, 80: 8”, 70: 7”, 60: 6:, 45: 4.5”, 30: 3”
Future Command
76 • APPENDIX D – PCL Summary 7.2
Available on
630, 650, 960, 6X6, SNAP
630
650
960
636, 656, 676, 686
545
630
650
960
636, 656, 676, 686
545
630, 650, 960, 636, 656, 686
676, SNAP
630, 650, 960, 6X6, SNAP
630, 650, 960, 6X6, SNAP
630, 650, 960
630, 6X6, SNAP
630, 650
650
6X6, SNAP
6X6, SNAP
PcMate Plus Display
630, 636, 656, 676, SNAP
650, 960
630, 676
650
636, 656, SNAP 500
686
545
SNAP 600, SNAP 700
PAXAR PCL
~XUB9
~XUR999
~XUW999
~XUA9
~XUX9
~XUP99
~XH99
PAXAR PCL
Barcode Exclusion
B9 – Barcode Exclusion SV100 Scanner Only
This command allows for specified barcodes on the tag
NOT to be verified. This command is ONLY valid with
the SV100 verifier. The barcodes can be excluded by
replacing the 9 with the following;
0 = Exclude none
1 = Exclude UPC-A, UPC-E, EAN-8, EAN-13
2 = Exclude Code 39
4 = Exclude Code 128, EDI Code 128
8 = Exclude Interleave 2 of 5
16 = Exclude Code 93
To exclude multiple barcodes, replace the 9 with the sum
of the values designating the barcodes to exclude.
Example: To exclude code 39 and Interleave 2 of 5, add the
2 and the 8 together and the command would be ~XUB10.
RFID Read Power
RFID Write Power
RFID Signal Adjust
RFID Write Retries
RFID Protocol
Head Strobe Value - 1 to 15
636, 656, 676, 686, SNAP
SNAP 700
SNAP 700
SNAP 700
SNAP 700
SNAP 700
630
APPENDIX D – PCL Summary 7.2 • 77
~XT99
Transfer Type
9: Topcoated Card Stock w/TF-1111 (lightest-650 only)
74: Fabric 2795 w/TT-1111
60: PS Thermal Receptive w/TW-1111
15: Size Stickers w/TW-1111
14: Fabric 2800 w/HC-3111
11: Tyvek w/TF-1111
59: PS Thermal Receptive w/TT-1111
73: Fabric 2800 w/HR-1111
69: Fabric 2800 w/TT-1111
10: PS Non Thermal Receptive w/TF-1111
8: Tyvek w/TT-1111
4: PS Non Thermal Receptive w/TT-1111
53: Topcoated card stock w/TT-1111
54: Topcoated card stock w/HR-3111
0: Topcoated card stock w/HR-4111
0: NonTopcoated card stock w/HR-4111
5: PS Non Thermal Receptive w/HR-1111
56: Topcoated Card Stock w/TW-1111
78: Fabric 2795 w/HR-1111
55: Topcoated card stock w/HR-1111 (darkest-650 only)
51: Heat Seal w/SD-1111
52: Topcoated card stock w/TT-3111
57: Topcoated card stock w/TW-1151
58: Pressure Sensitive w/TT-3111
61: Pressure Sensitive w/TW-1151
62: Pressure Sensitive w/HR-3111
63: Uncoated Tag Stock w/TT-3111
64: Uncoated Tag Stock w/TT-1111
65: Uncoated Tag Stock w/HR-3111
66: Uncoated Tag Stock w/HR-1111
67: Uncoated Tag Stock w/TW-1111
68: Uncoated Tag Stock w/TW-1151
70: Fabric 2800 w/HR-3111
71: Fabric 2800 w/TT-3111
72: Fabric 2800 w/HC-3111
75: Fabric 2795 w/HR-3111
76: Fabric 2795 w/TT-3111
77: Fabric 2795 w/HC-3111
78 • APPENDIX D – PCL Summary 7.2
650
650, 636, 656, 676, SNAP
650, 636, 656, 676, SNAP
650
650
650
650, 636, 656, 676, SNAP
650, 636, 656, 676, SNAP
650, 636, 656, 676, SNAP
650
650
650
650, 636, 656, 676, SNAP
650, 636, 656, 676, SNAP
650
650
650
650, 636, 656, 676, SNAP
650, 636, 656, 676, SNAP
650, 636, 656, 676, SNAP
636, 656, 676, SNAP
636, 656, 676, SNAP
636, 656, 676, SNAP
636, 656, 676, SNAP
636, 656, 676, SNAP
636, 656, 676, SNAP
636, 656, 676, SNAP
636, 656, 676, SNAP
636, 656, 676, SNAP
636, 656, 676, SNAP
636, 656, 676, SNAP
636, 656, 676, SNAP
636, 656, 676, SNAP
636, 656, 676, SNAP
636, 656, 676, SNAP
636, 656, 676, SNAP
636, 656, 676, SNAP
636, 656, 676, SNAP
PAXAR PCL
~XT99 (Con’t) Transfer Type
79: Coated Tag Stock w/HR-4111
80: Pressure Sensitive w/HR-4111
81: Uncoated Tag Stock w/HR-4111
82: Fabric 2800 w/HR-4111
83: Fabric 2795 w/HR-4111
84: New Pressure Sensitive (no xfer) w/TT-3111
85: New Pressure Sensitive (no xfer) w/TT-1111
86: New Pressure Sensitive (no xfer) w/TW-1111
87: New Pressure Sensitive (no xfer) w/TW-1151
88: New Pressure Sensitive (no xfer) w/HR-1111
89: New Pressure Sensitive (no xfer) w/HR-3111
90: New Pressure Sensitive (no xfer) w/HR-4111
91: Coated Tag Stock w/GP-1111
92: Uncoated Tag Stock w/GP-1111
93: New Pressure Sensitive w/GP-1111
94: 2800 Fabric w/GP-1111
95: 2795 Fabric w/GP-1111
96: 2795 Fabric w/CT-1111
97: 4800 Fabric w/CT-1111
98: 4800 Fabric w/CT-1114 (Blue)
99: 4800 Fabric w/GP-1111
100: 2395NWT Fabric w/CL-1111 (UK)
101: 2395NWT Fabric w/XC-3111 (UK)
102: 2395NWT Fabric w/HR-1111 (UK)
103: 2495NWT Fabric w/CL-1111 (UK)
104: 2495NWT Fabric w/XC-3111 (UK)
105: 2495NWT Fabric w/HR-1111 (UK)
106: 4000NWT Fabric w/CL-1111 (UK)
107: 4000NWT Fabric w/XC-3111 (UK)
108: 4000NWT Fabric w/HR-1111 (UK)
109: 4002NWT Fabric w/CL-1111 (UK)
110: 4002NWT Fabric w/XC-3111 (UK)
111: 4002NWT Fabric w/HR-1111 (UK)
112: G.S. Satin w/XC-3111 (UK)
113: 2012T Fabric w/XC-3111 (UK)
114: 1021T Fabric w/XC-3111 (UK)
115: 2800 Fabric w/CT-1111
116: 591SST Fabric w/CT-1111
117: 591SST/601SST Fabrics w/CT-1114
118: 601SST Fabric w/CT-1111
119: 591SST/601SST Fabrics w/CT-1115
120: 591SST/601SST Fabrics w/CT-1117
121: 591SST Fabric w/CT-1112
122: 601SST Fabric w/CT-1112
155: 4900NWT / 4900HSA & HS1111
156: 1800FRA & TW1111
157: 1800FRA & GP1111
158: 2085NWT / 2495NWT / 2360NWT & HS1111
159: 2360NWT / 2800NWT & XC3111
160: 2895NWT / 2800NWT & HS1111
161: 2895NWT & XC3111
162: 2895NWT & HC3111
163: 1800MWA & GP1111
164: 1800MWA & TW1111
165: 604LKP / 601LKP & DS7501 / 7502 / 7504
166: 604LKP / 601 LKP & DS7503
167: 4800NBC Fabric & HS1011
PAXAR PCL
636, 656, 676, SNAP
636, 656, 676, SNAP
636, 656, 676, SNAP
636, 656, 676, SNAP
636, 656, 676, SNAP
636, 656, 676, SNAP
636, 656, 676, SNAP
636, 656, 676, SNAP
636, 656, 676, SNAP
636, 656, 676, SNAP
636, 656, 676, SNAP
636, 656, 676, SNAP
636, 656, 676, SNAP
636, 656, 676, SNAP
636, 656, 676, SNAP
636, 656, 676, SNAP
636, 656, 676, SNAP
636, 656, 676, SNAP
636, 656, 676, SNAP
676, 656, 676, SNAP
636, 656, 676, SNAP
636, 656, 676, SNAP
636, 656, 676, SNAP
636, 656, 676, SNAP
636, 656, 676, SNAP
636, 656, 676, SNAP
636, 656, 676, SNAP
636, 656, 676, SNAP
636, 656, 676, SNAP
636, 656, 676, SNAP
636, 656, 676, SNAP
636, 656, 676, SNAP
636, 656, 676, SNAP
636, 656, 676, SNAP
636, 656, 676, SNAP
636, 656, 676, SNAP
636, 656, 676, SNAP
636, 656, 676, SNAP
636, 656, 676, SNAP
636, 656, 676, SNAP
636, 656, 676, SNAP
636, 656, 676, SNAP
636, 656, 676, SNAP
636, 656, 676, SNAP
636, 656, 676, SNAP
636, 656, 676, SNAP
636, 656, 676, SNAP
636, 656, 676, SNAP
636, 656, 676, SNAP
636, 656, 676, SNAP
636, 656, 676, SNAP
636, 656, 676, SNAP
636, 656, 676, SNAP
636, 656, 676, SNAP
636, 656, 676, SNAP
636, 656, 676, SNAP
636, 656, 676, SNAP
APPENDIX D – PCL Summary 7.2 • 79
~XT99 (Con’t) Transfer Type
168: 2012T Fabric & HS1111/1112
169: 4360NBT Fabric & SD1011
170: 4041THS Fabric & HS1111
171: 4700TWT Fabric & PL1111
172: 4800TST Fabric & CT1111
173: 4800TST Fabric & CT1112
174: 4800TST Fabric & CT1114
175: 4800TST Fabric & CT1115
176: 4800TST Fabric & CT5137
177: 4800TST Fabric & HS1111
178: 770SWT Fabric & CT1112
179: 770SWT Fabric & CT1114
180: 770SWT Fabric & CT1115
181: 770SWT Fabric & CT5137
182: 772SWT Fabric & CT1112
183: 772SWT Fabric & CT1114
184: 772SWT Fabric & CT1115
185: 772SWT Fabric & CT5137
201: New Tag Stock A & GN – 1111
202: New Tag Stock B & GN – 1111
203: New Tag Stock C & GN – 1111
204: New Tag Stock D & GN – 1111
205: New Tag Stock E & GN - 1111
~XI
Head Lift
~XC99
Number of Tags Before a Cut
~XV_..._
Verifier Setup Information
As many commands as are necessary can
be placed after the ~XV command
W: Halt on warnings
N: Halt the printer on a no read only.
B: Halt the printer on both a no read and a symbol quality
reject.
R: Halt on Symbol quality rejects only
S_: Quality level where _ is replaced by one character
grade B,C,D,F
C99: Consecutive failure where 99 is replaced by
00=Disable or 01 thru 10
A99: Accumulative failure where 99 is replaced by
00=Disable or 01 thru 20
~XR_
Ink Color
R: Red ink, B: Black ink
~XN
Print Station Selection
1:Station 1, 2:Station 2, 3:Station 3
~XO
Mirror Image
~XD
DPI Definition
240: 240 dpi, 300: 300 dpi
~XX
Printer Definition
6X6, SNAP
~XE
Printer Halt After Batch Command
~XJ99
Minimum Barcode Scans
~XZ
End of Format
80 • APPENDIX D – PCL Summary 7.2
636, 656, 676, SNAP
636, 656, 676, SNAP
636, 656, 676, SNAP
636, 656, 676, SNAP
636, 656, 676, SNAP
636, 656, 676, SNAP
636, 656, 676, SNAP
636, 656, 676, SNAP
636, 656, 676, SNAP
636, 656, 676, SNAP
636, 656, 676, SNAP
636, 656, 676, SNAP
636, 656, 676, SNAP
636, 656, 676, SNAP
636, 656, 676, SNAP
636, 656, 676, SNAP
636, 656, 676, SNAP
636, 656, 676, SNAP
636, 656, 676, SNAP
686
686
686
686
686
650, 656, 676
630, 6X6, SNAP
636, 656, 676, 686, SNAP
636 Beige,656 Beige
676, 545, SNAP
6X6, SNAP
PcMate Plus Display
PcMate Plus Display
6X6, SNAP
6X6, SNAP
630, 650, 960, 6X6, SNAP
PAXAR PCL
Field Commands
~FA99
~FB99
~FL
~FG99
~FS99
~FY99
~FM
~FK
~FW9999
~FP99999
~FR9
~FD_
~FTR9
~FTRP9
Alpha Numeric Field Definition
1 to 64 characters
1 to 128 characters
Barcode Field Definition
Box / Line Field Definition
Logo Field Definition
Care Symbol Field Definition
Special Symbol Field Definition
Graphic Image Field Definition
RFID Field Definition
Field Web Position
Field Pull Position
Field Rotation
0: 0, 1: 90, 2: 180, 3: 270 degrees
Side of Tag Field is Placed on
F:Front, B:Back
1:Station 1, 2:Station 2, 3:Station 3
2:Station 2
A:Flag (Station 2 default),
A1:Station 1 Flag, A2:Station 2 Flag, A3:Station 3 Flag
RFID Transponder Read Field
1 – 64 bit signature
2 – 96 bit signature
RFID EPC Data Field Datacopy
1 – 64 bit signature
2 – 96 bit signature
630, 650, 960
6X6, SNAP
630, 650, 6X6, SNAP
630, 960, 6X6, SNAP
630, 650, 960, 6X6, SNAP
630, 650, 960, 6X6, SNAP
960
630, 6X6, SNAP
SNAP 700
630, 650, 960, 6X6, SNAP
630, 650, 960, 6X6, SNAP
630, 650, 960, 636, 656, 676
960, 676
676, 545 (only 1 & 2)
636, 656, 686
960, 6X6, SNAP
676, 545 (only A1 & A2)
SNAP 600RFID, SNAP
700RFID
SNAP 700RFID
Alphanumeric Field Commands
~AF9999
~AL99999
~AC999
~AP99
~A199
~A299
~A399
PAXAR PCL
Alphanumeric Font Number
1:6 Pt CND, 2:6 Pt STD,
3:6 Pt BLD,
4:8 Pt CND, 5:8 Pt STD, 6:8 Pt BLD,
7:10 Pt CND, 8:10 Pt STD, 9:10 Pt BLD,
10:12 Pt CND, 11:12 Pt STD, 12:12 Pt BLD,
13:OCR A
Scaleable Fonts
5:Swiss 721 Bold
102:Swiss 721 Heavy
173:Swiss 721 Black Condensed
759:Swiss 721 Medium
596:Monospace 821
598:Monospace 821 Bold (default)
Code Page
000, 001, 437, 850, 851, 852, 857, 866
Point Size of Scaleable Font
4 to 96
6 to 96
Data Copy Source Field
Data Copy Start Character
Data Copy Number of Characters
630, 650, 960
630,
630, 650, 960
630, 650, 960
630, 650, 960
630, 650
6X6, SNAP
960, 6X6, SNAP
636, 656, 676, 686
545
630, 650, 6X6, SNAP
630, 650, 6X6, SNAP
630, 650, 6X6, SNAP
APPENDIX D – PCL Summary 7.2 • 81
~AS99
~AD99
~AE_
~AV9
~AH9
~AI99
~AR9
~AO99
~AT_
~AM_
~AW9999
~AQ9
~AA9
~AB_
Sequencing
1 to 255
1 to 254
255: Decrement by 1
- 2,147,483,647 to + 2,147,483,647
Number of Tags Before Sequencing
Edit Code
L:Left justified, R:Right justified, C:Center justified,
A:Print as is
Height Expansion Multiple
2, 4, and 8
1 to 9
Width Expansion Multiple
2, 4, and 8
1 to 9
Intercharacter Spacing
Write Mode
0: Direct, 1: And, 2: Or, 3: Xor
0: Direct, 2:Overlap, 3:Inverse
Oblique of Character (Slant)
-90 to 90
Character Orientation
V:Vertical, H:Horizontal
Function Field
D:Date – (mm/dd/yy), E:Date – (dd/mm/yy),
T:Time – (hh:mm:ss AM/PM), Q:Quantity,
I:Batch ID
Width of Field for Variable Width Fonts
Quadrangle Field
0:Squeeze to fit, 1:Proportion to fit,
2:Stretch to fit, 3: Regular fit
Escapement
0:Left to Right, 1:Right to Left
Field Ascender / Descender Selection
A: Ascenders only, D: Descenders only,
B: Ascender and Descenders,
O: Neither Ascenders or Descenders
82 • APPENDIX D – PCL Summary 7.2
630, 960
650
6X6, SNAP
630, 960, 6X6, SNAP
630, 650, 960, 6X6, SNAP
650
630, 960
650
630, 960
630, 960, 6X6, SNAP
630, 650, 960
6X6, SNAP
6X6, SNAP
6X6, SNAP
6X6, SNAP
6X6, SNAP
6X6, SNAP
Future Command
Future Command
PAXAR PCL
Barcode Field Commands
~BF99
Barcode Type
1:UPC-A (1-5-5-1 HRI),
1:UPC-A,
3:UPC-E,
4:Code 39, 5:EAN-8, 6:EAN-13, 7:I 2 of 5,
10:Code 128, 11:EDI Code 128,
~B199
~B299
~B399
~BS99
~BD99
~BH9999
~BW9
~BX9999
~BC
~BZ_
~BA99
~BL99999
~BP99
~BI99
~BB9999
~BJ9999
~BK9999
~BR9
PAXAR PCL
12:UPC-A (4-4-4 HRI),
13:Code 39 (Sears Code 39 HRI),
14:UPC-A w/Extended guard bars,
14:I 2 of 5 - 3:1 Ratio,
15:Expanded Code 128,
16:Reduced Code 128,
17:Code 93
18: Data Matrix
19: GS1 DataBar Omnidirectional
20: GS1 DataBar Stacked Omnidirectional
21: GS1 DataBar Truncated
22: GS1 DataBar Stacked
23: GS1 DataBar Limited
24: GS1 DataBar Expanded
Data Copy Source Field
Data Copy Start Character
Data Copy Number of Characters
Sequencing
Number of Tags Before Sequencing
Height for the Barcode Bars
Module Width of the Bars
Length of Barcode Guard Bars
Check Digit Calculated
HRI Placement
T:Top, B:Bottom
HRI Font
Scaleable Fonts
5: Swiss 721 Bold
102: Swiss 721 Heavy
173: Swiss 721 Black Condensed
759: Swiss 721 Medium
596: Monospace 821
598: Monospace 821 Bold (default)
Point Size of HRI
4 to 96
6 to 96
Intercharacter Spacing
Barcode Margin
UPC System Digit / Check Digit Horizontal Placement
UPC System Digit / Check Digit Vertical Placement
Write Mode
0: Direct, 1: And, 2: Or, 3: Xor
0: Direct, 2:Overlap, 3:Inverse
630
650, 6X6, SNAP
630, 6X6, SNAP
630, 650, 6X6, SNAP
630, 650, 6X6, SNAP
630
630
650
630
650
650
6X6, SNAP
6X6, SNAP
6X6, SNAP
6X6, SNAP
6X6, SNAP
6X6, SNAP
6X6, SNAP
6X6, SNAP
6X6, SNAP
630, 650, 6X6, SNAP
630, 650, 6X6, SNAP
630, 650, 6X6, SNAP
630, 650, 6X6, SNAP
630, 6X6, SNAP
630, 650, 6X6, SNAP
630, 6X6, SNAP
630, 6X6, SNAP
630, 650, 6X6, SNAP
630, 6X6, SNAP
630, 650, 6X6, SNAP
6X6, SNAP
636, 656, 676, 686
545
6X6, SNAP
630
630, 6X6, SNAP
630, 6X6, SNAP
630, 650, 960
6X6, SNAP
APPENDIX D – PCL Summary 7.2 • 83
~BG9
~BM_
HRI Segmentation
0:None, 1:4-4-4 UPC, 2:1-5-5-1 UPC,
3:Sears Code 39, 4:1-6-6 EAN, 5:UCC128
6:2&4, 7:1&6, 8:3-3-3-3, 9:4-4
Barcode Options
R99: Ratio for wide to narrow bars
20:2.0, 21:2.1, 22:2.2, ..., 29:2.9, 30:3.0
S9: Supplement to UPC/EAN barcode
2:+2, 5:+5
D99: Data Matrix matrix size
1 to 30 (see chart with ~BM command in Reference
Guide)
X99: X undercut (GS1 DataBar barcodes only)
Y99: Y undercut (GS1 DataBar barcodes only)
M99: Number of segments per row (GS1 DataBar Expanded
barcodes only)
650, 6X6, SNAP
650, 6X6, SNAP
6X6, SNAP
6X6, SNAP
Box / Line Field Commands
~LW9999
~LP99999
~LV99
~LH99
~LT_
~LF9
~LR9
End Web Position of Box / Line field
End Pull Position of Box / Line field
Width of Vertical Line
Width of Horizontal Line
Type of Shape
L:Line, B:Box
Write Mode of Box
0:Normal, 1:Clear, 2:Fill
Write Mode
0: Direct, 1: And, 2: Or, 3: Xor
0: Direct, 2:Overlap, 3:Inverse
630, 960, 6X6, SNAP
630, 960, 6X6, SNAP
630, 6X6, SNAP
630, 6X6, SNAP
960, 6X6, SNAP
630, 960, 6X6, SNAP
960
6X6, SNAP
Logo Field Commands
~GH9
~GV9
~GT99
~GM9
~GE_
~GU_
~GR9
~GI99
Logo Pull Expansion Multiple
Logo Web Expansion Multiple
Logo Type
Type of Image File
1:ASM, 2:LGO, 3:BMP, 4:PCX
Logo Horizontal Justification
L:Left, C:Center, R:Right
Logo Vertical Justification
T:Top, C:Center, B:Bottom
Write Mode
0: Direct, 1: And, 2: Or, 3: Xor
0: Direct, 2:Overlap, 3:Inverse
Inter Logo Spacing
84 • APPENDIX D – PCL Summary 7.2
630
630
630, 650, 960
6X6, SNAP
6X6, SNAP
6X6, SNAP
630, 650, 960
6X6, SNAP
630
PAXAR PCL
Care Symbol Field Commands
~SH9
~SV9
~ST99
~SR9
~SI99
~SP99
~SW9999
~SQ_
~SE_
~SO99
Care Symbol Pull Expansion Multiple
Care Symbol Web Expansion Multiple
Care Symbol Type
1:Small set, 2:Large set
3:Nafta symbols
9:Care symbol set
Write Mode
0: Direct, 1: And, 2: Or, 3: Xor
0: Direct, 2:Overlap, 3:Inverse
Spacing Between Care Symbols
Point Size of Symbol
4 to 96
6 to 96
Care Symbol, Width of Field
Care Symbol, Quadrangle Field
0:Squeeze to fit, 1:Proportion to fit, 2:Stretch to fit,
3:Regular fit
Edit Code
L: Left justified, R: Right justified, C: Center justified,
A: Print as is
Oblique of Character (Slant)
-90 to 90
630
630
960, 6X6, SNAP
6X6, SNAP
630
630, 650, 960
6X6, SNAP
630, 960, 6X6, SNAP
636, 656, 676, 686
545
6X6, SNAP
6X6, SNAP
6X6, SNAP
6X6, SNAP
Special Symbol Field Commands
~YH9
~YV9
~YT99
~YR9
~YI99
Special Symbol Pull Expansion Multiple
Special Symbol Web Expansion Multiple
Care Symbol Type
1:TM, 2:cm, 3:10 Pt fractions,
4:12 Pt fractions, 5:Size symbols
Write Mode
0: Direct, 1: And, 2: Or, 3: Xor
Spacing Between Special Symbols
960
960
960
960
960
960
Image Commands
~I
~MH9
~MV9
~MR9
Graphic Image
Image Width Expansion Multiple
Image Height Expansion Multiple
Write Mode
0: Direct, 1: And, 2: Or, 3: Xor
0: Direct, 2:Overlap, 3:Inverse
630, 6X6, SNAP
630
630
630,
6X6, SNAP
RFID Commands
~KS99
PAXAR PCL
Sequencing
- 2,147,483,647 to + 2,147,483,647
SNAP 700RFID
APPENDIX D – PCL Summary 7.2 • 85
Batch Commands
~ZD99
~D
~ZB9999
~ZZ9999
~ZIXXXXXX
XX
~ZE………..
~CC
~CF_
Start of Batch Data
Data to be Printed on the Tag
Batch Separation
End of Batch Data
Batch ID
XXXXXXXX Replaced with ID number
Extended Batch Information
Tells Printer to Send FS for Each Tag
Current Batch Flagging
N:None, L:Long/Short,
D: Double,
F: Flag according to format,
~CI
~CK_
~CE
T: Tag,
V: Verifier
B: Double blank,
S: Small, M: Medium, X: Extra Large
Z: Zero length
Tells Printer to Send Batch ID After Printing
Suppresses the Cut
A: All cuts in the batch are suppressed
B: Only the cut between batches is suppressed
Printer Halt After Batch Command
86 • APPENDIX D – PCL Summary 7.2
630, 650, 960, 6X6, SNAP
630, 650, 960, 6X6, SNAP
630, 6X6, SNAP
630, 650, 960, 6X6, SNAP
6X6, SNAP
SNAP
630, 6X6, SNAP
630, 650, 960, 6X6, SNAP
630, 650, 960
630, 650, 960, 6X6, SNAP
630, 6X6, SNAP
630, 650
650
6X6, SNAP
676
6X6, SNAP
6X6, SNAP
6X6, SNAP
PAXAR PCL
APPENDIX E – Graphics
The PCL printers are designed to allow the printing of graphic images on the label. The printers support BMP and PCX
formats (monochrome only). This discussion applies to the 6X6 and SNAP printers only.
There are two field types to support printing graphic images. When using the Graphic Image Field (~FM) , the graphic
image is included in the batch data. When using the Logo Field (~FG), the graphic image is stored in the printer and only a
reference value is sent with the batch.
Graphic Image Fields are the most versatile, since the image is sent with every batch. This is useful when many images are
required or the images change often. However, the batch files become larger because the image has to be sent with every
batch. Since graphic image files are binary files, problems can occur with applications that have difficulty handling binary
data. For example, some applications have trouble handling non-ASCII values.
Logo Fields are best when there are relatively few images, and they seldom change. Since the actual image file is stored in
the printer, only a reference to the file name is needed, so the batch is smaller. Also, since no binary data is included in the
batch file, there is less chance of problems with applications that have difficulty handling binary data.
Graphic Image Fields
When the format contains a Graphic Image Field, the corresponding data field in the batch will start with a ~I. This is
directly followed by the image file. Both BMP and PCX files contain field indicating the file size, so no file size command
or terminator is required. The image file must not be modified in any way. Specifically, the binary file may not be broken
with line breaks. This is sometimes a problem, most commonly with mainframe applications.
The field attribute commands described in the reference are used to indicate how the image file will be printed. Refer to the
command reference descriptions for details.
Logo Fields
When using Logo Fields, the actual image file is stored in the printer. The image file name must be of the following form:
ABC12345.BMP or ABC12345.PCX
Where ABC is the Logo Prefix, 12 is the Logo Set, and 345 is the Logo Position. The Logo Set is specified in the format
using the ~GT attribute command in the Logo Field definition. The Logo Position is specified in the batch, in the data field
corresponding to the Logo Field.
It is very important to note that the Logo Prefix (ABC) is not used. Therefore, the files ABC01001.BMP and
DEF01001.BMP are the same as far as the printer is concerned. If logo files with these names are stored in the printer, only
the first one loaded will be accessible.
Volatile Logos
The Volatile Logo feature allows for storing logos in the printer temporarily. This feature is useful when there are many
batches that use the same set of logos, but the logos change frequently. The temporary logos are downloaded before the
batches, and they are referenced in much the same way as normal logos. Since the logo is only downloaded once and
PAXAR PCL
APPENDIX E – Graphics • 87
referenced many times, the batch files are smaller and transmission time is reduced. When the batches that use the temporary
logos are done, the logos can be deleted. Refer to Appendix C for more details.
88 • APPENDIX E – Graphics
PAXAR PCL
PAXAR PCL
• 89
APPENDIX F – RFID Operation
Certain models in the SNAP printer line have the capability of reading and/or writing RFID transponders embedded in
labels. This section explains the details of designing the format for labels with RFID transponders.
Gen 0 (Read Only) Transponders
Class 1 Gen 0 transponders are read only. They contain a fixed 64-bit or 96-bit unique signature. The SNAP RFID printers
are capable of reading this signature and printing it on the label. This is accomplished by defining an alphanumeric field on
the tag of sufficient length to print the RFID transponder ID and adding the ~FTR command to the field definition (see the
Command Reference for details of this command). Note that a data field (~D…) corresponding to this field must be present
in the batch, but any data in the data field will be ignored.
In addition, the printer can create an association file that lists all RFID signatures that are associated with the SKU for the
batch. This is a special application that involves complex software systems beyond the scope of this manual and will not be
described here.
Gen 2 (Read/Write) Transponders
For printers having the capability of writing to Class 1 Gen 2 transponders, a special field type is used to provide the data to
write to the device. This field type is defined by the ~FK field type command. For this field type, only the ~FP (Field Pull
Position) command is active. This command defines the distance from the tag origin to the center of the transponder in the
pull direction. This value is used by the printer to determine when the transponder is at the antenna. If this command is not
included, the printer will assume that the transponder is centered in the tag. This may result in unreliable operation.
There is only a single attribute available for this field type. The ~KS command specifies that the EPC data is to be
incremented for each tag. The increment value is included in the command (see the Command Reference for details). Only
the EPC data can be incremented.
The data field for this field consists of several values, separated by the ASCII pipe character (|). These sub-fields are:
EPC Data
User Memory
Reserved – must be empty
Access Password
Kill Password
The format and data allowed in these fields may vary by transponder type.
In addition to writing the data to the transponder, it is possible to print the EPC value on the tag. To do this, either an
alphanumeric or barcode field should be defined and the ~FTRP9 command included in the field definition. The substringing command (~A199/~A299/~A399 or ~B199/~B299/~B399) may be used to select a portion of the EPC value to be
printed.
It is the format designer’s responsibility to ensure that the field is configured to properly print the EPC value. For example,
the field must be the correct size for the expected data and position so that the field resides completely on the tag. For a bar
code field, the data and bar code type must be compatible.
Following is a list of commands specific to RFID. Descriptions of the commands is contained in the Command Reference
section of this manual.
Format Header Commands
•
~XUR – RFID Read Power
•
~XUW – RFID Write Power
•
~XUA – RFID Signal Adjust
90 • APPENDIX F – RFID Operation
PAXAR PCL
•
~XUX – RFID Retries
•
~XUP – RFID Protocol
RFID Field Definition Commands
•
~FK – RFID Field Definition
•
~KS – RFID Field Increment Value
PAXAR PCL
APPENDIX F – RFID Operation • 91