Download Reliant Octel 300 Programming instructions

Transcript
INMAIL SYSTEM GUIDE
Issue 5.00 December 2010
This page is left blank intentionally
TABLE OF CONTENTS
___________________________________________________________________________________
Chapter 1
Quick Setup
Section 1
Install the InMail Blade ............................................................................. 1-1
Section 2
LED Indication ......................................................................................... 1-3
Section 3
Start-up (Default) InMail Configuration .................................................... 1-3
Section 4
Basic Functions without Main Greeting ................................................... 1-4
Section 5
Enable the Mailboxes for all Installed Extensions ................................... 1-4
Section 6
Set Up Automated Attendant to Answer Outside Calls ........................... 1-5
Section 7
Set Up Simple Day/Night Answering ....................................................... 1-7
Section 8
InMail System Requirements .................................................................. 1-8
Section 9
Examples of Common Applications ........................................................ 1-8
Chapter 2
Features
Section 1
Introduction to InMail Features ............................................................... 2-15
Section 2
Feature Glossary ................................................................................... 2-16
Section 3
Feature Descriptions ............................................................................. 2-26
ACD Delay Announcement ..................................................................... 2-29
Announcement Mailbox ........................................................................... 2-33
Announcement Message ........................................................................ 2-39
Answer Schedule Override ..................................................................... 2-41
Answer Tables ........................................................................................ 2-45
Answering Machine Emulation ................................................................ 2-55
Auto Attendant Do Not Disturb ................................................................ 2-57
Auto Erase or Save ................................................................................. 2-59
___________________________________________________________________________________
InMail System Guide
i
Issue
5.00
___________________________________________________________________________________
Auto Time Stamp .................................................................................... 2-61
Automated Attendant .............................................................................. 2-63
Automated Attendant Transfer ................................................................ 2-67
Automatic Routing for Rotary Dial Callers .............................................. 2-69
Call Forward to a Mailbox ....................................................................... 2-71
Caller ID .................................................................................................. 2-75
Caller ID - Automatic Access to VM by Caller ID .................................... 2-77
Caller ID with Return Call ........................................................................ 2-83
Calling the Automated Attendant ............................................................ 2-85
Cascading Message Notification ............................................................. 2-87
Dial Action Table ................................................................................... 2-105
Directory Dialing .................................................................................... 2-111
Directory Dialing Mailbox ...................................................................... 2-123
Distribution List ..................................................................................... 2-125
Email Notification .................................................................................. 2-129
Erasing All Messages ........................................................................... 2-143
Exiting a Mailbox ................................................................................... 2-145
External Transfer .................................................................................. 2-147
Fax Detection ........................................................................................ 2-149
Find Me Follow Me ................................................................................ 2-151
Flexible Answering Schedules .............................................................. 2-159
Flexible Call Routing ............................................................................. 2-161
Flexible Mailbox Numbering Plan ......................................................... 2-163
Forced Unscreened Transfer ................................................................ 2-167
Getting Recorded Help ......................................................................... 2-169
Go To A Mailbox ................................................................................... 2-171
Greeting ................................................................................................ 2-173
Group (Shared) Mailbox ........................................................................ 2-179
Guest Mailbox ....................................................................................... 2-187
___________________________________________________________________________________
ii
Table of Contents
VM8000
Issue 5.00
__________________________________________________________________________________
Hang Up ................................................................................................ 2-191
Hotel Motel ............................................................................................ 2-193
InMail Upload Download Audio ............................................................. 2-197
Instruction Menu .................................................................................... 2-221
Language Settings ................................................................................ 2-223
Leaving a Message ............................................................................... 2-227
Listening to Messages .......................................................................... 2-231
Live Record ........................................................................................... 2-235
Log On to Voice Mail ............................................................................. 2-237
Mailbox Announcement Message ......................................................... 2-241
Mailbox Name ....................................................................................... 2-245
Mailbox Options Menu .......................................................................... 2-249
Mailbox Security Code Delete ............................................................... 2-251
Main Menu ............................................................................................ 2-253
Make Call .............................................................................................. 2-255
Message Count Display ........................................................................ 2-259
Message Delete .................................................................................... 2-261
Message Forward ................................................................................. 2-263
Message Length .................................................................................... 2-265
Message Listen Mode ........................................................................... 2-267
Message Notification ............................................................................. 2-269
Message Playback Direction ................................................................. 2-279
Message Record ................................................................................... 2-281
Message Reply ..................................................................................... 2-283
Message Storage Limit ......................................................................... 2-285
Message Waiting Lamp ......................................................................... 2-287
Multiple Company Greetings ................................................................. 2-289
Next Call Routing Mailbox ..................................................................... 2-291
Park and Page/Auto Attendant Direct to Voice Mail .............................. 2-299
___________________________________________________________________________________
InMail System Guide
iii
Issue
5.00
___________________________________________________________________________________
Programming Voice Mail ....................................................................... 2-307
Quick Message ..................................................................................... 2-309
Record and Send a Message ............................................................... 2-313
Remote Programming ........................................................................... 2-315
Routing Mailbox .................................................................................... 2-317
Screened Transfer ................................................................................ 2-323
Security Code ....................................................................................... 2-327
Single Digit Dialing ................................................................................ 2-329
Station Mailbox ..................................................................................... 2-331
Subscriber Mailbox ............................................................................... 2-333
System Administrator ............................................................................ 2-337
System Administrator Mailbox .............................................................. 2-339
System Re-initialization ......................................................................... 2-341
Time and Date ...................................................................................... 2-343
Time and Date Stamp ........................................................................... 2-345
Transfer to a Mailbox ............................................................................ 2-347
Undefined Routing ................................................................................ 2-349
Unscreened Transfer ............................................................................ 2-351
Voice Mail Overflow .............................................................................. 2-355
Volume Control ..................................................................................... 2-365
Chapter 3
Programming
Section 1
Before You Start Programming ............................................................ 3-367
Section 2
Start-Up Programming (Default) ......................................................... 3-367
Section 3
2.1
InMail Configuration ....................................................................................... 3-368
2.2
Optional InMail Start-Up Programming ......................................................... 3-369
2.3
Set up Automated Attendant to Answer Outside Calls ................................. 3-369
Program 15 Extension, Basic Setup ................................................... 3-371
___________________________________________________________________________________
iv
Table of Contents
VM8000
Issue 5.00
__________________________________________________________________________________
Section 4
Program 41 ACD Setup ...................................................................... 3-374
Section 5
Program 45 Voice Mail Integration ..................................................... 3-378
Section 6
Program 47 InMail ............................................................................... 3-380
Chapter 4
VM8000 InMail Utility
Section 1
VM8000 InMail Utility ........................................................................... 4-475
Section 2
Requirements ...................................................................................... 4-476
Section 3
Installing and Starting the VM8000 InMail Utility ................................. 4-476
Section 4
Installing Reliant File System Driver ................................................... 4-477
Chapter 5
Soft Key Glossary
___________________________________________________________________________________
InMail System Guide
v
Issue
5.00
___________________________________________________________________________________
___________________________________________________________________________________
vi
Table of Contents
Quick Setup
SECTION 1
INSTALL THE INMAIL BLADE
The InMail CompactFlash drive must never be inserted or removed
with the chassis power on. Always turn chassis power OFF when
inserting or removing the InMail CompactFlash drive.
1.
Take adequate anti-static precautions.
Wear a grounded wrist strap at all times when installing or
removing the InMail blade.
Chapter
1
Ensure the wrist strap is attached to a known earth ground
(such as the earth ground lug on the CHS2U).
Discharge any built-up static electricity by touching the cabinet
earth ground lug.
2.
Install four plastic stand-offs included with the InMail blade before
installing the CompactFlash card assembly.
Locate stand-offs as shown in Figure 1-1 CPU without InMail
Daughter Board (PZ-VM21) and CompactFlash on page 1-2.
Be sure to install the stand-offs from the back (underneath) side
of the blade.
3.
Install the InMail CompactFlash card assembly face up as shown in Figure
1-2 InMail Daughter Board with CompactFlash Card Assembly Installed on
page 1-2.
4.
Insert the InMail blade into the CN4 connector on the CPU.
Position the InMail blade over the CN4 connector — then push
the blade into the connector on the CPU.
InMail System Guide
1-1
Issue 5.00
Figure 1-1 CPU without InMail Daughter Board (PZ-VM21) and CompactFlash
Figure 1-2 InMail Daughter Board with CompactFlash Card Assembly Installed
1-2
Quick Setup
Issue 5.00
SECTION 2
LED INDICATION
1.
Power up the system.
Remove the grounded wrist strap.
Mount the PZ-VM21 onto CD-CP00.
Install the CD-CP00 in the SV8100 chassis.
Turn the chassis power switch to On.
2.
Check the InMail LED. See Figure 1-3 Checking LED1.
Once the system powers up, check LED1 on the InMail daughter board.
LED1 is viewable on the front panel of the CD-CP00.
.
LED1 will blink quickly only when the InMail CF is being accessed.
Figure 1-3 Checking LED1
SECTION 3
START-UP (DEFAULT) INMAIL CONFIGURATION
When you install the InMail blade and turn on the system, InMail has the following
default programming:
Subscriber Mailboxes are enabled for extensions 200-207. The mailbox
numbers are the same as the extension numbers.
The Automated Attendant does not answer outside calls.
The InMail does not answer internal calls.
InMail System Guide
1-3
Issue 5.00
SECTION 4
BASIC FUNCTIONS WITHOUT MAIN GREETING
To make the InMail answer, the following programming must be done. The example
shown is for a 8-port InMail. Extension, Group and Pilot Numbers shown can be
adjusted as needed per installation requirements.
47-01-17
Set first port of In-Mail to 25, changing this PRG requires a CHS2U GW
reset.
10-09-01
Verify at least one resource is set to ICM/TRK or Common.
11-07-01
Set TEL Group Pilot 64 to 555 (Note: digit 5 is set to 4 digits by default).
Never use Group 1, as this is the default group for all extensions.
SECTION 5
15-03-01
Set extension 224~231 to DP
15-03-03
Set extension 224~231 to Special.
16-02-01
Put 224~231 in Group 64.
16-02-02
Assign priorities 1~8 to 224~231.
16-01-01
Set Group 64 name to Voice Mail.
16-01-04
Set Group 64 to Circular.
16-01-10
Set Group 64 to Busy/No Answer.
45-01-01
Set to Group 64.
ENABLE THE MAILBOXES FOR ALL INSTALLED EXTENSIONS
Since by default only extensions 200-263 have Subscriber Mailboxes, you should
enable additional Subscriber Mailboxes for all installed extensions.
To enable additional Subscriber Mailboxes:
1.
In 47-02-01 Mailbox Type, enter 1 to enable a Subscriber Mailbox for each
extension as a ‘Person’ mailbox.
To make programming easier, consider associating a mailbox number with a station
port. For example, mailbox 1 should correspond to port 1, which in turn corresponds
to extension 200.
2.
In 47-02-02 Mailbox Number, select the extension number to be associated with
the mailbox you are programming.
Normally, mailbox 1 should use Mailbox Number 200, mailbox 2 should use Mailbox
Number 201, etc.
1-4
Quick Setup
Issue 5.00
3.
In 15-02-26 Message Key Operation Mode, enter 1 at each extension for which
you are adding a mailbox. This enables the Message key for Voice Mail access.
You can optionally use 15-07-01 Programming Function Keys to assign a Voice Mail
programmable key (code 77).
If you don’t assign the Message key or a programmable key for Voice Mail access,
an extension user can access his mailbox by the following actions:
Press Speaker key
Dial InMail pilot number
Dial mailbox number
SECTION 6
SET UP AUTOMATED ATTENDANT TO ANSWER OUTSIDE CALLS
To enable Automated Attendant to answer outside calls, set up Direct Inward Lines
(DILs) and terminate them to InMail.
Automated Attendant enables the following capabilities:
All calls are answered by Call Routing Mailbox 1 and Dial Action Table 1. This
happens because:
Answer Table 1 Runs Monday-Friday from 8:30AM to 5:00PM, and uses Call
Routing Mailbox 1.
At all other times, the Default Mailbox answers – also using Call Routing Mailbox 1.
Dial Action Table 1 allows outside callers to perform the following actions:
Dial system extensions (if installed).
Dial 0 for an operator (extension 200).
Dial * + Extension to leave a Quick Message in a mailbox.
Dial # + Extension to remotely log on to their mailbox.
Wait on the line to be automatically routed to the operator.
To Set up the Automated Attendant to answer outside calls:
1.
Set up trunks as Direct Inward Lines (DIL) or Direct Inward Dialling lines (DID).
.
22-02-01
For full details for Direct Inward Dialling (DID) programming, refer to the
features manual.
Incoming Call Trunk Setup
Assign Service Type 4 to each trunk you want to be a DIL. Make a separate
entry for each Night Service mode.
Assign Service Type 3 to each trunk you want to be a DID. Make a separate
entry for each Night Service mode.
.
InMail System Guide
By default, trunks are Service Type 0 (Normal).
1-5
Issue 5.00
2.
Have the Direct Inward Lines or Direct Inward Dial lines terminate to InMail
(extension 555).
22-07-01
DIL Assignment
For each trunk you designated as a DIL above, enter 555. Make a separate
entry for each Night Service mode.
.
22-11
By default, there are no DIL destinations programmed.
DID Assignment
For the required incoming digits, enter 555 in 22-11-02 or 102 (Voice mail
routing) in 22-11-05 or 06 . Make a separate entry for each Night Service
mode configured.
1-6
Quick Setup
Issue 5.00
3.
Review the default Automated Attendant setup.
DIL or DDI to Voice Mail Master (555)
22-01-01 Incoming Call Trunk Setup
22-07-01 DIL Setup
22-11 DDI routing
InMail
Default
Automated Attendant Answering
Trunks Route to Answer Table 1
47-10-01 Answer Table Assignment
Answer Table 1
47-11 Answer Table Options
Schedule 1 or Default Mailbox
47-12 Answer Schedules
47-11-05 Default Mailbox
Call Routing Mailbox 1
47-08 Call Routing Mailbox Options
Dial Action Table 1
47-13 Dial Action Tables
SECTION 7
All calls route to Call Routing Mailbox 1
Schedule 1 active M-F 8:30AM-5:00PM
Default Mailbox active all other times
From a System Administrator mailbox,
record an Instruction Menu (SA + I) for
the active Call Routing Mailbox.
Dial Action Table 1 Dialing Options:
Dial an extension number, or
O for the operator
SET UP SIMPLE DAY/NIGHT ANSWERING
After you set up DILs to InMail, Call Routing Mailbox 1 answers outside calls. This is
because:
InMail System Guide
1-7
Issue 5.00
All trunks by default are assigned to Answer Table 1.
Answer Table 1, which runs Monday-Friday from 8:30AM to 5:00PM, uses Call
Routing Mailbox 1.
The Default Mailbox, which runs at all other times (evenings and weekends),
also uses Call Routing Mailbox 1.
To Set up simple Day/Night Answering:
In 47-11-03 Default Mailbox Category and in 47-11-03 Default Mailbox Number
change the Default Mailbox for Answer Table 1 to 2.
From the System Administrator Mailbox:
SECTION 8
1.
Dial SA + I and record a new Instruction Menu message for Call Routing
Mailbox 1.
2.
Dial SA + I and record a new Instruction Menu message for Call Routing
Mailbox 2.
.
Monday through Friday from 8:30AM to 5:00PM callers hear the Instruction
Menu message for Call Routing Mailbox 1.
Evenings and weekends, callers hear the Instruction Menu message for Call
Routing Mailbox 2.
.
Review the feature Automated Attendant on page 2-63.
INMAIL SYSTEM REQUIREMENTS
InMail Software
InMail CompactFlash Drive
PZ-VM21 Daughter Board
SECTION 9
EXAMPLES OF COMMON APPLICATIONS
The examples below show common applications. The chart in the beginning of each
example provides the following information:
How the relevant programmable options work by default.
The Application Summary providing the basic steps to set up the application.
Following the chart are the step-by-step instructions for setting up the application.
For more information, refer to Programming on page 3-367 in this manual.
1-8
Quick Setup
Issue 5.00
Example 1: Set Up Separate Day and Night Greetings
Default Automated Attendant Answering
All trunks answered by the Automated Attendant route to Answer Table 1.
Answer Table 1 uses Schedule 1 to answer calls from 8:30 AM -5:00 PM Monday through Friday
with Call Routing Mailbox 1.
The Default Mailbox for Answer Table 1 picks up Automated Attendant calls at all other times. The
Default Mailbox for Answer Table 1 is also Call Routing Mailbox 1.
The greeting that plays to outside callers is the Instruction Menu for the Call Routing
Mailbox that answers the call.
Since Schedule 1 and the Default Mailbox both use Call Routing Mailbox 1, the Automated
Attendant answers all calls the same way day and night, with the Instruction Menu for Call
Routing Mailbox 1.
Application Summary
Change the Default Mailbox from Call Routing Mailbox 1 to 2.
Record a night Instruction Menu for Call Routing Mailbox 2.
Change the Default Mailbox to Call Routing Mailbox 2.
47-11-03 Default Mailbox Number, change the Default Mailbox assignment to 2.
Record the daytime and night Instruction Menus.
1.
At extension 200, press Message.
2.
Dial SA (72) + I (4).
3.
Dial 001 (for Call Routing Mailbox 1) + R (7).
4.
Record the daytime Instruction Menu message + # twice.
5.
Dial I (4).
6.
Dial 002 (for Call Routing Mailbox 2) + R (7).
7.
Record the night Instruction Menu message + # + hang up.
.
InMail System Guide
See the Instruction Menu in this manual.
1-9
Issue 5.00
Example 2: Provide Unique Day and Night Dialing Options for Callers
Default Dial Action Table Options
All Call Routing Mailboxes (1-8 by default) use Dial Action Table 1.
Dial Action Table 1 provides the following dial options:
Dial extension number.
Dial 0 for the operator.
Dial * + extension to leave a Quick Message.
Dial # + extension to do a Remote Logon to the mailbox.
Timeout to operator if no digits dialed.
Application Summary
Allow callers at night to dial 0 to leave a message for the operator.
Set up separate day and night greetings.
Following example 1, set up separate day and night Instruction Menus using Call Routing
Mailboxes 1 and 2.
1.
Example of the day Instruction Menu: Thank you for calling. For Sales,
dial 201. For Technical Support, dial 202. To talk to an operator, dial 0. If
you know your party’s extension number, please dial it now.
2.
Example of the night Instruction menu: Thank you for calling. Our normal
business hours are 8:30 to 5:00, Monday through Friday. To leave us a
message, please dial 0 now.
Assign a unique Dial Action Table (2) to the night time Call Routing Mailbox (2).
In 47-08-01 Dial Action Table, assign Dial Action Table 2 to Call Routing Mailbox 2.
Change the dialing options for the night time Dial Action Table (2).
In 47-13-01 InMail Dial Action Table Actions for Dial Action Table 2, make the following
changes:
1 - 10
1.
For the digits 2 and 3, enter 0 for the Action entry to prevent callers from
dialing extensions at night.
2.
For the digit 0, change the Action entry to REC1 (by dialing 3) and the
Data entry to 200. This allows night time callers to dial 0 to leave a
message for the operator.
3.
Note that the * and # entries are left unchanged so that experienced
users can still leave Quick Messages or do Remote Logons at night.
Quick Setup
Issue 5.00
Example 3: Manual Night Mode Control of the Automated Attendant
Default Scheduling Options
There is no manual control of the Automated Attendant.
All calls answered by the Automated Attendant automatically follow the schedule set up by
Answer Table 1.
Answer Table 1 uses Schedule 1 to answer calls from 8:30 AM -5:00 PM Monday through Friday
with Call Routing Mailbox 1.
The Default Mailbox for Answer Table 1 picks up Automated Attendant calls at all other times.
The Default Mailbox for Answer Table 1 is also Call Routing Mailbox 1.
Application Summary
Set up a programmable key to switch the system into the night mode.
Assign a Group Mailbox to a virtual extension.
Have calls at night route to the virtual extension, which is Fixed Call Forwarded to voice
mail.
Set up programmable keys to switch the system into the night mode and back into
the day mode.
Night Mode
1.
At the extension that should control the system night mode, press
Speaker + 851.
2.
Press the programmable function key you want to assign as the day
(night mode 1) key.
3.
Dial 09 + 1 (for night mode 1).
.
You hear three confirmation beeps.
.
This allows the user to switch the system into the day mode (i.e., night mode 1).
Day Mode
1.
Press the programmable function key you want to assign as the night
(night mode 2) key.
2.
Dial 09 + 2 (for night mode 2).
3.
InMail System Guide
.
You hear three confirmation beeps.
.
This allows the user to switch the system from the day mode into night mode 2.
Press Speaker to hang up.
1 - 11
Issue 5.00
Allow the extension to switch the system night mode.
1.
In 20-07-01 Manual Night Mode Switching, enter 1 to enable night mode
switching in the extension Class of Service.
.
2.
By default, this capability is disabled.
In 20-06-01 Class of Service for Extensions, assign the extension Class
of Service.
.
By default, extension 101 has Class of Service 15. All other extensions have
Class of Service 1.
Set up a Group Mailbox as a Call Routing Mailbox.
1.
In 11-07-01 Department Group Pilot Numbers, assign a pilot number
(e.g., 600) to an unused Department Group (e.g., group 10).
.
2.
In 47-03-02 Group Mailbox Number, enter the pilot number assigned in
step 1 above.
.
3.
By default, there are no Group Mailbox numbers assigned.
In 47-03-03 Group Mailbox Type, enter 1 to assign the Group Mailbox as
a Call Routing Mailbox.
.
4.
By default, all extensions are assigned to group 1.
By default, Group Mailboxes are assigned as Subscriber Mailboxes (3).
In 11-07-01 Department Group Pilot Numbers, press Hold to remove the
assignment made in step 1 above.
.
You can use the Department Group for other programming.
Set up a virtual extension that will handle the switching for the trunk.
1.
In 11-04-01 Virtual Extension Numbering, assign the Group Mailbox
Number in step 2 as the extension number for a virtual extension port.
.
For example, assign extension 600 to virtual extension port 1.
.
By default, there are no virtual extension numbers assigned.
Terminate the trunk to the virtual extension in the night mode.
1.
2.
In 22-07-01 DIL Assignment, assign the trunk to the virtual extension
(e.g., 600) in night mode 2.
.
When the extension user presses the night key, the trunk follows this routing.
.
By default, there are no DIL assignments set up.
Check the setting of 22-02-01 Incoming Call Trunk Setup to be sure the
trunk is set up as a Direct Inward Line (4).
.
1 - 12
By default, trunk types are set to normal (0).
Quick Setup
Issue 5.00
Fixed Call Forward the virtual extension to Voice Mail.
1.
In 24-06-01 Fixed Call Forwarding, enable immediate Fixed Call
Forwarding to the InMail Master Number (555).
.
For example, for virtual extension 600 enter 3 for Call Forward Type and 555 for
the destination.
.
By default, Fixed Call Forwarding is not set up.
Record the Instruction Menu for the Group Call Routing Mailbox.
InMail System Guide
1.
At extension 200, press Message.
2.
Dial SA (72) + I (4).
3.
Dial the number of the Group Call Routing Mailbox (e.g., 600) + R (7).
4.
Record the Instruction Menu message + # + hang up.
.
See Instruction Menu on page 2-221 in this manual.
.
When the system is in the day mode, the trunk is answered by InMail normally
and follows the programmed Answer Table.
.
When the extension user presses the night mode 2 key, the trunk is answered by
the programmed Call Routing Mailbox, overriding the Answer Table assignment.
1 - 13
Issue 5.00
THIS PAGE INTENTIONALLY LEFT BLANK
1 - 14
Quick Setup
Features
SECTION 1
INTRODUCTION TO INMAIL FEATURES
If you are not familiar with the InMail features, review
the Section 2 Feature Glossary on page 2-16.
Chapter
This chapter provides detailed information on the InMail features. The
features are listed alphabetically. Each feature description includes the
following headings.
Description
2
Read Description to get an overview of the feature, its benefit, any
special considerations you should be aware of, and how it works in
the default system.
Related Features
Related Features shows you at a glance how each feature interacts
with other InMail features.
Programming
Here you’ll find easy to follow step-by-step programming instructions
for each feature.
Operation
Operation provides charts that show how the feature operates.
InMail System Guide
2 - 15
Issue 5.00
SECTION 2
FEATURE GLOSSARY
Feature Name
Description
Usage
See Security Code on page 2-23 in this glossary.
Voice Mail
Alternate Next Call
Routing Mailbox
See Next Call Routing Mailbox on page 2-21 in this glossary.
Voice Mail
Announcement
Mailbox
Mailbox that allows a prerecorded greeting to play to callers.
Automated
Attendant
Announcement
Message
The message that the System Administrator records for a specific
Announcement Mailbox.
Automated
Attendant
Answer Table
Determines how the Automated Attendant answers outside calls on
each trunk, according to the time of the day and day of the week that
the call is ringing.
Automated
Attendant
Answering Machine
Emulation
A keyset on the connected telephone system can work like a home
answering machine.
Voice Mail
Answering
Schedule Override
Enables an alternate greeting and alternate dialing options for
callers.
Automated
Attendant
Auto Attendant Do
Not Disturb
Auto Attendant Do Not Disturb sends Automated Attendant calls
directly to an extension user’s mailbox. Their phone does not ring for
calls from the Automated Attendant.
See Greeting on page 2-19 in this glossary.
Automated
Attendant
Auto Erase or Save
When a mailbox user completely listens to a new message and then
exits their mailbox, InMail either automatically saves or erases the
message.
Voice Mail
Auto Time Stamp
After a user listens to a message, InMail can optionally announce the
time and date the message was left.
Voice Mail
The Automated Attendant can automatically answer the telephone
system’s incoming calls, play an Instruction Menu message, and
provide dialing options to callers.
Automated
Attendant
Automated
Attendant Transfer
While on a trunk call, an extension user can transfer their trunk call to
the Automated Attendant so the caller can use the Automated
Attendant dialing options.
Voice Mail
Automatic Call
Distribution Delay
Announcement
With the appropriate hardware and system licenses, the InMail can
be used to store two ACD Delay Announcements.
System
Automatic Call
Routing to a Mailbox
See Go to a Mailbox on page 2-18 in this glossary.
Automated
Attendant
Automatic Message
Erase/Save
See Auto Erase or Save on page 2-16 in this glossary.
Voice Mail
Administrator
Security Code
Control
Automated
Attendant
2 - 16
Features
Issue 5.00
Feature Name
Description
Automatic Routing
for Rotary Dial
Callers
If an Automated Attendant caller does not dial any digits, InMail
automatically routes them to a specified option (such as the operator
or a mailbox).
Automated
Attendant
An extension user can forward calls to their mailbox.
Voice Mail
The mailbox associated with an Answer Table that specifies which
dialing options (Dial Action Table) and announcements are available
to Automated Attendant callers.
Automated
Attendant
Caller ID
A telephone company service that provides a caller’s number and
optional name. The telephone system can pass this information to
InMail to enable Caller ID with Return Call on page 2-17.
System
Caller ID - Automatic
Access to VM by
Caller ID
Enables easy access to voice mail mailbox on recognition of predefined caller ID.
Voice Mail
Caller ID with Return
Call
See Make Call on page 2-20 and Time and Date Stamp on page 2-23
in this glossary.
Voice Mail
Calling (Logging On
to) a Mailbox
See Log On to Voice Mail on page 2-20 in this glossary.
Voice Mail
Automated Attendant callers can use various InMail features and
then return to the Automated Attendant for additional dialing options.
Automated
Attendant
See Flexible Answering Schedules on page 2-18 in this glossary.
Automated
Attendant
See Message Delete on page 2-20 in this glossary.
Voice Mail
Deleting Mailbox
Security Code
See Mailbox Security Code Delete on page 2-20 in this glossary.
Maintenance
Dial Action Table
Defines the dialing options for a Call Routing Mailbox chosen by the
active Answer Table, which in turn provides those dialing options to
Automated Attendant callers.
Automated
Attendant
Directory Dialing
Directory Dialing allows an Automated Attendant caller to reach an
extension by dialing the first few letters in the extension user’s name.
Automated
Attendant
Distribution List
A Distribution List is a list of extensions that will receive a message
you record and send to a single Distribution Mailbox. Any message
left in the Distribution Mailbox will be automatically send to all the
mailboxes in the list.
Voice Mail
When a subscriber receives a new message, InMail can
automatically send them an email notifying that a new message has
arrived. Optionally, the email can include a wav file attachment of the
actual new message.
Voice Mail
Call Forward to a
Mailbox
Call Routing
Mailbox
Calling the
Automated
Attendant
Day, Night, and
Holiday Greetings
Deleting a Message
Email Notification
InMail System Guide
Usage
2 - 17
Issue 5.00
Feature Name
Description
Usage
Lets the System Administrator delete mailbox messages
system-wide.
Maintenance
An extension user can exit their mailbox by dialing a code or by
hanging up.
Voice Mail
The Automated Attendant can detect incoming fax calls and transfer
them to a fax machine.
System
Find-Me Follow-Me
The automated attendant can dial user configurable numbers in an
attempt the find the require party. This is a licensed feature.
Automated
Attendant
Flexible Answering
Schedules
The Automated Attendant can answer outside calls with different
announcements and dialing options, depending on the time of day
and day of week.
Automated
Attendant
The Automated Attendant can provide outside callers with a wide
variety of dialing (routing) options. There are 3 components to
Flexible Call Routing.
Answer Table on page 2-16
Determines how the Automated Attendant answers outside calls on
each Voice Mail port, according to the time of the day and day of the
week that the call is ringing.
Call Routing Mailbox on page 2-17
The mailbox associated with an Answer Table that specifies which
dialing options (Dial Action Table) and announcements are available
to Automated Attendant callers.
Dial Action Table on page 2-17
Defines the dialing options for the Call Routing Mailbox chosen by
the active Answer Table, which in turn provides those dialing options
to Automated Attendant callers.
Automated
Attendant
If the telephone system extension numbers are customized, the
InMail mailbox numbers can be customized to match.
System
Forced Unscreened
Transfer
A Subscriber Mailbox can optionally convert Automated Attendant
Screened Transfers to Unscreened Transfers.
Automated
Attendant
Forwarding Calls to
a Mailbox
See Call Forward to a Mailbox on page 2-17 in this glossary.
Voice Mail
If an extension user dials an incorrect code or forgets what to dial
while in their mailbox, they can request help from the InMail voice
prompts.
Voice Mail
An Automated Attendant caller can dial a digit and route directly into
a mailbox.
Automated
Attendant
Erasing All
Messages
Exiting a Mailbox
Fax Detection
Flexible Call
Routing
Flexible Mailbox
Numbering Plan
Getting Recorded
Help
Go to a Mailbox
2 - 18
Features
Issue 5.00
Feature Name
Description
Greeting
A Subscriber Mailbox user can record a personalized greeting for
their mailbox. With Multiple Greetings, the mailbox subscriber can
record up to three separate greetings and make any one of the three
active. Callers to the user’s mailbox hear the active greeting.
With Remote Greeting, an extension user can call into the Automated
Attendant, access their mailbox, and remotely record their mailbox
greeting.
See Auto Attendant Do Not Disturb on page 2-16 in this glossary.
Voice Mail
Group (Shared)
Mailbox
An extension user can share a Group Mailbox with co-workers for
receiving and sending messages.
Voice Mail
Guest Mailbox
An outside party can have their own mailbox for receiving and
sending messages.
Voice Mail
Hang Up
An Automated Attendant option that immediately hangs up the
outside call.
Automated
Attendant
See Getting Recorded Help on page 2-18 in this glossary.
Voice Mail
Allows integration with Hotel Motel feature for initialisation of mailbox
Voice Mail
Individual Trunk
Greetings
See Multiple Company Greetings on page 2-21 in this glossary.
Automated
Attendant
InMail Upload
Download Audio
See InMail Upload Download Audio on page 2-197
Voice Mail
Instruction Menu
The Instruction Menu is the announcement that plays to Automated
Attendant callers. Normally, the Instruction Menu provides callers
with the Automated Attendant dialing options.
Automated
Attendant
Language Setting
This feature allows the telephone display language and the InMail
mailbox language to be changed from the telephone.
Voice Mail
Leaving a Message
An extension user can leave a voice message in a co-worker’s
mailbox if that extension is busy, unanswered, or in Do Not Disturb.
Voice Mail
Leaving a Message
at a Busy/DND
Extension
See Leaving a Message on page 2-19 in this glossary.
Voice Mail
See Quick Message on page 2-22 in this glossary.
Automated
Attendant
See Listening to Messages on page 2-19 in this glossary.
Voice Mail
Listening to
Messages
While or after listening to a message, an extension user has many
message handling options from which to choose.
Voice Mail
Live Record
Allows an extension user to record their active call as a message in
their mailbox. InMail broadcasts a beep and a voice prompt to the
callers as Live Record begins.
Voice Mail
See Message Notification on page 2-21 in this glossary.
Voice Mail
Help
Hotel Motel
Leave a Quick
Message
Listening Options
Local Notification
InMail System Guide
Usage
2 - 19
Issue 5.00
Feature Name
Description
Usage
An extension user can press a key to log on to access their InMail
mailbox.
With Remote Logon, an employee calling through the Automated
Attendant can dial a single digit followed by their own mailbox
number to remotely log on to their mailbox.
Voice Mail
The Mailbox Announcement Message is a message, recorded by the
System Administrator, that plays to each subscriber when they log
onto their mailbox. The message will play at each log on until it
expires, is deleted, or made inactive by the System Administrator.
Administration
See Greeting on page 2-19 in this glossary.
Voice Mail
Mailbox Logon
See Log On to Voice Mail on page 2-20 in this glossary.
Voice Mail
Mailbox Name
A mailbox caller can hear the extension user’s prerecorded name
instead of their mailbox number.
Voice Mail
Mailbox Options
Menu
Sub-menu of a subscriber’s Main Menu that provides access to the
Auto Time Stamp, Mailbox Security Code Delete, and Message
Notification features.
Voice Mail
Mailbox Security
Code Delete
The System Administrator can delete the security code for any
mailbox, effectively unlocking it.
See Security Code on page 2-23 in this glossary.
Maintenance
Mailbox Transfer
See Transfer to a Mailbox on page 2-24 in this glossary.
Voice Mail
Main Menu
The InMail options available to an extension user when they log on to
their mailbox.
Voice Mail
Make Call
A Subscriber Mailbox user can listen to a voice message and dial MC
to return the call without knowing their caller’s phone number.
Voice Mail
Message Count
Display
The telephone display can show the number of new messages
waiting in a user’s mailbox.
Voice Mail
Message Delete
An extension user can delete any message left in their mailbox.
Voice Mail
Message Forward
A subscriber can forward a message in their mailbox to a co-worker.
They can optionally record a comment before the forwarded
message.
Voice Mail
Message Length
The System Administrator can set the maximum length of a message
that can be left in a user’s voice mailbox.
Voice Mail
Message Listen
Mode
When a user calls their mailbox, they can dial a code to listen to all
their messages, their new messages, their saved messages, or their
held messages.
Voice Mail
Log On to Voice Mail
Mailbox
Announcement
Message
Mailbox Greeting
2 - 20
Features
Issue 5.00
Feature Name
Description
Message
Notification
Once activated by the mailbox user, a telephone number is dialed to
let the recipient know there are new messages in the mailbox.
Notification can call extensions, local numbers, long distance
numbers and pagers. When licensed up to five destinations can be
called.
Voice Mail
Message Playback
Direction
An extension user can listen to their messages in either LIFO (last-infirst-out) or FIFO (first-in-first-out) order.
Voice Mail
See Record and Send a Message on page 2-22 in this glossary.
Voice Mail
Message Reply
An extension user can reply to a message in their mailbox by dialing
a code, without knowing the caller’s extension number.
Voice Mail
Message Send
See Record and Send a Message on page 2-22 in this glossary.
Voice Mail
Message Storage
Limit
Sets how many messages a mailbox can store.
Voice Mail
Message Waiting
Lamp
An extension Message Waiting lamp flashes on the telephone
indicating new messages are waiting in their mailbox.
Voice Mail
Multiple Company
Greetings
By assigning a unique Answer Table to each trunk, a single InMail
system can provide individual greetings and dialing options for
several companies.
Automated
Attendant
See Mailbox Name on page 2-20 in this glossary.
Voice Mail
Provides callers with additional dialing options after they leave a
message in an extension mailbox (depending on the setting of the
Next Call Routing Mailbox Dial Mode).
Voice Mail
See Call Forward to a Mailbox on page 2-17 and Message Forward
on page 2-20 in this glossary.
Voice Mail
One-Touch Mailbox
Access
See Log On to Voice Mail on page 2-20 in this glossary.
Voice Mail
One-Touch Mailbox
Retrieval
See Log On to Voice Mail on page 2-20 in this glossary.
Voice Mail
When you can’t reach a co-worker, IntraMail can automatically Page
them for you.
See Park and Page/Auto Attendant Direct to Voice Mail on page
2-299 for more.
Voice Mail
See Answering Machine Emulation on page 2-16 in this glossary.
Voice Mail
See Greeting on page 2-19 in this glossary.
Voice Mail
See Security Code on page 2-23 and Mailbox Security Code Delete
on page 2-20 in this glossary.
Voice Mail
Message Record
Name
Next Call Routing
Mailbox
One-Touch
Forwarding
Park & Page
Personal Answering
Machine Emulation
Personalized
Mailbox Greeting
Programmable
Security Code
InMail System Guide
Usage
2 - 21
Issue 5.00
Feature Name
Description
Programming Voice
Mail
You can program (customize) InMail by using the PCPro and WebPro
programming applications. Limited programming can also be done
from a System Administrator’s mailbox.
See Programming Voice Mail on page 2-22 for more.
Also see System Administrator Mailbox on page 2-23 in this glossary.
Maintenance
Quick Message
Automated Attendant callers can dial a digit followed by an extension
number to leave a message directly in a user’s mailbox.
See Quick Message on page 2-22 for more.
Automated
Attendant
A Subscriber Mailbox user can record and send a message to any
other Subscriber Mailbox.
Voice Mail
Prerecorded voice prompts guide the user through the InMail
features.
Voice Mail
See Live Record on page 2-19 in this glossary.
Voice Mail
See Record and Send a Message on page 2-22 in this glossary.
Voice Mail
Recording
Conversation Beep
See Live Record on page 2-19 in this glossary.
Voice Mail
Recording Options
See Record and Send a Message on page 2-22 in this glossary.
Voice Mail
See Log On to Voice Mail on page 2-20 in this glossary.
Voice Mail
Remote Greetings
See Greeting on page 2-19 in this glossary.
Voice Mail
Remote Message
Notification
See Message Notification on page 2-21 in this glossary.
Voice Mail
You can remotely program (customize) InMail by using the PCPro
and WebPro programming applications. You can also do limited
remote programming from the System Administrator’s mailbox.
Maintenance
See Make Call on page 2-20 in this glossary.
Voice Mail
Rotary Dial
Telephones
See Automatic Routing for Rotary Dial Callers on page 2-17 in this
glossary.
Automated
Attendant
Routing Mailbox
Routing Mailboxes are used to route Automated Attendant calls. A
Routing Mailbox can be either an Announcement or Call Routing
Mailbox.
Automated
Attendant
Record and Send a
Message
Recorded Help
Recording a
Conversation
Recording a
Message
Remote Log On
Remote
Programming
Return Call (with
Caller ID)
2 - 22
Usage
Features
Issue 5.00
Feature Name
Screened Transfer
Description
Similar to telephone system screened transfers in which the
transferring party controls the transfer.
After an Automated Attendant caller dials an extension, InMail calls
(screens) the destination extension to see if the transfer can go
through.
Usage
Automated
Attendant
If the destination is busy or in DND, the Automated Attendant doesn’t
extend the call and immediately provides the caller with additional
options.
If the destination is available, the Automated Attendant rings it. If the
destination answers, the call goes through. If the destination doesn’t
answer within a preset interval, the Automated Attendant doesn’t extend
the call and provides the caller with additional options.
Also see Unscreened Transfer on page 2-24 in this glossary.
An extension user’s mailbox can have a security code to protect the
mailbox from unauthorized access.
See Mailbox Security Code Delete on page 2-20 in this glossary.
Voice Mail
Select Listen Mode
See Message Listen Mode on page 2-20 in this glossary.
Voice Mail
Single Digit Dialing
An Automated Attendant caller can press a single key to route to an
extension, route to another destination, or use an InMail feature.
Automated
Attendant
Subscriber Mailbox
The mailbox type normally used for telephone system extensions.
Voice Mail
System
Administrator
The extension user that has InMail system administration abilities.
Maintenance
System
Administrator
Mailbox
A Subscriber Mailbox option that enables the system administration
abilities.
Also see System Administrator on page 2-23 in this glossary.
Voice Mail
System Reinitialization
Re-initializing InMail returns all programmed options to default value.
Maintenance
Time and Date
After listening to a message, an extension user can dial a code to
hear what time the message was sent.
Also see Auto Time Stamp on page 2-16 in this glossary.
Voice Mail
Time and Date
Stamp
With caller ID installed, an extension user can listen to a message
and dial a code to hear the time the message was sent, as well as the
caller’s number.
Also see Caller ID with Return Call on page 2-17 and Time and Date
in this glossary.
Voice Mail
See Time and Date Stamp on page 2-23 in this glossary.
Voice Mail
See Screened Transfer on page 2-23 and Unscreened Transfer on
page 2-24 in this glossary.
Automated
Attendant
See Fax Detection on page 2-18 in this glossary.
Automated
Attendant
Security Code
Time and Date
Stamp (with Caller
ID Storage
Transfer by
Extension
Transfer Calls to a
FAX Machine
InMail System Guide
2 - 23
Issue 5.00
Feature Name
Description
Usage
An extension user can transfer an active call to a co-worker’s
mailbox.
Voice Mail
Transfer to an
Extension
See Screened Transfer on page 2-23 and Unscreened Transfer on
page 2-24 in this glossary.
Automated
Attendant
Transfer to the
Automated
Attendant
See Automated Attendant Transfer on page 2-16 in this glossary.
Voice Mail
Undefined Routing
A dialpad digit for which the Automated Attendant has no routing
defined. When an Automated Attendant caller dials a digit for which
there is no routing assigned, InMail plays a brief error message and
then repeats the dialing options.
Automated
Attendant
Undefined Routing
Intercept
See Undefined Routing on page 2-24 in this glossary.
Automated
Attendant
Similar to telephone system unscreened transfers in which the
transferring party immediately extends the call.
After an Automated Attendant caller dials an extension, InMail
immediately transfers the call to the destination and hangs up. Any
recalls or additional routing are handled by the telephone system –
just as with any other unscreened transfer.
Also see Screened Transfer on page 2-23 in this glossary.
Automated
Attendant
Ensures that InMail picks up calls that do not go through.
System
A mailbox user can turn the volume up or down while listening to a
message.
Voice Mail
Transfer to a
Mailbox
Unscreened
Transfer
Voice Mail Overflow
Volume Control
2 - 24
Features
Issue 5.00
THIS PAGE INTENTIONALLY LEFT BLANK
InMail System Guide
2 - 25
Issue 5.00
SECTION 3
FEATURE DESCRIPTIONS
This section provides detailed feature descriptions, programming, operating
procedures and related feature programming.
2 - 26
Features
Issue 5.00
THIS PAGE INTENTIONALLY LEFT BLANK
InMail System Guide
2 - 27
Issue 5.00
2 - 28
Features
Issue 5.00
ACD Delay Announcement
Description
The In-Mail can now support Automatic Call Distribution Delay Announcements. Use
Program 41-19 : Voice Mail Delay Announcement to assign In-Mail Call Routing
Mailboxes (PRG 47-03) as ACD Delay “Announcement” Mailboxes.
Conditions
The KSU must be licensed for ACD and In-Mail in order for this feature to
work.
Call Routing Mailboxes used for Delay Announcements cannot be used for
other voice mail features.
Call Routing boxes used for dialing options cannot be used for other voice
mail features.
When Voice Mail Delay Announcements are being played, InMail talk paths
(ports) are used.
InMail cannot be used for ACD Night Announcement.
If a caller chooses to dial out of a queue during the delay announcement the
caller is immediately removed from the queue.
Default Settings
None
System Availability
Terminals:
Not applicable
Required Component(s):
SV8100 License for InMail
Related Features
Automatic Call Distribution
InMail System Guide
2 - 29
Issue 5.00
Programming
41-08-03
Delay Announcement Source Type
Set ACD Delay Announcement source to In-Mail.
Options:
0 = ACI
1 = VRS
2 = In-Mail
Default:
0
41-19-01
Delay Message Start Timer
Determine how long the system waits before playing the Delay Message.
Options:
0~64800
Default:
0
41-19-02
Mailbox Number for 1st Announcement Message
Assign Voice Mail ACD Announcement Mailbox as the message source for
the 1st Announcement Message.
Options:
Dial (Up to 8 digits)
Default:
No Setting
41-19-03
1st Delay Message Sending Count
Determine the 1st Delay Message Sending Count. This entry must be set to
1 or higher in order for the message to play.
Options:
0 = No Message Played, 1~255
Default:
0
41-19-04
Mailbox Number for 2nd Announcement Message
Assign Voice Mail ACD Announcement Mailboxes as the message source
for the 2nd Announcement Message.
Options:
Dial (Up to 8 digits)
Default:
No Setting
2 - 30
Features
Issue 5.00
41-19-05
2nd Delay Message Sending Count
Determine the 2nd Delay Message Sending Count. This entry must be set
to 1 or higher in order for the message to play.
Options:
0 = No Message Played, 1~255
Default:
0
41-19-06
Wait Tone Type at Message Interval
Determine what the caller will hear between the messages.
Options:
0 = Ring Back Tone
1 = MOH Tone
2 = BGM Source
Default:
0
41-19-07
ACD Forced Disconnect Time After 2nd Announcement
Assign how long the system should wait after the end of the ACD delay
message before disconnecting.
Options:
0~64800
Default:
0
41-19-08
Delayed Message Interval Time
Set the timer for the interval between the Delayed Messages
Options:
0~64800
Default:
20
Operation
None
InMail System Guide
2 - 31
Issue 5.00
THIS PAGE INTENTIONALLY LEFT BLANK
2 - 32
Features
Issue 5.00
Announcement Mailbox
Description
An Announcement Mailbox plays a prerecorded announcement to Automated
Attendant callers without providing dialing options. The Announcement Mailbox is
typically set up to provide information to callers and then route back to the Automated
Attendant. See the following example:
The Automated Attendant instructs the caller to dial a digit for company
directions.
Record this in the Instruction Menu message for the active Call Routing Mailbox.
See Instruction Menu on page 2-221 for more.
Define a group mailbox as an announcement Mailbox
Set the dialing options in the Dial Action Table associated with the active Call
Routing Mailbox to route to the group mailbox number defined as the
announcement mailbox. See Dial Action Table on page 2-105 for more.
The caller dials the digit and listens to the prerecorded Announcement Mailbox
message for directions.
After playing the directions, the caller routes back to the Automated Attendant
for additional dialing options.
See the Hang Up and Next Call Routing Mailbox options in Programming below.
By default, there are 8 Announcement Mailboxes (Routing Mailboxes 9~32).
However, you can assign any of the 32 Routing Mailboxes as an Announcement
Mailbox.
The Next Call Routing Mailbox Options
The following Mailbox Routing charts show how an Announcement Mailbox handles
Automated Attendant calls.
The first chart explains what happens when the outside call is directly answered
by the Announcement Mailbox. This happens when the Answer Table uses an
Announcement Mailbox for routing instead of a Call Routing Mailbox.
The second chart explains what happens when the outside call is answered by a
Call Routing Mailbox and then routed to the Announcement Mailbox. This can
happen, for example, when a caller dials a digit to hear an announcement of
company directions.
See Answer Tables on page 2-45 for more set up information.
InMail System Guide
2 - 33
Issue 5.00
Direct Announcement Mailbox Routing
(If the outside caller routes directly to the Announcement Mailbox)
47-09-01 Next
Call Routing
Mailbox
47-09-02
Repeat
Count
47-09-03
Hang Up
After
Undefined
0 (No
repeats)
0 = None
1 = Goodbye
2 = Silent
1-32 (valid Call
Routing Mailbox)
0 (No
repeats)
Undefined
x (x number
of repeats)
1-32 (valid Call
Routing Mailbox)
x (x number
of repeats)
2 - 34
0 = None
1 = Goodbye
2 = Silent
0 = None
1 = Goodbye
2 = Silent
0 = None
1 = Goodbye
2 = Silent
Action
If the caller doesn’t dial, after the announcement InMail hangs
up.
If the caller dials a digit during the announcement,
InMailInMail says “That is an invalid entry” and hangs up.
If the caller doesn’t dial, after the announcement they route to
the Next Call Routing Mailbox.
If the caller dials a digit during the announcement, they route
to the Next Call Routing Mailbox.
If the caller doesn’t dial, after the announcement InMail hangs
up.
If the caller dials a digit during the announcement, they route
to the Next Call Routing Mailbox.
If caller doesn’t dial, they hear the announcement x number of
times and then InMail hangs up.
If the caller dials a digit during the announcement, InMail says
“That is an invalid entry” and aborts the announcement. The
announcement repeats (if allowed by the Repeat Count) and
then InMail hangs up.
If caller doesn’t dial, they hear the announcement x number of
times and then route to the Next Call Routing Mailbox.
If the caller dials a digit during the announcement, they route
to the Next Call Routing Mailbox.
If caller doesn’t dial, they hear the announcement x number of
times and then InMail hangs up.
If the caller dials a digit during the announcement, they route
to the Next Call Routing Mailbox.
Features
Issue 5.00
Routed Announcement Mailbox Routing
(If the outside caller routes to the Announcement Mailbox from a Call Routing Mailbox)
47-09-01 Next
Call Routing
Mailbox
47-09-02
Repeat
Count
Undefined
0 (No
repeats)
47-09-03
Hang Up
After
0 = None
1 = Goodbye
2 = Silent
1-32 (valid
Call Routing
Mailbox)
Undefined
0 (No
repeats)
0 = None
1 = Goodbye
2 = Silent
x (x number
of repeats)
0 = None
1 = Goodbye
2 = Silent
1-32 (valid
Call Routing
Mailbox)
x (x number
of repeats)
InMail System Guide
0 = None
1 = Goodbye
2 = Silent
Action
If the caller doesn’t dial, after the announcement the caller goes
back to the initial Call Routing Mailbox.
If the caller dials a digit during the announcement, InMail says “That
is an invalid entry” and routes the caller goes back to the initial Call
Routing Mailbox.
If the caller doesn’t dial, after the announcement InMail hangs up.
If the caller dials a digit during the announcement, InMail says “That
is an invalid entry” and hangs up.
If the caller doesn’t dial, after the announcement they route to the
Next Call Routing Mailbox.
If the caller dials a digit during the announcement, they route to the
Next Call Routing Mailbox.
If the caller doesn’t dial, after the announcement InMail hangs up.
If the caller dials a digit during the announcement, they route to the
Next Call Routing Mailbox.
If caller doesn’t dial, they hear the announcement x number of times
and then go back to the initial Call Routing Mailbox.
If the caller dials a digit during the announcement, InMail says “That
is an invalid entry” and aborts the announcement. The
announcement repeats (if allowed by the Repeat Count) and then
InMail routes back to the initial Call Routing Mailbox.
If caller doesn’t dial, they hear the announcement x number of times
and then InMail hangs up.
If the caller dials a digit during the announcement, InMail says “That
is an invalid entry” and aborts the announcement. The
announcement repeats (if allowed by the Repeat Count) and then
InMail hangs up.
If caller doesn’t dial, they hear the announcement x number of times
and then route to the Next Call Routing Mailbox.
If the caller dials a digit during the announcement, they route to the
Next Call Routing Mailbox.
If caller doesn’t dial, they hear the announcement x number of times
and then InMail hangs up.
If the caller dials a digit during the announcement, they route to the
Next Call Routing Mailbox.
2 - 35
Issue 5.00
Related Features
Automated Attendant
The Automated Attendant routes callers to an Announcement Mailbox.
Routing Mailbox
A Call Routing Mailbox (and the associated Dial Action Table) provides dialing options to
Automated Attendant callers.
Next Call Routing Mailbox
The Next Call Routing mailbox provides additional routing options to Announcement
Mailbox callers.
System Administrator
The System Administrator records the Announcement Mailbox message.
Programming
1.
Set up the Announcement Mailbox:
47-07-02
Routing Mailbox Type (Mailbox Type)
Enter 2 to make the Routing Mailbox an Announcement Mailbox.
.
2.
By default, Routing Mailboxes 1~8 are Call Routing Mailboxes and Routing
Mailboxes 9~32 are Announcement Mailboxes.
Record the Announcement Message:
See Operation below.
.
3.
By default, a message is not recorded.
Hang up InMail after playing the Announcement Mailbox message (without
providing additional dialing options):
47-09-03
Hang Up After (HangUp)
Enter 1 (Goodbye) to have InMail play Goodbye to caller and hang up after
the announcement.
.
2 - 36
By default, this option is disabled (0).
Features
Issue 5.00
4.
Provide Announcement Mailbox callers with more dialing options (instead of
hanging up):
47-09-03
Hang Up After (HangUp)
Enter 0 (No - disabled) to have InMail hang up after the announcement.
.
By default, this option is disabled (0).
Review Next Call Routing Mailbox on page 2-291 to set up additional dialing
options for Announcement Mailbox callers.
5.
Repeat the Announcement Mailbox message while the caller listens:
47-09-02
Repeat Count (Repeat Count)
Enter the Repeat Count (0~10).
.
6.
By default, this option is 0 (no repeats).
Set the maximum length of the Announcement Mailbox message:
47-01-03
Subscriber Message Length (Subs Msg Length)
Enter the maximum length of the Announcement Mailbox message (1~4095
seconds).
.
InMail System Guide
By default, this interval is 120 seconds.
2 - 37
Issue 5.00
Operation
Recording an Announcement Mailbox Message
Log On to System Administrator’s mailbox.
SA
(72)
Access System Administrator options.
[Not applicable]
A (2)
Select Announcement Mailbox message.
[Annc]
Enter the Announcement Mailbox number.
L (5)
Listen to current Announcement Mailbox message.
[Lstn]
#
R (7)
Exit listen mode.
Record a new Announcement Mailbox message.
[Rec]
Record message.
#
0
2 - 38
*
Pause or restart recording.
[Resume]
[Pause]
E (3)
Erase recording.
[Cncl]
#
Exit recording mode.
[Done]
E (3)
Erase the Announcement Mailbox message.
[Erase]
#
Go back to the System Administrator options.
[Exit]
Go back to the System Administrator options.
[Exit]
Plays Help message.
Features
Issue 5.00
Announcement Message
Description
The Announcement Message is the voice message that the System Administrator
records for a specific Announcement Mailbox. See Announcement Mailbox on page
2-33 for more.
Related Features
See Announcement Mailbox.
Programming
See Announcement Mailbox.
Operation
See Announcement Mailbox.
InMail System Guide
2 - 39
Issue 5.00
THIS PAGE INTENTIONALLY LEFT BLANK
2 - 40
Features
Issue 5.00
Answer Schedule Override
Description
Answer Schedule Override provides alternate answering for Automated Attendant
calls. When enabled, Answer Schedule Override sends calls to the specified Override
Mailbox. The Override Mailbox can be an Announcement, Call Routing, or Subscriber
mailbox. You can use Answer Schedule Override to provide holiday and bad weather
closing announcements, for example. Enable override when you want callers to hear
the special announcements; disable override to have the Automated Attendant
answer normally. You can enable Answer Schedule Override from system
programming or from the System Administrator Mailbox.
If the Override Mailbox is an Announcement Mailbox, the outside caller hears
the recorded announcement. Depending on how the Announcement Mailbox is
programmed, InMail then hangs up, reroutes the call, or provides additional
dialing options.
If the Override Mailbox is a Call Routing Mailbox, the outside caller hears the
instruction menu and can dial any option allowed by the associated Dial Action
Table.
If the Override Mailbox is a Subscriber Mailbox, the outside caller hears the
mailbox greeting (if recorded) and can leave a message.
Related Features
Announcement Mailbox
The Override Mailbox can be an Announcement Mailbox.
Routing Mailbox
The Override Mailbox can be a Call Routing Mailbox.
Subscriber Mailbox
The Override Mailbox can be a Subscriber Mailbox.
System Administrator
Optionally enable Answer Schedule Override from the System Administrator Mailbox.
Programming
1.
InMail System Guide
Optionally Enable Answer Schedule Override from system programming.
2 - 41
Issue 5.00
47-11-01
Answer Schedule Override (Schedule Override)
Enter 1 (Yes) to enable Answer Schedule Override.
You can also enable Answer Schedule Override from the System
Administrator Mailbox. See Operation below.
By default, Answer Schedule Override is disabled (0).
.
2.
Specify the Override Mailbox Category.
47-11-02
Override Mailbox Category (Override MB Ctg)
When you enable Answer Schedule Override for the selected Answer
Table, you can choose to route Automated Attendant calls to any of the
following mailbox categories:
.
3.
1
Station Mailbox
2
Group Mailbox
3
Routing Mailbox
0
Undefined
By default, this option is 0 (undefined).
Specify the Override Mailbox Number.
47-11-02
Override Mailbox Number (Override MB Num)
For the selected Answer Table, choose the Override Mailbox number
(maximum 3 digits, using 0~9). The mailbox number you select must match
the mailbox category specified in 47-11-02 above.
.
4.
2 - 42
By default, there is no entry for this option.
Optionally enable Answer Schedule Override from the System Administrator
Mailbox.
Features
Issue 5.00
Operation
Enabling Answer Schedule Override
Log On to System Administrator’s Mailbox.
SA
(72)
Access System Administrator options.
[Not applicable]
O (6)
Access Answer Schedule Override.
[Not applicable]
1-8
Enter the number of the Answer Table you want to override.
You go to the Answer Schedule Override Menu.
O (6)
Turn Answer Schedule Override on or off.
[On]
[Off]
C (2)
Select the Override Mailbox.
[MBOX]
Enter the Override Mailbox number.
The Override Mailbox can be an Announcement, Call
Routing, or Subscriber Mailbox.
#
#
#
0
InMail System Guide
Go back to the Answer Schedule
Override Menu without entering an
Override Mailbox.
[Exit]
0
Plays Answer Schedule Override Menu Help
message.
#
Go back to the System Administrator Menu.
[Exit]
Go back to the System Administrator Menu.
[Exit]
Go back to the Main Menu.
[Exit]
Plays Help message.
2 - 43
Issue 5.00
THIS PAGE INTENTIONALLY LEFT BLANK
2 - 44
Features
Issue 5.00
Answer Tables
Description
The Answer Table determines how the Automated Attendant answers outside calls on
each trunk, according to the time of the day and day of the week that the call is
ringing. InMail provides 8 Answer Tables. The Answer Table is an integral part of the
Automated Attendant. The Automated Attendant can automatically answer the
telephone system incoming calls, play an Instruction Menu message, and provide
dialing options to callers. There are 3 major Automated Attendant components:
Answer Tables
The Answer Table determines how the Automated Attendant answers outside
calls on each trunk, according to the time of the day and day of the week that
the call is ringing. The Answer Table divides the time of day and day of the week
into individual schedules, which in turn assign a Call Routing Mailbox to each
call. When a specific schedule is not in effect, the Answer Table uses its Default
Mailbox to determine routing.
.
By default, all trunks use Answer Table 1. Answer Table 1 has a single schedule that runs
Monday through Friday from 8:30AM to 5:00PM.
Routing Mailbox
A Call Routing Mailbox is a mailbox associated with an individual Answer Table
schedule or the Default Mailbox. It specifies which dialing options (Dial Action
Table) are available to callers. It also provides the Instruction Menu to callers
which typically greets the callers and describes the dialing options.
.
By default, Answer Table 1 has a single schedule that runs Monday through Friday from
8:30AM to 5:00PM. This schedule and the Default Mailbox both use Call Routing
Mailbox 1.
Dial Action Table
After the Automated Attendant answers, the Dial Action Table provides the
dialing options to callers. Each digit a caller can dial is assigned a specific action
(function) in the Dial Action Table. The dial action used depends on the setting in
the active Call Routing Mailbox, which in turn depends on the Answer Table
setup.
.
InMail System Guide
By default, Call Routing Mailbox 1 uses Dial Action Table 1.
2 - 45
Issue 5.00
The block diagram below shows the default InMail Automated Attendant
configuration.
DIL or DDI to Voice Mail Master
(555)
InMail
Default
Automated Attendant Answering
Trunks Route to Answer Table 1
47-10-01 Answer Table Assignment
Answer Table 1
47-11 Answer Table Options
Schedule 1 or Default Mailbox
47-12 Answer Schedules
47-11-05 Default Mailbox
Call Routing Mailbox 1
47-08 Call Routing Mailbox Options
Dial Action Table 1
47-13 Dial Action Tables
2 - 46
All calls route to Call Routing Mailbox 1
Schedule 1 active M-F 8:30AM-5:00PM
Default Mailbox active all other times
From a System Administrator mailbox,
record an Instruction Menu (SA + I) for
the active Call Routing Mailbox.
Dial Action Table 1 Dialing Options:
Dial an extension number, or
O for the operator
Features
Issue 5.00
The Default Mailbox and Routing Hierarchy
The Default Mailbox provides routing for an Answer Table during periods when a
schedule is not in effect. By default, for example, Answer Table 1 Schedule 1 is active
Monday through Friday from 8:30 AM to 5:00 PM. The Default Mailbox for Answer
Table 1 is active during all other times (i.e., evenings and weekends). Since Schedule
1 and the Default Mailbox both use Call Routing Mailbox 1, initially the routing is the
same 24 hours a day, 7 days a week. See Customizing an Answer Table below for
more.
When setting up your Answer Tables, keep in mind that a more specific type of routing
has priority over a less specific type of routing. When selecting which routing to follow
when there is more than one choice for a specific time, InMail chooses in the following
order:
1.
Date Schedule
2.
Day of Week Schedule
3.
Range of Days Schedule
4.
Default Mailbox
For example, a Date Schedule set up for Christmas day has priority over any other
schedules in effect on December 25.
Customizing an Answer Table
Use the following examples as a guide when customizing your Answer Tables to meet
specific site requirements. Refer to Programming below for the specifics.
To set up daytime and evening/weekend answering (2 schedules):
In this example, use the Default Mailbox (Call Routing Mailbox 1) for evening/weekend
answering and specify a new Call Routing Mailbox for daytime answering.
1.
Change the Call Routing Mailbox for Answer Table 1, Schedule 1.
In 47-11 Program Entry, assign Call Routing Mailbox 2 to Answer Table 1,
Schedule 1. Use this setting for daytime answering.
2.
From a System Administrator’s Mailbox, record an evening/weekend Instruction
Menu message for Call Routing mailbox 1.
This message plays to callers Monday through Friday from 5:00 PM to 8:30 AM
and on weekends.
3.
From a System Administrator’s Mailbox, record a daytime Instruction Menu
message for Call Routing Mailbox 2.
This message plays to callers Monday through Friday from 8:30 AM to 5:00 PM.
InMail System Guide
2 - 47
Issue 5.00
To set up daytime, evening, and weekend answering (3 schedules):
This example builds on the example above, but adds a third schedule that plays only on
weekday evenings.
1.
Change the Call Routing Mailbox for Answer Table 1, Schedule 1.
In 47-11 Program Entry, assign Call Routing Mailbox 2 to Answer Table 1,
Schedule 1. As in the 2 schedule example, use this for daytime answering.
2.
Create a new schedule that will run only in the evenings.
In 47-11 Program Entry, create Schedule 2 for Answer Table 1 that will run
Monday through Friday from 5:00 PM to 11:00 PM. Assign Call Routing Mailbox
3 to this new schedule.
3.
From a System Administrator’s Mailbox, record a late night/weekend Instruction
Menu Message for Call Routing mailbox 1.
This message plays Monday through Friday from 11:00 PM to 8:30 AM, and on
weekends.
4.
From a System Administrator’s mailbox, record the weekday Instruction Menu
Message for Call Routing Mailbox 2.
This message plays Monday through Friday from 8:30 AM to 5:00 PM.
5.
From a System Administrator’s Mailbox, record the weekday evening Instruction
Menu Message for Call Routing Mailbox 3.
This message plays Monday through Friday from 5:00 PM to 1:00 PM.
Related Features
Automated Attendant
The Answer Table determines how the Automated Attendant answers calls.
Routing Mailbox
The Call Routing Mailbox provides the dialing instructions (Dial Action Table) and
announcements to Automated Attendant Callers.
Dial Action Table
The Dial Action Table defines the dialing options for the Call Routing Mailbox chosen by
the Answer Table, which in turn provides those options to Automated Attendant callers.
2 - 48
Features
Issue 5.00
Programming
1.
Assign Answer Tables to trunks.
47-10-01
Answer Table Assignment (Answer Table)
Assign an Answer Table (1~8) to each trunk that the Automated Attendant
should answer.
.
2.
By default, all trunks are assigned to Answer Table 1.
Set up the Automated Attendant to answer trunk calls.
22-02-01
Incoming Call Trunk Setup
Assign Service Type 4 to each trunk you want to be a DIL. Make a separate
entry for each Night Service mode.
Assign Service Type 3 to each trunk you want to be a DID. Make a separate
entry for each Night Service mode.
.
22-07-01
By default, trunks are Service Type 0 (Normal).
DIL Assignment
For each trunk you designated above, enter the InMail pilot number. Make a
separate entry for each Night Service mode.
.
22-11
DID Assignment
.
3.
By default, there are no DIL destinations programmed.
For the required incoming digits, enter InMail Pilot Number in 22-11-02
or 102 (Voice mail routing) in 22-11-05 or 06 . Make a separate entry for
each Night Service mode configured.
Select the Answer Table you want to customize.
47-11
InMail Answer Table Options
Select the Answer Table you want to customize (1~8).
47-11-04
Next Answer Table (Next Answer Table)
If 10 Answer Schedules in an Answer Table are not sufficient, enter the
number of the Answer Table to which you want to link the selected table.
InMail treats the two linked tables as a single 20 entry Answer Table.
.
47-11-03
By default, Answer Tables are not linked.
Default Mailbox Category (Default MB Ctg) and 47-11-03 Default
Mailbox Number (Default MB Num)
Set the mailbox the Answer Table will use if no Answer Schedule is in effect.
.
4.
InMail System Guide
By default, this option is Call Routing Mailbox 1 for Answer Table 1 and 0
(undefined) for all other Answer Tables.
Setting up a Type 1 (Day of Week) schedule.
2 - 49
Issue 5.00
47-12
InMail Answer Schedules
Select the Schedule Entry you want to customize.
2 - 50
Features
Issue 5.00
47-12-01
Schedule Type (Entryxx Schedule Type)
Enter 1 to make the Schedule Entry a Day of Week Schedule.
.
47-12-02
By default, Schedule Entry 1 of Answer Table 1 is a Range of Days (Type 2)
schedule. All other Schedule Entries are undefined.
Answering Mailbox Category (Entryxx MB Ctg) and 47-12-03
Answering Mailbox Number (Entryxx MB Num)
Select the Routing Mailbox (1~32) that will answer calls when this Schedule
Entry is active.
You can optionally assign a Subscriber Mailbox, Group Mailbox, or
Announcement Mailbox for this option.
.
47-12-04
By default, no Type 1 (Day of Week) schedules are enabled.
Day of the Week (Entryxx Day)
Specify the day of the week the Schedule Entry should be active.
.
47-12-08
By default, no Type 1 (Day of Week) schedules are enabled.
Schedule Start Time (Entryxx Start Time)
Set the time of day the Schedule Entry should start on the day specified.
.
47-12-09
By default, no Type 1 (Day of Week) schedules are enabled.
Schedule End Time (Entryxx End Time)
Set the time of day the Schedule Entry should stop on the day specified.
.
By default, no Type 1 (Day of Week) schedules are enabled.
.
Refer to Type 1 (Day of Week) Example on page 3-436.
Review this example if you need help setting up your Schedule Entry.
5.
Setting up a Type 2 (Range of Days) schedule.
47-12
InMail Answer Schedules
Select the Schedule Entry you want to customize.
47-12-01
Schedule Type (Entryxx Schedule Type)
Enter 2 to make the Schedule Entry a Range of Days Schedule.
.
47-12-02
By default, Schedule Entry 1 of Answer Table 1 is a Range of Days (Type 2)
schedule. All other Schedule Entries are undefined.
Answering Mailbox Category (Entryxx MB Ctg) and 47-12-03
Answering Mailbox Number (Entryxx MB Num)
Select the Routing Mailbox (1-32) that will answer calls when this Schedule
Entry is active.
.
InMail System Guide
You can optionally assign a Subscriber Mailbox, Group Mailbox, or
Announcement Mailbox for this option. By default, Schedule 1 of Answer Table 1
uses Call Routing Mailbox 1. All other schedules are undefined.
2 - 51
Issue 5.00
47-12-04
Start Day (Entryxx Start Day)
Specify the day of the week the Schedule Entry should be become active
(start).
.
47-12-05
By default, Schedule 1 of Answer Table 1 starts on Monday (2). All other schedules
are undefined.
End Day (Entryxx End Day)
Specify the day of the week the Schedule Entry should become inactive.
.
47-12-07
By default, Schedule 1 of Answer Table 1 ends on Friday (6). All other schedules
are undefined.
Schedule Start Time (Entryxx Start Time)
Set the time of day the Schedule Entry should start on the day specified.
.
47-12-08
By default, Schedule 1 of Answer Table 1 starts at 8:30AM (08:30). All other
schedules are undefined.
Schedule End Time (Entryxx End Time)
Set the time of day the Schedule Entry should stop on the day specified.
6.
.
By default, Schedule 1 of Answer Table 1 ends at 5:00PM (17:00).
All other schedules are undefined.
.
Refer to Type 2 (Range of Days) Example on page 3-438.
Setting up a Type 3 (Date) schedule.
47-11
Program Entry
Select the Schedule Entry you want to customize.
47-12-01
Schedule Type (Entryxx Schedule Type)
Enter 3 to make the Schedule Entry a Date Schedule.
.
47-12-02
By default, Schedule Entry 1 of Answer Table 1 is a Range of Days (Type 2)
schedule. All other Schedule Entries are undefined.
Answering Mailbox Category (Entryxx MB Ctg) and 47-12-03
Answering Mailbox Number (Entryxx MB Num)
Select the Routing Mailbox (1-32) that will answer calls when this Schedule
Entry is active.
You can optionally assign a Subscriber Mailbox, Group Mailbox, or
Announcement Mailbox for this option.
.
By default, there are no Type 3 (Date) schedules defined.
47-12-03
Day of the Week (Entryxx Day)
47-12-04
Start Day (Entryxx Start Day)
47-12-06
Date (Entryxx Date)
Specify the date on which the Schedule Entry should become active (start).
.
2 - 52
By default, there are no Type 3 (Date) schedules defined.
Features
Issue 5.00
47-12-07
Schedule Start Time (Entryxx Start Time)
Set the time of day the Schedule Entry should start on the date specified.
.
47-12-08
By default, there are no Type 3 (Date) schedules defined.
Schedule End Time (Entryxx End Time)
Set the time of day the Schedule Entry should stop on the date specified.
.
By default, there are no Type 3 (Date) schedules defined.
Type 3 (Date) Example on page 3-439
Review this example if you need help setting up your Schedule Entry.
.
Operation
Not applicable.
InMail System Guide
2 - 53
Issue 5.00
2 - 54
Features
Issue 5.00
Answering Machine Emulation
Description
A user’s keyset can work like a home answering machine by letting InMail screen
their calls. If activated, the extension’s incoming calls route to the user’s Subscriber
Mailbox. Once the mailbox answers, the user hears two alert tones followed by the
caller’s incoming message.
The keyset user can select one of the following options:
Let the call go through to their mailbox.
Intercept the call.
Related Features
Subscriber Mailbox
Subscriber Mailbox users can take advantage of Answering Machine Emulation.
Programming
11-12-52 Live Monitoring
Set the dial access code used to enable this feature at the user telephone. At default
this code is not set.
.
InMail System Guide
This service code is used for InMail only.
2 - 55
Issue 5.00
Operation
Personal Answering Machine Emulation (AME)
To enable Personal Answering Machine Emulation:
1. Press idle Speaker key and dial access code.
2.
3.
4.
5.
6.
You can optionally press your Call Forward to Station key.
Dial 1 to have AME pick up all calls.
OR
Dial 2 to have AME pick up just outside calls.
Press Speaker to hang up.
Forward phone to InMail pilot number by pressing the Speaker key and choose from the
following dial access codes:
741 = Call Forward - Immediate
742 = Call Forward - Busy
743 = Call Forward - No Answer
744 = Call Forward - Busy/No Answer
745 = Call Forward - Both Ring
746 = Call Forwarding - Follow-Me
Dial Voice Mail master number.
Press Speaker to hang up.
To cancel Personal Answering Machine Emulation:
1. Press Speaker key and dial access code.
2. Dial 0 to cancel setting.
When Personal Answering Machine Emulation broadcasts your caller’s voice, you can:
Do nothing to have the caller’s message automatically recorded in your mailbox.
Lift the handset to intercept the call.
Press Speaker to stop the broadcast and send the call directly to your mailbox.
2 - 56
Features
Issue 5.00
Auto Attendant Do Not Disturb
Description
When a subscriber enables Auto Attendant Do Not Disturb, Automated Attendant
calls to their extension go directly to their mailbox. Their phone does not ring for calls
from the Automated Attendant. You can optionally enable Auto Attendant Do Not
Disturb from system programming. A subscriber typically turns on Auto Attendant Do
Not Disturb when they need to work uninterrupted at their desk by outside callers sent
from the Automated Attendant.
Keep in mind that Auto Attendant Do Not Disturb does not block Intercom calls from
coworkers or any other type of outside call not routed through the Automated
Attendant. For example, with Automated Attendant Do Not Disturb enabled, Direct
Inwards Lines and transferred outside calls to an extension work normally.
Related Features
Call Forward to a Mailbox
If a subscriber has calls forwarded immediately to his mailbox, Auto Attendant Do Not
Disturb is not necessary.
Greeting
A subscriber does not have to have a greeting recorded to activate Auto Attendant Do Not
Disturb.
Programming
1.
Enable Auto Attendant Do Not Disturb From Your Subscriber Mailbox.
.
2.
Refer to Operation on page 2-58.
Optionally enable Auto Attendant Do Not Disturb from System Programming.
47-02-09
Auto Attendant Do Not Disturb (Auto-ATT DND)
Enter 1 (Yes) to enable Auto Attendant Do Not Disturb.
.
InMail System Guide
By default, this option is disabled (0).
2 - 57
Issue 5.00
Operation
Recording a Multiple Greeting and Setting Up Auto Attendant Do Not Disturb
Log on to Subscriber Mailbox.
G (4)
Access the Mailbox Greeting options.
[Greet]
InMail does the following:
Plays a summary of your current settings.
Displays the status of your active Greeting (1-3).
[GREETING n: RECORDED], or
[GREETING n: NOT REC]
Shows the Auto Attendant Do Not Disturb status.
[AUTO-ATTENDANT DND: OFF], or
[AUTO-ATTENDANT DND: ON]
Provides soft keys for each of the 3 greetings.
[Gr1]
[Gr2]
[Gr3]
Select a Greeting (which also makes it active).
(1)[Gr1]
(2)[Gr2]
(3)[Gr3]
L (5)
Listen to the active greeting (if recorded).
[Lstn]
R (7)
Record a new greeting (if not recorded), or rerecord the
current greeting.
[Rec]
Record at the tone, then press # when done.
*
Pause or restart recording.
[Resume]
[Pause]
E (3)
Erase the greeting.
[Cncl]
#
End the recording.
[Done]
Erase the currently recorded greeting (if any).
[Erase]
#
Go back to the Mailbox Greeting options.
[Exit]
Change Auto Attendant Do Not Disturb.
O (6)
Turn Auto Attendant Do Not Disturb off or on.
[AUTO-ATTENDANT DND: ON]
[AUTO-ATTENDANT DND: OFF]
#
Go back to mailbox Main Menu.
[Exit]
0
Plays Help message.
2 - 58
Features
Issue 5.00
Auto Erase or Save
Description
When a mailbox user listens to a new message completely and then exits the mailbox,
InMail either automatically saves or erases the message. The setting of this option
depends on subscriber preferences.
The subscriber can choose the Auto Erase option, review messages and save
messages. The subscriber that chooses the Auto Save option is assured that InMail
automatically saves all messages when the mailbox is exited.
Auto Save Example:
InMail alerts the subscriber to new messages by a Message Waiting Lamp.
The subscriber presses L (5) to listen to a portion of each message and then exits
his mailbox.
If a subscriber chooses the Auto Save option, InMail saves partially listened-to
messages but does not illuminate the message waiting lamp for those messages.
InMail saves all the messages and turns off the message waiting lamp.
If you hang up while listening to a new message, InMail automatically saves the
message as a new message.
Related Features
Not applicable.
Programming
1.
Set up Auto Erase or Save for a Subscriber Mailbox:
47-02-05
Auto Erase/Save of Messages (Auto Erase/Save)
Select 1 (Save) to save the message; 0 (Erase) to erase the message.
.
By default, the Subscriber Mailbox will save (1) the message.
Operation
Not applicable.
InMail System Guide
2 - 59
Issue 5.00
THIS PAGE INTENTIONALLY LEFT BLANK
2 - 60
Features
Issue 5.00
Auto Time Stamp
Description
After a Subscriber Mailbox user listens to a message, VM8000 InMail can optionally
announce the time and date the message was left. The Subscriber can enable Auto
Time Stamp from their mailbox, or you can optionally enable in from system
programming. Auto Time Stamp helps if the subscriber needs to know the time and
date of each message they receive without taking any extra steps. With Auto Time
Stamp turned on, InMail automatically announces the date, time, and (optionally) the
caller’s number at the end of each message. With Auto Time Stamp turned off, the
subscriber must dial TI (84) while listening to a message to get the same information.
Related Features
Mailbox Options Menu
Auto Time Stamp is available on the Mailbox Options Menu.
Time and Date
InMail uses the VM8000 InMail Time and Date.
Time and Date Stamp
An extension can listen to a message and dial a code to hear the time the message was
sent.
Programming
1.
Enable Auto Time Stamp from your Subscriber Mailbox.
.
2.
Refer to Operation on page 2-62.
Optionally Enable Auto Time Stamp from System Programming.
47-02-11
Auto Time Stamp
Enter 1 (Yes) to enable Auto Time Stamp.
.
InMail System Guide
By default, Auto Time Stamp is disabled (0).
2 - 61
Issue 5.00
Operation
Turning Auto Time Stamp On or Off
Log On to Subscriber Mailbox.
OP
(67)
Access the Mailbox Options Menu.
[Not applicable.]
AT
(28)
Access Auto Time Stamp.
[Time]
InMail plays a summary of your Auto Time Stamp setting.
By default, Auto Time Stamp is turned off.
O (6)
2 - 62
Turn Auto Time Stamp on or off.
[On]
[Off]
#
Go back to the Mailbox Options Menu.
[Exit]
0
Plays Help message.
Features
Issue 5.00
Automated Attendant
Description
The Automated Attendant answers outside calls on each trunk, according to the time
of day and day of the week. The Answer Table is an integral part of the Automated
Attendant. The Automated Attendant can automatically answer the phone system
incoming calls, play an Instruction Menu message, and provide dialing options to
callers. There are three major Automated Attendant components:
Answer Tables
The Answer Table determines how the Automated Attendant answers outside
calls on each trunk, according to the time of the day and day of the week. The
Answer Table divides the time of day and day of the week into individual
schedules, which in turn assign a Call Routing Mailbox to each call. When a
specific schedule is not in effect, the Answer Table uses its Default Mailbox to
determine routing.
.
By default, all trunks use Answer Table 1. Answer Table 1 has a single schedule that runs
Monday through Friday from 8:30AM to 5:00PM.
Routing Mailbox
A Call Routing Mailbox is a mailbox associated with an individual Answer Table
schedule or the Default Mailbox. It specifies which dialing options (Dial Action
Table) are available to callers. It also provides the Instruction Menu to callers
which typically greets the callers and describes the dialing options.
.
By default, Answer Table 1 has a single schedule that runs Monday through Friday from
8:30AM to 5:00PM. This schedule and the Default Mailbox both use Call Routing
Mailbox 1.
Dial Action Table
After the Automated Attendant answers, the Dial Action Table provides the
dialing options to callers. Each digit a caller can dial is assigned a specific action
(function) in the Dial Action Table. The dial action used depends on the setting in
the active Call Routing Mailbox, which in turn depends on the Answer Table
setup.
.
InMail System Guide
By default, Call Routing Mailbox 1 uses Dial Action Table 1.
2 - 63
Issue 5.00
The block diagram below shows the default InMail Automated Attendant
configuration.
DIL/DID to Voice Mail Master (555)
22-01-01 Incoming Call Trunk Setup
22-07-01 DIL Setup
22-11 DID setuo
InMail
Default
Automated Attendant Answering
Trunks Route to Answer Table 1
47-10-01 Answer Table Assignment
Answer Table 1
47-11 Answer Table Options
Schedule 1 or Default Mailbox
47-12 Answer Schedules
47-11-03 Default Mailbox
Call Routing Mailbox 1
47-08 Call Routing Mailbox Options
Dial Action Table 1
47-13 Dial Action Tables
2 - 64
All calls route to Call Routing Mailbox 1
Schedule 1 active M-F 8:30AM-5:00PM
Default Mailbox active all other times
From a System Administrator mailbox,
record an Instruction Menu (SA + I) for
the active Call Routing Mailbox.
Dial Action Table 1 Dialing Options:
Dial an extension number, or
O for the operator.
Features
Issue 5.00
Related Features
Answer Tables
Determines how the Automated Attendant answers outside calls on each trunk.
Routing Mailbox
The mailbox associated with an Answer Table that specifies the dialing options (Dial
Action Table) and Instruction Menu that announcements are available to Automated
Attendant callers.
Dial Action Table
Defines the dialing options for the Call Routing Mailbox chosen by the active Answer
Table.
Fax Detection
The Automated Attendant can route outside calls to the company fax machine.
Multiple Company Greetings
One InMail system can provide individual greetings and dialing options for several
companies.
Programming
1.
Assign Answer Tables to trunks.
47-10-01
Answer Table Assignment (Answer Table)
Assign an Answer Table (1~8) to each trunk that the Automated Attendant
should answer.
.
2.
By default, all trunks are assigned to Answer Table 1.
Set up the Automated Attendant to answer trunk calls.
22-02-01
Incoming Call Trunk Setup
Assign Service Type 4 to each trunk you want to be a DIL. Make a separate
entry for each Night Service mode.
Assign Service Type 3 to each trunk you want to be a DID. Make a separate
entry for each Night Service mode.
.
22-07-01
By default, all trunks are Service Type 0 (Normal).
DIL Assignment
For each trunk you designated as a DIL above, enter the InMail pilot
number. Make a separate entry for each Night Service mode.
.
InMail System Guide
By default, there are no DIL destinations programmed.
2 - 65
Issue 5.00
22-11
DID Assignment
.
3.
Set up the Answer Tables.
Turn to Answer Tables on page 2-45 for more.
.
4.
The active schedule (Answer Table 1, Answer Schedule 1) uses Call Routing Mailbox 000.
Set up the Dial Action Tables.
Turn to Dial Action Table on page 2-105 for more.
.
6.
By default, all trunks use Answer Table 1. Answer Schedule 1 is active and runs
continuously.
Set up the Call Routing Mailboxes.
Turn to Routing Mailbox on page 2-317 for more.
.
5.
For the required incoming digits, enter 555 in 22-11-02 or 102 (Voice
mail routing) in 22-11-05 or 06 . Make a separate entry for each Night
Service mode configured.
By default, Call Routing Mailbox 000 uses Dial Action Table 1.
Set the maximum message length for Automated Attendant callers leaving a
message in a mailbox.
47-01-03
Subscriber Message Length (Subs Msg Length)
This sets the maximum message length (1~4095 seconds) for outside
Automated Attendant callers accessing a mailbox via a LOGON or GOTO
command.
.
47-01-04
The default setting is 120 seconds.
Non-Subscriber Message Length (Mbox Msg Length)
This sets the maximum message length (1~4095 seconds) for outside
Automated Attendant callers leaving a message in a Subscriber Mailboxes.
.
The default setting is 120 seconds.
Operation
Using the Automated Attendant
For the outside caller:
After Automated Attendant answers, voice prompts will instruct you which digits to dial.
2 - 66
Features
Issue 5.00
Automated Attendant Transfer
Description
An extension user can transfer a trunk call to the Automated Attendant to enable an
outside caller to use the Automated Attendant dialing options.
.
Extensions cannot call or be transferred to the InMail Automated Attendant.
Related Features
Automated Attendant
The Automated Attendant can automatically answer the phone system incoming calls,
play an Instruction Menu message, and provide dialing options to callers.
Programming
No additional programming required.
Operation
Automated Attendant Transfer
To transfer an outside call to the Automated Attendant:
1. While on an outside call, press Hold.
2. Dial the voice mail master number (e.g., 555).
3. Hang up.
InMail System Guide
2 - 67
Issue 5.00
THIS PAGE INTENTIONALLY LEFT BLANK
2 - 68
Features
Issue 5.00
Automatic Routing for Rotary Dial Callers
Description
If an Automated Attendant caller does not dial any digits, InMail automatically routes
that caller to a specified option (such as the operator or a mailbox). This lets rotary
phone users stay on the line to leave a message or have their call processed. Without
Automatic Routing for Rotary Dial Callers, rotary callers cannot use the Automated
Attendant.
Related Features
Guest Mailbox
Consider routing rotary dial callers to a Guest Mailbox to collect messages.
Programming
1.
Program the Dial Action Table Timeout function.
47-13
InMail Dial Action Tables
Since rotary dial callers can not dial DTMF digits, the Timeout function
provides routing.
.
By default, TIMEOUT is an Unscreened Transfer (UTRF) to the operator (200).
Operation
Not applicable.
InMail System Guide
2 - 69
Issue 5.00
THIS PAGE INTENTIONALLY LEFT BLANK
2 - 70
Features
Issue 5.00
Call Forward to a Mailbox
Description
A subscriber can easily forward calls to his Subscriber Mailbox by pressing the
Message key instead of dialing an extension as the forwarding destination. With Call
Forward to a Mailbox, the subscriber is assured that when he is unavailable to answer
calls, those calls are saved in Voice Mail.
Unlike with Extension Hunting to Voice Mail, the Call Forward to a Mailbox feature
allows the subscriber to choose when and how to send unanswered calls to voice
mail.
Call Forwarding a Subscriber’s Direct Inward Line to their Mailbox
The following table describes how InMail handles a subscriber’s Direct Inward Line
when it is Call Forwarded to the mailbox. The routing occurs when the caller dials a
digit while listening to the recorded or default mailbox greeting.
Dialing Options while Listening to a Subscriber Mailbox Greeting
47-02-14 Next Call
Routing Mailbox
47-02-13
Dialing
Option
Digit
Dialed
Undefined
No
0
1~9
1~32 (valid Call Routing
Mailbox)
1~32 (valid Call Routing
Mailbox)
InMail System Guide
No
Yes
Action
Caller hears, “That is an invalid entry,” and the greeting
repeats.
#
InMail hangs up.
*
Caller skips greeting and can immediately start
recording.
0
Caller follows 0 action in Next Call Routing Mailbox.
1~9
Caller hears, “That is an invalid entry,” the greeting
repeats, and the caller is asked to leave a message.
#
Caller routes to the Next Call Routing Mailbox and hears
its Instruction Menu.
*
Caller skips greeting and can immediately start
recording.
0
Caller follows key’s action in Next Call Routing Mailbox.
1~9
#
Caller routes to the Next Call Routing Mailbox and hears
its Instruction Menu.
*
Caller skips greeting and can immediately start
recording.
2 - 71
Issue 5.00
Log On to a Subscriber Mailbox while Listening to the Greeting
A subscriber who wishes to log on to his mailbox while listening to his greeting must
have the option set in Next Call Routing Mailbox. To allow this ability, for example:
Program the Next Call Routing Mailbox # digit as LOGON to IXXX.
While listening to their greeting, the subscriber can dial:
# (to route to their Next Call Routing Mailbox).
# and their mailbox number to log on to their mailbox.
By default, this option is provided in Call Routing Mailbox 1. Additionally, the
subscriber can enable a Security Code to prevent unauthorized logons.
Related Features
Auto Attendant Do Not Disturb
When enabled, Auto Attendant Do Not Disturb automatically sends all calls from the
Automated Attendant to the subscriber’s mailbox.
Message Forward
A subscriber can forward a message in their Subscriber Mailbox to a coworker.
Next Call Routing Mailbox
The setting of the Next Call Routing Mailbox and Dialing Option options determine the
digits a caller can dial while listening to the recorded or default mailbox greeting.
Programming
1.
Set how long an unanswered call will ring before forwarding.
24-02-03
Delayed Call Forwarding Time
For type 2 and type 4 forwarding, an unanswered call will forward after this
interval.
This time applies to transferred trunk calls, Direct Inward Lines, and
Intercom calls.
.
2 - 72
By default, this interval is 10 seconds.
Features
Issue 5.00
Operation
Call Forward to your Mailbox
To forward your calls to your mailbox:
1.
Press the Speaker key (or lift the handset at the single line telephone) and
choose from the following dial access codes:
848 = Call Forward - Immediate
843 = Call Forward - Busy
845 = Call Forward - No Answer
844 = Call Forward - Busy/No Answer
842 = Call Forward - Both Ring
846 = Call Forwarding - Follow-Me
2.
Dial 1 to set
3.
Dial Voice Mail master number.
4.
Press Speaker to hang up (or hang up handset at the single line telephone).
InMail System Guide
2 - 73
Issue 5.00
THIS PAGE INTENTIONALLY LEFT BLANK
2 - 74
Features
Issue 5.00
Caller ID
Description
Caller ID is a telephone company service that provides an extension with a caller’s
number and optional name. With Caller ID, the display keyset user knows who is
calling before they pick up the call. When used with InMail, Caller ID enables the
Make Call feature for outside calls. After listening to a voice message, the subscriber
can dial MC to return the call without knowing the callers phone number.
Related Features
Make Call
An extension user can listen to a voice message and dial a code to return the call without
knowing the caller’s phone number. Make call to an outside telephone number requires
Caller ID.
Screened Transfer
Screened Transfers from the Automated Attendant provide Caller ID data only after the
user answers the call.
Unscreened Transfer
Unscreened Transfers from the Automated Attendant provide Caller ID data while the call
is ringing.
Programming
Be sure the telephone system is configured to pass
Caller ID to the InMail voice mail ports.
No additional programming is required to enable Caller ID in InMail. Following is a list
of the basic Caller ID programs.
1.
Be sure the telco provides Caller ID to the connected telephone system.
2.
Check your telephone system programming to be sure the telephone system is
set up to receive Caller ID and pass it to the InMail voice mail ports.
14-01-22
Basic Trunk Data Setup - Caller ID to Voice Mail
Enter 1 (Yes) to enable this option.
.
InMail System Guide
By default, this option is disabled.
2 - 75
Issue 5.00
14-02-10
Analog Trunk Data Setup - Caller ID
Enable (1) a trunk ability to receive Caller ID data.
.
20-09-02
By default, a trunk’s ability to receive Caller ID data is disabled (0).
Class of Service Options (Incoming Call Service) - Caller ID Display
Enter 1 (Yes) to enable the Caller ID display at an extension.
This option does not apply to InMail Voice Mail Ports.
.
20-06-01
By default, this option is disabled.
Class of Service for Extensions
Assign Class of Service to extensions.
.
By default, all extensions have Class of Service 1.
Operation
Not applicable.
2 - 76
Features
Issue 5.00
Caller ID - Automatic Access to VM by Caller ID
Description
Currently when a user outside the system wants to access their Inmail mailbox, they
must dial the voice mail then enter an access code followed by teir mailbox number.
From V5.0 or higher software, an Inmail mailbox can be associated with a specific
caller ID (CID) number. When that CID number is presented to the InMail, it
automatically logs the user into their mailbox. This greatly improves VM accessibilty
for outside callers.
Two types of voice mail access modes exist for this feature.
1.
Specifying the VM Pilot number as a DID/DIL/DISA/VRS destination
- OR -
Dialling the VM pilot number after calling in from a mobile extension
2.
Program to forward a call to VM (102) by any of the following programs.
Program 22-05-01 (Incoming Ring Group)
Program 22-11-05 (Transfer Target number - 1)
Program 22-11-06 (Transfer Target number - 2)
Program 25-03-01 (Incoming Ring Group No.)
Program 25-04-01 (VRS/DISA Transfer Ring Group at No answer/busy)
Figure 2-4 Example - User Access to Voice Mail
InMail System Guide
2 - 77
Issue 5.00
Service Conditions
The VM8000 InMail – Automatic Access to VM by Caller ID (CID) feature
requires Version 5.0 or higher software and the Version 5.0 Enhancement
license.
To use this feature, the voice mail box number must be set in Program 13-04-11.
If not set, the system requires the normal log in procedure or entering a valid
mailbox number and security code to login.
This feature is only supported for external calls to the InMail.
Mobile Extension users can use this feature by setting the VM box number in
Program 13-04-11 which corresponds to the Speed Dial number registered in
Program 15-22-01.
Common Speed Dial area is used for this feature. Group or Station Speed Dial
areas are not supported with this feature.
When a number in the Common Speed Dial includes a trunk access code or end
code (#), the Redial name indication will work if the number matches completely.
If the same number is registered in the Common Speed Dial bin, the latest
Speed Dial number is used.
The Flexible ringing feature has priority over the VM8000 InMail – Automatic
Access to VM by Caller ID feature.
To enable this feature, Program 14-01-22 (Caller ID to Voice Mail) must be set to
1.
Related Features
Speed Dial - System/Group/Station
Refer to Features and Specifications manual for further information
Caller ID - Flexible Ringing
Refer to Features and Specifications manual for further information
Mobile Extension
Refer to Features and Specifications manual for further information
2 - 78
Features
Issue 5.00
Programming
13-04-01
Speed Dialling Data
This program stores speed dial data into the speed dial areas and defines
the speed dial names.
Enter the CLI number of the device to be used for Automatic Access to VM
by Caller ID.
Entries
1~9, 0, ?, #, Pause (Press line key 1) Recall/Flash (Press line key 2) @ =
Code to wait for answer supervision in ISDN (Press line key 3)
(maximum 24 digits)
(default not assigned)
13-04-02
Name
Assign a name to each speed dial bin.
Entries
Maximum 12 characters
(Default not assigned)
13-04-11
Automatic Access to Voice Mail by Caller ID
Per Speed Dial Bin number (0000~1999), set the VM Box number
(001~512).
Incoming Caller ID number will be checked against Speed Dial data
(Program 13-04-01).
From matched Speed Dial Bin number, system then finds the associated
VM Box number with this program.
15-22-01
Mobil Extension Target Setup
For each Mobile Extension number, select the Abbreviated
Dial bin number to be associated with it.
When using this feature with Mobile Extension, set the associated VM Box
number in Program 13-04-11. The incoming Extension number will be
checked with Program15-22-01. From matched Speed Dial Bin No, system
finds the VM Box number with Program 13-04-11.
Entries
0~1999
(0 = No setting
1~1999 = target of
mobile extension)
(default = 0)
22-02-01
Incoming Call trunk Setup
Assign the incoming trunk type for each trunk.
Entries
Incoming Type for Day/ Night Mode (1~8):
InMail System Guide
2 - 79
Issue 5.00
0 = Normal
1 = VRS (second dial tone if no VRS installed)
2 = DISA
3 = DID
4 = DIL
5 = E&M Tie line
6 = Delayed VRS
7 = ANI/DNIS
8 = DID(DDI) Mode Switching (default = 0)
22-05-01
Incoming Trunk Ring Group Assignment
Assign trunks to incoming Ring Groups. Use this program to assign Normal
Ring Trunks (Program 22-02) to Incoming Ring Groups (Program 22-04).
It sets arriving group of the outside line set by Program 22-02 as "General
arrival call".
22-11-05/06DID Translation Table Number - Transfer Destination Number 1/2
For each DID Translation Table entry (1-2000), specify the first and second
Transfer Destinations if the callers receives a busy or no answer (action
defined in Program 22-11-04).
.
If the Transfer Destinations are busy or receive no answer, those calls are transferred
to the final transfer destination (Program 22-10).
Entries
0 = No Setting
1~100 = Incoming Group
101 = (Not Used)
102 = In-Skin/External
Voice Mail or InMail
103 = Centralized VM
201~264 = Department Group
400 = DUD
401 = DISA
501~599 = DISA/VRSMessage
1000~999 = Speed Number (000~999)
(default = 0)
25-03-01
VRS/DISA Transfer Ring Group With Incorrect Dialling
For each trunk port, set what happens to a call when the DISA or
Automated Attendant caller dials incorrectly or waits too long to dial. The
call can either disconnect (0) or Transfer to an alternate destination (a ring
group, In-Skin/External, Centralized).
When setting the DISA and DID Operating Mode, you make anntry for each
Night Service mode.
This program defines the Incoming Ring Group when dial tone is timed-out
or the wrong dialing is received in DID, DISA.
2 - 80
Features
Issue 5.00
Entries
Ring Groups: 1~100
Trunk Ports: 001~200
Day/Night Mode:1~8
0 (Disconnect)
1~100 (Incoming Ring Group)
101 DSPDB-VM
102 (In-Skin/ExternalVoice Mail or InMail)
103 Centralized VM
104 (Speed Dial table
Program 25-15-01) Version 3.0 software or higher is required.
(default = 0)
25-04-01
VRS/DISA Transfer Ring Group With No Answer/Busy
For each trunk port (001~200), set the operating mode of each DISA trunk.
This sets what happens to the call when the DISA or Automated Attendant
caller calls a busy or unanswered extension. The call can either disconnect
(0) or Transfer to an alternate destination (a ring group, In-Skin/External,
Centralized). When setting the DISA and DID Operating Mode, you make
an entry for each Night Service mode.
This program defines the Incoming Ring Group when Target extension has
no answer or is busy in DID.
Entries
Ring Groups: 1~100
Trunk Ports: 001~200
Day/Night Mode:1~8
0 (Disconnect)
1~100 (Incoming Ring Group)
101 DSPDB-VM
102 (In-Skin/ExternalVoice Mail or InMail)
103 Centralized VM
104 (Speed Dial table
Program 25-15-01) Version 3.0 software or higher is required.
(default = 0)
Operation
Retrieve VM Messages
To retrieve VM messages from outside of office:
Trunk 1: 03-1234-5678 (DIL)
InMail System Guide
2 - 81
Issue 5.00
Outside party number: 09087654321
Program 22-02-01: Trunk 1 DIL
Program 22-07-01: VM Pilot number, 300
Program 13-04-01: Speed Dial area No.0 -> 09087654321
Program 13-04-11: Speed Dial area No.0 -> 100 (VM BOX)
1.
Call DIL number.
2.
After the VM is answered, user can enter VM Box 100 directly.
3.
Announce the zone.
- OR -
Trunk 1: 03-1234-5678 (DID)
Outside party number: 09087654321
Program 22-02-01: Trunk 1 DID
Program 22-11-05: Set transfer destination, 102 InMail
Program 13-04-01: Speed Dial area No.0 -> 09087654321
Program 13-04-11: Speed Dial area No.0 -> 100 (VM BOX)
1.
Call the DID number to set the transfer to InMail from outside party.
2.
After the VM is answered, user can enter VM Box 100 directly.
To retrieve VM messages from Mobile extension:
Trunk 1: 03-1234-5678 (DIL)
Mobile extension number: 4321
Program 22-02-01: Trunk 1 DIL
Program 22-07-01: VM Pilot number, 300
Program 15-22-01: Mobile Extension Target Setup No.0 -> 4321
Program 13-04-11: Speed Dial area No.0 -> 100 (VM BOX)
2 - 82
1.
1. Call DIL number.
2.
2. After the VM is answered, user can enter VM Box 100 directly.
Features
Issue 5.00
Caller ID with Return Call
Description
Refer to Make Call on page 2-255.
Related Features
Refer to Make Call on page 2-255.
Programming
Refer to Make Call on page 2-255.
Operation
Refer to Make Call on page 2-255.
InMail System Guide
2 - 83
Issue 5.00
THIS PAGE INTENTIONALLY LEFT BLANK
2 - 84
Features
Issue 5.00
Calling the Automated Attendant
Description
Automated Attendant callers can use various InMail features and then return to the
Automated Attendant for additional dialing options. This lets the caller dial other
extensions, leave messages for co-workers, or use other Automated Attendant
features. The features below describe several ways to return to the Automated
Attendant.
Automated Attendant Transfer
An extension user can transfer their trunk call to the Automated Attendant so the outside
caller can use the Automated Attendant dialing options.
Next Call Routing Mailbox
The Next Call Routing Mailbox provides callers with additional dialing options after they
leave a message in a mailbox (depending on the setting of the Dialing Option).
Related Features
Refer to the features referenced in Description above.
Programming
Refer to the features referenced in Description above.
Operation
Refer to the features referenced in Description above.
InMail System Guide
2 - 85
Issue 5.00
2 - 86
Features
Issue 5.00
Cascading Message Notification
Description
If an extension user receives a new message in their mailbox, Cascading Message Notification
will call them, at up to five preset destinations, to let them know a new voice mail
message has arrived. A destination can be an outside number (such as a cell phone,
pager, or home office) or a co-worker's extension.
The Cascading Message Notification destinations are set up in the Notification
Schedule. Each of the five schedule entries can be individually enabled or disabled
and provides options for:
Type: Voice call or pager.
Start Hour: The time the destinations becomes active.
End Hour: The time the destinations becomes inactive.
Number: The destination telephone, pager, or extension number.
Busy Attempts: The number of times the system will try the destination when it is busy.
The system cancels notification callouts for this entry when the Busy Attempts
number is met.
RNA Attempts: The number of times the system will try the destination when it is
unanswered. The system cancels notification callouts for this entry when the
RNA Attempts number is met.
Security: Enables or disables the Security Code requirement for the notification
destinations. For example, you may want to disable the Security Code when the
destination is your cell phone and it may be inconvenient to dial digits after
answering the notification callout.
When the extension user enables Cascading Message Notification, the system will try
each enabled destination that is active for the current time (i.e., in-schedule). The
system will not try any destinations that are disabled or are not in-schedule. When the
retries for a particular destination have been met, the system will immediately move to
the next destination.
Service Conditions
Main Software version 4.00 or greater is required to support this feature.
The InMail language prompts installed on the CF must be version 2.10 or
greater. The VM8000 InMail Utility is used to update the installed language
InMail System Guide
2 - 87
Issue 5.00
prompts.
If the InMail CF has version 2.00 instead of version 2.10 prompt sets installed,
only a single destination Message Notification is available using Notification
Schedule entry 1.
Retry Interval timers are set on a system wide basis only.
The pager dial string is set on a system wide basis only.
Notification settings can be changed using the Telephone Mailbox Option
Interface or system programming only.
When the retries for a particular destination have been met the system will
immediately move to the next destination even if there is only one destination
active.
Once the notification process begins, a new message does not restart the
process if it is already in progress. Once the process ends (e.g., if the message
is acknowledged or the maximum number of callout attempts is reached), the
next new message will restart the process.
The system determines which numbers are internal extensions or external
numbers by the system dial plan settings.
Depending on the system ARS, routing may be needed to properly route
external calls.
If no trunks are available when an outside destination is attempted it is counted
as a Busy No Answer attempt.
2 - 88
Features
Issue 5.00
Figure 2-5 Cascade Message Notification Flowchart
Message Notification to Normal Telephone Numbers
Below is a basic overview of how Message Notification works with phone numbers,
assuming the retry attempts are at default. The system determines which numbers
are internal extensions or external numbers by the system dial plan settings.
Depending on the system, ARS routing may be needed to properly route external
calls.
InMail System Guide
2 - 89
Issue 5.00
1.
The subscriber activates Message Notification for their mailbox.
2.
When the subscriber receives a new message, the InMail dials the first
active destination in the cascade that should receive the Message
Notification.
InMail waits up to 30 seconds (approximately 5 rings) for ringback,
reorder, busy, or voice activity from the called number. If nothing is
detected, the callout is considered unanswered (RNA).
3.
If the recipient answers, InMail plays the notification message (“Hello, I
have a message for”) and asks the recipient to dial 1 to log onto their
mailbox. The recipient hears the notification message if:
They say “Hello” after answering the callout, or
The system receives answer supervision from the telco after the
recipient answers the call. (Note that the recipient can skip the
announcement by dialing 1 to log onto their mailbox after answering
the callout – without saying “Hello”.), or
The notification is to a system extension.
4.
Once the recipient logs onto the mailbox, the notification is considered
acknowledged and will not reoccur until the subscriber receives new
messages.
5.
If the recipient doesn’t answer, the system follows the Cascading
Message Notification retry attempt settings, and notification will
eventually stop if the call is not answered.
6.
Once the notification process begins, a new message does not restart
the process if it is already in progress. Once the process ends (e.g., if
the message is acknowledged or the maximum number of callout
attempts is reached), the next new message will restart the process.
Message Notification to Pager Numbers
Below is a basic overview of how Message Notification works with pager
numbers,
Below is a basic overview of how Message Notification works with pager numbers,
assuming the retry attempts are at default. The system determines which numbers
are internal extensions or external numbers by the system dial plan settings.
Depending on the system, ARS routing may be needed to properly route external
calls.
1.
The subscriber activates Message Notification for their mailbox.
2.
When the subscriber receives a new message, InMail immediately dials
the pager service.
InMail waits up to 30 seconds (approximately 5 rings) for ringback,
reorder, busy, or voice activity from the called number. If nothing is
detected, the callout is considered unanswered.
3.
2 - 90
After the pager service answers, InMail waits for the timer 47-01-08 then
sends the dial string in 47-01-07 which causes the pager display to show
Features
Issue 5.00
the subscriber's mailbox number as well as the number of new
messages in the mailbox.
The notification is considered acknowledged if the subscriber logs onto
their mailbox.
If the notification is not acknowledged (within a programmable time
frame, 47-01-12) the pager notification is repeated (up to the RNA
attempts count, 47-20-07).
If the pager service doesn't answer, the system follows the Cascading
Message Notification rules and notification will eventually stop if the
call is not answered.
Programming
47-01-07
Digital Pager Callback Number
Set the Digital Pager Callback number portion of the Message
Notification callout number for a digital pager. This is the portion of the
callout number that is appended to the pager service telephone number.
Normally, this option should be X?M#, where:
.
X is the number of the extension that generated the no thetification. is a visual
delimiter (to make the pager display easier to read).
.
M is the number of new messages in the extension mailbox.
.
# is the digit normally used by the pager service for positive disconnect.
Digits
(12 maximum, using 0~9, # and .)
M (Number of messages – entered by pressing LK1)
X (Extension number – entered by pressing LK2)
SV8100 InMail automatically replaces the X command with the number of
the extension that initially received the message.
Default = X*M#
47-01-08
Dialling Digital Pager Callback Number Delay
Delay in Dialing Digital Pager Callback Number (Pager Dial Delay) Set the
delay that occurs just before SV8100 InMail dials the Digital Pager Callback
Number portion of the Message Notification callout number for a digital
pager. Set this delay so the pager service has enough time to connect to the
digital pager before sending the callback number.
Entries
0~99 seconds
47-01-09
Wait Between Digital Pager Callot Attempts
Use this option to set the minimum time (1-255 minutes) between
unacknowledged or unanswered digital pager Message Notification
callouts. (A subscriber acknowledges a digital pager notification by logging
onto their mailbox.) After this interval expires, inMail will try the callout
again.
InMail System Guide
2 - 91
Issue 5.00
Entries
1~255 minutes
Default = 15
47-01-11
Wait between Busy non-Pager
Set the time SV8100 InMail waits after it dials a busy non-pager callout
destination, before retrying the callout number.
Entries
1~255 minutes
Default = 15
47-01-12
RNA Non-Pager Callout Attempt Interval
Set the time SV8100 InMail waits, after it dials an unanswered nonpager
callout destination, before retrying the callout number.
Entries
1~255 minutes
Default = 30
47-01-13
Number of RNA rings
If a non-pager callout rings the destination longer than this number of rings,
SV8100 InMail marks the call as unanswered (Ring No Answer) and hangs
up.
Entries
1~99 minutes
Default = 5
47-01-14
Maximum Attempts
Set how many attempts SV8100 InMail retries an incomplete Message
Notification callout. This total includes unacknowledged callouts, callouts to
a busy destination, and callouts to an unanswered destination. This option
applies to pager and non-pager callouts.
Entries
1~99 minutes
Default = 5
47-02-23
All Message Notification Enabled (Subscriber Mailbox)
Use this option to enable or disable notification for the subscriber mailbox. If
disabled, enabling the individual notification entries has no effect.
Entries
0 = Disabled
1 = Enabled
Default = 1
47-06-21
All Message Notification Enabled (Group mailbox)
Use this option to enable or disable notification for the group mailbox. If
disabled, enabling the individual notification entries has no effect.
2 - 92
Features
Issue 5.00
Entries
0 = Disabled
1 = Enabled
Default = 1
47-20-01
Station Mailbox Message Notification Options - Notification
For the selected entry (1-5), use thisption to enable or disable Message
Notification. If enabled, notificationill occur when the mailbox receives a
new message according to the settings for Type, Start Hour, End Hour, and
notification Phoneumber. If disabled, Message Notification will not occur.
There are five separately programmed Message notification entries for
each Subscriber Mailbox.
Entries
0 = Disabled
1 = Enabled
Default = 1
47-20-02
Station Mailbox Message Notification Options - Notification Begin
Hour
For the selected entry (1-5), use this option to set the hour when
MessageNotification will start. Notification will occur only for new messages
received between this setting and the End Hour setting. This entry is in 24hour (military time). For example, 08 is 8:00 AM and 20 is 8:00 PM. For 24hour notification, make the Start Hour the same as the End Hour.
There are five separately programmed
Message notification entries for each Subscriber Mailbox.
Entries
0~23 (24 hour clock)
Default = 0
47-20-03
Station Mailbox Message Notification Options - Notification End Hour
For the selected entry (1-5), use this option to set the hour when Message
Notification will stop. Notification will occur only for new messages received
between the Start Hour and this setting. This entry is in 24-hour (military
time). For example, 08 is 8:00 AM and 20 is 8:00 PM. For 24- hour
notification, make the Start Hour the same as the End Hour.
There are five separatelyprogrammed Message notification
entries for each Subscriber Mailbox.
Entries
0~23 (24 hour clock)
Default = 0
InMail System Guide
2 - 93
Issue 5.00
47-20-04
Station Mailbox Message Notification Options - Notification Type
For the selected entry (1-5), use this option to set the Message Notification
type. The choices are Voice and Pager. Choose Voice when the Phone
Number entry is to a regular office, home, or mobile telephone. Choose
Pager when you want to deliver the notification to a digital pager.
There are five separatelyprogrammed Message notification entries for each
Subscriber Mailbox.
Entries
0 = Undefined
1 = Voice
2 = Pager
Default = 1
47-20-05
Station Mailbox Message Notification options - Notification Number
For the selected entry (1-5), use this option to set the telephone number (16
digits maximum) Message Notification will dial to notify the subscriber of
new messages. Enter the number exactly as you want the system to dial it ,
but do not include a line access code (such as 9). If the number you enter is
extension number, it will be an Intercom call. Otherwise, it will be an outside
call. (The system decides by referring its numbering plan.)
There are five separatelyprogrammed Message notification entries for each
Subscriber Mailbox.
Entries
Valid number up to 16 digits.
Default = blank
47-20-06
Station Mailbox Message Notification Options - Notification Busy
Attempts
For the selected entry (1-5), use this option to set how many times InMail
will retry an incomplete Message Notification callout to a busy destination.
This option applies to pager and non-pager callouts. If the Busy Attempts
and RNA Attempts are both met, the notification callout to the selected entry
is cancelled.
There are five separatelyprogrammed Message notification entries for each
Subscriber Mailbox.
Entries
1~99 (attempts)
Default = 5
47-20-07
Station Mailbox Message Notification Options - Notification RNA
Attempts
For the selected entry (1-5), use this option to set how many times InMail
will retry an incomplete Message Notification callout when the destination
does not answer. This option applies to pager and nonpager callouts. If the
2 - 94
Features
Issue 5.00
Busy Attempts and RNA Attempts are both met, the notification callout to
the selected entry is cancelled.
There are five separatelyprogrammed Message notification entries for each
Subscriber Mailbox.
Entries
1~99 (attempts)
Default = 5
47-20-08
Station Mailbox Message Notification Security
For the selected entry (1-5), use this option to enable or disable Security
Code protection for the callout. If enabled, the user is required to enter their
security in order to log on and hear the new message. If disabled, the
Security Code is not required.
There are five separatelyprogrammed Message notification entries for each
Subscriber Mailbox.
Entries
0 = Security code not required
1 = Security code required
Default = 0
47-22-01
Group Mailbox Message Notification Options - Notification
For the selected entry (1-5), use thisption to enable or disable Message
Notification. If enabled, notificationill occur when the mailbox receives a
new message according to the settings for Type, Start Hour, End Hour, and
notification Phoneumber. If disabled, Message Notification will not occur.
There are five separately programmed Message notification entries for
each Group Mailbox.
Entries
0 = Disabled
1 = Enabled
Default = 1
47-22-02
Group Mailbox Message Notification Options - Notification Begin Hour
For the selected entry (1-5), use this option to set the hour when
MessageNotification will start. Notification will occur only for new messages
received between this setting and the End Hour setting. This entry is in 24hour (military time). For example, 08 is 8:00 AM and 20 is 8:00 PM. For 24hour notification, make the Start Hour the same as the End Hour.
There are five separately programmed
Message notification entries for each Group Mailbox.
Entries
0~23 (24 hour clock)
InMail System Guide
2 - 95
Issue 5.00
Default = 0
47-22-03
Group Mailbox Message Notification Options - Notification End Hour
For the selected entry (1-5), use this option to set the hour when Message
Notification will stop. Notification will occur only for new messages received
between the Start Hour and this setting. This entry is in 24-hour (military
time). For example, 08 is 8:00 AM and 20 is 8:00 PM. For 24- hour
notification, make the Start Hour the same as the End Hour.
There are five separatelyprogrammed Message notification
entries for each Group Mailbox.
Entries
0~23 (24 hour clock)
Default = 0
47-22-04
Group Mailbox Message Notification Options - Notification Type
For the selected entry (1-5), use this option to set the Message Notification
type. The choices are Voice and Pager. Choose Voice when the Phone
Number entry is to a regular office, home, or mobile telephone. Choose
Pager when you want to deliver the notification to a digital pager.
There are five separatelyprogrammed Message notification entries for each
Group Mailbox.
Entries
0 = Undefined
1 = Voice
2 = Pager
Default = 1
47-22-05
Group Mailbox Message Notification options - Notification Number
For the selected entry (1-5), use this option to set the telephone number (16
digits maximum) Message Notification will dial to notify the subscriber of
new messages. Enter the number exactly as you want the system to dial it ,
but do not include a line access code (such as 9). If the number you enter is
extension number, it will be an Intercom call. Otherwise, it will be an outside
call. (The system decides by referring its numbering plan.)
There are five separatelyprogrammed Message notification entries for each
Group Mailbox.
Entries
Valid number up to 16 digits.
Default = blank
47-22-06
Group Mailbox Message Notification Options - Notification Busy
Attempts
For the selected entry (1-5), use this option to set how many times InMail
will retry an incomplete Message Notification callout to a busy destination.
2 - 96
Features
Issue 5.00
This option applies to pager and non-pager callouts. If the Busy Attempts
and RNA Attempts are both met, the notification callout to the selected entry
is cancelled.
There are five separately programmed Message notification entries for
each Group Mailbox.
Entries
1~99 (attempts)
Default = 5
47-22-07
Group Mailbox Message Notification Options - Notification RNA
Attempts
For the selected entry (1-5), use this option to set how many times InMail
will retry an incomplete Message Notification callout when the destination
does not answer. This option applies to pager and nonpager callouts. If the
Busy Attempts and RNA Attempts are both met, the notification callout to
the selected entry is cancelled.
There are five separatelyprogrammed Message notification entries for each
Group Mailbox.
Entries
1~99 (attempts)
Default = 5
47-22-08
Group Mailbox Message Notification Security
For the selected entry (1-5), use this option to enable or disable Security
Code protection for the callout. If enabled, the user is required to enter their
security in order to log on and hear the new message. If disabled, the
Security Code is not required.
There are five separatelyprogrammed Message notification entries for each
Group Mailbox.
Entries
0 = Security code not required
1 = Security code required
Default = 0
Operation
To setup Cascade Notification:
1.
Access the All Message Notification Setting menu.
Log onto Subscriber Mailbox
InMail System Guide
2 - 97
Issue 5.00
V
m a
i
M
s
g
s
L
s
t
i
N
n
M a
i
0
e
w
:
G
r
e
e
l
t
b
L
o
v
x
:
1
0
1
A
r
c
h
:
0
M s
g
M o
r
e
>
M o
r
e
>
a
c
k
O
f
f
a
c
k
O
n
a
c
↓ Dial OP(67)/Press “More >” → “Setup”
Mailbox Options menu.
C
o
n
f
i
g
C
o
d
e
u
r
e
N
o
t
f
M b
o
x
y
C
a
f
i
1
0
l
l
H
c
a
t
1
↓ Dial N(6)/Press “Notify”
Notification Type Selection menu.
M
e
s
s
a
P
h
o
n
e
g
e
N
E
m a
o
t
i
l
i
i
o
n
B
↓ Dial P(7)/Press “Phone”
2.
P
h
o
n
O
n
All Message Notifications Settings Menu.
e
N
o
t
i
O
f
f
f
i
↓ Dial O(6)/Press “On”
c
a
t
i
o
D
e
s
t
n
:
B
↑ Dial O(6)/Press “Offf”
All Message Notifications Settings Menu.
P
h
o
n
O
n
e
N
o
t
i
O
f
f
f
i
c
a
t
i
o
D
e
s
t
n
:
B
k
2.1 Soft key Operation (3-Line Phone/Super Display Phone)
On/OnTurn All Notifications on.
2 - 98
Features
Issue 5.00
Off/OffTurn All Notifications off.
Dest/DestinationsProceed to notification Destination Selection
Menu.
Back/BackGo back to Notification Type Selections Menu
2.2 Key Operation
Key 3Proceed to Notification Destination Selection Menu.
Key 6Toggle All Notifications on/off.
Key 9Exit from Mailbox.
Key #Go back to Notification Type Selection menu.
3.
Notification Destination Selection menu
P
h
o
n
e
N
o
t
i
f
D
e
s
t
1
D
e
s
t
2
i
c
a
t
i
o
D
e
s
t
3
c
a
t
i
o
B
a
c
k
n
:
O
n
M o
r
O
n
M o
r
e
>
e
>
↓ Press “More”
P
h
o
n
e
N
o
t
i
f
D
e
s
t
4
D
e
s
t
5
i
n
:
3.1 Soft key Operation (3-Line Phone/Super Display Phone)
Dest1/Destination1Proceed to Notification Destination Selection
Menu.
Dest2/Destination2Proceed to Notification Destination Selection
Menu.
Dest3/Destination3Proceed to Notification Destination Selection
Menu.
Dest4/Destination4Proceed to Notification Destination Selection
Menu.
Dest5/Destination5Proceed to Notification Destination Selection
Menu.
Back Go back to All Message Notifications Setting menu.
1
2
3
4
5
3.2 3.2 Key Operation
Key 1Proceed to Phone Notification Destination 1 menu.
Key 2Proceed to Phone Notification Destination 2 menu.
Key 3Proceed to Phone Notification Destination 3 menu.
Key 4Proceed to Phone Notification Destination 4 menu.
Key 5Proceed to Phone Notification Destination 5 menu.
Key 9Exit from mailbox.
Key #Go back to All Message Notifications Setting menu.
4.
InMail System Guide
Message Notification main menu
2 - 99
Issue 5.00
InMail plays a summary of your Message Notification settings.
D
e
s
t
1
P
h
o
n
e
E
n
b
l
D
i
s
a
i
s
b
l
b
l
d
C
h
1
2
g
e
1
2
A
M -
1
2
A
a
c
k
1
2
A
a
c
k
0
6
P
a
c
k
M
:
D
n
B
If phone number is already entered
D
e
s
t
P
1
h
o
n
e
E
n
b
l
:
D
i
s
a
b
l
d
0
1
5
0
9
6
4
3
1
0
7
D
i
s
b
l
C
h
n
g
e
↓ Dial E(3)/Press “Enbl”
D
e
s
t
P
1
h
o
n
e
E
n
b
l
:
A
M B
M
↑ Dial D(3)/Press “Disbl”
E
n
a
b
l
e
d
0
1
5
0
9
6
4
3
D
i
s
b
l
C
h
0
8
1
0
7
n
g
e
A
M B
M
4.1 Soft key Operation (3-Line Phone/Super Display Phone)
Enbl/EnableTurn destination[x] notifications on.
Disbl/DisableTurn destination[x] notifications off.
Change/ChangeGo to destination[x] notification setting menus.
Back/BackGo back to Notification Destination Selection menu.
4.2 Key Operation
Key 2Go to destination[x] notification setting menus.
Key 3Toggle destination[x] notifications on/off.
Key #Go back to Notification Destination Selection menu.
5.
N
o
t
i
Message Notification Programming (Begin Hour)
f
6.
N
o
t
i
7.
2 - 100
i
c
a
t
i
o
n
B
e
g
i
N
e
x
t
n
:
E
1
2
A
x
i
t
1
2
A
x
i
t
M
Message Notification Programming (End Hour)
f
i
c
a
t
i
o
n
E
n
d
:
N
e
x
t
E
M
Message Notification Programming (Notification Type)
Features
Issue 5.00
N
u
m b
O
u
m b
O
e
c
u
R
e
q
:
C
l
e
a
r
N
e
x
t
E
x
i
t
E
x
i
t
i
t
Message Notification Programming (Number)
e
r
K
9.
S
r
K
8.
N
e
:
C
l
e
a
r
N
e
x
t
Message Notification Programming (Security Code required)
r
i
t
y
N
o
R
C
o
e
q
d
e
N
O
p
t
e
x
t
i
o
n
E
x
9.1 Soft key Operation (3-Line Phone/Super Display Phone)
Req/RequiredTurn "Security Code Required" flag On.
NoReq/Not RequiredTurn "Security Code Required" flag Off.
Next/NextKeep current setting and proceed to Busy Attempt count
menu.
Exit/ExitKeep current setting and return to main Notification menu.
9.2 Key Operation
Key 7Turn "Security Code Required" flag On.
Key 6Turn "Security Code Required" flag Off.
Key *Keep current setting and proceed to Busy Attempt count
menu.
Key #Keep current setting and return to main Notification menu.
10.
B
u
s
y
Message Notification Programming (Busy Attempt count)
A
t
t
e
m p
t
s
:
N
e
0
5
x
t
E
x
i
t
10.1Soft key Operation (3-Line Phone/Super Display Phone)
Next/NextKeep current setting and proceed to RNA Attempt menu.
Exit/ExitKeep current setting and return to main Notification menu.
10.2Key Operation
Key 0-9Set Busy Attempt count.
InMail System Guide
2 - 101
Issue 5.00
Key *Keep current setting and proceed to RNA Attempt count
menu.
Key #Keep current setting and return to main Notification menu.
11.
Message Notification Programming (RNA Attempt count)
11.1Soft key Operation (3-Line Phone/Super Display Phone)
Next/NextKeep current setting and proceed to main Notification
menu.
Exit/ExitKeep current setting and return to main Notification menu.
11.2Key Operation
Key 0-9Set RNA Attempt count.
Key *Keep current setting and proceed to main Notification menu.
Key #Keep current setting and return to main Notification menu.
2 - 102
Features
Issue 5.00
THIS PAGE INTENTIONALLY LEFT BLANK
InMail System Guide
2 - 103
Issue 5.00
2 - 104
Features
Issue 5.00
Dial Action Table
Description
The Dial Action Table defines the dialing options for the Call Routing Mailbox chosen
by the active Answer Table, which in turn provides those dialing options to Automated
Attendant callers. InMail provides 16 Dial Action Tables. The Dial Action Table is an
integral part of the Automated Attendant. The Automated Attendant can automatically
answer the telephone system’s incoming calls, play an Instruction Menu message,
and provide dialing options to callers. There are 3 major Automated Attendant
components:
Answer Tables
The Answer Table determines how the Automated Attendant answers outside
calls on each trunk, according to the time of the day and day of the week that
the call is ringing. The Answer Table divides the time of day and day of the week
into individual schedules, which in turn assign a Call Routing Mailbox to each
call. When a specific schedule is not in effect, the Answer Table uses its Default
Mailbox to determine routing.
.
By default, all trunks use Answer Table 1. Answer Table 1 has a single schedule that runs
Monday through Friday from 8:30AM to 5:00PM.
Routing Mailbox
A Call Routing Mailbox is a mailbox associated with an individual Answer Table
schedule or the Default Mailbox. It specifies which dialing options (Dial Action
Table) are available to callers. It also provides the Instruction Menu to callers
which typically greets the callers and describes the dialing options.
.
By default, Answer Table 1 has a single schedule that runs Monday through Friday from
8:30AM to 5:00PM. This schedule and the Default Mailbox both use Call Routing
Mailbox 1.
Dial Action Table
After the Automated Attendant answers, the Dial Action Table provides the
dialing options to callers. Each digit a caller can dial is assigned a specific action
(function) in the Dial Action Table. The dial action used depends on the setting in
the active Call Routing Mailbox, which in turn depends on the Answer Table
setup.
.
InMail System Guide
By default, Call Routing Mailbox 1 uses Dial Action Table 1.
2 - 105
Issue 5.00
The following block diagram shows the default InMail Automated Attendant
configuration.
DIL to Voice Mail Master (200)
22-01-01 Incoming Call Trunk Setup
22-07-01 DIL Setup
InMail
Default
Automated Attendant Answering
Trunks Route to Answer Table 1
47-10-01 Answer Table Assignment
Answer Table 1
47-11 Answer Table Options
Schedule 1 or Default Mailbox
47-12 Answer Schedules
47-11-03 Default Mailbox
Call Routing Mailbox 1
47-08 Call Routing Mailbox Options
Dial Action Table 1
47-13 Dial Action Tables
2 - 106
All calls route to Call Routing Mailbox 1
Schedule 1 active M-F 8:30AM-5:00PM
Default Mailbox active all other times
From a System Administrator mailbox,
record an Instruction Menu (SA + I) for
the active Call Routing Mailbox.
Dial Action Table 1 Dialing Options:
Dial an extension number, or
O for the operator.
Features
Issue 5.00
Dial Action Table Options
The following table summarizes the Dial Action Table dial (key) actions and their
associated features.
Dial Action Table Key Action Summary
Feature
Reference
Action
Description
TRF
Screened Transfer (1)
Allows an Automated Attendant caller to place a Screened Transfer to an
extension. InMail calls (screens) the destination to see if the call can go through.
Screened
Transfer on
page 2-323
UTRF
Unscreened Transfer (2)
Allows an Automated Attendant caller to place an Unscreened Transfer to an
extension.InMail transfers the call the destination and then hangs up.
Unscreened
Transfer on
page 2-351
REC1
Quick Message with Greeting (3)
Allows an Automated Attendant caller to leave a Quick Message at an extension.
The caller hears the extension’s personal greeting.
Quick Message
on page 2-309
REC2
Quick Message without Greeting (4)
Allows an Automated Attendant caller to leave a Quick Message at an extension.
The caller does not hear the extension’s personal greeting
Quick Message
on page 2-309
LOGON
Log On to Voice Mail (5)
Allows an Automated Attendant caller to log on to a mailbox, either directly or
one of their choosing.
Log On to
Voice Mail on
page 2-237
Hang Up
Hang Up (6)
InMail says “Goodbye” and hangs up.
Hang Up on
page 2-191
Go to a Mailbox, (7)
Allows an Automated Attendant caller to route to another mailbox.
Go To A
Mailbox on
page 2-171
Undefined Routing (0)
This action provides no routing.
Not applicable
GOTO
UND
Related Features
Automated Attendant
The Automated Attendant can automatically answer the telephone system’s incoming
calls, play an Instruction Menu message, and provide dialing options to callers.
Answer Tables
Determines how the Automated Attendant answers outside calls on each trunk.
Routing Mailbox
The mailbox associated with an Answer Table that specifies which dialing options (Dial
Action Table) and announcement are available to Automated Attendant callers.
InMail System Guide
2 - 107
Issue 5.00
Programming
1.
Assign a Dial Action Table to each active Call Routing Mailbox.
47-08-01
Dial Action Table
The Call Routing Mailbox uses the Dial Action Table assignment to provide
dialing options to callers.
.
2.
The default Call Routing Mailboxes (1~8) use Dial Action Table 1.
Customize the Dial Action Table options.
47-13
InMail Dial Action Tables
.
The default Dial Action Table dialing options are:
Dial Action Table Default Settings
Key
Dial Action Tables 2-16
0
UTRF to 200
(Unscreened Transfer to operator)
UND
(Undefined)
1
UTRF to XXX
(Unscreened Transfer to operator)
UND
(Undefined)
2
UND
(Undefined)
UND
(Undefined)
3
UTRF to XXX
(Unscreened Transfer to user-dialed extension)
UND
(Undefined)
4
UND
(Undefined)
UND
(Undefined)
5
UND
(Undefined)
UND
(Undefined)
6
UND
(Undefined)
UND
(Undefined)
7
UND
(Undefined)
UND
(Undefined)
8
UND
(Undefined)
UND
(Undefined)
9
HNGUP
(Hangup)
UND
(Undefined)
*
REC1 to IXXX
(Quick Message with Greeting to user-dialed extension)
UND
(Undefined)
#
LOGON to IXXX
(Logon to user-dialed mailbox)
UND
(Undefined)
UTRF to 200
(Unscreened Transfer to operator)
UND
(Undefined)
Timeout
2 - 108
Dial Action Table 1
Features
Issue 5.00
3.
Set the time limit for dialing commands for the Automated Attendant caller.
47-08-03
Time Limit for Dialing Commands (Dialing Timeout)
Enter the Time Limit for Dialing Commands interval (0~5 seconds).
By default, the interval is 5 seconds.
If the caller waits too long to dial:
.
When the associated Dial Action Table has a Timeout action
programmed, the caller routes to that destination.
When the associated Dial Action Table does not have a Timeout action
programmed, the Instruction Menu repeats three times and then InMail
hangs up.
4.
If using one key dialing from Auto Attendant to a stored speed dial number.
41-01-05
Message Wait
This program must be disabled (0) for one key dialing to a speed dial buffer
from Auto Attendant to work.
.
By default, this feature is enabled.
Operation
Not applicable
InMail System Guide
2 - 109
Issue 5.00
THIS PAGE INTENTIONALLY LEFT BLANK
2 - 110
Features
Issue 5.00
Directory Dialing
Description
Directory Dialing allows an Automated Attendant caller to reach an extension by
dialing the first few letters in the extension user’s name. With Directory Dialing, the
caller does not have to remember the extension number of the person they wish to
reach – just their name. Here is how Directory Dialing works:
1.
When the Automated Attendant answers, it sends the call to a Directory Dialing
Mailbox. (Optionally, the caller may be asked to dial a digit to access Directory
Dialing.)
2.
The Directory Dialing Mailbox plays the Directory Dialing Message (recorded by
the System Administrator) which asks the caller to dial letters for the name of
the person they wish to reach.
3.
The caller dials the letters for the person’s name plus #. They can dial by first
name or last name, depending on how the Directory Dialing Message was
recorded and the Directory Dialing Mailbox was set up.
4.
InMail searches the list of programmed extension names for a match of the
caller-entered letters.
5.
Voice prompts announce the first three matches, and allow the caller to dial a
digit (1~3) to reach one of the announced matches. Additionally, the caller can
dial 4 to hear additional matches (if any).
6.
The caller dials the digit for the extension they wish to reach, and InMail sends
the call to that extension. The call is sent as a Screened or Unscreened transfer,
depending on programming.
For callers to use Directory Dialing, the system must have a name programmed for
each extension (up to 12 characters, A~Z, using upper and lower case letters). Each
extension should also have a name recorded in their Subscriber Mailbox. In addition,
each extension used by Directory Dialing must be installed and must have their
Subscriber Mailbox active.
The Directory Dialing Mailbox is a Routing Mailbox assigned as a Directory Dialing
Mailbox. See Use a Routing Mailbox for Directory Dialing on page 2-112 below or Use
a Call Routing Mailbox for Directory Dialing on page 2-115 for more information.
InMail System Guide
2 - 111
Issue 5.00
Related Features
Directory Dialing Mailbox
A Directory Dialing Mailbox is the type of mailbox required to implement Directory Dialing.
System Administrator
Only the System Administrator can record the Directory Dialing Message.
Programming
Use a Routing Mailbox for Directory Dialing
1.
Set up the Directory Dialing Mailbox.
47-07-02
Routing Mailbox Type (Mailbox Type)
Enter 4 to make the selected Routing Mailbox a Directory Dialing Mailbox.
.
2.
By default, there are no Routing Mailboxes assigned as Directory Dialing
Mailboxes.
Set up the name programming and enter names.
47-01-16
Name Format (Name Format)
Determine how extension names should be entered in 15-01-01 Extension
Name or via the telephone. The options are 0 (first name followed by last
name) or 1 (last name followed by first name).
.
15-01-01
By default, the system expects names to be entered as first name followed by last
name (0).
Extension Name (Ext Name)
Enter the name for each extension. Refer to 47-01-16 Name Format for
name format.
.
47-15-03
By default, there are no names entered.
Extension Name Match (Name Match)
Select the portion of the extension name on which the Directory Dialing
Mailbox should route. Enter 0 for first; 1 for last. This option allows for
dial-by-first-name and dial-by-last-name Directory Dialing.
For example, if 47-01-16 Name Format is 0 and the name in 15-01-01
Extension Name is entered as first name followed by last name, enter 1 in
this option to set up last name dialing.
.
2 - 112
By default, the Directory Dialing Mailbox routes on the first portion of the name
(0).
Features
Issue 5.00
3.
Set up Directory Lists to control which extensions Directory Dialing can access.
47-02-15
Directory List (Directory List)
Select the Directory List to which the extension belongs. The entries are
1~8 (for lists 1~8), 0 (for no list), or * (for all lists). Directory Dialing to the
extension can occur only if the list entry matches the setting in 47-15-02
Directory List Number to Use for the Directory Dialing Mailbox.
.
47-15-02
By default, extensions are not included in a Directory List (0).
Directory List Number to Use (Directory List)
The Directory Dialing Mailbox can route calls only to the members of the
Directory List specified in this option. The entries are 1~8 (for lists 1~8).
.
4.
By default, the Directory Dialing Mailbox uses list 1.
Specify the required number of letters of the employee name the caller must
dial.
47-15-01
Minimum Number of Letters Required (Min Num Letters)
Specify how many letters of an employee’s name the caller must dial to use
Directory Dialing. If the caller dials less than the specified minimum number
of letters, InMail cannot route the call. The entries are 1~3 (1~3 letters).
.
5.
By default, callers must dial at least 1 letter of the employee’s name (1).
Select Screened or Unscreened Transfer call routing, when Directory Dialing
finds a name match.
Unscreened Transfer
47-15-04
Unscreened or Screened Transfer (Transfer Option)
Enter 1 to route the call as an Unscreened Transfer.
.
By default, InMail routes the call as a Screened Transfer (0).
Screened Transfer
47-15-04
Unscreened or Screened Transfer (Transfer Option)
Enter 0 to route the call as a Screened Transfer.
.
47-15-05
By default, InMail routes the call as a Screened Transfer (0).
Screened Transfer Timeout (Scrn Trf Timeout)
Set how long a Screened Transfer from the Directory Dialing Mailbox will
ring an unanswered extension before recalling. The entries are 1~255
seconds or 0 for no recall.
.
6.
By default, the Screened Transfer Timeout interval is 15 seconds.
Change the amount of time Directory Dialing callers have to dial letters.
47-15-06
Time Limit for Dialing Commands (Dialing Timeout)
Enter the new timeout duration (0~99 seconds).
InMail System Guide
2 - 113
Issue 5.00
If the caller waits too long to dial, the Directory Dialing Message repeats.
.
7.
By default, Directory Dialing callers have 5 seconds to dial letters.
Record a Directory Dialing Message.
See Operation on page 2-119.
The Directory Dialing Message is the Instruction Menu for the Routing Mailbox
programmed as a Directory Dialing Mailbox.
.
By default (without a custom message recorded), the Directory Dialing Message is,
“Please enter one or more letters of the person’s name, then press the pound key.”
47-01-04
Non-Subscriber Message Length (Mbox Msg Length)
This option sets the maximum message length (1~4095 seconds) for
Instruction Menus.
.
8.
By default, this option is 120 seconds.
Enable or disable the ability of the Directory Dialing Mailbox to detect and route
incoming faxes.
47-15-07
Fax Detection (Fax Detection)
Enter 1 to enable Fax Detection; 0 to disable. If enabled, when the Directory
Dialing Mailbox detects incoming fax CNG tone, it routes the call to the fax
extension specified in 47-01-06 Fax Extension.
See Fax Detection on page 2-149 for more.
.
9.
By default, Fax Detection is disabled (N).
Enable the Directory Dialing Mailbox caller to dial 0 for other options or # to
return to the Automated Attendant.
47-15-08
Next Call Routing Mailbox (Next CR Mbox)
Assign a Next Call Routing Mailbox (1~32) to the Directory Dialing Mailbox.
To remove an assignment, press Hold.
Once assigned, dialing # returns to the Automated Attendant. Dialing 0
follows the 0 action of the Next Call Routing Mailbox.
.
10.
Enable Directory Dialing Mailbox to directly answer an outside call.
Make sure the active Answer Table uses the Call Routing Mailbox programmed
as a Directory Dialing Mailbox.
See Answer Tables on page 2-45 for more.
.
2 - 114
By default, there is no Next Call Routing Mailbox assigned.
By default, Answer Table 1 routes to Routing Mailbox 000, which is a Call Routing
Mailbox.
Features
Issue 5.00
11.
Enable callers to access Directory Dialing from a Dial Action Table action.
Make sure you have an action in the active Dial Action Table that is a GOTO to
the Directory Dialing Mailbox.
See Dial Action Table on page 2-105 for more.
.
By default, no actions are assigned as a GOTO to a Directory Dialing Mailbox.
Use a Call Routing Mailbox for Directory Dialing
1.
Set up the Directory Dialing Mailbox.
47-03-02
Call Routing Mailbox Number
Enter the mailbox number for the Call Routing Mailbox. This number must
correspond to a Department Group pilot number set up in 11-07-01
Department Group Pilot Numbers.
When using a Call Routing Mailbox as an additional resource (for example,
as an extra Directory Dialing Mailbox), you can perform the following
actions:
Assign a pilot number to an unused Department Group in 11-07-01
Department Group Pilot Numbers.
Set up the Call Routing Mailbox in 47-03 using this pilot number.
When 47-03 programming is complete, remove the pilot number
assignment in 11-07-01 Department Group Pilot Numbers.
.
47-03-03
By default, no Call Routing Mailbox numbers are assigned.
Call Routing Mailbox Type (Mailbox Type)
Enter 3 to make the selected Call Routing Mailbox a Directory Dialing
Mailbox.
.
2.
By default, all Call Routing Mailboxes are set up as Call Routing Mailboxes (1).
Set up the name programming and enter names.
47-01-16
Name Format (Name Format)
Determine how extension names should be entered in 15-01-01 Extension
Name or via the telephone. The options are 0 (first name followed by last
name) or 1 (last name followed by first name).
.
15-01-01
By default, the system expects names to be entered as first name followed by last
name (0).
Extension Name (Ext Name)
Enter the name for each extension. The format you use should follow the
setting of 47-01-16 Name Format.
.
InMail System Guide
By default, no names are entered.
2 - 115
Issue 5.00
47-14-03
Extension Name Match (Name Match)
Select the portion of the extension name on which the Directory Dialing
Mailbox should route. Enter 0 for first; 1 for last. This option allows for dialby-first-name and dial-by-last-name Directory Dialing.
For example, if 47-01-16 Name Format is 0 and the name in 15-01-01
Extension Name is entered as first name followed by last name, enter 1 in
this option to set up last name dialing.
.
3.
By default, the Directory Dialing Mailbox routes on the first portion of the name
(0).
Set up Directory Lists to control which extensions Directory Dialing can access.
47-02-15
Directory List (Directory List)
Select the Directory List to which the extension belongs. The entries are
1~8 (for lists 1~8), 0 (for no list), or * (for all lists). Directory Dialing to the
extension can occur only if the list entry matches the setting in 47-14-02
Directory List Number to Use for the Directory Dialing Mailbox.
.
47-14-02
By default, extensions are not included in a Directory List (0).
Directory List Number to Use (Directory List)
The Directory Dialing Mailbox can route calls only to the members of the
Directory List specified in this option. The entries are 1~8 (for lists 1~8).
.
4.
By default, the Directory Dialing Mailbox uses list 1.
How many letters of the employee’s name must the caller dial?
47-14-01
Minimum Number of Letters Required (Min Num Letters)
Specify how many letters of an employee’s name the caller must dial to use
Directory Dialing. If the caller dials less than the specified minimum number
of letters, InMail cannot route the call. The entries are 1~3 (1~3 letters).
.
5.
By default, callers must dial at least 1 letter of the employee’s name (1).
Specify the call routing as a Screened or Unscreened Transfer when Directory
Dialing finds a name match.
Unscreened Transfer
47-14-04
Unscreened or Screened Transfer (Transfer Option)
Enter 1 to route the call as an Unscreened Transfer.
.
By default, InMail routes the call as a Screened Transfer (0).
Screened Transfer
47-14-04
Unscreened or Screened Transfer (Transfer Option)
Enter 0 to route the call as a Screened Transfer.
.
2 - 116
By default, InMail routes the call as a Screened Transfer (0).
Features
Issue 5.00
47-14-05
Screened Transfer Timeout (Scrn Trf Timeout)
Set how long a Screened Transfer from the Directory Dialing Mailbox will
ring an unanswered extension before recalling. The entries are 1~255
seconds or 0 for no recall.
.
6.
By default, the Screened Transfer Timeout interval is 15 seconds.
To change the amount of time Directory Dialing callers have to dial letters:
47-14-06
Time Limit for Dialing Commands (Dialing Timeout)
Enter the new timeout duration (0~99 seconds).
If the caller waits too long to dial, the Directory Dialing Message repeats.
.
7.
By default, Directory Dialing callers have 5 seconds to dial letters.
To record a Directory Dialing Message:
Refer to Operation on page 2-119.
The Directory Dialing Message is the Instruction Menu for the Call Routing Mailbox programmed as a Directory Dialing Mailbox.
.
By default (without a custom message recorded), the Directory Dialing Message is,
“Please enter one or more letters of the person’s name, then press the pound key.”
47-01-04
Non-Subscriber Message Length (Mbox Msg Length)
This option sets the maximum message length (1~4095 seconds) for
Instruction Menus.
.
8.
By default, this option is 120 seconds.
Enable or disable the ability of the Directory Dialing Mailbox to detect and route
incoming faxes.
47-14-07
Fax Detection (Fax Detection)
Enter 1 to enable Fax Detection; 0 to disable. If enabled, when the Directory
Dialing Mailbox detects incoming fax CNG tone, it routes the call to the fax
extension specified in 47-01-06 Fax Extension.
See Fax Detection on page 2-149 for more.
.
9.
By default, Fax Detection is disabled (N).
Enable the Directory Dialing Mailbox caller to dial 0 for other options or # to
return to the Automated Attendant:
47-14-08
Next Call Routing Mailbox (Next CR Mbox)
Assign a Next Call Routing Mailbox (1~32) to the Directory Dialing Mailbox.
To remove an assignment, press Hold.
Once assigned, dialing # returns to the Automated Attendant. Dialing 0
follows the 0 action of the Next Call Routing Mailbox.
.
InMail System Guide
By default, there is no Next Call Routing Mailbox assigned.
2 - 117
Issue 5.00
10.
Enable the Directory Dialing Mailbox to directly answer an outside call.
Make sure the active Answer Table uses the Call Routing Mailbox programmed
as a Directory Dialing Mailbox.
See Answer Tables on page 2-45 for more.
.
11.
Enable callers to access Directory Dialing from a Dial Action Table action:
Make sure you have an action in the active Dial Action Table that is a GOTO to
the Directory Dialing Mailbox.
See Dial Action Table on page 2-105 for more.
.
2 - 118
By default, Answer Table 1 routes to Routing Mailbox 000, which is a Call Routing
Mailbox.
By default, no actions are assigned as a GOTO to a Directory Dialing Mailbox.
Features
Issue 5.00
Operation
Recording a Directory Dialing Message
Log On to System Administrator’s mailbox.
SA
(72)
Access System Administrator options.
[Not applicable]
I (4)
Select Instruction Menus.
[Instr]
Enter the Directory Dialing Mailbox number.
L (5)
Listen to the current Directory Dialing Message (if
any).
[Lstn]
#
R (7)
Exit listen mode.
Record a new Directory Dialing Message.
[Rec]
Record message.
#
0
*
Pause or restart recording.
[Resume]
[Pause]
E (3)
Erase recording.
[Cncl]
#
Exit recording mode.
[Done]
E (3)
Erase the Directory Dialing Message.
[Erase]
#
Go back to the System Administrator options.
[Exit]
Go back to the System Administrator options.
[Exit]
Plays Help message.
Using Directory Dialing
To use Directory Dialing:
1.
After the Automated Attendant answers, wait for the Directory Dialing Message.
The Automated Attendant may ask you to dial a digit for Directory Dialing.
2.
Dial the letters that correspond to the name of the person you wish to reach + #.
The Directory Dialing Message tells how many letters you need to dial, and whether you
should enter the person’s first name or last name.
To exit Directory Dialing without selecting a name, just dial #.
3.
The Automated Attendant announces the name matches, and tells you which digit to
dial (1~3) to reach each of the announced names.
To hear additional name matches (if any), dial 4 instead.
4.
InMail System Guide
After you make your selection, the Automated Attendant routes your call to the name
selected.
2 - 119
Issue 5.00
Dialing Options Available while Entering a Name
The following table shows the dialing options available to the caller while they are
entering a name into a Directory Dialing Mailbox.
By default, the caller can dial the digits 2~9 to enter the name or dial # to return
to the Automated Attendant.
If a Next Call Routing Mailbox is specified, the caller can dial the digits 2~9 to
enter a name, dial 0 to follow the 0 action of the Next Call Routing Mailbox, or
dial # to route directly to the Next Call Routing Mailbox.
Directory Dialing Mailbox Name Entry Options
(Options available while entering a name)
Dialed
Digit
Action
1
Not applicable
Entry is ignored.
2~9
Not applicable
Interprets the digit as a letter and waits about 20
seconds for additional input (i.e., more letters or a
# to conclude name entry). If no additional digits
are dialed for 10 seconds, the Directory Dialing
Message repeats and then InMail hangs up.
UND (Not assigned)
Repeats the Directory Dialing Message (to make
a new name entry) each time the caller dials the
digit.
1-32 (valid Call Routing
Mailbox)
Caller routes according to the 0 action of the Next
Call Routing Mailbox’s Dial Action Table.
*
Not applicable
Repeats the Directory Dialing Message (to make
a new name entry) each time the caller dials the
digit.
#
UND (Not assigned)
Routes to the Automated Attendant (i.e., back to
the Call Routing Mailbox that initially answered
the call).
1~32 (valid Call Routing
Mailbox)
Routes to the Next Call Routing Mailbox and
plays that mailbox Instruction Menu.
UND (Not assigned)
Repeats the Directory Dialing Message (to make
a new name entry) up to two times and then
hangs up.
0
Timeout
2 - 120
47-14-08 or 47-15-08:
Next Call Routing
Mailbox Setting
Features
Issue 5.00
Dialing Options Available for duplicate Employee Names
If the name the caller enters is used by more than one employee, InMail lets the caller
select the employee to which they want to talk. The caller can dial 1, 2 or 3 to select
the employee from the first three name matches, or dial 4 to hear additional name
matches.
By default, the caller can also dial * to make a new entry or dial # to return to the
Automated Attendant.
If a Next Call Routing Mailbox is specified, the caller can also dial * to make a new
entry, dial 0 to follow the 0 action of the Next Call Routing Mailbox, or dial # to route
directly to the Next Call Routing Mailbox.
Directory Dialing Mailbox Routing Options
(Options available after a name is entered)
Dialed
Digit
Action
1~3
Not applicable
Route to the respective extension from the list
of up to three announced matches.
4
Not applicable
If more than three matches for the entered
name are found, provides access to the next
set of three matches.
5~9
Not applicable
Plays “That is an invalid entry” and repeats the
list of announced matches each time the caller
dials the digit.
UND (Not assigned)
Plays “That is an invalid entry” and repeats the
list of announced matches each time the caller
dials the digit.
1~32 (valid Call Routing
Mailbox)
Caller routes according to the 0 action of the
Next Call Routing Mailbox’s Dial Action Table.
*
Not applicable
Repeats the Directory Dialing Message (to
make a new name entry) each time the caller
dials the digit.
#
UND (Not assigned)
Routes to the Automated Attendant (i.e., back
to the Call Routing Mailbox that initially
answered the call).
1~32 (valid Call Routing
Mailbox)
Routes to the Next Call Routing Mailbox and
plays that mailbox’s Instruction Menu.
UND (Not assigned)
Repeats the list of announced matches (up to
two times). If no response, repeats the
Directory Dialing Message (to make a new
name entry) up to three times and then hangs
up.
0
Timeout
InMail System Guide
47-14-08 or 47-15-08 Next
Call Routing
Mailbox Setting
2 - 121
Issue 5.00
THIS PAGE INTENTIONALLY LEFT BLANK
2 - 122
Features
Issue 5.00
Directory Dialing Mailbox
Description
A Directory Dialing Mailbox is the type of mailbox required to implement Directory
Dialing. A Directory Dialing Mailbox is a Routing Mailbox set as a Directory. See
Directory Dialing on page 2-111 for more on how to set up a Directory Dialing Mailbox.
Related Features
Directory Dialing
Directory Dialing allows an Automated Attendant caller to reach an extension by dialing
the first few letters in the extension user’s name.
System Administrator
Only the System Administrator can record the Directory Dialing Message.
Programming
A Directory Dialing Mailbox can be a Routing Mailbox.
1.
Assign a Routing Mailbox as a Directory Dialing Mailbox:
2.
Define a Group Mailbox as the Directory Dialing Mailbox above:
47-07-02
Routing Mailbox Type (Mailbox Type)
Enter 3 to make the selected Group Mailbox a Directory Dialing Mailbox.
.
By default, no Group Mailboxes are assigned as Directory Dialing Mailboxes.
Operation
Turn to Directory Dialing on page 2-111 for more on how to use Directory Dialing and
record a Directory Dialing Message.
InMail System Guide
2 - 123
Issue 5.00
THIS PAGE INTENTIONALLY LEFT BLANK
2 - 124
Features
Issue 5.00
Distribution List
Description
A Distribution List is a list of extensions that will receive a message you record and
send to a single Distribution Mailbox. Any message left in the Distribution Mailbox will
be automatically sent to all the mailboxes in the list. Distribution List saves time when
you need to send the same message to many co-workers. Rather than recording the
message and manually specifying a list of recipients, use a Distribution List instead.
A Distribution List can consist only of Subscriber Mailboxes. The list is managed in a
Distribution Mailbox, which is a type of Routing Mailbox that contains the actual list of
member extensions. The system allows as many Distribution Lists as there are
available Routing Mailboxes (up to 32). Each list can have up to 20 members. You
assign the Distribution Mailbox in system programming, but you can create the
Distribution List and edit the list members from either system programming or a
System Administrator’s Mailbox. The System Administrator can also record a name
for the Distribution List.
Related Features
InMail Features:
Distribution Mailbox
A Distribution Mailbox is the type of Routing Mailbox that handles Distribution List
messages.
System Administrator
The user can edit the members of a Distribution List from a System Administrator Mailbox.
The user can also record a name for the list.
Programming
1.
Assign a Routing Mailbox as a Distribution Mailbox:
47-07-02
Routing Mailbox Type (Mailbox Type)
Enter 4 to assign the selected Routing Mailbox a Distribution Mailbox.
.
InMail System Guide
By default, there are no Distribution Mailboxes assigned.
2 - 125
Issue 5.00
2.
Enter the destination extensions into the Distribution List:
47-17-01
Routing Mailbox Type (Mailbox Type)
Enter the member extensions into the Distribution List (20 members
maximum).
.
You can also edit the Distribution List from a System Administrator Mailbox.
Operation
Recording and Sending a Message to a Distribution List
To record and send a message to a Distribution List:
1.
Log onto the Subscriber Mailbox.
2.
[Rec]
3.
Record your message.
4.
5.
2 - 126
Select Record and Send a Message.
• Alternately dial RS(77).
[Pause]
Pause recording.
• Alternately dial * to pause.
[Resume]
Resume recording if paused.
• Alternately dial * to resume.
[Cncl]
Cancel recording.
• Alternately dial E(3) to cancel (erase) a recording.
[Done]
End (accept) the recording.
• Alternately dial # to accept the recording.
Dial the Distribution Mailbox number.
[Exit]
[Cont]
Send the message to the selected Distribution List.
• Alternately dial # to send the recording.
[Mbox]
Back up and reenter the Distribution Mailbox number.
• Alternately dial * to back up and reenter.
[Exit]
Return to the Main Menu without sending the
message.
Return to the Main Menu after sending the message to the Distribution
List.
• Alternately dial # to return to the Main Menu.
Features
Issue 5.00
Editing a Distribution List and Recording a Name
To edit a Distribution List and record a name:
1.
Log onto a System Administrator’s Mailbox.
2.
[Mgr]
Select the System Administrator features.
• Alternately dial SA (72).
3.
[DList]
Select Distribution List editing. This is the Distribution List Menu.
• Alternately dial L (5).
4.
Enter the number of the Distribution List you want to edit (e.g., 008).
[Back]
5.
Return to the System Administrator Menu without selecting a list.
• Alternately dial #.
Select one of the following.
[Modfy]
a.
[Modfy] Select to edit the Distribution List member list. (This is the List
Modify Menu.)
• Alternately dial M (6).
[Add]
[RcNam]
b.
Select to add an extension to the list.
• Alternately dial A (2).
• The extension you add is inserted at the current position
in the list.
[OK]
Select to accept the entry and return to the List
Modify Menu.
• Alternately dial #.
[Clear]
[Clear] Select to reenter the mailbox number.
• Alternately dial *.
[Back]
Select to exit to the List Modify Menu.
• Alternately dial *.
[Del]
[Del] Select to remove the currently displayed extension
from the list.
• Alternately dial E (3).
[Next]
Select to go to the next extension in the list without making
any changes.
• Alternately dial N (6).
[Back]
[Back] Select to exit the list.
• Alternately dial #.
[RcNam] Select to record a name for the Distribution List. (This is the
Record Name Menu).
• Alternately dial RN (76).
[Back]
Select to listen to the recorded name (if any).
• Alternately dial L (5).
[Rec]
Select to record a new name.
• Alternately dial R (7).
[Cncl]
InMail System Guide
Select to cancel without recording and go back to
the Record Name menu.
2 - 127
Issue 5.00
Editing a Distribution List and Recording a Name (Continued)
[Done]
[Back]
2 - 128
Select to accept the recorded name and go back
to the Record Name Menu.
• Alternately dial #.
[Del]
[Del] Select to erase the recorded name.
• Alternately dial E (3).
[Back]
[Back] Select to exit to the Distribution List Menu.
• Alternately dial #.
Select to exit to the System Administrator Menu.
• Alternately dial #.
Features
Issue 5.00
Email Notification
Receive an email notification when a new message is left in your mailbox.
• Email Notification requires software version 03.10 or higher and a Memory Expansion Daughter Board .
Description
Email Notification automatically sends an email notification when a Subscriber Mailbox
receives a new message. The email can optionally include the recorded message as a
wav file attachment. To hear the message, the email recipient double-clicks the wav
attachment to have the message play in their wav player (such as Windows Media
Player).
Email Notification uses SMTP (Simple Mail Transfer Protocol) to deliver messages to the
recipient’s email account. Email Notification does not provide synchronization - the email
account and the voice mailbox operate independently. For example, deleting the voice
mail message does not automatically delete the email and visa-versa.
If Email Notification tries to deliver an email and it doesn’t go through because of a
connection problem (i.e., no connection or a dropped connection), it will retry every 15
minutes for 24 hours. If the email still can’t go through, Email Notification cancels the
delivery. Email deliveries that fail because authentication fails or the encryption mode is
incorrect are immediately cancelled.
InMail System Guide
2 - 129
Issue 5.00
Collecting the Email Notification Data
In order for the installation site’s SV8100 to send email notifications, it must have a valid
SMTP email account assigned. To save time during programming, use the following table
to help collect the system’s email account information. The email account provider can
supply this information. See Programming in this feature for more.
SV8100 Email Account Information
Item
Description
SMTP Email Account
The email account that will handle notifications sent from
the SV8100 (e.g., [email protected])
SMTP Server Name
The SMTP server (email provider) that will handle
email for the SMTP email account. The SMTP server
name is typically similar to smtp.emailserver.com.
SMTP Port Number
The port the SMTP server uses for SMTP delivery.
SMTP Encryption
Determines whether or not the SMTP server accepts
plain text (unencrypted) or encrypted email (Yes or No).
SMTP Authentication
Enter Yes if the SMTP server requires the SMTP
Email Account’s user name and password each
time the system logs on. Otherwise, enter No.
SMTP User Name
In the SMTP Email Account, this is normally the
yourname portion of [email protected].
SMTP Password
This is the password for the account specified in
SMTP Email Account above.
Email Reply To
If a notification recipient replies to a notification
email, this is the address to which the reply is
sent.
2 - 130
System’s Email Account Data
Features
Issue 5.00
An Explanation of the Message Sender (From) Field
Like any other email client, Email Notification uses the From field to identify
the person that left the message being delivered. In the email message, the
data in the From field is formatted as Name [Reply To], where:
Name identifies the person that left the message.
Reply To1 is the email address used when the email recipient replies to the
message.
- This information is not provided in the recipient’s inbox - just the
actual email message.
For messages left by Intercom callers:
Name is:
- The extension name (if programmed) or,
- The extension number (if there is no name programmed).
Reply To1 is:
- The email address of the person that left the message (if programmed)
or,
- The Reply To Email Address data from program 47-18-09 or,
- The Send From Email Address data from program 47-18-09.
For messages left by outside callers:
Name is always the text “Outside Caller.”
Reply To1 is:
- The Reply To Email Address data from program 47-18-09 or,
- The Send From Email Address data from program 47-18-09.
1.The recipient’s inbox only shows the Name portion of the From field. The Reply To portion is not included.
InMail System Guide
2 - 131
Issue 5.00
Email from Intercom Caller with Programmed Name
When a voice message is left from an extension with a programmed name,
Outlook 2007 shows the following:
Inbox
From - The programmed name for the extension that left the message.
Subject - The text “Voice Message from” followed by the extension name,
followed by the message duration.
Received - The date and time the message was received.
Size - The message size, which includes the size of the wav file attachment.
Message Body
From - The name programmed for the extension that left the message, followed by the programmed Reply To information.
Sent - The date and time the message was sent from the installation site’s
SMTP email server.
Subject - The same subject information shown in the inbox.
Message - The wav file attachment name and the attachment size. In the
example below,
- UBD Sales Support is the name of the extension that left the message.
- 07-16-07 is the date the message was left.
- 16h16 is the time the attachment was created (e.g., 4:16 PM).
Body text - Includes the date and time the voice message was received
and the message length.
2 - 132
Features
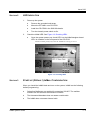
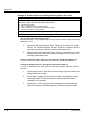
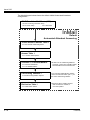
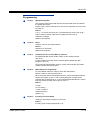
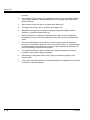
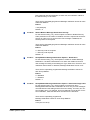
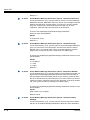
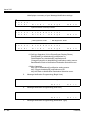
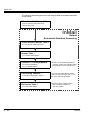
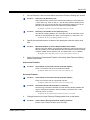
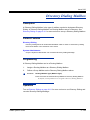
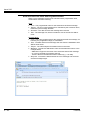
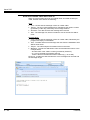
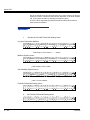
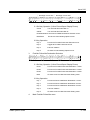
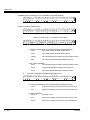
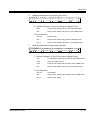
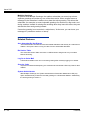
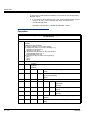
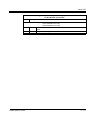
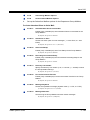
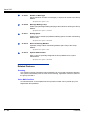
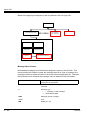
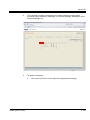
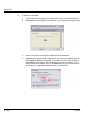
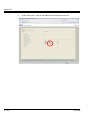
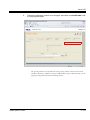
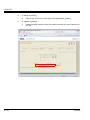
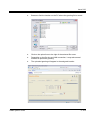
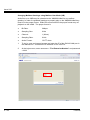
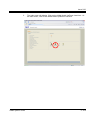
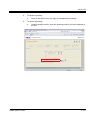
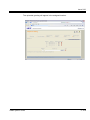
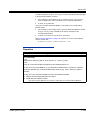
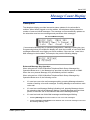
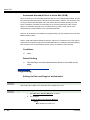
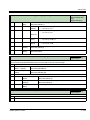
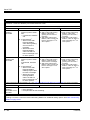
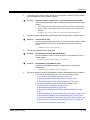
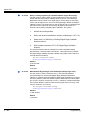
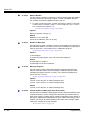
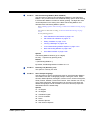
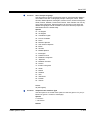
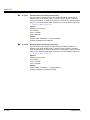
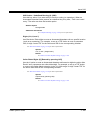
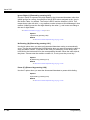
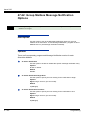
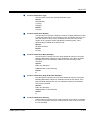
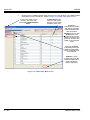
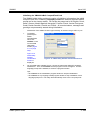
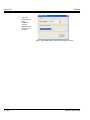
Issue 5.00
Email from Intercom Caller without Extension Name
When a voice message is left from an extension without a programmed name,
Email Notification substitutes the extension number for the name. In this
example, Outlook 2007 shows the following:
Inbox
From - The number of the extension that left the message.
Subject - The text “Voice Message from” followed by the extension number, followed by the message duration.
Received - The date and time the message was received.
Size - The message size, which includes the size of the wav file attachment.
Message Body
From - The number of the extension that left the message, followed by the
programmed Reply To information.
Sent - The date and time the message was sent from the installation site’s
SMTP email server.
Subject - The same subject information shown in the inbox.
Message - The wav file attachment name and the attachment size. In the
example below,
- Extension 302 is the number of the extension that left the message.
- 07-17-07 is the date the message was left.
- 10h17 is the time the attachment was created (e.g., 10:17 AM).
Body text - Includes the date and time the voice message was received
and the message length.
InMail System Guide
2 - 133
Issue 5.00
Email from Outside Caller with Caller ID
When a voice message is left by an outside caller and Caller ID was provided, Outlook 2007 shows the following:
Inbox
From - Shows that the message is from an outside caller.
Subject - The text “Voice Message from” followed by the caller’s number
(provided by Caller ID), followed by the message duration.
Received - The date and time the message was received.
Size - The message size, which includes the size of the wav file attachment.
Message Body
From - Shows that the message is from an outside caller, followed by the
programmed Reply To information.
Sent - The date and time the message was sent from the installation site’s
SMTP email server.
Subject - The same subject information shown in the inbox.
Message - The wav file attachment name and the attachment size. In the
example below,
- 203-926-5401 is the caller’s number (provided by Caller ID).
- 07-17-07 is the date the message was left.
- 10h42 is the time the attachment was created (e.g., 10:42 AM).
Body text - Includes the date and time the voice message was received and
the message length.
2 - 134
Features
Issue 5.00
Email from Outside Caller without Caller ID
When a voice message is left by an outside caller and Caller ID was not provided, Email Notification substitutes “Outside Caller” for the number. Outlook
2007 shows the following:
Inbox
From - Shows that the message is from an outside caller.
Subject - The text “Voice Message from” followed by “Outside Caller”, followed by the message duration.
Received - The date and time the message was received.
Size - The message size, which includes the size of the wav file attachment.
Message Body
From - Shows that the message is from an outside caller, followed by the
programmed Reply To information.
Sent - The date and time the message was sent from the installation site’s
SMTP email server.
Subject - The same subject information shown in the inbox.
Message - The wav file attachment name and the attachment size. In the
example below,
- Outside Caller (since there is no Caller ID number).
- 07-17-07 is the date the message was left.
- 10h55 is the time the attachment was created (e.g., 10:55 AM).
Body text - Includes the date and time the voice message was received
and the message length.
POP3 Login
InMail Email Notification supports POP3 Login. The logic of this method is
that it allows a user to send e-mail from any location, as long as they can
InMail System Guide
2 - 135
Issue 5.00
demonstrably also fetch their mail from the same place. Check with your
email provider to see if this type of login is required
Related Features
None
Programming
Some Common SMTP Settings
Common Email Notification SMTP Server Settings1
Provider
1
1
Server Name and Account
(47-18-02, 08)
SMTP Port
(47-18-03)
Encryption
(47-18-04)
Authentication
(47-18-05, 06, 07))
Yahoo
smtp.mail.yahoo.com
465
Yes
Yes
6/28/07
Requires POP
Yahoo! Mail Plus
GMail
smtp.gmail.com
465
Yes
Yes
6/28/07
-
Optimum
Online
mail.optonline.net
587
Yes
Yes
6/28/07
-
AOL
smtp.aol.com
587
Yes
Yes
6/28/07
-
Updated
Comments
Always check with your provider for the latest settings.
2 - 136
Features
Issue 5.00
Setting Up the System SMTP Options
1.
Enable SMTP Email Delivery System Wide.
1. 47-18-01: ENABLE SMTP
Enter 1 to enable SMTP email delivery system-wide.
3 By default, SMTP email delivery is disabled (0).
2. 47-18-08: SMTP EMAIL ADDRESS
Specify the email account that the SMTP server will use to process
email sent from the SV8100 (e.g., [email protected]).
3 By default, there is no entry for this option.
2.
Specify the site’s SMTP server name and port.
1. 90-11-11: DNS PRIMARY ADDRESS
Enter the IP address of primary Domain Name Server (DNS).
- The DNS (or name server) is the computer connected to the
internet that converts a domain name (such as
necSV8100.com) to a specific IP address for routing on the
internet. If you want to use a domain name to identify your
SMTP server in the following option, you must make an entry
for this option. The entry is the IP address of your name server.
3 By default, there is no entry for this option.
2. 90-11-12: DNS SECONDARY ADDRESS
Enter the IP address of secondary Domain Name Server (if any).
3 By default, there is no entry for this option.
3. 47-18-02: SMTP SERVER NAME
Enter the name of the SMTP server that will handle email delivery for
the installation site. The SMTP server name is typically similar to
smtp.emailserver.com.
- If you didn’t make a name server entry in the previous entry, you
must enter your SMTP server’s IP address in this option (not its
name).
3 By default, there is no entry for this option.
4. 47-18-03: SMTP PORT NUMBER
Enter the port (logical connection) the installation site’s email server
uses for SMTP. See Some Common SMTP Settings above for some
typical examples.
3 By default, SMTP uses port 25.
3.
Does the site’s SMTP email server require encryption?
1. If yes:
47-18-04: SMTP ENCRYPTION
Enter 1.
- The system negotiates “behind the scenes” to determine if
encryption should be TLS or SSL, and then adjusts accordingly.
3 By default, this option is disabled (0).
2. If no:
InMail System Guide
2 - 137
Issue 5.00
47-18-04: SMTP ENCRYPTION
Enter 0.
- If encryption is disabled, all messaging is in plain text.
3 By default, this option is disabled (0).
4.
Does the site’s SMTP email server require account authentication?
1. If yes:
47-18-05: SMTP AUTHENTICATION
To enable SMTP Authentication, enter 1.
To enable POP3 Authentication, enter 2. For more, turn to SETTING UP
POP3 LOGIN
3 By default, this option is disabled (0).
47-18-06: SMTP USERNAME
Enter the user name of the account on the SMTP server that will process the email sent from the SV8100. For example, if the subscriber’s
email address is [email protected], the User Name entry
would be yourname. Email Notification delivers all outbound email to
this account.
3 By default, there is no entry for this option.
47-18-07: SMTP PASSWORD
Enter the password for the account specified in the previous option.
When SMTP authentication is enabled, this password is required to
log onto the email account.
3 By default, there is no entry for this option.
2. If no:
47-18-05: SMTP AUTHENTICATION
Enter 0.
3 By default, this option is disabled (0).
5.
Enter the email reply data (i.e., the email account to which replies should be sent).
1. 47-18-09: SMTP REPLY-TO ADDRESS
Enter the email reply name.
- This is a required entry.
- Typically, this is the email account that handles inquiries and
administration for the installation site.
3 By default, there is no entry for this option.
2 - 138
Features
Issue 5.00
Setting Up POP3 Login
1.
Does the site’s SMTP email server require POP3 Login?
1. If yes:
47-18-05: SMTP AUTHENTICATION
To enable POP3 Authentication, enter 2.
3 By default, this option is disabled (0).
47-19-01: POP3 SERVER NAME
Enter the name of the POP3 server that will handle email delivery for
the installation site. The POP3 server name is typically similar to
pop.emailserver.com.
- If you didn’t make an entry in the 90-11-11 and 90-11-12
Domain Name options, this entry must be the IP address of the
POP3 server since there is no way to resolve a name.
3 By default, there is no entry for this option.
47-19-02: POP3 PORT NUMBER
Specify the port (logical connection) the installation site’s email server
uses for POP3. Normally, this is port 110.
3 By default, this option is 110.
47-19-03: POP3 ENCRYPTION METHOD
Enable or disable POP3 SSL encryption for the site's email server.
The option you choose depends on the requirements of the POP3 email
server.
3 By default, this option is disabled (0).
47-19-04: POP3 USERNAME
Enter the POP3 account’s user name. If the subscriber’s email
address is [email protected], the username would normally be yourname.
3 By default, there is no entry for this option.
47-19-05: POP3 PASSWORD
Enter the password for the account specified in the previous option.
When authentication is enabled, this password is required to log onto
the email account.
3 By default, there is no entry for this option.
2. If no:
47-18-05: SMTP AUTHENTICATION
To disable POP3 Authentication, enter either 0 (Authentication disabled) or 1 (SMTP Authentication enabled).
3 By default, this option is disabled (0).
InMail System Guide
2 - 139
Issue 5.00
Setting Up the Subscriber Mailbox Options
1.
Should email notification occur for new voice mail messages left in the Subscriber Mailbox?
1. If yes:
47-02-20: ENABLE EMAIL
Enter 1 (Yes).
- The subscriber can also do this from their Mailbox Options
Menu.
3 By default, this option is disabled (0).
47-02-21: EMAIL ADDRESS
Specify the email address to which the notification for this Subscriber
Mailbox should be delivered.
- If the voice message should be included in the email as a wav
file attachment, in 47-02-22: MESSAGE AS ATTACHMENT enter 1 (Yes). If
not, enter 0 (No).
3 By default, there is no entry for this option.
2. If no:
47-02-20: ENABLE EMAIL
Enter 0 (No).
- The subscriber can also do this from their Mailbox Options
Menu.
3 By default, this option is disabled (0).
Setting Up the Group Subscriber Mailbox Options
1.
Should email notification occur for new voice mail messages left in a Group Subscriber
Mailbox?
1. If yes:
47-06-18: ENABLE EMAIL
Enter 1 (Yes).
- The subscriber can also do this from their Mailbox Options
Menu.
3 By default, this option is disabled (0).
47-06-19: EMAIL ADDRESS
Specify the email address to which the notification should be delivered.
- If the voice message should be included in the email as a wav
file attachment, in 47-06-20: MESSAGE AS ATTACHMENT enter 1 (Yes). If
not, enter 0 (No).
3 By default, there is no entry for this option.
2. If no:
47-06-18: ENABLE EMAIL
Enter 0 (No).
- The subscriber can also do this from their Mailbox Options
Menu.
3 By default, this option is disabled (0).
2 - 140
Features
Issue 5.00
Operation
Turn Email Notification On or Off
In these instructions:
[Super Display Soft Key]
[Keyset Soft Key]
To turn email notification on or off:
1.
Log onto Subscriber Mailbox.
2.
[Mbox Options]
[Optns]
Select Mailbox Options.
• Alternately dial OP (67).
3.
[Notification]
[Notfy]
Select Notification.
• Alternately dial N (6).
4.
[Email]
[Email]
Select Email.
• Alternately dial E (6).
5.
Do one of the following.
a.
[On]
[On]
Select to turn email notification on.
• Alternately dial O (6)
b.
[Off]
[Off]
Select to turn email notification off.
• Alternately dial O (6)
c.
[Back]
[Backl]
Select to exit without making any changes.
• Alternately dial #.
InMail System Guide
2 - 141
Issue 5.00
2 - 142
Features
Issue 5.00
Erasing All Messages
Description
The System Administrator can delete all messages in a Subscriber Mailbox. Erasing
All Messages is an administrator’s maintenance tool. The administrator may need to
use this tool if an employee has left the company or has an excessive number of
messages stored in their mailbox. By deleting the unwanted messages, the
administrator can prevent the InMail recording capacity from being reached (which
would disable many of the InMail messaging features).
Related Features
Message Delete
A Subscriber Mailbox user can delete any message left in their mailbox.
System Administrator
Only the System Administrator can delete messages in a coworker’s mailbox.
Programming
No additional programming required.
InMail System Guide
2 - 143
Issue 5.00
Operation
Erasing All Messages System-Wide
Log On to System Administrator’s mailbox.
SA
(72)
Access System Administrator options.
[Not applicable]
S (7)
Select Subscriber Mailbox Maintenance options.
[Subs]
Enter the number of the Subscriber Mailbox you want to maintain.
0
2 - 144
EA
(32)
Erase all Subscriber Mailbox messages.
[Msgs]
#
Go back to System Administrator options.
[Exit]
Plays Help message.
Features
Issue 5.00
Exiting a Mailbox
Description
A Subscriber Mailbox user can exit their mailbox by dialing a code, pressing a soft key
or by hanging up. After exiting, the subscriber can use their extension for normal call
processing.
Related Features
Not applicable
Programming
No additional programming required.
Operation
Exiting a Mailbox
To exit your mailbox:
Log On to Subscriber Mailbox.
XX
(99)
Exit your mailbox.
[Exit] + [Exit]
To exit and immediately return to your mailbox:
Log On to Subscriber Mailbox.
X#
(9#)
0
InMail System Guide
Exit and return to your mailbox.
[Exit] + [Return]
Plays Help message
2 - 145
Issue 5.00
THIS PAGE INTENTIONALLY LEFT BLANK
2 - 146
Features
Issue 5.00
External Transfer
Description
External Transfer allows an Automated Attendant caller to automatically route to an
outside telephone number. To set this up, assign a Dial Action Table action as a UTRF
to a Common Abbreviated Dialing bin (e.g., 813000 + Pause for common bin 000).
When the Automated Attendant answers, the caller dials the digit and InMail
automatically routes them to the outside number contained in the bin. External
Transfer allows your callers to easily reach branch offices and important off-site
associates.
Related Features
Dial Action Table
External Transfer uses the active Dial Action Table to route an Automated Attendant caller
to an outside telephone number.
Programming
1.
Assign a Dial Action Table to each active Call Routing Mailbox.
47-08-01
Dial Action Table (Dial Action Table)
The Call Routing Mailbox uses the Dial Action Table assignment to provide
dialing options to callers.
.
2.
The default Call Routing Mailboxes (1~8) use Dial Action Table 1.
For an available key, set up a UTRF Dial Action Table option for External
Transfer.
47-13-01
Dial Action Table Actions: UTRF Action - Unscreened Transfer (2)
(UTRF)
The corresponding Number option should be 813 followed by the Common
Abbreviated Dialing bin, followed by two pauses (each pause entered by
pressing LK4).
Add additional pauses if the entire common bin does not dial out.
For example, to have External Transfer dial common bin 000, enter 813000
LK4 LK4.
.
InMail System Guide
This ability is not assigned by default.
2 - 147
Issue 5.00
3.
Program the Common Abbreviated Dialing bin for External Transfer.
13-04-01
Abbreviated Dialing Number and Name or Service Code 813
The bin should contain just the outside telephone number you want External
Transfer to dial.
Refer to the SV8100 Programming Manual for more.
.
4.
No common Abbreviated Dialing numbers are stored by default.
Enable Loop Supervision for the trunks you are going to use for External
Transfer.
14-01-13
Basic Trunk Data Setup - Loop Supervision
Enter 1 to enable Trunk to Trunk Transfer for each trunk to be used for
External Transfer.
.
5.
By default, this option is enabled for all trunks.
Enable Trunk-to-Trunk Transfer for all InMail extensions.
20-11-14
Class of Service Options (Hold/Transfer Service) - Trunk-to-Trunk
Transfer
For each InMail extension to be used for External Transfer, enter 0 to
enable Trunk-to-Trunk Transfer. (Entering 1 disables Trunk-to-Trunk
Transfer).
.
20-06-01
By default, Trunk-to-Trunk Transfer is enabled (0) for all InMail extensions.
Class of Service for Extensions
Assign Class of Service to extensions (1~15).
Operation
Operation is automatic once set up in programming.
2 - 148
Features
Issue 5.00
Fax Detection
Description
The Automated Attendant can detect incoming fax calls and transfer them to a fax
machine. With Fax Detection enabled, after the Automated Attendant answers a call it
listens for incoming fax CNG tone. If it detects the tone, it does an unscreened
transfer of the call to the specified company fax machine. The incoming fax then prints
out on the company fax machine. If you disable Fax Detection, the Automated
Attendant does not detect and route incoming fax calls.
Related Features
None
Programming
1.
Enable Fax Detection for the active Call Routing Mailbox.
47-08-04
Fax Detection
Enter 1 (Yes) to enable Fax Detection for the Call Routing Mailbox.
.
2.
By default, this option is 0 (No).
Specify the extension to which InMail should send a fax call when the
Automated Attendant detects fax CNG tone.
47-08-05
Fax Extension (Fax Extension)
Normally, this is the extension number of the analog port to which the fax
machine is connected.
.
By default, this option is undefined (entered by pressing Hold).
Operation
Not applicable
InMail System Guide
2 - 149
Issue 5.00
THIS PAGE INTENTIONALLY LEFT BLANK
2 - 150
Features
Issue 5.00
Find Me Follow Me
Description
Find-Me Follow-Me helps an Automated Attendant caller locate an extension user
who is not at their desk. If their call is unanswered and is picked up by voice mail, the
caller has the option of dialing a digit to try up to three alternate Find-Me Follow-Me
destinations. A destination can be an outside number (such as a cell phone or home
office) or a co-worker's extension.
The Find-Me Follow-Me destinations are set up in the Find-Me Follow-Me schedule.
Each of the three schedule entries can be individually enabled or disabled and
provides options for Start Hour, End Hour, and destination number. If the caller
chooses the Find-Me Follow-Me option, the system will try each enabled entry that is
active for the current time (i.e., in-schedule). The system will not try any entries that
are disabled or are not in-schedule.
When trying the destinations, Find-Me Follow-Me skips an active, in-schedule number
that is busy, in DND, or is unanswered. When all active in-schedule destinations have
been tried the caller can then choose to try Find-Me Follow-Me again or select
another option.
You can set up Find-Me Follow-Me for an extension in system programming. In
addition, an extension user can set up Find-Me Follow-Me from their Mailbox Options.
Service Conditions
Main Software is version 4.00 or greater is required to support this feature.
The features requires the SV8100 R4 Enhancment license (0033).
The InMail language prompts installed on the CF must be version 2.10 or
greater. The VM8000 InMail Utility is used to update the installed language
prompts.
Find Me Follow Me settings can be changed using the Telephone Mailbox
Option Interface only.
Find Me Follow Me can be used for standard subscriber mailboxes and Group
Mailboxes set to subscriber in PRG 47-03-03.
Find-Me Follow-Me requires that Tandem Trunking be enabled on the line that
rings into the Automated Attendant. If Tandem Trunking is not enabled, the FindMe Follow-Me options are not available.
InMail System Guide
2 - 151
Issue 5.00
Related Features
Automated Attendant
The Automated Attendant can automatically answer the telephone system’s incoming
calls, play an Instruction Menu message, and provide dialing options to callers.
Routing Mailbox
The mailbox associated with an Answer Table that specifies which dialing options (Dial
Action Table) and announcements are available to Automated Attendant callers.
Dial Action Table
Defines the dialing options for the Call Routing Mailbox chosen by the active Answer
Table.
Park and Page/Auto Attendant Direct to Voice Mail
Defines the park and page and auto attendant do not disturb settings.
Programming
1.
Determine which Answer Table answers each trunk.
47-10-01
Answer Table Assignment (Answer Table)
For each trunk, enter the number of the Answer Table that handles that
trunk’s Automated Attendant calls. See Answer Tables on page 2-45.
.
By default, all trunks use Answer Table 1.
14-01-13: Basic Trunk Data Setup - Trunk-to-Trunk Transfer
Use this option to enable or disable loop supervision for the trunk. For each
trunk that should be able to participate in a tandem call, enter 1.
20-11-14: Class of Service Options (Hold/Transfer Service) - Trunk-to-Trunk
Transfer
Use this option to turn off or on the Trunk-to-Trunk Transfer Restriction
option. If enabled, trunk-to-trunk transfer is not possible.
20-11-21: Class of Service Options (Hold/Transfer Service) - Restriction for
Tandem Trunking on Hang Up
Use this option to allow or deny an extension user's ability to set up a
tandem/conference call automatically when they hang up.
2 - 152
Features
Issue 5.00
47-02-24: IntraMail Station Mailbox Options - All Find-Me Follow-Me Enabled
47-06-22: Group Subscriber Mailbox Options - All Find-Me Follow-Me Enabled
Use these option to enable or disable Find-Me Follow-Me for the extension.
If disabled, enabling the individual notification entries has no effect.
47-21-01: Station Mailbox Find-Me Follow-Me Options - Find-Me Follow-Me
47-23-01: Group Mailbox Find-Me Follow-Me Options - Find-Me Follow-Me
For the selected entry (1-3), use this option to enable or disable Find-Me
Follow-Me. If enabled, Find-Me Follow-Me will occur according to the
settings for Start Hour, End Hour, and Find-Me Follow-Me Phone Number. If
disabled, Find-Me Follow-Me will not occur.
There are three separately-programmed Find-Me Follow-Me entries for
each Subscriber Mailbox.
47-21-02: Station Mailbox Find-Me Follow-Me Options - Find-Me Follow-Me Begin
Hour
47-23-02: Group Mailbox Find-Me Follow-Me Options - Find-Me Follow-Me Begin
Hour
For the selected entry (1-3), use this option to set the hour when Find-Me
Follow-Me will start. Find-Me Follow-Me will occur only between this setting
and the End Hour setting. This entry is in 24-hour mode. For example, 08 is
8:00 AM and 20 is 8:00 PM. For 24-hour Find-Me Follow-Me, make the
Start Hour the same as the End Hour.
There are three separately-programmed Find-Me Follow-Me entries for
each Subscriber Mailbox.
47-21-03: Station Mailbox Find-Me Follow-Me Options - Find-Me Follow-Me End
Hour
47-23-03: Group Mailbox Find-Me Follow-Me Options - Find-Me Follow-Me End
Hour
For the selected entry (1-3), use this option to set the hour when Find-Me
Follow-Me will end. Find-Me Follow-Me will occur only between this the
Start Hour and this setting. This entry is in 24-hour mode. For example, 08
is 8:00 AM and 20 is 8:00 PM. For 24-hour Find-Me Follow-Me, make the
Start Hour the same as the End Hour.
There are three separately-programmed Find-Me Follow-Me entries for
each Subscriber Mailbox.
47-20-05: Station Mailbox Find-Me Follow-Me Options - Find-me Follow-me
Number
47-22-05: Group Mailbox Find-Me Follow-Me Options - Find-me Follow-me
Number
For the selected entry (1-3), use this option to set the telephone number (16
digits maximum) Find Me Follow Me will dial. Enter the number exactly as
you want the system to dial it (including a leading 1 for toll calls, if required),
InMail System Guide
2 - 153
Issue 5.00
but do not include a line access code (such as 9). If the number you enter is
extension number, it will be an Intercom call. Otherwise, it will be an outside
call. (The system decides by referring its numbering plan.)
There are three separately-programmed Find Me Follow Me entries for
each Subscriber Mailbox.
Operation
1.
Access the Find-Me Follow-Me Setting menu.
Log onto Subscriber Mailbox.
V
M
m a
s g
L s
i
s
t
l
N
n
e
G
M
w :
r e
a
e
i
0
t
l
b
o
R
x
S
e
:
a
c
3
v
0
e
1
d
:
M o
0
r
e
>
M o
r
e
>
n
a
B
s
b
a
l
c
e
k
d
O
f
f
B
a
c
O
f
f
B
a
c
↓ Dial OP(67) / Press "More >" → "Optns"
Mailbox Options menu.
C
o
n
f
S
e
c
i
g
u
r
e
N
o
t
f
M b
o
x
3
0
y
C
a
l
l
H
n
F
O p
g :
M F
t
D
M
w
-
M e
D
e
s
w
-
M e
D
e
s
1
↓ Dial CO(26) / Press "CallH"
Call Handling Options menu.
C
D
a
V
D
l
l
M : O
V M
H
f
a
f
P
n
a
d
g
l
P
i
i
a
n
n
g
g
g
i
l
o
i
i
o
s
↓ Dial 1 / Press "FMFM"
Find-Me Follow-Me Setting menu.
F
i
2.
F
2 - 154
n
d
O
n
-
M e
O
F
o
f
f
l
:
t
k
All Find-Me Follow-Me Setting menu
i
n
d
O
n
-
M e
O
F
o
f
f
l
l
o
t
:
k
Features
Issue 5.00
↓ Dial O(6) / Press "On" ↑ Dial O(6) / Press "Off"
F
i
n
d
O
n
-
M e
O
F
o
f
f
l
l
o
w -
M e
D
s
e
:
t
O
n
B
a
c
k
2.1 Soft key Operation (3-Line Phone/Super Display Phone)
On/On
Turn All Find-Me Follow-Me on.
Off/Off
Turn All Find-Me Follow-Me off.
Dest/Destinations Proceed to FMFM Destination Selection menu.
Back/Back
Go back to Call Handling Options menu.
2.2 Key Operation
3.
F
Key 3
Proceed to Find-Me Follow-Me Selection menu.
Key 6
Toggle All Find-Me Follow-Me on/off.
Key 9
Exit from mailbox.
Key #
Go back to Call Handling Options menu.
Find-Me Follow-Me Destination Selection
i
n
d
O
n
-
M e
O
F
o
f
f
l
l
o
w -
M e
D
s
e
t
:
O
n
B
a
c
k
3.1 Soft key Operation (3-Line Phone/Super Display Phone)
Dest1
Proceed to Find-Me Follow-Me Destination 1 menu.
Dest2
Proceed to Find-Me Follow-Me Destination 2 menu.
Dest3
Proceed to Find-Me Follow-Me Destination 3 menu.
Back
Go back to All Find-Me Follow-Me Setting menu.
3.2 Key Operation
4.
InMail System Guide
Key 1
Proceed to Phone Notification Destination 1 menu.
Key 2
Proceed to Phone Notification Destination 2 menu.
Key 3
Proceed to Phone Notification Destination 3 menu.
Key 9
Exit from mailbox.
Key #
Go back to All Find-Me Follow-Me Setting menu.
Main Find-Me Follow-Me menu
2 - 155
Issue 5.00
IntraMail plays a summary of your Find-Me Follow-Me settings.
D
P
e
h
E
s
o
n
t
n
b
e
l
1
:
D
D
i
s
a
i
s
b
l
i
3
s
s
9
b
a
2
l
b
l
d
C
h
l
5
C
d
4
h
1
2
n
g
e
0
0
g
8
0
n
A
M -
1
2
A
B
a
c
k
M -
0
6
P
B
a
c
k
M
If phone number already exists
D
P
e
h
E
s
o
n
t
n
b
e
l
1
:
2
D
D
0
i
b
6
A
e
M
↓ Dial E(3) / Press "Enbl" ↑ Dial D(3) / Press "Disbl"
D
P
e
h
E
s
o
n
t
n
b
e
l
1
:
2
D
E
0
i
n
3
s
a
9
b
b
2
l
l
6
e
5
C
d
4
h
0
n
0
0
g
8
A
e
M -
0
6
P
B
a
c
k
M
4.1 Soft key Operation (3-Line Phone/Super Display Phone)
Enbl
Turn destination[x] Find-Me Follow-Me on.
Disbl
Turn destination[x] Find-Me Follow-Me off.
Chnge
Go to destination[x] Find-Me Follow-Me setting menus.
Back
Go back to FMFM Destination Selection menu.
4.2 4.2 Key Operation
5.
F
Key 2
Go to destination[x] Find-Me Follow-Me setting menus.
Key 6
Toggle destination[x] Find-Me Follow-Me on/off.
Key #
Go back to FMFM Destination Selection menu.
Find-Me Follow-Me Programming (Begin Hour)
M F
M
B
e
g
i
n
:
1
2
A
M
N
e
x
t
E
x
i
t
5.1 Soft key Operation (3-Line Phone/Super Display Phone)
Next
Keep current setting and proceed to End Hour menu.
Exit
Keep current setting and return to main FMFM menu.
5.2 Key Operation
2 - 156
Key 0-9
Set Begin Hour.
Key *
Keep current setting and proceed to End Hour menu.
Key #
Keep current setting and return to main FMFM menu.
Features
Issue 5.00
6.
F
Message Notification Programming (End Hour)
M F
M
E
n
d
:
1
2
A
M
N
e
x
t
E
x
i
t
6.1 Soft key Operation (3-Line Phone/Super Display Phone)
Next
Keep current setting and proceed to Number menu.
Exit
Keep current setting and return to main FMFM menu.
6.2 Key Operation
7.
N
Key 0-9
Set End Hour.
Key *
Keep current setting and proceed to Number menu.
Key #
Keep current setting and return to main FMFM menu.
Message Notification Programming (Number)
u
m b
O
e
r
K
:
C
l
e
a
r
N
e
x
t
E
x
i
t
7.1 Soft key Operation (3-Line Phone/Super Display Phone)
OK
Accept digits entered and proceed to main FMFM menu.
Clear
Clear any digits entered.
Next
Keep current setting and proceed to main FMFM menu.
Exit
Keep current setting and return to main FMFM menu.
7.2 Key Operation
InMail System Guide
Key 0-9
Set Number.
Key *
Keep current setting and proceed to main FMFM menu.
Key #
Keep current setting
2 - 157
Issue 5.00
THIS PAGE INTENTIONALLY LEFT BLANK
2 - 158
Features
Issue 5.00
Flexible Answering Schedules
Description
The Automated Attendant can answer outside calls with different announcements and
dialing options, depending on the time of day and day of week. For example, a
company can set up separate schedules for weekdays, evenings, weekends, and
specific holidays. Each schedule can play a different announcement to callers, as well
as provide them with unique dialing options. Once set up in programming, the
schedule operation is automatic.
The Flexible Answering Schedules are determined by the set up of the InMail Answer
Tables. See Answer Tables on page 2-45 for more.
Related Features
Answer Tables
Determines how the Automated Attendant answers outside calls on each trunk.
Automated Attendant
The Automated Attendant can automatically answer the telephone system’s incoming
calls, play an Instruction Menu message, and provide dialing options to callers.
Routing Mailbox
The mailbox associated with an Answer Table that specifies which dialing options (Dial
Action Table) and announcements are available to Automated Attendant callers.
Dial Action Table
Defines the dialing options for the Call Routing Mailbox chosen by the active Answer
Table.
Programming
1.
Determine which Answer Table answers each trunk.
47-10-01
Answer Table Assignment (Answer Table)
For each trunk, enter the number of the Answer Table that handles that
trunk’s Automated Attendant calls. See Answer Tables on page 2-45.
.
InMail System Guide
By default, all trunks use Answer Table 1.
2 - 159
Issue 5.00
Operation
Not applicable
2 - 160
Features
Issue 5.00
Flexible Call Routing
Description
The Automated Attendant provides outside callers with a wide variety of dialing
(routing) options, such as customized announcements. Use Flexible Call Routing to
eliminate or minimize the need for an operator or receptionist to handle outside calls.
There are 3 components to Flexible Call Routing.
Answer Tables
Determines how the Automated Attendant answers outside calls on each trunk
according to the time of day and day of the week.
Routing Mailbox
The mailbox associated with an Answer Table that specifies which dialing
options (Dial Action Table) and announcement are available to Automated
Attendant callers.
Dial Action Table
Defines the dialing options for the Call Routing Mailbox chosen by the active
Answer Table, which in turn provides those dialing options to Automated
Attendant callers.
Related Features
Answer Tables
Determines how the Automated Attendant answers outside calls on each trunk.
Automated Attendant
The Automated Attendant can automatically answer the telephone system’s incoming
calls, play an Instruction Menu message, and provide dialing options to callers.
Routing Mailbox
The mailbox associated with an Answer Table that specifies which dialing options (Dial
Action Table) and announcement are available to Automated Attendant callers.
Dial Action Table
Defines the dialing options for the Call Routing Mailbox chosen by the active Answer
Table.
InMail System Guide
2 - 161
Issue 5.00
Programming
Refer to Automated Attendant on page 2-63 for more on how to set up your Flexible
Answering Schedules.
Operation
Not applicable
2 - 162
Features
Issue 5.00
Flexible Mailbox Numbering Plan
Description
Flexible Mailbox Numbering Plan allows you to customize site extension numbers and
be assured that InMail adapts to the new configuration. When you change a port
extension number, you can change the number of the mailbox assigned to that port to
match. There is no need to reprogram — all of the options remain intact.
Related Features
Dial Action Table
Be sure the Dial Action Table actions accommodate the revised telephone system
numbering.
Programming
Flexible Numbering Plan Example
1.
Optionally change the number of digits in extension numbers.
11-01-01
System Numbering
Optionally change the number of digits required to reach each range of
extensions.
2.
.
By default, 3-digit extension numbers are 100~199, 200~299, 300~399, 400~499.
.
By default, 4-digit extension numbers are 5000~5099.
Change the extension number associated with a port.
11-02-01
Extension Numbering
Assign extension numbers to extension ports. The telephone programming
identity follows the port number, not the extension number.
.
3.
By default, extension-to-port assignments are consecutive starting with 200 (e.g.,
port 1=extensin 200, port 2=extension 201, etc.).
Change the mailbox number to match the new extension number.
47-02-02
Mailbox Number (Mailbox Number)
Change the mailbox number to match the number of the new extension.
.
InMail System Guide
By default, mailbox numbers are consecutively assigned for the first eight
mailboxes (mailbox 1=mailbox number 200, mailbox 2=mailbox number 201.)
2 - 163
Issue 5.00
4.
Modify the Dial Action Tables to accommodate the new numbering.
.
Refer to TRF Action - Screened Transfer (1) (TRF) on page 3-443.
Optionally modify the active Dial Action Table actions for the new extension
numbers.
For example, to allow Automated Attendant callers to dial extension 5000, for
digit 5:
Change the Action to UTRF (2) or TRF (1).
Change the Data to XXXX.
.
By default (in the above example), the digit 5 is undefined.
2-Digit Extension Numbering Example
InMail Does Not Support 2-Digit Extension Numbers 10-16
When setting up 2-digit extension numbering in a SV8100 with InMail, do not use
extensions 10~32. Although you can set up this application in 11-01-01 System Numbering
and 11-02-01 Extension Numbering, Subscriber Mailboxes assigned in 47-02-02 Mailbox
Number do not function. This is because mailboxes 1~32 are reserved for Routing
Mailboxes and cannot be reassigned.
The following example assigns a 2-digit extension number (26) to station port 6 and
enables the Subscriber Mailbox for extension 26. It also changes the * and # digits in
the active Dial Action Table to allow Quick Message and Remote Logon to the new
2-digit extension.
1.
Enable 2-digit extension numbers 20~29.
11-01-01
System Numbering
In 11-01-01 Digit for the digit 2x, enter 2.
In 11-01-01 Type for the digit 2x, enter 2.
.
2.
By default, the digit 1 is set up as a 3-digit extension number (100~199).
Change the extension number for port 6 to 26.
11-02-01
Extension Numbering
For extension port 6, enter 26.
.
3.
By default, extension port 6 is assigned to extension 106.
Change the mailbox number to match the new extension number.
47-02-02
Mailbox Number (Mailbox Number)
For mailbox 6, assign mailbox number 26.
.
2 - 164
By default, mailbox 6 is assigned to mailbox number 106.
Features
Issue 5.00
4.
Modify the Dial Action Tables to accommodate the new numbering.
.
Refer to TRF Action - Screened Transfer (1) (TRF) on page 3-443.
Make key 1 (digit 1) Action = UTRF (2) and Data = XX.
Make key 11 (*) Action = REC1 (3) and Data = XX.
Make key 12 (#) Action = LOGON (5) and Data = IXX.
.
By default:
Key 1 is UTRF to XXX.
Key 11 is REC1 to IXXX.
Key 12 is LOGON to IXXX.
Operation
Not applicable
InMail System Guide
2 - 165
Issue 5.00
THIS PAGE INTENTIONALLY LEFT BLANK
2 - 166
Features
Issue 5.00
Forced Unscreened Transfer
Description
A Subscriber can optionally convert Automated Attendant Screened Transfers to
Unscreened Transfers by enabling this option in the Mailbox user interface.
Calls from the Automated Attendant ring like other transferred calls and display
the incoming Caller ID data (if provided by telco and enabled in programming)
as the call is ringing.
As with Screened Transfers, unanswered calls route to the subscriber’s greeting
(recorded or default) so the caller can leave a message. However, with
Unscreened Transfer the caller cannot dial 2 to reach the Next Call Routing
Mailbox options (if programmed).
Related Features
Dial Action Table
If enabled in the Subscriber Mailbox, InMail automatically converts any Screened
Transfers (TRFs) to the subscriber’s extension to Unscreened Transfers (UTRFs).
Screened Transfer
After the Automated Attendant caller dials an extension, InMail calls (screens) the
destination extension to see if the transfer can go through.
Unscreened Transfer
After an Automated Attendant caller dials an extension, InMail immediately transfers the
call to the extension and hangs up.
Programming
1.
Enable Forced Unscreened Transfer for the Subscriber Mailbox.
47-02-10
Forced Unscreened Transfer (Forced UTRF)
Enter 1 (Yes) to enable this option to automatically convert Automated
Attendant Screened Transfers to Unscreened Transfers.
.
InMail System Guide
By default, this option is disabled (0).
2 - 167
Issue 5.00
Operation
Not applicable
2 - 168
Features
Issue 5.00
Getting Recorded Help
Description
If a Subscriber Mailbox user dials an incorrect code or forgets what to dial while in
their mailbox, they can request help from the InMail voice prompts. Recorded Help
provides the user with a built-in, interactive user’s guide. To get recorded help, the
user dials 0.
Related Features
None
Programming
No additional programming required.
Operation
Getting Recorded Help
Log On to your mailbox
0
Get recorded help.
Recorded help is always available from the Main Menu.
Recorded help may not be available at all levels.
InMail System Guide
2 - 169
Issue 5.00
THIS PAGE INTENTIONALLY LEFT BLANK
2 - 170
Features
Issue 5.00
Go To A Mailbox
Description
An Automated Attendant caller can dial a digit to route to a Call Routing or
Announcement Mailbox. This is called the Go To (GOTO) action. The GOTO action
can route directly to a specific Call Routing or Announcement Mailbox, or allow the
Automated Attendant caller to go to a mailbox of their own choosing. Use the GOTO
action to set up a “tree” of Automated Attendant options.
The block diagram below shows how the Automated Attendant can provide the caller
with a tree of dialing options. Dialing 1 (GOTO 9) routes to Announcement Mailbox 9,
which plays the company directions. Dialing 2 (GOTO 2) routes to Call Routing
Mailbox 2, which is set up to give the caller single-digit dialing to Tech Service
technicians.
The Announcement Message for Announcement Mailbox 9 tells the caller how
to locate the company.
The Instruction Menu for Call Routing Mailbox 2 instructs the caller which digits
to dial for each technician. The Dial Action Table for Call Routing Mailbox 2
contains the TRF or UTRF actions to each technician’s extension.
Automated Attendant
1
GOTO 9
Company
Directions
Announcement Mailbox 9
2
GOTO 2
Call Routing Mailbox 1
Tech Service
Technicians
Call Routing Mailbox 2
The GOTO action can also log on to a Subscriber Mailbox, although the LOGON
action is normally reserved for this function.
InMail System Guide
2 - 171
Issue 5.00
Related Features
Automated Attendant
The Automated Attendant can automatically answer the telephone system’s incoming
calls, play an Instruction Menu message, and provide dialing options to callers.
Dial Action Table
The GOTO action is a Dial Action Table option.
Instruction Menu
Be sure the Instruction Menu for the active Call Routing Mailbox describes how to use the
GOTO action.
Programming
1.
Assign a GOTO action to the active Dial Action Table.
47-13-01
Dial Action Table Actions: GOTO Action - Go to Mailbox (7) (GOTO)
To have Automated Attendant callers dial a single digit to go to a Call
Routing or Announcement Mailbox, enter the mailbox number in the
corresponding Number option.
For example, to have key 1 go to Call Routing Mailbox 2, for key 1 enter
GOTO for the Action and 2 for the corresponding Number.
To have InMail require Automated Attendant callers to enter a Call Routing
or Announcement Mailbox to go to, enter XXX in the corresponding Number
option. The key you choose must represent the first digit in the mailbox
numbers.
For example, to allow callers to go to mailboxes 1~16, for key 0 enter
GOTO for the Action and XXX for the corresponding Number.
To log into any valid Call Routing or Subscriber Mailbox, enter IXXX in the
corresponding Number option.
For example, to allow callers to dial 1 plus any Call Routing or
Announcement Mailbox number to go to, for key 1 enter GOTO for the
Action and IXXX for the corresponding Number.
.
By default, there are no GOTO actions assigned.
Operation
Using the Automated Attendant GOTO Action
For the outside caller:
After Automated Attendant answers, the voice prompts will instruct you on which digits to dial.
2 - 172
Features
Issue 5.00
Greeting
Description
A Subscriber Mailbox user can record a personalized greeting for his mailbox. After
the greeting is recorded, callers hear a prerecorded personalized greeting rather than
a default message.
The recorded message can include the following:
Subscriber name
Personal message (such as “Hello - I am on vacation this week”)
Instructions on leaving a message or using other mailbox options
Next Call Routing Mailbox options, if available
While listening to a mailbox greeting, a caller can dial * to immediately skip the
message.
Remote Greetings
A Subscriber Mailbox user can call into the Automated Attendant, access their
mailbox, and remotely record their mailbox greeting.
Following are two of the ways a user can do this:
After the Automated Attendant answers, dial a digit (typically #) followed by their
mailbox number. This method allows outside callers to log into their Subscriber
Mailboxes from outside the company. After logging on to their mailbox, the user
can dial G to record a greeting.
If an extension has a Direct Inward Line that is forwarded to voice mail, the
caller can dial # and log on to their mailbox (instead of leaving a message). After
they log on to their mailbox, the user can dial G to record a greeting. This option
must be set up in the Next Call Routing Mailbox. To allow this ability, for
example:
Program the Next Call Routing Mailbox # digit as LOGON to IXXX.
While listening to their greeting, the subscriber can dial:
# (to route to their Next Call Routing Mailbox), then
# and their mailbox number to log on to their mailbox.
By default, this option is provided in Call Routing Mailbox 1. Additionally, the
subscriber should enable a Security Code for their mailbox to prevent unauthorized
logons.
InMail System Guide
2 - 173
Issue 5.00
Multiple Greetings
In systems with Multiple Greetings, the mailbox subscriber can record up to three
separate greetings and make any one of the three active. When a caller leaves a
message in the subscriber’s mailbox, they hear the active greeting. This allows the
subscriber, for example, to record separate greetings for work hours, after work, and
during vacation. Instead of revising the recording when they leave the office, they can
activate the after work greeting instead.
If an active greeting is not recorded, a caller hears, “At the tone, you can leave your
message for (extension number or name).”
Related Features
Auto Attendant Do Not Disturb
Auto Attendant Do Not Disturb sends Automated Attendant calls directly to a subscriber’s
mailbox. Their phone does not ring for calls from the Automated Attendant.
Dial Action Table
The active Dial Action Table must have a LOGON action assigned to a key to enable
Remote Greeting.
Log On to Voice Mail
A Subscriber Mailbox user can record their greeting after remotely logging on to InMail.
Security Code
To prevent unauthorized tampering, the subscriber should enable a Security Code for their
mailbox.
System Administrator
With Multiple Greetings, the System Administrator’s Subscriber Maintenance EG (34)
option simultaneously erases all recorded greetings in a Subscriber Mailbox. Additionally,
the active greeting is reset to 1.
2 - 174
Features
Issue 5.00
Programming
1.
Set the maximum length of Subscribe Mailbox greetings.
47-01-03
Subscriber Message Length (Subs Msg Length)
Set the maximum length of Subscriber Mailbox greetings (1-4095 seconds).
This option also sets the maximum length of recorded messages for the
following:
Subscriber Mailbox users dialing RS to record and send a message.
Extension users leaving a message in a Subscriber Mailbox.
Outside Automated Attendant callers accessing a mailbox via a GOTO
command and then dialing RS to record and send a message.
Announcement Messages.
Call Routing Mailbox Instruction Menus.
.
2.
By default, Subscriber Mailbox greetings are 120 seconds long maximum.
Enable Remote Greeting by programming a LOGON action in the active Dial
Action Table.
47-13
InMail Dial Action Tables
To log directly into a specific Subscriber Mailbox, enter the mailbox number
in the corresponding Number option.
For example, to have key 4 log directly into Subscriber Mailbox 305, for key
4 enter LOGON for the Action and 305 for the corresponding Number.
To have InMail request Automated Attendant callers to select a Subscriber
Mailbox to log on to, enter N in the corresponding Number option. The key
you choose must represent the first digit in the Subscriber Mailbox
numbers.
For example, to have the Automated Attendant request callers to enter the
number of the Subscriber Mailbox into which they wish to log, for key 3
enter LOGON for the Action and N for the corresponding Number. When
callers dial 3, they hear, “Please enter your mailbox number.”
To have InMail require Automated Attendant callers to enter a Subscriber
Mailbox to log on to (without playing an announcement), enter XXX in the
corresponding Number option. The key you choose must represent the first
digit in the Subscriber Mailbox numbers.
For example, to allow callers to log on to mailboxes 101~199, for key 3
enter LOGON for the Action and XXX for the corresponding Number.
InMail System Guide
2 - 175
Issue 5.00
To log into any valid Subscriber Mailbox, enter IXXX in the corresponding
Number option.
For example, to allow callers to dial 1 plus any Subscriber Mailbox number
to log on, for key 1 enter LOGON for the Action and IXXX for the
corresponding Number.
.
By default, key # Action = LOGON and Number = IXXX.
Operation
Recording a Multiple Greeting and Setting Up Auto Attendant
Do Not Disturb
Log On to Subscriber Mailbox.
G (4)
Access the Mailbox Greeting options.
[Greet]
InMail does the following:
Plays a summary of your current settings.
Displays the status of your active Greeting (1-3).
[Greeting N: Recorded], or
[Greeting N: Not Rec]
Shows the Auto Attendant Do Not Disturb status.
[Auto-attendant Dnd: Off], or
[Auto-attendant Dnd: On]
Provides soft keys for each of the 3 greetings.
[Gr1]
[Gr2]
[Gr3]
Select a Greeting (which also makes it active).
(1)[Gr1]
(2)[Gr2]
(3)[Gr3]
L (5)
Listen to the active greeting (if recorded).
[Lstn]
R (7)
Record a new greeting (if not recorded), or rerecord
the current greeting.
[Rec]
Record at the tone, then press # when done.
*
Pause or restart recording.
[Resume]
[Pause]
E (3)
Erase the greeting.
[Cncl]
#
End the recording.
[Done]
Erase the currently recorded greeting (if any).
[Erase]
#
2 - 176
Go back to the Mailbox Greeting options.
[Exit]
Features
Issue 5.00
Recording a Multiple Greeting and Setting Up Auto Attendant
Do Not Disturb (Continued)
Change Auto Attendant Do Not Disturb.
O (6)
#
Go back to mailbox Main Menu.
[Exit]
0
InMail System Guide
Turn Auto Attendant Do Not Disturb off or on.
[Auto-attendant Dnd: On]
[Auto-attendant Dnd: Off]
Plays Help message.
2 - 177
Issue 5.00
THIS PAGE INTENTIONALLY LEFT BLANK
2 - 178
Features
Issue 5.00
Group (Shared) Mailbox
Description
Department/Ring Group Mailbox
Group (Shared) Mailbox
A Group Mailbox is a Department Group Mailbox shared by a group of coworkers. It is normally a Subscriber Mailbox. If a caller leaves a message at any
extension within the group that shares the mailbox, the system stores the
message in the shared Group Mailbox. The voice mail key Message lamp at all
keyset extensions in the group flashes to indicate that there is a new voice mail
message waiting. Any extension user in the group can log onto their mailbox to
hear and process the shared message. The message count on all keyset
displays increments and decrements as group messages are received, listened
to, or deleted.
Any extension sharing a Group Mailbox can record and activate the Greeting.
The system automatically uses the most recent Greeting, regardless of which
member of the group recorded it.
Group Mailboxes are helpful in both residential installations and larger business
workgroups, since extensions share a common voice mailbox. Messages in the
Group Mailbox can be listened to, forwarded, deleted, and otherwise processed
by any member of the group.
Group Mailbox uses Department/Ring Group programming. You can separately
set up Department/Ring Group members to have the same Department/Ring
Group Mailbox. Since the system provides 32 Department/Ring Groups, there
are a total of 328 Ring Group Mailboxes available.
The Department/Ring Group Mailbox can optionally be a Routing Mailbox. Refer
to Understanding Group Mailbox Types on page 2-180.
Mailbox for a Ring Group
A Ring Group Mailbox can also be the mailbox for a “stand-alone” Ring Group in
which the members do not share the mailbox, but have personal mailboxes
instead. The following types of unanswered calls route to this type of Ring
Group Mailbox:
Outside calls transferred to the Ring Group master number.
Automated Attendant transfers (UTRF or STRF) to the Ring Group master number.
Direct Inward Lines to the Ring Group master number.
InMail System Guide
2 - 179
Issue 5.00
UCD Group Mailbox
If a UCD Group is set to overflow to voice mail, an unanswered call into the group is
picked up by the UCD Group Mailbox. The UCD Group Mailbox can be a Subscriber
Mailbox (to allow the caller to leave a message) or a Routing Mailbox (to provide
additional dialing options or an announcement). Refer to Understanding Group
Mailbox Types.
Understanding Group Mailbox Types
If the Group Mailbox is a Subscriber Mailbox (1):
The Group Mailbox has all the features of any other personal Subscriber Mailbox.
If the Group Mailbox redirects to a Call Routing Mailbox (2):
A co-worker attempting to leave a message at an extension assigned to the Group
Mailbox hears: “Your call cannot go through. Goodbye.” InMail then hangs up.
An outside caller attempting to leave a message at an extension assigned to the
Group Mailbox hears the prerecorded Instruction Menu message and can dial
options allowed by the associated Dial Action Table.
If the Group Mailbox user presses their voice mail key, they are asked to enter their
mailbox number. After entering the number, they hear, “That mailbox does not exist.”
An Automated Attendant caller attempting to leave a Quick Message or do a
Remote Logon at an extension assigned to the Group mailbox hears, “That mailbox
does not exist.” They then return to the Auto-mated Attendant.
If the Group Mailbox redirects to an Announcement Mailbox (2):
A co-worker attempting to leave a message at an extension assigned to the Group
Mailbox hears: “Your call cannot go through. Goodbye.” InMail then hangs up.
An outside caller attempting to leave a message at an extension assigned to the
Group Mailbox hears the prerecorded announcement and can use all other
Announcement Mailbox features.
If the Group Mailbox user presses their voice mail key, they are asked to enter their
mailbox number. After entering the number, they hear: “That mailbox does not
exist.”
An Automated Attendant caller attempting to leave a Quick Message or do a
Remote Logon at an extension assigned to the Group mailbox hears, “That mailbox
does not exist.” They then return to the Automated Attendant.
If the Group Mailbox redirects to a Directory Dialing Mailbox (2):
A co-worker attempting to leave a message at an extension assigned to the Group
Mailbox hears: “Your call cannot go through. Goodbye.” InMail then hangs up.
An outside caller attempting to leave a message at an extension assigned to the
Group Mailbox hears the Directory Dialing message and can use any of the options
programmed for the Directory Dialing Mailbox.
If the Group Mailbox user presses their voice mail key, they are asked to enter their
mailbox number. After entering the number, they hear: “That mailbox does not
exist.”
An Automated Attendant caller attempting to leave a Quick Message or do a
2 - 180
Features
Issue 5.00
Remote Logon at an extension assigned to the Group mailbox hears, “That mailbox
does not exist.” They then return to the Automated Attendant.
Programming
1.
Assign extensions to the Department Group.
11-07-01
Department Group Pilot Numbers
Assigns pilot numbers for Department Group.
.
16-02-01
By default, this entry is 0 (no pilot number assigned).
Department Group Assignment for Extensions
Set up the Department Group called by the pilot number and the extension
priority when a group is called.
.
2.
By default, all extensions are assigned to Department Group 1.
If co-workers should share this mailbox, enter Group as the mailbox type for
each extension in the Department/Ring Group. This step should be skipped for
a “stand-alone” Ring Group.
47-02-01
Mailbox Type
Use this option to enable or disable the mailbox. An extension mailbox is
not accessible when it is disabled (even though its stored messages and
configuration are retained in memory.) If disabled, a user pressing
Message initiates a remote logon and is asked to enter their mailbox
number. A voice prompt then announces: “That mailbox does not exist.”
Options are: 0 (None), 1 (Personal), 2 (Group)
.
3.
By default, station mailboxes 1~64 are set to Personal.
For the Department/Ring Group Mailbox that corresponds to the extension’s
Department/Ring Group, assign the mailbox type.
For a Subscriber Mailbox:
16-02-01
Department Group Assignment for Extensions
Set up the Department Group called by the pilot number and the extension
priority when a group is called.
.
11-07
By default, all extensions are assigned to Department Group 1.
Department Group Master Numbers
Check to see to which Department Group the extension belongs (1~32).
.
InMail System Guide
By default, Department Groups do not have master numbers assigned.
2 - 181
Issue 5.00
47-03-02
Group Mailbox Number
The Group Mailbox Number is the same as the Department Group master
(pilot) number. Use this option to select the Department Group master
(pilot) number associated with the Group Mailbox you are programming.
.
47-03-03
By default, Department Group Mailbox Numbers are not assigned.
Group Mailbox Type
Enter 1 to assign the mailbox as a Subscriber Mailbox. Use this option to
set the Group Mailbox type. There are two types of InMail mailboxes:
Subscriber (1) and Routing (2).
.
By default, Group Mailboxes are set as Subscriber Mailboxes.
For a Routing Mailbox:
47-02-01
Mailbox Type
Settings are: 0 (None), 1 (Personal), 2 (Group). Set to 2 (Group).
.
16-02-01
By default, station mailboxes 1~64 are set to Personal.
Department Group Assignment for Extensions
Set up the Department Group called by the pilot number and the extension
priority when a group is called.
.
11-07-01
By default, all extensions are assigned to Department Group 1.
Department Group Master Numbers
Check to see to which Department Group the extension belongs (1~32).
.
47-03-02
By default, Department Groups do not have master numbers assigned.
Group Mailbox Number
The Group Mailbox Number is the same as the Department Group master
(pilot) number. Use this option to select the Department Group master
(pilot) number associated with the Group Mailbox you are programming.
.
47-03-03
By default, Department Group Mailbox Numbers are not assigned.
Group Mailbox Type
Enter 1 to assign the mailbox as a Subscriber Mailbox. Use this option to
set the Group Mailbox type. There are two types of InMail mailboxes:
Subscriber (1) and Routing (2).
.
47-07
By default, Group Mailboxes are set as Subscriber Mailboxes.
InMail Routing Mailbox Options
Set the type of Routing Mailbox and select the voice prompt language.
.
2 - 182
By default, all Routing Mailboxes are Call Routing Mailboxes and use UK English
for the voice prompt language.
Features
Issue 5.00
4.
47-08
Call Routing Mailbox Options
47-09
Announcement Mailbox Options
Set up the Subscriber Mailbox options for the Department Group Mailbox.
For Auto Attendant Direct to Voice Mail:
47-06-07
Auto Attendant Direct to Voice Mail
Enable (Yes) or disable (No) Auto Attendant Direct to Voice Mail for the
Group Mailbox.
.
47-06-03
By default, this option is disabled.
Auto Erase or Save
Set the auto save option for new messages ( 1 = Auto Save, 2 = Auto
Erase).
.
47-06-09
By default, this option is set to 1 (Auto Save).
Auto Time Stamp
Enable (Yes) or disable (No) Auto Time Stamp for the Group Mailbox.
.
47-06-05
By default, this option is disabled.
Recording Conversation Beep
Enable (Yes) or disable (No) the Conversation Recording Beep for the
Group Mailbox.
.
47-06-13
By default, this option is enabled.
Directory List Number
Specify the Directory List number (1~8, 0 = No lists, Q = All lists) to which
the Group Mailbox belongs.
.
47-06-08
By default, this option is 0 (No lists).
Forced Unscreened Transfer
Enable (Yes) or disable (No) Forced Unscreened Transfer for the Group
Mailbox.
.
47-06-02
By default, this option is disabled.
Message Playback
Set the Group Mailbox message playback order (1 = LIFO, 2 = FIFO).
.
47-06-04
by default, this option is set to 2 (FIFO).
Message Retention
Set how long the Group Mailbox will retain saved messages.
.
InMail System Guide
By default, this option is 0 (indefinite).
2 - 183
Issue 5.00
47-06-01
Number of Messages
Set the maximum number of messages (1~99) that can be left in the Group
Mailbox.
.
47-06-06
By default, this option is 20.
Message Waiting Lamp
Enable (Yes) Message Waiting lamping at the extensions sharing the Group
Mailbox.
.
47-06-11
By default, this option is enabled.
Dialing Option
Enable (Yes) or disable (No) additional dialing options for Next Call Routing
Mailbox calls.
.
47-06-12
By default, this option is disabled.
Next Call Routing Mailbox
Optionally assign a Next Call Routing Mailbox (801~832) to the Group
Mailbox.
.
47-06-10
By default, this option is 801.
System Administrator
Enter 1 (Yes) to optionally designate the Group Mailbox as a System
Administrator.
.
By default, this option is disabled.
Related Features
Greeting
Any extension sharing a Department Group Mailbox can record and activate the Greeting.
The system automatically uses the most recent Greeting, regardless of which member of
the group recorded it.
Voice Mail Overflow
An unanswered DIL to the Department Group master number can be picked up by the
Department Group Mailbox.
2 - 184
Features
Issue 5.00
Operation
Refer to the following features for operation of the specific Group Mailbox type:
Announcement Mailbox
Routing Mailbox
Directory Dialing
Subscriber Mailbox
InMail System Guide
2 - 185
Issue 5.00
THIS PAGE INTENTIONALLY LEFT BLANK
2 - 186
Features
Issue 5.00
Guest Mailbox
Description
An outside party can have their own Guest Mailbox mailbox for receiving and sending
messages. A Guest Mailbox is a Subscriber Mailbox that does not have an extension
associated with it. It is instead associated with a virtual extension. A Guest Mailbox
has many of the InMail features of a Subscriber Mailbox. A company visitor with a
Guest Mailbox could, for example:
Go to any extension, press Speaker + Dial the InMail master number (e.g., 200),
then dial their mailbox number.
Review their messages, leave messages for associates, or record a new
greeting for their mailbox.
Use many other features available to a Subscriber Mailbox.
For a brief overview of the features available at a Guest Mailbox, review the Related
Features below. Then, go to the individual feature to find out how it operates and any
programming required to make it work.
Related Features
Automated Attendant
The Automated Attendant GOTO and LOGON actions (assigned to the active Dial Action
Table) can route callers to a Guest Mailbox.
Auto Erase or Save
After a guest listens to a message in their Guest Mailbox, InMail can automatically erase
or save the message.
Greeting
A Guest Mailbox can have a recorded greeting that plays to callers leaving a message.
Listening to Messages
Review this feature to learn which features are available to the guest while listening to
messages.
Mailbox Name
A Guest Mailbox can have a recorded name.
InMail System Guide
2 - 187
Issue 5.00
Make Call
A Make Call callback to a Guest Mailbox is helpful only if an extension has a Call
Coverage key for the virtual extension associated with the Guest Mailbox. Otherwise, the
callback cannot be answered.
A Guest Mailbox user can use Make Call to return a call left in the Guest Mailbox.
Main Menu
The Main Menu provides assess to the features available to a Guest Mailbox.
Message Listen Mode
Set the type of messages a guest listens to when they dial L (5) after logging into their
Guest Mailbox.
Message Notification
Once activated, Message Notification dials a telephone number to let the user know they
have new messages in the Guest Mailbox.
Message Playback Direction
Set the Guest Mailbox message playback order.
Message Record
Review this feature to learn which features are available to the Guest Mailbox while
recording and sending a message.
Message Storage Limit
Set the maximum number of messages that can be left in the mailbox.
Next Call Routing Mailbox
The Next Call Routing Mailbox provides additional dialing options after a caller leaves a
message in a Guest Mailbox.
Security Code
If enabled, a Guest Mailbox caller must enter a security code before logging on to the
mailbox.
Transfer to a Mailbox
To transfer an outside call to a Guest Mailbox, the extension user presses Hold +
Message (or the Voice Mail key) + Dials the Guest Mailbox number + Speaker to hang up.
2 - 188
Features
Issue 5.00
Programming
1.
Set up a virtual extension for the Guest Mailbox.
11-04-01
Virtual Extension Numbering
Assign an unused extension number to an available virtual station port.
For example, assign extension 400 to virtual station port 1.
2.
Activate an unused mailbox for the virtual extension.
47-02-01
Mailbox Active (Mailbox Active)
Enter 1 to activate a mailbox for the virtual station port.
Choose a mailbox that is not likely required for an installed extension (e.g.,
128).
3.
Assign a mailbox number to the mailbox you activated for the virtual extension.
47-02-02
Mailbox Number (Mailbox Number)
The mailbox number you choose should be the same as the virtual
extension number (e.g., 400).
4.
Refer to Subscriber Mailbox on page 2-333 for additional details on Guest
Mailbox setup and operation.
Operation
Logging On to a Guest Mailbox
To log on to a Guest Mailbox:
1. Press the Speaker key + Dial the InMail master number (e.g., 555).
2. When InMail answers, dial the Guest Mailbox number.
Logging On to a Guest Mailbox from the Automated Attendant
To log on to a Guest Mailbox from the Automated Attendant:
1. After the Automated Attendant answers, dial # + The Guest Mailbox number.
o
o
InMail System Guide
This capability may be disabled in the Automated Attendant.
Your automated attendant may have GOTO or LOGON actions assigned to the Guest
Mailbox. Check with your Communications Manager.
2 - 189
Issue 5.00
Transferring your call to a Guest Mailbox
To transfer your active call to a coworker’s mailbox:
1.
2.
3.
4.
2 - 190
Press Hold.
Press Message.
Dial the Guest Mailbox number.
Press Speaker to hang up.
o To transfer a call to a coworker’s mailbox from a single line telephone, use the
following procedure:
Hookflash + Dial 717 + Dial the coworker’s mailbox + Hang up.
Features
Issue 5.00
Hang Up
Description
Hang Up is an Automated Attendant option that immediately hangs up the outside
call. When setting up a Dial Action Table, you may want to use Hang Up for unused
actions (rather than the caller hearing the standard error message). You might also
want to use the Hang Up action as the Timeout destination for callers that wait too
long to dial after the Automated Attendant answers.
Related Features
Automated Attendant
The Automated Attendant can automatically answer the telephone system’s incoming
calls, play an Instruction Menu message, and provide dialing options to callers.
Dial Action Table
The Hang Up action is a Dial Action Table option.
Programming
1.
Assign the Hang Up action to an available Dial Action Table key.
47-13-01
InMail Dial Action Table Actions: Hang Up Action (6) (HNGUP)
When the outside caller dials the key programmed with the Hang Up action,
the Automated Attendant immediately hangs up.
.
By default, the digit 9 is assigned as a Hang Up action.
Operation
Not applicable
InMail System Guide
2 - 191
Issue 5.00
2 - 192
Features
Issue 5.00
Hotel Motel
Description
Hotel integration allows the VM8000 InMail to be used in a hotel environment. In
addition to other InMail features, it provides basic integration when used in
conjunction with an external PMS Application or dial access codes from the front desk
extension.The table below shows the supported hotel messages and what if any
action is taken for a subscriber mailbox.
Operation
Check-In
Action
Mailbox for the room is cleared of
messages
The Mailbox language goes back
to default.
Mailbox for the room is cleared of
greetings
Name for the room is deleted
Security code is deleted.
Check-Out
No action
Edit
No action
Service Conditions
Main Software is version 4.00 or greater is required to support this feature.
The InMail language prompts installed on the CF must be version 2.10 or
greater. The VM8000 InMail Utility is used to update the installed language
prompts.
This feature requires the SV8100 be licensed for Hotel/Motel (0007) and the R4
Enhancement (0033).
Wake up call greetings require VRS programming and licensing.
Wake up call greetings are only provided to single line phones. Multiline phones
will hear dial tone when answered.
InMail System Guide
2 - 193
Issue 5.00
Related Features
Mailboxes
Programming
40-07-01
Voice prompt Language Assignment for VRS
This sets the default language for the system. This is the language a
mailbox will be set to when a room is checked in.
Entries
Any valid language 1-23
Default = 2 (UK English)
42-02-01
Hotel/Motel Telephone Setup - Hotel Mode
Use this option to set a phone to operate in the Hotel/Motel mode. Do not
set the front desk phone for the Hotel/Motel mode.
Entries
0 = Normal mode
1 = Hotel mode
Default = 0 (Normal)
45-02-05
NSL Option Setup - Send 4PM Message
Use this option to turn off or on the Send 4PM Message option. If turned on,
the system sends 4PM message to VoiceMail.
This must be set to 1 (On) for InMail Hotel Integration to work.
Entries
0 = Disabled
1 = Enabled
Default = 0
Operation
Check-In
To set a room as checked in from the front desk phone.
.
2 - 194
Check-In can also be set from the PMS system.
1.
Lift the handset.
2.
Dial 738.
Features
Issue 5.00
3.
Dial the extension number of the room you want to check in.
4.
You hear confirmation tone.
5.
Hang up.
Check-Out
To set a room as checked out from the front desk phone.
.
InMail System Guide
Check-out can also be set from the PMS system.
1.
Lift the handset.
2.
Dial 739.
3.
Dial the extension number of the room you want to check out.
4.
You hear confirmation tone.
5.
Hang up.
2 - 195
Issue 5.00
THIS PAGE INTENTIONALLY LEFT BLANK
2 - 196
Features
Issue 5.00
InMail Upload Download Audio
Description
The InMail Upload Download Audio feature allows the upload of mailbox greetings up
to 1MB in size, recorded on a PC or professionally, to any valid mailbox in the system.
It also allows users to listen to, download and/or delete voice mail messages from
callers. Access to the InMail compact flash drive is via the HTML User Pro (Web Pro).
Audio Prompt Format:
In order for uploaded greetings to properly play on the VM8000 InMail they must be in
the proper format. Audio files not recorded in the proper format may not playback on
the InMail. The proper format is:
Bit Rate:
64kbps
Sampling Size:
8 bits
Channel:
1 (Mono)
Sampling Rate:
8 kHz
Audio Format:
CCiTT a-law
User Pro Access Options:
There are two different User Pro login types available to make changes. To login,
open an Internet browser and enter the IP of the SV8100 LAN port in the address line.
At default the IP Address is 192.168.0.10.
1.
User Admin Mode (UA Mode): This mode allows the user admin to access any
telephone and mailbox in the system. This mode must be used to change VRS
greetings. At default the login ID is USER1 and the password is 1111.
2.
User Mode (UB Mode): This mode allows a user to access only their own
telephone and mailbox when logged in. They will not be able to change any
other telephone and mailbox. At default the login ID is the “Extension Number”
and the password is 1111.
InMail System Guide
2 - 197
Issue 5.00
Below is the page layout diagram for the two different User Pro login IDs:
UA Home Page
Telephone Setting
? Individual Extension?
VM messages
and Greetings
(All mailboxes)
VRS messages
UB Home Page
Feature Setup
One Touch Key
Function Key
Assignment
Virtual
Extension Ring
InMail Station
Options
VM messages
(Own subscriber mailbox)
Message Name Format:
Downloaded messages are automatically assigned a name by the SV8100. This
name includes the mailbox number the message was left in, type of message, the
message number, the date and time to the second the message was left. The table
below shows how to interpret the message name to determine this information.
2 - 198
File name format:
BTNNN_YYYYMMDD_HHMMSS.wav
(maximum 32 characters)
B
Mailbox number (max. 8 digit) or “VRS” for the VRS
message.
T
Message type
“ + ”:Greeting or VRS message
“‐”:Recorded message
NNN
Message number (3 digits)
YYYY
Year
MM
Month (01~12)
Features
Issue 5.00
DD
Day (01~31)
HH
Hour (00~23)
MM
Minute (00~59)
SS
Second (00~59)
Service Conditions
VRS and InMail messages are recorded in an ADPCM format which may not be
easily opened on the support PC.
It is not possible to upload/download/delete multiple files simultaneously.
The mailbox will be inaccessible from the telephone under these conditions:
Mailbox XXX will not be accessible when opening the telephone setup screen of
extension XXX by UA or UB mode in User Pro.
Mailbox XXX will not be accessible when selecting the extension XXX on the file
upload/download screen of UA mode User Pro.
Mailbox XXX will be inaccessible when logging in the UB mode User Pro for
extension XXX.
While uploading an audio file via User Pro the greeting is not accessible by
telephone.
When downloading/deleting an audio file via User Pro, the file is not accessible
by another User Pro session or from the telephone.
This feature is only supported using a LAN connection.
When uploading an audio file the extension will be checked whether it is “WAV”
or not however, the format of the uploaded file will not be checked. If the
uploaded file is not in the proper format it may not playback properly.
When a mailbox has a new message and the message is deleted using the User
Pro interface the MWI of the mailbox will NOT be cancelled.
The largest allowed upload file size is approximately 1MB. Files larger than this
cannot be uploaded.
There is no size limitation when downloading audio files.
User Pro does not check the uploaded file for correct naming format (i.e.
BTNNN_YYYYMMDD_HHMMSS.wav). The file name will be automatically
changed when the file is written in the CF.
The actual file name of the messages is not displayed in User Pro. The
message number, modified date and file size are displayed instead. If there is
not any message file, “—“ will be displayed and the download/delete icon will not
be displayed.
InMail System Guide
2 - 199
Issue 5.00
The User Pro message page does not refresh automatically, to see new
messages the page must be refreshed. For instance if a new message is
received via regular operation on the system while a user is viewing the upload/
download screen. The new message is not shown until the page is reloaded by
clicking the
icon.
At default Microsoft Windows will automatically open and play the downloaded
WAV. To make “Open” or “Save” selectable, following settings are required:
Windows XP:
1. Choose file type from “Control Panel” → “Folder Options”.
2. Click on “File Types” tab.
3. Select “WAV” extension from the list, then click “Advanced”.
4. Check “Confirm to open the file after download”, then click “OK”.
5. Close the folder option by clicking “OK” again.
Windows Vista: It is not possible to change the save to folder option. So the
downloaded file is always automatically opened for playback.
Troubleshooting
The table below shows possible Error messages and their causes.
Error Message
2 - 200
Cause
VMDB is not attached.
The PZ-VM21 is not attached.
Mailbox “XXX” does not exist.
(XXX = mailbox number)
The mailbox does not exist.
The mailbox is being used by
another session.
When the mailbox is being used by another
session, either PC or phone.
There is no available space in
the CF.
When there is no available space in the CF.
The file is being used by
another session. Please try
again later.
When the file to be downloaded is being
used by another session, either PC or
phone.
The selected file has already
been deleted.
When the file selected for download has
already been deleted.
The file is being used by
another session. Please try
again later.
When the file selected for deletion is being
used by another session.
Features
Issue 5.00
Error Message
Cause
The selected file has already
been deleted.
When the file selected for deletion has
already been deleted.
Cannot upload the file since
the original file is being used
by another session. Please
try again later.
When the file to be replaced is being used
when trying to upload the replacement.
Programming
90-02-01Programming Password Setup – User Name
Set the system user names. By default each mailbox can be accessed
using the extension number as the user name. The User Administrator
login user name of USER1.
90-02-02Programming Password Setup – Password
The default password for the User Administrator and mailbox user login is
1111.
90-02-03Programming Password Setup – User Level
Used to set the Set the system password user levels.
InMail System Guide
2 - 201
Issue 5.00
Listening to Voice Mail Messages Using User Admin Mode (UA)
All messages stored on the VM8000 InMail can be accessed via the Mailbox User
Mode for playback, or deletion.
2 - 202
1.
To log in, open an Internet browser and enter the IP of the SV8100 LAN port in
the address line. At default the IP Address is 192.168.0.10.
2.
At the login screen, enter username = USER1 and password = 1111.
Features
Issue 5.00
3.
InMail System Guide
At the main menu, click on the InMail Audio Up/Down Load icon.
2 - 203
Issue 5.00
4.
Choose the extension number to be changed, and make sure Audio Data is set
to Incoming Messages.
The message numbers correspond to the same message number when accessed via
the telephone. Message 1 is the first message, message 2 is the second message,
etc.
5.
To delete a message:
click on the red X icon to the right of the appropriate message.
2 - 204
Features
Issue 5.00
6.
To listen to a message:
To the right of the message you want to hear, click on the download icon.
Depending on the settings of your browser, you may get a security prompt.
Click on the menu and choose to allow the file to download.
Depending on the Windows configuration, you may be prompted again to
either Open or Save the message. If you want to listen to the message,
click Open and the default .wav file player will play the message. If you
want to save the message, click on the Save icon and you can browse to
the location you want the message saved on the local PC.
InMail System Guide
2 - 205
Issue 5.00
Listening to Voice Mail Messages Using Mailbox User Mode (UB)
2 - 206
1.
To log in, open an Internet browser and enter the IP of the SV8100 LAN port in
the address line. At default the IP Address is 192.168.0.10.
2.
At the login screen enter username = “The Extension Number” and password =
1111.
3.
In the Main Menu, click on the InMail Audio Up/Down Load icon.
Features
Issue 5.00
4.
The message numbers correspond to the same message number when
accessed via the telephone. Message 1 is the first message, Message 2 is the
second message, etc.
5.
To delete a message:
click on the red X icon to the right of the appropriate message.
InMail System Guide
2 - 207
Issue 5.00
6.
To listen to a message:
To the right of the message you want to hear, click on the download icon.
Depending on the settings of your browser, you may get a security prompt.
Click on the menu and choose to allow the file to download.
Depending on the Windows configuration, you may be prompted again to
either Open or Save the message. If you want to listen to the message,
click Open and the default .wav file player will play the message. If you
want to save the message, click on the Save icon and you can browse to
the location you want the message saved on the local PC.
2 - 208
Features
Issue 5.00
Changing Mailbox Greetings using User Admin Mode (UA)
Audio files up to 1MB may be uploaded to the VM8000 InMail for any mailbox
greeting. In order for uploaded greetings to properly play on the VM8000 InMail they
must be in the proper format. Audio files not recorded in the proper format may not
playback on the InMail. The proper format is:
Bit Rate:
64kbps
Sampling Size:
8 bits
Channel:
1 (Mono)
Sampling Rate:
8 kHz
Audio Format:
CCiTT a-law
1.
To log in, open an Internet browser and enter the IP of the SV8100 LAN port in
the address line. At default the IP Address is 192.168.0.10.
2.
At the login screen, enter username = USER1 and password = 1111.
InMail System Guide
2 - 209
Issue 5.00
3.
2 - 210
At the main menu, click on the InMail Audio Up/Down Load icon.
Features
Issue 5.00
4.
Choose the extension number to be changed, and make sure Audio Data is set
to Outgoing Messages.
.
InMail System Guide
The greeting numbers correspond to the same greeting number when accessed via the
telephone. Greeting 1 is GR1, Greeting 2 is GR2 and Greeting 3 is GR3. Greeting 7 is the
paging greeting used with the Park and Page feature.
2 - 211
Issue 5.00
5.
To delete a greeting:
Click on the red X icon to the right of the appropriate greeting.
6.
To upload a greeting:
Under message number, enter the greeting number you want replaced on
the VM.
2 - 212
Features
Issue 5.00
Browse to find the location on the PC where the greeting file is stored.
Click on the upload icon to the right of the selected file name.
Depending on the file size and LAN connection, it may take several
minutes to upload the greeting.
The uploaded greeting will appear in the assigned location.
InMail System Guide
2 - 213
Issue 5.00
Changing Mailbox Greetings using Mailbox User Mode (UB)
Audio files up to 1MB may be uploaded to the VM8000 InMail for any mailbox
greeting. In order for uploaded greetings to properly play on the VM8000 InMail they
must be in the proper format. Audio files not recorded in the proper format may not
playback on the InMail. The proper format is:
2 - 214
Bit Rate:
64kbps
Sampling Size:
8 bits
Channel:
1 (Mono)
Sampling Rate:
8 kHz
Audio Format:
CCiTT a-law
1.
To log in, open an Internet browser and enter the IP of the SV8100 LAN port in
the address line. At default the IP Address is 192.168.0.10.
2.
At the login screen, enter username = “The Extension Number” and password
= 1111.
Features
Issue 5.00
3.
InMail System Guide
The main menu will display. Click on the InMail Audio Up/Down Load icon. At
the main menu, click on the InMail Audio Up/Down Load icon.
2 - 215
Issue 5.00
.
2 - 216
The greeting numbers correspond to the same greeting number when accessed via the
telephone. Greeting 1 is GR1, Greeting 2 is GR2 and Greeting 3 is GR3. Greeting 7 is the
paging greeting used with the Park and Page feature.
Features
Issue 5.00
4.
To delete a greeting:
Click on the red X icon to the right of the appropriate greeting.
5.
To upload a greeting:
Under message number, enter the greeting number you want replaced on
the VM.
InMail System Guide
2 - 217
Issue 5.00
Browse to find the location on the PC where the greeting file is stored.
Click on the upload icon to the right of the selected file name.
Depending on the file size and LAN connection, it may take several
minutes to upload the greeting.
2 - 218
Features
Issue 5.00
The uploaded greeting will appear in the assigned location.
InMail System Guide
2 - 219
Issue 5.00
THIS PAGE INTENTIONALLY LEFT BLANK
2 - 220
Features
Issue 5.00
Instruction Menu
Description
The Instruction Menu is the announcement that plays to Automated Attendant callers.
Normally, the Instruction Menu greets callers and provides them with the Automated
Attendant dialing options. The Instruction Menu is associated with the active Call
Routing Mailbox. Normally, you should have the System Administrator customize
(rerecord) the Instruction Menu to match the dialing options enabled in the site’s Dial
Action Table. If a custom Instruction Menu is not recorded, the Automated Attendant
callers hear: “If you are calling from a touch tone phone, please dial the extension
number you wish to reach, or dial 0 for assistance. If you are calling from a rotary dial
phone, please stay on the line for assistance.”
Related Features
Answer Tables
Determines how the Automated Attendant answers outside calls on each trunk.
Automated Attendant
The Answer Table determines how the Automated Attendant answers calls, and assigns
the Call Routing Mailbox to the call.
Routing Mailbox
The mailbox associated with an Answer Table that specifies which dialing options (Dial
Action Table) and Instruction Menu are available to Automated Attendant callers.
Dial Action Table
Defines the dialing options for the Call Routing Mailbox chosen by the active Answer
Table.
Single Digit Dialing
An Automated Attendant caller can press a single key to route to an extension, route to
another destination, or use an InMail feature.
System Administrator
Only the System Administrator can record the Instruction Menu.
Programming
Not applicable
InMail System Guide
2 - 221
Issue 5.00
Operation
Recording an Instruction Menu for a Call Routing Mailbox
Log On to System Administrator’s mailbox.
SA (72)
Access System Administrator options.
[Not applicable]
I (4)
Select Instruction Menus.
[Instr]
Enter the Call Routing Mailbox number.
L (5)
Listen to the current Instruction Menu (if any).
[Lstn]
#
R (7)
Exit listen mode.
Record a new Instruction Menu.
[Rec]
Record message.
#
0
2 - 222
*
Pause or restart recording.
[Resume]
[Pause]
E (3)
Erase recording.
[Cncl]
#
Exit recording mode.
[Done]
E (3)
Erase the Instruction Menu.
[Erase]
#
Go back to the System Administrator options.
[Exit]
Go back to the System Administrator options.
[Exit]
Plays Help message.
Features
Issue 5.00
Language Settings
Description
The Language setting feature allows the telephone display language and the InMail
mailbox language to be changed from the telephone. This can be used to change
either the user's phone or another specified telephones display and InMail language if
allowed in system programming. Either a dial access code or Softkey operation is
available.
Service Conditions
Main Software version 4.00 or greater is required to support this feature.
The InMail prompt version must 2.10 or higher to support this feature.
The telephone display language can be changed using dial access codes or softkeys
only.
The InMail language can be changed using dial access codes, softkeys only or End
User Web Pro.
The ability to change other extensions language options is allowed on a class of server
basis in PRG 20-13-53.
The system will not allow an InMail language to be selected if that language prompt set
has not been loaded onto the InMail CF. When an invalid language is selected an
error tone is heard.
Supported Languages
01 (US English)
02 (UK English)
03 (Australian English)
04 (French Canadian)
05 (Dutch)
06 (Mexican Spanish)
07 (Latin America Spanish)
08 (Italian)
InMail System Guide
2 - 223
Issue 5.00
09 (German)
10 (Madrid Spanish)
11 (Norwegian)
12 (Parisian French)
13 (Brazilian Portuguese)
14 (Japanese)
15 (Mandarin Chinese)
16 (Korean)
17 (Iberian Portuguese)
18 (Greek)
19 (Danish)
20 (Swedish)
21 (Thai)
22 (Taiwan)
23 (Flemish)
24 (Turkish)
Related Features
Group Mailboxes
Guide to Feature Programming
11-11-13
Service code Setup - Display Language Selection for keyset
Enter any valid entry for service code
.
11-11-68
Default = 778
Service Code Setup - InMail Language Selection for own mailbox
Enter any valid entry for service code
.
11-11-69
Default = no entry
Service Code Setup - InMail Language Selection for Specific mailbox
Enter any valid entry for service code
.
2 - 224
Default = no entry
Features
Issue 5.00
20-13-53
Class of Service Setup - Language Selection for specific extension
Define whether class of service user is allowed to set language for other
extension.
Options are:
0=disabled
1=enabled
.
Default = 0 (disabled)
LanguageSetting Operation
From an Idle Display Phone:
Down
Press down arrow
Prog
Press Program Softkey
Down
Press Down arrow
Down
Press down arrow again
Lang
Presss Language Softkey
Disp
To change telephone display press Display
Softkey
Own
To change your own extension
display language press Own
softkey
Choose
Lang
Select desired
language, press
down arrow to
advance to next
page. Press Softkey
for desired language.
Press Speaker to Exit
Other
To change another extension
display language, press Other
softkey
Ext #
Enter the extension
number to be
changed
Choose
Lang
Select desired
language, press
down arrow to
advance to the next
page. Press Softkey
for desired language.
Press Speaker to exit
VMail
InMail System Guide
To change spoken InMail mailbox language,
press VMail Softkey
2 - 225
Issue 5.00
LanguageSetting Operation (Continued)
Own
To change your own spoken
mailbox language, press Own
softkey
Change
Lang
Select desired
language, press
down arrow to
advance to the next
page. Press Softkey
for desired language.
Press Speaker to exit
Other
To change another spoken
mailbox language, press Other
Softkey
Ext #
Enter the extension
number to be
changed
Choose
Lang
Select desired
language, press
down arrow to
advance to the next
page. Press Softkey
for desired language.
Press Speaker to Exit
2 - 226
Features
Issue 5.00
Leaving a Message
Description
An extension user or outside caller can leave a voice message in a coworker’s
mailbox if that extension is busy, unanswered, or in Do Not Disturb. Leaving a voice
message is a handy and efficient way to communicate with coworkers that avoids
post-it notes, message pads, and unnecessary email.
Additional Options While Leaving a Message
The following chart shows the additional dialing options a caller may have while
listening to the mailbox greeting prior to leaving a message. What happens depends
on the setting of the Next Call Routing and Dialing Option options.
InMail System Guide
2 - 227
Issue 5.00
Dialing Options While Leaving a Message
47-02-14 Next Call
Routing Mailbox
47-02-13 Dialing
Option
Undefined
No
Digit
Dialed
0
1~9
1~32 (valid Call
Routing Mailbox)
No
Yes
Trunk Call
Intercom Call
Caller hears, “That is an invalid entry,” and the
greeting repeats.
#
InMail hangs up.
*
Caller skips greeting and can immediately
start recording.
0
Caller follows 0
action in Next Call
Routing Mailbox.
1~9
1~32 (valid Call
Routing Mailbox)
Action
Caller hears, “That is
an invalid entry,” and
the greeting repeats.
Caller hears, “That is an invalid entry,” and the
greeting repeats.
InMail hangs up.
#
Caller routes to the
Next Call Routing
Mailbox and hears its
Instruction Menu.
*
Caller skips greeting and can immediately
start recording.
0
Caller follows key’s
action in Next Call
Routing Mailbox.
Caller hears, “That is
an invalid entry,” and
the greeting repeats.
#
Caller routes to the
Next Call Routing
Mailbox and hears its
Instruction Menu.
InMail hangs up.
*
Caller skips greeting and can immediately
start recording.
1~9
Related Features
Next Call Routing Mailbox
The Next Call Routing Mailbox provides callers with additional dialing options after they
leave a message in a mailbox (depending on the setting of the Dialing Option option).
Quick Message
Quick Message allows Automated Attendant callers to leave a message in a Subscriber
Mailbox.
2 - 228
Features
Issue 5.00
Programming
No additional programming required.
Operation
Leaving a Message for a Coworker
To leave a message in the mailbox of an unanswered extension:
1. Press Message.
2. Leave message and hang up.
OR
Leave message and dial #.
.
Dialing # sends the message and hangs up.
Leaving a Message from Outside the Company
To leave a message in a mailbox:
1. Leave message and hang up.
OR
Leave message and dial #.
.
Dialing # may provide you with additional dialing options. This depends on how the called
mailbox’s Next Call Routing Mailbox is set up.
To leave a message in an extension mailbox, you can be:
Transferred to an extension mailbox by another user.
Automatically routed to a mailbox when the called party does not answer or is unavailable.
Sent to the mailbox from the Automated Attendant after dialing * plus the called party’s mailbox
number.
Routed from the Automated Attendant after dialing a uniquely programmed digit set up to send you
to an extension’s mailbox.
InMail System Guide
2 - 229
Issue 5.00
THIS PAGE INTENTIONALLY LEFT BLANK
2 - 230
Features
Issue 5.00
Listening to Messages
Description
While or after listening to a message, a Subscriber Mailbox user has many message
handling options from which to choose. The listening options let you quickly and
efficiently manage your voice mail messages, respond to the message sender, or
forward the message to a coworker for additional handling. The following table shows
these options.
Message Listen Options
Option
Description
RE (73)
[Not applicable]
Record a reply.
See Message Reply on page 2-283.
MF (63)
[Not applicable]
Forward the message to another mailbox.
See Message Forward on page 2-263.
MC (62)
[Not applicable]
Make a call to the message sender.
See Make Call on page 2-255.
TI (84)
Hear the time and date the message was sent.
See Time and Date on page 2-343.
SA (72)
Save the message in your mailbox.
E (3)
[Erase]
Erase the message.
See Message Delete on page 2-261 for more.
L (5)
[Next]
Listen to the next message.
B (2)
Back up a few seconds.
BB (22)
[Rpt]
Back up to the beginning of the message.
G (4)
Go ahead a few seconds.
*
Pause/resume recording.
1N (16)
[Not applicable]
Select New Message List
See Message Listen Mode on page 2-267.
1S (17)
[Not applicable]
Select Saved Message List
See Message Listen Mode on page 2-267.
1A (12)
[Not applicable]
Select All Message List
See Message Listen Mode on page 2-267.
#
[Exit]
Exit the listen mode.
X (9)
Exit your mailbox.
Dial 0 while listening to hear the list of options.
InMail System Guide
2 - 231
Issue 5.00
Notes:
If a subscriber’s mailbox is set to Auto Save messages, InMail saves partially listened-to
messages but does not relamp the keyset for those messages. For example:
A subscriber with new messages calls his mailbox.
The subscriber presses L to listen to a portion of each message and then exits his
mailbox.
InMail saves all the messages and turns off the message waiting lamp.
If you hang up before listening to the complete new message, InMail automatically retains
the message as a new message.
Telephone Display while Listening to a Message
While listening to a message, your telephone display shows you important information
about the message. This includes:
The caller’s telephone number (if available).
The selected Message List.
The message number in the selected list.
The date and time the message was left.
Keyset Display
Caller’s phone number
(requires Caller ID)
Currently selected
Message List
Date message was left
Message number (in
selected Message
Time message was left
Related Features
Auto Erase or Save
When a mailbox user completely listens to a new message and then exits their mailbox,
InMail either automatically saves or erases the message.
Message Record
While recording a message, an Subscriber Mailbox user has many recording options from
which to choose.
2 - 232
Features
Issue 5.00
Programming
1.
Set the Message Backup/Go Ahead Time.
47-01-05
Message Backup/Go Ahead Time (Msg Bkup/Adv Time)
This interval sets how far InMail backs up (1~60 seconds) when a mailbox
user dials B while recording or listening to their messages.
This interval also sets how far InMail jumps ahead (1~60 seconds) when a
user dials G while listening to messages.
.
By default, this interval is 5 seconds.
Operation
Listening to Messages
Log On to Subscriber Mailbox
L (5)
0
InMail System Guide
Access the Message Listen mode
[Lstn]
See Message Listen Options on page 2-231 for an explanation of the available
options.
Plays Help message
2 - 233
Issue 5.00
THIS PAGE INTENTIONALLY LEFT BLANK
2 - 234
Features
Issue 5.00
Live Record
Description
Live Record allows a subscriber to record their active call as a new message in their
mailbox, which they can review later on. Live Record can be helpful when an
extension user is on a call that involves a lot of detail (such as a technical discussion
or extensive directions). Rather than taking notes as the call progresses, the user can
record the conversation and carefully review it later on. InMail broadcasts a beep and
a voice prompt to the callers as Live Record begins. After calling their mailbox, the
subscriber can save, edit, or delete the recorded conversation.
Caution
The use of monitoring, recording, or listening devices to eavesdrop, monitor, retrieve, or
record telephone conversations or other sound activities, whether or not contemporaneous
with transmission, may be illegal in certain circumstances under federal or state laws. Legal
advice should be sought prior to implementing any practice that monitors or records any
telephone conversation. Some federal and state laws require some form of notification to all
parties to a telephone conversation, such as using a beep tone or other notification
methods or requiring the consent of all parties to the telephone conversation, prior to
monitoring or recording the telephone conversation. Some of these laws incorporate strict
penalties.
Related Features
Subscriber Mailbox
Live Record is available only to subscriber extensions.
Programming
1.
Assign a Voice Mail Record Key to the extension.
15-07-01
Programmable Function Keys
Assign a programmable key as a Voice Mail Record Key (code 78).
.
By default, no Voice Mail Record Keys are assigned.
Optionally assign a Live Record One-Touch key.
To assign the key: Speaker + Dial 851 + Press key + Dial 78 + Speaker.
To use the key: While on a call press the One-Touch key.
.
InMail System Guide
By default, no Live Record One-Touch keys are assigned.
2 - 235
Issue 5.00
2.
Enable or disable the Live Record beep.
47-02-07
Recording Conversation Beep (Rec Conv Beep)
Enable (1) the Live Record beep.
.
45-01-06
By default, the beep is enabled (1).
Record tone Alert Tone Interval
Optionally set the repeat interval (0~64800 seconds) for the additional Live
Record beep provided by the telephone system. Entering 0 disables the
additional beep.
.
3.
By default, the additional beep interval is 30 seconds (30).
Set the maximum length of recorded conversations.
47-01-03
Subscriber Message Length (Subs Msg Length)
The length of a recorded conversation is 10 times this interval.
The range for this option is 1~4095 seconds.
Since the Live Record time cannot exceed 4095 seconds, any setting in this
option larger than 409 has no effect on the length of recorded
conversations.
.
By default, this option is 120 seconds. This means the default length of recorded
conversations is 1200 seconds (20 minutes).
Operation
Live Record
To record your active call in your mailbox:
1. Press your Voice Mail Record key.
o
o
o
.
You hear 2 beeps and your Voice Mail Record key flashes.
The beeps periodically repeat to remind you that you are recording.
You and your caller hear the voice prompt “recording.”
Only one party on a call can use Live Record at any time. This includes Intercom calls and
Conference calls.
To turn live record off:
1. Press your Voice Mail Record key.
o
o
2 - 236
Recording stops.
No options are available while recording (such as pause, resume, and exit).
Features
Issue 5.00
Log On to Voice Mail
Description
A subscriber can log on to their mailbox using a method that best suits their needs
and location. While at their own phone, the subscriber just presses a single key to log
on to their mailbox. To use their mailbox while at a co-worker’s phone, the subscriber
dials the InMail master number, followed by their mailbox number (which is normally
the same as their extension number). If they are away from the office, the subscriber
can still use their mailbox by calling in through the Automated Attendant.
Local (On-site) Logon
An extension user can log on to their mailbox in the following ways:
Press their Message key to log on to their Subscriber Mailbox.
Dial the InMail master number (e.g., 200), followed by their mailbox number.
This method is typically used by Guest Mailbox users, as well as subscribers
attempting to log into their Subscriber Mailbox from a coworker’s phone.
Remote Log On
A Subscriber Mailbox user can call into the Automated Attendant and log on to their
mailbox. Following are two of the ways a user can do this:
After the Automated Attendant answers, dial a digit (typically #) followed by their
mailbox number. This method allows outside callers to log into their mailboxes
from outside the company. After they log on to their mailbox, they can use the
allowed features in the mailbox main menu.
.
To avoid unauthorized access to their mailbox, the user can enable his own unique
Security Code.
If an extension has a Direct Inward Line that voice mail picks up, the caller can
dial # during their greeting to log on to their mailbox (instead of leaving a
message). This method allows subscribers to dial their own number and then
use the features of their mailbox. This ability must be set up in the user Next Call
Routing Mailbox.
For example:
Program the Next Call Routing Mailbox # digit as LOGON to IXXX.
While listening to their greeting, the subscriber can dial:
# (to route to their Next Call Routing Mailbox), then
# and their mailbox number to log on to their mailbox.
.
InMail System Guide
By default, this option is provided in Call Routing Mailbox 1. Additionally, the subscriber
2 - 237
Issue 5.00
should enable a Security Code for their mailbox to prevent unauthorized logons.
Related Features
Automated Attendant
The Automated Attendant allows Subscriber Mailbox users to log into their mailboxes.
Greeting
After remotely logging on to their mailbox, a subscriber mailbox user can remotely record
their greeting.
Guest Mailbox
A guest can log on to their mailbox by dialing the InMail master number followed by the
Guest Mailbox number.
Security Code
To avoid unauthorized access to their mailbox (particularly with Remote Log On), the user
should enable their own unique Security Code.
Subscriber Mailbox
A subscriber can log into their mailbox by pressing a key on their telephone, dialing the
In-Mail master number (followed by their mailbox number), or logging on through the
Automated Attendant.
Programming
1.
Log on to a mailbox through the Automated Attendant:
47-13-01
Dial Action Table Actions: LOGON Action - Log On to Voice Mail (5)
(LOGON)
To log directly into a specific Subscriber Mailbox, enter the mailbox number
in the corresponding Number option.
For example, to have key 4 log directly into Subscriber Mailbox 305, for key
4 enter LOGON for the Action and 305 for the corresponding Number.
To have InMail request Automated Attendant callers to select a Subscriber
Mailbox to log into, enter N in the corresponding Number option. The key
you choose must represent the first digit in the Subscriber Mailbox number.
For example, to have the Automated Attendant request callers to enter the
number of the Subscriber Mailbox into which they wish to log, for key 3
enter LOGON for the Action and N for the corresponding Number. When
callers dial 3, they hear, “Please enter your mailbox number.”
To have InMail require Automated Attendant callers to enter a Subscriber
Mailbox to log into (without playing an announcement), enter XXX in the
2 - 238
Features
Issue 5.00
corresponding Number option. The key you choose must represent the first digit
in the Subscriber Mailbox numbers.
For example, to allow callers to log on to mailboxes 101~199, for key 3
enter LOGON for the Action and XXX for the corresponding Number.
To enter an X, press LK2.
To log into any valid Subscriber Mailbox, enter IXXX in the corresponding
Number option.
For example, to allow callers to dial 1 plus any Subscriber Mailbox number
to log on, for key 1 enter LOGON for the Action and IXXX for the
corresponding Number.
To enter an I, press LK3.To enter an X, press LK2.
See Automated Attendant on page 2-63 for more on how to set up InMail to
answer outside calls.
.
By default, key # Action = LOGON and Number = None.
Operation
Logging On to Your Mailbox
To log on to your Subscriber Mailbox:
Press Message.
-ORPress Voice mail key (PGM 15-07 or SC 851: 01 + Pilot e.g. 555).
-ORFrom an on-premise single line telephone, lift handset and dial 717.
To log on to your Guest Mailbox or your Subscriber Mailbox from a coworker’s extension:
Press the Speaker key + Dial the InMail master number (e.g., 555) + Dial your mailbox
number.
To log on to your Subscriber Mailbox from the Automated Attendant:
1. Wait for the Automated Attendant to answer.
2. Dial # and your mailbox number.
.
InMail System Guide
This option may be different in your system. Check with your Communications Manager.
2 - 239
Issue 5.00
THIS PAGE INTENTIONALLY LEFT BLANK
2 - 240
Features
Issue 5.00
Mailbox Announcement Message
Description
The Mailbox Announcement Message is a message, recorded by the System
Administrator, that plays to each subscriber when they log onto their mailbox. The
message will play at each log on until it expires, is deleted, or made inactive by the
System Administrator. Similar to the Broadcast Message, the Mailbox Announcement
Message is also used for important company announcements such as weatherrelated schedule changes and personnel updates. Unlike the Broadcast Message, the
Mailbox Announcement Message cannot be deleted, forwarded, or saved by the
subscriber.
After recording the Mailbox Announcement Message, the System Administrator can
choose how long they want the announcement to last. The choices are a specific
number of days or indefinite. Once the specific number of days passes, the message
expires (i.e., is made inactive but not deleted). The message can be reactivated later
on if required. The System Administrator can also make the message inactive before
it expires.
If a subscriber has a Security Code enabled for their mailbox, the Mailbox
Announcement Message will play after they enter their security code.
Related Features
Security Code
The Mailbox Announcement Message will play after the subscriber enters their security
code.
System Administrator
Only the System Administrator can record and set up a Mailbox Announcement Message.
Programming
Not applicable.
InMail System Guide
2 - 241
Issue 5.00
Operation
Recording a Mailbox Announcement Message
To record a Mailbox Announcement Message:
1.
Log onto System Administrator’s Mailbox.
2.
[System Admin]
[Mgr]
Select the System Administrator Menu.
• Alternately dial SA (72).
[MboxAn]
Select to go to the Mailbox Announcement Message Menu.
• Alternately dial 3.
3.
4.
Do one of the following:
a.
[Lstn]
Select to listen to the current Mailbox Announcement Message (if any).
• Alternately dial L (5).
#
b.
[Rec]
Select to record the Mailbox Announcement Message.
• Alternately dial R (7).
[Cncl]
Select to erase the recording.
• Alternately dial E (3).
[Done]
Select to confirm the recording and exit the recording mode.
• Alternately dial #.
• If you don’t set the Days in step c below, the message is
automatically set to active (i.e., indefinite).
[Days]
Enter the number of days the Mailbox Announcement Message
will be active (01~99, 00 for inactive).
• Alternately dial A (2).
c.
[Reset]
2 - 242
Exit the listen mode.
[OK]
Select to confirm your entry.
• Alternately dial C (2).
[Clear]
Select to back up to the previous level
without making any changes.
• Alternately dial I (4).
[Exit]
Select to return to the Mailbox
Announcement Message Menu without
making any changes.
• Alternately dial #.
Select to make the Mailbox Announcement Message active
indefinitely.
• Alternately dial Q.
[OK]
Select to confirm your entry.
• Alternately dial C (2).
[Clear]
Select to back up to the previous level without
making any changes.
• Alternately dial I (4).
[Exit]
Select to return to the Mailbox Announcement
Message Menu without making any changes.
• Alternately dial #.
Features
Issue 5.00
Recording a Mailbox Announcement Message (Continued)
c.
d.
[Erase]
Select to erase the Mailbox Announcement Message.
• Alternately dial E (3).
[Exit]
Select to go back to the System Administrator Menu.
• Alternately dial #.
Listening to a Mailbox Announcement Message
To listen to a Mailbox Announcement Message:
1.
Log onto Subscriber Mailbox.
2.
Enter your Security Code (if enabled).
3.
You hear the Mailbox Announcement Message.
[Skip]
4.
Optionally select to skip the Mailbox Announcement Message.
When the Mailbox Announcement Message completes, you go to the Mailbox Main Menu.
InMail System Guide
2 - 243
Issue 5.00
THIS PAGE INTENTIONALLY LEFT BLANK
2 - 244
Features
Issue 5.00
Mailbox Name
Description
A caller leaving a message in a Subscriber Mailbox can hear the mailbox’s
prerecorded name instead of the mailbox number. The prerecorded Mailbox Name
gives the subscriber’s mailbox that personal touch. Prior to leaving a message, callers
hear the name instead of the default “extension xxx” prompt. The recorded name can
be up to 10 seconds.
Related Features
Subscriber Mailbox
A subscriber can record a name for their mailbox, or have the System Administrator
record one for them.
System Administrator
The System Administrator can record names for Subscriber Mailboxes.
Programming
Not applicable
Operation
Recording Your Mailbox Name
Log On to Subscriber Mailbox.
RN
(76)
Access the Mailbox Name Menu.
[Not applicable]
L (5)
Listen to the currently recorded name (if any).
[Lstn]
#
R (7)
Exit listen mode.
Record a new name.
[Rec]
Record message.
InMail System Guide
2 - 245
Issue 5.00
Recording Your Mailbox Name
2 - 246
*
Pause or restart recording.
[Resume]
[Pause]
E (3)
Erase recording.
[Cncl]
#
Exit recording mode.
[Done]
E (3)
Erase the currently recorded name.
[Erase]
#
Go back to the Mailbox Main Menu.
[Exit]
0
Plays Help message.
Features
Issue 5.00
Recording or Erasing Co-worker’s Names from a System Administrator’s Mailbox
Log On to System Administrator’s Mailbox.
SA
(72)
Access System Administrator options.
[Not applicable]
S (7)
Select Subscriber Mailbox Maintenance options.
[Subs]
Enter the number of the Subscriber Mailbox you want to maintain.
EN
(36)
Erase the mailbox name.
[Name]
N (6)
Record a new mailbox name.
[Not applicable]
L (5)
Listen to currently recorded name (if any).
[Lstn]
#
R (7)
Exit listen mode.
Record a new name.
[Rec]
Record message.
#
0
InMail System Guide
*
Pause or restart recording.
[Resume]
[Pause]
E (3)
Erase recording.
[Cncl]
#
Exit recording mode.
[Done]
E (3)
Erase the currently recorded name.
[Erase]
#
Go back to Subscriber Maintenance Menu.
[Exit]
Go back to System Administrator options.
[Exit]
Plays Help message.
2 - 247
Issue 5.00
THIS PAGE INTENTIONALLY LEFT BLANK
2 - 248
Features
Issue 5.00
Mailbox Options Menu
Description
The Mailbox Options Menu is a sub-menu of a subscriber’s Main Menu that provides
access to the Auto Time Stamp, Mailbox Security Code Delete, and Message
Notification features. The chart below summarizes these options. Auto Time Stamp
helps if the subscriber needs to know the time and date of each message they receive
without taking any extra steps. If mailbox security is not an issue, the subscriber can
delete their security code to simplify logging on to their mailbox.
Mailbox Options Menu
Option
Description
S (7)
[Sec]
Erase the mailbox’s Security Code.
See Mailbox Security Code Delete on page 2-251.
N (6)
[Notif]
Set up Message Notification.
See Message Notification on page 2-269.
AT (28)
[Time]
Enable or disable Auto Time Stamp.
See Auto Time Stamp on page 2-61.
To hear the list of Mailbox Options, dial 0.
Related Features
Auto Time Stamp
InMail can optionally announce the time and date the message was left.
Mailbox Security Code Delete
The System Administrator can delete the security code for any Subscriber Mailbox.
Message Notification
Message Notification dials a telephone or pager number to let the user know they have
new messages in their mailbox.
Programming
No additional programming required.
InMail System Guide
2 - 249
Issue 5.00
Operation
Accessing the Mailbox Options Menu
Log On to Subscriber Mailbox.
OP
(67)
Access the Mailbox Options Menu.
[Not applicable]
0
2 - 250
Plays Help message.
Features
Issue 5.00
Mailbox Security Code Delete
Description
The System Administrator can delete the security code for any Subscriber Mailbox.
This effectively unlocks the mailbox. If mailbox security is not necessary, deleting a
mailbox security code speeds up mailbox log on. Without a security code, the
subscriber just presses their Message key to immediately log on to their mailbox.
Related Features
Mailbox Options Menu
Mailbox Security Code Delete is available on the Mailbox Options Menu.
Security Code
Subscriber Mailboxes can have Security Codes.
System Administrator
The System Administrator can delete a mailbox security code.
Programming
No additional programming required.
InMail System Guide
2 - 251
Issue 5.00
Operation
Deleting a Mailbox Security Code
Log On to System Administrator’s Mailbox.
SA
(72)
Access System Administrator options.
[Not applicable]
S (7)
Select Subscriber Mailbox Maintenance options.
[Subs]
Enter the number of the Subscriber Mailbox you want to maintain.
S (7)
#
0
2 - 252
Erase the mailbox Security Code.
[Not applicable]
Go to the System Administrator Menu.
[Exit]
Plays Help message.
Features
Issue 5.00
Main Menu
Description
After a Subscriber Mailbox user logs into their mailbox, InMail provides them with the
Main Menu of options. The Main Menu provides quick access to the most commonly
used mailbox features in a central location. It includes listening and recording options,
as well as additional selections for recording mailbox names and greetings. The chart
below summarizes these options.
Mailbox Main Menu
Option
L (5)
[Lstn]
Description
Listen to messages.
See Listening to Messages on page 2-231.
RS (77)
Record and send a message.
See Message Record on page 2-281.
G (4)
[Greet]
Record a mailbox greeting.
See Greeting on page 2-173.
[Rec]
RN (76)
[Not applicable]
Record a mailbox name.
See Mailbox Name on page 2-245.
1N (16)
[Not applicable]
Select the New Message List.
See Message Listen Mode on page 2-267.
1S (17)
[Not applicable]
Select the Saved Message List.
See Message Listen Mode on page 2-267.
1A (12)
[Not applicable]
Select the All Message List.
See Message Listen Mode on page 2-267.
OP (67)
[Not applicable]
Use the Mailbox Options. See the following:
See Security Code on page 2-327.
See Message Notification on page 2-269.
See Auto Time Stamp on page 2-61.
SA (72)
[Not applicable]
Access the System Administrator options.
See System Administrator on page 2-337.
TI (84)
X (9)
[Exit]
Check the current time and date.
See Time and Date on page 2-343.
Exit your mailbox.
See Exiting a Mailbox on page 2-145.
To hear the complete Main Menu of options, dial 0 while in the Main Menu.
InMail System Guide
2 - 253
Issue 5.00
Related Features
See the Mailbox Main Menu chart above.
Programming
No additional programming required.
Operation
Accessing the Mailbox Main Menu
Log On to Subscriber Mailbox.
You automatically go to the mailbox Main Menu.
0
2 - 254
Plays Help message which summarizes the Main Menu options.
See Mailbox Main Menu on page 2-253 for the Main Menu options.
Features
Issue 5.00
Make Call
Description
Make Call lets a Subscriber Mailbox user listen to a voice message and dial MC to
return the call without knowing their caller’s phone number. Make Call automates
returning messages since you don’t have to dial the message sender’s telephone
number. Make Call is always available for messages received from coworkers. Make
call is available for messages received from outside callers if the system has Caller ID
enabled (and provided by the connected telco).
While listening to a message, the telephone display shows the callers number (or
extension) in addition to the date and time the message was left.
Automatic Route Selection
Since trunk Caller ID data is always received as 10 digits, you must set up Automatic
Route Selection (ARS) to properly process the digits dialed during a Make Call
callout. For example, it may be necessary to add a leading 1 for all long distance calls
or strip the leading 1 and area code from all local calls. Refer to Automatic Route
Selection in the SV8100 Programming Manual for more information. Without ARS, all
Make Call callouts are dialed exactly as the Caller ID data is received.
Related Features
Caller ID
Make Call for outside calls is available only if the telco provides Caller ID to the telephone
system and the telephone system passes that Caller ID data to the InMail voice mail ports.
Message Reply
Message Reply cannot automatically reply to a message left by an outside caller. Use
Caller ID with Return Call instead.
Programming
1.
Be sure the telco provides Caller ID to the connected telephone system.
2.
Check your telephone system programming to be sure the telephone system is
set up to receive Caller ID and pass it to the InMail voice mail ports.
14-02-10
Analog Trunk Data Setup - Caller ID
Enable (1) a trunk’s ability to receive Caller ID data.
InMail System Guide
2 - 255
Issue 5.00
.
14-01-22
By default, a trunk’s ability to receive Caller ID data is disabled (0).
Basic Trunk Data Setup - Caller ID to Voice Mail
Enter 1 (Yes) to enable this option.
.
20-09-02
By default, this option is disabled.
Class of Service Options (Incoming Call Service) - Caller ID Display
Enter 1 (Yes) to enable the Caller ID display at an extension.
.
20-06-01
By default, this option is disabled.
Class of Service for Extensions
Assign Class of Service to extensions.
.
3.
By default, extension 101 has Class of Service 15. All other extensions have Class
of Service 1.
Set up Trunk Group Routing.
Make Call callouts use Trunk Group Routing (dial 9) when selecting outbound routes.
14-05-01
Trunk Groups
Assign trunks to trunk groups (1~8).
.
14-06-01
By default, all trunks are in group 1.
Trunk Group Routing
Set up Trunk Group Routing. There are 8 routing tables, with 4 routes in
each table.
.
By default, the first route in routing table 1 is trunk group 1. No other entries are
defined. This makes trunk group 1 the dial 9 route by default.
Refer to Trunk Group Routing in the InMail Programming Manual for more.
4.
Enable Loop Supervision for the trunks on which you are going to allow remote
logons to use Make Call.
14-01-13
Basic Trunk Data Setup - Loop Supervision
Enter 1 to enable Loop Supervision for each trunk to be used for External
Transfer.
.
5.
By default, this option is enabled for all trunks.
If you are going to allow remote logos to use Make Call, enable Trunk-to-Trunk
Transfer for all InMail extensions.
20-11-14
Class of Service Options (Hold/Transfer Service) - Trunk-to-Trunk
Transfer Restriction
For each InMail extension to be used for External Transfer, enter 0 to
enable Trunk-to-Trunk Transfer Restriction. (Entering 1 disables Trunk-toTrunk Transfer Restriction).
20-06-01
Class of Service for Extensions
Assign Class of Service to extensions (1-15).
2 - 256
Features
Issue 5.00
Operation
Using Make Call from your Mailbox
Log On to Subscriber Mailbox.
L (5)
Listen to the message for which you want to make a return call.
[Lstn]
MC
(62)
Dial this code while listening to the message you want to return.
[Not applicable]
Make Call automatically places a return call to the co-worker that left you the
message.
If your system has Caller ID, Make Call can automatically place a return call
to your outside caller.
If you hear “Your call cannot go through,” your system’s Caller ID is not
properly set up. You go right back to the listen mode for the message you
were listening to when you tried the Make Call.
InMail System Guide
2 - 257
Issue 5.00
THIS PAGE INTENTIONALLY LEFT BLANK
2 - 258
Features
Issue 5.00
Message Count Display
Description
The telephone display provides interactive status updates for the subscriber’s
mailbox. When initially logged on to the mailbox, the telephone display shows the
number of new and saved messages. The message count automatically updates as
the subscriber receives new messages and processes older messages.
22- and 34-Button Display
If an extension Message key is optionally assigned as a Message Waiting key (see
Programming below), the telephone display can show the number of new Voice Mail
messages without the user logging on to their mailbox. If the user has 1 new Voice
Mail message in their mailbox, for example, they see the following display:
Enhanced Message Key Operation
When a keyset has 15-02-26 Multiline Telephone Basic Setup: Message Key
Operation Mode set to 1, the Message key provides one-button access to InMail.
When the user presses Message, they immediately call their mailbox.
When a keyset has 15-02-26 Multiline Telephone Basic Setup: Message Key
Operation Mode set to 0, the following occurs:
If a user has new voice mail messages waiting, pressing Message shows the
number of waiting voice mail messages. Pressing Message a second time calls
voice mail.
If a user has new Message Waiting indications left, pressing Message shows
the extension that left the Message Waiting. Pressing Message a second time
places an Intercom call to the coworker that left the Message Waiting.
If a user has both new Voice Mail messages and Messages Waiting:
Pressing Message shows the number of new voice mail messages.
Pressing Vol Up and Vol Down scrolls between the voice mail messages count and
the Message Waiting count.
InMail System Guide
2 - 259
Issue 5.00
Pressing Message a second time either calls Voice Mail or returns the Message
Waiting call, depending on which count is displayed.
Related Features
Not applicable
Programming
1.
Optionally assign an extension’s MSG key as a Message key.
15-01-26
Message Key Operation Mode
Enter 0 to optionally assign the Message key as a Message Waiting key.
.
15-07-01
By default, all extensions have the Message key assigned for Message Waiting (0).
Programming Function Keys
For one-button access to the Subscriber Mailbox, set up a Voice Mail key
(code 77 + Mailbox number).
.
By default, no Voice Mail keys are assigned.
Operation
Using the Message Count Display
Operation is automatic.
2 - 260
Features
Issue 5.00
Message Delete
Description
A Subscriber Mailbox user can delete any message left in their mailbox. Message
Delete lets the subscriber do their own mailbox maintenance. They can delete
messages they no longer need and save messages that contain essential
information. With Message Delete, the subscriber doesn’t have to rely on the System
Administrator to perform these routine mailbox maintenance functions.
Related Features
Erasing All Messages
The System Administrator can delete all messages in a Subscriber Mailbox.
Subscriber Mailbox
A subscriber can log on to their mailbox and delete any of their messages.
Programming
No additional programming required.
Operation
Deleting a Message
Log On to Subscriber Mailbox.
L (5)
Access Message Listen mode (to listen to the message that you want to delete).
[Lstn]
E (3)
Erase the message.
[Erase]
You automatically return to the Message Listen mode.
The message count updates after the user hangs up.
InMail System Guide
2 - 261
Issue 5.00
THIS PAGE INTENTIONALLY LEFT BLANK
2 - 262
Features
Issue 5.00
Message Forward
Description
A Subscriber Mailbox user can forward a message in their mailbox to a coworker or
coworkers. Forwarding is helpful when a subscriber receives a message with which a
coworker can assist them. Rather than sending a new message, the subscriber can
just forward the message with which they need help. If needed, they can send the
message to up to 10 other mailboxes. They can also optionally record a comment
before the forwarded message. Typically, the comment would describe the reason for
the message forwarding.
InMail erases the message in the subscriber’s mailbox after they forward it. The
Message Forward destination receives the forwarded message as a new message.
Related Features
Call Forward to a Mailbox
An extension user can easily forward calls to their mailbox.
Programming
No additional programming required.
InMail System Guide
2 - 263
Issue 5.00
Operation
Forwarding a Message
Log On to Subscriber Mailbox.
L (5)
Access the Message Listen mode (to listen to the message that you want to
forward).
[Lstn]
MF
(63)
Access the Message Forward Menu.
[Not applicable]
Enter the number of the mailbox to which you want to forward the
message.
#
Start recording.
[Cont]
Record a comment that will precede the forwarded
message, OR
Dial # to forward without a comment.
While recording a comment for your forwarded
message.
*
#
#
0
2 - 264
*
Pause or restart recording.
[Resume]
E (3)
Cancel the forwarding and exit your
mailbox.
[Cncl]
#
End the recording.
[Done]
Back up and re-enter the mailbox number.
[MBOX]
Go back to the Message Listen mode.
[Exit]
Exit the Message Listen mode and go to the Mailbox Main Menu.
[Exit]
Plays Help message.
Features
Issue 5.00
Message Length
Description
You can set the maximum length of a message that can be left in a Subscriber
Mailbox. When a caller tries to leave a message that exceeds the limit, they hear,
“You have reached the recording limit.” InMail sends the portion of the message that
fits within the allowed Message Length and hangs up. The Message Length option
helps maximize the storage space reserved for messages. If you find that callers are
leaving unusually long messages, shorten the Message Length. InMail cuts off the
message when the caller reaches the Message Length limit. On the other hand, if you
hear that InMail is cutting off caller’s messages prematurely, increase the Message
Length for more time.
Related Features
Not applicable
Programming
1.
Set the maximum length of recorded messages.
47-01-03
Subscriber Message Length (Subs Msg Length)
This option sets the maximum length (1~4095 seconds) of recorded
messages for:
Subscriber Mailbox users dialing RS (77) to record and send a message.
Extension users leaving a message in a Subscriber Mailbox.
Outside Automated Attendant callers accessing a mailbox via a GOTO
command and then dialing RS to record and send a message.
Subscriber Mailbox Greetings.
Mailbox Names.
Announcement Messages.
Call Routing Mailbox Instruction Menus.
.
2.
InMail System Guide
By default, these types of messages are 120 seconds long maximum.
Set the maximum length of recorded Quick Messages.
2 - 265
Issue 5.00
47-01-04
Non-Subscriber Message Length (Mbox Msg Length)
This option sets the maximum length (1~4095 seconds) of recorded
messages for:
Automated Attendant callers leaving a message or Quick Message in a
Subscriber Mailbox.
Outside callers transferred by an extension user to a Subscriber Mailbox.
.
By default, these types of messages are 120 seconds long maximum.
Operation
Not applicable
2 - 266
Features
Issue 5.00
Message Listen Mode
Description
After logging on to their mailbox, the subscriber can select the category of messages
they want to hear. Then they can listen to just new messages, just saved messages,
or all messages. Message Listen Mode lets the subscriber customize their mailbox to
initially play just the list of messages they want to hear. For example, if a subscriber
has many saved messages and just a few new messages, then can log on to their
mailbox and dial 1N to select the new message list. When they press L, they then
cycle through just their new message.
Initially, a Subscriber Mailbox uses the All Message List. If they select a different
message list, InMail reinstates the all Message List the next time they log on to their
mailbox.
Related Features
Main Menu
The Message Listen mode options are mailbox Main Menu selections.
Programming
Not applicable
Operation
Message Listen Mode
Log On to Subscriber Mailbox.
[Not applicable]
1N
(16)
1S
Listen to saved messages.
[Not applicable]
1A
Listen to all messages.
[Not applicable]
(17)
(12)
0
InMail System Guide
Listen to new messages.
[Not applicable]
Plays Help message.
2 - 267
Issue 5.00
THIS PAGE INTENTIONALLY LEFT BLANK
2 - 268
Features
Issue 5.00
Message Notification
Description
Once activated by the Subscriber Mailbox user, Message Notification dials a
telephone number to let the user know when there are new messages in their
mailbox. With Message Notification, a subscriber who is out of the office does not
have to keep calling their mailbox remotely to find out if they have new messages.
In-Mail lets them know automatically. Notification can call extensions, local numbers,
long distance numbers and digital pagers.
Licenese permitting up to 5 destinations can be set. By default only one destination is
permitted.
When a Subscriber Mailbox user sets up Message Notification, they choose from the
following options:
If Message Notification is enabled or disabled.
(Message Notification can only occur if it is enabled.)
The time of day Message Notification should begin and end.
(Callouts only occur between the begin and end times.)
The type of device Message Notification is calling.
(Message Notification can call a normal telephone number or a digital pager.)
The telephone or pager service phone number.
To protect your mailbox from unauthorized access, be sure to record a security code
for your mailbox before enabling Message Notification.
How Message Notification Works to Normal Telephone Numbers
1.
The subscriber activates Message Notification for their mailbox (see Operation
below).
2.
When the subscriber receives a new message, InMail immediately dials the
destination that should receive the Message Notification.
InMail waits up to 30 seconds for ringback, reorder, busy or voice activity from the
called number. If nothing is detected, the callout is considered unanswered.
3.
If the recipient answers, InMail plays the notification message (“Hello, I have a
message for”) and asks the recipient to dial 1 to log on to their mailbox. The
recipient hears the notification message if:
They say “Hello” after answering the callout.
- OR The system receives answer supervision from the telco after the recipient answers
InMail System Guide
2 - 269
Issue 5.00
the call.
.
Note that the recipient can skip the announcement by dialing 1 to log on to their
mailbox after answering the callout – without saying “Hello.”
The notification is to a system extension.
4.
After the recipient logs on to the mailbox, the notification is considered
acknowledged and does not reoccur until the subscriber receives new
messages.
5.
If the recipient doesn’t answer, the system retries the callout number. After
completing the programmed number of callout attempts, Message Notification
stops.
6.
After the notification process begins, a new message does not restart the
process if it is already in progress. After the process ends (e.g., if the message
is acknowledged or the maximum number of callout attempts is reached), the
next new message restarts the process.
Related Features
Security Code
To protect their mailbox from unauthorized access, the subscriber should be sure to record
a Security Code for your mailbox before enabling Message Notification.
Programming
Programming that Applies to All Types of Message Notification
1.
Set up Trunk Group Routing.
Message Notification callouts use Trunk Group Routing (dial 9) when selecting
outbound routes.
14-05-01
Trunk Groups
Assign trunks to trunk groups (1~8).
.
14-06-01
By default, all trunks are in group 1.
Trunk Group Routing
Set up Trunk Group Routing. There are 8 routing tables, with 4 routes in
each table.
.
By default, the first route in routing table 1 is trunk group 1. No other entries are
defined. This makes trunk group 1 the dial 9 route by default.
Refer to Trunk Group Routing in the SV8100 Programming Manual for
more.
2.
2 - 270
Set the maximum number on incomplete callout attempts.
Features
Issue 5.00
47-01-14
Number of Callout Attempts (Notify Call Attmpt)
Set how many times (1~99 attempts) InMail retries an incomplete Message
Notification callout. This total includes unacknowledged callouts, callouts to
a busy destination, and callouts to an unanswered destination. This option
applies to pager and non-pager callouts.
.
3.
The default setting for this option is 5 attempts.
Be sure Message Waiting lamp for Subscriber Mailboxes is on.
47-02-08
Message Waiting Lamp (Update MW Lamp)
Enter 1 (Yes) to enable Message Waiting lamp.
If Message Waiting lamp is disabled (0), Message Notification will not
function.
.
By default, this option is 1 (Yes).
Unique Programming for Non-Pager Message Notification
1.
Set the intervals InMail waits between incomplete non-pager Message
Notification callouts.
47-01-10
Wait Between Non-Pager Callout Attempts (Notify N-Pgr Intvl)
Set the minimum time (1~255 minutes) between non-pager Message
Notification callouts in which the destination answers, says “Hello,” dials 1
to acknowledge and then enters the wrong security code.
.
47-01-11
The default for this option is 20 minutes.
Wait Between Busy Non-Pager Callout Attempts (Notify Busy Intvl)
Set how long InMail will wait (1~255 minutes), after it dials a busy
non-pager callout destination, before retrying the callout number.
.
InMail System Guide
The default for this option is 15 minutes.
2 - 271
Issue 5.00
47-01-12
Wait Between RNA Non-Pager Callout Attempts (Notify RNA Intvl)
Set how long InMail will wait (1~255 minutes), after it dials an unanswered
non-pager callout destination, before retrying the callout number. The
default setting for this option is 30 minutes.
There are three types of unanswered non-pager callouts:
If the callout rings the destination longer than the 47-01-13 Wait for Answer
Non-Pager Callout Attempts option.
If the destination answers, says “Hello” (or the system detects answer
supervision) and then hangs up without dialing 1 to log on to their mailbox.
This typically happens if someone unfamiliar with notification answers the
callout, or if the callout is picked up by an answering machine.
If the destination answers and then hangs up without saying “Hello.” This
typically happens if someone unfamiliar with the notification answers the
callout (like the above example), or if the call is picked up by an answering
machine which insufficient outgoing message volume.
.
2.
The default for this option is 30 minutes.
Set how InMail determines when a non-pager callout rings without being
answered.
47-01-13
Wait for Answer Non-Pager Callout Attempts (Notify RNA Rings)
If a non-pager callout rings the destination longer than this option (1~99
rings), InMail marks the call as unanswered (Ring No Answer) and hangs
up.
.
47-20-01
The default for this option is 5 rings.
Notification (Index 1~5)
For the selected entry, enable or disable each individual notification
destination
.
47-20-02
The default for this is off
Notification Begin hour (Index 1~5)
For the selected entry, enter the time for the notification attempts for this
index to begin
.
47-20-03
The default for this is 0
Notification End hour (Index 1~5)
For the selected entry, enter the time for the notification attempts for this
index to end
.
47-20-04
The default for this is 0
Notification Type (Index 1~5)
Enter the notification type for this index.
For the selected entry, choose voice when the entry is for a regular office,
home or mobile telephone
0 = undefined
1 = voice
2 - 272
Features
Issue 5.00
2 = pager
47-20-05
Notification Number (Index 1~5)
For the selected entry, use this option to set the telephone number (16 digits
maximum). Enter the number exactly as you wish the system to dial it but
do not include a dial access code (such as 9). If the number matches an
extension number it will be an intercom call, otherwise it will be an outside
call.
.
47-20-06
Default = no entry
Notification Busy Attempts (Index 1~5)
For the selected entry, use this option to set how many times InMail will try
an incomplete Message Notification callout to a busy destination (0~99).
.
47-20-07
Default = 5 attempts
Notification Ring no Answer Attempts (Index 1~5)
For the selected entry, use this option to set how many times Inmail will
retry an incomplete Message Notification attempt when th edestination
does not answer. (0~99)
.
47-20-08
Default = 5 attempts
Notification Security (Index 1~5)
For the selected entry, use this option to enable or disable the security code
protection for the callout. If enabled, the user is required to enter their
security code in order to log on and hear the new message. If disabled, the
security is not required.
.
InMail System Guide
Default = enabled
2 - 273
Issue 5.00
Operation
Setting Up Message Notification
Log On to Subscriber Mailbox.
OP
(67)
Access the Mailbox Options menu.
[Not applicable]
N (6)
Access the Message Notification Options Menu.
[Notif]
InMail plays a summary of your Message Notification settings.
The your telephone display shows your current notification settings (see
sample below).
For telephone numbers
Notify On 8am- 5pm
Number: 12039265400
- OR For Pager Numbers
Notify On 8am- 5pm
Pager: 12039265400
O (6)
Turn Message Notification on or off.
[On]
[Off]
C (2)
Change your Message Notification setup.
[Chnge]
When you see: Notification Begin
Enter the hour you want Message Notification to
begin.
Enter 2 digits for the hour
A (2)
Select AM
[AM]
P (7)
Select PM
[PM]
*
Skip this option without changing your entry.
[Next]
#
Back up to the previous level without
changing your entry.
[Exit]
When you see: Notification End
Enter the hour you want Message Notification to end.
Enter 2 digits for the hour.
For 24-hour notification, make the End Time the same as
the Start Time.
2 - 274
A (2)
Select AM
[AM]
P (7)
Select PM
[PM]
Features
Issue 5.00
Setting Up Message Notification (Continued)
*
Skip this option without changing your entry.
[Next]
#
Back up to the previous level without
changing your entry.
[Exit]
When you see: Notify Via
N (6)
The notification destination is a telephone
number.
[Num]
D (3)
The notification destination is a digital pager
(not supported).
[Pager]
*
Skip this option without changing your entry.
[Next]
#
Back up to the previous level without
changing your entry.
[Exit]
When you see: Number
Enter the Message Notification callout number (16
digits max).
Enter the number exactly as you want the system to dial
it (including a leading 1 for toll calls, if required).
If the number you enter is 4 digits or less, it is an
Intercom call. If it is more than 4 digits, it is an outside
call.
#
#
0
InMail System Guide
#
Accept the number entered and
back up to the previous level.
[OK]
[Clear]
Erase the number you just
entered.
*
Skip this option without changing your entry.
[Next]
#
Back up to the previous level without
changing your entry.
[Exit]
Go back to the Mailbox Options menu.
[Exit]
Go back to the Main Menu.
[Exit]
Plays Help message.
2 - 275
Issue 5.00
Answering a Message Notification Callout to a Telephone
To answer a Message Notification to a telephone:
1. Answer the callout at the programmed destination.
If InMail does not hear your voice (or you do not speak), go to the next step and dial 1
to proceed.
2. Dial 1 to accept the Message Notification.
- OR hang up to have the Message Notification call back later.
3. When you dial 1, you automatically log on to the subscriber mailbox that left you the
Message Notification.
o If you do not log on to your mailbox, InMail resends your notification.
o
2 - 276
Features
Issue 5.00
THIS PAGE INTENTIONALLY LEFT BLANK
InMail System Guide
2 - 277
Issue 5.00
2 - 278
Features
Issue 5.00
Message Playback Direction
Description
When a user dials L (5) after logging on to their mailbox, InMail plays their messages
in either LIFO (last-in-first-out) or FIFO (first-in-first-out) order. Since Message
Playback Direction lets a subscriber listen to messages in the order they find most
helpful, check with them to find out how they want this option set. If the subscriber
prefers to hear their new messages first, enable LIFO (last-in-first-out) listening order.
The newest (last-in) messages are at the top of the message list and the oldest
messages are at the bottom of the list. If the subscriber wants to be reminded of their
oldest messages first, enable FIFO (first-in-first-out) listening order. The oldest (firstin) messages are at the top of the message list and the newest messages are at the
bottom.
Related Features
Listening to Messages
Programming
1.
Set the Message Playback Direction for a Subscriber Mailbox.
47-02-04
Message Playback (Message Playback)
The options are:
0 - FIFO (first-in-first-out, or oldest messages first).
1 - LIFO (last-in-first-out, or newest messages first).
.
By default, this option is 0 (FIFO, or first-in-first-out).
Operation
Not applicable
InMail System Guide
2 - 279
Issue 5.00
THIS PAGE INTENTIONALLY LEFT BLANK
2 - 280
Features
Issue 5.00
Message Record
Description
See Record and Send a Message on page 2-313.
Related Features
See Record and Send a Message on page 2-313.
Programming
See Record and Send a Message on page 2-313.
Operation
See Record and Send a Message on page 2-313.
InMail System Guide
2 - 281
Issue 5.00
THIS PAGE INTENTIONALLY LEFT BLANK
2 - 282
Features
Issue 5.00
Message Reply
Description
A Subscriber Mailbox user can reply to a message from a coworker by dialing RE,
without knowing the caller’s extension or mailbox number. Message Reply saves the
subscriber valuable time since they don’t need to know the sender’s extension
number or send a separate message to respond. The subscriber can just listen to the
coworker’s message, dial a code, and record their answer. The message sender
receives the reply as a new message.
Related Features
Make Call
Message Reply does not apply to outside calls. If the telephone system provides Caller ID
information to InMail, a subscriber can use Make Call (MC) to call the person back.
Programming
No additional programming required.
Operation
Message Reply
Log On to Subscriber Mailbox.
L (5)
Listen to your messages.
[Lstn]
While listening to a message.
RE
(73)
Reply to the message.
[Not applicable]
If the mailbox does not exist, you are prompted to enter the
mailbox number to receive the reply. This can occur if you dial RE
while listening to a message from an outside caller.
#
Start recording.
[Cont]
Options available while recording.
InMail System Guide
2 - 283
Issue 5.00
Message Reply
*
[Exit]
#
0
2 - 284
*
Pause or restart recording.
[Resume]
[Pause]
E (3)
Erase recording.
[Cncl]
#
End the recording.
[Done]
Back up and re-enter the mailbox number.
[MBOX]
Exit without recording and go back to the
Message Listen menu.
Exit and go back to the mailbox Main Menu.
[Exit]
Plays Help message
Features
Issue 5.00
Message Storage Limit
Description
Message Storage Limit sets how many messages can be left in a Subscriber Mailbox.
Message Storage Limit is another invaluable tool for managing InMail’s voice
message storage space. To conserve storage space and make it available for new
messages, decrease the Message Storage Limit. If storage space is not an issue,
increase the Message Storage Limit so subscribers can store additional messages.
Be sure to let the subscribers know how many messages their mailboxes can hold. By
default, InMail can store up to 99 messages in System Admin mailbox 101 and 20
messages in all other Subscriber Mailboxes.
Related Features
Erasing All Messages
The System Administrator can delete all messages in a Subscriber Mailbox.
Message Delete
A Subscriber Mailbox user can delete any messages left in their mailbox.
Programming
1.
Set the maximum number of messages that can be left in a Subscriber Mailbox.
47-02-03
Number of Messages (Number of Messages)
Enter the maximum number of messages the mailbox can store (0~99).
If a caller tries to leave a message after the maximum number is reached,
they hear: “That mailbox is full.” InMail then hangs up.
.
By default, the maximum number of messages that can be left is 99 for extension
200 and 20 for all others.
Operation
Not applicable
InMail System Guide
2 - 285
Issue 5.00
THIS PAGE INTENTIONALLY LEFT BLANK
2 - 286
Features
Issue 5.00
Message Waiting Lamp
Description
An extension’s Message Waiting (MSG) lamp flashes on the telephone to indicate
that the user has new messages waiting in their mailbox. After InMail is properly
installed and programmed, telephone Message Waiting Lamp operation is automatic.
The lamp flashes fast when new messages are in the extension user’s mailbox. The
Message Waiting Lamp is a visual reminder of new messages. The subscriber does
not have to call their mailbox and listen to the voice prompts to find out when they
have new messages.
Related Features
None
Programming
1.
Turn Message Waiting lamp for Subscriber Mailboxes on or off.
47-02-08
Message Waiting Lamp (Update MW Lamp)
Enter 0 (No) to disable Message Waiting lamp.
Enter 1 (Yes) to enable Message Waiting lamp.
If Message Waiting lamp is disabled (0), Message Notification does not
function.
.
2.
By default, this option is 1 (Yes).
Select Message Waiting Lamp color.
15-02-28
Message Waiting LED Color
Enter 0 = Flashes Green
Enter 1 = Flashes Red
.
By default, this option is set to 1 (Flashes Red).
Operation
Not applicable
InMail System Guide
2 - 287
Issue 5.00
THIS PAGE INTENTIONALLY LEFT BLANK
2 - 288
Features
Issue 5.00
Multiple Company Greetings
Description
The Automated Attendant can answer each individual trunk (outside line) with a
unique greeting and unique set of dialing options. Since there are a total of 8 Answer
Tables, this allows up to 8 companies or departments to share a single InMail. Callers
to each company hear the company greeting (Instruction Menu) and can dial options
that may be only available to that specific company. Set this up as follows:
Assign a unique Answer Table (1~8) to each trunk that you want to have an
individual greeting.
For each Answer Table, assign the Call Routing Mailbox that handles the call.
For each assigned Call Routing Mailbox, set up the dialing options (Dial Action
Table) and record an Instruction Menu.
If multiple companies or departments share an InMail, messaging and calling between
the workers of each company or department is not restricted.
Related Features
Answer Tables
Determines how the Automated Attendant answers outside calls on each trunk.
Automated Attendant
The Automated Attendant can automatically answer the telephone system’s incoming
calls, play an Instruction Menu message, and provide dialing options to callers.
Routing Mailbox
The mailbox associated with an Answer Table that specifies which dialing options (Dial
Action Table) and announcements are available to Automated Attendant callers.
Dial Action Table
Defines the dialing options for the Call Routing Mailbox chosen by the active Answer
Table.
InMail System Guide
2 - 289
Issue 5.00
Programming
1.
Assign an Answer Table to each trunk.
47-10-01
Answer Table Assignment (Answer Table)
Assign an Answer Table (1~8) to each trunk that the Automated Attendant
should answer.
.
2.
By default, all trunks are assigned to Answer Table 1.
See the following features for more:
Answer Tables on page 2-45.
Automated Attendant on page 2-63.
Routing Mailbox on page 2-317.
Dial Action Table on page 2-105.
Operation
Not applicable
2 - 290
Features
Issue 5.00
Next Call Routing Mailbox
Description
The Next Call Routing Mailbox provides callers with additional dialing options while
listening to a Subscriber Mailbox recorded, or the default greeting. It also provides
additional dialing options to callers routed to an Announcement Mailbox. Next Call
Routing Mailbox lets the caller choose how InMail should handle their call. For
example, if an Automated Attendant caller dials a subscriber’s extension and hears
the greeting, Next Call Routing Mailbox (if programmed) allows them to dial other
options instead of hanging up.
Subscriber Mailbox Options
The following chart shows the additional dialing options a caller has while listening to
a Subscriber Mailbox recorded or default greeting. The digits the caller can dial
depends on the setting of the Next Call Routing Mailbox and Dialing Option options.
For an explanation of the options a caller can dial while recording, see Record and
Send a Message on page 2-313.
InMail System Guide
2 - 291
Issue 5.00
Dialing Options while Listening to a Subscriber Mailbox Greeting
47-02-14 Next
Call
Routing
Mailbox
47-02-13
Dialing Option
Digit
Dialed
Action
Undefined
No
0
1~9
1~32 (valid Call
Routing
Mailbox)
No
2 - 292
Yes
Intercom Call
Caller hears, “That is an invalid entry,” and
the greeting repeats.
#
InMail hangs up.
*
Caller skips greeting and can immediately
start recording.
0
Caller follows 0
action in Next Call
Routing Mailbox.
1~9
1~32 (valid Call
Routing
Mailbox)
Trunk Call
Caller hears, “That is
an invalid entry,” and
the greeting repeats.
Caller hears, “That is an invalid entry,” and
the greeting repeats.
InMail hangs up.
#
Caller routes to the
Next Call Routing
Mailbox and hears its
Instruction Menu.
*
Caller skips greeting and can immediately
start recording.
0
Caller follows key’s
action in Next Call
Routing Mailbox.
Caller hears, “That is
an invalid entry,” and
the greeting repeats.
#
Caller routes to the
Next Call Routing
Mailbox and hears its
Instruction Menu.
InMail hangs up.
*
Caller skips greeting and can immediately
start recording.
1~9
Features
Issue 5.00
Logging On to a Subscriber Mailbox while Listening to the Greeting
A subscriber who wishes to log on to their mailbox while listening to their greeting
must have the option set in their Next Call Routing Mailbox. To allow this ability, for
example:
Program the Next Call Routing Mailbox # digit as LOGON to IXXX.
While listening to their greeting, the subscriber can dial:
# (to route to their Next Call Routing Mailbox), then
# and their mailbox number to log on to their mailbox.
By default, this option is provided in Call Routing Mailbox 1. Additionally, the
subscriber should enable a Security Code for their mailbox to prevent unauthorized
logons.
Announcement Mailbox Options
The following charts show how an Announcement Mailbox handles Automated
Attendant calls.
The first chart explains what happens when the outside call is directly answered by the
Announcement Mailbox. This happens when the Answer Table uses an Announcement
Mailbox for routing instead of a Call Routing Mailbox.
The second chart explains what happens when the outside call is answered by a Call
Routing Mailbox and then routed to the Announcement Mailbox. This can happen, for
example, when a caller dials a digit to hear an announcement of company directions.
.
InMail System Guide
For more information, see Answer Tables on page 2-45.
2 - 293
Issue 5.00
Direct Announcement Mailbox Routing
(If the outside caller routes directly to the Announcement Mailbox)
47-09-01 Next
Call
Routing
Mailbox
47-09-02
Repeat
Count
Undefined
0 (No repeats)
1~32 (valid
Call Routing
Mailbox)
0 (No repeats)
47-09-03
Hang Up
After
0 = None
1 = Goodbye
2 = Silent
If the caller doesn’t dial, after the
announcement InMail hangs up.
If the caller dials a digit during the
announcement, InMail says “That is an
invalid entry” and hangs up.
0 = None
1 = Goodbye
2 = Silent
If the caller doesn’t dial, after the
announcement they route to the Next Call
Routing Mailbox.
If the caller dials a digit during the
announcement, they route to the Next
Call Routing Mailbox.
0 = None
1 = Goodbye
2 = Silent
Undefined
1~32 (valid
Call Routing
Mailbox)
x (x number of
repeats)
x (x number of
repeats)
0 = None
1 = Goodbye
2 = Silent
0 = None
1 = Goodbye
2 = Silent
0 = None
1 = Goodbye
2 = Silent
2 - 294
Action
If the caller doesn’t dial, after the
announcement InMail hangs up.
If the caller dials a digit during the
announcement, they route to the Next
Call Routing Mailbox.
If caller doesn’t dial, they hear the
announcement x number of times and
then InMail hangs up.
If the caller dials a digit during the
announcement, InMail says “That is an
invalid entry” and aborts the
announcement. The announcement
repeats (if allowed by the Repeat Count)
and then InMail hangs up.
If caller doesn’t dial, they hear the
announcement x number of times and
then route to the Next Call Routing
Mailbox.
If the caller dials a digit during the
announcement, they route to the Next
Call Routing Mailbox.
If caller doesn’t dial, they hear the
announcement x number of times and
then InMail hangs up.
If the caller dials a digit during the
announcement, they route to the Next
Call Routing Mailbox.
Features
Issue 5.00
Routed Announcement Mailbox Routing
(If outside caller routes to Announcement Mailbox from Call Routing Mailbox)
47-09-01
Next Call
Routing
Mailbox
47-09-02
Repeat
Count
Undefined
0 (No repeats)
1~32 (valid
Call Routing
Mailbox)
Undefined
InMail System Guide
0 (No repeats)
47-09-03
Hang Up
After
Action
0 = None
1 = Goodbye
2 = Silent
If the caller doesn’t dial, after the
announcement the caller goes back to
the initial Call Routing Mailbox.
If the caller dials a digit during the
announcement, InMail says “That is an
invalid entry” and routes the caller goes
back to the initial Call Routing Mailbox.
0 = None
1 = Goodbye
2 = Silent
If the caller doesn’t dial, after the
announcement InMail hangs up.
If the caller dials a digit during the
announcement, InMail says “That is an
invalid entry” and hangs up.
0 = None
1 = Goodbye
2 = Silent
If the caller doesn’t dial, after the
announcement they route to the Next Call
Routing Mailbox.
If the caller dials a digit during the
announcement, they route to the Next
Call Routing Mailbox.
0 = None
1 = Goodbye
2 = Silent
If the caller doesn’t dial, after the
announcement InMail hangs up.
If the caller dials a digit during the
announcement, they route to the Next
Call Routing Mailbox.
0 = None
1 = Goodbye
2 = Silent
If caller doesn’t dial, they hear the
announcement x number of times and
then go back to the initial Call Routing
Mailbox.
If the caller dials a digit during the
announcement, InMail says “That is an
invalid entry” and aborts the
announcement. The announcement
repeats (if allowed by the Repeat Count)
and then InMail routes back to the initial
Call Routing Mailbox.
0 = None
1 = Goodbye
2 = Silent
If caller doesn’t dial, they hear the
announcement x number of times and
then InMail hangs up.
If the caller dials a digit during the
announcement, InMail says “That is an
invalid entry” and aborts the
announcement. The announcement
repeats (if allowed by the Repeat Count)
and then InMail hangs up.
x (x number of
repeats)
2 - 295
Issue 5.00
Routed Announcement Mailbox Routing (Continued)
(If outside caller routes to Announcement Mailbox from Call Routing Mailbox)
47-09-01
Next Call
Routing
Mailbox
1~32 (valid
Call Routing
Mailbox)
47-09-02
Repeat
Count
x (x number of
repeats)
47-09-03
Hang Up
After
Action
0 = None
1 = Goodbye
2 = Silent
If caller doesn’t dial, they hear the
announcement x number of times and
then route to the Next Call Routing
Mailbox.
If the caller dials a digit during the
announcement, they route to the Next
Call Routing Mailbox.
0 = None
1 = Goodbye
2 = Silent
If caller doesn’t dial, they hear the
announcement x number of times and
then InMail hangs up.
If the caller dials a digit during the
announcement, they route to the Next
Call Routing Mailbox.
Related Features
Call Forward to a Mailbox
The Next Call Routing Mailbox dial options also apply to a subscriber’s Direct Inward Line
while it is forwarded to their mailbox.
Record and Send a Message
Turn to this feature for an explanation of the options a caller can dial while recording.
Programming
Programming Subscriber Mailboxes
1.
Assign the Next Call Routing Mailbox to a Subscriber Mailbox (if required).
47-02-14
Next Call Routing Mailbox (Next CR Mbox)
Specify the Routing Mailbox (1~32) that should provide the caller leaving a
message with additional dialing options.
.
2.
By default, this option is 1 (Call Routing Mailbox 1).
Optionally allow the caller to dial additional digits (not just 0) once in the Next
Call Routing Mailbox.
47-02-13
Dialing Option (Dialing Option)
Enter 1 to enable additional dialing options.
.
2 - 296
By default, this option is disabled (0).
Features
Issue 5.00
Programming Announcement Mailboxes
1.
Assign the Next Call Routing Mailbox for the Announcement Mailbox (if
required).
47-09-01
Next Call Routing Mailbox (Next CR Mbox)
Specify the Routing Mailbox (1~32) to which the caller should route after
hearing the Announcement Mailbox message.
.
2.
By default, this option is 0 (Undefined).
Enter the number of times the Announcement Mailbox message should repeat
before routing to the Next Call Routing Mailbox.
47-09-02
Repeat Count (Repeat Count)
Specify the number of Announcement Mailbox message repeats (1~10, or 0
for no repeats).
.
3.
By default, this option is 0 (no repeats).
Be sure the Announcement Mailbox does not hang up after playing its message.
47-09-03
Hang Up After (HangUp)
Enter 0 (No) to disable this option.
.
By default, this option is disabled (0).
Operation
Not applicable
InMail System Guide
2 - 297
Issue 5.00
2 - 298
Features
Issue 5.00
Park and Page/Auto Attendant Direct to Voice
Mail
Park and Page
When an outside call can’t go through, Park and Page automatically parks the call and pages the extension
user.Automated Attendant Direct to Voice Mail
• Calls from the Automated Attendant can go directly to your mailbox without ringing your extension.
Description
Park and Page
Park and Page can automatically Park a call at an extension and Page the user with a
prerecorded Paging Message announcing the parked call. The called extension user can
then go to any extension and implement Personal Park to pick up the call. With Park and
Page, IntraMail tries to locate the person instead of just sending the call to their mailbox.
Additionally, there is no need for an operator or receptionist to manually answer the call,
park it, and then try to track down the employee.
The Paging Message is usually recorded in the user’s own voice and typically says
something like, “Mike Smart, you have a call.” If the Paging Message is not recorded for
the extension, a built-in message will announce the called party’s name or extension
number (if the name is not recorded).
When Park and Page intercepts the call, it normally offers the caller three options:
1. Dial 1 to leave a message in the called extension’s mailbox.
(The caller hears the mailbox Greeting, if recorded.)
2. Dial 2 to Park and Page.
(The caller returns to these options if the Park is not picked up.)
3. Dial 3 for other options.
(Normally, this routes to the extension’s Next Call Routing Mailbox.)
Park and Page is available at Personal and Group Subscriber Mailboxes and can be
enabled through programming or via the subscriber’s Mailbox Options Menu (page 249).
Park and Page is not applicable to Intercom calls.
InMail System Guide
2 - 299
Issue 5.00
Automated Attendant Direct to Voice Mail (DVM)
When an extension has Automated Attendant Direct to Voice Mail (DVM) enabled, all calls
from the Automated Attendant go directly to the subscriber’s mailbox. The extension does
not ring for Automated Attendant calls. The caller hears the mailbox greeting and can
leave a message, but unlike Park and Page is not normally offered any other routing
options. A subscriber typically turns on DVM when they need to work at their desk
undisturbed by outside calls from the Automated Attendant.
DVM can be enabled by the installer from programming or by the extension user from their
Mailbox Options Menu .
Keep in mind that DVM will not block Intercom calls from co-workers or any other type of
outside call not routed through the Automated Attendant. For example, with DVM enabled,
Direct Inward Lines and transferred outside calls to an extension work normally.
Conditions
None
Default Setting
Park and Page and Automated Attendant Direct to Voice Mail are disabled.
Programming
Setting Up Park and Page for an Extension
1.
Enable Fixed Call Forward to Voice Mail.
See Fixed Call Forward in the SV8100 Features Manual for more.
2.
Assign a Next Call Routing Mailbox.
1. See NEXT CALL ROUTING MAILBOX for more.
2. For example:
47-02-14: NEXT CALL ROUTING MAILBOX
Enter1.
3 By default, this option is 1.
2 - 300
Features
Issue 5.00
3.
Enable Park and Page.
47-02-17: ENABLE PAGING
Enter 1 (Yes).
- This option is the same as the Mailbox Options: Call Options:
Page user setting. The setting you make in this option overrides
the Mailbox Options setting and visa-versa.
3 By default, this option is disabled.
Park and Page (Call Handling)
For Transferred Outside calls, Direct Inward Lines, and Direct Inward Dialing
47-02-14: Next
Call Routing
Mailbox
47-02-13: Dialing
Option
47-02-17: Enable
Park and Page
Result
Undefined
0 (No)
0 (No)
If unanswered, caller hears greeting and can leave
a message.
Undefined
0 (No)
1 (Yes)
If unanswered, caller can dial 1 to leave a message
or 2 to Park and Page.
Undefined
1 (Yes)
0 (No)
If unanswered, caller hears greeting and can leave
a message.
Undefined
1 (Yes)
1 (Yes)
If unanswered, caller can dial 1 to leave a message
or 2 to Park and Page.
Defined
0 (No)
0 (No)
If unanswered, caller hears greeting and can leave
a message.
Defined
0 (No)
1 (Yes)
If unanswered, caller can dial 1 to leave a
message, 2 to Park and Page, and 3 for other
options (from the Next Call Routing Mailbox).
Defined
1 (Yes)
0 (No)
If unanswered, caller hears greeting, can leave a
message, and can dial options (from the Next Call
Routing Mailbox).
Defined
1 (Yes)
1 (Yes)
If unanswered, caller can dial 1 to leave a
message, 2 to Park and Page, and 3 for other
options (from the Next Call Routing Mailbox).
Setting up Automated Attendant Direct to Voice Mail (DVM)
for an Extension
1.
Should all calls from the Automated Attendant go directly to the subscriber’s mailbox?
If yes:
47-02-09: AUTO ATTENDANT DIRECT TO VOICE MAIL
Enter 1 (Yes).
InMail System Guide
2 - 301
Issue 5.00
- This option is the same as the Mailbox Options: Call Options:
Direct to V-Mail user setting. The setting you make in this option
overrides the Mailbox Options setting and visa-versa.
3 By default, this option is 0 (No).
If no:
47-02-09: AUTO ATTENDANT DIRECT TO VOICE MAIL
Enter 0 (No).
- See the next step for call handling.
3 By default, this option is 0 (No).
2.
When DVM is enabled, should Automated Attendant calls immediately do a Park and Page?
If yes:
1. Make sure Park and Page is enabled.
2. 47-02-18: PAGING OPTION
Enter 1 (Immediate).
3 By default, this option is 0 (RNA).
If no:
47-02-18: PAGING OPTION
Enter 0 (RNA).
- The call behaves like any other outside call transferred to the
subscriber’s mailbox.
3 By default, this option is 0 (RNA).
Park and Page (Call Handling)
For Automated Attendant Unscreened (UTRF) and Screened (STRF) Transfers
47-02-17: Enable
Park and Page
47-02-18: Paging
Option
47-02-09: Auto Att Result
Direct to VM
0 (No)
0 (RNA)
0 (No)
If unanswered, caller hears greeting and can leave
a message.
0 (No)
0 (RNA)
1 (Yes)
Caller immediately hears greeting and can leave a
message.
0 (No)
1 (IMM)
0 (No)
If unanswered, caller hears greeting and can leave
a message.
0 (No)
1 (IMM)
1 (Yes)
Caller immediately hears greeting and can leave a
message.
1 (Yes)
0 (RNA)
0 (No)
If unanswered, caller can dial 1 to leave a message
or 2 to Park and Page.1
1 (Yes)
0 (RNA)
1 (Yes)
Caller immediately hears greeting and can leave a
message.
1 (Yes)
1 (IMM)
0 (No)
Park and Page occurs immediately.
2 - 302
Features
Issue 5.00
Park and Page (Call Handling)
For Automated Attendant Unscreened (UTRF) and Screened (STRF) Transfers
47-02-17: Enable
Park and Page
47-02-18: Paging
Option
47-02-09: Auto Att Result
Direct to VM
1 (Yes)
1 (IMM)
1 (Yes)
Caller immediately hears greeting and can leave a
message.
1
With a Next Call Routing Mailbox assigned, caller can dial 1 to leave a message, 2 to Park and Page, and 3 for
other options.
Setting Up Park and Page for a Group Mailbox
1.
Enable Park and Page.
For a Department Group Mailbox:
47-06-15: ENABLE PAGING
Enter 1 (Yes).
3 By default, this option is 0 (No).
Setting up Automated Attendant Direct to Voice Mail (DVM)
for a Group Mailbox
1.
Should all calls from the Automated Attendant go directly to the subscriber mailbox?
For a Department Group Mailbox:
1. If yes:
47-06-07: AUTO ATTENDANT DIRECT TO VOICE MAIL
Enter 1 (Yes).
3 By default, this option is 0 (No)
2. If no:
47-06-07: AUTO ATTENDANT DIRECT TO VOICE MAIL
Enter 0 (No).
3 By default, this option is 0 (No)
These options are the same as the Mailbox Options: Call Options: Direct to VMail user setting. The setting you make in this option overrides the Mailbox
Options setting and visa-versa.
2.
When DVM is disabled, should Automated Attendant calls immediately do a Park and Page?
InMail System Guide
2 - 303
Issue 5.00
For a Department Group Mailbox:
1. If yes:
Make sure Park and Page is enabled.
47-06-16: PAGING OPTION
Enter 1 (Immediate).
3 By default, this option is 0 (RNA).
2. If no:
47-06-16: PAGING OPTION
Enter 0 (RNA).
- The call behaves like any other outside call transferred to the
subscriber’s mailbox.
3 By default, this option is 0 (RNA).
Other Related Features
Features
PARK
In unanswered, Park and Page follows the 24-01-06: SYSTEM OPTIONS
HOLD - PARK HOLD TIME.
FOR
InMail Features
None
Operation
Recording your Paging Message
In these instructions:
[Super Display Soft
Key]
[Keyset Soft Key]
To record your Paging Message:
1.
Log onto your Subscriber Mailbox.
2.
[Paging Message]
[More> + More> +
Page]
3.
Do one of the following.
a.
[Listen]
[Lstn]
Select Paging Message.
Alternately dial PG (74).
Select to listen to the current Paging Message (if any).
Alternately dial L (5).
#
2 - 304
Exit the listen mode.
Features
Issue 5.00
Recording your Paging Message
b.
[Record]
[Rec]
In these instructions:
[Super Display Soft
Key]
[Keyset Soft Key]
Select to record the Paging Message.
Alternately dial R (7).
[Pause]
[Pause]
Select to pause recording.
• Alternately dial *.
[Resume
]
[Resume
]
Select to resume recording (if paused).
• Alternately dial *.
[Cancel]
[Cncl]
Select to erase the recording.
• Alternately dial E (3).
[Done]
[Done]
Select to confirm the recording and exit the recording mode.
• Alternately dial #.
c.
[Erase]
[Erase]
Select to erase the Paging Message.
Alternately dial E (3).
d.
[Back]
[Back]
Select to go back to the Mailbox Main Menu.
Alternately dial #.
Setting the Call Handling Options
In these instructions:
[Super Display Soft Key]
[Keyset Soft Key]
To set your Call Handling options:
This includes Automated Attendant Direct to Voice Mail as well as Park and Page.
1.
Log onto your Subscriber Mailbox.
2.
[Mbox Options]
[More> + Optns]
Select Mailbox Options. (You are at the Mailbox Options Menu).
Alternately dial OP (67).
3
[Call Options]
[CallH]
Select Call Options. (You are at the Call Handling Options Menu).
Alternately dial CO (26).
3.
Do one of the following.
a.
[Direct to V-Mail]
[DVM]
Select to turn Automated Attendant Direct to Voice Mail on or off.
Alternately dial O (6).
[Paging]
[Paging]
Select to turn Park and Page on or off.
Alternately dial E (3).
[Back]
[Back]
Select to go back to the Mailbox Options Menu.
Picking up a Parked Call
In these instructions:
[Super Display Soft Key]
[Keyset Soft Key]
To retrieve a call parked in a Personal Park Orbit:
1.
Dial **.
2.
Dial the number of the extension at which the call is parked.
InMail System Guide
2 - 305
Issue 5.00
2 - 306
Features
Issue 5.00
Programming Voice Mail
Description
You can program (customize) InMail using the PCPro and WebPro programming
applications. You can also do limited programming from the System Administrator’s
mailbox.
Figure 2-1 PCPro and WebPro Login Screens
InMail System Guide
2 - 307
Issue 5.00
Related Features
System Administrator
The System Administrator can do limited InMail programming, such as recording
Automated Attendant announcements, recording mailbox names, and deleting messages
from mailboxes.
Programming
See Description at the beginning of this feature.
Operation
See Description at the beginning of this feature.
2 - 308
Features
Issue 5.00
Quick Message
Description
Quick Message is a Dial Action Table action that allows Automated Attendant callers
to dial a digit (normally *) followed by a mailbox number to leave a message in a
Subscriber Mailbox. Since Quick Message is enabled by default, it is an efficient way
for experienced Automated Attendant callers to leave messages. There is no need to
dial an extension first. To make this option more readily available to all Automated
Attendant callers, consider having the active Instruction Menu describe how to use
the Quick Message option.
There are two Quick Message Dial Action Table actions:
Quick Message with Greeting (REC1)
The caller hears the mailbox greeting followed by a beep and can leave
message. If the greeting is not recorded, the caller hears, “At the tone, you can
leave your message for extension xxx (or name if recorded). Start recording at
the tone. When you are done, press the # key or hang up.”
Quick Message without Greeting (REC2)
The caller bypasses the mailbox greeting (hearing “Recording” and a beep
instead) and can leave a message. This is typically used with a Next Call
Routing Mailbox when the caller is asked to dial a digit (e.g., 1) to leave a
message. Otherwise, the mailbox greeting (if recorded) is heard again.
Related Features
Dial Action Table
After the Automated Attendant answers, the Dial Action Table provides the dialing options
to callers. Each digit a caller can dial is assigned a specific action (function) in the Dial
Action Table. The dial action used depends on the setting in the active Call Routing
Mailbox, which in turn depends on the Answer Table setup.
Next Call Routing Mailbox
The Quick Message without Greeting option (REC2) is typically used when the Next Call
Routing Mailbox option allows the caller to dial a digit to leave a message. Otherwise, the
caller hears the mailbox greeting twice (once when initially accessing the mailbox and
again when routed by the Next Call Routing Mailbox).
InMail System Guide
2 - 309
Issue 5.00
Programming
1.
Optionally set up a Quick Message with Greeting (REC1) Action.
47-13-01
Dial Action Tables: REC1 Action - Quick Message With Greeting (3)
(REC1)
To have the caller leave a Quick Message at a specific extension, the
corresponding Number option should be the extension number.
To have the caller leave a Quick Message at any caller-dialed extension,
the corresponding Number option should be IXXX.
To have the caller leave a Quick Message at a caller-dialed extension in a
specific range, the corresponding Number option should be XXX.
For example, to allow callers to leave a Quick Message extensions
200~299, for key 3 enter REC1 for the Action and XXX for the
corresponding Number.
.
2.
By default, key * Action is REC1 and Number is IXXX.
Optionally set up a Quick Message without Greeting (REC2) Action.
47-13-01
Dial Action Tables: REC2 Action - Quick Message Without Greeting (4)
(REC2)
To have the caller leave a Quick Message at a specific extension, the
corresponding Number option should be the extension number.
To have the caller leave a Quick Message at any caller-dialed extension,
the corresponding Number option should be IXXX.
To have the caller leave a Quick Message at a caller-dialed extension in a
specific range, the corresponding Number option should be XXX.
For example, to allow callers to leave a Quick Message extensions
200~299, for key 3 enter REC2 for the Action and XXX for the
corresponding Number.
.
3.
By default, key * Action is REC1 and Number is IXXX.
Set the maximum message length for callers leaving a Quick Message in a
mailbox.
47-01-04
Non-Subscriber Message Length (Mbox Msg Length)
Set the maximum length (1~4095 seconds) of recorded messages for:
Automated Attendant callers leaving a message or Quick Message in a
Subscriber Mailbox.
Outside callers transferred by an extension user to a Subscriber Mailbox.
.
2 - 310
By default, this option is 120 seconds.
Features
Issue 5.00
Operation
Leaving a Quick Message
To leave a Quick Message after the Automated Attendant answers:
1. Dial *.
2. Dial the Subscriber Mailbox number.
3. Leave message and hang up.
- OR Leave message and dial #.
o Dialing # may provide you with additional dialing options. This depends on how the
called mailbox’s Next Call Routing Mailbox is set up.
InMail System Guide
2 - 311
Issue 5.00
THIS PAGE INTENTIONALLY LEFT BLANK
2 - 312
Features
Issue 5.00
Record and Send a Message
Description
A Subscriber Mailbox user can record and send a message to any other Subscriber
Mailbox. Record and Send a Message is the heart of the InMail voice messaging
system. It allows coworkers to efficiently stay in touch and exchange essential
information without relying on message slips, memos, or email.
Recording Options
While recording a message, a Subscriber Mailbox user has many recording options from
which to choose. The following table shows these options.
Message Recording Options
Option
Description
Options available while recording:
*
E (3)
#
Pause/resume recording.
Erase the recording.
End recording.
Dial 0 while recording to hear the list of options.
Related Features
Listening to Messages
While or after listening to a message, an extension user has many message handling
options from which to choose.
Programming
Not applicable
InMail System Guide
2 - 313
Issue 5.00
Operation
Record and Send a Message
Log On to Subscriber Mailbox.
RS
(77)
Record and send a message.
[Rec]
Enter the number of the mailbox to receive the message.
Start recording.
[Contd]
#
Options available while recording.
*
[Exit]
#
2 - 314
*
Pause or restart recording.
[Resume]
[Pause]
E (3)
Erase recording.
[Cncl]
#
End the recording.
[Done]
Back up and re-enter the mailbox number.
[MBOX]
Exit without recording and go back to the Mailbox Main Menu.
[Exit]
Features
Issue 5.00
Remote Programming
Description
You can remotely program (customize) InMail using the PCPro and WebPro
programming applications. You can also do limited remote programming from the
System Administrator’s mailbox. Check with NTAC for availability of updated versions
of these programs for SV8100. Refer to InMail system documentation for more
information.
Related Features
None
Programming
None
Operation
None
InMail System Guide
2 - 315
Issue 5.00
THIS PAGE INTENTIONALLY LEFT BLANK
2 - 316
Features
Issue 5.00
Routing Mailbox
Description
The Call Routing Mailbox, associated with an Answer Table, specifies which dialing
options (Dial Action Table) and announcements are available to Automated Attendant
callers. By default, InMail provides 32 Call Routing Mailboxes (1~32). However, you
can assign any of the 32 Routing Mailboxes as a Call Routing Mailbox. The Call
Routing Mailbox is an integral part of the Automated Attendant. The Automated
Attendant can automatically answer the telephone system incoming calls, play an
Instruction Menu message, and provide dialing options to callers. There are three
major Automated Attendant components:
Answer Tables
The Answer Table determines how the Automated Attendant answers outside
calls on each trunk, according to the time of the day and day of the week that
the call is ringing. The Answer Table divides the time of day and day of the week
into individual schedules, which in turn assign a Call Routing Mailbox to each
call. When a specific schedule is not in effect, the Answer Table uses its Default
Mailbox to determine routing.
.
By default, all trunks use Answer Table 1. Answer Table 1 has a single schedule that runs
Monday through Friday from 8:30AM to 5:00PM.
Routing Mailbox
A Call Routing Mailbox is a mailbox associated with an individual Answer Table
schedule or the Default Mailbox. It specifies which dialing options (Dial Action
Table) are available to callers. It also provides the Instruction Menu to callers
which typically greets the callers and describes the dialing options.
.
By default, Answer Table 1 has a single schedule that runs Monday through Friday from
8:30AM to 5:00PM. This schedule and the Default Mailbox both use Call Routing
Mailbox 531.
Dial Action Table
After the Automated Attendant answers, the Dial Action Table provides the
dialing options to callers. Each digit a caller can dial is assigned a specific action
(function) in the Dial Action Table. The dial action used depends on the setting in
the active Call Routing Mailbox, which in turn depends on the Answer Table
setup.
.
InMail System Guide
By default, Call Routing Mailbox 1 uses Dial Action Table 1.
2 - 317
Issue 5.00
The block diagram below shows the default InMail Automated Attendant
configuration.
DIL/DID to Voice Mail Master (555)
22-01-01 Incoming Call Trunk Setup
22-07-01 DIL Setup
22-11 DID Setup
InMail
Default
Automated Attendant Answering
Trunks Route to Answer Table 1
47-10-01 Answer Table Assignment
Answer Table 1
47-11 Answer Table Options
Schedule 1 or Default Mailbox
47-12 Answer Schedules
47-11-03 Default Mailbox
Call Routing Mailbox 1
47-08 Call Routing Mailbox Options
Dial Action Table 1
47-13 Dial Action Tables
2 - 318
All calls route to Call Routing Mailbox 1
Schedule 1 active M-F 8:30AM-5:00PM
Default Mailbox active all other times
From a System Administrator mailbox,
record an Instruction Menu (SA + I) for
the active Call Routing Mailbox.
Dial Action Table 1 Dialing Options:
Dial an extension number, or
O for the operator.
Features
Issue 5.00
Related Features
Answer Tables
The Call Routing Mailbox associates specific dialing options (Dial Action Table) with an
Answer Table.
Automated Attendant
The Automated Attendant can automatically answer the telephone system’s incoming
calls, play an Instruction Menu message, and provide dialing options to callers.
Routing Mailbox
The Call Routing Mailbox provides the dialing instructions (Dial Action Table) and
announcements to Automated Attendant Callers.
Dial Action Table
Defines the dialing options for the Call Routing Mailbox chosen by the active Answer
Table.
System Administrator
The System Administrator can record the Instruction Menu for a Call Routing Mailbox. See
Operation below.
Programming
1.
Set up the Call Routing Mailbox.
47-07-02
Routing Mailbox Type (Mailbox Type)
Enter 1 to assign the mailbox as a Call Routing Mailbox.
.
2.
Record an Instruction Menu for the Call Routing Mailbox:
See Operation on page 2-321.
.
3.
By default, Routing Mailboxes 1-8 are Call Routing Mailboxes and 9-32 are
Announcement Mailboxes.
The default Instruction Menu is: “If you are calling from a touch tone phone...”
Assign Dial Action Table to provide dialing options for this Call routing Mailbox:
47-08-01
Dial Action Table (Dial Action Table)
Enter the Dial Action Table (e.g., 1) that will provide the dialing options.
.
4.
Change the amount of time Automated Attendant callers have to dial options:
.
InMail System Guide
By default, all Call Routing Mailboxes use Dial Action Table 1.
See Automated Attendant on page 2-63 for more.
2 - 319
Issue 5.00
47-08-03
Time Limit for Dialing Commands (Dialing Timeout)
Enter the new timeout duration (0-99 seconds).
.
By default, Automated Attendant callers have 5 seconds to dial commands.
In the event the timeout duration is exceeded or is not programmed, the
following actions occur:
When a Timeout action is programmed, the call routes to that destination.
When a Timeout action is not programmed, the Instruction Menu repeats 3
times and then InMail hangs up.
5.
Set the Maximum Length of Instruction Menus:
47-01-03
Subscriber Message Length (Subs Msg Length)
This sets the maximum message length (1-4095 seconds) for Instruction
Menus.
.
2 - 320
The default setting is 120 seconds.
Features
Issue 5.00
Operation
Recording an Instruction Menu for a Call Routing Mailbox
Log On to System Administrator’s mailbox.
SA (72)
Access System Administrator options.
[Not applicable.]
I (4)
Select Instruction Menus.
[Instr]
Enter the Call Routing Mailbox number (001~008).
L (5)
Listen to the current Instruction Menu (if any).
[Lstn]
#
R (7)
Exit listen mode.
Record a new Instruction Menu.
[Rec]
Record message.
#
0
InMail System Guide
*
Pause or restart recording.
[Resume]
[Pause]
E (3)
Erase recording.
[Cncl]
#
Exit recording mode.
[Done]
E (3)
Erase the Instruction Menu.
[Erase]
#
Go back to the System Administrator options.
[Exit]
Go back to the System Administrator options.
[Exit]
Plays Help message.
2 - 321
Issue 5.00
THIS PAGE INTENTIONALLY LEFT BLANK
2 - 322
Features
Issue 5.00
Screened Transfer
Description
Screened Transfer is an Automated Attendant option that allows callers to directly dial
system extensions. Screened Transfer (and its related feature Unscreened Transfer)
allows the InMail Automated Attendant to transfer outside calls to system extensions
without the need for a live receptionist or operator. It is similar to telephone system
screened transfers in which the transferring party controls the transfer. After an
Automated Attendant caller dials an extension, InMail calls (screens) the destination
extension to see if the transfer can go through.
If the destination is busy or in DND, the Automated Attendant doesn’t extend the
call and immediately provides the caller with additional options.
If the destination is available, the Automated Attendant rings it. If the destination
answers, the call goes through. If the destination doesn’t answer within a preset
interval, the Automated Attendant does not extend the call and provides the
caller with additional options.
Screened vs. Unscreened Transfer
Both Screened and Unscreened Transfer allow Automated Attendant callers to
directly dial system extensions. The following summarizes the differences between
these two types of Automated Attendant transfer.
With Unscreened Transfer, calls from the Automated Attendant ring like other
transferred calls and display the incoming Caller ID data (if provided by telco
and enabled in programming). Screened Transfers ring like Intercom calls and
do not display Caller ID until the call is answered.
Both Screened and Unscreened Transfers route unanswered calls to the
subscriber’s greeting (recorded or default) so the caller can leave a message.
However, only Screened Transfer allows the caller to dial 2 to reach the Next
Call Routing Mailbox options (if programmed).
Screened Transfer and Inactive Mailboxes
Screened Transfer to an extension can occur only if the destination extension has an
active mailbox. If the extension’s mailbox is inactive, the Automated Attendant caller
hears: “That is an invalid entry,” and returns to the Automated Attendant.
InMail System Guide
2 - 323
Issue 5.00
Screened Transfer (TRF) Operation
Call = Call answered by the Automated Attendant.
Extension = Extension dialed by Automated Attendant caller.
If Auto Attendant Do Not Disturb is off, see Auto Attendant Do Not Disturb on page 2-57 for more information.
Extension Idle
With Active
Greeting
Recorded
1. Places a screened
(Intercom) call to extension.
o If answered, transfers
call.
2. If unanswered1:
With no Next Call
Routing Mailbox,
caller hears greeting
and can leave a
message.
o With a Next Call
Routing Mailbox,
caller can dial 1 to
leave a message or 22
for other options.
o
With Active
Greeting Not
Recorded
1. Places a screened
(Intercom) call to extension.
If answered, transfers
call.
2. If unanswered1:
With no Next Call
Routing Mailbox,
InMail prompts caller
to leave a message.
o With a Next Call
Routing Mailbox,
caller can dial 1 to
leave a message or 22
for other options.
o
Extension Busy
When busy:
With no Next Call Routing
Mailbox, caller hears
greeting and can leave a
message.
With a Next Call Routing
Mailbox, caller can dial 1 to
leave a message or 22 for
other options.
When busy:
With no Next Call Routing
Mailbox, InMail prompts
caller to leave a message.
With a Next Call Routing
Mailbox, caller can dial 1 to
leave a message or 22 for
other options.
Extension in DND
When in DND:
With no Next Call Routing
Mailbox, caller hears
greeting and can leave a
message.
With a Next Call Routing
Mailbox, caller can dial 1 to
leave a message or 22 for
other options.
When in DND:
With no Next Call Routing
Mailbox, caller hears
greeting and can leave a
message.
With a Next Call Routing
Mailbox, caller can dial 1 to
leave a message or 22 for
other options.
If Auto Attendant Do Not Disturb is on, see Auto Attendant Do Not Disturb on page 2-57 for more information.
Extension Idle
With Active
Greeting
Recorded or not
recorded
Extension Busy
Extension in DND
1. Sends call immediately to mailbox:
o
o
Plays greeting.
Prompts caller to start recording.
1
After 47-08-02 Screened Transfer Timeout interval.
Dialing 2 routes the call to the Next Call Routing Mailbox for additional dialing options. See Next Call Routing
Mailbox on page 2-291.
2
2 - 324
Features
Issue 5.00
Related Features
Answer Tables
Determines how the Automated Attendant answers outside calls on each trunk.
Automated Attendant
The Answer Table determines how the Automated Attendant answers calls.
Routing Mailbox
The mailbox associated with an Answer Table that specifies which dialing options (Dial
Action Table) and announcements are available to Automated Attendant callers.
You cannot program a Call Routing Mailbox as a Screened Transfer (TRF) Dial Action
Table destination.
Caller ID
InMail provides Caller ID data for a Screened Transfer call after it is answered.
Dial Action Table
Defines the dialing options for the Call Routing Mailbox chosen by the active Answer
Table.
Forced Unscreened Transfer
The Subscriber Mailbox can optionally convert Automated Attendant Screened Transfers
to Unscreened Transfers.
Unscreened Transfer
After an Automated Attendant caller dials an extension, InMail immediately transfers the
call to the destination and hangs up.
Programming
1.
Assign the TRF action to a key on the active Dial Action Table.
47-13-01
Dial Action Tables: TRF Action - Screened Transfer (1) (TRF)
Normally, the corresponding Number option should be XXX. Note the key
you choose for this action is the first digit of the called extension.
For example, to allow callers to place Screened Transfers to extensions
200~299, for key 3 enter TRF for the Action and XXX for the corresponding
Number.
InMail System Guide
2 - 325
Issue 5.00
To have Screened Transfer call a specific extension, the corresponding
Number option should be that extension number. The caller then dials that
single digit to reach the extension.
For example, to have callers dial 8 to reach extension 303, for key 8 enter
TRF for the Action and 303 for the corresponding Number.
.
2.
By default, key 1 Action is UTRF and Number is XXX. This means that Automated
Attendant callers can place Unscreened Transfers to extensions 101~199.
Set how long a Screened Transfer rings an unanswered extension before
recalling to the Automated Attendant.
47-08-02
Screened Transfer Timeout (Scrn Trf Timeout)
Set how long a Screened Transfer (TRF) from the Automated Attendant
rings (0~255 seconds) an unanswered extension before recalling.
Be sure that the 24-02-04 Transfer Recall Time is longer than the setting of
this option. If the Transfer Recall is shorter, Screened Transfers recalls the
same as Unscreened Transfers.
.
By default, this option is 15 seconds.
Operation
Not applicable
2 - 326
Features
Issue 5.00
Security Code
Description
A mailbox can have a security code to protect it from unauthorized access. A Security
Code must have 4 digits, using 0~9. If a subscriber wants to keep their mailbox
private, they can enter a Security Code. No one else can use the subscriber’s
mailbox, unless they know the code.
From R4 revision software an option is available to enable the security code only on
remote extensions or external access.
Related Features
System Administrator
The System Administrator can delete a mailbox security code.
Programming
47-02-25 Security Code option for Subscriber Mailboxes
Set whether security code option is set to ‘always required’ or ‘remote logon
only’.
47-06-23 Security Code Option for Group mailboxes
Set whether security code option is set to ‘always required’ or ‘remote logon
only’ for group mailboxes set as subscriber.
InMail System Guide
2 - 327
Issue 5.00
Operation
Changing or Deleting a Security Code (From your Subscriber Mailbox)
Log On to Subscriber Mailbox.
OP
(67)
Access the Mailbox Options Menu.
[Not applicable]
S (7)
Access the Security Code options.
[Sec]
Enter new Security Code (4 digits).
C (2)
Accept Security Code entry and go back to the
Mailbox Options Menu.
[OK]
I (4)
Do not accept Security Code entry and go back to the
Security Code options Menu.
[Clear]
[Exit]
0
Exit to the Mailbox Options menu without
changing your Security Code.
*
Optionally erase your Security Code and go back to the
Mailbox Options Menu.
[Erase]
#
Exit to the Mailbox Options Menu without making any changes
to your Security Code.
[Exit]
Plays Help message
Deleting a Security Code (From your System Administrator’s Mailbox)
Log On to System Administrator’s mailbox.
SA
(72)
Access System Administrator options.
[Not applicable]
S (7)
Select Subscriber Mailbox Maintenance options.
[Subs]
Enter the number of the Subscriber Mailbox you want to maintain.
S (7)
#
0
2 - 328
Erase mailbox’s Security Code.
[Not applicable]
Go back to System Administrator options.
[Exit]
Plays Help message.
Features
Issue 5.00
Single Digit Dialing
Description
An Automated Attendant caller can press a single key to route to an extension, route
to another destination, or use an InMail feature. Single Digit Dialing simplifies the
Automated Attendant since the caller dials a single digit to reach an extension or use
an option. If you set up Single Digit Dialing, be sure to customize the active Instruction
Menu so it describes which digits the caller should dial to use the available options.
All of the features in the following Dial Action Table Key Action Summary table are
accessible from a single Dial Action Table digit.
Dial Action Table Key Action Summary
Feature
Reference
Action
Description
TRF
Screened Transfer (1)
Allows an Automated Attendant caller to place a
Screened Transfer to an extension. InMail calls (screens)
the destination to see if the call can go through.
Screened Transfer
on page 2-323
UTRF
Unscreened Transfer (2)
Allows an Automated Attendant caller to place an
Unscreened Transfer to an extension.InMail transfers the
call the destination and then hangs up.
Unscreened
Transfer on page
2-351
REC1
Quick Message with Greeting (3)
Allows an Automated Attendant caller to leave a Quick
Message at an extension. The caller hears the
extension’s personal greeting.
Quick Message on
page 2-309
REC2
Quick Message without Greeting (4)
Allows an Automated Attendant caller to leave a Quick
Message at an extension. The caller does not hear the
extension’s personal greeting.
Quick Message on
page 2-309
LOGON
Log On to Voice Mail (5)
Allows an Automated Attendant caller to log on to a
mailbox, either directly or one of their choosing.
Log On to Voice
Mail on page
2-237
Hang Up
Hang Up (6)
InMail says “Goodbye” and hangs up.
Hang Up on page
2-191
Go to a Mailbox, (7)
Allows an Automated Attendant caller to route to another
mailbox.
Go To A Mailbox
on page 2-171
Undefined Routing (0)
This action provides no routing.
Not applicable
GOTO
UND
InMail System Guide
2 - 329
Issue 5.00
Related Features
Instruction Menu
The active Instruction Menu should describe the Single Digit Dialing options.
Also refer to Dial Action Table Key Action Summary on page 2-329.
Programming
Refer to Dial Action Table Key Action Summary on page 2-329.
Operation
Refer to Dial Action Table Key Action Summary.
2 - 330
Features
Issue 5.00
Station Mailbox
Description
Station Mailbox is one of three mailbox categories: Personal, Group and Undefined.
Personal Mailbox is the category of mailboxes assigned to stations (extensions). All
Personal Mailboxes are Subscriber Mailboxes.
For more on the options available to Station Mailboxes, see Subscriber Mailbox on
page 2-333.
Related Features
Group (Shared) Mailbox
Group Mailbox is a category of mailboxes normally used for Department Group overflow.
Programming
See Subscriber Mailbox on page 2-333.
Operation
See Subscriber Mailbox on page 2-333.
InMail System Guide
2 - 331
Issue 5.00
THIS PAGE INTENTIONALLY LEFT BLANK
2 - 332
Features
Issue 5.00
Subscriber Mailbox
Description
A Subscriber Mailbox is the mailbox assigned to a telephone system extension. The
telephone assigned to the Subscriber Mailbox is called the subscriber’s extension.
When an extension user accesses their voice mail, they are using their Subscriber
Mailbox. It provides the InMail voice messaging services. For a brief overview of the
features available at a Subscriber Mailbox, review the Related Features below. Then,
go to the individual feature to find out how it operates and what programming is
required to make it work.
At system startup, InMail automatically assigns a Subscriber Mailbox to extensions
200~263. All other extensions do not have Subscriber Mailboxes automatically
assigned. Refer to Programming on page 2-335.
Related Features
Automated Attendant
The Automated Attendant can route callers to a Subscriber Mailbox.
Auto Attendant Do Not Disturb
Auto Attendant Do Not Disturb sends Automated Attendant calls directly to a subscriber’s
mailbox. Their phone does not ring for calls from the Automated Attendant.
Auto Erase or Save
After a subscriber listens to a message in their Subscriber Mailbox, InMail can
automatically erase or save the message.
Live Record
Enable or disable the Live Record beep for the Subscriber Mailbox.
Greeting
A Subscriber Mailbox user can record a personalized greeting for their mailbox. Callers to
the user’s mailbox hear the prerecorded personalized greeting.
Listening to Messages
Review this feature to learn which features are available to a subscriber while listening to
messages.
InMail System Guide
2 - 333
Issue 5.00
Make Call
To simplify returning outside calls, InMail can ask the caller leaving a message to enter
their phone number prior to leaving the message. The subscriber can then dial MC to call
the person back.
Main Menu
The Main Menu provides access to the features available to a Subscriber Mailbox.
Message Listen Mode
Set the type of messages a subscriber will listen to when they dial L (5) after logging on to
their Subscriber Mailbox.
Message Notification
After activation, Message Notification dials up to 3 telephone numbers to let the user know
they have new Mailbox messages.
Message Playback Direction
Set the subscriber Mailbox message playback order.
Message Record
Review this feature to learn which features are available to a subscriber while recording
and sending a message.
Message Storage Limit
Set the maximum number of messages that can be left in the mailbox.
Next Call Routing Mailbox
The Next Call Routing Mailbox provides additional dialing options after a caller leaves a
message in a Subscriber Mailbox.
Security Code
If enabled, a subscriber must enter a security code before logging on to their Subscriber
Mailbox.
System Administrator
A Subscriber Mailbox designated as a System Administrator provides the subscriber with
unique system administration abilities through the SA menu.
Unscreened Transfer
The Subscriber Mailbox can optionally convert Automated Attendant Screened Transfers
to Unscreened Transfers.
2 - 334
Features
Issue 5.00
Programming
1.
Set up a Subscriber Mailbox.
47-02-01
Mailbox Active (Mailbox Active)
Activate (1) the Subscriber Mailbox.
.
47-02-02
By default, Subscriber Mailboxes 1~8 are active (1). All other Subscriber
Mailboxes are inactive (0).
Mailbox Number (Mailbox Number)
Assign the mailbox number to each active Subscriber mailbox. Normally,
the mailbox number is the same as the extension number.
.
2.
By default, mailboxes 1~8 correspond to mailbox numbers 200~207.
Check to be sure message waiting lamp is enabled for the Subscriber Mailbox.
47-02-08
Message Waiting Lamp (Update MW Lamp)
Enter 1 (Yes) to enable Message Waiting lamp for each Subscriber Mailbox.
.
3.
By default, this option is 1 (Yes).
Set the maximum length of recorded messages left in the Subscriber Mailbox.
47-01-03
Subscriber Message Length (Subs Msg Length)
Set the maximum length (1~4095 seconds) of recorded messages for:
Subscriber Mailbox users dialing RS to record and send a message.
Extension users leaving a message in a Subscriber Mailbox.
Outside Automated Attendant callers accessing a mailbox via a GOTO
command and then dialing RS to record and send a message.
Subscriber Mailbox Greetings.
Announcement Messages.
Call Routing Mailbox Instruction Menus.
.
4.
By default, these messages are 120 seconds long maximum.
Set the maximum length of recorded Quick Messages left in the Subscriber
Mailbox.
47-01-04
Non-Subscriber Message Length (Mbox Msg Length)
Set the maximum length (1~4095 seconds) of recorded messages for:
Automated Attendant callers leaving a message or Quick Message in a
Subscriber Mailbox.
Outside callers transferred by an extension user to a Subscriber Mailbox.
.
InMail System Guide
By default, these messages are 120 seconds long maximum.
2 - 335
Issue 5.00
Operation
Not applicable
2 - 336
Features
Issue 5.00
System Administrator
Description
The System Administrator is a Subscriber Mailbox that has unique system
administration features such as recording Menus and deleting messages in a
coworker’s mailbox. The System Administrator features are an essential part of InMail
setup since they allow the recording of the system-wide messages and provide
Subscriber Mailbox maintenance. After logging on to their Subscriber Mailbox, the
System Administrator can use all of the features in the SA menu. The System
Administrator Options table below shows these options.
System Administrator Options
Menu
Option
1st Sub
Menu
2nd Sub
Menu
For more, see:
Access the System
Administration Options.
SA (72)
[N/A]
I (4)
[Instr]
Record, listen to or
delete an Instruction
Menu.
Instruction Menu on page
2-221.
A (2)
[Annc]
Record, listen to or
delete an
Announcement Menu.
Announcement Message
on page 2-39.
S (7)
[Subs]
Access the Subscriber
Maintenance Menu.
V (8)
[Info]
O (6)
[Sched]
InMail System Guide
Description
EA (32)
[Msgs]
Erase all messages in a
mailbox.
Erasing All Messages on
page 2-143.
EG (32)
[Greet]
Delete the Greeting.
Greeting on page 2-173.
EN (36)
[Name]
Erase the Mailbox
name.
Mailbox Name on page
2-245.
S (7)
[Sec]
Delete the Mailbox
security code.
Mailbox Security Code
Delete on page 2-251.
N (6)
[RcNam]
Record, listen to or
delete the mailbox
name.
Mailbox Name on page
2-245.
Hear InMail prompt
version number.
To change the
Answering Schedule
Override for a table.
Answer Schedule
Override on page 2-41.
2 - 337
Issue 5.00
System Administrator Options (Continued)
L (5)
[Dlist]
3
[MboxAn]
Create, delete and edit
Message Distribution
Lists.
Distribution List on page
2-125.
Record, listen to or
delete a Mailbox
Announcement
message.
Mailbox Announcement
Message on page 2-241.
Related Features
Subscriber Mailbox
Only a Subscriber Mailbox can be a System Administrator.
Programming
1.
Designate a Subscriber Mailbox as a System Administrator.
47-02-12
System Administrator (System Admin)
Enter 1 (Yes) to designate the Subscriber Mailbox as a System
Administrator.
.
By default, this option is 1 (Yes) at extension 101 and 0 (No) at all other extensions.
Operation
Refer to the individual features referenced in the System Administrator Options on
page 2-337.
Accessing the System Administrator Options
Log On to System Administrator’s Mailbox.
SA
(72)
Access the System Administrator Menu.
[Not applicable]
Turn to System Administrator Options on page 2-337 for more.
0
2 - 338
Plays Help message.
Features
Issue 5.00
System Administrator Mailbox
Description
A System Administrator Mailbox is a Subscriber Mailbox in which you have enabled
the System Administrator option. This provides the subscriber with system
administration abilities. InMail can have multiple System Administrator Mailboxes.
Turn to System Administrator on page 2-337 for more.
Related Features
Subscriber Mailbox
Only a Subscriber Mailbox can be a System Administrator.
System Administrator
The System Administrator has unique system administration functions, such as recording
Welcome Messages and Instruction Menus, and deleting messages in a coworker’s
mailbox.
Programming
1.
Designate a Subscriber Mailbox as a System Administrator.
47-02-12
System Administrator (System Admin)
Enter 1 (Yes) to designate the Subscriber Mailbox as a System
Administrator.
.
2.
By default, this option is 1 (Yes) at extension 101 and 0 (No) at all other extensions.
Refer to System Administrator on page 2-337 for more programming details.
Operation
See Accessing the System Administrator Options on page 2-338.
InMail System Guide
2 - 339
Issue 5.00
THIS PAGE INTENTIONALLY LEFT BLANK
2 - 340
Features
Issue 5.00
System Re-initialization
Description
Initializing the telephone system automatically initializes all InMail programming. You
may want to do this if the site requirements significantly change and it is easier to start
over from default than remove all your custom programming. Re-initializing InMail
returns all programmed options to their default values.
Re-initializing the telephone system returns all programmed options to their factory
set (default) values. Any site specific programming you have done is erased
following re-initialization.
To initialize (erase) Subscriber Mailbox Security Codes and all recordings, use a
System Administrator Mailbox.
Related Features
System Administrator
The System Administrator can delete Subscriber Mailbox security codes as well as InMail
recorded messages.
Programming
To initialize (Cold Start) the telephone system:
1.
Make sure the system (not InMail) CompactFlash card is not installed.
.
The system does not boot correctly if the system CompactFlash card is installed.
2.
Push the power button to Off.
3.
Wait 10 seconds before going to the next step.
.
This gives the system time to complete the shutdown process.
4.
Press and hold the Load button, then turn the power switch to On.
5.
Continue to hold down the Load button for at least 3 seconds.
6.
Release the Load button.
InMail System Guide
.
The system restarts in about 2 minutes.
.
When the system restarts, the Live LED flashes red.
2 - 341
Issue 5.00
.
To erase recorded messages and Subscriber Mailbox Security Code refer to System
Administrator on page 2-337.
The recorded messages include:
Instruction Menus
Announcement Mailbox messages
Messages left in a Subscriber Mailbox
Subscriber Mailbox greetings
Subscriber Mailbox names
Operation
Not applicable
2 - 342
Features
Issue 5.00
Time and Date
Description
Since InMail is completely integrated with the telephone system software, the InMail
time and date is the same as the phone system time and date. Since time and date is
used on telephone displays and with the Auto Time Stamp and Time and Date Stamp
features, be sure to set it accurately. To change the time and date, use the system
programmable options. See Programming below. The Time and Date is retained if the
telephone system power should fail or the system resets.
In addition, a Subscriber Mailbox user can hear the time and date when they call their
mailbox.
Related Features
Auto Time Stamp
After a user listens to a message, InMail can optionally announce the time and date the
message was left.
Time and Date Stamp
An extension can listen to a message and dial TI to hear the time the message was sent.
Programming
1.
To set the system time and date from system programming:
10-01-01
Time and Date
Set the system Time and Date.
2.
To set the system time from a system telephone:
Press Speaker key.
Dial 828.
Dial two digits for the hour (24 hour clock, 13 = 1:00 PM).
Dial two digits for the minutes (00-60).
Press Speaker to hang up.
InMail System Guide
2 - 343
Issue 5.00
Operation
Hearing the Current Time and Date
Log On to Subscriber Mailbox.
TI (84)
Access the Time and Date option.
InMail plays the time and date, and then returns you to the mailbox Main Menu.
0
2 - 344
Plays Help message.
Features
Issue 5.00
Time and Date Stamp
Description
While listening to a message, a Subscriber Mailbox user can dial TI to hear the Time
and Date the message was left. This is a handy option while reviewing messages.
The subscriber can just dial a code to find out when the message arrived.
Time and Date Stamp with Caller ID
With Caller ID installed, a mailbox user can dial TI while listening to a message to hear the
time the message was sent, as well as the caller’s number.
Related Features
Auto Time Stamp
After a user listens to a message, InMail can optionally announce the time and date the
message was left.
Caller ID
With Caller ID installed and programmed, the Time and Date Stamp also includes the
caller’s number.
Listening to Messages
Turn to this feature for additional listening options.
Time and Date
You can set the system time from system programming or from a system extension. You
can set the date only from system programming.
Programming
To get Time and Date Stamp with Caller ID, be sure Caller ID is properly installed and
programmed in the connected telephone system.
InMail System Guide
2 - 345
Issue 5.00
Operation
Hearing the Time and Date a Message was Left
Log On to Subscriber Mailbox.
L (5)
Access the Message Listen mode.
[Lstn]
TI (84)
Hear the time and date the message was sent.
Turn to Listening to Messages on page 2-231 for more on your listening
options.
0
2 - 346
Plays Help message.
Features
Issue 5.00
Transfer to a Mailbox
Description
An extension user can transfer their active call to a coworker’s mailbox. This lets the
caller leave a personal message for the coworker. Transfer to a Mailbox is one of the
big conveniences of InMail since the caller can state their business and not have to
call back later. It saves the caller time and cuts down on unnecessary telephone
system call processing. Transfer to a Mailbox is frequently used by attendants and
receptionists as well as other coworkers.
Related Features
Auto Attendant Do Not Disturb
When enabled, Auto Attendant Do Not Disturb automatically sends all calls from the
Automated Attendant to the subscriber’s mailbox.
Screened Transfer
Automated Attendant Screened Transfers can automatically transfer an outside caller to
an extension.
Unscreened Transfer
Automated Attendant Unscreened Transfers can automatically transfer an outside caller to
an extension.
Programming
Not applicable
InMail System Guide
2 - 347
Issue 5.00
Operation
Transferring your call to a Coworker’s Mailbox
To transfer your active call to a coworker’s mailbox:
1.
2.
3.
4.
Press Transfer.
Press Message.
Dial your coworker’s mailbox number (e.g., 101 for extension 101).
Press Speaker to hang up.
o To optionally transfer a call to coworker mailbox without first ringing their phone, press
Message before dialing their mailbox number. (This is the only procedure you can use
to transfer to a Guest Mailbox.)
o To transfer a call to a coworker mailbox from a single line telephone, use the following
procedure:
Hookflash + Dial 717 + Dial the coworker’s mailbox + Hang up.
To transfer your active call and leave a message:
1.
2.
3.
4.
Press Transfer.
Dial your coworker’s mailbox number (e.g., 101 for extension 101).
Dial 8.
Leave a message and hang up.
.
2 - 348
This procedure can be used for any telephone.
Features
Issue 5.00
Undefined Routing
Description
An Automated Attendant Undefined Routing is a Dial Action Table key assignment for
which there is no routing defined. When an Automated Attendant caller dials a digit
and no routing is assigned, InMail plays: “That is an invalid entry.” InMail then repeats
the dialing options (Instruction Menu) to the caller. If a Dial Action Table key
assignment has no function, you should normally leave it undefined. By default, keys
1, 4, 5, 6, 7, and 8 have Undefined Routing.
Related Features
Dial Action Table
Undefined Routing is a Dial Action Table Action.
Instruction Menu
The active Call Routing Mailbox’s Instruction Menu repeats after a caller dials a digit with
an Undefined Routing.
Programming
1.
To set up an Undefined Routing for a Dial Action Table:
47-13-01
Dial Action Tables: UND Action - Undefined Routing (0) (UND)
For a key that should have an Undefined Routing, the Action entry should
be UND. There is no corresponding Number option entry.
.
By default, keys 1, 4, 5, 6, 7, and 8 have Undefined Routing.
Operation
Not applicable
InMail System Guide
2 - 349
Issue 5.00
THIS PAGE INTENTIONALLY LEFT BLANK
2 - 350
Features
Issue 5.00
Unscreened Transfer
Description
Unscreened Transfer is an Automated Attendant option that allows callers to directly
dial system extensions. Unscreened Transfer (and its related feature Screened
Transfer) allows the InMail Automated Attendant to transfer outside calls to system
extensions without a live receptionist or operator. It is similar to telephone system
unscreened transfers in which the transferring party immediately extends the call.
After an Automated Attendant caller dials an extension, InMail transfers the call to the
destination and hangs up. Any recalls or additional routing are handled by the
telephone system – just as with any other unscreened transfer.
Screened vs. Unscreened Transfer
Both Screened and Unscreened Transfer allow Automated Attendant callers to
directly dial system extensions. The following summarizes the differences between
these two types of Automated Attendant transfer.
With Unscreened Transfer, calls from the Automated Attendant ring like other
transferred calls and display the incoming Caller ID data (if provided by telco
and enabled in programming). Screened Transfers ring like Intercom calls and
do not display Caller ID until the call is answered.
Both Screened and Unscreened Transfers route unanswered calls to the
subscriber’s greeting (recorded or default) so the caller can leave a message.
However, only Screened Transfer allows the caller to dial 2 to reach the Next
Call Routing Mailbox options (if programmed).
Unscreened Transfer and Inactive Mailboxes
An Unscreened Transfer goes through to the destination extension even if the
destination doesn’t have an active mailbox. If the Unscreened Transfer is unanswered
at the destination, the call returns to the Automated Attendant.
InMail System Guide
2 - 351
Issue 5.00
Unscreened Transfer (UTRF) Operation
Call = Call answered by the Automated Attendant.
Extension = Extension dialed by Automated Attendant caller.
If Auto Attendant Do Not Disturb is off, see Auto Attendant Do Not Disturb on page 2-57.
Extension Idle
With Active
Greeting Recorded
With Active
Greeting Not
Recorded
Transfers call to extension.
If answered, connects call
(just like a phone system
transfer).
If unanswered1 in a default
phone system, plays
greeting (so caller can start
recording).2
Extension Busy
1. Transfers call to exten-
sion.
2. Retrieves call.
Extension in DND
1. Transfers call to exten-
sion.
2. Retrieves call.
3. If unanswered1 in a
Transfers call to extension.
If answered, connects call
(just like a phone system
transfer).
If unanswered1 in a default
phone system, plays name
(if recorded) or extension
number. InMail then
prompts caller to leave a
message.2
If answered, connects call
(just like a phone system
transfer).
If unanswered1 in a default
phone system, plays name
(if recorded) or extension
number. InMail then
prompts caller to leave a
message.2
If answered, connects call
(just like a phone system
transfer).
If unanswered1 in a default
phone system, plays name
(if recorded) or extension
number. InMail then
prompts caller to leave a
message.2
default phone system,
plays greeting (so caller
can start recording).2
default phone system,
plays greeting (so caller
can start recording).2
If Auto Attendant Do Not Disturb is on, see Auto Attendant Do Not Disturb on page 2-57.
Extension Idle
With Active
Greeting Recorded
With Active
Greeting Not
Recorded
Extension Busy
Extension in DND
Sends call immediately to mailbox:
Plays greeting.
Prompts caller to start recording.
1
After 24-02-04 Transfer Recall Time.
Custom phone system programming may redirect the unanswered call (for example, to a hunt group or
another extension).
2
2 - 352
Features
Issue 5.00
Related Features
Answer Tables
Determines how the Automated Attendant answers outside calls on each trunk.
Automated Attendant
The Answer Table determines how the Automated Attendant answers calls.
Routing Mailbox
The mailbox associated with an Answer Table that specifies which dialing options (Dial
Action Table) and announcements are available to Automated Attendant callers.
Caller ID
InMail provides Caller ID data for an Unscreened Transfer as the call is ringing.
Dial Action Table
Defines the dialing options for the Call Routing Mailbox chosen by the active Answer
Table.
You cannot program a Call Routing Mailbox as an Unscreened Transfer (UTRF) Dial
Action Table destination.
Forced Unscreened Transfer
The Subscriber Mailbox can optionally convert Automated Attendant Screened Transfers
to Unscreened Transfers.
Next Call Routing Mailbox
The Next Call Routing settings for a Subscriber Mailbox may provide additional options
after the caller leaves a message.
Screened Transfer
After an Automated Attendant caller dials an extension, InMail calls (screens) the
destination extension to see if the transfer can go through.
InMail System Guide
2 - 353
Issue 5.00
Programming
1.
Assign the UTRF action to a key on the active Dial Action Table.
47-13-01
Dial Action Tables: UTRF Action - Unscreened Transfer (2) (UTRF)
Normally, the corresponding Number option should be XXX. Note that the
key you choose for this action is the first digit of the called extension
number.
For example, to allow callers to place Unscreened Transfers to extensions
200~299, for key 3 enter UTRF for the Action and XXX for the
corresponding Number.
To have Unscreened Transfer call a specific extension, the corresponding
Number option should be that extension’s number. The caller then dials that
single digit to reach the extension.
For example, to have callers dial 8 to reach extension 303, for key 8 enter
UTRF for the Action and 303 for the corresponding Number.
.
2.
By default, key 0 and TIMEOUT are both UTRF actions to 200. In addition, key 3
is an UTRF action to XXX.
Optionally set the telephone system’s Transfer Recall interval.
24-02-04
Transfer Recall Time
Unanswered Unscreened Transfers route to the extension’s mailbox after
this interval.
.
By default, this interval is 30 seconds.
Operation
Not applicable
2 - 354
Features
Issue 5.00
Voice Mail Overflow
Description
The telephone system can automatically reroute unanswered outside calls to the
In-Mail Automated Attendant. Voice Mail Overflow ensures that InMail picks up calls
that do not go through. This allows callers to leave a message rather than having to
call back later. Voice Mail can be the overflow destination for the following types of
calls:
Direct Inward Line (DIL) Overflow
A trunk that directly rings an extension can overflow to that extension’s mailbox
if not answered.
Incoming Ring Groups
A trunk ringing an extension’s line keys can overflow to the InMail Automated
Attendant.
Department Calling Groups
A call to a Department Group master (pilot) number can overflow to InMail if
unanswered. The overflow destination is the Group Mailbox assigned to the
Department Group. The Group Mailbox can be a:
Call Routing Mailbox
This gives the Department Group caller additional dialing options if their call is
unanswered.
Announcement Mailbox
This plays a prerecorded announcement to the Department Group caller if their call
is unanswered. The Announcement Mailbox can then hang up or provide additional
dialing options.
Subscriber Mailbox
The Department Group caller can leave a message in the groups master mailbox. A
Member of the group can then retrieve the message later on.
The call into the Department Group can be one of the following:
A Direct Inward Line to the Department Group master (pilot) number.
A Screened Transfer from the InMail Automated Attendant to the Department Group
master (pilot) number.
An Unscreened Transfer from the InMail Automated Attendant to the Department
Group master (pilot) number.
InMail System Guide
2 - 355
Issue 5.00
Related Features
Answer Tables
Determines how the Automated Attendant answers outside calls on each trunk.
Automated Attendant
The Answer Table determines how the Automated Attendant answers calls.
Routing Mailbox
The mailbox associated with an Answer Table that specifies which dialing options (Dial
Action Table) and announcements are available to Automated Attendant callers.
Dial Action Table
Defines the dialing options for the Call Routing Mailbox chosen by the active Answer
Table.
Group (Shared) Mailbox
Use Group Mailboxes for:
Department Calling Group Overflow.
Screened Transfer
A Screened Transfer from the InMail Automated Attendant to a Department Group master
number can overflow to the group Mailbox.
Unscreened Transfer
An Unscreened Transfer from the InMail Automated Attendant to a Department Group can
overflow to the group Mailbox.
Programming
Programming DIL Overflow
1.
Set up Direct Inward Lines.
22-02-01
Incoming Call Trunk Setup
Assign Service Type 4 to each trunk you want to be a DIL. Make a separate
entry for each Night Service mode.
.
22-07-01
By default, trunks are Service Type 0 (Normal).
DIL Assignment
For each trunk designated as a DIL above, enter the extension number of
the DIL destination (e.g., 306). Make a separate entry for each Night
Service mode.
.
2 - 356
By default, no DIL destinations are programmed.
Features
Issue 5.00
2.
Assign InMail as the overflow (no answer) destination.
22-08-01
DIL/IRG No Answer Destination
For each trunk assigned as a DIL above, enter the InMail Department
Group pilot number to make InMail the overflow (no answer) destination.
.
3.
By default, the overflow (no answer) destination is Incoming Ring Group 1.
Set the interval after which unanswered calls should route to the overflow
destination.
22-01-04
DIL No Answer Recall Time
Enter the interval after which unanswered calls should overflow to the
programmed overflow (no answer) destination.
.
By default, this interval is 0 (no overflow).
Programming Incoming Ring Group Overflow
1.
Set up the Incoming Ring Group trunks.
22-02-01
Incoming Call Trunk Setup
Assign Service Type 0 (Normal) to each Incoming Ring Group trunk. Make
a separate entry for each Night Service mode.
.
2.
By default, trunks are Service Type 0 (Normal).
Assign InMail as the overflow (no answer) destination.
22-08-01
DIL/IRG No Answer Destination
For each trunk assigned as an Incoming Ring Group trunk above, enter the
InMail Department Group pilot number to make InMail the overflow (no
answer) destination.
.
3.
By default, the overflow (no answer) destination is Incoming Ring Group 1.
Set the interval after which unanswered calls should route to the overflow
destination.
22-01-04
DIL No Answer Recall Time
Enter the interval after which unanswered calls should overflow to the
programmed overflow (no answer) destination.
.
By default, this interval is 0 (no overflow).
Programming DID Overflow
1.
Set up the Incoming Ring Group trunks.
22-02-01
Incoming Call Trunk Setup
Assign Service Type 3 (DID) to each Incoming trunk. Make a separate entry
for each Night Service mode.
.
2.
InMail System Guide
By default, trunks are Service Type 0 (Normal).
Assign InMail as the overflow (no answer) destination.
2 - 357
Issue 5.00
22-11-04
DID Transfer Operation Mode
For each DID required to step over to voice mail, enter the status that the
call will step over:
.
1 = Busy, 2 = No Answer, 3 = Both
.
By default, the DID transfer operation mode is set to 0 ~ No transfer
22-11-05/06DID No Answer Destination
For each DID required to step over to voice mail, enter the InMail Ring
Group code (102) to make InMail the overflow (no answer) destination.
.
3.
By default, the overflow (no answer) destination is Incoming Ring Group 0.
Set the interval after which unanswered calls should route to the overflow
destination.
22-01-07/08DID No Answer Recall Time
Enter the interval after which unanswered calls should overflow to the
programmed overflow (no answer) destination.
.
22-01-07 = DID no answer timer for Incoming ring groups which by default is set
to 20.
.
22-01-08 = DID no answer timer for Department groups which by default is set to
60.
Programming Department Calling Group Overflow for Screened Transfers
(TRFs)
1.
Set up the Department Group.
16-02-01
Department Group Assignment for Extensions.
Assign telephone extensions to a Department Group.
.
By default, telephone extensions are assigned to Department Group 1.
Assign the InMail extensions to a unique Department Group (e.g., 2).
No other extensions should be in this group.
These extensions are the extensions the system assigns to the InMail.
Do not use Department Group 1.
Be sure to set up the Department Group in order. (For example, the first
extension should be order 1, the second order 2, etc.)
11-07-01
Department Group Pilot Numbers
Assign master (pilot) numbers to Department Groups.
2.
In the active Dial Action Table, assign a Screened Transfer (TRF) Action to the
Department Group master number.
47-13-01
Dial Action Tables: TRF Action - Screened Transfer (1) (TRF)
The corresponding Number option should be the Department Group master
number.
For example, to allow callers to place Screened Transfers to Department
Group 1 (600), enter TRF for the Action and 600 for the corresponding
2 - 358
Features
Issue 5.00
Number.
.
3.
By default, there are to TRF actions assigned to Department Groups.
Set how long the call will ring in the Department Group before overflow occurs.
47-08-02
Screened Transfer Timeout (Scrn Trf Timeout)
For the active Call Routing Mailbox, set how long (1~255 seconds) the
Screened Transfer from the InMail Automated Attendant rings in the
Department Group before overflow occurs.
.
4.
By default, this interval is 15 seconds.
Set up the Department Group Mailbox.
47-03-02
Group Mailbox Number (Mailbox Number)
The Group Mailbox number must be the same as the Department Group
master number.
.
InMail System Guide
By default, no Group Mailbox numbers are assigned.
2 - 359
Issue 5.00
47-03-03
Group Mailbox Type (Mailbox Type)
Assign the Group Mailbox category (2=Call Routing, 1=Subscriber,
0=Undefined).
.
5.
By default, the Group Mailbox type is 1 (Subscriber).
Set up the options for the Group Mailbox used for Department Group overflow.
If you entered 2 (Call Routing) for 47-03-03 Group Mailbox Type:
47-07 InMail Routing Mailbox Options on page 3-412.
47-08 Routing Mailbox Call Routing Options on page 3-416.
47-09 Routing Mailbox Announcement Options on page 3-419.
If you entered 1 (Subscriber) for 47-03-03 Group Mailbox Type:
47-06-01 Number of Messages on page 3-403.
47-06-02 Message Playback on page 3-403.
47-06-03 Auto Erase/Save of Messages (Auto Erase/Save) on page
3-404.
47-06-05 Recording Conversation Beep (Rec Conv Beep) on page 3-404.
47-06-06 Message Waiting Lamp (Update MW Lamp) on page 3-405.
47-06-07 Auto Attendant Do Not Disturb (Auto-ATT DND) on page 3-405.
47-06-08 Forced Unscreened Transfer (Forced UTRF) on page 3-405.
47-06-09 Auto Time Stamp on page 3-406.
47-06-10 System Administrator (System Admin) on page 3-406.
47-06-11 Dialing Option on page 3-406.
47-06-12 Next Call Routing Mailbox (Next CR Mbox) on page 3-407.
15-07-01 Programming Function Keys on page 3-369.
For each Department Group member, assign a Voice Mail key (code 77) for
the group master number. This allows group members to easily retrieve the
overflow messages.
Programming Department Calling Group Overflow for Unscreened Transfers
(UTRFs)
1.
Set up the Department Group.
16-02-01
Department Group Assignment for Extensions
Assign telephone extensions to a Department Group.
Assign the InMail extensions to a unique Department Group (e.g., 2).
No other extensions should be in this group.
These extensions are the extensions the system assigns to the InMail.
Do not use Department Group 1.
Be sure to set up the Department Group in order. (For example, the first
extension should be order 1, the second order 2, etc.)
11-07-01
Department Group Pilot Numbers
Assign master (pilot) numbers to Department Groups.
2 - 360
Features
Issue 5.00
2.
In the active Dial Action Table, assign an Unscreened Transfer (UTRF) Action
to the Department Group master number.
47-13-01
Dial Action Tables: UTRF Action - Unscreened Transfer (2) (UTRF)
The corresponding Number option should be the Department Group master
number.
For example, to allow callers to place Screened Transfers to Department
Group 1 (600), enter UTRF for the Action and 600 for the corresponding
Number.
.
3.
By default, there are two UTRF actions assigned to Department Groups.
Set how long the call will ring in the Department Group before overflow occurs.
24-02-04
Transfer Recall Time
Set how long (0~64800 seconds) the Unscreened Transfer from the InMail
Automated Attendant rings in the Department Group before overflow
occurs.
.
4.
By default, this interval is 30 seconds.
Set up the Department Group Mailbox.
47-03-02
Group Mailbox Number (Mailbox Number)
The Group Mailbox number must be the same as the Department Group
master number.
.
47-03-03
By default, no Group Mailbox numbers are assigned.
Group Mailbox Type (Mailbox Type)
Assign the Group Mailbox category (2=Call Routing, 1=Subscriber,
0=Undefined).
.
5.
By default, the Group Mailbox type is 1 (Subscriber).
Set up the options for the Group Mailbox used for Department Group overflow.
If you entered 2 (Call Routing) for 47-03-03 Group Mailbox Type:
47-07 InMail Routing Mailbox Options on page 3-412.
47-08 Routing Mailbox Call Routing Options on page 3-416.
47-09 Routing Mailbox Announcement Options on page 3-419.
If you entered 1 (Subscriber) for 47-03-03 Group Mailbox Type:
47-06-01 Number of Messages on page 3-403.
47-06-02 Message Playback on page 3-403.
47-06-03 Auto Erase/Save of Messages (Auto Erase/Save) on page
3-404.
47-06-05 Recording Conversation Beep (Rec Conv Beep) on page 3-404.
47-06-06 Message Waiting Lamp (Update MW Lamp) on page 3-405.
47-06-07 Auto Attendant Do Not Disturb (Auto-ATT DND) on page 3-405.
47-06-08 Forced Unscreened Transfer (Forced UTRF) on page 3-405.
47-06-09 Auto Time Stamp on page 3-406.
InMail System Guide
2 - 361
Issue 5.00
47-06-10 System Administrator (System Admin) on page 3-406.
47-06-11 Dialing Option on page 3-406.
47-06-12 Next Call Routing Mailbox (Next CR Mbox) on page 3-407.
Programming Department Calling Group Overflow for a DIL to the Master
Number
1.
Set up the Department Group.
16-02-01
Department Group Assignment for Extensions
Assign telephone extensions to a Department Group.
Assign the InMail extensions to a unique Department Group (e.g., 2).
No other extensions should be in this group.
These extensions are the extensions the system assigns to the InMail.
Do not use Department Group 1.
Be sure to set up the Department Group in order. (For example, the first
extension should be order 1, the second order 2, etc.)
11-07-01
Department Group Pilot Numbers
Assign master (pilot) numbers to Department Groups.
2.
Set up a DIL for the Department Group.
22-02-01
Incoming Call Trunk Setup
Assign Service Type 4 to each trunk you want to be a DIL. Make a separate
entry for each Night Service mode.
.
22-07-01
By default, trunks are Service Type 0 (Normal).
DIL Assignment
For each DIL you want to ring the Department Group directly, enter the
Department Group master number.
.
22-08-01
By default, there are no DIL destinations programmed.
DIL/IRG No Answer Destination
For each DIL to the Department Group master number, enter 102 to make
InMail the overflow (no answer) destination.
.
3.
By default, the overflow (no answer) destination is Incoming Ring Group 1.
Set how long a DIL rings in the Department Group before overflow occurs.
22-01-04
DIL No Answer Recall Time
Set how long (0~64800 seconds) the DIL rings in the Department Group
before overflow occurs.
.
2 - 362
By default, this interval is 0 (no overflow).
Features
Issue 5.00
4.
Set up the Department Group Mailbox.
47-03-02
Group Mailbox Number (Mailbox Number)
The Group Mailbox number must be the same as the Department Group
master number.
.
47-03-03
By default, no Group Mailbox numbers are assigned.
Group Mailbox Type (Mailbox Type)
Assign the Group Mailbox category (2=Call Routing, 1=Subscriber,
0=Undefined).
.
5.
By default, the Group Mailbox type is 1 (Subscriber).
Set up the options for the Group Mailbox used for Department Group overflow.
If you entered 2 (Call Routing) for 47-03-03 Group Mailbox Type:
47-07 InMail Routing Mailbox Options on page 3-412.
47-08 Routing Mailbox Call Routing Options on page 3-416.
47-09 Routing Mailbox Announcement Options on page 3-419.
If you entered 1 (Subscriber) for 47-03-03 Group Mailbox Type:
47-06-01 Number of Messages on page 3-403.
47-06-02 Message Playback on page 3-403.
47-06-03 Auto Erase/Save of Messages (Auto Erase/Save) on page
3-404.
47-06-05 Recording Conversation Beep (Rec Conv Beep) on page 3-404.
47-06-06 Message Waiting Lamp (Update MW Lamp) on page 3-405.
47-06-07 Auto Attendant Do Not Disturb (Auto-ATT DND) on page 3-405.
47-06-08 Forced Unscreened Transfer (Forced UTRF) on page 3-405.
47-06-09 Auto Time Stamp on page 3-406.
47-06-10 System Administrator (System Admin) on page 3-406.
47-06-11 Dialing Option on page 3-406.
47-06-12 Next Call Routing Mailbox (Next CR Mbox) on page 3-407.
Operation
Not applicable
InMail System Guide
2 - 363
Issue 5.00
2 - 364
Features
Issue 5.00
Volume Control
Description
Since InMail is completely integrated with the telephone system software, Volume
Control is available at a subscriber’s keyset any time while listening to a message,
greeting, or prerecorded voice prompt. Volume Controls let the user interactively
adjust the loudness of the InMail messages and prompts to a comfortable level.
Related Features
Not applicable
Programming
No additional programming required.
Operation
Volume Control
To adjust the volume while using any mailbox feature:
1. Press VOL Up or VOL Down.
InMail System Guide
2 - 365
Issue 5.00
THIS PAGE INTENTIONALLY LEFT BLANK
2 - 366
Features
Programming
SECTION 1
BEFORE YOU START PROGRAMMING
How to use this chapter
The InMail programmable options allow you to customize the way the
features associated with an option work. This Programming chapter
provides detailed information to enable you to accomplish the following:
Find out about each option.
Review the list of features that an option affects.
Learn how to enter the option data into system memory.
Chapter
3
When you want to customize a feature, refer to information in the Features
chapter, Section 3 Feature Descriptions on page 2-26. The Feature
Descriptions tells you what options you have to change to get the feature
operation you want. Then, look up the options in this section and
customize them as required.
Start-Up Programming
Default Programming
SECTION 2
START-UP PROGRAMMING (DEFAULT)
When you install the InMail blade and turn on the system, InMail does not
automatically start working, but the following areas are programmed.
Subscriber Mailboxes are enabled for extensions 200~263. The
mailbox numbers are the same as the extension numbers.
The Automated Attendant does not answer outside calls.
InMail System Guide
3 - 367
Issue 5.00
2.1
INMAIL CONFIGURATION
The following programs must be configured in a default system to get InMail
functions.
1.
The InMail blade is enabled.
47-01-17
InMail Port
This option is used to set the first port of InMail. This value can be any
valid station port not already in use. By default this option is not
assigned. Changing this option requires the CHS2U GW be reset for
changes to take effect.
2.
Assign InMail extensions to Department Group.
16-02-01
Department Group Assignment for Extensions
Assign the InMail extensions to a unique Department Group (e.g.,
64).
No other extensions should be in this group.
These extensions are the extensions the system assigns to the
In-Mail.
Do not use Department Group 1.
3.
Be sure to set up the Department Group in order. (For example, the first
extension should be order 1, the second order 2, etc.) Assign master
number to InMail Department Group.
11-07-01
4.
Define the Voice Mail Department Group.
45-01-01
5.
Department Group Pilot Numbers
Voice Mail Integration Options – Voice Mail Department Group
Number
Set extensions 101-108 to use the Message key for Voice Mail
operation.
15-02-26
Multiline Telephone Basic Data Setup – Message Key Operation
Mode
This option is 0 for all extensions.
No Voice Mail Programmable Function Keys are assigned (15-07-01
Programming Function Keys does not = 77 for any extensions).
6.
For extensions 200~263, the Subscriber Mailbox numbers are the same
as the extension numbers.
47-02-02
InMail Station Mailbox Options – Mailbox Number
Normally, Subscriber Mailbox numbers correspond to the respective
extension number. (For example, extensions 200~263 should use
3 - 368
Programming
Issue 5.00
Subscriber Mailbox numbers 200~263).
Options
1~256
Default
Not Assigned
7.
Also, the following program must be configured in a default system.
15-03-01
Single Line Telephone Basic Data Setup - Signalling Type
Set at DP (Dial Pulse) for InMail extensions.
15-03-03
Single Line Telephone Basic Data Setup – Terminal Type
Set at 1 (Special) for InMail extensions.
2.2
Optional InMail Start-Up Programming
Program Voice Mail keys on system extensions.
15-07-01
Programming Function Keys
Voice Mail keys are code 77.
Normally, the additional data is the number of the extension you are
programming.
You can optionally set up an extension Message key for Voice Mail
access in the next step.
Keysets can also have Voice Mail keys for Virtual Extensions, a
co-worker, or an uninstalled extension (for Message Center
operation).
Extension users can use Service Code 751 to set up their own Voice
Mail keys.
.
2.3
By default, no Voice Mail keys are assigned.
Set up Automated Attendant to Answer Outside Calls
To have Automated Attendant answer outside calls, perform the following:
Set up Direct Inward Lines (DILs) or DDI’s
Terminate DILs or DDIs to InMail
After the DILs/DDIs to InMail are set up, all calls are answered by Call
Routing Mailbox 1 and Dial Action Table 1.
Answer Table 1 Runs Monday-Friday from 8:30AM to 5:00PM, and uses
Call Routing Mailbox 1.
At all other times, the Default Mailbox answers – also using Call Routing
Mailbox 1.
Dial Action Table 1 enables the following usage:
InMail System Guide
3 - 369
Issue 5.00
Dial system extensions (if installed) 200~299 & 300~399.
Dial 0 for an operator (extension 200).
Dial * + Extension to leave a Quick Message in a mailbox.
Dial # + Extension to remotely log on to their mailbox.
Wait on the line to be automatically routed to the operator.
Programming
1.
Set up trunks as DILs.
22-02-01
Incoming Call Trunk Setup
Assign Service Type 4 to each trunk you want to be a DIL. Make a separate
entry for each Night Service mode.
Assign Service Type 3 to each trunk you want to be a DID. Make a separate
entry for each Night Service mode.
.
2.
By default, trunks are Service Type 0 (Normal).
Have the DILs terminate to InMail extension.
22-07-01
DIL Assignment
For each trunk you designate as a DIL, enter the InMail group pilot number.
Make a separate entry for each Night Service mode.
.
22-11
By default, there are no DIL destinations programmed.
DID Assignment
For the required incoming digits, enter InMail pilot number in 22-11-02 or
102 (Voice mail routing) in 22-11-05 or 06 . Make a separate entry for each
Night Service mode configured.
3 - 370
Programming
Issue 5.00
SECTION 3
PROGRAM 15 EXTENSION, BASIC SETUP
Program 15-01 Basic Extension Data Set Up
Description
Program 15-01 Basic Extension Data Setup defines the basic settings for each
extension.
Use 15-01-01 Extension Name to enter an extension name for Directory Dialing. You
can also enter an extension name from the telephone.
.
For information on the other 15-01 Basic Extension Data Setup options, refer to the SV8100
Programming Manual.
Options
15-01-01
Extension Name
Enter the name for each extension, using up to 12 characters, A~Z, upper
and lower case letters. Do not use non-alpha characters. To separate a first
name from a last name, enter a space or comma as a delimiter. You can
enter names in any of the following formats:
First
Last
First (space) Last
Last (space) First
You can also use Name Programming from the telephone to enter
extension names (Speaker + 800 or PRG 15-07/SC 851 + 55).
InMail System Guide
.
For help with programming names, see Keys for Entering Names on page 3-372.
.
See Directory Dialing on page 2-111.
3 - 371
Issue 5.00
Keys for Entering Names
Key for Entering Names
When entering names in the procedures below, refer to this chart. Names can be up to
12 digits long.
Use this keypad
digit . . .
When you want to. . .
Enter characters:
1 @ [ ¥ ] ^ _ ` { | }
1
→ ←
2
Enter characters: A-C, a-c, 2.
3
Enter characters: D-F, d-f, 3.
4
Enter characters: G-I, g-i, 4.
5
Enter characters: J-L, j-l, 5.
6
Enter characters: M-O, m-o, 6.
7
Enter characters: P-S, p-s, 7.
8
Enter characters: T-V, t-v, 8.
9
Enter characters: W-Z, w-z, 9.
0
Enter characters:
0
!
“
#
$
%
&
’
(
Á À Â Ã Ç É Ê ì ó
) ô Õ ú ä ö ü α ε θ
Enter characters:
Q
Q
+
¢ £
#
,
-
.
/
:
;
<
=
>
?
B E σ S
# = Accepts an entry (only required if two letters on the same key
are needed - ex: TOM). Pressing # again = Space. (In system
programming mode, use the right arrow soft key instead to accept
and/or add a space.)
Conf
Clear the character entry one character at a time.
Hold
Clear all the entries from the point of the flashing cursor and to the
right.
Options
Characters (12 maximum, using upper and lower case letters).
Use a space or comma as the delimiter between the first and last name.
Default
No extension names entered.
3 - 372
Programming
Issue 5.00
15-01 Program Entry
15-01 Basic Extension Data Setup Program Entry
(Entry Range) [Default Setting]
Speaker + #*#* + Password (12345678) + Transfer + 1501 + Option.
01
Extension Name (12 characters max., A-Z using upper and lower case letters) [No entry]
Use a space or comma as the delimiter between the first and last name.
02
Outgoing Trunk Line Preference (0=Off, 1=On) [0]
03
SMDR Printout (0=Do not print on SMDR report, 1=Include on SMDR report) [1]
04
ISDN Caller ID (0=Disable, 1=Enable) [1]
05
Restriction for Outgoing Disable on Incoming Line (0=Disable, 1=Enable) [0]
Press this:
To do this:
Editing
Transfer
Enter (accept) data you entered and advance to the next prompt, or advance to the next
prompt without changing your entry.
-1
+1
Scroll backwards (-1) or forwards (+1) through the list of available entries.
I
J
When editing an entry, moves the cursor left or right.
Conf
When editing an entry, delete the character to the left of the cursor.
Hold
When editing an entry, Hold erases the entire entry from the display.
Line Keys (LK)
Where indicated, press a line key to enter a specific value for the selected option.
Navigation
Backs up to the previous level (e.g., from Option to Series, or from Series to Program).
Answer
K
L
Scroll consecutively backwards or forwards through selected Option or Series.
InMail System Guide
3 - 373
Issue 5.00
SECTION 4
PROGRAM 41 ACD SETUP
41-19 Voice Mail Delay Announcement
Description
Use Program 41-19 : Voice Mail Delay Announcement to assign In-Mail Call
Routing Mailboxes (PRG 47-09) as ACD Delay “Announcement” Mailboxes. Refer to
Figure 3-1 ACD Delay Announcement Flowchart on page 3-377 for programming
example. Also, refer to the SV8100 ACD Manual for more information.
Conditions
The KSU must be licensed for ACD and In-Mail in order for this feature to work.
Call Routing Mailboxes used for Delay Announcements cannot be used for
other features.
Call Routing boxes used for dial options cannot be used for other features.
When Voice Mail Delay Announcements are being played, InMail talk paths
(ports) are used.
InMail cannot be used for ACD Night Announcement.
If a caller chooses to dial out of a queue during the delay announcement the
caller is immediately removed from the queue.
Options
41-19-01
Delay Message Start Timer
Determine how long the system waits before playing the first Delay
Message.
Options
0~64800
Default
0
3 - 374
Programming
Issue 5.00
41-19-02
Mailbox Number for 1st Announcement Message
Assign Voice Mail ACD Announcement Mailbox as the message source for
the 1st Announcement Message.
Options
Dial (Up to 7 digits)
Default
No Setting
41-19-03
1st Delay Message Sending Count
Determine the 1st Delay Message Sending Count. This entry must be set to
1 or higher in order for the message to play.
Options
0 = No Message Played, 1~255
Default
0
41-19-04
Mailbox Number for 2nd Announcement Message
Assign Voice Mail ACD Announcement Mailboxes as the message source
for the 2nd Announcement Message.
Options
Dial (Up to 7 digits)
Default
No Setting
41-19-05
2nd Delay Message Sending Count
Determine the 2nd Delay Message Sending Count. This entry must be set
to 1 or higher in order for the message to play.
Options
0 = No Message Played, 1~255
Default
0
41-19-06
Wait Tone Type at Message Interval
Determine what the caller will hear between the messages.
Options
0 = Ring Back Tone
1 = MOH Tone
2 = BGM Source
Default
0
InMail System Guide
3 - 375
Issue 5.00
41-19-07
ACD Forced Disconnect Time After 2nd Announcement
Assign how long the system should wait after the end of the ACD delay
message before disconnecting.
Options
0~64800
Default
0
41-19-08
Delayed Message Interval Time
Set the timer for the interval between the Delayed Messages
Options
0~64800
Default
20
3 - 376
Programming
Issue 5.00
Figure 3-1 ACD Delay Announcement Flowchart
InMail System Guide
3 - 377
Issue 5.00
SECTION 5
PROGRAM 45 VOICE MAIL INTEGRATION
45-01 Voice Mail Integration Options
Description
Use Program 45-01 : Voice Mail Integration Options to customize certain voice mail
integration options.
Input Data
Item
No.
01
Item
Voice Mail Department Group Number
Assign which Extension (Department) Group
number is to be assigned as the voice mail
group (non-networked system).
02
Voice Mail Master Name
Input Data
Default
0~64
0 = No Voice Mail
0
Up to 12 Characters
Voice Mail
0 = Off
1 = On
1
0 = Off
1 = On
1
0~64800 (sec)
30
Dial (up to 8 digits)
No Setting
Enter the Voice Mail master name
(non-networked system).
03
--- Not Used ---
04
Park and Page
Enable/disable the system ability to process the
Voice Mail Park and Page (Q) commands. You
should normally enable this option.
05
Message Wait
Enable/disable the system ability to process the
Voice Mail Message Wait (#) commands. You
should normally enable this option. If enabled,
be sure that the programmed Message
Notification strings don’t contain the code for
trunk access.
06
Record Alert Tone Interval Time
This time sets the interval between voice Mail
Conversation Record alerts
14
Centralized Voice Mail Number
Assign the pilot number to Centralized Voice
Mail over networking Link. This is assigned
only in the remote switches.
3 - 378
15
Analog Voice Mail Protocol Selection
0: Fixed
1: Program
16
Voice Mail Fax Digit Add Assignment
Up to four digits
0
None
Programming
Issue 5.00
Input Data (Continued)
Item
No.
Item
Input Data
Default
17
Reply Mailbox Number
0: No
1: Yes
1
18
Trunk Number Mapping
2~3
2
Conditions
None
Feature Cross Reference
Voice Mail Integration (Analog)
InMail System Guide
3 - 379
Issue 5.00
SECTION 6
PROGRAM 47 INMAIL
47-01 InMail System Options
Description
Use Program 47-01 InMail System Options to set up the InMail system-wide options.
Options
47-01-02
InMail Master Name
Use this option to modify the name for all InMail ports. The system briefly
displays this name when a display keyset user calls a Voice Mail port, either
by pressing Message, the voice mail key, or by dialing the master number.
You should always end the name with the ## characters. The system
substitutes the port number for the last #. Using the default name InMail ##
for example, the keyset display shows InMail #1 when calling port 1.
Changing this program requires the CHS2U GW be reset for the changes to
take effect.
See Keys for Entering Names on page 3-381.
Options
.
Consider leaving the option at its default setting.
Default
InMail ## (The system substitutes the port number for the # when calling the
port).
3 - 380
Programming
Issue 5.00
Keys for Entering Names
Key for Entering Names
When entering names in the procedures below, refer to this chart. Names can be
up to 12 digits long.
Use this keypad
digit . . .
When you want to. . .
Enter characters:
1 @ [ ¥ ] ^ _ ` { | }
1
→ ←
2
Enter characters: A-C, a-c, 2.
3
Enter characters: D-F, d-f, 3.
4
Enter characters: G-I, g-i, 4.
5
Enter characters: J-L, j-l, 5.
6
Enter characters: M-O, m-o, 6.
7
Enter characters: P-S, p-s, 7.
8
Enter characters: T-V, t-v, 8.
9
Enter characters: W-Z, w-z, 9.
0
Enter characters:
0 ! “ # $
Enter characters:
Q + , - . /
Q
#
%
&
:
;
’
<
(
Á À Â Ã Ç É Ê ì ó
) ô Õ ú ä ö ü
=
>
?
α ε θ
B E σ S
¢ £
# = Accepts an entry (only required if two letters on the same key
are needed - ex: TOM). Pressing # again = Space. (In system
programming mode, use the right arrow soft key instead to accept
and/or add a space.)
Conf
Clear the character entry one character at a time.
Hold
Clear all the entries from the point of the flashing cursor and to the
right.
47-01-03
Subscriber Message Length (Subs Msg Length)
Use this option to set the maximum length of recorded messages for:
Subscriber Mailbox users dialing RS to record and send a message.
Extension users leaving a message in a Subscriber Mailbox.
Outside Automated Attendant callers accessing a mailbox via a GOTO
command and then dialing RS (77) to record and send a message.
InMail System Guide
3 - 381
Issue 5.00
Subscriber Mailbox Greetings.
Announcement Messages.
Call Routing Mailbox Instruction Menus.
.
.
The length of a Conversation Record is 10 times the Subscriber Message
Length. Since the Conversation Record time cannot exceed 4095 seconds, any
settings in Subscriber Message Length larger than 409 has no effect on the
length of recorded conversations.
See the following for more:
Announcement Message on page 2-39
Automated Attendant on page 2-63
Routing Mailbox on page 2-317
Live Record on page 2-235
Greeting on page 2-173
Subscriber Mailbox on page 2-333
Options
1~4095 seconds
Default
120 seconds
47-01-04
Non-Subscriber Message Length (Mbox Msg Length)
Use this option to set the maximum length of recorded messages for:
Automated Attendant callers leaving a message or Quick Message in a
Subscriber Mailbox.
Outside callers transferred by an extension user to a Subscriber Mailbox.
.
See the following for more:
Automated Attendant on page 2-63
Message Length on page 2-265
Quick Message on page 2-309
Subscriber Mailbox on page 2-333
Options
1~4095 seconds.
Default
120 seconds.
47-01-05
Message Backup/Go Ahead Time (Msg Bkup/Adv Time)
Use this option to set the backup/go ahead interval. This interval sets how
far InMail backs up when a user dials B (2) while listening to a message.
This interval also sets how far InMail jumps ahead when a user dials G (4)
while listening to a message.
.
See the following for more:
Listening to Messages on page 2-231
3 - 382
Programming
Issue 5.00
Message Length on page 2-265
Options
1~60 Seconds.
Default
5 Seconds.
47-01-06
Fax Extension
Use this option to specify which system extension is the fax machine. When
the Automated Attendant answers a call and detects fax (CNG) tone, it
automatically transfers the call to this extension.
.
See Fax Detection on page 2-149 for more.
Options
No entry (Press Hold to clear).
Extension number (e.g., 310).
Default
No entry (Press Hold to clear).
47-01-07
Digital Pager Callback Number (Pager CBack)
Use this option to set the Digital Pager Callback Number portion of the
Message Notification callout number for a digital pager. This is the portion of
the callout number that is appended to the pager service telephone number.
Normally, this option is X*M#, where:
X is the number of the extension that generated the notification.
* is a visual delimiter (to make the pager display easier to read).
M is the number of new messages in the extension’s mailbox.
# is the digit normally used by the pager service for positive disconnect.
.
.
Note: this option is not available in Europe.
See Message Notification on page 2-269 for more.
Options
Digits (12 maximum, using 0~9, # and *)
M (Number of messages - entered by pressing LK1)
No entry (Entered by pressing Hold)
X (Extension number - entered by pressing LK2)
InMail automatically replaces the X command with the number of the
extension that initially received the message.
Default
X*M#
InMail System Guide
3 - 383
Issue 5.00
47-01-08
Delay in Dialing Digital Pager Callback Number (Pager Dial Delay)
Use this option to set the delay (0~99 seconds) that occurs just before
InMail dials the Digital Pager Callback Number portion of the Message
Notification callout number for a digital pager. Set this delay so the pager
service has enough time to connect to the digital pager before sending the
callback number. Your pager service may be able to help you determine the
best value for this option (0~99 seconds). By default, this option is 9
seconds. When placing a digital pager notification, the system:
1.
Seizes the trunk specified.
2.
Dials user-entered notification number (in Message + OP + N).
3.
Waits the 47-01-08 Delay in Dialing Digital Pager Callback
Number interval.
4.
Dials number entered in 47-01-07 Digital Pager Callback
Number.
The system assumes that the notification number completes dialing
approximately 4 seconds after trunk seizure. This means that, by default,
the Digital Pager Callback Number is dialed to the pager service about 13
seconds after trunk seizure.
.
Note: this is not applicable in Europe.
See Message Notification on page 2-269 for more.
Options
.
0~99 seconds
Default
9 seconds
47-01-09
Wait Between Digital Pager Callout Attempts (Notify Pager Intvl)
Use this option to set the minimum time (1~255 minutes) between
unacknowledged or unanswered digital pager Message Notification
callouts. (A subscriber acknowledges a digital pager notification by logging
onto their mailbox.) After this interval expires, InMail tries the callout again
(for up to the number of times set in 47-01-14 Number of Callout Attempts).
If the system dials the callout number and the pager service is busy, it will
retry the number in one minute.
.
Note: this option is not available in Europe.
.
See Message Notification on page 2-269 for more.
Options
1~255 minutes
Default
15 minutes
3 - 384
Programming
Issue 5.00
47-01-10
Wait Between Non-Pager Callout Attempts (Notify N-Pgr Intvl)
Use this option to set the minimum time (1~255 minutes) between nonpager Message Notification callouts in which the destination answers, says
“Hello,” dials 1 to acknowledge and then enters the wrong security code.
.
See Message Notification on page 2-269 for more.
Options
1~255 minutes
Default
20 minutes
47-01-11
Wait Between Busy Non-Pager Callout Attempts (Notify Busy Intvl)
Use this option to set how long InMail waits (1~255 minutes), after it dials a
busy non-pager callout destination, before retrying the callout number.
.
See Message Notification on page 2-269 for more.
Options
1~255 minutes
Default
15 minutes
47-01-12
Wait Between RNA Non-Pager Callout Attempts (Notify RNA Intvl)
Use this option to set how long InMail will wait (1~255 minutes), after it dials
an unanswered non-pager callout destination, before retrying the callout
number.
There are three types of unanswered non-pager callouts:
If the callout rings the destination longer than the 47-01-13 Wait for Answer
Non-Pager Callout Attempts option.
If the destination answers, says “Hello” (or the system detects answer
supervision) and then hangs up without dialing 1 to log on to their mailbox.
This typically happens if someone unfamiliar with notification answers the
callout, or if the callout is picked up by an answering machine.
If the destination answers and then hangs up without saying “Hello.” This
typically happens if someone unfamiliar with the notification answers the
callout (like the above example), or if the call is picked up by an answering
machine with insufficient outgoing message volume.
.
See Message Notification on page 2-269 for more.
Options
1~255 minutes
Default
30 minutes
InMail System Guide
3 - 385
Issue 5.00
47-01-13
Wait for Answer Non-Pager Callout Attempts (Notify RNA Rings)
If a non-pager callout rings the destination longer than this interval (1~99
rings), InMail marks the call as unanswered (Ring No Answer) and hangs
up.
.
See Message Notification on page 2-269 for more.
Options
1~99 rings
Default
5 rings
47-01-14
Number of Callout Attempts (Notify Call Attmpt)
Use this option to set how many times (1~99 attempts) InMail retries an
incomplete Message Notification callout. This total includes
unacknowledged callouts, callouts to a busy destination, and callouts to an
unanswered destination. This option applies to pager and non-pager
callouts.
.
See Message Notification on page 2-269 for more.
Options
1~99 attempts
Default
5 attempts
47-01-15
Send Pager Callout Until Acknowledged (Retry Until Ack)
When this option is enabled (1), InMail will continue to retry a digital pager
Message Notification callout until the notification is acknowledged. If this
option is disabled (0), InMail retries a digital pager Message Notification the
number of times specified in 47-01-14 Number of Callout Attempts. This
option does not apply to Message Notification callouts to telephone
numbers.
.
Note: this is not applicable in Europe.
A digital pager notification is considered acknowledged when the recipient
logs on to the mailbox.
See Message Notification on page 2-269 for more.
Options
.
1 (Enabled)
0 (No - disabled)
Default
0 (No - disabled)
47-01-16
Name Format
Use this option to determine how extension names should be entered in
15-01-01 Basic Extension Data Setup – Extension Name or via the
telephone. The options are 0 (first-last) and 1 (last-first).
3 - 386
Programming
Issue 5.00
If you enter 0 (first-last), the system assumes that all names are entered in
the following format:
M
A
R
Y
J
O
First
N
E
S
Last
Delimiter
(space or comma)
If you enter 1 (last-first), the system assumes that all names are entered in
the following format:
J
O
N
E
S
M
A
Last
R
Y
First
Delimiter
(space or comma)
.
See Directory Dialing on page 2-111 for more.
Options
0 (First/Last)
1 (Last/First)
Default
0 (First/Last)
InMail System Guide
3 - 387
Issue 5.00
47-01 Program Entry
47-01 InMail System Options Program Entry
(Entry Range) [Default Setting]
Speaker + #*#* + Password (12345678) + Transfer + 4701 + Option.
01
DSPDB VM Type (0=InMail, 1=VRS) [0]
LK1=InMail, LK2=VRS
02
InMail Master Name (See Keys for Entering Names on page 3-381) [InMail ##]
03
Subs Msg Length (1~4095) [120]
04
Mbox Msg Length (1~4095) [120]
05
Msg Bkup/Adv Time (1~60) [5]
06
Fax Extension (Extension number or no entry, entered by pressing Hold) [No entry]
07
Pager CBack (Digits, M=Number of messages, X=Extension number) [X*M#]
LK1=M, LK2=X
08
Pager Dial Delay (0~99) [9]
09
Notify Pager Intvl (1~255) [15]
10
Notify N-Pgr intvl (1~255) [20]
11
Notify Busy Intvl (1~255) [15]
12
Notify RNA Intvl (1~255) [30]
13
Notify RNA Rings (1~99) [5]
14
Notify Call Attmpt (1~99) [5]
15
Retry Until Ack (1=Yes - enabled, 0=No - disabled) [0]
16
Name Format (0=First-Last, 1=Last-First) [0]
Press this:
To do this:
Editing
Enter (accept) data you entered and advance to the next prompt, or advance to the next
prompt without changing your entry.
Transfer
-1
+1
Scroll backwards (-1) or forwards (+1) through the list of available entries.
I
J
When editing an entry, moves the cursor left or right.
Conf
When editing an entry, delete the character to the left of the cursor.
Hold
When editing an entry, Hold erases the entire entry from the display.
Line Keys (LK)
Where indicated, press a line key to enter a specific value for the selected option.
Navigation
Backs up to the previous level (e.g., from Option to Series, or from Series to Program).
Answer
K
3 - 388
L
Scroll consecutively backwards or forwards through selected Option or Series.
Programming
Issue 5.00
47-02 InMail Station Mailbox Options
Description
Use 47-02 InMail Station Mailbox Options to set up a station (extension) mailbox.
Station mailboxes are automatically assigned as Subscriber Mailboxes. You can also
set up Group Mailboxes as Subscriber Mailboxes.
Typically, InMail Station Mailbox numbers 1~26 correspond to extensions 101~126.
There are three Station Mailbox categories:
Undefined
Station
Group
.
Refer to Group (Shared) Mailbox on page 2-179 and Station Mailbox on page 2-331.
Options
47-02-01
Mailbox Type
Use this option to enable or disable the mailbox. An extension mailbox is
not accessible when it is disabled (even though stored messages and
configuration are retained in memory.) If disabled, a user pressing Message
will initiate a remote logon and be asked to enter their mailbox number. A
voice prompt then announces: “That mailbox does not exist.”
To make programming easier, consider associating a mailbox number with
a station port.
For example, mailbox 1 could correspond to port 1, which in turn
corresponds to extension 101.
.
.
See Section 2 Start-Up Programming (Default) for more.
See Subscriber Mailbox on page 2-333 for more.
Options
0 (Undefined)
1 (Personal)
2 (Group)
Default
Mailboxes 1~64 = 1 (Personal)
InMail System Guide
3 - 389
Issue 5.00
47-02-02
Mailbox Number
Use this option to select the extension number associated with the mailbox
you are programming. Normally, mailbox 1 should use Mailbox Number
101, mailbox 2 should use Mailbox Number 102, etc.
To make programming easier, consider associating a mailbox number with
a station port. For example, mailbox 1 could correspond to port 1, which in
turn corresponds to extension 101.
.
See Subscriber Mailbox on page 2-333 for more.
Options
Digits (7 maximum, using 0~9).
Default
Mailboxes 1~64 = 200~263.
For all other mailboxes, there is no entry.
47-02-03
Number of Messages
Use this option to set the maximum number of messages that can be left in
the Subscriber Mailbox. If a caller tries to leave a message once this limit is
reached, they hear, “That mailbox is full.” InMail then hangs up.
.
See Message Storage Limit on page 2-285 for more.
Options
0~99 messages
To conserve storage space, enter 0 for all unused mailboxes.
Default
99 messages for mailbox 1.
20 messages for all other mailboxes.
47-02-04
Message Playback
Use this option to set the Subscriber Mailbox message playback order.
When a subscriber listens to their messages, InMail can play the oldest
messages first (first-in-first-out, or FIFO), or the newest messages first
(last-in-first-out, or LIFO).
.
See Message Playback Direction on page 2-279 for more.
Options
0 (FIFO - first-in-first-out, or oldest messages first).
1 (LIFO - last-in-first-out, or newest messages first).
Default
0 (FIFO - first-in-first-out, or oldest messages first).
47-02-05
Auto Erase/Save of Messages (Auto Erase/Save)
Use this option to determine what happens when a Subscriber Mailbox user
completely listens to a new message and then exits their mailbox without
either saving (SA) or erasing (E) the message. Depending on the setting of
this option, InMail either automatically saves or erases the message. If the
mailbox user hangs up before listening to the entire new message, InMail
retains the message as a new message.
.
See Auto Erase or Save on page 2-59.
3 - 390
Programming
Issue 5.00
Options
0 (Erase)
After the subscriber listens to the entire new message and hangs up,
In-Mail erases the message.
1 (Save)
After the subscriber listens to the entire new message and hangs up,
In-Mail saves the message.
Default
1 (Save) (see above).
47-02-07
Recording Conversation Beep (Rec Conv Beep)
Use this option to enable or disable the Conversation Record beep. If
enabled, all parties on a call will hear the voice prompt Recording followed
by a single beep when the extension user initiates Conversation Record. If
disabled, the voice prompt and beep will not occur. When you disable the
Conversation Record beep, the following voice prompts do not occur while
InMail records the conversation:
“Recording” (followed by a beep)
“That mailbox is full” (if the mailbox message storage capacity is reached)
“You have reached the recording limit” (if the recorded message is too long)
The SV8100 telephone system software provides an additional
Conversation Record beep. This beep repeats according to the setting of
Program 45-01-06 Voice Mail Integration Options: Record Alert Tone
Interval Time (0~64800 seconds). To disable the SV8100 telephone system
Conversation Record beep, enter 0 for this option.
.
See Live Record on page 2-235 for more.
Options
1 (Yes - enabled)
0 (No - disabled)
Default
1 (Yes - enabled)
47-02-08
Message Waiting Lamp (Update MW Lamp)
Use this option to enable or disable Message Waiting lamp at the extension
associated with the Subscriber mailbox. For Subscriber Mailboxes, leave
this option enabled. For Guest Mailboxes, leave this option disabled.
.
See Guest Mailbox on page 2-187 for more.
.
Disabling this option also disables Message Notification. See Message
Notification on page 2-269 for more.
.
See Message Waiting Lamp on page 2-287 for more.
.
See Subscriber Mailbox on page 2-333 for more.
Options
1 (Yes - enabled)
0 (No - disabled)
InMail System Guide
3 - 391
Issue 5.00
Default
1 (Yes - enabled)
47-02-09
Auto Attendant Do Not Disturb (Auto-ATT DND)
Use this option to enable or disable Auto Attendant Do Not Disturb. When a
subscriber enables Auto Attendant Do Not Disturb, an Automated Attendant
caller routes directly to the mailbox, hears the greeting, and is asked to
leave a message. A subscriber can also enable Auto Attendant Do Not
Disturb while recording their mailbox greeting.
.
See Auto Attendant Do Not Disturb on page 2-57 for more.
Options
1 (Yes - enabled)
0 (No - disabled)
Default
0 (No - disabled)
47-02-10
Forced Unscreened Transfer (Forced UTRF)
Use this option to enable or disable Automated Attendant Forced
Unscreened Transfer for the Subscriber Mailbox. If enabled, each Screened
Transfer (TRF) to the extension is converted to an Unscreened Transfer
(UTRF). If disabled, Screened Transfers from the Automated Attendant
occur normally.
.
See Forced Unscreened Transfer on page 2-167 for more.
Options
1 (Yes - enabled)
0 (No - disabled)
Default
0 (No - disabled)
47-02-11
Auto Time Stamp
Use this option to enable or disable Auto Time Stamp for the Subscriber
Mailbox. If enabled, after the subscriber listens to a message InMail will
announce the time and date the message was left. Auto Time Stamp will
also announce the message sender (if known).
A subscriber can also enable Auto Time Stamp from their mailbox.
See Auto Time Stamp on page 2-61 for more.
Options
.
1 (Yes - enabled)
0 (No - disabled)
Default
0 (No - disabled)
3 - 392
Programming
Issue 5.00
47-02-12
System Administrator (System Admin)
Use this option to designate the Subscriber Mailbox as a System
Administrator. This allows the subscriber to use the SA options after logging
on to their mailbox.
.
See System Administrator on page 2-337 for more.
Options
1 (Yes - enabled)
0 (No - disabled)
Default
Mailbox 1 (200) = Enabled (1)
All other mailboxes = Disabled (0)
47-02-13
Dialing Option (Dialing Option)
Dialing Option provides additional dialing options for Next Call Routing
Mailbox calls (see Next Call Routing Mailbox below). If enabled, a caller
who accesses the Subscriber Mailbox to leave a message can dial any
option in the Next Call Routing Mailbox’s Dial Action Table. If disabled, the
caller can only dial 0 (to use the Next Call Routing Mailbox 0 action).
.
See Next Call Routing Mailbox on page 2-291.
Options
1 (Yes - enabled)
0 (No - disabled)
Default
0 (No - disabled)
47-02-14
Next Call Routing Mailbox (Next CR Mbox)
Use this option to assign a Next Call Routing Mailbox to the Subscriber
Mailbox. This provides callers with additional dialing options while listening
to a Subscriber Mailbox recorded or default greeting. The digits the caller
can dial depends on the setting of the Next Call Routing Mailbox and
Alternate Next Call Routing Mailbox options.
.
For a detailed explanation of the interaction of these two programs, turn to Dialing
Options while Listening to a Subscriber Mailbox Greeting on page 2-292.
.
For an explanation of the options a caller can dial while recording, see Record
and Send a Message on page 2-313.
.
See the following features for more:
Auto Attendant Do Not Disturb on page 2-57.
Call Forward to a Mailbox on page 2-71.
Exiting a Mailbox on page 2-145.
Leaving a Message on page 2-227.
Next Call Routing Mailbox on page 2-291
InMail System Guide
3 - 393
Issue 5.00
Options
Call Routing Mailbox Number (up to two digits)
No entry - 0 (Entered by pressing Hold)
Default
1 (Call Routing Mailbox 1)
By default, Call Routing Mailbox numbers are 1-8.
47-02-15
Directory List (Directory List)
Use this option to specify the Directory List to which the Subscriber Mailbox
belongs. When setting up Directory Dialing Mailboxes, you must specify
which Directory List you want the Directory Dialing Mailbox to use. The
Directory Dialing Mailbox can only call Subscriber Mailboxes that belong to
the list it is programmed to use. The entries for this option are 1~8 (lists
1~8), 0 (belongs to no lists), or * (belongs to all lists).
.
See Directory Dialing on page 2-111.
Options
1~8 (Directory List 1~8)
* (Belongs to all lists)
0 (Belongs to no lists)
Default
0 (Belongs to no lists)
47-02-16
Voice Prompt Language
Use this option to specify the language used for each Subscriber Mailbox.
The InMail comes with 13 language prompts: UK English, Dutch, Italian,
German, Madrid Spanish, Norwegian, Parisian French, Iberian Portuguese,
Greek, Danish, Swedish, Flemish and Turkish. Each mailbox can use any
one of these languages. Eight languages can be used concurrently and
additional languages can be licensed on the CCPU and the prompt sets
downloaded from the InMail Utility.
Options
01 - US English
02 - UK English
03 - Australian English
04 - French Canadian
05 - Dutch
06 - Mexican Spanish
07 - Latin America Spanish
08 - Italian
09 - German
10 - Madrid Spanish
11 - Norwegian
12 - Parisian French
13 - Brazilian Portuguese
3 - 394
Programming
Issue 5.00
14 - Japanese
15 - Mandarin Chinese
16 - Korean
17 - Iberian Portuguese
18 - Greek
19 - Danish
20 - Swedish
21 - Thai
22 - Taiwanese
23 - Flemish
24 - Turkish
Default
02 (UK English)
47-02-17: Enable Paging
Use this option to enable or disable the Park and Page option for the
mailbox. If enabled, when an outside call can’t go through Park and Page
automatically parks the call and pages the extension user. This option is the
same as the Mailbox Options: Call Options: Paging user setting. The setting
you make in this option overrides the Mailbox Options setting and visaversa.
See PARK AND PAGE / AUTOMATED ATTENDANT DIRECT TO VOICE MAIL .
Options
1 (Yes - enabled)
0 (No - disabled)
Default
0 (No - disabled)
47-02-18: Paging Option
When Automated Attendant Direct to Voice Mail is enabled, use this option
to set how Park and Page will intercept calls. It can intercept calls
immediately and do a Park and Page (1), or handle Park and Page like any
other transferred outside call (0).
See PARK AND PAGE / AUTOMATED ATTENDANT DIRECT TO VOICE MAIL for more.
Options
0 for RNA (Unanswered)
1 for Immediate
Default
0 for RNA (Unanswered)
47-02-19
Telephone User Interface Type
Use this option to set if caller hear options in Numeric (press 1 for
yes) or Mnemonic (press L to listen to messages).
InMail System Guide
3 - 395
Issue 5.00
Options
0 - Numeric
1 - Mnemonic
Default
0 (Numeric)
47-02-20: Enable Email
Use this option to enable or disable email notification for an extension. If
enabled, when the extension receives a new message in their mailbox they
will be automatically notified by email. If disabled, email notification will not
occur.
Options
0 - Disabled
1 - Enabled
Default
0 - Disabled
47-02-21: Email Address
If email notification is enabled, use this option to specify the email address
to which the notification should be delivered.
Options
48 characters maximum.
Default
No entry
47-02-22: Message as Attachment
When email notification is enabled, use this option to set how notification
handles new voice mail message content. If enabled, a new voice mail
message is saved as a wav file and included as an attachment to the email
notification. If disabled, the email does not contain an attachment (i.e., the
content of the voice mail message is not provided in the email).
Options
0 - New voice mail message wav file not provided.
1 - New voice mail message wav file provided as an email attachment.
Default
1 - New voice mail message wav file provided as an email attachment.
47-02-23: All Message Notification Enabled
When this feature is licensed, use this option to enable the mailbox to
configure up to 5 message notification destinations.
Options
0 - Message notification is disabled
1 - Message notification is enable
Default
1 - Message notification is enabled
3 - 396
Programming
Issue 5.00
47-02-24: All Find Me Follow Me Enable
When this feature is licensed, use this option to enable th emailbox to
configure up to 3 Find Me Follow Me destinations.
Options
0 - Find Me Follow Me is disabled
1 - Find Me Follow Me is enable
Default
0 - Find Me Follow Me is disabled
47-02-25: Security Code Option
Use this option to configure whether the entry of a security code is required
to be entered every time or only when th emailbox is accessed from another
extension or remotely.
Options
0 - Always
1 - Remote Logon
Default
0 - Always
InMail System Guide
3 - 397
Issue 5.00
47-02 Program Entry
47-02 InMail Station Mailbox Options Program Entry
(Entry Range) [Default Setting]
Speaker + #*#* + Password (12345678) + Transfer + 4702 + Option.
This selects the option chosen for Station Mailbox 1.
There are 128 available mailboxes (1~128).
3 - 398
01
Mailbox Active (1=Yes - enabled, 0=No - disabled) [1 for 101~108, 0 for all others]
LK1-No, LK2=Yes
02
Mailbox Number (Digits, 7 max using 0~9) [1~8 = 101~108, No entry for all others]
03
Number of Messages (0~99) [99 for mailbox 1, 20 for all others]
04
Message Playback (0=FIFO, 1=LIFO) [0]
LK1=FIFO, LK2=FIF0
05
Auto Erase/Save (0=Erase, 1=Save) [1]
LK1=Erase, LK2=Save
07
Rec Conv Beep (1=Yes - enabled, 0=No - disabled) [1]
LK1=No, LK2=Yes
08
Update MW Lamp (1=Yes - enabled, 0=No - disabled) [1]
LK1=No, LK2=Yes
09
Auto-ATT DND (1=Yes - enabled, 0=No - disabled) [0]
LK1=No, LK2=Yes
10
Forced UTRF (1=Yes - enabled, 0=No - disabled) [0]
LK1=No, LK2=Yes
11
Auto Time Stamp (1=Yes - enabled, 0=No - disabled) [0]
LK1=No, LK2=Yes
12
System Admin (1=Yes - enabled, 0=No - disabled) [1 (Enabled) for Mailbox 1 (101), 0
(Disabled) for all others]
LK1=No, LK2=Yes
13
Dialing Option (1=Yes - enabled, 0=No - disabled) [0]
LK1=No, LK2=Yes
14
Next CR Mbox (1~32, Hold=No entry) [1]
15
Directory List (1~8=Lists 1~8, 0=No list, *=All lists) [0]
16
Lang (1-24=Languages 1-24) [1 (UK English)]
17
Enable Paging (1=Yes - enabled, 0=No - disabled) [0]
LK1=No, LK2=Yes)
18
Paging Option (0=RNA, 1=Immediate) [0]
LK1=RNA, LK2=Immediate
19
User interface (0=Numeric, 1=Mnemonic, 2=Octel [Not used]) [0]
LK1=Numeric, LK2=Mnemonic, LK3=Octel (Not used)
20
Enable Email (1=Yes - enabled, 0=No - disabled) [0]
LK1=No, LK2=Yes
21
Email Add (48 characters max.) [No entry]
Programming
Issue 5.00
47-02 InMail Station Mailbox Options Program Entry (Continued)
(Entry Range) [Default Setting]
22
Msg as Attachment (1=Yes - enabled, 0=No - disabled) [1]
LK1=No, LK2=Yes
23
Message Notification (1=Yes - enabled, 0=No - disabled) [1]
LK1=No, LK2=Yes
24
Find Me Follow Me (1=Yes - enabled, 0=No - disabled) [0]
LK1=No, LK2=Yes
25
Security Code Option (1=Remote Logon, 0=Always) [0]
LK1=Always, LK2=Remote Logon
Press this:
To do this:
Editing
Transfer
Enter (accept) data you entered and advance to the next prompt, or advance to the next
prompt without changing your entry.
-1
+1
Scroll backwards (-1) or forwards (+1) through the list of available entries.
I
J
When editing an entry, moves the cursor left or right.
Conf
When editing an entry, delete the character to the left of the cursor.
Hold
When editing an entry, Hold erases the entire entry from the display.
Line Keys (LK)
Where indicated, press a line key to enter a specific value for the selected option.
Navigation
Redial + Mailbox number + Redial selects a new mailbox number
Redial
Backs up to the previous level (e.g., from Option to Series, or from Series to Program).
Answer
K
L
Scroll consecutively backwards or forwards through selected Option or Series.
InMail System Guide
3 - 399
Issue 5.00
47-03 Group Mailbox Options
Description
Use 47-03 Group Mailbox Options to set up the 32 Group Mailboxes (1~32). A Group
Mailbox is used for Department Group overflow and can be a Subscriber, Call
Routing, Announcement, or Directory Dialing Mailbox.
.
See Routing Mailbox on page 2-317.
Options
47-03-02
Group Mailbox Number (Mailbox Number)
When setting up Department Calling Group overflow, the Group Mailbox
Number is the same as the Department Group Master (pilot) number. Use
this option to select the Department Group Master (pilot) number
associated with the Group Mailbox you are programming.
If routing to a Routing Mailbox is required from a Dial Action Table e.g. by
the GOTO option, the Group Mailbox Number, associated with the routing
mailbox, should be used as the ‘data’ entry.
When using a Group Mailbox as an additional resource (for example, as an
extra Directory Dialing Mailbox), you can do the following:
Assign a pilot number to an unused Department Group in 11-07-01
Department Group Pilot Numbers.
Set up the Group Mailbox in 47-03, using this pilot number in 47-03-02
Group Mailbox Number.
When 47-03 programming is complete, remove the pilot number
assignment in 11-07-01 Department Group Pilot Numbers.
.
Refer to the following:
See Directory Dialing on page 2-111.
See Routing Mailbox on page 2-317.
See Voice Mail Overflow on page 2-355.
Options
Digits (7 maximum, using 0~9).
No entry (Entered by pressing Hold)
Default
No entry.
3 - 400
Programming
Issue 5.00
47-03-03
Group Mailbox Type (Mailbox Type)
Use this option to set the Group Mailbox type. There are three types of
In-Mail mailboxes: Call Routing (1), Announcement (2), and Subscriber (3).
If the Group Mailbox is a Call Routing Mailbox (1), go to 47-03 Program
Entry on page 3-402 to set up the Group Mailbox options.
If the Group Mailbox is an Announcement Mailbox (2), go to 47-03 Group
Mailbox Options on page 3-400 to set up the Group Mailbox options.
If the Group Mailbox is a Subscriber Mailbox (3), go to 47-03 Group Mailbox
Options on page 3-400 to set up the Group Mailbox options.
If the Group Mailbox is a Call Routing Mailbox (4), go to 47-15 Routing
Mailbox Directory Options on page 3-451 to set up the Group Mailbox
options.
.
.
See Routing Mailbox on page 2-317.
See Voice Mail Overflow on page 2-355.
Options
0 (Undefined)
1 (Subscriber)
2 (Call Routing)
Default
1 (Subscriber)
InMail System Guide
3 - 401
Issue 5.00
47-03 Program Entry
47-03 InMail Group Mailbox Options
(Entry Range) [Default Setting]
Speaker + #*#* + Password (12345678) + Transfer + 4703 + Option.
This selects the option chosen for Group Mailbox 1.
There are 32 available Group Mailboxes (1~32).
02
Mailbox Number (Digits, 8 max using 0~9) [No entry]
03
Mailbox Type (2=Call Routing, 1=Subscriber, 0=Undefined) [1]
Press this:
To do this:
Editing
Enter (accept) data you entered and advance to the next prompt, or advance to the next
prompt without changing your entry.
Transfer
-1
+1
Scroll backwards (-1) or forwards (+1) through the list of available entries.
I
J
When editing an entry, moves the cursor left or right.
Conf
When editing an entry, delete the character to the left of the cursor.
Hold
When editing an entry, Hold erases the entire entry from the display.
Line Keys (LK)
Where indicated, press a line key to enter a specific value for the selected option.
Navigation
Redial + Mailbox number + Redial selects a new mailbox number
Redial
Backs up to the previous level (e.g., from Option to Series, or from Series to Program).
Answer
K
3 - 402
L
Scroll consecutively backwards or forwards through selected Option or Series.
Programming
Issue 5.00
47-06 Group Mailbox Subscriber Options
Description
Use 47-06 Group Mailbox Subscriber Options to set up a Group Mailbox assigned as a
Subscriber Mailbox in 47-03-03 Group Mailbox Type.
.
See the following for more:
Voice Mail Overflow on page 2-355
Options
47-06-01
Number of Messages
Use this option to set the maximum number of messages that can be left in
the Subscriber Mailbox. If a caller tries to leave a message after this limit is
reached, they hear, “That mailbox is full.” InMail then hangs up.
.
See Routing Mailbox on page 2-317 for more.
.
See Message Storage Limit on page 2-285 for more.
.
See Voice Mail Overflow on page 2-355 for more.
Options
0~99 messages
To conserve storage space, enter 0 for all unused mailboxes.
Default
20
47-06-02
Message Playback
Use this option to set the Subscriber Mailbox message playback order.
When a subscriber listens to their messages, InMail can play the oldest
messages first (first-in-first-out, or FIFO), or the newest messages first
(last-in-first-out, or LIFO).
.
See Routing Mailbox on page 2-317 for more.
.
See Message Playback Direction on page 2-279 for more.
.
See Voice Mail Overflow on page 2-355 for more.
Options
0 (FIFO - first-in-first-out, or oldest messages first).
1 (LIFO - last-in-first-out, or newest messages first).
Default
0 (FIFO - first-in-first-out, or oldest messages first).
InMail System Guide
3 - 403
Issue 5.00
47-06-03
Auto Erase/Save of Messages (Auto Erase/Save)
Use this option to determine what happens when a Subscriber Mailbox user
completely listens to a new message and then exits their mailbox without
either saving (SA) or erasing (E) the message. Depending on the setting of
this option, InMail will either automatically save or erase the message. If the
mailbox user hangs up before listening to the entire new message, In-Mail
retains the message as a new message.
.
See Auto Erase or Save on page 2-59 for more.
.
See Routing Mailbox on page 2-317 for more.
.
See Voice Mail Overflow on page 2-355 for more.
Options
0 (Erase)
After the subscriber listens to the entire new message and hangs up,
In-Mail erases the message.
1 (Save)
After the subscriber listens to the entire new message and hangs up,
In-Mail saves the message.
Default
1 (Save) (see above).
47-06-05
Recording Conversation Beep (Rec Conv Beep)
Use this option to enable or disable the Conversation Record beep. If
enabled, all parties on a call hear the voice prompt Recording followed by a
single beep when the extension user initiates Conversation Record. If
disabled, the voice prompt and beep do not occur. When you disable the
Conversation Record beep, the following voice prompts do not occur while
InMail records the conversation:
“Recording” (followed by a beep)
“That mailbox is full” (if the mailbox message storage capacity is reached)
“You have reached the recording limit” (if the recorded message is too long)
The SV8100 telephone system software provides an additional
Conversation Record beep. This beep repeats according to the setting of
Program 45-01-06 Voice Mail Integration Options: Record Alert Tone
Interval Time (0~64800 seconds). To disable the SV8100 telephone system
Conversation Record beep, enter 0 for this option.
.
See Live Record on page 2-235 for more.
.
See Routing Mailbox on page 2-317 for more.
.
See Voice Mail Overflow on page 2-355 for more.
Options
1 (Yes - enabled)
0 (No - disabled)
Default
1 (Yes - enabled)
3 - 404
Programming
Issue 5.00
47-06-06
Message Waiting Lamp (Update MW Lamp)
Use this option to enable or disable Message Waiting lamp at the extension
associated with the Subscriber mailbox. For Subscriber Mailboxes, you
should leave this option enabled. For Guest Mailboxes, leave this option
disabled.
.
See Guest Mailbox for more.
.
See Routing Mailbox for more.
.
See Message Waiting Lamp for more.
.
See Subscriber Mailbox for more.
.
See Voice Mail Overflow for more.
Options
1 (Yes - enabled)
0 (No - disabled)
Default
1 (Yes - enabled)
47-06-07
Auto Attendant Do Not Disturb (Auto-ATT DND)
Use this option to enable or disable Auto Attendant Do Not Disturb. When a
subscriber enables Auto Attendant Do Not Disturb, an Automated Attendant
caller routes directly to the mailbox, hears the greeting, and is asked to
leave a message. A subscriber can also enable Auto Attendant Do Not
Disturb while recording their mailbox greeting.
.
See Auto Attendant Do Not Disturb for more.
.
See Routing Mailbox for more.
.
See Voice Mail Overflow for more.
Options
1 (Yes - enabled)
0 (No - disabled)
Default
0 (No - disabled)
47-06-08
Forced Unscreened Transfer (Forced UTRF)
Use this option to enable or disable Automated Attendant Forced
Unscreened Transfer for the Subscriber Mailbox. If enabled, each Screened
Transfer (TRF) to the extension is converted to an Unscreened Transfer
(UTRF). If disabled, Screened Transfers from the Automated Attendant
occur normally.
.
See Forced Unscreened Transfer for more.
.
See Routing Mailbox for more.
.
See Voice Mail Overflow for more.
Options
1 (Yes - enabled)
0 (No - disabled)
InMail System Guide
3 - 405
Issue 5.00
Default
0 (No - disabled)
47-06-09
Auto Time Stamp
Use this option to enable or disable Auto Time Stamp for the Subscriber
Mailbox. If enabled, after the subscriber listens to a message InMail
announces the time and date the message was left. Auto Time Stamp will
also announce the message sender (if known).
A subscriber can also enable Auto Time Stamp from his mailbox.
.
See Auto Time Stamp for more.
.
See Routing Mailbox for more.
See Voice Mail Overflow for more.
Options
.
1 (Yes - enabled)
0 (No - disabled)
Default
0 (No - disabled)
47-06-10
System Administrator (System Admin)
Use this option to designate the Subscriber Mailbox as a System
Administrator. This allows the subscriber to use the SA options after logging
onto their mailbox.
.
See Routing Mailbox for more.
.
See System Administrator for more.
See Voice Mail Overflow for more.
Options
.
1 (Yes - enabled)
0 (No - disabled)
Default
0 (No - disabled)
47-06-11
Dialing Option
Dialing Option provides additional dialing options for Next Call Routing
Mailbox calls (see Next Call Routing Mailbox below). If enabled, a caller
who accesses the Subscriber Mailbox to leave a message can dial any of
the options in the Next Call Routing Mailbox’s Dial Action Table. If disabled,
the caller can only dial 0 (to use the Next Call Routing Mailbox’s 0 action).
.
See Routing Mailbox for more.
.
See Next Call Routing Mailbox.
See Voice Mail Overflow for more.
Options
.
1 (Yes - enabled)
0 (No - disabled)
Default
0 (No - disabled)
3 - 406
Programming
Issue 5.00
47-06-12
Next Call Routing Mailbox (Next CR Mbox)
Use this option to assign a Next Call Routing Mailbox to the Subscriber
Mailbox. This provides callers with additional dialing options while listening
to a Subscriber Mailbox recorded or default greeting. The digits the caller
can dial depends on the setting of the Next Call Routing Mailbox and
Alternate Next Call Routing Mailbox options.
.
Refer to Dialing Options while Listening to a Subscriber Mailbox Greeting on page
2-292.
.
For options to dial while recording, see Record and Send a Message on page
2-313.
.
See the following features:
Auto Attendant Do Not Disturb on page 2-57
Call Forward to a Mailbox on page 2-71
Exiting a Mailbox on page 2-145
Leaving a Message on page 2-227
47-07 InMail Routing Mailbox Options on page 3-412
Next Call Routing Mailbox on page 2-291
Voice Mail Overflow on page 2-355
Options
Call Routing Mailbox Number (up to 2 digits)
No entry - 0 (Entered by pressing Hold)
Default
1 (Call Routing Mailbox 1)
By default, Call Routing Mailbox numbers are 1~8.
47-06-13
Directory List (Directory List)
This option is currently not used.
47-06-14
Voice Prompt Language
Use this option to specify the language used for each Subscriber Mailbox.
The InMail comes with 13 language prompts: UK English, Dutch, Italian,
German, Madrid Spanish, Norwegian, Parisian French, Iberian Portuguese,
Greek, Danish, Swedish, Flemish and Turkish. Each mailbox can use any
one of these languages. Eight languages can be used concurrently and
additional languages can be licensed on the CCPU and the prompt sets
downloaded from the InMail Utility.
Options
01 - US English
02 - UK English
03 - Australian English
04 - French Canadian
05 - Dutch
06 - Mexican Spanish
07 - Latin America Spanish
InMail System Guide
3 - 407
Issue 5.00
08 - Italian
09 - German
10 - Madrid Spanish
11 - Norwegian
12 - Parisian French
13 - Brazilian Portuguese
14 - Japanese
15 - Mandarin Chinese
16 - Korean
17 - Iberian Portuguese
18 - Greek
19 - Danish
20 - Swedish
21 - Thai
22 - Taiwanese
23 - Flemish
24 - Turkish
Default
02 (UK English)
47-06-17
Telephone User Interface Type
Use this option to set if caller hear options in Numeric (press 1 for
yes) or Mnemonic (press L to listen to messages).
Options
0 - Numeric
1 - Mnemonic
Default
0 (Numeric)
47-06-18: Enable Email
Use this option to enable or disable email notification for an extension. If
enabled, when the extension receives a new message in their mailbox they
will be automatically notified by email. If disabled, email notification will not
occur.
Options
0 - Disabled
1 - Enabled
Default
0 - Disabled
47-06-19: Email Address
If email notification is enabled, use this option to specify the email address
to which the notification should be delivered.
3 - 408
Programming
Issue 5.00
Options
48 characters maximum.
Default
No entry
47-06-20: Message as Attachment
When email notification is enabled, use this option to set how notification
handles new voice mail message content. If enabled, a new voice mail
message is saved as a wav file and included as an attachment to the email
notification. If disabled, the email does not contain an attachment (i.e., the
content of the voice mail message is not provided in the email).
Options
0 - New voice mail message wav file not provided.
1 - New voice mail message wav file provided as an email attachment.
Default
1 - New voice mail message wav file provided as an email attachment.
47-06-21: All Message Notification Enabled
When this feature is licensed, use this option to enable the mailbox to
configure up to 5 message notification destinations.
Options
0 - Message notification is disabled
1 - Message notification is enable
Default
1 - Message notification is enabled
47-06-22: All Find Me Follow Me Enable
When this feature is licensed, use this option to enable th emailbox to
configure up to 3 Find Me Follow Me destinations.
Options
0 - Find Me Follow Me is disabled
1 - Find Me Follow Me is enable
Default
0 - Find Me Follow Me is disabled
47-06-23: Security Code Option
Use this option to configure whether the entry of a security code is required
to be entered every time or only when th emailbox is accessed from another
extension or remotely.
Options
0 - Always
1 - Remote Logon
Default
0 - Always
InMail System Guide
3 - 409
Issue 5.00
47-06 Program Entry
47-06 Group Mailbox Subscriber Options Program Entry
(Entry Range) [Default Setting]
Speaker + #*#* + Password (12345678) + Transfer + 4706 + Option.
This selects the option chosen for Group Subscriber Mailbox 1.
There are 32 available Group Mailboxes (1~32).
3 - 410
01
Number of Messages (0~99) [20]
02
Message Playback (0=FIFO, 1=LIFO) [0]
LK1=FIFO, LK2=FIF0
03
Auto Erase/Save (0=Erase, 1=Save) [1]
LK1=Erase, LK2=Save
05
Rec Conv Beep (1=Yes - enabled, 0=No - disabled) [1]
LK1=No, LK2=Yes
06
Update MW Lamp (1=Yes - enabled, 0=No - disabled) [1]
LK1=No, LK2=Yes
07
Auto-ATT DND (1=Yes - enabled, 0=No - disabled) [0]
LK1=No, LK2=Yes
08
Forced UTRF (1=Yes - enabled, 0=No - disabled) [0]
LK1=No, LK2=Yes
09
Auto Time Stamp (1=Yes - enabled, 0=No - disabled) [0]
LK1=No, LK2=Yes
10
System Admin (1=Yes - enabled, 0=No - disabled) [0]
LK1=No, LK2=Yes
11
Dialing Option (1=Yes - enabled, 0=No - disabled) [0]
LK1=No, LK2=Yes
12
Next CR Mbox (1~32, Hold=No entry) [1]
13
Directory List (1~8=Lists 1~8, 0=No list, *=All lists) [0]
14
Lang (1-24=Languages 1-24) [1 (UK English)]
15
Enable Paging (1=Yes - enabled, 0=No - disabled) [0]
LK1=No, LK2=Yes)
16
Paging Option (0=RNA, 1=Immediate) [0]
LK1=RNA, LK2=Immediate
17
User interface (0=Numeric, 1=Mnemonic, 2=Octel [Not used]) [0]
LK1=Numeric, LK2=Mnemonic, LK3=Octel (Not used)
18
Enable Email (1=Yes - enabled, 0=No - disabled) [0]
LK1=No, LK2=Yes
19
Email Add (48 characters max.) [No entry]
20
Msg as Attachment (1=Yes - enabled, 0=No - disabled) [1]
LK1=No, LK2=Yes
21
Message Notification (1=Yes - enabled, 0=No - disabled) [1]
LK1=No, LK2=Yes
Programming
Issue 5.00
47-06 Group Mailbox Subscriber Options Program Entry (Continued)
(Entry Range) [Default Setting]
22
Find Me Follow Me (1=Yes - enabled, 0=No - disabled) [0]
LK1=No, LK2=Yes
23
Security Code Option (1=Remote Logon, 0=Always) [0]
LK1=Always, LK2=Remote Logon
Press this:
To do this:
Editing
Transfer
Enter (accept) data you entered and advance to the next prompt, or advance to the next
prompt without changing your entry.
-1
+1
Scroll backwards (-1) or forwards (+1) through the list of available entries.
I
J
When editing an entry, moves the cursor left or right.
Conf
When editing an entry, delete the character to the left of the cursor.
Hold
When editing an entry, Hold erases the entire entry from the display.
Line Keys (LK)
Where indicated, press a line key to enter a specific value for the selected option.
Navigation
Redial + Mailbox number + Redial selects a new mailbox number
Redial
Backs up to the previous level (e.g., from Option to Series, or from Series to Program).
Answer
K
L
Scroll consecutively backwards or forwards through selected Option or Series.
InMail System Guide
3 - 411
Issue 5.00
47-07 InMail Routing Mailbox Options
Description
Use 47-07 InMail Routing Mailbox Options to set up the 32 Routing Mailboxes.
Routing Mailboxes can be either Announcement or Call Routing Mailboxes.
Refer to the following:
Announcement Mailbox
Routing Mailbox
Options
47-07-02
Routing Mailbox Type (Mailbox Type)
Use this option to set the Routing Mailbox type: Call Routing (1) or
Announcement (2).
Options
1 (Call Routing)
2 (Announcement)
4 (Directory Dialing)
Default
Mailboxes 1~8 = 1 (Call Routing).
Mailboxes 9~32 = 2 (Announcement)
3 - 412
Programming
Issue 5.00
47-07-03
Voice Prompt Language
Use this option to specify the language used for each Subscriber Mailbox.
The InMail comes with 13 language prompts: UK English, Dutch, Italian,
German, Madrid Spanish, Norwegian, Parisian French, Iberian Portuguese,
Greek, Danish, Swedish, Flemish and Turkish. Each mailbox can use any
one of these languages. Eight languages can be used concurrently and
additional languages can be licensed on the CCPU and the prompt sets
downloaded from the InMail Utility.
Options
01 - US English
02 - UK English
03 - Australian English
04 - French Canadian
05 - Dutch
06 - Mexican Spanish
07 - Latin America Spanish
08 - Italian
09 - German
10 - Madrid Spanish
11 - Norwegian
12 - Parisian French
13 - Brazilian Portuguese
14 - Japanese
15 - Mandarin Chinese
16 - Korean
17 - Iberian Portuguese
18 - Greek
19 - Danish
20 - Swedish
21 - Thai
22 - Taiwanese
23 - Flemish
24 - Turkish
Default
02 (US English)
47-07-04
Telephone User Interface Type
Use this option to set if caller hear options in Numeric (press 1 for yes) or
Mnemonic (press L to listen to messages).
Options
0 - Numeric
1 - Mnemonic
Default
InMail System Guide
3 - 413
Issue 5.00
0 (Numeric)
3 - 414
Programming
Issue 5.00
47-07 Program Entry
47-07 InMail Routing Mailbox Options
(Entry Range) [Default Setting]
Speaker + #*#* + Password (12345678) + Transfer + 4707 + Option.
This selects the option chosen for Routing mailbox 1.
There are 32 available Routing Mailboxes (1~32).
01
Mailbox Active (1=Yes - enabled, 0=No - disabled) [1]
LK1-No, LK2=Yes
02
Mailbox Type (1=Call Routing, 2=Announcement) [1~8=1, 9~32=2]
Press this:
To do this:
Editing
Enter (accept) data you entered and advance to the next prompt, or advance to the next
prompt without changing your entry.
Transfer
-1
+1
Scroll backwards (-1) or forwards (+1) through the list of available entries.
I
J
When editing an entry, moves the cursor left or right.
Conf
When editing an entry, delete the character to the left of the cursor.
Hold
When editing an entry, Hold erases the entire entry from the display.
Line Keys (LK)
Where indicated, press a line key to enter a specific value for the selected option.
Navigation
Redial + Mailbox number + Redial selects a new mailbox number
Redial
Backs up to the previous level (e.g., from Option to Series, or from Series to Program).
Answer
K
L
InMail System Guide
Scroll consecutively backwards or forwards through selected Option or Series.
3 - 415
Issue 5.00
47-08 Routing Mailbox Call Routing Options
Description
Use 47-08 Routing Mailbox Call Routing Options to set the options for mailboxes
assigned as Call Routing Mailboxes in 47-07-02 Routing Mailbox Type.
.
See Routing Mailbox for more.
Description
47-08-01
Dial Action Table
Use this option to assign the Dial Action Table to the Call Routing Mailbox.
The Dial Action Table defines the dialing options for the call Routing
Mailbox.
.
See Routing Mailbox and Dial Action Table for more.
Options
1~16 (Dial Action Table 1~16)
Default
1 (Dial Action Table 1)
47-08-02
Screened Transfer Timeout (Scrn Trf Timeout)
Use this option to set how long a Screened Transfer (TRF) from the
Automated Attendant rings an unanswered extension before recalling.
.
This option has a similar function as Customize: Mailbox Options: Call Routing:
[Call Handling] Options: Delay Rings Before Redirect Transfer in InMail.
Options
0~255 seconds
Entering 0 causes immediate recall.
Default
15 seconds
47-08-03
Time Limit for Dialing Commands (Dialing Timeout)
This option determines how long InMail waits for an Automated Attendant
caller to dial before routing the call to the Timeout destination.
.
Be sure your Dial Action Tables have a Timeout action programmed.
.
See Routing Mailbox on page 2-317 and Dial Action Table on page 2-105 for more.
If the caller waits too long to dial:
When the associated Dial Action Table has a Timeout action programmed,
the caller routes to that destination.
When the associated Dial Action Table does not have a Timeout action
3 - 416
Programming
Issue 5.00
programmed, the Instruction Menu repeats 3 times and then InMail hangs
up.
Options
0~99 seconds
Entering 0 causes the Automated Attendant to immediately route callers to
the Timeout destination programmed in the active Dial Action Table.
Default
5 seconds
47-08-04
Fax Detection
Use this option to enable or disable Fax Detection for the Call Routing
Mailbox. In enabled, the InMail Automated Attendant (when using this Call
Routing Mailbox) detects incoming fax CNG tone. The fax call then routes
to the company fax machine according to the setting of 47-01-06 Fax
Extension. If disabled, the Automated Attendant does not detect incoming
fax calls.
See Fax Detection on page 2-149 for more.
Options
.
1 (Yes - enabled)
0 (No - disabled)
Default
0 (No - disabled)
InMail System Guide
3 - 417
Issue 5.00
47-08 Program Entry
47-08 Call Routing Mailbox Options
(Entry Range) [Default Setting]
Speaker + #*#* + Password (12345678) + Transfer + 4708 + Option.
This selects the option chosen for Call Routing Mailbox 1.
There are 32 available Routing Mailboxes (1~32).
01
Dial Action Table (1~16) [1]
02
Scrn Trf Timeout (0~255) [15]
03
Dialing Timeout (0~99) [5]
04
Fax Detection (1=Yes - enabled, 0=No - disabled) [0]
LK1-No, LK2=Yes
Press this:
To do this:
Editing
Transfer
Enter (accept) data you entered and advance to the next prompt, or advance to the next
prompt without changing your entry.
-1
+1
Scroll backwards (-1) or forwards (+1) through the list of available entries.
I
J
When editing an entry, moves the cursor left or right.
Conf
When editing an entry, delete the character to the left of the cursor.
Hold
When editing an entry, Hold erases the entire entry from the display.
Line Keys (LK)
Where indicated, press a line key to enter a specific value for the selected option.
Navigation
Redial + Mailbox number + Redial selects a new mailbox number
Redial
Backs up to the previous level (e.g., from Option to Series, or from Series to Program).
Answer
K
3 - 418
L
Scroll consecutively backwards or forwards through selected Option or Series.
Programming
Issue 5.00
47-09 Routing Mailbox Announcement Options
Description
Use 47-09 Routing Mailbox Announcement Options to set the options for mailboxes
assigned as Announcement Mailboxes in 47-07-02 Routing Mailbox Type.
.
See Announcement Mailbox on page 2-33 for more.
Options
47-09-01
Next Call Routing Mailbox (Next CR Mbox)
If you set up an Announcement Mailbox to answer Automated Attendant
calls, use this option to provide additional routing options to the Automated
Attendant callers. This option interacts with Repeat Count and Hang Up
After below.
.
For a detailed explanation of the interaction of these options, turn to the following
charts:
Direct Announcement Mailbox Routing on page 2-294
Routed Announcement Mailbox Routing on page 2-35
Announcement Mailbox on page 2-33 and Next Call Routing
Mailbox on page 2-291
Options
Call Routing Mailbox Number (up to 2 digits)
No entry - 0 (Entered by pressing Hold)
Default
No entry - 0
By default, Call Routing Mailbox numbers are 1~8.
47-09-02
Repeat Count (Repeat Count)
Enter the number of times you want the Announcement Mailbox message
to repeat to callers. After an Announcement Mailbox caller initially listens to
the message, it repeats the number of times specified in this option. This
option interacts with Next Call Routing Mailbox and Hang Up After when
providing routing options.
.
For a detailed explanation of the interaction of these options, turn to the following
charts:
Direct Announcement Mailbox Routing on page 2-294.
Routed Announcement Mailbox Routing on page 2-35.
Announcement Mailbox on page 2-33 and Next Call Routing
Mailbox on page 2-291.
InMail System Guide
3 - 419
Issue 5.00
Options
0 (No repeats)
1~10 (Announcement repeats 1~10 times)
Default
0 (No repeats)
47-09-03
Hang Up After (HangUp)
Use this option along with Next Call Routing Mailbox and Repeat Count
above to provide additional routing options to Automated Attendant callers.
PRG 47-07-02 must be set to 1 (Announce) for this setting to be used.
.
For a detailed explanation of the interaction of these options, turn to the following
charts:
Direct Announcement Mailbox Routing on page 2-294.
Routed Announcement Mailbox Routing on page 2-35.
Announcement Mailbox on page 2-33 and Next Call Routing
Mailbox on page 2-291.
Options
0:None
This setting enables the option of sending the caller to another Call Routing
or Announcement box. The destination Call Routing box is set in 47-05-01.
If no destination Call Routing box is set, the system plays “Goodbye” to the
caller after playing the Call Routing Announcement Box greeting then
hangs up.
1:Goodbye
When this setting is enabled the system plays “Goodbye” to the caller after
playing the Call Routing Announcement Box greeting, then hangs up.
Callers cannot be routed to another Call Routing box with this setting
enabled.
2:Silent
When this setting is enabled the system will hang up the caller after playing
the Call Routing Announcement Box greeting. Callers cannot be routed to
another Call Routing box with this setting enabled.
Default
0:None
3 - 420
Programming
Issue 5.00
47-09 Program Entry
47-09 Announcement Mailbox Options
(Entry Range) [Default Setting]
Speaker + #*#* + Password (12345678) + Transfer + 4709 + Option.
There are 32 available Routing Mailboxes (1~32).
01
Next CR Mbox (1~32, 0=Undefined) [0]
02
Repeat Count (1~10, 0=No repeat) [0]
03
0 = None, 1 = Goodbye, 2 = Silent
Press this:
To do this:
Editing
Transfer
Enter (accept) data you entered and advance to the next prompt, or advance to the next
prompt without changing your entry.
-1
+1
Scroll backwards (-1) or forwards (+1) through the list of available entries.
I
J
When editing an entry, moves the cursor left or right.
Conf
When editing an entry, delete the character to the left of the cursor.
Hold
When editing an entry, Hold erases the entire entry from the display.
Line Keys (LK)
Where indicated, press a line key to enter a specific value for the selected option.
Navigation
Redial + Mailbox number + Redial selects a new mailbox number
Redial
Backs up to the previous level (e.g., from Option to Series, or from Series to Program).
Answer
K
L
Scroll consecutively backwards or forwards through selected Option or Series.
InMail System Guide
3 - 421
Issue 5.00
47-10 InMail Trunk Options
Description
Use 47-10 InMail Trunk Options to assign InMail options for each trunk. Currently,
only 47-10-01 Answer Table Assignment is available.
.
See Automated Attendant on page 2-63.
Options
47-10-01
Answer Table Assignment (Answer Table)
Use this Use 47-10 InMail Trunk Options option to assign an InMail Answer
Table to each Direct Inward Line (DIL) the Automated Attendant should
answer. The Automated Attendant follows the routing specified by the
selected Answer Table.
.
For more on setting up DILs to InMail, see Section 6 Set Up Automated Attendant
to Answer Outside Calls.
Options
Answer Use 47-10 InMail Trunk Options Table (1~8)
Default
1 (Answer Use 47-10 InMail Trunk Options Table 1)
47-10-02
Record Pad Control
Use this option to pad or attenuate the volume for messages recorded on or
greetings played to outside callers on a specific trunk.
Options
01 - 63 (-15.5dB to 15.5dB)
Default
32 (0.0 dB)
47-10-03
Voice Prompt Language
Use this option to specify the language used for each Subscriber Mailbox.
The InMail comes with 13 language prompts: UK English, Dutch, Italian,
German, Madrid Spanish, Norwegian, Parisian French, Iberian Portuguese,
Greek, Danish, Swedish, Flemish and Turkish. Each mailbox can use any
one of these languages. Eight languages can be used concurrently and
additional languages can be licensed on the CCPU and the prompt sets
downloaded from the InMail Utility.
Options
01 - US English
02 - UK English
3 - 422
Programming
Issue 5.00
03 - Australian English
04 - French Canadian
05 - Dutch
06 - Mexican Spanish
07 - Latin America Spanish
08 - Italian
09 - German
10 - Madrid Spanish
11 - Norwegian
12 - Parisian French
13 - Brazilian Portuguese
14 - Japanese
15 - Mandarin Chinese
16 - Korean
17 - Iberian Portuguese
18 - Greek
19 - Danish
20 - Swedish
21 - Thai
22 - Taiwanese
23 - Flemish
24 - Turkish
Default
01 (US English)
47-10-04
Telephone User Interface Type
Use this option to set if caller hear options in Numeric (press 1 for yes) or
Mnemonic (press L to listen to messages).
Options
0 - Numeric
1 - Mnemonic
Default
0 (Numeric)
InMail System Guide
3 - 423
Issue 5.00
47-10 Program Entry
47-10 InMail Trunk Options
(Entry Range) [Default Setting]
Speaker + #*#* + Password (12345678) + Transfer + 4710 + Option.
There are 8 available trunks (1~8).
01
Press this:
Answer Table (1~8) [1]
To do this:
Editing
Transfer
Enter (accept) data you entered and advance to the next prompt, or advance to the next
prompt without changing your entry.
-1
+1
Scroll backwards (-1) or forwards (+1) through the list of available entries.
I
J
When editing an entry, moves the cursor left or right.
Conf
When editing an entry, delete the character to the left of the cursor.
Hold
When editing an entry, Hold erases the entire entry from the display.
Line Keys (LK)
Where indicated, press a line key to enter a specific value for the selected option.
Navigation
Redial + Trunk number + Redial selects a new trunk.
Redial
Backs up to the previous level (e.g., from Option to Series, or from Series to Program).
Answer
K
3 - 424
L
Scroll consecutively backwards or forwards through selected Option or Series.
Programming
Issue 5.00
47-11 InMail Answer Table Options
Description
Use 47-11 InMail Answer Table Options to set options for the Answer Tables. InMail
provides 8 Answer Tables (1~8). To set up the schedules for each Answer Table, go to
47-12 InMail Answer Table Schedule.
.
See Answer Tables on page 2-45 for more information.
Options
47-11-01
Answer Schedule Override (Schedule Override)
Use this option to enable or disable Answer Schedule Override for the
selected Answer Table. If enabled and you make an entry for Override
Mailbox below, the active Answer Table routes calls to the Override
Mailbox.
.
See Answer Schedule Override on page 2-41 for more.
Options
1 (Yes - Use 47-11 InMail Answer Table Options)
Default
0 (No - Use 47-11 InMail Answer Table Options)
47-11-02
Override Mailbox Category (Override MB Ctg)
Use this option to specify the category of the mailbox to which Automated
Attendant calls should route when you enable Answer Schedule Override.
InMail mailbox categories are Subscriber Mailbox, Group Mailbox, and
Routing Mailbox.
InMail handles the routing according to the type of mailbox (Subscriber, Call
Routing, or Announcement) within the specified category:
If the Override Mailbox is a Station Mailbox, the outside caller hears the
mailbox greeting (if recorded) and can leave a message.
If the Override Mailbox is an Announcement Mailbox, the outside caller
hears the recorded announcement. Depending on how the Announcement
Mailbox is programmed, InMail then hangs up, reroutes the call, or provides
additional dialing options.
If the Override Mailbox is a Call Routing Mailbox, the outside caller hears
the instruction menu and can dial any option allowed by the associated Dial
Action Table.
If the Override Mailbox is a Directory Dialing Mailbox, the outside caller can
reach an extension by dialing the first few letters in the extension user’s
InMail System Guide
3 - 425
Issue 5.00
name.
.
See Answer Schedule Override on page 2-41 for more.
Options
0 (Undefined)
1 (Station Mailbox)
2 (Group Mailbox)
3 (Routing Mailbox)
Default
0 (Undefined)
.
47-11-02
If any of the Input Data values are entered, the terminal displays the Override Mailbox
Number selection (below).
Override Mailbox Number (Override MB Num)
Use this option to specify the mailbox to which Automated Attendant calls
should route when you when you enable Answer Schedule Override. The
mailbox number you select in this option should match the mailbox category
specified in 47-11-02 Override Mailbox Category above.
Options
Digits (3 maximum, using 0-9).
Default
No entry.
47-11-03
Default Mailbox Category (Default MB Ctg)
Use this option to specify the category of mailbox used as the Default
Mailbox. InMail mailbox categories are Subscriber Mailbox, Group Mailbox,
and Routing Mailbox. InMail uses the Default Mailbox whenever an Answer
Schedule is not in effect.
InMail handles the routing according to the type of mailbox (Subscriber, Call
Routing, or Announcement) within the specified category:
If the Default Mailbox is a Subscriber Mailbox, the outside caller hears the
mailbox greeting (if recorded) and can leave a message.
If the Default Mailbox is an Announcement Mailbox, the outside caller hears
the recorded announcement. Depending on how the Announcement
Mailbox is programmed, InMail then hangs up, reroutes the call, or provides
additional dialing options.
If the Default Mailbox is a Call Routing Mailbox, the outside caller hears the
instruction menu and can dial any option allowed by the associated Dial
Action Table.
If the Default Mailbox is a Directory Dialing Mailbox, the outside caller can
reach an extension by dialing the first few letters in the extension user’s
name
.
See Answer Tables on page 2-45.
Options
0 (Undefined)
1 (Station Mailbox)
3 - 426
Programming
Issue 5.00
2 (Group Mailbox)
3 (Routing Mailbox)
InMail System Guide
3 - 427
Issue 5.00
Default
Answer Table 1 = 3 (Routing Mailbox)
Answer Table 2~8 = 0 (Undefined)
.
47-11-03
If any of the Input Data values are entered, the terminal displays the Override Mailbox
Number selection (below).
Default Mailbox Number (Default MB Num)
Use this option to set the Answer Table’s Default Mailbox number. InMail
uses the Default Mailbox when an Answer Schedule is not in effect. By
default, this occurs at all times other than Monday through Friday from 8:30
AM to 5:00 PM.
See Answer Tables on page 2-45.
Options
.
Digits (3 maximum, using 0~9).
Do not enter leading zeros. (For example, for Routing Mailbox 1 enter 1, not
01 or 001).
Default
Answer Table 1 = 1
Answer Table 2~8 = No entry
47-11-04
Next Answer Table
When 10 Answer Schedules within an Answer Table are not sufficient, use
this option to link two Answer Tables together. InMail treats the two linked
tables as a single 20-entry Answer Table.
See Answer Tables on page 2-45 for more.
Options
.
Answer Table (1~8)
0 (Undefined)
Default
0 (Undefined)
3 - 428
Programming
Issue 5.00
47-11 Program Entry
47-11 InMail Answer Table Options
(Entry Range) [Default Setting]
Speaker + #*#* + Password (12345678) + Transfer + 4711 + Option.
There are 8 available Answer Tables (1~8).
01
Schedule Override (1=Yes - enabled, 0=No - disabled) [0]
LK1-No, LK2=Yes
02
Override MB Ctg (1=Station Mailbox, 2=Group Mailbox, 3=Routing Mailbox, 0=Undefined) [0]
Override MB Num (Digits, 3 max., using 0~9) [No entry]
03
Default MB Ctg (1=Station Mailbox, 2=Group Mailbox, 3=Routing Mailbox, 0=Undefined) [0]
Default MB Num (Digits, 3 max., using 0~9) [Answer Table 1 = 1, Answer Tables 2~8 = No
entry]
04
Press this:
Next Answer Table (1~8, 0=Undefined)
To do this:
Editing
Transfer
Enter (accept) data you entered and advance to the next prompt, or advance to the next
prompt without changing your entry.
-1
+1
Scroll backwards (-1) or forwards (+1) through the list of available entries.
I
J
When editing an entry, moves the cursor left or right.
Conf
When editing an entry, delete the character to the left of the cursor.
Hold
When editing an entry, Hold erases the entire entry from the display.
Line Keys (LK)
Where indicated, press a line key to enter a specific value for the selected option.
Navigation
Redial + Table number + Redial selects a new table.
Redial
Backs up to the previous level (e.g., from Option to Series, or from Series to Program).
Answer
K
L
Scroll consecutively backwards or forwards through selected Option or Series.
InMail System Guide
3 - 429
Issue 5.00
47-12 InMail Answer Schedules
Description
Use 47-12 InMail Answer Schedules to set up the InMail Automated Attendant
Answer Schedules. There are eight Answer Tables, with up to 10 Answer Schedules
in each Answer Table.
.
See Answer Tables on page 2-45 for more information.
Options
47-12-01
Schedule Type (Entryxx Schedule Type)
Use this option to assign a Schedule Type to the selected Answer
Schedule. The Schedule Type determines how the Answer Schedule
answers calls.
.
See Answer Tables on page 2-45 for more.
The schedule can be one of the following types:
1.
Day of the Week
A Type 1 Answer Schedule runs on a specific day of the week.
For this type of schedule, select:
The day of the week the schedule should run:
The schedule start time.
The schedule end time.
The Call Routing or Announcement Mailbox used to answer
calls.
2.
Range of Days
A Type 2 Answer Schedule runs for a range of days. For this
type of schedule, select:
The day of the week the schedule should start.
The day of the week the schedule should stop.
The time on the start day the schedule should start.
The time on the stop day the schedule should stop.
The Call Routing or Announcement Mailbox used to answer the
calls.
3 - 430
Programming
Issue 5.00
3.
Date
A type 3 Answer Schedule runs only on a specific day of the
year. For this type of schedule, select:
The specific date the schedule should run.
On the selected date, the time the schedule should start.
On the selected date, the time the schedule should stop.
The Call Routing or Announcement Mailbox used to answer the
calls.
Options
1 (Day of the Week)
2 (Range of Days)
3 (Date)
0 (Undefined)
Default
Answer Table 1/Schedule 1 = 2 (Range of Days)
All other schedules = 0 (Undefined)
47-12-02
Answering Mailbox Category (Entryxx MB Ctg)
Use this option to specify the category of mailbox to which Automated
Attendant calls should route when the schedule is in effect. InMail mailbox
categories are Subscriber Mailbox, Group Mailbox, or Routing Mailbox.
InMail handles the routing according to the exact type of Subscriber, Group,
or Routing Mailbox specified.
If the Answering Mailbox is a Subscriber Mailbox, the outside caller hears
the mailbox greeting (if recorded) and can leave a message.
If the Answering Mailbox is an Announcement Mailbox, the outside caller
hears the recorded announcement. Depending on how the Announcement
Mailbox is programmed, InMail then hangs up, reroutes the call, or provides
additional dialing options.
If the Answering Mailbox is a Call Routing Mailbox, the outside caller hears
the instruction menu and can dial any option allowed by the associated Dial
Action Table.
If the Answering Mailbox is a Directory Dialing Mailbox, the outside caller
hears the Directory Dialing Message and can reach an extension by dialing
the first few letters of the person’s name.
.
See Answer Tables on page 2-45.
Options
1 (Station Mailbox)
2 (Group Mailbox)
3 (Routing Mailbox)
0 (Undefined)
InMail System Guide
3 - 431
Issue 5.00
Default
3 (Routing Mailbox)
.
When data is entered in 47-12-02, the terminal displays the Answering Mailbox
Number entry (next).
Answering Mailbox Number (Entryxx MB Num)
Use this option to set the number of the Answering Mailbox the Automated
Attendant uses when the selected schedule is in effect. This mailbox is
defined in 47-12-02 Answering Mailbox Category.
.
This item number is different when using PCPro/WebPro due to the window layout
of the applications. Refer to the PCPro/WebPro applications for more information.
See Answer Tables on page 2-45.
Options
.
Digits (3 maximum, using 0~9).
Default
Answer Table 1/Schedule 1 = 1
All other Answer Schedules = No entry
47-12-03
Day of the Week (Entryxx Day)
For Day of the Week (Type 1) Answer Schedules, use this option to select
the day of the week the Answer Schedule should be active.
.
See Type 1 (Day of Week) Example on page 3-436.
See Answer Tables on page 2-45.
Options
.
1 (Sunday)
2 (Monday)
3 (Tuesday)
4 (Wednesday)
5 (Thursday)
6 (Friday)
7 (Saturday)
Default
1 (Sunday)
47-12-04
Start Day (Entryxx Start Day)
For Range of Days (Type 2) Answer Schedules, use this option to select the
day of the week the Answer Schedule should start.
.
Refer to Type 2 (Range of Days) Example on page 3-438.
.
See Answer Tables on page 2-45.
Options
1 (Sunday)
2 (Monday)
3 (Tuesday)
4 (Wednesday)
3 - 432
Programming
Issue 5.00
5 (Thursday)
6 (Friday)
7 (Saturday)
Default
1 (Sunday)
Answer Table 1/Schedule 1 = 2 (Monday)
All other schedules = 1 (Sunday)
47-12-05
End Day (Entryxx End Day)
For Range of Days (Type 2) Answer Schedules, use this option to select the
day of the week the Answer Schedule should end.
.
Refer to Type 2 (Range of Days) Example on page 3-438.
See Answer Tables on page 2-45.
Options
.
1 (Sunday)
2 (Monday)
3 (Tuesday)
4 (Wednesday)
5 (Thursday)
6 (Friday)
7 (Saturday)
Default
Answer Table 1/Schedule 1 = 6 (Friday)
All other Answer Schedules = 1 (Sunday)
47-12-06
Date (Entryxx Date)
For Date (Type 3) Answer Schedules, use this option to select the date the
Answer Schedule should be active.
.
Refer to Type 3 (Date) Example on page 3-439.
.
See Answer Tables on page 2-45.
Options
MMDD
For example:
0101 = January 1
1231 = December 31
0000 = No date set
Default
0000 = No date set
InMail System Guide
3 - 433
Issue 5.00
47-12-07
Schedule Start Time (Entryxx Start Time)
Use this option to specify the time the Answer Schedule should start. It
applies to Day of the Week (Type 1), Range of Days (Type 2), and Date
(Type 3) schedules. (To make a schedule run continuously, make the same
entry for 47-12-08 Schedule Start Time and 47-12-09 Schedule End Time.)
.
See Answer Tables on page 2-45.
Options
HHMM (24-hour clock)
For example:
0130 = 1:30AM
1700 = 5:00PM
Default
Answer Table 1/Schedule 1 = 08:30 (8:30AM)
All other schedules are undefined.
47-12-08
Schedule End Time (Entryxx End Time)
Use this option to specify the time the Answer Schedule should end. It
applies to Day of the Week (Type 1), Range of Days (Type 2), and Date
(Type 3) schedules. (To make a schedule run continuously, make the same
entry for 47-12-08 Schedule Start Time and 47-12-09 Schedule End Time.)
.
See Answer Tables on page 2-45.
Options
HHMM (24-hour clock)
For example:
0130 = 1:30AM
1700 = 5:00PM
Default
Answer Table 1/Schedule 1 = 1700 (5:00PM).
All other schedules = 0000 (Undefined).
3 - 434
Programming
Issue 5.00
47-12 Program Entry
47-12 InMail Answer Schedules
(Entry Range) [Default Setting]
Speaker + #*#* + Password (12345678) + Transfer + 4712 + Option.
There are 10 Answer Schedules (1~10) within each of the 8 available Answer Tables (1~8).
01
Entryxx Schedule Type (1=Day of the Week, 2=Range of Days, 3=Date, 0=Undefined)
[Answer Table 1/Schedule 1 = 2, All other schedules = 0]
02
Entry MB (1=Station, 2=Group, 3=Routing, 0=Undefined)
[Answer Table 1/Schedule 1 = 3, All other schedules = 0]
Entryxx MB Num (3 digits, using 0~9) [Answer Table 1/Schedule 1 = 1, All other schedules =
No entry]
03
Entryxx Day (1=Sunday, 2=Monday, 3=Tuesday, 4=Wednesday, 5=Thursday, 6=Friday,
7=Saturday)[1]
LK1=Sunday, LK2=Monday, LK3=Tuesday, LK4=Wednesday, LK5=Thursday, LK6=Friday,
LK7=Saturday
04
Entryxx Start Day (1=Sunday, 2=Monday, 3=Tuesday, 4=Wednesday, 5=Thursday, 6=Friday,
7=Saturday) [Answer Table 1/Schedule 1 = 2 (Monday), All other schedules = 1 (Sunday)]
LK1=Sunday, LK2=Monday, LK3=Tuesday, LK4=Wednesday, LK5=Thursday, LK6=Friday,
LK7=Saturday
05
Entryxx End Day (1=Sunday, 2=Monday, 3=Tuesday, 4=Wednesday, 5=Thursday, 6=Friday,
7=Saturday)
[Answer Table 1/Schedule 1 = 6 (Friday), All other schedules = 1 (Sunday)]
LK1=Sunday, LK2=Monday, LK3=Tuesday, LK4=Wednesday, LK5=Thursday, LK6=Friday,
LK7=Saturday
06
Entryxx Date(MM/DD) (MMDD) [0000]
07
Entryxx Start Time (HHMM) [0000][Answer Table 1/Schedule 1 = 0830, All other schedules =
0000]
08
Entryxx End Time (HHMM) [Answer Table 1/Schedule 1 = 1700, All other schedules = 0000]
Press this:
To do this:
Editing
Transfer
Enter (accept) data you entered and advance to the next prompt, or advance to the next
prompt without changing your entry.
-1
+1
Scroll backwards (-1) or forwards (+1) through the list of available entries.
I
J
When editing an entry, moves the cursor left or right.
Conf
When editing an entry, delete the character to the left of the cursor.
Hold
When editing an entry, Hold erases the entire entry from the display.
Line Keys (LK)
Where indicated, press a line key to enter a specific value for the selected option.
Navigation
Redial
Answer
Redial + Table number + Redial selects an Answer Table.
Redial + Redial +Entry number + Redial selects an Answer Schedule.
Backs up to the previous level (e.g., from Option to Series, or from Series to Program).
InMail System Guide
3 - 435
Issue 5.00
47-12 InMail Answer Schedules (Continued)
(Entry Range) [Default Setting]
K
L
Scroll consecutively backwards or forwards through selected Option or Series.
Type 1 (Day of Week) Example
In this example, Answer Table 1 routes calls as follows:
Schedule 1 uses Routing Mailbox 2 and runs Sunday from 8:30AM to
5:00PM.
Schedule 2 uses Subscriber Mailbox 3 and runs Wednesday from 10:30AM
to 5:00PM.
Schedule 3 uses Routing Mailbox 4 and runs Tuesday from 9:00AM to
10:00AM.
At all other times, routing is handled by the Default Mailbox specified in 4711-03 Default Mailbox Category and 47-11-03 Default Mailbox Number.
When setting up Answer Tables with multiple types, build the Answer
Schedules in the following order:
Range of Days
Day of Week
Date
Type 1 (Day of Week) Example
Answer Table 1
Answer Schedule 1
Answer Schedule 1 is a Day of Week schedule that runs Sunday from 8:30AM to
5:00PM.
47-12-01 Entry01 Schedule Type = 1
47-12-02 Entry01 MB Ctg = 3
47-12-03 Entry01 MB Num = 2
47-12-04 Entry01 Day = 1
47-12-05 Entry01 Start Day = 1 (Entry does not matter)
47-12-06 Entry01 End Day = 1 (Entry does not matter)
47-12-07 Entry01 Date (MMDD) = 0000 (Entry does not matter)
47-12-08 Entry01 Start Time = 0830 (8:30AM)
47-12-09 Entry01 End Time = 1700 (5:00PM)
Answer Schedule 2
Answer Schedule 2 is a Day of Week schedule that runs Wednesday
from10:30AM to 5:00PM.
47-12-01 Entry01 Schedule Type = 1
47-12-02 Entry01 MB Ctg = 1
47-12-03 Entry01 MB Num = 3
3 - 436
Programming
Issue 5.00
Type 1 (Day of Week) Example (Continued)
47-12-04 Entry01 Day = 4
47-12-05 Entry01 Start Day = 1 (Entry does not matter)
47-12-06 Entry01 End Day = 1 (Entry does not matter)
47-12-07 Entry01 Date (MMDD) = 0000 (Entry does not matter)
47-12-08 Entry01 Start Time = 1030 (10:30AM)
47-12-09 Entry01 End Time = 1700 (5:00PM)
Answer Schedule 3
Answer Schedule 3 is a Day of Week schedule that runs Tuesday from9:00AM to
10:00AM.
47-12-01 Entry01 Schedule Type = 1
47-12-02 Entry01 MB Ctg = 3
47-12-03 Entry01 MB num = 4
47-12-04 Entry01 Day = 3
47-12-05 Entry01 Start Day = 1 (Entry does not matter)
47-12-06 Entry01 End Day = 1 (Entry does not matter)
47-12-07 Entry01 Date (MMDD) = 0000 (Entry does not matter)
47-12-08 Entry01 Start Time = 0900 (9:00AM)
47-12-09 Entry01 End Time = 1000 (10:00PM)
InMail System Guide
3 - 437
Issue 5.00
Type 2 (Range of Days) Example
In this example, Answer Table 1 routes calls as follows:
Schedule 1 uses Routing Mailbox 1 and runs Sunday through Wednesday
from 8:30AM to 5:00PM.
Schedule 2 uses Routing Mailbox 2 and runs Thursday and Friday from
11:00AM to 1:00PM.
At all other times, routing is handled by the Default Mailbox specified in 4711-04 Default Mailbox Category and 47-11-05 Default Mailbox Number.
When setting up Answer Tables with multiple types, build the Answer
Schedules in the following order:
Range of Days
Day of Week
Date
Type 2 (Range of Days) Example
Answer Table 1
Answer Schedule 1
Answer Schedule 1 is a Range of Days schedule that starts schedule that runs
Sunday through Wednesday from 8:30AM to 5:00PM.
47-12-01 Entry01 Schedule Type = 2
47-12-02 Entry01 MB Ctg = 3
47-12-03 Entry01 MB Num = 1
47-12-04 Entry01 Day = 1 (Entry does not matter)
47-12-05 Entry01 Start Day = 1 (Sunday)
47-12-06 Entry01 End Day = 4 (Wednesday)
47-12-07 Entry01 Date (MMDD) = 0000 (Entry does not matter)
47-12-08 Entry01 Start Time = 0830 (8:30AM)
47-12-09 Entry01 End Time = 1700 (5:00PM)
Answer Schedule 2
Answer Schedule 2 is a Range of Days schedule that runs Thursday and Friday
from 11:00AM to 1:00PM.
47-12-01 Entry01 Schedule Type = 2
47-12-02 Entry01 MB Ctg = 3
47-12-03 Entry01 MB Num = 2
47-12-04 Entry01 Day = 1 (Entry does not matter)
47-12-05 Entry01 Start Day = 4 (Wednesday)
47-12-06 Entry01 End Day = 5 (Thursday)
47-12-07 Entry01 Date (MMDD) = 0000 (Entry does not matter)
47-12-08 Entry01 Start Time = 1100 (11:00AM)
47-12-09 Entry01 End Time = 1300 (1:00PM)
3 - 438
Programming
Issue 5.00
Type 3 (Date) Example
In this example, Answer Table 1 routes calls as follows:
Schedule 1 uses Routing Mailbox 1 and runs every day from 8:30AM to
5:00PM.
Schedule 2 uses Routing Mailbox 9 and runs only on Christmas Day from
8:30AM to 5:00PM.
At all other times, routing is handled by the Default Mailbox specified in
47-11-04 Default Mailbox Category and 47-11-05 Default Mailbox Number.
When setting up Answer Tables with multiple types, build the Answer Schedules
in the following order:
Range of Days
Day of Week
Date
Type 3 (Date) Example
Answer Table 1
Answer Schedule 1
Answer Schedule 1 is a Range of Days schedule that starts schedule that runs
every day from 8:30AM to 5:00PM.
47-12-01 Entry01 Schedule Type = 2
47-12-02 Entry01 MB Ctg = 3
47-12-03 Entry01 MB Num = 1
47-12-04 Entry01 Day = 1 (Entry does not matter)
47-12-05 Entry01 Start Day = 1 (Sunday)
47-12-06 Entry01 End Day = 1 (Sunday)
47-12-07 Entry01 Date (MMDD) = 0000 (Entry does not matter)
47-12-08 Entry01 Start Time = 0830 (8:30AM)
47-12-09 Entry01 End Time = 1700 (5:00PM)
Answer Schedule 2
Answer Schedule 2 is a Date schedule that runs only on Christmas Day from
8:30AM to 5:00PM.
47-12-01 Entry01 Schedule Type = 3
47-12-02 Entry01 MB Ctg = 3
47-12-03 Entry01 MB Num = 9
47-12-04 Entry01 Day = 1 (Entry does not matter)
47-12-05 Entry01 Start Day = 1 (Entry does not matter)
47-12-06 Entry01 End Day = 1 (Entry does not matter)
47-12-07 Entry01 Date (MMDD) = 1225 (December 25, Christmas
Day)
47-12-08 Entry01 Start Time = 0830 (8:30AM)
47-12-09 Entry01 End Time = 1700 (5:00PM)
InMail System Guide
3 - 439
Issue 5.00
47-13 InMail Dial Action Tables
Description
Use 47-13 InMail Dial Action Tables to set up the InMail Dial Action Tables. The Dial
Action Table defines the options than an Automated Attendant caller can dial. A Dial
Action Table is associated with a Call Routing Mailbox, which is in turn associated
with an Answer Table. When an Answer Table is active, its associated Call Routing
Mailbox selects the Dial Action Table which provides dialing options to callers. The
illustration below shows how this works in a default InMail system. There are 16 Dial
Action Tables:
3 - 440
Programming
Issue 5.00
.
DIL/DDI to Voice Mail Master (555)
22-01-01 Incoming Call Trunk Setup
22-07-01 DIL Setup
22-11 DIDI Setup
InMail
Default
Automated Attendant Answering
Trunks Route to Answer Table 1
47-10-01 Answer Table Assignment
Answer Table 1
47-11 Answer Table Options
Schedule 1 or Default Mailbox
47-12 Answer Schedules
47-11-03 Default Mailbox
Call Routing Mailbox 1
47-08 Call Routing Mailbox Options
Dial Action Table 1
47-13 Dial Action Tables
InMail System Guide
All calls route to Call Routing Mailbox 1
Schedule 1 active M-F 8:30AM-5:00PM
Default Mailbox active all other times.
From a System Administrator mailbox,
record an Instruction Menu (SA + I) for
the active Call Routing Mailbox.
Dial Action Table 1 Dialing Options:
Dial an extension number, or
O for the operator.
3 - 441
Issue 5.00
Dial Action Table Default Settings
Key
.
3 - 442
Dial Action Table 1
Dial Action Tables 2-16
1
UND
(Undefined)
UND
(Undefined)
2
UTRF to XXX
(Unscreened Transfer to userdialed extension)
UND
(Undefined)
3
UTRF to XXX
(Unscreened Transfer to userdialed extension)
UND
(Undefined)
4
UND
(Undefined)
UND
(Undefined)
5
UND
(Undefined)
UND
(Undefined)
6
UND
(Undefined)
UND
(Undefined)
7
UND
(Undefined)
UND
(Undefined)
8
UND
(Undefined)
UND
(Undefined)
9
HNGUP
(Hangup)
UND
(Undefined)
0
UTRF to 200
(Unscreened Transfer to 101)
UND
(Undefined)
*
REC1 to IXXX
(Quick Message with greeting to
user-dialed extension)
UND
(Undefined)
#
LOGON to IXXX
(Logon to user-dialed mailbox)
UND
(Undefined)
TIMEOUT
UTRF to 200
(Unscreened Transfer to 101)
UND
(Undefined)
TIMEOUT provides the routing for rotary dial callers. See Automatic Routing for Rotary Dial
Callers on page 2-69 for more.
Programming
Issue 5.00
TRF Action - Screened Transfer (1) (TRF)
Use this action to allow an Automated Attendant caller to place a Screened Transfer
to an extension. After an Automated Attendant caller dials an extension, InMail calls
(screens) the destination to see if the transfer can go through.
If the destination is available, the Automated Attendant rings it. If the destination
answers, the call goes through.
If the destination doesn’t answer within a preset interval, is busy, or is in Do Not
Disturb, the Automated Attendant doesn’t extend the call. It then provides the
caller with additional options.
Number Option
Normally, the corresponding Number option should be XXX. Note that the
key you choose for this action is the first digit of the called extension
number.
.
For example, to allow callers to place Screened Transfers to extensions 200~207,
for key 2 enter TRF for the Action and XXX for the corresponding Number.
To have Screened Transfer call a specific extension, the corresponding
Number option should be that extension number. The caller then dials that
single digit to reach the extension.
.
For example, to have callers dial 8 to reach extension 303, for key 8 enter TRF for
the Action and 303 for the corresponding Number.
Additional Information
InMail System Guide
.
See the call routing chart detailed in Screened Transfer (TRF) Operation on page
2-324.
.
Also see Screened Transfer on page 2-323 and Unscreened Transfer on page 2-351.
3 - 443
Issue 5.00
UTRF Action - Unscreened Transfer (2) (UTRF)
Use this action to allow an Automated Attendant caller to place an Unscreened
Transfer to an extension. This is similar to telephone system unscreened transfers in
which the transferring party immediately extends the call. After an Automated
Attendant caller dials an extension, InMail transfers the call to the destination and
hangs up. Any recalls or additional routing are handled by the telephone system – just
as with any other unscreened transfer.
Number Option
Normally, the corresponding Number option should be XXX. Note that the
key you choose for this action is the first digit of the called extension
number.
.
For example, to allow callers to place Unscreened Transfers to extensions
200~299, for key 2 enter UTRF for the Action and XXX for the corresponding
Number.
To have Unscreened Transfer call a specific extension, the corresponding
Number option should be that extension’s number. The caller then dials that
single digit to reach the extension.
.
For example, to have callers dial 8 to reach extension 303, for key 8 enter UTRF
for the Action and 303 for the corresponding Number.
Additional Information
.
Refer to the Unscreened Transfer (UTRF) Operation on page 2-352 to see the call
routing chart.
.
Also see Screened Transfer on page 2-323 and Unscreened Transfer on page 2-351.
REC1 Action - Quick Message With Greeting (3) (REC1)
Use this action to allow an Automated Attendant caller to leave a Quick Message at
an extension. With this action, the caller hears the extension greeting prior to leaving
the message.
Number Options
To have the caller leave a quick Message at a specific extension, the
corresponding Number option should be the extension number.
To have the caller leave a Quick Message at any caller-dialed extension,
the corresponding Number option should be IXXX.
To have the caller leave a Quick Message at a caller-dialed extension in a
specific range, the corresponding Number option should be XXX.
.
For example, to allow callers to leave a Quick Message extensions 101~108, for
key 3 enter REC1 for the Action and XXX for the corresponding Number.
Additional Information
.
3 - 444
See Quick Message on page 2-309 for more.
Programming
Issue 5.00
REC2 Action - Quick Message Without Greeting (4) (REC2)
Use this action to allow an Automated Attendant caller to leave a Quick
Message at an extension. With this action, the caller does not hear the
extension’s greeting prior to leaving the message. Instead, the caller hears
the voice prompt “Recording” followed by a beep.
Number Option
To have the caller leave a quick Message at a specific extension, the
corresponding Number option should be the extension number.
To have the caller leave a Quick Message at any caller-dialed extension,
the corresponding Number option should be IXXX.
To have the caller leave a Quick Message at a caller-dialed extension in a
specific range, the corresponding Number option should be XXX.
.
For example, to allow callers to leave a Quick Message extensions 101~108, for
key 3 enter REC2 for the Action and XXX for the corresponding Number.
Additional Information
.
See Quick Message on page 2-309 for more.
LOGON Action - Log On to Voice Mail (5) (LOGON)
Use this key action to allow an Automated Attendant caller to log on to Voice Mail.
Depending on programming (see Number Option below), the caller is logged directly
on to a Subscriber Mailbox or is prompted to enter a Subscriber Mailbox of their own
choosing. You cannot use the LOGON option with Call Routing and Announcement
Mailboxes.
Number Option
To log directly into a specific Subscriber Mailbox, enter the mailbox number
in the corresponding Number option.
.
For example, to have key 4 log directly into Subscriber Mailbox 305, for key 4 enter
LOGON for the Action and 305 for the corresponding Number.
To have InMail request Automated Attendant callers to select a Subscriber
Mailbox to log into, enter N in the corresponding Number option. The key
you choose must represent the first digit in the Subscriber Mailbox
numbers.
.
For example, to have the Automated Attendant request callers to enter the number
of the Subscriber Mailbox into which they wish to log, for key 3 enter LOGON for
the Action and N for the corresponding Number. When callers dial 3, they hear,
“Please enter your mailbox number.”
To have InMail require Automated Attendant callers to enter a Subscriber
Mailbox to log on to (without playing an announcement), enter XXX in the
corresponding Number option. The key you choose must represent the first
digit in the Subscriber Mailbox numbers.
.
InMail System Guide
For example, to allow callers to log onto mailboxes 301~308, for key 3 enter
LOGON for the Action and XXX for the corresponding Number.
3 - 445
Issue 5.00
To log on to any valid Subscriber Mailbox, enter IXXX in the corresponding
Number option.
.
For example, to allow callers to dial 1 plus any Subscriber Mailbox number to log
on, for key 1 enter LOGON for the Action and IXXX for the corresponding Number.
Additional Information
.
See Log On to Voice Mail on page 2-237 for more information.
Hang Up Action (6) (HNGUP)
When an Automated Attendant caller presses a key assigned to this action, InMail
says “Goodbye” and immediately hangs up.
Number Option
No entry is required in the corresponding Number option.
Additional Information
.
See Hang Up on page 2-191 for more.
GOTO Action - Go to Mailbox (7) (GOTO)
Use this option to provide Automated Attendant callers with the ability to route to Call
Routing and Announcement Mailboxes. For example, a caller can dial a digit for
Sales, and then go to the Call Routing or Announcement Mailbox that provides the
dialing options and instructions for Sales.
Number Option
To have Automated Attendant callers dial a single digit to go to a Call
Routing or Announcement Mailbox, enter the mailbox number in the
corresponding Number option.
.
For example, to have key 1 go to Call Routing Mailbox 1, for key 1 enter GOTO for
the Action and the Group Mailbox extension number associated with the Call
Routing Mailbox for the corresponding Number.
To log into any valid Call Routing or Subscriber Mailbox, enter IXXX in the
corresponding Number option.
.
For example, to allow callers to dial 1 plus any Call Routing or Announcement
Mailbox number to go to, for key 1 enter GOTO for the Action and IXXX for the
corresponding Number.
Additional Information
.
3 - 446
See Go To A Mailbox on page 2-171 for more information.
Programming
Issue 5.00
UND Action - Undefined Routing (0) (UND)
Use this key action if you want a key to have no routing (no operation). When an
Automated Attendant caller presses an undefined key, they hear, “That is an invalid
entry.” The caller can then dial another option.
Number Option
Not applicable
Additional Information
.
See Undefined Routing on page 2-349 for more information.
Digits (0~9, #, and *)
Use Dial Action Table digits to route an Automated Attendant call to a specific location
(such as an extension). For example, to set up a TRF Action to route to extension
305, for digit 3 enter TRF for the Action and 305 for the corresponding Number.
.
See Dial Action Table on page 2-105 for more information.
Options
0~9, #, and * (8 digits max.)
Default
.
See Dial Action Table Default Settings on page 3-442.
Caller Dialed Digits (X) [Entered by pressing LK2]
Use the X option to route an Automated Attendant call based on digits the caller dials.
Each X entry represents one caller-dialed digit. For example, to set up a TRF Action
to route to any caller dialed extension in the 101~399 range, for digit 3 enter TRF for
the Action and IXXX for the corresponding Number.
.
See Dial Action Table on page 2-105 for more information.
Options
X (Entered by pressing LK2)
Default
.
InMail System Guide
See Dial Action Table Default Settings on page 3-442.
3 - 447
Issue 5.00
Ignore Digits (I) [Entered by pressing LK3]
Use the I option to represent any digit dialed by the Automated Attendant caller that
InMail ignores for routing. An example of this is REC action assigned to the * key in
Dial Action Table 1 by default. The Action is REC2 and the Number is IXXX. This
means that a caller can dial * + any mailbox number to leave a Quick Message in that
mailbox. InMail ignores the first digit dialed by the caller (*), and routes according to
the next 3 digits dialed.
.
See Dial Action Table on page 2-105 for more.
Options
I (Entered by pressing LK3)
Default
.
See Dial Action Table Default Settings on page 3-442.
No Routing (N) [Entered by pressing LK1]
Use the N option when you want no Automated Attendant routing to automatically
occur. This can be used with the LOGON action when you want to prompt the caller to
enter a mailbox number. To do this for the # key (for example), for the # key enter
LOGON for the Action and N for the corresponding Number. When the caller dials #,
they hear: “Please enter the mailbox number. Or, to exit, press the pound key.”
Options
N (Entered by pressing LK1)
Default
.
See Dial Action Table Default Settings on page 3-442.
Pause (P) [Entered by pressing LK4]
Use the P option when you want the Automated Attendant to pause while dialing.
Options
P (Entered by pressing LK4)
Default
.
3 - 448
See Dial Action Table Default Settings on page 3-442.
Programming
Issue 5.00
47-13 Program Entry
47-13 InMail Dial Action Tables
(Entry Range) [Default Setting]
When entering Keyxx Action data:
0=Undefined, 1=TRF, 2=UTRF, 3=REC1, 4=REC2, 5=LOGON, 6=Hangup, 7=GOTO
LK1=Undefined, LK2=TRF, LK3=UTRF, LK4=REC1, LK5=REC2, LK6=LOGON, LK7=Hangup
When entering Keyxx Data data:
8 digits max, using 0~9, #, *, X, I, N, P
LK1=N (No routing), LK2=X (Caller-dialed digits), LK3=I (Ignore Digits), LK4=P (Pause)
Default Settings below are for Dial Action Table 1. All actions for Dial Action Tables 2~16 are undefined.
Speaker + #*#* + Password (12345678) + Transfer + 4713 + Option.
There are 16 Dial Action Tables (1~16).
01
Key 01 Action [0-Undefined]
Key 01 Data [0]
02
Key 02 Action [2-UTRF]
Key 02 Data [XXX]
03
Key 03 Action [2 - UTRF]
Key 03 Data [XXX]
04
Key 04 Action [0 -Undefined]
Key 04 Data [0]
05
Key 05 Action [0-Undefined]
Key 05 Data [0]
06
Key 06 Action [0-Undefined]
Key 06 Data [0]
07
Key 07 Action [0-Undefined]
Key 07 Data [0]
08
Key 08 Action [0-Undefined]
Key 08 Data [0]
09
Key 09 Action [6-Hangup]
Key 09 Data [0]
10
(0 key)
Key 10 Action [2 - UTRF]
11
(* key)
Key 11 Action [3-REC1]
12
(# key)
Key 12 Action [5-LOGON]
13
(Timeout)
Key 13 Action [2 - UTRF]
InMail System Guide
Key 10 Data [200]
Key 11 Data [IXXX]
Key 12 Data [IXXX]
Key 13 Data [200]
3 - 449
Issue 5.00
47-13 InMail Dial Action Tables (Continued)
(Entry Range) [Default Setting]
Press this:
To do this:
Editing
Transfer
Enter (accept) data you entered and advance to the next prompt, or advance to the next
prompt without changing your entry.
-1
+1
Scroll backwards (-1) or forwards (+1) through the list of available entries.
I
J
When editing an entry, moves the cursor left or right.
Conf
When editing an entry, delete the character to the left of the cursor.
Hold
When editing an entry, Hold erases the entire entry from the display.
Line Keys (LK)
Where indicated, press a line key to enter a specific value for the selected option.
Navigation
Redial + Table number + Redial selects an Answer Table.
Redial + Redial +Entry number + Redial selects an Answer Schedule.
Redial
Backs up to the previous level (e.g., from Option to Series, or from Series to Program).
Answer
K
3 - 450
L
Scroll consecutively backwards or forwards through selected Option or Series.
Programming
Issue 5.00
47-15 Routing Mailbox Directory Options
Description
Use 47-15 Routing Mailbox Directory Options to set up the Routing Mailbox assigned
as a Directory Dialing Mailbox in 47-07-02 Routing Mailbox Type.
.
See the following for more:
Routing Mailbox on page 2-317.
Directory Dialing on page 2-111.
Options
47-15-01
Minimum Number of Letters (Min Num Letters)
Use this option to specify the minimum number of letters the caller should
dial to be routed by the Directory Dialing Mailbox. Callers must dial this
minimum number of letters, followed by #. The entries for this option are 13.
Refer to Directory Dialing on page 2-111.
Options
.
1~3 (Minimum number of letters)
Default
1 (Minimum number of letters = 1)
47-15-02
Directory List Number to Use (Directory List)
Use this option to specify which Directory List the Directory Dialing Mailbox
should use. The Directory Dialing Mailbox can call only Subscriber
Mailboxes that are in the list specified by this option. The entries for this
option are 1~8.
.
Refer to Directory Dialing on page 2-111.
Options
1~8 (Directory List 1~8)
Default
1 (Directory List 1)
InMail System Guide
3 - 451
Issue 5.00
47-15-03
Extension Name Match (Name Match)
Use this option to determine which portion of the extension’s programmed
name Directory Dialing uses to route the call. The options are 0 (first) or 1
(last). The setting you choose in this option depends on how you set up
47-01-16 Name Format.
.
Refer to Directory Dialing on page 2-111.
See the following example:
47-01-16 Name
Format Setting
47-15-03 Extension
Name Match
Entered Name
1 (first-last)
0 (first)
Mary Jones
2 (last-first)
Directory Dialing
Routes by:
Mary
1 (last)
Jones
0 (first)
Jones
1 (last)
Mary
Options
0 (First portion of programmed name)
1 (Second portion of programmed name)
Default
0 (First portion of programmed name)
47-15-04
Unscreened or Screened Transfer (Transfer Option)
Use this option to define the action Directory Dialing uses when routing a
call. The entries for this option are 0 (Screened Transfer) or 1 (Unscreened
Transfer).
.
Refer to Directory Dialing on page 2-111.
Options
0 (Screened Transfer)
1 (Unscreened Transfer)
Default
0 (Screened Transfer)
47-15-05
Screened Transfer Timeout (Scrn Trf Timeout)
Use this option to set how long a Screened Transfer (STRF) from the
Directory Dialing Mailbox rings an unanswered extension before recalling.
The entry range for this option is 0~255 seconds. A setting of 0 = no recall.
.
The 24-02-04 Transfer Recall Time interval has no interaction with this timer.
.
Refer to Directory Dialing on page 2-111.
Options
1~255 seconds
0 (No recall)
Default
15 seconds
3 - 452
Programming
Issue 5.00
47-15-06
Time Limit for Dialing Timeout (Dialing Timeout)
This option determines how long InMail waits for the caller connected to the
Directory Dialing Mailbox to dial before repeating the Directory Dialing
Message. If the caller doesn’t dial within three repeats of the message,
In-Mail routes the call to the Next Call Routing Mailbox for the Directory
Dialing Mailbox (if any) or hangs up. The entry range for this option is 0~99
seconds. A setting of 0 = no timeout.
.
Refer to Directory Dialing on page 2-111.
Options
1~99 seconds
0 (No timeout)
Default
5
47-15-07
Fax Detection
Use this option to enable or disable Fax Detection for the Directory Dialing
Mailbox. If enabled (1), the Directory Dialing Mailbox detects incoming fax
CNG tone. The fax then routes to the company fax machine according to
the settings of 47-01-06 Fax Extension. If disabled (0), the Directory Dialing
Mailbox does not detect incoming fax calls.
Refer to Directory Dialing on page 2-111.
Options
.
0 (No - disabled)
1 (Yes - enabled)
Default
0 (No - disabled)
47-15-08
Next Call Routing Mailbox (Next CR Mbox)
Use this option to specify the Next Call Routing Mailbox (1~32) for the
Directory Dialing Mailbox. If a Next Call Routing Mailbox is specified, the
following occurs:
If the caller dials 0 while listening to the Directory Dialing Message, the call
routes to the 0 action programmed into the Dial Action Table associated
with the Next Call Routing Mailbox.
If the caller dials # while listening to the Directory Dialing Message, the call
routes immediately to the Next Call Routing Mailbox and the recorded
Instruction Menu Message for that mailbox is played.
.
Refer to Directory Dialing on page 2-111.
Options
Call Routing Mailbox Number (up to 2 digits)
No entry - 0 (Entered by pressing Hold)
Default
No entry - 0
By default, Call Routing Mailbox numbers are 1~8.
InMail System Guide
3 - 453
Issue 5.00
47-15 Program Entry
47-15 Routing Directory Dialing Mailbox Options
(Entry Range) [Default Setting]
Speaker + #*#* + Password (12345678) + Transfer + 4714 + Option.
This selects the option chosen for Call Routing Mailbox 1.
There are 32 available Call Routing Mailboxes (1~32).
01
Min Num Letters (1~3) [1]
02
Directory List (1~8) [1]
03
Name Match (0=First portion of programmed name, 1=Second portion of
programmed name) [0]
04
Transfer Option (0=Screened Transfer, 1=Unscreened Transfer) [0]
05
Scrn Trf Timeout (1~255 seconds, 0=No recall) [15]
06
Dialing Timeout (1~99 seconds, 0=No timeout) [5]
07
Fax Detection (0=Disabled, 1=Enabled) [0]
08
Next CR Mbox (1~32, 0-Entered by pressing Hold=Undefined) [0]
Press this:
To do this:
Editing
Enter (accept) data you entered and advance to the next prompt, or
advance to the next prompt without changing your entry.
Hold
-1
+1
Scroll backwards (-1) or forwards (+1) through the list of available
entries.
I
J
When editing an entry, moves the cursor left or right.
Conf
When editing an entry, delete the character to the left of the cursor.
Hold
When editing an entry, Hold erases the entire entry from the display.
Line Keys (LK)
Where indicated, press a line key to enter a specific value for the
selected option.
Navigation
K
3 - 454
Redial
Redial + Mailbox number + Redial selects a new mailbox number
Answer
Backs up to the previous level (e.g., from Option to Series, or from
Series to Program).
L
Scroll consecutively backwards or forwards through selected Option or
Series.
Programming
Issue 5.00
47-16 InMail Language License
Description
This command defines the language order that the In-Mail can use. Depending on
the language license number, the In-Mail can use these languages defined in this
program, starting from Language 1. For example, if the system has 4 languages
license, the In-Mail can use the languages defined in the Language 1, 2, 3 and 4 in
this program.
Options
47-16-01
InMail Language License
This command defines the language order that the In-Mail can use.
Depending on the language license number, the In-Mail can use
these languages defined in this program, starting from Language 1.
For example, if the system has 4 languages license, the In-Mail can
use the languages defined in the Language 1, 2, 3 and 4 in this
program.
Options
01 - US English
02 - UK English
03 - Australian English
04 - French Canadian
05 - Dutch
06 - Mexican Spanish
07 - Latin America Spanish
08 - Italian
09 - German
10 - Madrid Spanish
11 - Norwegian
12 - Parisian French
13 - Brazilian Portuguese
14 - Japanese
15 - Mandarin Chinese
16 - Korean
17 - Iberian Portuguese
18 - Greek
19 - Danish
20 - Swedish
InMail System Guide
3 - 455
Issue 5.00
21 - Thai
22 - Taiwanese
23 - Flemish
24 - Turkish
Default
01 - UK English)
03 - Au English
08 – Italian
09 - German
10 - Madrid Spanish
11- Norwegian
3 - 456
Programming
Issue 5.00
47-17 Routing Mailbox Distribution Options –
Mailbox Type
Description
Use 47-17 : Routing Distribution Mailbox Options to assign data when Program
47-07-02 is set to 4 (Distribution).
Options
47-17-01
Routing Mailbox Distribution Options – Mailbox Type
This command defines the type of mailbox of a Distribution List member.
These settings will be used if PRG 47-07-02 Routing Mailbox Type is set to
Distribution. You can have Station Mailboxes and/or Group Mailboxes as
members of a Distribution List.
Options
0 - Undefined
1 - Station Mailbox
2 - Group Mailbox
Default
0 (Undefined)
47-17-02
Routing Mailbox Distribution Options – Mailbox Number
This command defines the mailbox number of a Distribution List member.
Options
Valid Station or Group mailbox number up to three digits.
Default
Undefined
InMail System Guide
3 - 457
Issue 5.00
47-18: SMTP Setup for Email Notification
Options
• Email Notification requires software version 03.10 or higher and a Memory Expansion Daughter Board .
Description
Use this option to set up the SMTP server and email account options for
Email Notification.
Options
47-18-01: Enable SMTP
Use this option to enable or disable SMTP email delivery. Once enabled,
you must make entries for the following SMTP options in order for Email
Notification to function.
Options
0 (Disabled)
1 (Enabled)
Default
0 (Disabled)
47-18-02: SMTP Server Name
Use this option to specify the SMTP server that will handle Email
Notification email delivery for the installation site. The SMTP server name is
typically similar to smtp.emailserver.com. If you didn’t make an entry in the
90-11-11 and 90-11-12 Domain Name options, this entry must be the IP
address of the SMTP server since there is no way to resolve a name. There
is one entry per system.
Options
48 characters maximum.
Default
No entry.
47-18-03: SMTP Port Number
Use this option to specify the port (logical connection) the installation site’s
email server uses for SMTP. Normally, this is port 25 (which is preassigned
by the IANA as the “Well-Known TCP Port Number” for SMTP).
Options
Digits using 0-9, 4 max.
3 - 458
Programming
Issue 5.00
Default
25
47-18-04: SMTP Encryption
Use this option to enable or disable SMTP encryption. The option you
choose depends on the requirements of the SMTP email server. Check with
the server administrator or Internet Service Provider (ISP) for more.
Options
0 (Disabled)
1 (Enabled)
Default
0 (Disabled)
47-18-05: SMTP Authentication
Use this option to set the SMTP authentication type (also called SMTP
AUTH). The options are:
0 (Disabled)
1 (SMTP Authentication enabled)
2 (POP3 Authentication enabled - see Program 47-19)
If SMTP Authentication is enabled (2), you must enter an email account
name in the following programs that is valid for the site’s SMTP email
server. Check with the server administrator or Internet Service Provider
(ISP) for more.
Options
0 (Disabled)
1 (SMTP Authentication enabled)
2 (POP3 Authentication enabled - see Program 47-19)
Default
0 (Disabled)
47-18-06: SMTP Username
Use this option to specify the user name of the account on the SMTP server
that will process the email sent from the SV8100. For example, if email
account used to send email from the SV81000 is
[email protected], the User Name entry would be yourname.
Options
48 characters maximum.
Default
No entry.
47-18-07: SMTP Password
Use this option to enter the password for the account specified in the
previous option. This is the password required to log onto email account.
Options
48 characters maximum.
InMail System Guide
3 - 459
Issue 5.00
Default
No entry.
47-18-08: SMTP EMail Address
Use this option to specify the email account that the SMTP server will use to
process email sent from the SV8100. Email Integration delivers all
outbound email to this account, which in turn delivers it to the email
recipient. This is the account’s entire email address (e.g.,
[email protected]).
Options
48 characters maximum.
Default
No entry.
47-18-09: SMTP Reply-To Address
For the email recipient, this is the email address shown in the From field. If
the message recipient replies to the email, it is sent to this email address.
This is a required entry.
Options
48 characters maximum.
Default
No entry.
47-18 Program Entry
47-18: SMTP Setup for Email Notification
(Entry Range) [Default Setting]
CALL1 + #*#* + Password (12345678) + HOLD + 4718 + Option.
This selects the first option.
01
SMTP Enabled (0=Disabled, 1=Enabled) [0]
LK1=Disabled, LK2=Enabled
02
ServerName (48 characters max.)[No entry]
03
SMTP Port (Digits using 0-9, 4 max.)[25]
04
Encryption (0=Disabled, 1=Enabled, 2=POP3) [0]
LK1=Disabled, LK2=Enabled, LK3=POP3
05
Authentication (0=Disabled, 1=Enabled) [0]
LK1=Disabled, LK2=Enabled
06
User Name (48 characters max.)[No entry]
07
Password (48 characters max.)[No entry]
08
Email Add (48 characters max.)[No entry]
09
Reply Add (48 characters max.)[No entry]
Press this:
3 - 460
To do this:
Programming
Issue 5.00
47-18: SMTP Setup for Email Notification
(Entry Range) [Default Setting]
Editing
Enter (accept) data you entered and advance to the next prompt, or advance to
the next prompt without changing your entry.
HOLD
-1
←
+1
Scroll backwards (-1) or forwards (+1) through the list of available entries.
→
When editing an entry, moves the cursor left or right.
When editing an entry, delete the character to the left of the cursor.
CONF
When editing an entry, CLEAR erases the entire entry from the display.
CLEAR
Line Keys (LK)
Where indicated, press a line key to enter a specific value for the selected option.
Navigation
FLASH
FLASH
+ Mailbox number + FLASH selects a new mailbox number
Backs up to the previous level (e.g., from Option to Series, or from Series to
Program).
?
?
back
select
InMail System Guide
Scroll consecutively backwards or forwards through selected Option or Series.
Selects currently displayed Option or Series
3 - 461
Issue 5.00
47-19: POP3 Login Setup for Email Notification
Options
• Email Notification requires software version 03.10 or higher and a Memory Expansion Daughter Board .
Description
Use this option to set up the POP3 Login options for Email Notification (if
required). To use POP3 Login, program 47-18-05 must be set to 2 (POP3
Authentication enabled).
Options
47-19-01: POP3 Server Name
Use this option to enter the name of the POP3 server that will handle email
delivery for the installation site. The POP3 server name is typically similar to
pop.emailserver.com. If you didn’t make an entry in the 90-11-11 and 90-1112 Domain Name options, this entry must be the IP address of the POP3
server since there is no way to resolve a name. There is one entry per
system.
Options
48 characters maximum.
Default
No entry.
47-19-02: POP3 Port Number
Use this option to specify the port (logical connection) the installation site’s
email server uses for POP3. Normally, this is port 110 (which is preassigned
by the IANA as the “Well-Known TCP Port Number” for POP3).
Options
Digits using 0-9, 4 max.
Default
110
47-19-03: POP3 Encryption Method
Use this option to enable or disable POP3 SSL encryption for the site's
email server. The option you choose depends on the requirements of the
POP3 email server. Check with the server administrator or Internet Service
Provider (ISP) for more.
3 - 462
Programming
Issue 5.00
Options
0 (SSL disabled)
1 (SSL enabled)
Default
0 (SSL disabled)
47-19-04: POP3 Username
Use this option to enter the POP3 account’s user name. If the subscriber’s
email address is [email protected], the username would
normally be yourname.
Options
48 characters maximum.
Default
No entry.
47-19-05: POP3 Password
Use this option to enter the password for the account specified in the
previous option. When authentication is enabled, this password is required
to log onto the email account.
Options
48 characters maximum.
Default
No entry.
47-19 Program Entry
47-19: POP3 Login Setup for Email Notification
(Entry Range) [Default Setting]
CALL1 + #*#* + Password (12345678) + HOLD + 4719 + Option.
This selects the first option.
01
ServerName (48 characters max.)[No entry]
02
POP3 Port (Digits using 0-9, 4 max.)[25]
03
Encryption (0=Disabled, 1=Enabled) [0]
LK1=Disabled, LK2=Enabled
04
User Name (48 characters max.)[No entry]
05
Password (48 characters max.)[No entry]
Press this:
To do this:
Editing
Enter (accept) data you entered and advance to the next prompt, or advance to
the next prompt without changing your entry.
HOLD
-1
←
+1
Scroll backwards (-1) or forwards (+1) through the list of available entries.
→
When editing an entry, moves the cursor left or right.
CONF
InMail System Guide
When editing an entry, delete the character to the left of the cursor.
3 - 463
Issue 5.00
47-19: POP3 Login Setup for Email Notification
(Entry Range) [Default Setting]
When editing an entry, CLEAR erases the entire entry from the display.
CLEAR
Line Keys (LK)
Where indicated, press a line key to enter a specific value for the selected option.
Navigation
FLASH
FLASH
?
?
select
3 - 464
+ Mailbox number + FLASH selects a new mailbox number
Backs up to the previous level (e.g., from Option to Series, or from Series to
Program).
back
Scroll consecutively backwards or forwards through selected Option or Series.
Selects currently displayed Option or Series
Programming
Issue 5.00
47-20: Station Mailbox Message Notification
Options
• Cascading Message Notification requires software version 04.00 or higher and a compact flash of
InMail 2.10 or higher.
Description
Use this option to set up the Message Notification options for a station
mailbox. To use Message Notification, program 47-02-23 must be set to 1
(All message notification enabled).
Options
There are five seperately programmed Message Notification entries for each
Subscriber Mailbox
47-20-01: Notification
Use this option to enable or disable the specific message notification entry.
Options
Enable or disable.
Default
Disable.
47-20-02: Notification Begin Hour
Use this option to specify the hour setting for the notification to begin.
Options
Digits using 0-23 Hour, (24 hour mode).
Default
0 (Midnight)
47-20-03: Notification End Hour
Use this option to specify the hour setting for the notification to end.
Options
Digits using 0-23 Hour, (24 hour mode).
Default
0 (Midnight)
InMail System Guide
3 - 465
Issue 5.00
47-20-04: Notification Type
Use this option specify the message notification type.
Options
0 (Undefined)
1 (Voice)
2 (Pager).
Default
1 (Voice).
47-20-05: Notification Number
Use this option to specify the telephone number (16 digits maximum) to dial
to notify the subscriber of new messages. Enter the number exactly as you
want the system to dial it, but do not include a line access code. If the
number is an extension number (decided by numbering plan), it will
automatically be dialled as an intercom call.
Options
16 digits maximum.
Default
No entry.
47-20-06: Notification Busy Attempts
Use this option to specify how many times InMail will retry an incomplete
Message Notification callout to an busy destination. If the Busy and RNA
attempts are met, the notification callout to the selected entry will be
cancelled.
Options
0 (No retry attempts)
0~99 (Number of retry attempts)
Default
5.
47-20-07: Notification Ring No Answer Attempts
Use this option to specify how many times InMail will retry an incomplete
Message Notification callout to a destination that does not answer. If the
Busy and RNA attempts are met, the notification callout to the selected
entry will be cancelled.
Options
0 (No retry attempts)
0~99 (Number of retry attempts)
Default
5.
47-20-08: Notification Security
Use this option to specify security code protection for the callout. If enabled,
the user is required to enter their security code in order to log on and hear
the new message
3 - 466
Programming
Issue 5.00
Options
0 (Disabled)
1 (Enabled)
Default
1 Enabled.
47-20 Program Entry
47-20: Cascading Message Notification Setup
(Entry Range) [Default Setting]
CALL1 + #*#* + Password (12345678) + HOLD + 4720 + Entry + Option.
This selects the first option.
01
Notification (0=Disabled, 1=Enabled.)[0=Disabled]
LK1=Disabled, LK2=Enabled
02
Notification Begin Hour (Digits using 0-23, 24 hour mode)[0]
03
Notification End Hour (Digits using 0-23, 24 hour mode)[0]
04
Notification Type (0=Undefined, 1=Voice, 2=Pager.)[0]
LK1=Undefined, LK2=Voice, LK3=Pager
05
Notification Number (16 digits max.)[No entry]
06
Notification Busy Attempts (0~99) [5]
07
Notification Ring No Answer Attempts (0~99) [5]
08
Notification Security (0=Disabled, 1=Enabled) [1]
Press this:
To do this:
Editing
Enter (accept) data you entered and advance to the next prompt, or advance to
the next prompt without changing your entry.
HOLD
-1
+1
Scroll backwards (-1) or forwards (+1) through the list of available entries.
←
→
When editing an entry, moves the cursor left or right.
When editing an entry, delete the character to the left of the cursor.
CONF
When editing an entry, CLEAR erases the entire entry from the display.
CLEAR
Line Keys (LK)
Where indicated, press a line key to enter a specific value for the selected option.
Navigation
FLASH
FLASH
+ Mailbox number + FLASH selects a new mailbox number
Backs up to the previous level (e.g., from Option to Series, or from Series to
Program).
?
?
back
select
InMail System Guide
Scroll consecutively backwards or forwards through selected Option or Series.
Selects currently displayed Option or Series
3 - 467
Issue 5.00
47-21: Station Mailbox Find-Me Follow-Me
Options
• Find Me Follow Me requires software version 04.00 or higher and a compact flash of InMail 2.10 or
higher
Description
Use this option to set up the Find-Me Follow-Me options for a station
mailbox. To use Find -Me Follow-Me, program 47-02-24 must be set to 1
(All Find-Me Follow-Me enabled).
Options
There are three seperately programmed Find-Me Follow Me entries for each
Subscriber Mailbox
47-21-01: Find Me follow Me
Use this option to enable or disable the specific Find Me Follow Me entry.
Options
Enable or disable.
Default
Disable.
47-21-02: Find Me Follow Me Begin Hour
Use this option to specify the hour setting for Find Me Follow Me to begin.
Options
Digits using 0-23 Hour, (24 hour mode).
Default
0 (Midnight)
47-21-03: Find Me Follow Me End Hour
Use this option to specify the hour setting for the Find Me Follow Me to end.
Options
Digits using 0-23 Hour, (24 hour mode).
Default
0 (Midnight)
3 - 468
Programming
Issue 5.00
47-21-03: Find Me Follow Me Number
Use this option to specify the telephone number (16 digits maximum) to dial
for Find Me Follow Me. Enter the number exactly as you want the system to
dial it, but do not include a line access code. If the number is an extension
number (decided by numbering plan), it will automatically be dialled as an
intercom call.
Options
16 digits maximum.
Default
No entry.
47-21 Program Entry
47-21: Find Me Follow Me Setup
(Entry Range) [Default Setting]
CALL1 + #*#* + Password (12345678) + HOLD + 4721 + Entry + Option.
This selects the first option.
01
Find Me Follow Me (0=Disabled, 1=Enabled.)[0=Disabled]
LK1=Disabled, LK2=Enabled
02
FindMe Follow Me Begin Hour (Digits using 0-23, 24 hour mode)[0]
03
FindMe Follow Me End Hour (Digits using 0-23, 24 hour mode)[0]
04
Find Me Follow Me Number (16 digits max.)[No entry]
Press this:
To do this:
Editing
Enter (accept) data you entered and advance to the next prompt, or advance to
the next prompt without changing your entry.
HOLD
-1
←
+1
Scroll backwards (-1) or forwards (+1) through the list of available entries.
→
When editing an entry, moves the cursor left or right.
When editing an entry, delete the character to the left of the cursor.
CONF
When editing an entry, CLEAR erases the entire entry from the display.
CLEAR
Line Keys (LK)
Where indicated, press a line key to enter a specific value for the selected option.
Navigation
FLASH
FLASH
+ Mailbox number + FLASH selects a new mailbox number
Backs up to the previous level (e.g., from Option to Series, or from Series to
Program).
?
?
back
select
InMail System Guide
Scroll consecutively backwards or forwards through selected Option or Series.
Selects currently displayed Option or Series
3 - 469
Issue 5.00
47-22: Group Mailbox Message Notification
Options
• Cascading Message Notification requires software version 04.00 or higher and a compact flash of
InMail 2.10 or higher
Description
Use this option to set up the Message Notification options for a group
mailbox set as subscriber. To use Message Notification, program 47-06-21
must be set to 1 (All message notification enabled).
Options
There are five seperately programmed Message Notification entries for each
Subscriber Mailbox
47-22-01: Notification
Use this option to enable or disable the specific message notification entry.
Options
Enable or disable.
Default
Disable.
47-22-02: Notification Begin Hour
Use this option to specify the hour setting for the notification to begin.
Options
Digits using 0-23 Hour, (24 hour mode).
Default
0 (Midnight)
47-22-03: Notification End Hour
Use this option to specify the hour setting for the notification to end.
Options
Digits using 0-23 Hour, (24 hour mode).
Default
0 (Midnight)
3 - 470
Programming
Issue 5.00
47-22-04: Notification Type
Use this option specify the message notification type.
Options
0 (Undefined)
1 (Voice)
2 (Pager).
Default
1 (Voice).
47-22-05: Notification Number
Use this option to specify the telephone number (16 digits maximum) to dial
to notify the subscriber of new messages. Enter the number exactly as you
want the system to dial it, but do not include a line access code. If the
number is an extension number (decided by numbering plan), it will
automatically be dialled as an intercom call.
Options
16 digits maximum.
Default
No entry.
47-22-06: Notification Busy Attempts
Use this option to specify how many times InMail will retry an incomplete
Message Notification callout to an busy destination. If the Busy and RNA
attempts are met, the notification callout to the selected entry will be
cancelled.
Options
0 (No retry attempts)
0~99 (Number of retry attempts)
Default
5.
47-22-07: Notification Ring No Answer Attempts
Use this option to specify how many times InMail will retry an incomplete
Message Notification callout to a destination that does not answer. If the
Busy and RNA attempts are met, the notification callout to the selected
entry will be cancelled.
Options
0 (No retry attempts)
0~99 (Number of retry attempts)
Default
5.
47-22-08: Notification Security
Use this option to specify security code protection for the callout. If enabled,
the user is required to enter their security code in order to log on and hear
the new message
InMail System Guide
3 - 471
Issue 5.00
Options
0 (Disabled)
1 (Enabled)
Default
1 Enabled.
47-22 Program Entry
47-22: Cascading Message Notification Setup
(Entry Range) [Default Setting]
CALL1 + #*#* + Password (12345678) + HOLD + 4722 + Entry + Option.
This selects the first option.
01
Notification (0=Disabled, 1=Enabled.)[0=Disabled]
LK1=Disabled, LK2=Enabled
02
Notification Begin Hour (Digits using 0-23, 24 hour mode)[0]
03
Notification End Hour (Digits using 0-23, 24 hour mode)[0]
04
Notification Type (0=Undefined, 1=Voice, 2=Pager.)[0]
LK1=Undefined, LK2=Voice, LK3=Pager
05
Notification Number (16 digits max.)[No entry]
06
Notification Busy Attempts (0~99) [5]
07
Notification Ring No Answer Attempts (0~99) [5]
08
Notification Security (0=Disabled, 1=Enabled) [1]
Press this:
To do this:
Editing
Enter (accept) data you entered and advance to the next prompt, or advance to
the next prompt without changing your entry.
HOLD
-1
+1
Scroll backwards (-1) or forwards (+1) through the list of available entries.
←
→
When editing an entry, moves the cursor left or right.
When editing an entry, delete the character to the left of the cursor.
CONF
When editing an entry, CLEAR erases the entire entry from the display.
CLEAR
Line Keys (LK)
Where indicated, press a line key to enter a specific value for the selected option.
Navigation
FLASH
FLASH
?
?
select
3 - 472
+ Mailbox number + FLASH selects a new mailbox number
Backs up to the previous level (e.g., from Option to Series, or from Series to
Program).
back
Scroll consecutively backwards or forwards through selected Option or Series.
Selects currently displayed Option or Series
Programming
Issue 5.00
47-23: Group Mailbox Find-Me Follow-Me
Options
• Find Me Follow Me requires software version 04.00 or higher and a compact flash of InMail 2.10 or
higher
Description
Use this option to set up the Find-Me Follow-Me options for a group mailbox
set as subscriber. To use Find -Me Follow-Me, program 47-06-22 must be
set to 1 (All Find-Me Follow-Me enabled).
Options
There are three seperately programmed Find-Me Follow Me entries for each
Subscriber Mailbox
47-23-01: Find Me follow Me
Use this option to enable or disable the specific Find Me Follow Me entry.
Options
Enable or disable.
Default
Disable.
47-23-02: Find Me Follow Me Begin Hour
Use this option to specify the hour setting for Find Me Follow Me to begin.
Options
Digits using 0-23 Hour, (24 hour mode).
Default
0 (Midnight)
47-23-03: Find Me Follow Me End Hour
Use this option to specify the hour setting for the Find Me Follow Me to end.
Options
Digits using 0-23 Hour, (24 hour mode).
Default
0 (Midnight)
InMail System Guide
3 - 473
Issue 5.00
47-23-03: Find Me Follow Me Number
Use this option to specify the telephone number (16 digits maximum) to dial
for Find Me Follow Me. Enter the number exactly as you want the system to
dial it, but do not include a line access code. If the number is an extension
number (decided by numbering plan), it will automatically be dialled as an
intercom call.
Options
16 digits maximum.
Default
No entry.
47-23 Program Entry
47-23: Find Me Follow Me Setup
(Entry Range) [Default Setting]
CALL1 + #*#* + Password (12345678) + HOLD + 4723 + Entry + Option.
This selects the first option.
01
Find Me Follow Me (0=Disabled, 1=Enabled.)[0=Disabled]
LK1=Disabled, LK2=Enabled
02
FindMe Follow Me Begin Hour (Digits using 0-23, 24 hour mode)[0]
03
FindMe Follow Me End Hour (Digits using 0-23, 24 hour mode)[0]
04
Find Me Follow Me Number (16 digits max.)[No entry]
Press this:
To do this:
Editing
Enter (accept) data you entered and advance to the next prompt, or advance to
the next prompt without changing your entry.
HOLD
-1
←
+1
Scroll backwards (-1) or forwards (+1) through the list of available entries.
→
When editing an entry, moves the cursor left or right.
When editing an entry, delete the character to the left of the cursor.
CONF
When editing an entry, CLEAR erases the entire entry from the display.
CLEAR
Line Keys (LK)
Where indicated, press a line key to enter a specific value for the selected option.
Navigation
FLASH
FLASH
Backs up to the previous level (e.g., from Option to Series, or from Series to
Program).
?
?
back
select
3 - 474
+ Mailbox number + FLASH selects a new mailbox number
Scroll consecutively backwards or forwards through selected Option or Series.
Selects currently displayed Option or Series
Programming
VM8000 InMail Utility
SECTION 1
VM8000 INMAIL UTILITY
This chapter introduces the VM8000 InMail Utility which allows the user to
do the following:
Determine the version of system voice prompts currently installed on
the VM8000 InMail CompactFlash card. Refer to Selecting the
CompactFlash Card on page 4-483.
Back up the system voice prompts and recorded names, messages
and greetings stored on the VM8000 InMail CompactFlash card to
your PC hard disk. Refer to Backing Up the VM8000 InMail
CompactFlash Card on page 4-484.
Chapter
4
Restore the system voice prompts and recorded names, messages,
and greetings stored on the your PC hard disk to the VM8000 InMail
CompactFlash card. Refer to Restoring a Backed-up Database to
the VM8000 InMail CompactFlash Card on page 4-486.
Update the system voice prompts stored on the VM8000 InMail
CompactFlash Card (required for feature upgrades). Refer to
Initializing the VM8000 InMail CompactFlash Card on page 4-489.
Optionally, initialize (completely erase) the VM8000 InMail
CompactFlash card and load the latest system voice prompts. Refer
to Initializing the VM8000 InMail CompactFlash Card on page 4-489.
Optionally add or remove any of the supported language prompt
sets. Refer to Managing Language Prompt Sets on SV8100
VM8000 InMail on page 4-487.
WARNING
The SV8100 system must be powered off and the
InMail drive must be removed from the CD-CP00
when using this utility. The telephone system and
InMail are inoperable during this time.
InMail System Guide
4 - 475
Issue 5.00
SECTION 2
VM8000
REQUIREMENTS
When installing the VM8000 InMail utility, the following minimum requirements apply:
Pentium® 330 MHz with 128 MB RAM, 256 Color 800 x 600 display, USB port.
Windows 2000, Windows XP (32-bit), or Windows Vista (32-bit).
CompactFlash Card Reader (SimpleTech STI-UCF-100 or equivalent), or, if your
PC has a PCMCIA slot, PC Card Adapter for Type I CompactFlash Cards
(SimpleTech STI-CFAD or equivalent).
SECTION 3
INSTALLING AND STARTING THE VM8000 INMAIL UTILITY
Attention:
The VM8000 InMail Utility requires that a driver for the Reliance file system be
installed after the utility has been installed. Currently, only Windows XP and
Windows 2000 drivers are available.
Installation
1.
If the PC has an older version of the VM8000 InMail Utility, un-install it first. If the PC
does not have an older version of the VM8000 InMail Utility, proceed to step 2.
2.
Double-click
the installer
(e.g.,
InMailUtilitySet
up_v1.00.exe).
After the
installer starts,
Figure 4-1
InMail Utility
Install Wizard
Welcome
Screen is
displayed.
3.
Click Next, on
the Install
Wizard
Welcome
Screen.
Figure 4-1 InMail Utility Install Wizard Welcome Screen
4 - 476
VM8000 InMail Utility
VM8000
Issue 5.00
4.
On the Install
Wizard
Completion
Screen
(Figure 4-2),
click Finish.
This
completes
the
installation.
Figure 4-2 InMail Utility Install Wizard Install Completion Screen
SECTION 4
INSTALLING RELIANT FILE SYSTEM DRIVER
Attention:
The VM8000 InMail Utility requires that a driver for the Reliance file system be
installed after the utility has been installed. Currently, only Windows XP and
Windows 2000 drivers are available.
1.
Download the Reliance driver for the appropriate Windows Operating System:
a. Windows 2000 = “reliance.windows.2k.driver.3.1.2.1352AM.msi”.
b. Windows XP = “reliance.windows.xp.driver.3.1.2.1352AM.msi”
2.
To Install the Reliance driver, go to the location where the driver installation file was
saved.
3.
Double click on the install “MSI” file.
InMail System Guide
4 - 477
Issue 5.00
VM8000
4.
When
prompted,
choose Next
to continue.
Figure 4-3 Install Wizard for Datalight Reliance Windows Driver
5.
Accept the
license
agreement
and choose
Next to
continue
installation.
Figure 4-4 EULA Agreement Screen
4 - 478
VM8000 InMail Utility
VM8000
Issue 5.00
6.
Click Next to
use the default
installation
directory
(Recommended).
Figure 4-5 Destination Folder Screen
7.
Click Install.
Figure 4-6 Begin Installation Screen
InMail System Guide
4 - 479
Issue 5.00
VM8000
8.
Click Finish
to complete
the
installation.
Figure 4-7 Finish Installation Screen
9.
To finish the
install, the PC
must be
rebooted.
This can be
done now or
later, but it
must be done
before using
the InMail
Utility.
Figure 4-8 Reboot PC Screen
4 - 480
VM8000 InMail Utility
VM8000
Issue 5.00
Starting the VM8000 InMail Utility
1.
Turn off the
telephone system
and access the
VM8000 InMail
blade. (Refer to the
VM8000 InMail
Quick Setup Guide
that came with
In-Mail for
additional
instructions, if
required.)
2.
Following proper
anti-static
precautions,
remove the
VM8000 InMail
CompactFlash
Figure 4-9 Removing the CompactFlash Card from the Blade
Card from the
In-Mail blade.
(Refer to Figure 4-9
Removing the
CompactFlash Card from the Blade.)
3.
Insert the VM8000 InMail CompactFlash Card in the PC CompactFlash Card reader.
InMail System Guide
4 - 481
Issue 5.00
VM8000
4.
Double-click the VM8000 InMail Utility shortcut on the PC desktop. The VM8000 InMail
Utility Main Screen is displayed. (Refer to Figure 4-10 InMail Utility Main Screen.)
To check the utility version
number, click Help, then
select About SV8100 InMail
Utility...
Prompt Version the
version of the system
prompts on the InMail
Compact Flash card.
Select the
CompactFlash Reader
and display important
InMail CompactFlash
card information.
Backup to the PC and
Restore the voice
prompts and recorded
names, messages and
greetings stored on the
InMail CompactFlash
Card.
Optionally Initialize
(completely erase) the
InMail CompactFlash
card and load the latest
voice prompts.
Update the voice
prompts stored on the
InMail CompactFlash
Card (required for
feature upgrades).
Figure 4-10 InMail Utility Main Screen
4 - 482
VM8000 InMail Utility
VM8000
Issue 5.00
Selecting the CompactFlash Card
After inserting the VM8000 InMail CompactFlash card into the reader, it must be
selected.
1.
From the InMail
Utility Main
Screen (Figure
4-10), click on
the drop-down
box.
Figure 4-11
Utility Select
InMail Card
Screen is
displayed.
.
2.
If the InMail
CompactFlash
Card is
changed in the
middle of an
InMail Utility
session, click
Refresh, then
Select to read
the new card.
The Language
Prompt portion of
the Main Screen
updates with the
prompt version
information.
Refer to Figure
4-10 InMail Utility
Main Screen
Device Select the InMail
card from the drop-down
box.
Figure 4-11 Utility Select InMail Card Screen
Refresh Drivelist: This resets drive list if
InMail CF was connected to support PC after
Utility was started.
Device: The card reader
drive ID or volume label
(if any).
Figure 4-12 Updated InMail Portion of InMail Utility Main Screen
InMail System Guide
4 - 483
Issue 5.00
VM8000
Backing Up the VM8000 InMail CompactFlash Card
The voice prompts, and the recorded names, messages and greetings stored on the
VM8000 InMail CompactFlash Card can be backed up to the hard drive on the PC.
1.
To back up the VM8000 InMail CompactFlash Card, click Backup on the InMail Utility
Main Screen (refer to Figure 4-10 InMail Utility Main Screen on page 4-482).
You can choose to backup any or all of the following:
- Extension Mailboxes
- Group Mailboxes
- Routing Mailboxes
- System Mailboxes
- VRS Mailboxes
- Outgoing Messages (Greetings, Instructions...)
- Incoming Messages (Subscriber...)
The Save As
(Backup) Screen
is displayed.
(Refer to Figure
4-13.)
2.
4 - 484
.
The default
backup directory
is
C:\NEC\In-Mail\
Backup.
.
A directory for the
backup hard drive
of the PC. If
maintaining
several customer
sites, consider
making a
separate folder
for each site.
.
Caller ID data,
stored as part of
an incoming voice message, are not retained during the backup. This information is lost.
.
After the backup, messages stored in Subscriber Mailboxes may be restored as new messages.
Figure 4-13 InMail Utility Save As (Backup) Screen
Select the location (Save in:) on the hard drive of the PC where the backup files are
stored and click Save. The backup may take several minutes.
VM8000 InMail Utility
VM8000
Issue 5.00
3.
When the backup
completes, either
click on Finish to
exit or click on
Report to see how
many messages
were backed up
for each mailbox.
Figure 4-14 Backup Progress Status Screen
Figure 4-15 Restore Data Report Screen
InMail System Guide
4 - 485
Issue 5.00
VM8000
Restoring a Backed-up Database to the VM8000 InMail CompactFlash Card
System voice prompts, and the recorded names, messages and greetings backed-up
on hard drive of the PC can be restored to the VM8000 InMail CompactFlash Card.
4 - 486
1.
To restore backed-up data to the VM8000 InMail CompactFlash Card, click Restore on
the InMail Utility Main Screen (Figure 4-10 InMail Utility Main Screen on page 4-482).
Dependant on what items are in the backup you can choose to restore any or all of the
following:
- Extension Mailboxes
- Group Mailboxes
- Routing Mailboxes
- System Mailboxes
- VRS Mailboxes
- Outgoing Messages (Greetings, Instructions...)
- Incoming Messages (Subscriber...)
2.
On the InMail
Utility Database
Restore Screen,
choose the
database to be
restored to the
card (Look In:
File name:) and
click Open.
(Refer to Figure
4-16.)
.
Restoring a
database to an
In-Mail
CompactFlash
card erases all
the data
currently
stored on the
card.
.
The restore
takes several
minutes.
Figure 4-16 InMail Utility Database Restore
VM8000 InMail Utility
VM8000
Issue 5.00
3.
Choose the
message to be
restored, then click
Restore.
4.
Once the InMail
Utility Restore has
completed click
Finish to close the
progress window.
Figure 4-17 Restore Message Screen
Managing Language Prompt Sets on SV8100 VM8000 InMail
Depending on SV8100 licensing the VM8000 InMail can support up to 20 languages
at the same time. At default, all InMail drives come with UK English, Dutch, Italian,
German, Madrid Spanish, Norwegian, Parisian French, Inerian Portuguese, Greek,
Danish, Swedish, Flemish and Turkish loaded on them. The SV8100 also supports
eight concurrent languages on the InMail, at default.
The SV8100 VM8000 InMail Utility includes all supported language prompt sets. If
desired default language prompt sets can be deleted to increase available recording
time or changed to a different language prompt set. This is done using the Manage
Languages selection from the Main Screen (refer to Figure 4-10 InMail Utility Main
Screen on page 4-482).
InMail System Guide
4 - 487
Issue 5.00
VM8000
Removing a Language Prompt
1.
From the Main
Screen click on
Manage
Languages.
2.
Click on the
language
prompt set to be
removed.
3.
At bottom of the
screen, click on
Remove. You
will get a
progress
window.
4.
Once the
prompt set has
been removed,
click Finish to
close the
progress
window.
Prompt Version the
version of the system
prompts on the InMail
Compact Flash card.
Figure 4-18 Manage Languages Screen
Adding a language prompt
4 - 488
1.
From the Main Screen click on Manage Languages.
2.
Click on the language prompt set to be added.
3.
At bottom of screen click on Install. You will get a progress window.
4.
Once the prompt set has been added, click Finish to close progress window.
VM8000 InMail Utility
VM8000
Issue 5.00
Initializing the VM8000 InMail CompactFlash Card
The VM8000 InMail Utility provides the option of initializing (reformatting) the InMail
Compact Flash drive. Initializing completely erases the card and loads the default
prompt set for the chosen market. For Europe the prompt set is UK English, Dutch,
Italian, German, Madrid Spanish, Norwegian, Parisian French, Iberian Portuguese,
Greek, Danish Swedish, Flemish and Turkish. All recorded names, messages and
greetings are permanently erased during initialization.
.
Initialization of the InMail CF takes approximately 15 minutes using a USB 1.0 port.
1.
To initialize
(reformat) the
InMail
CompactFlash
Card, click
Initialize on the
On the InMail
Utility Main
Screen (Figure
4-10 on page
482).
Figure 4-19
InMail Utility
Initialize
Confirmation
Screen is
displayed.
2.
Figure 4-19 InMail Utility Initialize Confirmation Screen
On the InMail Utility Initialize Screen, choose the market the InMail CF should be
initialized for. Then, click Initialize and the progress screen will appear. As each
language prompt set is installed, it will have a progress window.
Tips:
– Click Cancel on the Initialization progress window to stop the initialization.
– Click Cancel on any language install progress window to stop installation of that
language prompt set. The Utility will automatically move to the next prompt set.
InMail System Guide
4 - 489
Issue 5.00
VM8000
3.
Once the
InMail CF has
been
initialized,
click on
Finish to exit
the progress
window.
Figure 4-20 InMail Utility Initialization Progress Screen
4 - 490
VM8000 InMail Utility
Soft Key Glossary
Following is an alphabetical index of the InMail soft keys (available for all
multiline terminals with soft keys). Also see the Operation section of each
feature.
Soft Key
Feature
AM
Message Notification
Annc
Announcement Mailbox
System Administrator
Cancel
Cncl
Announcement Mailbox
Auto Att. Do Not Disturb
Call Routing Mailbox
Conversation Record
Greeting
Instruction Menu
Mailbox Name
Message Forward
Message Reply
Record and Send a Message
Definition
When programming a Message Notification time,
press to indicate that the entered time is AM.
Press to access the Announcement Mailbox
message options.
5
Press to erase the current message, name, or
greeting.
Chnge
Message Notification
Cont
Message Forward
Message Reply
Record and Send a Message
Press to begin recording.
Done
Announcement Mailbox
Auto Att. Do Not Disturb
Call Routing Mailbox
Conversation Record
Greeting
Instruction Menu
Mailbox Name
Message Forward
Message Reply
Record and Send a Message
Press to exit the recording mode while recording a
message, name, or greeting.
InMail System Guide
Chapter
Change the Message Notification setup.
5 - 491
Issue 5.00
5 - 492
Soft Key
Feature
Definition
Erase
Announcement Mailbox
Auto Att. Do Not Disturb
Call Routing Mailbox
Greeting
Instruction Menu
Listening to Messages
Mailbox Name
Message Delete
Security Code
FMFM
Subscriber Mailbox
Press to configure Find-Me Follow-Me settings
Greet
System Administrator
Press to erase a subscriber’s greeting from the
System Administrator Mailbox.
Exit
Answer Schedule Override
Announcement Mailbox
Auto Att. Do Not Disturb
Auto Time Stamp
Call Routing Mailbox
Erasing All Messages
Exiting a Mailbox
Greeting
Instruction Menu
Listening to Messages
Mailbox Name
Mailbox Sec. Code Delete
Main Menu
Message Forward
Message Notification
Message Reply
Record and Send a Message
Security Code
Greet
Auto Att. Do Not Disturb
Greeting
Main Menu
Press to access the Mailbox Greeting options.
Gr1
Gr2
Gr3
Auto Att. Do Not Disturb
Greeting
Press to select a Greeting
Instr
Call Routing Mailbox
Instruction Menu
System Administrator
Press to erase the currently accessed message,
name, greeting, or Security Code.
Press to go back to the previous menu level or exit
your mailbox.
Press to access the Instruction Menu options.
Soft Key Glossary
Issue 5.00
Soft Key
Feature
Lstn
Announcement Mailbox
Auto Att. Do Not Disturb
Call Routing Mailbox
Caller ID with Return Call
Greeting
Instruction Menu
Listening to Messages
Mailbox Name
Main Menu
Make Call
Message Delete
Message Forward
Message Reply
Time and Date Stamp
MBOX
Answer Schedule Override
Message Forward
Message Reply
Record and Send a Message
Msgs
Erasing All Messages
System Administrator
Press to erase all messages in the selected
Subscriber Mailbox.
Next
Message Notification
Press to skip to the next option without changing
your entry.
Next
Listening to Messages
While listening to a message, press to listen to the
next message.
Notif
Message Notification
Press to access the Message Notification Options
Menu.
Num
Message Notification
Press to program a telephone number as the
notification destination.
Off
Answer Schedule Override
Auto Time Stamp
Message Notification
OK
Message Notification
On
Answer Schedule Override
Auto Time Stamp
Message Notification
PM
Message Notification
When programming a Message Notification time,
press to indicate that the entered time is PM.
Pager
Message Notification
Press to program a pager number as the notification
destination.
InMail System Guide
Definition
Press to listen to message, name or greeting.
Select another mailbox.
Press to turn the selected feature off.
Accept the notification number entered and back up
to the previous level.
Press to turn the selected feature on.
5 - 493
Issue 5.00
5 - 494
Soft Key
Feature
Definition
Pause
Announcement Mailbox
Auto Att. Do Not Disturb
Call Routing Mailbox
Conversation Record
Greeting
Instruction Menu
Listening to Messages
Mailbox Name
Message Forward
Message Reply
Record and Send a Message
Press to pause while recording a message, name or
greeting.
Rec
Announcement Mailbox
Auto Att. Do Not Disturb
Call Routing Mailbox
Greeting
Instruction Menu
Mailbox Name
Main Menu
Record and Send a Message
Press to record a message, name or greeting.
Rpt
Listening to Messages
Resume
Announcement Mailbox
Auto Att. Do Not Disturb
Call Routing Mailbox
Conversation Record
Greeting
Instruction Menu
Mailbox Name
Message Forward
Message Reply
Record and Send a Message
Return
Exiting a Mailbox
Sec
Security Code
Subs
Erasing All Messages
Mailbox Name
Mailbox Sec. Code Delete
Security Code
System Administrator
Time
Auto Time Stamp
Go back to the beginning of the message.
Press to resume while recording a message, name
or greeting.
Press to return to your mailbox.
Press to access the Security Code options.
Press to select the Subscriber Mailbox maintenance
options.
Press to select the Auto Time Stamp feature.
Soft Key Glossary
This page is left blank intentionally
NEC Unified Solutions reserves the right to change the specifications, functions, or features at any time without notice.
NEC Unified Solutions has prepared this document for use by its employees and customers. The information contained
herein is the property of NEC Unified Solutions and shall not be reproduced without prior written approval of NEC
Unified Solutions.
UNIVERGE is a trademark of NEC Corporation. Pentium is a trademark or registered trademark of Intel Corporation or
its subsidiaries in the United States and other countries. All other brand names and product names referenced in this
document are trademarks or registered trademarks of their respective companies.
Copyright 2010
NEC Unified Solutions.
Anton Philipsweg 1
1223 KZ Hilversum
The Netherlands
www.nec-unified.com
NEC Unified Solutions
Issue 5.00