1
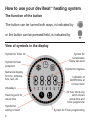
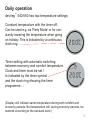
GB/DAS
User Instruction
devireg™ 540/550
Table of contents
Introduction
3
Introducing devireg 540/550
4
How to use your deviheat heating system
6
Daily operation
7
™
™
Setting the clock & day
10
Timer programming
11
Warranty
16
Do not cover the thermostat, e.g. by hanging towels etc.
directly in front of it !
2
Introduction
You have purchased a devireg™ 540/550 thermostat, which
forms an integrated part of a deviheat™ system.
DEVI™ has developed the devireg™ 540/550 to make your
floor heating an even more environmentally correct way of
heating your home.
devireg™ 540/550 will work dynamically with both the room
and floor temperature in order to give you the highest possible comfort in the most economical way.
devireg™ 550 ONLY:
Furthermore, devireg™ 550 will take a few days to optimise
the use of the heating system, but it does not stop there.
The devireg™ 550 will continue to learn from the room and
thus constantly improve its performance and consequently
your comfort and economy.
We wish you many years of comfort with your new
deviheat™ system.
3
Introducing devireg™ 540/550
devireg™ 540 is an advanced temperature controller, with a
built-in Timer.
devireg™ 550 ONLY:
devireg™ 550 is an adaptive temperature controller,
specially designed for floor heating systems.
The devireg™ 550 will measure the radiant comfort from the
floor combined with the comfort from the air temperature in
the room to offset the outside weather condition.
We as human beings perceive comfort as the combined
effect of the radiant heat from the floor and air temperature
in the room. By continually measuring this combined effect,
it is therefore possible to maintain the highest possible
comfort level.
A higher floor radiant temperature can produce a sense of
comfort with a lower air temperature which can result in
lower running costs without reducing comfort levels.
4
All this means that as soon as you have set your devireg™
550 at your desired comfort temperature, you do not have
to do anything else. devireg™ 550 will automatically adjust
the heating to meet your requirements for comfort and
economy, no matter how the weather is changing outside.
This also means that devireg™ 550 is capable of
detecting a sudden temperature drop in the room.
Instead of switching the heating on to immediately
compensate, the devireg™ 550 uses the information stored
then checks to see if this is caused by e.g. the effects of a
window opened for 10 minutes !
Even the programming of economy temperatures (i.e.
during the night) is very simple. You do not have to
calculate how much earlier the heating should start in order
to reach a specific temperature at a specific time. Just tell
the devireg™ 550 when you want the comfort temperature
and the devireg™ 550 will take care of the rest. By learning
the rate of heat loss from the room, the devireg™ 550 knows
when to start heating in order to achieve the selected
temperature at exactly the right time.
5
How to use your deviheat™ heating system
The function of the button
The button can be turned both ways, is indicated by
or the button can be pressed/held, is indicated by
View of symbols in the display
Symbol for Timer On
Symbol for frost
protection
Numerical display
for time, temperature, text, etc.
Symbol for
temperature
below set-point
Symbol for degrees
Indication of
AM/PM time at
12 hour clock
Weekdays
Flashing point for
actual time
Symbol for
setting of clock
6
24 hour clock-ring
which shows
actual time and
timer programme
Symbol for Timer programming
Daily operation
devireg™ 540/550 has two temperature settings:
Constant temperature with the timer off.
Can be used e.g. as ‘Party Mode’ or for constantly lowering the temperature when going
on holiday. This is indicated by a continuous
clock ring ...
Timer setting with automatic switching
between economy and comfort temperature.
Clock and timer must be set !
Is indicated by the timer symbol
and the clock ring showing the timer
programme ...
(Display will indicate same temperature during both comfort and
economy periods. But temperature will, during economy periods, be
lowered according to the set-back level.)
7
You want to raise the temperature ...
Turn clockwise to raise the temperature.
You want to lower the temperature ...
Turn counter-clockwise to lower the
temperature.
You want to switch on or off the timer
function ...
Economy set-back
between 0000 and 0700
Press the button to switch on the
timer. Press again to switch off the
timer.
The clock is between
1000 and 1030
8
The marking on the clock-ring indicates when comfort temperature is
chosen and when economy set-back
is switched on. A flashing point indicates the actual clock (every half
hour).
If the temperature is lowered to minimum (+5ºC), a frost symbol will
appear in the display, indicating that
the thermostat will maintain minimum
+5ºC in the room for frost protection.
If the temperature is turned below
+5ºC, the thermostat will switch off.
(Only possible with the timer off)
When the temperature is raised
again the thermostat will automatically
switch on.
If the devireg™ 540/550 only uses a
floor sensor, the display will not show
the actual temperature (5º to 35º), but
a scale from 0 to 10.
9
Setting the clock & day
You want to set/change the clock ...
(The clock is not set from the factory)
Hold the button for 3 sec.
The clock can now be set forward or
back by turning the button to the right
or left respectively.
Changing the week day is done by
continuing to change the time until it
passes 0:00, either way. The numbers
1-7 do not correspond to any specific
days, so you can choose which day of
the week is No. 1 etc.
When the clock is set correctly, press
the button to save the settings.
10
3 sec.
Timer programming
You want to set/change the
economy set-back programme ...
(The timer is not set from the factory)
Hold the button for 6 sec. The programme for economy set-back can
now be edited.
6 sec.
First, turn the button to choose the
weekday which you want to
programme ...
Press the button to start the
programming ...
11
The button is alternately turned and
pressed to choose periods with economy set-back and periods with comfort temperature respectively.
The programming switches between
low (economy set-back) and high
(comfort) temperature every time you
press the button.
And between every time you press,
you can turn the button and choose
the period of time.
12
Example
When you enter the programming
menu choose a day and press the
button ...
Turn until you reach the first time
when you want comfort temperature,
e.g. 06:00. Press ...
Turn until the temperature must be
lowered again, e.g. 07:30. Press ...
13
And turn to the next comfort period,
e.g. 15:30, and press ...
Then, turn until you reach the time
when the next lowering of the
temperature must start, e.g. 22:30,
and press ...
14
If you continue to turn, the
programme will automatically continue
with the next day.
This way, the programming can
continue for the entire week.
End
When you have ended the programming, the changes must be saved.
3 sec.
This is done by holding the button for
3 sec. The display will automatically
return to normal display.
Remember (devireg™ 550 ONLY):
With devireg™ 550 you only have to programme the
time when you want comfort temperature and the time
you want economy temperature. The thermostat will do
the rest. You do not have to calculate when the heating
should start; devireg™ 550 will do this for you.
15
The DEVI™ Warranty:
You have purchased a deviheat™ 550
thermostat, which forms an integrated part
of a deviheat™ system, which we are
certain will improve your home comfort and
economy.
deviheat™ provides complete heating
solutions with deviflex™ heating cables or
devimat™ heating mats, devireg™
thermostats and devifast™ fitting bands.
If, however, contrary to all expectations,
a problem should occur with your heating
system, we at DEVI™, with manufacturing
units in Denmark, are, as European Union
suppliers, subject to general product
liability rules, as stated in Directive 85/374/
CEE, and all relevant national laws which
implies that:
DEVI™ provides a warranty for deviflex™
heating cables and devimat™ heating
mats for a 10 year period and all other
DEVI™ products for a 2 year period against
defects in material and production.
The guarantee is granted on the condition
that the WARRANTY CERTIFICATE on
the overleaf is filled out properly in
accordance to instructions and that the
defect is inspected by, or presented to,
DEVI™ or authorised DEVI™ distributor.
Please note that the wording of the
WARRANTY CERTIFICATE must be
provided in English or local language with
the ISO code for your country in the upper
left corner of the front page of the
installation instructions in order to release
the warranty.
The obligation of DEVI™ will be to repair
or supply a new unit, free of charge to
the customer, without secondary charges
linked to repairing the unit.
In case of defective devireg™ thermostats,
DEVI™ reserves the right to repair the unit
free of charge and without unreasonable
delay to the customer.
The DEVI™ warranty does not cover
installations made by unauthorised
electricians, or faults caused by incorrect
designs supplied by others, misuse,
damage caused by others, or incorrect
installation or any subsequent damage
that may occur. If DEVI™ is required to
inspect or repair any defects caused by
any of the above, then all work will be fully
chargeable.
The DEVI™ warranty is void, if payment of
the equipment is in default.
At all times, we at DEVI™ will respond
honestly, efficiently and promptly to all
queries and reasonable requests from our
customers.
The above mentioned warranty concerns
product liability whereas matters in
relation to legislation on sale of goods
shall be referred to national law.
Warranty Certificate
The DEVI™ Warranty is granted to:
Name:
Address:
Postal code:
Phone:
Please Observe!
In order to obtain the DEVI™ Warranty, the following must be
carefully filled in. See other conditions on the overleaf.
Electrical Installation by:
Installation date:
Type of thermostat:
Production code:
Suppliers Stamp:
DEVI
DK · 7100 Vejle
Phone
+45 76 42 47 00
Fax
+45 76 42 47 03
Connection diagram:
Network
connection
devireg™ 550 ONLY
29
Technical specifications:
Temperature range:
+5º to +35°C or OFF
Floor temperature limit:
+20º to +50ºC
Voltage:
180 - 250 V ~ 50/60 Hz
Resistive load:
250 V ~ 16 A
Inductive load:
1 A (power factor 0.3)
Power consumption:
< 500 mW
Battery back-up:
100 hours
Economy set-back:
0º to -30ºC
Offset:
-5.5º to +5.5ºC
IP class:
IP 30
Type of sensor:
NTC
Sensor value:
28
15 kOhm / 25ºC
Fault:
What to do:
2
Configured as Master,
but can detect another
Master unit
Only one unit may be configured as a Master
6
Sensor fault
Change the floor sensor
floor sensor open circuit
5
Sensor fault
floor sensor shortcircuit
No:
Change the floor sensor
27
Error messages:
devireg™ 540/550 has a built-in system that constantly
checks the heating system, the thermostat itself and a possible network for any malfunctions.
If an error occurs, the display will flash together with a
reading of the detected fault, which will be shown indicated
by the weekday numbers 1 to 7:
Fault:
What to do:
7
Clock is not adjusted
Set the clock
4
The thermostat is
Let the thermostat cool for
switched off because of a period.
overheating
Then enter basic setup to
leave fault mode
3
Configured as a Slave,
but cannot find any
Master unit
No:
26
One unit must be configured as Master
If more master units are configured on the network, an error
message will flash in the display, and the unit will need to
be reconfigured.
If a devireg™ 550 is configured as a slave unit, the following
set-up parameters are controlled from the master unit:
•
•
•
•
•
Time
Day of week
Cº or Fº
12 hour AM/PM or 24 hour clock
Set back program
Network accessories:
Network cable
15881150
Single core 0,75 mm2
(100 m)
25
Network connections (devireg™ 550 ONLY):
The devireg™ 550 features a network capability.
All devireg™ 550’s installed in a building can be linked
together via the network facility, giving the possibility of
central adjustment of programming and parameters e.g.
clock setting.
The network can include up to 32 units, i.e. 1 master and
up to 31 slave units.
It is only possible to have one master unit.
A devireg™ 550 can be set as a stand alone unit, even
though it is connected to the network. It will not respond to
or send information to a master unit, but it will count as one
of the maximum 32 units in the network.
The network is a seperate two wire net, where the cables
are unshielded, untwisted and unpolarised for easy installation.
The maximum length of the network cables are up to 500
metres.
24
Factory setting:
The thermostat is preset with the following parameters:
Operation
Factory setting
Choices
Network type
Alone
(devireg™ 550 ONLY)
Alone, Master or
Slave
Temp. display
Sensor
Cº
Room + floor
Cº or Fº
Room, floor or
room + floor
Max. floor
temperature
Offset
Economy set-back
Weekday
Clock
+45ºC
0.0ºC
-5ºC
1
24
Time
Timer settings
--:--
+20ºC to +50ºC
-5.5ºC to +5.5ºC
-1º to -30ºC
1, 2, 3, 4, 5, 6, 7
12 hours AM/PM
or 24 hours
--:-Up to 336/week
23
Finally, the type of clock must be set.
Choose whether the clock must be 24
hours or 12 hours AM/PM.
Turn to choose 12 or 24 hours, and
press ...
To finish the basic setting, press the
button, and the display will return to
the daily operation menu.
22
In connection with the built-in Timer,
the thermostat can be programmed
to lower the temperature (LO), e.g.
during the night.
The range is 0ºC to -15ºC.
Turn to choose economy set-back
level, and press ...
(Choose -5ºC if the temperature must
be lowered 5 degrees).
If normal room heating is installed we
recommend not to lower the temperature at night with more than approx.
-5ºC.
21
Offset (OFFS) can be used to adjust a
variation between the thermostat and
a thermometer in the room, if any.
If the thermometer shows e.g. 1ºC
more than the thermostat, it is possible to adjust the offset with +1ºC.
The range is -5.5ºC to +5.5ºC.
Turn to choose offset, and press ...
20
Due to different floor constructions it
is possible to choose a maximum floor
temperature (Mt) in the floor which
cannot be exceeded.
The temperature range is 20ºC to
50ºC.
Turn to choose maximum floor temperature, and press ...
Please note !
Maximum floor temperature is preset
from the factory to 45ºC for cable temperature safety.
Local building regulations must be observed, when changing the maximum preset temperature.
For wooden floor constructions DEVI™ recommend to limit
the temperature to maximum 27ºC.
Max. temperature setting for
different floor
constructions !
Tiles on chipboard
Carpet/vinyl on chipboard
Wooden floors (parquet, plank, etc.)
Other (concrete, screed, etc.)
27ºC
35ºC
27ºC
45ºC
19
devireg™ 540/550 is able to use two
sensors, one built-in sensor plus an
external sensor which can be placed
e.g. in the floor.
Choose the sensor(s) which will be
used for this heating system.
Turn to choose Room Sensor (r S),
Floor Sensor (FS) or both Room and
Floor Sensor (rFS), and press ...
(If the thermostat only uses a floor
sensor, the display will not show the
actual temperature (5º to 35º), but a
scale from 0 to 10).
Always use a floor sensor when the
heating element is installed on or
beneath wooden surfaces !
18
Choose whether the thermostat must
show Celcius or Fahrenheit degrees.
Turn to choose Cº or Fº, and press ...
17
devireg™ 550 ONLY:
The first function to choose in the
basic setting is whether devireg™ 550
must operate Alone or as Master or
Slave thermostat.
If several thermostats are linked in
one network, only one of the thermostats can be choosen as Master !
For further information about network
and Master/Slave, see section on
page 24.
Turn to choose Alone (ALO), Master
(MAS) or Slave (SLA), and press ...
Please note !
If Slave is chosen, not all settings in
the Basic Setting will appear.
The settings left out can be set from
the Master unit.
16
Change of basic setting
If it is necessary to change the basic
setting, the button must be held for
12 sec.
12 sec.
It is then possible to access the basic
setting menu by choosing the code !
Turn to choose code ...
Choose the code: 0044
When the code is chosen, press the
button ...
15
devireg™ 540/550 is able to use two
sensors, one built-in sensor plus an
external sensor which can be placed
in the floor.
Choose the sensor(s) which will be
used for this heating system.
Turn to choose Room Sensor (r S),
Floor Sensor (FS) or both Room and
Floor Sensor (rFS), and press ...
(If the thermostat only uses a floor
sensor, the display will not show the
actual temperature (5º to 35º), but a
scale from 0 to 10).
Always use a floor sensor when the
heating element is installed on or
beneath wooden surfaces !
14
Activating devireg™ 540/550
When the thermostat is connected to
the mains voltage for the first time,
a code must be chosen and the
sensor(s) selected.
Turn to choose code ...
Choose the code: 0044
When the code is chosen, press the
button ...
Now the sensors to be used, should
be selected ...
13
DO NOT over tighten !
12
Reassemble the thermostat by first placing the
frame, then mount the display module and
finally press the front cover into place.
Note:
The display must be gently remounted on the
base module, ensuring that the 8-pin plug is
placed accurately by using the four tabs surrounding it.
When remounting the two screws in the side,
please DO NOT over tighten them.
They just need to be barely fastened.
11
In order to get the best possible result when
using the devireg™ 540/550, the thermostat
should be installed in the wall, following a few
basic rules:
- Installation height, typically between
80-150 cm.
- On a wall NOT facing the outside
- On a wall where it will NOT be subjected to
direct sunlight
- Away from windows/doors that will open
occasionally
- It must not be covered by curtains, towels etc.
The devireg™ 540/550 should not be installed
in small rooms with insufficient ventilation, such
as bathrooms. In these instances, place the
thermostat just outside the room (only use the
floor sensor - FS). The thermostat must not be
placed close to areas with a high risk of water
stains, e.g. close to running water, toilets etc.
10
Warning (devireg™ 550 ONLY):
Please note, when working on thermostats
connected to a network, ensure that the
mains supply for all thermostats in the
network is disconnected before the work is
started.
Screw holes
You can now
mount the thermostat in the wall,
by using any of
the eight screw
holes in the base
module.
9
When installing the devireg™ 540/550 you need to choose
the type of heating and thus which sensors should be used.
DEVI™ recommend always to install the floor sensor !
Comfort Heating:
- Constant temperature on the floor in e.g. bathrooms and
other rooms that are often used with bare feet.
- Install the Floor sensor and choose only the Floor sensor
in Basic Settings.
Total Room Heating:
- Control of room temperature in living rooms etc.
- Install the Floor sensor and choose both Floor sensor and
Room sensor in Basic Settings.
No Floor Sensor:
- A floor sensor is not present, and cannot be installed.
- Choose Room sensor only in Basic Settings.
- Be aware that temperature control is less accurate without
the floor sensor. DEVI™ recommend that a floor sensor is
installed.
Do NOT use devireg™ 540/550 without floor sensor
when the heating element is installed on or beneath
wooden surfaces !
8
Connection of the thermostat must be carried
out as shown below.
Heating element
Max. load 16 Amp.
Mains supply
NTC sensor
180-250 V
50/60 Hz
Network
connection
devireg™ 550 ONLY
As the devireg™ 540/550 is not equipped with an earth
terminal, the earthing screen of the heating cable must be
connected to the earth from the supply via the earthing
terminal in the surface mounted box or the recessed metal
box which ever is used.
7
Remove the frame from the thermostat.
Frame
6
Remove the two screws, one in each side, and
gently pull off the display module.
Screws
5
Installation of devireg™ 540/550:
When installing devireg™ 540/550 you must first
dismantle the thermostat.
Remove the front cover by gently pressing the
release tab in the top (center hole), and lift out
the cover.
Release tab
4
Table of contents
Installation of devireg™ 540/550
4
Activating devireg 540/550
13
Change of basic setting
15
Factory settings
23
Network
24
Error messages
26
Technical specifications
28
Connection diagram
29
™
Please Note:
The devireg™ 540/550 must be connected and the basic
setting must be done by an authorised electrician.
In-appropriate installation and basic setting may cause
damage to the heating system or floor construction.
3
GB
GB/DAS
Installation Instruction
devireg™ 540/550
08095121 · 03.03