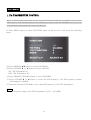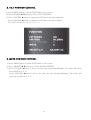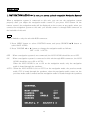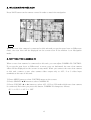
1
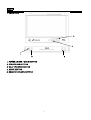
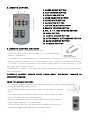
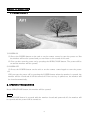
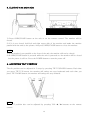
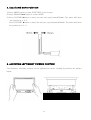
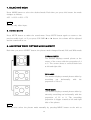
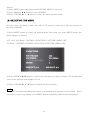
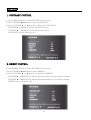
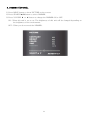
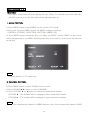
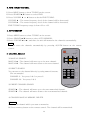
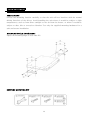
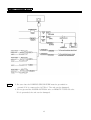
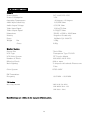
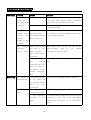
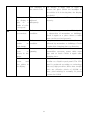
MOTORIZED 7” WIDE TFT LCD MONITOR
WITH COLOR TV
MODEL NO. : PLTV7.5DIN
1
ANY CHANGES OR MODIFICATIONS IN CONSTRUCTION OF THIS UNIT
DEVICE WHICH IS NOT APPROVED BY THE PARTY RESPONSIBLE FOR
COMPLIANCE COULD VOID THE USER’S AUTHORITY TO OPERATE
THE EQUIPMENT.
WARNING
DO NOT WATCH MONITOR WHILE DRIVING
2
CONTENTS
WARNING
CAUTION
UNIT
1. MONITOR
2. REMOTE CONTROL
3. REMOTE CONTROL BATTERY
BASIC OPERATION
1. POWER ON/OFF
2. OPENING THE MONITOR
3. CLOSING THE MONITOR
4. ADJUSTING TILT POSITION
5. ADJUSTING MOVE POSITION
6. ADJUSTING LEFT/RIGHT VIEWING POSITION
7. SELECTING MODE
8. AUDIO MUTE
9. ADJUSTING VIDEO PICTURE MODE (ASPECT)
10. SELECTING THE MENU
FUNCTION
1. FM TRANSMITTER CONTROL
2. TILT POSITION CONTROL
3. MOVE POSITION CONTROL
CONTROL
1. NAVIGATION AUDIO
2. WATCHING NAVIGATION
3. SETTING THE CAMERA IN
4. WATCHING THE REAR VIEW
5. WIRING CONNECTION
6. CAMERA ANGLE CONTROL
7. SCREEN ASPECT CONTROL
PICTURE
1. CONTRAST CONTROL
2. BRIGHT CONTROL
3. COLOR CONTROL
4. TINT CONTROL
5. DIMMER CONTROL
3
WATCHING TV
1. MENU CONTROL
2. CHANNEL CONTROL
3. FINE TUNING CONTROL
4. AUTO MEMORY
5. CHANNEL SEARCH
WARNING SCREEN
INSTALLATION
BASIC CONNECTION
CONNECTING TO AV SOURCES
SPECIFICATIONS
TROUBLE SHOOTING
4
WARNING
The exclamation mark in triangle and WARNING mark are intended to alert the user to the
important operating instructions. Wrong operations will result in severe injury to the unit.
DO NOT WATCH MONITOR WHILE DRIVING
Watching the video while driving may interrupt driving and may cause an accident.
DO NOT OPERATE ANY FUNCTION THAT TAKE YOUR ATTENTION AWAY FROM DRIVING YOUR
VEHICLE
Operation of some functions for this unit is very complicated. Because of this, it is necessary
to put these functions into a special SETUP screen. This will restrict operation of these
functions only when the vehicle is parked. This is to make the driver’s attention to the road
and not to this unit. Any function that requires driver’s attention for a long time should be
performed only after you stop the car. Always stop the vehicle in a safe place before
performing these functions. Performing these functions while driving may result in a serious
accident.
DO NOT DISASSEMBLE
Attempts to disassemble may lead to an accident, fire and / or an electric shock.
KEEP SMALL ARTICLES OUT OF REACH OF CHILDREN
Keep small things (screws etc.) in places not accessible to children. If swallowed, consult a
physician immediately.
FUSE REPLACEMENT
When replacing the fuses, the replacement must be the same amperage as shown on the fuse
holder. If the fuse(s) blow more than once, carefully check all electrical connections for short
circuit, also have your vehicle’s voltage regulator checked.
DO NOT USE IMMEDIATELY IF A PROBLEM APPEARS
When a problem appears, stop using the system immediately and contact the dealer from
whom you purchased the equipment.
5
CAUTION
DO NOT RAISE THE VOLUME EXCESSIVELY
Keep the volume at a specific level which you can still hear outside noise while driving .
Keeping the volume loud may cause an accident.
DO NOT USE THIS EQUIPMENT OUTSIDE THE VEHICLE
Do not use this equipment for purpose other than those listed for a vehicle.
Failure to do so may result in an electric shock or an injury.
HOW TO USE THE BATTERIES
Do not mix new batteries with old batteries and do not replace with other than specified
batteries. When inserting the batteries, be sure to observe proper polarity (+ and -) as
instructed. Battery rupture or chemical leakage can cause an injury or equipment malfunction.
TEMPERATURE
Be sure the temperature inside the vehicle is between +60℃ (+140℉) and
–5℃(+23℉)
before turning your unit on.
MAINTENANCE
If you have problems, do not attempt to repair the unit yourself. Return it to your dealer who
you purchased it from.
INSTALLATION LOCATION
Make sure the unit will not be exposed to :
▶Direct sun & heat
▶High humidity
▶Excessive dust
▶Excessive vibration
6
UNIT
1. MONITOR
4
5
5
4
4
1
2
3
1. POWER ON/OFF / MODE BUTTON
2. OPEN/CLOSE BUTTON
3. TILT UP/DOWN BUTTON
4. MENU BUTTON
5. SEARCH UP/DOWN BUTTON
7
2. REMOTE CONTROL
1. POWER ON/OFF BUTTON
2. TILT UP/DOWN BUTTON
3. OPEN/CLOSE BUTTON
4. MODE SELECTION BUTTON
5. SOUND MUTE BUTTON
6. NAVIGATION BUTTON
7. ASPECT SELECTION BUTTON
8. SEARCH UP/DOWN BUTTON
9. VOL ◀ / ▶: TILT UP/DOWN BUTTON
10. MENU BUTTON
11. MANUAL SEARCH BUTTON
12. AUTO SEARCH/ AUTO MEMORY BUTTON
13. BAND SELECTION BUTTON
14. NUMERIC BUTTONS
3. REMOTE CONTROL BATTERY
- Do not insert battery in the wrong direction.
- Be sure to observe the correct polarity (+/-) as indicated in the
battery compartment.
- It is dangerous to charge/heat/open or short circuitry the battery.
- Please remove the battery in case of not using the remote control for a long period of time.
- It is time to replace the battery if the remote control does not work properly or if the
operating range becomes reduced.
- Should battery leakage occur, clean the battery compartment with a soft cloth and replace
with a new battery.
INCORRECT BATTERY USEAGE MIGHT CAUSE EARLY DISCHARGE, LEAKAGE OR
CORROSION DAMAGE.
USING THE REMOTE CONTROL
- The remote control should be aimed directly towards the remote sensor of the Unit.
- Avoid dropping the remote control.
- Avoid spilling liquids on the remote control or exposing it to extreme
heat.
- The remote control should be pointed at the remote sensor in order
for the Unit Monitor to function correctly.
- Distance: Maximum of 16 feet from the front of the remote sensor.
- Angle: Approximately +/-30 from center.
- Please do not locate the Unit where direct sunlight or fluorescent
illumination might shine directly at the remote sensor.
8
BASIC OPERATION
1. POWER ON/OFF
1) POWER ON
(1) Press the POWER button on the unit or on the remote control to turn the power on. But
the monitor will not be opened and you can listen to the sound of this unit.
(2) You can also turn the power on by pressing the OPEN/CLOSE button. The power will be
on and the monitor will be opened.
2) POWER OFF
(1) Press the POWER button on the unit or on the remote control again to turn the power
off.
(2)If you turn the power off by pressing the POWER button when the monitor is opened, the
monitor will be closed and it will be turned off. If the car key is pulled out, the monitor will
be closed automatically.
2. OPENING THE MONITOR
Press OPEN/CLOSE button, the monitor will be opened.
NOTE
If OPEN/CLOSE button is pressed with the monitor closed and powered off, the monitor will
be opened and the power will be turned on.
9
3. CLOSING THE MONITOR
1) Press OPEN/CLOSE button on the unit or on the remote control. The monitor will be
closed.
2) If it is not closed, hold left and right upper side of the monitor and make the monitor
parallel with the unit as the picture. And press OPEN/CLOSE button to close the monitor.
NOTE
1) If the monitor is not parallel to the front of the unit, the monitor will not be closed.
2) If OPEN/CLOSE button is pressed while the unit is powered on, the monitor will be closed
but the power is still on. Press the POWER button to turn the power off.
4. ADJUSTING TILT POSITION
The tilt position can be adjusted in 5 steps by pressing TILT UP/DOWN buttons. Each time
you press TILT UP button, the monitor will swing one step backward and each time you
press TILT DOWN button, the monitor will swing one step forward.
NOTE
The TILT position also can be adjusted by pressing VOL ◀ / ▶ buttons on the remote
control.
10
5. ADJUSTING MOVE POSITION
1) Press MENU button to show FUNCTION on the screen.
2) Press SEARCH ▲/▼ button to select MOVE.
3) Press VOLUME ▶button to move the unit one step forward(50mm). The menu will show
the position at 1, 2, 3.
Press VOLUME ◀button to move the unit one step backward(50mm). The menu will show
the position at 2, 1, 0.
6. ADJUSTING LEFT/RIGHT VIEWING POSITION
The monitor’s left/right position can be adjusted for easier viewing by hand as the picture
below.
11
7. SELECTING MODE
Press MODE button to select the desired mode. Each time you press this button, the mode
changes as follows.
AV1 -> AV2 ->AV3 ->TV
NOTE
AV3 has only video input.
8. AUDIO MUTE
Press MUTE button to make the sound mute. Press MUTE button again to return to the
previous audio level, or if you press VOLUME ◀ or ▶ button, the volume will be adjusted
and the sound will be on.
9. ADJUSTING VIDEO PICTURE MODE (ASPECT)
Each time you press ASPECT button, the picture mode changes Normal, Full, and Wide mode.
NORMAL MODE
The monitor displays normal picture at the
center of the screen with the proportion of 4
to 3. The screen shows a vertical black belt
at left and right side.
FULL MODE
The monitor displays normal picture wider by
stretching
out
horizontally
with
the
proportion of 16 to 9.
WIDE MODE
The monitor displays normal picture wider by
unevenly stretching out horizontally with the
proportion
of
16
to
9.
The
stretching
proportion is bigger toward at left and right
side of the picture.
NOTE
You can also select the picture mode manually by pressing MENU button on the unit as
12
follows.
1) Press MENU button repeatedly until CONTROL MENU is selected.
2) Press SEARCH ▲/▼ button to select SCREEN.
3) Press VOLUME ▶ or ◀ button to select the desired picture mode.
10. SELECTING THE MENU
You can select the menu to make this unit or AV sources connected to this unit operate in
the best conditions.
1) Press MENU button to select the desired menu. Each time you press MENU button, the
menu changes as follows.
AV1, AV2, AV3 Mode : CONTROL->FUNCTION-> PICTURE->MENU OFF
TV Mode : CONTROL->TUNING->FUNCTION->PICTURE->MENU OFF
2) Press SEARCH ▲/▼ button to select the item that you want to adjust. The background
color of the selected item changes to red.
3) Press VOLUME ▶ or ◀ button to adjust the selected item.
NOTE
The MENU automatically disappears about 8 seconds after it appears on the screen.
But if
you want to erase it by manual, press MENU button repeatedly until the menu disappears.
13
FUNCTION
1. FM TRANSMITTER CONTROL
This is to listen to the sound of AV sources connected to this unit with the car speakers. If you set the
FM frequency of the FM transmitter in the following way and you have the FM Radio unit in your car,
you can listen to the sound of AV sources of this unit.
1) Press MENU button to show FUNCTION menu on the screen. It will show the following
menu.
2) Press SEARCH ▲/▼ button to select FM TRANS.
3) Press VOLUME ▶ or ◀ button to select ON/OFF.
ON : FM Transmitter on
OFF : FM Transmitter off
4) Press SEARCH UP/DOWN button to select FM FREQ.
5) Press VOLUME ▶ or ◀ button to select the FM frequency. The FM frequency station
will change by 100KHz.
6) Tune the car radio’s FM Radio to the same FM frequency of the FM Transmitter.
NOTE
The FM frequency range of the FM Transmitter is 89.5 ~ 90.2 MHz.
14
2. TILT POSITION CONTROL
1) Press MENU button to show FUNCTION on the screen.
2) Press SEARCH ▲/▼ button to select TILT POSITION.
3) Press VOLUME ▶button to swing the LCD panel one step backward.
Press VOLUME ◀button to swing the LCD panel one step forward.
The TILT position is +2, +1, 0, -1, -2.
3. MOVE POSITION CONTROL
1) Press MENU button to show FUNCTION on the screen.
2) Press SEARCH ▲/▼ buttons to select MOVE POSITION.
3) Press VOLUME ▶button to move the unit one step forward(50mm). The menu will show
the position at 1, 2, 3.
Press VOLUME ◀button to move the unit one step backward(50mm). The menu will
show the position at 2, 1, 0.
15
CONTROL
1. NAVIGATION AUDIO (※ In case, you use an optional compatible Navigation System)
When a navigation system is connected to this unit, you can use the navigation system
properly after you adjust the navigation audio control. If you press NAVI button on the
remote control, the navigation mode will be displayed on the screen on any mode, when you
connect the navigation system to this unit, you should connect it through RGB connector at
the backside of this unit
NOTE
This is limited to only the unit with RGB connector.
1. Press MENU button to select CONTROL menu, and press SEARCH ▲/▼ button to
select NAVI AUDIO.
2. Press VOLUME ◀ or ▶ button to change the navigation audio as follows.
OFF -> ON -> AUTO
OFF
: When a navigation system is not connected, the NAVI AUDIO should be set to OFF.
ON
: When a navigation system is connected to this unit through RGB connector, the NAVI
AUDIO should be set to ON or AUTO.
When the NAVI AUDIO is set to ON on the navigation mode, only the navigation
audio is heard through the speakers.
AUTO : When the NAVI AUDIO is set to AUTO on the navigation mode, the previous mode
audio (TV) is heard through the speakers, when the navigation audio comes on, the
previous mode audio is muted and the navigation audio is heard through the speakers.
16
2. WATCHING NAVIGATION
Press NAVI button on the remote control in order to watch the navigation.
NOTE
When the rear view camera is connected to this unit and you put the gear lever to R(Reverse
Gear), the rear view will be displayed on the screen even if the monitor is on Navigation
mode.
3. SETTING THE CAMERA IN
When a rear view camera is connected to this unit, you can adjust CAMERA IN CONTROL.
If you put the gear lever to R(Reverse) to move your car backward, the rear view camera
video will be displayed on the screen on any mode. When you connect the rear view camera
to this unit, connect a rear view camera video output only to AV1, 2 or 3 video input
terminals at the rear of this unit.
1) Press MENU button to show CONTROL menu on the screen.
2) Press SEARCH ▲/▼ button to select CAMERA IN.
3) Press VOLUME ◀ or ▶ button to select AV1, AV2 or AV3 mode which rear view camera
is connected. Each time you press this button, CAMERA IN changes as follows.
AV 1 -> AV 2 -> AV 3 -> OFF
17
4. WATCHING THE REAR VIEW
Put the gear lever to R(Reverse) on any mode. The monitor will show the rear view camera
picture.
5. WIRING CONNECTION
Connect orange color connection wire with a “REVERSE GEAR” sticker to a switched power
output terminal of the R (Reverse) gear.
See BASIC CONNECTION Part.
NOTE
If you select AV mode connected to the rear view Camera with MODE button, the monitor
does not show the rear view camera picture. The monitor will show only the WARNING
picture.
6. CAMERA ANGLE CONTROL
You should use the car-use rear view camera only, if not the rear view can be displayed with
mirror looking image. Then, you can adjust the image looking correctly as follows.
1) Press MENU button to show CONTROL on the screen.
2) Press SEARCH ▲/▼ button to select CAMERA
ANGLE.
3) Press VOLUME ◀ or ▶ button to change CAMERA
Each time you press this button, CAMERA
ANGLE.
ANGLE will be changed as follows.
0 -> 180
180 : When the image is mirror looking image, you should set the CAMERA ANGLE to 180
in order to watch the rear view with the right looking image.
7. SCREEN ASPECT CONTROL
1) Press MENU button to show CONTROL on the screen.
2) Press SEARCH ▲/▼ button to select SCREEN.
3) Press VOLUME ◀ or ▶ button to change SCREEN aspect.
Each time you press this button, SCREEN will be changed as follows.
NORMAL -> WIDE -> FULL
Refer to the 9. ADJUSTING VIDEO PICTURE MODE of BASIC OPERATION.
18
PICTURE
1. CONTRAST CONTROL
1) Press MENU button to show PICTURE on the screen.
2) Press SEARCH ▲/▼ button to select CONTRAST.
3) Press VOLUME ▶ or ◀ button to change the CONTRAST.
VOLUME ▶ : CONTRAST level will be increased.
VOLUME ◀ : CONTRAST level will be decreased.
CONTRAST level is from 0 to 30.
2. BRIGHT CONTROL
1) Press MENU button to show PICTURE on the screen.
2) Press SEARCH ▲/▼ button to select BRIGHT.
3) Press VOLUME ▶ or ◀ button to change the BRIGHT.
VOLUME ▶ : BRIGHT level will be increased and the screen will be brighter.
VOLUME ◀ : BRIGHT level will be decreased and the screen will be darker.
BRIGHT level is from 0 to 30.
19
3. COLOR CONTROL
1) Press MENU button to show PICTURE on the screen.
2) Press SEARCH ▲/▼ button to select COLOR.
3) Press VOLUME ▶ or ◀ button to change the COLOR.
VOLUME ▶ : COLOR level will be increased and the COLOR will be richer.
VOLUME ◀ : COLOR level will be decreased and the COLOR will be lighter.
COLOR level is from 0 to 30.
4. TINT CONTROL
1) Press MENU button to show PICTURE on the screen.
2) Press SEARCH ▲/▼ button to select TINT.
3) Press VOLUME ▶ or ◀ button to change the TINT.
VOLUME ▶ : Red color on the screen will be richer.
VOLUME ◀ : Green color on the screen will be richer.
20
5. DIMMER CONTROL
1) Press MENU button to show PICTURE on the screen.
2) Press SEARCH ▲/▼ button to select DIMMER.
3) Press VOLUME ▶ or ◀ button to change the DIMMER ON or OFF.
ON : When this unit is set to on. The brightness of this unit will be changed depending on
the brightness of the environment.
OFF : When you do not need the DIMMER.
21
WATCHING TV
<WARNING>
You cannot control this unit while driving for your safety. You should control this unit after
you park your car in a safe place and pull the parking brake up.
1. MENU CONTROL
1) Press MENU button to show MENU on the screen on TV mode.
2) Each time you press MENU button, the MENU changes as follows.
CONTROL->TUNING->FUNCTION->PICTURE->MENU OFF
3) Press MENU button repeatedly after you adjust the MENU, and the MENU on the screen
will be disappeared, or the MENU will disappear after 8 seconds if you do not do any function
on the unit.
NOTE
TUNING menu is on TV mode only.
2. CHANNEL CONTROL
1) Press MENU button to show TUNING on the screen.
2) Press SEARCH ▲/▼ button to select CHANNEL.
3) Press VOLUME ▶ or ◀ button to change the memorized channel.
VOLUME ◀ : The channel will be changed to lower memorized channel.
VOLUME ▶ : The channel will be changed to upper memorized channel.
NOTE
The color of memorized channel is GREEN and the color of non-memorized channel is RED.
22
3. FINE TUNING CONTROL
1) Press MENU button to show TUNING on the screen.
2) Press SEARCH ▲/▼ button to select FINE.
3) Press VOLUME ▶ or ◀ button to do the FINE TUNING.
VOLUME ◀ : The center frequency level of the channel will be decreased.
VOLUME ▶ : The center frequency level of the channel will be increased.
FINE TUNING frequency range is from –32 to +32.
4. AUTO MEMORY
1) Press MENU button to show TUNING on the screen.
2) Press SEARCH ▲/▼ button to select AUTO MEMORY.
3) Press VOLUME ◄ or ►, and then, the unit will memorize the channels automatically.
NOTE
You can store the channels automatically by pressing AS/ATM button on the remote
control.
5. CHANNEL SEARCH
1) MANUAL SEARCH
MANUAL ▲ : The channel will move up to the next channel.
MANUAL ▼ : The channel will move down to the next channel.
2) DIRECT SEARCH
You can tune to the channel directly by using numeric buttons.
(For an example)
CHANNEL 6 : You press 0 & 6 or press 6.
CHANNEL 28 : You press 2 & 8.
3) PRESET CHANNEL SEARCH
SEARCH ▲ : The channel will move up to the next memorized channel.
SEARCH ▼ : The channel will move down to the next memorized channel.
4) CHANNEL MANUAL MEMORY, DELETE
MEMORY
(A) Go to the channel which you want to memorize.
(B) Press memory button on the remote control. The channel will be memorized.
23
DELETE
(A) Go to the memorized channel which you want to delete.
(B) Press delete button on the remote control. The channel will be deleted.
24
WARNING SCREEN
The monitor shows the following warning picture when the parking brake is not pulled or
while
driving to prevent traffic accident that may happen while watching the screen. The monitor
shows the warning picture only and does not show any other picture, but you can enjoy the
sound only.
25
INSTALLATION
PRECAUTIONS
Choose the mounting location carefully so that the unit will not interfere with the normal
driving functions of the driver. Avoid installing the unit where it would be subject to high
temperatures, such as from direct sunlight or hot air from the heater, or where it would be
subject to dust, dirt or excessive vibration. Use only the supplied mounting hardware for a
safe and secure installation.
MOUNTING ANGLE ADJUSTMENT
Adjust the mounting angle to less than 20°.
SUPPLIED MOUNTING KIT
26
BASIC CONNECTION
NOTE
1. Be sure that the PARKING SENSOR WIRE must be grounded or
opened. If it is connected to ACC(B+). The unit can be damaged.
2. Do not ground the POWER ANTENNA wire or REMOTE TURN ON wire.
If it is grounded, the unit can be damaged.
27
CONNECTING TO AV SOURCES
28
SPECIFICATIONS
General
Power Supply
DC 14.4V(11V-15V)
Power Consumption
1.5A
Operating Temperature
-10 degree~ 60 degree
Audio Input Sensitivity
1.0V/22K Ohm
Audio Output Voltage
0.5V/1K Ohm
Video Input Signal
1.0Vpp/75 Ohm
Video Output Signal
1.0Vpp/75 Ohm
Dimensions
178(W) x 25(H) x 160(D)mm
Polarity
Negative Ground only
Fuses
2A(Back Up) 3A(ACC)
Weight
Net
1.5Kg
Gross
2.2Kg
Monitor Section
Screen Size
7 Inch Wide
LCD Type
Transparent Type TN LCD
LCD Drive System
TFT Active Matrix
Number of Pixels
336,960(1,440 X 234)
Effective Pixels
99% or more
Back Lighting
U-shaped cold cathode Fluorescent
Tube
Color System
NTSC ONLY
FM Transmitter
Frequency
89.5 MHz ~ 90.2 MHz
TV Section
Receiving Channel
VHF LOW (S3-NZ1)
VHF HIGH (E12 – E5)
UHF (E69 – E21)
Specifications are subject to be changed without notice.
29
TROUBLE SHOOTING
GENERAL Problem
Power
Cause
Measure
does Fuse is blown
Replace with a fuse of the same amperage.
not turn on.
If the fuse blow again, consult installation
(No sound is
shop where you purchased it from.
produced.)
Incorrect wiring
Consult
installation
shop
where
you
purchased it from.
Power it off and power it on again. If it is
The
Nothing
not working, consult installation shop where
happens when microprocessor
are has malfunctioned you purchased it from.
buttons
pressed.
due to noise, etc.
Display is not
accurate.
The
remote Direct rays of the When direct rays of the sun fall on the
controller
sun
fall
on
does not work.
light-receptive
the light-receptive
part
of
the
remote
controller, it may not work.
part of the remote
controller.
The batteries of Check the batteries of the remote controller
remote unit.
the
controller unit are
dead or there is
no battery in the
remote controller
unit.
MONITOR The image is The parking brake Check that the parking brake is applied
not displayed.
is not pulled or
the parking brake
wire
is
not
connected.
The display is The
dark.
brightness Adjust the brightness properly.
control is too low.
- The operating The temperature inside the vehicle may be
condition
is
not 0 degree or less. Set to an appropriate
temperature (25 degree or so) and check it
good.
again.
30
The headlight of The display is made dark at night to
the vehicle is lit.
prevent the glare (When the headlight of
the vehicle is lit in the daytime, the display
gets dark).
The color of The color is not Check that Color and Tint are adjusted
the
properly.
display is adjusted
light
a adequately.
or
shade of color
is not good .
TV
The
image Bad
gets unclear.
receiving A radio wave may not reach sufficiently due
condition.
to obstruction of mountains or buildings.
Check it again at a place where a radio
wave can be received properly.
Screen has a Bad
receiving It may be under the influence of radio wave
or condition
double
reflected by mountains or buildings. Check
it again after changing place or direction.
triple image.
Screen
spots
has Presence
of It
or jamming
may
be
under
the
influence
from
automobiles, streetcar, power cable, neon
stripes in the
sign, and so forth. Check it again after
image.
changing place.
There are red,
This is not a failure, but a phenomenon
green,
and
peculiar to a liquid crystal panel (The LCD
blue points in
panel is produced according to technology
the display.
with very high precision. Note that, though
there are effective pixels of 99.99% or
more, pixel missing or normally lit pixels
account for 0.01%)
31