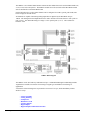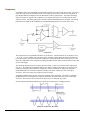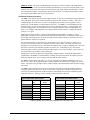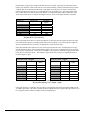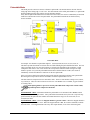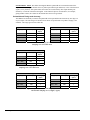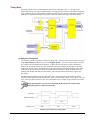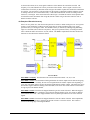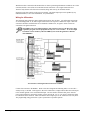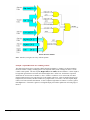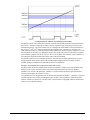
1
WBK17
Counter-Input Module with Quadrature Encoder Support
For use with WaveBook/516, /512A, /516A, and /516E
Description ……1
Hardware Setup ……3
Configuration ……3
Power …… 3
Using Fastener Panels to Stack Modules …… 4
Functional Concepts ……4
Input Coupling ……4
Analog Filtering ……5
Comparator ……6
Debounce Module ……7
Terms Applicable to Counter Modes…….11
Counter Options ……11
Counter/Totalize Mode ……12
Period Mode ……14
Pulsewidth Mode ……17
Timing Mode ……19
Encoder Mode ……20
Digital Inputs ……29
Digital Outputs…… 30
Pattern Detection and Data Markers ……31
Software Support ……31
Fuse Replacement ……36
WBK17 - Specifications …… 37
Description
Front Panel
Rear Panel
WBK17 Modules – Showing Front and Rear Panels
Front Panel
Counter Input - snap-in terminal blocks. Includes connections for Common, Low, & High for each of 8 channels.
Power Out [for Encoders] snap-in terminal block. Includes connections for Common, +5 VDC, and +15 VDC.
Digital Expansion In (HD26 Female) & Digital Expansion Out / Digital In, Trigger, Clock (DB25 Female)
LED Indicators - Active, Ready, and Power
Rear Panel
Power Switch
Power In and Out (DIN5 connectors) for +10 VDC to +30 VDC
Digital Outputs - snap-in terminal block with connection for Common and 8 Channels
Expansion Control In (DB15 Male) & Expansion Control Out (DB15 Female)
Expansion Signal In (BNC) & Expansion Signal Out (BNC)
WBK17, Counter/Encoder Module
987996
WBK17, pg. 1
The WBK17 is an 8-channel multi-function counter/encoder module that can be used with WaveBook/516,
/512A, /516A, and /516E systems. The WBK17 module can not be used with earlier WaveBook models
such as WaveBook/512 and WaveBook/512H.
Each of the high-speed, 32-bit counter channels can be configured for counter, period, pulse width, time
between edges, or encoder modes.
All channels are capable of measuring analog inputs that are digitized by the WaveBook at up to
1 MHz. The Analog Waveform Input Mode can be used to measure waveforms from 0 to 100 V peak-topeak (±50 V). The maximum analog over-range is 150 V peak-to-peak (± 75 V). The resolution is:
0.002307 V/bit.
WBK17 Block Diagram
The WBK17 can be used with any combination of up to 7 additional WBK signal-conditioning modules.
Together these modules can measure a broad range of signal types and address a broad range of
applications.
A discussion of the following items is presented in Functional Concepts, which immediately follows
Hardware Setup.
•
•
•
•
•
•
•
WBK17, pg. 2
AC/DC Coupling
Analog Filtering
Comparator
Debounce Circuit
Counter Options
Digital Inputs
Digital Outputs with Pattern Detection
987996
WBK17, Counter/Encoder Module
Hardware Setup
Configuration
All WBK17 configurations are controlled by software. The WBK17 requires no hardware settings.
Reference Notes:
➣ Encoder setups for WBK17 applications begin on page 22 of this document module.
➣ Refer to the WaveBook User’s Manual (p/n 489-0901) in regard to power, expansion
control, and expansion signal connections.
➣ When using WaveView you will need to set several parameters so WaveView can best
meet your application requirements. For software information, refer to the
WaveBook User’s Manual (p/n 489-0901).
Power
Power In [to the WBK17]
The WBK17 can be powered by an included AC power adapter or from any +10 to +30 VDC source, such
as a car battery. Check the WBK17 specifications for current requirements. For portable or field
applications, the WBK17 and the WaveBook can be powered by the DBK30A Battery Module or the
DBK34 UPS/Battery Module. Both devices contain rechargeable battery packs. The WaveBook User’s
Manual (p/n 489-0901) includes details.
Power Out [to the Encoders]
The WBK17 provides output power of +5V at 1A, and +15V at 500 mA to supply power to encoders.
Power connections from the WBK17 to [up to 4] encoders are made on the snap-in screw terminal block
located on the WBK17’s front panel. Example wiring diagrams for encoders begin on page 23.
You must compute power consumption for your entire system. You may need to use
auxiliary or high-current power supplies. The WaveBook User’s Manual
(p/n 489-0901) includes tables for calculating system power requirements and
discusses power supply options.
Reference Notes:
➣ The WaveBook User’s Manual (p/n 489-0901) provides tables for calculating system
power requirements and discusses power supply options.
➣ Encoder wiring diagrams are included in the Encoder section of functional concepts.
These drawings begin on page 23.
CE Kit
If your WBK17 is to be part of a CE compliant system, you will need to use part
number WBK17-CE KIT. The kit includes the terminal block headers and cable
housings that are needed to cover exposed sections of connectors and wiring, thus
bringing your WBK17 up to meet or exceed CE standards.
For a list of applicable CE Safety and EMC standards, as well as the CE Compliant
Operating Conditions that have been specified for WBK17, refer to the WBK17
Declaration of Conformity, p/n 1064-0740.
WBK17, Counter/Encoder Module
987996
WBK17, pg. 3
Using Fastener Panels to Stack Modules
For convenient mounting, the WBK17 has the same footprint as other WBK modules and WaveBooks.
Fastener Panels, sometimes referred to as “splice plates,” provide a means of stacking WaveBooks and
modules. Optional screw-on handles are available for portable applications. Refer to this manual’s
introduction for assembly information.
When using WBK17 modules in conjunction with other WBK modules, the WBK17
modules must be located closest to the WaveBook due to the CA-217 cable length.
The order of the other WBK modules does not matter.
Fastener panels will partially block the vents on WBK16s and the vents on
WaveBook/512A, /516, /516A, and /516E when the units are stacked.
This partial blocking of vents does not jeopardize the cooling process.
Functional Concepts
Input Coupling
Each WBK17 channel has a programmable input coupling feature. Input coupling can be turned off, or be
selected for AC or DC coupling. The type of coupling is determined after the input differential amplifier.
DC coupling makes use of the path going straight to the filter stage (of the programmable analog filter),
where as AC coupling makes use of the path with the 1 uF capacitor.
The inclusion [or exclusion]of DC offsets is important when calculating the appropriate comparator
threshold for the input waveform.
Use AC coupling to reject unwanted DC offsets. In other words, to prevent DC offsets from reaching the
comparator. AC coupling works well when the input is constantly changing. If the input stops for longer
than one second, it will appear as DC and may cause the comparator to switch on the decaying DC input.
Use DC coupling when both AC and DC components are to be presented as input to the comparator.
DC coupling does not reject anything. If the input can have periods of stability longer than one second, use
DC coupling so the comparator does not switch on a decaying DC input.
Input Coupling
The input coupling stage, shown in the figure above, is compatible with encoder outputs that have balanced
outputs (driving both high and low.) The high and low voltages are required to be within the maximum
input voltage range of –75V to +75V. A wide range of input waveforms can be accommodated since the
WBK17’s comparator threshold can be set anywhere from –12.5V to +12.5V. Many encoders offer
line driver outputs, using 4469 or 8830 driver circuits. The 8830 is a dual differential line driver with
balanced TTL outputs capable of directly driving long lengths of coax or twisted pair cable. The 4469 is a
WBK17, pg. 4
987996
WBK17, Counter/Encoder Module
CMOS output driver with high current outputs used with voltages of up to 15 V. Balanced line drivers that
are used at higher voltages (e.g., +15 V and +24 V) and used in differential mode are particularly immune
to external noise sources.
Some encoder outputs will be open-collector type. These require a pullup resistor in order to operate. In
many cases, the pullup resistor is already incorporated inside the encoder, other times it must be supplied
externally. Since the “open-collector with pullup resistor” output is inherently unbalanced (drives strongly
in the low direction, weakly in the high direction) the input differential amplifier will distort the input
waveform. This distortion can be easily viewed when the input channel is scanned by the WaveBook. This
distortion may have to be taken into account when setting the comparator threshold. Many times the best
way to accommodate unbalanced inputs is to AC couple and set the threshold at 0.00V. This forces the
comparator to trigger on the center of the waveform, where the input has high slew and little noise. An
option is to DC couple and set the comparator threshold at the mid-point of the transition.
If external pullup resistors are required, they can be connected at the WBK17’s input terminal blocks.
A pullup resistor can be placed between any input channel and one of the two power supplies offered on the
output power connector (+5V and +15V.) Choose a pullup resistor value based on the encoder’s output
drive capability and the input impedance of the WBK17. Lower values of pullup resistors will cause less
distortion but also cause the encoder’s output driver to pull down with more current. Although the WBK17
has a wide input dynamic range and good common-mode rejection, you should connect the encoder GND to
the COM input, when possible.
Analog Filtering
Analog Filter
Each channel has a single-pole, low-pass filter with three programmable cut-off frequencies.
These are: 100 kHz, 20 kHz, and 30 Hz.
Use analog filtering to reject low-level noise that may otherwise interfere with the comparator. The analog
filters are most beneficial when the unwanted noise is far outside the desired bandwidth. For example, if the
desired input bandwidth is only 0 to 10 kHz, then the 20 kHz low pass filter will reduce unwanted noise
components of 20 kHz by 3dB. Unwanted noise of 200 kHz will be reduced by 23dB; and noise
components of 2 MHz will be reduced by 43dB.
Since the analog filters come before the comparator circuit and the expansion analog output path, their
effects will be observed at the comparator and in the analog waveform scanned by the WaveBook.
The analog expansion path going back to the WaveBook has a 450 kHz single pole filter.
WBK17, Counter/Encoder Module
987996
WBK17, pg. 5
Comparator
Each channel has its own individually programmable comparator as shown in the figure below. The output
of the filter stage feeds the comparator circuit. The analog waveform that is present at the comparator is
gain adjusted and then multiplexed onto the WaveBook’s analog expansion port. This allows the analog
input waveform (as it appears at the comparator, post coupling, post filter) to be scanned like any other
analog waveform. The analog path going to the WaveBook is bandwidth-limited to 450 kHz. The analog
path between the input and the comparator is not bandwidth-limited unless a low-pass filter is used.
Comparator
The comparator has a programmable threshold, set by the DAC. The threshold can be set anywhere from
–12.5V to +12.5V in 100mV steps, referred to input. Since the counter output and analog waveform can
be scanned together, the effects of different comparator switching thresholds can be easily observed. This
allows easy adjustment of the comparator-switching threshold based on input waveform characteristics such
as noise and ringing.
The following diagram shows two common input waveforms: a square wave that has some ringing and a
sine wave. The comparator threshold should be set so that the ringing on the square wave does not cause
extraneous switching of the comparator, causing false counts to be measured. Ideally, the comparator
threshold should be set so that the comparator switches at the point of fastest slew rate on the input
waveform. This occurs in the grayed regions of the waveforms.
Amplitude modulated noise may also cause false switching of the comparator. The effects of amplitude
modulated noise can be minimized by setting the threshold at the point of fastest slew rate on the input
waveform. The sine wave shown below has its fastest slew rate within the gray region.
Set the comparator threshold within the gray regions to avoid the effects of ringing and noise.
Setting the Comparator Threshold
WBK17, pg. 6
987996
WBK17, Counter/Encoder Module
Debounce Module
Each channel’s comparator output can be debounced with 16 programmable debounce times from
500 ns to 25.5 ms. The debounce module eliminates switch-induced transients typically associated with
electro-mechanical devices including relays, proximity switches, and encoders.
From the following illustration we can see that there are two debounce modes, as well as a debounce
bypass. In addition, the signal from the comparator can be inverted before it enters the debounce circuitry.
The inverter is used to make the input rising-edge or falling-edge sensitive.
Edge selection is available with or without debounce. In this case the debounce time setting is ignored and
the input signal goes straight from the inverter [or inverter bypass] to the counter module.
There are 16 different debounce times. In either debounce mode, the debounce time selected determines
how fast the signal can change and still be recognized.
The two debounce modes are “trigger after stable” and “trigger before stable.” A discussion of the two
modes follows.
Debounce Model
WBK17, Counter/Encoder Module
987996
WBK17, pg. 7
Trigger After Stable Mode
In the “Trigger After Stable” mode, the output of the debounce module will not change state until a period
of stability has been achieved. This means that the input has an edge and then must be stable for a period of
time equal to the debounce time.
Debounce Module – Trigger After Stable Mode
The following time periods (T1 through T5) pertain to the above drawing. In Trigger After Stable mode, the
input signal to the debounce module is required to have a period of stability after an incoming edge, in order
for that edge to be accepted (passed through to the counter module.) The debounce time for this example is
equal to T2 and T5.
T1 – In the example above, the input signal goes high at the beginning of time period T1 but never stays
high for a period of time equal to the debounce time setting (equal to T2 for this example.)
T2 – At the end of time period T2, the input signal has transitioned high and stayed there for the required
amount of time, therefore the output transitions high. If the Input signal never stabilized in the high
state long enough, no transition would have appeared on the output and the entire disturbance on the
input would have been rejected.
T3 – During time period T3 the input signal remained steady. No change in output is seen.
T4 – During time period T4, the input signal has more disturbances and does not stabilize in any state long
enough. No change in the output is seen.
T5 – At the end of time period T5, the input signal has transitioned low and stayed there for the required
amount of time, therefore the output goes low.
WBK17, pg. 8
987996
WBK17, Counter/Encoder Module
Trigger Before Stable Mode
In the “Trigger Before Stable” mode, the output of the debounce module immediately changes state, but
will not change state again until a period of stability has passed. For this reason the mode can be used to
detect glitches.
Debounce Module – Trigger Before Stable Mode
The following time periods (T1 through T6) pertain to the above drawing.
T1 – In the illustrated example, the Input signal is low for the debounce time (equal to T1); therefore when
the input edge arrives at the end of time period T1 it is accepted and the Output (of the debounce
module) goes high. Note that a period of stability must precede the edge in order for the edge to be
accepted.
T2 – During time period T2, the input signal is not stable for a length of time equal to T1 (the debounce
time setting for this example.) Therefore, the output stays “high” and does not change state during
time period T2.
T3 – During time period T3, the input signal is stable for a time period equal to T1, meeting the debounce
requirement. The output is held at the high state. This is the same state as the input.
T4 – At anytime during time period T4, the input can change state. When this happens, the output will also
change state. At the end of time period T4, the input changes state, going low, and the output follows
this action [by going low].
T5 – During time period T5, the input signal again has disturbances that cause the input to not meet the
debounce time requirement. The output does not change state.
T6 – After time period T6, the input signal has been stable for the debounce time and therefore any edge on
the input after time period T6 will be immediately reflected in the output of the debounce module.
Mode Comparison
The following example shows how the two modes interpret the same input signal (which exhibits glitches).
Notice that the Trigger Before Stable mode will recognize more glitches than the Trigger After Stable
mode. Use the bypass option to achieve maximum glitch recognition.
Example of Two Debounce Modes Interpreting the Same Signal
WBK17, Counter/Encoder Module
987996
WBK17, pg. 9
Debounce times should be set according to the amount of instability expected in the input signal. Setting a
debounce time that is too short may result in unwanted glitches clocking the counter. Setting a debounce
time too long may result in an input signal being rejected entirely. Some experimentation may be required
to find the appropriate debounce time for a particular application.
To see the effects of different debounce time settings, simply view the analog waveform along with the
counter output.
Use trigger before stable mode when the input signal has groups of glitches and each group is to be counted
as one. The trigger before stable mode will recognize and count the first glitch within a group but reject the
subsequent glitches within the group if the debounce time is set accordingly. The debounce time should be
set to encompass one entire group of glitches as shown in the following diagram.
Trigger after stable mode behaves more like a traditional debounce function: rejecting glitches and only
passing state transitions after a required period of stability. Trigger after stable mode is used with electromechanical devices like encoders and mechanical switches to reject switch bounce and disturbances due to
a vibrating encoder that is not otherwise moving. The debounce time should be set short enough to accept
the desired input pulse but longer than the period of the undesired disturbance as shown in the diagram
below.
WBK17, pg. 10
987996
WBK17, Counter/Encoder Module
Terms Applicable to Counter Modes
The following terms and definitions are provided as an aid to understanding counter modes.
Detection Signal: A detection signal is one of 8 outputs of the pattern detection module. Each input
channel has an associated detection signal (Detect 1 for Channel 1, Detect 2 for Channel 2, etc.) A
channel’s detection signal will go active high when that channel’s counter value meets the setpoint criteria
programmed into the pattern detection module. Detection signals can be scanned along with any other
channel in the scan group.
Gating: Any counter can be gated by the mapped channel. When the mapped channel is high, the counter
will be allowed to count, when the mapped channel is low, the counter will not count but hold its value.
Mapped Channel: A mapped channel is one of 16 signals that can get multiplexed into a channel’s
counter module. The mapped channel can participate with the channel’s input signal by gating the counter,
clearing the counter, etc. The 16 possible choices for the mapped channel are the 8 input signals (post
debounce) and the 8 detection signals.
Start of Scan: The start of scan is a signal that is internal to the WBK17. It signals the start of a scan
group and therefore pulses once every scan period. It can be used to clear the counters and latch the counter
value into the acquisition stream.
Terminal Count: This signal is generated by the counter value. There are only two possible values for
the terminal count: 65,535 for a 16-bit counter (Counter Low); and 4,294,967,295 for a 32-bit counter
(Counter High). The terminal count can be used to stop the counter from rolling over to zero.
Ticksize: The ticksize is a fundamental unit of time and has four possible settings: 20ns, 200ns, 2000ns,
20000ns. For measurements that require a timebase reference like period or pulsewidth, the ticksize is the
basic unit of time. The count value returned in the scan is the number of ticks that make up the time
measurement.
Counter Options
The following mode options are available with the WBK17 and are detailed in the upcoming pages.
A separate block diagram has been created for each mode. Note that the OPT numbers relate to
sections of the block diagrams.
Counter/Totalize Mode (see page 12):
OPT0: Selects totalize or clear on read mode.
OPT1: Determines if the counter is to rollover or “stop at the top.”
OPT2: Determines whether the counter is 16-bits (Counter Low); or 32-bits (Counter High).
OPT3: Determines which signal latches the counter outputs into the data stream back to the
WaveBook. Start of scan or mapped channel.
OPT4: Allows the mapped channel to gate the counter.
OPT5: Allows the mapped channel to decrement the counter.
OPT6: Allows the mapped channel to increment the counter.
Period Mode (see page 14):
OPT[1:0]: Determines the number of periods to time, per measurement (1, 10, 100, 1000).
OPT2: Determines whether the period is to be measured with a 16-bit (Counter Low);
or 32-bit (Counter High).
OPT4: Allows the mapped channel to gate the counter.
OPT6: Allows the mapped channel to be measured for periods.
Pulsewidth Mode (see page 17):
OPT2: Determines whether the pulsewidth is to be measured with a 16-bit counter (Counter Low);
or a 32-bit counter (Counter High).
OPT4: Allows the mapped channel to gate the counter.
OPT6: Allows the mapped channel to be measured for pulsewidth.
WBK17, Counter/Encoder Module
987996
WBK17, pg. 11
Timing Mode (see page 19).
OPT2: Determines whether the time is to be measured with a 16-bit counter (Counter Low);
or a 32-bit counter (Counter High).
Encoder Mode (see page 20).
OPT[1:0]: Determines the encoder measurement mode: 1X, 2X, or 4X.
OPT2: Determines whether the counter is 16-bits (Counter Low); or 32-bits (Counter High).
OPT3: Determines which signal latches the counter outputs into the data stream going back to the
WaveBook. Start of scan or mapped channel.
OPT4: Allows the mapped channel to gate the counter.
OPT5: Allows the mapped channel to clear the counter for Z reference.
Counter/Totalize Mode
The counter mode allows basic use of a 32-bit counter. While in this mode, the channel’s input can only
increment the counter upward. When used as a 16-bit counter (Counter Low), one channel can be scanned
at the 1MHz rate. When used as a 32-bit counter (Counter High), two sample times are used to return the
full 32-bit result. Therefore a 32-bit counter can only be sampled at a 500kHz maximum rate. If only the
upper 16 bits of a 32-bit counter are desired then that upper word can be acquired at the 1MHz rate.
The first scan of an acquisition always zeroes all counters. It is usual for all counter outputs to be latched at
the beginning of each scan; however, there is an option to change this. A second channel, referred to as the
“mapped” channel, can be used to latch the counter output. The mapped channel can also be used to:
•
•
•
gate the counter
increment the counter
decrement the counter
The mapped channel can be any of the eight input channels (post-debounce), or any of the eight detection
signals. Each channel has its own detection signal that goes active when any of the sixteen counter value
setpoints has been reached. A detailed explanation of pattern detection begins on page 31 of this document
module.
Counter/Totalize Mode
An explanation of the various counter options, depicted in the previous figure, follows.
WBK17, pg. 12
987996
WBK17, Counter/Encoder Module
COUNTER: OPT0: This selects totalize or clear on read mode.
Totalize Mode – The counter counts up and rolls over on the 16-bit (Low Counter) boundary, or on the
32-bit (High Counter) boundary. See OPT2 in regard to choosing 16-bit or 32-bit counters.
Clear On Read Mode – In WaveView, the “Clear On Read Mode” is referred to as the “Counter” mode.
The counter is cleared at the beginning of every scan; and the final value of the counter [the value just
before it was cleared] is latched and returned to the WaveBook.
When using either an EXT CLK input, or one or both SYNC ports, the clear on read mode
is not available. In these instances, the totalize mode should be used.
COUNTER: OPT1: This determines if the counter is to rollover or “stop at the top.”
Rollover Mode - The counter continues to count upward, rolling over on the 16-bit (Counter Low)
boundary, or on the 32-bit (Counter High) boundary. See OPT2 in regard to choosing 16-bit or 32-bit
counters.
Stop at the Top Mode - The counter will stop at the top of its count. The top of the count is FFFF for the
16-bit option (Counter Low), and FFFFFFFF for the 32-bit option (Counter High).
COUNTER: OPT2: Determines whether the counter is 16-bits or 32-bits (Counter Low, or Counter
High, respectively). This only matters when the counter is using the “stop at the top” option, otherwise this
option is inconsequential.
COUNTER: OPT3: Determines which signal latches the counter outputs into the data stream back to
the WaveBook. Normally, the start of scan signal latches the counter outputs at the beginning of every
scan; but an option is to have the mapped signal latch the counter outputs. This mapped-signal option
allows a second signal to control the latching of the count data. This allows the user to know the exact
counter value when an edge is present on another channel.
COUNTER: OPT4: Allows the mapped channel to gate the counter if desired. When the mapped
channel is high, the counter is enabled. When the mapped channel is low, the counter is disabled (but holds
the count value). The mapped channel can be any other input channel, or one of the detection signals.
COUNTER: OPT5: Allows the mapped channel to decrement the counter. With this option the input
channel [for the counter] will increment the counter. The mapped channel can be used to decrement the
counter.
COUNTER: OPT6: Allows the mapped channel to increment the counter instead of the main channel.
This option allows the counter to be used with any other input channel (post-debounce), or with one of the
detection signals. If the channel’s input is used elsewhere, for example, gating another counter, the counter
for this channel does not need to go unused.
Reference Notes:
For information on implementing Up/Down Counters of any size, refer to Application
Example #2 on page 26 of this document module.
WBK17, Counter/Encoder Module
987996
WBK17, pg. 13
Period Mode
This mode allows for period measurement of the channel input. The measurement period is the time from
edge-to-edge, either both rising or both falling. Period data is latched as it becomes available and the data
is sent to the WaveBook at the scan rate. Therefore, if the scan period is much faster than the input
waveform, there will be a great deal of repetition in the period values. This repetition is due to the fact that
updates take place only when another full period becomes available.
Period Mode
An example: One channel’s acquired data might be: 0,0,0,0,80,80,80,80,79,79,79,79,81,81,81,81,…..
This data represents the number of ticksize intervals counted during the period measurement. The first
value(s) returned will be zero since the counters are cleared at the beginning of the acquisition. The data
comes in sets of four since the scan period is about one-fourth as long as the input channel’s period. Every
time the period measurement is latched from the counter, the counter is immediately cleared and begins to
count the time for the subsequent period.
If the scan period is a lot slower than the input period, the acquired data will be missing some periods.
To obtain greater resolution, you can increase the scan period, or use an averaging option (see OPT[1:0]).
The data returned is interpreted as time measured in ticks. There are four timebase settings: 20 ns, 200 ns,
2 µs, and 20 µs. These are often referred to as tick-sizes. The WBK17 uses a 50 MHz, 10 ppm oscillator
as a timing source.
PERIOD: OPT[1:0]: Determines the number of periods to time, per measurement. This makes it
possible to average out jitter in the input waveform, sampling error, noise, etc. There are four options:
(1) The channel’s measurement is latched every time one complete period has been observed.
(2) The channel’s measurement is latched every time that 10 complete periods have been observed,
the value that gets returned is equal to 10 consecutive periods of the input channel.
(3) The number returned is 100 consecutive periods.
(4) The number returned is 1000 consecutive periods.
PERIOD: OPT2: Determines whether the period is to be measured with a 16-bit (Counter Low), or
32-bit (Counter High) counter. Since period measurements always have the “stop at the top” option
enabled, this option dictates whether the measurement has a range of 0 to 65535 ticks or 0 to 4,294,967,295
ticks.
PERIOD: OPT4: Allows the mapped channel to gate the counter if desired. When the mapped
channel is high, the counter is enabled. When the mapped channel is low, the counter is disabled, but still
holds the count value. The mapped channel can be any other input channel or a detection signal.
WBK17, pg. 14
987996
WBK17, Counter/Encoder Module
PERIOD: OPT6: This allows a mapped channel’s period to be measured, instead of the input channel.
The mapped channel can be any other input channel (post debounce) or one of the detection signals (on any
channel). This option allows the counter to be used with any other input channel (post-debounce), or with
one of the detection signals. If the channel’s input is used elsewhere, for example, gating another counter,
the counter for this channel does not need to go unused.
Period and Frequency Accuracy
The WBK17 can measure the period of any input waveform. It does this by counting the integral number of
“ticks” that make up the period, the data returned will always be time measured in “ticks.” The error in
each data sample will come from two sources: the sampling error caused by not being able to count a
partial “tick”; and the WBK17’s internal timebase inaccuracy. The WBK17’s internal timebase has an
absolute accuracy of 10ppm. The sampling error will vary with input frequency, selected ticksize, and
selected averaging mode. The absolute error is the “root-sum-of-squares” of the two independent error
sources. For example, if the sampling error is 10ppm and the timebase accuracy is 10ppm, the absolute
accuracy is 14.1 ppm.
Many times the desired accuracy is much less than what the internal timebase is capable of. Other
applications will require a more accurate period measurement and the effects of sampling error will have to
be averaged out leaving only the inaccuracy associated with the internal timebase. Inaccuracy due to the
internal timebase cannot be averaged out.
For period and frequency measurements, percent sampling error is equal to 100%/(n+1) where n=0 to
65,535 for a 16-bit counter and n=0 to 4,294,967,295 for a 32-bit counter. For small count values, the
sampling error is large and for large count values, the sampling error is small. If sampling error is to be less
than 0.2%, n must be greater than 499 regardless of counter size. If sampling error is to be less than
0.001% (10 ppm), n must be greater than 99,999 which requires use of a 32-bit counter. These values of n
were used to derive the frequency range tables below.
Sampling error can also be reduced by averaging many samples together. Assuming the input signal is
asynchronous to the WBK17’s internal timebase, sampling error can be divided by the square-root of the
number of samples taken. The averaging can be done with PC-based software.
The WBK17 has the ability to measure 1, 10, 100 or 1000 periods, dividing the sampling error by 1, 10,
100, or 1000. This is done inside the WBK17 and may eliminate the need for any averaging to be done in
the PC. For high accuracy on high frequency inputs, multiple period measurement and PC-based averaging
can be done.
The WBK17 has the ability to provide various frequency ranges that are based upon different ticksizes,
averaging options, and counter size (16 bit or 32 bit values.) The frequency ranges are designed to fit a
wide array of possible applications. Within each range, the sampling error decreases dramatically as the
input period increases. The ranges will get smaller as required accuracy increases.
Upper 16-bits of the 32-bit counter
Lower 16-bits of the 32-bit counter
Range (Hz)
Range (Hz)
Ticksize
(nS)
Averaging
Option
Ticksize (nS)
Averaging
Option
15u – 1500u
20000
1
1 – 100
20000
1
150u – 15m
2000
1
10 – 1k
2000
1
1500u – 150m
200
1
100 – 10k
200
1
15m – 1500m
20
1
1k – 100k
20
1
150m – 15
20
10
10k – 1M
20
10
1500m – 150
20
100
100k – 5M
20
100
15 – 1500
20
1000
1M – 5M
20
1000
Frequency Ranges for a 16-bit value, sampling error is less than 0.2%
WBK17, Counter/Encoder Module
987996
WBK17, pg. 15
Each frequency range given in the previous table-set can be exceded. If the input waveform goes underrange by too much, the counter value will top out at 65535 indicating you have reached the lowest possible
frequency that can be measured on that range. If the input waveform goes over range by too much, the
counter will return values that are very course and have a lot of sampling error. The values returned will
have a small number of counts for the period duration. If an input waveform cannot fit within one of the
16-bit ranges shown above or requires much higher accuracy, then a 32-bit range should be considered.
Full 32-bit Counter
Range (Hz)
Ticksize (nS)
15u – 100
150u – 1k
1.5m – 10k
15m – 100k
150m – 1M
1.5 – 5M
15 – 5M
Averaging
Option
1
1
1
1
10
100
1000
20000
2000
200
20
20
20
20
Frequency Ranges for a 32-bit Value,
Sampling Error is Less than 0.2%
The 32-bit ranges shown above are much wider than the 16-bit ranges but also require the full 32-bit value
to be returned, this requires two sample periods within each scan group. The 32-bit frequency ranges can
also be exceeded with a loss of accuracy or topping out at 4,294,967,295 counts.
Some measurements will require the accuracy of an input waveform to be free of sampling error, having
only the absolute accuracy of the internal timebase as the source of error. Sampling error can be averaged
out to give the required result. In most cases, the WBK17 can perform the required averaging on the values
before they are returned to the PC. The frequency ranges shown below will give a sampling error that is
less than 10ppm or 1ppm.
Full 32-bit Counter <10 ppm
Full 32-bit Counter <1 ppm
Range (Hz)
Ticksize (nS)
Averaging
Option
15u – 500m
150u – 5
1.5m – 50
15m – 500
150m – 5k
1.5 – 50k
15 – 500k
20000
2000
200
20
20
20
20
1
1
1
1
10
100
1000
Range (Hz)
15u – 50m
150u – 500m
1.5m – 5
15m – 50
150m – 500
1.5 – 5k
15 – 50k
Ticksize (nS)
Averaging
Option
20000
2000
200
20
20
20
20
1
1
1
1
10
100
1000
High Accuracy Frequency Ranges for a 32-bit Value
that has little sampling error (<10ppm, <1ppm)
If the input frequency is required to have less than 1 ppm sampling error and is greater than 50kHz, use the
15-50kHz, 1ppm range. The values returned will have sampling error that is greater than 1ppm but they can
be averaged by the PC software to further reduce the sampling error.
WBK17, pg. 16
987996
WBK17, Counter/Encoder Module
Pulsewidth Mode
This mode provides a means to measure a channel’s pulsewidth. The measurement is the time from the
rising edge to the falling edge, or visa versa. The measurement will be either pulsewidth low, or pulsewidth
high, depending upon the edge polarity set in the debounce module.
Every time the pulsewidth measurement is latched from the counter, the counter is immediately cleared and
enabled to count the time for the next pulsewidth. The pulsewidth measurements are latched as they
become available.
Pulsewidth Mode
An example: one channel’s acquired data might be: 0,0,0,0,80,80,80,80,79,79,79,79,81,81,81,81,….
This data represents the number of ticksize intervals counted during the pulsewidth measurement. The first
value(s) returned will be zero since the counters are cleared at the beginning of the acquisition. In this
example the data comes in sets of four because the scan period is about one-fourth as long as the input
channel’s period. Every time the pulsewidth measurement is latched from the counter, the counter is
immediately cleared and enabled to count time for the next pulsewidth.
If the scan period is much slower than the input period, then the acquisitions will miss some pulsewidths.
Decreasing the scan period will increase the number of different pulsewidths received.
The data returned is interpreted as time measured in ticks. There are four timebase settings: 20 ns, 200 ns,
2 µs, and 20 µs. These are often referred to as tick-sizes. The WBK17 uses a 50 MHz, 10 ppm oscillator
as a timing source.
If the input signal has a poor slew rate the pulsewidth mode will provide variant results,
dependant upon the comparator threshold..
PULSEWIDTH: OPT2: Determines whether the pulsewidth is to be measured with a 16-bit (Counter
Low), or 32-bit (counter High) counter. Since pulsewidth measurements always have the “stop at the top”
option enabled, this option dictates whether the measurement has a range of 0 to 65535 ticks, or 0 to
4,294,967,295 ticks.
PULSEWIDTH: OPT4: Allows the mapped channel to gate the counter. When the mapped channel is
high, the counter is enabled to count. When the mapped channel is low, the counter is disabled, but holds
the count value. The mapped channel can be any other input channel, or one of the detection signals.
WBK17, Counter/Encoder Module
987996
WBK17, pg. 17
PULSEWIDTH: OPT6: This allows the mapped channel’s pulsewidth to be measured instead of the
input channel. The mapped channel can be any other input channel (post debounce) or one of the detection
signals (on any channel). This option allows the counter to be used with any other input channel (postdebounce), or with one of the detection signals. If the channel’s input is used elsewhere, for example,
gating another counter, the counter for this channel does not need to go unused.
Pulsewidth and Timing mode Accuracy
The WBK17 has the ability to measure the pulsewidth of an input and the time between any two edges on
any two inputs. The time ranges are similar to those shown for period mode except that averaging is not
available. The ranges given below reflect this.
Upper 16-bits of the 32-bit Counter
Lower 16-bits of the 32-bit Counter
Range (S)
Range (S)
Ticksize (nS)
Averaging
Option
20000
2000
200
20
1
1
1
1
800 – 80000
80 – 8000
8 – 800
800m – 80
Ticksize (nS)
Averaging
Option
20000
2000
200
20
1
1
1
1
10m – 1
1m – 100m
100u – 10m
10u – 1m
Pulsewidth and Time Ranges for a 16-bit Value
Sampling error is less than 0.2%
Full 32-bit Counter
Range (S)
Ticksize (nS)
Averaging
Option
10m – 80000
20000
1
1m – 8000
2000
1
100u – 800
200
1
10u - 80
20
1
Pulsewidth and Time Ranges for a 32-bit Value
Sampling error is less than 0.2%
Full 32-bit Counter
<10 ppm
Full 32-bit Counter
<1 ppm
Range (S)
Ticksize (nS)
Averaging
Option
Range (S)
Ticksize (nS)
Averaging
Option
2 – 80000
20000
1
20 – 80000
20000
1
200m – 8000
2000
1
2 – 8000
2000
1
20m – 800
200
1
200m – 800
200
1
2m – 80
20
1
20m – 80
20
1
High Accuracy Pulsewidth and Time Ranges for a 32-bit Value
that has little sampling error (<10ppm, <1ppm)
WBK17, pg. 18
987996
WBK17, Counter/Encoder Module
Timing Mode
This mode provides a means of measuring time between two subsequent events, i.e., the edge of one
channel with respect to the edge of another channel. The edge selection is done in each channel’s debounce
setup. Whenever the time measurement is latched from the counter, the counter is immediately cleared and
enabled for accepting the subsequent time period, which starts with the next edge on the main channel.
Timing Mode
An Example of Timing Mode
The following example represents one channel in timing mode. The time desired is between the rising edge
on the input channel and the falling edge on the mapped channel. Zeroes are returned, in the scan, until
one complete time measurement has been taken. At that point, the value (time in ticks) is latched and
output to the WaveBook until the next time measurement has been completed. Rising edges on the input
channel will clear the counter and falling edges on the mapped channel will latch the output of the counter
at that time. If the scan period is much slower than the rate of time-frames coming [available on the two
channels] then the data will miss some time-frames. The scan period can be decreased to capture more
time-frames.
The data returned is interpreted as time measured in ticks. This data represents the number of ticksize
intervals counted during the timing measurement. There are four timebase settings: 20 ns, 200 ns, 2 µs, and
20 µs. These are often referred to as tick-sizes. The WBK17 uses a 50 MHz, 10 ppm oscillator as a timing
source.
If the input signal has a poor slew rate the timing mode will provide variant results,
dependant upon the comparator threshold.
Example of One Channel in Timing Mode
WBK17, Counter/Encoder Module
987996
WBK17, pg. 19
TIMING: OPT2: This determines whether the time is to be measured with a 16-bit (Counter Low), or
32-bit (Counter High) counter. Since time measurements always have the “stop at the top” option enabled,
this option dictates whether the measurement has a range of 0 to 65535 ticks or 0 to 4,294,967,295 ticks.
Encoder Mode
Introduction
Rotary shaft encoders are frequently used with CNC equipment, metal-working machines, packaging
equipment, elevators, valve control systems, and in a multitude of other applications in which rotary shafts
are involved.
The encoder mode allows the WBK17 to make use of data from optical incremental quadrature encoders.
When in the encoder mode, the WBK17 accepts either differential or single-ended inputs and provides
power for up to four encoders. When reading phase A, phase B, and index Z signals, the WBK17 provides
positioning, direction, and velocity data.
The WBK17 can receive input from up to four encoders; however, the WaveView data
acquisition program can accept input from only one or two encoders. To receive input
from three or four encoders [with one WBK17] refer to the Programmer’s Manual
(p/n 1008-0901).
The WBK17 supports quadrature encoders with a 16-bit (Counter Low), or a 32-bit (Counter High) counter,
5 MHz frequency, and x1, x2, and x4 count modes. With only phase A and phase B signals, 4 channels are
supported; with phase A, phase B, and index Z signals, 2 channels are supported.
Quadrature encoders generally have 3 outputs: A, B, and Z. The A and B signals are pulse trains driven by
an optical sensor inside the encoder. As the encoder shaft rotates, a laminated optical shield rotates inside
the encoder. The shield has three concentric circular patterns of alternating opaque and transparent
windows through which an LED will shine. There is one LED for each of the concentric circular patterns
and likewise, one phototransistor. One phototransistor produces the A signal, another phototransistor
produces the B signal and the last phototransistor produces the Z signal. The concentric pattern for A has
512 window pairs (or 1024, 4096, etc.) The concentric pattern for B has the same number of window pairs
as A except that the entire pattern is rotated by 1/4 of a window-pair. Thus the B signal will always be
90 degrees out of phase from the A signal. The A and B signals will pulse 512 times (or 1024, 4096, etc.)
per complete rotation of the encoder.
The concentric pattern for the Z signal has only one transparent window and therefore pulses only once per
complete rotation. Representative signals are shown in the figure below.
Representation of Quadrature Encoder Outputs: A, B, and Z
WBK17, pg. 20
987996
WBK17, Counter/Encoder Module
As the encoder rotates, the A (or B) signal is indicative of the distance the encoder has traveled. The
frequency of A (or B) indicates the velocity of rotation of the encoder. If the Z signal is used to zero a
counter (that is clocked by A) then that counter will give the number of pulses the encoder has rotated from
its reference. The Z signal is a reference marker for the encoder. It should be noted that when the encoder
is rotating clockwise (as viewed from the back), A will lead B and when the encoder is rotating counterclockwise, A will lag B. If the counter direction control logic is such that the counter counts upward when
A leads B and counts downward when A lags B, then the counter will give direction control as well as
distance from the reference.
An Example of Encoder Accuracy
If there are 512 pulses on A, then the encoder position is accurate to within 360 degrees/512. Even greater
accuracy can be obtained by counting not only rising edges on A but also falling edges on A, giving
position accuracy to 360 degrees/1024. The ultimate accuracy is obtained by counting rising and falling
edges on A and on B (since B also has 512 pulses.) This gives a position accuracy of 360 degrees/2048.
These 3 different modes are known as 1X, 2X, and 4X. The WBK17 implements all of these modes and
functions, as described in the following options.
Encoder Mode
ENCODER: OPT[1:0]: This determines the encoder measurement mode: 1X, 2X, or 4X.
ENCODER: OPT3: This determines which signal latches the counter outputs into the data stream going
back to the WaveBook. Normally, the start of scan signal latches the counter outputs at the beginning of
every scan. The other option is to have the mapped signal latch the counter outputs. This allows the user to
have another signal control the latching of the count data, so the exact value of the counter is known when
an edge is present on another channel.
ENCODER: OPT4: This allows the mapped channel to gate the counter if desired. When the mapped
channel is high, the counter is enabled to count, when the mapped channel is low, the counter is disabled
(but holds the count value.) The mapped channel can be any other input channel or one of the detection
signals.
ENCODER: OPT5: This allows the mapped channel to clear the counter if desired. OPT5 implements
the Z-function [described above], allowing the encoder reference to clear the counter. The counter is
cleared on the rising edge of the mapped channel.
WBK17, Counter/Encoder Module
987996
WBK17, pg. 21
Encoder Wiring Diagrams
You can use up to four encoders with each WBK17 module in your WaveBook system. Each A and B
signal can be made as a single-ended connection with respect to common ground, or as a differential
connection.
Encoder wiring diagrams and example setup tables are included in the following pages; refer to them as
needed.
For Single-ended Connections:
For single-ended applications, the connections made from the encoder to WBK17’s front panel are as
follows:
• Signals A, B, and Z connect to the “H” (channel high) connectors on WBK17’s Counter Input
Terminal Blocks. A, B, and Z “highs” must be connected to separate channels.
• The input channel lows must be jumpered to COM.
• Each encoder ground connects to COM.
• Up to four encoders can be powered from the Encoder Power (Power Out) terminal block.
Refer to your encoder specification sheet for actual power requirements. Each encoder power
wire connects to the Encoder Power (Power Out) terminal block’s +15 VDC or +5 VDC
connector, as applicable.
For Differential Connections:
For differential applications, connections made from the encoder to the WBK17’s front panel are as
follows:
• Signals A, B, and Z connect to the “H” (channel high) connections on WBK17’s Counter
Input Terminal Blocks. A, B, and Z “highs” must be connected to separate channels.
• Signals /A, /B, and /Z connect to the respective “L” (channel low) connections on WBK17’s
Counter Input Terminal Blocks.
• Each encoder ground connects to COM.
• Up to four encoders can be powered from the Encoder Power (Power Out) terminal block.
Refer to your encoder specification sheet for actual power requirement. Each encoder power
wire connects to the Encoder Power (Power Out) terminal block’s +15 VDC or +5 VDC
connector, as applicable.
For Open-Collector Outputs: External pullup resistors can be connected to the WBK17’s
counter input terminal blocks. A pullup resistor can be placed between any input channel and one
of the two power supplies (+5V, or +15V) provided by the Encoder Power (Power Out) terminal
block. Choose a pullup resistor value based on the encoder’s output drive capability and the input
impedance of the WBK17. Lower values of pullup resistors will cause less distortion but also
cause the encoder’s output driver to pull down with more current. If the inputs are connected
differentially, then each channel will need two pullup resistors, i.e., one on the low signal input and
one on the high signal input.
WBK17, pg. 22
987996
WBK17, Counter/Encoder Module
Wiring for 1 or 2 Encoders
The following figure illustrates differential connections for two encoders. For single-ended connections,
remove the /A, /B, and /Z signal connections and short the Low inputs of these channels to COM.
The “A” signals must be connected to odd numbered channels and the associated “B” signals
must be connected to the next [higher] even numbered channels. For example,
for “A” connected to channel 1H, “B” is connected to channel 2H.
A wiring diagram for one encoder is not shown as it would be identical to the following diagram, except one
of the encoders and its associated wiring would be removed.
Two Encoders with Differential Connections to WBK17
In addition to the previous figure, the following table indicates how to connect two encoders to a WBK17
module. Each signal (A, B, Z) can be connected as a single-ended connection with respect to the common
ground or as a true differential input. Both encoders can draw their power from the WBK17’s power output
connector. Connect the encoder’s power input to the +5V or +15V power, connect the return to common
ground (COM) on the same connector. The programming setup given below is just a representative of
possible options.
Two Encoders – Example Setup
Channel
Connection
Example Programming Setup
1
Encoder1 – A
Encoder Mode, 4X option, 16-bit counter, Latch on SOS, Map channel
Clears the counter, set Map channel to 3
2
Encoder1 – B
Period Mode, 1Xperiod option, 16-bit counter, Map channel doesn’t gate,
Ticksize to 200ns
3
Encoder1 – Z
Counter in Totalize mode, stop-at-the-top, 16-bit counter
4
No connection
--
5
Encoder2 – A
Encoder Mode, 4X option, 16-bit counter, Latch on SOS, Map channel
Clears the counter, set Map channel to 7
6
Encoder2 – B
Period Mode, 1Xperiod option, 16-bit counter, Map channel doesn’t gate,
Ticksize to 200ns
7
Encoder2 – Z
Counter in Totalize mode, stop-at-the-top, 16-bit counter
8
No connection
--
WBK17, Counter/Encoder Module
987996
WBK17, pg. 23
There are other useful encoder options; for example, analog filtering. If the encoders are known to run in a
noisy environment then some analog filtering may be in order. A low-pass filter [with 20kHz or 100kHz
cutoff frequency] can be used to reduce extraneous high-frequency [normal mode] noise that may come in
on the encoder lines. In addition, if the encoder is connected in differential mode any common-mode noise
will be reduced by the common-mode rejection of the WBK17’s front-end differential amplifier,
typically –70dB.
If the encoder stops rotating, but is vibrating [due to the machine it is mounted to], the debounce feature can
be used to eliminate false edges. An appropriate debounce time can be chosen and applied to each encoder
channel. Refer to the Debounce Module section on page 7 for additional information regarding debounce
times.
Relative position and velocity can be obtained from each of the encoders. However, during an acquisition,
data that is relative to the Z-position can not be obtained until the encoder locates the Z-reference.
During an acquisition, data that is relative to the Z-position can not be obtained until the
encoder locates the Z-reference.
Note that the number of Z-reference crossings can be tabulated. If the encoder was turning in
only one direction, then the Z-reference crossings will equal the number of complete revolutions. This
means that the data streaming to the PC will be relative position, period = 1/velocity, and revolutions.
You can set detection setpoints on any or all channels. Detection setpoints can be used as
data markers, digital port updates, and as mapped channels.
Each of the WBK17’s eight channels has one detection signal. For measurement
purposes, the detection signals can be routed to an unused counter. The number of times
a certain detection setpoint has been met can be the output data for this counter channel.
Reference Note:
For a complete discussion of setpoints see the section, Pattern Detection and Data Markers,
beginning on page 31of this document module.
A typical acquisition might take 6 readings off of the WBK17 module as illustrated below. The user
determines the scan rate and the number of scans to take. Note that the channel numbers shown assume that
the WBK17 is the first expansion module.
WBK17 Acquisition of Six Readings per Scan
In general, the output of each channel’s counter is latched at the beginning of each scan period (called the
start-of-scan.) Every time the WBK17 receives a start-of-scan signal from the WaveBook, the counter
values are latched and are available to be sourced-down to the WaveBook as each WBK17 channel is
selected [during the scan period].
The WBK17 clears all counter channels at the beginning of the acquisition. This means that the values
returned during scan period 1 will always be zero. The values returned during scan period 2 reflect what
happened during scan period 1.
The scan period defines the timing resolution for the WaveBook and the WBK17.
If you need a higher timing resolution, shorten the scan period.
WBK17, pg. 24
987996
WBK17, Counter/Encoder Module
If more timing resolution is needed, the scan period must be shortened. This has an impact when setting a
detection setpoint because the values coming back from the acquisition have the timing granularity defined
by the scan period, not the actual counter. The counter may be counting very fast but the scan period could
be much slower, so the acquired data may only show every 10th count or every 100th count or whatever. If
the counter input is sufficiently fast and the scan period much slower, a detection setpoint could be
completely “stepped over” and go unrecognized, even though the counter clearly ran through the setpoint.
Application Example #1
Determining how many times an encoder goes beyond a certain position.
A user wants to know the number of times an encoder goes beyond a certain position. We will refer to the
position to be exceeded as “Low Limit.” To find the answer he completes the following steps.
1.
2.
3.
4.
5.
Sets a detection setpoint on Channel 1 of the WBK17 (channel 9 in the scan). The detection
setpoint will be CH1 data > Low Limit, where Low Limit is a 16-bit value.
Sets channel 9 in the scan to be in Encoder Mode. Note that channel 9 is A, channel 10 is B,
and channel 11 is Z.
Sets channel 12 to count the mapped channel.
Sets the mapped channel to Detect1.
Starts the acquisition.
In this example the setpoint criteria is simple, Ch1 data > Low Limit. Because of the criteria, whenever
the data on channel 1 goes beyond the value of Low Limit, Detect1 will go high.
Note: Detection setpoints are evaluated on a per-sample basis, for every scan. Since each channel can
have up to 16 different setpoints, the WBK17 must cycle through 16 setpoints, searching for a
match, every microsecond. The first match that is found terminates the search for that channel’s
current sample. Once the match has been found the digital output port can be updated (or NOT)
and the Detect1 signal (for channel 1) will be taken high.
The following timing diagram represents detection setpoints being used to drive a Detection signal for
channel 1.
Timing Diagram with Channel Detection Signal
As shown in the diagram, Detect1 for Channel 1 (Channel 9) will go high for those samples that meet the
setpoint criteria (Ch1 data > Low Limit). Note that the Detect signal can get routed to another counter
channel and be used at that channel to clock a counter. This allows the user to count the number of times an
encoder crosses a specified boundary. As an alternative, the Detect signal’s pulsewidth could be measured,
giving the amount of time that the encoder spent beyond the setpoint criteria.
The channel’s data stream will return data indicative of the time that Detect was active high and, more
importantly, the time that the encoder’s position was within the setpoint window. Keep in mind that the
timing resolution of the Detect signal is directly related to the Scan period, not to the actual counter.
Therefore smaller scan periods result in better timing resolution for the Detect signal and for measurements
based on the Detect signal.
Having your Detect signal as a part of the scan group allows for real-time data analysis.
WBK17, Counter/Encoder Module
987996
WBK17, pg. 25
Application Example #2
Using Encoder mode to implement Up/Down Counters of any size.
The encoder mode does not have to be used exclusively with quadrature encoders. The encoder mode can
be used to implement a 16 or 32 bit counter that has direction control. The encoder mode can also be used
to force the counter to rollover on any value.
When an odd-numbered channel (1, 3, 5, 7) is put in encoder mode, the next higher channel (2, 4, 6, 8) is
automatically selected to be the direction control. Therefore, if channel 1 is in encoder mode, channel 2 is
the direction control. Channel 1’s counter will count up (at the edge rate coming in on channel 1) if
channel 2 is low and channel 1 will count down if channel 2 is high. If channel 1’s counter is required to
decrement only, then channel 2 can be forced high by software (set the coupling mode to OFF and the
comparator threshold to negative 12V.) Any input channel can be forced to a low or high simply by setting
the coupling mode to OFF and setting the appropriate threshold level. When a channel is turned OFF, the
input settles to 0.0V, setting a positive threshold will force a low and setting a negative threshold will force
a high.
Encoder mode allows the mapped channel to clear the counter. If the mapped channel is programmed to be
the detection signal for the counter, then the counter will rollover to zero when the setpoint criteria is met.
The setpoint criteria could be a simple “greater-than” limit, forcing the counter to rollover on 1000, for
example.
The following steps show how to set up a counter so that it will rollover on the count value of 1000.
1.
Configure Channel 1 as Encoder mode, 1X option, 16-bit counter, Map channel clears the
counter option, set the Map channel to Detect 1. Select desired coupling, low pass filtering,
comparator threshold and debounce.
2. Configure Channel 2 as:
• Analog mode
• Coupling = OFF
• LPF = 30Hz
• Comparator threshold = 12.0V
If you want to observe the terminal count on pulsing high, scan the Detect signals.
3.
Program a setpoint on channel 1 to be “greater than 1000.” This will take Detect 1 high
whenever channel 1’s acquired counter data is greater than 1000.
4.
Take 10,000 scans at a scan rate of 2 kHz.
5.
Connect a 1kHz signal to channel 1’s input. Make sure it meets the comparator threshold
setting.
6.
Take the acquisition.
The counter on channel 1 will count up and rollover on the count of 1000. Since the pattern detection
circuit works on data that is latched into the data stream, the scan rate must be greater than the input
edge rate. If the scan rate is less than the input edge rate, then the counter will actually count up
beyond 1000 before the count value is sampled, detected, and then cleared back to zero.
It is important to realize that the Detect signals have the timing resolution of the scan
period and that the pattern detection module only looks at acquired data, not the actual
counter value.
WBK17, pg. 26
987996
WBK17, Counter/Encoder Module
Wiring for 3 Encoders
The following figure illustrates single-ended connections for three encoders. For differential connections
we would simply make /A, /B, and /Z signal connections to the respective channel slots. With three
encoders it should be noted that there is no separate channel for a third set of Z, /Z signals; thus, in the
following figure Encoder 3 has no Z signal.
The WBK17 can receive input from up to four encoders; however, the WaveView data
acquisition program can accept input from only one or two encoders. To receive input
from three or four encoders [with one WBK17] refer to the Programmer’s Manual
(p/n 1008-0901).
Three Encoders with Single-Ended Connections to WBK17
Connect three encoders to the WBK17 as shown in the table below. Each signal (A, B) can be connected
as a single-ended connection with respect to the common ground or as a true differential input. All three
encoders can draw their power from the power output connector. Connect the encoder’s power input to the
+5V or +15V power, connect the return to COM on the same connector. Make sure that the current output
spec is not violated or a fuse may blow. The programming setup given below is just a representative of
possible options.
Three Encoders – Example Setup
Channel
Connection
Programming Setup
1
Encoder1 – A
Encoder Mode, 1X option, 16-bit counter, Latch on SOS
2
Encoder1 – B
Period Mode, 1Xperiod option, 16-bit counter, Map channel doesn’t gate,
Ticksize to 20000ns
3
Encoder2 – A
Encoder Mode, 2X option, 16-bit counter, Latch on SOS
4
Encoder2 – B
Period Mode, 1Xperiod option, 16-bit counter, Map channel doesn’t gate,
Ticksize to 2000ns
5
Encoder3 – A
Encoder Mode, 4X option, 16-bit counter, Latch on SOS
6
Encoder3 – B
Period Mode, 1Xperiod option, 16-bit counter, Map channel doesn’t gate,
Ticksize to 200ns
7
Encoder1 – Z
Counter in Totalize mode, stop-at-the-top, 16-bit counter
8
Encoder2 – Z
Counter in Totalize mode, stop-at-the-top, 16-bit counter
WBK17, Counter/Encoder Module
987996
WBK17, pg. 27
With the encoders connected in this manner there is relative positioning information available on two of the
encoders (Encoder 1 and 2) but not on the third encoder since there is no Z signal connection for it.
Therefore only distance traveled can be measured (along with velocity) for the third encoder.
Setpoints can be done just like in the previous example. The digital output port can be updated by any
individual channel, a set of selected channels, or by all channels.
Wiring for 4 Encoders
The following figure illustrates single-ended connections for four encoders. For differential connections
we would simply make /A, /B, and /Z signal connections to the respective channel low inputs. With four
encoders it should be noted that there are no channels available for Z, /Z signals. In this scenario no
encoder has a Z signal connection.
The WBK17 can receive input from up to four encoders; however, the WaveView data
acquisition program can accept input from only one or two encoders. To receive input
from three or four encoders [with one WBK17] refer to the Programmer’s Manual
(p/n 1008-0901).
Four Encoders with Single-Ended Connections to WBK17
Connect four encoders to the WBK17. Refer to the above diagram and following table, Four Encoders –
Example Setup, as needed. Each signal (A, B) can be connected as a single-ended connection with respect
to the common ground or as a true differential input. All four encoders can draw their power from the
power output connector, connect the encoder’s power input to the +5V or +15V power, connect the return
to COM on the same connector. Make sure that the current output spec is not violated or a fuse may blow.
The programming setup given below is just a representative of possible options.
WBK17, pg. 28
987996
WBK17, Counter/Encoder Module
Four Encoders – Example Setup
Channel
Connection
Programming Setup
1
Encoder1 – A
Encoder Mode, 1X option, 16-bit counter, Latch on SOS
2
Encoder1 – B
Period Mode, 1Xperiod option, 16-bit counter, Map channel doesn’t gate,
Ticksize to 20000ns
3
Encoder2 – A
Encoder Mode, 2X option, 16-bit counter, Latch on SOS
4
Encoder2 – B
Period Mode, 1Xperiod option, 16-bit counter, Map channel doesn’t gate,
Ticksize to 2000ns
5
Encoder3 – A
Encoder Mode, 4X option, 16-bit counter, Latch on SOS
6
Encoder3 – B
Period Mode, 1Xperiod option, 16-bit counter, Map channel doesn’t gate,
Ticksize to 200ns
7
Encoder4 – A
Encoder Mode, 4X option, 16-bit counter, Latch on SOS
8
Encoder4 – B
Period Mode, 1Xperiod option, 16-bit counter, Map channel doesn’t gate,
Ticksize to 200ns
With the encoders connected in this manner there is no relative positioning information available since there
is no Z signal connection. Therefore only distance traveled can be measured on the A channels. This
means that for each encoder we can only know distance traveled and velocity of travel.
Setpoints can be done just like in the previous example. The digital output port can be updated by any
individual channel, a set of selected channels, or by all channels.
Digital Inputs
The WBK17 has 16 general-purpose digital inputs that can be scanned into an acquisition along with any
other channel on the WaveBook system. These are available on the 25 pin DSUB connector [Digital
Inputs, Trigger, External Clock connector] located on the WBK17 front panel, as shown in the figure on
page 1 of this document module.
The following signals are present on the DB25F high-speed digital I/O connector.
• 16 High-Speed Digital Input Lines (D0 through D15)
• TTL Trigger Input (TTLTRG)
• +15 V (pin 23), -15 V (pin 22), 50 mA max. (each)
• two +5 V (pin 19 and pin 21), 250 mA max. (total)
• External Clock (pin 20)
• two Digital Grounds (pins 24 and 25)
To sample just 16 digital input signals, connect them directly to the digital Input data lines.
D15 is the most significant bit, and D0 is the least.
The following figure depicts WBK17’s DB25 connector, rotated 90 degrees counter-clockwise for
convenience of labeling. Note that an optional Clock and External Trigger cable (CA-178) is available for
use with the WBK17. The cable connects to the DB25 connector and terminates in two BNC connectors,
one for an external clock (via pin 20) and the other to TTL external trigger (via pin 13).
Digital I/O Connections for WBK17
D0 – D15
High Speed Digital Input data lines
TTLTRG
TTL trigger input
External Clock
16 bit mode, read/write strobe
+5 VDC
250 mA maximum
+15,-15 VDC
50 mA maximum (each)
Digital Grounds
Pins 24 and 25
WBK17’s DB25 Pinout
WBK17, Counter/Encoder Module
987996
WBK17, pg. 29
Digital Outputs
The WBK17 has 8 fully programmable digital outputs. Each output has an open-drain DMOS FET
(Double-diffused Metal Oxide Semiconductor Field Effect Transistor) that can sink up to 150 mA and is
capable of directly driving relays.
Digital Output Port
The digital output port can be read back as part of the scan group of an acquisition. If the DMOSFET is
never turned on by the WBK17, then the digital output port can be used as an input port. An external driver
can drive any of the digital output bits high or low, as long as the WBK17”s DMOSFET is not turned on.
The digital outputs can be directly updated by application software at any time. The digital output port has
an 8-bit Mask byte associated with the digital update byte. The output port will be updated if the
corresponding bit in the Mask byte is a 1. Otherwise the output port bit will be left unchanged.
The digital outputs can be updated based on the condition of any input channel value(s). Up to 16 set points
(each with two 16-bit compare values, an 8-bit digital output port byte, an 8-bit mask byte, and a control
byte) can be assigned to a channel. When a set point has been programmed (count value, period,
pulsewidth, position, or velocity) the two 16-bit values are compared, in real-time, to the measured value for
that channel. When the comparison condition is met, the output port is updated instantaneously. Valid
conditions include greater than value, less than value, inside the window, and outside the window. Since
each set point has an 8-bit mask byte, any or all of the digital output bits can be updated. With 16 setpoints
per channel complex updating schemes can be defined to meet the most demanding application
requirements.
WBK17, pg. 30
987996
WBK17, Counter/Encoder Module
Pattern Detection and Data Markers
The WBK17 has a pattern detection feature that can be individually programmed for any of the 8 input
channels. The pattern detection feature allows up to 16 detection setpoints to be set on each channel. Each
detection setpoint can be programmed in several ways: inside the window, outside the window, above
setpoint, below setpoint. When a channel’s setpoint criteria has been met, a digital marker signal called the
detect signal will go high. The detect signals can also be part of the scan group and measured just like any
other input channel, allowing real time data analysis during an acquisition. Each setpoint can also update
the digital output port with a data byte and mask byte allowing real time control based on acquisition data.
The WBK17 pattern detection module looks at the 16-bit data being returned on a given channel and
generates another signal for each channel, Detect1 for Channel 1, Detect2 for Channel 2, etc. These signals
act like data markers for each channel’s data, whether that data is counts, period, pulsewidth, timing, or
encoder position. A channel’s detect signal will be high when the channel’s data meets any one of 16 preprogrammed setpoint windows, the detect signal will be low when the channel’s data does not meet any of
the setpoint windows. The detect signal has the timing resolution of the scan period as seen in the diagram
below. The detect signal can change no faster than the scan frequency (1/scan period.)
Example Diagram of Detection Signals for Channels 1, 2, and 3
Each channel can have 16 detection setpoints. Detection setpoints act on 16-bit data only. Since the
WBK17 has 32-bit counters for each channel, data is returned 16-bits at a time. The lower word, the higher
word or both lower and higher words can be part of the scan group. Each channel has 16 detection
setpoints for the counter’s lower 16-bit value and 16 detection setpoints for the counter’s higher 16-bit
value. Any mix of setpoints can be programmed to drive the detect signal. If all lower word setpoints and
higher word setpoints were programmed for a channel, that channel would have 32 programmed setpoints
driving the detect signal during the acquisition.
All setpoints are programmed as part of the pre-acquisition setup, similar to setting up the analog path,
debounce mode, or counter mode setup. As stated above, each setpoint acts on 16-bit data. Therefore each
setpoint has two 16-bit compare values: High Limit and Low Limit. The High Limit and Low Limit
values define the setpoint window. Each setpoint has four comparison types: (1) inside the window, (2)
outside the window, (3) greater than value, and (4) less than value. The programmed comparison type tells
the detection module how to compare the channel’s data value to the values of High Limit and Low Limit.
Each setpoint can also be programmed with an 8-bit digital output byte (DigOut) and corresponding 8-bit
mask byte (DigMask). When the setpoint criteria has been met, the digital output port can be updated with
the given byte and mask.
The digital output port can also be part of the setpoint comparison. Any setpoint can be programmed to
take the detect signal high when the digital output port is equal to the 8-bit digital byte DigComp qualified
by the 8-bit DigMask. If any of the digital output port bits are not going to be driven as outputs, they can
act as inputs that drive the detection signals via setpoints. The diagram below summarizes the comparisons
that are possible.
WBK17, Counter/Encoder Module
987996
WBK17, pg. 31
Pattern Detection Module
Note: OPT bits (see figure) are set by software options.
Example: Setpoint Detection on a Totalizing Counter
The figure below shows how 3 setpoints could be defined for channel 1. Channel 1 is shown in totalize
mode, the counter is simply counting upward. The setpoints define points of change for Detect 1 as the
counter counts upward. The first setpoint (High Limit1, Low Limit1) dictates channel 1’s detect output to
be high when greater than Low Limit1 but less than High Limit1. In this case, the channel 1 setpoint is
defined for the 16 lower bits of channel 1’s value. Channel 1 could be in 16 or 32-bit mode, the detect
pattern would just repeat every time the lower 16-bit counter rolled over. There is another setpoint set by
(High Limit2, Low Limit2), and then another set by (High Limit3, Low Limit3). The last setpoint (High
Limit3, Low Limit3) dictates that channel 1’s detect output be high whenever Channel 1’s value is greater
than HighLimit3. LowLimit3 is ignored. The digital output port could be updated on each rising edge of
Detect 1.
WBK17, pg. 32
987996
WBK17, Counter/Encoder Module
Example Detection: Channel 1 in Totalizing Counter Mode
The detection circuit works on data that is latched out of the counters and put into the acquisition stream at
the scan rate. This data is acquired according to the pre-acquisition setup (scan group, scan period, etc.)
and returned to the PC. The actual counters may be counting much faster than the scan rate and therefore
only every 10th, 100th, or nth count will show up in the acquisition data. Therefore it is possible to set a
small detection window on a totalizing counter channel and have the detection setpoint “stepped over” since
the scan period was too long. Even though the counter value stepped into and out of the detection window,
the actual values going back to the PC may not. This is true no matter what mode the counter channel is in.
The setting of a detection window must be done with a scan period in mind.
Two possible solutions for overcoming this problem. The scan period could be shortened to give more
timing resolution on the counter values or the setpoint window (High Limit and Low Limit) could be
widened. Perhaps a combination of both solutions is the best compromise.
Example: Setpoint Detection on Encoder Position and Velocity.
The figure below shows how setpoints can be used on two channels. Channel 4 is in encoder mode using
channel 1 as the Z-index, therefore relative to Z position information will be acquired on channel 4.
Channel 5 is the encoder’s B signal input. Channel 5 is in period mode, the data being acquired will be
inversely proportional to the encoder’s velocity.
Two setpoints have been programmed, one on channel 4 and the other on channel 5. Channel 4’s setpoint is
a window setpoint, Detect 4 will go high whenever the encoder’s relative position is within the setpoint
window. Channel 5’s setpoint is a “less than value” setpoint, Detect 5 will go high whenever the encoder’s
velocity is greater than the setpoint.
WBK17, Counter/Encoder Module
987996
WBK17, pg. 33
Detection Example: Channel 4 in Encoder Position Mode, Channel 5 in Period Mode
Detect 4 can be routed to the counter input of another channel that would otherwise be unused. If Detect 4
was measured for pulsewidth, the data returned in the acquisition would be the amount of time that the
encoder position was within the setpoint window. If Detect 4 was measured for period, the data returned in
the acquisition would be the periodicity of the encoder entering the setpoint window. If Detect 4 simply
clocked a totalizing counter, the data returned in the acquisition would be the number of times the encoder
entered the setpoint window. Any or all of these measurements could be made in the acquisition along with
the channel 4 position data and channel 5 period data. It should be noted that the timing resolution of the
Detect signals is the scan period. Reduce the scan period if more resolution is needed.
Detect 5 can also be routed to a counter input of another channel that would otherwise go unused. If Detect
5 was measured for pulsewidth, the data returned in the acquisition would be the amount of time that the
encoder velocity was greater than the setpoint. If Detect 5 was measured for period, the data returned in the
acquisition would be the periodicity of the encoder velocity going beyond the setpoint. If Detect 5 simply
clocked a totalizing counter, the data returned in the acquisition would be the number of times the encoder
went beyond the setpoint velocity.
WBK17, pg. 34
987996
WBK17, Counter/Encoder Module
Software Support
WaveView contains special software features for WBK17. These features are discussed in the WaveView
document module.
You can use WaveView’s spreadsheet-style GUI to select a specific counter mode, AC/DC coupling,
low-pass filter cut-off frequency, and other WBK17-specific configuration parameters. The WBK17 can be
configured to make several different types of measurements at the same time, but on different channels; for
example: frequency, period, and quadrature encoder measurements. A wide variety of setups is possible.
In addition to the Out-of-the-Box™ WaveView software, the WBK17 is supported by a complete set of
language drivers and documentation for developing custom applications using high-level languages such as:
Visual Basic®, C++, and Delphi™ for Windows® 95/98/2000/Me/NT and LabVIEW®. For applications that
require sophisticated graphical analysis and control that go beyond the scope of WaveView™, icon-based
DASYLab® software can be used. The WaveBook User’s Manual (p/n 489-0901) discusses software
options.
WBK17 support is only available with the 32-bit driver and 32-bit version of WaveView.
Reference Notes:
➣ For information regarding software installation, refer to the WaveBook User’s Manual
(p/n 489-0901).
➣ For detailed information regarding WaveView, refer to the WaveView document module,
included as a part of the WaveBook User’s Manual.
➣ If creating custom programs, refer to the Programmer’s Manual, p/n 1008-0901.
WBK17, Counter/Encoder Module
987996
WBK17, pg. 35
Fuse Replacement
The WBK17 has three user-replaceable fuses as follows:
•
F1 - Power Output Fuse (for +15V Encoder Power). 1.0 A, Mini ATO. Located near the center of
the front panel (see figure).
•
F2 - Power Output Fuse (for +5V Encoder Power). 2.0 A, Mini ATO. Located near the center of
the front panel (see figure).
•
F201 – Input Power Fuse. 4.0 A, Mini ATO. Located between the 5DIN Power In connector and the
DC/DC Converter (see figure).
WARNING
Electric shock hazard! Remove the WBK17, and all devices connected to it, from
power before removing the WBK17’s cover plate. Failure to do so could result in
electric shock and possible death.
CAUTION
Be careful to avoid component damage while WBK17 enclosure is open.
Locations of WBK17’s User-Replaceable Fuses
WBK17, pg. 36
987996
WBK17, Counter/Encoder Module
WBK17 - Specifications
General
Counter Module
Power Consumption: 520 mA @ 15V input, 310 mA @ 25V
input (assuming no load on power output)
Input Power Range: 10 to 30 VDC
Input Power Fuse (F201): 4A Mini ATO, user-replaceable
Power Output, to Quadrature Encoder: 5V ±10% @
1000 mA and 15V ±10% @ 500 mA
Output Power Connector: Removable screw terminal block
15V Output Power, to Encoder, Fuse (F1): 1A, Mini ATO,
user-replaceable
5V Output Power, to Encoder, Fuse (F2): 2A, Mini ATO,
user-replaceable
Operating Temperature: 0° to 50°C
Storage Temperature: 0° to 70°C
Vibration: MIL STD 810E, Category 1
Humidity: 0 to 95% RH, non-condensing
Dimensions: 285 mm W x 220 mm D x 35 mm H
(11” x 8.5” x 1.375”)
Weight: 1.5 kg (3.1 lbs)
Analog Inputs
Channels: 8 differential
Input Connections: COM, CH high, CH low
Input Connectors: Removable screw-terminal blocks (2
channels per block)
Input Impedance: 20 Ohm Single-ended; 40 K ohm, doubleended
Input Voltage ranges:-50V to +50Volts specified;
-75 Volts to + 75 Volts maximum
Resolution: 0.002307 V/bit
DC Accuracy: 0.25% of reading + 200 mV offset
Noise: 5 mVrms (typical); 10 mVrms (maximum)
Common Mode Rejection: -70 dB typical (0 to 60 Hz);
-40 dB guaranteed (0 to 60 Hz)
Coupling: AC or DC, programmable
Analog Sampling Bandwidth: DC to 1 MHz
Filtering: Programmable30 Hz, 20 kHz, 100 kHz,
Single pole low-pass filter
Time Base Accuracy: 10 ppm (0° to 50°C)
Five Programmable Modes: Counter, Period, Pulsewidth,
Timing, Encoder
Counter Mode Options: Totalize, Clear on Read, Rollover,
Stop at all Fs, 16-bit or 32-bit, any other channel can
decrement the counter
Period Mode Options: Measure x1, x10, x100, or x1000
periods, 16-bit or 32-bit, 4 time bases to choose from
(20 ns, 200 ns, 2 µs, 20 µs), any other channel can gate
the period measurement
Pulsewidth Mode Options: 16-bit or 32-bit values, 4 time
bases to choose from (20 ns, 200 ns, 2 µs, 20 µs), any
other channel can gate the pulsewidth measurement
Timing Mode Options: 16-bit or 32-bit values, 4 time bases
to choose from (20 ns, 200 ns, 2 µs, 20 µs)
Encoder Mode Options: x1, x2, x4 options, 16-bit or 32-bit
values, Z-channel clearing of the counter, any other
channel can gate the counter
Digital Inputs
Inputs: 8 Digital Inputs
Connector: DB25 female
Configuration: 16TTL-compatible pins
Input Characteristics: TTL-compatible
Input/Output Protection: Diode clamped to ground
and to +5V.
Digital Outputs
Outputs: 8 Digital Outputs
Connector: Removable screw-terminal block
Output Type: Open-drain DMOSFET
Output Pullup Resistor: 27k Ohm to +5V
Output Sink Current: 150 mA/output continuous, 500 mA
output peak (<100 µs), 150 total continuous (per bank of
8 outputs)
Output Voltage Range: 0 to +5V, no external pullup
required; 0 to +30V, with external pullup resistor
Output Resistance: 10 Ohms maximum
Note: All digital outputs are fully programmable with
masking.
Comparator
Input Threshold: -12.5V to +12.5V referred to input,
programmable in 100 mV steps
Detection Circuit
Digital Pattern Detection Choices: Greater than value, less
than value, inside the window, outside the window.
Detection Setpoints Per Channel: 16. Note that each
detection setpoint can be associated with a digital output port
update (with mask).
Threshold Accuracy: 2% of setting, plus 125 mV offset
Input Hysteresis: 50 mV minimum, 100 mV maximum
Input Frequency: DC to 5 MHz
Sensitivity: 500 mVpp DC to 1 MHz
5 Vpp 1 MHz to 5 MHz
CE Compliance
In regard to CE Compliance, refer to the WBK17 Declaration
of Conformity (p/n 1064-0740). As stated in that document,
one of the several requirements for CE compliance is the use
of a WBK17 CE kit (p/n WBK17-CE-Kit). Contact the factory
or your service representative should you desire detailed
information.
Debounce Module
Debounce Times: 16 selections from 500 ns to 25.5 ms,
Positive or negative edge sensitive, Glitch detect mode
or debounce mode.
The Declaration of Conformity is shipped with the WBK17
module.
WBK17, Counter/Encoder Module
987996
WBK17, pg. 37
WBK17, pg. 38
987996
WBK17, Counter/Encoder Module