1
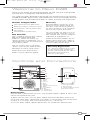
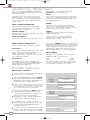
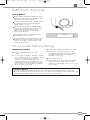
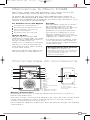
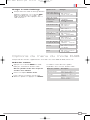
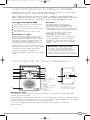
Pico DAB+ Manual.qxd
25/9/08
16:37
Page 1
English
D A B +
D I G I T A L
D A B / D A B +
D I G I T A L
Français
Deutsch
R A D I O
R A D I O
Operating Guide
mode d’emploi
Bedienungsanleitung
Mode d emploi
Italiano
Pico DAB+ Manual.qxd
25/9/08
16:37
Page 2
English
Contents
Welcome to Revo
3
Manual Tune
6
Benefits of DAB radio
3
Set DRC
6
Pico overview and key features
3
DRC - Dynamic Range Control
6
Warranty
3
Local and Full Scan
6
Warranty registration
3
Favourite Station Presets
6
Controls and Connections
3
FM Mode
7
Powering Pico
3
FM Operation
7
Getting Started
4
Favourite Station Presets
7
Pico’s Control Method
4
M-Port
8
Pico’s Menus Explained
4
Trouble-Shooting
8
DAB Mode
4
Technical Specification
9
Choosing a station
4
Change display mode
5
DAB Mode Menu Options
5
Station Order
5
Preface
Copyright and
Acknowledgements
Copyright © 2008 Revo Technologies Ltd.
All rights reserved.
Revo Technologies Ltd
The Inox Building
Caldwellside
Lanark
Scotland
United Kingdom
ML11 7SR
Safety Warnings
Do not operate this radio near water.
Avoid small objects and liquids from getting
into this product.
Do not remove screws or casing parts.
Use only the power supply unit supplied.
EEC: This product has been designed and
type-tested to comply with EU requirements
and carries a CE mark.
Tel. 01555 666 161
Fax. 01555 66 33 44
Email. [email protected]
Website: www.revo.co.uk
The information in this guide is believed to
be correct at the time of publication.
However, our policy is one of continuous
development and so the information is
subject to change without notice.
Revo®, Pico and M-Port are trademarks or
registered trademarks of Revo Technologies
Limited.
iPod® is a registered trademark of Apple
Computer, Inc.
2
Technical Support
Should you encounter any difficulties with
the operation of your radio, or should you
suspect that it may be faulty in some way,
please call our technical support
department on the number below:
01555 666 161
Alternatively, email [email protected] or
visit the troubleshooting section of our
website at: www.revo.co.uk/support
Pico DAB+ Manual.qxd
25/9/08
16:37
Page 3
English
Welcome to Revo DAB
Thank you for buying our Pico Digital Radio, we feel sure that it will provide
you with years of enjoyment and reliable service.
This guide has been designed to quickly get you up-and-running and listening
to DAB and DAB+ digital radio, offer guidance on the more complex features
of this product and provide information on safety, warranty and registration.
Benefits of Digital Radio
Warranty
Clear, interference free digital sound
Many more stations, much more choice
No frequencies, select by station name
No re-tuning
Text information via LCD screen
Pico Overview
Pico is capable of receiving both standard
DAB and new DAB+ digital radio
broadcasts, without the need for any
software upgrades or modification, all in a
splashproof casing, with the convenience of
internal battery power.
Revo Technologies Ltd warrants to the
purchaser that this product will be free
from parts and manufacturing defects in
the course of normal use for a period of
one year from the date of purchase.
This warranty does not apply in cases of
accidental damage, where the case has
been removed, wear and tear, negligence,
modification or inappropriate use.
Should you encounter problems with this
product, please contact your supplier or
alternatively see page 2 of this guide for
technical support contact details.
Pico can also be used as a high quality
speaker system for your iPod™ (or other
MP3 player or external sound source).
Warranty Registration
It is a warranty condition that you register
your purchase by either completing the
warranty card enclosed with your radio or
alternatively registering online at
www.revo.co.uk/register
Simply connect your device to Pico’s
M-Port using the audio lead supplied.
Controls and Connectors
D A B / D A B +
1.
D I G I T A L
R A D I O
7.
8.
2.
3.
4.
5.
6.
9.
10.
11.
3.
4.
2.
12.
1. LCD Screen
2. Power
1.
3. Menu
4. Presets
5. Back
6. M-Port
7. Remote Control Sensor
8. Mode
9. Scroll Wheel
10. Info
11. Volume Up
12. Volume Down
1.
2.
3.
4.
Telescopic Antenna
Stereo Line-Out
3.5mm Headphone Socket
DC Power Socket
Powering Pico
Your Pico radio is powered from the mains using the power adaptor supplied, or from its own
internal rechargeable battery pack.
To power from the mains, insert the power adaptor plug into the DC power socket on the
rear of Pico. When Pico is connected to mains power, its internal battery pack will commence
charging. On a full charge, Pico’s internal battery pack has a 12 hour life.
Only use the power adaptor supplied. Replacements are available from www.revo.co.uk
3
Pico DAB+ Manual.qxd
25/9/08
16:37
Page 4
English
Getting Started
Pico is a sophisticated digital radio device,
with several modes of operation and many
advanced features.
In order for you to get the most out of
Pico’s functions, it is important that you
learn how to use the cursor based control
system, and also understand how Pico’s
menus work.
Pico’s Control Method
Pico’s control method is based around a
central scroll wheel (with push to select
function) and a number of .
SCROLL WHEEL:
Rotate clockwise and anti-clockwise to scroll
through menu options.
PUSH TO SELECT:
Press the scroll wheel to select the current
Pico’s Menus Explained
Pico has three types of menu as follows:
Main Menu
This is Pico’s principle (top level) menu, and
allows you to enter different operating
modes, setup the radio, and view
information such as software version and
your radio’s ID number.
Mode Menus
The Mode menus are so called because
they show the functions available within the
context of each of the operating modes
(DAB mode, FM mode etc.).
menu option. In FM mode, pressing
SELECT will initiate an FM scan.
BACK:
Press to return to the previously selected
menu entry. Repeatedly pressing will return
you to the top level of the Mode menu (for
the mode you are in).
MENU:
Press to enter (or return to) the Mode
menu for the mode of operation you are
currently in. Pressing for a second time will
return you to the ‘playing’ screen.
MODE:
Sequentially cycles through each of the
modes of operation.
Using these keys, you will be able to
perform most functions and navigate
through Picos various menus.
Pressing the MENU button at any time will
take you to the Mode menu of the operating
mode your radio is currently in. Each Mode
menu includes a listing for Main Menu –
selecting this option will return you to the
top level Main Menu (as described above).
Main Menu
The Main menu provides access to the
following modes and sub-menus:
DAB
FM
Info
System
Setup
To select an option from the menu, simply
use the scroll wheel to move through the
menu options, then press to select.
DAB Mode
Choosing a Station
Firstly ensure that you have extended the
antenna on the rear of Pico.
Enter DAB Mode by pressing the MODE
key and switching between FM Mode and
DAB Mode. Alternatively, DAB Mode can
be accessed via the Main Menu.
MODE
DAB Mode
If this is the first time you have used Pico,
it will scan for DAB stations in your area
and store them in memory. Pico will also
set its clock and date at this point.
Pressing and holding the INFO button for
a period of two seconds will manually
instruct Pico to perform a station scan.
When the station scan has been
completed, stations will be displayed in
numeric then alphabetic order.
If no DAB signal is found, it may be
necessary for you to relocate your radio,
or to check whether DAB coverage is
available in your area.
To select a station simply rotate the scroll
wheel to cycle through the list of available
stations, then push to make your selection.
4
DAB Mode
INFO
Scanning...
10
•••••
Scanning...
10
•••••
>ArrwRock
BBCAD
sA
iB
anMode
>ArrwRock
BBCAsian
BBC 6Music
A
B.
M.
oda
eva10
ea
rn
vn
iD
cn
eg
n.
o
t
Sc
i
•
•C
••6
•Music
BB
Service not ava
B
B
C
6
M
S
c
a
n
n
iu
ns
gi
.c
..
10
>
Aa
ry
r
w
Pl
i
nR
gock
•
•B
•C
•
•
B
A
sian
BBC 6Music
Playing
>ArrwRock
BBC 6Music
BBCAsian
Service not ava
BBC 6Music
B
SB
eC
rv6
iM
cu
esi
nc
ot ava
Playing
BBC 6Music
Playing
Pico DAB+ Manual.qxd
25/9/08
16:37
Page 5
BBC Radio 1
12:34 22-08-2007
BBC Radio 1
12B
225.64MHz
To Change the Display Mode
Pico has nine different display modes.
Simply press the INFO button to cycle
through each mode. These display modes
are explained in the table opposite:
English
BBC Radio 1
128kbps
Stereo
Display option
Normal display
with scrolling text
Signal level,
indicator on bar
shows minimum
acceptable level
Type of broadcast
Broadcaster
Station name and
frequency
Signal strength
Data rate and
broadcast type
Time
Date
Example
BB
BC
CR
Ra
ad
di
io
o1
1
B
c
a
l
str
c
o
s
t
m
ci
ag
ll
ls
ce
on
sg
tth
ma
ax
x 96
S
BBC Radio 1
B
B
C
R
ad
i
o
1max
c
a
l
l
s
c
o
s
t
BB
BC
C R
Ra
adi
io
o 1
1
B
S
ci
ag
ln
la
sld
ce
or
sr
tor
max 98
Po
op
p M
Mu
us
si
ic
c
P
BBC Radio 1
BB
BC
C R
Ra
ad
di
io
o 1
1
B
P
o
p
M
u
s
i
c
B
B
C
R
a
d
i
o
c
a
l
lP
s
c
o
s
B
B
C
R
a
d
ic
ot1
1max
P
o
p
M
u
s
i
t
l
k
S
O
R
T
B
B
C
N
a
t
i
o
n
BBC Nationa
al
l D
DA
AB
B
B
B
C
R
a
d
i
o
1
BB
BC
CR
Ra
ad
di
io
o1
1
B
B
B
C
R
a
d
i
o
1
c
a
l
l
s
c
o
s
t
m
a
x
B
B
C
R
a
d
i
o
1
B
B
C
N
a
t
i
o
n
a
l
D
A
B
B
B
C
R
a
d
i
o
1
c
a
l
l
s
c
o
s
t
m
a
x
B
B
C
R
a
d
i
o
1
P
o
p
M
u
s
c
B
B
C
R
a
d
i
o
1
B
B
ClR
N
a
t
i
ot
n
a
l
D
A
B
B
B
C
a
d
i
o
6
M
u
i
c
c
a
l
s
c
o
s
m
as
x
1
2
:
3
4
2
2
0
8
2
0
0
7
1
2
:
3
4
2
2
0
8
2
0
0
7
1
1
:
4
8
:
0
3
BBC Radio 1
B
BB
BC
CR
Ra
ad
di
io
o1
1
P
o
p
M
u
s
i
c
B
B
C
a
d
i
o
1
2
:
3R
4
2
2
01
8
-2007
B
P
o
p
M
u
s
c
B
B
C
R
a
d
i
o
1
BB
BC
C3R
Na
ad
ti
io
o0
n1
al20
D0
A7
B
B
B
C
R
a
d
i
o
1
1
2
:
4
2
2
8
B
B
C
R
a
d
i
o
6
M
us
ic
P
o
p
Mus
i
c
1
2
B
2
2
5
.
6
4
1
2
B
2
2
5
.6
4M
MH
Hz
z
1
8
/
12
/
2
0
0
7
B
B
C
R
a
d
i
o
1
B
B
C
R
a
d
i
o
1
BB
BC
CR
Ra
ad
di
io
o1
1
B
BB
BC
CR
Na
ad
ti
io
o.
n1
a4
lMH
Dz
AB
B
1
2
B
2
2
5
6
BB
BC
CR
R
ad
d
io
on1
1
Na
ti
al20
D0
A7
B
B
1
2
:
3R
4
2
2
0
8
B
B
C
a
d
i
o
1
1
2
B
2
2
5
.
6
4
MH
z
B2
B8
Ckb
Np
as
tionS
at
le
De
AB
1
r
128kbps
Stereo
o
BB
BC
C R
Ra
ad
di
io
o 1
1
B
B
BB
BC
C3R
Ra
ad
di
io
o01
1-2007
1
2
:
4
2
2
8
B
B
C
R
a
d
i
o
1
1
2
8
k
p
s
S
t
er
e7
o
B
B
C
R
a
d
i
o
1
1
2
:
3b
4
2
2
0
8
B
B
C
R
a
d
i
o
1
1
2
B
2
2
5
.
6
42
M0
H0
zo
B2
B8
Ckb
Rp
as
dio S
1t
1
e
r
e
1
2
:
3
4
2
2
0
8
Si
ig
g s
st
tr
re
en
ng
gt
th2007
96
6
S
h
9
B
BB
BC
CR
Ra
ad
di
io
o1
1
B
B
C
R
a
d
i
o
1
B
B
C
R
a
d
i
o
1
1
2
B
2
2
5
.
6
4
M
H
z
B
B
C
R
a
d
i
o
1
Si
ig
gna
sl
td
re
er
nr
go
tr
hMHz9
98
6
B
B
C
R
a
i
o
1
1
2
B
2
2
5
.
6
4
S
1
2
8
ka
b
p
S
t
reo
S
Si
ig
gn
sl
ts
re
er
nr
go
tr
he
98
6
1
2
B
2
2
5
.
6
4
MHz9
Bi
Bg
Cna
Rl
ade
ir
oro
1r
S
9
8
B
R
BB
BC
Ck
Ra
ad
di
io
or1
1t
1
2
8
p
s
S
reo
S
i
g
nb
a
l
e
r
o
re
98
B
B
C
R
a
d
i
1
2
8
k
b
p
s
S
t
P
Sl
ik
gS
sO
tR
rT
eo
ng1
tt
hereo
96
t
1l
2k
8S
kP
bO
pR
sT Stereo
BBC Radio 1
t
Bl
Bk
CS
RO
aR
dT
ir
oo
1
S
i
g
nP
a
l
e
9
Sl
ik
gS
sO
tR
rT
enr
gtr
h
98
6
t
P
B
B
C
R
a
d
i
o
1
SB
iC
gR
sa
td
ri
eo
ng6
tM
husic
96
B
B
B
C
R
a
d
i
o
6
S1
i:
g48
s:
t0
r3
engtM
husic
96
1
1
S1
i:
g4
n8
a:
l03
error
98
B
SB
iC
gnR
aa
ldi
eo
rr6
oM
rusic
98
t
lk
SP
OR
B
C
dT
i
6
M
usic
1B
1:
4R
8a
:0
3o
S
i
g
n
a
l
e
r
r
o
r
98
B
1B
1C
:4R
8a
:d
0i
3o
B
B
C
R
a
d
i
o 6
6M
Mu
us
si
ic
c
1
8
/
1
2
/
2
0
0
7
1
t8
l/
k1
S2
P/
O2
R0
T07
B
B
C
R
a
d
i
t
Bl
Bk
CSP
RO
aR
dT
io
o 6
6M
Mu
us
si
ic
c
B
B
C
R
a
d
i
o
1
8
/
1
2
/
2
0
76Music
t
l
k
S
P
O
R
T
18
1/
:1
42
8/
:2
00
30
1
07
BBC Radio 6Music
BBC Radio 6Music
1B
1:
8a
:0
3o 6Music
B
C4R
di
B
C4R
di
1B
1:
8a
:0
3o 6Music
18/12/2007
11:48:03
Pico has a number of additional functions that are accessed through the DABBB
Mode
menu,
as
C Rad
io 6M
usfollows:
ic
BBC Radio 6Music
18/12/2007
B
C1R
d0
i0
o76Music
1B
8/
2a
/2
Station Order
18/12/2007
DAB Mode Menu Options
Press the MENU key in DAB Mode then
select ‘Station order’.
To specify the order in which stations
are displayed
The following table describes the options
available under the ‘Station Order’ menu:
Station order
Description
Alphanumeric
Lists stations in alphabetical
order.
Ensemble
Lists stations by multiplex.
Valid
Lists only active stations.
Select the Station order option.
Turn the scroll wheel to scroll through the
options and press to SELECT.
5
Pico DAB+ Manual.qxd
25/9/08
16:37
Page 6
English
Manual Tune
Local and Full Scan
Choose the ‘Manual tune’ option from the
DAB Mode menu.
The ‘Manual tune’ selection screen allows you
to select a particular frequency to tune to.
The list of frequencies displayed is dependant
on the currently-set frequency band and
contains all of the frequencies within that
band. It starts with the short name of the
frequency, for example 12B, and is followed
by the actual frequency in MHz.
If there is a station corresponding to this
station number and frequency, the display
will show the name, frequency, and a
tuning meter will show the signal strength.
DRC - Dynamic Range Control
Pico includes a dynamic range control that
automatically boosts the volume of quieter
sounds for listening in noisy environments.
The DRC control is found in the DAB Mode
menu under ‘DRC’. There are three
pre-defined settings as follows:
DRC
Description
DRC Low
Dynamic Range Control is
set to half
DRC High
The recommended setting
for noisy environments
DRC Off
Dynamic Range Control is
switched off
As time passes, new stations will become
available in your area. To find them and
add them to your station list it is
necessary to perform either a ‘Local’ or
‘Full’ scan. Both operations can be
accessed via the DAB Mode menu.
A Local Scan performs a shorter scan of
only the ‘local’ ensemble range.
A Full Scan will take longer, but will cover
the complete DAB ensemble range.
Favourite Station Presets
Pico allows you to store 12 favourite
station presets, either via the
PRESET button on Pico itself, or via the
optional Pico remote control.
To save the station you are currently
listening to as a preset, simply press the
PRESET button then use the scroll wheel to
find an unused location. Now press the
scroll wheel to store.
To listen to a stored station press the
PRESET button then use the scroll wheel to
locate your desired preset, then press to
select.
FM Mode
FM Operation
Extend the telescopic antenna found on the
rear of Pico.
Enter FM Mode by pressing the MODE
key and switching between DAB Mode
and FM Mode. Alternatively, FM Mode
can be accessed via the Main Menu.
MODE
FM Mode
87.50F
MM
hzMode
FM
If this is the first time Pico has been in FM
mode, it will start at the beginning of the FM
frequency range. Otherwise, the last FM
station you were listening to will be selected.
88
77
..
55
00
MM
hh
zz
To scan through the FM frequency range
turn the scroll wheel.
FM Mode
Mode
FM
8B
7B
.C
50R
Ma
hd
zio 1
FM
Preset Stored
To ‘SEEK’ the next active station, press the
scroll wheel.
87.50Mhz
87.50Mhz
FF
MM
FM
FM
BBC Radio 1
P>
reP
sr
ee
tse
St
to1
reu
dnset
> Preset 2 unset
8
7
.
5
0
M
h
z
F
M
87.50Mhz
FM
Favourite Station Presets
Pico allows you to store 12 favourite station
presets, either via the PRESET button on Pico
itself, or on the optional Pico remote control.
To save the station you are currently
listening to as a preset, simply press the
PRESET button then use the scroll wheel to
find an unused location. Now press the
scroll wheel to store.
To listen to a stored station press the PRESET
button then use the scroll wheel to locate your
desired preset, then press to select.
6
>> PP
rr
ee
ss
ee
tt 11 us
ne
st
et
>> PP
rr
ee
ss
ee
tt 22 uu
nn
ss
ee
tt
BBC Radio
Radio 1
BBC
Preset Stored
Stored
Preset
> Preset 1 set
> Preset 2 unset
reset 1 unset
unset
> P
Preset
Preset 2 unset
unset
> Preset
reset 1 s
et
> P
Preset
set
Preset 2 unset
unset
> Preset
Pico DAB+ Manual.qxd
25/9/08
16:37
Page 7
English
MPort Mode
Using MPort
Revo’s MPort connector allows for quick
and easy connection of an iPod® or other
MP3 player or sound source.
Using the connection lead supplied, Pico is
transformed into a high quality digital
audio speaker system.
Connect one end of the supplied audio
lead to the headphone (or auxiliary out)
socket of your source device, then
connect the other end to the MPort
on the front of Pico.
MPort Mode
Pico’s LCD screen will now display the
word ‘MPort’ on its screen.
M-Port
You should adjust the output volume level
on both the source device and on Pico
itself to gain optimal volume levels and
sound performance.
Trouble-Shooting
DAB Digital Radio
Q. I get a ‘No stations available’ message?
Q. I hear a ‘burbling’ noise on some
stations.
A. Make sure that your antenna is fully
extended and vertical. Check the signal
strength and move Pico to another
location if necessary.
A. If the signal strength is too low, a breakup in reception can occur and this sound
is the result. Make sure that Pico’s
antenna is fully extended and in an
upright position. If the problem persists,
move Pico to another location or check
that you are in an area where reception
of this station is possible.
Q. Pico’s clock isn’t set.
A. Pico needs to be able to pick-up a DAB
signal or have its clock set manually.
If Pico can find a DAB station, it can then
set its clock.
Factory Reset
In the unlikely event that Pico performs erratically, it is possible to perform a software
reset to restore the original factory settings. The factory reset option can be found under the
System Setup heading, which itself can be found under the Main Menu.
7
Pico DAB+ Manual.qxd
25/9/08
16:37
Page 8
English
Technical Specification
8
General:
Mono DAB and FM radio with full Band III reception.
Speaker:
2.25” full-range neodymium
Audio Power Output:
6W
Frequency Ranges:
DAB Band III (174 - 240 MHz)
DAB+ coverage
FM (87.5 - 108 MHz)
Antenna:
Integral telescopic aerial
Input Connectors:
DC power adaptor socket (230V adapter supplied)
3.5mm line-in for auxiliary devices (M-Port)
Output Connector:
3.5mm headphone socket
Stereo RCA connectors
LCD Display:
High resolution 3 line ‘negative’ LCD screen,
(2 lines text, 1 line icons, 16 character width)
Presets:
12 x DAB and 12 x FM presets
Remote Control:
Infra-red remote control (Optional)
Mains Power Supply:
12V 1200mA
Battery Power:
Li-Ion rechargeable battery pack, 12 hour life.
Approvals:
CE marked and RoHS compliant.
Dimensions:
167mm (H) x 105mm (W) x 105mm (D)
Pico DAB+ Manual.qxd
25/9/08
16:37
Page 9
Français
D A B +
D I G I T A L
D A B / D A B +
D I G I T A L
R A D I O
R A D I O
mode d’emploi
Pico DAB+ Manual.qxd
25/9/08
16:37
Page 10
Français
Table des matières
Bienvenue à Revo
3
Syntonisation manuelle
6
Les bénéfices de la radio DAB
3
Régler le DRC
6
Aperçu et caractéristiques de Pico
3
DRC - Dynamic Range Control
6
Garantie
3
Balayage local et complet
6
Enregistrement de la garantie
3
Réglage des stations préférées
6
Commandes et connexions
3
Mode FM
7
Allumer/alimenter Pico
3
Fonctionnement FM
7
Pour commencer
4
Réglage des stations préférées
7
Méthode de commande de Pico
4
M-Port
8
Explication des menus de Pico
4
Dépannage
8
Mode DAB
4
Spécifications techniques
9
Choisir une station
4
Changer le mode d’affichage
5
Options du menu du mode DAB
5
Ordre des stations
5
Préface
Droits d’auteur et
remerciements
Copyright © 2008 Revo Technologies Ltd.
Tous droits réservés
Revo Technologies Ltd
The Inox Building
Caldwellside
Lanark
Scotland
United Kingdom
ML11 7SR
Règles de sécurité
Ne faites pas fonctionner cette radio près
de l’eau.
Évitez que de petits objets et des liquides
entrent dans ce produit.
N’ôtez pas de vis ou des parties du boîtier.
Utilisez uniquement le bloc d’alimentation qui
est fourni.
EEC : Ce produit a été conçu et testé de
manière à être conforme aux exigences EU
et porte la marque CE.
Tel. 0044 1555 666 161
Fax. 0044 1555 66 33 44
Email. [email protected]
Site Internet : www.revo.co.uk
Les informations contenues dans ce guide
sont réputées exactes au moment de leur
publication. Cependant, nous observons une
politique de développement continu et ces
informations sont donc sujettes à
changement sans avertissement préalable.
Revo, Pico et M-Port sont des marques
déposées ou enregistrées de Revo
Technologies Limited.
iPod® est une marque enregistrée de Apple
Computer, Inc.
2
Support technique
En cas de difficultés pour faire fonctionner
votre radio, ou si vous soupçonnez quelque
défaut, veuillez appeler notre département
de support technique au numéro ci-dessous:
01555 666 161
ou nous envoyer un email à
[email protected], ou visiter la section
dépannage sur notre site Web :
www.revo.co.uk/support
Pico DAB+ Manual.qxd
25/9/08
16:37
Page 11
Français
Bienvenue à Revo DAB
Merci d’avoir acheté notre radio digitale Pico, nous sommes certains que
vous en retirerez des années de plaisir et de service fiable.
Ce guide a été conçu pour que vous soyez rapidement prêt à utiliser et
écouter la radio digitale DAB et DAB+, pour vous offrir des conseils sur les
fonctions plus complexes de ce produit et vous fournir des informations sur la
sécurité, la garantie et l’enregistrement.
Les bénéfices de la radio Digitale
Garantie
Revo Technologies Ltd garantit à l’acheteur
que ce produit ne présentera pas de
défauts de fabrication ou sur ses pièces lors
de son utilisation normale durant une
période d’un an à partir de la date d’achat.
Son digital clair, sans interférence
Beaucoup plus des stations et de choix
Pas de fréquences, choix par nom
Pas de re-syntonisation
Information écrite sur écran LCD
Aperçu de Pico
Pico peut capter les diffusions DAB
standard et les nouvelles DAB+, sans besoin
de mise à jour ni modification de logiciel, le
tout dans un boîter résitant aux
éclaboussures, et alimenté par une batterie.
Cette garantie ne s’applique pas en cas de
dommages accidentels, dus à l’usure ou la
négligence, à des modifications ou à l’utilisation
inappropriée ou si le boîtier a été ôté.
Si ce produit présente un problème, veuillez
s’il vous plaît contacter votre revendeur ou
voir les coordonnées du support technique à
la page 2 de ce guide.
Pico peut aussi servir de haut-parleur de
haute qualité pour votre iPod™ (ou MP3
ou autre source externe).
Enregistrement de la garantie
Une condition de la garantie est
d’enregistrer votre achat soit en remplissant
la carte de garantie inclue avec votre radio,
soit en l’inscrivant en ligne sur
www.revo.co.uk/register.
Connectez simplement votre appareil au MPort de Pico grâce au câble audio fourni.
Commandes et connexions
D A B / D A B +
D I G I T A L
R A D I O
1.
7.
8.
2.
3.
4.
5.
6.
9.
10.
11.
3.
4.
2.
12.
1. Écran LCD
2. On/Off
1.
3. Menu
4. Presets
5. Retour
6. M-Port
7. Senseur télécommande
8. Mode
9. Roulette
10. Info
11. Augmenter le volume
12. Diminuer le volume
1.
2.
3.
4.
Antenne téléscopique
Sortie stéréo
Prise écouteurs 3.5mm
Prise DC
Allumer/alimenter Pico
Pico fonctionne sur le secteur au moyen de l’adaptateur de courant fourni, ou grâce à sa
batterie rechargeable interne.
Pour utiliser le secteur, insérez la fiche de l’adaptateur dans la prise DC située à l’arrière de Pico.
Lorsque Pico est connecté au secteur, sa batterie commence à se charger. Chargée au
maximum, la batterie de Pico a 12 heures de vie.
Utilisez uniquement l’adaptateur du bloc-secteur fourni. Des pièces de rechanges sont disponibles
à www.revo.co.uk
3
Pico DAB+ Manual.qxd
25/9/08
16:37
Page 12
Français
Pour commencer
Pico est une radio digitale sophistiquée,
comprenant plusieurs modes de fonctionnement
et de caractéristiques avancées.
Pour que vous profitiez au maximum des
fonctions de Pico, il est important que vous
appreniez à utiliser le système basé sur le
curseur, ainsi que comprendre comment les
menus de Pico fonctionnent.
Méthode de commande de Pico
Cette méthode est basée sur une roulette
centrale (que l’on appuie pour choisir une fonction)
ROULETTE :
Tournez en sens horloger et anti-horloger
afin de faire défiler les options des menus.
APPUYEZ POUR CHOISIR:
Appuyez sur la roulette afin de choisir
l’option SELECT will initiate an FM scan.
Explication des menus de Pico
Pico possède les trois menus suivants :
Menu principal
Ce menu, du niveau supérieur, vous permet
d’utiliser différents mode de fonctionnement,
de régler la radio, et de voir des
informations telles que la version du logiciel
et le numéro d’identité de votre radio.
actuelle de menu. En mode FM, appuyer
sur SELECT commencera un balayage FM.
RETOUR :
Appuyez afin de revenir au menu choisi
auparavant. Appuyer plusieurs fois vous
fera retourner au niveau supérieur du menu
Mode (pour le mode où vous vous trouvez).
MENU:
Appuyez pour aller (ou revenir) au menu Mode
pour le mode de fonctionnement où vous vous
trouvez actuellement. Appuyer une seconde
fois vous renverra à l’écran ‘playing’ (jouer).
MODE:
Passe séquentiellement par tous les modes
de fonctionnement.
Grâce à ces touches, vous pourrez réaliser
la plupart des fonctions et passer par les
menus de Pico.
Appuyer sur MENU à tout moment vous
enverra vers le menu Mode de celui dans lequel
vous vous trouvez actuellement. Chaque menu
Mode inclut une liste du menu principal - choisir
cette option vous renverra vers le menu
principal du niveau supérieur (voir plus haut).
Menu principal
Le menu principal fournit l’accès aux modes
et sous-menus suivants :
Menus Mode
DAB
FM
Info
Système
Installation
Les menus Mode s’appellent ainsi car ils
montrent les fonctions disponibles dans le
contexte de chaque mode de fonctionnement.
(mode DAB, mode FM etc.).
Afin de choisir une option du menu, utilisez
simplement la roulette pour passer par les
options du menu, ensuite appuyez pour
choisir.
Mode DAB
Choisir une station
Assurez-vous d’abord que l’antenne à
l’arrière de Pico soit étendue.
Passez au mode DAB en appuyant sur la
touche MODE et en passant du mode FM
au mode DAB. Le mode DAB est
également accessible via le menu principal.
MODE
DAB Mode
Si c’est la première fois que vous utilisez Pico, il
balayera à la recherche de stations DAB de votre
région et les mettra en mémoire. Pico règlera
également l’heure et la date à ce moment.
Maintenir enfoncée la touche INFO pour
deux secondes instruira Pico manuellement
d’effectuer un balayage des stations.
Lorsque le balayage est terminé, les
stations seront affichées par ordre
numérique puis alphabétique.
Si aucun signal Dab n’est trouvé, il peut
s’avérer nécessaire de déplacer votre
radio, ou de vérifier si la couverture DAB
est disponible dans votre région.
Afin de choisir une station, faites tourner la
roulette pour faire défiler la liste des stations
disponibles, ensuite appuyez pour faire votre choix.
4
DAB Mode
INFO
Scanning...
10
•••••
Scanning...
10
•••••
>ArrwRock
BBCAD
sA
iB
anMode
>ArrwRock
BBCAsian
BBC 6Music
A
B.
M.
oda
eva10
ea
rn
vn
iD
cn
eg
n.
o
t
Sc
i
•
•C
••6
•Music
BB
Service not ava
B
B
C
6
M
S
c
a
n
n
iu
ns
gi
.c
..
10
>
Aa
ry
r
w
Pl
i
nR
gock
•
•B
•C
•
•
B
A
sian
BBC 6Music
Playing
>ArrwRock
BBC 6Music
BBCAsian
Service not ava
BBC 6Music
B
SB
eC
rv6
iM
cu
esi
nc
ot ava
Playing
BBC 6Music
Playing
Pico DAB+ Manual.qxd
25/9/08
16:37
Page 13
BBC Radio 1
12:34 22-08-2007
BBC Radio 1
12B
225.64MHz
Changer le mode d’affichage
Pico possède neuf modes d’affichage différents
Appuyez simplement sur la touche INFO
pour faire défiler tous les modes. Ces
modes d’affichage sont expliqués dans la
table ci-contre :
Français
BBC Radio 1
128kbps
Stereo
Option écran
Affichage normal
avec texte défilant
Niveau du signal,
l’indicateur montre
le niveau min.
acceptable
Type de diffusion
Diffuseur
Nom de la station
et fréquence
Puissance du
signal
Taux des données
et type de diffusion
Heure
Date
Exemple
BB
BC
CR
Ra
ad
di
io
o1
1
B
c
a
l
str
c
o
s
t
m
ci
ag
ll
ls
ce
on
sg
tth
ma
ax
x 96
S
BBC Radio 1
B
B
C
R
ad
i
o
1max
c
a
l
l
s
c
o
s
t
BB
BC
C R
Ra
adi
io
o 1
1
B
S
ci
ag
ln
la
sld
ce
or
sr
tor
max 98
Po
op
p M
Mu
us
si
ic
c
P
BBC Radio 1
BB
BC
C R
Ra
ad
di
io
o 1
1
B
P
o
p
M
u
s
i
c
B
B
C
R
a
d
i
o
c
a
l
lP
s
c
o
s
B
B
C
R
a
d
ic
ot1
1max
P
o
p
M
u
s
i
t
l
k
S
O
R
T
B
B
C
N
a
t
i
o
n
BBC Nationa
al
l D
DA
AB
B
B
B
C
R
a
d
i
o
1
BB
BC
CR
Ra
ad
di
io
o1
1
B
B
B
C
R
a
d
i
o
1
c
a
l
l
s
c
o
s
t
m
a
x
B
B
C
R
a
d
i
o
1
B
B
C
N
a
t
i
o
n
a
l
D
A
B
B
B
C
R
a
d
i
o
1
c
a
l
l
s
c
o
s
t
m
a
x
B
B
C
R
a
d
i
o
1
P
o
p
M
u
s
c
B
B
C
R
a
d
i
o
1
B
B
ClR
N
a
t
i
ot
n
a
l
D
A
B
B
B
C
a
d
i
o
6
M
u
i
c
c
a
l
s
c
o
s
m
as
x
1
2
:
3
4
2
2
0
8
2
0
0
7
1
2
:
3
4
2
2
0
8
2
0
0
7
1
1
:
4
8
:
0
3
BBC Radio 1
B
BB
BC
CR
Ra
ad
di
io
o1
1
P
o
p
M
u
s
i
c
B
B
C
a
d
i
o
1
2
:
3R
4
2
2
01
8
-2007
B
P
o
p
M
u
s
c
B
B
C
R
a
d
i
o
1
BB
BC
C3R
Na
ad
ti
io
o0
n1
al20
D0
A7
B
B
B
C
R
a
d
i
o
1
1
2
:
4
2
2
8
B
B
C
R
a
d
i
o
6
M
us
ic
P
o
p
Mus
i
c
1
2
B
2
2
5
.
6
4
1
2
B
2
2
5
.6
4M
MH
Hz
z
1
8
/
12
/
2
0
0
7
B
B
C
R
a
d
i
o
1
B
B
C
R
a
d
i
o
1
BB
BC
CR
Ra
ad
di
io
o1
1
B
BB
BC
CR
Na
ad
ti
io
o.
n1
a4
lMH
Dz
AB
B
1
2
B
2
2
5
6
BB
BC
CR
R
ad
d
io
on1
1
Na
ti
al20
D0
A7
B
B
1
2
:
3R
4
2
2
0
8
B
B
C
a
d
i
o
1
1
2
B
2
2
5
.
6
4
MH
z
B2
B8
Ckb
Np
as
tionS
at
le
De
AB
1
r
128kbps
Stereo
o
BB
BC
C R
Ra
ad
di
io
o 1
1
B
B
BB
BC
C3R
Ra
ad
di
io
o01
1-2007
1
2
:
4
2
2
8
B
B
C
R
a
d
i
o
1
1
2
8
k
p
s
S
t
er
e7
o
B
B
C
R
a
d
i
o
1
1
2
:
3b
4
2
2
0
8
B
B
C
R
a
d
i
o
1
1
2
B
2
2
5
.
6
42
M0
H0
zo
B2
B8
Ckb
Rp
as
dio S
1t
1
e
r
e
1
2
:
3
4
2
2
0
8
Si
ig
g s
st
tr
re
en
ng
gt
th2007
96
6
S
h
9
B
BB
BC
CR
Ra
ad
di
io
o1
1
B
B
C
R
a
d
i
o
1
B
B
C
R
a
d
i
o
1
1
2
B
2
2
5
.
6
4
M
H
z
B
B
C
R
a
d
i
o
1
Si
ig
gna
sl
td
re
er
nr
go
tr
hMHz9
98
6
B
B
C
R
a
i
o
1
1
2
B
2
2
5
.
6
4
S
1
2
8
ka
b
p
S
t
reo
S
Si
ig
gn
sl
ts
re
er
nr
go
tr
he
98
6
1
2
B
2
2
5
.
6
4
MHz9
Bi
Bg
Cna
Rl
ade
ir
oro
1r
S
9
8
B
R
BB
BC
Ck
Ra
ad
di
io
or1
1t
1
2
8
p
s
S
reo
S
i
g
nb
a
l
e
r
o
re
98
B
B
C
R
a
d
i
1
2
8
k
b
p
s
S
t
P
Sl
ik
gS
sO
tR
rT
eo
ng1
tt
hereo
96
t
1l
2k
8S
kP
bO
pR
sT Stereo
BBC Radio 1
t
Bl
Bk
CS
RO
aR
dT
ir
oo
1
S
i
g
nP
a
l
e
9
Sl
ik
gS
sO
tR
rT
enr
gtr
h
98
6
t
P
B
B
C
R
a
d
i
o
1
SB
iC
gR
sa
td
ri
eo
ng6
tM
husic
96
B
B
B
C
R
a
d
i
o
6
S1
i:
g48
s:
t0
r3
engtM
husic
96
1
1
S1
i:
g4
n8
a:
l03
error
98
B
SB
iC
gnR
aa
ldi
eo
rr6
oM
rusic
98
t
lk
SP
OR
B
C
dT
i
6
M
usic
1B
1:
4R
8a
:0
3o
S
i
g
n
a
l
e
r
r
o
r
98
B
1B
1C
:4R
8a
:d
0i
3o
B
B
C
R
a
d
i
o 6
6M
Mu
us
si
ic
c
1
8
/
1
2
/
2
0
0
7
1
t8
l/
k1
S2
P/
O2
R0
T07
B
B
C
R
a
d
i
t
Bl
Bk
CSP
RO
aR
dT
io
o 6
6M
Mu
us
si
ic
c
B
B
C
R
a
d
i
o
1
8
/
1
2
/
2
0
76Music
t
l
k
S
P
O
R
T
18
1/
:1
42
8/
:2
00
30
1
07
BBC Radio 6Music
BBC Radio 6Music
1B
1:
8a
:0
3o 6Music
B
C4R
di
B
C4R
di
1B
1:
8a
:0
3o 6Music
18/12/2007
11:48:03
Pico possède des fonctions supplémentaires accessibles via le menu Mode deBB
DAB,
:
C Racomme
dio 6Msuit
usic
BBC Radio 6Music
18/12/2007
B
C1R
d0
i0
o76Music
1B
8/
2a
/2
Ordre des stations
18/12/2007
Options du menu du mode DAB
Appuyez sur la touche MENU en mode
DAB puis sélectionnez ‘Station Order’.
Afin de spécifier l’ordre dans lequel les
stations sont affichées
Le tableau suivant décrit les options
disponibles dans le menu ‘Station Order’:
Ordre des stations
Description
Alphanumérique
Ordonne les stations par
ordre alphabétique.
Ensemble
Ordonne les stations par
multiplex
Valide
Montre uniquement les
stations actives.
Choisissez l’option Station order.
Faites tourner la roulette afin de faire
défiler les options et appuyez sur SELECT.
5
Pico DAB+ Manual.qxd
25/9/08
16:37
Page 14
Français
Syntonisation manuelle
Choisissez l’option ‘Manual tune’ du
menu Mode DAB.
L’écran de choix de ‘Manual tune’ vous
permet de choisir une fréquence particulière.
La liste des fréquences affichées dépend de
la bande de fréquences actuelle et contient
toutes les fréquences au sein de cette
bande. Elle commence avec le nom de la
fréquence, par ex. 12B, et est suivie
par la fréquence réelle en MHz.
Si une station correspond à ce numéro et
cette fréquence de station, l’écran
montrera le nom et la fréquence
du signal sera également affichée.
DRC - Dynamic Range Control
Pico inclut un contrôle de gamme dynamique
qui améliore automatiquement le volume des
sons les moins forts pour l’écoute en
environnement bruyant.
Le contrôle DRC se trouve dans le menu
mode DAB sous ‘DRC’. Il y a trois
réglages d’origine, comme suit :
DRC
Description
DRC Low
DRC est diminué de moitié
DRC High
Réglage recommandé pour
environnements bruyants
DRC Off
DRC est éteint
Balayage local et complet
Au fil du temps, de nouvelles stations vont
devenir disponibles dans votre région. Pour
les trouver et les ajouter à votre liste de
stations, il est nécessaire de réaliser un
balayage “local” ou “complet”. Ces deux
opérations sont accessibles via le menu DAB.
Un balayage local réalise un balayage plus
court, de la plage locale.
Un balayage complet prend plus de
temps, mais couvrira la plage DAB
complète.
Réglage des stations préférées
Pico vous permet de garder en mémoire
12 présélections, via la touche preset de
Pico, ou sur sa télécommande optionnelle.
Afin de mettre en mémoire la station que
vous êtes en train d’écouter, appuyez
simplement sur PRESET puis utilisez la
roulette afin de trouver un endroit non
utilisé. Appuyez ensuite sur la roulette afin
de mettre en mémoire.
Afin d’écouter une station mise en mémoire,
appuyez sur lla touche PRESET et utilisez la
roulette afin de trouver votre présélection
désirée, puis appuyez pour sélectionner.
FM Mode
Fonctionnement FM
Étendez l’antenne télescopique à l’arrière de
Pico.
Passez en mode FM en appuyant sur la
touche MODE et en passant du mode
DAB au mode FM. Le mode FM est
également accessible via le menu principal.
87.50F
MM
hzMode
FM
Si c’est la première fois que Pico se trouve
en mode FM, il commencera au début de la
fréquence FM. Sinon, la dernière station FM
que vous avez écoutée sera sélectionnée.
88
77
..
55
00
MM
hh
zz
Afin de balayer la fréquence FM, faites
tourner la roulette.
F
M
8B
7B
.C
50R
M
h
ziM
FM
a
d
ood
1e
FM
Mode
Preset Stored
Afin de ‘chercher’ la station active suivante,
appuyez sur la roulette.
87.50Mhz
FM
B
BC Radio 1
87.50Mhz
FM
P>
reP
sr
ee
tse
St
to1
reu
dnset
> Preset 2 unset
Réglage des stations préférées
87.50Mhz
FM
87.50Mhz
FM
>> PP
rr
ee
ss
ee
tt 11 us
ne
st
et
>> PP
rr
ee
ss
ee
tt 22 uu
nn
ss
ee
tt
Pico vous permet de garder en mémoire 12
présélections, via la touche PRESET de Pico,
ou sur sa télécommande optionnelle.
Afin de mettre en mémoire la station que vous
êtes en train d’écouter, appuyez simplement
sur PRESET puis utilisez la roulette afin de
trouver un endroit non utilisé. Appuyez ensuite
sur la roulette afin de mettre en mémoire.
Afin d’écouter une station mise en mémoire,
appuyez sur la touche PRESET et utilisez la
roulette afin de trouver votre présélection
désirée, puis appuyez pour sélectionner.
6
FM Mode
MODE
FF
MM
BBC Radio 1
BBC
PresRadio
et Sto1
red
>
Preset
1 set
Preset
Stored
> Preset 2 unset
>
>
>
>
Preset
Preset
Preset
Preset
1
1
2
2
unset
unset
unset
unset
> Preset 1 set
>
set
> Preset
Preset 1
2 u
nset
> Preset 2 unset
Pico DAB+ Manual.qxd
25/9/08
16:37
Page 15
Français
Mode MPort
Utiliser MPort
La prise Mport de Revo permet de
connecter facilement et rapidement un
iPod® ou une autre source telle qu’un MP3.
Grâce au câble de connexion fourni, Pico
se transforme en système de haut-parleur
de haute qualité.
Connectez une extrémité du câble fourni
à la prise pour écouteurs (ou de sortie) de
votre appareil source, puis l’autre au
Mport sur la face avant de Pico.
L’écran LCD affichera alors
le mot ‘MPort’.
MPort Mode
M-Port
A justez le volume de sortie tant sur
l’appareil source que sur Pico afin
d’obtenir une performance de son et de
volume optimale.
Dépannage
Radio digitale DAB
Q. J’entends un bruit de ‘gargouillis’ sur
certaines stations.
A. Si la puissance du signal est trop basse,
la réception peut s’arrêter. Ce son en est
le résultat. Assurez-vous que l’antenne
d’Uno ait été complètement étendue et
en position verticale. Si le problème
persiste, essayez de déplacer Pico ou
vérifiez que vous vous trouvez dans un
endroit où la réception de cette station
est possible
Q. J’obtiens un message ‘Aucune station
disponible’ (no stations available).
A. Assurez-vous que votre antenne soit
complètement étendue et verticale.
Vérifiez la puissance du signal et
déplacez Pico vers un autre endroit si
nécessaire.
Q. L’horloge de Pico n’est pas à l’heure.
A. Pico doit pouvoir trouver un signal DAB
ou son horloge doit être réglée
manuellement. Si Pico peut trouver une
station DAB, il peut mettre son horloge à
l’heure.
Réglages initiaux
Dans l’éventualité peu probable où Pico ne fonctionnerait pas correctement, il est possible
de réaliser une remise du logiciel en son état original. Cette option se trouve sous le titre
System Setup, se trouvant lui-même dans le menu principal.
7
Pico DAB+ Manual.qxd
25/9/08
16:37
Page 16
Français
Spécifications techniques
8
Général:
Récepteur FM mono DAB avec réception de bande III complète.
Haut-parleur:
2.25’’ néodyme pleine gamme
Puissance de la sortie audio:
6W
Amplitude des fréquences:
DAB Band III (174 - 240 MHz)
Couverture DAB+
FM (87.5 - 108 MHz)
Antenne:
Intégrale télescopique aérienne
Connexions entrantes:
Prise d’adaptateur bloc-secteur (adaptateur 230V fourni)
Prise de 3,5 mm pour appareils périphériques (M-Port)
Connexions sortantes:
Prise écouteurs 3,5mm
Connexions stéréo RCA
Écran LCD :
Écran LCD négatif 3 lignes en haute résolution
(2 lignes de textes, 1 ligne d ‘icônes, 16 caractères de large)
Programmes:
12 x DAB et 12 x FM programmes
Télécommande:
à infra-rouge (accessoire)
Alimentation sur secteur:
12V 1200mA
Puissance de la batterie :
Batterie Li-Ion rechargeable, 12 heures de vie.
Approvals:
Marqué CE et conforme RoHS.
Dimensions :
167mm (H) x 105mm (W) x 105mm (D)
Pico DAB+ Manual.qxd
25/9/08
16:37
Page 17
Deutsch
D A B +
D I G I T A L
R A D I O
plète.
D A B / D A B +
D I G I T A L
R A D I O
Bedienungsanleitung
Pico DAB+ Manual.qxd
25/9/08
16:37
Page 18
Deutsch
Inhalt
Willkommen bei Revo
3
Manuelles Einstellen
6
Vorteile des DAB Radios
3
DRC Einstellung
6
Pico Übersicht und Hauptfunktionen
3
DRC – Dynamische Lautstärkeregelung 6
Garantie
3
Lokale und komplette Suche
6
Garantieregistrierung
3
Voreinstellen der Lieblingssender
6
Bedienelemente und Anschlüsse
3
FM Modus
7
Pico einschalten
3
FM Bedienung
7
Erste Schritte
4
Voreinstellen der Lieblingssender
7
Bedienung des Pico Radios
4
M-Port
8
Menü des Pico Radios
4
Problemlösungen
8
DAB Modus
4
Technische Daten
9
Senderwahl
4
Anzeigemodus ändern
5
DAB Modus Menüoptionen
5
Senderfolge
5
Vorwort
Copyright und
Danksagungen
Copyright © 2008 Revo Technologies Ltd.
Alle Rechte vorbehalten.
Revo Technologies Ltd
The Inox Building
Caldwellside
Lanark
Scotland
United Kingdom
ML11 7SR
Sicherheitshinweise
Benutzen Sie dieses Radio nie in der Nähe
von Wasser. Vermeiden Sie das Eindringen
von kleinen Gegenständen oder Flüssigkeit
ins Radioinnere. Entfernen Sie keine
Schrauben oder Gehäuseteile. Benutzen Sie
nur das mitgelieferte Netzgerät.
EWG: Dieses Produkt wurde gemäß den EUAnforderungen entwickelt und typgeprüft. Es
trägt eine CE-Kennzeichnung.
Tel. 01555 666 161
Fax. 01555 66 33 44
Email. [email protected]
Website: www.revo.co.uk
Die in dieser Bedienungsanleitung
enthaltenen Informationen wurden zum
Zeitpunkt der Veröffentlichung als korrekt
erachtet. Da die ständige Weiterentwicklung
Teil unserer Firmenpolitk ist, können
Informationen ohne Vorankündigung
geändert werden.
Revo®, Pico e M-Port sind Marken oder
registrierte Marken der Revo Technologies
Limited.
iPod® ist eine registrierte Marke der
Apple Computer, Inc.
2
Technischer Support
Sollten Sie Probleme bei der Bedienung
dieses Revo-Radios haben oder sollte dieses
Gerät fehlerhaft sein, kontaktieren Sie bitte
unseren technischen Support unter der
folgenden Rufnummer:
01555 666 161
Alternativ schreiben Sie uns bitte eine Email
an [email protected] oder besuchen Sie
unsere Internetseite unter:
www.revo.co.uk/support
Pico DAB+ Manual.qxd
25/9/08
16:37
Page 19
Deutsch
Willkommen bei Revo DAB
Danke, dass Sie sich für unser Pico Digitalradio entschieden haben. Wir sind sicher,
dass es Ihnen Freude bereiten und lange Zeit ihr zuverlässiger Begleiter sein wird.
Diese Bedienungsanleitung soll Sie mit Ihrem DAB und DAB+ Digitalradio vertraut
machen und Ihnen helfen, es schnell und leicht in Betrieb zu nehmen. Sie finden
Anleitungen zu den komplexeren Ausstattungsteilen und erhalten Informationen zur
Sicherheit, Garantie und Registrierung.
Vorteile des DAB-Radios
Garantie
Sauberer, interferenzfreier digitaler Klang
Viel mehr Sender, viel größere Auswahl
Auswahl nach Sendernamen, keine Frequenzen
Kein erneutes Einstellen
Textinfos über den LCD Bildschirm
Pico: Übersicht
Pico ist ein Radio, das in der Lage ist, die
digitalen Sender sowohl im DAB Modus als
auch im neuen DAB+ Modus zu empfangen.
Deshalb ist es nicht erforderlich, die Software
upzugraden oder irgendwelche Veränderungen
vorzunehmen. Zudem hat das Radio ein
wasserfestes Gehäuse und verfügt über einen
bequemen internen Batteriebetrieb.
Revo Technologies Ltd garantiert dem
Käufer für den Zeitraum von einem Jahr ab
Kaufdatum, dass dieses Produkt bei
sachgemäßem Gebrauch keine Material- und
Herstellungsfehler aufweisen wird.
Die Garantieleistung gilt nicht im Falle von
versehentlicher Beschädigung, Entfernen
des Gehäuses, Abnutzung, Fahrlässigkeit,
Veränderungen am Gerät oder
unsachgemäßem Gebrauch.
Sollten Sie Probleme mit diesem Produkt
haben, wenden Sie sich bitte an Ihren
Händler oder konsultieren Sie alternativ
Seite 2 dieser Bedienungsanleitung zum
Thema technischer Support.
Pico kann auch als HochqualitätsLautsprecher für Ihren iPod® (oder Ihren
MP3-Player oder externe Tonträger) dienen.
Garantieregistrierung
Eine der Garantiebedingungen ist, dass Sie
Ihren Kauf entweder durch Ausfüllen der
Garantieskarte (liegt dem Radio bei) oder
unter www.revo.co.uk/register online
registrieren.
Es genügt, das Gerät mit Hilfe des
mitgelieferten Audiokabels an den M-Port
des Pico Radios anzuschließen
Bedienelemente und Anschlüsse
D A B / D A B +
1.
D I G I T A L
R A D I O
7.
8.
2.
3.
4.
5.
6.
9.
10.
11.
3.
4.
2.
12.
1. LCD Bildschirm
2. Power (an/aus)
1.
3. Menü
4. Voreinstellungen
5. Zurück
6. M-Port
7. Ferngesteuerter Sensor
8. Modus
9. Scroller
10. Info
11. Lautstärke hoch
12. Lautstärke runter
1.
2.
3.
4.
Teleskopantenne
Stereoausgang
3.5mm Kopfhörerbuchse
DC-Adapterbuchse
Pico einschalten
Ihr Pico Radio wird durch das Hauptstromnetz mit Hilfe des mitgelieferten Netzgeräts oder
durch seine wieder aufladbaren, internen Batterien betrieben.
Für den Netzbetrieb stecken Sie den Netzgerätestecker in die DC-Adapterbuchse auf der
Rückseite des Pico Radios. Während das Pico Radio an das Stromnetz angeschlossen ist,
beginnen die internen Batterien mit dem Aufladen. Nach dem vollständigen Aufladen können Sie
die Batterie für 12 Stunden nutzen.
Benutzen Sie nur das mitgelieferte Netzgerät. Ersatzteile finden Sie auf www.revo.co.uk
3
Pico DAB+ Manual.qxd
25/9/08
16:37
Page 20
Deutsch
Erste Schritte
Pico ist ein anspruchsvolles Digitalradio mit verschiedenen
Bedienmodi und vielen erweiterten Funktionen.
SELECT Taste die FM Sendersuche
ausgelöst.
Zur bestmöglichen Nutzung der Funktionen des Pico
Radios ist es wichtig, die Bedienung des cursorbasierten
Kontrollsystems und die Menüfunktionen des Gerätes zu
verstehen und zu erlernen.
ZURÜCK:
Drücken Sie diese Taste, um zum Anfang des
vorher gewählten Menüs zurückzukehren.
Mehrfaches Drücken bringt Sie zum
Hauptmenü des aktuellen Modusmenüs zurück.
Bedienung des Pico Radios
Die Bedienung des Pico Radios basiert auf einem
zentralen Scroller (mit einer Auswahlfunktion
durch Drücken) und einer Reihe von Tasten.
MENU:
Drücken Sie diese Taste um das Bedienmenü des aktuell
ausgewählten Modus zu betreten (oder zu diesem
zurückzukehren). Drücken Sie die Taste ein zweites Mal,
um zum Wiedergabebildschirm zurückzukehren.
SCROLLER:
Lassen Sie den Scroller im und gegen den
Uhrzeigersinn durch die Menüoptionen gleiten.
MODUS:
Ruft in Reihenfolge alle Bedienmodi auf.
ZUR AUSWAHL SCROLLER DRÜCKEN:
Drücken Sie, um etwas auszuwählen den
Scroller. Menüoption: Im FM Modus wird
durch Drücken der
Durch Drücken der MENÜ Taste, können Sie jederzeit
das Menü des aktuellen Bedienmodus aufrufen.
In jedem Modusmenü ist auch das Hauptmenü
aufgeführt, zu welchem Sie durch Auswahl dieser
Option zurückkehren (wie oben beschrieben).
Pico Menüs
Pico verfügt über drei Menüarten:
Hauptmenü
Picos Hauptmenü entspricht der obersten
(ersten) Menüebene und ermöglicht den Zugang
zu den verschiedenen Bedienmodi. Es können
weiterhin Grundeinstellungen vorgenommen und
Informationen wie Softwareversion und ID
Nummer des Radios aufgerufen werden.
Durch Drücken der MENÜ Taste, können Sie jederzeit
das Menü des aktuellen Bedienmodus aufrufen. In
jedem Modusmenü ist auch das Hauptmenü
aufgeführt, zu welchem Sie durch Auswahl dieser
Option zurückkehren (wie oben beschrieben).
Hauptmenü
Das Hauptmenü erlaubt den Zugriff auf die
folgenden Modi und Untermenüs:
DAB
FM
Info
System
Setup
Modusmenü
Die Modusmenüs werden so genannt, weil
sie die zugänglichen Funktionen innerhalb
jedes Bedienmodus (DAB Modus, FM
Modus, usw.) anzeigen.
Mit Hilfe des Scrollers kann eine Option
auswählt werden, indem Sie diesen durch
die Menüoptionen gleiten lassen. Wurde die
gewünschte Option gefunden, wird sie durch
Drücken des Scrollers ausgewählt.
DAB Modus
Senderauswahl
Stellen Sie sicher, dass die Teleskopantenne
auf der Rückseite Ihres Pico ausgezogen ist.
Drücken Sie die MODE-Taste, um in den ‘FM Modus’
zu gelangen und um zwischen dem DAB und FM
Modus hin und her zu schalten. Alternativ kann man
auch über das Hauptmenü in den FM Modus gelangen.
MODE
DAB Mode
Beim ersten Benutzen Ihres Pico, sucht
das Gerät DAB Sender in Ihrem Umfeld
und speichert diese. Pico stellt gleichzeitig
die Uhrzeit und das aktuelle Datum ein.
Wenn Sie die INFO-Taste drücken und
diese für zwei Sekunden gedrückt halten,
startet die manuelle Sendersuche.
Am Ende der Suche erscheinen die Sender
auf dem Display erst in numerischer und
dann in alphabetischer Reihenfolge.
Wird kein DAB Signal gefunden, versuchen Sie,
Ihr Radio an einem anderen Ort zu benutzen.
Alternativ kann es nötig sein zu kontrollieren, ob
in Ihr Umfeld in einem DAB Sendegebiet liegt.
Um einen Sender auszuwählen, scrollen Sie durch
die Liste der verfügbaren Senderstationen und
wählen durch Drücken des Scrollers eine aus.
4
DAB Mode
INFO
Scanning...
10
•••••
Scanning...
10
•••••
>ArrwRock
BBCAD
sA
iB
anMode
>ArrwRock
BBCAsian
BBC 6Music
A
B.
M.
oda
eva10
ea
rn
vn
iD
cn
eg
n.
o
t
Sc
i
•
•C
••6
•Music
BB
Service not ava
B
B
C
6
M
S
c
a
n
n
iu
ns
gi
.c
..
10
>
Aa
ry
r
w
Pl
i
nR
gock
•
•B
•C
•
•
B
A
sian
BBC 6Music
Playing
>ArrwRock
BBC 6Music
BBCAsian
Service not ava
BBC 6Music
B
SB
eC
rv6
iM
cu
esi
nc
ot ava
Playing
BBC 6Music
Playing
Pico DAB+ Manual.qxd
25/9/08
16:37
Page 21
BBC Radio 1
12:34 22-08-2007
BBC Radio 1
12B
225.64MHz
Anzeigemodus ändern
Pico hat neun verschiedene Anzeigemodi.
Drücken Sie einfach die INFO Taste, um zu
den verschiedenen Modi zu gelangen. Die
Anzeigemodi sind in der nebenstehenden
Tabelle erklärt:
Deutsch
BBC Radio 1
128kbps
Stereo
Anzeigeoptionen
Normale Anzeige
mit gleitendem Text
Signalpegel, der
Anzeiger auf der Leiste
zeigt das Minimum des
akzeptierbaren Pegels
Sendetyp
Rundfunkstation
Sendername und
Frequenz
Signalstärke
Datenrate und
Sendetyp
Uhrzeit
Datum
Beispiel
BB
BC
CR
Ra
ad
di
io
o1
1
B
c
a
l
str
c
o
s
t
m
ci
ag
ll
ls
ce
on
sg
tth
ma
ax
x 96
S
BBC Radio 1
B
B
C
R
ad
i
o
1max
c
a
l
l
s
c
o
s
t
BB
BC
C R
Ra
adi
io
o 1
1
B
S
ci
ag
ln
la
sld
ce
or
sr
tor
max 98
Po
op
p M
Mu
us
si
ic
c
P
BBC Radio 1
BB
BC
C R
Ra
ad
di
io
o 1
1
B
P
o
p
M
u
s
i
c
B
B
C
R
a
d
i
o
c
a
l
lP
s
c
o
s
B
B
C
R
a
d
ic
ot1
1max
P
o
p
M
u
s
i
t
l
k
S
O
R
T
B
B
C
N
a
t
i
o
n
BBC Nationa
al
l D
DA
AB
B
B
B
C
R
a
d
i
o
1
BB
BC
CR
Ra
ad
di
io
o1
1
B
B
B
C
R
a
d
i
o
1
c
a
l
l
s
c
o
s
t
m
a
x
B
B
C
R
a
d
i
o
1
B
B
C
N
a
t
i
o
n
a
l
D
A
B
B
B
C
R
a
d
i
o
1
c
a
l
l
s
c
o
s
t
m
a
x
B
B
C
R
a
d
i
o
1
P
o
p
M
u
s
c
B
B
C
R
a
d
i
o
1
B
B
ClR
N
a
t
i
ot
n
a
l
D
A
B
B
B
C
a
d
i
o
6
M
u
i
c
c
a
l
s
c
o
s
m
as
x
1
2
:
3
4
2
2
0
8
2
0
0
7
1
2
:
3
4
2
2
0
8
2
0
0
7
1
1
:
4
8
:
0
3
BBC Radio 1
B
BB
BC
CR
Ra
ad
di
io
o1
1
P
o
p
M
u
s
i
c
B
B
C
a
d
i
o
1
2
:
3R
4
2
2
01
8
-2007
B
P
o
p
M
u
s
c
B
B
C
R
a
d
i
o
1
BB
BC
C3R
Na
ad
ti
io
o0
n1
al20
D0
A7
B
B
B
C
R
a
d
i
o
1
1
2
:
4
2
2
8
B
B
C
R
a
d
i
o
6
M
us
ic
P
o
p
Mus
i
c
1
2
B
2
2
5
.
6
4
1
2
B
2
2
5
.6
4M
MH
Hz
z
1
8
/
12
/
2
0
0
7
B
B
C
R
a
d
i
o
1
B
B
C
R
a
d
i
o
1
BB
BC
CR
Ra
ad
di
io
o1
1
B
BB
BC
CR
Na
ad
ti
io
o.
n1
a4
lMH
Dz
AB
B
1
2
B
2
2
5
6
BB
BC
CR
R
ad
d
io
on1
1
Na
ti
al20
D0
A7
B
B
1
2
:
3R
4
2
2
0
8
B
B
C
a
d
i
o
1
1
2
B
2
2
5
.
6
4
MH
z
B2
B8
Ckb
Np
as
tionS
at
le
De
AB
1
r
128kbps
Stereo
o
BB
BC
C R
Ra
ad
di
io
o 1
1
B
B
BB
BC
C3R
Ra
ad
di
io
o01
1-2007
1
2
:
4
2
2
8
B
B
C
R
a
d
i
o
1
1
2
8
k
p
s
S
t
er
e7
o
B
B
C
R
a
d
i
o
1
1
2
:
3b
4
2
2
0
8
B
B
C
R
a
d
i
o
1
1
2
B
2
2
5
.
6
42
M0
H0
zo
B2
B8
Ckb
Rp
as
dio S
1t
1
e
r
e
1
2
:
3
4
2
2
0
8
Si
ig
g s
st
tr
re
en
ng
gt
th2007
96
6
S
h
9
B
BB
BC
CR
Ra
ad
di
io
o1
1
B
B
C
R
a
d
i
o
1
B
B
C
R
a
d
i
o
1
1
2
B
2
2
5
.
6
4
M
H
z
B
B
C
R
a
d
i
o
1
Si
ig
gna
sl
td
re
er
nr
go
tr
hMHz9
98
6
B
B
C
R
a
i
o
1
1
2
B
2
2
5
.
6
4
S
1
2
8
ka
b
p
S
t
reo
S
Si
ig
gn
sl
ts
re
er
nr
go
tr
he
98
6
1
2
B
2
2
5
.
6
4
MHz9
Bi
Bg
Cna
Rl
ade
ir
oro
1r
S
9
8
B
R
BB
BC
Ck
Ra
ad
di
io
or1
1t
1
2
8
p
s
S
reo
S
i
g
nb
a
l
e
r
o
re
98
B
B
C
R
a
d
i
1
2
8
k
b
p
s
S
t
P
Sl
ik
gS
sO
tR
rT
eo
ng1
tt
hereo
96
t
1l
2k
8S
kP
bO
pR
sT Stereo
BBC Radio 1
t
Bl
Bk
CS
RO
aR
dT
ir
oo
1
S
i
g
nP
a
l
e
9
Sl
ik
gS
sO
tR
rT
enr
gtr
h
98
6
t
P
B
B
C
R
a
d
i
o
1
SB
iC
gR
sa
td
ri
eo
ng6
tM
husic
96
B
B
B
C
R
a
d
i
o
6
S1
i:
g48
s:
t0
r3
engtM
husic
96
1
1
S1
i:
g4
n8
a:
l03
error
98
B
SB
iC
gnR
aa
ldi
eo
rr6
oM
rusic
98
t
lk
SP
OR
B
C
dT
i
6
M
usic
1B
1:
4R
8a
:0
3o
S
i
g
n
a
l
e
r
r
o
r
98
B
1B
1C
:4R
8a
:d
0i
3o
B
B
C
R
a
d
i
o 6
6M
Mu
us
si
ic
c
1
8
/
1
2
/
2
0
0
7
1
t8
l/
k1
S2
P/
O2
R0
T07
B
B
C
R
a
d
i
t
Bl
Bk
CSP
RO
aR
dT
io
o 6
6M
Mu
us
si
ic
c
B
B
C
R
a
d
i
o
1
8
/
1
2
/
2
0
76Music
t
l
k
S
P
O
R
T
18
1/
:1
42
8/
:2
00
30
1
07
BBC Radio 6Music
BBC Radio 6Music
1B
1:
8a
:0
3o 6Music
B
C4R
di
B
C4R
di
1B
1:
8a
:0
3o 6Music
18/12/2007
11:48:03
Pico verfügt über mehrere Zusatzfunktionen, welche über das DAB Menü wieBfolgt
BC Rzugänglich
adio 6Musind:
sic
BBC Radio 6Music
18/12/2007
B
C1R
d0
i0
o76Music
1B
8/
2a
/2
Senderfolge
18/12/2007
DAB Modus Menüoptionen
Drücken Sie die MENU Taste im DAB
Modus und wählen Sie ‘Senderfolge’.
Bestimmung der Reihenfolge der Sender,
die angezeigt werden sollen:
Die folgende Tabelle beschreibt die unter
‘Senderfolge’ wählbaren Optionen:
Senderfolge
Beschreibung
Alphanumerisch
Auflistung in alphabetischer
Reihenfolge.
Ensemble
Auflistung nach multiplex.
Valid
Zeigt nur aktive Sender an.
Wählen Sie die Option Senderfolge.
Lassen Sie den Scroller durch Optionen zu
rollen, drücken Sie dann die SELECT Taste.
5
Pico DAB+ Manual.qxd
25/9/08
16:37
Page 22
Deutsch
Manuelles Einstellen
Wählen Sie die Option ‘Manuelles
Einstellen’ aus dem DAB Modusmenü aus.
Die Anzeige der Auswahl ‘Manuelles Einstellen’
erlaubt Ihnen das Einstellen einer bestimmten
Frequenz. Die angezeigte Frequenzliste ist
abhängig vom aktuell eingestellten
Frequenzbereich und enthält alle Frequenzen
innerhalb dieses Bereiches. Es wird zuerst der
Kurzname der Frequenz angezeigt, z.B. 12B,
auf welchen die genaue Frequenz in MHz folgt.
Entspricht ein Sender der eingegebenen
Sendernummer und –frequenz, werden
dessen Name, Frequenz und die
entsprechende Signalstärke angezeigt.
DRC – Dynamische Lautstärkeregelung
Pico verfügt über eine besondere Art der
Lautstärkeregelung, welche das Volumen ruhigerer
Töne in einem geräuschstarken Umfeld erhöht.
Die DRC Bedienung findet sich im DAB
Modusmenü unter ‘DRC’. Es stehen die drei
folgenden Einstellungen zur Wahl:
DRC
Beschreibung
DRC niedrig
Die DRC ist auf halber
Stärke
DRC hoch
Empfohl. Einstellung für ein
geräuschstarkes Umfeld
DRC aus
Die DRC ist ausgeschaltet
Lokale und komplette Suche
Mit der Zeit werden in Ihrem Umfeld neue
Sender zur Verfügung stehen. Um diese zu
finden und zu Ihrer Senderliste hinzuzufügen,
ist entweder eine ‚lokale‘ oder eine ‚komplette‘
Suche notwendig. Beide Operationen sind
über das DAB Modusmenü zugänglich.
Eine lokale Suche ist kürzer und deckt nur
die lokalen Sender ab.
Eine Komplettsuche benötigt mehr Zeit, deckt
allerdings die ganze DAB Reichweite ab.
Voreinstellen der Lieblingssender
Pico gestattet es, 12 Sender mittels der
PRESET-Taste auf der Pico Rückseite
oder über die optionale Fernbedienung zu
speichern.
Um den gerade gehörten Sender als
Voreinstellung zu speichern, drücken Sie
einfach die PRESET-Taste und suchen Sie
mit Hilfe des Scrollers einen unbenutzten
Speicherplatz. Zum Abspeichern drücken Sie
auf den Scroller.
Um einen gespeicherten Sender zu hören,
drücken Sie zunächst die PRESET-Taste.
Suchen Sie dann mit Hilfe des Scrollers die
gewünschte Voreinstellung und wählen diese
durch Drücken aus.
FM Modus
FM Bedienung
Ziehen Sie die Teleskopantenne an der
Rückseite des Gerätes aus.
Drücken Sie die MODE-Taste, um in den ‘FM Modus’
zu gelangen und um zwischen dem DAB und FM
Modus hin und her zu schalten. Alternativ kann man
auch über das Hauptmenü in den FM Modus
gelangen.
Beim ersten Benutzen Ihres Pico, sucht das
Gerät die FM Frequenzspanne in Ihrem
Umfeld ab. Ansonsten wird der zuletzt
gehörte Sender gewählt.
Um die FM Frequenzspanne zu
durchsuchen, benutzen Sie den Scroller
Um den nächsten aktiven Sender zu
‘SUCHEN’, drücken Sie den Scroller.
Voreinstellen der Lieblingssender
Pico gestattet es, 12 Sender mittels der
PRESET-Taste auf der Pico Rückseite oder
über die optionale Fernbedienung zu speichern.
Um den gerade gehörten Sender als
Voreinstellung zu speichern, drücken Sie einfach
die PRESET-Taste und suchen Sie mit Hilfe des
Scrollers einen unbenutzten Speicherplatz. Zum
Abspeichern drücken Sie den Scroller.
Um einen gespeicherten Sender zu hören,
drücken Sie zunächst die PRESET-Taste.
Suchen Sie dann mit Hilfe des Scrollers die
gewünschte Voreinstellung und wählen diese
durch Drücken aus.
6
FM Mode
MODE
87.50F
MM
hzMode
88
77
..
55
00
MM
hh
zz
FM
FF
MM
8B
7B
.C
50R
Ma
hd
zio 1
FM
Preset Stored
FM Mode
FM Mode
BBC Radio 1
>
P
r
e
Presetse
St
to1
reu
dnset
> Preset 2 unset
87.50Mhz
FM
87.50Mhz
FM
>> PP
rr
ee
ss
ee
tt 11 us
ne
st
et
>> PP
rr
ee
ss
ee
tt 22 uu
nn
ss
ee
tt
87.50Mhz
FM
87.50Mhz
FM
> Preset 1 set
> Preset 2 unset
BBC Radio 1
B
BC Radi
o 1
Preset
Stored
Preset Stored
>
>
>
>
Preset
P
reset
Preset
Preset
1
1
2
2
unset
u
nset
unset
unset
>
>
>
>
Preset
P
reset
Preset
Preset
1
1
2
2
set
s
et
unset
unset
Pico DAB+ Manual.qxd
25/9/08
16:37
Page 23
Deutsch
MPort Modus
MPort benutzen
Der Revos MPort Anschluss erlaubt ein
schnelles und einfaches Anschließen an
einen iPod®, einen anderen MP3 Player
oder an andere Tonträger.
Benutzen Sie das beigefügte
Verbindungskabel und verwandeln Sie Pico
in einen Hochqualitätslautsprecher.
Verbinden Sie ein Ende des mitgelieferten
Audiokabels mit der Kopfhörerbuchse
(oder Auxiliary Out) Ihres Ausgangsgeräts
und verbinden Sie das andere Ende mit
dem Mport auf der Pico-Vorderseite.
MPort Mode
M-Port
Auf Pico LCD Bildschirm steht nun das
Wort ‘MPort’.
Sie sollten den Lautstärkegrad am
Ausgangsgerät und an Ihrem Pico justieren,
um eine optimale Musikqualität und eine
angenehme Lautstärke zu erzielen.
Problemlösungen
DAB Digitalradio
F. Ich höre ein ‘knatterndes’ Geräusch bei
einigen Sendern.
A. Ist die Signalstärke zu niedrig, kann die
Verbindung unterbrochen werden. Dieses
Geräusch ist die Folge davon. Stellen Sie
sicher, dass die Antenne vollständig
senkrecht ausgezogen ist. Besteht das
Problem weiterhin, wechseln Sie zu einem
anderen Ort oder überprüfen Sie, ob Sie
sich in einem Empfangsgebiet befinden.
F. Die Nachricht ‘Kein Sender verfügbar’
wird angezeigt.
A. Stellen Sie sicher, dass die Antenne
vollständig senkrecht ausgezogen ist.
Kontrollieren Sie die Signalstärke und
bringen Sie Ihr Pico notfalls an einen
anderen Ort.
F. Die Pico Uhr ist nicht eingestellt.
A. Pico benötigt ein DAB Signal um seine
Uhr einzustellen, da die Uhrzeit von einer
Radiosendestation empfangen wird. Sollte
Pico einen DAB Sender finden, kann es
seine Uhr einstellen.
Rücksetzen der Betriebseinstellungen
Im unwahrscheinlichen Fall, dass Pico fehlerhaft funktioniert, ist es möglich, zur Wiederherstellung der ursprünglichen Betriebseinstellungen die Softwareeinstellungen
zurückzusetzen. Diese Funktion, zu der man über das Hauptmenü gelangen kann,
ist im Systemsetupmenü zu finden,
7
Pico DAB+ Manual.qxd
25/9/08
16:37
Page 24
Deutsch
Technische Daten
8
Allgemeines:
Mono DAB und FM Radio mit vollem Band III Empfang.
Lautsprecher:
2,25” volle Neodym-Reichweite
Audiostromausgang:
6W
Frequenzspanne:
DAB Band III (174 - 240 MHz)
DAB+ Deckung
FM (87.5 - 108 MHz)
Antenne:
Integrierte Teleskopantenne
Eingangsanschlüsse:
DC Adapterbuchse (230V Adapter mitgeliefert)
3.5mm Eingang für Zusatzgeräte (M-Port)
Ausgangsanschlüsse:
3.5mm Kopfhörerbuchse
RCA Stereoanschlüsse
LCD Bildschirm:
3 Zeilen “negativ” LCD Bildschirm mit hoher Auflösung
(2 Textzeilen, 1 Symbolzeile, 16 Zeichenbreite)
Voreinstellungen:
12 DAB und 12 FM Voreinstellungen
Fernbedienung:
Infrarotfernbedienung (optionales Zubehör)
Stromversorgung:
12V 1200mA
Batterie:
Aufladbare Li-Ion Batterie, Batterieautonomie 12 Stunden
Zertifizierungen:
CE gekennzeichnet und RoHS konform
Abmessungen:
167mm (H) x 105mm (B) x 105mm (T)
Pico DAB+ Manual.qxd
25/9/08
16:37
Page 25
Italiano
D A B +
D I G I T A L
D A B / D A B +
D I G I T A L
R A D I O
R A D I O
Mode d emploi
Pico DAB+ Manual.qxd
25/9/08
16:37
Page 26
Italiano
Contenuti
Introduzione a Revo
3
Sintonia Manuale
6
Vantaggi della radio DAB
3
Impostare il DRC
6
Panoramica su Pico e funzioni principali
3
DRC - Dynamic Range Control
6
Garanzia
3
Scansione Local e Completa
6
Attivazione della Garanzia
3
Preselezioni stazioni preferite
6
Comandi e Connessioni
3
Modalità FM
7
Alimentare Pico
3
Modalità FM
7
Istruzioni
4
Preselezioni stazioni preferite
7
Comandi di Pico
4
M-Port
8
Spiegazione menu di Pico
4
Risoluzione dei Problemi
8
Modalità DAB
4
Specifiche Tecniche
9
Scegliere una stazione
4
Cambiare la modalità del display
5
Opzioni Menu Modalità DAB
5
Ordine Stazioni
5
Premessa
Copyright e
Riconoscimenti
Copyright © 2008 Revo Technologies Ltd.
Tutti i diritti riservati.
Revo Technologies Ltd
The Inox Building
Caldwellside
Lanark
Scotland
United Kingdom
ML11 7SR
Informazioni di Sicurezza
Non utilizzare questa radio in vicinanza di
acqua.
Evitare che piccolo oggetti e liquidi entrino
nel prodotto.
Non rimuovere viti o aprire gli alloggiamenti.
Utilizzare solo l’alimentatore di corrente
fornito.
CEE: Questo prodotto è stato progettato e
testato uniformemente ai requisiti UE ed è
marchiato CE.
Tel. 01555 666 161
Fax. 01555 66 33 44
Email. [email protected]
Sito Web: www.revo.co.uk
Le informazioni contenute in questa guida
sono da considerarsi esatte al momento
della sua pubblicazione. Poiché perseguiamo
una politica di continuo sviluppo le
informazioni sono soggette a cambiamento
senza preavviso.
Revo®, Pico e M-Port sono marchi o marchi
registrati di Revo Technologies Limited.
iPod® è un marchio registrato di Apple
Computer, Inc.
2
Assistenza Tecnica
Nel caso di problemi nell’utilizzo di questa
radio Revo o se essa dovesse risultare
difettosa per favore contattare la nostra
assistenza tecnica al seguente numero:
0044 1555 666 161
In alternativa è possibile scrivere una mail
all’indirizzo [email protected] o visitare la
sezione Risoluzione dei problemi del nostro
sito all’indirizzo web: www.revo.co.uk/support
Pico DAB+ Manual.qxd
25/9/08
16:38
Page 27
Italiano
Introduzione a Revo DAB
Grazie per aver scelto la nostra Radio Digitale Pico. Siamo certi che saprà
divertirvi per lungi anni senza recarvi alcun problema.
Questa guida permette di installare con facilità e rapidità la radio digitale DAB e
DAB+, offrendo una guida alle caratteristiche più complesse del prodotto e fornendo
informazioni sulla sicurezza, la garanzia e la registrazione del prodotto stesso.
Vantaggi della Radio DAB
Garanzia
Suono digitale pulito e senza interferenze
Molte più stazioni, molta più scelta
No frequenze, scelta tramite nome della stazione
No ri-selezione
Informazioni testuali su schermo LCD
Panoramica su Pico
Pico è una radio in grado di ricevere stazioni
digitali sia in modalità DAB che nella nuova
modalità DAB+, senza dover effettuare upgrade
del software o apportare modifiche, dotata di
una scocca resistente all’acqua e con la
comodità dell’alimentazione interna a batterie.
Revo Technologies Ltd garantisce
all’acquirente che questo prodotto non
presenterà difetti di componenti e di
fabbricazione durante il normale utilizzo per
un periodo di un anno dalla data di acquisto.
La garanzia decade in caso di danno
accidentale, di asportazione
dell’alloggiamento, di logoramento,
negligenza, modifiche o uso inappropriato.
In caso di problemi contattare il proprio
fornitore o in alternativa consultare pag. 2
di questa guida per i dettagli sul supporto
tecnico.
Pico può essere usato anche come sistema di
amplificazione di alta qualità per il lettore iPod®
(o lettori MP3 o fonti sonore di altro tipo).
Attivazione della garanzia
Per attivare la garanzia è obbligatorio
registrare il proprio acquisto compilando
la cartolina di garanzia allegata alla vostra
radio o in alternativa registrandosi on line al
seguente indirizzo: www.revo.co.uk/register
È sufficiente collegare l’ apparecchio
all’ingresso M-Port™ utilizzando il cavo audio
fornito.
Comandi e Connessioni
D A B / D A B +
1.
D I G I T A L
R A D I O
7.
8.
2.
3.
4.
5.
6.
9.
10.
11.
3.
4.
2.
12.
1. Schermo LCD
2. Power (accensione) 1.
3. Menu
4. Preselezioni
5. Indietro
6. M-Port
7. Sensore telecomando
8. Modalità
9. Comando a Rotella
10. Info
11. Volume Su
12. Volume Giù
1.
2.
3.
4.
Antenna Telescopica
Uscita Stereo
Ingresso cuffie 3.5mm
Ingresso DC Power
Alimentare Pico
La radio Pico è alimentata dalla rete elettrica tramite il trasformatore fornito, oppure dalla
batteria interna ricaricabile.
Per alimentare la radio dalla rete elettrica inserire il trasformatore nell’ingresso DC posizionato
sul retro di Pico. La sua batteria interna si ricarica quando la radio è collegata alla rete elettrica.
A pieno carico la batteria interna ha un’autonomia di 12 ore.
Usare solo il trasformatore fornito. I pezzi di ricambio sono disponibili sul sito web
www.revo.co.uk
3
Pico DAB+ Manual.qxd
25/9/08
16:38
Page 28
Italiano
Istruzioni
Pico è un sofisticato apparecchio radio digitale,
dotato di molteplici modalità di funzionamento e
molte caratteristiche avanzate.
E’ importante apprendere il funzionamento dei
cursori di comando e conoscere i menu di Pico
per poter ottenere il massimo dalle sue funzioni.
Comandi di Pico
I comandi di Pico si basano su un comando
a rotella centrale (con funzione di selezione
tramite pressione) e alcuni pulsanti.
ROTELLA DI SCORRIMENTO:
Ruotare in senso orario e antiorario per
scorrere le opzioni del menu.
PREMERE PER SELEZIONARE
Premere il comando a rotella per
selezionare la corrente voce di menu.
Spiegazione dei Menu di Pico
Pico ha tre tipi di menu:
Menu Principale
Questo è il menu principale di Pico (top
level) e permette di entrare nelle diverse
modalità di funzionamento, di impostare la
radio e controllare informazioni come la
versione del software o l’ID della radio.
Menu Modalità
I menu Modalità sono chiamati in questo modo
perchè mostrano tutte le funzioni disponibili
all’interno di ciascuna modalità di funzionamento
(modalità DAB, modalità FM, ecc.).
In modalità FM la pressione di SELECT fa
partire la ricerca di stazioni FM.
INDIETRO:
Premere per tornare alla precedente voce di
menu. Premendo più volte si ritorna al
primo livello del menu Modalità (della
modalità corrente).
MENU:
Premere per entrare (o ritornare) nel menu
Modalità della modalità corrente. Premendo
una seconda volta si ritorna alla schermata
in esecuzione.
MODALITA:
Entra in maniera sequenziale in ognuna delle
modalità di funzionamento.
Questi comandi permettono di attivare la
maggior parte delle funzioni e di navigare nei
vari Menu di Pico.
In qualsiasi momento la pressione del
pulsante MENU aprirà il menu Modalità della
modalità di funzionamento che la radio sta
utilizzando. Ogni menu Modalità include la
voce Menu Principale – selezionando questa
opzione si torna al Menu Principale (come
descritto in precedenza).
Menu Principale
Dal Menu Principale si accede alle seguenti
modalità e relativi sottomenu:
DAB
FM
Info
System
Setup
Per selezionare un’opzione del menu
scorrere con la rotella le opzioni di menu e
premere per confermare la selezione.
Modalità DAB
Scegliere una Stazione
Assicurarsi di aver allungato l’antenna
telescopica posizionata sul retro di Pico.
Premere il pulsante MODE per entrare in
‘Modalità DAB’ e passare dalla Modalità FM
alla Modalità DAB. È possibile entrare in
Modalità DAB anche dal Menu Principale.
MODE
DAB Mode
Alla sua prima accensione Pico cerca le
stazioni DAB della zona e le immagazzina
in memoria. Allo stesso tempo sincronizza
l’orologio e la data.
Premere e tenere premuto il pulsante
INFO per due secondi per effettuare la
ricerca manuale delle stazioni.
Al termine della ricerca le stazioni
compaiono sul display in ordine numerico
o alfabetico.
Se non viene trovato alcun segnale DAB
bisogna posizionare la radio in un altro
luogo o verificare se la zona è coperta da
segnale DAB.
Per selezionare una stazione scorrere con
la rotella la lista delle stazioni disponibili e
premere per confermare la selezione.
4
DAB Mode
INFO
Scanning...
10
•••••
Scanning...
10
•••••
>ArrwRock
BBCAD
sA
iB
anMode
>ArrwRock
BBCAsian
BBC 6Music
A
B.
M.
oda
eva10
ea
rn
vn
iD
cn
eg
n.
o
t
Sc
i
•
•C
••6
•Music
BB
Service not ava
B
B
C
6
M
S
c
a
n
n
iu
ns
gi
.c
..
10
>
Aa
ry
r
w
Pl
i
nR
gock
•
•B
•C
•
•
B
A
sian
BBC 6Music
Playing
>ArrwRock
BBC 6Music
BBCAsian
Service not ava
BBC 6Music
B
SB
eC
rv6
iM
cu
esi
nc
ot ava
Playing
BBC 6Music
Playing
Pico DAB+ Manual.qxd
25/9/08
16:38
Page 29
BBC Radio 1
12:34 22-08-2007
BBC Radio 1
12B
225.64MHz
Cambiare la modalità del display
Pico ha nove differenti modalità del display.
Premete in pulsante INFO per consultare
le varie modalità. Le modalità del display
sono spiegate nella tabella a fianco:
Italiano
BBC Radio 1
128kbps
Stereo
Opzione Display
Esempio
BB
BC
CR
Ra
ad
di
io
o1
1
B
c
a
l
str
c
o
s
t
m
ci
ag
ll
ls
ce
on
sg
tth
ma
ax
x 96
S
BBC Radio 1
B
B
C
Rad
i
o
1max
c
a
l
l
s
c
o
s
t
BB
BC
C R
Ra
adi
io
o 1
1
B
S
ci
ag
ln
la
sld
ce
or
sr
tor
max 98
Po
op
p M
Mu
us
si
ic
c
P
BC Radio 1
Livello del segnale, B
BB
BC
C R
Ra
ad
di
io
o 1
1
B
o
p
M
u
s
i
c
la barra mostra il P
B
B
C
R
a
d
i
o
c
a
l
lP
s
c
o
s
B
B
C
R
a
d
ic
ot1
1max
P
o
p
M
u
s
i
t
l
k
S
O
R
T
B
B
C
N
a
t
i
o
n
livello minimo
BBC Nationa
al
l D
DA
AB
B
B
B
C
R
a
d
i
o
1
BB
BC
CR
Ra
ad
di
io
o1
1
accettabile
B
B
B
C
R
a
d
i
o
1
c
a
l
l
s
c
o
s
t
m
a
x
B
B
C
R
a
d
i
o
1
B
B
C
N
a
t
i
o
n
a
l
D
A
B
B
B
C
R
a
d
i
o
1
c
a
l
l
s
c
o
s
t
m
a
x
B
B
C
R
a
d
i
o
1
P
o
p
M
u
s
c
B
B
C
R
a
d
i
o
1
B
B
ClR
N
a
t
i
ot
n
a
l
D
A
B
B
B
C
a
d
i
o
6
M
u
i
c
c
a
l
s
c
o
s
m
as
x
1
2
:
3
4
2
2
0
8
2
0
0
7
1
2
:
3
4
2
2
0
8
2
0
0
7
1
1
:
4
8
:
0
3
Tipo di trasmissione BBC Radio 1
B
BB
BC
CR
Ra
ad
di
io
o1
1
P
o
p
M
u
s
i
c
B
B
C
a
d
i
o
1
2
:
3R
4
2
2
01
8
-2007
B
P
o
p
M
u
s
c
B
B
C
R
a
d
i
o
1
BB
BC
C3R
Na
ad
ti
io
o0
n1
al20
D0
A7
B
B
B
C
R
a
d
i
o
1
1
2
:
4
2
2
8
B
B
C
R
a
d
i
o
6
M
us
ic
P
o
p
Mus
i
c
1
2
B
2
2
5
.
6
4
1
2
B
2
2
5
.6
4M
MH
Hz
z
1
8
/
12
/
2
0
0
7
B
B
C
R
a
d
i
o
1
B
B
C
R
a
d
i
o
1
Emittente
BB
BC
CR
Ra
ad
di
io
o1
1
B
BB
BC
CR
Na
ad
ti
io
o.
n1
a4
lMH
Dz
AB
B
1
2
B
2
2
5
6
BB
BC
CR
R
ad
d
io
on1
1
Na
ti
al20
D0
A7
B
B
1
2
:
3R
4
2
2
0
8
B
B
C
a
d
i
o
1
1
2
B
2
2
5
.
6
4
MH
z
B2
B8
Ckb
Np
as
tionS
at
le
De
AB
1
r
128kbps
Stereo
o
BB
BC
C R
Ra
ad
di
io
o 1
1
Nome della stazione B
B
BB
BC
C3R
Ra
ad
di
io
o01
1-2007
1
2
:
4
2
2
8
B
B
C
R
a
d
i
o
1
1
2
8
k
p
s
S
t
er
e7
o
e frequenza
B
B
C
R
a
d
i
o
1
1
2
:
3b
4
2
2
0
8
B
B
C
R
a
d
i
o
1
1
2
B
2
2
5
.
6
42
M0
H0
zo
B2
B8
Ckb
Rp
as
dio S
1t
1
e
r
e
1
2
:
3
4
2
2
0
8
Si
ig
g s
st
tr
re
en
ng
gt
th2007
96
6
S
h
9
B
BB
BC
CR
Ra
ad
di
io
o1
1
B
B
C
R
a
d
i
o
1
B
C
R
a
d
i
o
1
1
2
B
2
2
5
.
6
4
M
H
z
B
B
C
R
a
d
i
o
1
Potenza del segnale B
Si
ig
gna
sl
td
re
er
nr
go
tr
hMHz9
98
6
B
B
C
R
a
i
o
1
1
2
B
2
2
5
.
6
4
S
1
2
8
ka
b
p
S
t
reo
S
Si
ig
gn
sl
ts
re
er
nr
go
tr
he
98
6
1
2
B
2
2
5
.
6
4
MHz9
Bi
Bg
Cna
Rl
ade
ir
oro
1r
S
9
8
B
R
BB
BC
Ck
Ra
ad
di
io
or1
1t
Codifica dati e tipo
1
2
8
p
s
S
reo
S
i
g
nb
a
l
e
r
o
re
98
B
B
C
R
a
d
i
1
2
8
k
b
p
s
S
t
P
Sl
ik
gS
sO
tR
rT
eo
ng1
tt
hereo
96
di trasmissione
t
1l
2k
8S
kP
bO
pR
sT Stereo
Display normale con
testo che scorre
Orario
Data
BBC Radio 1
t
Bl
Bk
CS
RO
aR
dT
ir
oo
1
S
i
g
nP
a
l
e
9
Sl
ik
gS
sO
tR
rT
enr
gtr
h
98
6
t
P
B
B
C
R
a
d
i
o
1
SB
iC
gR
sa
td
ri
eo
ng6
tM
husic
96
B
B
B
C
R
a
d
i
o
6
S1
i:
g48
s:
t0
r3
engtM
husic
96
1
1
S1
i:
g4
n8
a:
l03
error
98
B
SB
iC
gnR
aa
ldi
eo
rr6
oM
rusic
98
t
lk
SP
OR
B
C
dT
i
6
M
usic
1B
1:
4R
8a
:0
3o
S
i
g
n
a
l
e
r
r
o
r
98
B
1B
1C
:4R
8a
:d
0i
3o
B
B
C
R
a
d
i
o 6
6M
Mu
us
si
ic
c
1
8
/
1
2
/
2
0
0
7
1
t8
l/
k1
S2
P/
O2
R0
T07
B
B
C
R
a
d
i
t
Bl
Bk
CSP
RO
aR
dT
io
o 6
6M
Mu
us
si
ic
c
B
B
C
R
a
d
i
o
1
8
/
1
2
/
2
0
76Music
t
l
k
S
P
O
R
T
18
1/
:1
42
8/
:2
00
30
1
07
BBC Radio 6Music
BBC Radio 6Music
1B
1:
8a
:0
3o 6Music
B
C4R
di
B
C4R
di
1B
1:
8a
:0
3o 6Music
18/12/2007
11:48:03
Pico possiede un numero di funzioni addizionali alle quali si può accedere dal B
Menu
BC RModalità
adio 6MDAB:
usic
BBC Radio 6Music
18/12/2007
B
C1R
d0
i0
o76Music
1B
8/
2a
/2
Ordine Stazioni
18/12/2007
Opzioni Menu Modalità DAB
Premere il pulsante MENU in Modalità
DAB e selezionare ‘Ordine Stazioni’.
Per specificare l’ordine in cui le stazioni
devono essere mostrate:
La tabella seguente mostra le opzioni
disponibili nel menu ‘Ordine Stazioni’:
Ordine Stazioni
Descrizione
Alfanumerico
Elenca le stazioni in ordine
alfabetico.
Ensemble
Elenca le stazioni per multiplex.
Operative
Elenca solo le stazioni attive.
Selezionare l’opzione Ordine Stazioni.
Ruotare il comando a rotella per scorrere
le opzioni e premere per confermare la
scelta.
5
Pico DAB+ Manual.qxd
25/9/08
16:38
Page 30
Italiano
Sintonizzazione manuale
Scegliere l’opzione ‘Sintonizzazione
Manuale’ dal menu Modalità DAB.
La schermata ‘Sintonizzazione Manuale’
permette di selezionare una specifica frequenza
sulla quale sintonizzarsi. La lista delle frequenze
disponibili dipende dalla banda di frequenza
selezionata e contiene tutte le frequenze della
banda. La schermata mostra il nome breve
della frequenza, ad esempio 12B, ed è seguita
dalla reale frequenza espressa in MHz.
Se esiste una stazione corrispondente a quel
numero di stazione e frequenza, il display
mostrerà il suo nome e relativa frequenza e
una barra mostrerà la potenza del segnale.
DRC - Dynamic Range Control
Pico include un dynamic range control che aumenta
automaticamente il volume troppo basso per un
ascolto ottimale anche in ambienti molto rumorosi.
Il controllo DRC si trova nel menu Modalità
DAB alla voce ‘DRC’. Esso ha tre impostazioni
predefinite:
DRC
Descrizione
DRC Basso
Il Dynamic Range Control è
a metà del livello normale
DRC Alto
L’impostazione raccomandata
per ambienti rumorosi
DRC Off
Il Dynamic Range Control è
disattivato
Scansione locale e completa
Col passare del tempo nascono nuove
stazioni radiofoniche. Per trovarle e
aggiungerle alla lista di stazioni è necessario
effettuare una scansione ‘Locale’ o
‘Completa’. Entrambe le operazioni sono
effettuabili dal menu Modalità DAB.
Una scansione Locale è una scansione rapida
dell’insieme delle sole frequenze ‘locali’.
Una scansione Completa impiega più tempo ma
copre l’insieme globale delle frequenze DAB.
Preselezione stazioni preferite
Pico permette di memorizzare 12 stazioni
preferite tramite il pulsante PRESET
posto su Pico o tramite il suo
telecomando.
Per salvare la stazione in onda premere il
pulsante PRESET e usare il comando a
rotella per trovare una posizione non
utilizzata, poi premere la rotella per
memorizzare.
Per ascoltare una stazione memorizzata
premere il tasto PRESET e usare il
comando a rotella per trovare la stazione
desiderata, poi premere per selezionare.
Modalità FM
Modalità FM
Allungare l’antenna telescopica posizionata
sul retro di Pico.
Premere il pulsante MODE per entrare in
‘Modalità FM’ e passare dalla Modalità
DAB alla Modalità FM. È possibile entrare
in Modalità FM anche dal Menu Principale
MODE
FM Mode
87.50F
MM
hzMode
FM
Se è la prima volta che Pico si trova in
modalità FM, esso si posizionerà all’inizio
della gamma di frequenze FM. Altrimenti
selezionerà l’ultima stazione FM ascoltata.
88
77
..
55
00
MM
hh
zz
Per scorrere le frequenze FM ruotare il
comando a rotella.
8B
7B
.C
50R
Ma
hd
zio 1
FM
F
M
PreseFM
tMSMode
to
od
re
ed
Per ‘SEEK’ (cercare) la prossima stazione
attiva premere il comando a rotella.
FF
MM
BBC Radio 1
8>
7e
.P
5r
0e
Ms
he
zt
Ft
M
87.50Mhz
FM
P
r
s
e
t
S
to1
reu
dnse
> Preset 2 unset
Preselezione stazioni preferite
Pico permette di memorizzare 12 stazioni
preferite tramite il pulsante PRESET posto su
Pico o tramite il suo telecomando.
Per salvare la stazione in onda premere il
pulsante PRESET e usare il comando a
rotella per trovare una posizione non
utilizzata, poi premere la rotella per
memorizzare.
Per ascoltare una stazione memorizzata
premere il tasto PRESET e usare il comando a
rotella per trovare la stazione desiderata, poi
premere per selezionare.
6
8>
7P
.P
5r
0e
Ms
he
zt 11 us
FM
87.50Mhz
FM
>
r
e
s
e
t
ne
st
et
>> PP
rr
ee
ss
ee
tt 22 uu
nn
ss
ee
tt
BBP
Cre
Rs
ae
dt
io11set
BBC
Radio
>
PrP
er
ses
tet
St2
oru
en
dset
Preset
Stored
>
reset 1 unset
unset
> P
Preset
Preset 2 unset
unset
> Preset
reset 1 s
et
> P
Preset
set
Preset 2 unset
unset
> Preset
Pico DAB+ Manual.qxd
25/9/08
16:38
Page 31
Italiano
Modalità MPort
Utilizzo MPort
Il connettore MPort di Revo permette di
collegare facilmente e rapidamente un iPod®,
o altri lettori MP3 e altri fonti sonore.
Usando il cavo di connessione fornito, Pico
si trasforma in un sistema audio digitale di
alta qualità.
Collegate un’estremità del cavo audio
fornito all’uscita delle cuffie (auxiliary out)
del vostro dispositivo sorgente, poi
collegate l’altra estremità alla MPort sul
davanti di Pico.
Lo schermo LCD di Pico mostrerà la
scritta ‘MPort’.
MPort Mode
M-Port
Per ottenere un livello ottimale di volume
dovete regolare il volume di uscita sia sul
dispositivo sorgente che su Pico.
Risoluzione dei problemi
Radio DAB digitale
D. Sento un ‘mormorio’ durante la
ricezione di alcune stazioni.
R. Se la potenza di segnale è troppo bassa
può verificarsi un’interruzione nella
ricezione, che causa questo mormorio.
Controllare che l’antenna sia stata aperta
e che sia dritta. Se il problema persiste,
spostare Pico in un altro luogo o
controllare se l’area in cui ci si trova è
raggiunta da queste stazioni.
D. Compare un messaggio ‘No stations
available’ (nessuna stazione disponibile).
R. Verificare che l’antenna sia completamente
aperta e verticale. Controllare la potenza
del segnale e se necessario spostare Pico
in un altro luogo.
D. L’orologio di Pico non è regolato.
R. Pico ha bisogno di ricevere un segnale
DAB. In caso diverso il suo orologio deve
essere regolato manualmente. Quando
Pico troverà una stazione DAB sarà in
grado di regolare l’orologio.
Reset Impostazioni di Fabbrica
Nell’improbabile eventualità che Pico possa malfunzionare, è possibile effettuare un reset
del software per riportarlo alle originarie impostazioni di fabbrica. L’opzione Reset
impostazioni di fabbrica si trova nel menu System Setup, nel Menu Principale.
7
Pico DAB+ Manual.qxd
25/9/08
16:38
Page 32
Italiano
Specifiche Tecniche
8
Generali:
Ricevitore DAB mono e radio FM con piena ricezione della banda III
Diffusore:
2” full-range in neodimio
Potenza uscita audio:
6W
Frequency Ranges:
Banda III DAB (174 - 240 MHz)
Copertura DAB+
FM (87.5 - 108 MHz)
Antenna:
Antenna telescopica integrata
Ingressi:
Ingresso per alimentazione DC (trasformatore 230V fornito)
Ingresso 3.5mm per dispositivi esterni (M-Port)
Uscite:
Ingresso per cuffia 3.5mm
Connettori Stereo RCA
Schermo LCD:
Schermo LCD negativo ad alta risoluzione a tre righe
(2 righe testuali, 1 riga di simboli, 16 caratteri massimi)
Preselezioni:
12 preselezioni x DAB e 12 x FM
Telecomando:
Telecomando ad infrarossi (Opzionale)
Alimentatore di rete:
12V 1200mA
Batterie:
Batterie ricaricabili agli ioni di litio, autonomia 12 ore
Conformità:
Direttiva RoHS e certificazione CE
Dimensioni:
167mm (A) x 105mm (L) x 105mm (P)
Pico DAB+ Manual.qxd
25/9/08
16:38
Page 33
English
Français
Deutsch
Italiano
Notes / Remarques / Notizen / Note
9
Pico DAB+ Manual.qxd
25/9/08
16:38
D A B +
Page 34
D I G I T A L
R A D I O
reset
Revo Technologies Ltd
The Inox Building
Caldwellside
Telephone Support
Online Support
Lanark
Scotland
United Kingdom
01555 666 161
www.revo.co.uk/support
[email protected]
ML11 7SR