1
Operator's Manual
p nion
7 1/4-in. Circular Saw
Model No.
320.10831
CAUTION: Read understand and follow
all Safety Rules and Operating Instructions
in this manual before using theeproduct.
•
•
•
•
SAFETY
OPERATION
MAINTENANCE
ESPAI_OL
Sears, Roebuck and Co., Hoffman Estates, IL 60179 U.S.A.
Warranty................................................................................................... Page
General Safety Rules............................................................................. Pages
SpecificSafety Rules............................................................................. Pages
Symbols.............................................................................................
Page
Specifications........................................................................................... Page
Features................................................................................................... Page
Operation.............................................................................................
Pages
Maintenance.................................................................................... ,........Page
Accessories.............................................................................................. Page
Service Numbers ..........................................................................................
2
2- 4
5-6
6
7
7
8-9
10
11
Back C<_ver
ONE FULL YEAR WARRANTY ON COMPANION TOOL
If thisCompaniontool fails dueto a defecl in material or workmanshipwithin one
yearfrom the date of purchase, RETURN IT TO THE NEAREST SEARS STORE
tN THE UNITED STATES, and Sears wfflreplace it, free of charge.
Thiswarranty is void if Ibis tool is usedfor commercialor rental purposes.
Thiswarranty gives you specificlegal rights,and you may also have otherdghts
whichvary from state to slate.
Sears, Roebuck and Co., Dept. 817WA, Hoffman Estates, IL 60179
READ ALL INSTRUCTIONS THOROUGHLY
To operate thistool, read thisoperating manualand all the labels affixedto the drcblar
saw carefully befere using.Keep this manualavailablefor future reference.
IMPORTANT
This tool should onlybe servicedby a quailed service technician.
Keep your work area dean and well lit. Cluttered benchesand dark areas
inviteaccidents.
Do not operate power tools in explosive atmospheres, such as in the presence
of ffammoble liquids, gases, or dust. Power toolscmafe sparkswhich may ignite
the dust or fumes.
Keep bystanders, children and visitors away While operating a power tool.
Distractionscan cause you to lose cootrbl.
Use clamps or other practical ways to secure and support the workp|ece
to a stable platform. Hbldingthe work by hand or againstyour bodyis unstableand
may lead to leasof control.
Do not force the toot. Use the correct tool for your applfuctlon. The correcttool
will do the job better and safer at the rate forwhich it is designed.
rl= _1_: 1:11._:111 =1tti
:lit ti:l.'r,!tSL
Do not use tool ff switch does not turn it on or off. Any tool that cannotbe
controlledwith the switch ls dangerousand must be repaired.
Disconnect the plug from the power source before making any ad|ustmenta,
changleg accessories, or storing the tool. Such preventivesafety measures reduce
the riskof startingthe tool accidenlail_
Store Idle tools out of reach of children and other untrained persons. Toolsare
dangerousIn the handsof untrainedusers.
Maintain tools with care. Keep cutting tools sharp and clean. Properlymaintained
tools,with sharp cuttingedges are less likelyto hindand are eaaier to control
Check for mleaitgnment or hlndtng of moving parts, breakage of parts, and any
other condition that may aft_'t the tool's operation. If damaged, have the tool
servleed before using. Many accidentsare caused by poorlymaintained tools.
Use only accesaorles that are recommended by the manufacturer for your
model. Accessories that may be suitablefo_one tool, may becomehazardous when
usedon another tool.
Do not aRer or misuse tool. These tools are precisionbuilt.Any aiteraticn or
modificationnot spedifiedis misuse and may result in a dangerouscondition.
I
I
read all Instructions, safely rules and warnings. Failure to comply can resutt in fire
electric shock, or serious personal injury. Save the Owner's Manual and review
A_ CAUTION: Do not attempt to operate this tool until you have thoroughly
frequently for reference.
A_, WARNING:
always
be followed
When
to reduce
using the
power
risktools,
of fire,
basic
dieotdc
safety
shod<,
precautions
and personal
should injury.
Stay alert, watch whet you are doing and use common sense when operating a
power tool. Oo not use tool while Ifred or under the influence of drags, alcohol,
or medication. A moment of inattenlicn while operafing power tools may result in
serious personal Injury.
Dress properly. Do not wear loose clothing or Jewelry. Contain long hair. Keep
your hair, cdothing, and gloves away from moving parts. Loose clothes, jewelry, or
long hair can be caught in moving paris.
Avoid accidental starting. Be sure switch is off before plugging in. Carrying tools
with your finger on the switch or plugging in tools that have the switch on invites
accidents.
Do not overreach. Keep proper footing and balance st all times. Proper footing
and balance enables better control of the tool in unexpected situations.
Use safety equiprrmnL Always wear eye protection. Dust mask, non-skid safety
shoes, hard hat, or hearing protection must be used for appropriate conditions.
Before connecting the toni to a power soume (receptacle, outlet, etc.), be sure
voltage supplied is the same as that specified on the nameplate of the tool. A power
source with voltage greater than that specified for the tool can result in serious injury
to the user, as we{t as damage to the tool.
[e]:1_1:::_:I I_'fd g q lt'i i.'llJg_l_q,ln
I
propelledinto your eyes, resulllogin severe eye damage.When operating
power
toof, always
wear
safety gogglesor
glasseswith
side shieldsand
\ WARNING:
The
operation
of any tool safely
can resultin
foreignobjects
being a
fullface shield when needed.
I
on.A wrench or a key that is left attached to a rotatingpart of thetool may result
_ WARNING: Remove adjustingkeys or switchesbefore turning the tcol
in personal injury.
A_ WARNING: If any parts are missing,de nof operate the tool untilthe missing
parts have been replaced. Doing so could resultin seriouspersonal injury.
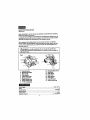
ELECTRICAL SAFETY
Double Insulated tools am equipped with • polarized
plug (one blade Is wider than the other).Thls
plug wilt
fit in a polarized outlet only one way. If the ptug does
not fit In the outlet, reverse tbe plug. if if ettll does not
Fig
.1
4
":
_ _
fit, contact a quatified etectricfen
to install a polarized
outlet. Do not change the plug in any way. DouSe
insulation eliminates the need fo)"a three wire grounded
power cord and grounded power supply system. (See Fig. 1)
Avoid contact with grounded surfaces such as pipes,
radiators, ranges and refrigerators.
There is an increased
risk of electric shock if your body is grounded.
•
!_
_,
Don't expose power tools to rain or wet conditions.
A wet power tool wilt increase the risk of electric shock.
Do not abuse the cord. Never use the cord to carry the toet, or pull the plug
from an outlet. Keep cord away from heat, oil, sharp edges or moving parts.
Repfece damaged cords immediately. Damaged cords increase the risk ol electric
shock.When operating a power tool oulside, use an outdoor extension cord marked
"W-A" or"W".These
cords are rated for outdoor use and reduce the risk of
electric shock.
Replace damaged
siectrocule.
cords immediately.
Use of damaged cords can shock, burn or
If an extension cord is necessary, a cord with adequate size conductors should be
used to prevent excessive voltage drop, loss of power or overheating. Always use UL
and CSA listed extension cords.
•/_
WARNING:
Keep hands away from cutting area and blade. Keep your
second hand on auxiliary hancte, or motor housing, If both hands am holding
the saw, they can't be cut by the blade.
Keep your body positioned to either side of the sew blade, _
not in line with
the saw blade. KICKBACK could cause the saw to jump backwards.
Do not reach underneath the work piece. The guard can nut protect you from the
blade below the work piece.
Check lower
lower guard
lower guard
may be bent.
moves freely
of cut.
guard for proper closing before each use. Do not operate saw if
does not move freely and close instantly. Never clamp or tie the
into the open position. If saw is ac_lentally
dropped, lower guard
Raise the iewer guard with the rettacting handle and make sure it
and does not touch the blade or any other part, in all angles and depths
Check the operation
and condition of the lower guard spring. If the guard and
the spring are not operating properly, they must be serviced before use. Lower
guard may operate sluggishly due to damaged parts, gummy depeslls, or a buildup
of debris.
Lower guard should be retracted manually only for special cuts such as
"pocket cuts" and "compound
cuts". Raise lower guard by retracting handle.
As soon as blade enters the material, lower guard must be released. For all
other sawing, the lower guard should operate automatically.
Always observe that the lower guard Is covering
the blade before placing saw
down on bench or floor. An unprotected, coasting blade will cause the saw to walk
backward, cutting whate_er is in its path. Be aware of the time it takes for the blade
to stop after swifch is released.
NEVER hold piece being cut in your heeds or across your leg. It is important to
support the work piece properly to minimize body exposure, blade binding, or less of
control
Hold tool by Insulated gripping surfaces
when performing an operation where
the cutting tool may contact hidden wiring or its own cord. Contact with a "li_"
wire will also make exposed metal paris of the tool "li_e" and shock the operator,
Always use blades with correct size and shape (diamond vs. round) arbor
holes. Blades thai do not match the mouotJng hardware of the sew will run
ecceutrically causing fuss of coutml.
Never use damaged or incorrect blade washers or bolts. The b4ade washers and
bolt wore specially designed for your saw, for optimum performance and safely of
operation.
Maintain a firm grip with both hands on the saw and position your body and
arm to allow you to resist KICKBACK forces. KICKBACK forces can be controlled
by the operator, if proper precautions are taken.
When blade is binding, or when hltarrxJpting a cut for any raeson, re/ease the
trigger and hold the saw motionless In the material until the blade comes to a
complete stop. Never attempt to remove the saw from the work or pull the saw
backward while the blade is in motion or KICKBACK may occur. Investigata and
take corrective actions Io ctim_te
the cause ol blade binding.
5
II."! ".l=[N I_1[II.'f.'|
I111li'|: I I I I _.1 _ mira
When restarting a saw in the work piece, center the saw blade in the kerr and
check that saw teeth are not engaged Into the msterlal. If saw blade is binding, it
may walk up or KICKBACK from the work piece as the saw is restarted.
Support large panels to minimize the risk of blade pinching end KICKBACK.
Large panels tend to sag under their own weight. Supports must be pisced under the
panel on both sides near the line of cut and near the edge of the panel.
Do not use dull or damaged blade. Unsharpened or improperly set b_ades produce
nan'ow kerfs causing excessive friction, blade binding and KICKBACK.
Blade depth and bevel adjusting
locking levers must be tight and secure
before making cut. If t_ade adjustment shifts while cutting, it may cause binding and
KICKBACK.
Use extra caution when making a "pocket cut" into existing walls or other
blind areas. The protruding bfede may cut objects that can cause KICKBACK.
Do not use blades made of high-allay, high-speed steel (HSS).
Do not usa the circular
Secure small pieces
hand.
saw near fumes or combustible
of wood firmly before
working.
liquids.
Never hold them in your
Never slow the blade down with your hands or by applying
side of the blade.
pressure
to the
Never apply forcel Move the clrcufer saw forward gently and steadily.
Important:Some of the followingsymbolsmay be usedon your tool. ptease
studythem and learn their meaning, proper interpretationof these symbolswill
allow you to operate the tool better and safer.
NAME
DESIGNATION/EXPLANATION
V
Volts
A
Amperes
Voltage
Current
Hz
Hertz
Frequency(cycles per second)
min
Minutes
Time
Aiternating Current
Type or a characterislicof current
SYMBOL
n0
/mln
©
; No Load Speed
Rotationalspeed, at no load
Revolutions or Reciprocation
Per Minute
Revolutions,strokes,sudace
speed, orbitsst¢, per minute
Safety Alert Symbol
Indicatesdanger, warning or
caution.It means attention!ll
_rotection
Wet Condition Alert
AJwayswear safety gear
Do net expose to rain or use in
damplocations.
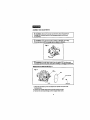
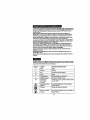
KNOWYOURCIRCULARSAW
(SeeFig.2)
Before attempting to use this circularsaw, familiarize yourselfwith all lfs operating
features and safety requirernen_s.
This circular saw is strictlya hend_Yperatedtcol and designed forstraightcuts.The
saw t_ade that comes with the tool 18suitablefor matdngcufein woad and wooden
materials accordingto the specificationsin this instructionmanual.
When equippedwith suitableblades, the tool can also be used to cut:plastics,
thermo-piastics,laminatedplastics, high-resistanceloam, plaster board, rockwool
boards, cement particleboard, and nonferrousmetals.All other applicationsare
expresslyruled out.
WARNING: Do not allow femlliarity with your circular saw to make you
careless. Remember that a carefree traclion of a second is sufifo_ent enough to
inliict severn injury.
Fig.
2
3---1--
4
10
5
_5 14
1.
2.
3.
4.
5.
6,
7.
8.
g.
Lock-oft sw_tch
Spindle lock button
Main handle
Front handle
Lower blade guard
Blade guard lever
Depth Io©ldng lever
Angle k_ldng knob
o°- 45 _ bev_ gauge
10.
11.
12.
13.
14,
15,
16.
17.
Hexagon b_de sq:rew
Base plste
Onter flange
Dust outlet
Blade wrench
Cord guard
Lock-off button
Carbon brush cap
I.'1"J:l[_llg[If_ I [I}_1€
Powersupply ................................................................................
120V-60 Hz
AMPS ........................................................................................................
10
No _oadspeed...................................................................................
5000/min
Saw blade sfz_.......................................................................................
7 I/4"
Cuttingangie .........................................................................................
0°-45°
Depthof cutat 90°........................................................................
2 1/2" (63mm)
7
ASSEMBLY
AND
ADJUSTMENTS
I
carefully. Do not discard carton or any packaging material until all parts
1_ WARNING:
Remove the circular saw from the carton and examine fl
are
examined•
Z_
WARNING:
If any part of Ihe saw is missing or damaged, do not plug
the circular saw in until the damaged part is repaired or replaced.
A_ WARNING: To avoid injury,ALWAYSturn the b"WgCh
OFF and disconnect
the circularsaw fromthe poweroutlet beforeinstatllngor changingthe saw bade.
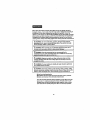
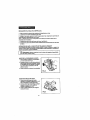
INSTALLING THE SAW BLADE (FIG. 4)
Fig. 4
1. Rotate Ihe saw blade by hand and depressthe spindle lockbuttonunlil
the blade locks.
2. Unsmewthe hexagon blade screw usingthe wrenchprovided.
3. Remove Ihe outer blade flange and the hexagon blade screw.
8
I
I
INSTALLING
THE SAW BLADE
cont.
4. Remove the saw blade from the spindle,the innerbushing remained on spindle.
5. Clean the flange thoroughlybefore mountingthe new saw btade.
6. Mount the new saw blade and tightenthe hexagonblade scTew.Check to be sure
the blade runs freely by turningthe blade by hand.
Note: The directionin whichthe blade rotateshas to be the same as the diredion
of the arrow marked onthe guard.
7. Be sure Ihatthe spindleieck buttonIs released.
8. Make sure the saw is in good workingorder beforeusingif again.
TRIGGER SWITCH WITH =LOCK-OFF" BurToN
The toolcan only be activatedwhen both trigger and lock-offtxdlon are depressed
tngether.The main switchcan also be locked in the "OFF'position to help
prevent accidents.
A_ WARNING: Alwaysensure that the saw is switchedoff and unplugged
formthe power supplybeforemakingany adjustmenla.
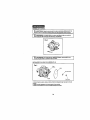
ADJUSTING THE CU'I'/'ING DEPTH
1. Loosen the depth lockinglever
as shown in Fig.5.
2. Hold the base plate flatagainst the
edge of the workpiece and 1illthe
body of the saw untilthe blade is at
the desiredcuttingdepth. The saw
teeth mustproject2 mm out
of the wood.
3. Tighten the depth iecking lever.
FIG. 5
ADJUSTING THE CUI'RNG ANGLE
1. Loosen the angle lockingknob
locatedon the 0°- 45° bevel gauge
which is on the base plate,
2. Till the body ofthe saw (F3g.6) until
the required angle Is reached by
usingthe scale on the 0°- 45°
bevel gauge.
3. Tighten the Iociengknob to secure
the base plate.
FIG. 6
Before
each
useinspect
thecircular
saw,
switch
and cordfor damage.Check for
damaged, missing, or wornparts. Check for loose screws, misetignmeetor binding of
movtng parts, or any othercondglonsthat may affect the operation. If abnormal
vibrationor noise occurs,turn the tool off immediatelyand have the problemcorrected
beforefurther use. Before cleaningor pedormingany mainlenance,the tool shouldbe
unpluggedfrom the powersupply.Using compressed air may be the mosteffective
cleanlogmethod. Adwayswear safety goggleswhen cleaningtoolswilh compressed air.
A_ WARNING:
Do not let brake fluids, gasoline, petroleumJoased
penetrating oiL, etc., come in contact with plastic parts.They
that can damage, weaken or destroy plastic,
WARNING:
products,
contain chemicals
When servicing use only identical replacement
parts. Use of
any other parts may create a hazard or cause product damage.
A_
WARNING:
Use only accessories that are recommended
by the
manufacturer for your model. Accessories that may be suitable for one tool may
become hazardous when used on another tool.
A_
WARNING:
Maintain tcols with care. Keep cutting tools sharp and clean.
Properly maintained tools wilh sharp cutting edges are less [ikely to bind and
are easier to control.
A_
WARNING:
To ensure safety and reliability, all repairs should be performed
by a qualified service techntdan.
A_ WARNING: Berne dust created by power sanding, sawing, gdnding, drilling,
and other construction activities contains chemicals known to cause cancer, birth
defects or other reproductive harm. Some examples of these chemicals are:
• Lead from lead-based paints,
• Crystalline silica from bricks and cement and other masonry products,
• Arsenic and chromium from chemically treated lumber.
Your risk from these exposures varies, depending on how often you do this
type of work. To reduce your exposure to Ihese chemicals: work in a well
vecttieted area, and work with approved safety equipment, such as those
dust masks that are specietly designed to filter out microscopic particles.
10
Thefollowing
recommended
accessories are currently
availabioat your local Sears Store.
Z_ WARNING: The use ofattachments or accessories that are
not recommendedmightbe dangerous
EXTENSION CORDS
Sears offersa largeselectionof extensioncordsthat helpextend yourworking range.
The use of any extension cord will cause some loss ot power.To keep the loss at a
minimum and to prevent overheating, use an extension cord that is heavy enough to
carry the current that the tool will draw.
A wire gauge (AWG) of at least 14 is recommendedfor an extensioncord 25 feet
or less in length.When workingoutdoorsALWAYS _se an extensioncord that is
suitablefor outdooruse.The cord's jacketwill be markedWA.
A_ CAUTION: Keep extension cords away from the cuffing area, and position the
cord so il will not get caught during operation,
A_
WARNING:
Check extenslo_
cords before each use. If damaged, replace it
immediately, NEVER use a tool with a dampged cord because touching the
damaged area could cause eledrical shock, resulting in serious injury.
BLADES
Sears has a large selection of circular saw blades for fast, efficient cuffing in a variely
cf materials and applications.
7
7
7
7
7
7
7
1/4-1n.
114-1n,
114-in.
l14-1n.
114-1n.
1/4-1n.
l14-in.
40-Touth
35-Touth
2DO-Tooth
18-Tooth
18-Tooth
24-Tooth
24-Tooth
General-Purpose
Cut-Off Blade
Master Combination
Blade
Plyv,,ond Blade
Carbide Blade
Mach II SIIve_ Series Carbide Blade
Maeh It Silver Series Carbide Blade
Combtnation
Carbide Blade
Sears also offers Combination Squares, Framing Squares and various length
Edge Guides to help you with all your cutting needs
11
NOTES
12
Manual del operador
Sierra Circular de 7-1/4 pulg.
Modelo No.
320.10831
ATENCI6N: Lea, enUenday riga Iodas las
normas de seguridady las instruccionesde
funcionamientode este manual antes de
util_zaresle producto.
•
•
•
•
SEGURIDAD
FUNClONAMIENTO
MANTENIMIENTO
ENGLISH
Sears, Roebuck and Co., Hoffman Estates, IL 60179 U.S.A.
13
Garantla ..................................................................................................................
Norrnas generales de segurided.............................................................................
Normas especif_as de segurided.........................................................................
Sfmbo_os...........................................................................................................
Espec*ficadones.....................................................................................................
Caracteds_cas ........................................................................................................
Funcio_miento. .....................................................................................................
Mantenimieflt_ ........................................................................................................
Ndmeros de servtcJo...............................................................................................
P_g.
14
Prigs. 14-16
Prigs. 17 - 18
P;tg.
18
Prig.
19
Prig.
lg
Prigs. 20 - 21
P_gs. 22 - 23
Cofltrapodada
GARANTJA COMPLETA DE UN Aide DE LA HERRAMIENTA 'COMPANLON'
Siesta herramienta 'C_npanion' fallara debido a deleclos de material o de _
de obra
durarde edpdmer erie a parlJrde la fecha de co(npra, DEVUI_LVALA A LA TIENDA SEARS
I M/_S CERCANA EN ESTADOS UNIDOS y Sears I_, memplazar_ sin costo algun_ Esta
garanlla no 8ene vaNdez si la herramienta se usa con fines comerciales e de arriende.
I Esla garantla le oto_e derechos legales espec_flcos.Uste_Jpuede tenet _ros derechos que
I _e_ra_ (F_oe_:°n:
Cto._Dept. 817WA, Hoffman Estatos, lL 6017g
LEA CUIDADOSAMENTE TOIDAS LAS INSTRUCClONES
Papa hacer lundonar esta herramient_ lea cuidedosamente este manual de luncJoflamienloy
todas las eliquetas ao'herldesala sierra ciroJl_ antes de usade. Guarde est,emanual para
relerencia future.
IMPORTANTE
Este henamienta s61odebe set mparada per un t_cnico de ser,,_idocanficado.
_.[i] :| ;;r F_,lk't[_ :1 _1:1 : F_,_II ;:k,'tl |) ;11._t:1[€_I I: | J|7_,_
Mantenga su J,rea de trabaJo Ilmplls y blen Ilundnada. Los bancos de Irabajo desordenados y
_s dreas oscums faciitan Ins accidentes.
No haga funclonsr las herramlentas el_ctrlcas en amblentes explosives donde est_n
wementes Ifquldos, gases o partlculas de polvo Inflamables. Las hen'e_entas ek_ctdcas
prodec_n chisp_s, _ascuales pueden encender tales partlculas de polvo o gases.
Mantengll alejados a los especladofes, nll_iolly vlsitantes ndentras opef_ unll herraltllenta
el&cbtca. Las dis*raccionespueden hacer que pierde el control.
Use tenazas u otras maneras practices de asegurar y apoyar la ple2a de trabaJo en una
platafo_ma estable, S_sostiep_ I_,p_ezacon la mane o tenths su cuerpo puede set inestab_ey
causer le pdrdide del centre4de la he_amient a.
NO fuerce la herramlenta. Use la herramlenta aproplada pare ul trabaJo que va a realizer.
La herramim_taapropiade realizard me_r e_tmbajo y Io h_ de manera rods segura ala
velocided para la cusi lue disefiade.
14
i_ [i ): i_rj
r,_.-1[€1=1_I=1:F_,q
II ;:k.HI)] =lk.'t:[¢t I I: I I| r-,q|Ill.TRill
No use la herramlenta sl el Intenuptor no la enc]ende o la apaga. Cualquier herramienta
que no se controla con el intemJptores pedigrosay debe ser reparad&
Desenchufe el cordGn ek;ctrlco antes de reallzar cualquier aJuste, camblo de accesodos
o almacenaje de ]a herramlenta. Estas medidas prevenUvasde segundad redu(;en el desgo
de encender la he_ienta
ac_dentalmeflle.
Guarde las herramlentas que no est_n en uso fuera de[ alcance de los nl_os y de oh'as
personas no callflcadas para su uso. Las henamie_tas son pellglo_as en manos inexpertas.
Mantenga las henamlentas con culdsdo. Mantenga las herramlentas para cortar aflladas
y Ilmplas. Las he_tas
bien mantenidas con boPdespara cortar afilados tlenen menos
posibilidades de alascarse y son m_s f_ciles de controtar.
Asegdrese de qua lag parles que se mueven est_n blen aflneadas y que no est_=n
atascadas, que las plezu de la herramlenta no estdn dal_adas y que no ha/a nlnguna otra
€ondlcl_n ClUeafecte el funclonamlento de la herramlenta. Sl hay algdn daRo, haga
reparar la hm'ramlenta antes de usarla. Muchos de los accidentes son causados por
herramientas maJmanteflidas.
Use sotamente eccesodos mcomendados pof el fabdcante para el modelo espec_flco de
herramlenta. Los accesorios que so_ apropiados para una hermmienla pueden Ilegar a set
peligrosos cuando se usan con o|ra herramienta.
NO altere o le dd real uso a la herramlenta. Estas herramiotltas son construidascon precis)tin.
Cu_quier altemck_n o rnodiflca(_ no espec_da
se considera real USOy puede resuItar ell
Una condicid_ petigmsa.
/_
ATIENCI()N: No intente hacer fundonar esta henamienta hasta que haya leido todas
las instrucciones,ncrrnas de seguddad y adverlefldas. El Incumplimiento de esta
advertenda puede msullar entm incendio, choque elddnco o lesiones personaJesgroves.
Guarde el manual del propkata._oy consOltelocon frecuenda a modo de referenda.
/_
ADVERTENCIA: Cuando utiice hertam.;er.tas etdctdcas,siga las prec;zucionesbd.sicas
de seguddad pare redudr et desgo de un incendio, choque sidctdcoo lesiones personales.
Mant_ngase alerta, ffjese on Io que hace y use el sentldo comdn cuando opere una
herramienta el_ctrlca. No utJllce esta herramlenta cuando est_ cansado o baJoel efecto
de las drogas, de[ alcohol o de medlcamentos. Un instante de distmc_dn durante la
operaci_n de herramlentas eldctrtcas pusde causar lesiones personales gra_e&
V_stase adecuadamente, No use mpa holgada o Joyeda. RecoJa eJcabello largo. Mantenga
su cabello, su rope y sus guanles aleJados de las plezas en movimiento, La mp_ holgada,
la joyer_ao el cabetlo largo pueden enredarse en I_s piezas en movimie_t(_
Evite encender la herramienta accldentalmente. Asegdrese de que el Interruptor estd
apagado antes de enchufar ]a herrmlenta. Si Ileva la herramienla con su dedo sobre el
Interruptor o sJenchufa la hermmienta con el in_emJptorencendido, puede causar accidentes.
NO sobreexttenda su mmriFo. Slempre mantenga sus pies flrmes y un buen balan_.
Mantener sus pies flrmes y un buen b_dancele permlte lener un mejor control de la herramienta
en situaciones inesperadas.
Use el equlpo de segurldad. Slemwe utlllce proteccl6n ocular. Se deben usar mdscaras
para polvo, zapatos consuetas _nti-resb,_.lantes, cascos o pmlecct_n pare los oidos en las
condiciones apropiadas.
Antes de enchufar la herramlenta a una fuente e_(_tdca (tomacordente, etc.), asegdrese que
e; vo_tajede_suministro es el misrnoque se espedfica en la placa de informaci(_nde la
herramienta. Sl se usa un surninistroel_ctricode mayo£ "mltajeque el es_ecificado para esta
herramienta puede causar lesiones graves aJusuario y dahos a la herramienta.
15
i +[e ] p,hVjJ,:1,,",]l
€I = + I=: f;'I l ;I+,_ |] tl,,"__IL"[I I: I111;I Ii
ob)efos ex_W_s _ los ojos, Io cual puede causar dafios groves a la _st& S_empre use lenles
protectoeeso
de e_gu_dad
con
[alerales o rn_scaras
pmtecioras
cuando
/_
ADVERTENCIA:
El uso
deprolectores
cualquierherramienla
puede causar
la pmpulsi6q
deuse una
henarnienta e!_ctf_ca_
L
antes de e_enderts. Una Ilave que quede fijada a una pieza de la herran'_lta que se
_ ADVERTENCIA: Reline Iodas las _a_es o intemJptores de ajuste de la hen-arnienta
mueve puede causar lesiones pemoflales.
I
,_
Si pieza.
falJaalguna
pleza,
no puede
haga lunc_onarla
hen-arnienlahasta
que no
haya ADVERTENCIA:
reernplazado dicha
De Io c_lt
ratio
causar lesiones
personales graves+
SEGURIDAD EI_CTRICA
Fig.1
Las herramientas con alslamlento doble est,_mequlpadas con
un enchurfe polarlzado (uno clmdJaes maJsancha que Is oh,a).
Esto enchufe cabe de una sola manera en tin tomacorrlonte
polaflzado. Sl e_ enchufe no cabe en el tomacordente, voltee
el enchufe. Si 8un asr no cat)e, pGngase en contacto con tm
electrlcista caHflcado para Instalar un tomacowkmte polartzado.
No altere el enchufe de nlnguna manere. El aislamiento doble
elimina ta ne(;esidad de un cord(_fle_Gctrioode tres davijas y de
un sistema de suministm elGclricopuesto a tierm. (Vea la F_+ 1)
Evib: el contacto con superficies puestas a tkeya tales como
tuberfas, radladores, estufas y refdgeradores. E_ste un mayor
pellgm de chc_TueelG_rico sdsu cuerpo est_ puesto a ,errs.
No exponga las herrmientas el_ctdcas a la Iluvla o a condlclc_es
h_rnedas. Una herramienta el6cldc_ rn_ada aumenta el riesgo de
d_oque el_'ctric_
No maltrate _ c_
ek_cl=lco. Nunca Io use pwa levantar la herramle.ta y no tim de e_l
para desenchufado del tomacorrient_ Mantenga el conJ_n alejado del ce_or,del aceite, de
Ins
fllosos y de plezas en movlmlento_ Reemptace los cordones da_ados
Inmec_Mamente. Los cordones e_6clr;cosaun_
el riesgo de choque el_cMco. Cuando
ha_a fL_ar
una herrarnienta ek_ddca en el exterioT,use un cord(_n_ie exlens_n pare
exleriores "W-A"o "W_.Eedoscordones e_
apmbados Loamuso en exterioresy reducen ed
riesgo de choque el_.ctr;co+
Reemplace los cordones dafiados Inmedlat amente. El USOde cordones el_ctricosdahad_s
pueden causar choque, quemaduras o electrocuc_n.
SI el uso de un cordon de extension es necesario, use un cord6n con conducloresde
larna_o adecuado pare evitar caidas de voltaje exces_vas,p_rdida de corrierde o
sobrec_lemtarnient(_ ._empre use co_lone_ de extension aprobados pot UL y C_A.
16
IJ _ [l]; I LT_
F±S',I ;_,"tU =[t,] I I [Of;1,,"ll i] =ii,,"4=[_ I I : I I I T;_iI I
A_
ADVERTENCIA:
Mantenga
las manos ale_adas de[ ;trea de code
y de la hoja,
Mantenga su segunda mano eft la mar_ia a_dflar o en la caja ded moto_ SJ arnbas manos
est_n sosteniendo la sierra, no pueden sufrir cortaduras debido a la hoja.
Mantemga su cuerpo an cualquier lado de la hoJa sierra y no ml Ifnea con Is mlsma. El
RETROCESO puede hacer que la hoja salte hacia arras.
NO ponga st= mano debaJo de la IdeZa de trabaJo. El protector no Io i_Jede protager de la hoja
debajo de la pieza de lrabajo.
Veriflque el protector Inferior para asegurarse de que estl debldamente cerrado antes de
cada uso. No haga funclonar Is sierra sl el prolactor Inferl_ no so mueve IlbrEmlente o sl
no se ¢lerra InmedQatmnente. Nunca omarre o sostmlga co41plnzas el protector inferlm"an
la poslcldq a_er ta. Si la sierra se cae acctdentalmenle se puede doblar el protectorinledor.
Levante el protector infedor con la manila mtr_ctil y ;;segdrese de que se mumra libremente y
que no toque la hoja o cualquier otra pieza en ning_Jndngulo o pm;undidad de corte.
Veriflque la condld_m y el fundonandemto del resorte del protector Inferior. Sl el protector
o el resorte no funclonan c_rectamente, rep,'irelos antes de usar In sierra. El protector
In_edorpuede fundonar lentamente debido a piezas datladas, a depGsiloSde matedaJpegajoso
o a la acumulacidflde restos.
El protector Inferior de debe retraer manualmente so(amente para cortes espedales tales
como los _cortes de bolslHo" y "cortes compuestos". Levante el protector inferior
retrayendo la manlJa. El protector Inferior debe Ilberarse apenas la hoJa penebre el
material, Papa todos los demds Uposde cortes con sierra, haga funcionar el protector infedor de
manera automdtica.
S_empro wdflque que el protector Inferior cobra Is hoJaantes de €olocar la sierra sobre
el banco o el suelo. Una hc_adesprotegida todavla en mo.Amlentopuede hacer que la sierra
se mueva hacia atrds (:orlando cualquier objeto en su caw, no. Mant_ngase al lanto dei tlernpo
que toma la hoja pard detemerse despu_s de que el interruplor ha sido llberado.
N t,_lCA sostenga la pl_a que va a €ortar en sus manos o sobre sus Idemas. Es
importante apoyar adecuadamente la pieza de tra_o pare minimizar la exposici_nde_cuerpo,
el atascamlento de la hoja o la pdrdida de c_nt mL
Sostenga la henamlenta por las superficies de agarm alsladas cuando malice una
acflvidad en la que la herramlenta de coHe pueda entrar en contacto con cableado
escond_do o co_ su WOldO corddn el_ctrlco. E] cmdacto con un cable cargado conduclrd
electdddad a las piezas metdllcas de la herramieflta qua est_me:q_uestasy afeclard al
OpeTadoT,
Slemfxe use hoias con agujeros de eJe de lama_o y forma adecuados (de dlamante o
circular). Las hojas que no encajan adeo_ada_e_te en la p_ezade i.stalaci_'l de la hoj& de la
sierra fundoflardn de manera errdllca y causardn pdrdida de control.
INunca use pemos o arandelam da_adas o incorrectem con la hoJa de la sierra. Las
arand_as y pemos de la hoja lueron disehados espec_icarnente para esta sierra y oltecen un
rendimiento y seguddad de fundo_amiento 6ptimos.
Agarre flrmemente la sierra con ambas memos y €oloque su _
y t_a_o de manera
que le perndta soportar la hm_a de los RETROCESOS. La lue_a de los RETRC(;ESOS
puede ser controlada porel operador si se roman ]as precaudones adecuadas.
Cuando la ho|a se atasque o cuando Intermmpa un code po_ cualquler ra_dn, Ilbem _d
gaSIIo y sostenga la sierra en el material sin moveda hasta qua la hoJa se detenga
completamente. Nunca Intente mtlra_ la sierra de la pk_za de brabaJoo moverla hada atr;is
mlentras la hoja estd en movlmlento ya ClUepuede ocurdr RETROCESO. Investigue las
causas del alascamiento y tome medidas correctivas pare eliminadas,
17
Cuando vmllva a encender m
sle4'Ta_
la pleza de traba)o_ centre la ho]a de la _lerra
en el _
y vm'mq_m q_ los dlen_E de In sierra no es_.n rams
en el material, si la
hoja de la meITa esld alascada, la mi_a puede e.sc_la_ia I_eza o RETROCEDER cuan_
_enda
la sle_&
Apoye las plan
_andes pare mlnlmlz_ el desgo de que la holn m atasque y el
RETROCESO. La_ piez_ grandes tienden a d_lame p_r su pmp_ peso. C_l_ue _podes
del_jo de I_ I_ez_ _ aml_s lados ce_.a de la I_ea de corle y _ma do] I_r_e de la piez_.
No u_ una hoJa _n t11oo dafiadL Las _
desalilada_ o realin_alad_ pmd_m codes
e_lr_hos que causan fd_i_ exc_,_, al_mkmto
de la h_a y RIETROCESa
Las palancns de bi_oo
de la profundldad de la hoJay del _Juste de los InUres deben
e_lar bleaTapretadas y augur_d_
_n_s de h_er el comte. Si _1a_e de la h_a _am_a
durar_e gl code se puede ala_r y _usa_ RE'T_CESO.
Tenl_ mucho culdado _ando h_a un "_m'le de b_slllo" _m pamdei exls_n_es o en
_'as _mas _ po_a vlslb_lldad. L_ h_ _obm_lienle IxJede _dar ol_os que pued_
causar RETF_)CE_. No use h_j_ de sierra h_has de a_m _pido (HSS) de alia al_a_6n.
No use la sierra circular _.a
de v_m_es o I_quldos ©MbusUbles.
Asegm flrmemenle Ins ple.zgs de madera peque_as antes de c_arla_.
Nun_ las
_ol_nga _1 su mHilo,
Nunca mdt_ca la velocldod de la hoJa c_n sus manos o apll_an_o presl6n sobre _l
costado de In relearn.
iNun_
ullllc_ la hl_al
Mueva la sierra clrcul_ sum_mte
har.]a _delanle de mn_
_n_nuL
m
Impodante: Algunos de los siguientes sfmbolospueden ser usados en su hermmienta. For favo_
estddielos y apreflda su signilicado.La inlemretacidn aproplada de estos simbolos le perm_rd
operar mejor ta hermmtent_ y de m_nera rods segur_
SJMBOLO
NOMBRE
OENOMI N ACION/IEXPU CACI(_N
v
Voliios
Volta)e
A
Amperios
Con_ente
HZ
Hertz
rain
Minutos
T'lempo
Cordente altema
Ttpo de corriente o su caracten'slica
Veloctdadsin carga
Velocidad de m4acid_sin carga
no
hnin
Revductones o
rec_r_cad6n
Por minuto
_ Frscuencta (ddos por segurrdo)
Revoluciones, go_pes,supen_c_e.Veloddad, 6rbitas,
et_ pot minuto
Sfmbolo
de _derla de
seguddad
indiciapeligro,
adverteflcia o ata_ddn. Significa
"]preste atenctSnl"
Protecci_
Siempre use equipos de protecci(_l
Alert_ de condictones
hdmedas
No exponga
Fugares
hdmedos.
_ahermmient_ a Laguv_ao la utilice en
18
CONOZCA
SUSIERRA CIRCULAR
(Vea la Fig. 2)
,_ntes de inte_qtar usar esta sierra dr_Jlar,
familiadcese
cor_ todas sos caradedstJcas
func_onamiento y con los requisitos de seguddad,
La sierra drcuiar es wla hertamienta
solo para uso manuaJ y fue dlseflada
derechos. La hoja de la sierra que vlette c_ la herramienta
maledaJes de madem de acuerdo con las especJficadones
de
para cortgs
sir_e p_za hacer cortes efz piezas
de este manual de instrucciofles.
y
Cuando estd equipada con las hojas adecuadas, esta sierra tamb_'fl puede usarse pata cortar
Io siguiente: Pldsiicos, pldsticos t_rmicos, pldslicos laminados, espuma de alta resisteflcta,
tabdasde yeso, ta_as de lana de inca, tablas de parllculas de co_cmto y metales que no
contengan hierro. Cualquier otra aplicaddn se prohibe expmsamente,
Z_. AOVERTENClA: No permita que la fam_addad con la sierra circular Io haga
descuidado, Recuerde que una |raccid_ de segundo que no preste atenctOnes sullciente
pare causar lesk_es graves.
3--
_---
16
1--
10.---
Q
12
10.Tomlllo hexagonaJ de la ho_a
11. Placa de la base
12. Brldo exterior
13. Sallda del polvo
14. Llave de la hoja
15. Protector d_dcord6n el_ctrlco
16. Botml de Idoqueo en apagado
l"_'rapa del ceplllo de cm'b_m
1. Interruptor de bloqueo eft apagado
2. Botdn de bloqueo dei eJe
3. ManlJa pdndpal
4. ManlJa delantera
S. Protector Inferior de la hoJa
& Palanca del protector de ia hoJa
7. Palanca de bloqueo de la profu,dldad
& Purlila de bloqueo del _ngulo
Medldor de Ingletes de 0° a 45"
Suminis|m de co_iente ................................................................................
Ampedos ....................................................................................................
Velocidad sin carga...................................................................................
Tamaflo de Lahoja de la sierra ........................................................................
Angulo de corte.........................................................................................
Profundidad de carte a go °. .......................................................................
19
12OV-6OHz
10
5C<_min
7 1/4"
0° a 45 °
2 1/2" (63mm)
ENSAMBLAJEY AJUSTES
Z_
Retire la
la cajs
dese_eADVERTENClA:
Ix _
o el mateJtal
de siena
m_quedrear_sta de que
hayay mmrneia
e_mlna_
misraa ha_
I
que _dla
pieza h_a
m_
r_rada
cuidadosamente.
t_
las piezas. No
o _eml:l_ad_
_
circular
ADVERTENCIA:
antes de instalar
Para
o camblar
evitar lesiones,
Is hoja de
SIEMPRE
la sierra.APAGUE y desenchufe la ederra
INSTALACI6N DE LA HOJA DE LA SIERRA (FIG. 4)
Fig. 4
_
j
\
1. Rote la hoja de [a sierra a mano y optima el bot6n de _oqueo dd eje hasla que la hoja se
bloquee.
2. Saque e{tomillo hexa[}onal de la hoja usando la flare provista.
3. Retire la brk_aexterior de la hoja y el tomil;ohexagonal de la hoja.
2O
I
INSTALACIf3N DE LA HOJA DE LA SIERRA (cont.)
4. Retire la hoja de la siena del eje rnanteniendo el buje intemo em el eje.
5. Umple bien el eje an]es de insta3arla hoja nueva6. instate la hc]a nueva y apdete el Iomillo hexagon_ de ia hoja. Asegdrese dB que la hoja se
mueve libremeflte hacidf,.dolagirar con la
Nora: La direcd6n en la cue gira la hoje debe ser la rnisma que muestra _aflecha que se
emcuenlmsobm el protsctor_
7. Aseg0rese de que el bot_ de bloqueo del eje se haya liberado.
8. Asegl_resede que ]a SielTaestd en buenas c(]fldlci(:mesde fLmck:_en_
_tes _ u_a
de nuevo.
INTERRUPTOR DE GATILLO CON BOT(_N DE "BLOQUEO EN APAGADO"
La herramienta s61opuede ser ac_vada cuando el gatiitoy el bot6n de bloqueo en apagado se
opdmen al n'_smoUernpo. El interruplor pr;nc_paltambddnpuede bloqueame en la podddn de
apagado pare ayudar a prevefliracddentes,
/_antesADVERTENCIA:
de re_lzar cuaiquier
Siempre
ajuste.
aseg_rese de que la s_erraestd apagada y deseflch_a_
AJUSTE DE LA PROFUNDIDAD DE CORTE
1. Nloje la paJancade bloqueo de profund_dad
como se muestra _ ta Fig. 5.
2. Sosleflga la placa de la bnse hodzontak,nenle
sobna el horde de la pieza de trabajo y _evante
la profundldadde code deseada. Los dlentes
de la sierra deben proyec_arse2 mm rods
a[Id de la madera.
:1 Apriete la palanca de bloqueo de pmfundidad.
FIG. 5
AJUSTE DEL lbNG U LO DE CORTE
1. NIoje la ped_a de bloqueo del dngulo
ubicada en el medtdof de ingletesde 0 ° a 45°
que se encuefltra e_ la plata de la base.
2_ Incline la sierra (Fig. 6) hasta ]legar al dngulo
deseado de acuerdo con la escala del
medidor de ingletes de 0 ° a 45°,
c:
3. Apriete _apedlla de bloqueo pare asegurar
la plata de la base.
FIG.
21
6
I
Inspecdona la siena drcelar, el interrupter y el corden eldctdeo antes de cade use. VefifRue que
no hayan plazas dehades, feltantes o desgaelades. Vedflque que no hayan tom,los flojos,qua
las pJezas que se mueven est6n ainaadas y qua no estde atascadas, y que no haya cua',quier
otra condicide qua pueda afectar el funciocLamienlode ta herramienta. SI slente vibractofles o
ascucha soeldes It;era de Io COhen. apague inmed_atamemela hermmienta y conija el
pro_ema antes de votver a usmta. Antes de reallzar ta limpieza o manleelmlento de la
herramienta, desenchOfela dd tomacornante. Es p_ible que la rnanem rods efecliva de limpiar
la harramienta sea usande aim compdmide. Siempre use lentes de segudd,'_d cuando limpie
herramientas con aim comp dmide.
A_ ADVERTENCIA: No perrnita quo I(quide de f renos, gasolina, produd,os a base de
petr61eo,el_ efltren en contaelo con las plezas do p_=Lstioa.
Estas sustandas contiene_
prodectos qelmJcosque pueden defiar, debiiltar o destrelr el pl_stico_
I
I
A_ ADVERTENCIA: Cuande haga mpamdones, sd4oulilic_ piozas de repueelo identicas a
las odgineles. El use de cualqulor otra plaza puedo causar un pe gm o del_os al pmducto.
I
ADVERTENCIA: Use solamente accesodos recomendados per el fabdcante pare _
I
modelo espe_fico de hanandenla. Los accesodos que son aprop_adospara una herrar_eflta
puoden llegar a ser peligrosos cuande se usan con otra hermmmnta.
A'_ ADVERTENCIA: Mantenga las horrandentas con cuidade. Mantenga tas henamientas
para corlar elilades y limpias. Las herramientas bion mantaeldes con bordes para cortar
_ilados tienen rnerms posibilidedes de alascarse y son _
fdciles de contrda_
A_ ADVERTENCIA: Para asegumr la seguridad y confiabilidedde la henamianta, todas
las reparadones deben ser _evadas a cabo per tm t6cnico de servido cakflcado.
}
A_ ADVERTENClA; Las partfcu_asde pelvo que resultan dd use de lijadems, sierras,
amoEadorasy teladros el6ctricos, ael come de otras aelividades de conelrucelde, co_lienen
productos qulndcos que se sade prodecen cdncer, delectos cong6nttos u otros da_os al
s_slama reprodectivo.AJgueesejemp_osdo eelos productos quimicos son bossigelefltes_
I
• Rome proveelente de pintums a base de piorno
• Sillc_ cdstelizada de laddllosy cernGntoy de otms produelosde alba_ile da
• Arsdelco y creme de madera tratade qufrnicarnente.
Su desgo do exposict6n a estos productosvada dependiendo de qu_ tan a monude
reel_ceesls tide de trabajo. Para reducir su exposicidn a eelos productos qutmicos:
trabajo on un dma bien venlJladeusande equipos de seguddad aprobados tales come
I_s m_scaras para pelvo, las cueles eeldn dise_adas ospecificamente par& filtrar
particelas microscdpicas.
22
J
I
Los siguienfos accesodes recomendados est,_n _sponiloles en su tlenda Sears focal,
•A_ ADVERTENClA: El uso de herraznientas o _sedes
no re_omendades puede
ser peligroso.
CORDONES DE EXTENSI6N
Sears le ofrece ulqagran variedad de corde_es de extansidn que Io ayudardn a extender su
tango de trabajo.
E1uso de cuafquier corden de extensifin causard alguna pdrotde de polenda. Para manmner
esta p_Kida a un minlrno y para prevenlr el sobrecalefltamiento, use un cord6n de exlen_de fo
suficienlerneflte pesade para Itevar Lacorrienle que la herramienla usar_L
Se recorrdendau, cotddn de exter_sidede porIo mer:os 14 AWG si el coKIdn es de 25 pies
(7.652 m) o menos. Cuande trabaje en el exterior,SIEMPRE use un corddn apropiado para uso
en el extede_ El form del corden estard marc.adocon _s letras "WA".
1
I
/_ ATENCI6N:
Man|enga
cordones
deatrapado
e_deflsidnafojades
del 4rea de code, y
coidquetode
manera
que no los
puede
quedar
durante e_funcfonamienlo.
I
I
est,. de, ado, Paempklceloinmediatamente. NUNCA use una derrarniE_.ltacon un cord6n
I
Z_ ADVERTENClA: Vedlique los cordenes de extenside antes de cads uso. SI el corden I
defiade_ SI foca ei drea dehada_ puede sufrir un choque eldctdco que cause ies_enes graves_
HOJAS DE LA SIERRA
Sears cuerda con una gran se]ecoidn de hojas de s_errapara codes rapidosy e_ldentes en una
vmiedad de matertales y ap_icacfones
Ho|a de 7 _ pulg_
Hola principal de 7 _ puig.
t!oJa de 7 _ pulg.
HoJade cadauro de 7 pulg.
Ho|a de ©arburo de 7 _ pulg_
Ho|a de ¢arburo de 7 _ pulg_
de
de
de
de
de
Ho]a de ©arburo de 7 _ pulg.
de 24 dle_tes
35 dlentes
2_Q dientes
18 dlenteB
18 dlentes
24 dlentes
de 40 dlentes para €ortes comunes
para cortes comblnados
parr madera €onb'achapada
de ia Sede _Mach II Silver'
de la eerie _Mach li Sl_vet'
para cortes ¢omblnados
Sears taml_n ofrece escuadr_s comblnadas, escuadras de montaJe y gulas de borde de
dlferentes _ongltudes para ayud_do ¢0_ todas sus necesldades de corfo_
23
Your
!_
Home
For repair In your home of all major brand appliances,
lawn and garden equipment, or heating and cooling systems,
no matter who made It, no matter who sold It]
For the replacement parts, accessories and
o,,vnefs manuals that you need to do-it-yourself,
For Sears professional installation of home appliances
and items like garage door openers and water heaters.
1-800-4-MY-HOME
(1-_)
Q
Any_n_ dayor night
(U.S.A.
WV_N.ElalTLC_411t
V_.T,
and Canada)
Qaf'IZ._.IR
Our Home
For repair of carry-in products like vacuums, lawn equipment,
and electronics, call or go on-line for the nearest
Sears Parts and Repair Center.
1-800-488-1222
!!i:i!
ii_
.......
_
........
;;._
_;
hJlylJme, day or night (U,S-A.
ordy)
To purchase a protection agreemerd (U.S.A.) or maintenance
agreement (Canada) on a product serviced by Sears:
1-800-827-6655
(U.SA)
1-800-361-6665
para pedk serviciode reqarack_n
a domicilioy para (_'denarp_:
I_OGAFI
m
Au Canada pourserviceen fr
1._B00-LE-FO_t_ER
Mc
(1-80_._33_7)
(1-888_784.6427)
M_I_ Re_s_s_
/ TM M_
_: Marque de _mmer_
I_
de F, b_
Miq_
d_
:
_ii!
w_w.sears.c/_
/ m Mama de S_o
_ Sum, _1_
dl S_s,
Ro_:_
and CO,
_ _
....
_
_
Go.