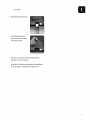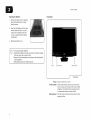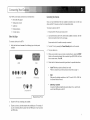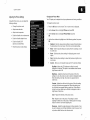
1
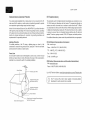
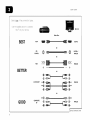
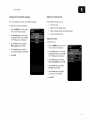
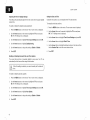
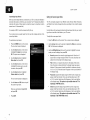
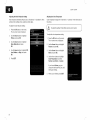
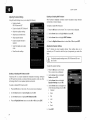
Thisproduct
qualifies
forENERGY
STAR
inthe"factory
default"
setting
andthisisthesetting
inwhich
power
savings
willbeachieved.
Changing
thefactory
default
picture
settings
orenabling
other
features
willincrease
power
consumption
that
could
exceed
thelimits
necessary
toqualify
forENERGY
STAR
rating.
srs
TruSurround
srs
HD
®
TruVolume
SRS TruSurround
HD and SRS TruVolume are trademarks
of SRS Labs, Inc. TruSurround
HD and TruVolume
technologies
are incorporated
under license from SRS
Labs, Inc.
HIGH-DEFINITION
Manufactured
under license from
Dolby Laboratories.
Dolby and the double-D symbol are trademarks of Dolby
Laboratories.
MULTIMEDIA
iNTERFACE
HDMI, the HDMI logo and High-Definition
Multimedia
Interface are trademarks or registered trademarks of HDMI
Licensing LLC.
Welcome
ThankYoufor ChoosingVIZl0
And congratulations
My ProductInformation
on your new VlZlO HDTV.
To get the most out of your new VlZlO product, read these instructions before
using your product and retain them for future reference. Be sure to inspect the
package contents to ensure there are no missing or damaged parts.
Product Registration
To purchase or inquire about accessories and installation services for your VlZIO
product, visit our website at www.VIZIO.com or call toll free at 1-888-849-4623.
We recommend
•
that you either:
Register your VIZIO product at www.VIZIO.com
Complete and mail the enclosed registration
card
Extended Warranties
For peace of mind, and to protect your investment beyond the standard warranty,
VIZIO offers on-site extended warranty service plans. These plans provide
additional coverage during the standard warranty period. To purchase an extended
warranty service plan, visit www.VIZIO.com.
When you see this symbol, please read the accompanying important |
warning or notice. It is intended to alert you to the presence of
important operating instructions.
J
When you see this symbol,
tip.
Model Number:
Serial Number:
Date of Purchase:
When Readingthis Manual
\
Enter your product information here for easy reference:
please read the accompanying
helpful|
J
VIZIO recommends
you attach your sales receipt to this manual for safekeeping.
E220MV / E260MV
to rain or moisture, does not operate normally or has been dropped.
important Safety instructions
Your DTV is designed and manufactured
to operate within defined design
limits. Misuse may result in electric shock or fire. To prevent your TV from being
damaged, the following instructions should be observed for the installation,
use, and maintenance of your TV. Read the following safety instructions before
operating your TV. Keep these instructions in a safe place for future reference.
•
To reduce the risk of electric shock or component damage, switch off
the power before connecting other components to your 3%(
Read these instructions.
Keep these instructions.
When moving your TV from an area of low temperature to an area of
high temperature, condensation may form in the housing. Wait before
turning on your TV to avoid causing fire, electric shock, or component
damage.
A distance of at least three
and any heat source, such
not install your 3%/close to
or moisture may cause fire
feet should be maintained between your TV
as a radiator, heater, oven, amplifier etc. Do
smoke. Operating your TV close to smoke
or electric shock.
Slots and openings in the back and bottom of the cabinet are provided
for ventilation. To ensure reliable operation of your TV and to protect it
from overheating, be sure these openings are not blocked or covered.
Do not place your TV in a bookcase or cabinet unless proper ventilation
is provided.
Heed all warnings.
Follow all instructions.
Do not use this apparatus near water.
Clean only with a dry cloth.
Do not block any ventilation openings.
manufacturer's instructions.
Unplug the power cord before cleaning your 3%(
Install in accordance
with the
Do not install near any heat sources such as radiators, heat registers,
stoves, or other apparatus (including amplifiers) that produce heat.
Do not defeat the safety purpose of the polarized or grounding-type
plug. A polarized plug has two blades and a third grounding prong.
The wide blade or the third prong are provided for your safety. If the
provided plug does not fit into your outlet, consult an electrician for
replacement of the obsolete outlet.
Protect the power cord from being walked on or pinched, particularly at
plugs, convenience receptacles, and the point where they exit from the
apparatus.
o
Only use attachments/accessories
specified
by the manufacturer.
o
Use only with the cart, stand, tripod, bracket, or table
specified by the manufacturer, or sold with the apparatus.
When a cart is used, use caution when moving the cart/
apparatus combination to avoid injuw from tip-over.
Unplug this apparatus during lightning storms or when unused for long
periods of time.
Refer all servicing to qualified service personnel. Servicing is required
when the apparatus has been damaged in any way, such as when
the power-supply cord or plug is damaged, liquid has been spilled or
objects have fallen into the apparatus, the apparatus has been exposed
Never push any object into the slots and openings on your TV cabinet.
Do not place any objects on the top of your TV. Doing so could short
circuit parts causing a fire or electric shock. Never spill liquids on your
3%(
Your TV should be operated only from the type of power source
indicated on the label. If you are not sure of the type of power supplied
to your home, consult your dealer or local power company.
Do not apply pressure or throw objects at your 3%(This may
compromise the integrity of the display. The manufacturer's warranty
does not cover user abuse or improper installations.
The power cord must be replaced when using different voltage than the
voltage specified. For more information, contact your dealer.
Your TV is equipped with a three-pronged grounded plug (a plug with
a third grounding pin). This plug will fit only into a grounded power
outlet. This is a safety feature. If your outlet does not accommodate the
three-pronged, have an electrician install the correct outlet, or use an
adapter to ground your TV safely. Do not defeat the safety purpose of
the grounded plug.
When connected to a power outlet, power is always flowing into your
3%(To totally disconnect power, unplug the power cord.
The lightning flash with arrowhead symbol within an equilateral triangle
is intended to alert the user to the presence of un-isolated, dangerous
voltage within the inside of your TV that may be of sufficient magnitude
to constitute a risk of electric shock to persons.
E220MV / E260MV
Do not overload power strips and extension cords. Overloading
result in fire or electric shock.
•
can
The wall socket should be installed near your TV and easily accessible.
Only power of the marked voltage can be used for your T_,(Any other
voltage than the specified voltage may cause fire or electric shock.
Do not touch the power cord during lightning. To avoid electric shock,
avoid handling the power cord during electrical storms.
Unplug your TV during a lightning storm or when it will not be used
for long period of time. This will protect your TV from damage due to
power surges.
Do not attempt to repair or service your TV yourself. Opening or
removing the back cover may expose you to high voltages, electric
shock, and other hazards. If repair is required, contact your dealer and
refer all servicing to qualified service personnel.
WARNING: Keep your TV away from moisture. Do not expose your TV
to rain or moisture. If water penetrates into your TV, unplug the power
cord and contact your dealer. Continuous use in this case may result in
fire or electric shock.
Do not use your TV if any abnormality occurs. If any smoke or odor
becomes apparent, unplug the power cord and contact your dealer
immediately. Do not try to repair your TV yourself.
Avoid using dropped or damaged appliances. If your TV is dropped
and the housing is damaged, the internal components may function
abnormally. Unplug the power cord immediately and contact your
dealer for repair. Continued use of your TV may cause fire or electric
shock.
Do not install your TV in an area with heavy dust or high humidity.
Operating your TV in environments with heavy dust or high humidity
may cause fire or electric shock.
Follow instructions for moving your T_( Ensure that the power cord and
any other cables are unplugged before moving your T_,(
When unplugging your TV, hold the AC/DC power adapter, not the
cord. Pulling on the power cord may damage the wires inside the cord
and cause fire or electric shock. When your TV will not be used for an
extended period of time, unplug the power cord.
To reduce risk of electric shock, do not touch the connector with wet
hands.
Insert batteries in accordance
with instructions.
Incorrect polarities may
cause the batteries to leak which can damage the remote control or
injure the operator. Do not expose batteries to excessive heat such as
sunshine, fire or the like.
If any of the following occurs, contact the dealer:
- The power cord fails or frays.
- Liquid sprays or any object drops into your T_,(
- Your TV is exposed to rain or other moisture.
- Your TV is dropped or damaged in any way.
- The performance of your TV changes substantially.
This apparatus shall not be exposed to dripping or splashing and
no objects fill with liquids, such as vases, shall be placed on the
apparatus.
The mains plug or appliance coupler is used as the disconnect
the disconnect device shall remain readily operable.
device,
CAUTION - These servicing instructions are for use by qualified service
personnel only. To reduce the risk of electric shock, do not perform any
servicing other than that contained in the operating instructions unless
you are qualified to do so.
The lightning flash with arrowhead symbol within an equilateral triangle is
intended to alert the user to the presence of uninsulated DANGEROUS
VOLTAGE within the product's enclosure that may be of sufficient
magnitude to constitute a risk of electrical shock to persons.
E220MV / E260MV
Television Antenna Connection Protection
DTVTransitionAdvisory
If an outside antenna/satellite dish or cable system is to be connected to the TV,
make sure that the antenna or cable system is electrically grounded to provide
some protection against voltage surges and static charges.
The nationwide switch to digital television broadcasting was complete on June
12, 2009. Analog-only television sets that receive TV programming through an
antenna now need a converter box to continue to receive over-the-air TV. Watch
your local stations to find out when they will turn off their analog signal and switch
to digital-only broadcasting. Analog-only TVs should continue to work as before
to receive low power, Class A or translator television stations and with cable and
satellite TV services, gaming consoles, VCRs, DVD players, and similar products.
Article 810 of the National Electrical Code, ANSI/NFPSA 70, provides information
with regard to proper grounding of the mast and supporting structure, grounding
of the lead-in wire to an antenna discharge unit, size of the grounding conductors,
location of antenna discharge unit, connection to grounding electrodes, and
requirements of the grounding electrode.
Lightning Protection
For added protection of the TV during a lightning storm or when it is left
unattended or unused for long periods of time, unplug the TV from the wall outlet
and disconnect the antenna or cable system.
For additional information,
FCC (US Federal Communications
Web: www.fcc.gov
Phone: 1-888-CALL-FCC
T-rY: 1-888-TELL-FCC
Power Lines
Do not locate the antenna near overhead light or power circuits, or where it could
fall into such power lines or circuits. Remember, the screen of the coaxial cable is
intended to be connected to earth in the building installation.
Antenna
Lead In Wire
Clamps
Power Service Grounding
Equipment
(NEC ART 250, part H)
Electrode
(1-888-835-5322)
E-mail: [email protected]
NTIA (National Telecommunications
Web: www.ntia.doc.gov
and Information Administration)
(1-888-388-2009)
Your TV comes with a built-in tuner capable of processing
broadcasts. No extra converter box is needed.
Grounding Conductors
(NEC Section 810-21)
Electric Service
(1-888-225-5322)
List of US Television Stations: www.hiclh-techproductions.com/usTVstations.htm
Antenna Discharge Unit
Section 810-20)
Ground
Commission)
Fax: 1-866-418-0232
Phone: 1-888-DTV-2009
Ground Clamp
please contact the parties listed below, as appropriate:
System
digital|
J
Installing the TV.......................................................................1
Setting the -R/'s Date and Time ...............................................................
15
15
16
Inspecting the Package Contents ...........................................................
1
Setting the Time Zone ..........................................................................
Installing the TV .......................................................................................
1
Adjusting the Time for Daylight Savings ..............................................
Installing the TV Stand .........................................................................
1
Enabling or Disabling Automatic
Installing the TV on a Wall ....................................................................
2
Setting the Date and Time ...................................................................
Controlsand Connections........................................................4
Date and Time Updates ................... 16
Using the Other Menu Settings .................................................
16
17
Rear Panel ...............................................................................................
4
Navigating the On-Screen
Menu .............................................................
17
Remote Control .......................................................................................
5
Changing the Input Source .....................................................................
17
Replacing the Batteries ........................................................................
Front Panel ..............................................................................................
6
6
ConnectingYourDevices..........................................................7
Before You Begin ....................................................................................
7
Connecting
7
Your Devices ........................................................................
Completing the First-Time Setup ..............................................
9
Adjusting the TVSettings .........................................................10
Navigating the On-Screen
Adjusting
Customizing
Input Names ...................................................................
18
Setting the Screen Aspect Ratio .............................................................
18
Setting Up Closed Captioning ................................................................
20
Changing the Appearance
Adjusting
of Digital Closed Captions ........................ 20
the Picture Settings .................................................................
21
Changing the Picture Mode .................................................................
21
Adjusting the Noise Reduction Setting ................................................
22
Adjusting the Color Temperature .........................................................
22
Enabling or Disabling Color Enhancement ..........................................
23
Menu .............................................................
10
Enabling or Disabling Adaptive Luma ..................................................
23
the Tuner Settings ...................................................................
10
Enabling or Disabling DCR (Dynamic Contrast Ratio) .........................
23
Changing the Signal Source ................................................................
10
Resetting the Picture Settings .............................................................
23
Scanning for Channels .........................................................................
11
Scanning for New or Additional Channels ...........................................
11
Enabling or Disabling SRS TruSurround
12
Enabling or Disabling SRS TruVolume .................................................
24
12
Adjusting the Equalizer Settings ..........................................................
24
the Parental Controls Menu ................................................
12
Adjusting
Bass and Treble Levels ........................................................
25
Locking and Unlocking Channels ........................................................
13
Adjusting the Speaker Balance ............................................................
25
Blocking and Unblocking
Adjusting
the TV Settings for Use with A PC ..........................................
Using the Parental Controls ....................................................................
Accessing
the Audio Settings ...................................................................
HD ........................................
24
24
13
Enabling or Disabling the Built-In Speakers ........................................
25
Setting the TV Button Locks ................................................................
14
Selecting the Digital Output Mode .......................................................
25
Changing the Parental Control Passcode ............................................
14
Resetting the Audio Settngs ................................................................
26
Resetting the Content Locks ...............................................................
14
Setting the Sleep Timer ...........................................................................
26
15
Viewing a USB Photo Slideshow
27
Changing the On-Screen
Content by Rating .......................................
Adjusting
Menu Language .............................................
............................................................
E220MV / E260MV
Customizing
thePhotoDisplay
Screen
...............................................
27
Legal & Compliance .................................................................
UsingthePhotoMenu
.........................................................................
28
FCC Class B Radio Interference Statement ........................................
Viewing
System
InfoandResetting
toFactowDefaults
.........................
28
Notice ...................................................................................................
Displaying
System
Information
............................................................
28
FCC warning ........................................................................................
Restoring
the-R/totheFactory
Default
Settingss
...............................
28
Caution .................................................................................................
Restarting
theSetupWizard
................................................................
29
Open Source Software Notice .............................................................
Troubleshooting& TechnicalSupport........................................30
The TV displays "No Signal.". ..............................................................
30
There is no power. ................................................................................
30
The power is on, but there is no image on the screen .........................
30
There is no sound ................................................................................
30
The colors on the TV don't look right ...................................................
30
The buttons on the remote aren't working ...........................................
30
The image quality is not good ..............................................................
30
The picture is distorted ........................................................................
31
The display image does not cover the entire screen ...........................
31
The TV has pixels (dots) that are always dark or always lit .................
31
I see "noise" or static on the screen ....................................................
31
When I change input source, the volume changes ..............................
31
When I change input source, the display image changes size ............ 31
Specifications ..........................................................................
32
Limited Warranty .....................................................................34
ON PARTS AND LABOR .........................................................................
34
Parts and Labor ...................................................................................
34
Type of Service ....................................................................................
34
Limitations and Exclusions ..................................................................
34
Personal Data ......................................................................................
34
Zero Bright Pixel Defect Guarantee .....................................................
34
Notes .......................................................................................
35
35
35
35
35
35
36
inspectingthe PackageContents
Installingthe TV
Before installing your new TV, take a moment to inspect the package contents.
Use the images below to ensure nothing is missing or damaged.
After removing the -IV from the box and inspecting the package contents you can
begin installing the TV. Your TV can be installed in two ways:
When you have completed your inspection,
install the TV.
•
On a flat surface, using the included stand
•
On a wall, using a VESA-standard
wall mount (not included)
Installing the TV Stand
Your TV includes a stand designed to support the weight of the TV and keep it
from falling over. However, the TV can still fall over if:
It is placed on an uneven, unstable, or non-level surface
It is pushed, pulled, or otherwise improperly
moved
If an earthquake occurs and the -R/is not properly secured
To install the TV stand:
1.
Place the TV screen-down on a clean,
flat surface. To prevent scratches or
damage to the screen, place the TV on
a soft surface, such as carpet, rug, or
blanket.
2.
Align the base with the stand neck.
VIZIOLCD HDTVwith Stand
/m
Gently push the base onto the stand
neck. The arrow on the bottom of the
stand should point towards the front of
the screen.
User Manual and
Remote Control with
Quick Start Guide
Batteries
Package Contents
If the base is not joining with the
stand neck, you may have it facing
backwards.
E220MV / E260MV
3. Turntheattached
thumbscrew
untilit
iscompletely
tightened.
Folddownthethumbscrew
tabsoit is
flatagainst
thebottomofthebase.
Installing
the "IV on a Wall
To mount your TV on a wall, you will need a wall mount. Consult the information
below to find the appropriate mount for your TV model:
Screw Size:
4. MovetheTVwithattached
standinto
anuprightposition
andplaceonaflat,
level,andstable
surface.
L,
M4
M4
Screw Length:
10mm
10mm
Screw Pitch:
0.7mm
0.7mm
Hole Pattern:
100mm x 100mm
100mm x 100mm
J
Installing a TV on a wall requires lifting. To prevent injury or damage "_
to the TV, ask someone to help you.
J
5.
To ensure proper ventilation, leave at
least 1" of space between the back of
the TV and any other objects (walls,
etc).
Be sure the mount you choose is capable of supporting the weight of the TV. After
you have determined that you have the correct mount for your TV, you can begin
the installation.
To install your TV on a wall:
1.
Disconnect
your TV.
any cables connected
to
,._
2.
Place the TV face-down on a clean,
flat, stable surface. Be sure the surface
is clear of debris that can scratch or
damage the TV.
Remove the thumbscrew
away the base.
and pull
J
E220MV / E260MV
3.
Gently remove the plastic stand neck.
4.
Using a philips-head screwdriver,
remove the stand neck by loosening
and removing the screws.
5.
Attach your TV and wall mount to the wall, carefully following the
instructions that came with your mount.
Use only with a UL-listed wall mount bracket rated for the weight/load
this TV. See Appendix A - Specifications for the weight of this TV.
of
Is a nd Con nections
Rear Panel
HDMI (1,2): Connect
Stereo
RCA In:
HDMI devices.
Connect RCA audio cables for devices using HDMI port
as DVl input.
RGB PC: Connect RGB cable from computer.
PC Audio In: Connect 3.5mm audio cable from your computer.
USB: Connect a USB thumb drive to view photos.
DTV/TV: Connect RF/Coaxial connector from cable, antenna, or
satellite box.
HDMI(1,2)
StereoRCA
In
DCIn:
PCAudioIn
RGBPC
USB
DTV/TV
I
Security
Slot:
Component:
Composite:
S=Video:
Digital Optical
Audio Out:
S._Video
Security Slot
DCIN
(E220MVONLY)
Composite
35mm
AudioOut
DigitalOptical
Audio Out
Rear Panel
3.Smm Audio Out:
Connect the included power adapter. (For E260MV, this
is a three-prong connector.)
Insert a laptop-style
theft.
cable lock to secure the TV from
Connect
device.
component
Connect composite device.
Connect s-video device.
Connect SPDIF/Optical audio device
(soundbar, receiver, etc).
Connect
device.
headphones,
speakers, or other 3.5mm audio
E220MV / E260MV
RemoteControl
f
Power/Standby:
Turn the TV on or off.
Input (Specific):
Change the input device. Press the button that
corresponds to the input device you wish to view.
PowedSta_dby
Info:
Arrow:
OK:
Mute:
OK
Arrow
Volume Up/
Down:
Channel Up/
Down:
Mute
Number
Volume
Up/Down
Channel
Up/Down
A/V Controls
Remote Control
menu and episode guide.
menu or select highlighted
Increase or decrease the loudness of the TV's audio.
Change the channel. With each press of the button, the
channel will increase or decrease by one.
Use the number pad to manually enter a channel.
Input:
menu
Turn the sound off or on. When mute is activated, the
TV's audio is turned off.
Return to the channel last viewed.
Exit:
Dash(°)
Display the on-screen
option.
Pad:
A/V Controls:
NumberPad
Navigate the on-screen
Last:
Dash (-):
Last
Display the Info Window.
Change the input device. With each press of the button,
the TV will display a different input.
Use with number pad to manually enter a digital subchannel. (For example, 18-4 or 18-5.)
Control external device (CEC-enabled
Close the on-screen menu.
devices only).
E220MV / E260MV
Replacing
theBatteries
1. Remove
thebatterycoverbypressing
gentlyandpushing
thecoveraway
fromtheremote.
2.
3.
Front Panel
f
Insert two AA batteries into the remote
control. Make sure that the (+) and (-)
symbols on the batteries match the
(+) and (-) symbols inside the battery
compartment.
Replace the battery cover.
• Use only good quality batteries.
|
Inserting the batteries incorrectly may result in cracking or leakage
that may cause a fire or result in injury.
Dispose of old or dead batteries in accordance with local hazardous
waste regulations.
Keep batteries away from children and pets.
J
Power
TouchControb
RemoteSensor
Front Panel
Power:
Touch Controls:
Remote
Sensor:
Touch to turn the -[%/on or off.
Touch the far left dot to open the on-screen menu.
Once on-screen menu is open, other touch controls
will light up. Touch the dot that corresponds to the
on-screen menu option you want to select.
Point the remote control at this area of the TV when
pressing a button.
Conn
Your HDTV can be easily connected
•
ConnectingYourDevices
to an external device:
DVD or Blu-Ray player
Once you have determined the best available connection type on both your
device and the TV, ensure you have the corresponding cable.
Video game console
Cable box
To connect a device to the TV:
External antenna
Or other device
Before You Begin
1.
Ensure both the TV and your device are off.
2.
Connect the device and the TV. Use the best available connection.
Device Connection Chart on the next page.
To connect a device to the HDTV:
1.
See the
Ensure each end of the cable is securely connected.
Verify that the device has one of the following types of video ports
available:
HDMI
RGB
3.
Turn the TV on by pressing the Power/Standby
button on the remote.
4.
Turn your device on.
5.
When you are ready to use your newly connected device, press the INPUT
button on the remote and select the connection type (HDMI, RGB, etc) from
the on-screen menu. Press OK.
6.
Check the list of devices/connection
types below for special instructions:
Cable "i'M(without cable box/directly from wall)
Perform a channel scan. See Scanning for Channels on page 11.
I
,'
R F/Ante nna
Component
Composite
RGB
Make sure the desktop resolution on the PC is set to 1920 x 1080. Set
the Screen Mode to Normal.
DVD Player with DVI
Connect left (white) and right (red) audio cables to the L and R ports
next to the HDMI ports on the TV.
AV
Required Device Ports
2.
Ensure the TV has a matching port available.
3.
Ensure you have a cable that matches the available port. For example, if
you are connecting a Blu-ray player with an HDMI port, be sure you have
an HDMI cable.
,iS:}
iS@
'lie
08 £/6(8}
TV
0
8k_
OAr
'it
0
GOI-'i']@C,;E
L! ,,iO÷,
BEST
HDMI
RF/
CORXIRL
RGB
BETTER
COM
GOOD
PONENT
COMPOSITE
RV
Com
The first time you turn on the TV, the Setup App will guide you through each of
the steps necessary to get your TV ready for use.
Before you begin the first-time
•
4.
setup:
If the TV is connected to a cable
service without a set-top box (cable is
connected directly from the wall outlet)
select Cable, then press Right Arrow
and go to step 5.
Have your remote ready. Ensure the batteries
are inserted.
Your devices should be connected.
1.
the first-time
setup:
If the TV is connected
5.
Press the Right Arrow button on the
remote to go to the next screen.
Use the Up/Down Arrow buttons on
the remote to highlight Scan, then
press Right Arrow.
The TV begins
3.
to a cable or
satellite set-top box, press the EXIT
button on the remote, then select the
input to which your set-top box is
connected (HDMI, COMP, or AV).
Turn the TV on by pressing the
Power/Standby
button on the
remote.
The Setup App is displayed.
2.
to an external
antenna, select Antenna, then press
Right Arrow and go to step 5.
Your TV should be installed and the power cord should be connected
to an electrical outlet.
To complete
If the TV is connected
a channel
scan.
Use the Up/Down Arrow buttons on
the remote to highlight your preferred
language, then press Right Arrow.
6.
Wait for the channel scan to finish.
7.
When the channel scan is complete,
the Congratulations screen is
displayed.
Use the Up/Down Arrow buttons on
the remote to highlight Home and
press Right Arrow.
The first-time
setup is complete.
FromtheTVSettings
Menu,
youcan:
• Adjustthetunersettings
Adjustthe-R/settings
forusewith
a PC
Setuptheparental
controls
Change
theon-screen
menu
language
Change
theTV'sdateandtime
Adjustingthe TunerSettings
From the tuner settings menu you can:
Change the signal source
Scan for channels
Scan for new/additional
channels
Start a new channel scan
Remove channels from the master list
Changing
the Signal Source
Using this option, you can change the signal source for the coaxial (TV) input.
To change the signal source:
1.
Press the MENU button on the remote.
The on-screen menu is displayed.
2.
Use the Arrow buttons on the remote
to highlight the "iV icon and press OK.
The TV Settings menu is displayed.
3.
Use the Arrow buttons to highlight
Tuner Settings and press OK.
To open the on-screen menu, press the OK
or MENU button on the remote.
4.
Use the Arrow
Tuner Mode.
Use the Arrow buttons to highlight a menu
option, and press the OK button to select
that option.
5.
Use the Arrow buttons to change the
setting to Cable or Antenna.
6.
Press EXIT.
Navigating the On=Screen Menu
10
buttons to highlight
E220MV / E260MV
Scanning
for Channels
Before the -IV can detect and display channels and their associated information,
you must scan for channels. A channel scan may also be necessary when the
TV has been moved to an area where different free-to-air broadcast television
channels are available.
Scanning
for New or Additional
Channels
When a new channel becomes available in your area, you do not have to rescan
all channels to add the new channel. Using the add channel feature, you can
restrict the scan to new channels only.
This is useful because your master channel list settings are preserved.
To scan for channels:
To scan for new channels:
1.
2.
3.
4.
5.
6.
Press the MENU button on the remote.
The on-screen menu is displayed.
1.
Press the MENU button on the remote.
The on-screen menu is displayed.
Use the Arrow buttons on the remote
to highlight the TV icon and press OK.
The TV Settings menu is displayed.
2.
Use the Arrow buttons on the remote
to highlight the "IV icon and press OK.
The TV Settings menu is displayed.
Use the Arrow buttons to highlight
Tuner Settings and press OK.
3.
Use the Arrow buttons to highlight
Tuner Settings and press OK.
Use the Arrow buttons to highlight
Auto Channel Scan and press OK.
4.
Use the Arrow buttons to highlight
Additional Scan.
Use the Arrow buttons to highlight On
and press OK.
5.
Use the Left/Right Arrow buttons to
change the option to On or Off.
The channel scan begins.
6.
Perform a channel scan.
Wait for the channel scan to reach
100%, then press EXIT.
11
E220MV / E260MV
Adjusting the IV Settingsfor Usewith A PC
Using the Parental Controls
Your TV can be used to display output from a home computer using the RGB port.
The TV's parental controls allow you to prevent the TV from displaying
channels or programs without a password.
I/i_
These
settings
RGB port.
are only available when viewing
content
J
from theft
Accessing
Press the MENU button on the remote.
The on-screen menu is displayed.
2.
Use the Arrow buttons on the remote
to highlight the "IV icon and press OK.
The TV Settings menu is displayed.
3.
Use the Arrow buttons to highlight PC
Settings and press OK.
4.
Use the Arrow and OK buttons to
adjust each of the following options:
Menu
To access the Parental Controls menu:
To adjust the PC settings:
1.
the Parental Controls
certain
1.
Press the MENU button on the remote. The on-screen
menu is displayed.
2.
Use the Arrow
3.
Enter your parental passcode. If you have not set a passcode, enter the
default, 0000. The Parental Controls menu is displayed.
buttons on the remote to highlight Parental
and press OK.
To set a custom parental passcode, see Changing the Parental
Control Passcode on page 14.
Enabling or Disabling
Program Ratings
To manage program content according to its rating, you must enable the Program
Rating feature.
Roriz. Position - Adjust the horizontal
(left/right) position of the picture.
To enable or disable the Program Rating feature:
Vertical Position - Adjust the vertical
(up/down) position of the picture.
Fine Tune - Adjust the synchronization
between the PC and the TV. Increase
or decrease this setting if you see
"waviness" or a blurry picture.
12
i_i_<i;
If you would like the TV to automatically
adjust the picture for best "]
_;:"
qualit y, select AUt° Sync and p!es s 0KI
J
1.
From the Parental Controls menu, highlight Rating Enable and press OK.
The Rating Enable menu is displayed.
2.
Select On or Off and press OK.
E220MV / E260MV
Locking and Unlocking Channels
Blocking
When a channel is locked, it will be inaccessible. Locking a channel is a good way
to prevent children from viewing inappropriate material.
A channel may sometimes broadcast programs that are meant for children, and
at other times broadcast programs that are meant for mature audiences. You may
not want to block the channel completely using a channel lock, but you may wish
to block certain programs from being viewed.
To lock or unlock a channel:
1.
From the Parental Controls menu,
highlight Channel Locks and press
OK. The Channel Locks menu is
3.
4.
by Rating
For a list of content ratings and their definitions, visit
www.tvg uidelines.org.
Highlight the channel you want to lock
or unlock and press OK.
When a channel is locked, the Lock
icon appears locked. The channel
is not accessible unless the parental
passcode is entered.
Content
When this is the case, you can use the TV's Rating Block feature to block content
based on its rating.
displayed.
2.
and Unblocking
To block or unblock content by its rating:
1.
From the Parental Controls menu, highlight the content type you want to
adjust and press OK:
USA - TV - USA television program broadcasts.
When a channel is unlocked, the Lock
icon appears unlocked. The channel is
accessible.
USA
- Movie
- USA movie
broadcasts.
CAN - English - Canadian English television program broadcasts.
CAN - French - Canadian French television program broadcasts.
2.
For each rating type you want to block or unblock, use the Up/Down and
Left/Right Arrow buttons on the remote to highlight the rating type and
press OK.
3.
When the rating type is blocked, the Lock icon appears locked.
with this rating cannot be viewed.
4.
When the rating type is unblocked, the Lock icon appears unlocked.
Content with this rating can be viewed.
5.
If you want to block all unrated content, highlight Block Unrated
and use the Arrow buttons on the remote to select On.
6.
When you are finished adjusting the rating level blocks, press the EXIT
button on the remote.
Content
Shows
13
lib
E220MV / E260MV
Setting the TV Button Locks
Resetting
the Content
Locks
To reset the content locks to the factory-default
L_,
i_
TV's remote control, you will be unable to use the buttons on the TV. |
WARNING: If you set User Control Lock to On and you lose your "_
Please use caution when setting this lock.
J
settings:
1.
From the Parental Controls menu, highlight More and press OK. The
Change PIN menu is displayed.
You can lock the buttons on the side of the TV so that the TV can only be controlled
by the remote.
2.
Highlight RESET LOCKS and press OK. The TV displays, "Are you sure
you want to RESET ALL LOCKS SETTINGS to the factory defaults?"
To lock or unlock this setting:
3.
Highlight Yes and press OK.
1.
From the Parental Controls menu, highlight User Control
OK.
2.
Highlight Off or On and press OK.
Lock and press
When this setting is On, the buttons on the side of the TV will not function.
When this setting is Off, the buttons on the side of the TV will function.
3.
Press Exit.
Changing
the Parental Control
Passcode
If you use the parental controls, you should change the passcode
children from accessing inappropriate material.
to prevent
1.
From the Parental Controls menu, highlight More and press OK.
2.
Highlight Change PIN and press OK. The Change PIN menu is displayed.
3.
In the New Pin field, use the Number Pad on the remote to enter your new
4-digit parental control passcode. If you have not yet set a passcode, enter
the default, 0000.
4.
In the Confirm Pin field, use the Number Pad on the remote to re-enter
your new 4-digit parental control passcode.
5.
Write down your new parental control passcode and save it in a secure
location.
6.
Press the EXIT button on the remote.
14
E220MV / E260MV
Changing the 0n-Screen Menu Language
Setting the TV's Date and Time
Your TV can display the on-screen menu in different languages.
From the Date & Time menu, you can:
•
To change the on-screen menu language:
1.
2.
Adjust the time for daylight savings
Press the MENU button on the remote.
The on-screen menu is displayed.
Use the Arrow buttons on the remote
to highlight the "IV icon and press OK.
The TV Settings menu is displayed.
Set the time zone
Enable or disable automatic
date and time updates
Set the current date and time
Setting
the Time Zone
To set the time zone:
3.
4.
5.
Use the Arrow buttons to highlight
Menu Language and press OK.
1.
Press the MENU button on the remote.
The on-screen menu is displayed.
Use the Arrow buttons to highlight
your preferred language and press OK.
2.
Use the Arrow buttons on the remote
to highlight the TV icon and press OK.
The TV Settings menu is displayed.
3.
Use the Arrow buttons to highlight
Time & Local Settings and press OK.
4.
Use the Arrow buttons to highlight
Time Zone and press OK.
5.
Use the Arrow buttons to highlight
your time zone and press OK.
6.
Press EXIT.
Press EXIT.
15
lib
E220MV / E260MV
Adjusting the Time for Daylight Savings
Setting
This setting will automatically
savings time.
Using this menu option, you can manually set the TV's date and time.
adjust the time for zones which recognize daylight
the Date and Time
To manually set the date and time:
To enable or disable the daylight savings adjustment:
1.
Press the MENU button on the remote. The on-screen
2.
Use the Arrow buttons on the remote to highlight the "iV icon and press
OK. The TV Settings menu is displayed.
3.
Use the Arrow
buttons to highlight Time & Local Settings
4.
Use the Arrow
buttons to highlight Daylight Saving.
5.
Use the Arrow
buttons to change the setting to Enable or Disable.
6.
Press EXIT.
Enabling or Disabling Automatic
menu is displayed.
and press OK.
Date and Time Updates
The current date and time is broadcast digitally in many areas. Your TV can
automatically set the time and date using this information.
I/_
J
time.
hen this setting is enabled, you cannot manually set the date and "]
To enable or disable automatic updates:
1.
Press the MENU button on the remote. The on-screen
2.
Use the Arrow buttons on the remote to highlight the TV icon and press
OK. The TV Settings menu is displayed.
3.
Use the Arrow
buttons to highlight Time & Local Settings
4.
Use the Arrow
buttons to highlight Auto Update.
5.
Use the Arrow
buttons to change the setting to Enable or Disable.
6.
Press EXIT.
16
menu is displayed.
and press OK.
1.
Press the MENU button on the remote. The on-screen
menu is displayed.
2.
Use the Arrow buttons on the remote to highlight the TV icon and press
OK. The TV Settings menu is displayed.
3.
Use the Arrow
buttons to highlight Time & Local Settings
4.
Use the Arrow
buttons to highlight Date & Time.
5.
Use the Arrow buttons to highlight individual numbers in the date and time.
Use the Number Pad to enter the current date and time.
6.
Press EXIT.
and press OK.
th Oth
U
Your TV features an easy-to-use
•
on-screen menu. Using this menu, you can:
Change the input source and
rename inputs
Set the screen aspect ratio
Changingthe InputSource
External devices such as DVD players, Blu-Ray Players, and video game consoles
can be connected to your TV. To use one of these devices with your TV, you must
first change the input source in the on-screen menu.
Set up closed captions
Adjust the picture settings
Adjust the audio settings
Set the sleep timer
(_
T° qUeiCkelyatcess
the Input
S°urce
menu'
press the INPUT
butt°n
I
To change the input device:
View a USB photo slideshow
Get system info or reset to
factory defaults
1.
Press the MENU button on the remote.
The on-screen menu is displayed.
2.
Use the Arrow buttons on the remote
to highlight the Input icon and press
OK. The Input menu is displayed.
3.
Use the Arrow buttons to highlight
Input Source and press OK.
4.
Use the Arrow buttons on the remote
to highlight the input source you wish
to display, then press OK.
5.
Press EXIT.
Navigating the On-Screen Menu
To open the on-screen menu, press the OK
or MENU button on the remote.
Use the Arrow buttons to highlight a menu
option, and press the OK button to select
that option.
17
E220MV / E260MV
Customizing
inputNames
When
youhavemultiple
devices
connected
toyourTV,itcanbecome
difficultto
remember
theinputstowhichtheyareconnected.
Your-IVfeatures
theabilityto
customize
thenames
oftheseinputstomakethemeasytoremember.
(Custom
names
havea 10-character
limit.)
Setting the Screen Aspect Ratio
Forexample,
HDMI
Use the table on the next page to determine the best aspect ratio for your content
type. Areas in red will not be visible on your TV screen.
1 could be renamed as My Blu-ray.
The TV can display images in four different modes: Normal, Wide, Panoramic,
and Stretch. Each mode changes the picture according to the content's original
format.
You can also remove unused inputs from the input list, making selection of the
correct input faster.
To adjust the screen aspect ratio:
To customize an input name:
1.
Press the OK button on the remote. The on-screen
1.
Press the MENU button on the remote.
The on-screen menu is displayed.
2.
Use the Arrow buttons on the remote to highlight the Wide icon and press
OK. The Wide menu is displayed.
2.
Use the Arrow buttons on the remote
to highlight the input icon and press
OK. The Input menu is displayed.
3.
Use the Left/Right Arrow buttons on the remote to highlight the screen
mode you want to display, then press OK:
3.
Use the Arrow buttons to highlight
Name Input and press OK.
4.
Use the Arrow buttons on the remote
to highlight the input source you wish
to rename, then press OK.
5.
Use the Arrow buttons to highlight
Custom Label and press OK.
The on-screen
6.
7.
18
•
Normal preserves the content's original aspect ratio. Since the 4:3
aspect ratio is not large enough to fill the -R/'s screen, black bars are
added to the left and right of the display image.
•
Full stretches a 4:3 aspect ratio picture to the edges of the screen.
Since the picture is being stretched, the display image may appear
distorted. If the program is already formatted for widescreen viewing
(1.85:1 or 2.35:1), then black bars will appear on the top and bottom of
the display image.
•
Panoramic expands the display image to fill the screen. Images may
appear wider than intended. If you are watching widescreen (1.85:1
or 2.35:1) content, black bars will still appear on the top and bottom
of the display image. This option is only available when the "IV is
displaying a 480i/480p source.
•
Stretch expands the display image to fill the screen. Images may
appear wider than intended. If you are watching widescreen (1.85:1
or 2.35:1) content, black bars will still appear on the top and bottom
of the display image. This option is only available when the "IV is
displaying a 720p/1080i/1080p
source.
keyboard is displayed.
Use the Arrow and OK buttons to spell
the custom input name.
When you are finished, highlight OK
and press OK.
Press EXIT.
menu is displayed.
E220MV / E260MV
Screen Aspect
Ratio Table
0
!oOt
o0o
0
0
o0o
0
0
o0o
0
o0o
0
0
0
0
o0o
0
0
IoOoOol
Ioo0ool
o0o
0
0
19
E220MV / E260MV
Changing
Setting Up Closed Captioning
the Appearance
of Digital Closed
Captions
Digital closed captions can be displayed according
Your TV can display closed captions for programs that include them. Closed
captions display a transcription of a program's dialogue.
i'_
If the program you are viewing is not being broadcast
captions, the TV will not display them.
To activate or deactivate
1.
Press the MENU button on the remote.
The on-screen menu is displayed.
2.
Use the Arrow buttons on the remote
to highlight the CO icon and press OK.
The Closed Caption menu is displayed.
3.
4.
To change the appearance of digital closed captions:
1.
From the Closed Caption menu, use
the Arrow buttons to highlight Digital
CO Style.
2.
Use the Left/Right Arrow buttons on
the remote to select Custom, then
press OK. The Digital CC Style menu
appears.
3.
Use the Up/Down Arrow buttons on
the remote to highlight the setting you
wish to change, then use the Arrow
buttons to change the setting:
with closed "_
J
closed captions:
Use the Arrow buttons on the remote
to highlight the type of closed captions
you wish to see:
•
Analog Closed Caption for
analog (NTSC) TV channels.
•
Digital Closed Caption for
digital (ATSC) TV channels.
to your preference.
After highlighting the type of closed
captions you wish to see, use the
Arrow buttons on the remote to
select the caption channel you wish to
display, then press OK.
:_i_:_<_.,Caption channels usually display different languages. For example, "_
_?,_(_" CC1 may display English captions and CC2 may display Spanish |
captions:
J
•
Caption Style- Choose a custom
preset caption style.
•
Text Size - Adjust the size of the
text.
•
Colortext.
•
OpacityChange the
transparency of the text.
•
BG Color - Change the
background color.
•
BG Opacity - Change the
transparency of the background.
•
Window
color.
•
Window Opacityedge type.
Change the color of the
Color-
Reset Default
Change the edge
Change the
- Restore closed
caption settings to factory defaults
4.
2O
When you are satisfied with the appearance of the closed
captions, press the EXIT button on the remote.
E220MV / E260MV
Adjusting the PictureSettings
Changing
the Picture Mode
Your TV display can be adjusted to suit your preferences and viewing conditions.
Using the Picture menu, you can adjust the
following settings:
•
To change the picture mode:
Change the picture mode
1.
Press the OK button on the remote. The on-screen
Adjust noise reduction
2.
Use the Arrow
buttons to highlight Picture
and press OK.
3.
Use the Arrow
OK.
buttons to highlight Picture
Mode and press
4.
Use the Arrow buttons to highlight one of the following options, then press
OK:
Adjust color temperature
Enable or disable color enhancement
Enable or disable adaptive luma
Enable or disable DCR
(Dynamic Contrast Ratio)
Reset the picture mode settings
menu is displayed.
Standard - Sets the various picture settings to values that will produce
the best picture in the most cases. This is the recommended setting.
Movie - Sets the picture settings to values perfect for watching
in a dark room.
a movie
Game - Optimizes the picture settings for displaying game console
output.
Vivid - Sets the picture settings to values that produce a brighter, more
vivid picture.
Custom
- Allows you to manually change each of the picture settings:
Backlight - Adjusts the LED brightness to affect the overall
brilliance of the picture. This option is not available unless Ambient
Light Sensor is set to Off.
Brightness - Adjusts the black level of the picture. When this
setting is too low, the picture may be too dark to distinguish details.
When this setting is too high, the picture may appear faded or
washed out.
Contrast - Adjusts the white level of the picture. When this setting
is too high, the picture may appear dark. When this setting is too
low, the picture may appear faded or washed out. If the setting is
too high or too low, detail may be difficult to distinguish in dark or
bright areas of the picture.
Color - Adjusts the intensity of the picture colors.
Tint - Adjusts the hue of the picture. This setting is useful in
adjusting the flesh tones in the picture. If flesh appears too orange,
reduce the level of color before adjusting tint.
Sharpness - Adjusts the edge sharpness of picture elements. It can
be used to sharpen non-HD (high definition) content; however, it will
not produce detail that does not otherwise exist.
21
E220MV / E260MV
Adjusting the Noise Reduction Setting
Noise reduction diminishes artifacts such as "blockiness"
activated, the resulting picture usually has softer edges.
Adjusting
or "pixellation".
When
the Color Temperature
Color temperature
the picture.
changes the "warmness"
or "coolness"
of the white areas of
To adjust the noise reduction setting:
1.
Press the OK button on the remote.
The on-screen menu is displayed.
2.
Use the Arrow buttons to highlight
Picture and press OK.
3.
Use the Arrow buttons to highlight
Noise Reduction and press
OK.
4.
Use the Arrow
Low, Medium,
OK.
5.
Press EXIT.
buttons to highlight Off,
or High, then press
I/_
T°adjustthissetting'PictureM°demustbesett°cust°m
To adjust the color temperature setting:
1.
Press the OK button on the remote.
The on-screen menu is displayed.
2.
Use the Arrow buttons to highlight
Picture and press OK.
3.
Use the Arrow buttons to highlight
More and press OK.
4.
Use the Arrow buttons to highlight
Color Temperature
and select
Normal, Cool, Warm, or Custom.
If you choose Custom, you can
change the individual Red, Blue, and
Green gain settings.
5.
22
When you are finished,
press EXIT.
1
E220MV / E260MV
Enabling or Disabling Color Enhancement
Color enhancement
tones.
/'_
reduces oversaturation
Enabling or Disabling
of some colors and improves flesh
To adjust this setting, Picture Mode must be set to Custom.
To enable or disable the color enhancement
I//_
setting:
1.
Press the OK button on the remote. The on-screen
2.
Use the Arrow
buttons to highlight Picture
3.
Use the Arrow
DCR (Dynamic
Contrast
Ratio)
Dynamic contrast ratio changes contrast according to displayed
best picture quality.
T°adjustthissetting'pictureM°demustbesett°cust°m
1
To enable or disable the DCR setting:
1.
Press the OK button on the remote. The on-screen
2.
Use the Arrow
buttons to highlight Picture
buttons to highlight More and press OK.
3.
Use the Arrow
buttons to highlight More and press OK.
4.
Use the Arrow buttons to highlight Color Enhancement.
4.
Use the Arrow
buttons to highlight DCR.
5.
Use the Left/Right
5.
Use the Left/Right
6.
Press EXIT.
6.
Press EXIT.
Enabling or Disabling
Arrow
and press OK.
Luma
Adaptive luma adjusts the average brightness
large areas of brightness.
I//_
menu is displayed.
buttons to change the setting to Off or On.
Adaptive
Resetting
of the picture to compensate
T° adjust this setting' Picture Mode must be set to Custom"
To enable or disable the adaptive luma setting:
1.
Press the OK button on the remote. The on-screen
2.
Use the Arrow
buttons to highlight Picture
3.
Use the Arrow
buttons to highlight More and press OK.
4.
Use the Arrow
buttons to highlight Adaptive
5.
Use the Left/Right
6.
Press EXIT.
Arrow
content for the
for
1
and press OK.
buttons to change the setting to Off or On.
the Picture Settings
To restore the TV's picture settings to the factory defaults:
1.
Press the OK button on the remote.
The on-screen menu is displayed.
2.
Use the Arrow buttons to highlight
Picture and press OK.
3.
Use the Arrow buttons to highlight
Reset Picture Mode, then press OK.
4.
Use the Arrow buttons to highlight OK
and press OK.
5.
Press EXIT.
menu is displayed.
and press OK.
Arrow
menu is displayed.
Luma.
buttons to change the setting to Off or On.
23
E220MV / E260MV
Adjusting the AudioSettings
Enabling or Disabling
Using the Audio Settings menu, you can adjust the following:
SRS TruVolume intelligently normalizes
commercials or channel changes.
•
Enable or disable
SRS TruSurround HD'"
•
Enable or disable SRS TruVolume ®
•
Adjust the equalizer settings
•
Adjust bass and treble levels
•
SRS TruVolume
volume
1.
Press the OK button on the remote. The on-screen
2.
Use the Arrow
buttons to highlight Audio and press OK.
Adjust speaker balance
3.
Use the Arrow
buttons to highlight SRS TruVolume.
•
Enable or disable the built-in
speakers
4.
Press the Right/Left
•
Select the digital audio output
mode
Adjusting
•
Reset the audio settings
Arrow
the Equalizer Settings
Your TV features six preset equalizer settings. These settings allow you to
customize your TV's sound to match the type of programming you most often
enjoy.
To adjust the equalizer settings
menu, SRS TruSurround
To adjust the equalizer settings:
Enabling or Disabling SRS TruSurround
HD
TruSurround HD is a robust multichannel virtualization technology developed
by SRS Labs that provides an enhanced listening experience unlike any other
technology offered for a two speaker playback environment.
To enable or disable SRS TruSurround
menu is displayed.
buttons to select On or Off and press EXIT.
be set to Off.
HD:
1.
Press the OK button on the remote.
The on-screen menu is displayed.
2.
Use the Arrow buttons to highlight
Audio and press OK.
3.
Use the Arrow buttons to highlight
Equalizer Settings and press OK.
4.
Use the Arrow buttons to highlight one
of the following settings and press OK:
•
Classical
1.
Press the OK button on the remote. The on-screen
2.
Use the Arrow
buttons to highlight Audio and press OK.
•
Disco
3.
Use the Arrow
buttons to highlight SRS TruSurround
•
Flat
4.
Press the Right/Left
menu is displayed.
HD.
Jazz
Arrow
during television
To enable or disable SRS TruVolume:
/_
buttons to select On or Off and press EXIT.
5.
24
fluctuations
•
Pop
•
Rock
Press EXIT.
HD must
_}
)
Ill
E220MV / E260MV
Adjusting
Bass and Treble Levels
Enabling or Disabling
The bass and treble levels for your TV's built-in speakers can be adjusted to your
liking.
"
/'_
To
set adjust
to Off.the bass and treble levels, SRS TruSurround
HD must be
1
the Built-In
Speakers
Using this menu option, you can turn the built-in speakers on or off. This is often
used when the -iV is connected to a home audio system.
To enable or disable the built-in speakers:
1.
Press the OK button on the remote. The on-screen
To adjust the bass and treble levels:
2.
Use the Arrow
buttons to highlight Audio and press OK.
1.
3.
Use the Arrow
buttons to highlight "iV Speakers
4.
Press the Right/Left Arrow
k
Press the OK button on the remote.
The on-screen menu is displayed.
2.
Use the Arrow buttons to highlight
Audio and press OK.
3.
Use the Arrow buttons to highlight
Equalizer Settings and press OK.
4.
Use the Arrow buttons to highlight
Bass or Treble and press OK.
5.
Use the Left/Right Arrow buttons to
increase or decrease the level.
6.
When you are finished, press EXIT.
Selecting
buttons to select On or Off and press EXIT.
Mode
If you are unfamiliar with audio formats, or your TV is not connected
to an audio receiver, VlZlO recommends
/_
"_
you set this option to Auto..J
This option only affects audio output from the optical port.
1
J
Balance
The built-in speakers can be adjusted to distribute the sound between the left and
right speakers.
To adjust the speaker balance:
1.
Press the OK button on the remote. The on-screen
2.
Use the Arrow
buttons to highlight Audio and press OK.
3.
Use the Arrow
buttons to highlight Balance
4.
Use the Arrow
buttons to adjust the speaker balance:
•
and press OK.
Using this menu option, you can force the TV to downsample unsupported audio
formats to PCM audio. You may want to use this option if you have an older audio
receiver connected to the TV.
i_
Adjusting the Speaker
the Digital Output
menu is displayed.
menu is displayed.
and press OK.
To select the digital output mode:
1.
Press the OK button on the remote. The on-screen
menu is displayed.
2.
Use the Arrow
buttons to highlight Audio and press OK.
3.
Use the Arrow
OK.
buttons to highlight Optical
4.
Use the Arrow
OK.
buttons to highlight Auto or Force PCM and press
5.
Press EXIT.
Audio Out and press
To increase the loudness of the right speaker, increase the balance
setting.
To increase the loudness of the left speaker, decrease the balance
setting.
25
/IS
Resetting
E220MV / E260MV
the Audio Settngs
Setting the Sleep Timer
To reset the audio settings to the factory default settings:
When activated, the TV's sleep timer will turn the TV off after a set period of time.
1.
Press the OK button on the remote. The on-screen
menu is displayed.
2.
Use the Arrow
buttons to highlight Audio and press OK.
3.
Use the Arrow
OK.
buttons to highlight Reset Audio Mode and press
4.
The TV displays "Are you sure you want to RESET Audio Settings to the
factory defaults?"
To use the sleep timer:
1.
2.
Press the MENU button on the remote.
The on-screen menu is displayed.
Use the Arrow buttons on the remote
to highlight the Sleep Timer icon
and press OK. The Timer menu is
displayed.
Use the Arrow buttons to highlight OK and press OK.
5.
26
3.
Use the Up/Down Arrow buttons on
the remote to highlight the period of
time after which you want the TV to
power off (30, 60, 90, or 120 minutes).
4.
Press OK, then press EXIT.
Press EXIT.
E220MV / E260MV
Viewing a USBPhotoSlidesh0w
Customizing
Your player features a USB port where you can connect and share a USB thumb
drive containing your photos.
the Photo Display Screen
The Photo menu can be displayed as a list or as a grid of thumbnail
images can also be sorted by date or by name.
images. The
To customize the photo display screen:
The TV supports
the following file types:
.jpeg
.jPg
1.
From the photo screen, use the Arrow
buttons on the remote to highlight an
image, then press OK. The menu is
displayed on the left side of the screen.
2.
Highlight one of the following options
and press OK:
•
Sort- Select to change the display
order of photos. Choose Date or
Name.
•
File - Select to change the method
of displaying photos. Choose List
or Thumbnail.
To play USB media, you must first save your images onto a USB thumb drive.
Remember:
•
The USB thumb drive must be formatted
as FAT32
•
Files on the USB thumb drive must be a supported
•
The USB thumb drive must have a minimum 1GB memory
file type
•
The TV will not play media from external hard drives or mp3 players
To play your USB media:
1.
Load your photos onto a USB thumb drive using your home computer.
2.
Insert the USB thumb drive into the USB port on the back of the TV.
3.
Press the MENU button on the remote. The on-screen
4.
Use the Arrow buttons on the remote to highlight the Photo icon and press
OK. The Photo screen is displayed.
5.
Use the Arrow buttons on the remote to highlight the photo you would like
to be displayed first, then press the Play button. The slideshow begins.
•
To pause the slideshow,
•
To go to the previous photo, press the Stop button.
•
To exit the slideshow, press the EXIT button.
Thumbnail Size - Select to change
the size of displayed thumbnail
images. Choose Small, Medium,
or Large.
menu is displayed.
press the Pause button.
27
E220MV / E260MV
UsingthePhoto
Menu
Viewing System Info and Resetting to Factory Defaults
This menu allows you to customize slideshow
your image metadata.
playback, rotate photos, and see
You can use the TV's Help menu to:
Display system information
To open the Photo menu:
1.
When you are viewing a photo in
fullscreen, press the OK button on the
remote. The Photo menu is displayed.
•
Restore the TV to its factory default settings
•
Restart the Setup Wizard
Displaying System
2.
Use the Arrow and OK buttons on
the remote to select one of the menu
To display a summary of the TV settings:
options:
1.
Press the MENU button on the remote. The on-screen
2.
Use the Arrow buttons on the remote to highlight the Help icon and press
OK. The Help menu is displayed.
Shuffle - Select Yes on this option to display the slideshow photos in a
random order.
3.
Highlight System
o
Rotate - Select this option to rotate the photo 90 ° clockwise.
4.
o
Info - Select this option to open an info window. The window displays
image metadata including date, resolution, and exposure time. The
metadata may vary according to your camera settings.
When you are finished reviewing the system information,
button on the remote.
•
Repeat - Select Yes on this option to play the slideshow
continuous loop.
•
in a
Restoring
3.
information
When you have finished,
press Exit.
I/i_
Info and press OK. The system information
the "IV to the Factory
All of the on-screen
menu is displayed.
is displayed.
press the EXiT
Default Settingss
menu settings can be reset to the factory defaults.
If you made
have
restoreto the
the -iV
settings
to the will
factory
be lost!
default settings,
J
all changes you fl
To restore the -iV to its factory default settings:
1.
Press the MENU button on the remote. The on-screen
menu is displayed.
2.
Use the Arrow buttons on the remote to highlight the Help icon and press
OK. The Help menu is displayed.
3.
Highlight System
Reset and press OK.
The TV displays, "Are you sure you would like to Restore Defaults? This will
erase any custom settings."
28
4.
Highlight Yes and press OK.
5.
Press EXIT.
E220MV / E260MV
Restarting
the Setup Wizard
The TV's Setup App can be used to easily set up the TV tuner.
To access the Setup App:
1.
Press the MENU button on the remote. The on-screen
menu is displayed.
2.
Use the Arrow buttons on the remote to highlight the Help icon and press
OK. The Help menu is displayed.
3.
Highlight Start Setup Wizard
4.
Use the Number Pad to enter your parental PIN. If you have not yet set
your PIN, enter 0000.
5.
The TV displays, "Are you sure you want to RESET SETUP WIZARD?"
and press OK.
Highlight OK and press OK.
29
Products
areoftenreturned
duetoa technical
problem
ratherthandueto a
defect.
Ifyouareexperiencing
aproblem
whenusingyourTV,trytofixtheissue
usingthistroubleshooting
guide.
If,afterusingthistroubleshooting
guide,youarestillexperiencing
anissuewith
yourTV,contactVlZIO'sSupport
Department.
Quality
customer
supportand
service
areintegral
partsofVlZlO's
commitment
toservice
excellence.
Web: www.VlZlO.com
Phone: (877)
698-4946
Fax: (949)
585-9563
Hours of operation:
Email: [email protected] - Friday: 6 am to 9 pm
There is no sound.
Press Volume Up on the remote control.
Press the MUTE button on the remote to ensure mute is off.
Check the audio settings.
Ensure the speakers are set to On.
Ensure no headphones are connected
Check the audio connections
game console, cable/satellite
(PST)
Saturday - Sunday: 8 am to 4pm (PST)
to the -R/.
of external devices (Blu-ray player,
box) that are connected to the TV.
If you are using an antenna, the signal strength of the channel may be
low. Ensure your antenna is connected securely to the TV and move
the antenna around the room or close to a window for the best signal.
The colors on the TV don't look right.
Adust the Color and Tint settings
for Channels on page 11.
The TV displays "No Signal."
•
Press the INPUT button on the remote control to select a different
in the Picture menu. See Scanning
Reset the picture settings.
Check all cables to ensure they are securely attached.
input source.
If you are using cable TV, satellite, or antenna connected directly to
the TV, scan for channels. See Scanning for Channels on page 11.
The buttons
on the remote
aren't working.
Ensure you are only pressing one button at a time.
Point the remote directly at the TV when pressing a button.
There is no power.
Ensure the TV is plugged into a working electrical outlet.
Replace the remote batteries with new ones. See Replacing the
Batteries on page 6.
Ensure the power cable is securely attached to the -R/.
Press the Power/Standby
button on the remote or press the Power/
Standby button on the side of the TV to turn the TV on.
The power is on, but there is no image on the screen.
Ensure all cables are securely attached to the TV.
Ensure all devices are connected
device's user manual for details.
correctly. Devices differ; see your
Adjust Brightness, Contrast, or Backlight.
on page 11.
See Scanning for Channels
Press the INPUT button on the remote to select a different input
source.
30
The image quality
is not good.
For the best image quality, view high-definition programs using digital
sources. Connect your devices with HDMI cables.
If you are using an antenna, the signal strength of the channel may be
low. Ensure your antenna is connected securely to the TV and move
the antenna around the room or close to a window for the best signal.
E220MV / E260MV
The picture is distorted.
When I change input source, the display
•
Nearby electrical devices may be interfering with the TV. Separate the
TV from electrical appliances, cars, or flourescent lights.
•
Ensure all cables are securely attached.
The display
image changes
size.
•
The TV remembers the viewing mode on each input source. If the
viewing mode on the new input source differs from the one on the
input source you switch from, the difference may be noticable.
•
See Setting the Screen Aspect Ratio on page 18.
image does not cover the entire screen.
•
If you are in RGB mode (computer), ensure that H-Size and V-Position
in the on-screen menu are set correctly.
•
If you are using 1%_,AVl, AV2, or Component with 480i input, press
the WIDE button on the remote to change the screen mode.
The TV has pixels (dots) that are always dark or always lit.
o
Your HDTV is precision-manufactured
using an extremely high level
of technology. However, sometimes pixels may not display correctly.
These types of occurences are inherent to this type of product and do
not constitute a defective product.
I see "noise"
or static
on the screen.
•
When your TV's digital capabilities exceed a digital broadcast signal,
the signal is up-converted (improved) to match your TV's display
capabilities. This up-converting can sometimes cause irregularities in
the image.
•
If you are using an antenna, the signal strength of the channel may be
low. Ensure your antenna is connected securely to the TV and move
the antenna around the room or close to a window for the best signal.
change
input source, the volume changes.
The -R/ remembers the volume level on each input source. If the
volume level on the new input source is higher or lower than the level
on the source you switch from, the difference may be noticable.
Use the Volume Up/Down
volume.
buttons on the remote to adjust the
31
E220MV
E260MV
21.53"
26.00"
7.66 Ibs
6.72 Ibs
15.10 Ibs
13.97 Ibs
Refresh Rate:
60 Hz
60 Hz
Dynamic Contrast Ratio:
20,000:1
20,000:1
Diagonal Viewable:
Weight w/Stand:
w/o Stand:
Pixel Pitch:
0.248mm
x 0.248mm
0.300mm
x 0.300mm
HDMI Inputs:
Composite
Inputs:
USB Ports:
OSD Language:
English, Spanish, French
English, Spanish, French
SRS TruSurround HD,
Dolby Digital
SRS TruSurround HD,
Dolby Digital
Number of Speakers
Simulated Surround:
32
E220MV / E260MV
E220MV
E260MV
Energy Star
FCC Class B
HDMI 1.3
Energy Star
FCC Class B
HDMI 1.3
Voltage Range:
100-240 VAC @ 50/60 Hz
100-240 VAC @ 50/60 Hz
Temperature:
32 ° to 95 ° F
32 ° to 95 ° F
Compliance:
Operating
Operating
Humidity:
10 - 90% (Relative, Non-condensing)
10 - 90% (Relative, Non-condensing)
33
ONPARTSANDLABOR
maintenance are not covered. This one year limited warranty does not cover
Products sold "AS IS", "FACTORY RECERTIFIED", or by a non-authorized reseller.
Covers units purchased as new in United States and Puerto Rico Only.
THERE ARE NO EXPRESS WARRANTIES OTHER THAN THOSE LISTED OR
DESCRIBED ABOVE. ANY IMPLIED WARRANTIES, INCLUDING ANY IMPLIED
WARRANTY OF MERCHANTABiLiTY
AND FITNESS FOR A PARTICULAR
PURPOSE, SHALL BE LIMITED IN DURATION TO THE PERIOD OF TiME SET
FORTH ABOVE. VlZIO'S TOTAL LiABiLiTY FOR ANY AND ALL LOSSES AND
DAMAGES RESULTING FROM ANY CAUSE WHATSOEVER INCLUDING VlZIO'S
NEGLIGENCE, ALLEGED DAMAGE, OR DEFECTIVE GOODS, WHETHER SUCH
DEFECTS ARE DISCOVERABLE OR LATENT, SHALL IN NO EVENT EXCEED THE
PURCHASE PRICE OF THE PRODUCT. VlZIO SHALL NOT BE RESPONSIBLE
FOR LOSS OF USE, LOSS OF INFORMATION OR DATA, COMMERCIAL
LOSS, LOST REVENUE OR LOST PROFITS, OR OTHER INCIDENTAL OR
CONSEQUENTIAL DAMAGES. SOME STATES DO NOT ALLOW LIMITATIONS
ON HOW LONG AN IMPLIED WARRANTY LASTS OR THE EXCLUSION OF
INCIDENTAL OR CONSEQUENTIAL DAMAGES, SO THE ABOVE LIMITATIONS
OR EXCLUSIONS MAY NOT APPLY TO YOU. THIS WARRANTY GIVES YOU
SPECIFIC LEGAL RIGHTS, AND YOU MAY ALSO HAVE OTHER RIGHTS, WHICH
VARY FROM STATE TO STATE. THIS WARRANTY IS SUBJECT TO CHANGE
WITHOUT NOTICE.
VlZIO provides a warranty to the original purchaser of a new Prod uct against defects
in materials and workmanship for a period of one (1) year of non-commercial usage
and ninety (90) days of commercial use. If a Product covered by this warranty is
determined to be defective within the warranty period, VlZIO will either repair or
replace the Product at its sole option and discretion.
To obtain warranty service, contact VlZIO Technical Support via e-maih
[email protected]
or via phone at 877 MY VlZIO (877.698.4946) from
6:00AM to 9:00PM Monday through Friday and 8:00AM to 4:00PM Saturday and
Sunday, Pacific Time, or visit www.VlZIO.com. PRE-AUTHORIZATION MUST BE
OBTAINED BEFORE SENDING ANY PRODUCT TO A VlZIO SERVICE CENTER.
Proof of purchase in the form of a purchase receipt or copy thereof is required to
show that a Product is within the warranty period.
Parts and Labor
There will be no charge for parts or labor during the warranty period. Replacement
parts and Products may be new or recertified at VlZIO's option and sole discretion.
Replacement parts and Products are warranted for the remaining portion of the
original warranty or for ninety (90) days from warranty service or replacement,
whichever is greater.
CHECK WWW.VIZIO.COM
FOR THE MOST CURRENT VERSION.
Personal Data
Type of Service
Defective Products must be sent to a VlZIO service center to obtain warranty
service. VlZIO is not responsible for transportation costs to the service center,
but VlZIO will cover return shipping to the customer. PRE-AUTHORIZATION IS
REQUIRED BEFORE SENDING ANY PRODUCT TO A VlZIO SERVICE CENTER
FOR WARRANTY SERVICE.
Product returns to VlZIO's service centers must utilize either the original carton
box and shipping material or packaging that affords an equal degree of protection.
VlZIO Technical Support will provide instructions for packing and shipping the
covered Product to the VlZIO service center.
Limitations and Exclusions
VlZIO's one-year limited warranty only covers defects in materials and
workmanship. This warranty does not cover, for example: cosmetic damage,
normal wear and tear, improper operation, improper voltage supply or power
surges, signal issues, damages from shipping, acts of God, any type of customer
misuse, modifications or adjustments, as well as installation and set-up issues
or any repairs attempted by anyone other than by a VlZIO authorized service
center. Products with unreadable or removed serial numbers, or requiring routine
34
If your VlZIO product is capable of storing personal data and other information, ALL
CONTENTS AND INFORMATION WILL BE DELETED IN THE COURSE OF SOME
IN-HOME AND ALL SHIP-IN WARANTY SERVICE. If this occurs, your product will
be restored to you configured as originally purchased. You will be responsible for
restoring all applicable data and passwords. Recovery and reinstallation of user
data is not covered under this Limited Warranty. In order to protect your personal
information, VlZIO recommends that you always clear all personal information
from the unit before it is serviced, regardless of the servicer.
Zero Bright Pixel Defect Guarantee
This policy covers "zero bright pixel" defects for the duration of the limited
"ONE YEAR WARRANTY" on select new product purchases. To determine if
this guarantee applies to your product, refer to the "DETAILS" tab of the model's
product information page (www.VIZIO.com) or look for the "zero bright pixel"
guarantee on the box.
FCC Class B Radio interference Statement
NOTE: This equipment has been tested and found to comply with the limits
for a Class B digital device, pursuant to Part 15 of the FCC Rules. These limits
are designed to provide reasonable protection against harmful interference in
a residential installation. This equipment generates, uses and can radiate radio
frequency energy, and if not installed and used in accordance with the instructions,
may cause harmful interference to radio communications.
However, there is
no guarantee that interference will not occur in a particular installation. If this
equipment does cause harmful interference to radio or television reception, which
can be determined by turning the equipment off and on, the user is encouraged to
try to correct the interference by one or more of the following measures:
1.
Reorient or relocate the receiving antenna.
2.
increase the separation
3.
Connect the equipment into an outlet on a circuit different from that to
which the receiver is connected.
4.
Consult the dealer or an experienced
between the equipment
and receiver.
radio/-R/technician
for help.
This device complies with Part 15 of the FCC Rules. Operation is subject to the
following two conditions: (1) this device may not cause harmful interference, and
(2) this device must accept any interference received, including interference that
may cause undesired operation.
Caution
Always use an AC/DC power adapter that is properly grounded. Use the AC cords
listed below for each area.
USA: UL
Canada: CSA
Germany: VDE
UK: BASE/BS
Japan: Electric Appliance Control Act
Open Source Software Notice
Your ViA device may contain GPL executables and LGPL libraries that are subject
to the PL2.0/LGPL2.1 License Agreements. VIZIO offers to provide source code
to you on CD-ROM for a processing fee covering the cost of performing such
distribution, such as the cost of media, shipping and handling upon request made
to VIZIO at www.VIZIO.com.
This offer is valid for a period of three (3) years from the date of the distribution
this ViA device by VIZIO.
You can obtain a copy of the GPL, LGPL licenses from:
http://www.qnu.orq/licenses/old-licenses/q
2.
3.
pl-2.0.html
and
http://www.qnu.orq/licenses/oldlicenses/Iq
Notice
1.
of
pl-2.1 .html
You can also obtain a copy of gSOAP public license from:
The changes or modifications not expressly approved by the party
responsible for compliance could void the user's authority to operate
the equipment.
Shielded interface cables and AC power cord, if any, must be used in
order to comply with the emission limits.
The manufacturer is not responsible for any radio or TV interference
caused by unauthorized modification to this equipment, it is the
responsibilities
of the user to correct such interference.
FCC warning
Changes or modifications not expressly approved by the party responsible for
compliance with the FCC Rules could void the user's authority to operate this
equipment.
http://www.cs.fsu.ed
u/-enqelen/license,
html
Please visit www.VlZIO.com for attribution
software on your VlZIO ViA device.
of copyrights
to any open source
Permission is hereby granted, free of charge, to any person obtaining a copy of any
such software and associated documentation files (the "Open Source Software"),
to deal in the Open Source Software without restriction, including without limitation
the rights to use, copy, modify, merge, publish, distribute, sublicense, and/or sell
copies of the Open Source Software, and to permit persons to whom the Open
Source Software is furnished to do so, subject to the following conditions:
THE SOFTWARE iS PROVIDED "AS iS", WITHOUT WARRANTY OF ANY KIND,
EXPRESS OR IMPLIED, INCLUDING BUT NOT LIMITED TO THE WARRANTIES
OF ERCHANTABILITY, FITNESS FOR A PARTICULAR PURPOSE AND NONINFRINGEMENT. iN NO EVENT SHALL THE AUTHORS OR COPYRIGHT HOLDERS
BE LIABLE FOR ANY CLAIM, DAMAGES OR OTHER LIABILITY, WHETHER iN AN
ACTION OF CONTRACT, TORT OR OTHERWISE, ARISING FROM, OUT OF OR
iN CONNECTION WITH THE SOFTWARE OR THE USE OR OTHER DEALINGS
iN THE SOFTWARE.
35
36
E220MV / E260MV
37
E220MV / E260MV
38