1
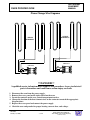
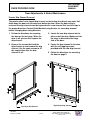
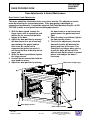
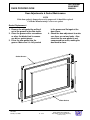
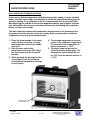
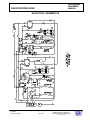
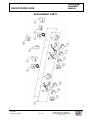
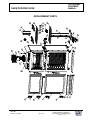
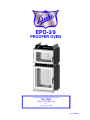
EPO-3/9
PROOFER OVEN
For information or technical assistance, call:
TOLL FREE
1(800) 735-DUKE (3853)
or
1(314) 231-1130
PN 156084P
THIS PAGE INTENTIONALLY LEFT BLANK
RESTAURANT
EQUIPMENT
MANUAL
DUKE PROOFER OVEN
TABLE OF CONTENTS
MANUFACTURER’S INTRODUCTION ....................................................................4
INSTALLATION .............................................................................................................5
PHASE CHANGE WIRE DIAGRAMS ........................................................................7
DOOR ADJUSTMENTS & GASKET MAINTENANCE ...........................................8
REVERSING OVEN DOOR SWING DIRECTION ...............................................................................................8
PROOFER DRIP CHANNEL REVERSAL............................................................................................................9
DOOR GASKET LEAK ADJUSTMENTS ...........................................................................................................10
GASKET REPLACEMENT .................................................................................................................................11
OPERATING INSTRUCTIONS ..................................................................................12
PROOFER OPERATION ...................................................................................................................................12
OVEN OPERATION ...........................................................................................................................................14
OVEN AND PROOFER TEMPERATURE CHECK............................................................................................15
OVEN AND PROOFER TROUBLESHOOTING .....................................................16
CLEANING AND MAINTENANCE...........................................................................18
ELECTRICAL SCHEMATICS ...................................................................................19
REPLACEMENT PARTS ............................................................................................21
REVISED:
January 18, 2006
3 of 24
DUKE PROOFER OVEN
DUKE MANUFACTURING CO.
TOLL FREE 1-800-735-DUKE(3853)
1-314-231-1130
RESTAURANT
EQUIPMENT
MANUAL
DUKE PROOFER OVEN
Manufacturer’s Introduction
The Duke EPO-3/9 Proofer Oven was
developed in response to the Food
Service Industry’s need for uniform
baking capabilities and to provide
consistently high, “just baked” bread
quality.
The Duke Proofer Oven utilizes Duke’s
unique directional convection airflow
technology that provides even heat
distribution and a uniform bake without
the need for turning pans during the
bake cycle. This enhances the quality
and consistency of the baked products
while reducing food scrap/waste and
simplifying operating procedures.
The low profile oven will easily roll
through a standard height door. The
oven and proofer doors are field
reversible with a drip channel on the
proofer door to prevent water from
dripping on the floor.
Full width doors on the oven and
proofer
help
to
display
and
merchandise fresh baked bread to the
customer.
The controls are simple to operate,
there are two timers for independent
timing of the proofer and oven.
The full width oven and proofer cavity
will accept standard ½ size or full size
sheet pans.
The Duke EPO 3/9 Proofer Oven has a
90-day labor and 1- year parts warranty.
REVISED:
January 18, 2006
4 of 24
Supplier Name:
Address:
Duke Manufacturing Co.
2305 North Broadway
St. Louis, MO 63102
Model #:
EPO-3/9
Serial #:
__________________
Date Received: __________________
Date Installed: __________________
Toll Free Telephone: 1-800-735-3853
Fax:
1-314-231-5074
Service Referral #:
__________________
Local Service Name: __________________
_____________________________________
Local Service #:
__________________
General Specifications
Model #:
EPO-3/9
Overall Dimensions
Height: 77 3/4 in./197.5cm
Width: 37 1/4 in./94.6cm
Depth: 27 1/4 in./69.2cm
ELECTRICAL SPECIFICATIONS
1 PHASE
3 PHASE
208 V
AMPS
32.0
18.5
Shipping Weight:
240 V
AMPS
27.8
16.0
TOTAL
WATTS
6650
6650
550lbs / 250kg
Installation Requirements
Power Connection:
1 PHASE: 8 AWG COPPER WIRE
3 PHASE: 10 AWG COPPER WIRE
NO ALUMINUM WIRING ALLOWED
!CAUTION!
All electrical connections must be in
compliance with the National Electric Code,
ANSI/NFPA 70-current edition or in Canada,
CSA std. C22.1. and local code requirements.
The circuit must be properly grounded
according to the codes.
DUKE PROOFER OVEN
DUKE MANUFACTURING CO.
TOLL FREE 1-800-735-DUKE(3853)
1-314-231-1130
RESTAURANT
EQUIPMENT
MANUAL
DUKE PROOFER OVEN
INSTALLATION
Inspect the exterior of the shipping container carefully and note any damage on the delivery
receipt. Remove the shipping container and check for damage to the oven. If there is any
damage file a freight claim with the carrier and call Duke at 800-735-3853.
Compare the voltage and phase from the oven specification label to the power supply for the
oven and call Duke if there is a difference. If the phase is wrong, a qualified service
technician can change the wire connections inside the oven to correct the problem. See the
illustration on page 4 for phase conversions. If the voltage is wrong, the heat elements must
be changed. Call Duke to get new elements.
WARNING
Risk of Electric Shock
This appliance must be secured to building structure. A restraining device kit
(#153586) was provided with the unit to limit the movement of the appliance without
depending on or transmitting stress to the electrical conduit. Installation instruction is
in the kit.
This Restraining Device MUST always be connected when the Appliance is in Service.
Disconnect for movement, servicing and or cleaning, then reconnect when the
appliance has been returned to its normal position.
The appliance shall be installed using flexible conduit.
Check the swing of the door. The hinge side can be changed by following the instructions on
page 8. The door swing direction can be changed in the field after you have a new drip
channel for the proofer door. Call Duke to get the new drip channel for the proofer door.
Check the door seal and make sure both doors close completely. If they do not close and
seal properly, call Duke for assistance.
Important: A minimum clearance of 6” from the top of the unit to the ceiling must be
provided.
REVISED:
January 18, 2006
5 of 24
DUKE PROOFER OVEN
DUKE MANUFACTURING CO.
TOLL FREE 1-800-735-DUKE(3853)
1-314-231-1130
RESTAURANT
EQUIPMENT
MANUAL
DUKE PROOFER OVEN
Remove the light bulbs from the shipping container and install them in the oven and proofer
before the oven is connected to the power supply. The light bulb covers can be removed by
turning them counter -clockwise. Make sure the gasket is in place when replacing the covers.
If you replace the light bulbs, make sure they are the correct voltage and a maximum rating of
40 watts. Contact Duke Manufacturing Service for long life replacement bulbs.
Fill the proofer water pan about half full of clean water. Put the wire racks in the oven and
proofer.
Have a qualified service technician or electrician connect the oven to the power supply.
• Turn the oven and proofer power switches to the ON position.
• Set the oven thermostat at 350° F, the proofer thermostat at 105° F, and the proofer
humidity at #3.
• All of the indicator lights should be on.
• Check to make sure that the oven and proofer fans are turning and the lights are on.
• Open the oven door. The oven fan should stop. Close the door to continue.
• Set both timers to 20 minutes and check to make sure they time down and the buzzers
work.
NOTE: When using timer for less than 10 minutes, you must turn the timer knob past
10 then set time.
If there are any problems, call the service department at Duke for assistance before you call
a service agency. If the problem is an operator or procedural error you will be liable for the
service charges.
Allow the oven and proofer to pre-heat for at least 30 minutes.
Your Duke Proofer Oven is now ready to operate.
REVISED:
January 18, 2006
6 of 24
DUKE PROOFER OVEN
DUKE MANUFACTURING CO.
TOLL FREE 1-800-735-DUKE(3853)
1-314-231-1130
RESTAURANT
EQUIPMENT
MANUAL
DUKE PROOFER OVEN
Phase Change Wire Diagrams
1 PHASE
ELEMENTS
3 PHASE
ELEMENTS
CONTACT
CONTACT
9
8
11
T1 L1
10
T2 L2
9
8
11
T1 L1
10
T2 L2
T3 L3
T3 L3
!! DANGER !!
A qualified service technician must complete this procedure. Access to electrical
parts is hazardous and could cause serious injury or death.
1.
2.
3.
4.
Disconnect the oven from the power supply.
Remove the access panel on the right side below the oven.
Locate the contactor on the rear control compartment surface.
Change the location of the heat element wires on the contactor to match the appropriate
diagram above.
5. Replace the access panel and connect the power supply.
6. Check the oven and proofer for proper heating, current draw, and voltage.
REVISED:
January 18, 2006
7 of 24
DUKE PROOFER OVEN
DUKE MANUFACTURING CO.
TOLL FREE 1-800-735-DUKE(3853)
1-314-231-1130
RESTAURANT
EQUIPMENT
MANUAL
DUKE PROOFER OVEN
Door Adjustments & Gasket Maintenance
Reversing Oven Door Swing Direction
NOTE
If you reverse the Proofer door you must have the reverse drip channel for the bottom
of the door. Call Duke at 800-735-3853 to order the drip channel before you
reverse the door swing.
1. Remove cover from hinges to
expose the screws that hold the
hinge to the front of the oven.
2. Remove the hinge screws and door
from the oven.
3. Remove the door handle screws and
flip the door handle over and replace
it on the door.
4. Remove the six screws on the front
of the oven to expose the hinge
screw holes for the other swing
direction.
5. Use the six screws to fill the unused
hinge screw holes on the front of the
oven.
6. Remove the latch strike plate from
the front of the oven and move it to
the other side. Use the screws from
the other side to fill the screw holes
that are no longer used.
7. Position the door on the front of the
oven and tighten the hinge screws.
Make sure the door is level with the
oven body before the screws are
tightened permanently.
8. Adjust the door gasket seal. See
page 7 for instructions
Door Handle Screws
Hinge Cover and Screws
REVISED:
January 18, 2006
8 of 24
DUKE PROOFER OVEN
DUKE MANUFACTURING CO.
TOLL FREE 1-800-735-DUKE(3853)
1-314-231-1130
RESTAURANT
EQUIPMENT
MANUAL
DUKE PROOFER OVEN
Door Adjustments & Gasket Maintenance
Proofer Drip Channel Reversal
The proofer door has a sloped drip channel on the bottom that directs any water that
drips down the door into the water pan below the door. When the door swing is
reversed this drip channel must be replaced with a new channel that has the slope in
the proper direction. Contact Duke Manufacturing Service for a new drip channel
before changing door swing direction.
1. Follow the directions for removing
the door on the last page. When the
door is off you can then replace the
drip channel.
3. Locate the new drip channel on the
other end of the door. Make sure that
the slope is directed to the hinge
side of the door.
2. Remove the screws that hold the
drip channel on and remove the drip
channel. Use the same screws to fill
the empty holes after the drip
channel is off.
4. Fasten the drip channel to the door
with the self tapping screws
provided with the new drip channel.
Right Hinge Drip Channel
Left Hinge Drip Channel
REVISED:
January 18, 2006
5. Follow the directions for mounting
the door on page 5.
9 of 24
DUKE PROOFER OVEN
DUKE MANUFACTURING CO.
TOLL FREE 1-800-735-DUKE(3853)
1-314-231-1130
RESTAURANT
EQUIPMENT
MANUAL
DUKE PROOFER OVEN
Door Adjustments & Gasket Maintenance
Door Gasket Leak Adjustments
The doors should be checked for leaks every three months. The adjustment can be
made by following the instructions below. If the door gasket is damaged, or
compressed permanently, it should be replaced. Call Duke Manufacturing Co. at 800735-3853 to order a new gasket before making adjustments.
1. With the door closed, remove the
hinge covers with a screwdriver and
loosen the six screws that hold the
hinges to the door.
2. Adjust the door position by moving
the door frame in or out to seal any
gaps between the gasket and the
oven front. Be careful not to
compress the gasket too much, it
will cause the door to bind up on the
hinge side.
3. When the door is positioned, tighten
the hinge screws.
4. Loosen the two screws that hold the
door handle in place.
5. Adjust the door position by moving
the door frame in or out to seal any
gaps between the gasket and oven
front.
6. When the door is positioned, tighten
the door handle screws.
7. To check the adjustment, close the
door with a dollar bill between the
gasket and front of the oven. You
should feel resistance when you try
to pull the dollar bill out with the
door closed. Do this check in several
places and readjust the door if
necessary.
Move Door to adjust gap
Door Hinge Screws
Door Handle Screws
REVISED:
January 18, 2006
10 of 24
DUKE PROOFER OVEN
DUKE MANUFACTURING CO.
TOLL FREE 1-800-735-DUKE(3853)
1-314-231-1130
RESTAURANT
EQUIPMENT
MANUAL
DUKE PROOFER OVEN
Door Adjustments & Gasket Maintenance
NOTE
If the door gasket is damaged or overly compressed, it should be replaced.
Call Duke Manufacturing Co. for a new gasket.
Gasket Replacement
1. Remove the old gasket by pulling it
out of the groove in the door frame.
2. Clean the groove with a screwdriver
or other flat-bladed tool to remove
any dirt or gasket pieces.
3. Press the new gasket into the
groove. Make sure it is fully seated
in the groove and flat against the
door frame.
4. Check the door adjustment to make
sure there are not any leaks. Also
check that the new gasket is not
compressed too much, making the
door hard to close.
Gasket Groove
Door Gasket
REVISED:
January 18, 2006
11 of 24
DUKE PROOFER OVEN
DUKE MANUFACTURING CO.
TOLL FREE 1-800-735-DUKE(3853)
1-314-231-1130
RESTAURANT
EQUIPMENT
MANUAL
DUKE PROOFER OVEN
OPERATING INSTRUCTIONS
Proofer Operation
Make sure the humidity pan has fresh
clean water in it. Fill it with warm water
to get the best performance. A regular
check of the water level is
recommended during operation. Add
water as required.
Turn the proofer power switch on and
set the proofer heat to the desired
temperature. A good starting
temperature is 105 0 F. The light above
the heat thermostat will be on until the
proofer has heated to the set
temperature. You may need to adjust
this temperature depending on your
results. Do not turn on the proofer
humidity at this time.
After the proofer has been heating for
20 minutes, turn the humidity switch to
a setting of #3 or 4. You may need to
adjust this setting depending on your
results. When a light fog appears on the
door glass the proofer is ready to load
with dough. The humidity setting is too
high if water is running down the door
glass. If the door glass does not fog
then the humidity setting is too low.
REVISED:
January 18, 2006
12 of 24
Load the proofer with bread dough and
set the timer for 50 - 60 minutes. You
may need to adjust the time depending
on the type of dough and your results.
When it rises to 75 - 80 % of it’s final
size, it is ready to bake. Since the
proofer can hold more
pans of bread than the oven can bake,
stagger the loading in increments of the
oven bake time. This will prevent over
proofing of the bread remaining in the
proofer after the first load is moved to
the oven.
If there is excessive humidity on the
door glass it is probably caused by a
humidity setting that is too high or by
having the humidity on when there is no
dough loaded in the proofer. Turn the
proofer off and remove the bottom
panel. Remove excess water that has
accumulated in the bottom of the
proofer.
DUKE PROOFER OVEN
DUKE MANUFACTURING CO.
TOLL FREE 1-800-735-DUKE(3853)
1-314-231-1130
RESTAURANT
EQUIPMENT
MANUAL
DUKE PROOFER OVEN
DO NOT…
• Run the proofer humidity without a load of dough.
It is OK to leave the proofer heat on to maintain the temperature, but turn the
humidity off if the proofer is empty.
•
Let the dough dry out while it is thawing.
Dough that is too dry will not fully rise in the proofer and may crack.
• Over-proof the dough
Excessive proofing will cause the bread to collapse after it has been baked. Make
sure to adjust the proofing time to prevent over-proofing.
• Under-proof the dough
If the bread is under-proofed it will not bake to the proper finished size and will
have a dense cell structure.
• Proof frozen dough
Make sure the dough is thawed properly before loading it into the proofer. The
dough should be soft and moist with the center thawed.
DO…
•
Watch the proofing process carefully and make adjustments if necessary.
REVISED:
January 18, 2006
13 of 24
DUKE PROOFER OVEN
DUKE MANUFACTURING CO.
TOLL FREE 1-800-735-DUKE(3853)
1-314-231-1130
RESTAURANT
EQUIPMENT
MANUAL
DUKE PROOFER OVEN
OPERATING INSTRUCTIONS
Oven Operation
Turn the oven on and set the
temperature to 350 0 F for bread and for
Deli rolls. If this is done right after the
proofer is loaded with the first load, the
oven will be ready to bake when the first
load is ready from the proofer.
The oven preheat time should be from
20 to 30 minutes. The oven door should
be closed, except during loading and
unloading. Load the oven quickly to
reduce heat loss.
Load the oven with 6 pans of bread and
set the bake timer. The bake time can be
adjusted to get the desired color of the
baked bread.
If the baking results are uneven or too
dark, reduce the temperature and
extend the bake time.
bread is still too dark then reduce the
temperature 15° F and try baking for a
longer period of time. The same
procedure can be used to bake Deli
rolls.
If you are baking partial loads try to
center the pans in the oven and start
loading the oven starting at the bottom
shelf and working up to the top.
Cookies are baked at 325°° F and are
loaded in the oven the same way as
bread and deli rolls.
Keep in mind that opening the oven
door allows heat to escape. If the door
is left open too long it could affect the
performance of the oven. Under normal
conditions of loading the oven this will
not be a problem.
If the bread is too dark, reduce the bake
time. If the bake time is reduced and the
REVISED:
January 18, 2006
14 of 24
DUKE PROOFER OVEN
DUKE MANUFACTURING CO.
TOLL FREE 1-800-735-DUKE(3853)
1-314-231-1130
RESTAURANT
EQUIPMENT
MANUAL
DUKE PROOFER OVEN
Oven and Proofer Temperature Check
If the oven or proofer temperature calibration seems to be wrong, it can be checked
before a service call is made. It is important to follow the correct procedure to get an
accurate reading. If the calibration is off it is recommended that you first call Duke
Manufacturing Co. and talk to the service department before you schedule a service
call. Calling Duke first can save you time and money by eliminating other problems
before a service call is made.
The most important concern with temperature measurement is the accuracy of the
thermometer and the location in the oven cavity. Duke recommends an electronic
temperature meter with a wire thermocouple.
1. Place the thermocouple in the exact
center of the oven cavity. It can be
fastened to the center of the middle
wire shelf.
2. Start the oven and set the
temperature control for 350°° follow
the oven to pre-heat for at least 45
minutes.
3. While watching the heat light on the
control panel, note the maximum
and minimum temperatures through
several cycles.
4. The average temperature of several
cycles is the calibration temperature.
It is normal for this temperature to
have a variance of +/- 10°° F.
5. The same steps can be used to
check the proofer temperature. The
temperature control should be set
for 105°° F and the normal variance is
+/- 5°° F.
Thermocouple
Placement
REVISED:
January 18, 2006
15 of 24
DUKE PROOFER OVEN
DUKE MANUFACTURING CO.
TOLL FREE 1-800-735-DUKE(3853)
1-314-231-1130
RESTAURANT
EQUIPMENT
MANUAL
DUKE PROOFER OVEN
OVEN AND PROOFER TROUBLESHOOTING
Yes
Problem
No
1. Oven does not heat with oven
switch in the ON position and
Oven Temperature not set at
0°.
a. Are oven lights on?
Observe Oven Fan. Go to b.
Check Proofer Operation. Go
to c.
b. Does Oven Fan work?
Call Duke Service.
Check Proofer Operation. Go
to c.
c. Does Proofer work?
Ensure Oven Door is Closed.
Go to d.
Check Supply Circuit Breaker.
Go to e.
d. Is Oven Door Securely
closed?
Call Duke Service.
Close Door securely. Go to g.
e. Is Supply Circuit Breaker
tripped?
Reset Circuit Breaker. Try
oven again. Go to g.
Check Fuses on Control Panel.
Go to e.
f. Is Oven Breaker Switch
tripped?
Reset Oven Breaker Switch.
Go to g.
Call Duke Service.
g. Does oven work?
Troubleshooting complete.
Call Duke Service.
a. Are Proofer lights on?
Observe Proofer Fan. Go to b.
Check Oven Operation. Go to
c.
b. Does Proofer Fan work?
Call Duke Service.
Check Oven Operation. Go to
c.
c. Does Oven work?
Call Service Technician.
Check Supply Circuit Breaker.
Go to d.
d. Is Supply Circuit Breaker
tripped?
Reset Circuit Breaker. Try
Proofer again. Go to f.
Check Fuses on Control Panel.
Go to e.
e. Is Proofer Breaker Switch
tripped?
Reset Proofer Breaker Switch. Call Duke Service.
Go to f.
f. Does oven work?
Troubleshooting complete.
2. Proofer does not heat with
Proofer Switch in the ON
position Proofer
REVISED:
January 18, 2006
16 of 24
Call Duke Service.
DUKE PROOFER OVEN
DUKE MANUFACTURING CO.
TOLL FREE 1-800-735-DUKE(3853)
1-314-231-1130
RESTAURANT
EQUIPMENT
MANUAL
DUKE PROOFER OVEN
OVEN AND PROOFER TROUBLESHOOTING
Yes
Problem
No
3. Oven/Proofer lights not
working.
a. Is more than one light not
working?
Replace inoperative light
bulbs and recheck. Go to b.
Call Duke Service.
b. Do lights work?
End of troubleshooting.
Call Duke Service.
a. Does proofer humidity
appear to be working?
Adjust Humidity to next
higher setting. Wait 15
minutes. Go to b.
Adjust humidity to maximum
setting. Wait 15 minutes. Go to
b.
b. Does proofer humidity
appear to be working?
Adjust humidity to
appropriate setting. End of
troubleshooting.
Call Duke Service.
a. Is Proofer Humidity Control
set properly?
Remove proofer floor and
remove accumulated water.
Go to b.
Adjust humidity control to
proper level. Go to b.
b. Is proofer humidity working
properly?
End of troubleshooting.
Call Duke Service.
4. Proofer Humidity not
working/insufficient with
Humidity Control not set to
Off.
5. Proofer Humidity too high.
DUKE MANUFACTURING CO.
2305 N. Broadway
St. Louis, MO 62025
Toll Free 1-800-735-DUKE (3853)
1-314-231-1130
Fax 1-314-231-5074
http:\\www.dukemfg.com
REVISED:
January 18, 2006
17 of 24
DUKE PROOFER OVEN
DUKE MANUFACTURING CO.
TOLL FREE 1-800-735-DUKE(3853)
1-314-231-1130
RESTAURANT
EQUIPMENT
MANUAL
DUKE PROOFER OVEN
CLEANING AND MAINTENANCE
DAILY
CLEANING INSTRUCTIONS
1. Wipe down the interior and exterior of the proofer oven with warm water and mild
detergent using a soft cloth.
2. Clean proofer water pan using mild detergent and warm water. Ensure all soap is
rinsed from the oven and proofer surfaces and water pan to avoid flavor transfer
to the bread.
3. Open the proofer door and run the proofer with the heat on for at least 30 minutes
to dry it out.
4. Turn the proofer off, wait 10 minutes, and remove the bottom fan cover panel.
Wipe up any excess water that has accumulated in the bottom of the proofer.
!Caution!
Do not use caustic cleaners, acids, ammonia products or abrasive cleaners or cloths.
These can damage the stainless steel and door gaskets.
WEEKLY
NONE
MONTHLY
1. Check door handle screws for tightness.
THREE MONTHS
1. Check the door gasket seal on the oven and proofer for leaks. See the section on
Door Adjustments and Gasket Maintenance for help.
SIX MONTHS
None.
REVISED:
January 18, 2006
18 of 24
DUKE PROOFER OVEN
DUKE MANUFACTURING CO.
TOLL FREE 1-800-735-DUKE(3853)
1-314-231-1130
RESTAURANT
EQUIPMENT
MANUAL
DUKE PROOFER OVEN
ELECTRICAL SCHEMATICS
REVISED:
January 18, 2006
19 of 24
DUKE PROOFER OVEN
DUKE MANUFACTURING CO.
TOLL FREE 1-800-735-DUKE(3853)
1-314-231-1130
RESTAURANT
EQUIPMENT
MANUAL
DUKE PROOFER OVEN
ELECTRICAL SCHEMATICS
REVISED:
January 18, 2006
20 of 24
DUKE PROOFER OVEN
DUKE MANUFACTURING CO.
TOLL FREE 1-800-735-DUKE(3853)
1-314-231-1130
RESTAURANT
EQUIPMENT
MANUAL
DUKE PROOFER OVEN
REPLACEMENT PARTS
REVISED:
January 18, 2006
21 of 24
DUKE PROOFER OVEN
DUKE MANUFACTURING CO.
TOLL FREE 1-800-735-DUKE(3853)
1-314-231-1130
RESTAURANT
EQUIPMENT
MANUAL
DUKE PROOFER OVEN
REPLACEMENT PARTS
REVISED:
January 18, 2006
22 of 24
DUKE PROOFER OVEN
DUKE MANUFACTURING CO.
TOLL FREE 1-800-735-DUKE(3853)
1-314-231-1130
RESTAURANT
EQUIPMENT
MANUAL
DUKE PROOFER OVEN
REPLACEMENT PARTS
Item #
1
2
3
3
4
5
5
6
7
10
11
12
13
14
15
16
17
18
19
20
21
22
22
23
23
24
25
26
26
27
27
28
29
30
31
32
33
33
34
35
35
36
37
38
39
40
41
42
43
43
44
45
46
47
48
Part #
512852
154075
512972
512972
512850
512949
512949
512068
502191
502805
153142
154470
154039
502177
502939
512843
512821
154375
154547
156040
156041
156029
502341
502342
502342
512955
512956
512895
512849
600102
600103
512872
154019
512836
512835
512935
155977
155979
155981
155976
155978
512817
512905
512909
512910
512914
512913
502180
512480
512941
502195
512833
502744
502745
502338
Description
Thermostat, Oven
Buzzer
Timer, 60 minute, 50 Hz
Timer, 60 minute, 60 Hz
Thermostat, proofer
Thermostat, humidity 208V
Thermostat, Humidity 240V
Light, indicator
Mylar, control panel
Switch, circuit breaker
Knob
Motor Oven – 230V
Blower Wheel, Oven
Thermostat, high limit
Mylar, EPO
Compression spring, door switch assembly
Plunger rod, door switch
Element, 2.5 kW, oven
Wire rack
Lens, Glass, Light
Gasket, lens
Bulb, light, 120V, 40 Watt
Bulb, light, 230V, 40 Watt
Fixture, Light Assembly, 120V
Fixture, Light Assembly, 230V
Cooling fan
Fan guard
Element, 250 watt, 208V, proofer
Element, 250 watt, 240V, proofer
Kit, Element, 450 watt, 208V, humidity proofer
Kit, Element, 450 watt, 240V, humidity proofer
Motor, proofer – 208/240 volt
Blower, forward curve, proofer
Castor, swivel
Castor, locking w/brake
Drip pan
Housing, drip edge – left hinged door
Housing, drip edge – right hinged door
Gutter, drip edge
Channel, drip edge – left hinged door
Channel, drip edge – right hinged door
Hinge, door
Handle & latch assembly
Proofer door assembly
Oven door assembly
Gasket, proofer door
Gasket, oven door
Cover, Motor
Terminal Block, 3 Pole
Terminal Block, 4 Pole
Cover Access
Contactor, 30A
Guard, Oven Light
Guard, Proofer Light
Fan, Motor
REVISED:
January 18, 2006
23 of 24
DUKE PROOFER OVEN
DUKE MANUFACTURING CO.
TOLL FREE 1-800-735-DUKE(3853)
1-314-231-1130