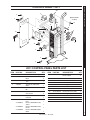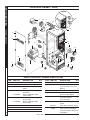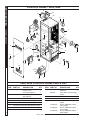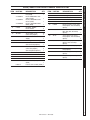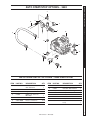
1
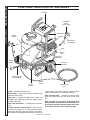
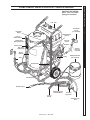
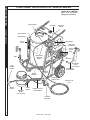
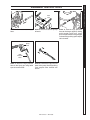
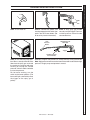
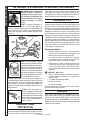
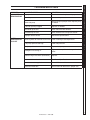
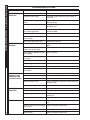
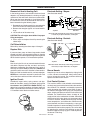
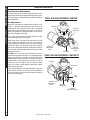
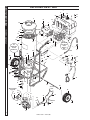
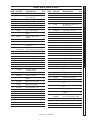
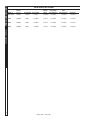
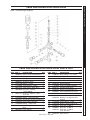
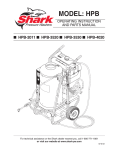
Model: HPB
operating instruction
and parts manual
■ HPB-2011 ■ HPB-3520 ■ HPB-3530 ■ HPB-4020
For technical assistance or the Shark dealer nearest you, call 1-800-771-1881
or visit our website at www.shark-pw.com
97-6131
machine specifications
● Pump Volume At Pump Head:
● Total Machine Amperage:
2011
2.0 GPM
2011
15 Amps
3520
3.5 GPM
3520
22 Amps
3530
3.5 GPM
3530
29 Amps
4020
4.2 GPM
4020
29 Amps
● Pump Pressure At Pump Head:
● Pump Pressure At Pump Head:
2011
1000 PSI
2011
300 Lbs.
3520
2000 PSI
3520
340 Lbs.
3530
3000 PSI
3530
515 Lbs.
4020
2000 PSI
4020
515 Lbs.
● Machine Voltage:
2011
120V/1PH
3520
230V/1PH
3530
230V/1PH
4020
230V/1PH
● Machine Dimensions:
2011Length = 31" Width = 23" Height = 40"
3520Length = 28" Width = 28" Height = 43"
3530Length = 41" Width = 32" Height = 44"
4020Length = 41" Width = 32" Height = 44"
CONTENTS
Introduction & Important Safety Information
4-5
Component Identification
6-8
Assembly Instructions
9
Installation
10
Operating Instructions
11
Detergents & General Washing Techniques
12
Shut Down & Clean-up
13
Storage
13
Troubleshooting
14-16
Maintenance & Oil Change Record
17
Preventative Maintenance
18-20
2011 Exploded View & Parts List
21-23
2015, 3520 Exploded View & Parts List
24-26
3530, 4020 Exploded View & Parts List
27-29
2011 Control Panel & Parts List
30
2015, 3520 Control Panel & Parts List
31-32
3530, 4020 Control Panel & Parts List
33-34
3530, 4020 Float Tank Option & Parts List
35-36
Steam Options & Parts Lists
37
Auto Start/Stop Options Exploded Views and Parts Lists
38-41
Hose & Spray Gun Assembly & Parts List
42
Burner Specifications
43
Pump Specifications
44-45
Unloader Exploded Views and Parts List
46-48
Pump Exploded Views and Parts List
49-53
Warranty
Model Number ______________________________
Serial Number ______________________________
Date of Purchase ___________________________
The model and serial numbers will be found on a decal attached
to the pressure washer. You should record both serial number and
date of purchase and keep in a safe place for future reference.
HPB 97-6131 • REV. 5/06
PRESSURE WASHER
INTRODUCTION & Important Safety Information
Thank you for purchasing a hot water pressure
washer.
This manual covers operation and maintenance
of your pressure washer. All information in this manual
is based on the latest product information available at
the time of printing.
We reserve the right to make changes at any time
without incurring any obligation.
Owner/User Responsibility:
OPERATOR’S MANUAL
WaRning
The owner and/or user must have an understanding of
the manufacturer’s operating instructions and warnings
before using this pressure washer. Warning information
should be emphasized and understood. If the operator
is not fluent in English, the manufacturer’s instructions
and warnings shall be read to and discussed with
the operator in the operator’s native language by the
purchaser/owner, making sure that the operator comprehends its contents.
Owner and/or user must study and maintain for future
reference the manufacturers’ instructions.
This manual should be considered a permanent
part of the machine and should remain with it
if machine is resold.
When ordering parts, please specify model
and serial number.
important safety
information
CAUTION: To reduce the risk of
injury, read operating instructions carefully before using.
1.Read the owner's manual
thoroughly. Failure to follow instructions could cause
malfunction of the machine
read operator’s
manual thoroughly
and result in death, serious
prior to use.
bodily injury and/or property
damage.
2.All installations must comply with local codes.
Contact your electrician, plumber, utility company
or the selling distributor for specific details.
To comply with National Electrical Code (NGPA
70) and provide additional protection from risk of
electric shock, this hot water pressure washer is
equipped with a UL approved ground fault circuit
interrupter (GFCI) power cord.
CAUTION
risk of fire.
do not use with
flammable liquids.
WARNING: Flammable liquids
can create fumes which can
ignite causing property damage
or severe injury.
WARNING: Do not use gasoline,
crankcase drainings or oil containing gasoline, solvents or
alcohol. Doing so will result in
fire and/or explosion.
WARNING: Do not spray flammable liquids. Operate
only where an open torch is permitted.
3.This fuel burning machine shall be installed only in
locations where combustible dusts and flammable
gases or vapors are not present.
4.Use only kerosene, No.1 home heating fuel, or
diesel fuel.
WARNING: Keep water spray,
wand and high pressure hose
away from electrical wiring or
fatal electric shock may result.
Read warning tag on electrical
cord.
5.To protect the operator from
keep water spray
away from
electrical shock, the machine
electrical wiring.
must be electrically grounded.
It is the responsibility of the
owner to connect this machine to a UL grounded
receptacle of proper voltage and amperage ratings.
Do not spray water on or near electrical components. Do not touch machine with wet hands or
while standing in water. Always disconnect power
before servicing.
WaRning
CAUTION: Spray gun kicks back — hold with both
hands.
6.Grip cleaning wand of attached pressure washer
securely with both hands before starting cleaner.
Failure to do this could result in injury from a whipping wand.
WARNING: High pressure
stream of fluid that this equipment can produce can pierce
the skin and its underlying tissues, leading to serious injury
and possible amputation.
high pressure
7. High pressure developed by
spray can pierce
the attached pressure washer
skin and tissues.
can cause bodily injury or
damage. Use caution when operating. Do not point
the spray gun at anyone or at any part of the body.
This machine is to be used only by qualified operators.
8.Never make adjustments on machine while it is in
operation.
WaRning
HPB 97-6131 • REV. 5/06
WaRning
protective
eyewear and clothing must
be worn.
risk of
asphyxiation.
use only in a well
ventilated area.
WARNING: Risk of asphyxiation
— Use this product only in a
well ventilated area.
10. When the machine is working, do not cover or place in
a closed space where ventilation is insufficient.
WARNING: Risk of fire. Do not
add fuel when the machine is
operating or still hot.
11. Machines with a spray gun
should not be operated with
the spray gun in the off posirisk of fire.
tion for extended periods of
do not add fuel
when operating
time as this may cause dammachine.
age to the pump. Check to
make sure burner shuts off when spray gun trigger
is closed.
12.Protect from freezing.
13.To prevent a serious injury, make certain quick
coupler on discharge hose has locked before using
pressure washer.
WaRning
14.Do not allow acids, caustic or abrasive fluids to
pass through the pump.
15.Inlet water must be cold and clean fresh water.
16.Do not allow CHILDREN to operate the pressure
washer at any time. THIS MACHINE MUST BE
ATTENDED DURING OPERATION.
17.The best insurance against an accident is precaution, and knowledge of the machine.
18.Do not operate this product when fatigued or under
the influence of alcohol or drugs. Keep operating
area clear of all persons.
19. We will not be liable for any changes made to
our standard machines, or any components not
purchased from us.
20.Do not overreach or stand on unstable support.
Keep good footing and balance at all times.
21. Follow the maintenance instructions specified in
the manual.
22. When making repairs disconnect from electrical
source.
23. Before disconnecting high pressure hose from
hot water outlet, turn off burner to allow water to
cool to 100°F, then turn off pump motor and water
supply and operate spray gun to relieve back pressure in hose. This will prevent coil damage from
thermal expansion.
OPERATOR’S MANUAL
WaRning
WARNING: High pressure spray
can cause paint chips or other
particles to become airborne
and fly at high speeds.
9. Eye, hand and foot safety
devices must be worn when
using this equipment.
PRESSURE WASHER
Important Safety Information
Caution: This machine produces hot water and
must have insulated components attached to protect the operator.
Caution: Inspect rupture disc and pressure relief
devices annually for any obstruction.
HPB 97-6131 • REV. 5/06
OPERATOR’S MANUAL
PRESSURE WASHER
Component Identification - Mini Series
Fuel Tank
Fresh Water
Faucet
(not included)
Wand Holder
Burner
Chamber
Unloader
Discharge
Nipple
Garden Hose
(not included)
GFCI
Pump
Rupture
Disc
High Limit
Thermostat
Nozzle
Coupler
Insulated
Spray Gun
Variable Pressure
Insulated Wand
Control
Handle
Burner
Motor
Pump — Develops high pressure.
Rupture Disc — Opens when pressure exceeds safe
operating temperature.
Spray Gun — Controls the application of water and
detergent onto cleaning surface with trigger device.
Includes safety latch.
High Limit Thermostat — Controls water temperature.
Variable Pressure Control Wand — Must be connected to the spray gun. This wand handle controls
dishcharge flow from one tube to both wand tubes.
When water is discharged from both tubes you will have
High Pressure
Hose
a pressure loss and allows chemical siphoning when
used in combination with a detergent injector.
High Pressure Hose — Connect one end to water
pump discharge nipple and the other end to spray
gun.
Note: If trigger on spray gun is released for more
than 2 minutes, water will leak from valve. Warm water will discharge from pump protector onto floor.
This system prevents internal pump damage.
HPB 97-6131 • REV. 5/06
CAUTION HOT WATER:
Must use insulated
spray gun and wand.
Fuel Tank
Discharge
Nipple
Detergent Pickup Hose
Pump &
Burner Switch
Downstream
Detergent Injector
Pressure
Switch
Control Panel
Unloader
High Limit
Thermostat
OPERATOR’S MANUAL
Fresh Water
Faucet
(not included)
PRESSURE WASHER
Component Identification - Junior Series
Garden
Hose (not
included)
Burner
Chamber
Pump
GFCI
Detergent Bucket
(not included)
Wand Holder
Burner Motor
Nozzle Coupler
Variable Pressure
Insulated Wand
Control
Handle
Insulated
Spray Gun
High Pressure
Hose
HPB 97-6131 • REV. 5/06
PRESSURE WASHER
Component Identification - Senior Series
CAUTION HOT WATER:
Must use insulated
spray gun and wand.
OPERATOR’S MANUAL
Quick Coupler
Fuel Tank
Discharge
Nipple
Burner Switch
Pump Switch
Control
Panel
Wand Holder
High Limit
Thermostat
Pressure
Switch
Pump
Downstream
Detergent
Injector
GFCI
Unloader
Fresh Water
Faucet
(not included)
High
Pressure
Nozzle
Garden Hose
(not included)
Burner
Chamber
Burner
Motor
Detergent
Pick-Up Hose
High Pressure
Hose
Nozzle
Coupler
Detergent
Bucket
(not included)
Control
Handle
Variable Pressure
Insulated Wand
Insulated
Spray Gun
HPB 97-6131 • REV. 5/06
Fuel
Cap
STEP 2: Check fuel tank and pump
oil levels.
STEP 3: Connect high pressure
hose to discharge nipple by sliding
quick coupler collar back. Insert
quick coupler onto discharge nipple
and secure by pushing quick coupler
collar forward.
OPERATOR’S MANUAL
STEP 1: Connect water supply
hose.
PRESSURE WASHER
Assembly Instructions
Spray
Gun
High
Pressure
Hose
STEP 4: Attach the high pressure
hose to the spray gun using teflon
tape on hose threads.
STEP 5: Connect the high pressure
hose to the pump discharge fitting.
Push coupler collar forward until
secure.
HPB 97-6131 • REV. 5/06
PRESSURE WASHER
OPERATOR’S MANUAL
Installation
Place machine in a convenient location providing ample
support, draining and room for maintenance.
Electrical:
This machine is intended for outdoor use. Machine
must be stored indoors when not in use.
This machine, when installed, must be electrically
grounded in accordance to local codes. Check for
proper power supply using a volt meter.
Location:
Placement:
The location should protect the machine from damaging environmental conditions, such as wind, rain, and
freezing.
1.This machine should be run on a level surface
where it is not readily influenced by outside sources
such as strong winds, freezing temperatures, rain,
etc. It should be located to allow accessibility for
refilling of fuel, adjustments and maintenance. Normal precautions should be taken by the operator
of the machine to prevent moisture from reaching
the electrical controls.
2.It is recommended that a partition be made between the wash area and the machine to prevent
water spray from coming in contact with the machine. Excess moisture reaching any electric components or electrical controls will reduce machine
life and may cause electrical shorts.
3.During installation of the machine, beware of
poorly ventilated locations or areas where exhaust
fans may cause an insufficient supply of oxygen.
Sufficient combustion can only be obtained when
there is a sufficient supply of oxygen available for
the amount of fuel being burned. If it is necessary
to install a machine in a poorly ventilated area,
outside fresh air may have to be piped to the burner
and a fan installed to bring air into the machine.
Avoid small locations or areas near exhaust fans.
Do not locate near any combustible material. Keep all
flammable material at least 20 feet away.
Allow enough space for servicing the machine.
Local code will require certain distances from floor
and walls. (Two feet away from walls should be adequate.)
Water Source:
The water source for the pressure washer should be
supplied by a minimum 5/8" I.D. garden hose with a
city water pressure of not less than 30 PSI. If the water
supply is inadequate, or if the garden hose is kinked,
the attached pressure washer will run very rough and
the burner will not fire.
Connection:
Connect the wand, nozzle, hose and spray gun (where
applicable). On pipe thread connections, use teflon
tape to avoid water leaks. (See Component Identification).
Venting:
Adding exhaust vent pipe to your oil fired burner is
not recommended because restricted air flow causes
carbon build-up, which affects the operation, and increases maintenance on the coil. If a stack must be
used, refrain from using 90° bends. If the pipe can not
go straight up then use only 45° bends and go to the
next size pipe. The overall pipe length must not exceed
6 feet in length*.
*Note: After vent pipe installation test burner using a
smoke tester and adjust air setting to achieve a #3 or
below results.
10
HPB 97-6131 • REV. 5/06
STEP 2: Connect the power cord
into the proper electrical outlet, then
push in the GFCI reset button. (Refer to serial plate for information).
High
Pressure
Nozzle
STEP 3: Grip spray gun handle
securely and pull trigger. Then turn
variable pressure control handle
counterclockwise.
Variable Pressure
Wand (VP)
OPERATOR’S MANUAL
STEP 1: Turn water on.
PRESSURE WASHER
operating instructions
Trigger
Variable Pressure
Control Handle
STEP 4: Turn switch to pump position. When a steady stream of water
flows from the spray gun and wand
the machine is ready for cold water
cleaning by turning the variable
pressure control handle clockwise
to raise the pressure.
Selection of high or low pressure is accompanied by turning the handle.
Note: High pressure nozzle must be inserted at end of wand to obtain high
pressure. To apply soap read operator's manual.
For hot water washing, turn the
switch to the burner position. (The
burner will light automatically when
the trigger on the spray gun is
pulled.)
11
HPB 97-6131 • REV. 5/06
PRESSURE WASHER
OPERATOR’S MANUAL
detergents & general operating techniques
WARNING: Some detergents
may be harmful if inhaled or
ingested, causing severe nausea, fainting or poisoning. The
harmful elements may cause
property damage or severe
injury.
STEP 1: Connect detergent injector to discharge nipple on
machine, Connect high pressure hose to injector with
quick coupler(check to make sure locking coupler
sleeves are in proper position before applying water
pressure
WaRning
Discharge Nipple
Quick
Coupler
Detergent
Injector
tures. When the water reaches this temperature, the
pump protector engages and cools the pump by discharging the warm water onto the ground. This thermal
device prevents internal damage to the pump.
cleaning tips
Pre-rinse cleaning surface with fresh water. Place detergent suction tube directly into cleaning solution and
apply to surface at low pressure (for best results, limit
your work area to sections approximately 6 feet square
and always apply detergent from bottom to top). Allow
detergent to remain on surface 1-3 minutes. Do not
allow detergent to dry on surface. If surface appears
to be drying, simply wet down surface with fresh water.
If needed, use brush to remove stubborn dirt. Rinse at
high pressure from top to bottom in an even sweeping
motion keeping the spray nozzle approximately 1 foot
from cleaning surface. Use overlapping strokes as you
clean and rinse any surface. For best surface cleaning
action spray at a slight angle.
Recommendations:
Pressure
Hose
STEP 2: Use detergent designed
specifically for pressure washers.
Household detergents could damage the pump. Prepare detergent
solution as required by the manufacturer. Fill a container with pressure washer detergent. Place the
filter end of detergent suction tube
into the detergent container.
STEP 3: Apply safety latch to spray gun trigger. Turn
variable pressure control handle until discharge water
exits both tubes. Secure black detergent nozzle into
quick coupler if you have a single wand. NOTE: Detergent cannot be applied using Red, Yellow, Green or
White nozzles.
STEP 4: With the engine running, pull trigger to operate machine. Liquid detergent is drawn
into the machine and mixed with
water. Apply detergent to work
area. Do not allow detergent to
dry on surface.
thermal pump
protection
If you run the engine on your pressure washer for 3-5
minutes without pressing the trigger on the spray gun,
12 circulating water in the pump can reach high tempera-
• Before cleaning any surface, an inconspicuous
area should be cleaned to test spray pattern and
distance for maximum cleaning results.
• If painted surfaces are peeling or chipping,
use extreme caution as pressure washer may
remove the loose paint from the surface.
• Keep the spray nozzle a safe distance from the
surface you plan to clean. High pressure wash
a small area, then check the surface for damage. If no damage is found, continue to pressure
washing.
CAUTION - Never use:
• Bleach, chlorine and other corrosive chemicals
• Liquids containing solvents (i.e., paint thinner,
gasoline, oils)
• Tri-sodium phosphate products
• Ammonia products
• Acid-based products
These chemicals will harm the machine and will damage the surface being cleaned.
rinsing
It will take a few seconds for the detergent to clear.
Apply safety latch to spray gun. Remove black soap
nozzle from the quick coupler. Select and install the
desired high pressure nozzle. NOTE: You can also stop
detergent from flowing by simply removing detergent
siphon tube from bottle.
HPB 97-6131 • REV. 5/06
STEP 2: Turn burner switch off and
continue spraying water, allowing
the water to cool. After water has
cooled to less than 100°F, turn the
attached pressure washer off.
STEP 3: Turn off water supply.
OPERATOR’S MANUAL
STEP 1: Remove detergent suction
tube from container and insert into
1 gallon of fresh water. Turn variable
pressure wand handle for low pressure or connect the black detergent
nozzle. Pull trigger on spray gun and
siphon water for one minute.
PRESSURE WASHER
shutting down and clean-up
STEP 4: Open the spray gun to
relieve remaining pressure.
STORAGE
CAUTION: Always store your pressure washer in a
location where the temperature will not fall below
32°F (0°C). The pump in this machine is susceptible
to permanent damage if frozen. FREEZE DAMAGE
IS NOT COVERED BY WARRANTY.
1.Stop the pressure washer, squeeze spray gun trigger to release pressure.
2.Detach water supply hose and high pressure
hose.
3.Turn on the machine for a few seconds, until remaining water exits. Turn motor off immediately.
4.Drain the fuel from the fuel tank.
5.Do not allow high pressure hose to become
kinked.
6.Store the machine and accessories in a room which
does not reach freezing temperatures.
CAUTION: Failure to follow the above directions will
result in damage to your pressure washer.
When the pressure washer is not being operated or is
being stored for more than one month, follow these
instructions:
1.Replenish pump oil to upper level.
2.Drain fuel from fuel tank, fuel line and filter.
3.Cover the pressure washer and store in a clean, dry
place that is well ventilated away from open flame
or sparks.
After Extended Storage
CAUTION: Prior to restarting, thaw out any
possible ice from pressure washer hoses,
spray gun or wand.
13
HPB 97-6131 • REV. 5/06
Troubleshooting Guide
PRESSURE WASHER
Troubleshooting
problem
possible cause
burner will not Disconnected or short in electrical
light
wiring
solution
All wire contacts should be clean and tight.
No breaks in wire.
Burner motor thermal protector
tripped
If tripped, check voltage, connections and
extensions for cause. Check fuel pump shaft
rotation for binding, causing motor to overheat.
On-off switch defective
Check continuity through burner switch.
Heavy sooting on coil and burner,
can cause interruption of air flow and
shorting of electrodes
Clean as required.
Improper electrode setting
Clean and test according to diagram in
operator's manual.
Fuel not reaching combustion chamber
Check fuel pump for proper flow. Check
solenoid valve on machines with spray gun
control for proper on-off flow switch.
Fuel solenoid malfunction
Check by placing screwdriver inside coil then
turn machine on, open spray gun and check
for magnetic pull.
Clogged burner nozzle
Replace.
Water not turned on
Turn on water to activate burner pressure
switch.
Pressure switch malfunction
Remove, test for continuity and replace as
needed.
machine smokes Improper fuel or water in fuel
Drain tank and replace contaminated fuel.
Low fuel pressure
Adjust fuel pump pressure to specifications.
Air leaks in fuel lines
Check fuel lines for leaks or air bubbles.
Tighten or replace as needed.
Plugged or dirty burner nozzle
Replace.
Faulty burner nozzle spray pattern
Replace nozzle.
Heavy accumulation of soot on coils
and burner assembly
Remove coils and burner assembly. Clean
thoroughly.
Misaligned electrode
Realign electrodes to specifications.
Fuel filter partially clogged
Replace as needed.
Obstruction in smoke stack
Check for insulation blockage or other foreign
objects.
Soot build up on coils
Clean coils with soot remover.
Lime build up in coils
Clean inside of coils using coil cleaner.
14
HPB 97-6131 • REV. 5/06
problem
low water
temperature
water
temperature
too hot
possible cause
solution
Improper fuel or water in fuel
Drain fuel tank and replace with proper fuel.
Low fuel pressure
Increase fuel pressure.
Weak fuel pump
Check fuel pump temperature. Replace pump
if needed.
Fuel filter partially clogged
Replace as needed.
Soot build up on coils
Clean coils with soot remover.
Lime build up on coils
Clean inside of coils usings coil cleaner.
Improper burner nozzle
See Burner Specifications.
Incoming water to machine warm or hot Lower incoming water temperature.
Fuel pump pressure too high
Lower fuel pressure.
Fuel pump defective
Replace fuel pump.
Detergent line sucking air
Tighten all clamps. Check detergent line for
holes.
Defective high limit switch (thermostat)
Replace.
Incorrect fuel nozzle size
See Burner Specifications.
Insufficient water supplied
Check GPM to machine.
Restricted water flow
Check nozzle for obstruction, proper size.
PRESSURE WASHER Troubleshooting Guide
Troubleshooting
15
HPB 97-6131 • REV. 5/06
Troubleshooting Guide
PRESSURE WASHER
Troubleshooting
problem
Possible cause
solution
low operating
pressure
Faulty pressure gauge
Install new gauge.
Insufficient water supply
Use larger garden hose; clean filter washer at
water inlet.
Old, worn or incorrect spray
nozzle
Match nozzle number to machine and/or replace
with new nozzle.
Plumbing or hose leak
Check plumbing system for leaks. Retape leaks
with teflon tape.
Faulty or misadjusted unloader
valve (where applicable)
Adjust unloader for proper pressure. Install repair
kit when needed.
Worn packing in pump
Install new packing kit.
Fouled or dirty inlet or discharge
valves in pump
Clean inlet or discharge valves.
Worn inlet or discharge valves
Replace with valve kit.
Air leak
Tighten all clamps. Check detergent lines for
holes.
Clean or replace valve in injector.
detergent not
drawing
Valve in the injector head may be
blocked, dirty or damaged
pump running
normally but
pressure low
on installation
Fluctuating
Pressure
pump noisy
16
Filler screen on detergent suction
hose plugged
Clean or replace.
Dried up detergent plugging metering valve
Disassemble and clean thoroughly.
High viscosity of detergent
Dilute detergent to specifications.
Hole in detergent line(s)
Repair hole.
Low detergent level
Add detergent if needed.
Discharge water temperature
above 180oF.
Lower discharge water temperature.
Pump sucking air
Check water supply and possibility of air seepage.
Valves sticking
Check and clean or replace if necessary.
Unloader valve seat faulty
Check and replace if necessary.
Nozzle incorrectly sized
Check and replace if necessary (See serial plate
for proper size).
Worn piston packing
Check and replace in necessary.
Valves worn
Check and replace if necessary.
Blockage in valve
Check and replace if necessary.
Pump sucking air
Check water supply and air seepage at joints in
suction line.
Worn piston packing
Check and replace if necessary.
Air in suction line
Check water supply and connections on suction
line.
Broken or weak inlet or discharge
valve springs
Check and replace if necessary.
Excessive matter in valves
Check and clean if necessary.
Worn bearings
Check and replace if necessary.
HPB 97-6131 • REV. 5/06
This pressure washer was produced with the best available materials and quality craftsmanship. However, you
as the owner have certain responsibilities for the correct care of the equipment. Attention to regular preventative
maintenance procedures will assist in preserving the performance of your equipment. Contact your pressure
washer dealer for maintenance. Regular preventative maintenance will add many hours to the life of your pressure washer. Perform maintenance more often under severe conditions.
maintenance schedule
Replace Fuel Lines
Annually
Pump Oil
Inspect
Daily inspect the oil level
Change
After first 50 hours, then every 500 hours or annually
Clean Burner Filter
Monthly (More often if fuel quality is poor)
Remove Burner Soot
Annually
Burner Adjustment/Cleaning
Annually
De-scale Coil
Annually (More often if required)
Replace High Pressure Nozzle
Every 6 months
Replace Quick Connects
Annually
Clean Water Screen/Filter
Weekly
Clean Float/Supply Tank
Every 6 months
Replace HP Hose
Annually if there is any sign of wear
Grease Motor
Every 10,000 hours
Replace Burner Nozzle
Annually
Replace Rupture Disc
Annually
PRESSURE WASHER Troubleshooting Guide
Maintenance Charts
Oil Change Record
Date Oil Changed
Month/Day/Year
Estimated Operating
Hours Since Last
Oil Change
Date Oil Changed
Month/Day/Year
Estimated Operating
Hours Since Last
Oil Change
17
HPB 97-6131 • REV. 5/06
PRESSURE WASHER
OPERATOR’S MANUAL
Preventative Maintenance
1.Use clean fuel — kerosene, No. 1 home heating
fuel or diesel fuel. Clean or replace fuel filter every
100 hours of operation. Avoid water contaminated
fuel as it will seize up the fuel pump. De-soot coils
monthly. Use an additive if diesel is being used.
2.Check to see that the attached pressure washer
water pump is properly lubricated.
3. Follow winterizing instructions to prevent freeze
damage to pump and coils.
4.Always neutralize and flush detergent from system
after use.
5.If water is known to be high in mineral content, use
a water softener on your water system, or de-scale
as needed.
6.Do not allow acidic, caustic or abrasive fluids to be
pumped through the system.
7.Always use high grade quality cleaning products.
8.Never run attached pressure washer pump dry for
extended periods of time.
9.If machine is operated with smoky or eye burning
exhaust, coils will soot up, preventing water from
reaching maximum operating temperature. (See
section on Maintenance and Service).
10.Never allow water to be sprayed on or near the
motor or burner assembly or any electrical component.
11.Delime coils as per instructions.
It is advisable, periodically, to visually inspect the
burner. Check air inlet to make sure it is not clogged
or blocked. Wipe off any oil spills and keep equipment
clean and dry.
The areas around the pressure washer should be kept
clean and free of combustible materials, gasoline and
other flammable vapors and liquids.
The flow of ventilating air to the burner must not be
blocked or obstructed in any manner.
MAINTENANCE AND SERVICE
Unloader Valves:
Unloader valves trap pressure in the line when a shutoff spray gun is closed. Machines with unloader valves
are preset and tested at the factory before shipping.
Occasional adjustment of the unloader may be necessary to maintain correct pressure.
Winterizing Procedure:
Damage due to freezing is not covered by warranty.
Adhere to the following cold weather procedures whenever the washer must be stored or operated outdoors
under freezing conditions.
During winter months, when temperatures drop below
32°F, protecting your machine against freezing is nec18 essary. Store the machine in a heated room. If this is
not possible then mix a 50/50 solution of anti-freeze/
water or windshield washer fluid with water in a 5 gallon bucket. Place a short section of garden hose into
the bucket and connect it to the machine. Elevate the
bucket and turn the pump on to siphon the anti-freeze
through the machine. If compressed air is available, an
air fitting can be screwed into the inlet connector and
by injecting compressed air, all water will be blown out
of the system.
If you have an optional float tank, pour the antifreeze
into this tank and run machine until antifreeze exits
discharge nipple.
High Limit Hot Water Thermostat:
For safety, each machine is equipped with a high limit
control switch. In the event the temperature of the water
should exceed its operating temperature, the high limit
control will turn the burner off until the water cools.
Pumps:
Use only SAE 30 weight non-detergent oil. Change oil
after first 50 hours of use. Thereafter, change oil every
three months or at 500 hour intervals. Oil level should
be checked by using the dipstick found on the top of
the pump or by the red dot visible through the oil gauge
window. Oil should be maintained at that level.
Cleaning of Coils:
In alkaline water areas, lime deposits can accumulate
rapidly inside the coil pipes. This growth is increased
by the extreme heat build up in the coil. The best
prevention for liming conditions is to use high quality
cleaning detergents. In areas where alkaline water is an
extreme problem, periodic use of deliming powder will
remove lime and other deposits before coil becomes
plugged.
Deliming Coils With A Pressure Washer:
Periodic flushing of coils is recommended.
Step 1 Fill a 5 gallon bucket with 4 gallons of water,
then add 1 lb. of deliming powder. Mix thoroughly.
Step 2Remove the high pressure nozzle from the
pressure wand and put the wand into the
bucket. Secure the trigger on the spray gun
into the open position.
Step 3Attach a short section (3-5 ft.) of garden hose
to the attached pressure washer to siphon solution from the elevated bucket. Start up pressure washer, allowing solution to be pumped
through pressure washer and into HPB coils
and back into the bucket. Solution should be
allowed to circulate 2-4 hours.
Step 4 After circulating solution flush entire system
with fresh water.
HPB 97-6131 • REV. 5/06
Electrode Setting - Wayne:
In the heating process, fuel residue in the form of soot
deposits may develop between the heating coil pipe
and block air flow which will affect burner combustion.
When soot has been detected on visual