1
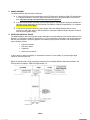
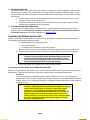
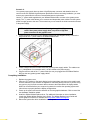
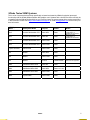
3Dlabs Wildcat Realizm 800 Installation Instructions and OEM & Motherboard Compatibility List This document contains the following: • Detailed installation instructions for 3Dlabs Wildcat Realizm 800 into workstation class systems • A list of 3Dlabs-tested motherboards and OEM systems that have the physical space and functionality needed to install a Wildcat Realizm 800 (see page 5 of this document). System Requirements Before attempting to install the Wildcat Realizm 800 into any system, make sure the system meets the following requirements: SYSTEM HARDWARE • Intel® Pentium® or compatible processor or • Intel Xeon® or compatible processor or • AMD Opteron™ or compatible processor or • AMD Athlon™ 64 or compatible processor OPERATING SYSTEM • Microsoft® Windows® 2000 or • Microsoft Windows XP 32 or 64 bit or • Red Hat® Linux® Enterprise Edition 3 32 or 64 bit CAUTION FOR MICROSOFT WINDOWS XP 32-BIT WITH 4 GB SYSTEM RAM If your system runs Microsoft Windows XP 32-bit and you have tuned user and kernel virtual memory space in the BOOT.INI file via the /3GB switch, you may also need to use /USERVA switch to fine tune the user and kernel address space allocation for proper Wildcat Realizm 800 operation. Below is an example: [BOOT LOADER] TIMEOUT=30 DEFAULT=MULTI(0)DISK(0)RDISK(0)PARTITION(2)\WINNT [OPERATING SYSTEMS] MULTI(0)DISK(0)RDISK(0)PARTITION(2)\WINNT="MICROSOFT WINDOWS XP" /FASTDETECT /3GB /USERVA=2700 The optimal setting of the /USERVA setting varies between systems. For more information on the /3GB and /USERVA switches please refer to the knowledge base on the Microsoft Web site. 3Dlabs 1 POWER SUPPORT The Wildcat Realizm 800 requires the following: A 16-lane PCI Express slot that conforms to the PCI Express x16 Graphics 150W-ATX Specification 1.0. Detailed information on the PCI Special Interest Group (PCI -SIG) specification can be found here: http://www.pcisig.com/specifications/pciexpress/graphics/ A six-pin auxiliary power connection in to the power supply. This connection should be available in a computer system designed to be PCI Express x16 Graphics 150W-ATX Specification 1.0 compliant. The connector should be black. A 500 W (recommended minimum) power supply. Since the Wildcat Realizm 800 can use a maximum of 150 watts under full load conditions, it requires an additional High-end power connector from the system power supply. SUFFICIENT PHYSICAL SPACE The Wildcat Realizm 800 is a full length, double width add-in card that adheres to the industry approved PCI Express™ x16 Graphics 150W-ATX Specification 1.0. This specification states there can be no interference with the physical space in which the graphics card resides by components mounted on the motherboard or system chassis, such as: • Disk drive brackets • Disk drive cables • Capacitors • Serial ATA connectors In some cases, it may be necessary to use another connector, reroute cables, or purchase right-angle cables for Serial ATA devices. Below are specific width, height, and length restrictions for the Wildcat Realizm 800 and as defined in the PCI Express x16 Graphics 150W-ATX Specification 1.0. 3Dlabs 2 SUFFICIENT AIRFLOW The Wildcat Realizm 800 has its own cooling system for circulating air across the graphics card from within the system case; however, the cooling system must have sufficient clearance to operate properly. A poor cooling environment could lead to extreme thermal conditions and system failure. To help avoid this, check the following: • There is enough room around the graphics card for the cooling system to pull cool air in and exhaust hot air out of the graphics card. • No cables or wires are around the fan that could block airflow to the card or catch in the fan, preventing the fan blades from turning properly. SYSTEM INTEGRATOR INFORMATION To ensure optimum graphics card fit and performance, it is recommended that system and add-in card designers refer to the PCI Express x16 Graphics 150W-ATX Card Thermal and Mechanical Guideline for Desktop Systems documentation available from www.pcisig.com Installing the Wildcat Realizm 800 Refer to your computer’s documentation for instructions on opening and closing the computer, identifying the PCI Express slots and adding expansion cards. The Wildcat Realizm 800 requires two slots: One for PCI Express • • An adjacent slot for clearance of the cooling shroud Remove the slot covers for the PCI Express slot and the adjacent slot that you intend to use. 2. Push the card firmly and evenly into the correct x16 PCI Express slot until it is fully seated. 1. NOTE: The cooling fan on the graphics card must have sufficient clearance to ensure proper airflow. Blocked airflow can cause the graphics card to overheat. Ensure there are no cables or wires around the fan that could block airflow to the card or catch in the fan, preventing the fan blades from turning properly. 3. Secure the bracket of the graphics card to the computer chassis. Connecting Auxiliary Power to the Wildcat Realizm 800 Before you restore power to the system, you must connect auxiliary power from the system power supply to the graphics card. There are two scenarios for connecting auxiliary power to the Wildcat Realizm 800: Scenario 1: Your power supply has a High-End power connector designed to plug into a x16 PCI Express graphics card. If this is the case, simply plug this power connector into the Wildcat Realizm 800 (see diagram below). Go to “Completing Installation” immediately following this section to finish installing the graphics card. NOTE: The PCI Express high power connector is a black, 6-pin connector originating from the system power supply. Use extreme caution when identifying this connector. Some power supply connectors can look similar to the PCI Express high power connector, but are keyed slightly different. Do not force the PCI Express high power connector into the graphics card. If force seems necessary, you may not have the correct connector. Make sure the connector from the system power supply is correctly keyed for the graphics card. 3Dlabs 3 Scenario 2: Your system power supply does not have a High-End power connector and therefore does not conform to the PCI Express High-End power specification. Before continuing installation, you must ensure your system has the minimum recommended power requirements. Use the “Y” power cable supplied with your Wildcat Realizm 800 to connect to the system power supply. The “Y” power cable allows you to connect two independent power cables from the system power to supply power to the card. The connections you use must be the initial connections closest to the power supply. NOTE: Only follow these instructions for using the supplied “Y” power cable if the system power supply does not provide a High-End power connector for the graphics card 1. Locate the power connection on the Wildcat Realizm 800 (see diagram below). Connect the single end of the “Y” power cable to the Wildcat Realizm 800. 2. Locate a single connector on each of the two (system) power supply cables. The cables must be 1.) independent of one another and 2.) the two closest to the power supply. 3. Plug the two free ends of the “Y” power cable (the one you plugged into the Wildcat Realizm 800) into the two (system) power supply cables. Completing Installation 1. Replace the system cover. 2. Plug your CRT monitor or flat panel display into the appropriate connector on the graphic card. A DVI to standard 15-pin converter is supplied for connecting analog monitors. If you are using one monitor, plug it into the connector that is closest to the motherboard. All display cables MUST be connected before your computer is powered on to allow the operating system and video drivers to properly detect the display configurations. 3. Power up the system and note the detection of the new graphics hardware. Click to cancel the new hardware installation wizard. 4. Install the 3Dlabs Wildcat Realizm driver. For additional information on driver installation, consult the 3Dlabs Wildcat Realizm User’s Guide. The Wildcat Realizm User’s Guide and current graphics card driver is available from http://www.3dlabs.com/support/ 5. Reboot the system after driver installation has completed. 3Dlabs 4 3Dlabs Tested OEM Systems This is a list of systems that have been specifically reviewed and tested by 3Dlabs for physical space and functionality with the 3Dlabs Wildcat Realizm 800 graphics card. Systems with a similar form factor will likely be compatible with the Wildcat Realizm 800, but you must first insure the system meets all the requirements listed in this document. Please check http://www.3dlabs.com/support/ or email [email protected] for the most up-todate information. OEM System Make OEM System Model Chipset Status Dell Precision Workstation 370 Intel 925X Pass Dell Precision Workstation 380 Intel 955 Pass Dell Precision Workstation 470 Intel E7525 Pass Dell Precision Workstation 670 Intel E7525 Pass Fujitsu Siemens Celsius R630 Intel E7525 Pass HP xw4200 Intel 925X Pass HP xw8200 Intel E7525 Pass HP xw9300 nForce Under Review IBM IntelliStation MPro 6218 Intel 955 Pass IBM IntelliStation MPro 6225 Intel 925X Pass und to date IBM IntelliStation ZPro 6223 Intel E7525 Pass NEC Express 5800 Intel E7525 Pass 3Dlabs Notes Minimum system configuration, no addition add-on features Minimum system configuration, no addition add-on features Dual card not supported 5 3Dlabs Tested Motherboards This is a list of motherboards that have been specifically reviewed and tested by 3Dlabs for physical space and functionality with the 3Dlabs Wildcat Realizm 800 graphics card. Note that testing is on an “open” motherboard and does not take into account any additional requirements of the system/chassis in which the motherboard may be installed. Motherboards with a similar form factor are likely to be compatible with the Wildcat Realizm 800, but you must first insure the motherboard meets all the requirements listed in this document. Please check http://www.3dlabs.com/support/ or email [email protected] for the most up to date information. Motherboard Make ASUS ASUS ASUS ASUS ABIT ABIT ABIT Gigabyte Gigabyte Motherboard Model NCD-D P5GD1 P5AD2 A8N-SLI AA7-Max AA8-DuraMAX AA8-XE GA-9ITDW GA-81AX Intel E7525 Intel 915P Intel 925X nForce Intel i925X Intel i925X Intel i925X Intel E7525 Intel 925X Pass Pass Pass Under Review Pass Pass Pass Pass Pass Intel SE2575GP2 Intel E7525 Pass Intel D915GEV Intel 915G Pass Conditional Intel D915GUX Intel 915G Pass Intel D925XCV Intel 925X Pass Supermicro X6DA8 Intel E7525 Pass Conditional Supermicro X6DAE Intel E7525 Pass Conditional Tyan i7525 (S2676) Intel E7525 Pass Tyan K8WE (S2895) nForce Under Review Chipset 3Dlabs Status Notes Dual card not supported Must have T61_ww34 system BIOS (or later) Slight jumper clash. Must have EV91510A.86A.0260 system BIOS (or later) Must have EV91510A.86A.0260 system BIOS (or later). Must have EV92510A.86A.0338 system BIOS (or later). Must use IDE and floppy cables with low profile connectors. The one IDE cable supplied is OK, floppy cable is not. Must use IDE and floppy cables with low profile connectors. The one IDE cable supplied is OK, floppy cable is not. Dual card not supported 6