1
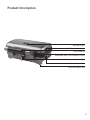
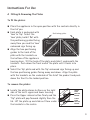
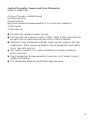
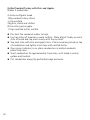
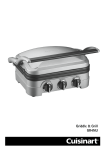
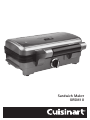
Sandwich Maker
GRSM1U
CPT445U
Important Safeguards
When using electrical appliances, basic safety precautions should
always be followed, including the following:
1. The appliance is not intended to be operated by means of external
timer or separate remote-control system.
2. This appliance is not intended for use by persons with reduced physical,
sensory or mental capabilities, or lack of experience and knowledge,
unless they have been given supervision or instruction concerning use
of the appliance by a person responsible for their safety.
3. Children should always be supervised to ensure that they do not play
with this product.
4. Not for use by children. Keep out of reach of children during and
after use.
5. Once you have finished cooking, turn the selector control to the ‘OFF’
position, unplug the power cord from the mains and allow the appliance
to cool for at least 30 minutes before handling. The sandwich plates can
be washed by hand or in the dishwasher. Do not use metallic objects
such as knives when cleaning. This will damage the non stick coating.
Use wooden or heatproof plastic utensils only. The housing base, cover
and control knob can be wiped clean with a soft, dry cloth. For tough
stains dampen cloth. Never use an abrasive cleaner or harsh pad.
6. The temperature of all surfaces marked with this symbol will
be very hot when the appliance is in use. DO NOT TOUCH these
surfaces as possible injury could occur. Allow to cool completely
before handling this appliance.
7. The outer surface may get hot when the appliance is in use.
8. Always inspect the appliance before use for noticeable signs of
damage. Do not use if damaged, or if the appliance has been dropped.
Do not use this appliance if the lead is damaged. In the event of damage,
or if the appliance develops a fault, contact the Cuisinart Customer Care
Line (refer to “UK After Sales Service section“ for further information).
Congratulations on your purchase of the Cuisinart
Sandwich Maker.
For over 30 years Cuisinart’s aim has been to produce the
very finest kitchen equipment. All Cuisinart products are
engineered for exceptionally long life, and designed to be
easy to use as well as to give excellent performance day
after day.
To learn more about our products and for recipe ideas visit
our website www.cuisinart.co.uk
3
Contents
Product Description..............................................................................5
Safety Cautions....................................................................................6
Instructions For Use.............................................................................9
A Fitting & Removing The Plates................................................................. 9
B Using The Sandwich Maker....................................................................10
Hint & Tips..........................................................................................11
Cleaning & Maintenance.................................................................. 12
UK Guarantee..................................................................................... 13
UK After Sales Service...................................................................... 13
Recipes................................................................................................ 14
4
Product Description
Indicator Lights
Plate release button
Lock Down Lid
Removable Non-Stick Sandwich Plates
Temperature Control Dial
Plate release button
Non Slip Rubber Feet
5
Safety Cautions
Carefully read all the instructions before using the appliance and keep
in a safe place for future reference
Always follow these safety cautions when using this appliance to avoid
personal injury or damage to the appliance. This appliance should be used
only as described within this instruction book.
n
n
n
n
n
n
n
n
n
n
n
6
E nsure all packaging materials and any promotional labels or stickers
are removed from the sandwich maker before first use.
Always inspect the appliance before use for noticeable signs
of damage. Do not use if damaged, or if the appliance has been dropped.
In the event of damage, or if the appliance develops a fault, contact the
Cuisinart Customer Care Line (refer to ‘UK After Sales Service’ section
for further information).
Do not use this appliance if the lead is damaged. In the event of lead
damage discontinue use immediately. If the lead is damaged it must
be replaced with a special lead available from the manufacturer or its
service agent. (See ‘UK After Sales Service’).
Whilst in use the surfaces will become extremely hot. Do not touch hot
surfaces. Always use handles.
Unplug from the mains when not in use and before cleaning. Allow to
cool before cleaning the appliance. To disconnect, turn the control to
‘OFF’ setting, and then remove the plug from the mains.
This appliance is not intended for use by persons with reduced physical,
sensory or mental capabilities, or lack of experience and knowledge,
unless they have been given supervision or instruction concerning use
of the appliance by a person responsible for their safety.
Children should always be supervised to ensure that they do not play
with this product.
Not for use by children. Keep out of reach of children during and after
use.
Do not use any accessories or attachments with this appliance other than
those recommended by Cuisinart.
To protect against fire, electric shock or personal injury, do not immerse
cord, plug or unit in water or other liquids.
Do not leave the lead hanging over the edge of a kitchen table or
worktop. Avoid contact between the lead and hot surfaces.
n
n
n
n
n
n
n
n
For indoor, domestic use only.
This appliance should be used only for preparation of food as described
within the instructions for use that accompany it. Please retain these
instructions for further use.
Always ensure that your hands are dry before removing the plug from
the mains socket. Never pull the plug out of the mains socket by its
lead.
To avoid injury or possible fire, do not cover the appliance when in use.
If this appliance is used for re-heating foods, also ensure the food is
piping hot before eating.
Allow to cool before putting on or taking off parts, and before cleaning
appliance.
Do not connect this appliance to an external timer or remote control
system.
This appliance complies with the basic requirements of Directives
04/108/EC (Electromagnetic Compatibility) and 06/95/EC (Safety of
domestic electrical appliances).
ARNING: Polythene bags over the product or packaging may
W
be dangerous. To avoid danger of suffocation, keep away from
babies and children. These bags are not toys.
The temperature of all surfaces marked with this symbol will be very
hot when the appliance is in use.
DO NOT TOUCH these surfaces as possible injury could occur.
Allow to cool completely before handling this appliance.
The symbol
on the product or on its packaging indicates that this
product may not be treated as household waste. Instead it should be handed
over to an appropriate collection point for the recycling of electrical and
electronic equipment.
By ensuring this product is disposed of correctly, you will help prevent
potential negative consequences for the environment and human health,
which could otherwise be caused by inappropriate waste handling of this
product. For more detailed information about the recycling of this product,
please contact your local council office or your household waste disposal
service.
7
UK Wiring Instructions
The wires in the mains lead are coloured in accordance with the following
code:
n
n
n
BLUE = NEUTRAL
BROWN = LIVE
YELLOW & GREEN = EARTH
As the colours of the wire in the mains lead of this appliance may not
correspond with the colour marking identifying the terminals on your plug,
proceed as follows:
The wire which is coloured BLUE must be connected to the terminal which
is marked with the letter N
The wire which is coloured BROWN must be connected to the terminal
which is marked with the letter L
The wire which is coloured YELLOW & GREEN must be connected to the
terminal which is marked with the letter E or the
symbol
This appliance is supplied fitted with a BS1363 mains plug and a BS1362
13A fuse. If this plug is removed from the appliance please ensure it is
disposed of safely as a disconnected plug is dangerous if reconnected to
the mains. If any other type of plug is used, a 13A fuse must be fitted.
8
Instructions For Use
A Fitting & Removing The Plates
To fit the plates:
Place the appliance in the open position with the controls directly in
front of you.
n Each plate is embossed with
Positioning guides
‘Low’ or ‘Up’. Select the
‘Low’ plate, hold it flat with
the positioning guides facing
away from you and the ‘Low’
embossed sign facing up.
n Align the two positioning
guides to the back of the
plate with the brackets on
the bottom of the appliance
housing base. Tilt the back of the plate and slide it underneath the
brackets. Push down the front end of the plate until it locks into
place.
n Select the ‘Up’ plate and with the ‘Up’ embossed sign facing up and
the two positioning guides facing away and down. Align the plate
with the brackets on the underside of the lid of the product and push
down the front to the locked position.
n
To remove the plates:
Locate the plate release buttons on the right
side of the unit’s upper and lower housing.
n Press the Upper release button firmly and the
“Up” plate will pop forward slightly from the
lid. Lift the plate up and slide out from under
the brackets in the centre.
n
Upper
Plate
Release
Button
Lower
Plate
Release
Button
9
cm
1
2
3
4
5
Scale 1 : 1
150%
Press the button on the Lower housing and repeat the above method
to remove the “Low” plate.
N.B: Always allow the appliance to cool for at least 30 minutes before
removing the plates.
n
B Using The Sandwich Maker
Plug the appliance into a suitable mains socket.
Although the plates have a non-stick coating, we recommend that you
season the sandwich plates with cooking spray or oil. If using oil, apply
with a paper towel or pastry brush.
n Turn the temperature control dial to the desired setting for cooking;
Low, Medium or High.
n
n
When the dial is in place a red light will illuminate on top of the
appliance to indicate that the power is on.
n Once the appliance has reached For
the
optimal
temperature, the green
posiction
1:1
light will illuminate to indicate the appliance is ready to cook.
n Place the ingredients on the bottom plate. Close the lid and lock the
handle.
n It may take a few seconds for the green light to switch off. This is
normal.
n The green light runs on a thermostat and indicates when the product is
up to temperature. As part of the cooking cycle the light will go on and
off during this process. You will need to assess if the food is cooked by
lifting the lid.
n When you are happy the food is cooked, remove it by gently
loosening the edges with a heat-proof plastic spatula. Never use
metal utensils, as they may damage the non-stick coating.
N.B. The first time you use the appliance, it may have a slight odour
and may smoke a little. This is normal and common to appliances with
a non-stick surface.
n
10
Hints & Tips
Using the Sandwich Maker
n
n
n
n
n
n
n
n
The Sandwich Maker has been designed with a handle that locks down
to secure the contents when cooking.
Always preheat your Cuisinart Sandwich Maker completely before
using.
The lid of the sandwich maker should be closed whilst preheating.
The sandwich plates measure 14cm x 13.5cm and are designed to
accommodate breads of all shapes and sizes.
Breads longer than 14cm can easily be toasted lengthwise or
diagonal. Breads can also be sliced from whole loaves.
Butter, and olive oil are recommended for coating the outside of bread
when making sandwiches.
“Light/Low Fat” versions of margarines are not recommended as
they do not withstand heat (check manufacturer’s labels for cooking
recommendations for best results).
Butter at room temperature is more suitable when spreading on bread,
or melt and apply with a pastry brush. For best results, moist
ingredients such as sliced tomatoes or fruits, pickles, etc., should be
blotted or patted dry with a paper towel.
11
Cleaning & Maintenance
Before first use and after every use, clean each part thoroughly.
Once you have finished cooking, turn the selector control to the ‘Off’
position, unplug the power cord from the mains, allow the appliance
to cool for at least 30 minutes before handling.
n The sandwich plates can be washed by hand or in the dishwasher.
Do not use metallic objects such as knives when cleaning. This will
damage the non stick coating. Use wooden or heatproof plastic
utensils only.
n The housing base, cover and control knobs can be wiped clean with a
soft, dry cloth. For tough stains dampen cloth. Never use an abrasive
cleaner or harsh pad.
n Never leave plastic utensils in contact with the appliance.
n Make sure all the parts are clean and dry before storing.
n Never wrap the cord around the outside of the appliance.
n Never immerse the plug, lead or housing in water or any other liquid.
n For compact storage inside cupboards, the appliance can be stored in
an upright position.
n The sandwich maker has been designed with a special latch so lid stays
closed during storage.
n
n
12
UK Guarantee
T his Cuisinart appliance is guaranteed for consumer use for 5 years. This
guarantee covers defects under normal use from date of purchase and
ceases to be valid in the event of alteration or repairs by unauthorised
persons. If the appliance does not perform satisfactorily due to defects in
materials or manufacture, it will be repaired or replaced through Conair
UK After Sales Service. No responsibility will be accepted for any damage
caused in transit. The Conair Group Ltd reserves the right to amend terms
and specifications without prior notice.
This guarantee in no way affects your statutory rights.
UK After Sales Service
For further advice on using the appliance, contact the Conair Customer
Care Line on 0370 240 6902 (09:00 to 17:00 Monday to Friday) or email
your enquiry to [email protected]
If you should need to return your appliance to us please send it to the
following address:
Customer Care Centre,
Conair Logistics
Unit 4
Revolution Park
Buckshaw Avenue
Buckshaw Village
Chorley
PR7 7DW
Please enclose your name and address, together with a copy of proof of
purchase and details of the fault.
13
Recipes
To help you get started with your new Sandwich Maker, we have included
a few recipe ideas in this instruction manual. For further recipe ideas and
inspiration please visit our website www.cuisinart.co.uk. You can also
share some of your own recipe ideas on our Facebook page Cuisinart UK.
Breakfast
Individual Spinach and Goat Cheese Frittatas........................................... 15
Breakfast On The Go.......................................................................................... 16
Mains
Toasted Prosciutto, Tomato and Fresh Mozzarella.................................... 17
Grilled Smoked Turkey with Brie and Apples.............................................. 18
The Gobbler........................................................................................................... 19
Toasted Avocado, Cheese and Tomato.......................................................... 20
Three-Cheese Calzones with Sausage and Pesto........................................21
Dessert
Caramelised Apple Turnovers........................................................................... 22
14
Individual Spinach and Goat Cheese Frittatas
Makes 4 individual frittatas
½ tsp olive oil
1 garlic clove, crushed
220g spinach leaves
4 large eggs
1 tbsp whole milk
2 tbsp soft goat cheese or chèvre
2 tbsp parmesan, grated
1 tbsp fresh basil, thinly sliced
Pinch of salt and ground pepper
n
n
n
n
n
Place a small saucepan over a medium heat and add the olive oil.
Once heated through, add the garlic and spinach.
Stir together until spinach is wilted then remove and reserve.
Whisk the eggs and milk together. Stir the cheeses in with the eggs.
Fold in the reserved spinach and the basil and season with salt and
pepper.
Pre-heat the sandwich maker to medium. Once green indicator light
is on, pour the egg mixture equally into each of the four pockets and
close.
Frittatas should be ready in approximately 5 to 6 minutes. Remove
and serve immediately.
15
Breakfast On The Go
Makes 2 sandwiches, or 4 servings
4 large eggs
Cooking spray
4 slices bread
30g cheddar, grated
2 tbsp butter, melted
n
n
n
n
n
n
n
n
n
16
Pre-heat the sandwich maker to medium.
Whisk the eggs together in a measuring cup and once green indicator
light is on, spray the sandwich plates with cooking spray and pour the
egg mixture equally into the four pockets and close.
The egg mixture will be cooked in approx 5 minutes. Remove and
reserve.
Turn the heat up to high. Lay two slices of bread on a work surface.
Divide the cooked eggs equally between the two slices of bread.
Top each with the cheese. Place remaining bread on top of sandwiches
and lightly brush the tops with melted butter.
Once green indicator is on, place sandwiches in heated sandwich plates
and close.
Toast sandwiches for approximately 5 minutes, until bread is evenly
golden and toasted.
Cut sandwiches along the perforated edge and serve.
Toasted Prosciutto, Tomato and Fresh Mozzarella
Makes 2 sandwiches
4 slices of bread or ciabatta bread
6 slices prosciutto
4 slices tomato
55g fresh mozzarella (approximately 2 to 3 slices per sandwich)
4 basil leaves
1 tbsp olive oil
n
n
n
n
n
n
Pre-heat the sandwich maker to high.
Lay two slices of bread on a work surface. Place 3 slices of prosciutto
on each slice of bread and top each with 2 slices of tomato.
Distribute fresh mozzarella and basil leaves equally between the two
sandwiches. Place remaining bread on top of sandwiches and lightly
brush tops with olive oil.
Once green indicator is on, place sandwiches in heated sandwich
plates and close.
Toast sandwiches for approximately 5 minutes, until bread is evenly
golden and toasted.
Cut sandwiches along the perforated edge and serve.
17
Grilled Smoked Turkey with Brie and Apples
Makes 2 sandwiches
4 slices multigrain bread
100g smoked turkey, sliced
½ tsp mustard
25g brie, sliced and chilled
8 thin slices green apple
1 tbsp unsalted butter, melted
n
n
n
n
n
n
18
Pre-heat the sandwich maker to high.
Lay two slices of bread on a work surface. Place 50g of turkey on each
slice of bread and top each evenly with the mustard.
Top each slice with brie and apple slices. Place remaining bread on top
of sandwiches and lightly brush tops with melted butter.
Once green indicator is on, place sandwiches in heated sandwich
plates and close.
Toast sandwiches for approximately 5 minutes, until bread is evenly
golden and toasted.
Cut sandwiches along the perforated edge and serve.
The Gobbler
Makes 2 sandwiches
4 slices white bread
150g sliced turkey
1 tsp mayonnaise
55g prepared stuffing
1 tbsp cranberry sauce
1 tbsp unsalted butter, melted
n
n
n
n
n
n
n
Pre-heat the sandwich maker to high.
Lay two slices of bread on a work surface. Place 75g of turkey on each
slice of bread and top each with ½ tsp of mayonnaise and 2 tbsp of
stuffing.
Top each sandwich evenly with cranberry sauce.
Place remaining bread on top of sandwiches and lightly brush tops
with melted butter.
Once green indicator is on, place sandwiches onto heated sandwich
plates and close.
Toast sandwiches for approximately 4 to 5 minutes, until bread is
evenly golden and toasted.
Cut sandwiches along the perforated edge and serve.
19
Toasted Avocado, Cheese and Tomato
Makes 2 sandwiches
4 slices multigrain bread
½ avocado, pitted and sliced
4 slices tomato
25g cheddar, sliced
Pinch of salt and ground pepper
1½ tbsp unsalted butter, melted
n
n
n
n
n
n
n
20
Pre-heat the sandwich maker to high.
Lay two slices of bread on a work surface. Place avocado slices evenly
on each slice of bread, and sprinkle with a pinch of the salt and pepper.
Top each with 2 slices of tomato and sprinkle again with the remaining
salt and pepper.
Top each with equal amounts of the cheddar.
Place remaining bread on top of sandwiches and lightly brush tops with
melted butter.
Once green indicator is on, place sandwiches onto heated sandwich
plates and close. Toast sandwiches for approximately 5 minutes, until
bread is evenly golden and toasted.
Cut sandwiches along the perforated edge and serve.
Three-Cheese Calzones with Sausage and Pesto
Makes 8 calzones
½ tsp olive oil
175g fresh Italian sausage (hot or sweet), skin removed
2 garlic cloves, peeled and crushed
165g ricotta
165g mozzarella, shredded
3 tbsp parmesan, grated
2 tsp pesto
3.2kg pizza dough
Marinara sauce to serve
n
n
n
n
n
n
n
n
Place olive oil in a medium saucepan over a medium heat.
Add sausage meat and crushed garlic cloves and cook until meat is
completely cooked throughout.
Whilst the sausage is cooking, stir together the three cheeses and
pesto in a separate bowl. Once the sausage is cooked, remove, reserve
and cool to room temperature.
Stir in the three cheese and pesto mixture into the cooked sausage
meat whilst cooling.
Roll pizza dough into four long rectangles that are 13 x 25cm.
Spread approximately 110g of calzone filling evenly on the bottom half
of each rectangle. Fold the top part of the pizza dough down to cover
the filling, and seal the calzones by pressing the dough together with
fingers or a fork to create a sealed 13 x 13cm pocket.
Pre-heat the sandwich maker to high.
When green indicator lights, place two calzones into preheated
sandwich plates. Close unit and bake for approximately 8 to 10
minutes, until pizza dough is evenly golden. Bake the remaining two
calzones.
Cut into individual calzones along the perforated edges. Serve with
warm marinara sauce.
21
Caramelised Apple Turnovers
Makes 8 turnovers
1½ tbsp unsalted butter
2 medium apples, peeled, cored, halved and thinly sliced
3 tbsp granulated sugar
½ tsp ground cinnamon
450g or 2 sheets packaged puff pastry, thawed
Melted butter for brushing
Ice cream or fresh whipped cream to serve
n
n
n
n
n
n
n
n
22
Melt butter in a large saucepan over a medium heat. Add sliced apples,
sugar and cinnamon. Turn heat down to medium-low and cook apples
for approximately 8 to 10 minutes, stirring occasionally. Once soft and
slightly caramelized remove and reserve.
On a floured work surface, roll each sheet of pastry into a large square.
Cut each sheet of rolled pastry so that there are four 13 x 25cm
rectangles (two rectangles per pastry sheet).
Place approximately 110g of apple on the bottom half of each pastry
rectangle. Fold the top part of the pastry down to cover the apples, and
close the turnovers by pressing a fork around the pastry edge to create a
sealed 13 x 13cm pocket.
Brush the tops of each pocket with melted butter.
Pre-heat the sandwich maker to high.
When green indicator lights, place two apple turnovers into pre-heated
sandwich plates. Close unit and bake for approximately 8 to 10 minutes,
until pastry is evenly golden.
Bake the remaining two turnovers. Cut into individual turnovers along
the perforated edge.
Top turnovers with vanilla ice cream and/or fresh whipped cream.
23
www.cuisinart.co.uk
IB-8/217E