1
HTZ180DVD_en_RXJ.book 1 ページ
2009年3月17日 火曜日 午後6時53分
HTZ180DVD
DVD/CD Receiver | Receptor con DVD/CD
XV-DV180
Speaker System | Sistema de altavoces
S-DV180
Operating Instructions
Manual de instrucciones
HTZ180DVD_en_RXJ.book 2 ページ
2009年3月17日 火曜日 午後6時53分
IMPORTANT
CAUTION
RISK OF ELECTRIC SHOCK
DO NOT OPEN
The lightning flash with arrowhead symbol,
within an equilateral triangle, is intended to
alert the user to the presence of uninsulated
“dangerous voltage” within the product’s
enclosure that may be of sufficient
magnitude to constitute a risk of electric
shock to persons.
CAUTION:
TO PREVENT THE RISK OF ELECTRIC
SHOCK, DO NOT REMOVE COVER (OR
BACK). NO USER-SERVICEABLE PARTS
INSIDE. REFER SERVICING TO QUALIFIED
SERVICE PERSONNEL.
The exclamation point within an equilateral
triangle is intended to alert the user to the
presence of important operating and
maintenance (servicing) instructions in the
literature accompanying the appliance.
D3-4-2-1-1_A1_En
VENTILATION CAUTION
&$(# !'&!"'*'%#%"""#%)!'%
"%&"-%"!"'#!,"!'!%
*'$(!%'&$(# !'&(&)&"%
"*%#"'"%+#"&''"%##!&#&!%!
"% "&'(% !
When installing this unit, make sure to leave space
around the unit for ventilation to improve heat
radiation (at least 10 cm at top, 10 cm at rear, and
10 cm at each side).
+$!)$)+ !!%$,'(*%%!- '(
$' #)$$*#)'-$'' $#(*')))
%$,'(*%%!-+$!)$)',') (*# )
, !!*(")()'&* '+$!)
$',' ))#$#)''%#!
#
WARNING
To prevent a fire hazard, do not place any naked
flame sources (such as a lighted candle) on the
D3-4-2-1-7a_A_En
equipment.
POWER-CORD CAUTION
Handle the power cord by the plug. Do not pull out the
plug by tugging the cord and never touch the power
cord when your hands are wet as this could cause a
short circuit or electric shock. Do not place the unit, a
piece of furniture, etc., on the power cord, or pinch the
cord. Never make a knot in the cord or tie it with other
cords. The power cords should be routed such that they
are not likely to be stepped on. A damaged power cord
can cause a fire or give you an electrical shock. Check
the power cord once in a while. When you find it
damaged, ask your nearest PIONEER authorized
service center or your dealer for a replacement. S002*_En
Operating Environment
Operating environment temperature and humidity:
+5 °C to +35 °C (+41 °F to +95 °F); less than 85 %RH
(cooling vents not blocked)
Do not install this unit in a poorly ventilated area, or in
locations exposed to high humidity or direct sunlight (or
strong artificial light)
D3-4-2-1-7c*_A1_En
WARNING
Slots and openings in the cabinet are provided for
ventilation to ensure reliable operation of the
product, and to protect it from overheating. To
prevent fire hazard, the openings should never be
blocked or covered with items (such as newspapers,
table-cloths, curtains) or by operating the
D3-4-2-1-7b_A_En
equipment on thick carpet or a bed.
CAUTION
The STANDBY/ON switch on this unit will not
completely shut off all power from the AC outlet.
Since the power cord serves as the main disconnect
device for the unit, you will need to unplug it from
the AC outlet to shut down all power. Therefore,
make sure the unit has been installed so that the
power cord can be easily unplugged from the AC
outlet in case of an accident. To avoid fire hazard,
the power cord should also be unplugged from the
AC outlet when left unused for a long period of time
D3-4-2-2-2a_A_En
(for example, when on vacation).
If the AC plug of this unit does not match the AC
outlet you want to use, the plug must be removed
and appropriate one fitted. Replacement and
mounting of an AC plug on the power supply cord of
this unit should be performed only by qualified
service personnel. If connected to an AC outlet, the
cut-off plug can cause severe electrical shock. Make
sure it is properly disposed of after removal.
The equipment should be disconnected by removing
the mains plug from the wall socket when left unused
for a long period of time (for example, when on
vacation).
D3-4-2-2-1a_A1_En
HTZ180DVD_en_RXJ.book 3 ページ
2009年3月17日 火曜日 午後6時53分
CAUTION
This product is a class 1 laser product, but this
product contains a laser diode higher than Class 1.
To ensure continued safety, do not remove any covers
or attempt to gain access to the inside of the product.
Refer all servicing to qualified personnel.
The following caution label appears on your unit.
Location: top of the unit
CLASS 1
LASER PRODUCT
D3-4-2-1-8*_C_En
[US Military and Duty Free models only]
CAUTION
This product satisfies FCC regulations when shielded cables and connectors are used to connect the unit to other
equipment. To prevent electromagnetic interference with electric appliances such as radios and televisions, use
shielded cables and connectors for connections.
D8-10-3a_A1_En
Information to User
Alterations or modifications carried out without appropriate authorization may invalidate the user’s right to operate
the equipment.
D8-10-2_A1_En
NOTE:
This equipment has been tested and found to comply with the limits for a Class B digital device, pursuant to Part 15
of the FCC Rules. These limits are designed to provide reasonable protection against harmful interference in a
residential installation. This equipment generates, uses, and can radiate radio frequency energy and, if not installed
and used in accordance with the instructions, may cause harmful interference to radio communications. However,
there is no guarantee that interference will not occur in a particular installation. If this equipment does cause
harmful interference to radio or television reception, which can be determined by turning the equipment off and on,
the user is encouraged to try to correct the interference by one or more of the following measures:
— Reorient or relocate the receiving antenna.
— Increase the separation between the equipment and receiver.
— Connect the equipment into an outlet on a circuit different from that to which the receiver is connected.
— Consult the dealer or an experienced radio/TV technician for help.
D8-10-1-2_A1_En
FEDERAL COMMUNICATIONS COMMISSION DECLARATION OF CONFORMITY
This device complies with part 15 of the FCC Rules. Operation is subject to the following two conditions: (1) This
device may not cause harmful interference, and (2) this device must accept any interference received, including
interference that may cause undesired operation.
Product Name: DVD/CD Receiver
Model Number: XV-DV180
Responsible Party Name: PIONEER ELECTRONICS SERVICE, INC.
Address: 1925 E. DOMINGUEZ ST. LONG BEACH, CA 90801-1760, U.S.A.
Phone: 1-800-421-1404
D8-10-4*_A1_En
HTZ180DVD_en_RXJ.book 4 ページ
2009年3月17日 火曜日 午後6時53分
Thank you for buying this Pioneer product.
Please read through these operating instructions so that you will know how to operate your model
properly. After you have finished reading the instructions, put them in a safe place for future reference.
Contents
01 Speaker Setup Guide
05 Listening to your system
Home theater sound setup . . . . . . . . . . . . . . .
5 spot speaker layout . . . . . . . . . . . . . . . . . .
3 spot speaker layout . . . . . . . . . . . . . . . . . .
Preparing the speakers . . . . . . . . . . . . . . . . . .
Attaching non-skid pads . . . . . . . . . . . . . . .
Wall mounting the speakers . . . . . . . . . . . . . .
Before mounting . . . . . . . . . . . . . . . . . . . . .
Attaching the brackets . . . . . . . . . . . . . . . . .
Additional notes on speaker placement . . . . .
6
6
6
6
6
6
6
7
7
Basic connections . . . . . . . . . . . . . . . . . . . . . 8
Selecting Listening mode . . . . . . . . . . . . . . . 20
Auto listening mode . . . . . . . . . . . . . . . . . . . 20
Listening in surround sound . . . . . . . . . . . . . 20
Using Front Surround . . . . . . . . . . . . . . . . . . 21
Listening in stereo. . . . . . . . . . . . . . . . . . . . . 21
Listening with headphones . . . . . . . . . . . . . . 21
Adjusting the bass and treble . . . . . . . . . . . . 21
Using the SFC modes . . . . . . . . . . . . . . . . . . 21
Boosting the bass level . . . . . . . . . . . . . . . . . 22
Using the MP3 Expander. . . . . . . . . . . . . . . . 22
Using the Voice Enhancer mode . . . . . . . . . . 22
Effective Sound (for optimum sound) . . . . . . 22
03 Controls and displays
06 Disc playback features
02 Connecting up
Front panel . . . . . . . . . . . . . . . . . . . . . . . . . .
Display . . . . . . . . . . . . . . . . . . . . . . . . . . . . .
Remote control . . . . . . . . . . . . . . . . . . . . . . .
Putting the batteries in the remote
control . . . . . . . . . . . . . . . . . . . . . . . . . . . .
Using the remote control . . . . . . . . . . . . . .
12
12
13
14
14
04 Getting started
Setting Speaker Layout . . . . . . . . . . . . . . . . .
Setting the channel levels . . . . . . . . . . . . .
Using the on-screen displays . . . . . . . . . . . .
Playing discs . . . . . . . . . . . . . . . . . . . . . . . .
Basic playback controls . . . . . . . . . . . . . . .
Resume and Last Memory . . . . . . . . . . . . .
DVD-Video disc menus. . . . . . . . . . . . . . . .
Video CD/Super VCD PBC menus . . . . . . .
Listening to the radio . . . . . . . . . . . . . . . . . .
Improving poor FM reception . . . . . . . . . . .
Reducing AM reception noise . . . . . . . . . .
Memorizing stations. . . . . . . . . . . . . . . . . .
Listening to station presets . . . . . . . . . . . .
Listening to other sources . . . . . . . . . . . . . .
Setting the sleep timer . . . . . . . . . . . . . . . . .
4
En
15
15
16
16
17
17
17
18
18
18
18
19
19
19
19
Scanning discs . . . . . . . . . . . . . . . . . . . . . . . 23
Playing in slow motion . . . . . . . . . . . . . . . . . 23
Frame advance/frame reverse . . . . . . . . . . . . 23
Playing a JPEG slideshow . . . . . . . . . . . . . . . 23
Browsing DVD or Video CD/Super VCD discs
with the Disc Navigator . . . . . . . . . . . . . . . . . 24
Browsing Windows MediaTM Audio (WMA), MP3,
MPEG-4 AAC, DivX video/WMV and JPEG files
with the Disc Navigator . . . . . . . . . . . . . . . . . 25
Using Playlists. . . . . . . . . . . . . . . . . . . . . . . . 25
Programming playlists . . . . . . . . . . . . . . . . 25
Listening to playlists . . . . . . . . . . . . . . . . . . 26
Clearing files from a playlist . . . . . . . . . . . . 26
Looping a section of a disc . . . . . . . . . . . . . . 26
Using repeat play . . . . . . . . . . . . . . . . . . . . . 26
Using random play . . . . . . . . . . . . . . . . . . . . 26
Creating a program list . . . . . . . . . . . . . . . . . 27
Other functions available from the
program menu . . . . . . . . . . . . . . . . . . . . . . 27
Searching a disc . . . . . . . . . . . . . . . . . . . . . . 27
Switching subtitles . . . . . . . . . . . . . . . . . . . . 28
Switching language/audio channels . . . . . . . 28
Zooming the screen . . . . . . . . . . . . . . . . . . . 28
Switching camera angles . . . . . . . . . . . . . . . 28
Displaying disc information. . . . . . . . . . . . . . 28
HTZ180DVD_en_RXJ.book 5 ページ
2009年3月17日 火曜日 午後6時53分
08 Singing karaoke
Singing karaoke . . . . . . . . . . . . . . . . . . . . . . 31
Changing the vocal mix . . . . . . . . . . . . . . . 31
Changing the backing track . . . . . . . . . . . . 31
09 Audio Settings and Video Adjust
menus
Audio Settings menu. . . . . . . . . . . . . . . . . . . 32
Audio DRC . . . . . . . . . . . . . . . . . . . . . . . . . 32
Video Adjust menu . . . . . . . . . . . . . . . . . . . . 32
10 Initial Settings menu
11 Other connections
Nederlands
Español
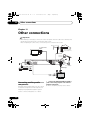
Connecting auxiliary audio components . . . . 38
Connecting using the component video
output . . . . . . . . . . . . . . . . . . . . . . . . . . . . . . 39
About progressive scan video . . . . . . . . . . . 39
Connecting using HDMI . . . . . . . . . . . . . . . . 39
Switching the HDMI audio setting . . . . . . . 39
Resetting the HDMI connection . . . . . . . . . 40
About HDMI . . . . . . . . . . . . . . . . . . . . . . . . 40
Connecting external antennas. . . . . . . . . . . . 40
Italiano
Using the Initial Settings menu . . . . . . . . . . . 33
Video Output settings . . . . . . . . . . . . . . . . . . 33
Language settings . . . . . . . . . . . . . . . . . . . . . 34
Display settings . . . . . . . . . . . . . . . . . . . . . . . 34
Options settings . . . . . . . . . . . . . . . . . . . . . . 35
Speakers settings . . . . . . . . . . . . . . . . . . . . . 35
Parental Lock . . . . . . . . . . . . . . . . . . . . . . . 35
About DivX® VOD content . . . . . . . . . . . . . 36
Speaker Distance . . . . . . . . . . . . . . . . . . . . 36
Français
Disc/content format playback
compatibility . . . . . . . . . . . . . . . . . . . . . . . . . 41
Disc compatibility table . . . . . . . . . . . . . . . . 41
About DVD+R/DVD+RW
compatibility . . . . . . . . . . . . . . . . . . . . . . . . 42
About DivX . . . . . . . . . . . . . . . . . . . . . . . . . 42
About WMV. . . . . . . . . . . . . . . . . . . . . . . . . 43
About MPEG-4 AAC. . . . . . . . . . . . . . . . . . . 43
About WMA . . . . . . . . . . . . . . . . . . . . . . . . 43
Using and taking care of discs. . . . . . . . . . . . 43
DVD Video regions . . . . . . . . . . . . . . . . . . . 44
Installation and maintenance . . . . . . . . . . . . 44
Hints on installation . . . . . . . . . . . . . . . . . . 44
Cleaning the pickup lens. . . . . . . . . . . . . . . 44
Problems with condensation. . . . . . . . . . . . 44
Moving the system unit . . . . . . . . . . . . . . . . 44
Screen sizes and disc formats . . . . . . . . . . . . 45
Widescreen TV users. . . . . . . . . . . . . . . . . . 45
Standard TV users . . . . . . . . . . . . . . . . . . . . 45
TV system setting . . . . . . . . . . . . . . . . . . . . . . 45
Frequency step setting. . . . . . . . . . . . . . . . . . 46
Dimming the Display . . . . . . . . . . . . . . . . . . . 46
Setting the Key Lock . . . . . . . . . . . . . . . . . . . 46
Resetting the system . . . . . . . . . . . . . . . . . . . 46
Using the language code list . . . . . . . . . . . . . 46
Troubleshooting . . . . . . . . . . . . . . . . . . . . . . . 47
General . . . . . . . . . . . . . . . . . . . . . . . . . . . . 47
DVD/CD/Video CD player. . . . . . . . . . . . . . . 48
Tuner. . . . . . . . . . . . . . . . . . . . . . . . . . . . . . 49
USB connection . . . . . . . . . . . . . . . . . . . . . 49
HDMI connection . . . . . . . . . . . . . . . . . . . . 49
Error Messages . . . . . . . . . . . . . . . . . . . . . . 50
Language code list. . . . . . . . . . . . . . . . . . . . . 51
Country/Area code list . . . . . . . . . . . . . . . . . . 51
Specifications . . . . . . . . . . . . . . . . . . . . . . . . 52
Deutsch
12 Additional information
Using the USB interface . . . . . . . . . . . . . . . . 29
Recording the tracks of a music CD on
a USB device . . . . . . . . . . . . . . . . . . . . . . . . . 29
Recording all the tracks . . . . . . . . . . . . . . . 29
Recording specific tracks . . . . . . . . . . . . . . 30
English
07 USB playback and Recording
5
En
HTZ180DVD_en_RXJ.book 6 ページ
01
2009年3月17日 火曜日 午後6時53分
Speaker Setup Guide
Chapter 1
Speaker Setup Guide
Home theater sound setup
Wall mounting the speakers
Depending on the size and characteristics of
your room, you can place your speakers in one
of two ways using this system. For the speaker
configuration, see the Setup Guide.
The front and surround speaker have
mounting brackets.
5 spot speaker layout
This is a standard multichannel surround sound
speaker setup for optimal 5.1 channel home
theater sound.
3 spot speaker layout
This setup is ideal when rear surround speaker
placement isn’t possible or you want to avoid
running long speaker cables in your listening
area.
Before mounting
• Remember that the speaker system is
heavy and that its weight could cause the
screws to work loose, or the wall material to
fail to support it, resulting in the speaker
falling. Make sure that the wall you intend
to mount the speakers on is strong enough
to support them. Do not mount on plywood
or soft surface walls.
• Mounting screws are not supplied. Use
screws suitable for the wall material and
support the weight of the speaker.
CAUTION
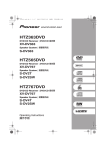
Preparing the speakers
Attaching non-skid pads
• Attach the smaller non-skid pads to the
base of each of the speakers. The four large
non-skid pads are for the subwoofer.
Use the supplied adhesive to attach 4 pads to the
• If you are unsure of the qualities and
strength of the wall, consult a professional
for advice.
• Pioneer is not responsible for any
accidents or damage that result from
improper installation.
5 mm
base (flat surface) of each speaker.
10 mm
Mounting screw
(not supplied)
5 mm to 7 mm
6
En
HTZ180DVD_en_RXJ.book 7 ページ
2009年3月17日 火曜日 午後6時53分
Speaker Setup Guide
• Make sure to tighten the supplied screw as
securely as possible when attaching the
bracket to the back of the speaker.
• Please do not attach the brackets to the
center speaker.
• The subwoofer is not magnetically shielded
and so should not be placed near a TV or
monitor. Magnetic storage media (such as
floppy discs and tape or video cassettes)
should also not be kept close to the
subwoofer.
• Install the main front left and right
speakers at an equal distance from the TV.
Precautions:
Español
• When installing the center speaker on top
of the TV, be sure to secure it with tape or
some other suitable means. Otherwise, the
speaker may fall from the TV due to
external shocks such as earthquakes,
endangering those nearby or damaging
the speaker.
Nederlands
• When using the 5 spot speaker layout,
install the surround speakers slightly
above ear level for optimum effect.
Italiano
Additional notes on speaker
placement
Français
Bracket screw
(supplied)
Deutsch
• Do not attach the center speaker and
subwoofer to a wall or ceiling. They may fall
off and cause injury.
English
Attaching the brackets
01
• Make sure that all the bare speaker wire is
twisted together and inserted fully into the
speaker terminal. If any of the bare speaker
wire touches the back panel it may cause
the power to cut off as a safety measure.
• The front, center and surround speakers
supplied with this system are magnetically
shielded. However, depending on the
installation location, color distortion may
occur if the speaker is installed extremely
close to the screen of a television set. If this
case happens, turn the power switch of the
television set OFF, and turn it ON after
15 min. to 30 min. If the problem persists,
place the speaker system away from the
television set.
7
En
HTZ180DVD_en_RXJ.book 8 ページ
02
2009年3月17日 火曜日 午後6時53分
Connecting up
Chapter 2
Connecting up
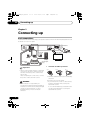
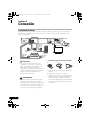
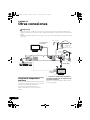
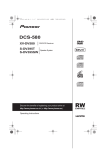
Basic connections
For the best surround sound, setup your speakers as below. The front left and right speaker should
be about 1.8 m to 2.7 m apart.
LINE 1
R
FRONT
L
CENTER
L
AC IN
COMPONENT
VIDEO
PR
VIDEO(TV)
PB
Y
R
R
SURROUND
ANALOG AUDIO IN
L
AM LOOP
HDMI OUT
VIDEO OUT
To video input
Front right
(Red)
AM loop antenna
Center
(Green)
Subwoofer
(Purple)
Surround left
(Blue)
FM antenna
FM
UNBAL 75 Ω
SUB
WOOFER
SPEAKERS (4 Ω )
Front left
(White)
A
N
T
E
N
N
A
Listening position
TV
Surround right
(Grey)
Important
• When connecting this system or changing
connections, be sure to switch power off
and disconnect the power cord from the
wall socket.
After completing all connections, connect
the power cords to the wall socket.
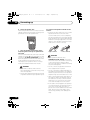
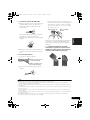
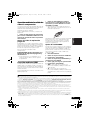
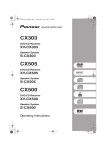
1
Assemble the AM loop antenna.
fig. a
fig. b
fig. c
a. Bend the stand in the direction indicated by
the arrow.
b. Clip the loop onto the stand.
WARNING
• Pioneer bears no responsibility for
accidents resulting from faulty assembly or
installation, insufficient mounting strength
of walls, mounting fixtures (or other
building fixtures), misuse or natural
disasters.
8
En
c. If you want to fix to a wall or other surface,
perform step b after first securing the
stand with screws.
It is recommended that you determine the
reception strength before securing the
stand with the screws.
HTZ180DVD_en_RXJ.book 9 ページ
2009年3月17日 火曜日 午後6時53分
Connecting up
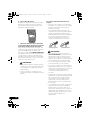
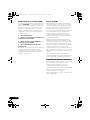
Connect the AM and FM antennas.1
a. Pull off the protective shields of both AM
antenna wires. Connect one wire of the AM
loop antenna to each AM antenna
terminal.2
• Match the color-coded wire with the color
indicator on the label, then insert the colorcoded wire into the red (+) side and the
other wire into the black (–) side.
Black (–) Red (+)
Color-coded wire
Deutsch
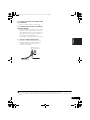
When you select the 3 spot speaker layout,
follow steps a through c below to set up the
speakers.
2
Color-coded wire
(Connect to speaker)
• Twist and pull off the protective shields on
each wire.
Español
Color-coded connector
(Connect to rear panel)
Nederlands
3-1 Connect each speaker.
• Connect the wires to the speaker.
Italiano
b. Push the FM antenna3 plug onto the center
pin of the FM antenna socket.
a. The base of each surround speaker fits
into the circular groove on the top of the
front speakers as shown.
Français
For each terminal, press down on the tab to
open; insert the wire, then release to
secure.
31
English
2
02
Note
1 • Keep antenna cables away from the receiver and other cables.
• If reception with the supplied antenna is poor, see Improving poor FM reception on page 18 or Connecting external
antennas on page 40.
• Do not attach any antenna other than the provided loop antenna, or an external antenna as described on page 40.
2 • Don’t let it come into contact with metal objects and avoid placing near computers, television sets or other electrical
appliances.
• If radio reception is poor, you may be able improve it by re-inserting each antenna wire into the opposite terminal.
• For best reception, do not untwist the AM loop antenna wires or wrap them around the loop antenna.
3 To ensure optimum reception, make sure the FM antenna is fully extended and not coiled or hanging at the rear of
the unit.
9
En
HTZ180DVD_en_RXJ.book 10 ページ
02
2009年3月17日 火曜日 午後6時53分
Connecting up
b. Secure the speaker wire.
After testing for the slack necessary to turn the
speaker (see the following step), use the groove
provided to secure the speaker wire.
3-2 Connect each speaker terminals on the
receiver.
• Connect the other end to the color-coded
speaker terminals on the rear of the
receiver. Make sure to insert completely.
The small lug at the wire-end of the speaker
plug should face up or down depending on
whether it’s being plugged into one of the
upper or lower speaker terminals. Please
make sure to connect correctly.
c. Turn the speakers towards the closest
wall, lining the arrows up for optimal Front
Surround.
For Front Surround mode, turn each surround
speaker so that the arrow at the base is lined
up with the (FRONT SURROUND) arrow on
the front speaker. For Extra Power mode, have
all the speakers facing forward. See the
Listening to your system for more on using
Front Surround and Extra Power modes.
CAUTION
• To prevent accidents, make sure the
surround speaker is placed securely on top
of the front speaker.
• Please don’t attach the speakers to the wall
or speaker stands for 3 spot speaker layout.
Upper terminal
Lower terminal
CAUTION
• These speaker terminals carry
HAZARDOUS LIVE voltage. To prevent
the risk of electric shock when connecting
or disconnecting the speaker cables,
disconnect the power cord before touching
any uninsulated parts.
• Do not connect any speakers other than
those supplied to this system.
• Do not connect the supplied speakers to
any amplifier other than the one supplied
with this system. Connection to any other
amplifier may result in malfunction or fire.
• After connecting the plugs, pull lightly on
the cables to make sure that the ends of
the cables are securely connected to the
terminals. Poor connections can create
noise and interruptions on the sound.
• If the cable’s wires happen to be pushed
out of the terminals, allowing the wires to
come into contact with each other, it
places an excessive additional load on the
amp. This may cause the amp to stop
functioning, and may even damage the
amp.
10
En
HTZ180DVD_en_RXJ.book 11 ページ
2009年3月17日 火曜日 午後6時53分
Connecting up
02
Connect the other end to the video
output of the receiver.
5
Connect the power cord.1
• Connect the power cord to AC inlet on the
receiver. Connect the power cord to a wall
socket.
Nederlands
To AC outlet
Italiano
AC IN
Français
6
Deutsch
• This unit is equipped with copy protection
technology. Do not connect this unit to
your TV via a VCR using AV cables, as the
picture from this unit will not appear
properly on your TV.
English
4 Connect one end to a video input on your
TV.
• Use the supplied video cable.
Español
Note
1 • Do not use any power cord other than the one supplied with this system.
• Do not use the supplied power cord for any purpose other than connecting to this system.
11
En
HTZ180DVD_en_RXJ.book 12 ページ
03
2009年3月17日 火曜日 午後6時53分
Controls and displays
Chapter 3
Controls and displays
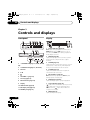
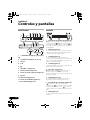
Front panel
Display
1
2
3
4
5
1
6
2 3
4
5
PRGSVE SOUND
DTS F.SURR.
STANDBY/ ON
OPEN/CLOSE
FUNCTION
12 11
8
7
9
MAIN
RPT -1
kHz PGM
MHz RDM
2D
2PL
VOLUME
MIC
SUB
PHONES
6
10
9 8
7
1 Decord indicators (page 20)
DTS lights during playback of a DTS source.
2PL II lights during 2Dolby Pro Logic II
decoding and 2D lights during playback of
Dolby Digital sources.
USB
MAIN
MIC
SUB
PHONES
USB
10
11
12
1 STANDBY/ON (page 15, 30, 44, 46 and
48)
2 PRGSVE (page 39)
Lights when progressive scan video signal is
given from the component video output
terminal.
3 SOUND (page 21)
Lights when the SFC modes, the tone controls
(treble, bass or bass boost), MP3 Expander
mode, Voice Enhancer mode are active.
2
OPEN/CLOSE (page 16, 30 and 47)
3
Function
4
5
6
VOLUME +/– (page 16)
7
Disc tray (page 16)
8
Remote Sensor (page 14)
6 PGM (page 25 and 27)
Lights during program or playlist playback.
9
Display
7
10 USB interface (page 29)
11 MIC input jacks (page 31)
12 PHONES jack (page 21)
4 F.SURR. (page 21)
Lights when the Extra Power mode/Front
surround mode is selected.
5 RPT and RPT-1 (page 26)
RPT lights during repeat play. RPT-1 lights
during repeat one-track play.
Tuner indicators (page 18)
Lights when a broadcast is being received,
Lights when a stereo FM broadcast is
being received,
Lights when FM mono
reception is selected.
8 RDM (page 26)
Lights during random play.
12
En
HTZ180DVD_en_RXJ.book 13 ページ
2009年3月17日 火曜日 午後6時53分
Controls and displays
03
3 Number buttons, CLEAR, DISPLAY, SLEEP
and DVD controls
CLEAR
DISPLAY (page 28)
(page 19)
11
Lights when sleep timer is active.
SHIFT+SLEEP (page 19)
12
Lights during playback.
SHIFT+AUDIO (page 28)
SHIFT+USB REC (page 29)
SHIFT+SUBTITLE (page 28)
SHIFT+ANGLE (page 28)
SHIFT+ZOOM (page 28)
4
LINE
1
2
3
USB REC
AUDIO
SUBTITLE
PLAYLIST
1
4
7
5
6
ANGLE
ZOOM
8
9
SLEEP
CLEAR
DISPLAY
2
MIC VOL
7
SETUP
ECHO
ENTER
PRESET
HOME
MENU
KARAOKE
RETURN
AUTO/
STEREO
TUNE
SURROUND
SOUND
TUNE (page 18)
PRESET (page 18)
CLASS
VOLUME
VOLUME
10
T.EDIT
MUTE
6
HOME MENU
7
Sound controls
AUTO/STEREO (page 20 and 21)
16
SURROUND (page 20 and 21)
17
18
Español
SHIFT
CHANNEL
ENTER
MP3 EXP/
V.ENH
TV CONTROL
INPUT
Cursor buttons
15
8
9
SHIFT+ / SHIFT+ (page 31)
13
14
PRESET
6
SHIFT+ECHO (page 31)
MENU
TUNE
SHIFT+KARAOKE (page 31)
Nederlands
TOP MENU
5
3
0
4
5
12
Italiano
USB
TOP MENU (page 17 and 28)
SHIFT+SETUP (page 15, 19, 39, 43, 45, 46
and 46)
11
1
2
3
DVD/CD
TUNER
(FM/AM) OPEN/CLOSE
Français
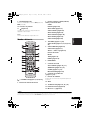
Remote control
STANDBY
/ON
Deutsch
10 Character display
English
9 kHz/MHz (page 18)
Indicates the frequency unit shown in the
character display (kHz for AM, MHz for FM).
SOUND (page 21 and 22)
MP3 EXP/V.ENH (page 22)
8
1 STANDBY/ON (page 15, 30, 44, 46 and
48)
2
Function select buttons
Playback controls (page 17 and 23)
9 TV CONTROL buttons
These control Pioneer flat screen TVs.1
10 SHIFT
11 OPEN/CLOSE (page 16, 30 and 47)
Note
1 Hold down the number button 1 for over three seconds with the CLEAR pressed. If the TV refuses to respond, hold down the
number button 2. After control is properly switched over, the power to the TV can be operated by directing the TV CONTROL
toward the TV and pressing it.
13
En
HTZ180DVD_en_RXJ.book 14 ページ
03
2009年3月17日 火曜日 午後6時53分
Controls and displays
12 PLAYLIST buttons (page 25)
13 MIC VOL +/– (page 31)
14 MENU (page 17, 24 and 28)
15 RETURN
16 Tuner controls
CLASS (page 19)
SHIFT+T.EDIT (page 19)
17 MUTE
18 VOLUME +/– (page 16)
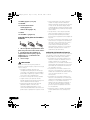
Putting the batteries in the remote
control
1 Open the battery compartment cover
on the back of the remote control.
2 Insert two AA/R6 batteries into the
battery compartment following the
indications (, ) inside the compartment.
3
Close the cover.
CAUTION
Incorrect use of batteries can result in hazards
such as leakage and bursting. Please observe
the following:
• Always insert batteries into the battery
compartment correctly matching the
positive and negative polarities, as
shown by the display inside the
compartment.
• Never mix new and used batteries.
• Batteries of the same size may have
different voltages, depending on brand. Do
not mix different brands of batteries.
• When disposing of used batteries, please
comply with governmental regulations or
environmental public instruction’s rules
that apply in your country or area.
• In order to prevent battery leakage, remove
the batteries when not using the remote
control for an extended period (one month
or more). If leakage occurs, carefully wipe
away any battery fluid inside the
compartment, and replace the batteries
with new ones.
• Do not allow books or other objects to rest
on top of the remote control, since the
buttons may be depressed, causing faster
exhaustion of the batteries.
• Do not use or store batteries in direct
sunlight or excessively hot places, such as
inside a car or near a heater. This can
cause batteries to leak, overheat, explode
or catch fire. It can also reduce the life or
performance of batteries.
Using the remote control
The remote control can be used within a range
of about 7 meters from the remote sensor on
the front panel, and within a 30 degree angle.
• The remote control may not work if there is
an obstacle between the remote control
and the display unit, or if the remote
control is not directed towards the remote
sensor of the display unit at the correct
angle.
• The remote control may not work properly if
strong light such as direct sunlight or
fluorescent light is shining onto the unit’s
remote sensor.
• The remote control may not work properly
when this unit is used near devices
emitting infrared rays, or when remote
controls of other devices which use
infrared rays are used. Also, the use of this
remote control may cause other devices to
work improperly.
• When the operating range of the remote
becomes too short, replace the batteries.
14
En
HTZ180DVD_en_RXJ.book 15 ページ
2009年3月17日 火曜日 午後6時53分
Getting started
04
English
Chapter 4
Getting started
Select the speaker layout for the speaker
setting you arranged to your listening area
environment.
2 SELECT SPEAKER LAYOUT will run on
the display for about 10 seconds.
1
Press SHIFT+SETUP.
2 Use / to select SOUNDSET, then
press ENTER.
3 Use / to select CH LEVEL, then press
ENTER.
4 Use / to select TESTTONE, then
press ENTER.
The test tone is output in the following order
(from the speakers active in the current
listening mode):
• L – Front left speaker
• C – Center speaker
See Setup Guide for more details about
speaker layout and mode description.
• SL – Surround left speaker
• 3 SPOT – This is the classic layout for the
Front Surround mode. The two surround
speakers are placed in front of the listening
position.
4
Press ENTER to confirm.1
• SR – Surround right speaker
• SW – Subwoofer3
5 Use the VOLUME +/– to adjust the
volume to an appropriate level.4
6 Use / to adjust the channel levels in
turn.
You should hear the test tone at the same
volume from each speaker when seated in the
main listening position. The channel level
range is ±10 dB.
Español
• 5 SPOT – Optimal for 5.1 channel home
theater sound by placing the two surround
speakers in the rear of the listening
position.
• R – Front right speaker
Nederlands
3 Use / to select appropriate speaker
layout.
There are two speaker layout modes – 5 spot
speaker layout and 3 spot speaker layout.
Italiano
1 Press STANDBY/ON and confirm
WELCOME is shown on the display.
Set the relative channel levels from your main
listening position.2
Français
First time you switch on the system, the
following speaker layout setting appears. If you
switch off the system without finishing this
setting, the same appears again next time you
switch on the system.
Setting the channel levels
Deutsch
Setting Speaker Layout
7 When you’re done, press ENTER to exit
test tone setup.
Note
1 To change the setting, press SHIFT+SETUP, use / to select SYS SET, then use / to select LAYOUT to start setting
procedure.
2 • This is only available when DVD/CD is selected and playback is stopped. Also make sure headphones are unplugged.
• To adjust the overall balance while listening to any sound source you want, press SHIFT+SETUP, use / to select
SOUNDSET, then press ENTER. Use / to select CH LEVEL, then press ENTER. Use / to switch between channels, and
/ to adjust the channel levels. Press ENTER when you’re finished.
3 Since the subwoofer produces ultra-low frequencies its sound may seem quieter than it actually is.
4 When the volume is set to 51 or more, TESTTONE cannot be selected and the channel level setting range is restricted. In
addition, if the channel level range of any speaker is set to the + side, the maximum volume is also restricted.
15
En
HTZ180DVD_en_RXJ.book 16 ページ
04
2009年3月17日 火曜日 午後6時53分
Getting started
Using the on-screen displays
For ease of use, this system makes extensive
use of graphical on-screen displays (OSDs).
All the screens are navigated in basically the
same way, using , , , to change the
highlighted item and pressing ENTER to select
it.1
1 If the player isn’t already on, switch it on.
If you’re playing a disc with video, also turn on
your TV and make sure that it is set to the
correct video input.
2 Press OPEN/CLOSE to load a disc.
Load a disc with the label side facing up, using
the disc tray guide to align the disc (if you’re
loading a double-sided DVD disc, load it with
the side you want to play face down).
Important
• Throughout this manual, ‘Select’ means
use the cursor buttons to highlight an item
on-screen, then press ENTER.
Button
What it does
HOME
MENU
Displays/exits the on-screen display.
Changes the highlighted menu
item.
ENTER
Selects the highlighted menu item.
RETURN Returns to the main menu without
saving changes.
Tip
• The button guide at the bottom of every
OSD screen shows you which buttons
you’ll need to use for that screen.
Playing discs
The basic playback controls for playing DVD,
CD, Video CD/Super VCD, DivX video/WMV
and WMA/MP3/MPEG-4 AAC discs are
covered here. Further functions are detailed in
chapter 6.
Important
• Throughout this manual, the term ‘DVD’
means DVD-Video, DVD-R and DVD-RW.
Note
1 The screen saver will appear after five minutes of inactivity.
16
En
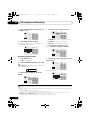
3 Press (play) to start playback.
If you’re playing a DVD or Video CD/Super VCD,
a menu may appear. See DVD-Video disc
menus and Video CD/Super VCD PBC menus on
page 18 to navigate these.
If you loaded a disc containing JPEGs, a
slideshow will start. See Playing a JPEG
slideshow on page 23 for more on this.
• If a disc contains a mixture of DivX video/
WMV and other media file types (MP3, for
example), first select whether to play the
DivX video/WMV files (DivX/WMV) or the
other media file types (MP3/WMA/JPEG/
MPEG-4 AAC) from the on-screen display.
• Please see Disc/content format playback
compatibility on page 41 if you want to play
a DualDisc (DVD/CD hybrid disc).
4 Adjust the volume.
Use the VOLUME +/– control.
HTZ180DVD_en_RXJ.book 17 ページ
2009年3月17日 火曜日 午後6時53分
Getting started
04
When you stop playback of a disc, RESUME
shows in the display indicating that you can
resume playback from that point.
With DVDs and Video CD/Super VCDs, even if
ejected, the play position is stored in memory.2
The next time you load the disc, the display
shows LAST MEM and you can resume
playback.
If you want to clear the resume point, press
(stop) while RESUME is displayed.
Button What it does
Pauses/unpauses a disc.
Stops playback or cancels the resume
function (if the display shows RESUME).
Press to start fast reverse scanning.
Press to start fast forward scanning.
Skips to the start of the current track or
chapter, then previous tracks/chapters.
Skips to the next track or chapter.
Many DVD-Video discs contain menus from
which you can select what you want to watch.
Sometimes DVD-Video menus are displayed
automatically when you start playback; others
only appear when you press MENU or TOP
MENU.
Button
What it does
TOP MENU Displays the ‘top menu’ of a DVD
disc — this varies with the disc.
Displays a DVD disc menu — this
varies with the disc and may be
the same as the ‘top menu’.
Moves the cursor around the
screen.
ENTER
Selects the current menu option.
RETURN
Returns to the previously
displayed menu screen.
Numbers
Highlights a numbered menu
option (some discs only). Press
ENTER to select.
Español
MENU
Nederlands
Numbers Use to enter a title/chapter/track
number. Press ENTER to select.
• If the disc is stopped, playback starts
from the selected title (for DVD) or
track (for CD/Video CD/Super VCD).
• If the disc is playing, playback jumps
to the start of the selected title (VR
mode DVD-R/-RW), chapter (DVDVideo) or track (CD/Video CD/Super
VCD).
DVD-Video disc menus
Italiano
Starts/resumes normal playback.
• If the display shows RESUME or
LAST MEM playback starts from the
resume or last memory point (see
Resume and Last Memory below).
Français
Deutsch
Resume and Last Memory
The following table shows the basic controls on
the remote for playing discs.1 You can find
other playback features in chapter 6.
English
Basic playback controls
Note
1 You may find with some DVD discs that some playback controls don’t work in certain parts of the disc.
2 •The Resume and the Last Memory functions may not work with some discs.
• For DVD-Video discs (except VR mode DVD-R/-RW), the player stores the play position of the last five discs.
17
En
HTZ180DVD_en_RXJ.book 18 ページ
04
2009年3月17日 火曜日 午後6時53分
Getting started
Video CD/Super VCD PBC menus
Improving poor FM reception
Some Video CD/Super VCDs have menus from
which you can choose what you want to watch.
These are PBC (Playback control) menus.
If you’re listening to an FM station in stereo but
the reception is weak, you can improve the
sound quality by switching to mono.
You can play a PBC Video CD/Super VCD
without having to navigate the PBC menu by
starting playback using a number button to
select a track, rather than the (play) button.
1 Tune to an FM radio station then press
SHIFT+SETUP.
Button
What it does
RETURN
Displays the PBC menu.
Numbers
Selects numbered menu options.
Press ENTER to select.
Displays the previous menu page
(if there is one).
Displays the next menu page
(if there is one).
4 Use / to select FM MONO then press
ENTER.
The mono indicator ( ) lights when the tuner
is in mono reception mode.
Select FM AUTO above to switch back to autostereo mode (the stereo indicator ( ) lights
when receiving a stereo broadcast).
Reducing AM reception noise
The tuner can receive both FM and AM
broadcasts, and lets you memorize your
favorite stations so you don’t have to manually
tune in every time you want to listen.
If AM reception seems particularly poor, or the
AM radio station you’re listening to seems
noisy, try using the Noise Cut feature for better
sound quality.
1 Press TUNER to switch to the tuner, then
press repeatedly to select the AM or FM band.
The display shows the band and frequency.
1 Tune to an AM radio station then press
SHIFT+SETUP.
• Manual tuning: Press TUNE repeatedly to
change the displayed frequency.
• Auto tuning: Press and hold TUNE until
the frequency display starts to move, then
release. The tuner will stop on the next
station it finds. Repeat to keep searching.
• High-speed tuning: Press and hold
TUNE until the frequency display starts to
move rapidly. Keep the button held down
until you reach the frequency you want. If
necessary, fine tune the frequency using
the manual tuning method.
En
3 Use / to choose FM MODE then press
ENTER.
Listening to the radio
2 Tune to a frequency.
There are three tuning modes — manual, auto,
and high-speed:
18
2 Use / to choose TUNERSET then press
ENTER.
2 Use / to choose TUNERSET then
press ENTER.
3 Use / to choose NOISECUT then press
ENTER.
4 Use / to select the noise cut mode
then press ENTER.
Select an effect level between 1 or 2.
HTZ180DVD_en_RXJ.book 19 ページ
2009年3月17日 火曜日 午後6時53分
Getting started
This system can memorize up to 30 stations,
stored in three banks, or classes (A, B and C) of
10 stations each.
2
Press SHIFT+T.EDIT.
Listening to station presets
1 Make sure the TUNER function is
selected.
3 Use the PRESET buttons to select a station
preset.
• You can also use the number buttons to do
this.
Press LINE to select the source.
If necessary, start playback of the source.
Setting the sleep timer
The sleep timer switches off the system after
about an hour so you can fall asleep without
worrying about it.1
• Press SHIFT+SLEEP repeatedly to select an
option then press ENTER.
Choose between the following options:
• SLP ON – Switches off after about an hour.
The
indicator lights.
• SLP OFF – Cancels the sleep timer.
After selecting SLP ON, you can press
SHIFT+SLEEP again to check how much time is
left. Each line indicates approximately
12 minutes (remaining):
Español
2 Press CLASS to select the class in which
the channel is stored. Press repeatedly to
cycle through classes A, B and C.
2
3
Nederlands
You will need to have some presets stored to do
this.
1 Make sure that the external source (TV,
satellite receiver, etc.) is switched on.
Italiano
4 Press ENTER.
After pressing ENTER, the preset class and
number stop blinking and the system
memorize station.
• To connect a USB device to the USB
terminal, see USB playback and Recording
on page 29.
Français
3 Press CLASS to select one of the three
classes, then use the PRESET buttons to select
the station preset you want.
You can also use the number buttons to select
a preset.
You can connect auxiliary sources (TV, satellite
receiver, etc.) to this unit for playback through
the speaker system. See Connecting auxiliary
audio components on page 38 for more on this.
Deutsch
1 Tune to an AM or FM radio station.
For the FM band, select mono or auto-stereo
reception as necessary. This setting is saved
along with the preset.
Listening to other sources
English
Memorizing stations
04
SLP - - - - -
Note
1 The display dims when the sleep timer is set.
19
En
05_Home_theater.fm
05
20 ページ
2009年3月17日 火曜日 午後7時27分
Listening to your system
Chapter 5
Listening to your system
Important
• This unit’s audio function may be restricted
depending on the sound source, HDMI
audio setting (page 39) or karaoke mode
with the microphone plugged in (page 31).
In this event, the menus may not appear, or
a message may be displayed instead
(page 50).
Selecting Listening mode
Various listening modes are available for
enjoyment of diverse sound effects and for
sound field correction according to your
preference. Depending on the speaker layout
you have chosen in the Home theater sound
setup on page 6, the listening mode you can
set differs. Read the following and proceed
with each setting.
• 5 spot speaker layout
When you have chosen 5 spot speaker layout,
select one listening mode from the surround
sound mode. See Listening in surround sound
below.
• 3 spot speaker layout
When you have chosen 3 spot speaker layout
which places the surround speakers in front of
you, select one listening mode from the front
surround mode. See Using Front Surround on
page 21.
Auto listening mode
The Auto listening mode is the simplest way to
listen to any source as it was mastered: the
output from the speakers mirrors the channels
in the source material.
• Press AUTO/STEREO to select the AUTO
listening mode.1
The listening mode is automatically allotted
according to the source material as shown in
the table below.
source
5 SPOT
3 SPOT
two-ch
multi-ch
STEREO
STANDARD
STEREO
F.SURR
Listening in surround sound
When you set up the system for 5 spot speaker
layout, the surround sound mode is available.
You can listen to stereo or multichannel
sources in surround sound.2 Surround sound
is generated from stereo sources using one of
the Dolby Pro Logic decoding modes.
• Press SURROUND repeatedly to select a
listening mode.1
The choices that appear in the display will vary
according to the type of source that’s playing.
• STANDARD – Standard decoding mode
(This mode can be selected only when the
source is multi channel)
• MOVIE (Dolby Pro Logic II Movie) – Pro
Logic II 5.1 channel surround sound,
especially suited to movie sources (use
with any two-channel source)
Note
1 If the source is Dolby Digital or DTS, the corresponding indicator lights in the front panel display.
2 Note that the input source must be switched to DVD/CD or USB for multichannel playback.
20
En
HTZ180DVD_en_RXJ.book 21 ページ
2009年3月17日 火曜日 午後6時53分
Listening to your system
Using Front Surround
• F.SURR – Use to provide rich surround
sound effect.
For Front Surround
mode
For Extra Power
mode
When headphones are connected, the
STEREO playback mode starts. The listening
mode cannot be changed.1
Adjusting the bass and treble
Use the bass and treble controls to adjust the
overall tone.
1
Press SOUND.
2 Use / to select BASS/TRE then press
ENTER.
3
Use / to select BASS or TREBLE.
Using the SFC modes
This illustration is 3 spot layout.
Español
4 Use / to adjust the sound then press
ENTER to confirm.
• Bass and Treble can be adjusted from –6dB
to +6dB.
Nederlands
• EXTRAPWR – Outputs stereo sound (in the
case of multi-channel sources, downmixed stereo sound) from the surround
speakers for powerful stereo effect.
Listening with headphones
Italiano
• Press SURROUND repeatedly to select a
front surround mode.
• Press AUTO/STEREO repeatedly until
STEREO shows in the display.
Français
The Front Surround mode and Extra Power
mode are effective when DVD/CD or USB is
selected as the input source and you are using
3 spot speaker layout as described in Home
theater sound setup on page 6.
You can listen to any source — stereo or
multichannel — in stereo. When playing a
multichannel source, all channels are
downmixed to the front left/right speakers and
the subwoofer.
Deutsch
• DOLBY PL (Dolby Pro Logic) – 4.1 channel
surround sound (use with any two-channel
source)
Listening in stereo
English
• MUSIC (Dolby Pro Logic II Music) – Pro
Logic II 5.1 channel surround sound,
especially suited to music sources (use
with any two-channel source)
05
The SFC (Sound Field Control) modes can be
used with any multichannel or stereo source for
a variety of additional surround sound effects.
1
Press SOUND.
2 Use / to select SFC MODE then press
ENTER.
3 Press / then ENTER to select an SFC
Sound mode.
Select between OFF, LIVE, HALL, POP, ROCK,
DRAMA or ACTION.
Note
1 When you disconnect the headphones, the system reverts to the previous surround setting mode.
21
En
HTZ180DVD_en_RXJ.book 22 ページ
05
2009年3月17日 火曜日 午後6時53分
Listening to your system
Boosting the bass level
There are two bass modes you can use to
enhance the bass in a source.
1
Press SOUND.
2 Use / to select BASSMODE then press
ENTER.
3 Use / to adjust the sound then press
ENTER to confirm.
Select between OFF, MUSIC or CINEMA.
Using the MP3 Expander
Reproduce the comfortable sound for
compressed music (MP3, WMA, MPEG-4
AAC).
• Press MP3 EXP/V.ENH repeatedly to select
MP3 EXP.1
Using the Voice Enhancer mode
This mode is used for easy listening to the
spoken lines of the movies or dialogs.
• Press MP3 EXP/V.ENH repeatedly to select
VOICE E.2
Effective Sound (for optimum
sound)
With the uniquely shaped high-quality
speakers supplied with this unit, the Effective
Sound mode enables the following Pioneer
exclusive audio technologies designed to
maximize the real experience of sound
originally inherent in movies and music.
Turn on the Effective Sound mode under
normal circumstances to maximize the
capabilities of this unit.3
• Dynamic Range Compression
Resuscitates detailed sound susceptible to
ambient noise to create an acoustic
environment where you feel as if you are right
in the action.
• Frequency Characteristic Correction
Realizes the playback characteristic optimized
for long hours of listening in addition to the
added features of the supplied speaker units.
1 Press SHIFT+SETUP and use / to
select SOUNDSET, then press ENTER.
2 Use / to select S.FIELD then press
ENTER.
3 Use / to adjust the setting then press
ENTER to confirm.
• EFFECT (Effective Sound) – Plays the sound
with the characteristics optimized for the
included speakers.
• DIRECT (Direct Sound) – Turns off the
Effective Sound mode.
Note
1 When turned on, the SFC mode will be turned off.
2 When turned on, the SFC mode will be turned off.
3 The Sound Field will not affect the headphone outputs.
22
En
HTZ180DVD_en_RXJ.book 23 ページ
2009年3月17日 火曜日 午後6時53分
Disc playback features
06
Disc playback features
• Some DVDs restrict the use of some
functions (random or repeat, for example)
in some or all parts of the disc. This is not a
malfunction.
You can fast-scan discs forward or backward at
various different speeds.1
• To resume playback, press (play).2
Playing in slow motion
You can play DVDs, Video CD/Super VCDs and
DivX video/WMV at four different forward slow
motion speeds. DVD discs can also be played
in reverse slow motion.
Frame advance/frame reverse
You can advance or back up DVD discs frameby-frame. With Video CD/Super VCDs and DivX
video/WMV you can only use frame advance.
1
During playback, press (pause).
2 Press / or / to reverse or
advance a frame at a time.
• To resume playback, press (play).2
Playing a JPEG slideshow
After loading a disc containing JPEG pictures,
press to start a slideshow from the first
folder/picture on the disc.3 The player displays
the pictures in each folder in alphabetical
order.
• If the disc contains WMA/MP3/MPEG-4
AAC files, playback of the slideshow and
audio files repeats. During audio playback,
you can still use the skip (/), scan
(/) and pause () functions.
Español
• During playback, press or to start
scanning.
Press repeatedly to increase the scanning
speed (shown on-screen).
• To resume playback, press (play).2
Nederlands
Scanning discs
2 Press and hold / or / until slow
motion playback starts.
Press repeatedly to change the slow motion
speed (shown on-screen).
Italiano
• When playing Video CD/Super VCDs, some
of the functions are not available during
PBC playback. If you want to use them,
start the disc playing using a number
button to select a track.
During playback, press (pause).
Français
• Many of the functions covered in this
chapter apply to DVD discs, Video CDs/
Super VCDs, CDs, DivX video/WMV and
WMA/MP3/MPEG-4 AAC/JPEG discs,
although the exact operation of some
varies slightly with the kind of disc loaded.
1
Deutsch
Important
English
Chapter 6
Pictures are automatically adjusted so that
they fill as much of the screen as possible.
Note
1 Only one speed is available for DivX video/WMV discs.
2 • Depending on the disc, normal playback may automatically resume when a new chapter is reached on a DVD disc.
• For Video CDs/Super VCDs in PBC mode and WMA/MP3/MPEG-4 AAC tracks (in Scan mode only) normal playback resumes
when you reach the beginning or the end of track.
3 • The time it takes for the player to load a file increases with large file sizes.
• Discs can contain up to 299 folders and up to 648 folders and files combined.
23
En
HTZ180DVD_en_RXJ.book 24 ページ
06
2009年3月17日 火曜日 午後6時53分
Disc playback features
While the slideshow is running:
Button
What it does
Pauses the slideshow (or audio);
press again to restart.
Jumps to the previous picture (or
audio file with audio playback).
Jumps to the next picture (or
audio file with audio playback).
/// Pauses the slideshow and
rotates/flips the displayed
picture (Press (play) to restart
slideshow).
SHIFT+ZOO Pauses the slideshow and zooms
M
the picture. Press again to toggle
between 1x, 2x and 4x zoom
(Press (play) to restart
slideshow).
MENU
Displays the Disc Navigator
screen (see below).
Browsing DVD or Video CD/
Super VCD discs with the Disc
Navigator
Use the Disc Navigator to browse through the
contents of a DVD or Video CD/Super VCD disc
to find the part you want to play.
1 During playback, press HOME MENU
and select ‘Disc Navigator’ from the onscreen menu.
Disc Navigator
2
Select a view option.
Disc Navigator
Title
Chapter
24
En
The options available depend on the kind of
disc loaded and whether the disc is playing or
not, but include:
• Title – Titles from a DVD-Video disc.
• Chapter – Chapters from the current title
of a DVD-Video disc.
• Track – Tracks from a Video CD/Super VCD
disc.
• Time – Thumbnails from a Video CD/Super
VCD disc at 10 minute intervals.
• Original: Title – Original titles from a VR
mode DVD-R/-RW disc.
• Playlist: Title – Playlist titles from a VR
mode DVD-R/-RW disc.
• Original: Time – Thumbnails from the
Original content at 10 minute intervals.
• Playlist: Time – Thumbnails from the
Playlist at 10 minute intervals.
The screen shows up to six moving thumbnail
images displayed one after another. To display
the previous/next six thumbnails, press /
.
3 Select the thumbnail image for what
you want to play.
01
02
03
04
05
06
Disc Navigator: Title
01- 49: - -
You can use either /// and ENTER to
select a thumbnail, or the number buttons.
To select using the number buttons, enter a
two-digit number then press ENTER.
HTZ180DVD_en_RXJ.book 25 ページ
2009年3月17日 火曜日 午後6時53分
Disc playback features
06
Tip
Use the Disc Navigator to find a particular file
or folder by filename.
1 Press HOME MENU and select ‘Disc
Navigator’ from the on-screen menu.
• To play the contents of the whole disc
rather than just the current folder, exit the
Disc Navigator and start playback using
the (play) button.
0kbps
Folder1
Folder2
Français
00:00/ 00:00
Deutsch
• You can also play a JPEG slideshow while
listening to WMA/MP3/MPEG-4 AAC
playback. Simply select the audio file you
want to listen to followed by the JPEG from
which you want the slideshow to start.
Playback of both the slideshow and the
audio files repeats. Playback controls are
effective for the JPEG slideshow only.
English
Browsing Windows MediaTM
Audio (WMA), MP3, MPEG-4
AAC, DivX video/WMV and JPEG
files with the Disc Navigator
Folder3
Using Playlists
Folder4
Use to return to the parent folder.1
• When a JPEG file is highlighted, a
thumbnail image is displayed on the right.
Programming playlists
00:00/ 00:00
0kbps
Folder2
File2
File3
File4
File5
3 To play the highlighted track or
DivX video/WMV file or display the
highlighted JPEG file, press ENTER.
• When a WMA/MP3/MPEG-4 AAC or DivX
video/WMV file is selected, playback
begins from that file, and continues until
the end of the folder.
• When a JPEG file is selected, a slideshow
begins, starting with that file, and
continues to the end of the folder.
2 Select the file you want to add to the
playlist.
See Browsing Windows MediaTM Audio (WMA),
MP3, MPEG-4 AAC, DivX video/WMV and JPEG
files with the Disc Navigator above if you don’t
know how to do this.
Español
File1
1 With the disc stopped, press HOME
MENU and select ‘Disc Navigator’ from the
on-screen menu.
Nederlands
Use ENTER or to open a highlighted folder.
With this feature, you can make up to three
playlists of 30 files each for discs containing
WMA, MP3, MPEG-4 AAC and JPEG files.
Since this unit will remember all playlists for
the last ten discs you have loaded, this is useful
if you have a large number of files that you
want to organize quickly and easily.2
Italiano
2 Use /// and ENTER to navigate.
Use / to move up and down the folder/file list.
3 Press PLAYLIST 1, 2 or 3.
The file is added to the playlist you select.
4
Repeat steps 2 and 3 until you’re done.
Note
1 You can also do this by going to the ‘..’ folder at the top, then pressing ENTER.
2 The disc must be loaded for the files in your playlist to play back.
25
En
HTZ180DVD_en_RXJ.book 26 ページ
06
2009年3月17日 火曜日 午後6時53分
Disc playback features
Tip
• To add files without the on-screen display,
simply press PLAYLIST 1, 2 or 3 during
normal playback of the file you want
(except when a JPEG slideshow is playing
at the same time as audio).
Listening to playlists
• With playback stopped, press PLAYLIST
1, 2 or 3.
During playback, PGM lights in the front panel
display. If no playlist has been programmed,
NO LIST shows in the display.
• If the playlist contains both JPEG and audio
files, playback of the slideshow and audio
files starts.
Clearing files from a playlist
1
4 Press ENTER on ‘B(End Point)’ to set the
loop end point.
After pressing ENTER, playback jumps back
to the start point and plays the loop.
5
To resume normal playback, select ‘Off’.
Using repeat play
In addition to various repeat play options, it’s
also possible to use repeat play together with
program play (see Creating a program list on
page 27).
1 During playback, press HOME MENU and
select ‘Play Mode’.
2 Select ‘Repeat’ then select a repeat play
option.1
If program play is active, select Program
Repeat to repeat the program list, or Repeat
Off to cancel.
• For DVD discs, select Title Repeat or
Chapter Repeat.
Start playback of your playlist.
2 From the ‘Disc Navigator’ screen,
highlight the file you want to remove
from the playlist and press CLEAR.
• For CDs and Video CD/Super VCDs, select
Disc Repeat or Track Repeat.
• For DivX video/WMV discs, select Title
Repeat (or Repeat Off).
Looping a section of a disc
The A-B Repeat function allows you to specify
two points (A and B) within a track (CD, Video
CD/Super VCD) or title (DVD) that form a loop
which is played over and over.
1 During playback, press HOME MENU and
select ‘Play Mode’.
Using random play
Use this function to play titles or chapters
(DVD-Video) or tracks (CD and Video CD/Super
VCD) in a random order.2
1 During playback, press HOME MENU and
select ‘Play Mode’.
Play Mode
2
2
Select ‘A-B Repeat’.
3 Press ENTER on ‘A(Start Point)’ to set the
loop start point.
Select ‘Random’ then select an option.
• For DVD discs, select Random Title or
Random Chapter.
• For CDs and Video CD/Super VCDs, select
On or Off to switch random play on or off.
Note
1 You can’t use repeat play with WMA/MP3/MPEG-4 AAC discs.
2 • You can set the random play option when a disc is playing or stopped. However, you can’t use random play together with
program play.
• You can’t use random play with VR format DVD-R/-RW discs, WMA/MP3/MPEG-4 AAC discs, DivX video/WMV discs, or while
a DVD disc menu is being displayed.
26
En
HTZ180DVD_en_RXJ.book 27 ページ
2009年3月17日 火曜日 午後6時53分
Disc playback features
• Use the following controls during random
play:
Selects a new track/title/chapter
at random.
Returns to the beginning of the
current track/title/chapter;
further presses select another
random track/title/chapter.
• Random play remains in effect until you
select Random Off from the random play
menu options.
This feature lets you program the play order of
titles/chapters/tracks on a disc.1
1 During playback, press HOME MENU and
select ‘Play Mode’.
• Use the following controls during program
play:
Button
What it does
HOME
MENU
Save the program list and exit
without starting playback.
Skip to the next step in the
program list.
Other functions available from the
program menu
There are a number of other options in the
program menu in addition to Create/Edit.
2 Select ‘Program’ then select ‘Create/Edit’
from the list of program options.
4 Repeat step 3 to build up a program list.
A program list can contain up to 24 steps.
• You can insert steps by just highlighting
the position where you want the new step
to appear and entering a title/chapter/track
number.
• To delete a step, highlight it and press
CLEAR.
• Program Delete – Erases the program list
and turns off program play
Searching a disc
You can search DVD discs by title or chapter
number, or by time; CDs and Video CD/Super
VCDs by track number or time; DivX video/
WMV discs by time.
Español
3 Use /// and ENTER to select a
title, chapter or track for the current step in
the program list.
• For a DVD disc, you can add a title or a
chapter.
• For a CD or Video CD/Super VCD, select a
track to add to the program list.
After pressing ENTER to select the title/
chapter/track, the step number automatically
moves down one.
• Playback Stop – Turns off program play,
but does not erase the program list
Nederlands
• Playback Start – Starts playback of a
saved program list
Italiano
Creating a program list
Tip
Français
What it does
Deutsch
Button
5 To play the program list, press (play).
Program play remains active until you turn off
program play (see below), erase the program
list (see below), eject the disc or switch off.
English
Tip
06
1 Press HOME MENU and select ‘Play
Mode’.
2 Select ‘Search Mode’.
The search options that appear depend on the
kind of disc loaded.
3
Select a search mode.
• The disc must be playing in order to use
time search.
Note
1 You can’t use Program play with VR format DVD-R/-RW discs, WMA/MP3/MPEG-4 AAC discs, DivX video/WMV discs, or while
a DVD disc menu is being displayed.
27
En
HTZ180DVD_en_RXJ.book 28 ページ
06
2009年3月17日 火曜日 午後6時53分
Disc playback features
4 Use the number buttons to enter a title,
chapter or track number, or a time.
• For a time search, enter the number of
minutes and seconds into the currently
playing title (DVD/DivX video/WMV) or
track (CD/Video CD/Super VCD) you want
playback to resume from. For example,
press 4, 5, 0, 0 to have playback start from
45 minutes into the disc. For 1 hour, 20
minutes and 30 seconds, press 8, 0, 3, 0.
5
Press ENTER to start playback.
Switching subtitles
Some DVD discs and DivX video discs have
subtitles in one or more languages; the disc
box will usually tell you which subtitle
languages are available. You can switch
subtitle language during playback.1
• Press SHIFT+SUBTITLE repeatedly to
select a subtitle option.
• To set subtitle preferences, see Language
settings on page 34.
• See Displaying DivX subtitle files on
page 42 for more on DivX subtitles.
Switching language/audio
channels
When playing discs recorded with dialogue in
two or more languages, or with dual-mono
audio2 you can switch these during playback.3
When playing a Video CD/Super VCD, you can
switch between stereo, just the left channel or
just the right channel.
• Press SHIFT+AUDIO repeatedly to select
an audio language option.
• To set audio language preferences, see
Language settings on page 34.
Zooming the screen
Using the zoom feature you can magnify a
part of the screen by a factor of 2 or 4, while
watching a DVD, DivX video/WMV title or
Video CD/Super VCD or playing a JPEG disc.
1 During playback, press SHIFT+ZOOM to
select the zoom factor (Normal, 2x or 4x).
2 Use /// to change the zoomed
area.
You can change the zoom factor and the
zoomed area freely during playback.4
Switching camera angles
Some DVD discs feature scenes shot from two
or more angles — check the disc box for
details.
When a multi-angle scene is playing, a
icon appears on screen (this can be switched
off if you prefer — see Display settings on
page 34).
• During playback (or when paused), press
SHIFT+ANGLE to switch angle.
Displaying disc information
Various track, chapter and title information can
be displayed on-screen during playback.
• To show/switch/hide the information
displayed, press DISPLAY repeatedly.
Limited disc information also appears in the
front panel display. Press DISPLAY to change
the displayed information.
Note
1 Some discs only allow you to change subtitle language from the disc menu. Press TOP MENU or MENU to access.
2 Some Super VCDs have two soundtracks. With these discs you can switch between the two soundtracks as well as individual
channels in each.
3 Some discs only allow you to change audio language from the disc menu. Press TOP MENU or MENU to access.
4 • Since DVD, Video CD/Super VCD, DivX video/WMV title and JPEG pictures have a fixed resolution, picture quality will
deteriorate, especially at 4x zoom. This is not a malfunction.
• If the navigation square at the top of the screen disappears, press SHIFT+ZOOM again to display it.
28
En
HTZ180DVD_en_RXJ.book 29 ページ
2009年3月17日 火曜日 午後6時53分
USB playback and Recording
07
USB playback and Recording
1
1 With the player switched on, press USB.
Make sure your TV is on and set to the correct
video input.
2 Connect your USB device.
The USB terminal is located on the front panel.
• Selecting to another input source (like
DVD/CD), then back to USB.
• Using a dedicated AC adapter (supplied
with the device) for USB power.
If this doesn’t remedy the problem, it is likely
your USB device is incompatible.
USB
(Type A)
USB mass
storage device
The tracks of a music CD loaded in this unit
can be recorded on a USB connected to the
USB port.
Recording all the tracks
1 Load the music CD.
Press to stop playback.
Español
3 Press (play) to start playback.
If your USB device contains JPEGs, a
slideshow will start. See Playing a JPEG
slideshow on page 23 for more on this.
• Make sure USB DATA is showing in the
front panel display (or the system is in
standby) when disconnecting.
Recording the tracks of a
music CD on a USB device
Nederlands
USB
• Reconnecting the USB device with the
player switched off.
Italiano
USB
• Switch the player off, then on again.
Français
It is possible to listen to two-channel audio
and watch DivX video/WMV/JPEG files using
the USB interface on the front of this unit.
Connect a USB mass storage device2 as
shown below.
If a USB ERR message lights in the display, it
may mean that the power requirements of the
USB device are too high for this player, or that
the device is incompatible. Try the following:
Deutsch
Important
Using the USB interface
English
Chapter 7
Note
1 This includes playback of DivX video/WMV/WMA/MP3/MPEG-4 AAC files (except files with copy-protection or restricted
playback).
2 • Compatible USB devices include external magnetic hard drives, portable flash memory (particularly keydrives) and digital
audio players (MP3 players) of format FAT16/32. It is not possible to connect this unit to a personal computer for USB playback.
• Pioneer cannot guarantee compatibility (operation and/or bus power) with all USB mass storage devices and assumes no
responsibility for any loss of data that may occur when connected to this unit.
• With large amounts of data, it may take longer for the system to read the contents of a USB device.
• Some USB devices may not be properly recognized.
• Even when they are in a supported format, some files may not play or display depending on the content.
29
En
HTZ180DVD_en_RXJ.book 30 ページ
07
2009年3月17日 火曜日 午後6時53分
USB playback and Recording
2 Press SHIFT+USB REC to display the ‘CD > USB Rec’ screen.
4
Select the track you want to record.
CD –> USB Rec
Track 1–13
CD –> USB Rec
Track 1–13
04:18
Track04
04:59
Track05
04:20
Track06
04:38
01
Track07
04:40
003:17
Track08
04:11
Track03
04:18
Track04
04:59
Start
Track05
04:20
Selected Track
Track06
04:38
Total Time
13
Track07
04:40
055:07
Track08
04:11
CD –> USB Rec
Track 1–13
Track01
01:43
Track02
03:17
Track03
04:18
Track04
04:59
Track05
04:20
Track06
04:38
13
Track07
04:40
055:07
Track08
04:11
Track Progress
Total Progress
Cancel
Total Time
03:17
Track03
03:17
3 Press ENTER to start recording.
Recording starts. The screen shown below is
displayed during recording.1
Selected Track
01:43
Track02
Track02
Start
Total Time
Track01
Select All
01:43
128kbps
Selected Track
Individual
Bitrate
Track01
Select Track
Bitrate
Select Track
All Clear
• Individual — Select one track at a time.
• Select All — Select all the tracks.
• All Clear — Clear all selected tracks.
5 Select the bit rate (transfer rate).
Select 128 kbps, 192 kbps or 320 kbps.
CD –> USB Rec
Track 1–13
Select Track
128kbps
Track01
01:43
192kbps
Track02
03:17
320kbps
Track03
04:18
Bitrate
Track04
04:59
Track05
04:20
Track06
04:38
03
Track07
04:40
012:17
Track08
04:11
Start
Selected Track
Total Time
Recording specific tracks
6 Select ‘Start’ using the ///, then
press ENTER.2
1 Load the music CD.
Press to stop playback.
2 Press HOME MENU and select ‘CD ->USB
Rec’.
CD -> USB Rec can only be selected when the
music CD is stopped.
CD –> USB Rec
Track 1–13
01:43
03:17
Track03
04:18
Track04
04:59
Track05
04:20
Track06
04:38
03
Track07
04:40
012:17
Track08
04:11
128kbps
Bitrate
Start
Selected Track
Total Time
CD – > USB Rec
Track01
Track02
Select Track
Recording starts.
3 Make setting using /// and
ENTER.
CD –> USB Rec
Track 1–13
Track01
01:43
Track02
03:17
Track03
04:18
Track04
04:59
Track05
04:20
Track06
04:38
03
Track07
04:40
012:17
Track08
04:11
Track Progress
Total Progress
CD –> USB Rec
Track 1–13
Cancel
Select Track
Individual
Track01
01:43
Bitrate
Select All
Track02
03:17
All Clear
Track03
04:18
Track04
04:59
Track05
04:20
Track06
04:38
00
Track07
04:40
000:00
Track08
04:11
Start
Selected Track
Total Time
Selected Track
Total Time
Note
1 Recording cannot be started if there is not enough free space on the USB device. In this case, “Available USB space is low” is
displayed.
2 • When recording is finished, a folder named “PIONEER” is created automatically on the USB device. The recorded tracks are
stored in this folder.
• Up to 99 “PIONEER” folders can be created.
• Recording is not possible if the USB device contains 300 folders or more.
• When recording on a USB device is under way, all DVD-related key operations are disabled except for the operation of
STANDBY/ON and OPEN/CLOSE buttons and switchover of the functions.
• When the sleep timer is ON, it is cancelled once recording on a USB device is started.
30
En
HTZ180DVD_en_RXJ.book 31 ページ
2009年3月17日 火曜日 午後6時53分
Singing karaoke
08
English
Chapter 8
Singing karaoke
OFF (default) – Switches the Karaoke mode off.
Singing karaoke
4
MIC
SUB
Adding some effects to the microphone mix
can sometimes improve the overall sound.4
You can choose between three echo levels.
• To add effects to the microphone mix,
press SHIFT+ECHO.
Pressing repeatedly switches between echo
levels 1 to 3 and off.
Changing the backing track
You may want to lower or raise the pitch of the
backing track to match your vocal range.5
• Press SHIFT+ or SHIFT+ to lower or
raise the pitch of the backing track.
Español
• Press SHIFT+KARAOKE to turn KARAOKE
mode on or off for discs that have vocals on
both Left and Right channels:
KARAOKE (Vocal Fade) – Vocals in the
backing track are partially eliminated.
Changing the vocal mix
Nederlands
1 Plug in the microphone(s).
If you’re only using one mic, plug it into the
MIC (MAIN) jack. The MIC (SUB) jack can be
used only if MIC (MAIN) is also connected.
• If the microphone has an on/off switch,
make sure it’s on.
2 Load a karaoke backing disc.
You can also use tracks on a USB device as
source material for a backing track.
3 Adjust KARAOKE mode settings.
5 Adjust the MIC VOL +/– to get the sound
you want. 2
To avoid unpleasant feedback, make sure you
don’t point the microphone(s) at the speakers.3
Italiano
MAIN
Play the backing track.
Français
• Press SHIFT+AUDIO to switch between
audio channels (except Data discs and USB
sources) with discs that have vocal tracks on
only one channel:
Left – Left channel only. Use for tracks that
have a vocal recorded in the right channel.
Right – Right channel only. Use for tracks that
have a vocal recorded in the left channel.
STEREO – Switches the Karaoke mode off.
Deutsch
Using the karaoke features you can plug in a
microphone and mix the sound of your own
voice with a backing track.1 You can select a
backing track from audio sources such as CDs,
DVDs, VCDs or USB devices. Adjust the
microphone level relative to the backing track.
Note
1 • These features are only possible when a microphone is connected. If you try to use SHIFT+KARAOKE, SHIFT+ECHO,
SHIFT+, SHIFT+ or MIC VOL when no mic is connected, a NO MIC error message is displayed. Also note that during DVD
playback, when you connect a mic sound settings are automatically switched to STEREO playback and the player downmixes
multichannel sources to 2.1 channels.
• These features are only available with the DVD/CD or USB input functions.
2 MIC VOL is set to 0 when you remove the microphone, change the function or turn the power off.
3 Depending on the microphone level, the sound of the disc may distort. If this happens, turn down the volume.
4 You cannot adjust SFC modes, tone controls (bass, treble, and bass boost), Extra Power mode, Front Surround mode,
MP3 Expander mode or Voice Enhancer mode when a microphone is plugged in.
5 This feature is not compatible with DTS signals.
31
En
HTZ180DVD_en_RXJ.book 32 ページ
09
2009年3月17日 火曜日 午後6時53分
Audio Settings and Video Adjust menus
Chapter 9
Audio Settings and Video
Adjust menus
Audio Settings menu
1 Press HOME MENU and select ‘Video
Adjust’ from the on-screen display.
The Audio Settings menu offers features for
adjusting the way discs sound.
1 Press HOME MENU and select ‘Audio
Settings’ from the on-screen display.
Audio Settings
2 Select and change settings using //
/ and ENTER.
Video Adjust
2 Make settings using /// and
ENTER.
Video Adjust
Sharpness
Brightness
Contrast
Gamma
Hue
Chroma Level
Standard
0
0
Off
0
0
Audio Settings
Audio DRC
High
Medium
Low
Off
Audio DRC
• Settings: High, Medium, Low,
Off (default)
When watching Dolby Digital DVDs at low
volume, it’s easy to lose the quieter sounds
completely — including some of the dialog.
Switching Audio DRC (Dynamic Range
Control) to on can help by bringing up the
quieter sounds, while controlling loud peaks.
How much of a difference you hear depends on
the material you’re listening to. If the material
doesn’t have wide variations in volume, you
may not notice much change.1
Video Adjust menu
From the Video Adjust screen you can adjust
settings that affect picture presentation.
Note
1 Audio DRC is only effective with Dolby Digital audio sources.
32
En
You can adjust the following settings:
• Sharpness – Adjusts the sharpness of
edges in the picture (Fine, Standard, Soft)
• Brightness – Adjusts the overall
brightness (–20 to +20)
• Contrast – Adjusts the contrast between
light and dark (–16 to +16)
• Gamma – Adjusts the ‘warmth’ of the
picture (High, Medium, Low, Off)
• Hue – Adjusts the red/green balance
(Green 9 to Red 9)
• Chroma Level – Adjusts how saturated
colors appear (–9 to +9)
Adjust the Brightness, Contrast, Hue and
Chroma Level settings using /.
Brightness
min
max
0
3 Press ENTER to return to the Video Adjust
screen, or HOME MENU to exit.
HTZ180DVD_en_RXJ.book 33 ページ
2009年3月17日 火曜日 午後6時53分
Initial Settings menu
10
English
Chapter 10
Initial Settings menu
1
Press DVD/CD.
2 With playback stopped, press HOME
MENU and select ‘Initial Settings’.
The Initial Settings menu provides audio and
video output settings, parental lock settings,
and display settings, among others.
Initial Settings
3 Use /// and ENTER to select the
setting and option you want to set.
All the settings and options are explained on
the following pages.1
Option
What it means
TV Screen
(See also Screen sizes
and disc formats on
page 45.)
4:3 (Letter Box)
Set if you have a conventional 4:3 TV. Widescreen movies are
shown with black bars top and bottom.
4:3 (Pan & Scan)
Set if you have a conventional 4:3 TV. Widescreen movies are
shown with the sides cropped so that the image fills the screen.
Set if you have a widescreen TV.
Set if you have a widescreen TV. 4:3 material is shown with
black bars on either side of the screen.2
Interlace
Set if your TV is not compatible with progressive scan video.
Progressive
Set if your TV is compatible with progressive scan video (see
your TV’s instruction manual for details). Press ENTER once
more to confirm (or RETURN to cancel).
Note that progressive scan video is only output from the
component video jacks.
Español
Component Out
(See also Connecting
auxiliary audio
components on
page 38.)
16:9 (Wide)
16:9 (Compressed)
Nederlands
Setting
Italiano
Video Output settings
Français
If an option is grayed out it means that it
cannot be changed at the current time. This is
usually because a disc is playing. Stop the
disc, then change the setting.
Deutsch
Using the Initial Settings menu
Note
1 • In the table, the default setting is shown in bold: other settings are shown in italics.
• Some settings, such as TV Screen, Audio Language and Subtitle Language may be overridden by the DVD disc. Often
these settings can also be made from the DVD disc menu.
• The HDMI Resolution and HDMI Color settings only need to be set if you connected this player to an HDMI-compatible
component using the HDMI connector.
2 This setting can only be used when you are connected via HDMI and have the HDMI resolution set to 1920x1080p, 1920x1080i
or 1280x720p. When using this setting, only the HDMI connection is available.
33
En
HTZ180DVD_en_RXJ.book 34 ページ
10
2009年3月17日 火曜日 午後6時53分
Initial Settings menu
Setting
Option
What it means
HDMI Resolution*
(See Connecting using
HDMI on page 39.)
* Default changes with
TV format (PAL/NTSC).
1920x1080p
Set if your TV supports 1920 x 1080 pixel progressive-scan video.
1920x1080i
Set if your TV supports 1920 x 1080 pixel interlace video.
1280x720p
Set if your TV supports 1280 x 720 pixel progressive-scan video.
720x480p (NTSC)/
720x576p (PAL)
Set if your TV supports 720 x 480 (NTSC)/720 x 576 (PAL) pixel
progressive-scan video.
720x480i (NTSC)/
720x576i (PAL)
Set if your TV supports 720 x 480 (NTSC)/720 x 576 (PAL) pixel
interlace video.
Full range RGB
If colors are weak, this gives brighter colors and deeper black
(default setting for HDMI-compatible DVI devices).
RGB
Use this setting if colors appear overly rich on the Full Range
RGB setting.
Component
Outputs 8-bit component video format (default setting for
HDMI-compatible devices).
HDMI Color*
(See Connecting using
HDMI on page 39.)
* Default changes
depending on device
connected.
Language settings
Setting
Option
What it means
Audio Language
English
If there is an English soundtrack on the disc, it is played.
Languages as displayed
If there is a language selected on the disc, it is played.
Other Language
Select to choose a language other than the ones displayed (see
Using the language code list on page 46).
English
If there are English subtitles on the disc they are displayed.
Languages as displayed
The subtitle language selected on the disc is displayed.
Other Language
Select to choose a language other than the ones displayed (see
Using the language code list on page 46).
w/Subtitle Lang.
DVD disc menus are displayed in the same language as your
selected subtitle language, if possible.
Languages as displayed
DVD menus are displayed in the selected language, if possible.
Other Language
Select to choose a language other than the ones displayed (see
Using the language code list on page 46).
On
Subtitles are displayed in your selected subtitle language.
Off
Subtitles are always off by default when you play a DVD disc.
Subtitle Language
DVD Menu
Language
Subtitle Display
Display settings
Setting
Option
What it means
OSD Language
English
On-screen displays of the player are in English.
Languages as displayed
On-screen displays are shown in the language selected.
On
A camera icon is displayed on-screen during multi-angle
scenes on a DVD disc.
Off
No multi-angle indication is shown.
Angle Indicator
34
En
HTZ180DVD_en_RXJ.book 35 ページ
2009年3月17日 火曜日 午後6時53分
Initial Settings menu
10
Setting
Option
What it means
Parental Lock
–
See Parental Lock below.
DivX(R) VOD
Display
See About DivX® VOD content below.
English
Options settings
Deutsch
Speakers settings
Option
What it means
Speaker Distance
–
Specify the distance of your speakers from your listening
position (see Speaker Distance on page 36).
Parental Lock
Changing your password
• Default level: Off; Default password: none;
Default Country/Area code: us (2119)
Registering a new password
Setting/changing the Parental Lock
1
Select ‘Level Change’.
2 Use number buttons to enter your
password, then press ENTER.
3
Select a new level and press ENTER.
• Press repeatedly to lock more levels
(more discs will require the password);
press to unlock levels. You can’t lock
level 1.
Español
Register a password to change the Parental
Lock level or enter a Country/Area code.1
1 Select ‘Password’.
Enter a new password and press ENTER.
Nederlands
Some discs also support the Country/Area
Code feature. The player does not play certain
scenes on these discs, depending on the
Country/Area Code you set.
2
Italiano
To give you some control over what your
children watch on your DVD player, some DVDVideo discs feature a Parental Lock level. If your
player is set to a lower level than the disc, the
disc won’t play.
To change your password, confirm your
existing password then enter a new one.
1 Select ‘Password Change’, input your
existing password, then press ENTER.
Français
Setting
Setting/changing the Country/Area code
Initial Settings
Video Output
Parental Lock
Password
Language
Display
DivX (R) VOD
Level Change
Country Code
Options
Speakers
2 Use the number buttons to input a fourdigit password then press ENTER.
You can find the Country/Area code list on
page 51.
1 Select ‘Country Code’, input your
password, then press ENTER.
2 Select a Country/Area code then press
ENTER.
There are two ways you can do this:
• Select by code letter: Use / to change
the Country/Area code.
Note
1 • Not all discs use Parental Lock, and will play without requiring the password first.
• If you forget your password, you’ll need to reset the player to register a new password (see Resetting the system on page 46).
35
En
HTZ180DVD_en_RXJ.book 36 ページ
10
2009年3月17日 火曜日 午後6時53分
Initial Settings menu
• Select by code number: Press then use
the number buttons to enter the four-digit
Country/Area code.
The new Country/Area code takes effect after
ejecting the disc once.
About DivX® VOD content
In order to play DivX VOD (video on demand)
content on this player, you first need to register
the player with your DivX VOD content
provider. You do this by generating a DivX VOD
registration code, which you submit to your
provider.1
Important
• DivX VOD content is protected by a DRM
(Digital Rights Management) system. This
restricts playback of content to specific,
registered devices.
• If you load a disc that contains DivX VOD
content not authorized for your player, the
message Authorization Error is displayed
and the content will not play.
Playing DivX® VOD content
Some DivX VOD content may only be playable for
a fixed number of times. When you load a disc
containing this type of DivX VOD content, the
remaining number of plays is shown on-screen
and you then have the option of playing the disc
(thereby using up one of the remaining plays), or
stopping. If you load a disc that contains expired
DivX VOD content (for example, content that has
zero remaining plays), the message Rental
Expired is displayed.
If your DivX VOD content allows an unlimited
number of plays, then you may load the disc
into your player and play the content as often
as you like, and no message will be displayed.
Speaker Distance
• Default setting: 3.0m
To get the best surround sound from your
system, you should set up the speakers equal
distances from your listening position.
1 Press HOME MENU and select ‘Initial
Settings’.
2 Select ‘Speakers’, then ‘Speaker Distance’.
Displaying your DivX VOD registration
code
Initial Settings
Video Output
Language
Display
Options
Speakers
1 Press HOME MENU and select ‘Initial
Settings’.
2
Speaker Distance
Select ‘Options’, then ‘DivX (R) VOD’.
3
Initial Settings
Video Output
Parental Lock
Language
Display
DivX (R) VOD
Display
Options
Speakers
Use / to select a speaker.
Initial Settings
Video Output
Language
Display
Options
Speakers
L
C
R
3.0m
3.0m
SR
SL
3.0m
3.0m
3.0m
SW
3.0m
3 Select ‘Display’.
Your eight-digit registration code is displayed.
Make a note of the code as you will need it
when you register with a DivX VOD provider.
Note
1 Resetting the player (as described in Resetting the system on page 46) will not cause you to lose your registration code.
36
En
HTZ180DVD_en_RXJ.book 37 ページ
2009年3月17日 火曜日 午後6時53分
Initial Settings menu
Deutsch
Français
Italiano
Use / to change the distance.
• When you change the distance settings of
the front left (L) or front right (R) speakers,
all the other speaker distances change
relative to it.
• Front left/right (L/R) speaker distances can
be set from 30 cm to 9 m in 30 cm
increments.1
• The center speaker (C) can be set from
–2.1 m to 0 m relative to the front left/right
speakers.
• Surround left/right (SL/SR) speakers can
be set from –6.0 m to 0 m relative to the
front left/right speakers.2
• The subwoofer (SW) can be set from –2.1 m
to 0 m relative to the front left/right
speakers.
6 Press to go back to the speaker list if
you want to modify another speaker, or press
ENTER to exit the Speaker Distance screen.
5
English
4 Press to change the speaker distance
for the highlighted speaker.
10
Nederlands
Español
Note
1 The L and R speakers are paired; you can’t set them differently.
2 Make sure to set them the same distance when using the Extra Power mode (page 21).
37
En
11_Other connections.fm
11
38 ページ
2009年3月18日 水曜日 午後6時6分
Other connections
Chapter 11
Other connections
Important
• When making or changing connections on the rear panel of this unit, be sure to switch power
off and disconnect the power cord from the wall socket.
After completing all connections, connect the power cord to the wall socket.
Outdoor antenna
To component
input
Indoor antenna
(vinyl-coated wire)
5 m to 6 m
TV
LINE 1
AM loop
antenna
R
FRONT
L
CENTER
L
AC IN
PR
PB
Y
R
R
ANALOG AUDIO IN
COMPONENT
VIDEO
VIDEO(TV)
SURROUND
A
N
T
E
N
N
A
AM LOOP
FM
UNBAL 75 Ω
HDMI OUT
SUB
WOOFER
SPEAKERS (4 Ω )
VIDEO OUT
PAL connector
To
HDMI input
From audio output
Tape deck, etc.
From
audio output
Flat screen TV
Connecting auxiliary audio
components
Using the stereo analog inputs, you can connect
an external component such as a tape deck or
MD player for playback through this system.
For the connection diagram, see 1 above.
38
En
• Connect the ANALOG AUDIO IN (LINE 1)
jacks to the analog outputs of an external
playback component.
Connect using RCA pin-plug stereo cables.
HTZ180DVD_en_RXJ.book 39 ページ
2009年3月17日 火曜日 午後6時53分
Other connections
If your TV has component video inputs, you can
use these instead of the standard video outputs
for a better quality picture.1
• Use an HDMI cable to connect the HDMI
OUT interconnect on this player to an HDMI
interconnect on a HDMI-compatible display.
• The arrow on the cable connector body
should be face down for correct alignment
with the connector on the player.
Deutsch
For the connection diagram, see 2 on page 38
• Use a component video cable to connect
the COMPONENT VIDEO OUT to a set of
component inputs on your TV.
Compatibility of this player with
progressive-scan and high-definition TVs.
Connecting using HDMI
1
Press SHIFT+SETUP.
2 Use / to select ‘HDMI SET’ then press
ENTER.
3 Use / to choose HDMI MODE then
press ENTER.
4 Use / to choose the setting you want
then press ENTER.
• AMP – Output Audio sound of the DVD/CD
and USB function signal from this system.
• TV – Output Audio sound of the DVD/CD
and USB function signal from a TV or flat
screen TV.4
Español
If you have a HDMI or DVI (with HDCP)
equipped monitor or display, you can connect
it to this player using a commercially available
HDMI cable for high quality digital video.3
For the connection diagram, see 3 on page 38.
You can select the system speaker or the TV
through the HDMI to output the audio sound of
the DVD/CD or USB function. You cannot use
a number of sound functions of this system
when HDMI audio is set to TV.
Nederlands
• This player is compatible with progressive
video Macro Vision System Copy Guard.2
Switching the HDMI audio setting
Italiano
Compared to interlace video, progressive scan
video effectively doubles the scanning rate of
the picture, resulting in a very stable, flickerfree image. Progressive scan video is available
only from the component video output.
You can also adjust the HDMI settings for
resolution and color. For more on these
settings see Video Output settings on page 33.
Français
About progressive scan video
English
Connecting using the
component video output
11
Note
1 • The component video output is switchable between interlaced and progressive formats. See Video Output settings on page 33.
• While the player is connected using HDMI cable, the component video output cannot be switched between Interlace and
Progressive formats. When HDMI Resolution is set to 720x480i (NTSC)/720x576i (PAL), Interlace format is automatically
selected, and Progressive format is automatically selected in other settings.
2 Consumers should note that not all high-definition television sets are fully compatible with this product and may cause
artifacts to be displayed in the picture. In case of 525 progressive scan picture problems, it is recommended that the user switch
the connection to the ‘standard definition’ output (Interlace). If there are questions regarding our TV set compatibility with this
model, please contact our customer service center.
3 • An HDMI connection can only be made with DVI-equipped components compatible with both DVI and High Bandwidth
Digital Content Protection (HDCP). If you choose to connect to a DVI connector, you will need a separate adaptor (DVIHDMI)
to do so. A DVI connection, however, does not support audio signals. Consult your local audio dealer for more information.
• Depending on the component you have connected, using a DVI connection may result in unreliable signal transfers.
• When you change the component connected to the HDMI output, you will also need to change the HDMI settings to match
the new component (see Video Output settings on page 33 to do this).
4 This makes it possible to use the TV’s built-in speakers to listen to the audio input from a DVD or USB device. Audio output from
the HDMI terminal is 2 channel linear PCM only. In this event, no sound will be heard from this unit’s speakers (or headphones).
All other audio sources (including TUNER) are output from this unit normally.
39
En
HTZ180DVD_en_RXJ.book 40 ページ
11
2009年3月17日 火曜日 午後6時53分
Other connections
Resetting the HDMI connection
About HDMI
If you get an error message (the display shows
HDMI ERR) or if the screen goes blank (for
example, after changing the resolution), check
the troubleshooting guide on page 47. If this
doesn’t solve the problem, follow the steps
below to reset the HDMI connection.
HDMI (High Definition Multimedia Interface)
supports both video and audio on a single
digital connection for use with DVD players,
DTV, set-top boxes, and other AV devices. HDMI
was developed to provide the technologies of
High Bandwidth Digital Content Protection
(HDCP) as well as Digital Visual Interface (DVI)
in one specification. HDCP is used to protect
digital content transmitted and received by DVIcompliant displays.
1
Press SHIFT+SETUP.
2 Use / to select INITIAL then press
ENTER.
3 Use / to choose HDMIINIT then press
ENTER.
4 Press ENTER while INIT OK is blinking.
The system will restart and the HDMI settings
are automatically reset to the factory defaults.
See Video Output settings on page 33 for more
on these settings.
HDMI has the capability to support standard,
enhanced, or high-definition video plus
standard to multichannel surround-sound
audio. HDMI features include uncompressed
digital video, a bandwidth of up to five
gigabytes per second (with HDTV signals), one
connector (instead of several cables and
connectors), and communication between the
AV source and AV devices such as DTVs.
HDMI, the HDMI logo and High-Definition
Multimedia Interface are trademarks or
registered trademarks of HDMI Licensing, LLC.
Connecting external antennas
For an external AM antenna, use 5 m to 6 m of
vinyl-insulated wire and set up either indoors or
outdoors. Leave the loop antenna connected.
Only use the included AM loop antenna.
For an external FM antenna, use a PAL
connector to hook up an external FM antenna.
For the connection diagram, see 4 on page 38.
40
En
HTZ180DVD_en_RXJ.book 41 ページ
2009年3月17日 火曜日 午後6時53分
Additional information
12
Additional information
Disc compatibility table
DVD-Video
Video CD
DVD-RW
CD-R
Compatible formats
CD-R/-RW
• CD-Audio, Video CD/Super VCD,
ISO 9660 CD-ROM* containing MP3,
WMA, MPEG-4 AAC, JPEG or DivX
video/WMV files.
* ISO 9660 Level 1 or 2 compliant. CD
physical format: Mode1, Mode2 XA
Form1. Romeo and Joliet file systems
are both compatible.
• Multi-session playback: No
• Unfinalized disc playback: No
DVD-R/-RW
• DVD-Video (Video mode), Video
Recording (VR)*, UDF Bridge DVD-ROM
containing MP3, WMA, MPEG-4 AAC,
JPEG or DivX video/WMV files.
* Edit points may not play exactly as
edited; screen may go momentarily
blank at edited points.
• Multi Border playback: No
• Unfinalized playback: No
PC-created
disc
• Discs recorded using a PC may not
be playable due to the setting of the
software used to create the disc. In
these instances, check the DVD-R/-RW
or CD-R/-RW software manual or disc
boxes for more on compatibility.
• Discs recorded in packet write mode
are not compatible.
CD-RW
Fujicolor CD
• This unit will play DVD+R/+RW discs.
•
•
is a trademark of FUJIFILM Corporation.
is a trademark of DVD Format/Logo
Licensing Corporation.
• Also compatible with KODAK Picture CD.
This player supports the IEC’s Super VCD
standard for superior picture quality, dual
soundtracks, and widescreen support.
Super Video CD (Super VCD)
Español
Media
Nederlands
Audio CD
DVD-R
Italiano
See the Disc compatibility table below for more
information.
A DualDisc is a new two -sided disc, one side
of which contains DVD content video, audio,
etc. while the other side contains non-DVD
content such as digital audio material.
The non-DVD, audio side of the disc is not
compliant with the CD Audio specification and
therefore may not play.
The DVD side of a DualDisc plays in this
product. DVD-Audio content will not play.
For more detailed information on the DualDisc
specification, please refer to the disc
manufacturer or disc retailer.
Français
This player is compatible with a wide range of
disc types (media) and formats. Playable discs
will generally feature one of the following logos
on the disc and/or disc packaging. Note
however that some disc types, such as
recordable CD and DVD, may be in an
unplayable format.
About DualDisc playback
Deutsch
Disc/content format playback
compatibility
English
Chapter 12
41
En
HTZ180DVD_en_RXJ.book 42 ページ
12
2009年3月17日 火曜日 午後6時53分
Additional information
Media
Compatible formats
Compressed • MPEG-1 Audio Layer 3 (MP3),
Windows Media Audio (WMA), MPEGaudio
4 AAC
• Sampling rates: 32 kHz/44.1 kHz/
48 kHz
• Bit-rates: Any (128 kbps or higher
recommended)
• VBR (variable bit rate) MP3/WMA/
MPEG-4 AAC playback: No
• WMA lossless encoding: No
• DRM (Digital Rights Management)
compatible: Yes (DRM-protected audio
files will not play in this player.)
• File extensions: .mp3, .wma, .m4a
(these must be used for the player to
recognize MP3/WMA/MPEG-4 AAC files)
• File structure (may differ): Up to 299
folders on a disc; up to 648 folders and
files (combined) within each folder
JPEG file
• Baseline JPEG and EXIF 2.2* still
image files up to a resolution of
3072 x 2048
*File format for digital still cameras
• Progressive JPEG compatible: No
• File extensions: .jpg (must be used
for the player to recognize JPEG files)
• File structure (may differ): Up to 299
folders on a disc; up to 648 folders and
files (combined) within each folder
About DVD+R/DVD+RW compatibility
Only DVD+R/DVD+RW discs recorded in
‘Video Mode (DVD Video Mode)’ which have
been finalized, can be played back. However,
some editing made during the recording may
not be played back accurately.
About DivX
DivX is a digital video format created by DivX,
Inc. This player can play DivX videos recorded
on DVDs, CDs, or USB storage devices.
Keeping the same terminology as DVD-Video,
individual DivX video files are called “Titles”.
DivX video compatibility
• Plays DivX® video1
• File extensions: .avi and .divx (these must
be used for the player to recognize DivX
video files). Note that all files with the .avi
extension are recognized as MPEG4, but not
all of these are necessarily DivX video files
and therefore may not be playable on this
player.
Displaying DivX subtitle files
The font sets listed below are available for DivX
external subtitle files. You can see the proper
font set on-screen by setting the Subtitle
Language (in Language settings on page 34)
to match the subtitle file.2
Group 1: Albanian (sq), Basque (eu), Catalan (ca),
Danish (da), Dutch (nl), English (en), Faroese (fo),
Finnish (fi), French (fr), German (de), Icelandic (is),
Irish (ga), Italian (it), Norwegian (no), Portuguese (pt),
Rhaeto-Romanic (rm), Scottish (gd), Spanish (es),
Swedish (sv)
Group 2: Albanian (sq), Croatian (hr), Czech (cs),
Hungarian (hu), Polish (pl), Romanian (ro), Slovak (sk),
Slovenian (sl)
Note
1 Playback of .avi video files larger than 4 GB is not possible.
2 • For external subtitle files the following subtitle format filename extensions are supported (please note that these files are not
shown within the disc navigation menu): .srt, .sub, .ssa, .smi
• Some external subtitle files may be displayed incorrectly or not at all.
• The filename of the movie file has to be repeated at the beginning of the filename for the external subtitle file.
• The number of external subtitle files which can be switched for the same movie file is limited to a maximum of 10.
42
En
HTZ180DVD_en_RXJ.book 43 ページ
2009年3月17日 火曜日 午後6時53分
Additional information
About WMV
Windows Media is a trademark of Microsoft
Corporation.
This product includes technology owned by
Microsoft Corporation and cannot be used or
distributed without a license from Microsoft
Licensing, Inc.
Using and taking care of discs
Hold the disc by its edges when handling so as
not to leave fingerprints, dirt or scratches on
either side of the disc. Damaged or dirty discs
can affect playback performance.
About MPEG-4 AAC
About WMA
This player can playback Windows Media
Audio content.
Wipe lightly from the center of the disc using
straight strokes. Don’t wipe the disc surface
with circular strokes.
Español
Advanced Audio Coding (AAC) is at the core of
the MPEG-4 AAC standard, which incorporates
MPEG-2 AAC, forming the basis of the MPEG-4
audio compression technology. The file format
and extension used depend on the application
used to encode the AAC file. This unit plays
back AAC files encoded by iTunes® bearing the
extension ‘.m4a’. DRM-protected files will not
play, and files encoded with some versions of
iTunes® may not play, or filenames may display
incorrectly.
Apple and iTunes are trademarks of Apple Inc.,
registered in the U.S. and other countries.
Nederlands
If a disc becomes marked with fingerprints,
dust, etc., clean using a soft, dry cloth.
Italiano
Handling discs
Français
WMV is an acronym for Windows Media Video
and refers to a video compression technology
developed by Microsoft Corporation. WMV
content can be encoded by using Windows
Media Encoder.
• This player is compatible with WMV9 files
that are encoded by using the Windows
Media Encoder 9 Series, with .wmv as an
extension.
• Compatible with size under 720 x 576 pixels/
720 x 480 pixels.
• Advanced Profile is not supported.
• DRM-protected video files will not play in
this player.
• File extensions .wmv.
• Compatible with bit rate under 192 kbps.
Deutsch
DivX® is a registered trademark of DivX, Inc., and
is used under license.
WMA is an acronym for Windows Media Audio
and refers to an audio compression technology
developed by Microsoft Corporation. WMA
content can be encoded by using Windows
Media Player version 7.7.1, Windows Media
Player for Windows XP, or Windows Media
Player 9 series.
English
Group 3: Bulgarian (bg), Byelorussian (be),
Macedonian (mk), Russian (ru), Serbian (sr),
Ukrainian (uk)
Group 4: Hebrew (iw), Yiddish (ji)
Group 5: Turkish (tr)
12
If necessary, use a cloth soaked in alcohol, or a
commercially available CD/DVD cleaning kit to
clean a disc more thoroughly. Never use
benzine, thinner or other cleaning agents such
as those designed for cleaning vinyl records.
Storing discs
Avoid leaving discs in excessively cold, humid,
or hot environments (including under direct
sunlight). Don’t glue paper or put stickers onto
the disc, or use a pencil, ball-point pen or other
sharp-tipped writing instrument. These could
all damage the disc.
43
En
HTZ180DVD_en_RXJ.book 44 ページ
12
2009年3月17日 火曜日 午後6時53分
Additional information
Discs to avoid
Discs spin at high speed inside the player. If a
disc is cracked, chipped, warped, or otherwise
damaged, don’t risk using it in your player —
you could end up damaging the unit.
This unit is designed for use with conventional,
fully circular discs only. Pioneer disclaims all
liability arising in connection with the use of
shaped discs.
DVD Video regions
All DVD Video discs carry a region mark that
indicates which region(s) of the world the disc
is compatible with. Your DVD system also has
a region mark (on the rear panel). Discs from
incompatible regions will not play in this
player. Discs marked ALL play in any player.
When you insert a disc that cannot be played
on this player, one of the following messages is
displayed:
Incompatible disc region number
Can’t play disc
Installation and maintenance
Hints on installation
We want you to enjoy using this system for
years to come, so please bear in mind the
following points when choosing a location:
Place directly on top of an amplifier, or other
component in your stereo system that becomes
hot in use.
Use near a television or monitor as you may
experience interference — especially if the
television uses an indoor antenna.
Use in a kitchen or other room where the system
may be exposed to smoke or steam.
Use on a thick rug or carpet, or cover with cloth
— this may prevent proper cooling of the system
unit.
Place on an unstable surface, or one that is not
large enough to support all four of the system
unit’s feet.
Cleaning the pickup lens
The DVD player’s lens should not become dirty
in normal use, but if for some reason it should
malfunction due to dust or dirt, consult your
nearest Pioneer authorized service center.
Although lens cleaners are commercially
available, we do not recommend using them
since some may damage the lens.
Problems with condensation
Condensation may form inside the player if it is
brought into a warm room from outside, or if
the temperature of the room rises quickly.
Although the condensation won’t damage the
player, it may temporarily impair performance.
Leave it to adjust to the warmer temperature
for about an hour before switching on.
Do...
Moving the system unit
Don’t...
If you need to move the main unit, first remove
a disc if there’s one in the player, then press
STANDBY/ON on the front panel to turn the
system off. Wait for -OFF- to disappear from
the display, then unplug the power cord.1
Never lift or move the unit during playback —
discs rotate at high speeds and may damage.
Use in a well-ventilated room.
Place on a solid, flat, level surface, such as a
table, shelf or stereo rack.
Use in a place exposed to high temperatures or
humidity, including near radiators and other
heat-generating appliances.
Place on a window sill or other place where the
system will be exposed to direct sunlight.
Use in an excessively dusty or damp
environment.
Note
1 Unplugging the unit before -OFF- disappears from the display may cause the system to return to the factory settings.
44
En
HTZ180DVD_en_RXJ.book 45 ページ
2009年3月17日 火曜日 午後6時53分
Additional information
12
Please note that many widescreen discs
override the player’s setting so that the disc
is shown in letter box format regardless of the
setting.
Widescreen TV users
Press SHIFT+SETUP.
3 Use / to choose TV SYS then press
ENTER.
The TV system changes as follows:
• AUTO NTSC
• NTSC PAL
• PAL AUTO
Español
Set to 4:3 (Letter Box), widescreen
discs are shown with black bars top
and bottom.
1
2 Use / to select SYS SET then press
ENTER.
Nederlands
If you have a standard TV, the TV Screen
setting (page 33) of this player should be
set to 4:3 (Letter Box) or 4:3 (Pan & Scan),
depending on which you prefer.
The default setting of this system is AUTO, and
unless you notice that the picture is distorted
when playing some discs, you should leave it
set to AUTO. If you find picture distortion with
some discs, set the TV system to match your
country or region’s system. However, this may
restrict the kinds of disc you can watch. See
the table for the kinds of discs compatible with
each setting (AUTO, PAL and NTSC).3
Italiano
Standard TV users
TV system setting
Français
If you have a widescreen TV, the TV Screen
setting (page 33) of this player should be set
to 16:9 (Wide) or 16:9 (Compressed).
When you watch discs recorded in 4:3 format
with the 16:9 (Wide) setting, you can use the
TV controls to select how the picture is
presented. Your TV may offer various zoom and
stretch options; see the instructions that came
with your TV for details.
Please note that some movie aspect ratios are
wider than 16:9, so even though you have a
widescreen TV, these discs will still play in a
‘letter box’ style with black bars at the top and
bottom of the screen.
Deutsch
DVD-Video discs come in different screen
aspects, ranging from TV programs, which are
generally 4:3, to CinemaScope widescreen
movies1, with an aspect ratio of up to about 7:3.
Televisions also come in different aspect ratios;
‘standard’ 4:3 and widescreen 16:9.2
English
Set to 4:3 (Pan & Scan), widescreen
discs are shown with the left and right
sides cropped. Although the picture
looks larger, you don’t actually see
the whole picture.
Screen sizes and disc formats
Note
1 Many widescreen discs override the system’s settings so that the disc is shown in letterbox format regardless of the setting.
2 Using the 16:9 (Wide) or 16:9 (Compressed) setting with a standard 4:3 TV, or one of the 4:3 settings with a widescreen TV,
will result in picture distortion.
3 Most models of the newly developed countdown PAL TV system detect 50 Hz (PAL)/60 Hz (NTSC) and automatically switch
vertical amplitude, resulting in a display without vertical shrinkage. However, in some cases, the image may appear without color.
If your PAL TV does not have a V-Hold control, you may not be able to watch NTSC discs because of picture roll. If the TV has a
V-Hold control, adjust it until the picture stops rolling. On some TVs, the picture may shrink vertically, leaving black bands at the
top and bottom of the screen.
45
En
12_Additional_information.fm
12
46 ページ
2009年3月17日 火曜日 午後7時12分
Additional information
4 Press ENTER while CHANGE is blinking.
The system will automatically enter standby
mode, then turn on again. You’ll see the new TV
system setting in the display after seeing
POWER ON.1
Player setting
Media Type
DVD/Super VCD/
Video CD/DivX
video/WMV
CD/MP3/WMA/
MPEG-4 AAC/
JPEG/no disc
Format NTSC
PAL
AUTO
NTSC
NTSC
PAL
NTSC
PAL
NTSC
PAL
PAL
—
NTSC
PAL
NTSC or
PAL
Setting the Key Lock
You can disable the front panel buttons by
switching the Key Lock feature on.
1
Press SHIFT+SETUP.
2 Use / to select SYS SET then press
ENTER.
3 Use / to choose KEYLOCK then press
ENTER.
4 Use / to select LOCK ON or LOCK OFF
then press ENTER.
Resetting the system
Frequency step setting
If you find that you can’t tune into stations
successfully, the frequency step may not be
suitable for your country/region.
1
Press SHIFT+SETUP.
2 Use / to choose AM 9K/10K then
press ENTER.
3 Use / to select AM 9K or AM 10K then
press ENTER.
Dimming the Display
You can adjust the brightness of the text in the
front panel display.
1
Press SHIFT+SETUP.
2 Use / to select SYS SET then press
ENTER.
3 Use / to select DIMMER then press
ENTER.
This is shown in the front panel display.
4 Use / to select LIGHT or DARK then
press ENTER.
Use this procedure to reset all system settings
to the factory default.
1
With the system on, press SHIFT+SETUP.
2 Use / to select INITIAL then press
ENTER.
3 Use / to select ALL INIT then press
ENTER.
• INIT OK is displayed.
4
Press ENTER while INIT OK is blinking.2
Using the language code list
Some of the language options (see Language
settings on page 34) allow you to set your
preferred language from any of the 136
languages in the Language code list on page 51.
1
Select ‘Other Language’.
2 Use / to select either a code letter or
a code number.
3 Use / to select a code letter or a code
number.
See the Language code list on page 51 for a
complete list of languages and codes.
Note
1 You have to switch the player into standby (press STANDBY/ON) before each change.
2 Do not operate the unit without reason or pull the power cord because the system’s power automatically turns on.
46
En
HTZ180DVD_en_RXJ.book 47 ページ
2009年3月17日 火曜日 午後6時53分
Additional information
• If the system does not operate normally due to external effects such as static electricity,
disconnect the plug from the outlet and insert again to return to normal operating conditions.
Deutsch
Incorrect operations are often mistaken for trouble and malfunctions. If you think that there is
something wrong with this component, check the points below. Sometimes the trouble may lie in
another component. Investigate the other components and electrical appliances being used. If the
trouble cannot be rectified even after exercising the checks listed below, ask your nearest Pioneer
authorized service center or your dealer to carry out repair work.
English
Troubleshooting
12
General
• Wait for one minute before switching back on.
• Make sure there are no loose strands of wire touching the unit. This could cause
the system to shut off automatically.
• Check that the speakers are connected correctly.
• Make sure the voltage of the mains power source is correct for the model.
• Try reducing the volume level.
• If the problem persists, take it to your nearest Pioneer authorized service center or
your dealer for servicing.
Can’t operate the remote • Replace the batteries (see Putting the batteries in the remote control on page 14).
control.
• Operate within 7 m, 30° of the remote sensor (see Using the remote control on
page 14).
• Remove any obstacles or operate from another position.
• Avoid exposing the remote sensor on the front panel to direct light.
Español
No sound from surround • Refer to Setting the channel levels on page 15 to check the speaker levels.
or center speakers.
• When TUNER or LINE is selected, you can only hear the source in stereo. Switch
the input source to DVD/CD or USB for multichannel sound.
• Check that you haven’t selected the STEREO mode (see Listening in surround
sound on page 20).
• Check if a microphone is connected or not.
• Connect the speakers properly (see Basic connections on page 8).
Nederlands
No sound is output when • If you’re using the line input, make sure the component is connected correctly (see
a function is selected.
Connecting auxiliary audio components on page 38).
• No audio is output from the speakers connected to this unit if HDMI audio mode is
set to TV (page 39).
• Press MUTE on the remote control to turn muting off.
• Turn up the volume.
Italiano
Remedy
The power does not turn
on, or switches off
suddenly (an error
message may be
displayed at startup).
Français
Problem
The microphone can’t be • You are only using one microphone and it’s plugged into the MIC (SUB) jack. The
heard.
MIC (SUB) jack can only be used if there is also a microphone plugged into the MIC
(MAIN) jack.
• Adjust the MIC VOL +/–.
Feedback noise when
mic is switched on.
• The mic is pointing toward the speakers. Keep the mic pointed away from the
speakers.
• The microphone level is set too high. Turn down the mic control level.
TRAYLOCK shows in the • Press and hold OPEN/CLOSE on the front panel for about eight seconds. Then
display and the tray can’t the tray can be opened/closed using OPEN/CLOSE.
be ejected.
47
En
HTZ180DVD_en_RXJ.book 48 ページ
12
2009年3月17日 火曜日 午後6時53分
Additional information
DVD/CD/Video CD player
Problem
Remedy
The disc is ejected
automatically after
loading.
• Clean the disc and align the disc properly in the disc guide.
• If the region number on a DVD-video disc does not match the number on the
player, the disc cannot be used (see DVD Video regions on page 44). In this instance,
one of the following messages appears on screen: Incompatible disc region
number/Can’t play disc.
• Allow time for any condensation inside the player to evaporate. Avoid using the
player near an air-conditioning unit.
Playback not possible.
• If the disc is loaded upside down, reload the disc with label side face up.
Picture playback stops
and buttons cannot be
used.
• Press (stop), then (play) to start playback again.
• Switch the power off once, then on again using the front panel STANDBY/ON
button.
Settings are canceled.
• When the power is cut, settings will be canceled.
No picture/No color.
• Check that connections are correct and that plugs are inserted fully.
• Check the manual of the TV/monitor to make sure the settings are correct.
• If the Progressive setting is selected and you have used component video cables
to connect a TV that is not compatible with a progressive scan signal, you will not
be able to see any picture at all. With your TV connected using either the
composite or S-video terminals, change the Component Out setting to Interlace
(see Video Output settings on page 33).
Screen is stretched or
aspect doesn’t change.
• The TV Screen setting is incorrect. Set the TV Screen option to match the TV/
monitor you’re using (see Video Output settings on page 33).
When recorded on a VCR • This system uses copy-protection technology which may prevent recording or
or passed through an AV cause picture problems when connected through a VCR or AV selector. This is not a
selector, there is
malfunction.
disturbance in the
playback picture.
Picture disturbance
during playback or dark.
• This player is compatible with Macro-Vision System copy guard. Some discs
include a copy prevention signal, and when this type of disc is played back, stripes
etc., may appear on some sections of the picture depending on the TV. This is not a
malfunction.
• Discs respond differently to particular player functions. This may result in the
screen becoming black for a brief instant or shaking slightly when the function is
executed. These problems are largely due to differences between discs and disc
content and are not malfunctions of this player.
Noticeable difference in
DVD and CD volume.
• DVDs and CDs use different recording methods. This is not a malfunction.
CD-ROM disc is not
recognized.
• Make sure that the CD-ROM was recorded using the ISO 9660 disc format. See
Disc compatibility table on page 41 for more on disc compatibility.
DVD-ROM disc is not
recognized.
• Make sure that the DVD-ROM was recorded using the UDF bridge format. See Disc
compatibility table on page 41 for more on disc compatibility.
Files don’t show up in the • The files on the disc must be named with the correct file extension: .mp3 for MP3
Disc Navigator/Photo
files; .wma for WMA files; .m4a for MPEG-4 AAC files; .jpg for JPEG files (upper or
Browser.
lower-case is OK). See Disc compatibility table on page 41.
Can’t play WMA or
MPEG-4 AAC files.
48
En
• The files were recorded using DRM (digital rights management). This is not a
malfunction.
HTZ180DVD_en_RXJ.book 49 ページ
2009年3月17日 火曜日 午後6時53分
Additional information
Remedy
Can’t play WMV files.
• When the bit rate the file is more than 192 kbps, the file cannot be played back.
Tuner
Considerable noise in
radio broadcasts.
• Connect the AM antenna (see Basic connections on page 8) and adjust the
direction and position for best reception. You may also connect an additional internal
or external AM antenna (refer to Connecting external antennas on page 40).
• Fully extend the FM wire antenna, position for best reception, and secure to a wall.
You may also connect an outdoor FM antenna (see Connecting external antennas on
page 40).
• Turn off other equipment that may be causing the noise or move it further away.
• The tuning interval is incorrect for your country or region. See Frequency step
setting on page 46 to switch the tuning interval.
Auto tuning does not
pick up some stations.
• The radio signal is weak. Auto tuning will only detect radio stations with a good
signal. For more sensitive tuning, connect an outdoor antenna.
Problem
Remedy
USB mass storage device • Make sure you have completely inserted the USB connector to this unit.
is not recognized by the • Check that the memory format is FAT16 or FAT32.
system.
• USB devices with an internal USB hub are not supported.
Can’t play WMA or
MPEG-4 AAC files.
• The files were recorded using DRM (digital rights management). This is not a
malfunction.
Problem
Remedy
No HDMI video output.
• Make sure that you’ve selected this player as the HDMI input in the settings for the
component you’re using (refer to the component’s instruction manual).
• Check that the HDMI cable is connected properly and isn’t damaged.
• Check that components connected using the HDMI interface are switched on and
HDMI compatible (components must be compatible with both DVI and High
Bandwidth Digital Content Protection (HDCP)).
• Depending on the component you have connected, using a DVI connection may
result in unreliable signal transfers.
• Make sure the resolution on this player matches that of the component you have
connected using HDMI. See Video Output settings on page 33 to change the HDMI
resolution.
• If the screen goes blank after changing the resolution, it means the resolution
you selected is incompatible with your monitor. See Resetting the HDMI connection
on page 40 to reset to the factory defaults.
Color problems occur
with your monitor after
changing the HDMI Color
setting (page 34).
• Depending on the connected equipment, some HDMI Color settings may cause
the picture to be displayed incorrectly. In this case, use the TV’s own video input
settings to select RGB, if possible. Alternatively, revert to the previous HDMI Color
setting.
Español
HDMI connection
Nederlands
Files don’t show up in the • The files must have the correct file extension: .mp3 for MP3 files; .wma for WMA
Navigator/Photo
files; .m4a for MPEG-4 AAC files; .jpg for JPEG files (upper or lower-case is OK).
Browser.
• Make sure the file permission hasn’t been restricted (through a password, etc.).
Italiano
USB connection
Français
Remedy
Deutsch
Problem
English
Problem
12
49
En
HTZ180DVD_en_RXJ.book 50 ページ
12
2009年3月17日 火曜日 午後6時53分
Additional information
Problem
Remedy
No picture or sound.
• If the problem still persists when connecting your HDMI component directly to your
monitor, please consult the component or monitor manual or contact the
manufacturer for support.
No HDMI audio output.
• See Switching the HDMI audio setting on page 39 to make sure that TV is
selected.
Error Messages
50
En
Message
Description
EXTRAPWR
• You cannot adjust SFC modes, tone controls (bass, treble, and bass boost),
MP3 Expander mode, Voice Enhancer mode when using Extra Power mode.
CANNOT
• Operation is prohibited because DVD/CD or USB isn’t selected, or
SHIFT+KARAOKE, SHIFT+ECHO, SHIFT+ or SHIFT+ has been pressed.
• Appears when DVD/CD is not selected and SHIFT+USB REC is pressed.
TRAYLOCK
• The tray lock is on. See General in Troubleshooting on page 47.
STEREO
• STEREO appears when SURROUND or AUTO/STEREO is pressed in the TUNER or
LINE input mode.
KEYLOCK
• The key lock is enabled. See Setting the Key Lock on page 46.
USB ERR
• See Important in Using the USB interface on page 29 for more on this.
HDMI ERR
• See HDMI connection above for troubleshooting tips. See also Resetting the HDMI
connection on page 40 if the problem persists.
EEP ERR
• Contact your Pioneer authorized service center or your dealer for servicing.
EXIT
• Appears when any prohibited signal is input or the headphones are connected
while the menu screen is displayed, and then the display returns to the normal
display.
NO MIC
• Appears when you press SHIFT+KARAOKE, SHIFT+ECHO, SHIFT+, SHIFT+ or
MIC VOL +/– when no mic is inserted.
OC ERR 1
OC ERR 2
• Check whether the speaker cables are short-circuited. If the error message
continues to be displayed, contact your Pioneer authorized service center or your
dealer for servicing.
OVER TEMP
• Try lowering the volume. If this problem is not fixed by removing and inserting the
power cable, this unit may be damaged. In such an event, please contact a Pioneerauthorized service center or your nearest dealer.
TV AUDIO
• Indicator is lit for two seconds if the listening mode is changed while HDMI audio
mode is set for TV.
KARAOKE
• Appears when you press SURROUND, SOUND, AUTO/STEREO or MP3 EXP/
V.ENH when a mic is inserted.
PHONESIN
• Appears when you press SURROUND, SOUND, AUTO/STEREO or MP3 EXP/
V.ENH when a headphone is inserted.
HTZ180DVD_en_RXJ.book 51 ページ
2009年3月17日 火曜日 午後6時53分
Additional information
12
Language (Language code letter), Language code
Nederlands
Español
Slovak (sk), 1911
Slovenian (sl), 1912
Samoan (sm), 1913
Shona (sn), 1914
Somali (so), 1915
Albanian (sq), 1917
Serbian (sr), 1918
Siswati (ss), 1919
Sesotho (st), 1920
Sundanese (su), 1921
Swedish (sv), 1922
Swahili (sw), 1923
Tamil (ta), 2001
Telugu (te), 2005
Tajik (tg), 2007
Thai (th), 2008
Tigrinya (ti), 2009
Turkmen (tk), 2011
Tagalog (tl), 2012
Setswana (tn), 2014
Tonga (to), 2015
Turkish (tr), 2018
Tsonga (ts), 2019
Tatar (tt), 2020
Twi (tw), 2023
Ukrainian (uk), 2111
Urdu (ur), 2118
Uzbek (uz), 2126
Vietnamese (vi), 2209
Volapük (vo), 2215
Wolof (wo), 2315
Xhosa (xh), 2408
Yoruba (yo), 2515
Zulu (zu), 2621
Italiano
Lingala (ln), 1214
Laothian (lo), 1215
Lithuanian (lt), 1220
Latvian (lv), 1222
Malagasy (mg), 1307
Maori (mi), 1309
Macedonian (mk), 1311
Malayalam (ml), 1312
Mongolian (mn), 1314
Moldavian (mo), 1315
Marathi (mr), 1318
Malay (ms), 1319
Maltese (mt), 1320
Burmese (my), 1325
Nauru (na), 1401
Nepali (ne), 1405
Norwegian (no), 1415
Occitan (oc), 1503
Oromo (om), 1513
Oriya (or), 1518
Panjabi (pa), 1601
Polish (pl), 1612
Pashto, Pushto (ps), 1619
Portuguese (pt), 1620
Quechua (qu), 1721
Rhaeto-Romance (rm), 1813
Kirundi (rn), 1814
Romanian (ro), 1815
Kinyarwanda (rw), 1823
Sanskrit (sa), 1901
Sindhi (sd), 1904
Sangho (sg), 1907
Serbo-Croatian (sh), 1908
Sinhalese (si), 1909
Français
Esperanto (eo), 0515
Estonian (et), 0520
Basque (eu), 0521
Persian (fa), 0601
Finnish (fi), 0609
Fiji (fj), 0610
Faroese (fo), 0615
Frisian (fy), 0625
Irish (ga), 0701
Scots-Gaelic (gd), 0704
Galician (gl), 0712
Guarani (gn), 0714
Gujarati (gu), 0721
Hausa (ha), 0801
Hindi (hi), 0809
Croatian (hr), 0818
Hungarian (hu), 0821
Armenian (hy), 0825
Interlingua (ia), 0901
Interlingue (ie), 0905
Inupiak (ik), 0911
Indonesian (in), 0914
Icelandic (is), 0919
Hebrew (iw), 0923
Yiddish (ji), 1009
Javanese (jw), 1023
Georgian (ka), 1101
Kazakh (kk), 1111
Greenlandic (kl), 1112
Cambodian (km), 1113
Kannada (kn), 1114
Kashmiri (ks), 1119
Kurdish (ku), 1121
Kirghiz (ky), 1125
Latin (la), 1201
Deutsch
Japanese (ja), 1001
English (en), 0514
French (fr), 0618
German (de), 0405
Italian (it), 0920
Spanish (es), 0519
Dutch (nl), 1412
Russian (ru), 1821
Chinese (zh), 2608
Korean (ko), 1115
Greek (el), 0512
Afar (aa), 0101
Abkhazian (ab), 0102
Afrikaans (af), 0106
Amharic (am), 0113
Arabic (ar), 0118
Assamese (as), 0119
Aymara (ay), 0125
Azerbaijani (az), 0126
Bashkir (ba), 0201
Byelorussian (be), 0205
Bulgarian (bg), 0207
Bihari (bh), 0208
Bislama (bi), 0209
Bengali (bn), 0214
Tibetan (bo), 0215
Breton (br), 0218
Catalan (ca), 0301
Corsican (co), 0315
Czech (cs), 0319
Welsh (cy), 0325
Danish (da), 0401
Bhutani (dz), 0426
English
Language code list
Country/Area code list
Country/Area, Country/Area code, Country/Area code letter
Argentina, 0118, ar
Australia, 0121, au
Austria, 0120, at
Belgium, 0205, be
Brazil, 0218, br
Canada, 0301, ca
Chile, 0312, cl
China, 0314, cn
Denmark, 0411, dk
Finland, 0609, fi
France, 0618, fr
Germany, 0405, de
Hong Kong, 0811, hk
India, 0914, in
Indonesia, 0904, id
Italy, 0920, it
Japan, 1016, jp
Korea, Republic of, 1118, kr
Malaysia, 1325, my
Mexico, 1324, mx
Netherlands, 1412, nl
New Zealand, 1426, nz
Norway, 1415, no
Pakistan, 1611, pk
Philippines, 1608, ph
Portugal, 1620, pt
Russian Federation, 1821, ru
Singapore, 1907, sg
Spain, 0519, es
Switzerland, 0308, ch
Sweden, 1905, se
Taiwan, 2023, tw
Thailand, 2008, th
United Kingdom, 0702, gb
United States of America, 2119, us
51
En
12_Additional_information.fm
12
52 ページ
2009年3月17日 火曜日 午後7時5分
Additional information
S-DV180 Speaker system
Specifications
•
•
Amplifier section
RMS Power Output:
Front, Center, Surround . . . 60 W per channel
(1 kHz, 10 % T.H.D., 4 Ω)
Subwoofer . . .60 W (100 Hz, 10 % T.H.D., 4 Ω)
•
Disc section
Type . . . . . . . DVD system, Video CD/Super VCD
system and Compact Disc digital audio system
•
FM tuner section
Frequency range . . . . . . . . 87.5 MHz to 108 MHz
Antenna . . . . . . . . . . . . . . . . . . 75 Ω, unbalanced
•
AM tuner section
Frequency range:
With 9 kHz step . . . . . . . . 531 kHz to 1602 kHz
With 10 kHz step . . . . . . . 530 kHz to 1700 kHz
Antenna . . . . . . . . . . . . . . . . . . . . . .Loop antenna
•
Miscellaneous
Power requirements:
Central and South American models
. . . . . . . . . . . . AC 110 V to 220 V, 50 Hz/60 Hz
US Military and Duty Free models
. . . . . . . . . . . . . . AC 110 V to 240 V, 50 Hz/60 Hz
Power consumption . . . . . . . . . . . . . . . . . . . 55 W
Power consumption in standby. . . . . . . . .0.48 W
Dimensions
. . . . . . . 420 mm (W) x 62 mm (H) x 331 mm (D)
Weight . . . . . . . . . . . . . . . . . . . . . . . . . . . . . 2.8 kg
•
Accessories (DVD/CD receiver)
Remote control . . . . . . . . . . . . . . . . . . . . . . . . . .
AA/R6 dry cell batteries
(to confirm system operation) . . . . . . . . . . . . . .
Video cable (yellow plugs) . . . . . . . . . . . . . . . . .
AM loop antenna . . . . . . . . . . . . . . . . . . . . . . . .
FM antenna . . . . . . . . . . . . . . . . . . . . . . . . . . . .
Power cord . . . . . . . . . . . . . . . . . . . . . . . . . . . . .
Power plug adapter
(Central and South American models only) . . .
Warranty Card
(US Military and Duty Free models only) . . . . .
Setup Guide
Operating instructions (This document)
52
En
1
2
1
1
1
2
1
1
Front speakers
Enclosure . . . . . . . . . . Closed-box bookshelf type
(magnetically shielded)
System . . . . . . . . . . . . . . . . 7.7 cm 1-way system
Speakers . . . . . . . . . . . . . . . . . . 7.7 cm cone type
Impedance . . . . . . . . . . . . . . . . . . . . . . . . . . . . 4 Ω
Frequency range . . . . . . . . . . . . . 90 Hz to 20 kHz
Maximum input power . . . . . . . . . . . . . . . . .60 W
Dimensions
. . . . . . .105 mm (W) x 115 mm (H) x 114 mm (D)
Weight. . . . . . . . . . . . . . . . . . . . . . . . . . . . . . 0.6 kg
•
Center speaker
Enclosure . . . . . . . . . . Closed-box bookshelf type
(magnetically shielded)
System . . . . . . . . . . . . . . . . 7.7 cm 1-way system
Speakers . . . . . . . . . . . . . . . . . . 7.7 cm cone type
Impedance . . . . . . . . . . . . . . . . . . . . . . . . . . . . 4 Ω
Frequency range . . . . . . . . . . . . . 90 Hz to 20 kHz
Maximum input power . . . . . . . . . . . . . . . . .60 W
Dimensions
. . . . . . .115 mm (W) x 105 mm (H) x 114 mm (D)
Weight. . . . . . . . . . . . . . . . . . . . . . . . . . . . . . 0.6 kg
•
Surround speaker
Enclosure . . . . . . . . . . Closed-box bookshelf type
(magnetically shielded)
System . . . . . . . . . . . . . . . . 7.7 cm 1-way system
Speakers . . . . . . . . . . . . . . . . . . 7.7 cm cone type
Impedance . . . . . . . . . . . . . . . . . . . . . . . . . . . . 4 Ω
Frequency range . . . . . . . . . . . . . 98 Hz to 20 kHz
Maximum input power . . . . . . . . . . . . . . . . .60 W
Dimensions
. . . . . . .105 mm (W) x 118 mm (H) x 114 mm (D)
Weight. . . . . . . . . . . . . . . . . . . . . . . . . . . . . . 0.6 kg
•
Subwoofer
Enclosure . . . . . . .Bass-reflex floorstanding type
System . . . . . . . . . . . . . . . . . 16 cm 1-way system
Speaker . . . . . . . . . . . . . . . . . . . . 16 cm cone type
Impedance . . . . . . . . . . . . . . . . . . . . . . . . . . . . 4 Ω
Frequency range . . . . . . . . . . . . . . 28 Hz to 1 kHz
Maximum Input Power . . . . . . . . . . . . . . . . .60 W
Dimensions
. . . . . . .190 mm (W) x 360 mm (H) x 317 mm (D)
Weight. . . . . . . . . . . . . . . . . . . . . . . . . . . . . . 3.8 kg
12_Additional_information.fm
53 ページ
2009年3月17日 火曜日 午後7時5分
Additional information
•
Accessories
Manufactured under license from Dolby
Laboratories. “Dolby”, “Pro Logic”, and the
double-D symbol are trademarks of Dolby
Laboratories.
Deutsch
Note
• Specifications and design subject to
possible modification without notice, due
to improvements.
Nederlands
Español
DRM (digital rights management)
copy protection is a technology
designed to prevent unauthorized
copying by restricting playback, etc. of
compressed audio files on devices
other than the PC (or other recording
equipment) used to record it. For
detailed information, please see the
instruction manuals or help files that
came with your PC and/or software.
Published by Pioneer Corporation.
Copyright © 2009 Pioneer Corporation.
All rights reserved.
Italiano
This product incorporates copyright
protection technology that is protected
by method claims of certain U.S. patents
and other intellectual property rights
owned by Macrovision Corporation and
other rights owners. Use of this copyright
protection technology must be authorized
by Macrovision Corporation, and is intended
for home and other limited viewing uses
only unless otherwise authorized by
Macrovision Corporation. Reverse
engineering or disassembly is prohibited.
Manufactured under license under U.S. Patent
#’s: 5,451,942; 5,956,674; 5,974,380; 5,978,762;
6,487,535 & other U.S. and worldwide patents
issued & pending. DTS and DTS Digital Surround
are registered trademarks and the DTS logos and
Symbol are trademarks of DTS, Inc. © 1996-2008
DTS, Inc. All Rights Reserved.
Français
This product includes FontAvenue®
fonts licenced by NEC Corporation.
FontAvenue is a registered trademark
of NEC Corporation.
English
Non-skid pads (small) . . . . . . . . . . . . . . . . . . . . 12
Non-skid pads (large) . . . . . . . . . . . . . . . . . . . . . 4
Mounting brackets . . . . . . . . . . . . . . . . . . . . . . . 4
Screws (for mounting brackets). . . . . . . . . . . . . 4
12
53
En
HTZ180DVD_en_RXJ.book Page 2
Friday, March 20, 2009
11:40 AM
IMPORTANTE
CAUTION
RISK OF ELECTRIC SHOCK
DO NOT OPEN
La luz intermitente con el símbolo de punta
de flecha dentro un triángulo equilátero.
Está convenido para avisar el usuario de la
presencia de “voltaje peligrosa” no aislada
dentro el producto que podría constituir un
peligro de choque eléctrico para las
personas.
ATENCIÓN:
PARA PREVENIR EL PELIGRO DE CHOQUE
ELÉCTRICO NO REMOVER LA TAPA NI LAS
PARTES DENTRO NO UTILIZADAS,
LLAMAR UNA PERSONA CUALIFICADA.
El punto exclamativo dentro un triángulo
equilátero convenido para avisar el usuário
de la presencia de importantes
instrucciones sobre el funcionamiento y la
manutención en la libreta que acompaña el
aparato.
D3-4-2-1-1_A1_Es
PRECAUCIÓN PARA LA VENTILACIÓN
'($&(#"#'!$&! &*(& &'#""#,'&' -(&'"#
$#"""/"&$"( "# 0%)##!#
$)'&)"*'##)" #&&#& $&(#"
#+$#"#(#' $)&' )*#
)! $
Cuando instale este aparato, asegúrese de dejar
espacio en torno al mismo para la ventilación con el
fin de mejorar la disipación de calor (por lo menos
10 cm encima, 10 cm detrás, y 10 cm en cada lado).
Antes de enchufar el aparato a la corriente, lea la
sección siguiente con mucha atención.
& %) $+&$%%& &%, "-%!$) %,$%#'& %) &) !! %"$!"! '&($%&"$&!!$$%"! & %) %$%$
) " "!%&$!$
"
$(&$#$"!!"!"#"!!
"!'"!!"" "#'%$'!(
! #$&"
#
ADVERTENCIA
Las ranuras y aberturas de la caja del aparato sirven
para su ventilación para poder asegurar un
funcionamiento fiable del aparato y para protegerlo
contra sobrecalentamiento. Para evitar el peligro de
incendio, las aberturas nunca deberán taparse ni
cubrirse con nada (como por ejemplo, periódicos,
manteles, cortinas) ni ponerse en funcionamiento el
aparato sobre una alfombra gruesas o una cama.
D3-4-2-1-7b_A_Sp
Entorno de funcionamiento
Temperatura y humedad del entorno de funcionamiento
+5 °C a +35 °C; menos del 85 % de humedad relativa
(rejillas de refrigeración no obstruidas)
No instale este aparato en un lugar mal ventilado, ni en
lugares expuestos a alta humedad o a la luz directa del
sol (o de otra luz artificial potente).
D3-4-2-1-7c*_A1_Es
Si la clavija del cable de alimentación de CA de este
aparato no se adapta a la toma de corriente de CA
que usted desea utilizar, deberá cambiar la clavija por
otra que se adapte apropiadamente. El reemplazo y
montaje de una clavija del cable de alimentación de
CA sólo deberá realizarlos personal de servicio
técnico cualificado. Si se enchufa la clavija cortada a
una toma de corriente de CA, puede causar fuertes
descargas eléctricas. Asegúrese de que se tira de la
forma apropiada después de haberla extraído.
El aparato deberá desconectarse desenchufando la
clavija de la alimentación de la toma de corriente
cuando no se proponga utilizarlo durante mucho
tiempo (por ejemplo, antes de irse de vacaciones).
D3-4-2-2-1a_A1_Es
Este producto es para tareas domésticas generales.
Cualquiera avería debida a otra utilización que
tareas domésticas (tales como el uso a largo plazo
para motivos de negocios en un restaurante o el uso
en un coche o un barco) y que necesita una
reparación hará que cobrarla incluso durante el
K041_Sp
período de garantía.
HTZ180DVD_en_RXJ.book Page 3
Friday, March 20, 2009
PRECAUCIÓN
Este aparato es un producto de láser de clase 1, pero
contiene un diodo de láser de clase superior a 1.
Para mantener la seguridad en todo momento, no
quite ninguna cubierta ni intente acceder al interior
del aparato.
Solicite todo el servicio técnico a personal cualificado.
En su aparato encontrará la siguiente etiqueta de
precaución.
Ubicación: parte superior de la unidad
11:40 AM
PRODUCTO
LASER CLASE 1
D3-4-2-1-8*_C_Sp
PRECAUCIONES CONCERNIENTES A LA
MANIPULACIÓN DEL CABLE DE
ALIMENTACIÓN
Tome el cable de alimentación por la clavija. No
extraiga la clavija tirando del cable. Nunca toque el
cable de alimentación cuando sus manos estén
mojadas, ya que esto podría causar cortocircuitos o
descargas eléctricas. No coloque la unidad, algún
mueble, etc., sobre el cable de alimentación. Asegúrese
de no hacer nudos en el cable ni de unirlo a otros
cables. Los cables de alimentación deberán ser
dispuestos de tal forma que la probabilidad de que
sean pisados sea mínima. Una cable de alimentación
dañado podrá causar incendios o descargas eléctricas.
Revise el cable de alimentación está dañado, solicite el
reemplazo del mismo al centro de servicio autorizado
PIONEER más cercano, o a su distribuidor.
S002*_Sp
PRECAUCIÓN
El interruptor de la alimentación STANDBY/ON de
este aparato no corta por completo toda la
alimentación de la toma de corriente de CA. Puesto
que el cable de alimentación hace las funciones de
dispositivo de desconexión de la corriente para el
aparato, para desconectar toda la alimentación del
aparato deberá desenchufar el cable de la toma de
corriente de CA. Por lo tanto, asegúrese de instalar
el aparato de modo que el cable de alimentación
pueda desenchufarse con facilidad de la toma de
corriente de CA en caso de un accidente. Para evitar
correr el peligro de incendio, el cable de
alimentación también deberá desenchufarse de la
toma de corriente de CA cuando no se tenga la
intención de utilizarlo durante mucho tiempo
seguido (por ejemplo, antes de irse de vacaciones).
D3-4-2-2-2a_A_Sp
HTZ180DVD_en_RXJ.book Page 4
Friday, March 20, 2009
11:40 AM
Gracias por comprar un producto Pioneer.
Le sugerimos que lea atentamente este manual de instrucciones a fin de que aprenda a utilizar su
equipo de manera adecuada. Después de leer las instrucciones, guárdelas en un lugar seguro para
futuras consultas.
Contenido
01 Guía de configuración de los altavoces
05 Escuchar su sistema
Distribución del sonido del equipo
home cinema . . . . . . . . . . . . . . . . . . . . . . . . .
Distribución de los altavoces en 5 puntos . . .
Distribución de los altavoces en 3 puntos . . .
Preparación de los altavoces . . . . . . . . . . . . .
Colocación de almohadillas
antideslizantes . . . . . . . . . . . . . . . . . . . . . . .
Montaje en la pared de los altavoces . . . . . . .
Antes de empezar a montar . . . . . . . . . . . . .
Fijación de las escuadras . . . . . . . . . . . . . . .
Notas adicionales sobre la ubicación de los
altavoces. . . . . . . . . . . . . . . . . . . . . . . . . . . . .
Selección del modo Listening . . . . . . . . . . . . 20
Modo de escucha Auto . . . . . . . . . . . . . . . . . 20
Escucha con sonido envolvente . . . . . . . . . . 20
Uso del modo Front Surround
(Sonido envolvente frontal) . . . . . . . . . . . . . . 21
Escucha en estéreo . . . . . . . . . . . . . . . . . . . . 21
Escucha con cascos . . . . . . . . . . . . . . . . . . . 21
Ajuste de los graves y agudos . . . . . . . . . . . . 21
Uso de los modos SFC . . . . . . . . . . . . . . . . . 21
Refuerzo del nivel de graves . . . . . . . . . . . . . 22
Uso del MP3 Expander . . . . . . . . . . . . . . . . . 22
Uso del modo Voice Enhancer . . . . . . . . . . . 22
Effective Sound
(para un sonido óptimo) . . . . . . . . . . . . . . . . 22
6
6
6
6
6
6
6
7
7
02 Conexión
Conexiones básicas . . . . . . . . . . . . . . . . . . . . 8
03 Controles y pantallas
Panel frontal . . . . . . . . . . . . . . . . . . . . . . . . .
Pantalla . . . . . . . . . . . . . . . . . . . . . . . . . . . .
Mando a distancia . . . . . . . . . . . . . . . . . . . .
Inserción de las pilas en el mando
a distancia . . . . . . . . . . . . . . . . . . . . . . . . .
Utilización del mando a distancia. . . . . . . .
12
12
13
14
14
04 Primeros pasos
Ajuste de la distribución de los altavoces . . .
Ajuste de los niveles de canal . . . . . . . . . .
Uso de la información en pantalla . . . . . . . .
Reproducción de discos . . . . . . . . . . . . . . . .
Controles de reproducción básicos . . . . . .
Punto de reanudación y último punto
memorizado . . . . . . . . . . . . . . . . . . . . . . . .
Menús de disco DVD-Vídeo . . . . . . . . . . . .
Menús PBC de Vídeo CD/Súper VCD . . . . .
Escucha de la radio . . . . . . . . . . . . . . . . . . .
Mejora de la recepción FM . . . . . . . . . . . . .
Reducción de ruido en la recepción AM. . .
Memorización de emisoras . . . . . . . . . . . .
Escucha de presintonías . . . . . . . . . . . . . .
Escucha de otras fuentes . . . . . . . . . . . . . . .
Ajuste del temporizador de apagado. . . . . . .
4
Es
15
15
16
16
17
17
17
18
18
18
18
19
19
19
19
06 Características de reproducción de
disco
Exploración de discos . . . . . . . . . . . . . . . . . . 23
Reproducción a velocidad lenta . . . . . . . . . . 23
Avance/retroceso de cuadro . . . . . . . . . . . . . 23
Reproducción de una presentación de
diapositivas JPEG . . . . . . . . . . . . . . . . . . . . . 23
Navegación en discos DVD y Vídeo CD/
Súper VCD con Disc Navigator . . . . . . . . . . . 24
Búsqueda de archivos Windows MediaTM
Audio (WMA), MP3, MPEG-4 AAC, DivX video/
WMV y JPEG con Disc Navigator. . . . . . . . . . 25
Uso de las listas de reproducción . . . . . . . . . 25
Programación de listas de reproducción . . . . 25
Cómo escuchar las listas de
reproducción . . . . . . . . . . . . . . . . . . . . . . . 26
Cómo borrar archivos de una lista de
reproducción . . . . . . . . . . . . . . . . . . . . . . . 26
Reproducción en bucle de una sección
de un disco . . . . . . . . . . . . . . . . . . . . . . . . . . 26
Uso de la reproducción de repetición . . . . . . 26
Uso de la reproducción aleatoria. . . . . . . . . . 26
Creación de una lista de programa . . . . . . . . 27
Otras funciones disponibles desde
el menú de programa . . . . . . . . . . . . . . . . . 27
Búsqueda en un disco . . . . . . . . . . . . . . . . . 27
Cambio de subtítulos . . . . . . . . . . . . . . . . . . 28
Cambio del idioma/canales de sonido. . . . . . 28
Ampliación de la imagen en pantalla . . . . . . 28
Cambio de ángulos de cámara . . . . . . . . . . . 28
Visualización de la información de disco. . . . 28
HTZ180DVD_en_RXJ.book Page 5
Friday, March 20, 2009
11:40 AM
08 Cantar karaoke
Cantar karaoke . . . . . . . . . . . . . . . . . . . . . . . 31
Cambio de la mezcla de voces . . . . . . . . . . 31
Cambio de la lista de fondo. . . . . . . . . . . . . 31
09 Menús Audio Settings y Video Adjust
Menú Audio Settings. . . . . . . . . . . . . . . . . . . 32
Audio DRC . . . . . . . . . . . . . . . . . . . . . . . . . 32
Menú Video Adjust . . . . . . . . . . . . . . . . . . . . 32
10 Menú Initial Settings
11 Otras conexiones
Nederlands
Deutsch
Conexión de componentes auxiliares . . . . . . 38
Conexión mediante la salida de vídeo de
componentes . . . . . . . . . . . . . . . . . . . . . . . . 39
Acerca del vídeo de exploración
progresiva . . . . . . . . . . . . . . . . . . . . . . . . . . 39
Conexión mediante HDMI . . . . . . . . . . . . . . . 39
Ajuste del sonido HDMI . . . . . . . . . . . . . . . 39
Restauración de la conexión HDMI. . . . . . . 40
Acerca de HDMI . . . . . . . . . . . . . . . . . . . . . 40
Conexión de antenas externas. . . . . . . . . . . . 40
Italiano
Uso del menú Initial Settings . . . . . . . . . . . . 33
Configuración de “Video Output”
(Salida de Vídeo) . . . . . . . . . . . . . . . . . . . . . . 33
Configuración de “Language” (Idioma) . . . . . 34
Configuración de “Display” (Pantalla) . . . . . . 34
Configuración de “Options” (Opciones) . . . . . 35
Configuración de “Speakers” (Altavoces) . . . 35
Parental Lock . . . . . . . . . . . . . . . . . . . . . . . 35
Acerca de los contenidos DivX® VOD . . . . . 36
Distancia de los altavoces . . . . . . . . . . . . . 36
Français
Compatibilidad de reproducción
de formatos de disco/contenidos . . . . . . . . . . 41
Tabla de compatibilidad de discos . . . . . . . 41
Acerca de la compatibilidad con
DVD+R/DVD+RW . . . . . . . . . . . . . . . . . . . 42
Acerca de DivX . . . . . . . . . . . . . . . . . . . . . . 42
Acerca de WMV . . . . . . . . . . . . . . . . . . . . . 43
Acerca de MPEG-4 AAC . . . . . . . . . . . . . . . 43
Acerca de WMA . . . . . . . . . . . . . . . . . . . . . 43
Uso y cuidado de los discos. . . . . . . . . . . . . . 43
Regiones de DVD-Vídeo. . . . . . . . . . . . . . . . 44
Instalación y mantenimiento . . . . . . . . . . . . . 44
Sugerencias de instalación . . . . . . . . . . . . . 44
Limpieza de la lente lectora . . . . . . . . . . . . . 44
Problemas de condensación . . . . . . . . . . . . 44
Desplazamiento de la unidad . . . . . . . . . . . 44
Tamaños de pantalla y formatos de disco . . . 45
Usuarios de televisores de
pantalla ancha . . . . . . . . . . . . . . . . . . . . . . 45
Usuarios de televisores estándar. . . . . . . . . 45
Configuración del sistema de televisor . . . . . 45
Ajuste de paso de frecuencia. . . . . . . . . . . . . 46
Debilitamiento de la luz de la pantalla . . . . . . 46
Ajuste de la función Key Lock . . . . . . . . . . . . 46
Restablecimiento del sistema . . . . . . . . . . . . 46
Uso de la lista de códigos de idioma . . . . . . . 46
Solución de problemas . . . . . . . . . . . . . . . . . 47
General . . . . . . . . . . . . . . . . . . . . . . . . . . . . 47
Reproductor de DVD/CD/Vídeo CD . . . . . . . 48
Sintonizador . . . . . . . . . . . . . . . . . . . . . . . . 49
Conexión USB . . . . . . . . . . . . . . . . . . . . . . . 49
Conexión HDMI . . . . . . . . . . . . . . . . . . . . . . 49
Mensajes de error . . . . . . . . . . . . . . . . . . . . 50
Lista de códigos de idioma . . . . . . . . . . . . . . 51
Lista de códigos del país/zona . . . . . . . . . . . . 51
Especificaciones . . . . . . . . . . . . . . . . . . . . . . 52
Español
12 Información adicional
Uso de la interfaz USB . . . . . . . . . . . . . . . . . 29
Grabación de pistas de un CD de
música en un dispositivo USB. . . . . . . . . . . . 29
Grabación de todas las pistas . . . . . . . . . . . 29
Grabación de pistas específicas . . . . . . . . . 30
English
07 Reproducción de USB y grabación
5
Es
HTZ180DVD_en_RXJ.book Page 6
Friday, March 20, 2009
11:40 AM
Capítulo 1
Guía de configuración de los
altavoces
Distribución del sonido del
equipo home cinema
Montaje en la pared de los
altavoces
Según el tamaño y las características de la
habitación, puede disponer los altavoces de
cualquiera de las siguientes dos maneras
utilizando este sistema. Para la configuración
de los altavoces, consulte la Guía de
configuración.
El altavoz frontal y el de sonido envolvente
tienen soportes de montaje.
Distribución de los altavoces en 5
puntos
Ésta es una disposición estándar de altavoces
de sonido envolvente multicanal para obtener
un sonido Home Theater óptimo de 5.1 canales.
Distribución de los altavoces en 3
puntos
Esta disposición es ideal para lugares en los que
no exista espacio para colocar altavoces en la
parte posterior o se quiera evitar la utilización de
cables largos en el área de escucha.
Preparación de los altavoces
Colocación de almohadillas
antideslizantes
• Coloque las almohadillas antideslizantes
pequeñas en la base de cada altavoz. Las
cuatro almohadillas antideslizantes grandes
son para el altavoz de graves.
Use el adhesivo suministrado para colocar
Antes de empezar a montar
• Los altavoces son pesados y, por lo tanto,
podrían hacer que se aflojasen los
tornillos, o que cediese el material de la
pared que los soporta, ocasionando la
caída de los altavoces. Asegúrese de que la
pared en la que se propone montar los
altavoces tenga suficiente resistencia para
soportarlos. No monte el altavoz en
tableros contrachapados ni en superficies
poco sólidas.
• No se suministran los tornillos de montaje.
Utilice tornillos apropiados para el material
de la pared y el peso de los altavoces.
PRECAUCIÓN
• Si tiene dudas acerca de la calidad y la
solidez de la pared, consulte a un
profesional.
• Pioneer no se hace responsable de
accidentes, daños o lesiones como
resultado de una instalación inadecuada.
5 mm
10 mm
Tornillo de montaje
(no suministrado)
4 almohadillas en la base (superficie plana) de
cada altavoz.
5 mm a 7 mm
6
Es
HTZ180DVD_en_RXJ.book Page 7
Friday, March 20, 2009
Fijación de las escuadras
• Al fijar la escuadra a la parte posterior del
altavoz, asegúrese de ajustar al máximo el
tornillo suministrado.
• No fije las escuadras al altavoz central.
Precauciones:
Deutsch
• Asegúrese de que todo el cable desnudo
del altavoz está retorcido entre sí y
completamente insertado en el terminal
del altavoz. Si cualquier parte del cable
desnudo del altavoz está en contacto con
el panel trasero, podría cortar la
alimentación como medida de seguridad.
Nederlands
• Cuando instale el altavoz central sobre el
televisor, cerciórese de asegurarlo con
cinta o algún otro medio apropiado. De lo
contrario, el altavoz podría caerse del
televisor debido a impactos, como
terremotos, y poner en peligro a quienes se
encontrasen cerca, o dañar el propio
altavoz.
• No coloque el altavoz central ni el altavoz
de graves en una pared o techo. Podrían
caerse y provocar lesiones.
Italiano
• Al utilizar una distribución de altavoces de
cinco puntos, instale los altavoces de
sonido envolvente ligeramente por encima
del nivel del oído para un efecto óptimo.
Français
• Instale los altavoces delanteros izquierdo y
derecho principales a igual distancia del
televisor.
• El altavoz de graves no está
magnéticamente blindado, motivo por el
que no deberá colocarse cerca de una
televisión ni de un monitor. Los medios de
almacenamiento magnético (como
disquetes de ordenador y casetes de audio
y vídeo) no deberán guardarse cerca del
altavoz de graves.
Español
Notas adicionales sobre la
ubicación de los altavoces
• Los altavoces frontales, centrales y de
sonido envolvente suministrados con este
sistema disponen de blindaje magnético.
Sin embargo, dependiendo de la ubicación
de instalación, es posible que se produzca
distorsión de colores si los altavoces están
demasiado cerca de la pantalla del
televisor. Cuando suceda esto, ponga el
interruptor de alimentación del televisor en
la posición OFF y vuelva a situarlo en la
posición ON después de entre 15 y 30
minutos. Si el problema persiste, aleje el
sistema de altavoces de la televisión.
English
Tornillo
para escuadra
(suministrado)
11:40 AM
7
Es
HTZ180DVD_en_RXJ.book Page 8
Friday, March 20, 2009
11:40 AM
Capítulo 2
Conexión
Conexiones básicas
Para obtener el mejor sonido envolvente, instale los altavoces como se indica a continuación.
Debe existir una separación de entre 1,8 m a 2,7 m entre los altavoces de sonido envolvente
derecho e izquierdo.
LINE 1
R
FRONT
L
CENTER
L
AC IN
PR
PB
Y
R
R
ANALOG AUDIO IN
COMPONENT
VIDEO
VIDEO(TV)
SURROUND
L
Frontal izquierdo Centro
(blanco)
(verde)
HDMI OUT
Posición de escucha
A entrada de vídeo
Altavoz de
subgraves
(púrpura)
Envolvente
derecho
(gris)
• Antes de conectar este sistema o de
cambiar las conexiones, cerciórese de
poner el interruptor de alimentación en
OFF y de desconectar el cable de
alimentación del tomacorriente de la red.
Después de haber finalizado la conexiones,
conecte el cable de alimentación al
tomacorriente de la red.
ADVERTENCIA
• Pioneer no será responsable de ningún
accidente provocado por un montaje o
instalación defectuosa, fuerza insuficiente
de las paredes de montaje, elementos de
montaje (u otros elementos del edificio),
usos incorrectos o desastres naturales.
Es
AM LOOP
VIDEO OUT
Importante
8
Antena FM
FM
UNBAL 75 Ω
SUB
WOOFER
SPEAKERS (4 Ω )
Frontal
derecho
(rojo)
Envolvente
izquierdo
(azul)
A
N
T
E
N
N
A
1
Antena de
cuadro AM
Televisor
Ensamble la antena de cuadro de AM.
fig. a
fig. b
fig. c
a. Doble el soporte en el sentido indicado por
la flecha.
b. Enganche el cuadro en el soporte.
c. Si desea fijar la antena en una pared u otra
superficie, realice el paso b después de
haber asegurado el soporte con tornillos.
Se recomienda determinar la intensidad de
recepción antes de asegurar el soporte con
los tornillos.
HTZ180DVD_en_RXJ.book Page 9
2
Friday, March 20, 2009
Conecte las antenas de AM y FM.1
a. Quite los protectores de los dos cables de
la antena AM. Conecte un cable de la
antena de cuadro a cada terminal de
antena AM.2
11:40 AM
• Haga coincidir el cable con código de color
con el indicador de color de la etiqueta y, a
continuación, inserte el cable con código
de color en el lado rojo (+) y el otro cable
en el lado negro (–).
Negro (–) Rojo (+)
Cuando seleccione la distribución de altavoces
en 3 puntos, siga los pasos a hasta c, que
aparecen a continuación, para configurar los
altavoces.
31
b. Empuje la clavija3 de la antena de FM en el
contacto central de la toma de antena de
FM.
a. La base de los altavoces de sonido
envolvente se acoplan en la ranura circular
situada en la parte superior de los altavoces
frontales, como muestra la ilustración.
Cable con código de color
(conectar al altavoz)
• Gire y retire los protectores de todos los
cables.
Nederlands
Enchufe con código de color
(conectar al panel trasero)
Italiano
3-1 Conecte cada altavoz.
• Conecte los cables al altavoz.
Français
2
Español
Para cada terminal, presione la lengüeta
para abrirlo, inserte el conductor, y
después suelte para que la conexión quede
segura.
English
Cable con código
de color
Deutsch
Nota
1 • Mantenga los cables de las antenas alejados del receptor y de otros cables.
• Si la recepción con la antena suministrada es deficiente, consulte Mejora de la recepción FM en la página 18 o
Conexión de antenas externas en la página 40.
• No utilice ninguna antena que no sea la antena de cuadro suministrada o una antena externa según se describe
en página 40.
2 • No permita que entre en contacto con objetos metálicos y evite colocarla cerca de ordenadores, televisiones u otros
aparatos eléctricos.
• Si la recepción de la radio es deficiente, usted podrá mejorarla reinsertando cada conductor de la antena en el
terminal opuesto.
• Para conseguir la mejor recepción, no retuerza los hilos de la antena de cuadro de AM ni los enrolle alrededor de
la antena de cuadro.
3 Para asegurar una óptima recepción, cerciórese de que la antena de FM esté completamente extendida y no
enrollada ni colgada en la parte posterior de la unidad.
9
Es
HTZ180DVD_en_RXJ.book Page 10 Friday, March 20, 2009
b. Fije el cable del altavoz.
Después de comprobar la holgura necesaria
para girar el altavoz (consulte el siguiente
paso), utilice la ranura que se proporciona
para fijar el cable del altavoz.
11:40 AM
3-2 Conecte cada terminal de altavoz al
receptor.
• Conecte el otro extremo a los terminales
del altavoz con código de color de la parte
posterior del receptor. Cerciórese de
insertarlos a fondo.
La lengüeta pequeña del extremo del
conductor de la clavija del altavoz deberá
quedar encarada hacia arriba o hacia
abajo dependiendo de si está insertándose
en uno de los terminales superiores o
inferiores del altavoz. Cerciórese de
realizar correctamente las conexiones.
c. Mueva los altavoces hacia la pared más
cercana alineando las flechas para conseguir
un excelente sonido frontal envolvente.
Para el modo Sonido frontal envolvente, gire
cada altavoz de sonido envolvente de manera
que la flecha situada en la base esté
alineada con la flecha (FRONT SURROUND)
del altavoz frontal. Para el modo Extra Power,
coloque todos los altavoces mirando hacia
adelante. Consulte Escuchar su sistema para
más información sobre el uso de los modos
Front Surround y Extra Power.
PRECAUCIÓN
• Para evitar accidentes, asegúrese de que
el altavoz de sonido envolvente está fijado
correctamente en la parte superior del
altavoz frontal.
• No fije los altavoces a la pared o a los
soportes de altavoz en la distribución de 3
puntos.
Terminal superior
Terminal inferior
PRECAUCIÓN
• Estos terminales de altavoces poseen
tensión PELIGROSA. Para evitar el riesgo
de descarga eléctrica cuando conecte o
desconecte los cables de los altavoces,
desconecte el cable de corriente antes de
tocar las partes que no están aisladas.
• No conecte ningún altavoz que no haya
sido suministrado con este sistema.
• No conecte los altavoces suministrados a
ningún amplificador que no sea el que se
suministra con este sistema. La conexión a
cualquier otro amplificador puede
ocasionar mal funcionamiento o un
incendio.
• Después de conectar los enchufes, empuje
ligeramente los cables para asegurarse de
que los extremos de los cables estén
conectados a los terminales de forma
segura. Las conexiones defectuosas
pueden producir ruidos e interrupciones
en el sonido.
• Si los alambres de los cables salen de las
terminales, de modo que los alambres
puedan entrar en contacto entre sí, se
genera una carga adicional excesiva en el
amplificador. Esto puede provocar que el
amplificador deje de funcionar e, incluso,
que se produzcan daños en el
amplificador.
10
Es
HTZ180DVD_en_RXJ.book Page 11 Friday, March 20, 2009
11:40 AM
4 Conecte un extremo a la entrada de vídeo
de su televisión.
• Utilice el cable de vídeo suministrado.
Conecte el otro extremo a la salida de
vídeo del receptor.
5
Conecte el cable de alimentación.1
• Conecte el cable de alimentación a la
entrada de CA del receptor. Conecte el
cable de alimentación a la toma de
corriente de la pared.
Español
6
English
• Esta unidad está equipada con tecnología
de protección contra copia. No conecte
esta unidad a su televisión mediante VCR
utilizando cables AV, ya que la imagen
procedente de esta unidad no se
visualizará correctamente en su televisión.
Français
AC IN
Italiano
A salida de CA
Nederlands
Deutsch
Nota
1 • No conecte ningún otro cable de alimentación más que el suministrado con este sistema.
• No conecte ningún otro cable de alimentación suministrado para ningún fin más que no sea la conexión de este
sistema.
11
Es
HTZ180DVD_en_RXJ.book Page 12 Friday, March 20, 2009
11:40 AM
Capítulo 3
Controles y pantallas
Panel frontal
1
Pantalla
2
3
4
5
1
6
2 3
4
5
PRGSVE SOUND
DTS F.SURR.
STANDBY/ ON
OPEN/CLOSE
FUNCTION
12 11
8
7
9
MAIN
MIC
SUB
PHONES
USB
MAIN
MIC
SUB
PHONES
USB
10
11
RPT -1
kHz PGM
MHz RDM
2D
2PL
VOLUME
12
1 STANDBY/ON (página 15, 30, 44, 46 y
48)
2
OPEN/CLOSE (página 16, 30 y 47)
3
Función
4
5
6
VOLUME +/– (página 16)
7
Bandeja de disco (página 16)
8
Sensor de mando a distancia (página 14)
9
Pantalla
6
10
9 8
1 Indicadores de reproducción (página 20)
DTS se enciende durante la reproducción de
una fuente DTS. 2PL II se enciende durante la
descodificación 2Dolby Pro Logic II y 2D se
enciende durante la reproducción de fuentes
Dolby Digital.
2 PRGSVE (página 39)
Se ilumina cuando se da la señal de vídeo de
exploración progresiva desde la terminal de
salida de vídeo de componentes.
3 SOUND (página 21)
Se ilumina cuando los modos SFC, los
controles de tono (agudos, bajos o refuerzo de
bajos), el modo MP3 Expander y el modo Voice
Enhancer están activados.
4 F.SURR. (página 21)
Se ilumina cuando se ha seleccionado el modo
Extra Power/Front Surround.
5 RPT y RPT-1 (página 26)
RPT se ilumina durante la reproducción en
modo de repetición. RPT-1 se enciende
durante la reproducción en modo de repetición
de una sola pista.
11 Tomas de entrada MIC (página 31)
6 PGM (página 25 y 27)
Se ilumina durante la reproducción de un
programa o de la lista de reproducción.
12 Toma PHONES (página 21)
7
10 USB interfaz (página 29)
7
Indicadores del sintonizador (página 18)
Se ilumina cuando se recibe una
transmisión,
Se ilumina cuando se recibe
una transmisión estéreo FM,
Se ilumina
cuando está seleccionada la recepción mono
FM.
8 RDM (página 26)
Se enciende durante la reproducción en modo
aleatorio.
12
Es
HTZ180DVD_en_RXJ.book Page 13 Friday, March 20, 2009
9 kHz/MHz (página 18)
Indica la unidad de frecuencia (kHz para AM,
MHz para FM).
11:40 AM
3 Botones numéricos, CLEAR, DISPLAY,
SLEEP y controles del DVD
CLEAR
DISPLAY (página 28)
(página 19)
11
Se enciende cuando el temporizador de
apagado está activado.
SHIFT+SLEEP (página 19)
SHIFT+USB REC (página 29)
SHIFT+AUDIO (página 28)
12
Se enciende durante la reproducción.
SHIFT+SUBTITLE (página 28)
SHIFT+ANGLE (página 28)
4
LINE
1
1
2
3
USB REC
AUDIO
SUBTITLE
4
5
6
ANGLE
ZOOM
8
9
SLEEP
CLEAR
DISPLAY
2
TUNE
SETUP
ECHO
MIC VOL
ENTER
PRESET
KARAOKE
RETURN
AUTO/
STEREO
SURROUND
SOUND
MP3 EXP/
V.ENH
HOME MENU
7
Controles de sonido
INPUT
SHIFT
CHANNEL
CLASS
VOLUME
VOLUME
T.EDIT
MUTE
SURROUND (página 20 y 21)
17
SOUND (página 21 y 22)
18
MP3 EXP/V.ENH (página 22)
8 Controles de reproducción
(página 17 y 23)
1 STANDBY/ON (página 15, 30, 44, 46 y
48)
2
Botones de selección de función
Deutsch
16
Nederlands
6
AUTO/STEREO (página 20 y 21)
TV CONTROL
10
TUNE (página 18)
PRESET (página 18)
15
8
9
ENTER
14
HOME
MENU
TUNE
Botones de flecha
13
MENU
PRESET
6
SHIFT+ / SHIFT+ (página 31)
Italiano
TOP MENU
SHIFT+KARAOKE (página 31)
SHIFT+ECHO (página 31)
12
3
0
7
5
PLAYLIST
Français
USB
7
4
5
SHIFT+SETUP (página 15, 19, 39, 43, 45 y
46)
TUNER
(FM/AM) OPEN/CLOSE
11
1
2
3
DVD/CD
TOP MENU (página 17 y 28)
Español
SHIFT+ZOOM (página 28)
Mando a distancia
STANDBY
/ON
English
10 Caracteres en pantalla
9 Botones TV CONTROL
Controlan los televisores de pantalla plana de
Pioneer.1
10 SHIFT
11 OPEN/CLOSE (página 16, 30 y 47)
12 PLAYLIST botones (página 25)
13 MIC VOL +/– (página 31)
Nota
1 Mantenga presionado el botón del número 1 durante más de tres segundos mientras pulsa CLEAR. Si la televisión continúa
sin responder, mantenga presionado el botón del número 2. Después de cambiar correctamente la tecla, la alimentación de la
televisión puede manejarse presionando TV CONTROL apuntando hacia la televisión.
13
Es
HTZ180DVD_en_RXJ.book Page 14 Friday, March 20, 2009
14 MENU (página 17, 24 y 28)
15 RETURN
16 Teclas de sintonización
CLASS (página 19)
SHIFT+T.EDIT (página 19)
17 MUTE
18 VOLUME +/– (página 16)
Inserción de las pilas en el mando a
distancia
1 Abra la tapa del compartimiento de las
pilas en la parte trasera del control remoto.
2 Introduzca dos pilas AA/R6 en el
compartimiento de las pilas y siga las
indicaciones (, ) del interior del
compartimiento.
• No deje libros u otros objetos posados
sobre el mando a distancia, ya que los
botones podrían quedar presionados,
provocando un agotamiento más rápido de
las pilas.
• No utilice ni almacene las pilas bajo la luz
solar directa o en lugares excesivamente
calientes, como el interior de un coche o
cerca de un calefactor. Esto puede
ocasionar que las baterías goteen, se
sobrecalienten, exploten o se incendien.
También se puede reducir la vida o el
rendimiento de las mismas.
Utilización del mando a distancia
El mando a distancia tiene un alcance de unos
7 m desde el sensor del mando en el panel
frontal y abarca un ángulo de 30 grados.
El uso incorrecto de las pilas puede ser
peligroso y producir fugas y explosiones. Siga
estos consejos:
• Introduzca siempre las pilas en el
compartimento para pilas de modo que
coincidan correctamente las polaridades
positiva y negativa , según se indica
en el interior del compartimento.
• Es posible que el mando a distancia no
funcione correctamente si el sensor del
mando de la unidad recibe demasiada luz,
como la luz directa del sol o la luz
fluorescente.
• No mezcle nunca pilas nuevas y usadas.
• Es posible que el mando a distancia no
funcione correctamente si se utiliza esta
unidad cerca de aparatos que emitan rayos
infrarrojos o si se utilizan mandos a
distancia de otros aparatos. Además, el
uso de este mando a distancia puede
provocar que otros aparatos funcionen
incorrectamente.
Cierre la tapa.
PRECAUCIÓN
• Según la marca, las pilas del mismo
tamaño pueden tener distintos voltajes. No
mezcle distintas marcas de pilas.
• Cuando tenga que desechar las pilas
gastadas, hágalo conforme a las
normativas gubernamentales o a las
normas medioambientales de instrucción
publica que se apliquen en su país o zona.
Es
• Para evitar fugas en las pilas, retírelas
cuando no vaya a utilizar el mando a
distancia durante un largo periodo (un mes
o más). Si han producido fugas, limpie
cuidadosamente cualquier fluido de la pila
del compartimento y sustituya las pilas por
otras nuevas.
• Es posible que el mando a distancia no
funcione si existe un obstáculo entre el
mando a distancia y la unidad de
visualización o si el mando a distancia no
está dirigido directamente hacia el sensor
del mando de la unidad de visualización
con el ángulo correcto.
3
14
11:40 AM
• Cuando el alcance operativo del mando
resulte demasiado corto, sustituya las
pilas.
HTZ180DVD_en_RXJ.book Page 15 Friday, March 20, 2009
11:40 AM
Capítulo 4
Primeros pasos
Seleccione la distribución de los altavoces
para el ajuste de los altavoces que haya fijado
para el entorno de su área de escucha.
2 SELECT SPEAKER LAYOUT aparecerá en
la pantalla durante unos 10 segundos.
• 5 SPOT – Óptimo para sonido Home
Theater de 5.1 canales colocando los dos
altavoces de sonido envolvente detrás de la
posición de escucha.
4
Pulse ENTER para confirmar.1
3 Utilice / para seleccionar CH LEVEL
y, a continuación, pulse ENTER.
4 Utilice / para seleccionar
TESTTONE y, a continuación, pulse ENTER.
El tono de prueba se emite en el siguiente
orden (desde los altavoces activos en el modo
de escucha actual):
• L – Altavoz frontal izquierdo
• C – Altavoz central
• R – Altavoz frontal derecho
• SR – Altavoz de sonido envolvente derecha
• SL – Altavoz de sonido envolvente izquierda
• SW – Subwoofer3
5 Utilice el botón VOLUME +/– para
ajustar el volumen a un nivel adecuado.4
6 Utilice / para ajustar los niveles de
cada canal.
Desde la posición principal de escucha debe
escuchar el tono de prueba en el mismo
volumen para cada altavoz. El intervalo de nivel
de canal es ±10 dB.
7 Cuando haya finalizado, pulse ENTER
para salir de la configuración del tono de
prueba.
Deutsch
• 3 SPOT – Es la distribución clásica del
modo Front Surround. Los dos altavoces de
sonido envolvente se colocan frente a la
posición de escucha.
2 Utilice / para seleccionar
SOUNDSET y, a continuación, pulse ENTER.
Nederlands
Consulte la Guía de configuración para más
información sobre la distribución de los
altavoces y la descripción del modo.
Pulse SHIFT+SETUP.
Italiano
3 Utilice / para seleccionar la
distribución adecuada de los altavoces.
Existen dos modos de distribución de los
altavoces: distribución en 3 ó en 5 puntos.
1
Français
1 Presione STANDBY/ON y confirme que
WELCOME aparezca en la pantalla.
Ajuste los niveles de canal relativos desde la
posición principal de escucha.2
Español
La primera vez que encienda el sistema,
aparecerá el siguiente ajuste de distribución
de altavoces. Si apaga el sistema sin finalizar
este ajuste, volverá a aparecer la próxima vez
que encienda el sistema.
Ajuste de los niveles de canal
English
Ajuste de la distribución de los
altavoces
Nota
1 Para cambiar el ajuste, pulse SHIFT+SETUP, utilice / para seleccionar SYS SET y, a continuación, utilice / para
seleccionar LAYOUT para comenzar el procedimiento de ajuste.
2 • Esta opción sólo está disponible cuando está seleccionado DVD/CD y está detenida la reproducción. Asegúrese también de
que los cascos estén desconectados.
• Para ajustar el balance general mientras escucha la fuente de sonido que desea, pulse SHIFT+SETUP, utilice / para
seleccionar SOUNDSET y, a continuación, pulse ENTER. Utilice / para seleccionar CH LEVEL y, a continuación, pulse
ENTER. Utilice / para desplazarse por los canales, y / para ajustar los niveles de los canales. Pulse ENTER cuando haya
terminado.
3 Puesto que el subwoofer produce frecuencias ultra bajas, su sonido puede parecer más bajo de lo que es.
4 Si el volumen está ajustado en 51 o superior, no podrá seleccionar TESTTONE y se restringirá la gama de ajuste del nivel de
los canales. Además, si la gama del nivel de los canales de cualquiera de los altavoces está ajustado en el lado +, el volumen
máximo también está restringido.
15
Es
HTZ180DVD_en_RXJ.book Page 16 Friday, March 20, 2009
Uso de la información en
pantalla
Para facilitar su uso, el sistema utiliza la
información gráfica que aparece en pantalla
(OSD).
La forma de navegación es prácticamente la
misma en todas las pantallas: use , , ,
para resaltar otro elemento y pulse ENTER
para seleccionarlo.1
Importante
11:40 AM
1 Si el reproductor no está encendido,
enciéndalo.
Si va a reproducir un disco de vídeo, encienda
también el televisor y asegúrese de que tiene
ajustada la entrada de vídeo correspondiente.
2 Pulse OPEN/CLOSE para cargar un
disco.
Cargue los discos con la cara de la etiqueta
hacia arriba, usando la guía de la bandeja del
disco para alinear el disco (si va a cargar un
disco DVD de doble cara, colóquelo con la
parte que desee reproducir hacia abajo).
• A lo largo de este manual, ‘Seleccionar’
significa utilizar los botones de flecha para
resaltar un elemento en pantalla y, a
continuación, pulsar ENTER.
Botón
Función
HOME
MENU
Muestra/abandona la información
en pantalla.
Cambia el elemento de menú
resaltado.
ENTER
Selecciona el elemento de menú
resaltado.
RETURN Vuelve al menú principal sin
guardar los cambios.
Sugerencia
• La guía de botones que aparece en la parte
inferior de todas las pantallas de
información muestra qué botones hay que
usar para esa pantalla.
Reproducción de discos
En esta sección se explican los controles
básicos para reproducir discos DVD, CD, Vídeo
CD/Súper VCD, vídeo DivX/WMV y WMA/MP3/
MPEG-4 AAC. En el capítulo 6 se tratan las
funciones más avanzadas.
3 Pulse (reproducir) para empezar la
reproducción.
Si está reproduciendo un DVD o Vídeo CD/
Súper VCD, puede aparecer un menú en
pantalla. Para desplazarse por este menú,
consulte Menús de disco DVD-Vídeo y Menús
PBC de Vídeo CD/Súper VCD en la página 18.
Si introduce un disco con imágenes JPEG, se
inicia una presentación de diapositivas. Para
obtener más información, consulte
Reproducción de una presentación de
diapositivas JPEG en la página 23.
• Si el disco contiene una mezcla de vídeo
DivX/WMV y archivos de otros formatos
(por ejemplo, MP3), seleccione primero en
el menú en pantalla si desea reproducir los
archivos de vídeo DivX/WMV (DivX/WMV)
o los de otros formatos (MP3/WMA/JPEG/
MPEG-4 AAC).
• Consulte Compatibilidad de reproducción
de formatos de disco/contenidos en la
página 41si desea reproducir un DualDisc
(disco híbrido DVD/CD).
4 Ajuste el volumen.
Utilice el control VOLUME +/–.
Importante
• A lo largo de este manual, el término ‘DVD’
se refiere a DVD-Video, DVD-R y DVD-RW.
Nota
1 El protector de pantalla aparece después de cinco minutos de inactividad.
16
Es
HTZ180DVD_en_RXJ.book Page 17 Friday, March 20, 2009
Controles de reproducción básicos
La siguiente tabla muestra los controles
básicos para reproducir discos del mando a
distancia.1 Encontrará otras funciones de
reproducción en el capítulo 6.
Inicia/reanuda la reproducción normal.
• Si en la pantalla aparece RESUME o
LAST MEM, la reproducción empieza a
partir del punto de reanudación o del
que se memorizó por última vez
(consulte Punto de reanudación y
último punto memorizado abajo).
Hace una pausa/cancela la pausa en la
reproducción de un disco.
Púlselo para iniciar la exploración en
retroceso rápido.
Púlselo para iniciar la exploración en
avance rápido.
Salta al principio de la pista o el
capítulo actual y, después, a pistas o
capítulos anteriores.
A veces, los menús DVD-Vídeo aparecen
automáticamente al iniciar la reproducción;
otros aparecen sólo al pulsar MENU o TOP
MENU.
Botón
TOP MENU Muestra el ‘menú principal’ de un
disco DVD, según el disco.
Muestra un menú de disco DVD;
depende del disco y puede ser
igual que el ‘menú principal’.
Desplaza el puntero por la
pantalla.
ENTER
Selecciona la opción de menú
actual.
RETURN
Vuelve a la pantalla de menú
anterior.
Números
Resalta una opción de menú
numerada (sólo algunos discos).
Pulse ENTER para seleccionar.
Deutsch
MENU
Salta a la siguiente pista o capítulo.
Números Úselos para introducir un número de
título, capítulo o pista. Pulse ENTER
para seleccionar.
• Si el disco está detenido, la
reproducción se inicia desde el título
(para DVD) o pista (para CD/Vídeo CD/
Súper VCD) seleccionados.
• Si se está reproduciendo el disco, la
reproducción salta al principio del
título (DVD-R/-RW en modo VR),
capítulo (DVD-Vídeo) o pista (CD/Vídeo
CD/Súper VCD) seleccionados.
Función
Nederlands
Muchos discos DVD-Vídeo disponen de menús
en los que puede seleccionar lo que desea ver.
Italiano
Detiene la reproducción o cancela la
función de reanudación (si en la
pantalla aparece RESUME).
Menús de disco DVD-Vídeo
Français
Cuando detiene la reproducción de un disco,
RESUME le indica en pantalla que puede
reanudar la reproducción desde ese punto.
Con los DVD y Vídeo CD/Súper VCD, la
posición de reproducción se almacena en
memoria, incluso si se expulsa el disco.2 La
próxima vez que cargue el disco, en la pantalla
verá LAST MEM y podrá reanudar la
reproducción.
Si quiere borrar el punto de reanudación, pulse
(detener) mientras se visualiza RESUME.
Español
Función
Punto de reanudación y último
punto memorizado
English
Botón
11:40 AM
Nota
1 Es posible que algunos controles de reproducción no funcionen en ciertas partes de algunos discos DVD.
2 • Es posible que las funciones de punto de reanudación y último punto memorizado no funcionen con algunos discos.
• En el caso de los discos DVD-Vídeo (excepto los DVD-R/-RW en modo VR), el reproductor guarda la posición de reproducción
de los últimos cinco discos.
17
Es
HTZ180DVD_en_RXJ.book Page 18 Friday, March 20, 2009
Menús PBC de Vídeo CD/Súper VCD
Mejora de la recepción FM
Algunos Vídeo CD/Súper VCD tienen menús
desde los que puede elegir lo que desea ver. Se
denominan menús PBC (Control de
reproducción).
Con el PBC, puede reproducir un Vídeo CD/
Súper VCD sin tener que desplazarse por el
menú PBC; se inicia la reproducción utilizando
un botón de número, en lugar del botón
(reproducir), para seleccionar la pista.
Si está oyendo una emisora FM en estéreo pero
la recepción es mala, puede mejorar la calidad
del sonido pasando al modo monoaural.
Botón
Función
RETURN
Muestra el menú PBC.
Números
Seleccionan las opciones de
menú numeradas. Pulse ENTER
para seleccionar.
Muestra la página anterior del
menú (si la hay).
Muestra la siguiente página del
menú (si la hay).
Escucha de la radio
El sintonizador recibe señales FM y AM, y le
permite memorizar sus emisoras favoritas de
forma que no tenga que sintonizarlas
manualmente cada vez.
1 Pulse TUNER para pasar al sintonizador y,
a continuación, pulse repetidamente para
pasar de AM a FM o viceversa.
La pantalla muestra la banda y la frecuencia.
2 Sintonice una frecuencia.
Hay tres modos de sintonización — manual,
automático y de alta velocidad:
• Sintonización manual: Pulse
repetidamente TUNE para cambiar la
frecuencia que aparece en pantalla.
• Sintonización automática: Mantenga
pulsado TUNE hasta que la visualización
de la frecuencia empiece a moverse, y
luego suéltelo. El sintonizador parará en la
primera emisora que encuentre. Repita
para seguir buscando.
• Sintonización a alta velocidad: Pulse y
mantenga pulsado TUNE hasta que la
visualización de la frecuencia empiece a
moverse con rapidez. Mantenga pulsado el
botón hasta que aparezca la frecuencia
que busca. Si es necesario, ajuste la
frecuencia con el método de sintonización
manual.
18
Es
11:40 AM
1 Sintonice una emisora FM y, a
continuación, pulse SHIFT+SETUP.
2 Utilice / para seleccionar TUNERSET,
después, pulse ENTER.
3 Utilice / para elegir el FM MODE y, a
continuación, pulse ENTER.
4 Utilice / para seleccionar FM MONO
y, a continuación, pulse ENTER.
El indicador del modo monoaural ( ) se
ilumina cuando el sintonizador está en modo
de recepción monoaural.
Seleccione FM AUTO encima para volver al
modo autoestéreo (el indicador de estéreo ( )
se ilumina al recibir la señal en estéreo).
Reducción de ruido en la recepción
AM
Si la recepción AM es especialmente mala, o la
emisora de radio AM que está utilizando tiene
mucho ruido, intente obtener mejor calidad de
sonido mediante la función Corte de ruido.
1 Sintonice una emisora de radio de AM y,
después, pulse SHIFT+SETUP.
2 Utilice / para seleccionar TUNERSET,
después, pulse ENTER.
3 Utilice / para seleccionar NOISECUT,
después, pulse ENTER.
4 Utilice / para seleccionar el modo de
corte de sonido y, a continuación, pulse
ENTER.
Seleccione un nivel de efectos entre 1 o 2.
HTZ180DVD_en_RXJ.book Page 19 Friday, March 20, 2009
Memorización de emisoras
Este sistema puede memorizar hasta
30 canales, almacenados en tres bancos o
clases (A, B y C) de 10 canales cada uno.
2
Escucha de otras fuentes
Esta unidad admite la conexión de fuentes
auxiliares (televisor, receptor de satélite, etc.)
para su reproducción a través del sistema de
altavoces. Para obtener más información,
consulte Conexión de componentes auxiliares
en la página 38.
• Para conectar un dispositivo USB al
terminal USB, consulte Reproducción de
USB y grabación en la página 29.
Pulse SHIFT+T.EDIT.
Escucha de presintonías
Pulse LINE para seleccionar la fuente.
3 Si fuera necesario, inicie la reproducción
de la fuente.
Ajuste del temporizador de
apagado
2 Pulse CLASS para seleccionar la clase en la
que se almacena el canal. Púlselo
repetidamente para alternar entre el ciclo de
las clases A, B y C.
• Pulse SHIFT+SLEEP repetidamente para
seleccionar una opción y, a continuación,
pulse ENTER.
Elija una de las siguientes opciones:
• SLP ON – Se apaga después de cerca de
una hora. El indicador
se enciende.
• SLP OFF – Cancela el temporizador de
apagado.
Después de seleccionar SLP ON, puede pulsar
SHIFT+SLEEP de nuevo para comprobar el
tiempo que resta. Cada línea indica 12 minutos
(restantes) aproximadamente:
Deutsch
3 Utilice los botones PRESET para
seleccionar una presintonía.
• También puede hacerlo con los botones de
número.
Nederlands
1 Asegúrese de que la función TUNER está
seleccionada.
El temporizador de apagado apaga el sistema
después de aproximadamente una hora a fin
de que usted se pueda dormir sin preocuparse
por él.1
Italiano
Necesitará tener varios canales
preprogramados para poder hacer esto.
2
Français
4 Pulse ENTER.
Después de pulsar ENTER, la clase y el número
preprogramado dejan de parpadear y el
sistema memoriza canales.
1 Asegúrese de que la fuente externa
(televisor, receptor satélite, etc.) está
encendida.
Español
3 Pulse CLASS para seleccionar una de las
tres clases y, a continuación, utilice los
botones PRESET para seleccionar el canal
preprogramado que desee.
También puede seleccionar un canal
preprogramado con los botones de número.
English
1 Sintonice una emisora AM o FM.
Para FM, seleccione la recepción monoaural o
autoestéreo, según convenga. Este ajuste se
guardará junto con la presintonía.
11:40 AM
SLP - - - - -
Nota
1 La luz de la pantalla se debilita cuando el temporizador de apagado está activado.
19
Es
HTZ180DVD_en_RXJ.book Page 20 Friday, March 20, 2009
11:40 AM
Capítulo 5
Escuchar su sistema
Importante
• La función de audio de esta unidad puede
estar restringida dependiendo de la fuente
de sonido, el ajuste de audio HDMI
(página 39) o el modo karaoke cuando hay
un micrófono conectado en (página 31). En
este caso, puede que los menús no
aparezcan o que, en su lugar, se visualice
un mensaje (página 50).
Selección del modo Listening
Existen varios modos de escucha disponibles
para disfrutar de diversos efectos de sonido y
para la corrección del campo de sonido según
prefiera. Según la distribución de los altavoces
que haya elegido en Distribución del sonido del
equipo home cinema en la página 6, varía el
modo escucha que puede seleccionar. Lea las
siguientes instrucciones y continúe con cada
ajuste.
• Distribución de los altavoces en 5 puntos
Cuando haya elegido una distribución de
altavoces de 5 puntos, seleccione uno de los
modos de escucha del modo de sonido
envolvente. Consulte Escucha con sonido
envolvente abajo.
• Distribución de los altavoces en 3 puntos
Cuando haya elegido una distribución de
altavoces de 3 puntos, en la que los altavoces
de sonido envolvente están en frente suyo,
seleccione uno de los modos de escucha del
modo de sonido frontal envolvente. Consulte
Uso del modo Front Surround (Sonido
envolvente frontal) en la página 21.
Modo de escucha Auto
El modo de escucha Automático es la forma
más sencilla de escuchar cualquier fuente tal
como se masterizó: la salida de los altavoces
es un reflejo de los canales del material de
origen.
• Pulse AUTO/STEREO para seleccionar el
modo de escucha AUTO.1
El modo de escucha se asigna
automáticamente de acuerdo con el material
fuente, como indica la siguiente tabla.
fuente
5 SPOT
dos canales STEREO
multicanal STANDARD
3 SPOT
STEREO
F.SURR
Escucha con sonido envolvente
Cuando configure el sistema de distribución
de altavoces de 5 puntos, el modo de sonido
envolvente estará disponible.
Puede escuchar fuentes estéreo o multicanal
con sonido envolvente.2 El sonido envolvente
se genera a partir de fuentes estéreo que usan
uno de los modos de decodificación de Dolby
Pro Logic.
• Pulse repetidamente SURROUND para
seleccionar un modo de escucha.1
Las opciones que aparezcan en pantalla
dependerán del tipo de fuente reproducida.
• STANDARD – Modo de descodificación
estándar (Este modo sólo puede
seleccionarse cuando la fuente es
multicanal)
• MOVIE (Dolby Pro Logic II Movie) – Sonido
envolvente Pro Logic II de 5.1 canales, ideal
para el visionado de películas (utilícelo con
cualquier fuente de dos canales)
Nota
1 Si la fuente es Dolby Digital o DTS, se enciende el indicador correspondiente en la pantalla del panel frontal.
2 Tenga en cuenta que para la reproducción multicanal se debe pasar la fuente de entrada a DVD/CD o USB.
20
Es
HTZ180DVD_en_RXJ.book Page 21 Friday, March 20, 2009
• MUSIC (Dolby Pro Logic II Music) – Sonido
envolvente Pro Logic II de 5.1 canales, ideal
para la audición de música (para ser
utilizado con cualquier fuente de dos
canales)
• Pulse SURROUND varias veces para
seleccionar un modo de sonido envolvente
frontal.
Modo de sonido
envolvente frontal
Para el modo
Extra Power
Cuando se conectan los cascos, comienza el
modo reproducción STEREO. El modo de
escucha no se puede modificar.1
Ajuste de los graves y agudos
Utilice los controles de graves y agudos para
ajustar el tono general.
1
Pulse SOUND.
2 Utilice / para seleccionar BASS/TRE y,
a continuación, pulse ENTER.
3 Utilice / para seleccionar BASS o
TREBLE.
4 Utilice / para ajustar el sonido y, a
continuación, pulse ENTER para confirmar.
• Bass y Treble pueden ajustarse de –6dB a
+6dB.
Uso de los modos SFC
1
Esta ilustración representa la distribución en 3 puntos.
Pulse SOUND.
Deutsch
Los modos SFC (Control del campo de sonido) se
pueden usar con cualquier fuente multicanal o
estéreo para crear una variedad de sonidos
envolventes adicionales.
Nederlands
• EXTRAPWR – Emite sonido estéreo (en el
caso de fuentes multicanal, sonido
mezclado) desde los altavoces de sonido
envolvente para un potente efecto estéreo.
Escucha con cascos
Italiano
• F.SURR – Utilícelo para conseguir un rico
efecto de sonido envolvente.
• Pulse AUTO/STEREO repetidamente
hasta que aparezca STEREO en la pantalla.
Français
Los modos Front Surround y Extra Power son
efectivos cuando se selecciona DVD/CD o USB
como fuente de entrada y está utilizando la
distribución de altavoces en 3 puntos como se
describe en Distribución del sonido del equipo
home cinema en la página 6.
Se puede escuchar cualquier fuente — estéreo
o multicanal — en estéreo. Al reproducir una
fuente multicanal, todos los canales se
mezclan en los altavoces frontales izquierdo y
derecho, y en el subwoofer.
Español
Uso del modo Front Surround
(Sonido envolvente frontal)
Escucha en estéreo
English
• DOLBY PL (Dolby Pro Logic) – Sonido
envolvente de 4.1 canales (para ser
utilizado con cualquier fuente de dos
canales)
11:40 AM
2 Utilice / para seleccionar SFC MODE
y, a continuación, pulse ENTER.
3 Pulse / y, a continuación, ENTER, para
seleccionar un modo de sonido SFC.
Elija entre OFF, LIVE, HALL, POP, ROCK,
DRAMA o ACTION.
Nota
1 Cuando desconecte los cascos, el sistema volverá al modo anterior de ajuste de sonido envolvente.
21
Es
HTZ180DVD_en_RXJ.book Page 22 Friday, March 20, 2009
Refuerzo del nivel de graves
Dispone de dos modos de graves para reforzar
los graves de una fuente.
1
Pulse SOUND.
2 Utilice / para seleccionar BASSMODE
y, a continuación, pulse ENTER.
3 Utilice / para ajustar el sonido y, a
continuación, pulse ENTER para confirmar.
Elija entre OFF, MUSIC o CINEMA.
Uso del MP3 Expander
Reproduce el sonido de música comprimida
(MP3, WMA, MPEG-4 AAC) con buena calidad.
• Pulse varias veces MP3 EXP/V.ENH para
seleccionar MP3 EXP.1
Uso del modo Voice Enhancer
Este modo se utiliza escuchar fácilmente los
fragmentos hablados de las películas o los
diálogos.
• Pulse varias veces MP3 EXP/V.ENH para
seleccionar VOICE E.2
11:40 AM
Effective Sound
(para un sonido óptimo)
Junto con los altavoces de diseño único y alta
calidad suministrados con esta unidad, el
modo Effective Sound permite las siguientes
tecnologías de audio exclusivas de Pioneer,
diseñadas para maximizar la auténtica
experiencia del sonido inherente en las
películas y en la música.
Active el modo Effective Sound en
circunstancias normales para maximizar las
capacidades de esta unidad.3
• Dynamic Range Compression
(Compresión de intervalo dinámico)
Resucita sonido detallado sensible al ruido
ambiental para crear un entorno acústico en el
que se sienta como si estuviese en el centro de
la acción.
• Frequency Characteristic Correction
Desarrolla la característica de reproducción
optimizada para prolongadas horas de
escucha, además de los rasgos añadidos de
los altavoces suministrados.
1 Pulse SHIFT+SETUP y utilice / para
seleccionar SOUNDSET y, a continuación,
pulse ENTER.
2 Utilice / para seleccionar S.FIELD y, a
continuación, pulse ENTER.
3 Utilice / para ajustar el valor y, a
continuación, pulse ENTER para confirmar.
• EFFECT (Effective Sound) – Reproduce el
sonido con las características optimizadas
para los altavoces incluidos.
• DIRECT (Direct Sound) – Apaga el modo
Effective Sound.
Nota
1 Cuando se encienda, el modo SFC se desactivará.
2 Cuando se encienda, el modo SFC se desactivará.
3 El campo de sonido no afectará la salida de los auriculares.
22
Es
HTZ180DVD_en_RXJ.book Page 23 Friday, March 20, 2009
11:40 AM
Capítulo 6
Características de reproducción
de disco
Los discos DVD, Vídeo CD/Súper VCD y vídeo
DivX/WMV se pueden reproducir a cuatro
velocidades lentas de avance distintas. Los
discos DVD también se pueden reproducir a
velocidad lenta en retroceso.
1
Durante la reproducción, pulse (pausa).
2 Pulse / o / para avanzar o
retroceder cuadro a cuadro.
• Para reanudar la reproducción, pulse
(reproducir).2
Reproducción de una
presentación de diapositivas
JPEG
Después de insertar un disco con imágenes
JPEG, pulse para iniciar una presentación
de diapositivas de la primera carpeta/imagen
del disco.3 El equipo reproduce las imágenes
de cada carpeta en orden alfabético.
• Si el disco contiene archivos WMA/MP3/
MPEG-4 AAC, la reproducción de las
imágenes y los archivos de audio se repite.
Durante la reproducción de audio, puede
usar las funciones saltar (/),
barrido (/) y pausa ().
Deutsch
Reproducción a velocidad
lenta
Puede hacer avanzar o retroceder un disco
DVD cuadro a cuadro. Con Vídeo CD/Súper
VCD y vídeo DivX/WMV sólo se puede usar el
avance de cuadro.
Nederlands
• Durante la reproducción, pulse o
para iniciar la exploración.
Pulse repetidamente para aumentar la
velocidad de exploración (indicada en
pantalla).
• Para reanudar la reproducción, pulse
(reproducir).2
Avance/retroceso de cuadro
Italiano
Puede explorar discos hacia delante o hacia
atrás a distintas velocidades.1
2 Mantenga pulsado / o / hasta
que comience la reproducción a velocidad
lenta.
Pulse repetidamente para cambiar la
velocidad lenta (indicada en pantalla).
• Para reanudar la reproducción, pulse
(reproducir).2
Français
Exploración de discos
Durante la reproducción, pulse (pausa).
Español
• Muchas de las funciones de este capítulo
corresponden a los discos DVD, Vídeo CD/
Súper VCD, CD, vídeo DivX/WMV y WMA/
MP3/MPEG-4 AAC/JPEG, aunque el
funcionamiento exacto de algunos de ellos
varía ligeramente según la clase de disco
que se inserte.
• Algunos DVD restringen el uso de algunas
funciones (reproducción aleatoria o de
repetición, por ejemplo) en todo el disco o
en partes de él. Este no es un fallo de
funcionamiento.
• Al reproducir Vídeo CD/Súper VCD,
algunas de las funciones no están
disponibles durante la reproducción PBC.
Si desea usarlas, inicie la reproducción del
disco mediante un botón de número para
seleccionar una pista.
1
English
Importante
Las imágenes se ajustan automáticamente al
tamaño de la pantalla.
Nota
1 Los discos de vídeo DivX/WMV sólo disponen de una velocidad.
2 • Según el disco, la reproducción normal puede reanudarse automáticamente cuando se alcanza un nuevo capítulo en un
DVD.
• Para vídeo CD/Súper VCD en modo PBC y pistas WMA/MP3/MPEG-4 AAC (sólo en modo Exploración) la reproducción
normal se reanuda cuando se llega al principio o al final de la pista.
3 • Cuanto más grande sea el archivo, más tiempo empleará el reproductor en cargarlo.
• Los discos pueden contener un máximo de 299 carpetas, y de 648 carpetas y archivos combinados.
23
Es
HTZ180DVD_en_RXJ.book Page 24 Friday, March 20, 2009
Durante la presentación de diapositivas:
Función
Interrumpe la presentación de
diapositivas (o la reproducción
del archivo de audio); vuelva a
pulsarlo para reanudar la
reproducción.
• Title – Títulos de un disco DVD-Vídeo.
Salta a la imagen anterior
(o al archivo de audio con
reproducción de sonido).
• Time – Imágenes en miniatura de un Vídeo
CD/Súper VCD a intervalos de 10 minutos.
Salta a la siguiente imagen
(o al archivo de audio con
reproducción de sonido).
Interrumpe la presentación de
diapositivas y rota la imagen
que aparece en pantalla (Pulse
(reproducir) para reanudar la
reproducción de diapositivas).
SHIFT+ZOOM Detiene momentáneamente la
presentación de imágenes y
amplía la imagen. Púlselo de
nuevo para cambiar entre zoom
1x, 2x y 4x (Pulse (reproducir)
para reanudar la reproducción
de diapositivas).
MENU
Muestra la pantalla Disc
Navigator (véase abajo).
Navegación en discos DVD y
Vídeo CD/Súper VCD con Disc
Navigator
Utilice Disc Navigator para acceder al
contenido de un DVD o Vídeo CD/Súper VCD y
localizar la parte que desea reproducir.
1 Durante la reproducción, pulse HOME
MENU y seleccione ‘Disc Navigator’ en el
menú que aparece en pantalla.
Disc Navigator
2
Seleccione una opción de visualización.
Disc Navigator
Title
Chapter
Es
Las opciones disponibles dependen del disco
introducido y de si el disco se está
reproduciendo o no, pero incluyen:
Botón
///
24
11:40 AM
• Chapter – Capítulos del título actual de un
DVD-Vídeo.
• Track – Pistas de un Vídeo CD/Súper VCD.
• Original: Title – Títulos originales de un
DVD-R/-RW en modo VR.
• Playlist: Title – Títulos de listas de
reproducción de un disco DVD-R/-RW en
modo VR.
• Original: Time – Imágenes en miniatura
del contenido original a intervalos de 10
minutos.
• Playlist: Time – Imágenes en miniatura de
la lista de reproducción a intervalos de 10
minutos.
La pantalla muestra, una tras otra, hasta seis
imágenes en miniatura en movimiento. Para
mostrar las imágenes en miniatura previas/
siguientes, pulse /.
3 Seleccione la imagen en miniatura a
partir de la cual quiere empezar la
reproducción.
01
02
03
04
05
06
Disc Navigator: Title
01- 49: - -
Para seleccionar una imagen en miniatura,
puede usar /// y ENTER, o los botones
numerados.
Para seleccionarla mediante los botones de
número, introduzca un número de dos dígitos
y, a continuación, pulse ENTER.
HTZ180DVD_en_RXJ.book Page 25 Friday, March 20, 2009
11:40 AM
Búsqueda de archivos Windows
MediaTM Audio (WMA), MP3,
MPEG-4 AAC, DivX video/WMV y
JPEG con Disc Navigator
Sugerencia
Use Disc Navigator para encontrar un archivo
o carpeta específicos mediante el nombre de
archivo.
1 Pulse HOME MENU y seleccione ‘Disc
Navigator’ en el menú que aparece en
pantalla.
0kbps
• Para reproducir todo el contenido del disco
en lugar de la carpeta actual, salga de Disc
Navigator e inicie la reproducción
mediante el botón (reproducir).
Folder1
Folder2
Folder3
Folder4
0kbps
Folder2
File1
File3
File4
File5
3 Para reproducir una pista o un archivo
de vídeo DivX/WMV resaltado, o mostrar
un archivo JPEG resaltado, pulse ENTER.
• Cuando se selecciona un archivo WMA/
MP3/MPEG-4 AAC o de vídeo DivX/WMV, la
reproducción empieza a partir de ese
archivo y continúa hasta el final de la
carpeta.
• Cuando se selecciona un archivo JPEG,
empieza una presentación de diapositivas
a partir del archivo y hasta el final de la
carpeta.
1 Con el disco detenido, pulse HOME
MENU y seleccione ‘Disc Navigator’ del
menú de la pantalla.
2 Seleccione el archivo que desea agregar a
la lista de reproducción.
Vaya a Búsqueda de archivos Windows MediaTM
Audio (WMA), MP3, MPEG-4 AAC, DivX video/
WMV y JPEG con Disc Navigator arriba si no
sabe cómo hacerlo.
Deutsch
File2
Programación de listas de
reproducción
Nederlands
00:00/ 00:00
Usando esta función, puede hacer hasta tres
listas de reproducción de 30 archivos cada una
para discos que contengan archivos WMA,
MP3, MPEG-4 AAC y JPEG. Puesto a que esta
unidad recordará todas las listas de
reproducción de los últimos diez discos
cargados, es útil si usted tiene una gran
cantidad de archivos que desea organizar fácil
y rápidamente.2
Italiano
• Cuando un archivo JPEG está resaltado, a
la derecha aparece una imagen en
miniatura.
Uso de las listas de
reproducción
Français
2 Utilice /// y ENTER para
desplazarse.
Utilice / para desplazarse hacia arriba o
abajo por la lista de carpetas/archivos.
Utilice para volver a la carpeta original.1
Utilice ENTER o para abrir una carpeta
resaltada.
Español
00:00/ 00:00
English
• También puede reproducir una
presentación de diapositivas JPEG
mientras escucha archivos WMA/MP3/
MPEG-4 AAC. Sencillamente seleccione el
archivo de audio que quiere escuchar
seguido del JPEG desde el que desea
iniciar la presentación de diapositivas. La
reproducción de diapositivas y de los
archivos de audio se repite. Los controles
de reproducción sólo funcionan para la
reproducción de diapositivas JPEG.
3 Pulse PLAYLIST 1, 2 ó 3.
El archivo se agrega a la lista de reproducción
que seleccione.
4
Repita los pasos 2 y 3 hasta que termine.
Nota
1 También puede desplazarse hasta la carpeta ‘..’ de arriba y pulsar ENTER.
2 El disco debe cargarse para que los archivos de la lista se reproduzcan.
25
Es
HTZ180DVD_en_RXJ.book Page 26 Friday, March 20, 2009
Sugerencia
• Para agregar archivos sin el menú en
pantalla, sólo pulse PLAYLIST 1, 2 ó 3
durante la reproducción normal del
archivo que desee (excepto cuando se está
reproduciendo una presentación JPEG al
mismo tiempo que el audio).
Cómo escuchar las listas de
reproducción
• Con la reproducción detenida, pulse
PLAYLIST 1, 2 ó 3.
Durante la reproducción, PGM se ilumina en la
pantalla del panel frontal. Si no se ha
programado una lista de reproducción, las
palabras NO LIST aparecen en la pantalla.
• Si la lista de reproducción contiene
archivos JPEG y de audio, se reproducen
las diapositivas y los archivos de audio.
Cómo borrar archivos de una lista de
reproducción
1
Inicie la reproducción de su lista.
2 En la pantalla ‘Disc Navigator’, resalte el
archivo que desea eliminar de la lista de
reproducción y pulse CLEAR.
Reproducción en bucle de una
sección de un disco
La función A-B Repeat permite definir dos
puntos (A y B) en una pista (CD, Vídeo CD/
Súper VCD) o título (DVD) que forman un bucle
que se reproduce una y otra vez.
1 Durante la reproducción, pulse HOME
MENU y seleccione ‘Play Mode’.
Play Mode
2
Seleccione ‘A-B Repeat’.
3 Pulse ENTER en ‘A(Start Point)’ para
establecer el punto de inicio del bucle.
11:40 AM
4 Pulse ENTER en ‘B(End Point)’ para
establecer el punto final del bucle.
Después de pulsar ENTER, la reproducción
salta al punto de inicio y reproduce el bucle.
5 Para reanudar la reproducción normal,
seleccione ‘Off’.
Uso de la reproducción de
repetición
Además de las distintas opciones de
reproducción de repetición, también es posible
utilizar la reproducción de repetición con la
reproducción de programa (consulte Creación
de una lista de programa en la página 27).
1 Durante la reproducción, pulse HOME
MENU y seleccione ‘Play Mode’.
2 Seleccione ‘Repeat’ y, a continuación, una
opción de reproducción de repetición.1
Si la reproducción de programa está activa,
seleccione Program Repeat para repetir la
lista de programa o Repeat Off para cancelar.
• Para discos DVD, seleccione Title Repeat
o Chapter Repeat.
• Para CD y Vídeo CD/Súper VCD, seleccione
Disc Repeat o Track Repeat.
• Para discos de vídeo DivX/WMV,
seleccione Title Repeat (o Repeat Off).
Uso de la reproducción
aleatoria
Utilice esta función para reproducir títulos o
capítulos (DVD-Vídeo), o pistas (CD y Vídeo
CD/Súper VCD) en orden aleatorio.2
1 Durante la reproducción, pulse HOME
MENU y seleccione ‘Play Mode’.
2 Seleccione ‘Random’ y, a continuación,
una opción.
• Para discos DVD, seleccione Random
Title o Random Chapter.
• Para CD y Vídeo CD/Súper VCD, seleccione
On o Off para activar o desactivar la
reproducción aleatoria.
Nota
1 No se puede usar la función de reproducción repetida con discos WMA/MP3/MPEG-4 AAC.
2 • Puede ajustar la opción de reproducción aleatoria tanto si el disco está siendo reproducido como si está detenido. Sin
embargo, no se puede utilizar la reproducción aleatoria junto con la reproducción de programa.
• No se puede utilizar la reproducción aleatoria con discos DVD-R/-RW en modo VR, WMA/MP3/MPEG-4 AAC, vídeo DivX/
WMV, o mientras aparece en pantalla el menú de un disco DVD.
26
Es
HTZ180DVD_en_RXJ.book Page 27 Friday, March 20, 2009
Sugerencia
• Use los siguientes controles durante la
reproducción aleatoria:
Selecciona aleatoriamente una
nueva pista/título/capítulo.
Vuelve al principio de la pista/
título/capítulo actual; siga
pulsándolo para seleccionar
aleatoriamente otra pista/título/
capítulo.
• La reproducción aleatoria permanece
activada hasta que se selecciona Random
Off desde las opciones del menú de
reproducción aleatoria.
Función
HOME
MENU
Guarda la lista de programa y
sale sin iniciar la reproducción.
Va al siguiente paso de la lista de
programa.
Otras funciones disponibles desde el
menú de programa
En el menú de programa existe una serie de
opciones adicionales además de Create/Edit.
• Playback Start – Inicia la reproducción de
una lista de programa guardada
• Playback Stop – Desactiva la
reproducción de programa, pero no borra
la lista de programa
• Program Delete – Borra la lista de
programa y desactiva la reproducción de
programa
Búsqueda en un disco
Puede buscar en discos DVD por título o
número de capítulo, o por tiempo; en CD y
Vídeo CD/Súper VCD por número de pista o por
tiempo, y en vídeo DivX/WMV por tiempo.
Deutsch
3 Utilice /// y ENTER para
seleccionar un título, capítulo o pista para el
paso actual de la lista de programas.
• Para un disco DVD, puede añadir un título
o capítulo.
• Para un CD o Vídeo CD/Súper VCD,
seleccione una pista para añadir a la lista
de programa.
Después de pulsar ENTER para seleccionar el
título/capítulo/pista, el número del paso
disminuye automáticamente una unidad.
4 Repita el paso 3 para crear una lista de
programa.
Una lista de programa puede contener hasta
24 pasos.
• Para introducir pasos, basta con resaltar la
posición donde desea que aparezca el
nuevo paso e introducir un número de
título/capítulo/pista.
• Para eliminar un paso, resáltelo y pulse
CLEAR.
Nederlands
2 Seleccione ‘Program’ y, a continuación,
‘Create/Edit’ en la lista de opciones de
programa.
Italiano
Esta función permite programar el orden de
reproducción de títulos/capítulos/pistas de un
disco.1
1 Durante la reproducción, pulse HOME
MENU y seleccione ‘Play Mode’.
Botón
Français
Creación de una lista de
programa
Sugerencia
• Use los siguientes controles durante la
reproducción de programa:
Español
Función
5 Para reproducir la lista de programa,
pulse (reproducir).
La reproducción de programa permanecerá
activa hasta que se desactive (véase abajo),
borre la lista de programa (véase abajo),
expulse el disco o apague el equipo.
English
Botón
11:40 AM
1 Pulse HOME MENU y seleccione ‘Play
Mode’.
2 Seleccione ‘Search Mode’.
Las opciones de búsqueda que aparecen en
pantalla dependen del tipo de disco cargado.
3
Seleccione un modo de búsqueda.
• El disco debe estar en reproducción para
poder utilizar la búsqueda de tiempo.
Nota
1 No se puede utilizar la reproducción de programa con discos DVD-R/-RW en modo VR, WMA/MP3/MPEG-4 AAC, vídeo DivX/
WMV, o mientras aparece en pantalla el menú de un disco DVD.
27
Es
HTZ180DVD_en_RXJ.book Page 28 Friday, March 20, 2009
4 Utilice los botones de número para
introducir un título, capítulo o número de
pista o un tiempo.
• Para realizar una búsqueda por tiempo,
introduzca el número de minutos y
segundos en el título (DVD/vídeo DivX/
WMV) o pista (CD/Vídeo CD/Súper VCD)
que se está reproduciendo; la
reproducción se reanudará a partir del
punto elegido. Por ejemplo, pulse 4, 5, 0, 0
para hacer que la reproducción empiece
en el minuto 45 del disco. Para hacerlo a
partir de una hora, 20 minutos y 30
segundos, pulse 8, 0, 3, 0.
5 Pulse ENTER para iniciar la reproducción.
Cambio de subtítulos
11:40 AM
Ampliación de la imagen en
pantalla
Mediante la función zoom, puede ampliar una
parte de la pantalla por 2 ó 4 mientras ve un
DVD, un título de vídeo DivX/WMV o un Vídeo
CD/Súper VCD, o reproduce un disco JPEG.
1 Durante la reproducción, use el botón
SHIFT+ZOOM para seleccionar el factor de
ampliación (Normal, 2x o 4x).
2 Utilice /// para cambiar la zona
ampliada.
Puede cambiar el factor de ampliación y la
zona ampliada durante la reproducción.4
Algunos discos DVD y de vídeo DivX tienen
subtítulos en uno o más idiomas; en la carcasa
del disco se suelen indicar los idiomas
disponibles para los subtítulos. Puede cambiar
el idioma de los subtítulos durante la
reproducción.1
• Pulse SHIFT+SUBTITLE repetidamente
para seleccionar una opción de subtitulación.
• Para definir las preferencias de
subtitulación, consulte Configuración de
“Language” (Idioma) en la página 34.
• Consulte Visualización de archivos de
subtítulos DivX en la página 42 para
obtener más información sobre los
subtítulos DivX.
Cambio de ángulos de cámara
Cambio del idioma/canales de
sonido
Visualización de la
información de disco
Al reproducir discos con diálogos en dos o más
idiomas, o con sonido monoaural doble2, se
pueden realizar cambios durante la
reproducción.3
Al reproducir un Vídeo CD o Súper VCD, puede
elegir entre estéreo, sólo el canal izquierdo o
sólo el canal derecho.
• Pulse SHIFT+AUDIO repetidamente para
seleccionar una opción de idioma.
• Para ajustar las preferencias del idioma de
sonido, consulte Configuración de
“Language” (Idioma) en la página 34.
Algunos discos DVD ofrecen escenas rodadas
desde dos o más ángulos (lea las
especificaciones en la carcasa del disco para
obtener más detalles).
Cuando se reproduce una escena rodada
desde varios ángulos, en pantalla aparece el
icono
(que se puede desactivar; consulte
Configuración de “Display” (Pantalla) en la
página 34).
• Durante la reproducción (o en modo de
pausa), pulse SHIFT+ANGLE para cambiar el
ángulo.
Durante la reproducción se pueden ver
diversos datos de pista, capítulo y título.
• Para mostrar/cambiar/ocultar la
información en pantalla, pulse repetidamente
DISPLAY.
La pantalla del panel frontal también ofrece
información limitada sobre el disco. Pulse
DISPLAY para cambiar la información
ofrecida.
Nota
1 Algunos discos sólo le permiten cambiar el idioma de los subtítulos desde el menú del disco. Pulse TOP MENU o MENU para
acceder a él.
2 Algunos Súper VCD tienen dos pistas de audio. En estos discos se puede cambiar la pista de audio, así como los canales
individuales de cada una.
3 Algunos discos sólo le permiten cambiar el idioma de sonido desde el menú del disco. Pulse TOP MENU o MENU para
acceder a él.
4 • Puesto que las imágenes de los DVD, Vídeo CD/Súper VCD, títulos de vídeo DivX/WMV y JPEG tienen una resolución fija, la
calidad de la imagen se deteriorará, especialmente con el factor 4x. No es un fallo de funcionamiento.
• Si desaparece el cuadro de navegación en la parte superior de la pantalla, vuelva a pulsar SHIFT+ZOOM para que aparezca.
28
Es
HTZ180DVD_en_RXJ.book Page 29 Friday, March 20, 2009
11:40 AM
Capítulo 7
Reproducción de USB y
grabación
canales1
2 Conecte el dispositivo USB.
El puerto USB está situado en el panel frontal.
USB
USB
(Tipo A)
Las pistas de un CD de música cargado en
esta unidad pueden grabarse en un USB
conectado a un puerto USB.
Grabación de todas las pistas
Deutsch
3 Pulse (reproducir) para empezar la
reproducción.
Si su dispositivo USB contiene imágenes
JPEG, se iniciará una presentación de
diapositivas. Para obtener más información,
consulte Reproducción de una presentación de
diapositivas JPEG en la página 23.
• Al desconectar el equipo, asegúrese de
que en la pantalla del panel frontal aparece
USB DATA o que el sistema está en modo
de espera.
Grabación de pistas de un CD
de música en un dispositivo
USB
Nederlands
Dispositivo
de almacenamiento
masivo USB
Italiano
USB
Français
1 Con el reproductor encendido, pulse USB.
Asegúrese de que el televisor está encendido y
ajustado a la entrada de vídeo correcta.
Si en la pantalla aparece el mensaje USB ERR,
es posible que los requisitos de alimentación
del dispositivo USB sean demasiado altos para
el reproductor, o que el dispositivo sea
incompatible. Intente lo siguiente:
• Apague el reproductor y, a continuación,
vuelva a encenderlo.
• Vuelva a conectar el dispositivo USB con el
reproductor apagado.
• Seleccione otra fuente de entrada (como,
por ejemplo, DVD/CD) y, a continuación,
vuelva a USB.
• Use un adaptador de CA adaptado
(suministrado con el equipo) para la
alimentación USB.
Si esto no soluciona el problema, lo más
probable es que su dispositivo USB sea
incompatible.
Español
Se puede escuchar sonido de dos
y
visualizar archivos DivX vídeo, WMV y JPEG
mediante la interfaz USB de la parte frontal de
esta unidad. Conecta un dispositivo de
almacenamiento masivo USB2 tal como se
muestra abajo.
English
Importante
Uso de la interfaz USB
1 Cargue el CD de música.
Pulse para detener la reproducción.
Nota
1 Esto incluye la reproducción de archivos DivX vídeo/WMV/WMA/MP3 y MPEG-4 AAC (excepto archivos protegidos contra
copia o con reproducción restringida).
2 • Algunos de los dispositivos USB compatibles son los discos rígidos magnéticos externos, los dispositivos de memoria flash
portátiles (especialmente las tarjetas de memoria) y los reproductores de sonido digital (reproductores MP3) de formato FAT16/
32. Esta unidad no se puede conectar a un ordenador personal para la reproducción USB.
• Pioneer no puede garantizar la compatibilidad (funcionamiento y/o potencia de bus) con todos los dispositivos de
almacenamiento masivo USB y, por tanto, no se hace responsable de pérdidas de datos durante su conexión a esta unidad.
• En el caso de grandes volúmenes de datos, el sistema puede tardar más en leer el contenido del dispositivo USB.
• Puede que no se reconozcan adecuadamente algunos dispositivos USB.
• Dependiendo del contenido, es posible que algunos archivos no se reproduzcan o visualicen, aunque estén en un formato
compatible.
29
Es
HTZ180DVD_en_RXJ.book Page 30 Friday, March 20, 2009
2 Pulse SHIFT+USB REC para visualizar la
pantalla ‘CD -> USB Rec’.
11:40 AM
4
Seleccione la fuente que desea grabar.
CD –> USB Rec
Track 1–13
CD –> USB Rec
Track 1–13
04:18
Track04
Track03
04:18
04:59
Track05
Track04
04:59
04:20
Start
Track06
Track05
04:20
04:38
Selected Track
04:38
01
Track07
Track06
04:40
Total Time
Track08
13
Track07
04:40
003:17
04:11
055:07
Track08
04:11
CD –> USB Rec
Track 1–13
Track01
01:43
Track02
03:17
Track03
04:18
Track04
04:59
Track05
04:20
Track06
04:38
13
Track07
04:40
055:07
Track08
04:11
Track Progress
Total Progress
Cancel
Total Time
03:17
Track03
03:17
3 Pulse ENTER para comenzar la grabación.
La grabación comienza. La pantalla que se
muestra a continuación se visualiza durante la
grabación.1
Selected Track
01:43
Track02
Track02
Start
Total Time
Track01
Select All
01:43
128kbps
Selected Track
Individual
Bitrate
Track01
Select Track
Bitrate
Select Track
All Clear
• Individual — Selecciona cada vez una
pista.
• Select All — Selecciona todas las pistas.
• All Clear — Limpia todas las pistas
seleccionadas.
5 Seleccione la tasa de bits
(tasa de transferencia).
Seleccione 128 kbps, 192 kbps o 320 kbps.
CD –> USB Rec
Track 1–13
Select Track
128kbps
Track01
01:43
192kbps
Track02
03:17
320kbps
Track03
04:18
Track04
04:59
Track05
04:20
Track06
04:38
03
Track07
04:40
012:17
Track08
04:11
Bitrate
Grabación de pistas específicas
Start
Selected Track
1 Cargue el CD de música.
Pulse para detener la reproducción.
2 Pulse HOME MENU y seleccione
‘CD ->USB Rec’.
CD -> USB Rec sólo puede seleccionarse
cuando el CD de música se haya detenido.
CD – > USB Rec
Total Time
6 Seleccione ‘Start’ utilizando ///
y, a continuación, pulse ENTER.2
CD –> USB Rec
Track 1–13
Track01
01:43
Track02
03:17
Track03
04:18
Track04
04:59
Track05
04:20
Track06
04:38
03
Track07
04:40
012:17
Track08
04:11
Select Track
128kbps
Bitrate
Start
Selected Track
Total Time
3 Realice el ajuste utilizando /// y
ENTER.
La grabación comienza.
CD –> USB Rec
Track 1–13
CD –> USB Rec
Track 1–13
Individual
Track01
01:43
Bitrate
Select All
Track02
03:17
All Clear
Track03
04:18
Track04
04:59
Track05
04:20
Track06
04:38
Selected Track
00
Track07
04:40
Total Time
000:00
Track08
04:11
Start
Selected Track
Total Time
Track01
01:43
Track02
03:17
Track03
04:18
Track04
04:59
Track05
04:20
Track06
04:38
03
Track07
04:40
012:17
Track08
04:11
Track Progress
Select Track
Total Progress
Cancel
Nota
1 La grabación no puede iniciarse si no hay suficiente espacio libre en el dispositivo USB. En ese caso, se visualiza el mensaje
“Available USB space is low”.
2 • Cuando la grabación ha finalizado, se crea automáticamente la carpeta “PIONEER” en el dispositivo USB. Las pistas
grabadas se almacenan en esta carpeta.
• Pueden crearse hasta 99 carpetas “PIONEER”.
• La grabación no es posible si el dispositivo USB contiene 300 carpetas o más.
• Cuando la grabación en un dispositivo USB está en marcha, todas las operaciones clave relacionadas con el DVD quedan
deshabilitadas, excepto los botones STANDBY/ON y OPEN/CLOSE y el cambio de funciones.
• Si el temporizador de sueño está en modo ON, éste se cancela en cuanto comienza la grabación en un dispositivo USB.
30
Es
HTZ180DVD_en_RXJ.book Page 31 Friday, March 20, 2009
11:40 AM
Capítulo 8
Cantar karaoke
OFF (predeterminado) – Desactiva el modo
Karaoke.
Cantar karaoke
MAIN
MIC
SUB
Al añadir algunos efectos a la mezcla del
micrófono puede mejorar el sonido global.4
Puede elegir entre tres niveles de eco.
• Para añadir efectos a la mezcla de
micrófono, pulse SHIFT+ECHO.
Al pulsar varias veces se cambian los niveles
de eco de 1 a 3 y se desactiva.
Nederlands
Cambio de la lista de fondo
Puede que desee reducir o aumentar el tono de
la pista de fondo para que coincida con el
alcance de su voz.5
• Pulse SHIFT+ o SHIFT+ para reducir o
aumentar el tono de la pista de fondo.
Deutsch
• Pulse SHIFT+KARAOKE para activar o
desactivar el modo KARAOKE en discos que
tienen voces en ambos canales, derecho e
izquierdo:
KARAOKE (cancelación de voz) – Las voces de
la pista de fondo se eliminan parcialmente.
Cambio de la mezcla de voces
Italiano
1 Enchufe el micrófono o micrófonos.
Si utiliza un solo micrófono, enchúfelo en el
conector MIC (MAIN). El conector MIC (SUB)
puede utilizarse solamente si se conecta
también MIC (MAIN).
• Si el micrófono tiene un interruptor de
encendido y apagado, asegúrese de que
está encendido.
2 Cargue un disco de fondo de karaoke.
También puede usar las pistas del dispositivo
USB como material de origen para una pista
de fondo.
3 Ajuste los parámetros del modo
KARAOKE.
Reproduzca la pista de fondo.
5 Ajuste el MIC VOL +/– para obtener el
sonido deseado. 2
Para evitar una respuesta desagradable,
asegúrese de no apuntar el micrófono hacia
los altavoces.3
Français
4
Español
• Pulse SHIFT+AUDIO para cambiar los
canales de audio (excepto en los discos de
datos y fuentes USB) en los discos que tiene
pistas vocales solamente en un canal:
Left – Sólo canal izquierdo. Utilícelo para
pistas que tengan voces grabadas en el canal
derecho.
Right – Sólo canal derecho. Utilícelo para
pistas que tengan voces grabadas en el canal
izquierdo.
STEREO – Desactiva el modo Karaoke.
English
Con las funciones de karaoke puede conectar
un micrófono y mezclar el sonido de su propia
voz con la pista de fondo.1 Puede seleccionar
una pista de fondo de las fuentes de audio
como CD, DVD, VCD o dispositivos USB.
Ajuste el nivel del micrófono en relación a la
pista de fondo.
Nota
1 • Estas funciones sólo puede utilizarse con un micrófono conectado. Si intenta utilizar SHIFT+KARAOKE, SHIFT+ECHO,
SHIFT+, SHIFT+ o MIC VOL cuando no hay ningún micrófono conectado, aparecerá el mensaje de error NO MIC. Observe
también que durante la reproducción de un DVD, cuando conecta un micrófono, los ajustes de sonido cambian
automáticamente a la reproducción STEREO y mezcla fuentes de sonido multicanal en 2.1 canales.
• Estas funciones sólo están disponible con el DVD/CD o las funciones de entrada del USB.
2 Al extraer el micrófono MIC VOL está ajustado en 0, cambie la función o apague el equipo.
3 Según el nivel del volumen, el sonido del disco puede distorsionarse. Si esto sucede, baje el volumen.
4 No puede ajustar los modos SFC, los controles de tono (agudos, bajos o refuerzo de bajos), el modo Extra Power, el modo Front
Surround, el modo MP3 Expander o el modo Voice Enhancer cuando hay un micrófono conectado.
5 Esta función no es compatible con las señales DTS.
31
Es
HTZ180DVD_en_RXJ.book Page 32 Friday, March 20, 2009
11:40 AM
Capítulo 9
Menús Audio Settings y Video
Adjust
Menú Audio Settings
1 Pulse HOME MENU y seleccione ‘Video
Adjust’ desde la información en pantalla.
El menú Audio Settings le ofrece funciones
para ajustar el sonido de los discos.
1 Pulse HOME MENU y seleccione ‘Audio
Settings’ en la información en pantalla.
Audio Settings
2 Seleccione ajustes y modifíquelos
mediante /// y ENTER.
Video Adjust
2 Realice ajustes mediante /// y
ENTER.
Video Adjust
Sharpness
Brightness
Contrast
Gamma
Hue
Chroma Level
Standard
0
Off
0
0
0
Audio Settings
Audio DRC
High
Medium
Low
Off
Audio DRC
• Ajustes: High, Medium, Low,
Off (predeterminado)
Cuando se ven discos DVD Dolby Digital a bajo
volumen, es fácil perder por completo los
sonidos de volumen más bajo, incluso parte
del diálogo. La activación de Audio DRC
(Dynamic Range Control) puede ayudar a
recuperar los sonidos de volumen más bajo, al
mismo tiempo que controla picos de volumen
alto.
Las diferencias en el sonido dependen del
material que está escuchando. Si el material
no tiene grandes variaciones de volumen, no
notará mucho cambio.1
Menú Video Adjust
Desde la pantalla Video Adjust puede hacer
ajustes que afectan a la presentación de
imágenes.
Nota
1 Audio DRC sólo es eficaz con fuentes de sonido Dolby Digital.
32
Es
Puede realizar los siguientes ajustes:
• Sharpness – Ajusta la nitidez de los bordes
de la imagen (Fine, Standard, Soft)
• Brightness – Ajusta el brillo general
(–20 a +20)
• Contrast – Ajusta el contraste entre claro y
oscuro (–16 a +16)
• Gamma – Ajusta la ‘calidez’ de la imagen
(High, Medium, Low, Off)
• Hue – Ajusta el equilibrio entre rojo y verde
(Green 9 a Red 9)
• Chroma Level – Ajusta la presentación de
los colores saturados (–9 a +9)
Realice los ajustes de Brightness, Contrast,
Hue y Chroma Level con /.
Brightness
min
max
0
3 Pulse ENTER para volver a la pantalla
Video Adjust o HOME MENU para salir.
HTZ180DVD_en_RXJ.book Page 33 Friday, March 20, 2009
11:40 AM
Capítulo 10
Menú Initial Settings
1
El menú Initial Settings permite realizar
ajustes de sonido y vídeo, de bloqueo para
padres y de visualización, entre otros.
Initial Settings
3 Utilice /// y ENTER para
seleccionar el ajuste y la opción deseados.
En las siguientes páginas se explican todos los
ajustes y opciones.1
TV Screen
(Consulte también
Tamaños de pantalla y
formatos de disco en la
página 45.)
4:3 (Letter Box)
Use este ajuste si tiene un televisor convencional de 4:3. Las
películas en formato de pantalla ancha se reproducen con bandas
negras en la parte superior e inferior de la pantalla.
4:3 (Pan & Scan)
Use este ajuste si tiene un televisor convencional de 4:3. Las
películas en formato de pantalla ancha se reproducen cortando
parte de la imagen por los lados.
16:9 (Wide)
Úselo si tiene un televisor panorámico.
16:9 (Comprimido)
Úselo si tiene un televisor panorámico. El material 4:3 aparece con
barras negras a cada lado de la pantalla.2
Interlace
Use esta opción si su televisor no es compatible con el vídeo de
exploración progresiva.
Progressive
Use esta opción si su televisor es compatible con el vídeo de
exploración progresiva (para más información, consulte el manual
de instrucciones de su televisor). Pulse ENTER una vez más para
confirmar (o RETURN para cancelar).
Tenga en cuenta que el vídeo de exploración progresiva sólo sale por
las tomas de vídeo de componentes.
Component Out
(Consulte también
Conexión de
componentes auxiliares
en la página 38.)
Deutsch
Significado
Nederlands
Opción
Italiano
Ajuste
Français
Configuración de “Video Output” (Salida de Vídeo)
Español
Si una opción aparece en color gris, significa
que no puede cambiarse en ese momento.
Esto es debido a que se está reproduciendo un
disco. Detenga el disco y cambie el ajuste.
Pulse DVD/CD.
2 Con la reproducción detenida, pulse
HOME MENU y seleccione ‘Initial Settings’.
English
Uso del menú Initial Settings
Nota
1 • En la tabla, el ajuste predeterminado se muestra en negrita: todos los demás ajustes aparecen en cursiva.
• Algunos ajustes, como TV Screen, Audio Language y Subtitle Language, puede anularlos el disco de DVD. A menudo,
estos ajustes también se pueden realizar desde el menú del disco de DVD.
• Sólo tiene que ajustar las opciones HDMI Resolution y HDMI Color si ha conectado este reproductor a un componente
compatible con HDMI mediante el conector HDMI.
2 Este ajuste sólo puede utilizarse cuando está conectado a través de HDMI y la resolución del HDMI es de 1920x1080p,
1920x1080i o 1280x720p. Al utilizar este ajuste, sólo dispondrá de conexión HDMI.
33
Es
HTZ180DVD_en_RXJ.book Page 34 Friday, March 20, 2009
Ajuste
Opción
11:40 AM
Significado
HDMI Resolution*
1920x1080p
(Consulte Conexión
mediante HDMI en la
1920x1080i
página 39.)
* El valor predeterminado 1280x720p
cambia según el formato
de televisor (PAL/NTSC).
720x480p (NTSC)/
720x576p (PAL)
Selecciónelo si su televisor soporta vídeo de barrido progresivo de
1920 x 1080 píxeles.
Selecciónelo si su televisor soporta vídeo entrelazado de 1920 x
1080 píxeles.
Selecciónelo si su televisor soporta vídeo de barrido progresivo de
1280 x 720 píxeles.
Selecciónelo si su televisor soporta vídeo de barrido progresivo de
720 x 480 (NTSC)/720 x 576 (PAL) píxeles.
720x480i (NTSC)/
720x576i (PAL)
Selecciónelo si su televisor soporta vídeo entrelazado de 720 x 480
(NTSC)/720 x 576 (PAL) píxeles.
HDMI Color*
Full range RGB
(Consulte Conexión
mediante HDMI en la
página 39.)
RGB
* El valor predeterminado
cambia en función del
Component
dispositivo conectado.
Si los colores son flojos, esta opción proporciona colores más
luminosos y un negro más profundo (ajuste predeterminado para
dispositivos DVI compatibles con HDMI).
Utilice este ajuste si los colores se ven demasiado intensos en el
ajuste Full Range RGB.
Salida en formato de vídeo de componentes de 8 bits (ajuste
predeterminado para dispositivos compatibles con HDMI).
Configuración de “Language” (Idioma)
Ajuste
Opción
Significado
Audio Language
English
Si existe una pista sonora en inglés en el disco, se reproducirá.
Se visualizan imágenes
Si existe un idioma seleccionado en el disco, se reproducirá.
Other Language
Selecciónela para elegir un idioma distinto a los que aparecen en
pantalla (consulte Uso de la lista de códigos de idioma en la
página 46).
English
Si el disco tiene subtítulos en inglés, se visualizarán.
Se visualizan imágenes
Se visualiza el idioma de subtítulos seleccionado en el disco.
Other Language
Selecciónela para elegir un idioma distinto a los que aparecen en
pantalla (consulte Uso de la lista de códigos de idioma en la
página 46).
w/Subtitle Lang.
Siempre que sea posible, el menú del disco DVD aparecerá en
pantalla en el idioma de subtítulos seleccionado.
Se visualizan imágenes
Siempre que sea posible, el menú del disco DVD aparecerá en
pantalla en el idioma seleccionado.
Other Language
Selecciónela para elegir un idioma distinto a los que aparecen en
pantalla (consulte Uso de la lista de códigos de idioma en la
página 46).
Subtitle Language
DVD Menu
Language
Subtitle Display
On
Los subtítulos se visualizan en el idioma de subtítulos seleccionado.
Off
Los subtítulos están desactivados de forma predeterminada al
reproducir un DVD.
Configuración de “Display” (Pantalla)
Ajuste
Opción
Significado
OSD Language
English
La información en pantalla del reproductor aparece en inglés.
Se visualizan imágenes
La información en pantalla aparece en el idioma seleccionado.
On
Se muestra un icono de cámara en pantalla durante las
escenas multiángulo de un disco DVD.
Off
No se muestra ninguna indicación multiángulo.
Angle Indicator
34
Es
HTZ180DVD_en_RXJ.book Page 35 Friday, March 20, 2009
11:40 AM
Configuración de “Options” (Opciones)
Ajuste
Opción
Significado
Parental Lock
–
Consulte Parental Lock abajo.
DivX(R) VOD
Display
Consulte Acerca de los contenidos DivX® VOD abajo.
Opción
Significado
Speaker Distance
–
Especifique la distancia entre los altavoces y la posición de
escucha (consulte Distancia de los altavoces en la página 36).
Parental Lock
Cambio de contraseña
2
Ajuste/cambio de Parental Lock
(bloqueo paterno)
1
Registro de una contraseña nueva
3
Seleccione ‘Level Change’.
2 Use los botones de número para
introducir la contraseña y, a continuación,
pulse ENTER.
Seleccione un nivel nuevo y pulse ENTER.
Ajuste/cambio de código de país/zona
Initial Settings
Video Output
Parental Lock
Password
Language
Display
Options
DivX (R) VOD
Level Change
Country Code
Speakers
2 Use los botones de número para
introducir una contraseña de cuatro dígitos y,
a continuación, pulse ENTER.
Encontrará la Lista de códigos del país/zona en
la página 51.
Deutsch
• Presione repetidamente para bloquear
más niveles (más discos requerirán la
contraseña); pulse para desbloquear
niveles. No puede bloquear el nivel 1.
Nederlands
Algunos discos admiten la función código del
país/zona. El reproductor no reproduce ciertas
escenas de esos discos, según el código de
país/zona ajustado.
Registre una contraseña para cambiar el nivel
de Parental Lock o introduzca un código de
país/zona.1
1 Seleccione ‘Password’.
Introduzca una contraseña nueva ENTER.
Italiano
Para proporcionarle cierto nivel de control
sobre lo que ven sus hijos en el reproductor de
DVD, algunos discos DVD-Vídeo incorporan un
nivel de Parental Lock. Si el reproductor se
configura a un nivel más bajo que el disco, el
disco no se reproduce.
Para cambiar la contraseña, confirme la
contraseña existente y, a continuación,
introduzca una nueva.
1 Seleccione ‘Password Change’, introduzca
su contraseña actual y pulse ENTER.
Français
• Nivel por defecto: Off; Contraseña por
defecto: none; Código de país/zona por
defecto: us (2119)
Español
Ajuste
English
Configuración de “Speakers” (Altavoces)
1 Seleccione ‘Country Code’, introduzca su
contraseña y, a continuación, pulse ENTER.
2 Seleccione un código de país/zona y, a
continuación, pulse ENTER.
Existen dos maneras de hacerlo:
• Seleccione por letra de código: Utilice
/ para cambiar el código de país/zona.
Nota
1 • No todos los discos incorporan el Parental Lock; cuando no lo tienen, reproducen su contenido sin pedir la introducción de
una contraseña.
• Si olvida su contraseña, deberá reconfigurar el reproductor para registrar una contraseña nueva (consulte Restablecimiento
del sistema en la página 46).
35
Es
HTZ180DVD_en_RXJ.book Page 36 Friday, March 20, 2009
• Selecciónelo por el número del código:
Pulse y utilice los botones de número
para introducir el código de país/zona de
cuatro dígitos.
El nuevo código de país/zona entrará en efecto
después de expulsar el disco una vez.
Acerca de los contenidos DivX® VOD
Para poder reproducir contenidos DivX VOD
(vídeo bajo demanda) en este equipo, primero
tiene que registrar el reproductor con su
proveedor de contenidos DivX VOD. Para ello,
hay que generar un código de registro DivX
VOD y enviarlo al proveedor.1
Importante
• Los contenidos DivX VOD están protegidos
por el sistema DRM (Digital Rights
Management). Esto quiere decir que los
contenidos sólo se pueden reproducir en
dispositivos específicos y registrados.
• Si introduce un disco con contenidos DivX
VOD no autorizados para su reproductor,
aparecerá el mensaje Authorization
Error en pantalla y no se reproducirán los
contenidos.
11:40 AM
Reproducción de contenidos DivX® VOD
Algunos contenidos DivX VOD sólo se pueden
reproducir un número determinado de veces.
Cuando inserte un disco con este tipo de
contenidos DivX VOD, verá el número de
reproducciones restante en pantalla y tendrá la
oportunidad de reproducir el disco (y, por tanto,
reducir el número de reproducciones restante) o
expulsarlo. Si inserta un disco cuyo contenido
DivX VOD ha expirado (por ejemplo, el contenido
no tiene reproducciones restantes), aparecerá el
mensaje Rental Expired.
Si el contenido DivX VOD se puede reproducir
ilimitadamente, podrá usarlo en el reproductor
cuantas veces desee, y no aparecerá ningún
mensaje.
Distancia de los altavoces
• Ajuste predeterminado: 3.0m
Para obtener el mejor sonido envolvente de su
sistema, deberá colocar los altavoces a una
distancia idéntica respecto a la posición de
escucha.
1 Pulse HOME MENU y seleccione ‘Initial
Settings’.
2 Seleccione ‘Speakers’ y, a continuación,
‘Speaker Distance’.
Visualización del código de registro DivX
VOD
Initial Settings
Video Output
Language
1 Pulse HOME MENU y seleccione ‘Initial
Settings’.
2 Seleccione ‘Options’ y, a continuación,
‘DivX (R) VOD’.
Initial Settings
Speaker Distance
Display
Options
Speakers
3
Utilice / para seleccionar un altavoz.
Initial Settings
Video Output
Parental Lock
Language
Display
Options
Speakers
DivX (R) VOD
Display
Video Output
Language
Display
Options
Speakers
L
C
R
SR
SL
3.0m
3.0m
3.0m
SW
3.0m
3.0m
3.0m
3 Seleccione ‘Display’.
Verá su código de registro de ocho dígitos.
Anote el código, ya que lo necesitará para
registrarse con un proveedor de DivX VOD.
Nota
1 El restablecimiento del reproductor (tal como se describe en Restablecimiento del sistema en la página 46) no produce la
pérdida del código de registro.
36
Es
HTZ180DVD_en_RXJ.book Page 37 Friday, March 20, 2009
11:40 AM
4 Pulse para cambiar la distancia del
altavoz resaltado.
Utilice / para modificar la distancia.
• Cuando modifique la distancia de los
altavoces frontales izquierdo (L) o derecho
(R), las distancias de todos los demás
altavoces cambiarán en relación con este
ajuste.
• La distancia de los altavoces frontales
izquierdo/derecho (L/R) se puede fijar entre
30 cm a 9 m, en incrementos de 30 cm.1
• El altavoz central (C) se puede fijar entre –
2,1 m a 0 m con relación a los altavoces
frontales izquierdo/derecho.
• La distancia de los altavoces de sonido
envolvente izquierdo/derecho (SL/SR) se
puede fijar entre –6,0 m a 0 m en relación
con los altavoces frontales izquierdo/
derecho.2
• La distancia del subwoofer (SW) se puede
fijar entre –2,1 m a 0 m en relación con los
altavoces frontales izquierdo/derecho.
6 Pulse para volver a la lista de altavoces
si desea realizar algún otro ajuste, o pulse
ENTER para salir de la pantalla Speaker
Distance.
5
English
Español
Français
Italiano
Nederlands
Deutsch
Nota
1 Los altavoces L y R están emparejados; no se pueden ajustar por separado.
2 Asegúrese de ajustarlos a la misma distancia al utilizar el modo Extra Power (página 21).
37
Es
HTZ180DVD_en_RXJ.book Page 38 Friday, March 20, 2009
11:40 AM
Capítulo 11
Otras conexiones
Importante
• Antes de realizar o cambiar conexiones en el panel trasero de esta unidad, asegúrese de
apagar la alimentación y desconectar el cable de alimentación de la toma de corriente de la
pared.
Después de haber finalizado la conexiones, conecte el cable de alimentación al tomacorriente
de la red.
Antena exterior
A la entrada del
componente
Antena interior
(cable con
aislamiento vinílico)
5ma6m
TV
LINE 1
Antena de
cuadro AM
R
FRONT
L
CENTER
L
AC IN
PR
PB
Y
R
R
ANALOG AUDIO IN
COMPONENT
VIDEO
VIDEO(TV)
SURROUND
A
N
T
E
N
N
A
AM LOOP
FM
UNBAL 75 Ω
HDMI OUT
SUB
WOOFER
SPEAKERS (4 Ω )
VIDEO OUT
Conector PAL
Desde salida de audio
A entrada HDMI
Platina, etc.
Desde salida
de audio
Pantalla plana de televisión
Conexión de componentes
auxiliares
Gracias a las entradas analógicas estéreo, puede
conectar un componente externo, tal como una
pletina o reproductor de MD para su
reproducción a través de este equipo.
Para el diagrama de conexión, consulte 1
arriba.
38
Es
• Conecte las clavijas AUDIO IN (LINE 1) a
las salidas analógicas de un componente de
reproducción externo.
Realice la conexión mediante cables estéreo
de contactos RCA.
HTZ180DVD_en_RXJ.book Page 39 Friday, March 20, 2009
Conexión mediante la salida de
vídeo de componentes
• Este reproductor es compatible con el
vídeo progresivo Macro Vision System
Copy Guard.2
Nota
Deutsch
Si dispone de un monitor o pantalla dotado de
HDMI o DVI (con HDCP), puede conectarlo a
este reproductor mediante un cable HDMI de
venta en comercios para obtener vídeo digital
de alta calidad.3
Para el diagrama de conexión, consulte 3 en la
página página 38.
Nederlands
Conexión mediante HDMI
Puede seleccionar los altavoces del sistema o
la televisión mediante HDMI para la salida del
audio de las funciones DVD/CD o USB. No
puede utilizar ciertas funciones de sonido de
este sistema cuando el audio HDMI esta
ajustado a TV.
1 Pulse SHIFT+SETUP.
2 Utilice / para seleccionar ‘HDMI SET’
y, a continuación, pulse ENTER.
3 Utilice / para elegir HDMI MODE y, a
continuación, pulse ENTER.
4 Utilice / para elegir el ajuste deseado
y, a continuación, pulse ENTER.
• AMP – Sale audio de la señal de las
funciones DVD/CD y USB procedente de
este sistema.
• TV – Sale audio de la señal de las
funciones DVD/CD y USB procedentes de
una televisión o una televisión con pantalla
plana.4
Italiano
Compatibilidad de este reproductor con
televisores de exploración progresiva y
alta definición.
Ajuste del sonido HDMI
Français
Comparado con el vídeo entrelazado, el vídeo
de exploración progresiva duplica eficazmente
la tasa de exploración de la imagen, lo que se
traduce en una imagen estable, sin parpadeos.
El vídeo de exploración progresiva sólo
funciona desde la salida de vídeo
componentes.
También puede modificar los ajustes de HDMI
para resolución y color. Para obtener más
información sobre estos ajustes, consulte
Configuración de “Video Output” (Salida de
Vídeo) en la página 33.
Español
Acerca del vídeo de exploración
progresiva
• Utilice un cable HDMI para realizar la
conexión entre la salida HDMI OUT de este
reproductor y la toma HDMI de un monitor
compatible con HDMI.
• La flecha de la clavija debe mirar hacia
abajo para una correcta alineación con la
toma del reproductor.
English
Si su televisor dispone de entradas de vídeo de
componentes, puede utilizarlas en lugar de la
salida de vídeo estándar para obtener
imágenes de mejor calidad.1
Para el diagrama de conexión, consulte 2 en
página 38.
• Utilice un cable de vídeo de componentes
para conectar COMPONENT VIDEO OUT a un
conjunto de entradas de vídeo componentes
de su televisor.
11:40 AM
1 • La salida de vídeo de componentes permite elegir entre dos formatos: entrelazado y progresivo. Consulte Configuración de
“Video Output” (Salida de Vídeo) en la página 33.
• Cuando el reproductor esté conectado usando un cable HDMI, la salida de vídeo de componentes no puede cambiarse entre
los formatos Interlace y Progressive. Cuando HDMI Resolution está ajustada en 720x480i (NTSC)/720x576i (PAL), Interlace
se selecciona automáticamente, y el formato Progressive se selecciona automáticamente en otros ajustes.
2 El consumidor debe saber que no todos los televisores de alta definición son compatibles con este producto, y que es posible
que la imagen sufra interferencias. En caso de tener problemas con la imagen de exploración progresiva 525, se recomienda
cambiar la conexión a la salida de ‘definición estándar’ (entrelazada). Si tiene dudas acerca de la compatibilidad de nuestro
televisor con este modelo, póngase en contacto con nuestro centro de atención al cliente.
3 • Sólo se puede establecer una conexión HDMI con componentes dotados de DVI compatibles tanto con DVI como con la
norma High Bandwidth Digital Content Protection (HDCP). Si decide conectar la unidad a un conector DVI, necesitará un
adaptador específico (DVIHDMI). Sin embargo, la conexión DVI no admite señales de sonido. Para obtener más información,
consulte al representante de su equipo de sonido.
• Según el componente que haya conectado, el uso de una conexión DVI puede traducirse en transferencias de señales
inestables.
• Cuando cambie el componente conectado a la salida HDMI, también deberá cambiar los ajustes HDMI en función del nuevo
componente (para hacerlo, consulte Configuración de “Video Output” (Salida de Vídeo) en la página 33).
4 Esto posibilita el uso de los altavoces integrados en la televisión para escuchar la entrada de audio procedente de un dispositivo
DVD o USB. La salida de audio desde los terminales HDMI es sólo PCM lineal de 2 canales. En este caso, no se oirá ningún
sonido procedente de los altavoces (o auriculares) de esta unidad. Todas las otras fuentes de audio (incluyendo TUNER) salen
de esta unidad normalmente.
39
Es
HTZ180DVD_en_RXJ.book Page 40 Friday, March 20, 2009
11:40 AM
Restauración de la conexión HDMI
Acerca de HDMI
Si recibe un mensaje de error (verá aparecer en
pantalla HDMI ERR) o si la pantalla se pone en
blanco (por ejemplo, después de cambiar la
resolución), consulte la guía de solución de
problemas en la página 47. Si no consigue
resolver el problema, siga los pasos que se
enumeran a continuación para restaurar la
conexión HDMI.
HDMI (High Definition Multimedia Interface)
soporta tanto vídeo como sonido en una sola
conexión digital para reproductores de DVD y
DTV, descodificadores, y otros dispositivos AV.
HDMI se desarrolló para proporcionar las
tecnologías de High Bandwidth Digital Content
Protection (HDCP) así como Digital Visual
Interface (DVI) en una sola especificación.
HDCP se utiliza para proteger contenidos
digitales transmitidos y recibidos por pantallas
compatibles con DVI.
1
Pulse SHIFT+SETUP.
2 Utilice / para seleccionar INITIAL y, a
continuación, pulse ENTER.
3 Utilice / para elegir HDMIINIT y, a
continuación, pulse ENTER.
4 Pulse ENTER mientras INIT OK esté
parpadeando.
El sistema se reiniciará y restaurará los valores
de fábrica de HDMI. Para obtener más
información sobre estos ajustes, consulte
Configuración de “Video Output” (Salida de
Vídeo) en la página 33.
HDMI tiene la capacidad de soportar vídeo
estándar, mejorado o de alta definición más
sonido surround estándar o multicanal. Entre
las características de HDMI destacan el vídeo
digital sin comprimir, un ancho de banda de
hasta cinco gigabites por segundo (con
señales HDTV), un solo conector (en lugar de
varios cables y conectores) y la comunicación
entre la fuente AV y dispositivos AV tales como
la DTV.
HDMI, el logotipo HDMI y High-Definition
Multimedia Interface son marcas comerciales o
marcas registradas de HDMI Licensing, LLC.
Conexión de antenas externas
Para una antena externa AM, utilice un cable
con aislamiento vinílico de 5 m a 6 m e
instálela dentro o fuera de casa. Deje
conectada la antena de cuadro. Utilice
solamente la antena de cuadro de AM incluida.
Para una antena FM externa, utilice un
conector PAL para conectarla.
Para el diagrama de conexión, consulte 4 en la
página página 38.
40
Es
HTZ180DVD_en_RXJ.book Page 41 Friday, March 20, 2009
11:40 AM
Capítulo 12
Información adicional
Tabla de compatibilidad de discos
DVD-Vídeo
Vídeo CD
DVD-RW
CD-R
• CD-Audio, Video CD/Súper VCD, ISO
9660 CD-ROM* que contiene archivos
MP3, WMA, MPEG-4 AAC, JPEG o
vídeo DivX/WMV.
* Compatible con la norma ISO 9660
Nivel 1 ó 2. Formato físico del CD:
Mode1, Mode2 XA Form1. Los sistemas
de archivo Romeo y Joliet son ambos
compatibles con este reproductor.
• Reproducción multisesión: No
• Reproducción de sesión abierta: No
DVD-R/-RW
• DVD-Video (modo vídeo), Video
Recording (VR)*, UDF Bridge DVD-ROM
que contiene archivos MP3, WMA,
MPEG-4 AAC, JPEG o vídeo DivX/
WMV.
* Es posible que los puntos de edición
no se reproduzcan exactamente como
fueron editados; la pantalla se podría
poner en blanco en los puntos
editados.
• Reproducción multiformato: No
• Reproducción de sesión abierta: No
Discos
creados en
PC
• Es posible que los discos grabados
en un PC no se puedan reproducir
debido a la configuración del software
empleado. En estos casos, lea la
información sobre compatibilidad en el
manual del software para creación de
DVD-R/-RW o CD-R/-RW o en las
carcasas de los discos.
• Los discos grabados en el modo
Packet Write no son compatibles con
este reproductor.
CD-RW
Fujicolor CD
• Esta unidad reproduce discos DVD+R/
+RW.
•
es una marca registrada de FUJIFILM
Corporation.
•
es una marca registrada de DVD
Format/Logo Licensing Corporation.
• También compatible con KODAK Picture
CD.
Este reproductor es compatible con la norma
Súper VCD de IEC, que ofrece una calidad de
imagen superior, permite la grabación de dos
pistas de audio estéreo y es compatible con el
formato de pantalla ancha.
Deutsch
Formatos compatibles
CD-R/-RW
Nederlands
Soporte
Italiano
Audio CD
DVD-R
Français
Para obtener más información, consulte la
Tabla de compatibilidad de discos abajo.
Un DualDisc es un nuevo disco de dos caras,
una de las cuales incluye contenido de vídeo,
audio, etc., de DVD, mientras que la otra
recoge contenido que no es propio de DVD,
como material de audio digital.
La cara de audio no propio de DVD no cumple
la especificación de CD-Audio y, por lo tanto,
es posible que no pueda reproducirse.
La cara de DVD de un DualDisc sí se
reproduce en este producto. El contenido de
DVD-Audio no.
Para obtener más información sobre las
características de DualDisc, consulte al
fabricante o al distribuidor del disco.
Español
Este reproductor es compatible con una
amplia gama de tipos de disco (soportes) y
formatos. Los discos compatibles suelen llevar
uno de los siguientes logotipos en el disco y/o
en el envoltorio del disco. Sin embargo, tenga
en cuenta que algunos tipos de disco, como
los CD y DVD grabables, pueden tener un
formato no reproducible.
Acerca de la reproducción DualDisc
English
Compatibilidad de reproducción
de formatos de disco/contenidos
Súper Vídeo CD (Súper VCD)
41
Es
HTZ180DVD_en_RXJ.book Page 42 Friday, March 20, 2009
Soporte
Formatos compatibles
Audio
• MPEG-1 Audio Layer 3 (MP3),
comprimido Windows Media Audio (WMA),
MPEG-4 AAC
• Frecuencias de muestreo: 32 kHz/
44,1 kHz/48 kHz
• Tasas de bits: Cualquiera (se
recomienda 128 kbps o superior)
• Reproducción de archivos MP3/
WMA/MPEG-4 AAC en tasa de bits
variable (VBR o variable bit rate): No
• Codificación sin pérdida WMA: No
• Compatibilidad con DRM (Digital
Rights Management): Sí (los archivos
de sonido con protección DRM no se
reproducirán en este equipo).
• Las extensiones de archivo: .mp3,
.wma, .m4a (deben utilizarse para que
el reproductor pueda reconocer
archivos MP3/WMA/MPEG-4 AAC)
• Estructura de archivo (puede variar):
Hasta 299 carpetas en un disco; hasta
648 carpetas y archivos (combinados)
dentro de cada carpeta
Archivo
JPEG
• Archivos de imágenes fijas Baseline
JPEG y EXIF 2.2* hasta una resolución
de 3072 x 2048
*Formato de archivos para cámaras de
fotografía digitales
• Compatibilidad con Progressive
JPEG: No
• Extensiones de archivo: .jpg
(se debe utilizar a fin de que el
reproductor reconozca los archivos
JPEG)
• Estructura de archivo (puede variar):
Hasta 299 carpetas en un disco; hasta
648 carpetas y archivos (combinados)
dentro de cada carpeta
Acerca de la compatibilidad con
DVD+R/DVD+RW
Sólo se pueden reproducir discos DVD+R/
DVD+RW grabados en ‘Modo Vídeo (DVD
Video Mode)’ con la sesión cerrada. Sin
embargo, es posible que algunos fragmentos
editados durante la grabación no se
reproduzcan con exactitud.
11:40 AM
Acerca de DivX
DivX es un formato de vídeo digital creado por
DivX, Inc. Este reproductor puede reproducir
vídeos DivX grabados en DVDs, CDs o
dispositivos de almacenamiento USB.
En la terminología de DVD-Vídeo, cada archivo
de vídeo DivX se llama “Título”.
Compatibilidad con vídeo DivX
• Reproduce vídeo DivX®.1
• Extensiones de archivo: .avi y .divx (deben
usarse a fin de que el reproductor
reconozca los archivos de vídeo DivX).
Tenga en cuenta que todos los archivos con
la extensión .avi son reconocidos como
MPEG4, pero no todos ellos son
necesariamente archivos de vídeo DivX y,
por lo tanto, es posible que no se puedan
reproducir en este equipo.
Visualización de archivos de subtítulos
DivX
Los grupos de fuentes que se indican a
continuación están disponibles para archivos
de subtítulos externos DivX. Puede ver en
pantalla el grupo de fuentes apropiado
ajustando el Subtitle Language (en
Configuración de “Language” (Idioma) en la
página 34) para que coincida con el archivo de
subtítulos.2
Grupo 1: Albanés (sq), Euskera (eu), Catalán (ca),
Danés (da), Holandés (nl), Inglés (en), Faroés (fo),
Finlandés (fi), Francés (fr), Alemán (de), Islandés (is),
Irlandés (ga), Italiano (it), Noruego (no), Portugués (pt),
Retorromano (rm), Gaélico escocés (gd), Español (es),
Sueco (sv)
Grupo 2: Albanés (sq), Croata (hr), Checo (cs),
Húngaro (hu), Polaco (pl), Rumano (ro), Eslovaco (sk),
Esloveno (sl)
Nota
1 No se pueden reproducción archivos de vídeo .avi de más de 4 GB.
2 • Para los archivos de subtítulos externos, pueden utilizarse las extensiones siguientes de nombres de archivo en formato de
subtítulos (observe que estos archivos no se muestran en el menú de navegación del disco): .srt, .sub, .ssa, .smi
• Algunos archivos de subtítulos externos pueden mostrarse incorrectamente o no mostrarse.
• El nombre del archivo de la película ha de repetirse al comienzo del nombre del archivo de los subtítulos externos.
• El número de archivos de subtítulos externos que puede activarse para la misma película está limitado a un máximo de 10.
42
Es
HTZ180DVD_en_RXJ.book Page 43 Friday, March 20, 2009
Grupo 3: Búlgaro (bg), Bielorruso (be), Macedonio (mk),
Ruso (ru), Serbio (sr), Ucraniano (uk)
Grupo 4: Hebreo (iw), Yiddish (ji)
Grupo 5: Turco (tr)
DivX® es una marca registrada de DivX, Inc. y se
utiliza bajo licencia.
Almacenamiento de discos
Evite dejar los discos en ambientes demasiado
fríos, húmedos o calientes (y bajo la luz directa
del sol). No pegue papeles ni adhesivos al
disco, ni utilice lápices, bolígrafos u otros
instrumentos de punta afilada. Podría dañar el
disco.
Deutsch
Este reproductor puede reproducir contenido
de tipo Windows Media Audio.
Frote suavemente desde el centro del disco con
movimientos rectos. No limpie la superficie del
disco con movimientos circulares.
Si necesita limpiar el disco más a fondo, use
un trapo con alcohol o un equipo de limpieza
para CD/DVD disponible en tiendas. No use
nunca bencina, disolvente u otros agentes de
limpieza, tales como los productos diseñados
para la limpieza de discos de vinilo.
Nederlands
Acerca de WMA
Sujete el disco por los bordes a fin de no dejar
huellas, ensuciarlo o rayarlo en cualquiera de
los dos lados. Un disco sucio o rayado puede
afectar a la calidad de su reproducción.
Si un disco se llena de huellas digitales, polvo,
etc., límpielo con un paño suave y seco.
Italiano
Advanced Audio Coding (AAC) forma parte
sustancial de la norma MPEG-4 AAC, que
incorpora MPEG-2 AAC, formando la base de la
tecnología de compresión de sonido MPEG-4.
El formato de archivo y la extensión dependen
de la aplicación utilizada para codificar el
archivo AAC. Esta unidad reproduce archivos
AAC codificados por iTunes® con la extensión
‘.m4a’. No se reproducirán los archivos
protegidos por DRM; asimismo, es posible que
tampoco se reproduzcan los archivos
codificados con algunas versiones de iTunes®,
o que los nombres de archivos no se muestren
correctamente.
Apple e iTunes son marcas comerciales de
Apple Inc., registradas en los EE. UU. y en otros
países.
Manipulación de discos
Français
Acerca de MPEG-4 AAC
Uso y cuidado de los discos
Español
WMV es la sigla de Windows Media Video y
corresponde a una tecnología de compresión
de vídeo desarrollada por Microsoft
Corporation. El contenido WMV puede
codificarse utilizando Windows Media
Encoder.
• Este reproductor es compatible con
archivos WMV9 que se codifican utilizando
Windows Media Encoder 9 Series con
extensión .wmv.
• Compatible con tamaño inferior a
720 x 576 píxeles/720 x 480 píxeles.
• No es compatible con Advanced Profile.
• En este reproductor no se reproducirán
archivos de vídeo protegidos con DRM.
• Extensiones de archivo .wmv.
• Compatible con una tasa de bits inferior a
192 kbps.
WMA es la sigla de Windows Media Audio y
corresponde a una tecnología de compresión
de audio desarrollada por Microsoft
Corporation. El contenido WMA se puede
codificar con el reproductor Windows Media
versión 7.7.1, el reproductor Windows Media
para Windows XP o el reproductor Windows
Media serie 9.
Windows Media es una marca comercial de
Microsoft Corporation.
Este producto incluye tecnología propiedad de
Microsoft Corporation, y no se puede usar ni
distribuir sin una licencia de Microsoft
Licensing, Inc.
English
Acerca de WMV
11:40 AM
Discos no recomendables
Los discos giran a alta velocidad dentro del
reproductor. Si un disco está agrietado,
picado, doblado o dañado de alguna otra
forma, no lo inserte en el reproductor: podría
dañar el equipo.
Este reproductor ha sido diseñado para usar
sólo discos circulares convencionales. Pioneer
no asume ninguna responsabilidad
relacionada con el uso de discos con otras
formas.
43
Es
HTZ180DVD_en_RXJ.book Page 44 Friday, March 20, 2009
Regiones de DVD-Vídeo
Todos los discos DVD-Vídeo tienen una señal
de región en la funda que indica las regiones
del mundo con las que el disco es compatible.
Su sistema de DVD también tiene una señal de
región (en el panel posterior). Los discos de
regiones no compatibles no se reproducirán
en este reproductor. Los discos con la señal
ALL se reproducirán en cualquier reproductor.
Cuando se inserta un disco que no puede ser
reproducido en este reproductor, verá
aparecer uno de los siguientes mensajes:
Incompatible disc region number
(Código de región del disco
incompatible)
Can’t play disc
(No se puede reproducir el disco)
Instalación y mantenimiento
Sugerencias de instalación
Queremos que disfrute de este sistema el
mayor tiempo posible, así que tenga en cuenta
los siguientes consejos cuando elija una
ubicación:
11:40 AM
Utilice la unidad cerca de un televisor o monitor
puesto que podría sufrir interferencias,
especialmente si el televisor emplea una antena
interna.
Use la unidad en la cocina u otra habitación en
la que el sistema esté expuesto a humo o vapor.
Use la unidad encima de una alfombra gruesa ni
la cubra con un trapo, ya que impedirá la
adecuada ventilación del sistema.
Coloque la unidad sobre una superficie inestable
o demasiado reducida para sostener las cuatro
patas del sistema.
Limpieza de la lente lectora
La lente del reproductor de DVD no debería
ensuciarse en su uso normal, pero si por
alguna razón se produjese un fallo en el
funcionamiento debido a la presencia de polvo
o suciedad, contacte con el centro de servicio
autorizado por Pioneer más cercano. Si bien
en las tiendas se pueden comprar productos
de limpieza para lentes, no recomendamos su
uso ya que algunos de ellos pueden dañarla.
Problemas de condensación
Recomendamos que…
Se puede formar condensación dentro del
reproductor si se trae del exterior a una
habitación caliente o si la temperatura de la
habitación aumenta con rapidez. Aunque la
condensación no dañará el reproductor, es
posible que afecte su rendimiento
temporalmente. Deje que se aclimate a una
temperatura más elevada durante una hora
aproximadamente antes de encenderlo.
Recomendamos que no…
Desplazamiento de la unidad
Use la unidad en una habitación con buena
ventilación.
Coloque la unidad sobre una superficie sólida,
plana y nivelada, como una mesa, estantería o
estante para aparatos estéreo.
Use la unidad en lugares expuestos a
temperaturas o humedad altas, como cerca de
radiadores y otros aparatos eléctricos
generadores de calor.
Coloque la unidad en el alféizar de la ventana o
en un lugar en el que el sistema esté expuesto a
la luz directa del sol.
Use la unidad en ambientes con exceso de
humedad o polvo.
Coloque la unidad encima de un amplificador u
otro componente del equipo estéreo que se
caliente con el uso.
Si necesita transportar la unidad principal,
retire antes el disco del interior del
reproductor, en caso de que haya alguno, y, a
continuación, pulse STANDBY/ON en el
panel frontal para apagar el sistema. Espere a
que desaparezca de la pantalla la palabra
-OFF- y, a continuación, desenchufe el cable
de alimentación.1 Nunca levante o mueva la
unidad durante la reproducción, ya que los
discos giran a una velocidad alta y pueden
dañarse.
Nota
1 Si desenchufa la unidad antes de que el mensaje -OFF- desaparezca de la pantalla, los ajustes predeterminados de fábrica del
sistema podrían restablecerse.
44
Es
HTZ180DVD_en_RXJ.book Page 45 Friday, March 20, 2009
11:40 AM
Si lo configura en 4:3 (Pan&Scan),
los discos para pantalla ancha
aparecen con los laterales izquierdo y
derecho recortados. Aunque la
imagen aparece más grande, en
realidad no la ve entera.
Tamaños de pantalla y formatos
de disco
Tenga en cuenta que muchos discos de
pantalla ancha anulan los ajustes del
reproductor para que el disco se vea en
formato buzón independientemente del ajuste.
Usuarios de televisores estándar
Pulse SHIFT+SETUP.
2 Utilice / para seleccionar SYS SET y,
a continuación, pulse ENTER.
3 Utilice / para elegir TV SYS y pulse
ENTER.
El televisor cambia de la siguiente manera:
• AUTO NTSC
• NTSC PAL
• PAL AUTO
Deutsch
Si tiene un televisor estándar, el valor TV
Screen (página 33) de este reproductor deberá
ajustarse a 4:3 (Letter Box) o
4:3 (Pan & Scan), según prefiera.
1
Nederlands
El ajuste predeterminado de este sistema es
AUTO y, a menos que note que la imagen
aparece distorsionada, le recomendamos
dejarlo en AUTO. Si la imagen aparece
distorsionada con algunos discos, configure el
televisor para que coincida con la región o país
del sistema. Sin embargo, esto puede
restringir el tipo de discos que puede ver.
Consulte la tabla para conocer la
compatibilidad entre los discos y los ajustes
(AUTO, PAL y NTSC).3
Italiano
Si tiene un televisor de pantalla ancha, el valor
TV Screen (página 33) de este reproductor
deberá ajustarse a 16:9 (Wide) o
16:9 (Compressed).
Cuando vea discos grabados en formato 4:3
con el valor 16:9 (Wide), puede usar los
controles del televisor para seleccionar la
presentación de la imagen. El televisor puede
ofrecer varias opciones de zoom y ampliación;
para más información, lea las instrucciones
del televisor.
Tenga en cuenta que algunos formatos de cine
son más amplios que 16:9, así que aunque
tenga un televisor de pantalla ancha estos
discos se verán en formato ‘buzón’ con bandas
negras en la parte superior e inferior de la
pantalla.
Français
Configuración del sistema de
televisor
Español
Usuarios de televisores de pantalla
ancha
English
Existen discos DVD-Vídeo para distintos
formatos de pantalla, desde programas de
televisión, que normalmente son de 4:3, hasta
películas de pantalla ancha CinemaScope1,
con una dimensión proporcional de hasta 7:3.
Los televisores también poseen dimensiones
diferentes: formato ‘estándar’ 4:3 y pantalla
ancha 16:9.2
Si lo configura en 4:3 (Letter Box),
los discos para pantalla ancha
aparecen con franjas negras en la
parte superior e inferior.
Nota
1 Muchos discos para pantalla ancha anulan los valores del reproductor, por lo que el disco aparece en formato tipo buzón a
pesar del valor ajustado.
2 El uso del valor 16:9 (Wide) o 16:9 (Compressed) con un televisor estándar con formato 4:3 o el valor 4:3 con un televisor de
pantalla ancha, dará como resultado una imagen distorsionada.
3 La mayoría de modelos del recientemente desarrollado sistema de televisión PAL detectan 50 Hz (PAL)/60 Hz (NTSC) y
cambian automáticamente la amplitud vertical, lo que resulta en una reproducción sin pérdida vertical. Sin embargo, en algunos
casos la imagen podría reproducirse sin color. Si su televisor PAL no posee un control de visualización vertical, es posible que
no pueda ver discos NTSC debido al movimiento de las imagen. Si el televisor tiene un control de visualización vertical, ajústelo
hasta que la imagen deje de moverse. En algunos televisores, la imagen podría encogerse verticalmente, dejando franjas
blancas en las partes superior e inferior de la pantalla.
45
Es
HTZ180DVD_en_RXJ.book Page 46 Friday, March 20, 2009
4 Pulse ENTER mientras parpadea CHANGE.
El sistema entrará, automáticamente, en modo
de espera y, a continuación, se encenderá de
nuevo. Verá el nuevo ajuste del sistema de
televisión en la pantalla después de visualizar
POWER ON.1
Tipo de soporte Formato NTSC
CD/MP3/WMA/
MPEG-4 AAC/
JPEG/sin disco
PAL
AUTO
NTSC
NTSC
PAL
NTSC
PAL
NTSC
PAL
PAL
—
NTSC
PAL
NTSC o
PAL
Ajuste de paso de frecuencia
Si tiene dificultades para sintonizar
correctamente las emisoras, es posible que el
paso de frecuencia no corresponda a su país/
zona.
1
Ajuste de la función Key Lock
Para desactivar los botones del panel frontal,
active la función Key Lock.
1
Pulse SHIFT+SETUP.
2 Utilice / para seleccionar SYS SET y,
a continuación, pulse ENTER.
Ajuste de
reproductor
DVD/Súper VCD/
Vídeo CD/vídeo
DivX/WMV
11:40 AM
Pulse SHIFT+SETUP.
3 Utilice / para elegir KEYLOCK y, a
continuación, pulse ENTER.
4 Utilice / para seleccionar LOCK ON o
LOCK OFF y, a continuación, pulse ENTER.
Restablecimiento del sistema
Use este procedimiento para restablecer todos
los valores del sistema a los predeterminados
de fábrica.
1 Con el sistema encendido, pulse
SHIFT+SETUP.
2 Utilice / para seleccionar INITIAL y, a
continuación, pulse ENTER.
2 Utilice / para elegir AM 9K/10K y, a
continuación, pulse ENTER.
3 Utilice / para seleccionar ALL INIT y, a
continuación, pulse ENTER.
• Se visualiza INIT OK.
3 Utilice / para seleccionar AM 9K o AM
10K y, a continuación, pulse ENTER.
4 Pulse ENTER mientras INIT OK esté
parpadeando.2
Debilitamiento de la luz de la
pantalla
Uso de la lista de códigos de
idioma
Puede ajustar el brillo del texto en la pantalla
del panel delantero.
Algunas opciones de idioma (consulte
Configuración de “Language” (Idioma) en la
página 34) le permiten elegir su idioma favorito
entre los 136 de la Lista de códigos de idioma en
la página 51.
1
Pulse SHIFT+SETUP.
2 Utilice / para seleccionar SYS SET y,
a continuación, pulse ENTER.
3 Utilice / para seleccionar DIMMER y,
a continuación, pulse ENTER.
Se muestra en la pantalla del panel frontal.
4 Utilice / para seleccionar LIGHT u
DARK y, a continuación, después pulse
ENTER.
1
Seleccione ‘Other Language’.
2 Use / para seleccionar una letra o un
número de código.
3 Use / para seleccionar una letra o un
número de código.
Para obtener la lista completa de idiomas y
códigos, consulte Lista de códigos de idioma en
la página 51.
Nota
1 Debe conmutar el reproductor al modo de espera (pulse STANDBY/ON) antes de cada cambio.
2 No utilice la unidad sin motivo ni enchufe el cable de alimentación porque la alimentación del sistema se enciende
automáticamente.
46
Es
HTZ180DVD_en_RXJ.book Page 47 Friday, March 20, 2009
11:40 AM
Solución de problemas
• Si el sistema no funciona con normalidad debido a factores externos tales como la
electricidad estática, desenchufe la unidad de la red y vuelva a enchufarla para restablecer las
condiciones normales de funcionamiento.
• Si está utilizando la entrada de línea, asegúrese de que el componente esté
correctamente conectado (consulte Conexión de componentes auxiliares en la
página 38).
• No sale audio de los altavoces conectados a esta unidad si el modo de audio HDMI
está ajustado a TV (página 39).
• Pulse MUTE en el mando a distancia para desactivar la función de desactivación
del sonido.
• Aumente el volumen.
Los altavoces de sonido
envolvente o el altavoz
central no producen
ningún sonido.
• Consulte Ajuste de los niveles de canal en la página 15 para comprobar los niveles
de los altavoces.
• Cuando se selecciona TUNER or LINE, la fuente sólo se oye en estéreo. Para
obtener un sonido multicanal, cambie la fuente de entrada a DVD/CD o USB.
• Asegúrese de que no ha seleccionado el modo de audio STEREO (consulte
Escucha con sonido envolvente en la página 20).
• Compruebe si hay algún micrófono conectado.
• Conecte correctamente los auriculares (consulte Conexiones básicas en la
página 8).
El mando a distancia no
funciona.
• Cambie las pilas (consulte Inserción de las pilas en el mando a distancia en la
página 14).
• Utilícelo a una distancia de 7 m y con un ángulo de 30° desde el sensor del mando
a distancia (consulte Utilización del mando a distancia en la página 14).
• Retire cualquier obstáculo o úselo desde otra posición.
• Evite exponer el sensor del panel frontal de la unidad a la luz directa del sol.
No se escucha el
micrófono.
• Utiliza un solo micrófono y está enchufado en el conector MIC (SUB). El conector
MIC (SUB) sólo puede usarse si hay micrófono enchufado en el conector MIC
(MAIN).
• Ajuste el MIC VOL +/–.
Se oye un ruido al
enchufar el micrófono.
• El micrófono está apuntando hacia los altavoces. Mantenga el micrófono alejado
de los altavoces.
• El nivel del micrófono está ajustado demasiado alto. Baje el nivel de control del
micrófono.
En la pantalla aparece
TRAYLOCK y no se
puede expulsar la
bandeja.
• Pulse y mantenga pulsado OPEN/CLOSE en el panel frontal durante unos ocho
segundos. A continuación, se puede abrir/cerrar la bandeja de discos pulsando
OPEN/CLOSE.
Deutsch
Al seleccionar una
función, no se oye nada.
Nederlands
• Espere un minuto antes de volver a encender la unidad.
• Asegúrese de que no haya filamentos sueltos en contacto con la unidad. Esto
podría hacer que la unidad se apague automáticamente.
• Compruebe que los altavoces están correctamente conectados.
• Asegúrese de que el voltaje de la unidad corresponde al de la red.
• Pruebe bajando el volumen.
• Si el problema persiste, lleve la unidad al servicio autorizado por Pioneer más
cercano.
Italiano
Solución
La unidad no se
enciende, o se apaga
repentinamente (puede
mostrarse un mensaje de
error al iniciarlo).
Français
Problema
Español
General
English
Algunas operaciones incorrectas se suelen confundir con problemas o fallos de funcionamiento.
Si piensa que algo funciona mal en este componente, compruebe los puntos siguientes. Algunas
veces, el problema puede estar en otro componente. Inspeccione los otros componentes y los
aparatos eléctricos que esté utilizando. Si el problema no se puede solucionar después de
comprobar los puntos indicados abajo, solicite al centro de servicio autorizado por Pioneer o a su
distribuidor que le haga los trabajos de reparación necesarios.
47
Es
HTZ180DVD_en_RXJ.book Page 48 Friday, March 20, 2009
11:40 AM
Reproductor de DVD/CD/Vídeo CD
Problema
Solución
La unidad expulsa el disco • Limpie el disco y alinéelo adecuadamente en la guía de la bandeja.
automáticamente después • Si el número de la región en el disco DVD-Vídeo no corresponde al de la unidad,
de insertarlo.
el disco no se podrá usar (consulte Regiones de DVD-Vídeo en la página 44). En este
caso, aparece uno de los siguientes mensajes en la pantalla: Incompatible disc
region number/Can’t play disc.
• Aguarde a que cualquier posible condensación del interior del reproductor se
evapore. Evite utilizar el reproductor cerca de un aparato de aire acondicionado.
La unidad no reproduce.
• Si se ha introducido el disco boca abajo, vuelva a introducirlo con la cara de la
etiqueta hacia arriba.
La reproducción de
imágenes se detiene y no
se pueden utilizar los
botones.
• Pulse (detener) y, a continuación, (reproducir) para volver a iniciar la reproducción.
• Apague la unidad y vuelva a encenderla con el botón del panel frontal
STANDBY/ON.
Los ajustes se cancelan.
• Si se va la electricidad, se cancelan los ajustes.
No hay imagen ni color.
• Compruebe que las conexiones estén bien hechas y las clavijas introducidas
completamente.
• Consulte el manual del televisor/monitor para ver si los ajustes son los correctos.
• Si está seleccionada la opción Progressive y ha utilizado cables de vídeo de
componentes para conectar un televisor que no es compatible con una señal de
exploración progresiva, no podrá ver ninguna imagen. Con el televisor conectado
mediante los terminales compuesto o S-Vídeo, cambie la opción Component
Out a Interlace (consulte Configuración de “Video Output” (Salida de Vídeo) en la
página 33).
La imagen en pantalla se
alarga o el formato no
cambia.
• El ajuste de TV Screen no es el correcto. Modifique la opción TV Screen para que
corresponda con el televisor/monitor que está usando (consulte Configuración de
“Video Output” (Salida de Vídeo) en la página 33).
• Este sistema utiliza una tecnología de protección contra copias que puede
Si la imagen ha sido
grabada en un reproductor impedir la grabación o producir problema de imagen a través de un reproductor de
de vídeo o se pasa a través vídeo o un selector AV. No es un fallo de funcionamiento.
de un selector AV, se
producen distorsiones en
la reproducción.
Durante la reproducción, la • Este reproductor es compatible con la protección contra copias Macro-Vision
imagen se ve distorsionada System. Algunos discos incluyen una señal para impedir el copiado, y cuando se
u oscura.
introduce este tipo de discos y se reproduce, en algunas secciones de la imagen
pueden aparecer franjas, etc. dependiendo del televisor. No es un fallo de
funcionamiento.
• Los discos responden de forma distinta a ciertas funciones del reproductor. Esto
puede hacer que la imagen se vuelva negra durante un instante o que tiemble
ligeramente cuando se ejecuta la función. Estos problemas se deben en gran
medida a las diferencias entre los discos y los contenidos de los discos y no son
fallos de funcionamiento del reproductor.
Hay una diferencia notable • Los DVD y CD utilizan métodos distintos de grabación. No es un fallo de
entre el volumen de DVD y funcionamiento.
CD.
48
Es
El equipo no reconoce el
disco CD-ROM.
• Compruebe que el CD-ROM ha sido grabado con el formato de disco ISO 9660.
Para obtener más información sobre la compatibilidad de los discos, consulte
Tabla de compatibilidad de discos en la página 41.
El equipo no reconoce el
disco DVD-ROM.
• Compruebe que el DVD-ROM ha sido grabado con el formato puente UDF. Para
obtener más información sobre la compatibilidad de los discos, consulte Tabla de
compatibilidad de discos en la página 41.
No aparecen los archivos
en el Disc Navigator/
Photo Browser.
• Los archivos del disco deben tener la extensión correcta: .mp3 para archivos
MP3; .wma para archivos WMA, .m4a para archivos MPEG-4 AAC y .jpg para
archivos JPEG (en mayúsculas o en minúsculas). Consulte Tabla de compatibilidad
de discos en la página 41.
HTZ180DVD_en_RXJ.book Page 49 Friday, March 20, 2009
11:40 AM
Problema
Solución
No se reproducen los
archivos WMA o MPEG-4
AAC.
• Los archivos fueron grabados con DRM (gestión de derechos digitales). No es un
fallo de funcionamiento.
No se pueden reproducir
archivos WMV.
• Cuando la tasa de bits del archivo es superior a 192 kbps, el archivo no puede
reproducirse.
• Conecte la antena AM (consulte Conexiones básicas en la página 8) y ajuste la
posición y la orientación para obtener la mejor recepción. También puede conectar
una antena AM interna o externa adicional (consulte Conexión de antenas externas
en la página 40).
• Extienda al máximo la antena de cable FM, oriéntela correctamente y fíjela a una
pared. También puede conectar una antena FM externa (consulte Conexión de
antenas externas en la página 40).
• Apague los otros aparatos que podrían estar causando el ruido o aléjelos de la
unidad.
•El intervalo de sintonización no corresponde a su país o zona. Consulte Ajuste de
paso de frecuencia en la página 46 para cambiar el intervalo de sintonización.
La sintonización
automática no capta
algunas emisoras.
• La señal de radio es débil. La sintonización automática sólo detecta emisoras con
una buena señal. Para una sintonización más sensible, conecte una antena exterior.
Français
Solución
Hay demasiado ruido en
las emisiones.
Español
Problema
English
Sintonizador
Conexión USB
Solución
El sistema no reconoce el
dispositivo de
almacenamiento masivo
USB.
• Compruebe que ha insertado correctamente el conector USB a la unidad.
• Compruebe que el formato de memoria es FAT16 o FAT32.
• El equipo no es compatible con dispositivos USB con concentradores USB
internos.
Conexión HDMI
Problema
Solución
No hay salida de vídeo
HDMI.
• Compruebe que en la configuración del componente que está utilizando ha elegido
este reproductor como entrada HDMI (consulte el manual de instrucciones del
componente).
• Compruebe que el cable HDMI está conectado correctamente y no está dañado.
• Compruebe que los componentes conectados mediante la interfaz HDMI están
encendidos y son compatibles con HDMI (los componentes deben ser compatibles
tanto con DVI como con High Bandwidth Digital Content Protection (HDCP)).
• Según el componente que haya conectado, el uso de una conexión DVI puede
traducirse en transferencias de señales inestables.
• Asegúrese de que la resolución de este reproductor corresponde a la del
componente conectado mediante HDMI. Para cambiar la resolución HDMI, consulte
Configuración de “Video Output” (Salida de Vídeo) en la página 33.
• Si la pantalla se pone en blanco después de cambiar la resolución, quiere decir
que ha seleccionado una resolución no compatible con el monitor. Para restaurar
los valores de fábrica, consulte Restauración de la conexión HDMI en la página 40.
Deutsch
No se reproducen los
• Los archivos fueron grabados con DRM (gestión de derechos digitales). No es un
archivos WMA o MPEG-4 fallo de funcionamiento.
AAC.
Nederlands
Los archivos no aparecen • Los archivos del disco deben tener la extensión correcta: .mp3 para archivos MP3;
en el Navigator/Photo
.wma para archivos WMA, .m4a para archivos MPEG-4 AAC y .jpg para archivos
Browser.
JPEG (en mayúsculas o en minúsculas).
• Compruebe que la autorización de archivos no ha sido restringida (con una
contraseña, etc.).
Italiano
Problema
49
Es
HTZ180DVD_en_RXJ.book Page 50 Friday, March 20, 2009
11:40 AM
Problema
Solución
El monitor sufre
problemas de color
después de cambiar el
ajuste de HDMI Color
(página 34).
• Según el equipo conectado, algunos ajustes HDMI Color pueden hacer que la
imagen se reproduzca de forma incorrecta. En este caso, y siempre que sea posible,
utilice los propios ajustes de entrada de vídeo del televisor para seleccionar RGB. De
lo contrario, utilice el ajuste HDMI Color previo.
No hay imagen ni sonido. • Si el problema persiste al conectar su componente HDMI directamente a su
monitor, por favor, consulte el manual del monitor o del componente o póngase en
contacto con el fabricante para obtener apoyo técnico.
No hay salida de sonido • Consulte Ajuste del sonido HDMI en la página 39 para asegurarse de que TV está
seleccionado.
HDMI.
Mensajes de error
50
Es
Mensaje
Descripción
EXTRAPWR
• No puede ajustar los modos SFC, los controles de tono (agudos, bajos o refuerzo de bajos), el
modo MP3 Expander ni el modo Voice Enhancer cuando mode si está utilizando el modo Extra
Power.
CANNOT
• El sistema no permite una operación porque no se ha seleccionado DVD/CD ni USB, o se ha
pulsado SHIFT+KARAOKE, SHIFT+ECHO, SHIFT+ o SHIFT+.
• Aparece cuando no se ha seleccionado DVD/CD y se ha pulsado SHIFT+USB REC.
TRAYLOCK
• Está activado el bloqueo de la bandeja. Consulte General en Solución de problemas en la
página 47.
STEREO
• STEREO aparece cuando se pulsa SURROUND o AUTO/STEREO en el modo de entrada
TUNER o LINE.
KEYLOCK
• El bloqueo del teclado está activado. Consulte Ajuste de la función Key Lock en la página 46.
USB ERR
• Para obtener más información, consulte Importante en Uso de la interfaz USB en la página 29.
HDMI ERR
• Si desea obtener sugerencias para resolver este problema, consulte Conexión HDMI arriba. Si
el problema persiste, consulte también Restauración de la conexión HDMI en la página 40.
EEP ERR
• Para recibir asistencia, póngase en contacto con su centro de asistencia autorizado de
Pioneer o con su distribuidor.
EXIT
• Aparece cuando entra cualquier señal prohibida o los cascos están conectados mientras
aparece la pantalla de menú y, a continuación, la pantalla vuelve a su estado normal.
NO MIC
• Aparece cuando pulsa SHIFT+KARAOKE, SHIFT+ECHO, SHIFT+ o SHIFT+ o MIC VOL +/–
cuando no hay ningún micrófono insertado.
OC ERR 1
OC ERR 2
• Compruebe si los cables del altavoz han sufrido un cortocircuito. Si el mensaje de error sigue
mostrándose, póngase en contacto con el centro del servicio autorizado de Pioneer o con su
distribuidor para que realicen una revisión.
OVER TEMP
• Intente bajar el volumen. Si el problema no se soluciona retirando e insertando otra vez el cable
de alimentación, es posible que la unidad esté dañada. En este caso, póngase en contacto con
el centro del servicio autorizado de Pioneer o con su distribuidor más cercano.
TV AUDIO
• El indicador se enciende durante dos segundos si el modo de escucha se cambia mientras el
modo de audio HDMI está configurado para televisión.
KARAOKE
• Aparece al pulsar SURROUND, SOUND, AUTO/STEREO o MP3 EXP/V.ENH cuando hay un
micrófono insertado.
PHONESIN
• Aparece al pulsar SURROUND, SOUND, AUTO/STEREO o MP3 EXP/V.ENH cuando hay un
micrófono insertado.
HTZ180DVD_en_RXJ.book Page 51 Friday, March 20, 2009
11:40 AM
Lista de códigos de idioma
Idioma (letra de código de idioma), Código de idioma
Italiano
Nederlands
Slovak (sk), 1911
Slovenian (sl), 1912
Samoan (sm), 1913
Shona (sn), 1914
Somali (so), 1915
Albanian (sq), 1917
Serbian (sr), 1918
Siswati (ss), 1919
Sesotho (st), 1920
Sundanese (su), 1921
Swedish (sv), 1922
Swahili (sw), 1923
Tamil (ta), 2001
Telugu (te), 2005
Tajik (tg), 2007
Thai (th), 2008
Tigrinya (ti), 2009
Turkmen (tk), 2011
Tagalog (tl), 2012
Setswana (tn), 2014
Tonga (to), 2015
Turkish (tr), 2018
Tsonga (ts), 2019
Tatar (tt), 2020
Twi (tw), 2023
Ukrainian (uk), 2111
Urdu (ur), 2118
Uzbek (uz), 2126
Vietnamese (vi), 2209
Volapük (vo), 2215
Wolof (wo), 2315
Xhosa (xh), 2408
Yoruba (yo), 2515
Zulu (zu), 2621
Français
Lingala (ln), 1214
Laothian (lo), 1215
Lithuanian (lt), 1220
Latvian (lv), 1222
Malagasy (mg), 1307
Maori (mi), 1309
Macedonian (mk), 1311
Malayalam (ml), 1312
Mongolian (mn), 1314
Moldavian (mo), 1315
Marathi (mr), 1318
Malay (ms), 1319
Maltese (mt), 1320
Burmese (my), 1325
Nauru (na), 1401
Nepali (ne), 1405
Norwegian (no), 1415
Occitan (oc), 1503
Oromo (om), 1513
Oriya (or), 1518
Panjabi (pa), 1601
Polish (pl), 1612
Pashto, Pushto (ps), 1619
Portuguese (pt), 1620
Quechua (qu), 1721
Rhaeto-Romance (rm), 1813
Kirundi (rn), 1814
Romanian (ro), 1815
Kinyarwanda (rw), 1823
Sanskrit (sa), 1901
Sindhi (sd), 1904
Sangho (sg), 1907
Serbo-Croatian (sh), 1908
Sinhalese (si), 1909
Español
Esperanto (eo), 0515
Estonian (et), 0520
Basque (eu), 0521
Persian (fa), 0601
Finnish (fi), 0609
Fiji (fj), 0610
Faroese (fo), 0615
Frisian (fy), 0625
Irish (ga), 0701
Scots-Gaelic (gd), 0704
Galician (gl), 0712
Guarani (gn), 0714
Gujarati (gu), 0721
Hausa (ha), 0801
Hindi (hi), 0809
Croatian (hr), 0818
Hungarian (hu), 0821
Armenian (hy), 0825
Interlingua (ia), 0901
Interlingue (ie), 0905
Inupiak (ik), 0911
Indonesian (in), 0914
Icelandic (is), 0919
Hebrew (iw), 0923
Yiddish (ji), 1009
Javanese (jw), 1023
Georgian (ka), 1101
Kazakh (kk), 1111
Greenlandic (kl), 1112
Cambodian (km), 1113
Kannada (kn), 1114
Kashmiri (ks), 1119
Kurdish (ku), 1121
Kirghiz (ky), 1125
Latin (la), 1201
English
Japanese (ja), 1001
English (en), 0514
French (fr), 0618
German (de), 0405
Italian (it), 0920
Spanish (es), 0519
Dutch (nl), 1412
Russian (ru), 1821
Chinese (zh), 2608
Korean (ko), 1115
Greek (el), 0512
Afar (aa), 0101
Abkhazian (ab), 0102
Afrikaans (af), 0106
Amharic (am), 0113
Arabic (ar), 0118
Assamese (as), 0119
Aymara (ay), 0125
Azerbaijani (az), 0126
Bashkir (ba), 0201
Byelorussian (be), 0205
Bulgarian (bg), 0207
Bihari (bh), 0208
Bislama (bi), 0209
Bengali (bn), 0214
Tibetan (bo), 0215
Breton (br), 0218
Catalan (ca), 0301
Corsican (co), 0315
Czech (cs), 0319
Welsh (cy), 0325
Danish (da), 0401
Bhutani (dz), 0426
Lista de códigos del país/zona
Argentina, 0118, ar
Australia, 0121, au
Austria, 0120, at
Bélgica, 0205, be
Brasil, 0218, br
Canadá, 0301, ca
Chile, 0312, cl
China, 0314, cn
Dinamarca, 0411, dk
Finlandia, 0609, fi
Francia, 0618, fr
Alemania, 0405, de
Hong Kong, 0811, hk
India, 0914, in
Indonesia, 0904, id
Italia, 0920, it
Japón, 1016, jp
Corea, República de, 1118, kr
Malasia, 1325, my
México, 1324, mx
Países Bajos, 1412, nl
Nueva Zelanda, 1426, nz
Noruega, 1415, no
Pakistán, 1611, pk
Filipinas, 1608, ph
Portugal, 1620, pt
Federación Rusa, 1821, ru
Singapur, 1907, sg
España, 0519, es
Suiza, 0308, ch
Suecia, 1905, se
Taiwán, 2023, tw
Tailandia, 2008, th
Reino Unido, 0702, gb
Estados Unidos de América, 2119, us
Deutsch
País/zona, código del país/zona, letra de código del país/zona
51
Es
HTZ180DVD_en_RXJ.book Page 52 Friday, March 20, 2009
Especificaciones
•
Características del amplificador
•
Altavoces frontales
Tipo. . . . . . . . . . . Sistema de DVD, de Vídeo CD/
Súper VCD y de sonido digital disco compacto
•
•
•
Sección de disco
Características del sintonizador FM
Banda de frecuencias . . . . 87,5 MHz a 108 MHz
Antena . . . . . . . . . . . . . . . . .75 Ω, desequilibrado
•
Características del sintonizador AM
Banda de frecuencias:
Con paso de 9 kHz . . . . . . 531 kHz a 1602 kHz
Con paso de 10 kHz . . . . . 530 kHz a 1700 kHz
Antena . . . . . . . . . . . . . . . . . . . Antena de cuadro
•
Otros
Requisitos de potencia:
Modelos para Sudamérica y Centroamérica
. . . . . . . . . . . . . CA 110 V a 220 V, 50 Hz/60 Hz
Modelos para el Ejército de EE.UU. y para las
zonas libres de impuestos
. . . . . . . . . . . . . . . CA 110 V a 240 V, 50 Hz/60 Hz
Consumo de energía . . . . . . . . . . . . . . . . . . 55 W
Consumo de energía en
modo en espera . . . . . . . . . . . . . . . . . . . . .0,48 W
Dimensiones
. . . . . .420 mm (An) x 62 mm (Al) x 331 mm (Pr)
Peso . . . . . . . . . . . . . . . . . . . . . . . . . . . . . . . 2,8 kg
•
Accesorios (receptor DVD/CD)
Mando a distancia . . . . . . . . . . . . . . . . . . . . . . . 1
Pilas AA/R6(para confirmar el
funcionamiento del sistema) . . . . . . . . . . . . . . . 2
Cable de vídeo (clavijas amarillas) . . . . . . . . . . 1
Antena de cuadro AM . . . . . . . . . . . . . . . . . . . . 1
Antena FM . . . . . . . . . . . . . . . . . . . . . . . . . . . . . . 1
Cable de alimentación . . . . . . . . . . . . . . . . . . . . 2
Adaptador de cable de alimentación
(Modelos para Sudamérica y
Centroamérica) . . . . . . . . . . . . . . . . . . . . . . . . . . 1
Tarjeta de garantía
(Modelos exclusivos para el Ejército de
EE.UU. y para las zonas libres de impuestos) . . . . . . 1
Guía de configuración
Instrucciones de funcionamiento
(Este documento)
Es
Sistema de altavoces S-DV180
Caja . . . . . . . . . . . . . Caja cerrada tipo estantería
(con protección magnética)
Sistema . . . . Sistema 7,7 cm de una sola dirección
Altavoces . . . . . . . . . . . . . Tipo cónico de 7,7 cm
Impedancia . . . . . . . . . . . . . . . . . . . . . . . . . . . 4 Ω
Banda de frecuencias . . . . . . . . 90 Hz a 20 kHz
Entrada máxima de energía . . . . . . . . . . . . .60 W
Dimensiones
. . . . . 105 mm (An) x 115 mm (Al) x 114 mm (Pr)
Peso . . . . . . . . . . . . . . . . . . . . . . . . . . . . . . . 0,6 kg
Potencia de salida RMS:
Frontal, Central, Sonido envolvente
. . . . . . . . . . . . . . . . . . . . . . . . . .60 W por canal
(1 kHz, 10 % T.H.D., 4 Ω)
Subwoofer . . .60 W (100 Hz, 10 % T.H.D., 4 Ω)
52
11:40 AM
Altavoz central
Caja . . . . . . . . . . . . . Caja cerrada tipo estantería
(con protección magnética)
. . . . . . . . . . . . . . . . . Entrada máxima de energía
Sistema . . . Sistema 7,7 cm de una sola dirección
Altavoces . . . . . . . . . . . . . Tipo cónico de 7,7 cm
Impedancia . . . . . . . . . . . . . . . . . . . . . . . . . . . 4 Ω
Banda de frecuencias . . . . . . . . 90 Hz a 20 kHz
Entrada máxima de energía . . . . . . . . . . . . .60 W
Dimensiones
. . . . . 115 mm (An) x 105 mm (Al) x 114 mm (Pr)
Peso . . . . . . . . . . . . . . . . . . . . . . . . . . . . . . . 0,6 kg
•
Altavoz de sonido envolvente
Caja . . . . . . . . . . . . . Caja cerrada tipo estantería
(con protección magnética)
Sistema . . . Sistema 7,7 cm de una sola dirección
Altavoces . . . . . . . . . . . . . Tipo cónico de 7,7 cm
Impedancia . . . . . . . . . . . . . . . . . . . . . . . . . . . 4 Ω
Banda de frecuencias . . . . . . . . 98 Hz a 20 kHz
Entrada máxima de energía . . . . . . . . . . . . .60 W
Dimensiones
. . . . . 105 mm (An) x 118 mm (Al) x 114 mm (Pr)
Peso . . . . . . . . . . . . . . . . . . . . . . . . . . . . . . . 0,6 kg
•
Subwoofer
Caja . . . . . . . . . . . . . . . . Bass-reflex para el suelo
Sistema . . . .Sistema 16 cm de una sola dirección
Altavoz. . . . . . . . . . . . . . . . . Tipo cónico de 16 cm
Impedancia . . . . . . . . . . . . . . . . . . . . . . . . . . . 4 Ω
Banda de frecuencias . . . . . . . . . 28 Hz a 1 kHz
Entrada máxima de energía . . . . . . . . . . . . .60 W
Dimensiones
. . . . . 190 mm (An) x 360 mm (Al) x 317 mm (Pr)
Peso . . . . . . . . . . . . . . . . . . . . . . . . . . . . . . . 3,8 kg
•
Accesorios
Pastillas antideslizantes (pequeñas) . . . . . . . . 12
Pastillas antideslizantes (grandes) . . . . . . . . . . 4
Escuadras para montaje . . . . . . . . . . . . . . . . . . . 4
Tornillos (para las escuadras). . . . . . . . . . . . . . . 4
HTZ180DVD_en_RXJ.book Page 53 Friday, March 20, 2009
Nota
• Las especificaciones y el diseño están
sujetos a posibles modificaciones sin
previo aviso, debido a mejoras.
11:40 AM
Fabricado bajo licencia de Dolby Laboratories.
“Dolby”, “Pro Logic” y el símbolo de la doble D
son marcas comerciales de Dolby Laboratories.
Publicado por Pioneer Corporation.
Copyright © 2009 Pioneer Corporation.
Todos los derechos reservados.
Français
Italiano
Nederlands
Deutsch
La protección contra el copiado DRM
(gestión de derechos digitales) es una
tecnología diseñada para impedir la
copia sin autorización mediante la
restricción de la reproducción, etc., de
archivos de sonido comprimidos en
dispositivos que no sean un ordenador
(o en otros equipos de grabación)
utilizados para grabarlos. Para obtener
más información, consulte los
manuales de instrucciones o los
archivos de ayuda de su ordenador o
sus programas.
Fabricado bajo licencia con patentes de los
EE.UU. números: 5,451,942; 5,956,674;
5,974,380; 5,978,762; 6,487,535 y otras patentes
de los EE.UU. y el resto del mundo emitidas y
pendientes. DTS y DTS Digital Surround son
marcas registradas, y los logotipos y símbolos
de DTS son marcas de fábrica de DTS, Inc.
© 1996-2008 DTS, Inc. Todos los derechos
reservados.
Español
Este producto incorpora tecnología de
protección del copyright que a su vez está
protegida por reclamaciones de métodos de
ciertas patentes de los EE.UU. y otros
derechos de la propiedad intelectual
propiedad de Macrovision Corporation y
otros propietarios de derechos. El uso de la
tecnología de protección del copyright
deberá contar con la autorización de
Macrovision Corporation, y deberá usarse
en casa o con fines de visión limitada, a
menos que Macrovision Corporation
autorice lo contrario. La inversión de
ingeniería o el desmontaje están prohibidos.
English
Este producto incluye fuentes
FontAvenue® bajo licencia de NEC
Corporation. FontAvenue es una marca
registrada de NEC Corporation.
53
Es
HTZ180DVD_en_RXJ.book 54 ページ
2009年3月17日 火曜日 午後6時53分
Published by Pioneer Corporation.
Coppyright © 2009 Pioneer Corporation.
All rights reserved.
PIONEER CORPORATION
4-1, Meguro 1-Chome, Meguro-ku, Tokyo 153-8654, Japan
PIONEER ELECTRONICS (USA) INC.
P.O. BOX 1540, Long Beach, California 90801-1540, U.S.A. TEL: (800) 421-1404
PIONEER ELECTRONICS OF CANADA, INC.
300 Allstate Parkway, Markham, Ontario L3R 0P2, Canada TEL: 1-877-283-5901, 905-479-4411
PIONEER EUROPE NV
Haven 1087, Keetberglaan 1, B-9120 Melsele, Belgium TEL: 03/570.05.11
PIONEER ELECTRONICS ASIACENTRE PTE. LTD.
253 Alexandra Road, #04-01, Singapore 159936 TEL: 65-6472-7555
PIONEER ELECTRONICS AUSTRALIA PTY. LTD.
178-184 Boundary Road, Braeside, Victoria 3195, Australia, TEL: (03) 9586-6300
PIONEER ELECTRONICS DE MEXICO S.A. DE C.V.
Blvd.Manuel Avila Camacho 138 10 piso Col.Lomas de Chapultepec, Mexico,D.F. 11000 TEL: 55-9178-4270
K002_B_En
Printed in
<XRE3232-A>