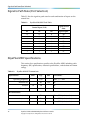
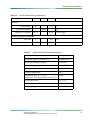
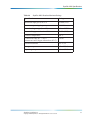
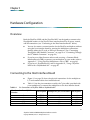
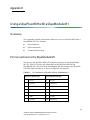
1
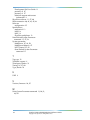
SkyePlus™ MXH and MXU Multiplexer Reference Guide
Version 080715
SkyeTek, Inc.
11030 Circle Point Rd., ste. 300
Westminster, CO 80020
U.S.A.
Copyright 2008
Copyright 2008 SkyeTek, Inc., 11030 Circle Point Road, Westminster, Colorado 80020, U.S.A. All rights reserved.
July 15, 2008
This product or document is protected by copyright and distributed under licenses restricting its use, copying, distribution, and
decompilation. No part of this product or document may be reproduced in any form by any means without prior written authorization of
SkyeTek and its licensors, if any.
Copyright Information
SkyeTek, SkyePlus, and SkyeWare are trademarks or registered trademarks of SkyeTek, Inc.
Technical Support and Contact Information
SkyeTek, Inc.
11030 Circle Point Road, Suite 300
Westminster, CO 80020
http://www.skyetek.com
Sales:
[email protected]
Technical Support:
http://support.skyetek.com
Table of Contents
Overview and Quick Start ......................................................................................9
Features ............................................................................................................. 9
Firmware and Compatibility ....................................................................... 10
Quick Start Procedure ....................................................................................11
SkyePlus Specifications .......................................................................................13
Mechanical Specifications ............................................................................ 13
Electrostatic Precautions............................................................................... 15
Pin Descriptions ............................................................................................. 15
Signal to Path State (Port Selection) ............................................................ 16
SkyePlus MXH Specifications...................................................................... 16
SkyePlus MXU Specifications ...................................................................... 18
Hardware Configuration......................................................................................21
Overview......................................................................................................... 21
Connecting to the Host Interface Board ..................................................... 21
Connecting Through the MH Module Connector .....................................23
Connecting Through the CF Module Connector .......................................24
Software Configuration .......................................................................................25
Overview......................................................................................................... 25
Communications Timing...............................................................................26
Enabling the Multiplexer ............................................................................. 27
Example: Enabling a Multiplexer .......................................................28
Controlling Multiplexer Operation..............................................................29
Example: Detecting a Multiplexer......................................................29
Example: Enabling a Port ....................................................................30
Example: No Multiplexer Detected....................................................31
Example: Inaccessible Port ..................................................................31
Using the SkyePlus Multiplexer with Other Devices .........................................33
Code for Third-Party Readers...................................................................... 33
Main.c .....................................................................................................34
Mux.h......................................................................................................35
Mux.c ......................................................................................................37
Using Multiple SkyePlus Multiplexers ................................................................39
iii
Copyright 2008 SkyeTek, Inc. All Rights Reserved.
Overview ........................................................................................................
GPIO Control Lines.......................................................................................
Signal Loss......................................................................................................
Delay ...............................................................................................................
Using Two Multiplexers...............................................................................
Using More Than Two Multiplexers ..........................................................
39
39
39
40
40
40
Using SkyePlus Multiplexers with a CBIB .......................................................... 41
Overview ........................................................................................................ 41
Using the MUX Connector (J19).................................................................. 41
Using the GPIO Connector (J17) .................................................................. 43
Using a SkyePlus MXH with a SkyeModule M1 ................................................. 45
Overview ........................................................................................................ 45
Pin Connections to the SkyeModule M1.................................................... 45
Cable Connections to the SkyeModule M1 ...................................... 46
Communications with SkyeTek Protocol v2 .............................................. 47
Multiplexer Memory Parameter......................................................... 47
Multiplexer System Parameter ........................................................... 47
Index ..................................................................................................................... 51
iv
SkyePlus™ MXH and MXU Multiplexer Reference Guide
Copyright 2008 SkyeTek, Inc. All Rights Reserved. Revision 070824
List of Figures
Overview and Quick Start 9
Figure 1-1 SkyePlus Multiplexer .........................................................9
SkyePlus Specifications 13
Figure 2-1 SkyePlus MXH or MXU four-port multiplexer, top view
13
Figure 2-2 SkyePlus MXH or MXU eight-port multiplexer ..........14
Figure 2-3 SkyePlus Multiplexer: Side View ...................................14
Hardware Configuration 21
Figure 3-1 Physical Pin and Antenna Connections HIB to SkyePlus
Multiplexer .......................................................................................22
Figure 3-2 Custom MXU Connection Through MH-style Connector
23
Figure 3-3 Custom Connection Through CF-style Connector ......24
Software Configuration 25
Figure 4-1 SkyeTek Protocol Timing Diagram ...............................26
Using the SkyePlus Multiplexer with Other Devices 33
Using Multiple SkyePlus Multiplexers 39
Using SkyePlus Multiplexers with a CBIB 41
Figure C-1 Connecting Multiplexer to CBIB Via MUX Connector ..
42
Figure C-2 Connecting Multiplexer to CBIB Via GPIO Connector ..
44
Using a SkyePlus MXH with a SkyeModule M1 45
Figure D-1 Pin Connections: SkyeModule M1 (J3) to SkyePlus
MXH (JP1) ........................................................................................46
Figure D-2 SkyePlus MXH (J1) to the SkyeModule M1 (J2) .........46
Index 51
v
Copyright 2008 SkyeTek, Inc. All Rights Reserved.
vi
SkyePlus™ MXH and MXU Multiplexer Reference Guide
Copyright 2008 SkyeTek, Inc. All Rights Reserved. Revision 070824
List of Tables
Overview and Quick Start .....................................................................................9
SkyePlus Specifications .......................................................................................13
Table 2-1 JP1 Pin Descriptions ....................................................................15
Table 2-2 SkyePlus MXH/MXU Truth Table ...........................................16
Table 2-3 SkyePlus MXH RF Characteristics ............................................16
Table 2-4 SkyePlus MXH Electrical Characteristics .................................17
Table 2-5 SkyePlus MXH Absolute Maximum Ratings ..........................17
Table 2-6 SkyePlus MXU RF Characteristics ............................................18
Table 2-7 SkyePlus MXU Electrical Characteristics .................................18
Table 2-8 SkyePlus MXU Absolute Maximum Ratings ..........................19
Hardware Configuration .....................................................................................21
Table 3-1 Pin Connections of SkyePlus MXH to SkyeModule M2 ........21
Table 3-2 Pin Connections of SkyePlus MXU to SkyeModule M9 Via MH
Connector ....................................................................................................23
Table 3-3 Pin Connections of SkyePlus MXU to SkyeModule Via CF
Connector ....................................................................................................24
Software Configuration ......................................................................................25
Table 4-1 Timing Components ...................................................................27
Table 4-2 Device Type Values .....................................................................29
Using the SkyePlus Multiplexer with Other Devices ........................................33
Using Multiple SkyePlus Multiplexers ...............................................................39
Using SkyePlus Multiplexers with a CBIB ..........................................................41
Table C-1 Pin Connections of SkyePlus to CBIB MUX Connector ........42
Table C-2 Pin Connections of SkyePlus to CBIB MUX Connector ........43
Using a SkyePlus MXH with a SkyeModule M1 .................................................45
Table D-1 Pin Connections of SkyePlus MXH to SkyeModule M1 .......45
Table D-2 Device Type Value .....................................................................47
Table 4-3 Data Field Values .........................................................................48
Index .....................................................................................................................51
vii
Copyright 2008 SkyeTek, Inc. All Rights Reserved.
viii
SkyePlus™ MXH and MXU Multiplexer Reference Guide
Copyright 2008 SkyeTek, Inc. All Rights Reserved.
Chapter 1
Overview and Quick Start
The SkyePlus™ MXH and MXU multiplexer boards feature either four or eight
antenna ports, which lets you use one SkyeModule reader to operate multiple
antennas. Figure 1-1 shows the SkyePlus eight-port multiplexer. The reader uses
a digital signal to control the SkyePlus multiplexer outputs.
Figure 1-1
SkyePlus Multiplexer
Features
●
The SkyePlus MXH operates at the HF (13.56) frequency band and works
with the SkyeModule M2 reader.
●
The SkyePlus MXU operates at the UHF (900Mhz) frequency band and
works with the SkyeModule M7 and M9 readers.
9
SkyePlus™ MXH and MXU Multiplexer Reference Guide
Copyright 2008 SkyeTek, Inc. All Rights Reserved.
Firmware and Compatibility
●
Both types of multiplexer connect to the SkyeModule reader via the
SkyeTek host interface board for power, control, and RF connections (see
“Hardware Configuration” on page 21).
●
You can also create a custom interface for the SkyePlus multiplexer without
using the host interface board by running the multiplexer connections
through either the CF-style or MH-style connectors. (See ‘‘Connecting
Through the MH Module Connector’’ on page 23 or ‘‘Connecting Through
the CF Module Connector’’ on page 24.)
Firmware and Compatibility
The SkyeModule firmware gives the multiplexer full compatibility with the latest
host interface board for either the CF or MH versions of the SkyeModule readers.
Make sure that your SkyeTek reader has the correct version of the firmware
before you connect it to the SkyePlus multiplexer:
●
For the M2: March 7, 2007 release, 0x010104BD or higher
●
For the M9: May 14, 2007 release, 0x010001C3 or higher
●
For the M7: all firmware releases
For information about how to check your firmware version, consult the reference
guide for your reader.
If you have an older firmware release and are using a Common Blade Interface
Board (CBIB) to connect your multiplexer to your reader, refer to Appendix C,
“Using SkyePlus Multiplexers with a CBIB” on page 41.
Note – If your firmware does not support the host interface board, you can
L o r e m ip s u m d o lo r s tai m e t,c o n s e c te tu e r
l b o r tis p u lv n
o
i a r m a g n a .Mo r b iq u is
fe r m e n tu m n
.I s o d a le s fe u g ia st e m .
S e d u tp e d e N
. a m te m p u s Ma
.
e c e n a s r u tr u m
C u r a b itu r n u n c A
. e n e a n s c e le r is q u e
S u s p e n d is s e e r a t.Ma u r is u tc u
v e s tib u lu m s e m .V iv a m u s e t,v e le c tu s v ita e
U to r c ir is u s ,c o n v a lis e t,S u s p e n d is s e s u s c p
i itv u p
l u at te e it.l
e tr a e n im .
S u s p e n d is s e e el m e n tu m .S e d e n im lo r e m ,s u s c ip itq u si v
, e s tib u u
l m
in ,s u s c ip itn o n ,a n te .L o r e m ip s u m d o lo r s tai m e t,c o n s e c te tu e r
h a b ita s s e p la te a d ci tu m s .t
S u s p e n d is s e s u s c ip itv u p
l u ta te e it.l
.S e d
c o n s e c te tu e r r is u s .
connect your SkyeModule reader to the multiplexer via the CF or MH
connectors. See ‘‘Hardware Configuration’’ on page 21 for more information.
lu c tu s im p e r d ie .t
p r e tiu m c o n d im e n tu m .
10
SkyePlus™ MXH and MXU Multiplexer Reference Guide
Copyright 2008 SkyeTek, Inc. All Rights Reserved. Version 080715
Quick Start Procedure
Quick Start Procedure
The following instructions provide an example of how to set up your new
SkyePlus multiplexer and switch between two antennas.
1. Connect your SkyePlus MXH or MXU to a host interface board with an
attached SkyeModule reader (see ‘‘Hardware Configuration’’ on page 21),
using the included control and RF cables.
2. Connect one antenna to port 0 (P0) and another antenna to port 7 (P7) of
the MXH or MXU. (Alternatively, you can connect only one antenna to port
0 and manually change it to port 7 when you instruct the MXH or MXU to
switch between the ports as described in this procedure.)
3. Use the SkyeWare software to prepare to send commands to the reader:
a.
Let SkyeWare automatically discover the reader.
b.
4.
5.
Select the Capabilities tab and then the Protocol subtab. (The
commands in the remainder of this procedure follow the more
detailed examples in the SkyeTek Development Kit User Guide.)
Enable the MXH or MXU with the following command:
Command:
Store Default System Parameter
Address:
000A (multiplexer control)
Block:
01
Data:
02
Verify that the multiplexer is properly detected:
Command:
Address:
Block:
Data:
6.
Read System Parameter
000A (multiplexer control)
01
The command response returns data showing the
type of multiplexer (see Table 4-2 on page 29).
Set the multiplexer to port 0:
7.
Command:
Write System Parameter
Address:
000A (multiplexer control)
Block:
01
Data:
00
Hold a tag in front of the antenna connected to port 0.
8.
Select a tag:
Command:
Tag Type:
9.
Select Tag
Auto Detect
The tag should be detected successfully via port 0.
Reset the port to port 7:
Command:
Address:
Block:
Data:
Write System Parameter
000A (multiplexer control)
01
07
Overview and Quick Start
Copyright 2008 SkyeTek, Inc. All Rights Reserved. Version 080715
11
Quick Start Procedure
10. Hold a tag in front of the antenna connected to port 7.
11.
Select a tag:
Command:
Tag Type:
Select Tag
Auto Detect
The tag should be detected successfully via port 7.
12
SkyePlus™ MXH and MXU Multiplexer Reference Guide
Copyright 2008 SkyeTek, Inc. All Rights Reserved. Version 080715
Chapter 2
SkyePlus Specifications
This chapter details the general mechanical and electrical specifications of the
SkyePlus multiplexer and then provides specifications specific to the SkyePlus
MXH or MXU.
Mechanical Specifications
The SkyePlus MXH or MXU share the same mechanical specifications.
Figure 2-1 shows the top view of the SkyePlus four-port multiplexer board.
95.5 mm
76.6 mm
49.6 mm
P2
P5
J5
J4
J3
J9
J6
70.4 mm
J2
50.8 mm
P7
P0
J8
J7
JP1
Figure 2-1
3 mm
J1
Vcc
GND
Vcc
A2
A1
A0
GND
1 2 3 4 5 6 7
I/O
SkyePlus MXH or MXU four-port multiplexer, top view
13
SkyePlus™ MXH and MXU Multiplexer Reference Guide
Copyright 2008 SkyeTek, Inc. All Rights Reserved.
Mechanical Specifications
Figure 2-2 shows a top view of the SkyePlus eight-port multiplexer board.
95.5 mm
76.6 mm
P2
P3
J5
P4
J4
P5
J3
J9
70.4 mm
P6
P1
J6
16.4 mm
50.8 mm
J2
P7
P0
J8
J7
JP1
3 mm
J1
Vcc
GND
Vcc
A2
A1
A0
GND
1 2 3 4 5 6 7
Figure 2-2
I/O
SkyePlus MXH or MXU eight-port multiplexer
Figure 2-3 shows a side view of a SkyePlus multiplexer board, facing the I/O
port.
95.5 mm
76.6 mm
Vcc
GND
Vcc
A2
A1
A0
GND
1 2 3 4 5 6 7
11.3 mm
I/O
Figure 2-3
14
SkyePlus Multiplexer: Side View
SkyePlus™ MXH and MXU Multiplexer Reference Guide
Copyright 2008 SkyeTek, Inc. All Rights Reserved. Version 080715
Electrostatic Precautions
Electrostatic Precautions
CAUTION – Failure to take proper electrostatic precautions may result in
damage to or failure of your SkyePlus multiplexer.
SkyePlus multiplexers contain static-sensitive parts. Observe the following
precautions to prevent damage to these parts.
●
Wear a static grounding strap when handling the multiplexer or other
electronic control components.
●
Keep all plastic, vinyl, and styrofoam (except antistatic versions) away
from printed circuit boards.
●
Do not touch the components or conductors on a printed circuit board with
your hands or with conductive devices.
Pin Descriptions
Table 2-1 lists the pins for JP1, the control connection for the SkyePlus MXU or
MXH multiplexer boards.
Table 2-1
JP1 Pin Descriptions
Pin
Name
Description
1
Vcc
3.3/5V Input Power
2
GND
Power supply ground (electrically connected to pin 7)
3
Vcc
3.3/5V input
●
Not connected to pin 1
●
Must be powered for operation
4
A2
Control line 2
5
A1
Control line 1
6
A0
Control line 0
7
GND
Signal ground (electrically connected to pin 2)
SkyePlus Specifications
Copyright 2008 SkyeTek, Inc. All Rights Reserved. Version 080715
15
Signal to Path State (Port Selection)
Signal to Path State (Port Selection)
Table 2-2 lists the signal-to-path state for each combination of inputs on the
control line.
Table 2-2
SkyePlus MXH/MXU Truth Table
Signal to Path
State
Control Input (Vctl)
A2
A1
A0
Input to port:
0
0
0
0
0
1
1
0
0
1
1
0
1
0
1
0
1
0
1
P0
P1
P2
P3
P4
P5
P6
P7
1
1
1
1
SkyePlus MXH Specifications
This section lists specifications specific to the SkyePlus MXH including radio
frequency (RF) specifications, electrical specifications, and absolute maximum
ratings.
Table 2-3
SkyePlus MXH RF Characteristics
Specification
Min
Operating frequency
Max
13.56
Insertion loss
Isolation
Typ
-0.5
MHz, +/- 7 kHz
-0.6
dB
-50
dB
-33
dB
1x (reader)
50
Ohms/SMA jack (reader)
4x (antenna)
50
Ohms/SMA jack (reader)
8x (antenna)
50
Ohms/SMA jack (reader)
Return loss
-45
Units/Notes
RF Connections
16
SkyePlus™ MXH and MXU Multiplexer Reference Guide
Copyright 2008 SkyeTek, Inc. All Rights Reserved. Version 080715
SkyePlus MXH Specifications
Table 2-4
SkyePlus MXH Electrical Characteristics
Specification
Min
Typ
Max
Units/Notes
General:
Power supply
4.5
Power consumption
Digital I/O (3 inputs)
5.5
V
A
200.0
0/3.3
0/5.0
V (low/high)
Control voltage bias conditions:
Low state
0
+0.2
Vdc
High state
+4.5
+5.5
Vdc
Table 2-5
SkyePlus MXH Absolute Maximum Ratings
Specification:
Rating:
Maximum input power at 0V to 5V
24 dBm (0.25 W)
Maximum operating frequency
13.56 MHz
Control voltage range (A and B)
-0.2 to +5.5 Vdc
Hot Switching Power Level at 0V to 5V
24 dBm (0.25 W)
Channel Temperature
150° C
Continuous Pdiss at T = +85° C
(derates at 6 mW/degree when above 85° C)
0.38 W
Thermal Resistance
173° C/W
Storage Temperature
-65 to 150° C
Operating Temperature
-40 to +85° C
SkyePlus Specifications
Copyright 2008 SkyeTek, Inc. All Rights Reserved. Version 080715
17
SkyePlus MXU Specifications
SkyePlus MXU Specifications
This section lists specifications specific to the SkyePlus MXH including radio
frequency (RF) specifications, electrical specifications, and absolute maximum
ratings.
Table 2-6
SkyePlus MXU RF Characteristics
Specification
Operating frequency
Min
Typ
Max
Units/Notes
860.0
900.0
960.0
MHz, +/- 7 kHz
1
1.4
Insertion loss
Isolation
28
dB
30
dB
22
dB
1x (reader)
50
Ohms/SMA jack (reader)
4x (antenna)
50
Ohms/SMA jack (reader)
8x (antenna)
50
Ohms/SMA jack (reader)
Return loss
RF Connections
Table 2-7
SkyePlus MXU Electrical Characteristics
Specification
Min
Typ
Max
Units/Notes
General:
Power supply
3.0
Power consumption
Digital I/O (3 inputs)
5.5
V
A
200.0
0/3.3
0/5.0
V (low/high)
Control voltage bias conditions:
18
Low state
0
+0.2
Vdc
High state
+3.0
+5.5
Vdc
SkyePlus™ MXH and MXU Multiplexer Reference Guide
Copyright 2008 SkyeTek, Inc. All Rights Reserved. Version 080715
SkyePlus MXU Specifications
Table 2-8
SkyePlus MXU Absolute Maximum Ratings
Specification:
Rating:
Maximum input power at 0-5 V
33 dBm (2 W)
Maximum operating frequency
960 MHz
Control voltage range (A and B)
-0.2 to +5.5 Vdc
Hot switching power level at 0-5 V
33 dBm (2 W)
Channel Temperature
150° C
Continuous Pdiss at T = +85° C
(derates at 6 mW/degree when above 85° C)
0.38 W
Thermal resistance
173° C/W
Storage temperature
-65 to 150° C
Operating temperature
-40 to +85° C
SkyePlus Specifications
Copyright 2008 SkyeTek, Inc. All Rights Reserved. Version 080715
19
SkyePlus MXU Specifications
20
SkyePlus™ MXH and MXU Multiplexer Reference Guide
Copyright 2008 SkyeTek, Inc. All Rights Reserved. Version 080715
Chapter 3
Hardware Configuration
Overview
Both the SkyePlus MXH and the SkyePlus MXU are designed to connect to the
SkyeModule reader via the SkyeTek host interface board for all power, control,
and RF connections (see “Connecting to the Host Interface Board” below).
●
You can also create a custom interface for the SkyePlus multiplexer without
using the host interface board by running the multiplexer connections
through either the CF-style or MH-style connectors. (See ‘‘Connecting
Through the MH Module Connector’’ on page 23 or ‘‘Connecting Through
the CF Module Connector’’ on page 24.)
●
If you have an older firmware release and are using a Common Blade
Interface Board (CBIB) to connect your multiplexer to your reader, refer to
Appendix C, “Using SkyePlus Multiplexers with a CBIB” on page 41.
●
If you have a SkyeModule M1, refer to Appendix D, “Using a SkyePlus
MXH with a SkyeModule M1” on page 45.
Connecting to the Host Interface Board
Table 3-1
●
Figure 3-1 on page 22 shows the physical connections for the multiplexer
I/O and antenna cables host interface board.
●
Table 3-1 lists the pin connections used by the 7-pin cable (provided with
your multiplexer) to connect the multiplexer to the host interface board.
Pin Connections of SkyePlus MXH to SkyeModule M2
Host Interface Board (J5) Pin
Number
2
1
0
3V
GND
Description
Multiplexer (JP1) Pin Number
Description
GPIO2
GPIO1
GPIO0
Vcc
GND
6
5
4
1, 3
2, 7
A0
A1
A2
Vcc
GND
21
SkyePlus™ MXH and MXU Multiplexer Reference Guide
Copyright 2008 SkyeTek, Inc. All Rights Reserved.
Connecting to the Host Interface Board
Spacer text. Spacer text. Spacer text. Spacer text. Spacer text. Spacer text. Spacer text. Spacer text. Spacer text. Spacer text. Spacer
text. Spacer text.
P2
P4
P3
J5
J4
J3
P5
J9
P1
J6
J2
SkyePlus MXH or MXU
Multiplexer
SkyeTek host interface board
P0
USB
1 2
J8
2 1
J11
J7
J8
RS-232
(J3)
J4
P6
P7
JP1
1234 56 7
J1
6 5 4 3 2 1
GPIO
J10
J1
2 1
3 2 1
J5
J6
SMA
7-pin connector cable
J9
RESET
Power
SkyeModule
M2 or M9 reader
(CF or MH)
MH-style connector (J7)
for SkyeModule reader
on bottom of interface board
ANT1
MMCX
Figure 3-1
22
Physical Pin and Antenna Connections HIB to SkyePlus Multiplexer
SkyePlus™ MXH and MXU Multiplexer Reference Guide
Copyright 2008 SkyeTek, Inc. All Rights Reserved. Version 080715
Connecting Through the MH Module Connector
Connecting Through the MH Module Connector
●
Figure 3-2 illustrates the pin and antenna connections.
●
Table 3-2 lists the pin connections for the MH connector.
Table 3-2
Pin Connections of SkyePlus MXU to SkyeModule M9 Via MH Connector
SkyePlus MXU (JP1)
SkyeModule M2 or M9 MH-style connector
1
2
3
4
5
6
7
9, 15
10, 16
9, 15
23
21
19
10, 16
Vcc
GND
Vcc
A2
A1
A0
GND
Vcc
GND
Vcc
GPIO00
GPIO01
GPIO02
GND
P2
P4
P3
J5
J4
J3
P5
J9
P1
J6
J2
SkyePlus Multiplexer
P6
P0
J7
J8
P7
JP1
1234 56 7
J1
VCC
SMA
MH connector
9
7
5
3
1
24 22 20 18 16 14 12 10
8
6
4
2
23 21 19 17 15 13 11
Standard Pin 1 location
Figure 3-2
Actual Pin 1
GND
To MMCX connector
onSkyeModule M2 or M9
Custom MXU Connection Through MH-style Connector
Hardware Configuration
Copyright 2008 SkyeTek, Inc. All Rights Reserved. Version 080715
23
Connecting Through the CF Module Connector
Connecting Through the CF Module Connector
●
Figure 3-3 illustrates the pin and antenna connections.
●
Table 3-3 lists the pin connections for the CF connector.
Table 3-3
Pin Connections of SkyePlus MXU to SkyeModule Via CF Connector
SkyePlus MXU (JP1)
M9 CF-style connector
1
2
3
4
5
6
7
2, 3
1, 25, 26, 27, 49
2, 3
32
33
34
1, 25, 26, 27, 49
Vcc
GND
Vcc
A2
A1
A0
GND
Vcc
GND
Vcc
GPIO00
GPIO01
GPIO02
GND
P2
P4
P3
J5
J4
J3
P5
J9
P1
J6
J2
SkyePlus Multiplexer
P6
P0
J7
J8
P7
JP1
1234 56 7
J1
SMA
VCC
GND
CF-style connector
25 24 23
22 21 20 19 18 17 16 15 14 13 12 11 10
50 49 48 47 46 45 44 43 42
41 40 39
9
8
7
38 37 36 35 34 33 32
6
5
4
3
2
1
31 30 29 28 27 26
To MMCX connector
on SkyeModule M2 or M9
Figure 3-3
24
Custom Connection Through CF-style Connector
SkyePlus™ MXH and MXU Multiplexer Reference Guide
Copyright 2008 SkyeTek, Inc. All Rights Reserved. Version 080715
Chapter 4
Software Configuration
Overview
The SkyeModule firmware gives the multiplexer full compatibility with the latest
host interface board for either the CF or MH versions of the SkyeModule readers.
Make sure that your SkyeTek reader has the correct version of the firmware
before you connect it to the SkyePlus multiplexer:
●
For the M2: March 7, 2007 release, 0x010104BD or higher
●
For the M9: May 14, 2007 release, 0x010001C3 or higher
●
For the M7: all firmware releases
For information about how to check your firmware version, consult the reference
guide for your reader.
Note – If your firmware does not support the host interface board, you can
L o r e m ip s u m d o lo r s tai m e t,c o n s e c te tu e r
lo b o r tis p u lv in a r m a g n a .Mo r b iq u is
fe r m e n tu m n
.I s o d a le s fe u g ia st e m .
S e d u p
t e d e .N a m te m p u s .Ma e c e n a s r u tr u m
C u r a b itu r n u n c .A e n e a n s c e le r is q u e
S u s p e n d is s e e r a t.Ma u r is u tc u
v e s tib u u
l m s e m .V iv a m u s e t,v e le c u
t s v ita e
Uo
t r c ri is u s ,c o n v a lis e ,S
t u s p e n d is s e s u s c ip itv u p
l u at te e it.l
e tr a e n im .
S u s p e n d is s e e le m e n u
t m .S e d e n im lo r e m ,s u s c ip tq
i u is v
, e s ib
t u lu m
in ,s u s c ip itn o n ,a n te .L o r e m ip s u m d o lo r s tai m e t,c o n s e c te tu e r
h a b tai s s e p la te a d ci u
t m s .t
S u s p e n d is s e s u s c ip tv
i u lp u at te e it.l
.S e d
c o n s e c et tu e r r is u s .
lu c tu s im p e r d ie .t
p r e iu
t m c o n d im e n tu m .
connect your SkyeModule reader to the multiplexer via the CF or MH connector
(see ‘‘Hardware Configuration’’ on page 21). Or, if you have an older firmware
release and are using a Common Blade Interface Board (CBIB) to connect your
multiplexer to your reader, refer to Appendix C, “Using SkyePlus Multiplexers
with a CBIB” on page 41.
The MUX Control system parameter for your SkyeModule reader lets you
configure and control your SkyePlus multiplexer. This section describes how to:
●
Set the parameter’s default values to enable the multiplexer.
●
Write values to the system parameter to control multiplexer behavior.
The MUX Control system parameter is a 1-byte value at address 0x0A.
●
For more information about SkyeWare software, see the SkyeTek Developer
Kit User Guide.
●
For more information about commands, see the SkyeTek Protocol v3 Reference
Guide.
25
SkyePlus™ MXH and MXU Multiplexer Reference Guide
Copyright 2008 SkyeTek, Inc. All Rights Reserved.
Communications Timing
Communications Timing
With SkyeTek firmware, the host controls all port switching. The host determines
which port is activated and when. The MUX Control system parameter lets you
control this functionality.
Switching speeds for hardware components on the multiplexer are on the order
of a few hundred nanoseconds. However, when you use the multiplexer with a
SkyeModule reader communicating through the firmware, these timings are
affected by factors including the tag protocol, the number of tags in the field, and
the setting for the number of retries. In general, the more tags that are in the read
field and the higher the setting for the number of retries, the longer it takes to
complete tag commands at each port.
The following example illustrates a timing sequence for a port change with a
SkyeModule M9, configured as follows:
●
SkyeTek Protocol v3
●
RS-232 communication
●
38400 baud
●
Select Tag command
●
Inventory mode
●
Gen 2 protocol
●
Number of retries set to three
●
Four tags in the field
In this configuration the total switching time per port is ~150ms. This equates to
1.6 cycles/second to switch a four-ports multiplexer or 0.8 cycles/second to
switch an eight-ports multiplexer.
Figure 4-1shows the typical timing of communications between host and reader,
and Table 4-1 on page 27 describes each timing component.
...
A
B
C
D
Time
Figure 4-1
26
SkyeTek Protocol Timing Diagram
SkyePlus™ MXH and MXU Multiplexer Reference Guide
Copyright 2008 SkyeTek, Inc. All Rights Reserved. Version 080715
E
...
...
... ...
Enabling the Multiplexer
Table 4-1 describes the timing components shown in Figure 4-1.
Table 4-1
Timing Components
Designator
Time (ms)
Description
A
6
B
1.5
Firmware delay to change port
C
2
Receive Change Port response
D
3.5
Send Select Tag command for Gen2 tags, Inventory
mode
E
130
Firmware delay to perform actual tag selection
and to receive response
Send Change Port command
Enabling the Multiplexer
Writing to the default MUX Control system parameter enables or disables the
multiplexer.
To set up communications:
1.
Set up the hardware connections as described in ‘‘Hardware
Configuration’’ on page 21.
2.
Use SkyeWare to send a Store Default System Parameter command to the
reader for the MUX Control parameter. The data value determines the
multiplexer setting:
●
0x02 enables the multiplexer on GPIO pins 0, 1, and 2 on the host
interface board. In this state, you can still access GPIO pins 3, 4, 5, and
6 through the User Port system parameter.
●
0x01 enables the multiplexer on GPIO pins 4, 5, and 6. In this state,
you can still access GPIO pins 0, 1, 2, and 3 through the User Port
system parameter.
●
0x00 disables the multiplexer. In this state, you can access all GPIO
pins (0–6) through the User Port system parameter.
Software Configuration
Copyright 2008 SkyeTek, Inc. All Rights Reserved. Version 080715
27
Enabling the Multiplexer
Example: Enabling a Multiplexer
The following example shows how to use the Store Default System Parameter
command with the data value of 0x02 to enable the multiplexer. (The example
shows both ASCII and binary forms of the command.)
Command = Store Default System Parameter
Mandatory Flags = Data
Request (ASCII Mode)
Start
<CR>
Flags Command Address Number Blocks Data Length
0x0820 0x1301
0x000A
0x0001
0x0001
Data
0x02
CRC
0xB74C
End
<CR>
Request (Binary Mode)
Start
Message Length Flags
<02>
0x000D
Command Address # Blocks
0x0820 0x1301
0x000A
0x0001
Data Length Data
0x0001
0x02
Response (ASCII Mode)
Start
Response
CRC
End
<LF>
0x1301
0xAE70
<CR><LF>
Response (Binary Mode)
28
Start
Message Length
Response Code
CRC
<02>
0x0004
0x1301
0xCD11
SkyePlus™ MXH and MXU Multiplexer Reference Guide
Copyright 2008 SkyeTek, Inc. All Rights Reserved. Version 080715
CRC
0x3D83
Controlling Multiplexer Operation
Controlling Multiplexer Operation
The MUX Control system parameter (0x0A) operates the multiplexer.
Reading the value of the parameter returns the type of multiplexer connected,
based on the device type code (Table 5-1).
Table 4-2
Device Type Values
Return Code
SkyePlus Multiplexer
SkyeModule Reader
01
MXH four-port
M2
02
MXH eight-port
M2
05
MHU four-port
M7, M9
06
MHU eight-port
M7, M9
00
No device detected
—
Writing a value to the MUX Control system parameter lets you address different
ports on the multiplexer. The value provided in the data field corresponds
directly to the multiplexer port to address. For example, writing 0x05 in the data
field selects multiplexer port 5. All tag operations that follow occur on port 5
until the parameter is set to a different value.
Example: Detecting a Multiplexer
In the following example, the response data of 0x01 indicates a SkyePlus MXH
multiplexer is detected. (The example shows both ASCII and binary forms of the
command.)
Command = Read System Parameter
Mandatory Flags = (none)
Request (ASCII Mode)
Start
Flags
<CR>
0x0020
Command Address Number Blocks
0x1201
0x000A
0x0001
Software Configuration
Copyright 2008 SkyeTek, Inc. All Rights Reserved. Version 080715
CRC
0x40D2
End
<CR>
29
Controlling Multiplexer Operation
Request (Binary Mode)
Start
<02>
Message Length
0x000A
Flags
0x20
Command
0x1201
Address
0x000A
Number of Blocks
0x0001
CRC
0xA4EF
Response (ASCII Mode)
Start
Response Code
Data Length
Data
CRC
End
<LF>
0x1201
0x0001
0x01
0xB622
<CR><LF>
Response (Binary Mode)
Start
Message Length
Response Code
Data Length
Data
CRC
<02>
0x0007
0x1201
0x0001
0x01
0xAAF3
Example: Enabling a Port
The following example shows the request data (0x02) to enable multiplexer port
number 2. (The example shows both ASCII and binary forms of the command.)
Command = Write System Parameter
Mandatory Flags = Data
Request (ASCII Mode)
Start
Flags
Command
<CR> 0x0820 0x1202
Address
Number Blocks
0x000A
0x0001
Data Length Data CRC
0x0001
End
0x02 0x7061 <CR>
Request (Binary Mode)
Start
Message Length Flags
<02>
0x000D
Command Address # Blocks
0x0820 0x1202
0x000A
0x0001
Data Length Data
0x0001
0x02
Response (ASCII Mode)
Start
Response
CRC
End
<LF>
0x1202
0x8533
<CR><LF>
Response (Binary Mode)
30
Start
Message Length
Response Code
CRC
<02>
0x0004
0x1202
0xE652
SkyePlus™ MXH and MXU Multiplexer Reference Guide
Copyright 2008 SkyeTek, Inc. All Rights Reserved. Version 080715
CRC
0xFAAE
Controlling Multiplexer Operation
Example: No Multiplexer Detected
The following ASCII example shows the response when a read request is sent
but no multiplexer is detected. (The data returned is zero, indicating the error.)
Command = Read System Parameter
Mandatory Flags = (none)
Request (ASCII Mode)
Start
Flags
<CR>
0x0020
Command Address Number Blocks
0x1201
0x000A
0x0001
CRC
0x40D2
End
<CR>
Response (ASCII mode)
Start
Response Code
Data Length
Data
CRC
End
<LF>
0x1201
0x0001
0x00
0xA7AB
<CR><LF>
Example: Inaccessible Port
The following ASCII example shows the response when a write is performed
using an inaccessible port number.
Command = Write System Parameter
Mandatory Flags = Data
Request (ASCII Mode)
Start
<CR>
Flags Command Address Number Blocks Data Length
0x0820 0x1202
0x000A
0x0001
0x0001
Data
0x10
CRC
0x43F2
End
<CR>
Response (ASCII Mode)
Start
Response
CRC
End
<LF>
0x1202
0x09FF
<CR><LF>
Software Configuration
Copyright 2008 SkyeTek, Inc. All Rights Reserved. Version 080715
31
Controlling Multiplexer Operation
32
SkyePlus™ MXH and MXU Multiplexer Reference Guide
Copyright 2008 SkyeTek, Inc. All Rights Reserved. Version 080715
Appendix A
Using the SkyePlus Multiplexer with Other
Devices
Code for Third-Party Readers
The following code examples show how a typical microcontroller can control the
SkyePlus multiplexer through general purpose I/O ports. The examples are in
the C programming language.
These code examples show a general implementation but are therefore not
optimized for any single platform. Using one I/O port and performing read and
write functions with a single mask can simplify the bit manipulations and reduce
computation cycles. To use the sample code, specify the I/O port, direction
registers, and appropriate bit masks in the header file.
The SkyePlus multiplexer uses 20k Ω pull-up and pull-down resistors on the
control lines for device detection. When interfacing the SkyePlus multiplexer to
other devices, the devices must be capable of driving these control lines. When
detecting the SkyePlus multiplexer, you may need to disable any internal pullups or pull-downs in the device.
33
SkyePlus™ MXH and MXU Multiplexer Reference Guide
Copyright 2008 SkyeTek, Inc. All Rights Reserved.
Code for Third-Party Readers
Main.c
The following code in main.c shows the use of the mux_detect() and
mux_open_port() functions as defined in the mux.h and mux.c files. Contact
technical support to download source code.
#include “mux.h”
void main(){
unsigned char skyetek_mux, response;
skyetek_mux = mux_detect();
//to open port 0
response = mux_open_port(skyetek_mux, 0);
}
34
SkyePlus™ MXH and MXU Multiplexer Reference Guide
Copyright 2008 SkyeTek, Inc. All Rights Reserved. Version 080715
Code for Third-Party Readers
Mux.h
/******************************************************************************
* Copyright (c) 2006, Skyetek, Inc.
*
* Permission is hereby granted, free of charge, to any person obtaining a copy of this
* software and associated documentation files (the “Software”), to deal in the Software
* without restriction, including without limitation the rights to use, copy, modify,
* merge, publish, distribute, sublicense, and/or sell copies of the Software, and to permit
* persons to whom the Software is furnished to do so, subject to the following conditions:
*
* The above copyright notice and this permission notice shall be included in all copies or
* substantial portions of the Software.
*
* THE SOFTWARE IS PROVIDED “AS IS”, WITHOUT WARRANTY OF ANY KIND,
* EXPRESS OR IMPLIED, INCLUDING BUT NOT LIMITED TO THE WARRANTIES
* OF MERCHANTABILITY, FITNESS FOR A PARTICULAR PURPOSE AND
* NONINFRINGEMENT. IN NO EVENT SHALL THE AUTHORS OR COPYRIGHT
* HOLDERS BE LIABLE FOR ANY CLAIM, DAMAGES OR OTHER LIABILITY,
* WHETHER IN AN ACTION OF CONTRACT, TORT OR OTHERWISE, ARISING FROM,
* OUT OF OR IN CONNECTION WITH THE SOFTWARE OR THE USE OR OTHER
* DEALINGS IN THE SOFTWARE.
******************************************************************************/
/************************************************************
* !!!EXAMPLE NAMES ONLY!!!
* Processor specific settings
* Replace with the names of your IO port and data direction registers.
* Replace with appropriate bit masks.
************************************************************/
//IO port registers
#define MUX_A0_IO
(PORTA)
#define MUX_A1_IO
(PORTA)
#define MUX_A2_IO
(PORTA)
//IO Direction registers
#define MUX_A0_DIR
#define MUX_A1_DIR
#define MUX_A2_DIR
(DDRA)
(DDRA)
(DDRA)
//Bit Mask needed to set data direction register as an output
#define MUX_A0_DIR_MASK
(0xFE)
//(MSB) 1111 1110 (LSB)
#define MUX_A1_DIR_MASK
(0xFD)
//(MSB) 1111 1101 (LSB)
#define MUX_A2_DIR_MASK
(0xFB)
//(MSB) 1111 1011 (LSB)
//Bit Mask needed for reading and for writing a high to
#define MUX_A0_IO_MASK
(0x01)
//(MSB) 0000 0001
#define MUX_A1_IO_MASK
(0x02)
//(MSB) 0000 0010
#define MUX_A2_IO_MASK
(0x04)
//(MSB) 0000 0100
the IO ports
(LSB)
(LSB)
(LSB)
Using the SkyePlus Multiplexer with Other Devices
Copyright 2008 SkyeTek, Inc. All Rights Reserved. Version 080715
35
Code for Third-Party Readers
/************************************************************
* Intermediate bit calculations
************************************************************/
//set dir registers for writing and write a 1 to control lines
#define MUX_A0_WRITE_HI
{MUX_A0_DIR &= MUX_A0_DIR_MASK; MUX_A0_IO |= MUX_A0_IO_MASK;}
#define MUX_A1_WRITE_HI
{MUX_A1_DIR &= MUX_A1_DIR_MASK; MUX_A1_IO |= MUX_A1_IO_MASK;}
#define MUX_A2_WRITE_HI
{MUX_A2_DIR &= MUX_A2_DIR_MASK; MUX_A2_IO |= MUX_A2_IO_MASK;}
//set dir registers for writing and write
#define MUX_A0_WRITE_LO
{MUX_A0_DIR &=
#define MUX_A1_WRITE_LO
{MUX_A1_DIR &=
#define MUX_A2_WRITE_LO
{MUX_A2_DIR &=
a 0 to control lines
MUX_A0_DIR_MASK; MUX_A0_IO &= ~MUX_A0_IO_MASK;}
MUX_A1_DIR_MASK; MUX_A1_IO &= ~MUX_A1_IO_MASK;}
MUX_A2_DIR_MASK; MUX_A2_IO &= ~MUX_A2_IO_MASK;}
//set dir registers for reading
#define MUX_A0_READ_ENBL
(MUX_A0_DIR |= ~MUX_A0_DIR_MASK)
#define MUX_A1_READ_ENBL
(MUX_A1_DIR |= ~MUX_A1_DIR_MASK)
#define MUX_A2_READ_ENBL
(MUX_A2_DIR |= ~MUX_A2_DIR_MASK)
//read IO values and normalize
#define MUX_A0_READ_VAL
((MUX_A0_IO & MUX_A0_IO_MASK)/MUX_A0_IO_MASK)
#define MUX_A1_READ_VAL
((MUX_A1_IO & MUX_A1_IO_MASK)/MUX_A1_IO_MASK)
#define MUX_A2_READ_VAL
((MUX_A2_IO & MUX_A2_IO_MASK)/MUX_A2_IO_MASK)
/************************************************************
* Final values used for device detection and port addressing
************************************************************/
#define MUX_PORT0
{MUX_A0_WRITE_LO;
MUX_A1_WRITE_LO;
MUX_A2_WRITE_LO;}
#define MUX_PORT1
{MUX_A0_WRITE_HI;
MUX_A1_WRITE_LO;
MUX_A2_WRITE_LO;}
#define MUX_PORT2
{MUX_A0_WRITE_LO;
MUX_A1_WRITE_HI;
MUX_A2_WRITE_LO;}
#define MUX_PORT3
{MUX_A0_WRITE_HI;
MUX_A1_WRITE_HI;
MUX_A2_WRITE_LO;}
#define MUX_PORT4
{MUX_A0_WRITE_LO;
MUX_A1_WRITE_LO;
MUX_A2_WRITE_HI;}
#define MUX_PORT5
{MUX_A0_WRITE_HI;
MUX_A1_WRITE_LO;
MUX_A2_WRITE_HI;}
#define MUX_PORT6
{MUX_A0_WRITE_LO;
MUX_A1_WRITE_HI;
MUX_A2_WRITE_HI;}
#define MUX_PORT7
{MUX_A0_WRITE_HI;
MUX_A1_WRITE_HI;
MUX_A2_WRITE_HI;}
#define MUX_DEVICE
(MUX_A0_READ_VAL*1 + MUX_A1_READ_VAL*2 + MUX_A2_READ_VAL*4)
unsigned char mux_detect(void);
unsigned char mux_open_port(unsigned char device, unsigned char port);
36
SkyePlus™ MXH and MXU Multiplexer Reference Guide
Copyright 2008 SkyeTek, Inc. All Rights Reserved. Version 080715
Code for Third-Party Readers
Mux.c
/******************************************************************************
* Copyright (c) 2006, Skyetek, Inc.
*
* Permission is hereby granted, free of charge, to any person obtaining a copy of this
* software and associated documentation files (the “Software”), to deal in the Software
* without restriction, including without limitation the rights to use, copy, modify,
* merge, publish, distribute, sublicense, and/or sell copies of the Software, and to permit
* persons to whom the Software is furnished to do so, subject to the following conditions:
*
* The above copyright notice and this permission notice shall be included in all copies or
* substantial portions of the Software.
*
* THE SOFTWARE IS PROVIDED “AS IS”, WITHOUT WARRANTY OF ANY KIND,
* EXPRESS OR IMPLIED, INCLUDING BUT NOT LIMITED TO THE WARRANTIES
* OF MERCHANTABILITY, FITNESS FOR A PARTICULAR PURPOSE AND
* NONINFRINGEMENT. IN NO EVENT SHALL THE AUTHORS OR COPYRIGHT
* HOLDERS BE LIABLE FOR ANY CLAIM, DAMAGES OR OTHER LIABILITY,
* WHETHER IN AN ACTION OF CONTRACT, TORT OR OTHERWISE, ARISING FROM,
* OUT OF OR IN CONNECTION WITH THE SOFTWARE OR THE USE OR OTHER
* DEALINGS IN THE SOFTWARE.
******************************************************************************/
#include “mux.h”
//also include any processor specific header files here
/******************************************************************************
* Purpose: mux_detect reads the control line values to determine the type of
*
mux connected.
* @return unsigned char: The device number is returned according to a code read from the
*
control lines (MXH4 -> 0x01, MXH8 -> 0x02, MXU4 -> 0x05, MXU8 -> 0x06).
*
The device code of 0x00 is returned if no device is detected.
* @note
*****************************************************************************/
unsigned char mux_detect(){
unsigned char device;
MUX_A0_READ_ENBL;
MUX_A1_READ_ENBL;
MUX_A2_READ_ENBL;
device = MUX_DEVICE;
if((device == 1) || (device == 2) || (device == 5) || (device == 6)){
return device;
}
else{
//no device recognized
return 0x00;
}
}
Using the SkyePlus Multiplexer with Other Devices
Copyright 2008 SkyeTek, Inc. All Rights Reserved. Version 080715
37
Code for Third-Party Readers
/******************************************************************************
* Purpose: mux_open_port writes the control line values to activate mux ports.
* @param unsigned char device: The mux device type as defined by the mux_detect() function
* @param unsigned char port: The mux port number to be opened (0 through 7 for 8-port)
*
or (0, 2, 5, 7 for 4-port)
* @return unsigned char: 0x42 is returned if no errors are found.
*
The error code 0xC2 is returned if the requested port is invalid or
*
if the device is not recognized.
* @note
*****************************************************************************/
unsigned char mux_open_port(unsigned char device, unsigned char port){
unsigned char response_value = 0x42;
//If the device is a 4 port mux and if port 0, 2, 5, or 7 is accessed, then continue.
if(((device == 1) || (device == 5)) && ((port == 0) || (port == 2) || (port == 5) || (port
== 7))){
}
//If the device is an 8 port mux and if port 0 through 7 is accessed, then continue.
if(((device == 2) || (device == 6)) && ((port >= 0) && (port <= 7))){
}
else{
//the port must be unavailable or there is no device detected
//set the port to a value out of range and let the case statement catch it.
port = 0x09;
}
//Enable specified port.
switch(port) {
case 0:
MUX_PORT0;
case 1:
MUX_PORT1;
case 2:
MUX_PORT2;
case 3:
MUX_PORT3;
case 4:
MUX_PORT4;
case 5:
MUX_PORT5;
case 6:
MUX_PORT6;
case 7:
MUX_PORT7;
default:
MUX_PORT0;
response_value = 0xC2;
}
break;
break;
break;
break;
break;
break;
break;
break;
return response_value;
}
38
SkyePlus™ MXH and MXU Multiplexer Reference Guide
Copyright 2008 SkyeTek, Inc. All Rights Reserved. Version 080715
Appendix B
Using Multiple SkyePlus Multiplexers
Overview
With SkyeTek Protocol v3, you can operate more than one SkyePlus multiplexer,
although there are limitations due to:
●
GPIO control lines
●
Performance issues related to signal loss and delay
GPIO Control Lines
Each eight-port multiplexer requires three general purpose I/O (GPIO) lines to
address all eight ports. The Mounting Hole (MH) style readers have four GPIO
lines available, and the Compact Flash (CF) style readers have six GPIO lines.
(Refer to the pin mapping information in your SkyeModule reader’s reference
guide for more specific pin information.)
This means the MH-style reader can operate one SkyePlus multiplexer and the
CF-style readers can operate two. (Alternatively, you can operate a four-port
multiplexers with only two I/O lines, although SkyeModule readers do not by
default support this configuration. Contact SkyeTek for assistance if you wish to
use this model for your application.)
Signal Loss
For the MXU at a typical frequency of 900 MHz, the loss through one mux is
approximately 1.3dB. Cabling losses can account for an additional few tenths of
a decibel. With two multiplexers and cabling to connect them, there could be
close to 3 dB (½ power) in loss.
For the MXH at 13.56 MHz, the analysis is similar although signal loss will be
slightly less.
39
SkyePlus™ MXH and MXU Multiplexer Reference Guide
Copyright 2008 SkyeTek, Inc. All Rights Reserved.
Delay
Delay
Delays caused by the high port count and time division of using additional
multiplexers may interfere with performance of time-critical applications. Using
more multiplexer ports requires more time to cycle through and perform
operations on all ports. For example, an application could take several seconds to
complete a single cycle using eight or more ports, depending on the tag type and
operations required.
Using Two Multiplexers
You can operate up 9-15 antennas using two SkyePlus multiplexers together. For
example, assuming you have a CF variant of a SkyeModule with six I/O lines,
you would connect and operate the multiplexers as follows:
●
Connect the antenna (MMCX to SMA) cable from the reader to the input of
the first eight-port multiplexer.
●
Connect one output (antenna) port of the first multiplexer to the input of
the second multiplexer.
●
Connect one SkyePlus MXU to one to the MUX GPIO port. (This
multiplexer will be controlled with the Multiplexer Control system
parameter.)
●
Connect the second multiplexer to the GPIO lines at J17. (Refer to the
SkyeTek™ Common Blade Interface Board Reference Guide for pin descriptions.)
●
Use SkyeWare to add code to the host system to control the second
multiplexer using the User Port Direction and User Port Value system
parameters.
Assuming you are using a SkyePlus MXU, you could calculate the signal loss as
follows:
●
Seven ports would have approximately a 1.3 dB signal loss.
●
The remaining eight ports would have approximately a 2.8 dB loss.
Using More Than Two Multiplexers
Using an MH-style SkyeModule reader (which has only four GPIO lines) or
using more than two multiplexers with a CF-style reader requires the use of an
additional host microcontroller. SkyeTek also offers custom solutions that
integrate additional multiplexers with the SkyeModule reader. Please contact
SkyeTek technical support if you have questions about multiple multiplexers.
40
SkyePlus™ MXH and MXU Multiplexer Reference Guide
Copyright 2008 SkyeTek, Inc. All Rights Reserved. Version 080715
Appendix C
Using SkyePlus Multiplexers with a CBIB
Overview
This appendix provides information for customers using older firmware releases
and using the Common Blade Interface Board (CBIB) to connect the SkyeModule
reader to the SkyePlus multiplexer.
You have two options for connecting your multiplexer to the CBIB:
●
The MUX connector at J19
●
The GPIO connector at J17
Using the MUX Connector (J19)
Note – This option applies only to SkyeModule readers with the CF-style
L o r e m ip s u m d o lo r s tai m e t,c o n s e c te tu e r
lo b o r tis p u lv in a r m a g n a .Mo r b iq u is
fe r m e n tu m n
.I s o d a le s fe u g ia st e m .
S e d u p
t e d e .N a m te m p u s .Ma e c e n a s r u tr u m
C u r a b tu
i r n u n c A
. e n e a n s c e le r is q u e
S u s p e n d is s e e r a t.Ma u r is u tc u
v e s tib u u
l m s e m .V iv a m u s e t,v e le c u
t s v ita e
Uo
t r c ri is u s ,c o n v a lis e ,S
t u s p e n d is s e s u s c ip itv u p
l u at te e it.l
e rt a e n m
i .
S u s p e n d is s e e le m e n u
t mS
. e d e n im o
l r e m s, u s c ip q
ti u si ,v e s ib
t u lu m
connectors.
in ,s u s c ip itn o n ,a n te .L o r e m ip s u m d o lo r s tai m e t,c o n s e c te tu e r
h a b tai s s e p la te a d ci u
t m s .t
S u s p e n d is s e s u s c ip tv
i u lp u at te e it.l
.S e d
c o n s e c et tu e r r is u s .
lu c tu s im p e r d ie .t
p r e iu
t m c o n d im e n tu m .
To connect your SkyePlus multiplexer to the CBIB using the MUX connector at
location J19:
1.
Use the 7-pin cable provided with your multiplexer to connect JP1 on the
multiplexer to the MUX connector at J19 on the CBIB (see Table C-1 for
individual pinouts).
2.
Use the antenna cable provided with your multiplexer to connect the RF
port of the multiplexer (J1, SMA connector) to the external antenna port of
your SkyeModule reader (ANT1, MMCX plug).
3.
Set the MUX Control system parameter to 0x01 to enable the MUX
connector. (Use the same technique described in ‘‘Example: Enabling a
Multiplexer’’ on page 28.)
Figure C-1 on page 42 shows the pin and antenna connections.
41
SkyePlus™ MXH and MXU Multiplexer Reference Guide
Copyright 2008 SkyeTek, Inc. All Rights Reserved.
Using the MUX Connector (J19)
Table C-1
Pin Connections of SkyePlus to CBIB MUX Connector
SkyePlus Multiplexer (JP1)
CBIB MUX Connector (J19)a
1
2
3
4
5
6
7
6
1
6
4
3
2
1
Vcc
GND
Vcc
A2
A1
A0
GND
Vcc
GND
Vcc
MUX Control 2
MUX Control 1
MUX Control 0
GND
a. Pin 5 on CBIB MUX connector is not used.
Common Blade
Interface Board
(CBIB)
J4
J6
ISP
J12
J14
3 2 1
1 2
RS-232
J15
J13
J10
SIM
1 2 3
USB
2
I C
JTAG
1 2 3
GPIO
J2
1
J7
2
J18
1 2
J17
6 5 4 3 2 1
MUX
6 5 4 3 2 1
J19
J16
1 2
J3
P2
1
Power
2 1
P4
P3
P5
J11
J9
J5
J4
J3
J9
P1
J6
SkyeModule
M2 or M9
J2
SkyePlus Multiplexer
P6
P0
J7
J8
P7
JP1
ANT1
1234 56 7
GND
J1
VCC
MMCX
SMA
7-pin cable
Antenna Cable
Figure C-1
42
Connecting Multiplexer to CBIB Via MUX Connector
SkyePlus™ MXH and MXU Multiplexer Reference Guide
Copyright 2008 SkyeTek, Inc. All Rights Reserved. Version 080715
Using the GPIO Connector (J17)
Using the GPIO Connector (J17)
Note – This option applies to all SkyeModule readers (i.e., with either the CF or
L o r e m ip s u m d o lo r s tai m e ,ct o n s e c te u
t e r
l b o r tis p u v
o
l n
i a r m a g n a .Mo r b iq u si
fe r m e n tu m n
.I s o d a le s ef u g ai st e m .
S e d u tp e d e .N a m te m p u s .Ma e c e n a s r u tr u m
C u r a b itu r n u n c .A e n e a n s c e le r si q u e
S u s p e n d is s e e r a t.Ma u r is u ct u
v e s tib u u
l m s e m .V iv a m u s e t,v e le c u
t s v tai e
Uo
t r c ir si u s ,c o n v a lis e ,S
t u s p e n d is s e s u s c p
i tv
i u p
l u at et e it.l
e rt a e n m
i .
S u s p e n d is s e e el m e n u
t m .S e d e n im o
l r e m ,s u s c ip tq
i u si ,v e s ib
t u u
l m
MH style connectors).
in ,s u s c ip tn
i o n ,a n te .L o r e m ip s u m d o lo r s tai m e t,c o n s e c te u
t e r
h a b ita s s e p la et a d ci u
t m s .t
S u s p e n d is s e s u s c ip tv
i u p
l u at et e it.l
.S e d
c o n s e c te u
t e r r si u s .
lu c u
t s im p e r d ie .t
p r e tiu m c o n d im e n u
t m.
To connect your SkyePlus multiplexer to the CBIB using the MUX connector at
location J19:
1.
Use the 7-pin cable provided with your multiplexer to connect JP1 on the
multiplexer to the MUX connector at J17 on the CBIB (see Table C-2 for
individual pinouts).
2.
Use the antenna cable provided with your multiplexer to connect the RF
port of the multiplexer (J1, SMA connector) to the external antenna port of
your SkyeModule reader (ANT1, MMCX plug).
3.
Set the MUX Control system parameter to 0x02 to enable the GPIO
connector. (Use the same technique described in ‘‘Example: Enabling a
Multiplexer’’ on page 28.)
Figure C-2 on page 44 shows the pin and antenna connections.
Table C-2
Pin Connections of SkyePlus to CBIB MUX Connector
SkyePlus Multiplexer (JP1)
CBIB GPIO Connector (J17)a
1
2
3
4
5
6
7
4
1
4
5
6
3
1
Vcc
GND
Vcc
A2
A1
A0
GND
Vcc
GND
Vcc
GPIO Control 0
GPIO Control 1
GPIO Control 2
GND
a. Pin 2 on CBIB connector J17 is not used.
Using SkyePlus Multiplexers with a CBIB
Copyright 2008 SkyeTek, Inc. All Rights Reserved. Version 080715
43
Using the GPIO Connector (J17)
P2
J5
Common Blade
Interface Board
(CBIB)
ISP
J14
1 2
RS-232
J7
J10
P7
J18
1 2
GND
GPIO
J17
6 5 4 3 2 1
MUX
6 5 4 3 2 1
J1
2
I C
1 2 3
USB
J2
1234 56 7
J13
1 2 3
J19
J16
7-pin cable
1 2
J3
1
Power
2 1
CBIB
Adapter
Board
J11
J9
SkyeModule M2 or
M9 MH
Antenna cable
MMCX
Figure C-2
44
P6
J8
JP1
SIM
2
J2
SkyePlus Multiplexer
J15
J7
J9
P0
VCC
1
J3
J6
J4
J12
J4
P5
P1
J6
3 2 1
P4
P3
Connecting Multiplexer to CBIB Via GPIO Connector
SkyePlus™ MXH and MXU Multiplexer Reference Guide
Copyright 2008 SkyeTek, Inc. All Rights Reserved. Version 080715
SMA
Appendix D
Using a SkyePlus MXH with a SkyeModule M1
Overview
This appendix provides information about how to use a SkyePlus MXH with a
SkyeModule M1. This includes:
●
Pin connections
●
Cable connections
●
Communications setup
Pin Connections to the SkyeModule M1
The pins on the SkyePlus MHX (JP1) connect to the pins on the SkyeModule
M1 (J3). Table D-1 lists the pin connections of the SkyePlus MXH to the
SkyeModule M1. The pins on the SkyeModule M1 (J2) connect to the SkyePlus
(J1) SMA female connector, as shown in Figure D-2 on page 46.
Table D-1
Pin Connections of SkyePlus MXH to SkyeModule M1
SkyePlus MXH (JP1)
SkyeModule M1 (J3)
1
1 (Vcc)
9
9 (V5)
2
2 (GND)
10
10 (GND)
3
3 (Vcc)
9
9 (V5)
4
4 (A2)
6
6 (D2)
5
5 (A1)
7
7 (D1)
6
6 (A0)
8
8 (D0)
7
7 (GND)
10
10 (GND)
45
SkyePlus™ MXH and MXU Multiplexer Reference Guide
Copyright 2008 SkyeTek, Inc. All Rights Reserved.
Pin Connections to the SkyeModule M1
Figure D-1 shows the pin connections of the SkyePlus MXH (JP1) to the
SkyeModule M1 (J3).
P2
J2
P4
P5
V5
D0
D1
D2
9
7
6
1
GND
2
VIN
3
RST
SCK/SCL
5
SDI/SDA/RX_TTL
6
SDO/TX_TTL
7
GND
8
TX_232
9
Rx_232
10
J5
4
3
2
J9
P1
P6
J6
SkyePlus MXH
J2
P0
P7
J8
J7
J3
5
J3
J4
Vcc
GND
Vcc
A2
A1
A0
GND
INT
ANT
GND
GND
10
Vs
4
SkyeModule M1
8
P3
J1
1
1 2 3 4 5 6 7 JP1
J1
SMA
I/O
Figure D-1
Pin Connections: SkyeModule M1 (J3) to SkyePlus MXH (JP1)
Figure D-2 shows the pin connections of the SkyePlus MXH (J1) to the
SkyeModule M1 (J2).
If it has not already been done, remove the jumper between ANT and INT (J2) to
disable the on-board antenna.
SkyePlus MXH
J1
Figure D-2
INT
ANT
GND
SkyeModule M1
J2
SMA
I/O
SkyePlus MXH (J1) to the SkyeModule M1 (J2)
Cable Connections to the SkyeModule M1
To connect the RF port of the SkyePlus MXH (J1) to the external antenna port of
the SkyeModule M1 (J2), an SMA plug to two-pin (100 mil spacing) female
header is needed.
When using the included RF cable, note that the arrow on the header end
indicates the ground pin.
46
SkyePlus™ MXH and MXU Multiplexer Reference Guide
Copyright 2008 SkyeTek, Inc. All Rights Reserved. Version 080715
Communications with SkyeTek Protocol v2
Communications with SkyeTek Protocol v2
This section describes how to use the Multiplexer Memory and the Multiplexer
system parameters to operate an external multiplexer. This information applies
to the SkyeModule M1 reader, which uses the SkyeTek Protocol v2 (STPv2).
Multiplexer Memory Parameter
The M1 supports reads and writes to the non-volatile (EEPROM) memory
parameter (0x09) to enable or disable multiplexer functionality.
●
Setting the multiplexer memory parameter to 0x01 enables the multiplexer
and disables the user ports. In this state, you can write to the multiplexer
system parameter but not to the user port system parameters.
●
Setting the multiplexer memory parameter to 0x00 disables the multiplexer
and enables the user ports. In this state, you cannot write to the multiplexer
system parameter, but you can write to the user port system parameters.
Multiplexer System Parameter
The Multiplexer system parameter (0x09) is a read/write system parameter that
contains a one-byte Device Type value and also controls the port-addressing
function of the multiplexer. The Multiplexer system parameter supports the
following two commands:
●
Read System Parameter command
●
Write System Parameter command
The Read System Parameter command (0x22) returns the Device Type value, as
shown in Table D-2, and sets the default port on the multiplexer to 0x00. If no
device is detected a value of 0x00 is returned.
Table D-2
Device Type Value
Return Code
SkyePlus Multiplexer
01
MXH four-port
02
MXH eight-port
05
MHU four-port
06
MHU eight-port
00
No device detected
Using a SkyePlus MXH with a SkyeModule M1
Copyright 2008 SkyeTek, Inc. All Rights Reserved. Version 080715
47
Communications with SkyeTek Protocol v2
The Write System Parameter command (0x42) changes the multiplexer port
address. Use the data values in the Data field, as shown in Table 4-3, to change
the port address.
Table 4-3
Data Field Values
Data
Eight-Port
Four-Port
0x00
0x01
0x02
0x03
0x04
0x05
0x06
0x07
0
1
2
3
4
5
6
7
0
n/a
2
n/a
n/a
5
n/a
7
Example: Detecting the Multiplexer
Request (ASCII Mode)
(For Multiplexer system parameter)
Command = Read System Parameter
Mandatory Flags = (none) )
Start
Flags
Command
Starting Block
Number of Blocks
CRC
End
<CR>
0x20
0x22
0x09
0x01
0xFF41
<CR>
Request (Binary Mode) )
Start
Message Length
Flags
Command
Starting Block
Number of Blocks
CRC
<STX>
0x06
0x20
0x22
0x09
0x01
0xC4D9
Response (ASCII Mode)
The response data (0x02) indicates the reader detected a SkyePlus MXH eightport multiplexer.
Start
Response
Response Data (Multiplexer Type)
CRC
End
<LF>
0x22
0x02
0x75B5
<CR><LF>
Response (Binary Mode):
48
Start
Message Length
Response
Data
CRC
<LF>
0x04
0x22
0x01
0x1604
SkyePlus™ MXH and MXU Multiplexer Reference Guide
Copyright 2008 SkyeTek, Inc. All Rights Reserved. Version 080715
Communications with SkyeTek Protocol v2
Example: Enabling a Port
In the next example, the request data field (0x02) indicates that port 2 of the
multiplexer will be enabled.
(For Multiplexer system parameter)
Command = Write System Parameter
Mandatory Flags = (none)
Request: (ASCII mode):
Start
Flag
Command Starting Block Number of Blocks Data
CRC
End
<CR>
0x20
0x42
0xE984
<CR>
0x09
0x01
0x02
Response: (ASCII mode)
Start
Response
CRC
End
<LF>
0x42
0x75B5
<CR><LF>
Example: Enabling a Port
In the following example, the system parameter location, or starting block, is
0x09. The Number of Blocks parameter is 0x01 or one block. The CRC Flag is set.
The Data field value sets the multiplexer port address (see Table 4-3 on page 48).
(For Multiplexer system parameter)
Command = Write System Parameter
Mandatory Flags = (none)
Request: (Binary mode):
Start
Message Length Flags Command Starting Block Number of Blocks Data CRC
<STX> 0x07
0x20
0x42
0x09
0x01
0x02
0xF555
Response: (Binary mode):
Start
Message Length
Response
CRC
<STX>
0x03
0x42
0x4B7E
Using a SkyePlus MXH with a SkyeModule M1
Copyright 2008 SkyeTek, Inc. All Rights Reserved. Version 080715
49
Communications with SkyeTek Protocol v2
The following examples show ASCII-mode request and response errors. In the
next example, the response data (0x00) indicates the reader does not detect a
multiplexer.
(For Multiplexer system parameter)
Command = Read System Parameter
Mandatory Flags = (none)
Request: (ASCII mode):
Start
Flags
Command
Starting Block
Number of Blocks
CRC
End
<CR>
0x20
0x22
0x09
0x01
0xFF41
<CR>
Response:(ASCII mode):
Start
Response
Data (Error Code)
CRC
End
<LF>
0x22
0x00
75B5
<CR><LF>
In the following example, the request attempts to set the multiplexer port to 10
(out of bounds). The response code indicates a Write System Parameter fail.
(For Multiplexer system parameter)
Command = Write System Parameter
Mandatory Flags = (none)=
Request: (ASCII mode):
Start
Flag
<CR> 0x20
Command Starting Block
Number of Blocks Data CRC
0x42
0x01
0x09
0x10
Response: (ASCII mode)
50
Start
Response
CRC
End
<LF>
0xC2
0xE51E
<CR><LF>
SkyePlus™ MXH and MXU Multiplexer Reference Guide
Copyright 2008 SkyeTek, Inc. All Rights Reserved. Version 080715
End
0xDA17 <CR>
Index
A
Antenna 9, 11, 40, 41, 43
CBIB connections 41, 43
CF connector 24
connections via CF connector 24
connections via MH connector 23
M1 46
on-board 46
Antistatic precautions 15
ASCII mode 28, 29, 30, 31, 48, 49, 50
Auto detect 11
B
Binary mode 28, 30, 48, 49
C
C code examples 33
Cable connections 40, 46
CBIB 42
host interface board 22
M1 46
M2 22
M9 22
CBIB 41, 42, 43
Code
device 29
error 50
response 28, 30, 31
return 29, 47
third-party 33
Command
quick start 11
Read System Parameter 29, 48
Read System Parameter command 30, 31,
48, 50
Select Tag 11, 12
Store Default System Parameter 11, 27, 28
Write System Parameter 11, 30, 31, 49, 50
Write System Parameter System
Parameter 11
Common Blade Interface Board 41
Communications
overview 25
protocol, v2 47
STPv3 27
timing 26, 27
Compact Flash (CF) connector 10, 25, 39, 40,
41, 43
Configuration
hardware 9
software 25
Connections
CBIB 41, 42, 43
CF module 24
GPIO 21, 22, 23
GPIO/CBIB 43
host interface board 21, 22, 23
JP1 connector 15
M1 45, 46
MH connector 23
MMCX 40, 41, 43
MUX/CBIB 42
pin descriptions 15
SMA 40, 41, 43, 45, 46
Contacting SkyeTek ii
51
Copyright 2008 SkyeTek, Inc. All Rights Reserved.
Custom
boards 23
Custom solutions 40
Cycle time 40
H
D
I
Data 11
Delay 40
Development Kit User Guide 11
Device type 29
Device Type value 47
Diagram, timing 26, 27
Inaccessible port 31
HF 9, 29
Host interface board 11, 21, 22, 23
E
EEPROM 47
Eight-port multiplexer 14
Electrostatic safety precautions 15
Enabling
multiplexer 27, 28
port 30
Error code 50
ESD precautions 15
Examples
code for third-party readers 33
Default MUX Control system
parameter 28, 30
detecting multiplexer 29
enabling multiplexer 27, 28
enabling port 30
inaccessible port 31
Multiplexer system parameter 49, 50
no multiplexer detected 31
F
Firmware 10, 25, 26, 41
Four-port multiplexer 13
G
GPIO
CBIB connections 43
connections 21, 22, 23
control lines 39, 40
52
J
Jumper
ANT/INT(J2) 46
J17 43
J19 41
J2 45, 46
J3 45
JP1 45
M
M1 45, 46, 47
M2 9, 10, 25, 29
cable connections 22
connecting through MH module
connector 23
connections 24
pin connections 23
M7 9, 10, 25, 29
M9 9, 10, 25, 29
cable connections 22
connecting through MH module
connector 23
connections 24
pin connections 23
Microcontroller 40
MMCX connection 40, 41, 43
Mounting Hole (MH) style readers 10, 25, 39,
40, 43
Multiplexer
CBIB connections 42, 43
connecting with MH module connector 23
connections via CF connector 23, 24
default system parameter 27
hardware configuration 9
host interface board connections 22
Multiplexer Memory parameter 47
Multiplexer system parameter 47, 48, 50
MUX Control system parameter 29
SkyePlus™ MXH and MXU Multiplexer Reference Guide
Copyright 2008 SkyeTek, Inc. All Rights Reserved.
overview 9
port address 48
using multiple 39
MUX connector 41, 42
MUX Control system parameter 25
MXH 9
specifications 16
MXU 9
specifications 18
O
On-board antenna 46
Overview
hardware configuration 9
multiplexer communications 25
SkyePlus 9
P
Parameter
Multiplexer 47, 48, 50
Multiplexer Memory 47
MUX Control 25, 29
Pin/antenna connections 21, 22, 23
Pins
ANT/INT(J2) 46
CBIB 41, 43
CF connector 24
descriptions 15
GPIO/CBIB 43
host interface board 21, 22, 23
J2 45, 46
J3 45
JP1 45
M1 45, 46
mapping 39
MH connector 23
MUX/CBIB 42
Port
address 48
connection 40
count 40
Port selection 16
Protocol
STPv2 47
STPv3 27
Q
Quick-start procedure 11
R
Read System Parameter command 29, 30, 31,
48, 50
Readers 9
Readers, third-party 33
Request
Read System Parameter 29, 30, 31, 48, 50
Store Default System Parameter 28
Write System Parameter 30, 31, 49, 50
Response
code 28, 30, 31
Read System Parameter 30, 31, 48, 50
Store Default System Parameter 28
Write System Parameter 30, 31, 49, 50
Return code 29, 47
RF
cable 46
port 41, 43, 46
S
Safety, electrostatic 15
Select Tag command 11, 12
Selecting ports 16
Signal loss 39, 40
Signal to path state 16
SkyeModule
M1 45, 46, 47
M2 9, 10, 25, 29
M7 9, 10, 25, 29
M9 9, 10, 25, 29
SkyePlus
communications 25
features 9
hardware configuration overview 9
overview 9
SkyePlus multiplexer
mechanical specifications 13
MXH specifications 16
MXU specifications 18
safety 15
specifications 13
SkyeTek
custom solutions 40
Index
Copyright 2008 SkyeTek, Inc. All Rights Reserved.
53
Development Kit User Guide 11
protocol, v2 47
protocol, v3 27
technical support and contact
information ii
SkyeWare software 11, 27, 40
SMA connection 40, 41, 43, 45, 46
Software
configuration 25
Specifications
mechanical 13
MXH 16
MXU 18
SkyePlus multiplexer 13
Store Default System Parameter
command 11, 27, 28
System parameter
Multiplexer 47, 48, 50
Multiplexer Memory 47
MUX Control 25, 29
Store Default System Parameter
command 11
T
Tag type 12
Technical support ii
Third-party readers 33
Timing 26, 27, 40
Type, device 29
U
UHF 9
V
Version, firmware 10, 25
W
Write System Parameter command 11, 30, 31,
49, 50
54
SkyePlus™ MXH and MXU Multiplexer Reference Guide
Copyright 2008 SkyeTek, Inc. All Rights Reserved.