1
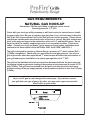
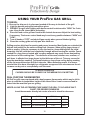
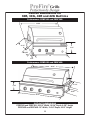
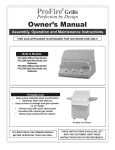
Owners Manual ASSEMBLY AND MAINTENANCE INSTRUCTIONS PERF30R Shown Model # PERF 30R 30G PERF 42R 42G Gas Type: LP NAT THESE INSTRUCTIONS SHOULD BE LEFT WITH THE CUSTOMER. KEEP THESE INSTRUCTIONS FOR FUTURE REFERENCE. REV. 11/08 Congratulations! You have purchased the finest Gas Grill ever built. Every effort has been made to use only the finest materials available and to design the grill to give many years of trouble free service. If you have any questions or comments please feel free to contact us at ProFire. We thank you for buying the “Made in the USA” Professional ProFire Grill. ProFire Grills Tested in Accordance With: ANSI Z21.58a-1998-CGA 1.6Am98 Standard for Outdoor Cooking Gas Appliances. THIS GRILL IS FOR OUTDOOR USE ONLY. Check your local building codes for proper method of installation. In absence of local codes, this unit should be installed in accordance with the Latest Edition of the Fuel Gas Code No. Z223.1 and National Electrical Code ANSI/NFPA No. 70 CALIFORNIA PROPOSITION 65WARNING The burning of gas cooking fuel generates some by-products, which are on the list of substances, which are known by the State of California to cause cancer or reproductive harm. California law requires business to warn customers of potential exposure to such substances. To minimize exposure to these substances, always operate this unit according to the use and care manual, ensuring you provide good ventilation when cooking with gas. (a) Do not store a spare LP gas cylinder under or near this appliance. (b) Never fill the cylinder beyond 80% full. (c) If the information in “(a)” and “(b)’ is not followed exactly, a fire causing death or serious injury may occur. WARNING: Do not try to light this appliance without reading the “LIGHTING INSTRUCTIONS” Section of this manual. FOR YOUR SAFETY: Do not store or use gasoline or other flammable vapors and liquids in the vicinity of this or any other appliance. FOR YOUR SAFETY IF YOU SMELL GAS: 1. Shut of gas to appliance. 2. Extinguish any open flames. 3. Open Lid. 4. If odor continues, immediately call your gas supplier. 2 TABLE OF CONENTS INTRODUCION...........................................................................2 TABLE OF CONENTS................................................................3 SAFETY PRACTICES..............................................................4,5 GAS REQUIREMENTS...............……………..............................6 NATURAL GAS HOOK-UP....................................…..................7 L.P. HOOK UP AND TANK REQUIREMENTS……………….....8 LOCATION REQUIREMENTS...…..............................................9 LEAK TESTING........................................................................10 ADJUSTING FOR PROPER FLAME..…………….........….......11 INSTALLATION CHECK-LIST........….............................…......12 LIGHTING INSTRUCTIONS...…....................................…..13,14 USING YOUR ProFire GAS GRILL................................15,16 REAR BROILER & ROTISSERIE.............................................16 CARE & MAINTENANCE.…................................................17,18 TROUBLESHOOTING.......…...................................................19 CUT OUT DIMENSIONS………………….………………………20 PARTS LIST & DIAGRAM...…..................................................20 WARRANTY............................................…...............................23 3 SAFETY PRACTICES TO AVOID INJURYTO SELF OR PROPERTY When lighting a burner always pay close attention to what you are doing. Be certain that you are turning the igniter labeled for the burner you intend on using. When using the grill: do not touch the grill rack, burner grate, or immediate surrounding areas these areas become extremely hot and could cause burns. Use only dry potholders, moist or damp potholders on hot surfaces may cause burns from steam. Do not use a towel or bulky cloth in place of potholders. Do not let potholders touch hot portions of the grill or burner grate. Grease is flammable. Let hot grease cool before attempting to handle it. Avoid letting grease deposits collect in the drip pan. Clean often. This grill is not intended to be installed in or on recreational vehicles, and or boats. Minimum clearance from sides and back of unit to adjacent combustible construction below top of unit, 12" from sides and back. Minimum horizontal clearance from sides and back of unit to adjacent vertical combustible construction extending above top of unit, 12" from sides and back. Do not locate this appliance under overhead unprotected combustible surfaces. If stored indoors, detach and leave gas cylinder outdoors. The gas supply must be turned off at the L.P. gas cylinder when the grill is not in use. Do not use aluminum foil to line drip pans or grill racks. This can severely upset combustion airflow or trap excessive heat in the control area. The result of this can be melted knobs. When using the open top burner always use flat-bottomed pans which are large enough to cover the burner. The pan should be a minimum of 5” and maximum of 9” in diameter. Adjust the flame so that it heats only the bottom of the pan to avoid ignition of clothing. Hold the handle of the pan to prevent movement while turning or stirring food. For proper lighting and performance of the burners keep the ports clean. It is necessary to clean them periodically for optimum performance. 4 SAFETY PRACTICES TO AVOID INJURY TO SELF OR PROPERTY NEVER GRILL WITHOUT THE DRIP PAN IN PLACE and pushed all the way to the back of the grill. Without it, hot grease could leak downward and produce a fire or explosion hazard. Do not locate the grill under overhead unprotected surfaces. Use only in well ventilated areas. Do not use in buildings, garages, sheds, breezeways, or other such enclosed areas. THIS UNIT IS FOR OUTDOOR USE ONLY. Keep the area surrounding the grill free from combustible fluids and vapors such as gasoline or charcoal lighter fluid. Do not obstruct the flow of combustion and ventilation air. If a cart unit is stored indoors, insure that it is cool, then push, never pull the grill. The LP cylinder must be unhooked and stored outside in a well-ventilated area, out of the reach of children. Never use the grill during windy conditions. If located in a consistently windy area (oceanfront, mountaintop, etc.) a windbreak will be required. Always adhere to the specified clearances. Keep any electrical supply cord, or the rotisserie motor cord away from the heated areas of the grill. Never use a dented or rusty L.P. tank. DO NOT USE CHARCOAL IN THE GRILL. Never place paper inside the grill. The ProFire gas grill is designed for use without lava rock. The use of lava rock or other forms of briquettes may cause a fire hazard. Never obstruct the flow of combustion and ventilation air to the grill. Keep the ventilation opening of the cylinder enclosure free and clear from debris. Only original factory parts should be used when repairing your grill. The use of unapproved or untested parts will void your warranty and may cause serious personal harm. 5 GAS REQUIREMENTS Verify the type of gas supply to be used, either Natural or L.P., and make sure the marking on the appliance rating plate agrees with that of the supply. The rating plate is located on the rear of the grill. An "X" will be marked next to the type of gas that the unit is orifice for. L.P. gas installation requires the use of a regulator set for 10"W.C. pressure. Natural gas installation requires a pressure of 7"W.C. An installer supplied gas shut-off valve must be installed in an easily accessible location. All installer supplied parts must conform to local codes, or in the absence of local codes, with the latest edition of the National Fuel Gas Code, ANSI Z223.1 All pipe sealants must be an approved type and resistant to the actions of L.P. and Natural gases. Never use pipe sealant on flare fittings. All gas connections should be made by a competent technician and in accordance with local codes and ordinances. In the absence of local codes, the installation must comply with the latest edition of the National Fuel Gas Code, ANSI Z223.1 Gas conversion kits are available from your dealer or ProFire. When ordering have available the model number, and type of gas (L.P. or Natural) which you need the ProFire grill orifice for. To convert to LP gas the model # will be GCKLP followed by the model # of your grill. To convert to Natural gas the model # will be GCKNAT followed by the model number of your grill. Total gas consumption of the ProFire Gas Grill with all burners on "HI": Main Burners 25,000 BTU each Total 50,000 BTU Side Burner 14,000 BTU Rear Infrared Burner 12,500 BTU The appliance and its individual shut-off valve must be disconnected from the gas supply piping system during any pressure testing of that system at test pressures in excess of 1/2 PSIG (3.5kPa.). This appliance must be isolated from the gas supply piping system by closing its individual manual shut-off valve during any pressure testing of the gas supply piping system at test pressures equal to or less than 1/2 PSIG (3.5kPa.). The installation of this appliance must conform with local codes or, in the absence of local codes, to the latest edition of the National Fuel Gas Code, ANSI Z223.1. Installation in Canada must be in accordance with the Standard Can1-b149.1 or .2 (installation code for gas burning appliances and equipment) and local codes. 6 GAS REQUIREMENTS NATURAL GAS HOOK-UP Connection: 3/8-flare male fitting in right rear corner of unit Operating pressure :7.0" W.C. Check with your local gas utility company or with local codes for instructions on installing gas supply lines. Be sure to check on type and size of run, and how deep to bury the line. If the line is too small the ProFire Gas Grill will not function properly. Please have a certified gas installer make sure that the size of the line is correct. Any joint sealant used must be an approved type and be resistant to actions of L.P. and Natural gases. Do not forget to place the installer supplied gas valve in an accessible location. Check local codes. Consult your local gas dealer. In the absence of local codes, installation must conform to the latest edition of the NATIONAL FUEL GAS CODE, ANSI Z233.1 The grill is designed to operate on Natural Gas at a pressure of 7" water column (W.C.) (1.75kPa) unregulated. Check with your gas utility for local gas pressure. Use of your grill at pressures other than approximate 7" water column will affect the performance of your grill and requires installation of a natural gas regulator set at 7" W.C. The grill and its individual shut-off valve must be disconnected from the gas supply piping system during any pressure testing of that system at test pressures in excess of 1/2 psig (3.5kPa). The grill must be isolated from the gas by closing its valves during any pressure testing of the gas supply system at test pressures equal to or less than 1/2 psig (3.5kPa). Never use LP gas in a unit designed for natural gas. If you wish to convert your grill from one type of gas to the other you may order a gas conversion kit from ProFire or your dealer. 7 L.P. GAS CONNECTION AND TANK REQUIREMENTS A dented or rusty L.P. tank may be hazardous and should be checked by your L.P. supplier. Never use a cylinder with a damaged valve. The L.P. cylinder must be constructed and marked in accordance with the specifications for L.P. gas cylinders of the U.S. Department of Transportation (DOT). This appliance is approved with a combination L.P. gas/propane cylinder valve and QCC1 fitting, the gas must be turned off at the supply cylinder when the unit is not in use. If the appliance is stored indoors the cylinder must be disconnected and removed from the appliance. Cylinders must be stored outdoors in a well-ventilated area out of the reach of children. The cylinder supply system must be arranged for vapor withdrawal and must include a collar to protect the cylinder valve. Disconnected cylinders must not be stored in a building, garage, or any other enclosed area. The grill is designed to operate on Propane gas regulated at a gas pressure of 10" water column (W.C.) (2.7kPa). A regulator adjusted to this pressure must be installed in the gas supply line before the grill is connected to the propane source. ProFire LP Gas grills use a QCC1 gas connection fitting. This safety system is utilized to ensure your safety. Check with your LP gas utility or dealer for a tank that will accommodate a QCC1 fitting. Your gas grill utilizes ONLY the QCC1 fitting. Any other could affect the performance of you grill. Use only the type regulator and hose specified by ProFire. L.P. cylinders must never be connected directly below the grill without proper ventilation. Never enclose L.P. cylinders in any enclosure that can trap any leaking gas. Only 20 lb. cylinders should be used with your ProFire grill. Connect the "QCC1 regulator to the tank by placing the black plastic fitting on to the threaded valve of the tank and tighten clockwise. Be sure to tighten snugly but do not over tighten or use a wrench or other tool to tighten. To remove regulator, close the valve on the tank, turn the black plastic fitting counterclockwise. Do not turn gas valve on unless connection between regulator and tank is complete. Before attempting to light grill, be certain the gas valve knobs are in the “OFF” position, turn tank on by turning knob on top of the tank counterclockwise, Check all connections for leaks by spraying a solution of 50% liquid soap and 50% water. If bubbles appear there is a leak, turn off gas and have a certified gas installer repair the leak. 8 LOCATION REQUIREMENTS CLEARANCE TO COMBUSTIBLE CONSTRUCTION Minimum clearance from sides and back of unit to adjacent combustible construction below top of unit, 12" from sides and back. Minimum horizontal clearance from sides and back of unit to adjacent vertical combustible construction extending above top of unit 12" from sides and back. CLEARANCE TO NON-COMBUSTIBLE CONSTRUCTION It is desirable to allow at least 6" side clearance to non-combustible construction above the cooking surface for counter space. ProFire gas grills can be placed directly adjacent to non-combustible construction below the cooking surface. LOCATION When determining a suitable location take into account concerns such as exposure to wind, proximity to traffic paths and keeping any gas supply lines as short as possible. Locate the grill only in a well-ventilated area. Never locate the grill in a building, garage, breezeway, shed or other such enclosed areas without an approved ventilation system. During heavy use, the grill will produce a lot of smoke. Ensure that there is adequate area for smoke to dissipate. VENTILATION HOODS When installing your grill under overhead-unprotected areas the use of a ventilation hood with a minimum of 600CFM is necessary. 9 LEAK TESTING CHECK ALL GAS SUPPLY FITTINGS FOR LEAKS BEFORE EACH USE. Keep a spray bottle of soapy water near the shut-off valve of the gas supply valve. Spray all the fittings. Bubbles indicate leaks. Although all gas connections on the ProFire grill are leak tested at the factory prior to shipment a complete gas tightness check must be performed at the installation site due to possible mishandling in shipment, or excessive pressure unknowingly being applied to the unit. Periodically check the whole system for leaks, or immediately check if the smell of gas is detected. DO NOT SMOKE WHILE LEAK TESTING. EXTINGUISH ALL OPEN FLAMES. NEVER LEAK TEST WITH AN OPEN FLAME. Make a soap solution of one part liquid detergent and one part water. You will need a spray bottle, brush, or rag to apply the solution to the fittings. For L.P. units, check with a full cylinder. The valve panel must be removed to check the valves and fittings. Remove the knobs. Then remove the screws, which fasten the valve panel to the unit. Pull the valve panel outward and unplug the wires from the back of the igniter. If your grill has the optional rear broiler, the fitting can be checked from behind the grill by removing the shield attached to the back of the unit. The access hole will be exposed for leak testing. TO TEST Make sure all control valves are in the "OFF" position. Turn the gas supply "ON". Check all connections from the supply line, or L.P. cylinder up to and including the manifold pipe assembly. Apply the soap solution around all connections, valves, and tubing. Soap bubbles will appear where there is a leak present. If a leak is present, immediately turn off gas supply, tighten any leaking fittings, turn gas on, and recheck. If you cannot stop the leak, have a certified gas technician repair the leak. IF YOU CANNOT STOP A GAS LEAK TURN OFF THE GAS SUPPLY AND CALL YOUR LOCAL GAS UTILITY, OR THE DEALER YOU PURCHASED THE APPLIANCE FROM. Only those parts recommended by the manufacturer should be used on the ProFire Gas Grill. Substitutions will void the warranty. Do not use the ProFire Gas Grill until all connections have been checked and do not leak. 10 ADJUSTING FOR PROPER FLAME AND EFFICIENCY Each burner is tested and adjusted at the factory prior to shipment. However, variations in the local gas supply or conversion from one gas to another may make it necessary to adjust the burners. The flames of the grill burners should be visually checked. The rear broiler (when equipped) should have a very low flame (no more than 1/4") and glow with a light red color. There is no air shutter adjustment for the rear broiler. On the main burners and side burners the flames should be blue and stable with small yellow tips and no excessive noise or lifting. If the burners do not operate correctly, check if the air shutter or burner ports are blocked by dirt, debris, spider webs, etc. and proceed with air shutter adjustment. The amount of air, which is drawn into a burner, is governed by a metal cup at the inlet of the burner called an air shutter. (Main burners only) It is locked in place by a screw, which must be loosened prior to lighting the burner for adjustment. To access the grill burner air shutters, remove the burner by removing the screw that holds the burner in place and push the burner forward and up. With a screwdriver, loosen the screw on the side of the air shutter. Adjust the air shutter (open or close) according to the directions below. BURNER AIR ADJUSTMENT BE CAREFUL AS THE BURNER MAY BE VERY HOT! An all yellow flame indicates insufficient air: Open the air shutter to allow more air to the burner. Yellow tips on the flame are normal. Flame is noisy, blows out, or lifts away from burner or will not light, this indicates too much air: Close the air shutter. Once the air shutter is adjusted turn the burner off and reverse steps to reassemble. Loosen screw on air shutter. Tighten after adjusting. Adjust air shutter. 11 Install burner. Tighten screw. INSTALLATION CHECK LIST NOTE TO THE INSTALLER: BE SURE ALL ITEMS ON THIS LIST HAVE BEEN THOROUGHLY COMPLETED AND CHECKED BEFORE OPERATING THE GRILL. _____ Specified clearances maintained to combustibles. _____ All internal packaging removed. _____ Knobs turn freely. _____ Each burner lights satisfactorily, individually or with adjacent burner lit. _____ Air shutters adjusted. _____ Adjustable low setting satisfactory. _____ Drip pan in place properly and sliding freely. _____ Pressure regulator connected and set for 10.0"W.C. for L.P. gas. _____ Pressure checked and set at 7.0"W.C. for natural gas. _____ Manual shut off valve installed and accessible. _____ Unit tested and free of gas leaks. _____ User informed of gas supply shut off valve location INSTALLER: PLEASE LEAVE THESE INSTRUCTIONS WITH THE USER.USER: PLEASE RETAIN THESE INSTRUCTIONS IN A SAFE PLACE FOR FUTURE USE. Installer Signature________________________________________ Date of completion_____________ 12 HOW TO LIGHT YOUR GAS GRILL WARNING! Before lighting your grill be sure to read this section carefully. Turn all knobs to the off position then: Inspect the gas supply piping or hose prior to turning the gas on. If there is evidence of cuts, wear, or abrasion, it must be replaced prior to use. The replacement pressure regulators and hose assembly must be the type specified by the manufacturer. Do not use the ProFire Gas Grill if the odor of gas is present. For L.P. gas, the pressure regulator must be the type specified by ProFire. Install the regulator into the tank and check the hose and regulator connections for leakage with a soap and water solution before operating your ProFire gas grill. Be sure there is gas in the tank. WHEN LIGHTING YOUR GRILL ALWAYS KEEP YOUR FACE AND BODY AS FAR AWAY FROM THE GRILL AS POSSIBLE. LIGHTING THE GRILL BURNERS OR REAR BROILER. 1. 2. 3. 4. 5. Make sure all knobs are in the "OFF" position. OPEN THE LID. Turn on the gas supply. Push and turn the burner knob to "LIGHT". Push igniter button for up to 4 seconds. You will hear a snapping sound, indicating that a spark is being delivered to the burner. 6. If the burner does not light in 4 seconds, turn the knob to "OFF" and wait 5 minutes before repeating steps 4 and 5. 7. To LIGHT MAIN BURNERS using a long stemmed match or lighter, hold a lighted match or lighter over the flash tube holes located at either side of grill and turn knob to "LIGHT". 8. If grill does not light, turn all knobs to "OFF" and have a qualified service technician check the grill. 9. Turn all knobs to "OFF" and shut off gas supply when not in use. 10. To LIGHT REAR BURNER using long stemmed match or lighter, place a lighted match or long stemmed lighter next to burner keeping your hands away from burner as far as possible and turn rear burner knob to “LIGHT”. If the burners will not light after several tries refer to the Troubleshooting section of this manual. TO PREHEAT GRILL: Once lit, close the lid for approximately 5 minutes to preheat grill. 13 HOW TO LIGHT YOUR GAS GRILL Using a long stemmed match or lighter. LIGHTING THE SIDE BURNERS 1. Remove the burner cover and any cooking utensils from the burner grate. 2. Push and turn the burner control knob to the "LIGHT" position and immediately push the igniter button (marked side burner) for 4 seconds or until the burner is lit. If the burner does not light in 4 seconds turn the burner control knob to "OFF" and wait at least 5 minutes for the gas to dissipate before trying to light again. 3. The side burner can also be lit with a long match or match holder if the igniter fails to light the burner. 4. To light with a match or match holder, hold the lighted match next to the burner ports and turn the burner control knob to "LIGHT". Remove and extinguish the match quickly when the burner lights. LIGHTING THE REAR BROILER DO NOT USE DURING WINDY CONDITIONS Because of the location of the rear broiler it is easily susceptible to windy conditions. 1. OPEN THE LID. Push and turn the rotisserie burner control knob to "LIGHT". 2. Push the igniter button (marked rotisserie) You will hear a snapping sound indicating that a spark is being delivered to the burner. 3. If the burner does not light in 4 seconds, turn the knob to "OFF" and wait 5 minutes before trying to light again. 4. If the igniter does not light the burner it may be lit with a long stemmed match or match holder. Hold the match next to the burner then turn burner control knob to "LIGHT". If relighting a hot burner, wait 5 minutes. 14 USING YOUR ProFire GAS GRILL TO BEGIN: 1. Be sure the drip pan is in place and pushed all the way to the back of the grill. 2. Light the burners using the instructions given. 3. PREHEAT the grill after lighting with burner control knob turned to "HIGH" for 5 minutes. Keep the lid closed while preheating. 4. Place the food on the grill and cook to the desired doneness. Adjust the heat setting if necessary. The burner control knob may be set to any position between "HIGH" and "LOW". 5. Turn all knobs of "OFF" and shut off gas supply when you are finished grilling. 6. Clean the cooking grids and drip pan after each use. Grilling requires high heat for searing and proper browning. Most foods are cooked at the highest heat setting for the entire cooking time. However, when grilling large pieces of meat or poultry, it may be necessary to turn the heat to a lower setting after the initial browning, this will cook the food completely through without burning the outside. Foods cooked for a long time or basted with a sugary marinade may need a lower heat setting near the end of the cooking time. The doneness of the meat, whether rare, medium, or well done, is affected to a large degree by the thickness of the cut. Trim any excess fat from the meat before cooking. To prevent steaks or chops from curling during cooking, slit the fat around the edges at 2-inch intervals. When defrosting meats, it is recommended that it be done overnight in a refrigerator as opposed to a microwave as the microwave can dry out or even partially cook the meat. TO AVOID FLARE-UPS CHICKEN SHOULD BE COOKED ON THE MEDIUM OR LOW SETTING DUAL PURPOSE THERMOMETER All ProFire grills come equipped with a dual-purpose thermometer which may be left in place to read the air temperature inside of the closed lid or it can be removed and inserted into the meat that you are grilling. NEVER ALLOW THE AIR TEMPERATURE INSIDE THE GRILL TO GO ABOVE 500°F. CHART FOR DESIRED DONENESS Insert thermometer directly into center of meat to check for doneness. MEAT RARE MEDIUM WELL BEEF 135°-140°F 150°-160°F 170°F PORK not recommended not recommended 170°F POULTRY not recommended 170°F 185°F 15 USING YOUR ProFire GAS GRILL FLAVOR GRID An exclusive feature of the ProFire Gas Grill is its Stainless Steel Flavor grid designed to deflect the grease from falling into the burners thereby preventing flare-ups and extending the life of the burners. The Stainless Steel Flavor grid evens out the heat and creates a hot surface for the meat drippings to fall on to. This action turns the drippings into smoke, which passes over the meat resulting in a delicious "Charcoal Flavor". ROTISSERIE & REAR BROILER The rear broiler is an infrared type, which provides intense searing radiant heat. Preferred by professional chefs over other methods, this intense heat is perfect for searing in the natural juices and nutrients found in quality cuts of meats. When lit, the rear broiler will reach cooking temperatures in about 3 minutes. The orange/red glow will even out in about 5 minutes. The rotisserie motor is equipped with gears capable of turning up to a 12-lb. cut of meat or poultry. The motor is mounted to a stainless steel bracket, which attaches to the left side of the grill. The rotisserie motor must be electrically grounded in accordance with local codes or, in the absence of local codes, with the National Electrical Code, ANSI/NFPA 70-1990. Warning: This appliance is equipped with a three-prong (grounding) plug for your protection against shock hazard and should be plugged directly into a properly grounded three-prong receptacle. Do not cut or remove the grounding prong from this plug. The skewer for the rotisserie fits into the motor assembly by placing the pointed end into the motor and the other end on the support at the right side of the grill. With the skewer pushed into the motor, the grooved skewer bushing should rest on the right side notch on the grill body. The removable handle should only be in place when handling the skewer. To load the skewer, begin with the handle in place, and slide one of the meat holders with prongs facing away form the handle onto the skewer. Push the skewer through the center of the food, then slide the second meat holder with prongs towards the food onto the skewer. Center the food on the skewer then push the meat holders firmly into the food. Tighten the wing nuts. It may be necessary to wrap the food with butchers string (never use nylon or plastic string) to secure any loose portions. Once the food is secure insert the skewer into the motor. If needed, remove the grill racks. Place a basting pan under the food. It is normal for the skewer to flex when large cuts of meats are being cooked. NOTE: After the first use of your rear broiler it is likely that the stainless steel above the burner will darken to a dark blue color this is normal. The electric motor should be removed and stored in a dry place when not in use. WARNING! DO NOT USE THE REAR BROILER AND THE BOTTOM BURNERS AT THE SAME TIME! 16 CARE AND MAINTENANCE STAINLESS STEEL The ProFire gas grill is made from non-rusting, nonmagnetic, type 304 stainless steel. There are many different stainless steel cleaners available. Always use the mildest cleaning methods first, scrubbing in the direction of the grain. To touch up noticeable scratches in the stainless steel, sand lightly with dry 100 grit emery paper or scotch bright pad in the direction of the grain. Specks of grease can gather on the surfaces of the stainless steel and bake on to the surface giving the appearance of rust. To remove this grease buildup scrub with a strong degreaser in the direction of the grain. IMPORTANT: Coat the outer surface of your grill with lemon oil or a Stainless Shine product such as Sheila Shine. WD 40 also works well to coat the outer finish of your grill. Never clean your grill with soap and water or degreaser without coating the outer surface of your grill when you’re finished. COOKING GRIDS The easiest way to clean the grill is immediately after cooking is completed. Be sure the burners are turned off and there are no flames before beginning. Wear a barbecue mitt to protect your hand from the heat. Using a brass bristle barbecue brush, scrub the hot grids. If the grill is allowed to cool before cleaning, the cleaning process will be more difficult. DRIP TRAY The drip tray will collect grease from the grill. Do not attempt to remove or clean until thoroughly cooled. To avoid grease fires or flare-ups, be sure to clean out the grease often. GRILL BURNERS The burners are constructed of stainless steel and should only require minimal maintenance. However, they should be checked every 6 months and cleaned if needed. 1. Shut off gas supply and make sure the grill is cool before attempting to check the burners. 2. Remove the cooking grids, then lift out the flavor grid. 3. Remove the mounting screw holding the burner in place then lift the burner up and forward so that the burner is pulled away from the valve. (See Page 11) 17 CARE AND MAINTENANCE CLEANING THE BURNERS After removing: 1. Clean the exterior of the burner with a wire brush. 2. Clear any clogged ports with a straightened paper clip. 3. Never use a wooden toothpick as it may break off and clog the port. 4. Shake out any debris through the air shutter. 5. Use a flashlight to inspect the burner inlet to ensure it is not blocked. 6. If an obstruction can be seen, use a straightened metal wire coat-hanger to clean it out. CLEANING THE ORIFICES No regular maintenance should be needed for the orifices. They should only be removed if it is determined that there is a blockage. FLAVOR GRID The flavor grid should be cleaned regularly as it has grease and other debris falling directly on to it. Keeping it clean will greatly reduce flare-ups and grease fires. TO CLEAN 1. Wait until the entire grill is cool then remove the cooking grids. 2. Lift out the flavor grid and brush it with a steel wire brush until all the carbon build up and other debris are removed. 3. Clean with a degreaser or soapy water solution if necessary. TO REPLACE THE BURNERS Replace a burner by sliding the end with the air shutter into the opening located on the inside of the grill and be sure the burner is placed on to orifice. Then place the burner onto the mounting bracket and replace the screw. Be careful not to change the air shutter's original position. Once reinstalled, light all of the burners and check for proper flame. Warning: Serious injury may occur if the orifice is not located properly in the burner. REMOVING AND REPLACING THE BATTERY IN THE IGNITERS 1. Unscrew the plastic nut on the front of the igniter. 2. Insert a AAA battery making sure the + side faces in. 3. Screw the black plastic nut back on. 18 TROUBLESHOOTING If your ProFire Gas Grill does not function properly, use the following checklist before contacting your dealer for service. You may save the cost of a service call. PROBLEM Grill won't light when the igniter button is pushed. WHAT TO CHECK FOR AND DO With the gas turned off remove the grills and flavor grid, push the igniter button look at an angle into the collector box. You should see a spark jump from tip of the igniter. If there is a spark, check the gas supply. Is the tank full? Is the line purged of air? Can you light the burner with a match? Check air shutter adjustment, close as needed. (See page 11.) Do other burners on the unit light? Check the orifice for blockage. (See page 11.) Is the igniter tip clean and free from debris? Sand area lightly. Burner flame is yellow or orange and there is a smell of gas. Check the burner inlet for obstructions. (See pages 11) Check the air shutter for proper adjustment. (See page 11.) Low heat with control knob set Is the fuel hose bent or kinked? on "HI”. Is there an adequate gas supply? If there is only one burner that appears low, does the orifice or burner need cleaning? (See pages 11.) Are any other gas appliances at the location below normal rate? Is the air shutter too far open or closed? Is the gas supply or gas pressure low? Has the grill been preheated for at least 5 minutes? The smell of gas with burner flames appearing yellow. The gas grill does not reach temperature. The gas grill heats unevenly. The burners make popping noises. Check for spiders or insects. Spiders and insects can nest in the burner of this or any grill, and cause a disruption in the flow of gas from the burner. This is dangerous and can cause a fire behind the valve panel, damaging the grill and making it unsafe to operate. You should inspect the burners at least once a year or immediately if any of these conditions occur or persist. Check air shutter adjustment. (See page 11.) Check burners for clogged ports. (See page 18.) 19 Overall Dimensions for 30R, 30G, 42R and 42G Built-Ins Performance PERF30R and PERF30G 26 5/8" 21 1/2" 8 1/2" 19 5/8" 30" 2 1/2" Performance PERF42R and PERF42G 38 3/4" 21 1/2" 8 1/2" 19 3/4" 42 1/2" CUT-OUT DIMENSIONS PERF30R and PERF30G- 26-3/4" Width, 19-3/4" Depth, 8-5/8" Height PERF42R and PERF42G- 39" Width, 19-3/4" Depth, 8-5/8" Height 20 NOTES: MODEL IDENTIFICATION Always use both model and serial numbers when contacting ProFire about your grill. For future reference, take the time now to record the model and serial numbers below: MODEL NUMBER:_________ SERIAL NUMBER:___________ DATE PURCHASED:_______ 21 NOTES: 22 WARRANTY ProFire, LLC hereby warrants to the Original Purchaser of the ProFire Gas Grill that it will be free of defects in material and workmanship from the date of purchase as follows: LIFETIME Stainless Steel Body’s, Smoker Tops, Lids, Carts, Cooking Grids, Burners 3-YEAR Stainless Steel Flavor Grids 1-YEAR All Remaining Parts When assembled and operated in accordance with the printed instructions accompanying it. ProFire requires reasonable proof of your date of purchase. Therefore, you must retain your sales slip or invoice. This warranty is in effect for all grills purchased after November 1, 2006. This Limited Warranty shall be limited to the repair or replacement of parts, which prove defective under normal use and service and which on examination, shall indicate, to ProFire’s satisfaction, they are defective. Warranty is for parts only. There is no warranty for labor. Before returning any parts, contact the ProFire Customer Service Department. If ProFire confirms the defect and approves the claim, ProFire will elect to replace such parts without charge. If you are required to return defective parts, transportation charges must be prepaid. ProFire will return parts to the purchaser, freight or postage prepaid. This Limited Warranty does not cover failures or operating difficulties due to accident, abuse, misuse, alteration, misapplication, vandalism, improper installation or improper maintenance or service, or failure to perform normal and routine maintenance, including but not limited to damage caused by insects within the burner tubes, as set out in the owner’s manual. Deterioration or damage due to severe weather conditions such as hail, discoloration due to exposure to chemicals either directly or in the atmosphere, hurricanes, earthquakes, tornadoes, or acts of God is not covered by this Limited Warranty. Discoloration of Stainless Steel Is normal and is not covered by this Warranty. There are no other express warrants except as set forth herein and any applicable implied warranties of merchantability and fitness are limited in duration to the period of coverage of this express written Limited Warranty. ProFire is not liable for any special, indirect or consequential damages. ProFire does not authorize any person or company to assume for it any other obligation or liability in connection with the sale, installation, use, removal, return, or replacement of its equipment; and no such representations are binding on ProFire. Implied warranty shall not extend beyond the duration of this written warranty. This warranty is in lieu of all other warranties expressed or implied and all other obligations or liability in connection with the sale of this appliance. 23 ACCESSORIES TO MAKE YOUR OUTDOOR COOKING MORE CONVENIENT AND ENJOYABLE. Double Side Burner PFDSB 30,000 BTUs Single Side Burner PFSSB 15,000 BTUs All-Weather Grill Cover PFVC27B Fits 27” Built-In Grill PFVC30B Fits 30” Built-In Grill PFVC36B Fits 36” Built-In Grill PFVC48B Fits 48” Built-In Grill PFVC48BS Fits 36” Built-In with Side Burner Drop-In Single Side Burner PFLSB 14,000 BTUs (Includes Counter Top Trim Kit) Cast Aluminum Griddle PFGRIDDLE27 Fits 27” Grill PFGRIDDLE36 Fits 36” or 48” Grill PFGRIDDLE26 Fits 26” or 30” Grill Warming Shelf/Rack PF27WRM Fits 27” Grill PF30WRM Fits 26” or 30” Grill PF48WRM Fits 26” or 30” Grill Heavy-Duty 25 lb. Capacity Rotisserie Kits PFR27 27” with Stainless Steel Motor PFR30 30” with Stainless Steel Motor Super Heavy-Duty 50 lb. Capacity Rotisserie Kits PFR27HD 27” with Stainless Steel Motor PFR36HD 36” with Stainless Steel Motor PFR48HD 48” with Stainless Steel Motor 5565 North 124th Street • Butler, Wisconsin 53007 Ph: 262.781.4657 • 888.781.4657 Fax: 262.781.3965 •888.781.3965 Email: [email protected] • www.profiregrills.com ©2008 ProFire , LLC ProFire is a register trademark of ProFire, LLC #OMPERF Printed in U.S.A.