1
MIDAS Transponder System Handbook
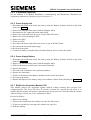
SIEMENS TRAFFIC CONTROLS LIMITED
Sopers Lane
Poole
Dorset
BH17 7ER
SYSTEM HANDBOOK
MIDAS TRANSPONDER
THIS DOCUMENT IS ELECTRONICALLY HELD AND APPROVED IN AMW
PREPARED : Andrea Carter/Ruth Davis
FUNCTION : Engineer/Technical Author
DATE
: 22 February 2001
Crown Copyright 1997 - 2001
MS-DOS, Microsoft and Windows are registered trade marks of the Microsoft Corporation. All
trade marks recognised.
667/HB/26766/ETC
Page 1
Issue 7.00
MIDAS Transponder System Handbook
Product Support
Technical Support is provided by STCL Engineering for the benefit of the Highways Agency and
its installation and maintenance contractors. Technical Support is provided for the items included
in the Installation, Commissioning and Maintenance sections of this Handbook.
The Telephone Help Line is available between the hours of 9.00 am and 5.00 pm, Monday to
Friday (excluding Bank Holidays). Outside office hours use the Fax Help Line.
Telephone: (01202) 782064
Fax: (01202) 782545
Brian Cherry, Project Manager
Siemens Traffic Controls Limited
Sopers Lane
Poole
Dorset
BH17 7ER
667/HB/26766/ETC
Page 2
Issue 7.00
MIDAS Transponder System Handbook
TABLE OF CONTENTS
1. INTRODUCTION .......................................................................................................6
1.1
Purpose .........................................................................................................................................................6
1.2
Scope .............................................................................................................................................................6
1.3
Related Documents ......................................................................................................................................6
1.3.1
Required Documents..............................................................................................................................6
1.3.2
Reference Documents ............................................................................................................................6
1.4
Abbreviations ...............................................................................................................................................7
1.5
Issue State .....................................................................................................................................................8
1.6
SAFETY WARNING...................................................................................................................................8
1.7
Operational Warning ..................................................................................................................................8
2. EQUIPMENT DESCRIPTION ....................................................................................9
2.1
Functionality ................................................................................................................................................9
2.2
Equipment Overview ...................................................................................................................................9
2.3
Physical Arrangement ...............................................................................................................................13
2.4
Power System .............................................................................................................................................13
2.5
Cables..........................................................................................................................................................14
2.6
PCBs............................................................................................................................................................14
2.6.1
Power PC Processor PCB ....................................................................................................................14
2.6.2
Comms I/O PCB ..................................................................................................................................15
2.6.3
V.26 Modem PCB (optional)...............................................................................................................15
2.6.4
RS485 Line Protection Module PCB ...................................................................................................15
3. INSTALLATION.......................................................................................................16
3.1
Physical Installation...................................................................................................................................16
3.1.1
Installation List ....................................................................................................................................16
3.1.1.1 Installation Kit .................................................................................................................................16
3.1.2
Non-Standard Tools.............................................................................................................................16
3.2
Connect RS485 Line Protection Module..................................................................................................16
3.3
Connect V.26 Modem data cable (optional) ............................................................................................17
3.4
Connect Modem to Power PC Processor .................................................................................................17
3.5
Earthing ......................................................................................................................................................18
3.6
Address Header..........................................................................................................................................18
3.6.1
Programming the Address Header .......................................................................................................18
3.6.2
Fitting the Address Header ..................................................................................................................19
3.7
Connect Mains Lead to PDU ....................................................................................................................19
4. COMMISSIONING...................................................................................................20
5. MAINTENANCE ......................................................................................................21
5.1
Replaceable Parts.......................................................................................................................................21
5.2
Routine Maintenance.................................................................................................................................21
5.3
Fault Finding..............................................................................................................................................22
5.4
Reset............................................................................................................................................................24
5.5
Replacement Procedures ...........................................................................................................................24
5.5.1
Default Settings....................................................................................................................................25
5.5.2
Power PC Processor PCB ....................................................................................................................26
5.5.2.1 Power PC Processor PCB Battery....................................................................................................26
5.5.3
Comms I/O PCB ..................................................................................................................................26
5.5.4
V.26 Modem (Optional) ......................................................................................................................27
5.5.5
Power Supply Unit...............................................................................................................................27
5.5.6
Power Supply Battery ..........................................................................................................................27
667/HB/26766/ETC
Page 3
Issue 7.00
MIDAS Transponder System Handbook
5.5.7
RS485 Line Protection Module PCB ...................................................................................................27
5.5.8
Fuses ....................................................................................................................................................28
5.5.8.1 Battery Fuse .....................................................................................................................................28
5.5.8.2 Mains Fuse.......................................................................................................................................28
5.5.8.3 Modem Fuse ....................................................................................................................................28
5.5.8.4 Line Protection Module Fuse...........................................................................................................28
6. USE OF THE STCL ENGINEER’S TERMINAL ......................................................29
6.1
General .......................................................................................................................................................29
6.2
Configure....................................................................................................................................................30
6.2.1
Configure Baud Rate............................................................................................................................30
6.2.2
Get Host Status ....................................................................................................................................31
6.3
Status...........................................................................................................................................................31
6.3.1
Station Status Data...............................................................................................................................31
6.4
Report .........................................................................................................................................................33
6.4.1
Fault Report .........................................................................................................................................33
6.5
Logging .......................................................................................................................................................35
6.5.1
Logging................................................................................................................................................35
6.6
Settings........................................................................................................................................................37
6.6.1
Baud Speed ..........................................................................................................................................37
6.7
Help .............................................................................................................................................................38
6.7.1
About MIDAS......................................................................................................................................39
6.8
Exit ..............................................................................................................................................................39
6.8.1
Quit ......................................................................................................................................................39
7. TECHNICAL SPECIFICATION................................................................................40
7.1
7.2
7.3
7.4
7.5
7.6
7.7
7.8
7.9
7.10
7.11
7.12
Physical Characteristics ............................................................................................................................40
Power Requirements..................................................................................................................................40
Features ......................................................................................................................................................40
Safety ..........................................................................................................................................................40
EMC............................................................................................................................................................40
Environmental Information ......................................................................................................................41
Data Rates ..................................................................................................................................................41
Battery Backup ..........................................................................................................................................41
Lightning Protection..................................................................................................................................41
Processor.....................................................................................................................................................41
Modem (Optional) .....................................................................................................................................41
Engineer’s Terminal ..................................................................................................................................42
APPENDIX A - TECHNICAL DRAWINGS.....................................................................43
APPENDIX B - PARTS LISTS.......................................................................................44
APPENDIX C - PART NUMBERS .................................................................................45
INDEX............................................................................................................................46
667/HB/26766/ETC
Page 4
Issue 7.00
MIDAS Transponder System Handbook
FIGURES
FIGURE 1 - MIDAS SYSTEM OVERVIEW.............................................................................................................10
FIGURE 2 - SYSTEM SCHEMATIC DIAGRAM .....................................................................................................11
FIGURE 3 - FRONT PANELS ...................................................................................................................................12
FIGURE 4 - HARDWARE MODULE ARRANGEMENT (FRONT VIEW, FRONT PANELS REMOVED) .........13
FIGURE 5 - ADDRESS HEADER .............................................................................................................................18
FIGURE 6 - INITIAL SCREEN..................................................................................................................................29
FIGURE 7 - CONFIGURE MENU OPTIONS ...........................................................................................................30
FIGURE 8 - CONFIGURE BAUD RATE DIALOG BOX.........................................................................................31
FIGURE 9 - STATUS MENU OPTIONS...................................................................................................................31
FIGURE 10 - STATION STATUS DATA DIALOG BOX ........................................................................................32
FIGURE 11 - REPORT MENU OPTION...................................................................................................................33
FIGURE 12 - FAULT REPORT DIALOG BOX ........................................................................................................34
FIGURE 13 - LOGGING MENU OPTION ................................................................................................................35
FIGURE 14 - LOGGING CONTROL DIALOG BOX ...............................................................................................35
FIGURE 15 - LOGGING REPORT DIALOG BOX...................................................................................................36
FIGURE 16 - SETTINGS MENU OPTION ...............................................................................................................37
FIGURE 17 - BAUD SPEED DIALOG BOX.............................................................................................................38
FIGURE 18 - HELP MENU OPTION ........................................................................................................................38
FIGURE 19 - ABOUT MIDAS DIALOG BOX..........................................................................................................39
FIGURE 20 - EXIT MENU OPTION .........................................................................................................................39
TABLES
TABLE 1 - CABLE CONNECTIONS ........................................................................................................................14
TABLE 2 - LEDS ........................................................................................................................................................14
TABLE 3 - RS485 LINE PROTECTION CONNECTIONS ......................................................................................17
TABLE 4 - WIRING OF V26 MODEM CABLE .......................................................................................................17
TABLE 5 - ADDRESS LINK VALUES .....................................................................................................................18
TABLE 6 - FAULT FINDING....................................................................................................................................24
TABLE 7 - FUSE RATINGS ......................................................................................................................................28
TABLE 8 - STATION STATUS DATA DETAILS ...................................................................................................32
TABLE 9 - FAULT REPORT DETAILS ...................................................................................................................34
TABLE 10 - LOGGING REPORT DETAILS ............................................................................................................36
667/HB/26766/ETC
Page 5
Issue 7.00
MIDAS Transponder System Handbook
1.
INTRODUCTION
1.1
Purpose
This handbook contains the information needed to install and maintain the STCL MIDAS
Transponder. In the interests of Health and Safety, when installing, using or servicing the
equipment, the instructions in Section 1.6 should always be followed.
1.2
Scope
This document covers the general description and installation, commissioning and maintenance
instructions for the MIDAS Transponder. The Transponder configuration will determine which
sections of the handbook are relevant.
1.3
Related Documents
1.3.1 Required Documents
The documents in the following table are referred to in the text of this handbook, and are
required when installing, commissioning and maintaining MIDAS equipment.
STCL Documents
667/HB/26745/ETC
667/HB/26767/ETC
Highways Agency Drawings
MCX 0156 Sheets 1 and 2
MCX 0594 Sheets 2 and 3
MCX 0834 Sheets 1 - 4
MIDAS V.26 Modem
Installation, Commissioning and
Maintenance Handbook
(where a modem is fitted)
MIDAS Outstation System
Handbook
NMCS Installation Cabinet 600
NMCS Midas 600 Cabinet
Arrangement
600 Cabinet Equipment
Configuration
1.3.2 Reference Documents
The documents in the following table may be referred to in the text of this handbook, but are not
required when installing, commissioning and maintaining MIDAS equipment.
Highways Agency
TRG 1068 (Feb 1991)
MCG 1088 B (Jan
1996)
667/HB/26766/ETC
Electro Magnetic Compatibility Test for
Motorway Communications Equipment and
Portable and Permanent Traffic Control
Equipment
NMCS2 MIDAS Transponder Acceptance Test
Specification
Page 6
Issue 7.00
MIDAS Transponder System Handbook
Highways Agency
(Continued)
TR 1100 A (Feb 1991)
TR 2066 C (Aug 1993)
TR 2130 B (May 1993)
TR 2142 A (July 1993)
TR 2146 C (July 1997)
TR 2168 C (Jan 1996)
TR 2171 A (June 1994)
TR 2172 B (Sept 1994)
CCITT
British Standards
1.4
TR 2173 F (Nov 1999)
TR 2178 C (Jan 1996)
K20
V.26 Modem standard
V.28
BS6328 Part 1
EN 41003
EN 60950
BS7671
Technical & Quality Control Requirements for
Systems, including parts of Systems,
Manufactured, Supplied, Installed or
Maintained
HDLC Multi-Drop Communications Electrical
and Protocol
Environmental Tests for Motorway
Communications Equipment and Portable and
Permanent Road Traffic Control Equipment
Message Control Message Sign Equipment
MIDAS Outstation Link Specification
MIDAS Transponder Specification
LCC - Transponder Link Specification
MIDAS Engineer’s Terminal Link
Specification
MIDAS Message Specification
MIDAS Interface Unit Specification
Lightning protection
Modem standard
Electrical Interface Specification
Apparatus for connection to Private Circuits
Telecommunication Safety requirement
Electrical Safety requirement
IEE Wiring Regulations
Control of Substances Hazardous to Health
Regulations 1988
Abbreviations
COBS
CRC
EMC
HDLC
IDC
LCC
MIDAS
MIU
NMCS2
O/S
PC
PCB
PDU
PPC
PSU
STCL
TPR
Control Office Base System
Cyclic Redundancy Check
Electro Magnetic Compatibility
Higher level Data Link Control
Insulation Displacement Connector
Local Communications Controller
Motorway Incident Detection and Automatic Signalling
MIDAS Interface Unit
National Motorway Communications System Mk 2
Outstation
Personal Computer
Printed Circuit Board
Power Distribution Unit
Power PC
Power Supply Unit
Siemens Traffic Controls Limited
Transponder
667/HB/26766/ETC
Page 7
Issue 7.00
MIDAS Transponder System Handbook
1.5
Pages
1 to 47
1.6
Issue State
Current Issue
7.00
Change Ref.
TS000366
Type
AMW
Part ID
667/HB/26766/ETC
SAFETY WARNING
In the interests of Health and Safety when installing, using or servicing this equipment the
following instructions must be noted and adhered to:
i) Only skilled or instructed personnel with relevant technical knowledge and experience, who
are also familiar with the safety procedures required when dealing with modern electrical and
electronic equipment are to be allowed to use and/or work on the equipment.
ii) Such personnel must take heed of all relevant notes, cautions and warnings in this handbook
and any other document or handbook associated with the MIDAS Transponder including, but
not restricted to, the following:
a) The equipment must be correctly connected to the specified incoming power supply.
b) The equipment must be disconnected/isolated from any incoming power supply before
removing any protective covers, or working on any part from which protective covers
have been removed.
c) All wiring must be carried out in accordance with the requirements of BS7671 (IEE
Wiring Regulations).
d) The MIDAS Transponder uses a Sealed Lead Acid Battery. Care must be taken in
handling this battery to prevent a short circuit condition occurring on any of the Lead
Acid Cells. The Power PC Processor PCB contains a Nickel Metal Hydride Battery
which does not require special handling as it contains no mercury, cadmium or lead.
e) Exercise great care when handling old batteries, which may be leaking. BATTERIES
MUST BE DISPOSED OF IN ACCORDANCE WITH THE “CONTROL OF
SUBSTANCES HAZARDOUS TO HEALTH REGULATIONS 1988”. SPENT
BATTERIES MUST BE DISPOSED THROUGH AN APPROVED HAZARDOUS
WASTE DISPOSAL CONTRACTOR. DO NOT PUNCTURE BATTERIES. DO
NOT DISPOSE OF BATTERIES IN ANY FIRE.
1.7
Operational Warning
Do not carry out a manual reset during a mains fail, as the equipment will shut down.
667/HB/26766/ETC
Page 8
Issue 7.00
MIDAS Transponder System Handbook
2.
EQUIPMENT DESCRIPTION
2.1
Functionality
MIDAS Transponders are physically located adjacent to motorways that have been equipped with
inductive loop vehicle detectors and associated MIDAS Outstations.
Each Transponder is attached to two communication lines of MIDAS Outstations. Each
communication line can be connected to up to 12 Outstations, covering up to 5 km of motorway.
The Transponder maintains a record of the current operational status of each attached Outstation.
A Transponder continuously monitors its Outstations for alerts, traffic and MIDAS equipment
status data and forwards this information, together with fault reports detailing changes in
Outstation operational status, via the LCC to the NMCS2 Instation. Changes in Transponder
status and fault reports detailing hardware failures (e.g. mains fail) are also reported to the
Instation.
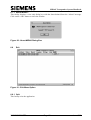
The MIDAS System Overview Figure 1 shows how the Transponder and Outstation interface to
one another, and to other traffic control equipment.
A serial interface allows connection of a MIDAS Engineer’s Terminal, which can give identity,
version and status information. It also allows monitoring of messages on the Transponder to
Outstation links.
Further details of MIDAS Transponder functionality may be obtained from the MIDAS
Transponder Specification, document reference TR 2168 C.
2.2
Equipment Overview
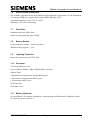
The Transponder consists of the following items, as shown in the System Schematic diagram
Figure 2.
1 x Power PC Processor PCB
1 x Comms I/O PCB
1 x RS485 Line Protection Module PCB
1 x V.26 Modem PCB (Optional)
1 x Power Supply Unit (PSU)
1 x Battery backup
There is also an Address Header, not shown on Figure 2, which connects to the front of the
Comms I/O PCB and is described in Section 3.6.
Links to the Transponder and LCC are generally RS485 via an MIU, but may be by V.26 modem.
Both links are shown. Communications to the Outstation are always by RS485.
667/HB/26766/ETC
Page 9
Issue 7.00
MIDAS Transponder System Handbook
COBS
MIDAS
LCC
MIDAS
LCC
PCM Link (RS232
interface)
MIU
V.26 Link
RS485 Link
LCC-TPR Link
MIDAS
TRANSPONDER
MIDAS
TRANSPONDER
TPR-O/S Link 1
TPR-O/S Link 2
ENGINEER’S
TERMINAL
MIDAS
OUTSTATION
MIDAS
Transponder or
Outstation
O/S Auxiliary Link
Up to 10
Inductive
loop pairs
Figure 1 - MIDAS System Overview
667/HB/26766/ETC
Page 10
Issue 7.00
MIDAS Transponder System Handbook
Power PC PCB
To Engineer’s
Terminal
RS 232 + 5V supply
3 x RS485
RS 485 Line
Protection
Module PCB
Comms I/O PCB
V.26 Modem PCB
(Optional)
HDLC (V.26)
built-in lightning
protection
Battery Isolation
Switch
PSU
7AH
Lead-acid
battery
Mains inlet
Figure 2 - System Schematic Diagram
667/HB/26766/ETC
Page 11
Issue 7.00
MIDAS Transponder System Handbook
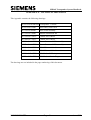
Supplier
Label
Battery
Isolation
Switch
Battery
Fuse
Power
PC
Comms
I/O
V.26
Modem
(optional)
Blanking panel
ISOLATE
SIEMENS
CONNECTED
Mains
Switch
Mains
fuse
Mains
Input
POWER PC
COMMS I/O
MODEM
RESET
PRC ERR
RUN
TXD
W/D FAIL
RUN
RXD
RTS
DCD
DIAG
ENG
TERM
LSB
....
....
.
....
....
.
MSB
ADDRESS
ADDRESS
BIT
0
1
2
3
4
5
6
7
LINK
COLOUR
BLACK
BROWN
RED
ORANGE
YELLOW
GREEN
BLUE
VIOLET
LINK PRESENT = LOGIC 0
LINK CUT = LOGIC 1
RESET
Figure 3 - Front Panels
667/HB/26766/ETC
Page 12
Issue 7.00
MIDAS Transponder System Handbook
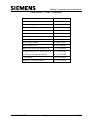
2.3
Physical Arrangement
The MIDAS Transponder is mounted in a standard 19” equipment rack of 3U height, which
provides a mounting frame and mechanical protection for all the hardware.
All RS485 inputs to the MIDAS equipment are routed through the Line Protection Module
mounted at the rear of the cabinet.
A view of the equipment with the front panels removed is shown below.
Battery
Power PC
Processor
PCB
Comms
I/O PCB
V.26 Modem
PCB (optional)
Power
Supply
Figure 4 - Hardware Module Arrangement (front view, front panels removed)
2.4
Power System
The power supply is a 30W switched mode unit with a single voltage output. It is used to power
the MIDAS Transponder hardware and charge the battery backup unit. See Section 7.2 for details
of the power requirements.
The battery is a 12V sealed lead-acid type. It is capable of providing up to 20 hours cover in the
event of a mains failure.
The system operates normally while the battery is being recharged. The battery is fully recharged
within 5 hours of mains power restoration.
667/HB/26766/ETC
Page 13
Issue 7.00
MIDAS Transponder System Handbook
2.5
Cables
The cables are connected as follows:
Cable
Connection
Mains
RS485
V.26 Modem data
Modem to Power PC
Processor
Earths
Via IEC320 mains connector on the front panel. See Section 3.7.
Via Klippon block. See Section 3.2.
Where fitted, via Klippon block on rear of cabinet. See Section 3.3.
Where fitted, via RS232 cable at the rear of the Transponder. Refer
to Section 3.4.
Refer to Section 3.5.
Table 1 - Cable Connections
The Klippon block positions are to be defined by the Highways Agency.
2.6
PCBs
2.6.1 Power PC Processor PCB
The Power PC Processor PCB is based on an IBM 403GA PowerPC, which is a 32-bit Processor.
The PCB has two serial ports. One is a 9 pin ‘D’ type socket located on the front, into which a
MIDAS Engineer’s Terminal can be connected. The other, an 18-pin IDC connector located at
the back, provides the interface to the optional V.26 Modem.
There are 4 LEDs located on the front, which indicate the following:
LED
Function
No Fault State
PRC ERR
W/D FAIL
RUN
Processor Error
Watchdog Failure
Software running
Off
Off
Flashing Green
DIAG
Software status indication
Off
Fault
Indicated
State
Lit Red
Lit Red
Off/Steady
Green
Lit Green
Table 2 - LEDs
See Table 6 in Section 5.3 for details of the diagnosis and possible remedy when a fault is
indicated by one of the LEDs.
667/HB/26766/ETC
Page 14
Issue 7.00
MIDAS Transponder System Handbook
2.6.2 Comms I/O PCB
The Comms I/O PCB main functions are to provide interfaces to the battery charger and battery
monitor circuits and the RS485 communications channels.
At the front of the PCB (top and bottom) are two reset switches, which when pressed at the same
time cause a system reset.
The Board Address Header is a 9 pin ‘D’ type socket above the lower reset switch. A 9-pin ‘D’
type plug which has the address of the Transponder configured is plugged into this socket. See
Section 3.6.
2.6.3 V.26 Modem PCB (optional)
For further details of this PCB, see the MIDAS V.26 Modem Installation, Commissioning and
Maintenance Handbook, detailed in Section 1.3.
2.6.4 RS485 Line Protection Module PCB
This PCB provides the Transponder with lightning protection, and connects to the rear of the
cabinet.
667/HB/26766/ETC
Page 15
Issue 7.00
MIDAS Transponder System Handbook
3.
INSTALLATION
3.1
Physical Installation
The Transponder is supplied fully assembled with the exception of the Address Header, Modem
to Power PC Processor cable and the mains power cable. All the parts needed for an installation
are contained within the packaging. Locate the Installation kit of parts which contains all the
fixings required to install the unit and check it against Section 3.1.1.1. No specialised tools are
required other than those listed in Section 3.1.2.
Insert the cage nuts into the required positions in the front of the Type 600 frame using four bolts
and washers at the front. The location of the unit within the Type 600 frame is detailed in the
Highways Agency installation drawings.
3.1.1 Installation List
• Transponder Assembly
• V.26 Modem to Power PC Processor ribbon cable (optional)
• Transponder Installation Kit (See Section 3.1.1.1 below).
3.1.1.1 Installation Kit
The following items are provided in a plastic bag tie-wrapped to the rack.
4 x Cage Nuts
4 x Bolts
4 x Washers
1 x Address Plug
1 x Mains Power Cable
3.1.2 Non-Standard Tools
The only items needed to complete an installation are a normal set of Engineer’s tools and the
following:
• Indelible pen for marking the address on the Address Header.
3.2
Connect RS485 Line Protection Module
Connect the module in accordance with the table below. It is advisable to fit the RS485 Line
Protection module to the Klippon block before terminating its earth lead (see Section 3.5). This
ensures that the earth lead is long enough to reach the appropriate earthing point in the cabinet.
Refer to the Highways Agency installation requirements for specific fitting instructions. See also
the Highways Agency drawing MCX 0834 sheets 1 and 4 for more details.
Ensure that the switch on the front of the Comms I/O card is in the “up” position to connect the
RS485 circuits to Outstation Link 1.
667/HB/26766/ETC
Page 16
Issue 7.00
MIDAS Transponder System Handbook
Terminal
Block
Position
RS485
Polarity
Link Function
1
Transponder - Outstation Link 1
A
2
Transponder - Outstation Link 1
B
3
Transponder - LCC Link
A
4
Transponder - LCC Link
B
5
Not used
-
6
Not used
-
7
Transponder - Outstation Link 2
A
8
Transponder - Outstation Link 2
B
9
Not used
-
10
Not used
-
11
Not used
-
12
Not used
-
Table 3 - RS485 Line Protection Connections
3.3
Connect V.26 Modem data cable (optional)
Where provided, connect the HDLC modem cable according to the following table:
Pin No.
TB1/1
TB1/2
TB1/3
TB1/4
Terminal Block ref.
Command
Reply
Reply
Command
Colour
Blue/White
Orange/White
White/Orange
White/Blue
Table 4 - Wiring of V26 Modem Cable
This cable is terminated by a four way screw terminal on the Modem, labelled TB1.
3.4
Connect Modem to Power PC Processor
Where a Modem is provided, connect the 18-way ribbon cable between the rear of the Modem
and the 18 pin IDC connector located at the back of the Power PC Processor PCB, labelled PL4.
The Modem cable is terminated with an 18-way IDC plug. The red wire indicates Pin 1 of the
cable.
667/HB/26766/ETC
Page 17
Issue 7.00
MIDAS Transponder System Handbook
3.5
Earthing
The Transponder has a flying earth lead that is attached to the front panel star point. There is also
a flying earth lead on the RS485 Line Protection module. Where fitted, there is an earth lead
from the V.26 modem. These flying earth leads must be fed down the side of the T600 cabinet,
and terminated on the cabinet earth point.
3.6
Address Header
This sets the address of the unit in binary.
Cover Removed
Figure 5 - Address Header
3.6.1 Programming the Address Header
Dismantle the unit by removing the two front cover screws, and cut the links where appropriate.
The table below gives details of the link values.
LSB
MSB
Address Bit
0
1
2
3
4
5
6
7
Link Colour
Black
Brown
Red
Orange
Yellow
Green
Blue
Violet
Link Present = Logic 0
Link Cut = Logic 1
Table 5 - Address Link Values
For example: To set Address 5 hex (00000101 bin), cut the Black and Red links.
To set Address 55 hex (01010101 bin), cut the Black, Red, Yellow and Blue links.
To set Address 42 hex (01000010 bin), cut the Brown and Blue links.
667/HB/26766/ETC
Page 18
Issue 7.00
MIDAS Transponder System Handbook
To set Address 97 hex (10010111 bin), cut the Black, Brown, Red, Yellow and
Violet links.
Write the address on the white label in indelible pen.
3.6.2 Fitting the Address Header
Reassemble and fit the address header into the front connector of the Comms I/O PCB (See
Figure 3). Screw it securely to the PCB.
3.7
Connect Mains Lead to PDU
Ensure the mains power to the cabinet is turned off before starting to connect the power lead.
Connect the mains lead in accordance with Highways Agency drawings MCX 0156 sheets 1 and
2. The PDU is located in the base of the equipment cabinet.
667/HB/26766/ETC
Page 19
Issue 7.00
MIDAS Transponder System Handbook
4.
COMMISSIONING
The MIDAS Transponder requires minimal commissioning consisting of the following:
Check the Transponder Address is correct for the location.
Turn the power on at the mains switch.
Make sure that the Battery Isolation Switch is set to Connected.
Check the Power PC LEDs. (RUN LED is flashing green, others should be off.)
Connect an Engineer’s Terminal and proceed as follows:
• Configure the baud rate as described in Section 6.2.
• Check the Station Status Data dialog box. The status should be as seen on Figure 10.
“Master Link” should show OK, which indicates that the Transponder is
communicating with the Instation.
• Check at the Control Office or Instation that communications have been established.
Communications are established when the Transponder receives site data from the
Instation.
• Check the Fault Report. If “Battery low” does not appear, then the battery voltage is
OK. If a “Battery low” fault appears, wait at least one hour for the battery to become
sufficiently charged, when the fault should clear.
• If the Transponder is working correctly, no faults will appear in the Fault Report.
• If Outstations are connected to the RS485 master links, check that messages are being
transmitted and received by enabling the Logging Control dialog box (see Figure 14).
Outstation messages will then appear on Links 0 and 1 if they are connected correctly.
For a Modem based Instation link, check that TXD and RXD red LEDs flash. Also check
the MIDAS Station Status Data menu for the master link is OK.
Where a Modem is fitted, follow the Commissioning instructions in the V.26 Modem
Handbook, detailed in Section 1.3.
Note: A telephone and fax “Help Line” facility is available. See page 2 for details.
667/HB/26766/ETC
Page 20
Issue 7.00
MIDAS Transponder System Handbook
5.
MAINTENANCE
Before undertaking any maintenance of the equipment, read the Safety Instructions in Section
1.6.
When maintenance and refitting is carried out on other equipment within the cabinet, it may be
necessary to move MIDAS equipment, in particular the RS485 Line Protection Module. Follow
the instructions given for replacing individual items of equipment in Section 5.5.
For the MIDAS Transponder internal layout see Figure 4, and for the front panels see Figure 3.
5.1
Replaceable Parts
The following parts are replaceable. Follow the instructions given in the remainder of this section
for replacing individual parts.
See Appendix C for the part numbers.
Address Header
Battery Backup fuse
Comms I/O PCB
Line Protection Module fuse
Mains fuse
Modem fuse
Power PC Processor PCB Battery
Power Supply Battery
Power Supply Unit
RS485 Line Protection Module PCB
Transponder Power PC Processor PCB
Transponder PROM
V.26 Modem
5.2
Routine Maintenance
The only routine maintenance required is the replacement of batteries. There are two types of
battery in each Transponder. Before removing or replacing batteries, read the Safety Warning in
Section 1.6.
One is the power supply battery backup, which is a 12V sealed lead-acid type, with an estimated
life of 5 years. Instructions for replacing the power supply battery can be found in Section 5.5.6.
The other is the RAM battery backup. This is a nickel metal hydride type contained within the
Power PC Processor PCB that has an estimated minimum life of 6 years. Follow the instructions
in Section 5.5.2.1 to replace this battery.
667/HB/26766/ETC
Page 21
Issue 7.00
MIDAS Transponder System Handbook
To minimise site visits, it is recommended that both batteries are replaced at the same time.
Therefore a replacement schedule should be prepared which ensures that each battery is replaced
no later than five years from the date of delivery.
5.3
Fault Finding
Listed below are the main faults that might be reported by Transponders. If any fault is reported
which is not listed below, or a fault persists after trying the remedy(ies) suggested, consult STCL
(see page 2 for details).
Symptom
Diagnosis
Remedy
The PRC ERR LED on the
Power PC PCB is lit
Processor error.
Replace the PPC PCB.
Consult STCL (see page 2).
Replace the PPC PCB.
Consult STCL (see page 2).
Reset the Transponder. (DO
NOT reset if the mains has
failed. See Section 5.4).
Check the watchdog link is
shorted (LK5 on PPC PCB).
Reset the Transponder. (DO
NOT reset if the mains has
failed. See Section 5.4). If the
fault persists, replace and
return the PPC.
Reset the Transponder. (DO
NOT reset if the mains has
failed. See Section 5.4). If the
fault persists, replace and
return the PPC.
Reset the Transponder. (DO
NOT reset if the mains has
failed. See Section 5.4). If the
fault persists, replace and
return the PPC.
Refer to the Fault Log for
further information. See
Section 6.4.1.
Check the Battery Isolation
Switch is set to connected.
Replace the battery.
Software exception error.
The W/D FAIL LED on the
Power PC PCB is lit
The watchdog has failed.
Hardware fault.
The RUN LED on the
Power PC PCB is not
flashing
Software is not running.
Hardware fault.
The DIAG LED on the
Power PC PCB is lit
There is a fault reported in
the Fault Log.
A battery low fault is
reported at the Instation
The battery is not charging.
667/HB/26766/ETC
Page 22
Issue 7.00
MIDAS Transponder System Handbook
Symptom
Diagnosis
Remedy
The battery is disconnected.
Check the battery
connections.
Check the Battery Isolation
Switch is set to connected.
Check the battery fuse.
Replace the Comms I/O
module.
Check that the mains is
connected.
Check the mains fuse.
Check the mains supply.
DO NOT reset the
Transponder. See Section 5.4.
The PSU output should be
15V +1V. If not, replace the
PSU.
Replace the Comms I/O
module.
Check the battery leads.
Check the battery fuse.
Replace the battery.
Check the battery
connections.
Check the Battery Isolation
Switch is set to connected.
Check the battery fuse.
Replace the Comms I/O
module.
Check the Outstation(s).
Check the site configuration.
The Comms I/O has failed.
A Mains fail fault is
reported at the Instation
The Mains is disconnected.
The Mains has failed.
The PSU has failed.
The Comms I/O has failed.
A battery charger fault is
reported at the Instation
The Battery is not charging.
The Battery is disconnected.
The Comms I/O has failed.
A fault report is received at
the Instation reporting that
at least one, but not all,
Outstations are unobtainable
A fault report is received at
the Instation reporting that
all Outstations on one link
are unobtainable
The Outstation has failed.
The site configuration is
wrong.
The Outstation link has
failed.
The Comms I/O has failed.
667/HB/26766/ETC
Page 23
Check the Outstation link
connections.
Check that the switch on the
front of the Comms I/O card
is in the “up” position.
Check the site configuration.
Replace the Comms I/O
module.
Issue 7.00
MIDAS Transponder System Handbook
Symptom
A fault report is received at
the Instation reporting that
at least one, but not all,
Outstations are not
responding
RS485 Communications are
lost between Instation and
Transponder
Modem Communications
are lost between Instation
and Transponder
Any other fault report or
message.
Diagnosis
Remedy
The Line Protection Module
has failed.
Replace the RS485 Line
protection module fuse.
Replace the RS485 Line
protection module.
Check the Outstation(s).
The Outstation has failed.
The Instation link has failed. Check the Instation link
connections.
Check the site configuration.
The Comms I/O PCB has
Replace the Comms I/O
failed.
module
The Line Protection Module Check the RS485 Line
has failed.
Protection Module fuse.
Replace the RS485 Line
Protection Module.
The Instation link has failed. Check the Instation link
connections.
Check the site configuration.
The Modem has failed.
Replace the modem fuse.
Replace the modem.
Reset the Transponder (DO
NOT reset if the mains has
failed. See Section 5.4). If the
fault persists, consult STCL
(see page 2).
Table 6 - Fault Finding
5.4
Reset
Note: Do Not carry out a manual reset during a mains fail, as the equipment will shut down.
To carry out a reset, locate the two buttons marked “Reset” on the front of the Comms I/O PCB
(see Figure 3) and press both at the same time. The system then restarts.
5.5
Replacement Procedures
Please note that PCB switches are factory set. Check with Section 5.5.1 that the PCB is the
correct one and that the default settings are correct before fitting the replacement. Part numbers
for all the replaceable parts are given in Appendix C.
667/HB/26766/ETC
Page 24
Issue 7.00
MIDAS Transponder System Handbook
5.5.1 Default Settings
The following table shows the factory default settings for the various items of equipment.
It is important to ensure that the equipment uses the settings detailed below when installed.
Default Setting
Power PC Processor PCB
Battery switch
Watchdog Disable LK5
All other links
Meaning
On
Shorted
Open
Battery connected
Watchdog enabled
Not used
On
Off
Comms I/O PCB
PCB Add ( S6,1
(
2
(
3
Off
(
4
Off
One PCB in rack
(Would be on if 2 PCBs
in rack, others in S6 off)
(Would be on if 3 PCBs
in rack, others in S6 off)
Not used
On (Down)
Off (Up)
Off (Up)
On (Up)
Bias enabled, O/S Link 1
Bias disabled, LCC Link
Bias disabled, Not used
Bias enabled, O/S Link 2
Up
RS485 enabled to O/S
Link 1
RS485 Line Voltage Biasing{
{
{
{
S2
S4
S5
S8
Local/Remote Toggle switch on front
Optional V.26 Modem PCB - 2400 Baud Rate
See the MIDAS V.26 Modem I C
& M Handbook. Details in Section
1.3.
Link Data Rates (Set via Engineer’s Terminal.
See Section 6.6.1)
OAL
Any
ETR
9600
Upstream
4800
Downstream 1
4800
Downstream 2
4800
667/HB/26766/ETC
Page 25
Not used
Baud speed
Baud speed
Baud speed
Baud speed
Issue 7.00
MIDAS Transponder System Handbook
5.5.2 Power PC Processor PCB
1. The PCB contains a nickel metal hydride rechargeable battery. Note the Safety Warning in
Section 1.6.
2. Switch off at the main power switch. See Figure 3.
3. Switch the battery off at the Battery Isolation Switch.
4. Undo the four screws holding the front panel and remove it.
5. Disconnect the 4 way Molex connector on the Comms I/O PCB. The PCB positions are
identified on Figure 4.
6. Disconnect the 10 way IDC connector on the rear of the Comms I/O PCB.
7. Disconnect the 18 way IDC connector on the rear of the Power PC Processor PCB (if a
Modem is fitted).
8. Pull out the Power PC Processor PCB (PPC) and Comms I/O modules.
9. Disconnect the PPC from the Comms I/O PCB by undoing the four spacer screws.
10.Pull the PPC and Comms I/O units apart.
11.Replace the PPC Board. Before fitting the new board check that the default settings
correspond with those in Section 5.5.1. Also make sure that the PROM part number is the
same as that listed in Appendix C.
12.Reverse the above procedures to reassemble and reconnect the PCBs.
5.5.2.1 Power PC Processor PCB Battery
1.
2.
3.
4.
5.
To replace the battery, follow items 1 - 10 from Section 5.5.2 above.
Desolder the battery (labelled BAT1) from the PCB.
Replace the battery and solder securely to the PCB.
Fix a new date label on the battery.
Reassemble and reconnect the PCBs.
5.5.3 Comms I/O PCB
1. Switch off at the main power switch. See Figure 3.
2. Switch the battery off at the Battery Isolation Switch.
3. Undo the four screws holding the front panel and remove it.
4. Disconnect the 4 way DC power cable connector on the Comms I/O PCB. The PCB positions
are identified on Figure 4.
5. Disconnect the 10 way IDC connector on the rear of the Comms I/O PCB.
6. Pull out the Power PC Processor PCB (PPC) and Comms I/O modules.
7. Disconnect the PPC from the Comms I/O PCB by undoing the four spacer screws.
8. Pull the PPC and Comms I/O units apart.
9. Replace the Comms I/O Board. Before fitting the new board check that the default settings
correspond with those in Section 5.5.1.
10.Reverse the above procedures to reassemble and reconnect the PCBs.
667/HB/26766/ETC
Page 26
Issue 7.00
MIDAS Transponder System Handbook
5.5.4 V.26 Modem (Optional)
See the MIDAS V.26 Modem Installation, Commissioning and Maintenance Handbook for
replacement instructions. Details are given in Section 1.3.
5.5.5 Power Supply Unit
1. Disconnect the mains and isolate the battery using the Battery Isolation Switch on the front
panel (See Figure 3).
2. Remove the left hand front panel (with the Supplier label).
3. Disconnect the DC output and mains input plugs.
4. Remove the earth lead from the screw on top of the PSU board.
5. Remove the screws holding the PSU.
6. Remove the PSU.
7. Fit the new PSU.
8. Re-connect the mains earth lead to the screw on top of the PSU board.
9. Re-connect the input and output plugs.
10.Re-fit the front panel.
11.Connect the battery using the Battery Isolation Switch, and re-connect the mains.
5.5.6 Power Supply Battery
1. Disconnect the mains and isolate the battery using the Battery Isolation Switch on the front
panel (See Figure 3).
2. Remove the left hand front panel (with the Supplier label).
3. Slide out the battery and disconnect the battery terminals.
4. Replace the battery.
5. Re-connect the terminals to the replacement battery.
6. Replace the front panel.
7. Switch on the battery at the Battery Isolation Switch on the front panel.
8. Re-connect the mains.
9. Handle and dispose of the battery safely in accordance with the Safety Warning in Section 1.6.
5.5.7 RS485 Line Protection Module PCB
This module protects the equipment against induced voltage transient and excessive line
voltages/currents. The fuses will blow if excessive currents are coupled into the lines. It is
unlikely that the module will require replacement, but it may need to be moved within the cabinet
when rewiring is carried out or new equipment is fitted.
Proceed as follows:
1.
2.
3.
4.
Remove the cabling.
Unscrew the module from the cabinet rear cage ribs and remove.
Fit the new module by screwing to the cabinet rear cage ribs.
Refit the cabling.
667/HB/26766/ETC
Page 27
Issue 7.00
MIDAS Transponder System Handbook
5.5.8 Fuses
Location
Fuse
Rating
Front panel
Front panel
Modem - if fitted
RS485 Line Protection Module
Battery backup fuse
Mains fuse
Modem fuse
Line Protection module fuse
3.15AF
250V, 500mA, Slow blow
250V, 500mA, Quick blow
250V, 1 Amp, Anti-surge (T)
Table 7 - Fuse Ratings
5.5.8.1 Battery Fuse
Isolate the battery using the Battery Isolation Switch. Remove the fuse and replace with one of
the same rating on the battery front panel.
Re-connect the battery at the Battery Isolation Switch.
5.5.8.2 Mains Fuse
Isolate the mains using the Mains Switch. Isolate the battery using the Battery Isolation Switch.
Remove and replace the fuse in the mains socket. See Figure 3.
Re-connect the battery at the Battery Isolation Switch. Re-connect the main power using the
Mains Switch.
5.5.8.3 Modem Fuse
Isolate the mains using the Mains Switch.
Remove the front cover from the panel containing the modem (see Figure 3) and slide out the
V.26 modem. Remove the plastic cover. Replace fuses FS1 to FS4 as required. Replace the
plastic cover and refit the modem into its previous position. Replace the front panel using the
four screws.
Re-connect the main power.
5.5.8.4 Line Protection Module Fuse
Remove the plastic cover from the Line Protection Module. Replace fuses FS1 to FS8 as
required. Replace the cover.
667/HB/26766/ETC
Page 28
Issue 7.00
MIDAS Transponder System Handbook
6.
USE OF THE STCL ENGINEER’S TERMINAL
6.1
General
Note: The following section applies only to the use of an STCL Engineer’s Terminal.
This section assumes that the user is familiar with Windows software and terminology.
Plug the terminal in to the socket shown on Figure 3.
Log in in the usual way and select the MIDAS Engineer’s Terminal icon from the Main Menu.
See the figure below for the initial screen displayed on entry to the Engineer’s Terminal.
Figure 6 - Initial Screen
Note: The menus and buttons displayed on the initial screen show options that relate to the
MIDAS Outstation as well as the Transponder. Not all options are available when the Engineer’s
Terminal is connected to the Transponder, and any attempt to select them causes a message to be
displayed indicating that the selection is not valid. Only the options available from a Transponder
are described in this section.
On the MIDAS Main Menu Window, under the menu bar, there are buttons that give easy access
to the options listed below (See the figure above):
• SS - Station Status
• FR - Fault Report
• LR - Logging Report
• BS - Baud Speed
• AM - About Midas
These options are described in detail later in this section.
667/HB/26766/ETC
Page 29
Issue 7.00
MIDAS Transponder System Handbook
There is also a status bar at the bottom of the window. On the left hand side there is a summary
of what each menu option can do. On the right hand side there are two small windows; the larger
one displays the name of the device the Engineer’s Terminal is connected to (i.e. Transponder),
and the smaller window shows the address of the device. Until the Engineer’s Terminal has been
configured as described in Section 6.2 these windows are blank. For example, page 29 shows the
screen before the Terminal has been configured; page 33 shows the screen after configuration.
6.2
Configure
This menu confirms the connection of the Engineer’s Terminal to the host, and these options
should be selected before using any of the remaining menu options.
Figure 7 - Configure Menu Options
6.2.1 Configure Baud Rate
Choose from 9600, 4800 or 2400 baud speed for the Engineer’s Terminal to communicate with
the Transponder. Click on the <OK> button to confirm the entry and close the window.
<Cancel> closes the window without making any change to the entry.
667/HB/26766/ETC
Page 30
Issue 7.00
MIDAS Transponder System Handbook
Figure 8 - Configure Baud Rate Dialog Box
6.2.2 Get Host Status
Selecting this option identifies the name and address of the device to which the Engineer’s
Terminal is connected. The information is then displayed in the status bar at the bottom of the
window.
6.3
Status
Extended
Station Data
Device Mod
Loop
Transponder
Figure 9 - Status Menu Options
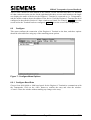
6.3.1 Station Status Data
This facility displays a view-only dialog box with the data obtained from the Station Status Data
message. Click on the <OK> button to close the window.
667/HB/26766/ETC
Page 31
Issue 7.00
MIDAS Transponder System Handbook
Figure 10 - Station Status Data Dialog Box
Dialog Box Field
Possible Data
Explanation
CRC
0 - FFFF
CRC of Site Data
Site Data CRC Check
Passed/Failed or not done
Status of CRC Check
Mode
Normal or Initialisation
Current mode of Transponder
Slave Comms Status
Known or not known
Status of Slave Comms
Initialising from
Watchdog reset, or other
reason than in Watchdog,
or in Normal mode
Reason for initialisation
Faults
One or more, or none
Number of faults
Master Link
OK, or re-established
Transitory indication – do not use
Mod. No.
Modification Number
Modification Number
Store Code Type
Code
Store Code Type
Poll TX Link n
Number
Transmission Counter for Link n
Retries Link n
Number
Transmission Retries Counter for
Link n
Link n transmission
retries
Exceeded, or not exceeded
Transmission Retries Threshold for
Link n
Note : Where n is a value of 0, 1, 2 or 3.
Table 8 - Station Status Data Details
667/HB/26766/ETC
Page 32
Issue 7.00
MIDAS Transponder System Handbook
6.4
Report
Figure 11 - Report Menu Option
6.4.1 Fault Report
This facility displays a view-only dialog box with the data obtained from the Fault Report
message. Click on the <OK> button to close the window. Click on the <Save> button to save the
contents of the window to a text file. You are prompted to enter a name and destination for the
text file.
Access the text file and print the fault report (if required) in the usual way.
667/HB/26766/ETC
Page 33
Issue 7.00
MIDAS Transponder System Handbook
Figure 12 - Fault Report Dialog Box
Dialog Box Field
Possible Data
Explanation
Time
0-23 for hours, 0-59 for
minutes, 0-59 for seconds
Time the fault or clearance
of fault occurred
Fault Type
Text
Name of the fault
See Section 5.3 for
diagnosis and remedy for
each fault
Fault Status
Clear or Fault
Fault cleared or fault
occurred
Device
Transponder (TPR) or
Outstation (O/S)
The device reporting the
fault
Addr
Number
Address of the device
Data
Number
Dependent on fault type –
For engineering use only
Category
Fatal, Error or Warning
Category of fault
Diagnostics
Number
Dependent on fault type For engineering use only
Table 9 - Fault Report Details
667/HB/26766/ETC
Page 34
Issue 7.00
MIDAS Transponder System Handbook
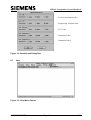
6.5
Logging
Figure 13 - Logging Menu Option
6.5.1 Logging
This facility displays a dialog box. The data to be displayed can be enabled or disabled, by
clicking on the required check box(es). When a change is made in the window and the <OK>
button is pressed a dialog box appears, “Are you sure you want to Enable/Disable these
functions?”.
Figure 14 - Logging Control Dialog Box
The <Cancel> button closes the dialog box without saving any changes and re-displays the main
screen (see Figure 6). The <OK> button closes the window and then a further window prompts
for a file name and destination for the logging data. Make entries where appropriate on the screen
and press <OK>.
The Logging dialog box (see the next figure) then appears, where messages are displayed as they
are sent and received. This information may not be changed.
667/HB/26766/ETC
Page 35
Issue 7.00
MIDAS Transponder System Handbook
The <Pause> button in the Logging box stops the scrolling of messages in the window.
The <OK> button in the Logging box closes the dialog box.
The <Resume> button in the Logging box starts the scrolling of messages in the window again.
Figure 15 - Logging Report Dialog Box
Dialog Box Field
Possible Data
Explanation
Time
0-23 for hours, 0-59 for
minutes, 0-59 for seconds
Time the fault or clearance
of fault occurred
Message Data
Text
Dependent on Type of
Message
Sequence Number
0-255
Sequence number of the
Alert
Site Number
Number
Dependent on Type of
Message
Alert Data
0 – 255
Lane in Alert
Table 10 - Logging Report Details
667/HB/26766/ETC
Page 36
Issue 7.00
MIDAS Transponder System Handbook
6.6
Settings
Figure 17 - Settings Menu Option
6.6.1 Baud Speed
This facility displays a dialog box with the data obtained from the Baud Rate Reply message.
The data can be changed, by clicking on the required radio buttons. Click on the <OK> button to
close the window, recording any changes made to the baud rates of individual links. Click on the
<Cancel> button to close the window without saving any changes. See Section 5.5.1 for details
of the default values.
667/HB/26766/ETC
Page 37
Issue 7.00
MIDAS Transponder System Handbook
- not used (Outstation only)
- Engineering Terminal Link
- LCC Link
- Outstation Link 1
- Outstation Link 2
Figure 18 - Baud Speed Dialog Box
6.7
Help
Figure 19 - Help Menu Option
667/HB/26766/ETC
Page 38
Issue 7.00
MIDAS Transponder System Handbook
6.7.1 About MIDAS...
This facility displays a view-only dialog box with the data obtained from the “About” message.
Click on the <OK> button to close the window.
Figure 20 - About MIDAS Dialog Box
6.8
Exit
Figure 21 - Exit Menu Option
6.8.1 Quit
This facility exits the application.
667/HB/26766/ETC
Page 39
Issue 7.00
MIDAS Transponder System Handbook
7.
TECHNICAL SPECIFICATION
7.1
Physical Characteristics
Size
Approx.
Weight
7.2
height
width
depth
without battery
without modem
with battery (and modem
if appropriate)
Packaged with
installation kit
225 mm
580 mm
465 mm
7.2 Kg
9.7 Kg
10.0 Kg
Power Requirements
Voltage
Frequency
Rated current
7.3
Unpackaged unit only
130 mm
480 mm
240 mm
2.6 Kg
5.1 Kg
5.4 Kg
Mains Input
85 - 260V AC
47 - 440Hz
150mA
Features
‘CE’ Certified.
MIDAS Transponder can communicate with up to 24 Outstations.
8 Transponders per LCC.
LCC link can be RS485 or V.26 Modem.
Provides monitoring of its own hardware functionality.
Provides monitoring of Outstation communications.
7.4
Safety
Meets Electrical Safety requirement EN 60950.
Meets Telecommunications Safety requirement EN 41003.
7.5
EMC
MIDAS Transponders meet the emission and susceptibility requirements of TRG 1068 (Feb.
1991).
667/HB/26766/ETC
Page 40
Issue 7.00
MIDAS Transponder System Handbook
7.6
Environmental Information
The roadside equipment meets the mechanical and temperature requirements of UK Department
of Transport (Highways Agency) Specification TR2130B (May 1993).
Operating temperature from -15°C to +65°C.
Humidity + 95% (non-condensing).
7.7
Data Rates
Standard rates 2400, 4800, 9600.
Other rates programmable up to 38,400.
7.8
Battery Backup
Lead acid battery support - 20 hour operation.
SRAM memory support - 1 year.
7.9
Lightning Protection
Meets the requirements of CCITT K20.
7.10 Processor
32 bit Embedded Power PC.
Up to 512Kbyte PROM, 1Mbyte SRAM (Battery backed).
1Mbyte Flash.
4 Synchronous/Asynchronous Isolated RS485 ports.
2 Synchronous/Asynchronous RS232 ports.
1 Asynchronous RS232 port.
JTAG Interface.
Real Time Clock.
7.11 Modem (Optional)
See the MIDAS V.26 Modem Installation, Commissioning and Maintenance Handbook, details
of which are given in Section 1.3.
667/HB/26766/ETC
Page 41
Issue 7.00
MIDAS Transponder System Handbook
7.12 Engineer’s Terminal
The hardware needed to run the MIDAS Engineer’s Terminal software is a standard (IBM
compatible) portable PC with a suitable lead to connect to the 9-pin ‘D’ type socket located on
the front of the Power PC Processor PCB.
The PC must have the following features as minimum requirements:
•
•
•
•
•
•
•
•
•
•
•
Processor of the 80386 family
4 Mb of RAM
Hard disk drive with minimum capacity 40Mb (“C” drive)
1 x integral floppy disk drive (3.5”, 1.44Mb) or access to one
1 x RS232C 9 way serial port; required cable connections as defined by STCL. (Part number
667/1/24661/000)
1 x standard 25 pin parallel printer port
Operating system MS-DOS (version 3.3 minimum)
Microsoft Windows version 3.1 or greater
Standard size display screen (80 column x 25 lines) CGA compatible, colour or monochrome
Power supply from mains (with adapter) and batteries (rechargeable)
Full QWERTY keyboard
In addition, a mouse or trackerball would be a desirable option.
667/HB/26766/ETC
Page 42
Issue 7.00
MIDAS Transponder System Handbook
APPENDIX A - TECHNICAL DRAWINGS
This Appendix contains the following drawings:
667/GA/26766/000-003 Transponder - General
667/GA/26791/000
PSU battery cable form
667/GA/26748/000
PSU socket assembly
667/GA/26774/000
MIDAS Installation Kit
667/GA/26771/ETC
Comms I/O PCB Kit
667/DA/26771/ETC
Comms I/O PCB Kit
667/GA/26601/ETC
Power Processor PCB Assembly
667/DA/26601/ETC
Power Processor PCB Assembly
667/GA/20982/ETC
RS485 External Line Protection
667/DA/20982/ETC
RS485 External Line Protection
667/GA/26769/ETC
V26 Modem PCB Assy
667/DA/26769/ETC
V26 Modem Circuit Diagram
The drawings are not included in the page numbering of this document.
667/HB/26766/ETC
Page 43
Issue 7.00
MIDAS Transponder System Handbook
APPENDIX B - PARTS LISTS
This Appendix contains parts list and drawing information for the following Siemens MIDAS
product: Transponder. For each product a hierarchical breakdown of the main components is
given in the form of a tree structure. References to technical drawings are given as part of the tree
structure. Those technical drawings needed for the maintenance of the equipment are given in
Appendix A.
This Appendix is split into two sections.
The first section provides a family tree for the equipment. The trees show:
- the component number for the parts list of each product,
- the part numbers of technical drawings which are relevant to the product.
The second section contains a number of parts lists. These are ordered according to the
component number.
The following pages in this Appendix are not included in the page numbering of this document.
667/HB/26766/ETC
Page 44
Issue 7.00
MIDAS Transponder System Handbook
APPENDIX C - PART NUMBERS
Equipment Description
Part No
Address Header
667/1/26774/000
Battery Backup fuse
518/4/90285/007
Comms I/O PCB
667/1/26747/000
Line Protection Module fuse
518/4/90284/005
Mains fuse
518/4/90284/004
Modem fuse
518/4/90285/004
Power PC Processor PCB Battery
418/4/39820/000
Power Supply Battery
418/4/42314/023
Power Supply Unit
605/4/97048/000
RS485 Line Protection Module PCB
667/1/20982/000
Transponder Power PC Processor PCB
667/1/26601/100
(Containing Transponder PROM)
667/1/12750/000
V.26 Modem
667/1/26768/000
Engineer’s Terminal Software
667/1/26752/000
667/HB/26766/ETC
Page 45
Issue 7.00
MIDAS Transponder System Handbook
INDEX
—A—
—G—
About MIDAS... ............................................................... 40
Address............................................................................. 31
Address Header ..............9. See also Board Address Header
Fit................................................................................. 18
Program........................................................................ 18
AM ................................................................................... 30
General Assembly Drawings............................................ 44
—H—
HDLC Cable ...................................See V.26 Modem Cable
Health and Safety........................................................... 6, 8
Help ................................................................................. 39
—B—
Battery ...................................................................... 8, 9, 13
Backup ......................................................................... 42
Charger......................................................................... 15
Charger fault ................................................................ 23
Fuse.............................................................................. 29
Low fault...................................................................... 23
Replacement..................................................... 21, 27, 28
Baud Speed....................................................................... 38
Board Address Header...................................................... 15
British Standards ................................................................ 7
BS..................................................................................... 30
—C—
Cables......................................................................... 14, 17
CCITT ................................................................................ 7
Circuit Diagrams .............................................................. 44
Commissioning................................................................. 20
Comms I/O PCB..................................................... 9, 15, 19
Default settings ............................................................ 25
Replacement................................................................. 27
—D—
Data Rates ........................................................................ 42
Default settings................................................................. 25
DIAG................................................................................ 14
Drawings ................................................................ 6, 44, 45
General Assembly ........................................................ 44
—E—
Earth ........................................................................... 18, 28
Cable ............................................................................ 14
Engineer’s Terminal ......................................... 9, 14, 30, 43
Environmental Requirements ........................................... 42
Exit ................................................................................... 40
—I—
IEC320............................................................................. 14
Installation
Kit................................................................................ 16
Instation ............................................................................. 9
—K—
Klippon block ............................................................ 14, 16
—L—
LCC ................................................................................... 9
LEDs ................................................................................ 14
Line Protection Module ...................................... See RS485
Link Data Rates................................................................ 26
Logging............................................................................ 36
LR .................................................................................... 30
—M—
Mains ............................................................................... 19
Cable............................................................................ 14
Fail................................................................................. 8
Fault............................................................................. 23
Fuse ............................................................................. 29
Maintenance
Routine ........................................................................ 21
Modem.................................................................................
Communications lost ................................................... 24
Monitor circuits ............................................................... 15
—O—
Outstation
Not responding ............................................................ 24
System Handbook.......................................................... 6
Unobtainable ............................................................... 23
—F—
Faults................................................................................ 22
Finding......................................................................... 33
Report .......................................................................... 34
Features ............................................................................ 41
FR..................................................................................... 30
Frequency......................................................................... 41
Functionality ...................................................................... 9
Fuse
Part Numbers ............................................................... 46
Replacement................................................................. 29
667/HB/26766/ETC
—P—
Part Numbers ................................................................... 46
PDU
Connection .................................................................. 19
Physical Characteristics ................................................... 41
Power PC Processor PCB ............................................ 9, 14
Connections................................................................. 18
Default settings............................................................ 25
Replacement ................................................................ 27
Page 46
Issue 7.00
MIDAS Transponder System Handbook
Power Requirements......................................................... 41
Power Supply ................................................................... 13
Battery Backup............................................................. 21
Battery Replacement .................................................... 28
Replacement................................................................. 28
Unit ................................................................................ 9
PRC ERR ................................................................... 14, 22
Processor Features............................................................ 42
PSU ......................................................... See Power Supply
Sealed Lead Acid Batteries ................................................ 8
Settings ............................................................................ 38
Size .................................................................................. 41
Spares............................................................................... 21
Specification
Engineer’s Terminal .................................................... 43
SS..................................................................................... 30
Station Status Data........................................................... 32
System Overview ............................................................... 9
—Q—
—T—
Quit................................................................................... 40
Tools ................................................................................ 16
—R—
—V—
RAM Battery Backup ....................................................... 21
Rated current .................................................................... 41
Reset............................................................... 15, 22, 24, 25
RS485................................................................................. 9
Cable ............................................................................ 14
Communications channels ........................................... 15
Communications lost.................................................... 24
Connections ................................................................. 17
Flying Earth Lead......................................................... 18
Line Protection Module ......................................... 13, 16
Fuse ......................................................................... 29
PCB ..................................................................... 9, 15
Replacement ............................................................ 28
RUN ........................................................................... 14, 22
V.26 Modem...................................................................... 6
Cable...................................................................... 14, 17
Commissioning............................................................ 20
Connections................................................................. 18
Default settings............................................................ 25
Earth Lead ................................................................... 18
Fuse ............................................................................. 29
Interface....................................................................... 14
PCB ......................................................................... 9, 15
Replacement ................................................................ 28
Voltage....................................................................... 13, 41
—S—
—W—
W/D FAIL.................................................................. 14, 22
Watchdog link.................................................................. 25
Weight.............................................................................. 41
Safety Instructions.............................................................. 8
Last page of the MIDAS Transponder System Handbook
667/HB/26766/ETC
Page 47
Issue 7.00