1
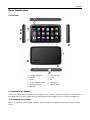
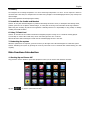
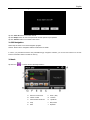
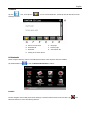
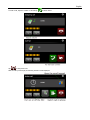
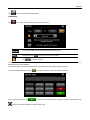
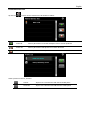
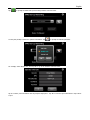
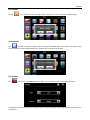
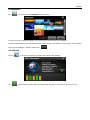
WayteQ GPS Navigation
X960BT
User Manual
English Version
English
Thanks for using WAYTEQ products !
z
WAYTEQ reserves the rights of final interpretation of the manual.
z
The product is subject to change without any further notice. Please accept our apology for your inconvenience.
z
Please back up your information in the GPS navigator. WAYTEQ assumes no responsibility for any loss caused by
material loss.
z
The manual might contain a few mistakes though it has been checked. If mistakes are found, please contact the
WAYTEQ customer service center.
z
Please read carefully the instructions in this manual and use only accessories of WAYTEQ to avoid unpredicted damage.
Failure to follow the instructions will invalidate warranty and might endanger personnel safety, for which WAYTEQ
assumes no responsibility.
z
Data of navigation electronic maps might be inconsistent with actual traffic signals due to transportation development.
Please follow traffic regulations and signs and drive according to road situation.
z
Operating the GPS navigator device while driving might cause serious accidents. Please shorten your time in viewing
the navigator and use the voice prompt function. While driving, try to shorten your time in operating the navigator, for
example, inputting addresses, changing settings or using other functions. WAYTEQ assumes no responsibility for
accidents and loss due to improper use.
z
For safe driving, please pay attention to road and weather conditions as well.
z
The pictures in the manual are subject to the material object.
English
Welcome!
Thanks for using the WAYTEQ GPS featured with navigation as the major function as well as other amusement functions like
audio play, video play, photo browsing, e-book reading, and games, etc.
9
SiRF Atlas-V, dual-core CPU with high performance and low power consumption
9
Friendly user interfaces for simple operation
9
Power management for longer and more stable operation
9
Data transmission with computers via Mini USB
9
Quality reception for accurate positioning and satisfactory navigation service
9
Leisure partner with audio/video/amusement functions
You may use the GPS navigator anytime anywhere, for example while driving, walking or cycling. Its navigation and
amusement functions will enrich your life and work!
To fully exert the functions of WAYTQ GPS and to understand the operation details, please read the manual carefully.
This manual is applicable only to the WAYTEQ GPS
.
English
Basic Introduction
1. Overview
A. Charging Indication
G. Stylus Pen Slot
B. Speaker
H. Reset
C. Power
I. MIC
D. 3.5mm Earphone Socket
J. Light Sensor
E. Memory Card Slot
K. Warranty label
F. Mini USB
2. Charging by AC Adapter
Caution: The charging indicator light is red during charging. Do not unplug the charge until the battery is fully charged and
the indicator light turns green. Please charge the GPS navigator when the battery is low or used up in succeeding use.
3. Charging by Car Charger
Caution: To protect your device against suddenness, please connect the car charger only after the car engine has been
started.
English
4. Battery
The navigator has a working temperature of 0~50°C and storage temperature -10~60°C. Do not expose the device in
excessive heat or hot areas, for example in the car under strong sunlight. To avoid damaging the device, keep it away from
direct sunlight.
Follow local regulations while disposing the battery.
5. Install the Car Cradle and Bracket
Caution: Do not place the GPS navigator in positions obstructing the driver’s vision, for example at the steering wheel,
pedal or gear lever. Do not place it without fixing it, or in the place of air bag or the area after the air bag is inflated.
While using the mounting kit, follow local regulations. WAYTEQ will have no responsibility for any penalty or damage
resulting from traffic violation.
6. Using T-Flash Card
Caution: Do not take out the T-Flash card while an navigation program is being run or a media file is being played.
To avoid drop or crash of the T-Flash card, do not exert heavy pressure on it or bend it.
Mind the direction while inserting the T-Flash card to avoid damaging the slot or the card.
7. Restarting the system
When the system does not response, press the reset key on the right side of the GPS navigator to restart the system.
Caution: Restarting the system by pressing the reset key will result in loss of unsaved data. Please backup your data
regularly.
Main Functions Introduction
1. Starting Up and Power Off
Long press the “Power” button to power the equipment on and you can see the main interface as below :
Tap the “
” to Set the system date and time.
English
Long press the “Power” button again to enter into the below interface :
Tap the “Turn off” button to turn the unit off.
Tap the “Sleep” button to enter a suspend state and the system stops operation.
Tap the “Cancel” button to turn back to the screen.
2. GPS Navigation
Double tap the “GPS” icon to start navigation program.
Caution: Please refer to navigation software instructions for details.
In case if you puchased the device with preinstalled Sygic navigation software, you can find user manual of it in PDF
format in ”Manuals” folder in the bulit-in memory.
3. Music
Tap the icon "
" to enter into the following interface :
A.
Return to main menu
F. Pause / Play
B. Volume control
G. Previous
C.
H.
Select desired music file
Speed bar
D. Stop
I. Play modes
E. Next
J. Equalizer
English
Double tap icon “
Tap the icon “
” to choose music file .
“ for single selection , tap the icon “
delete , tap the icon “
”
“ to select all , tap the icon “
“
for single
to delete all.
4. Photo
Tap the "
" icon, then tap the icon “
“ to select photo files , double tap the photo file to see the following
interface .
A.
Return to main menu
E.
Zoom in
B. Select photo file
F. Zoom out
C. Slide mode
G. Next
D. Rotate
H.
Previous
English
5. Video
Tap the icon "
" icon, then tap the “
“ icon to choose video files , and double tap the file and enter into
following interface .
A.
Return to main menu
E.
Next
B. Volume
F. Pause / Play
C. Select video file
G. Previous
D. Stop
H. Speed bar
Tips:
Double tap the screen, it will display in full screen, double tap the screen again, it will return to original playing size.
6. Flash
Tap the icon “
” and enter into the following interface .
A. Volume
D. Stop
B. Return to main menu
E.
C.
F. Speed bar
Select flash file
Pause / Play
English
7. Ebook
Tap the "
" icon , then tap the "
" icon to choose Ebook files , double tap the file and enter into the
following interface .
A.
Return to main menu
E.
Next page
B. Bookmark list
F. Previous page
C. Bookmark
G. Select Ebook file
D. Setting to set theme & font
8. Bluetooth
Before using this function, make sure that Bluetooth function of the cell phone has been enabled.
Tap the Bluetooth icon
to enter the Bluetooth Interface as follows.
8.1 Pair
Pair the navigator and a mobile phone while setting up connection between them for the first time. Tap
Bluetooth interface to enter the following interface.
in the
English
Meanwhile, press the icon “Search audio device” or similar one on the mobile phone. After the mobile phone finds and
display the name of the navigator (i.e. PND), tap “Connect” and input the default PIN code: 8888. After pairing, the
following interface will be displayed with connection situation and mobile phone name on the bottom.
8.2 Make Calls
Tap
on the Bluetooth interface to enter the keypad interface as follows.
Delete the last input number or character
Dial the input number
Check the call records
English
To make a call, input the number to call and tap
Tap
as shown below.
to hang off the call.
After the call is put through, the following interface will be displayed.
English
8.3 Answer Calls
When there is an incoming call, the following interface will be displayed.
8.4 Dial Record
Tap
in the Bluetooth interface to enter the call records interface as shown below.
Incoming call records
Outgoing call records
Failed call records
Select a number in the list and generate a call
Delete one record
Delete all records
English
8.5 Redial
Tap
icon to redial the latest dialed number.
8.6 Setting
Tap
icon to enter into the setting interface as shown below.
The device’s display name in the Bluetooth transmission process
Tap keyboard icon
Tap
/
to set a pin code for the connection
to select a ring tone
You may choose to “Keep Bluetooth function when the Bluetooth interface is closed” by ticking in the box. Otherwise, the
Bluetooth function will be disabled.
You may also choose automatic HFP connection when Bluetooth is started up by ticking in the box.
To modify the Bluetooth PIN code, tap
in the above interface to enter the following interface.
Input a new PIN code, then tap
to return to the setting interface to finish. To cancel the modification, tap
to return to the setting interface and tap it again to quit.
English
8.7 Paired Device List
Tap the icon
to enter into the Paired Device List interface as follows.
Profile list
Select a paired device on the left and tap this icon to view the profile list
Delete one
Select a paired device and tap this icon to delete the device
Disconnect
Select a paired device and tap this icon to disconnect
Select a profile from the list, and then:
Connect
Tap the icon to reconnect the PND with the mobile phone
Disconnect
Tap the icon to disconnect the PND from the mobile phone
English
Tap
to prompt the GPRS Dial-Up Networking interface as shown below.
You may add, modify or delete the operator information. Tap
to prompt the following interface.
For example, select “Modify Info”, and tap “OK” to go to the interface as shown below.
Tap in a column, enter information with the prompted input panel . Tap “OK” to save the input information or tap “Cancel”
to quit.
English
Tap
to connect the navigator to the network. After connection is established, the Internet Explorer interface
will prompt as shown below.
8.8 Search Bluetooth Device
Tap
icon to enter into the Search Bluetooth Device interface for auto Bluetooth device searching and display as
shown below.
Search / Stop
Search for Bluetooth devices; tap it again to stop search
Pair
Select a Bluetooth device, tap this icon to pair the navigator and the mobile phone.
The default PIN code “8888” Shall be input
Pair device list
Tap to enter the Pair device list. Refer to 8.7 Paired Device List
English
8.9 Phonebooks
Tap the icon
to enter into the Phonebook interface as follows:
Download
Download the phonebook of the mobile phone to the PND
Dial
Select a number from the phonebook and tap this icon to make a call
Delete
Select a number from the phonebook and tap this icon to delete it
9. FM Setting
Tap the "
" icon and enter into the following display interface.
Tap "+"or "-" icon to increase or decrease the emissive frequency of FM.
Tips: after make any changes of setting, tap "
" to save the change.
English
10. Default
Tap the "
" icon and enter into the following interface . Tap the icon “ OK “ to load factory default setting .
11. Explorer
Tap "
" icon, there will be one prompt as below to ask if go into WINCE mode, choose “OK” to enter and “Cancel”
to exit. WayteQ do not take responsibility for any operation done on Windows CE interface.
12. Theme
Tap “
” icon to enter the Theme interface as below to set a style and theme for the system interfaces.
To rearrange icons at will, tap on an icon and stay until a four-way arrow appears at the upper left of it, drag the icon to a
wanted place.
English
13. Wallpaper
Tap “
” icon to enter into the Wallpaper interface as below.
You may choose an pre-installed wallpaper, you may also set an external image as the wallpaper.
The pre-installed wallpapers cannot be deleted, while the added images can be deleted. To delete images, select an added
image from the “Wallpaper ” interface and then tap “
”.
14. GPS Info
Tap the "
Tap "
" icon and the unit will show the detail information of GPS satellites.
" and will have a prompt to ask if reset GPS receiver, tap “OK” to reset signal or tap “Cancel” to exit.
English
15. Resource
Tap “
” icon to enter System Resource interface as shown below.
You may check the capacity of the memory, SD card and flash.
16. Volume
Tap the icon “
” on the menu and enter into the following interface .
Choose “ Music “ files to be background sound when unit is power on .
17. Backlight
Tap the "
" icon and enter into the following interface to make the backlight settings.
English
18. Language
Tap the "
" icon and choose the language .
19. Date and Time
Tap the icon "
" and enter into the following interface to set date, time and time zone .
20. Calibration
Tap the "
" icon and enter into the following interface.
Tap the icon "OK" to adjust the touch screen.
English
21. Sys Info
Tap the "
" icon and the system information will be shown.
22. USB
Tap the icon “
” to set the USB working mode .
23. Nav Path
Tap the "
" icon and enter into the following display interface .
When you have several Navigation maps in the device, you can set up one of Navigation maps (navigation program files)
by choosing the "Navigation" icon and selecting the Auto Run Navigation , next time when tapping the “GPS” icon in the
main menu, the device will run the selected Navigation software automatically .
English
24. Calculator
Tap “
” icon to enter into the Calculator interface.
25. Unit
Tap “
” icon to enter into the Unit Converter interface.
26. Jaw Breaker
Tap “
” icon to enter into the game interface. Tap “New Game” to start.
27. Russia Block
Tap “
” icon to enter into the game interface. Tap “Start” to start.
28. Dui Dui Peng
Tap “
” icon to enter into the game interface. Tap “New Game” to start.
29. Snake
Tap “
” icon to enter into the game interface and start playing.
30. Othello
Tap “
” icon to enter into the game interface. Tap “Start” to start.
This document is for guidance only and does not form part of any contract, and may be subject to change
without notice.