1
Operator's Manual
lcRR.n.!
'
i
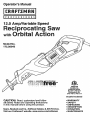
12,0 AmpP,/ariable Speed
Reciprocating Saw
with Orbital Action
Model Noo
172,26043
Double lnsuFated
CAUTION: Read, understand andfo!low
all Safety Rules and Operating Instructions
in this manual before usingthis pmducL
Sears,Roebuckand Co., HoffmanEstates,IL 60179UoS.A.
Visit our Craftsman• webslte:www.sesrs.com/craftsman
• WARRANTY
SAFETY
• UNPACKING
• DESCRIPTION
• OPERATION
• MAINTENANCE
Warranty ................................................................................................................
Page
2
Safety' Symbaf9 ..............................................................................
Safety lnslructions
..................................................................................
Page
Pages
3
4-10
Unpacking ..................................................................................................
Page
10
Description ....................................................................................................................................
Pages 11-t2
Operation .............................................................................................................................
Pages 12-22
Maintenance .............................................................................................................................
Pages 23-24
Accessodes .................................................................
Page 25
Parts List ............................................................................................................................................
Pages 26-29
Sears Repair Parts Phone Numbers .........................................................................
Back Cover
ONEYEAR
FULLWARRANTY
ON CRAFTSMAN
PROFESStONALTOOL
if this Craftsman Professional Tool tails due to a detect In material or workmanship
within one year from the dale of pumhase, RETURN tTTO ANY SEARS STORE OR
PARTS AND REPAIR CENTER OR OTHER CRAFTSMAN
OUTLET INTHE UNITED
STATES FOR FREE REPAIR (OR REPLACEMENT
1F REPAIR PROVES
IMPOSSIBLE),
This warranty does not include
blades,
expendable
parts such as lamps, batteries,
bits or
This warranty gives you specific legal rights, end you may have ether rights, which
very from state to slate°
Seam, Roebuck and Co,,, Heffmen Eslates, IL 60179
SAVE THESE INSTRUCTIONS!
READ ALL INSTRUCTIONS!
ifk WARNING:
some dust creeled by using power toots contains chemicals
known to the State of California to cause cancer and birth defects or other
reproductive harm,
]
I
The purpose of safety symbois is to attract your attention to possible dangers.
The safety symbols end the explanations with them, deserve your careful attention
and
understandlng_ The, symbol warnings DO NOT by themselves eliminate any danger.
The Instructions and warnings they give are no substItules for proper accident prevention
measures°
,-_ WARNING: BE SURE to read and understand all safety instructions in
thls manual, Including
all sefety alert symbols such as "DANGER",
"WARNING"
end "CAUTION".
BEFORE using this too!, Failure to follow all Instructions I_sted
below may result in electric shock, fire and/or serious personal injury.
SYMBOL
MEANtNG
SAFETY
ALERT SYMBOL: IndleetesDANGER,WARNING,
OR
CAUTION, May be used in conjunction with other symbols or ptctographs,
_
ailure toInjury
obey tothis
safety orwarning
WILLAlways
result follow
In death
serious
yourself
to ethers.
the or
safety precautions to reduce the risk of fire, electric Shock
and personal injury.
Z_WARN1NG I
[/_ CAUTION
I!
Failure to
obey tothis
safety orwarning
CANAlways
result follow
tn death
serious
injury
yourself
to others,
theor
safety precautions to reduce the risk of fire, electric shock
and personal injury,
Failure
obey this
MAYdemega_
result In Always
personal
Injury totoyourself
or safety
others warning
or property
follow the safety precautions
to reduce the risk of fire,
electric shock and personal Injury,
DAMAGE PREVENTION
AND INFORMATION
MESSAGES
These Inform user of important Information
andlor instructions that could teed to
equipment or other property damage if not followed° Each message is preceded
by the word "NOTE:" as in the example below:
not
followed,
NOTE:
Equipment
WEAR ¥oeR
andlor
property damage may result If these instructions
ere
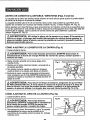
z_WARNING:
The operation of any power tool can result
In foreign oblecte being thrown into your eyes, which coo
l_suit _n severe eye damage, Before begLnnlng power tool
operetlon, ALWAYS wear safety goggles or safety glasses
with slde shield end a full-face shleld when needed.
We recommend e Wide Vision Safety Mask for use over
eyeglasses or standard safety gfesaes wffh side shield,
available at Sears Stores or other Craftsman Outlets.
I
before using this power toot. Failure to follow ell instructions may result In electric
_ WARNING:
SURE persona!
to read and
understand all instructions in thta manual
shock,
fire _nd / or BE
aerlous
injury.
WORK AREA SAFETY
I. Keep your work area clean end well lit. Cluttered
invite accidents,
workbenches and dark areas
2, DO NOT operate power tools in explosive atmospheres,
such as in the presence
of flammable liquids, gases, or dust. Power toots create sparks which may igntle the
dust or fumes.
3. Keep bystanders,
children and visitors away while operating
Distractions can cause you to lose control
4. Make your workshop chlldproof
toots away when not in use
a power
with padlocks and master switches
tool.
Lock
5, MAKE SURE the work area has ample lighting so you can see the work and that
there are no obstructions that will interfere with sale operation BEFORE using your saw
PERSONAL
SAFETY
1,, KNOW your power tool, Read the operator's manual carefully. Learn the tours
applications and limitations, as well as the specific potential hazards related to this tool
2o STAY ALERT, watch what you ate doing and use common sense when operating a
power tool.
3. DO NOT use tool whta tired or under the influence of drugs, alcohol or medication.
A moment of inattention white operating power toots may result in serious personal
inJuP/.
4o DRESS properly. DO NOT wear loose clothing or jewelry_ Pull back long hair. Keep your
hair, clothing, and gloves away from moving parts. Loose clothing, or long hair can be
caught in moving parts Air vents often cover moving parts and should also be avoided
5,, AVOID accidental starling, Be sure switch is in "OFF" positron before plugging in.
DO NOT carry tools with your finger on the switch. Carrying tools wtlh your finger on the
switch or plugging in tools that have the switch in the "ON" position Invites accidents.
6. REMOVE adjusting keys or blade wrenches before turning the tool "ON-,
is left attached to a rotating pad of the tool may resull in personal Injury
A wrench
that
77 Do not overreach. Keep proper footing and balance at all times. Proper footing and
balance enables better control of the tool in unexpected situations.
8. ALWAYS SECURE¥OUR
WORK. Use c[arnps or a vise lo hold work when practical.
It is safer than using your hand end frees both hands to operate tool
g., USE SAFETY EQUIPMENT. Always wear eye protection, Dust mask, non-skid
shoes, hard hat, or hearing protection must be used for appropriate conditions
safety
TOOL
USEANDCARE
SAFETY
Ak WARNING:
BE SURE to read and understand
operating this tool, Failure to follow all instructions
electric shock, fire and/or serious personal injury.
all instructions before
listed below may result in
t
J
t. ALWAYS use clamps or other practical ways to secure and support the
workplace to a stable platform. Holding the work by hand or against your body
is unstable and may lead to loss of conlro!,
2.. DO NOT rome the tool. Use the correct tool and blade for your application.
The
correct tool end blade wf!l do the job better and safer at the rate lot which it is designed.
3, DO NOT usa the tool If switch does not turn it "On" or "Off", Any tool that
cannot be controlled with the switch is d_ngerous and must be repotted
4, DISCONNECT
the plug from the power source before making any
od|ustments
changing accessories
or storing the tool, Such preventive
safe[,/measures
reduce the risk of starling the too acc denla y,
5. STORE Idle tools out of the reach of children and other untralned persons.
Tools are dangerous in the hands of untrained users,
6 MAINTAIN tools wlth care, Keep cutting tools sharp and clean. Properly maintained
tools wilh sharp cutting edges are loss likely to bind and are easier to conlrol,
7. CHECK for misallgnment
or binding of moving parts, breakage of parts, and
any other condition that may affect the tooYs operatlono If damaged, have the
tool serviced before using., Many accidents ore caused by poorly maintained tools.
8. USE ONLY accessories
that are recommended
for this tool. Accessories that
may be suitable for one tool may become hazardous when used on another tool.
ELECTRICAL
SAFETY
/h.
installing
WARNING:
or removing
Do notthepermit
plug
from
fingers
the tooutleL
touch the terminals
of plug when
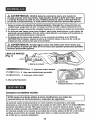
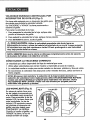
f_,Doub|o Insulated toots are equipped with a
polarized plug (one blade Is wider than the other)_
This plug will fit In a polarized outlet only' one way°
If the plug does not fit fully' in the curtal, reverse the
pIug, tf it still does not tit, contact a qualified
electrician
to lnslatl a polarized outlet, Do not change
the plug In any way.
2° Double Insulation 1Oleltmlnales the need for the
three.Ire
grounded power cord and grounded power
suppfy syslem. Applicable only to Class Ii
(double.lnsulaled}
tools
This tool is a double Insulated
tool.
I Z_
precautions
WARNING:
when Double
operating
Insulation
this toolDOES
NOT take the place of normal
®,,,!
safety
3. BEFORE plugging in the tool, BE SURE that the outlet voltage supplied ts within the
voltage marked on the fool's data plate° DO NOT use "AC onty" rated tools with
a DC power supply
ELECTRICAL
SAFETY cont.
4 AVOID body contact with grounded surfaces, such as pipes, radiators, ranges and
refrigerators., There is an increased dBk of et_ctric shock if your body is grounded
5 DO NOT expose power tools lo rain or wet conditions or use power tools tn wet
or damp locations, Water entering a power tool will increase the risk el electric shock.
6 INSPECT toot cords for damage,, Have damaged tool cords repaired at a Sears
Service Center, BE SURE to stay constantb/aware of Ihe cord location and keep It well
away from the moving blade,
7 DO NOT abuse the cord,, NEVER use the oord to carry the tool by or to pull the
plug from the outlet. Keep cord away from heat. oil sharp edges or moving parts
Replace damaged cords tmmsdialely., Damaged cords increase the dsk of electric shock.,
EXTENSION
CORDS
Use a proper extension cord., ONLY usa cords tfsisd by UnderwritersLaboratories(UL),
Other extensioncords san cause a drop in line voltage, resultingin a loss of power and
overheating of tool,For thistool an AWG (AmericanWire Gauge) size of a leasl 14-gauge
is recommendedfor an extensioncord o! 25oft, or less in length Use 12-gauge for an
extension cord of 50-fL Extension cords lO0-ft, or longer are not recommended.
Remember. a smaller wire gauge size has greater capacity than a larger number
(! 4-gauge wire has more capacity than 16-gauge wire; 12-gauge wire has more capacity
than 14-gauge),,When in doubt use the smaller number.When operating a powertool
outdoors, use an outdoor extension cord marked '_/-A" or "W".These cords are rated lor
outdooruse and reducethe riskof electricshock.
1
l
the cord so that It wlllnot get caught on lumber, tools or other obstructions
while
[Z_
Keep a the
extension
cord clear of the working area. Position
|
you CAUTION:
are working with
power
tool.
Immediately. Never use too! with n damaged cord since touching the damaged
/k
Check extension
cords before
each use,
if damaged replace
areaWARNING:
could cause electrical
shock, resulting
In serious
Injury.
J
1
SAFETY SYMBOLS
FOR YOUR TOOL
The Fabelon your tool may Include the following symbols.
...............................................................
V .................................................................................
,Volts
A..............................................................................
Amps
Hz ...............................................................................
Hertz
W...........................................
................................................
Watts
..............................................................................................
Alternalingcurrent
......................................................................
Directcurrent
n=.........................................................................................
No-leadspeed
I_ ........................................................................
Class II construction.
DoubleInsulated
RPM....................................................... RevolulJoespermiet,,te
SPM
Strokespar minute
OPM...................................................... Orbits perminute
Z_o........................................................................................
Indicates danger, warningor caution.
[! means atlentfonlYoursafety Is involved,
SERVICE SAFETY
1, if any part of this tool Is missing or should break, bend, or fall in any way;
or should any electrical component fall to perform properly: SHUT OFF the power
switch and remove lhe saw's plug from Ihe power source and have the m_ss{ng,
damaged or failed parts replaced BEFORE resumtngeperatlom
2, Tool service must be performed only at a Sears Service Center. Service or
maintenance performedby unqualifiedpersonnel could resultin a risk of injury
3_When servicing a tool, use only Identical replacement parts. Follow Instructions
in the maintenance section of this manual. Use of unauthorized parts or failureto
followmaintenance instructions may create a risk of etectrtcshock or tnJur_,
SAFETY
RULES
FOR
RECIPROCATING
_Keep
hands
SAWS
sway from cutting
area and blade. Keep both
hands on the saw (rear handle and front boot grip). I! both hands are holding
the s_w, the blade cannot cut them_
_
CAUTION:
Blades
coast after saw is switched
off.
]
t Hold tool by insulated gripping surfaces, (rear handle and front boot grip), when
performing an operation where the cuffing toot may contsct hidden wiring or its
own cord. Contact with a 'live" wire wilt make the exposed metal parts of the tool"liw"
and shock the operator,
electrical
wlrlng
may exist. If the situation ls unavoidable, DISCONNECT
ALL
sewarea/workslte
into existing walls
or other
blind areas where
the
BEFORE
sawtng.,
Z_
CAUTION:POWER
DO NOT
ELECTRICAL
to
!
/
SAFETY RULES FOR RECIPROCATING
SAWS cent,
2. KEEP your body positioned to either side of the saw and not In direct ltne
with the saw blade, Counter-fame
(a jumping or kickback action) could cause the
blade to bend or break, and the saw to jump backwards causing loss o! control,
_esulltng In serious Injury.,
3. ALWAYS keep your hands away from cutting area° DO NOT reach under the
materiel being cut because the nearness o! the blade to your hand ts hidden from
your sight,
4. DO NOT use dull or damaged blades. Bent blades can break easfly, or cause
kickback resulting In loss of control and serious injury,
5 When slarllng a cut, lhe speed you use will be determined by the blade and reaterial
you are cutling_ Fast speeds lor soft realerials and slow speeds for hard materials
If the blade speed Is too slow, the saw could chaffer or vibrate at the beglnnlng of a
cut, and posslb_ cause counter-fame (a jumping or kickback action) and vibration,
which can result te loss of control and serlous pemonal injury. Use a stIghtly !aster
speed at the very beginning of your cut. !1 is always a good idea to practice your cuts
in scrap material until you have a Ieal for the cutting and handling perforreance of
the saw.
6. NEVER hold the piece being cut In your hands or across your legs. It ls
important to support the workplace properly tn order to minimize body exposure.
b_de binding, or loss of contro!..
7_ ALWAYS
clamp the workplace
securely
so i! wItt not move when making the cut.
8o ONLY USE the designated blades for cutting the type of materia! for which they
are recommended.
Cutting materlal_ that are NOT recommended could cause blade
breakage and loss of control, resulting In serious injury.
g_ ALWAYS Inspect and remove all nails from lumber before sawing. Following
this rule will reduce the risk of counter*force
(a jumping or kickback
action)
that could cause loss of control that can cause serious personal Injury,
Ir this Is unavoidable,
such as when performing demolition or renovation jobs,
MAKE SURE to use b!-reetal blades lhat are thicker, with 4 Io 6 teeth per inch,
and Bpeoiflcafiy designed to cut wood with imbedded nails. EXERCISE EXTREME
CAUTION when performing this type of cutting operation=
Z_ WARNING:
To reduce the risk of explosion, electric shock, property
damage and serious bodily injury, ALWAYS check the work area for hidden gas
pipes, electrical wires, water pipes, and nail and cleat Imbedded 2 x 4's when
making blind or plunge cuts Into wails during demo!itlon or renovation work°
10. AVOID awkward operations
and hand postllona
cause your hand to move Into the blade.
tl
NEVER
reach Into the cutting
path of the blade,
where a sudden slip could
Z_WARNING:
Some dust created by using power tools contains chemicals
known to the State of California to cause cancer and birth defects or other
reproductive harm. Some examples of these chemicals are:
• Lead from lead-based patnts_
• Crystalline slllca from bricks and cement and other masonry pmductso
• Arsenic and chromium, from chemically treated lumber_
Your risk from these exposures varies, depending upon how often you do
this type of work.To reduce your exposure to these chemicals:
• Work in a wellwentllated area.
• Work with approved safety equipment, such as those dust masks that
ere specially designed to filter out microscopic particles.
Avoid prolonged contact with dust from power sanding, sawing, grinding,
drl!ltng and other construction activities, Wear protective clothing and wash
exposed areas with soap and water. Allowing dust to get Into your mouth, eyes,
or lay on the skin may promote absorption of harmful chemicals.,
/h WARNING:
Use of this tool can generate and/or disburse dust, whtch may
cause serious and permanent respiratory or other Injury. Always use
NIOSH/OSHA approved respiratory protection appropriate for the dust exposure_
Direct particles away from face and body.
ADDITIONAL
RULES
FOR SAFE
OPERATION
Z_ WARNING:
BE SURE to read and understand etl instructions.
Failure to follow all instructions
listed below may result tn e_ectrlc shock, fire
and / or serious personal injury.
]
J
t_, Know your power tool. Read operators manual carefully. Learn the appficalions and
limitations, as wall as the specific potential hazards misted to this tool Following this rule
wtU reduce the risk of electric shock, fits or sedous injury.,
2, ALWAYS wear safety glasses or eye shields when using Uds tool, Everyday
eyeglasses have only impact-resistant lenses; they are NOT safety glasses,
3, PROTECT your lungs, Wear a face mask or dust mask if the operation }s dusty
4_ PROTECT your hearing. Wear appropriate personal headng protection dudng use,
Under some conditions noise from this producl may contribute to hearing ross
5, ALLVISTORS
AND BYSTANDERS
operator of the tool wears.
MUST wear the same sa[ety equipment that the
6, INSPECT the tool cords periodically and if damaged have them repaired
nearest Sears Service Center, ALWAYS BE AWARE of the cord location°
at your
7, ALWAYS check the tool for damaged parts. Before further use of the tool, a guard or
other pad that is damaged should be carefully checked to determine if it will operate
propedy and perform its intended function. Check for misaflgnment
or binding of moving
parts, breakage of pads, and any other condition thai may a|fect the tool's cperatiom
A guard or other part that Is damaged should be properly repaired or replaced at a
Sears Service center
8
SAVETHESE
INSTRUCTIONS.
Refer to them frequently end use them to instruct
others who may use this tool. If someone borrows this tool, make sure they have
these Instructfons atsoo
Z_ WARNING:
Your tool ehoutd NEVER be connected to the power source
when you are assembling
parts, making adjustments,
installing or removing
blades, cleaning or when it is not in use. D!sconnectlng
the sew wtll prevent
accidental
starting,
which could cause serious
personal injury.
|
1
1. Remove the saw from lhe carrying / storage case and inspect it carefully to make sure
lhat no breakage or damage has occurred during shipping,
2, Do not discard any of the packing materials until aft pads are accounted for.
3, Three blades are included; wood culling, ferrous metal cutting, and general purpose
culling (plastic, fiberglass, soft metal). Blades are located inside the carrying I storage
ca_e.
4, If any of the parts are damaged or missing (relar to PARTS LIST below), return the saw
to your nearest Sears store or Craltsm_n outIel to have the saw replaced,
missing
parts are replaced. Failure to do so could result tn possible serious
[ Z_ WARN,NG:
,f any parts are missing,
DO NOT operate this saw until the
personal injury,
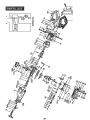
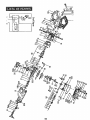
PARTS
LIST
(Fig.
1)
-__'_-_
__o
]
2. Wood Culling Blade
....
,
3, General
Purpose Blade
,1. Metal Cutting Blade
5,,Carrying t Storage Case
6, Operator's Manual
KNOW YOUR RECIPROCATING
SAW
oV the
LNOTE:
Before
attempting
to use
your saw, femlllarlze
petering
features
and snfaty
requirements.
yourself
with all
1
=
Your reciprocating saw has a precision-built electric motor and it should be connected to a
t20-voll060-Hz
AC ONLY power supply (normal household current}. DO NOT operate on
direct current (DC). The large voltage drop will cause a loss of power and the motor wil!
overheat, if the saw does not operate when plugged into correct t20-volt, 6D-Hz AC ONLY
outlet, check the power supply,, This saw has a 10*it, 2.wire power cord (no adapter needed)o
lO
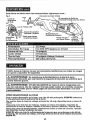
This Reciprocating
Saw has the foliowlng
features:
Craftsman vibra free _" Reciprocating Saws are uniquely designed so that the
reclprocattng md and the counter batance sleeve always move in opposite directions
to each other This design platform virtually cancels out the saw's vibration making
this saw more comfortable and easy Io use, It takes the vibration out of the saw and
pule this energy to work saw+ng and removing matedaL
1 Powerful motor 12.0 Amp and 043000 SPM (strokes per minute) no,,ioad speed
provide sure cuts In wood, woodbase building materials, plastics, fiberglass ferrous
and non-ferrous metal pipe. tublng and nails, with 3 different blades Included,,
2 Four Position Orbital Action
The cor_trol switch regulates the 4 cutting modes of the saw
0 SMOOTH minimal splintering, normal up and down blade motion., NO orbital action.
1 LOW for culling most metals, few orbital acttom
2. MEDIUM for cutting plastics+ hardwood, medium orbital action.
3 FAST for maximum orbital action, use for fast cutting in plywood, softwoods,
3, Variable
speed allows matching
cutting speed to blade and material,
4 Two finger variable speed trigger switch
pressure you apply to the trigger switch+
5 Full 1+h-inch
contmis btade speed by the amo_Jnt of
blade stroke for fast cutting and extended
blade life..
6+ Tool+less blade clamp features lever action collar for easy, fast blade changes_
Uses universal 1/2-in shank blades+
7 Adjustable
length / pivoting shoe Ior maximum control on workpiece in a variety of
cuts+ Adjusts by pressing in on yellow button betow pivo!Ing shoe_
B LED workfight comes on when trigger switch is turned on, Llluminetes cutting area for
better vlstbtliiy+
9 Easy-to-grip front boot and rear handle design wlth molded
provide maximum control, balance and comfort.
in comfort
grip
f0 Permanently lubricated bearings for smooth operation and long fife.
11 Uses universal 1/2-inch shank blades
Includes 3 blades: 1 blade for last wood cutting. 1 for smooth cuts in ferrous metal,
pipe, and tubing, and 1 for cutting solt metal+ plastics and libergiass
12 Impact resistant
handitng,
13 Includes
housing
helps protect saw from damage,
rugged storage/carry
reduces weFght ior easier
case.
• vibr_fr0ets on_ya tf_dem_,__,nd¢.aniesr,o expti_:il
or impliedclaimas Io tile vthrgt+on
reduclionoi Iho product.
11
ThisReciprocating
Sew
hasthefollowing
features
Rgo2
cent+:
Orbtt_lAction Switch
B_do
Two Fing_r Vadable
Speed Trlg_r Switch
R_ar Hat, die
wtth Soft Grip
i Rating
12.0Amps
No_oad
Speeds
Blade Stroke
....
Orbital Action
.....Blade
...........
0 to 300D SPM
i v4-incl_.............................
4 Position
Type
1/2-In,
Input
Universal
Shank ...................
120 volt, 60Hz AC
NOTE: Before
attempting
to use
your tool, familiarize
operating
features
end safety
requirements,
yourself
with all of the
!t
t /_
WARNING:
D° n°t letfree|Ion
famtl|er'ty
y°uris t°°i
make to
y°ucause
careless"
Remember
that a careless
of a with
second
sufficient
severe Injury.
I
i
i
Using any other blade could result In an accident caustng serious
See page 25 for designated blades and recommended uses,
SELECTINGTHE
injury,
BLADE
For the best blade performanceand longerblade It|e,ALWAYSselect the proper blade
for your sawingapplication.
There aremany types of 1/2_tn,.universal shank btades availablelor your reciprocatingsaw:
Blades lot cuttingall types of wood, netl._mbedded wood, woodbase buikling
matedats, non-ferrous and ferrousmetal, ptasfies end fiberglass.
Blades for scroll culling,roughing-in, and cuttingcontours.Many blade lengths
are also available.
ALWAYS choose s blade length long enough to extend beyond the shoe and your
workplace, throughout the cutting stroke (see page 1B).
12
SAW
BLADES
Allsaw blades need to be kept clean, sharp and properlysat _norder to cutefficiently.
Using a dull blade places a heawt load on the saw and increases the danger of
counter-force(a jumping or kickback action).Keep extra blades on hand, so sharp blades
am always available.Gum and wood pitchhardened on the blade slowsthe saw down.
Use gum and pfLchremover,hot water or kerosene to remove them° DO NOT use gasofine_
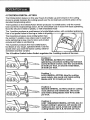
BLADE INSTALLATION
AND REMOVAL
This saw is designed to use all 1t2--tno
universal shank btades.,
I
_ WARNING:
BE can
SURE
to wear
protective
work gloves while handling a
saw
blade.The blade
Injure
unprotected
hands.
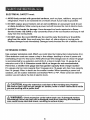
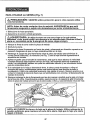
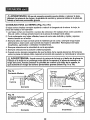
TO INSTALL BLADE (Ftgure 3 and 3a)
f Unplug the saw.
[Z_
WARNING:To prevent personal Inlury, ALWAYS disconnect
power soume BEFORE assembling parts, making adjustments or
the plug from
changing blades.
2, To Install the blade, extend the shoe away from the blade clamp for easier access
(see Page 15. Fig. 6)o
3 Locate the lever action cellar and titt collar up, (see arrow on collar, Fig, 3)_
4 With collar"up" in raised posilion, install shank of 1he saw blade into the blade ciamp
(see Fig° 3 and Fig. 3a),,
5. Release the collar, and the blade should be securely locked Into the biade clamp,,
Pull the blade to make sure it is locked in _lace
g"
E_L._
e Cbmp
NOTE: The Universal shanked blades only install one way, with the blade's shank
installed into the blade clamp, with saw teeth down (Fig. 3 standard use) or saw
teeth up (Fig. 3e for special applications sea page 21).
TO REMOVE BLADE (Figure 3)
1. Unplug the saw,
t extremely
_ WARNING:
hot.
Never touch blade Immediately after use as It may be
2..Whenremovingthe blade,exlend the adjustableI pivoting shoe awayfrom the blade clamp.
3. Locateindeni witharrowon side of Ieveractioncollar(see Fig 3)
4. Pull up on collarat _ndentandholdup.This loosenstheblade ctamp and enablesyou
to pul/the blade out of theclamp.
13
I
1
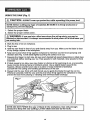
VARIABLE
SPEED
CONTROLLED
TRIGGER
SWITCH
(Fig,4)
Your saw is equipped with a twe-I_nger trigger swtlch
that conlrols the variable speed.
The saw is turned "ON" or =OFP by squeezing
releasing the tdgger.
Fig. 4
or
To vary the speed o! lhe blade:
1, To Increase blade speed, apply more pressure
to tdgger switch..
2. To decrease blade speed, apply less pressure.
J
3,. TO STOP the saw release the trigger_
and workplace) at the very beginning of a cut.Then Increase speed once the cut
I Z_ CAUTION:
Use the appropriate slower speed (for your cutting application
Is sfmrted.Prolonged use st a very stow speed may damage your saw.
!
I NOTE:
ALWAYS
allow
blade
come
to a complete stop before ramovtng it
from the
workplace
or the
laying
thetosaw
down.
J
CHOOSING
THE
CORRECT
SPEED
The speed you use wilt depend on the type of material
you are culling
I Use high speeds for cutting wood and woodbase materials
2. Medium speed is best for culling non-ferrous metals, plastics and fiberglass
3 Low speed is recommended
for cutting ferrous metals, iron pipe and angle iron
NOTE: Material thickness and blade selection will also affect your speed selection.
As a general rule, use FASTER SPEEDS and blades with !ess teeth per Inch for
softer materials. Use SLOWER SPEEDS and blades with more teeth per inch for
thicker, more dense materiels.
LED WORKLIGHT
(Fig.
5)
Rg,5
Your reciprocating saw has
a butit-in worklight lor better
visibility when cutttng_ To turn
on the LED worktight, the saw
must be phJgged in. The LED
workltght comes on when the
two-linger trigger switch is
squeezed to turn the saw "ON".,
When the trigger is released
and the saw is turned "OFF".
the worklight goes ouL
!4
1
/
t
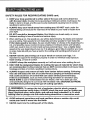
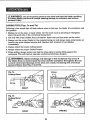
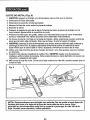
THE ADJUSTABLE LENGTH / PWOTING SHOE (Figs, 6, and 6a)
The saw's shoeslides in or out to adjust the b{ade's depth-o{_cui into tile workplace,
The si_oealso pivotsin order to keep as much of lhe shoe's surface as possibleIn conlaot
with the workpiece (Fig,,6a and see Page f 4. Fig, 5),,
These adjustments are impodantIn lhat lhey providemaximum control against the
surface being cut, optimizing blade life and reducing the blade's protrusionbeyond the
and of the shoe, suchas when curlinginto larged}ameter pipe or into walls (see Page 20.
Fig.g),
Z_ WARNING:
DO NOT operate the saw without the shoe In place, If the shoe
Is not in place the spindle shaft (reciprocating
mechanism) could strike the
workplece and damage the saw, causing loss of control resulting in possible
serious personal injury.
ADJUSTING
THE
LENGTH
OF THE
SHOE
(Fig.
S)
1. Unplug the saw_
Z_WARNING: ALWAYS hold the saw by the insulated boot on the front houslng.lf
you sow into a blind area where live wiring exists, you may be shocked or e_ectrocuted.
It is always recommended to shut power off to blind areas you are sawing Into,
2. Locale the yellow bulton on the saw jusl below tile
pivoting shoe,
,3 Press in on bulton while either pulling or pushing tile
adjustable shoe
Rg. 6
Mc,v_s ta or out
4 As soon aS shoe is positioned to length, is! go of
button and shoe will be _ocked in posillon,
5. Plug in saw and slowly squeeze the trigger to be sure
the blade ALWAYS extends beyond Ihe shoe and the
workp{eca during the cutting slinks
z_WARNING:
To reduce the rlsk of tn|ury, be sure the BLADE EXTENDS BEYOND
the shoe and el!lthe way through the workpfece throughout the stroke, (see Figs. 7a
and 7b), Blades may shatter, bend or break if the blade hits the shoe or hits the
workplace at an angle that Is nearly he,_d on (see Figs. 7a and 7b).
ADJUSTING
THE
PIVOT
OF THE
SHOE
(Fig.
6a)
I, Unplug the saw.
Ftg.6a
Z_WARNING:
To prevent personal lnlur=t,
I ALWAYS disconnect the plug from power source
I BEFORE assembling
parts, making adjustments
Lot changing blades,
2 Firmfy hold saw and "pivot" the shoe, keeping as
much of the shoe's surface up against the
workpiece as pesslblewhen cutting.
15
Pivols
4 POSITION
ORBITAL
ACTION
The Orbital Action feature on this saw thrusts the blade up and forward on the cutting
stroke to greatly increase the cutting speed over the normal back and Forth action of the
slandard reciprocating action,
The O position on the Orbital Aclion Swilch produces no orbital action, only the normal
back and forth (reciprocating)
action, for lhe smoothest cuts in wood with least splinleringo
Good for all cuts in metal or plastic, or nail embedded wood
The 1 position produces a sinai! amount oF orbital blade action, with controlled splintering
Use to cut pocket holes in flooring or holes in drywall.['---The 2 position produces more orbital action than
|
the number t position, Use where cuts in wood wlth |
some splintering is okay Use for door and window
|
cutouts and holes insub-flo0ring,
The 3 position produces the most orbital action,
but leaves a very rough, splintered finish. Use this
speed when you need the fastest cutting. Ideal for
demolition and tear out jobs
The 4 Position
Orbltet Action
Switch regulates
///
/(Z---...._
/__'_,,_
//.F_/_i_
"_'_'_,
))
/_
/
_'i
i I
| I
t/ 1
t,/ i
I
_
I
_
I
_ ./
LLT_.
the 4 cutting
-_------_
_//_
/ J_
"_ _//
//
/1
[
//_ 1/
modes of the saw,
Position 0
NO ORBITAL ACTION. For minimal
splintering, smoothest cuffing. Normal back
and forth blade motion. Use fine wood blade,
20 teeth par inch, or smooth metal blade,
36 teeth per inch°
Posltton I
LOW ORBITAL ACTION, Ideal for cutting
most metals. Use wood and metal cutting
blades with 10-t2 teeth per inch,
Position 2
MEDIUM ORBITAL ACTION. Ideal for cutting
most plastics and hardwoods, Use wood
and metal cutting
blades with 10-12 teeth
per inch.
Position 3
FAST I MAXIMUM ORBITAL ACTION. Use for
fastest cutting in plywood, soft woods end
wallboard. Use wood. metal and wallboard
cutting blades with 8, B,12 teeth per inch,
16
I
I
I
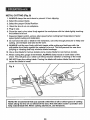
USING
THE
SAW
(Fig., 7)
I Ak CAUTION: ALWAYS
wear eye protection
i c!_mped
OTE: Before
cuttingslipping.
any type of material,
to prevent
while operating
BE SURE
this power tool.
It ta firmly enchored
or
]
I
1o Select the proper blade
2. Select the proper orbital action.
,_ WARNING:
If you saw into a blind area where live wiring exists, you may be
l
shacked or eleetrocuted_ it Is always recommended to shut power off to bffnd areas you
are sawing into.
J
3+ Mark the t_na of cut on workp+ece.,
4 Plug in saw
5+ Hold the saw firmly in front of you and ctea{_ away from you. Make sure the blade +sclear
of any foreign objects tn the workpiece.,
6 Keep saw's pivot shoe firmly against workpiece to minimize counter+force (jumping) and
vibration (see Fig+ 7) with brads lightly touching the surface to be cut+
7 Squeeze Ihe trigger to alert saw, let saw reach desired futl speed (depending on blade type
and material) before start+ng your cut, Fast speeds for self materials+ slow speeds lot hard
materials,
8 If blade speed is too slow, saw may chatter or vibrate at the beginning ot cut, and possibly
cause counter+tome ( umping or klckback action) Use a sfightly lm'.oterspeed tf this
happens. Atways practice your cuts on apiece of scrap material to familiarize
yourself with the cutting and handling performance o1 the saw+
9, Always hold the saw lirmly with both hands as you guide the blade through the cut line,
Whenever pose+hie, hold the saw and the pivot shoe firmly agatne_ the workpiece to help
prevent the saw from jumping or vibrating and mfnimtze brads breakage
Fig. 7
NOTE:
saw or Let
blade
the workpteca.
pressureDOtoNOT
keepFORCE
lhe sawthecuffing°
the inblade
and saw doUse
the only
work.enough
17
]
[
In broken blades and loss of control, causing damage to werkp|ece end serious
AWARNING:
personal tnJury._ Use of excessive pressure can bond and twist the blade, moult|rig
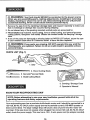
SAWINGTIPS
(Figs.
7a and 7b)
Following a few simple tips wlg help reduce wear on the saw. the blade, the workplace and
the operator,
1 Blades cut on the draw, or back stroke On fine work such as paneling or fiberglass.
place the good side of the workp_ece lacing down
2 Cut only with sharp blades;
lhey cut cleaner, faster and put less strain on the motor,
3. Always use the correct blade for the material being out and akvays keep extra blades on
hand to use when blades become dull Replace dull. cracked or bent btades
immediately.
4. Ahvays select the prope!r cutting speed,
5oAlways select the proper Orbital
Postton,
6. When cuging, always make sure that the shoe plate ts resting f_rmty against the
workpleco, This wil! Improve operator control and mfnimfze vibration°
Z_ WARNING:
Blade breakage end damage to the workpiece may occur if
the blade does not extend past the shoe and the workpfece throughout
the cut.
Loss of control and damage to the shoe can result, Increasing
risk of serious
personal Injury (see Fig. 7a and 7b)o
Fig,7a
Jl
Cutting Wood
:
' RIGHT
Stroke
_1
I
|
.!
I_ WRONG
Stroke
Stroke
WRONG
RIGHT
1B
I
I
WOOD
CUTTING
! ,,ALWAYS
(Fig.
8)
c_amp the workpiece
down to prevent it from s_ipping,,
2. Select the proper blade.,
3. Select the proper Orbital Position
4., Mark the line of cut on workplace,
5.. Ptug in saw.
6. Place the saw's pivot shoe firmly against the workpiece
the surface to be cut,
wi{h the btade fightly touching
7. Squeeze Idggar sw_lch, bflngtng the blade up to the appropriate srower speeds when
sladlng the cut,before appiying pressure to blade and workplece (laster speeds tor
soft woods, slower speeds for hard woods
8. Do net torce Ihe saw or blade in the workptece, use only enough pressure to keep saw
cuffing Let the blade and saw do the work,
g.. ALWAYS hold the saw fltmty with both hands whiie cu;ttt_g.. Always hold saw with tile
adjustable shoe firmly against the material lo be cut This will prevent the saw from
jumplng or vibraiing and help mlntmtze blade breakage.
10. Practice on a scrap piece ef wood, similar to your workplace,
the saw's performance.
until you get a feel for
Fig_ 8
NOTE: Wear gloves If cutting
z_WARNING:
I
[
To reduce
]
for long periods,
the risk of Injury,
BE SURETHE
BLADE EXTENDS
BEYOND the shoe end all the way through the workplace throughout the stroke
(see Page t8, Figs. 7a and 7b), Blades may shalter_ bend or break If the blade
_he
shoe or hits the workptece
at an angle that is nearly head on,
19
METAL
CUTTING
(Fig. 9)
1, ALWAYS clamp the work down to prevent il from sfipplng
2, Select the proper blade..
3+ Select the proper Orbital Position+
4, Mark the line el cut on workpfece+
5, Ptug in saw+
6_ PEace the saw's pivot shoe firmly against the workpieee
the surface to be cut.
with the btade lightly touching
7. Squeeze trigger switch, using a slow speed (when cutting hard materials) or faster
speed (when curling soil materials),
8 Do not tome the saw or blade in the workpiece, use only enough pressure
cutting Let the blade and saw do the work,
to keep saw
9+ ALWAYS hotd the saw lirmly with both hands while cutting and hold saw with the
adjustable shoe firmly egatnst the matertal to be cut. This will prevent the saw from
jumping or vibrating and he?p minimize blade breakage..
10. Use a liner blade for ferrous metals and a coarse blade for non,ferrous metals_
11+ When cutting thin gauge sheel metals, ALWAYS clamp wood on both sides el Ihs
sheet. This wtit give you a clean cut without excess vibration or tearing of the metal
!2. DO NOT force the cutt+ng blade. Forcing the blade w+Ureduce blade ISleand could
cause the blade to break.
Fig, g
fluids along the line of cut ahead of the saw.This
wil! allow easier operation and
NOTE:
We recommend
that you
spreed
a thin film
oil or other types of cutting
help extend
blade life, When
cutting
aluminum,
useof kerosene,
2O
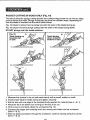
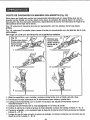
POCKET
CUTTING
INWOOD
ONLY
(Ftg.10)
This saw is ideal lor plunge cuttingdirectly tnlo surfaces lhal cannot be cut from an edge,
such as floors end wails. Plunge cuttingcan be done two dillerent ways, depending on
how Ihe blade ts insertedinto the saw's blade clamp,,
Fig. !0 columnA showshow to plunge cutwtlh lha teeth of the blade lacing up_
Fig. 10 columnB showsplunge cuttingwith lhe teeth of the blade facing down,
DO NOT plunge cut Into metal surfaces.
Teeth
down facing
towage
bottom of
2Y
2
_i ¸¸'¸
! .. Measure the surface to be cut and mark clearly with a penctt_ scriber
2, Insert proper blade In blade clamp and tfghlen securely
or chalk
3, Set the too{with one edge of the tootplate
(seeA
firmly against the malarial
-B,
1}..
4 Place the tip ol Ihe blade (not running) on the line !o be cut..
5. Tilt the saw so the blade clears lhe workplace (Fig t0}.
6o Squeeze lhe tdgger and carefully
(see A - B, 2}
7. Afler the blade penelrales
(see A - B, 3},
lower the moving saw blade into the workplace
lhrough the workplace,
2t
continue
sawing
along the cut line
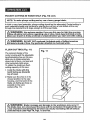
POCKET CUTTING IN WOOD ONLY (Fig_ 10) cant,
[NOTE: To make plunge cutting easier, use a heavy gauge blade,
]
|n thickor very hard materials, plunge cuttingshould not be altempted_Pockelcutting in
suchmaterialsshould oniy be done by starting thecut from a hatedrlfledal_the way
through the material thatis large enough tofit the saw blade.
I
Follow all safety instructions regarding use of shoe, blade type and blade stroke.
Z_
WARNING:
use
extreme
caution
if you usa
this saw for
light
tree pruning.
Make
sure branch is
firmly
anchored
or attached
beforeyou
start
endwhile
cutting. 1
Z_ WARNING:
DOtime.
NOTPay
CUTparticular
overhead.
Anticipate
path of falling
and
debris ahead of
attention
to overhead
wires.branches
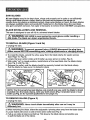
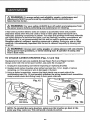
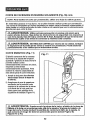
FLUSH CUTTING (Fig, 1t)
J
l
Fig. tl
The compscl design of the
motor housing and the adjustable
tengthlpk_oting shoe on this sew
allow you to make extremely
close cuts in floors, corners and
other extremely tight areas,
To obtain the maximum flush
cutting capacity of this sew:
1 install the blade with the
teeth facing up (towards
top of saw),
2 Make sure the shoe is in tls
closest position to the saw
housing, and the teeth of the
blade are facing as close as
possible to the work
sudece (Fig_ 11)o
A_ WARNING:
Blade breakage and damage to the workplace may occur If
the blade does not extend past the shoe and the workplace throughout the cut.
Loss of control and damage to the shoe can result, increasing risk of serious
personal Injury (see Page 18, Figs. 7a and 7b).
2.2
I
1
Z_ WARNING:
To ensure safety and reliability, repairs, maintenance and
adjustments MUST be performed by e qualified sen/Ice technician at a
Sears Service Center.
WARNING:
the power source
For your safety, ALWAYS turn off switch end unplug saw from
before performing any maintenance
or cleaning°
has been found that ereclric toots am subject to accelerated wear and possible
)remature failure when they are used to work on fiber glass boats and sports cars,
wallboard, spackling compounds or pfasier, The chips and grindings from these materials
are highly abrasive to electrical tool parts, such as bearings, brushes, commutators, etc.
Consequently,
it is not recommended
that this tool be used for extended work on any
fiberglass material, wallboard, spackling compound or piaster. During any use on these
materials, It ts extremely Important
that the tool is cleaned frequently by blowing wilh
an air Jet.
WARNING: Always wear safety goggles or safety glasses with side shields
during power tool operatlons_ or when blowing dust. I1 operation is dusty, also
wear a dust mask.
TO CHANGE
CARBON
BRUSHES
(Figs.
12 and
12a)
Replacement brush sels are available through Sears Parts and Repair Centers,
Atways order with the correct part number, see paris list on page 27.
1..Unplug the reciprocating saw before inspecting or replacing brushes
2.. Replace bolh carbon brushes when eilher has less than 1/4-ira length el carbon
remaining, or if the spring or wire is damaged or bumed_
3. Using a slotted screwdriver, remove the black plastic cap on each side o! the
reciprocating saw (Fig. !2) and carefully withdraw lha apringJoeded brush assemblles_
Keep brushes clean end stiding freely in their guide channels
Fig. 12a
NOTE: To reinstall the same brushes, make sure the brushes
same way they came out, This will avoid a break*In period.
23
go back in the
TO CHANGE
CARBON
BRUSHES
cont_ (Figs.
12 and
12a)
4o Insert new brush assemblies into guide channels, with the carbon part going in first,
being certain to fit the two metal "ears" into their stets tn the channe_ (Ftg- 12a},
5, Remember to replace bolh plastic end caps Biter inspecting or servicing brushes
Tighten the caps snugly, but do not over-tighten.The reciprocating saw sheu]d be
allowed to "RUN IN" (run at no load wtlhout a bYade) for 5 minutes before use, lo seat
Ihe new brushes properly,
ROUTINE
MAINTENANCE
WARNING:
DO NOT at any lime let brM_efluids, gasoline, petroleumbased products, penetrating oils, eteocome In contact with plastic parts.
Chemicals can damage, weaken or destroy plastic, which may result in
serious personal Injury.
Periodicmaintenanceallowsfor long life and trouble*free operation A cleaning,
lubrication end maintenance schedugashould be maintained, As a common
preventive maintenance practice, follow these recommendedsteps:
I Z_
the WARNING:
power source For
before
yourperforming
safer, ALWAYS
any maintenance
turn off switch
or cleaning.
end unplug saw from
t. When work has been completed, clean the tool to allowsmooth functioning of the tool
over time,
2 Use clean damp cloU_sto wipe the teoL
3 Check the state of all power colds.
4 Keep the motor air vent openingsfree from oil. grease and sawdust or woodchtps,
and store toolin a dry place.
5 Be certain that all moving palls are welt lubricated,particularlyafter lengthy exposure
to damp andlor dirty conditions
LUBRICATION
Your Craftsman" Professional Reciprocating
Saw has been properly lubricated and is
ready to use. No lurther lubrication is needed under normal operattng condttlens,
All bearings in the saw are lubricated for the lile of the tool
24
1
1
[Z_recommended
WARNING:for The
attachments
or accessories
areInnot
this usa
toot of
might
be dangerous
and could that
result
serious
J
injury, /
Sears and other Craftsman outlets have a large selection of rectpmcaling saw blades
in a variety of blade tengths and teeth per inch that are ideal for a wide vartety of
cutting appf_catIons,
ALWAYS usa the shortest blade suilabla for your _eb, but long enough to keep the
blade culling through the material
/
during
usao During operation,
longer blades may vibrato or shake, causing toss
are more
likely serious
to bend personal
and become
and
possible
Injury, damaged
I Z_
CAtYrlON:
blades
of control,
damage Longer
to workpleee
The material you are cutting delermines
1
/
lfle type o! blade to use..
Generally, tess teeth on ;he blade removes more material
a rough finfshed cut
quicker, but produces
More teeth cut slower but smoother.
Use a blade that is slightly larger (longer)
Wider (thicker)
that the depth of the material
you are cutting_
blades are more durable and ideal for tougher lobs like demolition.
When cutltng wood that has embedded nails, use hi-metal blades that are specifically
marked on the bfade or packaging that they are suited for this purpose,,
Sears and other Craftsman outlets also have a large assortment of clamps, sawhorses,
safety equipment, groves, extension cords and other equipment to harp you with
sit your sawing needs
Visit your loca! Sea;s store or other Craftsman
Z_ WARNING:
outlets or shop seers comJcreftsman,
Blade breakage and damage to the workplace may occur If
the blade does not extend past the shoe and the workplece Ihroughout
the cut,
Loss of control and damage to the shoe can result, Increasing rtsk of serious
personal injury (see Page 18, Figs, 7a and 7b),
25
I
I
l
w
26
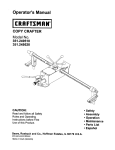
RECIPROCATING
........
item No.
..... i
"
2
3
4
5
6
B
g
.......10
11
_2
t3
14
15
2oi
IB
19
20
21
22
23
24
25
202
SAW - MODEL NUMBER 172.26043
P_rts'No.
P_rt Descdptlon
PSR120S*2 ............... Omanlent Cover
GGT480PU*38
CordClamp....
PES360U-24
Screw
PSR120S=5
Cable Ptolaclor
PSR12BS,-6
......CordAndPtug
PDIBOOSU-5
Screw
PSR120S-9
Screw
PSR 120S-,10 ..................
PSR 120S-! I
pS,R,!,,20S-I
2
PSRtBOSV*13
PSR120S-14
PSRt20S-15
PSR120S-201
PSR120S-1B
PSR120S-t9
......
PSR120S-20
PSR120SV-21
PES360U-27
PSR120S-24
PSR_20S_25
PSR120S*202
26 ............
PSRtBOS-26
27
PSR120S-27
2a ....... PSR120S-2B .........
......P.g
...PSRi20S-2g .............
::",
30
PSR120S-30
3I
PsRt20S_3_
32
PSR120S-32
33
PSRt20S_3 .................
34
, PSRI20S,,34
_5
CDT218GU-41
203
PSR120S-203
_
3B
PSR120S-36
37
.F_:SR120S_37
38
PSR120SV*38
..........
39
PSRI20SV<_9
40
PSRI20SV-40
........
41
PSR120SV'4,1
.....
PSRtBOS-.42
42
43
PSRI_2OSV.-43
44
CGT t B;3UA-,46
4,s,
4B
Qty,........
I
I
I
4
I
I
6
4
t
I
' PSR_2Os:1
.......................
_, _ Ri_ht,H_,_,:
......
PSR!20S,,45
PSR12OS,*46
,
Switch
InnerWire
InnerW_m
Screw
Terminel
fnnorWire
9rush HotderAssembly ' ............
I
4
2
2 ...........
, ....
ca_on,e_sh(Pa!r_
......
1
Brush,,Cover
2
.......
Rated Lab!e
Staler
Screw
Baffb
,, ,
Beating Sleeve
Rolor
,
,
Ba_lBeating
.....................
Dust P_oe!
Armature
Fla!al,n,!ngR'Ing ....
Ford R{ng
Retaining R{ng...................
Bear;ngCover
...............
Ball Beating
.............
Washer
ScrewAssembly,,
eaS_ prate
,
Botlom Cover
Ball 8ez_r_n,_
A!_mof
Nul
S_dn9
..... '
W _her
Gear Sot
Cushion
,,
I
1
!
1
1
f
1
t
6
t
1
:1
t
.............
1
1
.....................
CompressJort Sp_n_
27
,,,
1 .......
1
Gea,r,,C,ose
.............
S,upport
Pin
, ......
Rfn 9 .....
1
1
2
1
1
1
............
1
1
! ...........
2
RECIPROCATING
Item No.
47
.....
Port= NO.
PSR 120S-,47
48
49
PSR't28S,..48
PSR120s_Ig
50
51
part Oeecr,iptlon
Cylindr',cal Pin
Q,ty*,
1
4
1......
PSRt20S-50
Push 8otlon
I ....
PSRt2gS-102
Screw
52
PSR120S-52
Torsi55_,| Spring
53
PSR 120S-53
Sp_nner
54
F'SRI20SV-54
Retatnifig Ring
55
PSR120S_55
S_ppoM BmcketAssemb_,
57
pSR!20E_7
Batl Bearing
5B
PSR120S-58
Beating COvet
59,
60
PSm2Os:s,_
..............................................
screw
61
PSR120S.GO
PSR120SV.61
62
PSR120S_52
.......................
63
GGT4501U-50
64
.
.............................
E Ring
P,ubber s'k_eve ......................
.........
t
I
1
,
N_dtaB_adn
I
I
.........
1
3
Tmns_orrmtion Ring
Pinion Shzd! Se!
'
, ,
.....
1,
t
DCOmpOnent
'
Relaln_ng R}ng
Screw W_het
Pres_ P_le
1
65
204
PSRi20SV-204
66
PSR120SV-GB
67
PSR 120S..67
Reciprocating Shalt
0il SGai 8aadng
6B
PSR120S..68
Se_t Gasket
I
69
PSRt20S-69
Fe_ Sea|
1
70
PSRi20S-70
71
PSRtEOS-71
Seat Ring
' F'ait Seat
1
1
72
PSR120S-72
trpmol Pstch
1
73
PSR120S-73
Atrproa! Ring
1
74
PSR120S-74
'_'pring Pin
75
PeR i20S,.75
.
Carder Base
76
GDTIOgGU-2B
_
St_aJ Ba_l
77
PSRi20S-77
7B
205
. PSR120S-78
PSR12gS-205
........
.
i
PSR1EOS-IOB
PSRIEOS-.65
79
.........
,
'
ASSembly
Reciprocaior'Sat
4
1
.....
1
.....
1
2
1
.
1
_
1
C_,rrfe r Cam
,
PSR_2os_79
1
Pin,
,
Angle Bracket
'
1
1
'
RO_'t Guide ASsembly
.....
1
BO
PSR120S_80
B1
PSR120S'-8'I
B2
PSR120S,82
Screw Assembly,
4
B3
PSR120S-83
Washer
4
PSRi20S_4
E Ring
4
top'
1 "
B5
......
SAW - MODEL NUMBER 172.26043
86
Copper Cap
_
PSRt20SV_5
'
PSR'_20S.8'6
................
I]7
At_roof
'
'
...........
PSR120S*S7
Ring
1
Pend_m
I
Pb_B
......
89
PSRt20S-ag
...........
Outer Flange
Cover
PSR'tEOS-gD
......
Cbmp
.
PSRI_2OSogl
Pin
28
1
RQvok,o Pin
PSRI20S-aB
gt
.
Covei .......
B8
gO
2
"
Leve,r
1
I
.
1
1
,
RECIPROCATING
item No,
92
g3
94
95
g8
97
98
SAW - MODEL NUMBER 172.26043
Parts No,
PSR120S-92
PsRi20s-93
PSR120s-g4
PSR120S-g5
PSRI20s*g6
PSRt20S+97
PSR120S-g8
...........
9_..............
psm2osw9
100
1Ot
102
103
iO4
105
106
107
PSR120S-100
PSRI20SV-1OI
PSR120S*I02
PSR120S-t(}3
PSRt20S-104
PSRt20SV405
PSRI20SV*10B
PSR120SV.107
........!oe
109
swsT.31.t-oo
PSRI20SV*lOg
.....!+o.........PSR_20SV-1+O
111
,
Part Description
................
Holbw Pin
Compress!onSpring
Cytif_drIcalPin
, ,Spindk_Shaft
.............
A+rprea!
n+ng
1
Compression Spdng
Press B_ck
. Press Pla_
Power SupplyBo_d
Brand Lat]e|
Screw
Washer
TorsionalSpfln_
Counte_t,'atght
Middle Cover
Pin
ScrewAsssmbFi
Washer
O+tSe=8o..._
PSRt20S-109
Screw
29
Qty.
1
1
1
! ....
2
1
t
1
1"
1
4
1
i.
t
3
4
I
,
,,:,,..........
,£,:
2
NOTES
30
Manual del Operador
t;n
0 ',
s s , o ,,
Ll
12.0 Amperios / Velocidad variable
Sierra de Vaiv_n
conAcci6n Orbital
Modelo No.
172.26043
Oobre Aisfamlento
PRECAUCION:
Lea, comprenda y stga todaslas
Normas de Segurtdad e tnstruccfonesde Operaci6n
en este Manual antes de usar este producto,
Sears, Roebuck and Co,, Hoffman Estates, IL 60179 EE.UUo
Vea nuestro sltIo web de Craftsman,:
www.sears.com/craffsman
GARANT_A
SEGURIDAD
DESEMPACADO
DESCRIPCJON
OPERACI6N
MANTENIM|ENTO
Gatantia ....................................................................................................................................
P_gina
32
Stmbotos de Seguridad .......................................................................................
P_Sgina 33
lnstruciones de Seguridad ................................................................ Paginas 34-40
Desempacado .........................................................................................................
P&gina
40
Descripcidn ......................................................................................................................
P_g[nas 4t-42
Operaci6n .................................................................................................P>nas 42-52
Mantentmiento ......................................................................................................
P_ginas
53-54
Accesorios ......................................................................................................................
P,Sgina 55
Lista de Partes ...................................................................................................................
P,_ginas 56-59
N0meros deTel_fono de Partes de Repuesto de Sears .....................
Contraportada
GARAN'HA DE UN AI_O COMPLETO SABRE PRODUCTOS
PROFESIONAL CRAFTSMAN
Sf este productopmfestonalCraftsmanfairs debldoa detectos en el material omano
de obra entre unafro desde la fecha de compra, REGRI_SELO a LATtENDA
O CENTRO DE PARTES¥ P|EZAS DE REPUESTOS U OTRO PUNTO DEVENTA
CRAFTSMAN MAS CERCANO EN LOS ESTADOS UN|DOS PARA REPARACI(_N
GRATIS {O REEMPLAZO St ES IMPOSIBLE REPARARLA).
Esta garantfa no incluys partes desechables tales coma _mparas, piles, braces u
hojas_
Esta garantfa b otorga derechos legalesespeclflos yes posstblsqu usted tenga
arras derechos, los cuales varfan de un estado s otto,.
Seam, Roebuckand Co... Hoffman Estates, IL 60179
IGUARDE ESTAS INSTRUCCIONES!
i LEA TODAS LAS INSTRUCClONES!
/_ ADVERTENSIA:
Algun potvogenerado par el use de herramtentaa
elSe|rices conttsne qulmlcos conocldos par el estsdo de California par causer
cancer y defectoa de naclmiento u arms defectos pars fe repmducct6n.
32
]
]
Et prop6sitode los sfmbolos de seguridsd es Ilamar su atenci6ncon respectoa los posibles
pc!lares.Los simbofos de seguddedy la expitcacI5nde sues merecen ¢utdadosa etenci6n
y comprensi6n. La advertencia de !as slmbo!osNO elimine ning_npeligroen sL Las
tnsfruccionesy a@_ertenciasque bdnden no son sustitutesde las medidas correc_asde
prevenci_n de sccidentes.
Z_ ADVERTENCIA:
ASEGURESE de leer y comprender todas las !flstrucclones
de segurldad de este manual, lncluso fades los aimbotoa de alerts tales coma
"PELIGRO", "ADVERTENCIA'y "PRECAUCIt_N",ANTES de utilizer esta herramlenta.
SI no se respetan fades tas tnstrucctones qua se lneluyen en Is stgufente lists se
pueden pmducir descargas el_ctr!eas, tncendlos y/o lea|ones personatesgraves.
SIGN|FICADO
_
DE SIMBOLOS
ADVERTENCIA
uesree an conlonct6n
con afros
O DEO PRECAUCti_N_
ALERTA
DE Pueden
SEGURIDAD:
Indtce PELIGRO,
efmbalae o plctogramt=e.
E!
de est_
seguridadalga
RESULTARA
en fncump|tmiento
LESIONES graves
pare advertencla
usted u afros.deSlempre
lee
preeauclones de de segurldad pars reduclr el rfesgo de Incend]o,
descarga eldctr|ea y lestones personales.
_ADVERTENCIA]
l Incumpitmtento
eats advertencia
segurtdad
PUEDE
resultar
en leslones depersanales
gr_ves do
pars
uated u aires,
Slempre slga las precauclonas de segurfdad pare raducir el
dasge de tncendlo, descarga eldctrica y leslones personates.
I _PRECAUCII_I ]J El
ineumplimtento
esta advertenala
resultar
en leslonsadepersonates
pare
.........
PREVENCION
de seguridad
uated
u afros o PUEDE
daces
materlales. Siempre siga las precsuclones de seguddad pars
reduclt et r{esgo de lncendio, descarga el6ctdca y leslones
personalas.
DE DA_IOSY MENSAJES DE INFORMACION.
Estos comuntcan a! usus_to Informscl6n y/o Instrucclones importantes qua sl no no sa
respelan, podfian pmducir el dal_o.. Cads mensajs as precedido per ;a patabm "NaTAl" coma
en el stgutenle ejsmpla:
NOTA:
y/o
Is propledad.
S! no se respetan estee |nstruccionaa
USE SUS
se puede produelr et daSo def aqulpo
Z_ ADVERTENCIA:
El tunctanamlento
de cualquler
herremtenta el_ctrica puada causer le prayecci6n de objetos
extrafios hacla los ojos Io cual puede ocaslonar da_os
graves an los alas, Antes de porter an funcionamfanto
una
hermmienta el6ctdce, SIEMPRE use galas de segurlded o
anteoJos de segurldad can protector lateral y protector facial
complete euertdo sea neceearlo. Recomendamoa
el use de
una m_scara de segurtdad de vial6n empire pars user sabre
los anleotos a anieoJos de seguddsd estdndar con protector
lateral, diaponibles en laa_endaa
Sears u afros centros de
ventss Craftsman.
33
este menus! antes de user esta sierra vaiv_n e|_ctrfca. No segulr redes las Instrucciones
I podrla
_ ADVERTENCIA:
ASEGORESE
leer y entender
redes personales
lss Instrucciones
resultar an descargas
el_ctrtcas,de tncendto
y/e leslones
gmves_en
AREA DE TRABAJO SEGURA
I Mantenga su drea de trsba|o limpta y b_eniluminadaoLosbancos de trabajo
desorganizados y fas _raas oscuras invitana los accidentes..
2. NO opere herrsmlentss el_ctricas en atm6sferas explosivas_tales come en
presencta de liquldoa, gases o potvos tnflamables, Las herramtentsseldctricas
crean chispas qua podrfan encender e| polvo o los gases
3. Mantenga a los observadores, hires y vlsltantes atejades al operar une
herramlenta e!6ctrleaoLas distracctones podrlan ocastonar que usted pisrda at control
4.. Mantenga su lugar de trabaJn segum pare los nlfos tmp?ementandocandados e
lnlerruptoresmaestros, Guards bajo llave las herremientascuando no las USer
5. ASEGORESE qua el drea de traba]o euenta con amplta llumlnaet6n pare que pueda
vet el trabajoy que no hays obstrucctonesqua tnterferlr_ncon una op_ract_nsegura
ANTES de user su sterra_
SEGURIDAD
PERSONAL
t, CONOZCA su hsrramlenta
eldctrlca. Lea el manuaf de! operador cutdadosamente,
Aprenda las apficactones y limttaciones de la su cepifladora, asi come Zos pefigros
potenciales aspen[rices zetacionados con esta herramienta
2, MANT[_NGASE
ALERTA, mira lo qua hacs y utitice sentldo com0n al operar una
henamtenta e_ctdcB.
3o NO use ta hermmIenta sl slants cansanclo e st est_ bajo la influencia de drogas, alcohol
e rnedicamantos, Un memento de desatencf6n mtentras opera una herrarnlenta
elL_ctrfca podrla resultar en lestones personales graves.
4,,VISTA apropfadamenteo
NO use rope suelta o joyas RecoJa e! cabello largo, Man[enga
su cabello, mpa y guantes lejos de las ptezas m6vtles, La mpa suelta o el cabello largo
poddan quedar alrepades on tas pfezas m6viles, Las aperlures de ventilacidn a rnenudo
cubre ptezas m6vtles y tambtOn deben evilarse
5_ EVITE encender accfdantafmente
la herramtenta, Asegt_mse de que el interrupter re
encuentm en poslet6n de "APAGADO"o Transporter ]as herram_entas con un dede en el
interrupter o enchu_iar la herremlenta mfentras el tnter_ptor se encuentre en ta poslci6n
"ENCENDIDO"
Invite a accidenteso
6o RETIRE lea Ilavas de eJuste de las hojas shies de encender la herramtenta, Una llave
de eJuste que queda conectada a una pieze rotativa de ia herramlenta podda resultar en
lesiones personates
7,, No ea extlenda pare alcanzar sobre la herramienta. Manlenga el pie firms eel
come et balance en rode memento. Una poslci6n y balance apropiados permiten un
major control de Is hermmienta en posiclones lnesparadas.
8. ASEGURE SIEMPRE SU TRABAJO_ Use abrezaderes o un tomitlo pare sos|ener el
trebajo cuando sea practice, Es m_s seguro qua usar sue manes y libera ambas manes
pare operar la harramtenta,
g. USE EQUIPO DE SEGURIDAD.
Use SIEMPRE protecclSn pare los o)os M_scares
antt-polvo, zapatos de segurtdad antfdesltzantes cases e protecct6n pare los otdes
deben usarse en condlclonesque lo requ|eren,
34
SEGURIDAD
EN EL USOY
CUtDADO
DE LA HERRAMIENTA
antesADVERTENCIA:
deopersr este herrsmfenta.
No
[Z_
ASEGURESE
podrfa resuitar en descergae
segulr
les instrucelones
Indlcedas ebsjo II
de leerlodes
y enlender
todee lee Inelrucclones
el_ctrlces,
Incendto y/o leslones personales graves.
I
! _ SIEMPRE use abrazaderas u otra manera pr,_cflca de esegurar y epoyar la pleza de
trabaJo sobm unn pfataforma est_ble, Soslener et t_eba_o con _esmanes o centre el
cuerpo es tnestable y podrfa resuitar an p_rdida de control.
2_ NO fuerca la herremlenta. Usa la herremlente y hoja carrecta pare su epllcacldn.
La herramienta y hoja corrects hardn el trabaie de manera meier y m_s segura para Io
cual ftteron diseP,adas
3. NO use !n herramlenta sl el Interrupter no la Enclende o Apega. Toda herram]enta
que no puede set conirolada pot el inlerruplor as peligrosa'y @be ser reparede,
4, DESCONECTE
el enchufe de la fuente de ellmentact6n antes de hacer cualquter
ejuete, ¢amblar los accesorlos
o guarder la herramlenta. Tales medldas preventdas
reducen et rlesgo de encender la herramlenta accldentafmente
5,_GUARDE tes herramlentas
sTn user fuera del elcence de !as nlSos y arras
personas no capecitedeso Nines NO DEBEN OPERAR eeta herramfante, Las
herrsmientas son pe[_grosae en [as manes de usuedos no capecitedos.
6o DELEa las herrsmlentas
un msntenimtento
ouldadosoo SIEMPRE mentenge las
herramienlas
Iimpisdas y err buen arden de trabaja_
7 VERIFIQUE st lee piezas m6viles estdn desaltne_das o se atascan, se mmpen oei
exists nfguna otre condtcl6n qua podria efeclar In operact_n de [a her_amienta÷ SI est_
daSeda, la herramienta debe rectblr mantenimtento antes det use. Muchos accidentes
oeurren debtda a herramtentas con un mantentmtento pobre.
8, USE S6LO los accesorlos
recomendedoe
pare esta herramtenta. Los accesor}os
aptes pare una hetramienta poddan set daSinos sf se utitizan con otra herramlenta.
SEGURIDAD
ELiECTRICA
Z_ ADVERTENCIA:
No permits
enchufe
el Instalar o retlrar
el enchuiequedelosle dedos
tame. toquen
t_ Las herramientas
con doble atslamtento
est_n
equlpadas con un enchufe poterlzado (una hoja
as rods ancha qua la errs), Este enchute entrer_i en
une lama polarlzada de un solo mode, Si el enchufe
no catza lotalmente en la tome, invierta el enchufe St
a0n as{ no catza, contacts aun electrlcfsln calfflcado
pare qua Instals una tome poiadzada, No modfitque e!
enchufe de forms atguna,
2,, Oobt_ Atslemiento _t e(imine le necestdad de un
oo_d6n de atimentaci6n con conexfbn a tierra de tres
alambres y un ststema de sumintslro de energla can
conext6n a tierra. Aptlca s61o pare herramientas Class If
(con doble nislamlento). Esta cepilledora de esuna
herramtenta con dable alslamlento.
Z_,ADVERTENCIA:
E! dobte
NO reempleza
segurldnd
normales el operar
estaalslamlento
herramlenta,,
los termlnales
de un
Cublertadel
cajeltn de
If _ _
li
Alimentac_n it \..._L/
It
conconoxt6,
l[ _
It
a T_erra--.-,,----]_ /F_ f;'_\ tl
!as preceuclones
de
3, ANTES de enchufar la herramienta. ASEGrJRESE de qua el voltaic de la tomE_provtslo
se encuentra en el range de voile e marcado en In place de identificncfdn de ta
herramtenta, NO use herramien_as con ctasf! cec (_n ' CA so amenle _ en una fuenle de
ailmentact6n CC
35
SEGURIDAD
ELP-CTRICA
cant,
4, EVITE el con|aciD corporal con superf|cias
con conexibn
a |terra. |ales coma
tubertas, rad_adores, estufas y re[rigeradores,, Existe un riesgo mayor de de_carga
el_clrica si su cuerpo liens conexiSn a tlerra,
5_ NO exponga las herramlentaa
eI_ctrtces ele tluvla o a condtclones h0medaa nl
use las harramlentas
el_ctrlcas en ublcaclones
h_medas o majadeso Ei ague que
ingress ala herramienta ei_ctdca incrementar_ el riesgo de descargas el_ctrtcas
6, INSPECCIONE
el cordbn de le herramlenta pare varifiear la preaencta de daSoa.
So[tolls al Centre de Servicto Sears qua repare todd cord6n dafiado. ASEGORESE
de eslar constanlemente atenlo ala ubicaci6n del cord6n y manl_ngalo lej0s de la hoja
en movtmianto,,
7, NO abuse del cordbn_ NUNCE use el cordbn pare trasiadar le herramlenta nlto
hale pare sacar la tame dot enchufe. Reemplace tOdD corddn dafiado de
Inmediato, Los cordones de,adDs _ncrementan el riesgo de descargas oleo|rices.
CABLES
DE EXTENSI6N
Use un cable de axtanet6n apropiado, S6LO use !as cables y cordones que indica
Underwriters Labors!odes (UL). aires cables de extensiSn podr|an acast0nar una cards en
la linaa da vof_aje, resuttando en p_rdida de energfa y sobrecalentamienlo de la
herramienta. Pare asia herramlenta, se recomtenda un cable de extenst6n con un tamaSo
AWG (American Wire Gauge) de par Io mends 14 pare un cable de extenst6n de 25 pies c
mends de largo, Use uno calibre 12 pare un cable de extenst6n de 50 pies No sa
recomlenda el usa de cables de extenel6n
de 100 pies o m_s de largo. Recuerde, un
calibre de alambre m_s pequeF=o tlene mayor capacldad
qua una de mayor n_mero
(un afambm calibre 14 tiene m_s capacidad qua uno calibre 16: un atambre calibre 12
tlene m&s capacldad qua uno calibre 14), En case de dudes, use un n0mero meno_
AI opemr herramfentas el_ctdcas en exteriores, use un cable de e_tensl6n pare exter;ores
marcado _W-A" o "W _, Estos cables estdn claslftcades pare uso an exieriores y reducen el
riesgo de descargas el_ctdcas.
3
Poslctone
el cord6n
u arras
[Z_herramientaa
PRECAUCION:
et(;ctrlca,
de manera tat qua na so atascar_ en la readers, las
obetrucclones
mlentrss
ueled trabaja
Msntenga el cable
de extenai6n
libra con
del una
_rea herram!anta
de trabaJo.
Z_ ADVERTENCIA:
Revise todD cable de extensi6n antes de cads usa, SI
extsten daiioa, reemplaca el cable de Inmed;ato.
Nunca use la herramlenta con
un cerd6n 'o cable dafiado, ya qua racer el _rea da_ada podria oces!enar
descargas
el_clrlcae, resultado en teslenes graves.
36
]
|
SiMBOLOS
DESEGt.IRIDAD
PARA
SUHERRAMIENTA
Laetiqueta de su herramienta puede Inclulr lea atgutentes afmbolos
......................................................
V .........................................................................................
.Voltios
A ....................................................................................
Amperes
Hz ............................................................................
Herc{os
W ............................................................................
Varies
,',.. ..............................................................................
Cordenie allema
.................................................................................
Co,ante continua
no ............................................................................
_Jeloctdad librade carga
_j ....................................................................................
Constn.,tcci6nC]ase li, Doble a_slamien{e
RPM ......................................................
Revoluclones per minute
SPM
Ca_
(Strokes) per minute
OPM ......................................................
X3rbitos per minute
Z_- .............................................................................................
Indtca petigm, advertencia o precauci6n.
Signtfica: lllAlenc16n]ll Su segurtdad se
encuentra compmmatldao
SEGURIDAD
EN EL SERVICIO
Tt_CNICO
I. SI cuatquier parle se pterde, se rompe, se dobla o fatla de cuelquier forma; o sl
cualquler componente eldctrtco no funclona adecuadamente: APAGUE el
interrupter de potencia desanchufe la cepitladomde ta luenie de energfa y haga
reemplazar la parle perdida, daAada o qua no funciona ANTES de ut [zar nuevamenleo
2..El aervicio t_.cntco de la herramlenta se debe realizer solamente en un Centre de
servlclo t_cnlco de Sears, El SerVtCIO
t_cnico o mantentmiento qua se malice per
personal no calificadopodria pmducirflesgo de lesiones..
3..Cu_mdo reaflce el servlcIo tdcnlco de una herramienla, uttlice sotamente laa
plazas de repuesto id_nticas. Reepete tas instrucclonea de la seccldn de
manlenlmlento de este manual, St se uttiizanparles no autortzadas o no se respelan
Ins instrucclenes de mantenimienio, se puede crear un riesgo de descarga el6clrica o
lesi6n.
REGLAS DE SEGURIDAD
_
Queda
PARA LAS SIERRAS DE VAIV!_N
lee manes
lejos del area de corlando
y la hola,
Sostenga las dos manes en la sierra (manlja trasera y empu_adura de suJeclbn
frontal). SItas dos manes est6rt sujetendo la sierra, la hoja no puede cortartes_
Z_ PRECAUCION:
La hoja se des|iza despuds
de qua apague
la sierra.
Sostenga la herramlenta
per tas superficies
de sujecl6n eisladas (mango
posterior y empuBadura
de su|ect6n
frontal) cuando reetlce una ectlvldad en fa
cual ta herramlenta de corte pueda entrar en contacto
con cableado oculto o con
su proplo cable, El contacto con un cable "vivo" expondr_ Ias pertes met_licas a
corrien{e y provocar_ una descarga en el usuario
Z_ PRECAUCI()N: NO utllice
ia sierra en paredee extstentes
u otrae zones
cfegas en las cuales pueden exist& cableados el_ctricos. El la situact6n no se
puede evltar, DESCONECTE
TODA LA ENERGIA ELECTRICA del _rea de trabajo
ANTES de utttizar la sierra.
37
REGLAS DE SEGURIDAD
PARA LAS SIERRAS DE VAIVEN cDnt,
2 MANTENGA el cuerpo ublcado hacla cualqulera de los laterales de la sierra y no
en lfnea direcls con ta hoja de |a slerra_ El contrafuerza
(acci6n de salter o
contmgolpe) puede causer qua la hoja se doble o se romps y qua la sierra salte hacla
atr_sprovocande la p_rdida de control y produclendo fesiones graves,
3, SIEMPRE mantenga sue manes fuera det elcence det _rea de carte. NO coloque la
mane deba o de| material que se est,', certendo proqua la cercanfa de la heja a su
mane esl,=_oculta ds su v s_e,
4, NO UTILICE hoJas deeaflledae o decades. Lee hojes dobladae se pueden romper
con tacit|dad e causar contragolpes 1oqua puede producer la p_rdida de control y
lea|onesgmveso
5. Cuando comlence un carte, Is velocidad qua utllice estar_ determfnada
per ia hoja y el
material que estd corlando, Las veioctdades rdpidas son pare los materlales bfandos y
las veloc|dades lentas pare los matertales duros. 51 la vetocldad de la heja es
demaelado lent.a, la sierra puede traquetear o vlbrar al pdneiplo dal carte y
posfblemente causer una contra-fuerza (una acct6n de satlo o conlragolpe) y vibracl6n,
qua pueds productr la p_rdtda de conlrol y lesienes personalss graves, Utilice una
velocidad tevamante m_s r_pida al pdnctpio de! cortm Siempre esuna buena idea
pmclicar los codes en material de descarte haste qua so tamiliedzarse con el carte y
et desempeSe de! manejo de la sierra,,
6, NUNCA soslenga la plaza de carte con sue manes o entre sue plernas. Es
tmportante sostaner la plaza de trabajo edecuadarnente pare minimizer la exposlci6n
detcuerpe, eviler qua la heja do atesque o perder el conlroL
7, StEMPRE sulete la pleza de trabeJo ltrmemenle pare qua no se mueva mien|tee se
estd cortando
8,. UTILICE SOLAMENTE
lee holes dealgnadas pera el carte do| tlpo de material
pare el eual se recemfende. El carte de matenales que NO se recomtenda puede
causer la rotura de la hoja y la pdrdida de contro!, y productr lestones graven,
9.,SIEMPRE Inspections
y retire lodes los clavos de la readers antes de peser Is
alerts, Si slgue esta regla reducfr_ el riesgo de contra-tuerza (une accidn de sallo e
contragalpe)que
podrfa causer le pdrdtda de control y lestones personates graves
SIesto no sepuade evltar, come cuando se reaiizan trabajos de demolici6n o de
renovact6n, ASEGORESE DE utffiz_r heJas bt..meldticas qua son mSs gruesas, con 4 a
6 dientes per pulgada y dtsefiadas especlitcamente pare co_lar madam con ctavos
incruslades.
TENGA EXTREMA PRECAUCI_)N
cuando reallce este ripe de operaclbn de corte_
Z_ ADVERTENCIA: Pare reduclr el rlesgo de explosl6n, deecarge eldctrlca,
defies a ia proptedad y lesiones corporales graves, SIEMPRE ver]flque el _ree de
trabaJo pare detormtfler sl hay tuberias de gas eculles, cables el_ctrlcos,
caSert!aa de egua y clavoa e grapaa Incruatades de 2 X 4 cuendo resllce cortes
cleges u codes en profundlded
Internee en parades durante el trabaJo de
demollclbn o renovael6n.
10, EVITE postures y poelctenes de la mane Inconvenlentes
en lea cuales un
deslizamiento
repentlno podria causer qua su mane se mueva heels le hejm
11, NUNCA coloque Is mane en el treyecto de carte de la he]a,
38
_ADVERTENCIA:
Algunpolvc generado per el use de herremJentae el_clrlcas
coat,one qu[mlcoe conccl0te per el eetado de California per cauear cancer y defectoe
de nacimiento u circe de/ectos pare la reproduction.
Algunos ejemplos de estos quimlcos son:
• El plomc de tas pin{urea a base de plomo.
• La ellice cdsL_tlna de los ladrlllos, el csmento y circe ptodiJctcsde albsr3iler;a.
• El ars_ntco yet creme, de la modem lrelada quimicemente
El rlesgo de estas exposicienes vet|a, dependlendo de I_ frecuencte con qua reeflza
eete ttpo de trebsjo. Pare reducir su exposfci6n a cotes qufmtcos:
• Trabeje an _rees bten ventiladas,
• Tmbaje con los squlpos de seg,Jdded aprobades, tales come re&scares conlra el pclvo que
est_n especlalmante dlsefiedas pare flitmr part{culas mlcmscr_picas,
Evils el contacto protengado con el polvo de lljedcrae, sierras, pulidores, perfor_doree
e V_ctrloes y arras acttv|dades de Is conetrucclbn.
Utfflce rope de proteccl6n y rove lea
=trees expuestae con ague y Jaban_ Sl porto;to que el polvo Ingress seu boca, ojos o
permseezca en la plel, se puede fomenter la ebscrclbn de qufmlcos noclvoe.
Z_ ADVERTENCIA: La utlllzacI6n de esta herramlenta puede generar ylo
esperclr potvo, que puede causer lestonee mspiratodas groves y permenentes o de
otto tipo. Slempre utiltce le protecet6n resplmtcrte spmbada per el Instltuto Nacional
pare |e Segttridad y Salud en el TrebaJo/Departamento gubernamental de ice EE.UU_
pare Is edmtnlstraclOn
de ?a Segurldad y Salud en et TrabaJo (NIOSWOSHA,por
sus
elgfes on Ingles) apropfade pars fa expos]c{6n el polvoo DlrtJe los partfculas lucre del
alcance de le care y e_cuerpo.
REGLAS
ADICIONALES
PARA
EL FUNCIONAMIENTO
SEGURO
Si no se mspelan todas los Instrucclones
que se Incluyen en le s_gulente lists se
I Z_
ADVERTENCIA:
ASEGORESE
leer y comprender
los tnstrucciones,
pueden
productr descargas
et_ctrtcas, de
Incendlos
yto lesionesredes
personales
graves.
1
1=Conozca su herramfenla el_clrica. Lea culdadosamente
el manuel de operaclonee,
Aprende tas apficaclones yfimitscianes de _lacepitfadcra, as! come tembt_n los peltgtos
potenctales especiflcos ref_,ctonados con esta herramlenla. SI reapers ssta regis, reducirfi ice
riesgoS de descargas et_cldcas, lncendios o les_cnes g_ves
2 S|EMPRE ut!lfce galas de segurided o protectores pare le vista cuando emplee esta
cep;lladera, Los aeteeJospera redes los dlas seisments tfenee lentes reslstentes a foe
_mpactos: NO sort galas de seguddad
3 PROTEJA sue pulmoneao Utllice una m_scera pare _ care o una mdscara centre el polvo sl el
trabaJo es po_orientc,
4 PROTEJA su audlcl6n. Utlllce una proleccion audittva personal sdecuada durenie el staples.
Bets clerics c_ndlctones, el ruido de este products puede contrtbu[ra Ia pdrdtda de la audition,
5 TODOS LOS VISITAHTES Y PERSONAS PRESENTES DEBEN utlttzer el mismo equips
de sagudded que el usuedo de ta cepfltadom
6 INSPECCIONE los cables de ta herramienta perl6dtcemente
y s| est_n de,odes h_gelos
reperer en el Centre de servlclo t_cnico Seers m_ts cerceno,, TENGA PRESENTE SIEMPRE
In ublcac!6n del cable.
7 SIEMPRE verlftque lee herramientes pare determiner st ex_sten partes dafiadas. At_tes de
ssguir utili_ando ta herramienta, se deberla veri_car con cuidsdo el protector u otto pads q_e
se hays da_ads pare determiner ei lunciona_ apmpiademente y realtzard la funci_n desead_
Verllique st extslen desa usles o atescamienlos de lee partss mOvtles, rupture de pades o
cualquter ctta condtciOnque pueda elector el funclcnsmlentc de la herramtenla., Se dsbe repaint
o cambtar una proteccidn u elm parts defieda en un centre de Servlcto l_cnlco de Sears,
8, CONSERVE ESTAS INSTRUCCIONES.
Remgeee a elias {recusntemente y ufiltce|as
pare capacitor a elms personas que pueden uUgzar esta herramtenta. Sl elgulen le
plde eels herramlenta prostatic, esegureee de qoe se Ileve tambl_n eetas instrucctcrtee.
39
energia cuando erme laspartes,
hags ajustee, instals o quite las hoJas, I_mp|e
o cuando ta sierra no est_en use. AI desconeclar
la sierra, evlta qua dste se
Z_
ADVERTENCtA:
NUNCA
deberie
la sierra apersonales
la tuente de
enclenda accidentalmente,
Io cuel pedrfaconectar
causer lestones
graves.
!_ Saquela sierra det estuehe de aimscenamiento
I transporte
e Inspeccl6nela con
cuIdadc pare asegurarse de que no hayan ocurddo re|urea o daSos durante et envlm
2., No deseche ning_n material de embala]e hasla que se cuenie con redes los contentdos_
3. So Incluyen tree hoJss: pare carter madera, pare carter metal ferrosc y pare cor_es de
epTicacion garteral (ptL_shco. fibra de vid_io, metal blar_do),, Las hojas se encuentran en
e/eetucha de elmacenamIenlo
I transports,
4o St alguns de las patios eat& daSeda o no se encuentra (remitase e la LtSTA DE
REPUESTOS de abaJc), regrese la sierra al comereto Sears oal punic de vents de
Craftsman m_s corcsno pare qua se la cambien.
I
se
reemplace
ta parts qua
felts. alguna
SI no se
hace NO
estoutlilce
podr|an
/1k
ADVERTENCIA:
St fells
par|e,
eeta produclrse
sierra hastepostbies
qua
lealones perscnales
graves,
LISTA DE PARTES
(Fig. 1)
t
I ,.Sierra de vatv_n
.......................
_----_
,_"_:7_
2.. Hoja pare cedar readers
3 Hoja pare aplleactones
generalee
4 Hoja pare cortar metal
6oManual de| Operador
CONOZCA
SU SIERRA
5 Estuche de
Atmacenamlanto / Transports
VAIVI_N
NOTA: Antes de in|enter
ut;|izer |a sterra, fer!!tier|case
con redes |as
caracter[stlcas
de funcfonemlento
y requisites de segurldad.
LB sierra de veiv_n pmfesional ttene un motor et_cldco incorporado y sSIo debe
conectarse a una iuente de sumintstro de energla de 120 veil|as, 60 Hz CA 0HICAMENTE
(cements domestics normal). NO hags [uncionar con corriente continue (CC)o La gran
calda de voItaje causar_ una p_rdlda de potencta y el motor se sobrecafantar_,
Si la sierra
no funeione cuando se la censers a una saIida de corrlenta altema de 60 Hz y 120 voItias,
verif_que el sumintstro de energtm Esta s_erra liana un cable de potancle de 10 ptee_
de 2 hilos (no se neceeita adeptador),
4O
This
Reciprocating
Saw
hasthefollowing
features:
vlbrafree
_1'_*V|bra Llbrementa Sierras deValvdn
se dIseSan 0ntcamenle asi que
el eje de vatvdny ia mange de centre balanzase mueven stempre en dtreceiones
opuesiss el uno al otro_Esla plataforrnadel d+seSocance_ virtuafmente la vtbraci6n
de lasierra, ilac+endo asia sierra de vatv6n m_s c6moday elictenteuser. El disefio
toms la vtbracl6nde ta sierra y pone esta energia al trabajoeserrsndo y qutfendo
el matedaL
t El potanta motor de t2 Ampertos y 0.3000 GPM (golpes per minute) velocldad
sin carga propom+ona codes seguros en readers, matedafes de construcctOn a base
de readers pl_stlcos, f_bra de v_drio, morales ferrosos y no fermsos, car3os, tuberias y
clavos+ con tree hojas dfferenies nclu des
2 Acci6n Orbital de 4 Poaictones El interrupter de conlrol regula los 4 modes de
cortando de b sierra,
0. SUAVFe con el aslillar mfntmo, con movimiento arr+ba y abajo del hijo normal
NINGUN ac¢i6n orbital.
1. BAJO para codando !a mayorra de morales, acct6n orbital bajo.
2. MEDIA pare codando plasticos, readers dote, con sce_on orbital media.
3. RAPtDO pare ecci6n orbital m_xlmo, use pars codando r_pldo en readers de
contrachapads, madetas soaves,
3 La veiocldad variable permtle siustar ta vetocidad de code ala hoja y al material
4. El Interrupter
de get]llo de velocldad variable pare dos dedos controls la velocIdad
de la hoja per la cantidad de prest_,n qua splisa al interrupter de gatifto+
5 Carrots de hoja complete de 11/4.,pulgedes pare codes r_pidos y una vfda 0Ill de la
hoja profongada
6 Abrazadera sln-herramlenta
l+ene la caracteflstica de cuetlo con acci6n de palancs
pars cambfos de hoJa f_c+l y r_,pIdo Utilize hojas on eje universal de _,_puigada_
7+ Zapata de Iongltud ajustable I gtratarta pare m_imo
control de fa pteza de trsbajo
en una vadedad de cortes Ajusta per apretar el bot6n amarillo debaJo de la zapata
glratoda.
8, La Luz de trabaJo LED se adelant_ cuando est_ incendIda el interrupter del get[tie,
lifum{na at _rea de corte pare mayor visibi[idad
9 La empuSedura con facllidad de suJecl6n y el dtseSo de mango posterior con
empuP, adura moldeado
de confort proporcionan el maxlmo control, equilibrio y
comodldad
10, Rodamtentos
lubrleados
permenentementa
sin compltcactones y una vida 0til proiongsda
pare un funclonamlento
tt
Utlltza hojas con ll2+pulgada
eje universal.
Inctuye 3 he|as: 1 hoja pare corlando
r_pide en readers t hoja pare cortes ltsos en metal ferroeo, tuberla, y atslanle de tube.
y 1 heja pars cortando metal suave, p astlcos, y fibre de v dr eo
12_ tncluye estuche rugoso del almacenamlento
! transports.
* vibrafzee e_ sotamenle una mama reg_stmda y no i_sva ntng_n exp_icto demands impficada _,rt
cuanto ata mducci6n de Is vibraci6n dol produc|o,
41
Po|enclal Nominal
120 vo!tfos, 60 Hz CA
I , de
f',_OTA:Antes
da In|enter deda
user su harramlenta,
opemr y requisites
sagurldsd,
famltiarfcase
con redes los rasgoa
,/k ADVERTENSIA:
No permit° qua la faml|tarldad con !_asierra to tome
deaculdado. Recuerde qua una fraccl6n de segundo de desculdo ee euficlente par°
causer lesiones graves.
/k ADVERTENS|A:
UTILIZE SOLAMENTE lea hojaa de sierra design°des par°
usa con estn sierra, Usa de cualqu_ar otra hoja puede taBu|tar en accident°, causando
leelonas personates gmves+V6ase p6g|na 55 par° las hojas disefiadas y los uses
recomendados,
C(_MO
SELECCIONAR
LA HOJA
a un major dasemper_o de la hoje y un_ viola_tIl m6s pTolongada, StEMPRE _eleccione
a_a aaecuaae pars ta apllcac_6n oe _as+arm,,
Ha,y toucher; tipos de ho]a_, de v_siago universal de 112 putg, dispon_blss par° su sierra de
vafvBR:
HoJas par° cortpr rode tlpo de reader°s, mad sic con clavos incrust°dos, maJefiales de.
construccl6n a case oe maoera, melmes no tsrrosos y lerrosos, pl,6sticosy tiDra _le viario,
ojas par° Fortes d+ade spla+za.relents,.InFtalacIenes ocultas y codes de centomo., Tambi6n
y alspoi3tDia mucnas tong+tuo_s aa nojas+
StEMPFI+E al_a un_.hoJa _osufic!antamonle la.rga par° qua .se pro fo._gpa m_s all6 d.a
2_.pal_ay Qa gu plezJ_loe rraDajo, a io largo ae la cerr_ra us cone |verse acceeorlo9,
p,6gma 4B)
42
HOJAS DE SIERRA
Es necesado que todas las ho|as de ia sierra est_n siempre tmpias, altadas y bier,
co ocadas para qua corten de forma etciente. Una hoja desailada es una carga muy pesada
pare a sierra y aumenta el des go de contra4uarza (un sato o acctdn de ceniragolpe), Tenga a
mano hoJas de sierra adlcionalas, de manera tar que seimpre est_n disponbles ;as holas
afladas. La brea y la mstna de madera soldlicadas sobr la hoJa vueban lanto el
(unctonambnto de la sterna. Uttice removedor de reslna y brea, agua calente o kamseno para
efminafias NO UTILICE gasotnm
PARA
tNSTALAR
Y SACAR
LA HOJA
Esla sierra estd disefiada para uttzar con vdstagos unlversales de tt2 pulg.
q
Z_ ADVERTENSIA:
ASEGORASE de protegerse con guarttes de trabafo mienlras
uttliza la hoja de Is sierra, Lr, hoJa puede lastlmarle las manos sl no est_n protegldas.
INSTALAR
LA HOJA (Fig.
1, Desenchub fs sierra.
/
I
3 y 3a)
herramelnts de la fuente de energra ANTES de mon_r I_ts partes, realizar ajuates o
/_
ADVERTENSIA:
Para evtar teslones personales, SIEMPRE desenchufe (a
camblar
las ho|_s+
1
/
2. Para instalar la ho a0extbnds Is zapsta _jos de la abmzsdem de la hoJa pare un acceso
rods fdct (vet Pdgina 45, Fig. 6).
3 UbIca el cuelo de ecci6n de palanca y levan(a el cuelo (yea la flecha en ef cuetlo, Fig. 3).
4 Con el cueflo "anlba" an la postcl6n bvantada, {nstala el v=_stagode ia hoJa de la sierra en
ts ab_az_._ders de hoJa (ver Ftg.,3 y 3a),
5, Suela el cueflo, y la hola debe ser tjado bien en la _brazadera de hoJa.Tire la hoIa para
ensegurar que la hoJa se_ fijada en su [ugar..
I
NOTA: Lss hojss con vdstagos unlvers_les sola ;nstsla en urea manera, con el
v_istago de la hoJa Instnl_da en I_ _brazader_ de ho)a, con los dientes de la hoJa
hac(a _bsto (Fig. 3 uso est_nder) o con dienles de hoJa hacfa arrIba (Fig. 3a p_ra
=zpllcacfones espe¢iabs, vet p_girm 51).
I
SACAR LA HOJA (Fig. 3)
I.Desenchufe la siena,
I que
L_ puede
ADVERTENSIA."
Nunca toque
I,_hoja ,nmed,'ttamente
estar extremadamente
caliente.
despu_s
de su uso Ya I
2..Cuando saque I_ ho)_, extenda la zap_Ia ajus(abb / glratmla (uera deI alcsnce de la abrazad_ra
de tahojm
3. Ubtca ta he_dtdura con tech_ en e! lado del cuelIo de p_fa_ca de accI_n (vet Fig 3)
4 Tira en el cuelIo a hendIdura y suj_t_b arriba Es(e elbja _aabrazadera de hoj_ y (e permila
sacar _ ho)a de (aabrazadera,
43
VELOCIDAD
VARIABLE
INTERRUPTER
CONTROLADA
DE GATILLO
(Fig.
PeR
Fig, 4
4)
Su sierra est_ aquipeda con un tnterruplor de gatllle pare
dos dedos qua controla la veioctdad vartabte
Se "ENCIENDE" o "APAGA" ta s_erra presionando o
softando et gettllo.
Pare variat ta vetocldad de la heja:
1, Pare aumerttar la veloctdad de ta heja, aplique m_s
presf6n al fnierrupler de gatttlo,
2, Pare reduclr le velacidad de la hoja. aplique manes presiSn,
3 Pare DETENER la sierra, sue[re e_gattl]o,,
apptlcacl6n
de carter y ptezo de trabejo) a! principle de un carte,, Luego eumenle
qua
eomtenza
a cortarrapmplado
El use prolongedo
una su
velocldad
Utllice
Is velocIdad
mtfs lenta a
(pare
muy baJa puede dafter eu sterta.
una vez
t la
Z_velocldad
PRECAUCI()N:
i de
NOTA:
SIMEPRE
de|e que
sierra aseunderange
la plaza
de trabajo
o de tadejar|a
|ado.
C6MO
ELEGIR
LA VELOCIDAD
completamente
antes de seearla
I
1
II
CORRECTA
L_ vsfocidad que utitice depender& del tips de material que carte,
1, Utilice aires velocidades para cedar madara y materfales e base de maderao
2. La velocfdad media es major pare cedar meleres no fermsoe_ pl_elices y libra de vidrto.,
3, Se recomlenda ts veloctdad m&s baJa pars tartar metales ferresos, cases de hierro e
hlerro angular.
NOTA: El espesor dei material y la sefecchSn de la hoja tambl_n afectardn su
aelaccl6n de velecldad. Come regla general, uUUce VELOCIDADES
M_S RAPIDAS
y hojaa con meno_ dtentes per pulgeda pare materialee m_s blandos. Utllice
VELOCIDADES MAS LENTAS y he|as con m_s d{entea per pulgada para los
malerleles
m_a gruesos y denaDs.
LED WORKLIGHT
(Fig. 5)
Su sierra de vaiv_n tlene una
iuz de trabajo tncorporada par
ala vislblfided major durante el
carte. Pare eneender la luz de
trabajo LED, la sierra liens qua
estar enchulada. La tuz de
trabajo LED enclende cuando
se presiona el in_,erruptor de
gatilto pare dos dedoa pare
"ENCENDER" LA SIERRA.
Cuartdo se suelta el gatlflo y se
=APAGA" la sierra, la luz de
t_abajo tambfen se apsga°
F_g.S
.__
Luz del LED
44
ZAPATA
DE LONGITUD
AJUSTABLE
/ GIRATORIA
(Ftgs.
6 and
6a)
La zapaia de {a sierra se desliza hNcia adentro o hacia Nfuera pa_N ajustNr la pmfundidad
de corte de la hoja en la pleza de tmbajo,
La zapata lambl6n gila a fin de conserver tanlo come sea postble fa supedrice de ta
zapNta en contacto con la pteza de trabslo (vedse Ftg_Sa, y va_,se P_,g_na 44, Flg_ 5)_
EsIos aJustes sen lmportanles ya que propcrc{onan el mdxlmo control de IN superfic[e que
se corta, opttmfzan la vide _tll de IN hoja y reducen IN protongact6n de la hoJa m_r_saftd del
exlrsmo de la zapata, come cuando se cortan cases de gran di_metro o parades
(v6ase P_gina 50, Fig. 9),
estd an eu lugsr, el v_stago
l
del hueillo {Mecenismo de velvdn) puede goipeer la
causer
pdrdlda
de control
y producir
postblesno l
Is sierra la sin
la zepata
en su lugar.
St |e zapata
de Irabajo, dNfiar NO
la sierra,
I pieza
_ADVERTENCIA:
uttltce
leslones
personNles
graves,
COMe AJUSTAR LA LONGITUD
I, Desenchufela sierra°
{
DE LA ZAPATA (Fig, 6)
herrameinte de la [uenle de energia ANTES de montar lss parlee, rsefizar ajusles o
_ADVERTENSIA:
Pare eviler les!enes personales, SIEMPRE desenchufe la
cambtar las hoj_s,
2_Ublca el bot6n amarilloen la sierraabajo de la
zspataptvola.
3_Oprimaen re bot6n mienirss ttrandoo empuJando
a
!s zepa{aajuslable,
4Ten pmnlo come is zapsta seub{caen Iongffud,
suefts el bot6ny Is zspata ssr_ fijsda en posfcion
5 Enchu{e Is sierray apr_eletenlementee! interrupter
pareensegumrqua Is hejaSIEMPRE exltendajuslo
pasandeel zapsloy el pedszode trsbajoduranleel
gofpede carter.
Fig.6
Muevs adentm o !'rectafuera
SE PROLONGUEMAS ALLA de Is zapata y a |rsv_s de Is plaza de carte s Io largo de
toda
ls carters, Les hejas
se puedeneiromper,
o quebrar
sl is hoJagelpea
la
Z_ ADVERTENSIA:
Par_reduclr
rlesgodobtsr
de lesiones,
ssegdrase
de qua la HOJA
zapata o la Neza de trebaie eun _tngulo qua sea cast franlal (verse Fig°7s y 7b).
C6MO AJUSTAR EL GtRO DE LA ZAPATA (Fig. 6a)
t- Desenchufe la sierra
Rg, 6_
Z_ADVERTENSIA:
Pare eviler leslertes
persenales, SIEMPREdesenchufe la herramelnta
de ia fuenle de energie ANTES de reenter tas
partes, resltzsrajustes e cembtar les hojss,
2, Sonstenga la sierra firmaments y "gire" la zapata,
mantentendo la mayor pads postbfede la
superflcie de Fazspa!a sobre Eapieza de lrabajo
cuando corte_
45
Pivots
ACCION
ORBITAL
DE 4 POSICIONES
El rasgo de acct6n Orbital en esla sierra empuja ia hoja ardba y detantero en el golpe de
co_te pare aumentar la veloctdad de corte sobre _a acci6n normal de hacia adetanle y
hacia atr;_s de la sierra eatS.rider de vatv_n.
La poslct6n 0 en e! interrupter de accPJn orbtlal no produce ntng_n acci6n orbital, sate la
acclSn normal de hacta adelante y hacfa atr,'_s (valv_n), pare ios cortes m_s lisos an
readers con e! Io manes asfiflar. Buena pare todos cortes en metal o plastico, e readers
La posict6n 1 produce un peque_o confided de
accl6n orbital con astillar controtado. Use pare carter
agujeros de bolsifle en susie o agujeros en cart6n de
yeso
Posfct6n 2 produce m_s acci6n o_bilal qua en le
posicl6n nomero t. Use en donde caries de madera
con alg0n asl_ftedo son aceptab_a. Usa pa_rarecortes
de puedo o ventane y agujeros en subpiso.
La _ostci6n 3 produce la m_s acciSn orbital, pare deja un acabado muy _spere y con
asUtles. Use esta veioc_dad cuando necesilas el cortando m_s r&pidoEs ideal pare
demoItc_6n y trabajas de rasg6n hacia fuera
Et Interrupter
la Sierra.
de Accl6n
Orbltat de 4 Poslclones
Regula
tea 4 Modes de Carter
de
PosiclSn 0
NINGUN ACCI6N ORBITAL,, Pare estillando
minimal, corlando m_s lisa. Movlmlento
haole adelante y hacta atr_s normal. Use hoJa
de readers line, 20 dlentes par pulgada, o hoJa
de metal lisa, con 36 dlentes per pulgeda.,
Poslcl6n t
ACCI6t',I ORBITAL BAJO. Ideal pare cortando
la mayorfs de restates. Use hojas pars
cortando madam y metal con 10-12 dientee
per pulgada°
Poslct6n 2
ACCIISN ORBITAL MEDIANO. Ideal pare
cortartdo la mayoria de pleat|cos y maderas
duras, Use hojas psra cortando readers y
metal con 10.12 dlentes per pufgada.
Posfcl6n 3
R/_PIDO / MAXIMa ACCION ORBITAL
Use
pare el cortando rods rdpldo en madera de
contrachepsds,
mederas auaves, y carl6n de
yeso. Use he]as pars cortando readers, metal
y csrtSn de yeso con 6,8,12 delntes
por pulgada.
46
PARA
UTtLIZAR
LASIERRA
(Fig.7)
l Z_
lasts
PRECAUCI(_)N:
herram,enta.
S'EMPRE utilice pr°tecci_Snpars la vista cuand° utlflza
NOTA:
Antesasegurado
de cortar eualqufer
ttpoabrazaderas
de material par
ASEGL_RASEde
qua est_
firmaments
o sujeto con
eviler el desllzamlento.
1
•
1 Selecoionela hojaapropfada
2 Sefscclone la acctbn orbitalspmptada
cableedos vivos, pueds reciblr una dasoarga o ser eloctmcutado Mteniraautilize Ia
[ z_
ADVERTENS'A
S, atll,za
,a sierradeon
zone
c,egastempro
en ,a cue, existan
sierra
so rocomtenda¢ortar
b energ{a
losuna
zones
degas
1
3 Marque Ia lines de corts sobrele pteza de trabajo
4 Enchufe la sierra
5 SostengaIs sierra firmamentsan frente de ustedy c_aramenieen d_recciSnopuestaa su
persons,Aseg_rasede qua no hays mater!st extrafio en la hoja,
6 Manlenga fa zapata de giro firmaments sobre fa plaza de trabajo pars minimizer la
contm-fuerza (saltande) y la vtbracl6n(vor Fig 7)con la heja tocandoflgemmenteet
superflcto sercorrode
7 Aprteteeigatillo pars encenderis herramlenladale qua la s_orraalcance Is velocidad
completedeseeda (dependiendo de! ttpodo hojay del malarial) antes de comenzara
cerlar Lea velocldsdesrdpidassonpars losmatertatesblondes y los veloctdadeslentas
pars los materfales duros_
8 St ra vetectdedde la hoja es demastado lenta,fa sierra puedetraquetearo vibraral
principledol cortey posibtementecausaruna contra-fuerza(una accc}6nde saltoo
contragolpe), Uli/ica una velocidad levemento m_o r_pidasi occure_,
Sismpre practice sus
codes en material de descade haste qua se famtltarfz_rseconel eerie y el desempeSodel
manejode la sierra
g S{empmsostenga la sierrafirmaments conlas dos manes s medida qua la gu[aa lo largo
de ia l_neade code Cuandoquterapostble sujetala sierra y ta zapata de gim Iirmemente
sob,s la _lezade Irabato pravenirqua la sierra sa!Sao vibra,y para minimizer mtura de hols
Fig. 7
I
J
prest6n sulictente pars mantener e/corte de la sierra Deje qua la hoja y la sierra
NOTA:
NOtrabajo.
FUERCE le sierra o is hole en la plaza de trabaJo. Utlltr:esolamante fa |
hagen el
47
[
pmduclr ia rotura de las hojas y la p_rdida de control, y pmvocar dafios a Is pteza de
t_ADVERTENCIA: E! usa de exceslva presi6n puede doblar o retorter ta hoja,
trabajo y leslones persansles graves
CONSEJOS
PARA
LA SIERRA
(Fig. 7a y 7b)
SI slgue estos slmptes consejos ayudard
pfeza de trabajo y de! operador.
a reducfr el desgasie
de _asierra, ta hoJa, la
1, Las hojas cortan par tracdSn o carrera de retmceso_ En trab_Jos _nos coma pane[as o
libra de vidrlo, co}oque el lado buena de la pteza de tmb_jo hacla abajo
2 Corte sofamente con hojas aflladas; hacen el corte m_s defintdo y r_ptdo y ejercen
menos tensiSn on el motor
3 Stempre uliilce ls hoja corrects pars el material qua se coda y stempre tenga hoJas
adictonales a mano para usar cuando las hojas se desafilan Reemplace las hojas
desaflladas, agrieladas o dobladas Inmedtamenteo
4, Stempre selecclones
5, Stempre selecciones
ta ve!ocldad de carte apropiado
la poslc_Sn orbital apropfado.
6.,Cuando code, siempre aseg,3rase de qua fa place de Is zapala descanse itrmemenle
sobre la pieza de trabajo_ Esto mejorard el control del operador y minlmfzard la vlbrac[Sn.
lrabajo slla ho|a no se prolongs m_s alt_ de is zapata y fa pteza de trabaJo a Io
largo det code. Puede pmductr la p_rdtda de contm! y el dafio de la zapata, Io
que aumenta el rtesgo de lesions personales graves (vdaee Fig., 7a y 7b),
............i
Fig, 7a
Cartando
Carrera
J
Madera
/
,rT_-' _
|!r !i; i _!',_I_
! !! ',il_lncorreclo
Correcto
CaPcera
[ncorrecto
48
i
CARTE
DE MADERA
(Fig,
8)
t. S1EMPRE asegure la pieza de trajabo con abrazadaras
2o Saleccione la hoje ap_optada
parr eviler qua se des_tce
3. Seleccione ta posicfOn orbital apropiada.
4, Marque ta tfnea de eerie sabre la p_eza de trabajo+
5, Ertchule la sierra,
6, Coloque la zapata de giro de la sierra flrmementa sabre ia plaza de trabajo con la hoja
tocando tigemmente Ia superltcte de earle,,
7+ Pres+one et interrupter de galtllo y Ilave ta sierra o unas valocidades m_s lenlos
aproptades at empezar un carte, antes de apllcar pres+_n a to hoja y plaza de trabajo
(velocldades ads r_pidos pare mate_ales m,_s blondes, y mds lentos pare matedales
m_,s duros+)
8+ Ho tuerce la sierra ofa heir en fa pieza de trabajo, uttf+ce solamenla prest6n suflcfente
pare qua Io sierra stga codando, Dejo qua la hoJa y la sierra hogan el tmbajoo
9, SIEMPRE sestenga la sierra flrmemente can ambas manes mlenlres eat& certando,
Siempre soster_ga la sierra con la zapala adjustable lirrnemente sabre el malarial de
code,, Esto evttar_ qua la sierra salte o vIbre y ayudard a mlntmtzar ta rolura de ta hojat0. Practice en un padazo de madera de desearte similar o su pedazo de Ifabato+ haste
qua tienee un sentido pare lo funet6n de la sierra°
NOTA: Uffilce guantes
sl realize cortes dumntas
AADVENTENSIA:
per|odes
prolongados+
Pare reduclr el rEesgo de lesions, asegdrase de qua la
HOJA SE PROLONGUE
MAS ALLA de Is zapete y o travda de |a pleza de carte a
!o largo de toda lo carrera (vdase Pdglna 48, Fig, 7a y 7b)+ Los hojas se pueden
romper, doblar o quebrar sf la hoja golpea le zapata ota pteza de lraba|o a un
_ingulo qua sea cast frontal,
49
CARTE
DEMETAL
(Fig,9)
1,
2,
3.
4,
5.
SIEMPRE asegure el t_abajocon abrazaderas pare evllar qua se deslice,
Se_ecctonela hoja adecuada.
Seteccfone la postciSnorbital apropiado,
Marque la Ifnea de carte sabre la plaza de trabejo
Enchufela sierra.
6. Coloque le zapata de gtrode ia sierra firmemente sabre ta pteza de trabajocon la
heja tecando ligeramente la supedicie de cede,
7 Presfonee! Interrupter de gatillo,utft_ceuna velocldad baja (cuando carte malertales
duma) o velocidad m_s rbpido (cusndo comemaleriales m_s blandos)
B No fuerce ta sierra o la hoiaen la pteza de trabaJo ulilicesolamente preet6nsulictenle
pare qua ta sierra alga cortando.Deje que ta hoja y la sierra hagen el trabajo
9. SIEMPRE sostenga la sferra flrmemsntecon ambas manes mientras est_ cortandoy
sostenga la sierra con la zapeta ad_usiableflrmementesabre el material de carte
Esto evttarA qua te sierra salte o vibrey ayudarA a minimizerta recursde Eahoja,
10. Ulificeuna hojam_ fine pare los metales fermses y una m6s gruesa pare los metales
no |BITDSOB,
11. Cuando coda places melt[ices de calibrefine, SIEMPRE sujete con abrezaderas
madera a ambos lades de la ptaca_Esto proporctonarbun carte definidosin excesode
vibracibno rasgaduradel metal.
t2, NO tuerce la hojs de corte_Si fuerza ta hoja reducirb ta vide Otil y podria causerqua se
tampa ta hoja.
NOTA: Recomendamos qua extlenda una palicuta fine de acelte u aires tlpos de
liquldos del torte a Io large de la |inca de carte delanle de la sierra, Esto
permlttr,_ un funclonamlento m_s fd¢ll y ayudar/, a prolonger ia vlda _tl! de la
hole. Cuendo carte alumlnlo, utlllce queros_n.
50
CORTE
DECAVIDADES
ENMADERA
SOLAMENTE
(Fig.10)
Esta sierra es Ideal pate cortes per penetrack_ndirectamenle en superficies qua no se
puedan cedar des'de un borde, Isles come piece o parades. Se puede hacer el corte per
penelractSn de dos manatee diferentes, dependiendo de c{_mose introduzca{a hoja en la
abrazadera de la hoja de ta slerra.
Fig. 10, columnaA mueslra el eerie per penetraciSncon toe deintes de _ hoja hacla
arrlbm
Fig. I0, columna B muestrac6mo hacer el corte per penetracl6n con los dlentesde la heja
hacta abeJo_
NO h_ga un corte per penetracfan en superficies metales
2
t. Mida _a superflcie a ser codada y marque claramente con un l_plz, gramtl o tiza,
2_ Tntroduzca la hoja adecuada en la abrazadefa pare hoJas y ajuste bfen
3. Cotoque la herramlenta con un borde en la place de zapata flrmemente sobre el
matedal (v_,aee A - B- t),
4_ Coleque la exlremldad de la hoja (apegada) en la tinea de corte.
5_ incline la sierra de manera ta! qua Ia hoJa despeje a pteza de Irabajo (v(_ase A - B, 1).
6_ Prestene el gatitlo y con cutdade baje ta hoja de la sierra m6vt! hacta la plaza de trabajo
(v_,ase A - B, 2),,
7 Luego de qua [a hoja penetre la pieza de trabaJo, continue codando con {a sierra per la
Iinea de code (v_ase A - B, 3)
51
CORTE
I
DE CAV|DADES
NOTA: Pars facititar
EN MADERA
SOLAMENTE
(Fig.
lg)
cortt.
utillce una hoja de oaJ_bre gruesoo
e! code per penetraci6n,
1
En matertales gruesos o muy duros, no se debe Inientar reatizar cortes per penetrect6n,
Los cortes de cav_dades en dichos materlales se deben hacer sofamente comenzando el
carte deeds un otificto perforedo de lade a lade en el material qua sea io sufictentemente
grende pars qua entre la hoja,
/_ ADVERTENSIA:
Uttllce extrema precauct6n st emplea esta sierra pars
1
podar drboles llvlanos. Slgs todas lss Instrucctonea
de segur|dad con respecto al
use de la zapsts, ttpo de hojs y carters de le hoJa, Aseg_rase de qua la rams est_
flrmemente
suJeta o fiJa antes de comenzar y mlentras esld cortando,.
1
/_ ADVERTENSIA:
NO REALICE CORTES per enclma de su cabeza. Anttcipe
la treyector|a de la caida de las ramasy asserin con antelacl6n. Preste atenct6n
padlcularmente
s los cables que se encuentran ardba.
CORTE EMBUTIDO (Fig. t'I)
Fig, t I
Et diseho compactode ia carcass
del motor y la zapata de !ongi_ud
ajustab_eI giretoriade es_ sierra le
permite reellzar comes
extremadamente cemanosen pIsos,
e_qutnesy otres _reas
extremadamente ajustadas, Pare
oblenerla m_.ximacapacidadde
esta sierrapars et corteembulido:
!
i
i
i
l
i
l
i
i
i
1. Instate la hojacon los dfentes
hacia abaJo (haole la taps de
la sierra).
i
i
i
i
i
i
i
i
i
i
i
i
i
i
2oAseg_resedequa lazapata se
encuentre an la posict6nm_s
cercanaa la carcass de la sierra
y el dienle
de lahojaest_tan
cema come sea posibie de la
supedicte de tmbajo(Figure 1!)
i
i
=
Ak ADVERTENCIA:
Puede ocurrlr la rotura de la hoJay el dafio de la plaza de
trabajo at la hoja no se prolongs rods a!l_ de Is zapata y ta plaza de treba]o e Io
largo de; corte. Puede pmduclr la p_.rdida de control y e! daBo de le znpata, lo
qua aumenta el rlesgo de leelonaa personales graves (v(rese Paglna 48,
Figures 7a y 7b),=
52
j
I
t
reparacl6n debeser reallzada per un t_cnEco c.'_liftcado en un Centre de Serviette
_ ADVERTENCIA: Pare asegurar le segurtdnd y conflabtlldad, toda
Sears,
desenchu!'e la sierra de la fuente de allmentac|6n
antes de realizer cualquier
i Z_S
ADVERTENCIA:
Per su segurldad,
SIEMPRE apague el tnterrup|or
y
mantenlmlenlo
o tlmpleza,
'1
]
]
Se ha detefmtnado qua las herramlentas eldctdcas es_n sujetas a fallas premaluras
postbles y desgaste aceletado cuando se utilizan sobre betas de libra de vlddo y autos
deportlvos, tablones de pared, compuestos de retteno o yeso. Las asfiilas y residues de
estos metertalos son altamente abrasives psra las plezas de herramtentas eldclrfcas, tales
come rodamientos,
cepil{os, cenmutadores, etc. Consecuentemenie.
no se recomtenda
qua esta herramienta sea utilizada pard Irabalo extenso sobre material de libra de vidrio,
lab_ones de pared, compuesto de relleno o ysso.. Dumnte cuatquIer use sobre eslos
matarIales, es extremadamente
Importante limplar la herramtenta frecuentemente
sopi_,.ndola con un chorro de airs..
durante l_s operaclones
con galas
hertamtent_s
el_)etrlcas,
o st
soplar
el
[ f_terales
Z_S ADVERTENC'A:
Use s'empre
de seguridad
o gafas
con
p rotectores
poivo, SI la operaclbn es polvorlenta, use tambi_n una m_scara antl.-polvo.
CAMBIAR
LAS
ESCOBILLAS
DE CARBON
(Figs
1
12 y 12a)
Juegos de escebtllas de reempfazo estdn d_spontbies per El Centre de Par|as y
Repuestos Sears, S]empre hags un order con el n_mero correcto del parrs, yea la lists
de partss de p_glne 57..
1, Desenchufe la sierra vaivdn antes de revtsando o reempiazar las escobiflas
2. Reemptaza |as dos escobifias de carb6n cuando cue{quiet una tlene manes que t/4
pulg_da longitud de carbSn quedaba, osf el resorte o alambre est_ da,Sado o quemada,
3. Usando un destornlllador
ranumdo, quits Is taps negra de plastlca en eada lade de la
simTa de vaiv_in (Fig. 12 y t2a) cuidosamenle
retire lss montajes de escobillas
cargado-comresortes,
Queda ltmpia _a_ escobitlas y desiizando Jibremenle an sus
canales de guia,
Fig. 12
Ap_
do
_scobii'lo
E.q=_biIIa
R_so_e
dr_Cad_On
(an_'nd_
b_oIre
Tap_
I
NOTA: manera
Pare reempfazar
las mismee
escoblllss,
ensegl3rase
de qua ilnstelan en la 1
mlsma
qua salleron,
Esto evite
un periodo
de demando,.
_3
CAMBIAR
LAS
ESCOBILLAS
DE CARBI_N
(Figs
12 y 12a) coal
4 Encarta 1as montajes de escobillas nuevas en los canaEes de gula con la parle de
carb6n entrando primate, ansegurando co!ocar las dos "orajas" metales an sue ranuTas
en el canal {vet Fig, 12a)o
5 Recuerdas de reemplazar las dos tapes pt_sticNs despu_s de inspaccionar o hacer el
manetentmIento
a Ias escobiilaso Aprieta la tapes bten, pare no las aprieta demasiado,
La sierra de vatv6n debe permftase hacer el rodaje de, (an marchaa vefocldad sin
carga y sin hoJa) pars 5 minutes antes de u_ar, asentar las escobillas nuevas bten
MANTENIMIENTO
I
DE RUTINA
gasoline, pmductos a base de petr61eo, sce!tes penetrantes, etc. entren en
contacto con las plazas pl_stlcas_ Los quimlcos pueden daSar, debiliter o
_ ADVERTENCIA:
NO permlte en ntng_n momenta que flufdo de frenos,
deetrulr et pl_sllco, to cual podHa resultar en leslones personalee graves.
El mantentmfenlo
peribdico lactlita una large vide y una operaci6n libre de problemas,
Mantenga un cronograma de limpiado, lubricacJSn y msntanimiento,
Coma pr&ctiea de
mantenimien!o
preventive corot]n, stga _os psso_ slgutenles:
Z_ ADVERTENCtA:
Pare su segurtdad, SIEMPRE apague et Interrupter
y
desenchufa |a starts de ta fuente de alimentact6n
antes de realizer cualqutar
mantentmlento o llmpiez_,
1. Una vez finalizado el lrabaJo, limpie IN herram|enta pars permttfr
de ta herramlenta a !o largo del tfempo
2, Use pat_os limpios y h0medos pars limpiar b hermmienta,
un buen funclonamlento
3,,Vefl_ique el estado de lodes lob cables el_clricoso
4, Mantenga las aberturas de alre del motor fibres de acelte, grass y aserdn o asttIlas de
readers y guards IN hermmienla an un lugar seco..
5, AsegOrese de qua lodes las pfezas mSvlles esi_n bten lubdcadas, parltcularmente
despu_s de una exposiciSn larga a condicfones de humeclad ylo suciedad.
LUBRICACIC)N
Ls Sierrade valv6nCraftsman® se ha lubrteado adecuadamente y estd lists para utilizer,
No es necesarts m_s lubrtcactSn bale condicfonesde funcionamlento normales,
Se lubrfcaroa lodes los cojinetesde ta sierra pars lode la vfdN_3tilde INherramlenta_
54
ik, ADVERTENCIA:
recomendedos
leetones graves.
La utlltzacl6n
pare esta herramienta
de repuestos o aeceeortos qua no son
podria resultar pelfgrosa y podrfa causer
I
I
I
Lospun[oede venta Seam y otrosde Craftsman ttenen una gran seleccISn de hoj_s pare
sierrasde valvdn en una variedadde longitudes de hojay dfentes per pulgada que son
ldeales pare una amplia variedad de apticactones de come.
SIEMPRE ulfltcela hoJarods corta adecuada pare su tmbajo_peru fo suftctentemente
large come pare qua ta hoja corte a trav_sde! matertai
y da_arse durente el use. Ourante el funeionamiento, las hojaa m_s larges
vtbraro egltarseLee
y causer
la pdrdlda
control,
a |a pieza doblarse
de
I pueden
Z_ PRECAUCI6N:
holes rods
largas del
tfenen
m6s daSoa
pmbabi!_dedde
i
|rabajo y poslbles les_oneapersonales graves.
E1material qua sorts determine et ripede hoja qua debe utilizerGeneralmente,
manes dIentes en la hoJa sacan m_s material y rods rdp_da, pero producen
un torte de acabado brusco_.
M_s dientes cor_n
rods lento peru queda m_s liso
Uttlica una hoja qua sea tevamente m_s grands (larga) qua la pro[undtdad del material
qua va a cortes.
Lee hojas rods anchas (de mayor eepesar)
bnJsces come fa demolicf6n..
son m_s dumderas
y son ideates pare traba10s
Cuande corte madera que tenga clavos incrustados, utilice hojas bi,met_licas
con la
fndlcac{On espec{!_ca en la hoja a en el envase de qua son adecuadas para este propds{Io,
Los puntos de venta de Sears y Qtms de Craftsman tambi@n ofrecen una gran vadedad
de abrazaderas, cabatletes, equipo de seguddad, guantee, alargues y o_ros equtpoe para
ayudarlocon sus necesidades de asen'ado_
Visits su comercto Sears tocai u otros puntos de vents Craftsman
sears_cem/craftsman,
o compre en
/_ ADVERTENCIA: Puede ocurrlr la mtura de la hoja y el daSo de la pteza
de trebajo slla hoja no se pmlonga mr]s atld de la base y la ptezs de trabajo a Io
largo def eerie, Puede productr la p_rdlda de control y el daSo de la base, lo qua
aumenta el riesgo de lestones persanales graves°
55
1
J
_ i_I_°_
w
_w
w_
56
Sierra de Vaivdn - Modelo
No. deiitem
N_mero
de Parte ...........
!
PSR120S-t
2
3
PSRI_OS-2
GGT480PU*3B
4
•
:
No. 172.26043
OescrlpcfSn
MANUA
..........
p.ES360U-24.
. 4
PSR120S-6
,
, ,Cua_.y,
8
9
,
PDIBOOSU-5
PSR!20S*9
,
Tomi[b
Tcmt_[o
io
. Psm2os-lo _
,
Tom_i_
PSRlZOs-_l
19
,?.0
.
F_SR 12(}SV-2_
23
24 .........
25
..............
'202
'
.........
B
4
'"'
t
,
.................
.........
INTERIOR
, ESTA,NTE,,,O,E,,ESCO,BfLLA
BASTIDOR
_=2 .....
1
......
2;
t
t
PES3SQU-27
TORNILLO
2
PSR120S=24
BAFLE
PSR120S-25
PSRt20S-202
MANGA DE COJINETE
ROTOR
I
................
.........
I
1
2B
PSR120S-2B
PSRI20S-27
2B
PSR120S-2B
COJINETE DE BOLA
PRUEBA {}EL POLVO
ARMADURA
............2'9
PSR_20S-29
ANILLO DE RETENIENDO
30
PSRI20S_3(}
ANtLLO OE FERRI
i
31
PSR120S-31
ANILLO
1
.................
32
................
P.S,R'I,20S-32
33
34
35
203
PSR1208-33
PSRt20S-34
.....
I
t
1
.......
DE RETENIENDO
TAPA DE COJINETE
....
COJINETE
ARANDELA
DE BOLA
I
.....................
MONTAJE DE TORNILLO
PLACA DE BASE
3B
PSR120S-36
TAPA DE FONDO
t
37
PSR120S=37
COJINETE
1
3B
3g
....... PSR!20,SV_8
PSRI20SV-39
', PSRt 20Sv-40
PSR120SV41
42
PSR120S-42
coJIN
43
PSR 120SV-,4.3
............
ESTUCHE
46
,
CGTIB3uA-46
PSR120S,45
PSR t 20S-46
DE BOLA
ARANDE:_
bE'RESORTE
ENGRANAJE
............
i'i i'i"i'; ..................
_E_O,_TE
APOYO
CLAVUA
57
, 6 ,, ,
I
PRUEBA D,E AiRE
40'
41
44,
45
................
ANILLO
TUERCA
:
1.......
1
CDT,21BGU-41
PSR120S-203
,
,,,,,,',,,
4,
2
ETtQ U F"TA CLAS IFiCA [_A
............
,
1
TERMINAL
ALAMBRE
MONq'AJE DR SOSTENEDOR DE _scOBIL_
SOSTENEDOR
DE ESCOBILLA
pSR120S*I9
PSR120S-20
2t
t
....
Tom}$!o
PSR120S-14
PSR120S-I5
. PSR120S-20t
PSR120S-18
,
t
Enc,hu!e .........................................
A_MSRE
_TERIOR
...............
13.....................
PSR120SV-!3
..........,201
tB
1
t
Protectar del C_bte
,
:
1
Tomt_lo
6
14
t5
Cent!dad
Y DERECHA
C UBiERTA DEL ORNAMENTO
Abrez_dBm dB _ Cuerda
.......... 5 ..........................
PSR120S-5
.
del Parte
IZQUIERDA
1
I
.....
i
1
I
DE ENGRANAJES
DE C0MPRESION
................... 1 ..........
.............1 .....
1
2
Sierra de Vaiv_n - Modelo
No. dei
Item
N_mero
47
48
49
50
PSR120S-49
,
PSR12(_S:50
Deect}pcl6n
del Perle
Canttd.d
C_VUA
Ci_l_O
AN=LLO-E
4
MANGA DE GO},t,,A
' .......
1
BOTON DE EMPUJE
1
t
52
PSR120S-52
53 ............
PSR120S-53
54
PSRt20SV-54
....
55
57
PSR120S-55
PSR120S-57
_
5B
PSR120S*SB
TAPA DE COJINE']'E
1_
59
PSR120S-59
TDRNILLO
3
.......60
PSR120SJSO
ANILLO DE TP,AN'SFO'MACi(_N
6t
PSR_2oSV,61
P!NfON SHAFT
1
COMPOhtENTE DE RODAM1ENTO DE AGUJA
ANILLO DE RETEN[ENDO
1
1
B2
63
, PSR120S_62
GGT45DIU-SD
64
B5
PSR12DS-10B
PSR12DS_5
..............
204
BB
....................
..............
, PSRt2Ds=lO2
.....
67
6B
PSRt20S.69
7D
71
! PSR120S-70
PSRt20S-7_
72
PSRt20S-72
73
PSR 120S-73
, PSR120S-74
PSR120S-75
7B
RODAM_K) DE CDJNE3E DELSEI..LD
JUNTA DEL SELLO
'
PSR120S-81
PSm20S-82
B3
B4
PSR120S-83
PBR120S_4
9D
9'_
,
4
t
............
..............
1 ......
1
2
1
ANILLO DEL SELLO
SELLO DE FIELTRO
AN!LLO
1
................................
,
1
1
PRUEBA DE AiRE
PRUEBA DE AIRE
1
............................
! ..............
1
......1 ........
BOLA DE ACERO
B2
PSR120S-87
!i
CLAVUA DE RESORrE
.....PORTADOR 2 BASE
.
B1
.....
PSR12OS-BB
PSRI2DS-S9
DE "[ORNILLO
_
.
PSR120S-79
PSRi2OS-80
BB
e9
....
CONJU_
DEL REctPR|CATOR
F..JEDE RECIPRICANDO
CORRECCION
79
aO
B7
f
i
I
SELLO DE FI;ELTRO
PSR120S,-78
PSR1205-205
P:SRi 205V.85
PSFI120S-SB
MONTAJE,,pE ARANDELA
PLACA DE OPRIMA
DE SDPORTE
_
:
. PSR120S*77
....
1
I
MON_TAJE DE ABRAZADERA
COJINETE DE BOLA
,
7B
205
B5
BB
1
.....
ANILLO DE RETENIENDO
,
CDT10gGU,.2B
......... 77
.........
LLAVE
_ PSR120S-67
PSR12DS.,6B
69
TORNLLO
, FIESOR_,_RSIONAL
PSR 120SV-,_D4
PSR120SV.6B
74
75
....
....
51
.......
.
de Parte
_ PSRi_OS-_7
PSR_2OS_B
No. 172.26043
.........
.....
LEVA DE PORTADOR
CLAVUA
ABRAZADERA
1
...............................
DEL ANGULQ .......
MONTAJE DE GUiA DE RODFLLO
TAPA DE COBRE
_
AN_LLO PRUEBA DE A|FIE
i
.......
1.......
2
.........................................
, ,MONTAJE,_E,TQ,RN!t.LO
,,
! ............
1
_1.....
1
.............
4, ,,
ARANDEL_,, '
AN_LLO E
4
4
' 'TAPA suPER'iOR
CLAVUA DE GIRA
i', ........
1
PLACA DEL FENDULO
1
P ESTA£-tA EXTERNO
TAPA
................
PSR120S-BO
PALANCA
............................
PSRI2DS-gl
C LAVIJA
5B
DE PRENSA
1
I
1_
,
,!_ ....
Sierra de Vaiv_n - Modelo
No. 172.26043
CanUdad
No, de| item
92
93
PSRt20S*92
PSR120S-93
CLAVUAAHUECADO
..........
RESORTE DE COMPRESION
1
1
94
PSRtEOS-g4
CLAVIJA C_t._NDRICO
I
Psm2os-gs
EJEDEL_E DEROTACtON
1
95
96
97
PSR12QS-96
PSR120S-97
ANILLO FRUEBA DE AIRE
::RESORTE DE COMPREStON
98
PSR120S*gB
BLOQUE
99
PSR120SV-99
PLACA DE OPRfMA
100
PSR 120S-t
10t
102
PSR1EOSV-I0t
_iQUETA
FSR1EOS-102
TORN|LLO
I
103
t04
PSR120S-t03
ARANDELA
4
PSRt20S*I04
RESORTE
105
PSRI2OSV*105
CONTRAPESO
!08
CUSIERTA
107
PSR!20SV-t06
PSRI20SV-I07
108
SW57.31ol-OD
MONTAJE
!Q9
PSRt20SV-t09
ARANDELA
1
110
PSRI20SV-110
111
PSR120S.i09
EOOA_ ENTD DE COJ_ETE, DEL8ELLO ..................
TORNILLO
1
2
O0
TA_ETA
1
2
DE OPRIMA
DE _
FUEN_
1
t
DE
ALiME'NTAClON
DE MARCA
i
TORSIONAL
MEDIA
1
,
1
.........
1
C_vtIa
59
t
3
DE TORNILLO
,
4
lawn and garden equipment, or heaEing and cooling systems,
no matter who made it, no matter who sold Itl
!:z:ilr:::_
::_:i;i
For the replacement parts, accessories and
owner's manuals that you need to do-it-yourself
For Sears professional installation of home appliances
and items like garage door openers and water heaters.
1-800.4-MY-HOME _ (1-e_o.4_.4Bs_)
Call anylima, day or nlght(U SA_ and Canada)
Our
Home
.:
For repair of carry-in items like vaculJms, lawn equipment,
and etectronlcs, call anytime [or the location of your nearest
Sears Paris & Repair Service
1-800.488-1222
W'WW,.t; _a_
(u.sJ_,)
Center
1-800.469.4663
.corn
_J_aarB
_::::ii
_-::_;
......
:;':
(Canada)
j::._
To purchase a proteclion agreement on a product servicad by Sears:
1.,800-827-6655(U.S.A.)
:i
Para pedirserv[ctode r_paracf_n
a domlc_lio,y paraordenar plazas:
1,.SBB.SU-HOGAR ®
11.,BB8-784-6427)
1.800-361-6665 (Canada)
Au Canadapourserviceen fran_;.afs:
1.800 j..E.FOYER_
(1-800-G33-6937)
www_saars,ca
, ealrN
! :ii::;
:_;!i