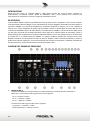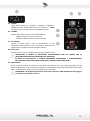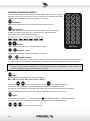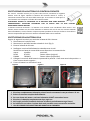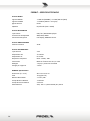
1
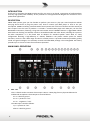
FREE8LT Portable Sound System USER’S MANUAL ENGLISH ITALIANO 96MAN00094-REV.18/14 This page is intentionally left blank. 2 DISPOSAL OF OLD ELECTRICAL & ELECTRONIC EQUIPMENT 4 VRLA BATTERIES SAFETY INSTRUCTIONS 4 GENERAL SAFETY INSTRUCTIONS 4 IN CASE OF FAULT 4 PACKAGING, SHIPPING AND COMPLAINT 5 WARRANTY AND PRODUCTS RETURN 5 MAINTENANCE AND DISCLAIMER 5 POWER SUPPLY 5 USER’S WARNINGS AND CE CONFORMITY 5 INTRODUCTION 6 DESCRIPTION 6 MAIN PANEL OPERATIONS 6 REMOTE CONTROL OPERATIONS 12 REMOTE CONTROL BATTERY REPLACEMENT 13 VRLA BATTERY OPERATIONS AND REPLACEMENT 13 FREE8LT - TECHNICAL SPECIFICATION 14 3 DISPOSAL OF OLD ELECTRICAL & ELECTRONIC EQUIPMENT This marking shown on the product or its literature, indicates that it should not be disposed with other household wastes at the end of its working life. To prevent possible harm to the enviroment or human health from uncontrolled waste disposal, please separate this from other types of wastes and recycle it responsibly to promote the sustainable reuse of material resources. Household users should contact either the retailer where they purchased this product, or their local government office, for details of where and how they can take this item for environmentally safe recycling. Business users should contact their supplier and check the terms and conditions of the purchase contract. This product should not be mixed with other commercial wastes for disposal. This product contains an internal Valve Regulated Lead Acid (VRLA) battery: VRLA batteries must be recycled at the end of life in accordance with local and national laws and regulation. VRLA BATTERIES SAFETY INSTRUCTIONS • CAUTION – Special safety precaution must be taken when using and replacing VRLA batteries, including the following: • The replacement should be made or supervised by professionals with suitable protection. The batteries for replacement must be always same as the old ones in model and type. • WARNING – Do not smoke or use fire near VRLA batteries. • WARNING – Do not use any organic cleaner to clean VRLA batteries. • WARNING – Do not put the VRLA batteries on fire, or they will explode. • WARNING – Do not cut open the VRLA batteries, they contain electrolyte which is toxic to skin and eyes. • WARNING – VRLA batteries release hydrogen gas which can form explosive mixture in air, do not place inside a sealed container. • WARNING – VRLA batteries may cause shock and short. Please remove the watch and jewellery as rings when replace the battery, also please operate with insulating tools. GENERAL SAFETY INSTRUCTIONS • CAUTION - Before using this product read carefully the following safety instructions. Take a look of this manual entirely and preserve it for future reference. When using any electric product, basic precautions should always be taken, including the following: • To reduce the risk, close supervision is necessary when the product is used near children. • Protect the apparatus from atmospheric agents and keep it away from water, rain and high humidity places. • This product should be site away from heat sources such as radiators, lamps and any other device that generate heat. • Care should be taken so that objects and liquids do not go inside the product. • The product should be connected to a power supply only of the type described on the operating instructions or as marked on the product. IN CASE OF FAULT In case of fault or maintenance this product should be inspected only by qualified service personnel when: • • Liquids have spilled inside the product. • The product has fallen and been damaged. • The product does not appear to operate normally or exhibits a marked change in performance. Do not operate on the product, it has no user-serviceable parts inside. • 4 • Refer servicing to an authorized maintenance centre. PACKAGING, SHIPPING AND COMPLAINT • This unit package has been submitted to ISTA 1A integrity tests. We suggest you control the unit conditions immediately after unpacking it. • If any damage is found, immediately advise the dealer. Keep all unit packaging parts to allow inspection. • Proel is not responsible for any damage that occurs during shipment.. • Products are sold “delivered ex warehouse” and shipment is at charge and risk of the buyer. • Possible damages to unit should be immediately notified to forwarder. Each complaint for manumitted package should be done within eight days from product receipt. WARRANTY AND PRODUCTS RETURN • Proel products have operating warranty and comply their specifications, as stated by manufacturer.. • Proel warrants all materials, workmanship and proper operation of this product for a period of two years from the original date of purchase. If any defects are found in the materials or workmanship or if the product fails to function properly during the applicable warranty period, the owner should inform about these defects the dealer or the distributor, providing receipt or invoice of date of purchase and defect detailed description. This warranty does not extend to damage resulting from improper installation, misuse, neglect or abuse. Proel S.p.A. will verify damage on returned units, and when the unit has been properly used and warranty is still valid, then the unit will be replaced or repaired. Proel S.p.A. is not responsible for any "direct damage" or "indirect damage" caused by product defectiveness. MAINTENANCE AND DISCLAIMER • Clean only with dry cloth. • Proel products have been expressly designed for audio application, with signals in audio range (20Hz to 20kHz). Proel has no liability for damages caused in case of lack of maintenance, modifications, improper use or improper installation non-applying safety instructions. • Proel S.p.A. reserves the right to change these specifications at any time without notice. • Proel S.p.A. declines any liability for damages to objects or persons caused by lacks of maintenance, improper use, installation not performed with safety precautions and at the state of the art. POWER SUPPLY • This apparatus should only be connected to power source type specified in this owner’s manual or on the unit. • If the supplied AC power cable plug is different from the wall socket, please contact an electrician to change the AC power plug. • Hold the plug and the wall outlet while disconnecting the unit from AC power. • If the unit will not be used for a long period of time, please unplug the power cord from AC power outlet. • To avoid unit power cord damage, please do not strain the AC power cable and do not bundle it. • In order to avoid damages, please ensure that the power cord is not stepped on or pinched by heavy objects. USER’S WARNINGS AND CE CONFORMITY • The product is in compliance with Directive LVD 2006 / 95 / EC as stated in EN 60065 standard. • PROEL S.p.A hereby, declares that this product complies with the essential requirements and other relevant provisions of Directive 2004/108/EC (EMC), as stated in EN 55103-1 and EN 55103-2 standards. 5 INTRODUCTION Thank you for choosing this PROEL product and for your trust in our brand, synonymous of professionalism, accuracy, high quality and reliability. All our products are CE approved and designed for continuous use in professional applications. DESCRIPTION PROEL FREE systems gives you the freedom to perform your music or play your sound anywhere without worrying about where to plug the power cord, how to connect your MP3 player or how to set your microphone. FREE8LT is battery powered combo sound systems with a full set of features and the sound you don’t expect from this kind of products. It includes a versatile MP3 player with USB port, SD slot and BLUETOOTH connection, featuring a large LCD and remote control. FREE8LT features a rugged MDF cabinet with black PVC finishing and includes a built-in retractable handle and roller wheels, allowing the system to be taken everywhere. It is also fitted with an adapter for standard speaker stand. With its 2-way configuration featuring a high-efficiency 3” tweeter, FREE8LT is the perfect combo system for mobile musicians, vocal P.A. and a wide range of indoor or outdoor events. It provides maximum portability, quality sound and good coverage in an extremely versatile and affordable package. The rechargeable 12V battery provides up to 2-3 hours of mains free continuous operation. MAIN PANEL OPERATIONS 1. 6 MIC 1 IN This is a female combo connector that accepts a XLR or a JACK plug from any dynamic balanced or unbalanced microphone. The XLR input is wired as follows: Pin 1 = shield or ground Pin 2 = + positive or "hot" Pin 3 = - negative or "cold" The JACK input is wired as follows: Tip = + positive or "hot" Sleeve = shield or ground 2. MIC 1 LEVEL This potentiometer sets the level of the MIC 1 IN input. 3. INS/MIC 2 IN This is a female jack connector that accepts a balanced or unbalanced JACK plug from any dynamic balanced microphone or instrument pickup. The balanced JACK input is wired as follows: Tip = + positive or "hot" Ring = - negative or "cold" Sleeve = shield or ground The unbalanced JACK input is wired as follows: Tip = + positive or "hot" Sleeve = shield or ground 4. INS/MIC 2 LEVEL This potentiometer sets the level of the MIC 2 IN input. 5. LINE STEREO 3/4 IN (RCA) These are two RCA female connectors that accept two RCA plug from LEFT and RIGHT channels of a line level auxiliary source, each RCA input is wired as follows: Tip = + positive or "hot" Sleeve = shield or ground 6. LINE STEREO 3/4 IN (MINI JACK) This is a MINI JACK (3.5mm) female connector that accepts a STEREO MINI JACK plug from Computer / CD / DVD / MP3 players. The MINI JACK is wired as follows: Tip = positive signal of left channel Ring = positive signal of right channel Sleeve = shield or ground 7. LINE STEREO 3/4 LEVEL This potentiometer sets the level of the LINE STEREO 3/4 input or the internal player. 8. ST IN/MP SWITCH Use this switch to select the external player connected at RCA or MINI JACK connectors or the internal Media Player as the source for the input channel 3/4. 9. SD SLOT This slot is where you can insert a SD MEMORY CARD containing audio files. 10. USB SLOT This slot is where you can insert an USB FLASH DRIVE containing audio files. 11. MODE SWITCH Pressing this switch you can select the source containing audio files between SD, USB or external Bluetooth player device. A small icon appears on the display that identify the memory currently used: USB FLASH DRIVE SD MEMORY CARD BLUETOOTH DEVICE Preferably use only reliable memories (suggested brands are: Sandisk, Kingston, Lexar, Verbatim). 7 To connect a Bluetooth device follow the instructions for the device to be connected. Select BLUETOOTH DEVICE by pressing MODE button and, if the device is close enough, it is recognized after few seconds. If this doesn’t happen, try again pressing the PLAY button and, at the same time, restarting the search procedure in the external Bluetooth device. Press MODE… Press PLAY to connect … BT device connected. NOTE: the audio file types and quality playable with Bluetooth connection depends on the Bluetooth device used. Press and hold MODE button and the following utility menu will appear: Use and buttons to browse the options, press button to select an option. Recently reconnection: selecting this option the media player tries to reconnect the latest Bluetooth device connected. EQ: selecting this option the following menu will appear. In this menu you can choose an equalization for the audio files to be reproduced: Normal, Pop, Rock, Jazz, Classic, Country, Bass enhance. After an EQ setting has been chosen, a small icon in the main screen will show the choice. Deleted paired info: selecting this option the information about any Bluetooth device previously paired with the media player will be cancelled. Try this option if you have problems to set a new BT connection. Device Information: selecting this option the following info screen will appear, showing the name and address of the FREE8LT Bluetooth receiver. Exit: returns to the main screen. 8 12. PLAY/PAUSE This button plays or pauses the current audio file. 13. STOP This button stops the current audio file. If you press again the play button, the song will restart from the beginning. 14. PLAY MODE This button changes the play mode of the audio files. A small icon on the display shows the current mode. NORMAL: normal forward play of all songs contained in all memories and all folders, when it reaches the latest song it will stop playing. RANDOM: it plays all songs contained in all memories and all folders randomly. INTRO: it plays the first 10 seconds of each song contained in the current folder. ALL: same as normal playing but when it reaches the latest song it restarts from the first. SINGLE ONE: it plays only the current song then stops. FOLDER: it plays all song contained in the current folder. Brief explanation of how the player works. When you insert an SD memory card or USB flash drive in the respective slot, the player scrolls the entire content of the memory locating all audio file that can be played (files with .WAV .MP3 .WMA extensions). All files will be played in numerical and alphabetical order, considering first the “name of the folder” and then the “name of the file”. Example of use: insert a memory into a slot, the player starts playing the first song in numerical and alphabetical order. Press PLAY MODE button to choose INTRO, then wait until you hear the song you want to listen. Then press again the PLAY MODE button to choose FOLDER to play all songs contained in that folder or SINGLE ONE to play only the selected song. 15. PREVIOUS SONG Skip to previous song. 16. NEXT SONG Skip to the next song. Pressing and hold or you set the digital volume of the internal media player. We suggest to let this volume always at the maximum and to adjust the level of the player using the CH3/4 level potentiometer. 17. IR RECEIVER This is the remote control IR receiver. 9 18. LCD DISPLAY The LCD DISPLAY shows several data: 19. HIGH This potentiometer sets the HIGH TONE level: if rotated clockwise it enhances the highs, if rotated counter-clockwise it reduces the highs (in the centre position the response is flat). 20. LOW This potentiometer sets the LOW TONE level: if rotated clockwise it enhances the lows, if rotated counter-clockwise it reduces the lows (in the centre position the response is flat). 21. EFFECT This potentiometer sets the level of the effect applied to the MIC IN 1 input. 22. MAIN MIX This potentiometer sets the general level of all signals. 23. ON GREEN LED that shows the “ON” status of the FREE8LT. 24. BATTERY LEVEL This LED bar indicates the battery charging status as follows: - 3 GREEN: the internal battery is fully charged. - 2 GREEN: the internal battery is half charged. - 1 GREEN: the internal battery is near to be exhaust, you have to re-charge it as soon as possible. - LOW/RED: FREE8LT cannot be used disconnected from mains and you must re-charge the battery. - OFF: the internal battery is disconnected or not present. 10 25. POWER Use this switch to power ON or OFF the FREE8LT. The FREE8LT is "ON" when the switch is in the "I" position. NOTE: The internal battery is charging even if the FREE8LT is OFF. 26. CHARGE This LED indicates the battery charging status as follows: - GREEN: the internal battery is charging. - OFF: the internal battery is charged 27. AC~ SOCKET Here’s where you plug in your mains supply cord. You should always use the mains cord supplied with the device. Be sure that your device is turned off before you plug the mains supply cord into an electrical outlet. 28. FUSE holder Here is where the mains protection fuse is placed. REPLACE THE PROTECTION FUSE ONLY WITH THE SAME TYPE. IF, AFTER THE REPLACEMENT, THE FUSE INTERRUPTS AGAIN, DO NOT TRY AGAIN THEN CONTACT THE PROEL SERVICE CENTER. 29. LINE VOLTAGE This switch sets the AC voltage line of your country (usually it is set by factory and isn't necessary to change it). The 115V setting is for mains line in the range of 105-120V~ and 230V setting is for mains line in the range of 210-240V~. WARNING: an incorrect setting of AC LINE VOLTAGE could damage seriously the internal electronics! 11 REMOTE CONTROL OPERATIONS The use of the player and its remote control depends on the type of media utilized. Some buttons are active or not active depending if an SD CARD, a USB memory or a BLUETOOTH device is used to reproduce the audio files. PLAY/PAUSE This button plays or pauses the current audio file. EQ equalization Using this button you can choose different types of equalization for the audio files: Normal, Pop, Rock, Jazz, Classic, Country, Bass enhance. On the display you can see in sequence: VOLUME Press this button to reduce or increase the volume. PREVIOUS – NEXT Press to skip to the previous or the next song. NUMERIC KEYPAD Jumps directly to a specific song. All songs contained in a memory media are sorted in a list in numerical and alphabetical order: selecting a number you can play immediately the corresponding song in this list. A simple trick: by renaming the song files contained in a memory stick with a two number prefix you can quickly jump to a specific song corresponding to that number For example: 01filename.mp3, 02 filename.wma and so on. ENTER Pressing this button you enter in a sub-menu with the following options: EQ PLAY MODE CHANGE DEVICE EXIT buttons to browse the options and to select an option. Use the See the corresponding point in this paragraph for the description of the EQ option. See the corresponding point in the previous paragraph for the description of the PLAY MODE options. The CHANGE DEVICE option corresponds to the use of MODE button (see following point). MODE USB FLASH DRIVE SD MEMORY CARD This button switches between Press and hold the MODE button to switch off and on the MEDIA PLAYER. These buttons are not used. 12 BLUETOOTH DEVICE REMOTE CONTROL BATTERY REPLACEMENT To use the remote control for the first time you need to remove the protective sticker as shown in the figure. When the battery of the remote control is discharged, you need to replace it with a new one of the same type. Instructions about how to open the battery compartment are printed on the remote control body. BE CAREFUL: DANGER OF EXPLOSION IF BATTERY IS INCORRECTLY REPLACED. REPLACE ONLY WITH SAME TYPE: CR 2025 LITHIUM MANGANESE DIOXIDE BATTERY. The battery contains Perchlorate Material – special handling may apply, it should not be disposed with other household wastes at the end of its working life. To prevent possible harm to the environment or human health from uncontrolled waste disposal, please separate this from other types of wastes and recycle it. VRLA BATTERY OPERATIONS AND REPLACEMENT Follow the instructions below to replace the internal sealed VRLA battery: 1. Disconnect the mains plug from the wall outlet. 2. Remove the side cover unscrewing the four screws (fig.1). 3. Take out the battery from the box (fig.2). 4. Disconnect the battery terminals (fig.3), avoiding carefully any shorts between them. Replace the battery with a new one with same size and characteristics: brand: model: terminals: RITAR RT1250 Faston 4.8mm (original) FIAMM FG20451 Faston 4.8mm (equivalent) 5. Connect the battery terminals respecting the polarity: red wire at positive + terminal and black wire at negative – terminal. 6. Fix the batteries and close the cover. Figure 1 Figure 2 Figure 3 IMPORTANT WARNINGS FOR A CORRECT USE OF THE BATTERY: 1. Fully charge the battery before using it: connect the system to mains at least 12h. 2. Avoid completely draining the battery. 3. For maximum life, drain the battery 80% once a month. 4. Charge the battery completely after each use. 5. For long-term storage, periodically recharge the battery, once every 2 months. 6. If you do not charge the battery for 6 months, it may not charge and it must be replaced. 7. A MISUSE OF THE BATTERY VOIDS ITS WARRANTY. 13 FREE8LT - TECHNICAL SPECIFICATION 14 MIXER Section MONO inputs STEREO inputs Internal Effect Main EQ 1 x MIC IN (COMBO) + 1 x INST/MIC IN (JACK) 1 x LINE IN (2xRCA + mini-jack) ECHO 2-band EQ (HIGH + LOW) MULTIMEDIA Section Player Type Compatible File Formats Control Interface USB / SD / BLUETOOTH player WAV, MP3, WMA LCD display, REMOTE control AMPLIFIER Section Continuous Power 20 W LOUDSPEAKER Section Loudspeaker System High Frequency Device Low Frequency Device Frequency Response Construction Handles Pole Holder 2-way system 3" tweeter 8” woofer 65Hz - 15KHz, -3dB MDF with black PVC finishing, 2 wheels 1 top, 1 rear retractable 1 bottom GENERAL Specifications Dimensions (W x H x D) Weight Recharge Battery Battery Recharging Time Battery Working Time Power Supply 46.5 x 51 x 37.5 cm 12 Kg (26.5 lb) 1 x 12V / 5Ah 7-10 hours 2-3 hours 230 / 115 V~ (switchable) 50 / 60 Hz TRATTAMENTO DEL DISPOSITIVO ELETTRICO OD ELETTRONICO A FINE VITA 16 ISTRUZIONI PER LA SICUREZZA PER LE BATTERIE VRLA 16 AVVERTENZE PER LA SICUREZZA 16 IN CASO DI GUASTO 16 IMBALLAGGIO, TRASPORTO E RECLAMI 17 GARANZIE E RESI 17 MANUTENZIONE E LIMITAZIONI D’USO 17 ALIMENTAZIONE 17 AVVERTENZE PER L’UTILIZZO E CONFORMITÀ CE 17 INTRODUZIONE 18 DESCRIZIONE 18 FUNZIONI DEL PANNELLO PRINCIPALE 18 FUNZIONI CONTROLLO REMOTO 24 SOSTITUZIONE DELLA BATTERIA DEL CONTROLLO REMOTO 25 SOSTITUZIONE DELLA BATTERIA VRLA 25 FREE8LT – SPECIFICHE TECNICHE 26 15 TRATTAMENTO DEL DISPOSITIVO ELETTRICO OD ELETTRONICO A FINE VITA Il marchio riportato sul prodotto o sulla documentazione indica che il prodotto non deve essere smaltito con altri rifiuti domestici al termine del ciclo di vita. Per evitare eventuali danni all’ambiente si invita l’utente a separare questo prodotto da altri tipi di rifiuti e di riciclarlo in maniera responsabile per favorire il riutilizzo sostenibile delle risorse materiali. Gli utenti domestici sono invitati a contattare il rivenditore presso il quale è stato acquistato il prodotto o l’ufficio locale preposto per tutte le informazioni relative alla raccolta differenziata e al riciclaggio per questo tipo di prodotto. Gli utenti aziendali sono invitati a contattare il proprio fornitore e verificare i termini e le condizioni del contratto di acquisto. Questo prodotto non deve essere smaltito unitamente ad altri rifiuti commerciali. Questo prodotto contiene una batteria piombo-acido regolata da valvola (VRLA): le batterie VRLA esauste sono considerate rifiuti tossici e devono essere smaltite in ottemperanza alla normativa vigente. ISTRUZIONI PER LA SICUREZZA PER LE BATTERIE VRLA • ATTENZIONE – Speciali precauzioni per la sicurezza devono essere prese quando si usano o sostituiscono le batterie VRLA, incluse le seguenti: • La sostituzione deve essere eseguita o supervisionata da professionisti muniti di idonee protezioni. Le batterie in sostituzione devono essere sempre dello stesso modello e tipo di quelle da sostituire. • ATTENZIONE – Non fumare o usare fiamme in prossimità di batterie VRLA. • ATTENZIONE – Non usare solventi organici per pulire le batterie VRLA. • ATTENZIONE – Non gettare batterie VRLA sul fuoco altrimenti esplodono. • ATTENZIONE – Non tagliare ne aprire le batterie VRLA, esse contengono un elettrolita che è tossico sia per la pelle che per gli occhi. • ATTENZIONE – Le batterie VRLA rilasciano gas idrogeno che può formare una miscela esplosiva in aria, non collocarle all’interno di spazi siggillati. • ATTENZIONE – Le batterie VRLA possono provocare scossa elettrica. Togliersi orologi e bracciali metallici quando si sostituiscono le batterie ed usare esclusivamente attrezzi isolati. AVVERTENZE PER LA SICUREZZA • ATTENZIONE – Prima di utilizzare il prodotto, si prega di leggere attentamente le seguenti istruzioni per la sicurezza. Prendere visione del manuale d’uso e conservarlo per successive consultazioni. Durante l’uso di un prodotto elettrico devono essere sempre prese precauzioni di base onde evitare danni a cose o persone, incluse le seguenti: • In presenza di bambini, controllare che il prodotto non rappresenti un pericolo. • Posizionare l’apparecchio al riparo dagli agenti atmosferici e a distanza di sicurezza dall’acqua, dalla pioggia e dai luoghi ad alto grado di umidità. • Collocare o posizionare il prodotto lontano da fonti di calore quali radiatori, griglie di riscaldamento e ogni altro dispositivo che produca calore. • Evitare che qualsiasi oggetto o sostanza liquida entri all’interno del prodotto. • Il prodotto deve essere connesso esclusivamente alla alimentazione elettrica delle caratteristiche descritte nel manuale d’uso o scritte sul prodotto. IN CASO DI GUASTO • • 16 In caso di guasto o manutenzione questo prodotto deve essere ispezionato da personale qualificato quando: • Sostanze liquide sono penetrate all’interno del prodotto. • Il prodotto è caduto e si è danneggiato. • Il prodotto non funziona normalmente esibendo una marcato cambio di prestazioni. Non intervenire sul prodotto. Rivolgersi a un centro di assistenza autorizzato Proel. IMBALLAGGIO, TRASPORTO E RECLAMI • L’imballo è stato sottoposto a test di integrità secondo la procedura ISTA 1A. Si raccomanda di controllare il prodotto subito dopo l’apertura dell’imballo. • Se vengono riscontrati danni informare immediatamente il rivenditore. Conservare quindi l’imballo completo per permetterne l’ispezione. • Proel declina ogni responsabilità per danni causati dal trasporto. • Le merci sono vendute “franco nostra sede” e viaggiano sempre a rischio e pericolo del distributore. • Eventuali avarie e danni dovranno essere contestati al vettore. Ogni reclamo per imballi manomessi dovrà essere inoltrato entro 8 giorni dal ricevimento della merce. GARANZIE E RESI • I Prodotti Proel sono provvisti della garanzia di funzionamento e di conformità alle proprie specifiche, come dichiarate dal costruttore. • La garanzia di funzionamento è di 24 mesi dopo la data di acquisto. I difetti rilevati entro il periodo di garanzia sui prodotti venduti, attribuibili a materiali difettosi o difetti di costruzione, devono essere tempestivamente segnalati al proprio rivenditore o distributore, allegando evidenza scritta della data di acquisto e descrizione del tipo di difetto riscontrato. Sono esclusi dalla garanzia difetti causati da uso improprio o manomissione. Proel SpA constata tramite verifica sui resi la difettosità dichiarata, correlata all’appropriato utilizzo, e l’effettiva validità della garanzia; provvede quindi alla sostituzione o riparazione dei prodotti, declinando tuttavia ogni obbligo di risarcimento per danni diretti o indiretti eventualmente derivanti dalla difettosità. MANUTENZIONE E LIMITAZIONI D’USO • Pulire il prodotto unicamente con un panno asciutto. • I Prodotti Proel sono destinati esclusivamente ad un utilizzo specifico di tipo sonoro: segnali di ingresso di tipo audio (20Hz-20kHz). Proel declina ogni responsabilità per danni a terzi causati da mancata manutenzione, manomissioni, uso improprio o installazione non eseguita secondo le norme di sicurezza. • Proel S.p.A. si riserva di modificare il prodotto e le sue specifiche senza preavviso. • Proel S.p.A. declina ogni responsabilità per danni a terzi causati da mancata manutenzione, manomissioni, uso improprio o installazione non eseguita secondo le norme di sicurezza e a regola d'arte. ALIMENTAZIONE • Il prodotto deve essere connesso esclusivamente alla alimentazione elettrica delle caratteristiche descritte nel manuale d’uso o scritte sul prodotto. • Se la spina in dotazione non combacia con la presa, rivolgersi ad un elettricista per far installare una presa appropriata. • Quando si scollega l’apparato alla rete tenere saldamente sia la spina che la presa. • Quando l’unità non viene utilizzata per un periodo prolungato, interrompere l’alimentazione estraendo la spina dalla presa dell’alimentazione. • Per evitare danni alla linea d’alimentazione dell’apparato, non mettere in trazione il cavo d’alimentazione e non utilizzare un cavo attorcigliato. • Per evitare il danneggiamento del cavo d’alimentazione dell’apparato, assicurarsi che questo non venga calpestato o schiacciato da oggetti pesanti. AVVERTENZE PER L’UTILIZZO E CONFORMITÀ CE • I Prodotti Proel sono conformi alla direttiva LVD 2006 / 95 / EC, secondo lo standard EN 60065. • PROEL S.p.A dichiara che questo prodotto (escluso il sistema del radio microfono) è conforme ai requisiti essenziali ed alle altre disposizioni pertinenti stabilite dalla direttiva 2004/108/EC (EMC), secondo gli standard EN 55103-1 e EN 55103-2. 17 INTRODUZIONE Grazie per aver scelto un prodotto PROEL e della fiducia riposta nel nostro marchio, sinonimo di professionalità, accuratezza, elevata qualità ed affidabilità. Tutti i nostri prodotti sono conformi alle normative CE per utilizzazione continua in impianti di diffusione sonora. DESCRIZIONE I sistemi FREE di PROEL vi offrono la possibilità di suonare la vostra musica o amplificare il vostro suono in libertà, senza preoccuparvi di dove collegare il cavo di alimentazione, di come collegare il lettore MP3 o di come regolare il microfono. FREE8LT è un sistema di amplificazione combinato alimentato a batteria, con un set completo di funzioni ed un suono inaspettato per questo tipo di prodotto. Include un lettore MP3 con porta USB, slot SD e connessione BLUETOOTH, dotato di ampio display e controllo remoto. FREE8LT è costruito in robusto MDF rifinito con PVC nero ed include una maniglia telescopica e due ruote per la massima libertà di movimento, inoltre è dotato di flangia per l’installazione su supporto standard per diffusori. Con la sua configurazione a 2 vie che utilizza un tweeter da 3” ad elevata efficienza, FREE8LT è il sistema combinato perfetto per musicisti on-the road, diffusione vocale ed una vasta gamma di eventi al chiuso o all’aperto. Offre la massima portabilità, un suono di qualità ed una buona copertura in un formato estremamente versatile e conveniente. La batteria ricaricabile da 12V fornisce fino a 2-3 ore di funzionamento senza alimentazione di rete. FUNZIONI DEL PANNELLO PRINCIPALE 1. 18 INGRESSO MIC 1 Connettore COMBO che accetta un XLR o un JACK da qualsiasi microfono dinamico bilanciato o sbilanciato. Le terminazioni dell' ingresso XLR sono le seguenti: Pin 1 = schermo o massa Pin 2 = + positivo o "caldo" Pin 3 = - negativo o "freddo" Le terminazioni dell' ingresso JACK sono le seguenti: Tip (punta) = + positivo o "caldo" Sleeve (manicotto) = schermo o massa 2. 3. 4. 5. 6. 7. 8. 9. 10. 11. LIVELLO MIC 1 Potenziometro per la regolazione del livello dell’ingresso MIC 1 IN. INGRESSO INS/MIC 2 Connettore jack femmina che accetta uno spinotto JACK da qualsiasi microfono dinamico bilanciato o sbilanciato. Le terminazioni dell' ingresso JACK bilanciato sono le seguenti: Pin 1 = schermo o massa Pin 2 = + positivo o "caldo" Pin 3 = - negativo o "freddo" Le terminazioni dell' ingresso JACK sbilanciato sono le seguenti: Tip (punta) = + positivo o "caldo" Sleeve (manicotto) = schermo o massa LIVELLO INS/MIC 2 Potenziometro per la regolazione del livello dell’ingresso MIC 2 IN. INGRESSO LINE STEREO 3/4 (RCA) Due connettori femmina RCA che accettano due RCA maschio dai canali sinistro e destro di una sorgente ausiliaria con livello linea, ogni ingresso RCA è terminato come segue: Tip (punta) = + positivo o "caldo" Sleeve (manicotto) = schermo o massa INGRESSO LINE STEREO 3/4 (MINI JACK) Connettore femmina MINI JACK (3.5mm) che accetta un JACK MINI STEREO maschio da una sorgente ausiliaria Computer / CD / DVD / MP3. Il MINI JACK è terminato come segue: Tip (punta) = segnale positivo del canale sinistro Ring (anello) = segnale positivo del canale destro Sleeve (manicotto) = schermo o massa LIVELLO LINE STEREO 3/4 Potenziometro per la regolazione del livello dell’ingresso LINE STEREO 3/4 o del media player interno. TASTO ST IN/MP Usate questo tasto per selezionare un lettore esterno connesso agli ingressi RCA o MINI JACK oppure il Media Player interno come sorgente per il canale 3/4. SD SLOT In questa fessura potete inserire una memoria tipo SD (SD MEMORY CARD) contenente file audio. USB SLOT In questa fessura potete inserire una memoria tipo USB (USB FLASH DRIVE) contenente file audio. MODE SWITCH Premendo questo tasto si sceglie la sorgente contenente i file audio fra SD, USB o un lettore Bluetooth esterno. Una piccola icona appare sul display per identificare la memoria corrente: USB FLASH DRIVE SD MEMORY CARD BLUETOOTH DEVICE Preferibilmente usare solo memorie affidabili, marchi suggeriti sono: Sandisk, Kingston, Lexar, Verbatim. 19 Per connettere un lettore Bluetooth seguite le istruzioni del dispositivo. Selezionate BLUETOOTH premendo il tasto MODE e se il dispositivo BT è sufficientemente vicino sarà riconosciuto dopo qualche secondo. Se ciò non accadesse, provate nuovamente premendo il tasto PLAY e, allo stesso tempo, fate ripartire la procedura di ricerca nel dispositivo Bluetooth esterno. Premere MODE… Premere PLAY per connettersi … dispositivo BT connesso. NOTA: il tipo di file audio e la qualità di riproduzione con la connessione Bluetooth dipende dal dispositivo Bluetooth usato. Tenendo premuto il tasto MODE compare il seguente menu di utilità. Usate i tasti e per scorrere le opzioni e premete il tasto per selezionarne una. Recently reconnection: scegliendo questa opzione il media player prova a riconnettere l’ultimo dispositivo Bluetooth connesso. EQ: scegliendo questa opzione appare il seguente menu. Con questa opzione potete impostare una equalizzazione per i file audio da riprodurre: Normale, Pop, Rock, Jazz, Classic, Country, esaltazione Bassi. Una piccola icona nella schermata principale conferma la scelta effettuata: Deleted paired info: scegliendo questa opzione tutte le informazioni relative ai dispositivi Bluetooth precedentemente connessioni verranno cancellate. Provate ad usare questa opzione se avete problemi nel connettere un nuovo dispositivo. Device Information: Scegliendo questa opzione appare la seguente schermata con il nome e l’indirizzo del ricevitore Bluetooth di FREE8LT. Exit: ritorna alla schermata principale. 20 12. PLAY/PAUSE Questo tasto esegue o ferma la riproduzione del file audio corrente. 13. STOP Questo tasto ferma la riproduzione corrente. Premendo nuovamente il tasto play la canzone corrente riparte dall’inizio. 14. PLAY MODE Questo tasto cambia il modo di riproduzione dei files audio. Una piccola icona nel display indica il modo corrente. NORMAL: esegue tutti I file audio contenuti in tutte le memorie e cartelle, raggiunto l’ultimo file audio si ferma. RANDOM: riproduce tutte le canzoni contenute in tutte le memorie e cartelle casualmente. INTRO: riproduce i primi 10 secondi di ogni canzone contenuta nella cartella corrente. ALL: come in NORMAL ma quando raggiunge l’ultima canzone riparte dalla prima. SINGLE ONE: riproduce solo il file corrente al termine si ferma. FOLDER: riproduce tutti i file audio contenuti nella cartella corrente. Breve spiegazione di come funziona il media player. Quando si inserisce la SD memory card o USB flash drive nel corrispondente slot, il media player controlla l’intero contenuto della memoria localizzando tutti i files che possono essere riprodotti (file con le estensioni .WAV .MP3 .WMA). Tutti i files saranno riprodotti in ordine numerico e alfabetico, considerando in primo luogo il “nome della cartella” ed in seguito il “nome del file”. Esempio: inserite una memoria nello slot, il media player riproduce la prima canzone in ordine numerico e alfabetico. Premete il tasto PLAY MODE e scegliete INTRO, quindi attendete finche non si sente l’intro della canzone che si vuole ascoltare. Quindi premete ancora il tasto PLAY MODE e scegliete FOLDER per riprodurre tutte le canzoni contenute nella cartella, o SINGLE ONE per riprodurre solo la canzone scelta. 15. PREVIOUS SONG Passa alla canzone precedente. 16. NEXT SONG Passa alla canzone successiva. Premendo a lungo o si imposta volume digitale del media player interno. Suggeriamo di lasciare questo volume sempre al massimo e regolare il livello del media player usando il potenziometro di livello CH3/4. 17. RICEVITORE IR Questo è il ricevitore IR del controllo remoto. 21 18. DISPLAY LCD Il display mostra diverse informazioni: 19. HIGH Potenziometro per la regolazione dei toni alti: se ruotato al massimo enfatizza gli alti, se ruotato al minimo diminuisce gli alti (in posizione centrale l’intervento è neutro). 20. LOW Potenziometro per la regolazione dei toni bassi: se ruotato al massimo enfatizza i bassi, se ruotato al minimo diminuisce i bassi (in posizione centrale l’intervento è neutro). 21. EFFECT Potenziometro per la regolazione del livello dell’effetto interno applicato all’ingresso MIC IN 1. 22. MAIN MIX Potenziometro per la regolazione del livello generale di tutti i segnali. 23. ON LED VERDE che indica quando il FREE8LT è acceso. 24. BATTERY LEVEL Questa barra LED indica lo stato di carica della batteria come segue: - 3 VERDI: la batteria è completamente carica. - 2 VERDI: la batteria interna è metà carica. - 1 VERDE: la batteria interna è quasi scarica, meglio ricaricarla al più presto. - LOW/ROSSO: FREE8LT non può essere usato scollegato dalla rete, bisogna assolutamente ricaricare la batteria. - SPENTO: la batteria interna è scollegata o assente. 22 25. POWER Usare questo tasto per accendere e spegnere il FREE8LT. Il FREE8LT è acceso "ON" quando il tasto è in posizione "I". NOTA: la batteria interna si carica anche se il FREE8LT è spento. 26. CHARGE Questo LED indica lo stato di ricarica della batteria: - VERDE: la batteria interna è in ricarica. - SPENTO: la batteria interna è stata ricaricata. 27. AC~ SOCKET Inserire in questa presa il cavo di alimentazione di rete, utilizzando esclusivamente il cavo in dotazione. Accertarsi che l'altoparlante sia spento prima di collegarlo alla rete. 28. FUSE holder In questo vano è inserito il fusibile di protezione principale di rete. RIMPIAZZARE IL FUSIBILE DI PROTEZIONE ESCLUSIVAMENTE CON UN FUSIBILE CON LE MEDESIME CARATTERISTICHE RIPORTATE SUL PRODOTTO. SE DOPO LA SOSTITUZIONE, IL FUSIBILE INTERROMPE NUOVAMENTE IL FUNZIONAMENTO DELL'APPARATO, NON INSISTERE E CONTATTARE IL SERVIZIO ASSISTENZA PROEL. 29. LINE VOLTAGE Questo selettore imposta la tensione di rete della linea elettrica del vostro paese (tipicamente è già impostato di fabbrica e non è necessario cambiarlo). L'impostazione 115V è per le linee elettriche da 105120V~ e l'impostazione 230V è per le linee elettriche da 210-240V~. ATTENZIONE una sbagliata impostazione della linea elettrica AC LINE VOLTAGE può danneggiare seriamente l'amplificatore interno. 23 FUNZIONI CONTROLLO REMOTO L’uso del media player e del controllo remoto dipendono dal tipo di supporto utilizzato. Alcuni tasti sono attivi o inattivi a seconda del dispositivo SD CARD, USB memory o BLUETOOTH usato per riprodurre i file audio. PLAY/PAUSE Questo tasto esegue o ferma la riproduzione del file audio corrente. EQ equalization Con questa opzione potete impostare una equalizzazione per i file audio da riprodurre: Normale, Pop, Rock, Jazz, Classic, Country, esaltazione Bassi. Una piccola icona indica la scelta effettuata: VOLUME Premete questi tasti per ridurre o incrementare il volume. PREVIOUS – NEXT Premete per saltare alla canzone precedente o successiva. NUMERIC KEYPAD Salta direttamente ad una canzone specifica. Tutte le canzoni contenute in una memoria sono ordinate in successione numerica e alfabetica: selezionando un numero suonerà la corrispondente canzone nella lista. Un semplice trucco: rinominando i file delle canzoni contenuti in una memoria con un prefisso di 2 numeri si può accedere velocemente a una specifica canzone corrispondente a tale numero. Ad esempio: 01filename.mp3, 02 filename.wma e così via. ENTER Premendo questo tasto si entra in un sotto menu: EQ PLAY MODE CHANGE DEVICE EXIT Usare I tasti per scorrere le opzioni e il tasto per scegliere un’opzione. Vedi il punto corrispondente in questo paragrafo per la descrizione dell’opzione EQ. Vedi il punto corrispondente nel paragrafo precedente per la descrizione dell’opzione PLAY MODE. L’opzione CHANGE DEVICE corrisponde all’opzione MODE descritta al punto successivo. MODE Questo tasto commuta tra USB FLASH DRIVE SD MEMORY CARD BLUETOOTH DEVICE Mantenere premuto il tasto MODE per accendere e spegnere il lettore MEDIA PLAYER. Questi tasti non sono utilizzati. 24 SOSTITUZIONE DELLA BATTERIA DEL CONTROLLO REMOTO Per usare il controllo remoto per la prima volta occorre rimuovere la linguetta adesiva come da figura. Quando la batteria del controllo remoto è scarica, è necessario sostituirla con una nuova dello stesso tipo. Le istruzioni su come aprire il vano batterie sono stampate sul fondo del controllo remoto. ATTENZIONE: RISCHIO DI ESPLOSIONE SE LA BATTERIA NON VIENE MONTATA CORRETTAMENTE. SOSTITUIRE SOLAMENTE CON LO STESSO TIPO: CR 2025 LITHIUM MANGANESE DIOXIDE BATTERY. La batteria contiene Perclorato – le batterie Li-ion esauste sono considerate rifiuti tossici e non devono essere smaltite con altri rifiuti domestici al termine del ciclo di vita. Per evitare eventuali danni all’ambiente, si invita l’utente a separare questo prodotto da altri tipi di rifiuti e di riciclarlo in maniera responsabile per favorire il riutilizzo sostenibile delle risorse materiali. SOSTITUZIONE DELLA BATTERIA VRLA Seguire le seguenti istruzioni per sostituire la batteria VRLA interna: 1. Disconnettere la spina di rete. 2. Rimuovere lo sportello laterale svitando le 4 viti (fig.1). 3. Estrarre la batteria dal vano. 4. Scollegare i terminali delle batterie evitando corto circuiti. Sostituirle con batterie nuove delle stesse dimensioni e caratteristiche: marca: modello: terminali: RITAR RT1250 Faston 4.8mm (original) FIAMM FG20451 Faston 4.8mm (equivalent) 5. Collegare i terminali della batteria rispettando la polarità: Cavo rosso terminale positivo + e Cavo nero terminale negativo -. 6. Fissare le batterie e richiudere il vano. Figure 1 Figure 2 Figure 3 IMPORTANTI AVVERTIMENTI PER UN CORRETTO USO DELLE BATTERIE: 1. Ricaricare completamente la batteria prima di usarla: connettere la rete per almeno 12 ore. 2. Evitare il consumo completo della batteria. 3. Per una durata nel tempo, scaricare la batteria del 80% una volta al mese. 4. Ricaricare la batteria completamente dopo ogni uso. 5. Nei lunghi periodi di inattività ricaricare la batteria periodicamente ogni 2 mesi 6. Se la batteria non viene ricaricata da 6 mesi potrebbe essere necessario sostituirla. 7. UN USO ERRATO DELLA BATTERIA NE ANNULLA LA GARANZIA. 25 FREE8LT – SPECIFICHE TECNICHE 26 Sezione MIXER Ingressi MONO Ingressi STEREO Effetto Interno EQ Main 1 x MIC IN (COMBO) + 1 x INST/MIC IN (JACK) 1 x LINE IN (2xRCA + mini-jack) ECHO EQ 2-bande (ALTI + BASSI) Sezione MULTIMEDIA Tipo Lettore Formato File Compatibile Controlli di Interfaccia USB / SD / BLUETOOTH player WAV, MP3, WMA LCD display, REMOTE control Sezione AMPLIFICATORE Potenza Continua 20 W Sezione ALTOPARLANTI Tipo Sistema Altoparlante HF Altoparlante LF Risposta in Frequenza Costruzione Maniglie Flangia per supporto 2-vie 3" tweeter 8” woofer 65Hz - 15KHz, -3dB MDF con finitura PVC nera, 2 ruote 1 sopra, 1 posteriore retraibile 1 sotto GENERAL Specifications Dimensioni (L x A x P) Peso Batteria Ricaricabile Tempo Ricarica Batteria Tempo di Lavoro Batteria Alimentazione 46.5 x 51 x 37.5 cm 12 Kg (26.5 lb) 1 x 12V / 5Ah 7-10 hours 2-3 hours 230 / 115 V~ (commutabile) 50 / 60 Hz Questa pagina è intenzionalmente lasciata vuota. 27 PROEL S.p.A. (World Headquarters - Factory) Via alla Ruenia 37/43 64027 Sant’Omero (Te) – Italy Tel: +39 0861 81241 Fax: +39 0861 887862 www.proel.com 28