1
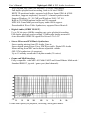
1LJKWLQJDOH3UR 6WXQQLQJ$&7KHDWHU6RXQG(IIHFW 5HDG\ ,QVWDOODWLRQ0DQXDO www.zoltrix.com User’s Manual Nightingale PRO 6 PCI Audio Accelerator Overview and Acknowledgments: Thank you for purchasing Zoltrix Nightingale Pro 6 PCI Audio Accelerator. It will offer you a new generation PCI audio solution: it utilizes the state-of-the-art CRL® 3D Audio technology (HRTF 3D positional audio), and supports Microsoft® Direct Sound ® 3D, A3D® interfaces and EAX. Better yet, it supports two, four and 5.1 speakers and DLS based (Down Loadable Sound) wave table music synthesizer which supports the Direct Music®. Besides being legacy audio SB16® compatible and providing professional SPDIF IN/OUT* non-distortion digital interface, it also supports MPU-401 interface, dual game ports, etc. * Not applicable to Nightingale Pro 6 LITE version. Disclaimer Zoltrix makes no representations or warranties, expressed, statutory or implied, regarding the fitness or merchantability of this product for any particular purpose. Further, Zoltrix is not liable for any damages, including but not limited to, lost profits, lost savings, or other incidental or consequential damages arising out of the use of this product. Zoltrix also reserves the right to make any improvements or modifications to the product described in this manual at any time, without notice of these changes. Trademark Acknowledgments Microsoft, Windows, Direct Sound 3D, and Direct Music are trademarks of Microsoft Corporation. Sound Blaster is a trademark of Creative Technology, Ltd. Aureal is a trademark of Aureal Inc. A3D is a registered trademark of Aureal Inc. All other trademarks and registered trademarks mentioned in this manual are the property of their respective holders and are hereby acknowledged. FCC Compliance Statement Certified to comply with the limits for a Class B computing device according to Subpart J or Part 15 of FCC rules. Copyright This manual may not be copied, photocopied, transmitted, or translated into language or computer language, in any form, or by any means, in whole or in part, without the prior written consent by the Manufacturer. (c) Copyright 2000. All rights reserved. Manual Version 1.0 Information in this manual is subject to change without notice. Product Features: • Special Features -1- User’s Manual Nightingale PRO 6 PCI Audio Accelerator PCI Plug and Play (PnP) bus interface, 32 bit PCI bus master. Full duplex playback and recording, built-in 16 bits CODEC. HRTF 3D positional audio, supports both Direct Sound 3D® & A3D® interfaces, supports earphones, two and 5.1 channel speakers mode. Support Windows 95 / 98 /ME and Windows 2000 / NT 4.0. Built-in 32 OHM Earphone buffer and 3D surround. MPU-401 Game/Midi port and legacy audio SB16 support. Downloadable Wave Table Synthesizer, supports Direct Music®. • Digital Audio (SPDIF IN/OUT) Up to 24 bit stereo 44KHz sampling rate voice playback/recording. Full duplex playback and recording, 120dB audio quality measured. Auto detectable SPDIF/IN signal level from 0.5V to 5V. • Stereo Mixer and FM Music Synthesizer Stereo analog mixing from CD-Audio, Line-in Stereo digital mixing from Voice, FM/Wave-table, Digital CD-Audio Mono mixing from MIC and software adjustable volume OPL3 FM synthesizer (4 operators) Up to 15 melody sounds and 5 rhythm sounds (20 voices) • Game and Midi Interface Fully compatible with MPU-401 Midi UART and Sound Blaster Midi mode / Standard IBM PC joystick / game port (dual channels) 120dB audio quality in playback, recording, and bypass modes. -2- User’s Manual Nightingale PRO 6 PCI Audio Accelerator Connectors and Jumper setting information Connector Function J3 Analog CD/IN Port ( Signals: L-G-G-R) J6 AUX_IN Port ( Signals: L – G – G – R ) J4 Analog CD/IN Port ( Signals: G – R – G – L ) J7 PC Speaker_IN Port J11* SPDIF IN JP 1 OPTICAL SPDIF- I/O LINE_IN MIC (LINE_IN) Connect with the audio output port of stereo Connect with the Microphone ( Mono ) SPK/LINE_OUT Output to speakers with the amplifier or earphones or Audio_IN of home stereo REAR OUT Connect to the rear speakers while multi-channel speakers mode are enabled CENTER/BASS Connect to center speaker and subwoofer while 5.1 speakers are used GAME/MIDI Connect with Joystick or devices that use MIDI interface * J 11 will be replaced by optical SPDIF on optical module if the optical module is attached. A second channel of SPDIF IN(J 01) on optical module will also be enabled to use. -3- User’s Manual Nightingale PRO 6 PCI Audio Accelerator OS Installation Before the installation, please make sure that your hard disk has sufficient space (min. 4MB). Insert the driver CD into the CD-ROM drive. 1. Change directory to PCI audio DOS drivers folder (ex. D:\DOSDRV) at DOS prompt, and type: INSTALL [Enter] 2. Type DOS utilities path which you want to install. 3. Program will expand the file to the path which you've specified. 4. Install program will add initial drivers into AUTOEXEC.BAT file. -4- User’s Manual Nightingale PRO 6 PCI Audio Accelerator Win95/98/ME Installation 1. Power off your system, install the PCI sound card, the audio cable, the speaker, the microphone, and insert driver CD into the CD-ROM drive. 2. Turn on the computer, and enter Microsoft® Windows™. 3. You will see a windows prompt like this: “New Hardware Found PCI Multimedia Audio Device” 4. Click “Next” and select “Search for the best driver for your device (Recommend)”. 5. Click on “Next” and select “Specify a location” to D:\W95-98\drv. Note: Replace D: with the drive letter of your CD-ROM driver if necessary. 6. When CMI8738/C3DX PCI Audio Device found, click “Finish”. 7. Now, system is installing device drivers automatically. After a while, the system will finish the installation, which includes the following device drivers. CMI8738/C3DX PCI Audio Device CMI8738/C3DX PCI Audio Joystick Device CMI8738/C3DX PCI Audio Legacy Device DOS mode MPU-401 Emulator 8. The Windows application will be automatically installed at this stage. 9. Click “OK” to start the installation procedure, and follow the on-screen instructions to finish the installation. When all the application software have been installed, please shut down Windows system, and reboot your system. -5- User’s Manual Nightingale PRO 6 PCI Audio Accelerator Win95/98/ME Un-installation 1. 2. 3. 4. 5. Click "Start". Select “Program.” Find “Uninstall device drivers and applications” program in PCI audio applications. Run it. Follow the on-screen instructions to uninstall the device drivers or applications. Windows NT 4.0 Installation Click “Start” button, move the highlight bar to “Setting” item, and select the “Control Panel”. 1. Double-click “Multimedia” icon. 2. Select “Devices” page, and press “Add” button. 3. Select “Unlisted or Updated Driver” item in “List of Drivers”. 4. Specify the drive and the path where NT drivers are(such as D:\NT40\DRV). 5. Select “C-Media CM8738” item and press “OK” button. 6. Select proper I/O value. 7. Press “OK”. 8. Reboot the system when being asked. 9. Now, you have already installed the PCI Audio Adapter under Microsoft Windows NT 4.0 successfully. if you want to install the Windows applications, continue the following steps: 10. Click “start” key. 11. Select “Run” item. 12. Key in drive and path for Windows NT application installation program, for example, “D:\NT40\APP\SETUP.EXE” 13. Click “OK” to start the installation procedure, and follow the on-screen instructions to finish the installation. When all of application software have been installed, shut down the Windows NT system, and then reboot your system. Windows 2000 Installation -6- User’s Manual Nightingale PRO 6 PCI Audio Accelerator 1. Power off your system, install the PCI sound card, audio cable, speaker, microphone, and insert driver CD into the CD-ROM drive. 2. Turn on the computer, and enter the Microsoft Windows system. 3. You will see a dialog box prompt like this: “This wizard helps you install a device for a hardware device To continue, click "Next.". Click “Next” to go on the procedures. 4. When “Install Hardware Device Drivers” dialog box is shown, select “Search for a suitable driver for my device, ” then click "Next button." 5. Click “Specify a location” to specify the driver path. 6. When “C-Media CM8738 Audio Driver(WDM)” is found, click “Finish”. 7. Now, system is installing device drivers automatically. The Audio Rack -7- User’s Manual Nightingale PRO 6 PCI Audio Accelerator Introduction By means of a user-friendly interface (as easy as operating your home stereo system), this PCI audio rack avails you to your PC audio functions, including multi-speakers mode enable / disable availability, and perfect digital sound ( SPDIF ) input / output. This Audio Rack consists of several major components: Control Center: Controls the display of the PCI Audio Rack’s components. CD Player can play standard audio CDs, and allow you to create your favorite song play list. MIDI Player can play MIDI files, *.mid/*.rmi, and allow you to create your favoriate song play list. MP3/Wave Player can play mp3, wave, CDDA, and MPEG-1 files. It provides EAX and equalizer to improve the sound effect when you playback the audio files. -8- User’s Manual Nightingale PRO 6 PCI Audio Accelerator If you want to sing a song, MP3/Wave Player also provides a Karaoke function. MP3/Wave Player can record input signals and save it in a wave file as well. Mixer controls the volume level of your audio inputs and outputs. Showing or Hiding Audio Rack Components To show or hide a component from the display, click the component button(s) listed on the top. Showing or Hiding Audio Rack Components To remove or add a component from the display, click on the component's button on the Control Center’s Button Bar or toggle it off. Detailed description of the buttons can be found by pressing this help button. System Mixer Volume Control For each output signal, a control slider controls the loudness whereas a horizontal slider controls the balance between the two speakers. The mute button can temporarily stop the output without changing slider positions. A button with a lit LED means the output is available, and vice versa. Several output signals can usually be enabled at once. Volume: This is the master control for all outputs. The power of an output signal is determined by both of the volume slider and the slider for the individual output. To modify all the outputs, move the volume slider. To change individual output(s), move its(their) slider(s). CD: Controls the CD drive audio input level. MIC: Controls the input level of microphone. WAVE: Controls wave (voice) playback levels. FM: Controls the FM music play level. AUX IN: Controls the Auxiliary input play level. -9- User’s Manual Nightingale PRO 6 PCI Audio Accelerator MONO IN: Controls the Mono input level. LINE IN: Controls the Line-In levels. Multi-SPK/4Speaker: Turn on or turn off the multi-speakers/4 speakers system. If you want to use multi-speakers/4 speakers system, please turn on this button and connect rear speakers to 'Rear-out'. If you have a 5.1 speakers system, you also can connect center/subwoofer speakers to 'Center/Bass'. Important: When you purchase 5.1 speaker system, please make sure that the subwoofer and center speakers use 3.5mm stereo plug. And the connection diagram is as follows: Advanced: Controls the advanced settings. Recording Control For each input signal, a control slider controls the loudness whereas a horizontal slider controls the balance between the two channels. The select button can temporarily select input signal without changing slider positions. A button with a lit LED means it is available, and vice versa. CD: Controls the CD drive audio input level. MIC: Controls the input level of microphone. WAVE: Controls wave (voice) playback level. FM: Controls the FM music play level. AUX IN: Controls the Auxiliary input play level. LINE IN: Controls the Line-In level. SPDIF IN: Enables the recording from SPDIF in. SPDIF-in is mutually exclusive with other input signals. - 10 - User’s Manual Nightingale PRO 6 PCI Audio Accelerator Echo: Enables the echo effect of microphone for karaoke. Advanced: Controls the advanced settings. Advanced Advanced dialog provides a fully control over SPDIF IN/OUT functions. You can use these settings to connect your computer to other pieces of audio device, such as Mini Disc, amplifier, etc. Furthermore, you can enable microphone booster and hot keys. Using hot keys to control Mixer's status is an easy way, but please note that some applications may be effected if you use the same hot keys setting. You can enable independent bass output if you have a subwoofer connected. Please use 'Load Mixer Defaults' to change all settings to default values. Multi-Channel Audio Demo Zoltrix Nightingale PRO 6 PCI sound card provides many advanced functions, such as: z HRTF-based CRL® 3D extension positional audio; API compatible with ® Microsoft DirectSound® 3D and Aureal® A3D API. Supports rear side - 11 - User’s Manual Nightingale PRO 6 PCI Audio Accelerator speakers; C3DX positional audio in 5.1 CH speakers mode. (5.1 CH, DVD AC-3® home theater available). z EAXTM (Environment Audio eXtention). z KARAOKE ascending/descending keys, Echo. z Supports Center/Subwoofer side speakers. To let everyone get familiar with and avail himself/herself of the above functions, we design a user-friendly interface(Multi-Channel Audio Demo) which provides the following features: 1. 2. 3. 4. 5. 4 CH speakers mode, including Demo1 and Demo2. EAXTM (Environment Audio eXtention). HRTF-based CRL® 3D extension positional audio. KARAOKE ascending/descending keys, Echo ascending/descending keys. 6 CH speakers mode, including Demo1 and Demo2. , and microphone Important: The sound card is designed to use with 5.1 speakers system. If you need to use with 4 speakers and running software DVD program, be sure to select 4 channels mode from the software DVD program instead of selecting 5.1 channels. Otherwise, some sound sources of the DVD movie may not be heard. Connection of speakers and microphone Before running this demo program, you have to connect the speakers and the microphone to the correct jacks. Below describes the method to connect either 4 speakers or 5.1 speakers system: 1. Four speakers setup: - 12 - User’s Manual 2. Nightingale PRO 6 PCI Audio Accelerator 5.1 speakers setup: How to enable Multi-SPK You have to open the "Mixer" program and enable the "Multi-SPK" mode to let the audio driver recognize your rear or center/subwoofer speakers, and have the front/rear/center/subwoofer speakers work. The audio driver will activate the audio chip to output different sounds from the front/rear/center/subwoofer speakers based on different playback formats. The following is the "Multi-SPK" console. - 13 - User’s Manual Nightingale PRO 6 PCI Audio Accelerator Left-click the mouse to activate the output mode. As you can see, the "Multi-SPK" mode is not enabled here(the light is dim): How to adjust the volume of microphone You have to use the microphone when enabling yourself of the "Echo" function. If the microphone is on and is very close to the speakers, it will cause feedback between the two. Also, unusual high frequencies or buzzing sounds might be heard from the speakers. To avoid this, you have to adjust the volume of microphone in both recording and playback. Sometimes you might have to adjust main and Wave volume as well. Please left-click the mouse to adjust the microphone(MIC) in both Volume and Recording Control. - 14 - User’s Manual Nightingale PRO 6 PCI Audio Accelerator Test Your Speakers Connection To make sure that the front and the rear speakers are correctly connected, you can use the following program to testify individual speaker output. Move cursor to whichever speaker you want to test and left-click the mouse. If the setup is correct, you can hear music coming from that speaker alone. Each output music is different for distinction. Demonstrations Demo1 and Demo 2 are specially design for 5.1speaker system demonstration. Select Demo 1 and/or Demo 2 by left-clicking the mouse. Sit back and relax, and let the music take control. EAX Monotonous footsteps generate distinctive sound effects in different environments. In this Demo, you can hear a lady wearing high heels walk in different surroundings: generic environment, bathroom, sewer pipe, and underwater. Leftclick the mouse to activate this Demo and feel the differences. - 15 - User’s Manual Nightingale PRO 6 PCI Audio Accelerator HRTF HRTF stands for Head Related Transfer Functions, and it is a set of audio filters varying locations of sound effects(spatial hearing cues) in three-dimension measure from listener's eardrum. This technology and special digital signal processing are used to recreate spatial hearing cues, making our ears hear realistic and threedimensional sounds coming from a pairs of loud speakers or headphones. When you activate this Demo, you can hear a helicopter fly around you for three times in a clockwise direction. Echo Want to sing along with Karaoke? It might occur to you to use your PC for this. However, when you turn on the microphone, play the song, and ready to sing, you see that the effect is not very good. Why? Echo is the answer. To help you solve this problem, we design this demo and add the echo function in it. Please left-click the upper right of the demo screen as follows, and choose your favorite music file to play. Please note the file type has to be MP3 file. Please left-click "Echo" to activate the function. For pitch adjustment, please use ↑ and ↓ keys in your keyboard keyboard and for microphone pitch adjustment, please use "+" and "-" keys in your numeric keyboard. To resume the original, please use ← and → keys. - 16 -