1
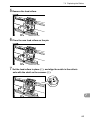
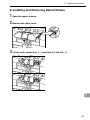
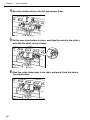
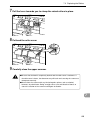
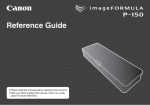
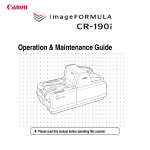
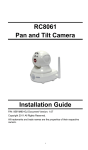
CANON DOCUMENT SCANNER Maintenance Guide CANON ELECTRONICS INC. 1248, SHIMOKAGEMORI, CHICHIBU-SHI, SAITAMA 369-1892, JAPAN CANON U.S.A. INC. ONE CANON PLAZA, LAKE SUCCESS, N.Y. 11042, U.S.A. CANON CANADA INC. 6390 DIXIE ROAD, MISSISSAUGA, ONTARIO L5T 1P7, CANADA CANON EUROPA N.V. BOVENKERKERWEG 59-61, P.O.BOX 2262, 1180 EG AMSTELVEEN, THE NETHERLANDS CANON LATIN AMERICA, INC. 703 WATERFORD WAY, SUITE 400 MIAMI, FLORIDA 33126, U.S.A. CANON AUSTRALIA PTY. LTD. 1 THOMAS HOLT DRIVE, NORTH RYDE, SYDNEY. N.S.W, 2113. AUSTRALIA CANON SINGAPORE PTE. LTD. 1 HARBOUR FRONT AVENUE #04-01, KEPPEL BAY TOWER, SINGAPORE 098632 CANON HONGKONG COMPANY LTD. 19TH FLOOR, THE METROPOLIS TOWER, 10 METROPOLIS DRIVE, HUNGHOM, KOWLOON, HONG KONG. PUB.CE-IE-422G 0704AB0.6 CANON ELECTRONICS INC. 2003 ENGLISH *CE-IE-422* PRINTED IN JAPAN Please read this manual before operating this unit. After you finish reading this manual, store it in a safe place for future reference. Chapter 7 Daily Cleaning This chapter describes daily cleaning of the scanner. 7.1 Daily Cleaning .................................... 80 Cleaning the Main Unit ............................ Cleaning the Document Detection Sensor ..................................................... Cleaning the Scanning Glasses and Rollers ...................................................... Cleaning the Shading Plates ................... Cleaning the Guide Plate (When Using the Imprinter) ..................... Cleaning the Ink Jet Nozzles (When Using the Imprinter) ..................... Power Outlet ............................................ 80 81 81 85 87 87 87 7.2 Replacing the Rollers .........................88 When to Replace the Rollers ................... 88 Resetting the Counter .............................. 89 Installing and Removing the Rollers ........ 91 Chapter 7 Daily Cleaning Daily Cleaning To ensure high-quality image scanning, regularly clean your DR-6080/9080C as described below. CAUTION ■ Before you clean the scanner, turn OFF the scanner and computer and disconnect the power cord from the power outlet. Otherwise, it might cause an electrical shock. ■ Never clean the scanner with any kind of organic solvent, such as alcohol, benzene, or paint thinner. It might cause a fire and electrical shock, or cause the exterior of the scanner to disfigure of discolor. ■ Never spray mild detergent or water directly on the scanning glasses. The spray could penetrate below the glass and contaminate the internal light source and lenses. Cleaning the Main Unit Wipe the scanner with a firmly wrung cloth moistened slightly with water or mild detergent. Then wipe off with a clean, dry cloth. 80 7.1 Daily Cleaning Cleaning the Document Detection Sensor Dust and debris that collects on the sensor will cause false recognition. Clean the sensor periodically so that dust and debris do not collect on it. Sensor Cleaning the Scanning Glasses and Rollers A probable cause of stripes appearing on scanned images or dirt appearing on scanned documents is dirt on the scanning glasses or rollers. Clean the scanning glasses and rollers regularly. 1 Press the power switch to turn OFF the scanner, and unplug the power cord from the power outlet. 2 Close the document eject tray extension if it is open. 3 Open the upper scanner. Press the open/close button, and lift up the upper scanner gently until it stop and locks in the open position. 7 81 Chapter 7 Daily Cleaning 4 Use a clean, soft cloth to wipe the scanning glasses. Be sure to clean both scanning glasses, the one below and one above. CAUTION Never spray mild detergent or water directly on the scanning glasses. The spray could penetrate below the glass and contaminate the internal light source and lenses. Scanning Glasses 82 7.1 Daily Cleaning 5 Wipe the rollers with a firmly wrung cloth moistened with water. Rollers are located at the positions indicated in the figure below. Pickup Rollers Feed Rollers Feeding Rollers Platen Rollers Retard Rollers 6 Remove the pickup roller, retard roller, and feed roller. (See “Installing and Removing the Rollers,” on p.91.) 7 Use cloth from which all the water has been wrung out to wipe off the rollers. 7 83 Chapter 7 Daily Cleaning 8 Replace the rollers that you removed. (See “Installing and Removing the Rollers,” on p.91.) 9 Carefully close the upper scanner. 10 Press the upper scanner down firmly on both sides to close it. If you press the upper scanner down only on one side, the opposite side will not be fully closed. Make sure that you hear it click into place. Important 84 If paper jams or double-feed (feeding of two or more document pages) occurs frequently in spite of your having cleaned the rollers, a probable cause is roller friction. If this happens, replace the rollers. Contact your service representative. 7.1 Daily Cleaning Cleaning the Shading Plates If scanned images appear scratchy even after you have cleaned the rollers, the shading plates inside the scanner may be dirty. If this happens, clean the shading plates. CAUTION The power to the scanner is ON when you are cleaning the shading plates so be very careful. 1 Open the upper scanner. Press the open/close button, and lift up the upper scanner gently until it stops and locks in the open position. 2 Press the [Start] key. The shading plates come out from above the platen rollers. 7 Shading Plates 3 Wipe the shading plates with a firmly wrung cloth moistened with water or mild detergent. 85 Chapter 7 Daily Cleaning 4 Press the [Stop] key. The shading plates retract. 5 Carefully close the upper scanner. 6 Press the upper scanner down firmly on both sides to close it. If you press the upper scanner down only on one side, the opposite side will not be fully closed. Make sure that you hear it click into place. If there is no change in the appearance of the image after you have cleaned the Important shading plates, contact your service representative. 86 7.1 Daily Cleaning Cleaning the Guide Plate (When Using the Imprinter) Ink that collects on the guide plate inside the optional imprinter may stain the documents when they are scanned. Clean off the ink with water and a mild detergent on a soft cloth that has been firmly wrung, and then thoroughly dry it with a dry cloth. Ink Absorber Guide Plate Cleaning the Ink Jet Nozzles (When Using the Imprinter) Ink that collects around the ink jet nozzle may stain your documents or cause the text to appear scratchy. Remove the ink jets and clean them periodically with cotton swabs. Contact Important Do not touch the contact while you are cleaning the ink jet nozzles. Doing so may cause incorrect printing. 7 Power Outlet If you leave the power plug connected to the power outlet for a long period of time, dust may accumulate at the power outlet, and cause a fire or electrical shock. Clean it periodically. 87 Chapter 7 Daily Cleaning Replacing the Rollers The feed rollers (pickup rollers, feed rollers, and retard rollers) are consumables. The feed rollers need to be changed periodically to maintain scanning quality. When to Replace the Rollers If the total number of scanned documents exceeds 250,000, a message for roller replacement appears when you restart the computer. In this case, buy the exchange roller kit and replace the feed rollers (pickup rollers, feed rollers, and retard rollers). Be sure to reset the counter after changing the counter. Important ● Windows NT do not support a function to display a message for roller replacement. To confirm the total scan, check “Total Scanning Count” in the “About” dialog box of the ISIS/TWAIN driver and replace the feed rollers if the count shows around 250,000 scans. ● Contact your sales representative for information about exchange roller kit (pickup rollers, feed rollers, and retard rollers). 88 7.2 Replacing the Rollers Resetting the Counter Do the following procedure to reset the counter after replacing the feed rollers. 1 Click the [Start] button, and then click [Settings]-[Control Panel]. 2 Double click on the [Scanners and Cameras] icon Note ● Windows NT do not display the “Scanners and Cameras” icon. ● The displayed dialog box differs depending on which Windows operating system you are using. 7 89 Chapter 7 Daily Cleaning 3 Select the scanner that you are using, and click on the [Properties] button. 4 Click the [Counter] tab. 5 Click the [Reset] button and confirm whether the counter is reset to 0. 90 7.2 Replacing the Rollers Installing and Removing the Rollers Follow the procedure shown below to remove and install the rollers when you need to clean or replace the pickup, feed, or retard rollers. CAUTION ■ Turn OFF the power to the scanner and unplug the power cord from the power outlet when you remove or install the rollers. Leaving the power turned ON may result in an electrical shock. ■ When removing or replacing the rollers be careful to not use too much force. Forcing the rollers into position may damage them. Pickup Rollers Feed Rollers Retard Rollers 7 91 Chapter 7 Daily Cleaning ◆ Installing and Removing Pickup Rollers 1 Open the upper scanner. 2 Open the roller cover. 3 Open the roller holder and remove the pickup rollers. 4 Position the square axle of the pickup roller on the left and insert the new pickup rollers. 92 7.2 Replacing the Rollers 5 Firmly close the roller holder until you hear it click. 6 Firmly close the roller cover until you hear it click. 7 Carefully close the upper scanner. If the roller holder and roller cover are not firmly closed it will cause a feed error. Important Always be sure to check that the roller holder and roller cover are closed. 7 93 Chapter 7 Daily Cleaning ◆ Installing and Removing Feed Rollers 1 Open the upper scanner. 2 Open the roller cover. 94 3 Pull the lever that locks the feed rollers in place towards you. 4 Slide the feed rollers to the right, and then pull them towards you. 7.2 Replacing the Rollers 5 Remove the feed rollers. 6 Place the new feed rollers on the pin. 7 Set the feed rollers in place (q), and align the notch in the roller’s axle with the shaft on the scanner (w). 7 95 Chapter 7 Daily Cleaning 8 Lock the lever. 9 Firmly close the roller cover until you hear it click. 10 Carefully close the upper scanner. If the roller cover is not firmly closed it will cause a feed error. Always be sure to Important check that the roller cover is closed. 96 7.2 Replacing the Rollers ◆ Installing and Removing Retard Rollers 1 Open the upper scanner. 2 Remove the roller cover. 3 Lift the roller clamp lever (q) and slide it to the left (w). 7 97 Chapter 7 Daily Cleaning 4 Move the retard rollers to the left and remove them. 5 Set the new retard rollers in place, and align the notch in the roller’s axle with the shaft on the scanner. 6 Slide the roller clamp lever to the right, and push it into the hole in the retard rollers. 98 7.2 Replacing the Rollers 7 Pull the lever towards you to clamp the retard rollers in place. 8 Put back the roller cover. 9 Carefully close the upper scanner. CAUTION ■ Be sure that the hook is completely latched and the roller cover is not loose. If the roller cover is loose, the document tray will catch on it causing the scanner to not operate correctly. ■ Never clean the scanner with any kind of organic solvent, such as alcohol, benzene, or paint thinner. Doing so might cause a fire and electrical shock, or cause the exterior of the scanner to disfigure or discolor. 7 99