1
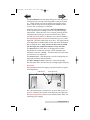
510934.qxd
10/28/2005
12:13 PM
Page i
USER’S MANUAL
102005-510934-(01)
© 2005 All rights reserved.
510934.qxd
10/28/2005
12:13 PM
Page ii
Notices: The information in this document is subject to change without notice. NO WARRANTY OF
ANY KIND IS MADE WITH REGARD TO THIS MATERIAL, INCLUDING, BUT NOT LIMITED TO,
THE IMPLIED WARRANTIES OF MERCHANTABILITY AND FITNESS FOR A PARTICULAR
PURPOSE. No liability is assumed for errors contained herein or for incidental or consequential
damages in connection with the furnishing, performance, or use of this material. This document
contains proprietary information that is protected by copyright. All rights are reserved. No part of
this document may be photocopied, reproduced, or translated into another language without prior
written consent.
Trademark Acknowledgments: Windows is a registered trademark of Microsoft Corporation. All
other trademarks are the property of their respective owners.
Printing History
Edition 1.1, #102005, ©Copyright 2005, All rights reserved.
FCC Compliance Statement: This device complies with part 15 of the FCC rules. Operation is subject
to the following two conditions: (1) this device may not cause harmful interference, and (2) this device
must accept any interference received, including interference that may cause undesired operation.
For Users in the United States: This product is intended to be supplied by a UL listed Direct Plug-In
Power Supply marked "Class 2"or a UL listed ITE Power Supply marked "LPS" with output rated
12VDC, 4.5A or higher. This equipment has been tested and found to comply with the limits for a Class
B digital device, pursuant to Part 15 of the FCC Rules. These limits are designed to provide reasonable
protection against harmful interference in a residential installation. This equipment generates, uses,
and can radiate radio frequency energy and, if not installed and used in accordance with the
instructions, may cause harmful interference to radio communications. However, there is no guarantee
that interference will not occur in a particular installation. If this equipment does cause harmful
interference to radio or television reception, which can be determined by turning the equipment off
and on, the user is encouraged to try to correct the interference by one or more of the following
measures:
• Re-orient or relocate the receiving antenna.
• Increase the separation between the equipment and receiver.
• Connect the equipment into an outlet on a circuit different from that to which the receiver
is connected.
• Consult the dealer or an experienced radio/TV technician for help.
Use of shielded cables is required to comply with the Class B limits of Part 15 of the FCC Rules. You are
cautioned that any changes or modifications not expressly approved in this manual could void your
authority to operate and/or obtain warranty service for this equipment.
For Users in Canada: This digital apparatus does not exceed the Class B limits for radio noise for
digital apparatus set out on the Radio Interference Regulations of the Canadian Department of
Communications. Le present appareil numerique n'emet pas de bruits radioelectriques depassant les
limites applicables aux appareils numeriques de la class B prescrites dans le Reglement sur le
brouillage radioelectrique edicte par le ministere des Communications du Canada.
Note: To ensure the unit operates within FCC limits, the power supply should be kept at least 10 cm
away from the metal case.
CAUTION!
TO PREVENT FIRE OR SHOCK HAZARD, DO NOT EXPOSE THE UNIT TO RAIN OR
MOISTURE. TO REDUCE THE RISK OF ELECTRIC SHOCK, DO NOT REMOVE EXTERIOR PANELS.
NO USER-SERVICEABLE PARTS INSIDE. REFER SERVICING TO QUALIFIED SERVICE
PERSONNEL. OPERATE THE UNIT WITH ONLY THE PROPER ELECTRICAL SPECIFICATIONS AS
LABELED ON THE PRINTER AND AC ADAPTER.
CAUTION!
THIS PRODUCT CONTAINS A LASER DIODE OF A HIGHER CLASS THAN 1. TO ENSURE
CONTINUED SAFETY, DO NOT REMOVE ANY COVERS OR ATTEMPT TO GAIN ACCESS TO THE
INSIDE OF THIS PRODUCT. REFER ALL SERVICING TO QUALIFIED PERSONNEL. THE
FOLLOWING LABEL APPEARS INSIDE YOUR UNIT:
CLASS 1 LASER PRODUCT
LASER KLASSE 1
CAUTION!
USE OF CONTROLS OR ADJUSTMENTS OR PERFORMANCE OF PROCEDURES OTHER THAN
THOSE SPECIFIED HEREIN MAY RESULT IN HAZARDOUS RADIATION.
ii
510934.qxd
10/28/2005
12:13 PM
Page iii
Table of Contents
Section 1: Getting Started ...............................................................................1
A. Choosing a Good Location ................................................................1
B. Unpacking and Inspection.................................................................1
C. Identifying the Parts ...........................................................................2
D. PC System Requirements...................................................................4
E. Overview of Robotic Operation........................................................4
Section 2: Hardware and Software Set-Up .................................................7
A. Installing the PC Software .................................................................7
B. Hardware Setup ..................................................................................7
Step 1: Applying Power .....................................................................7
Step 2: Loading Media .......................................................................8
Step 3: Installing Ink Cartridges .......................................................9
Step 4: Connecting the USB Cable....................................................9
C. Opening the Software for the First Time.......................................11
D. Reloading Media ...............................................................................12
Section 3: OptiVault Printer Driver ............................................................14
Section 4: Using Retrospect..........................................................................17
A. Performing a Backup ........................................................................17
B. Restoring a Backup ...........................................................................25
C. Using Backup Scripts........................................................................29
D. Performing an Exchange Server Backup .......................................31
E. Backup Strategies ..............................................................................38
F. Adding Clients...................................................................................47
G. Progressive Backup...........................................................................52
H. Viewing System Errors.....................................................................53
Section 5: Interpreting the OptiVault’s Indicator Lights .......................55
Section 6: Maintenance and Troubleshooting ..........................................56
A. Cleaning the OptiVault ....................................................................56
B. Performing a Robotic Self-Test ........................................................56
C. Cleaning the Ink Cartridges ............................................................57
D. Technical Support..............................................................................57
Section 7: Technical Specifications .............................................................58
Index..................................................................................................................59
iii
Interactive.qxd
9/6/2005
3:30 PM
Page 1
Interactive Feature
in this PDF Document
There are interactive features that will allow you to jump
to different locations within the document. Each listing in
the Table of Contents is interactive. Place the cursor on
either the words or the page number. A small hand with a
pointing finger icon appears. Click on the line with the
icon and the document will jump to that page. If you want
to return to the Table of Contents, move the icon to the top
of the page and click on the arrow marked TOC.
Navigating through the Index is similar. Place the icon on
one of the listings or page numbers, click on it, and it will
move to that page. The text relating to the Index listing
will appear in red. Returning to the Index can be done by
clicking on the arrow marked Index.
510934.qxd
10/28/2005
12:13 PM
Page 1
TOC
INDEX
Section 1: Getting Started
THANK YOU…
...for purchasing the OptiVaultTM . The OptiVault and
Retrospect together are the perfect professional backup and
archival solution for servers and desktop computers.
A. CHOOSING A GOOD LOCATION
•
•
Place the OptiVault in a location with adequate air
circulation to prevent internal heat build up.
Do not place the OptiVault near heat sources such as
radiators or air ducts, or in a place subject to direct
sunlight, excessive dust, mechanical vibration or shock.
B. UNPACKING AND INSPECTION
While unpacking your OptiVault, inspect the carton to ensure
that no damage has occurred during shipping. Make sure
that all supplied accessories are included with your unit.
The following items should be included:
•
•
OptiVault
Gray Plastic Input and Output Bins (Located inside the
cardboard insert)
• Switching Power Supply with Power Cord
• One Three-Color (CMY) Ink Cartridge
• One Monochrome Black Ink Cartridge
• QuickStart Installer Disc
• USB 2.0 Interface Cable
• Warranty Card
• 10 Pack Primera TuffCoat Archival Media
• This Operator's Manual, Quick Start Guide and Other
Printed Information
Save the carton and packing materials. They will come in
handy later if you ever need to transport the OptiVault and/or
any of its parts and accessories.
Getting Started 1
510934.qxd
10/28/2005
12:13 PM
Page 2
INDEX
TOC
C. IDENTIFYING THE PARTS
Front Panel and Top
This illustration shows the Optivault, its Control Panel,
Buttons, LED indicator lights, Input and Output Bins and
other components.
Ink Cartridge
Carrier
Input Bin
Ink Cartridge
Button
Output Bin
Control Panel
Robotic Disc
Transporter
Power Button
Front Cover
LED Status Lights
Color Ink Cartridge
Monochrome Black
Cartridge
Control Panel Lock
Reject Area
CD/DVD Recorder
Recorder Tray Button
The Robotic Disc Transporter moves discs from the Input Bin,
to a CD/DVD Recorder, to the printer, and finally to the
Output Bin.
The CD/DVD Recorder is automatically loaded and unloaded
by the Optivault’s Robotic Disc Transporter.
The Recorder Tray Button manually opens or closes the
Recorder Tray. In normal operation, the in/out movement of
the Recorder Tray is controlled automatically and this button is
not used.
The Control Panel contains LED Status Lights and Buttons to
control the Optivault.
The right LED Status Light indicates that Power is ON. The
left LED Status Light is on to indicate that the cover is closed.
They also blink in certain patterns to indicate an error or other
condition of the Optivault. See Section 5 for a full explanation
of the LED Status Light conditions.
2 Getting Started
510934.qxd
10/28/2005
12:13 PM
Page 3
INDEX
TOC
The Power Button turns the Optivault's power OFF if pressed
and held for five seconds. Press it quickly to turn power back
on. When already powered on quickly pressing the power
button will move the arm to the right or the middle to allow
access to the recorder drive or the bins.
When the front cover is opened, the Ink Cartridge Button is
used to position the Cartridge Carrier for easy ink cartridge
replacement. When the front cover is closed, pressing the Ink
Cartridge button will open or close the Printer Tray. (Must
override cover lock sensor to simulate cover closed condition)
The Input/Output Bins are situated under the top cover of the
Optivault. The bins will hold up to 25 discs. The right-side bin
is the Input Bin for blank media; the left-side bin is the Output
Bin for finished discs. Only a total of 25 discs can be loaded
into the input bin, output bin and drive at any one time.
The Reject Area is where discs are dropped if the header
information is not burned correctly or if the minimum size
threshold is not met. (100MB) . The discs slide down the ramp
out in front of your Optivault.
The Front Cover is a durable plastic cover that will protect the
Optivault from dust and interference.
The Ink Cartridge Carrier holds both a color ink cartridge
(left-side pen) and a monochrome ink cartridge (right-side pen).
Rear Panel
This illustration shows the input ports found on the rear panel
of the OptiVault:
USB 2.0 Port
Power Input Port
The USB 2.0 Interface is connected to an open USB 2.0 port on
your PC with the USB 2.0 cable, included with your Optivault.
The Power Input Port connects to the included 100V~240V 12V
switching power supply.
Getting Started 3
510934.qxd
10/28/2005
12:13 PM
Page 4
TOC
INDEX
D. PC SYSTEM REQUIREMENTS
Before getting started, it is important for you to verify that
your PC meets the minimum system requirements.
•
1 Ghz or faster Pentium IV processor running Windows
2000 or X, Server 2000 or 2003.
• 512 MB or greater RAM
• Free hard drive space of at least 10 GB.
• Available USB 2.0 Port.
If your PC does not have at least these minimum system
requirements, system performance may not be acceptable.
Client software for other operating systems is available from
the EMC Dantz website.
E. OVERVIEW OF ROBOTIC OPERATION
The following is a description of the complete sequence of the
robotic arm, drive and disc tray during normal backup
operation.
1.
The Backup Appliance's integrated Robotic Disc
Transporter will pick a disc from the Input Bin.
2.
The Recorder Tray opens automatically and the Robotic
Disc Transporter places a disc into the recorder.
4 Getting Started
510934.qxd
10/28/2005
TOC
12:13 PM
Page 5
INDEX
3.
The Recorder Tray then automatically shuts. Robotic Disc
Transporter will automatically check the Input Bin to make
certain that only one disc was picked. The software checks
the disc to make sure it is blank and then burns header
information to the disc.
4.
If the header information burn was successful the Robotic
Arm will pick the disc from the recorder and place it into
the Printer.
5.
Backup job information is then printed onto the disc. The
title you choose is printed followed by a dash and the
number this disc is in the backup set. For example the first
disc in the backup set might be named 1-My Backup.
6.
The Robotic Arm then moves the printed disc back into the
recorder to write the files contained on the source volume.
7.
Once the writing is complete the disc is moved to the
output bin.
Getting Started 5
510934.qxd
10/28/2005
TOC
12:13 PM
Page 6
INDEX
8.
The process is repeated for each necessary disc in the
backup set.
9.
After all discs are written, the discs are picked from the
left bin and placed in the right bin to simulate the original
order.
10. Each disc is then picked and placed in the recorder for
verification by the software and then placed into the left
bin when finished.
11. After the last disc is verified it remains in the recorder so
that it can be appended to during the next progressive
backup of this backup set.
6 Getting Started
510934.qxd
10/28/2005
12:13 PM
Page 7
INDEX
TOC
Section 2: Hardware and Software
Set-Up
This section will describe the step-by-step process of setting
up your OptiVault. This includes information on how to
load the supplies (ink and disc media) necessary to start
producing discs.
A. INSTALLING THE PC SOFTWARE
The Installer Disc has a menu that will guide you through the
process of setting up your OptiVault. Please refer to the
following for more information on each step:
1.
2.
Place the Installer CD in your CD-Rom Drive. The
Installer application should automatically launch in a few
moments. If it does, proceed to Step 2.
If it does not automatically launch, follow these steps:
• Double-click the My Computer Icon, then double-click
the icon of the appropriate CD drive containing the
Software Installer disc
• Double-click Installer.exe
In the Installer Application, click the Standard Install
button. The Standard Install will guide you step-by-step
through the installation process. As you complete each
step, click the → Next arrow. Steps 1-4 are shown in
section B below as well as on the monitor. You may follow
either to complete the setup.
B. HARDWARE SETUP
To connect your new Optivault, please do the following:
Be sure you have removed the packing tape and cardboard insert prior
to applying power.
Step 1: Applying Power
•
•
•
Locate the power adapter
supplied with your Optivault.
Place one end of the adapter
cord into the power port on the
rear panel of the Optivault.
Unit will initialize for
approximately 30 seconds.
Hardware and Software Set-Up 7
510934.qxd
10/28/2005
12:13 PM
Page 8
TOC
INDEX
Step 2: Loading Media (Discs)
NOTE: Only a total of 25 discs can be loaded into the input bin,
output bin and drive at any one time.
For reliable, consistent operation of your OptiVault, we strongly
encourage you to use only genuine Primera TuffCoat Archival Media
available at www.primerastore.com. There are documented quality
differences between different brands of media. Primera has not
researched the archival life nor can it support the recording
characteristics and/or performance of other brands of optical media.
Refer to the following steps when loading discs in to the
Optivault:
•
Open the front cover of the Optivault
•
The Optivault will automatically position the cartridge
carrier and Robotic Disc Transporter to the center position
allowing for easy access to the bins.
•
Load the Input Bin (the bin located on the right-hand side
of the Optivault) with up to 25 blank discs and place the
bins on the mounting pegs.
8 Hardware and Software Set-Up
510934.qxd
10/28/2005
12:13 PM
Page 9
INDEX
TOC
Step 3: Installing Ink Cartridges
• Press the Ink Cartridge Button
to move the Ink
Cartridge Carrier to the load position and open the ink
cartridge covers
• Remove each ink cartridge from its packaging
• Slowly remove the tape covering
the cartridge's print head, being
careful to avoid damaging the
barcode label on the underside of
the cartridge.
DO NOT TOUCH THE COPPER AREA!
• Insert the ink cartridges into the carrier, copper end first
and snap the cartridge cover in place. Insert the color
in the left holder, monochrome black in the right
cartridge holder.
Color
Black
Pull out and
lift up
• Close the Optivault’s front cover.
Step 4: Connecting the USB 2.0 Cable
Connect the Optivault to your computer with the beige
USB 2.0 Cable.
Hardware and Software Set-Up 9
510934.qxd
10/28/2005
12:13 PM
Page 10
TOC
INDEX
After a few moments a found new hardware wizard will
appear.
Select "Install the software automatically" and click Next.
Make sure that you have your installation disc in a drive on
your computer.
You may see a notice like the one shown below stating that
the device has not passed Windows Logo Testing. Click
Continue Anyway to continue installing the printer driver for
your Optivault.
In the installer application, follow the steps shown on your
monitor to complete the installation of the Retrospect and
SureThing software.
10 Hardware and Software Set-Up
510934.qxd
10/28/2005
12:13 PM
Page 11
INDEX
TOC
C. OPENING THE SOFTWARE FOR THE FIRST TIME
The first time you open the software a wizard will guide you
through several steps to complete the setup. Follow the steps
and click Next to complete the setup.
If you will be using the Exchange Database/Mailbox backup
feature it is important that you enter the License code when
prompted by the setup wizard to add more license codes.
The License Code is HXN9-HJ4M-ANAJ-2TCX.
Hardware and Software Set-Up 11
510934.qxd
10/28/2005
12:13 PM
Page 12
TOC
INDEX
It is also important that the user logged in to run Retrospect
has rights to access the Exchange Server. You can set Retrospect
to always run as a user with these rights or run as the loggedin user. In either case make sure the user has necessary rights
to access the Exchange server.
D. RELOADING MEDIA
Any time media is moved or removed from the OptiVault it
is necessary to clear the media location memory before
continuing backup operations. Use the following procedure
each time you reload media:
1.
Remove all discs from the backup set except for the last
disc of each set. Put them in the left bin. Note: Burned
discs could be in the right or left bin.
12 Hardware and Software Set-Up
510934.qxd
10/28/2005
TOC
12:13 PM
Page 13
INDEX
2.
Reload blank media in the right bin so the total number of
discs in the unit does not exceed 25 discs. Remember, the
last disc may be located in the drive so don't forget to
include it in your media count!
3.
Open Configure on the left navigation menu. Click
Devices.
4.
Click on Primera OptiVault to Highlight it. Click on the
Initialize Elements button to clear the media location
memory.
Hardware and Software Set-Up 13
510934.qxd
10/28/2005
12:13 PM
TOC
Page 14
INDEX
Section 3: OptiVault Printer Driver
Once the Optivault software has been successfully installed,
take a moment to familiarize yourself with the printer driver
settings for your Optivault. Only the settings that affect the
print quality of your discs are described below. You will see
many other settings that will not need to be changed. The
default settings of the Optivault printer driver will fit most
printing needs. Please refer to the following steps to change or
verify your printer driver options:
1.
Click the Start button. For Windows 2000 point to Settings
and click on Printers. For XP Professional click on Printers
and Faxes. For XP Home click on Control Panel, then click
on Printers and Other Hardware, then click on Printers
and Faxes.
Click on the OptiVault icon with the right mouse button
and select Printing Preferences.
Resolution
Select the appropriate print quality option for your image.
Keep in mind that Normal 600 provides the lowest quality but
fastest print, and that Ultra Photo 4800 provides the highest
quality but slowest print.
14 OptiVault Printer Driver
510934.qxd
10/28/2005
12:13 PM
TOC
Page 15
INDEX
Cartridge Type
Select Color to print using only the color cartridge. The
Monochrome Black setting prints using the Monochrome
Black cartridge only.
Ink Saturation
This option controls the ink saturation of the printed image.
Please note that higher ink saturation results in higher ink
usage. This will reduce the amount of discs produced per
cartridge.
Enable Ink Low Warning
This setting lets you enable or disable the warning from the
printer to tell you when the ink cartridges are getting low.
Ink Levels and Cartridge Maintenance
Select this button to display the current ink levels as well as
options for cleaning and changing cartridges.
Select Clean
button to send a
simple test pattern
to the printer. Be
sure to have a disc
in the OptiVault’s
input bin and the
front cover closed.
Select the Change
button to install a
fresh, new ink
cartridge or to
switch back and
forth between
previously used
cartridges. After
the cartridge has been replaced according to the instructions in
section 2B, select either the New Cartridge Installed button or
the Old Cartridge Installed button accordingly. These
selections are necessary for the printer to accurately keep track
of ink cartridge ink levels.
Select the Details button for information on the drivers,
firmware, alignment and number of discs printed with
your Optivault.
OptiVault Printer Driver 15
510934.qxd
10/28/2005
12:13 PM
Page 16
INDEX
TOC
Alignment Calibration
The Alignment Calibration allows you you create a test print
that will provide you with values to configure your printer for
Bi-Di- Printing and to align the color and black cartridges for
Color+Black printing. If Bi-Di Printing is enabled, or if you use
Color+Black as a cartridge type in the driver settings, it is
important to perform this calibration every time you change a
cartridge. To print, click the Alignment Calibration Properties
button then click Yes.. The print will look like this:
A
B
0
0
4
8
12
1
5
9
13
2
6
10
14
3
7
11
15
2
4
6
8
10
12
14
2
4
6
8
10
12
14
C
0
D
16 OptiVault Printer Driver
0
2
4
6
8
10 12 14
510934.qxd
10/28/2005
12:13 PM
Page 17
INDEX
TOC
Section 4: Using Retrospect
A. PERFORMING A BACKUP
1.
Load Media into the right bin of the Optivault.
IMPORTANT NOTE ON MEDIA: Only a total of 25 discs can be
loaded into the input bin, output bin and drive at any one time. For
reliable, consistent operation of your OptiVault, we strongly encourage you to
use only genuine Primera TuffCoat Archival Media available at
www.primerastore.com. There are documented quality differences between
different brands of media. Primera has not researched the archival life nor can
it support the recording characteristics and/or performance of other brands of
optical media.
2.
Open Retrospect
3.
Click on the Backup button on Backup Overview window
or on the left navigation menu.
4.
This screen will automatically display information about
the last backup that was performed. You can change this
information by selecting "Let me change these settings".
When you click Next the wizard will guide you through all
the steps necessary to setup a backup job. For this example
we will use the Wizard Mode. Click the Help button on
any step in Wizard Mode for more information on that
step.
Using Retrospect 17
510934.qxd
10/28/2005
12:13 PM
Page 18
INDEX
TOC
To bypass the wizard, click Switch to Advanced Mode.
Advanced Mode allows you to jump to specific settings
you want to change without going though the wizard.
Additional settings are also available in Advanced Mode
which are not available in Wizard Mode.
Wizard Mode
Advanced Mode
18 Using Retrospect
510934.qxd
10/28/2005
TOC
12:13 PM
Page 19
INDEX
5.
This screen allows you to choose preset volumes that are
commonly backed up or a specific location. Select "Let Me
Choose”. Click Next.
6.
Choose the specific location you would like to back up. For
this example choose Local Disk (C:). To backup other
computers on the network choose "My Network Places". To
choose multiple locations, hold down the control key and
click on each item you would like included in the backup.
Click Next.
Using Retrospect 19
510934.qxd
10/28/2005
12:13 PM
TOC
Page 20
INDEX
If you would like to backup only specific folders on a
computer/server, select the destination and then click
Show folders. Choose the folder or folders you would like
to define as volumes. Click Define.
7.
Choose the type of files you would like included in the
backup. Uncheck anything you would like to exclude.
More specific exclusion options are available in Advanced
Mode. Click Next.
20 Using Retrospect
510934.qxd
10/28/2005
TOC
12:13 PM
Page 21
INDEX
8.
Choose the destination by selecting the Optivault and
clicking Next.
9.
You may schedule a backup or choose to run it now. Select
Now and click Next.
Using Retrospect 21
510934.qxd
10/28/2005
12:13 PM
TOC
Page 22
INDEX
10. Name your Backup Set using this screen. Uncheck Use
existing if you would like to create a new backup set.
Note: See Section 4C for information on saving Backup Source and
Destination information as one Backup Script.
11. Decide whether you would like to compress data. Data
compression saves space in the Backup Set by compressing
files before copying them into the Backup Set. Files are
automatically decompressed back to their original state
when restored. Backups (and restores) from Backup Sets
using data compression are slower than those that do not.
Click Next.
22 Using Retrospect
510934.qxd
10/28/2005
TOC
12:13 PM
Page 23
INDEX
12. Choose a security policy if desired. Choosing a security
password other than "None" will encrypt the data on disc
and require the user to enter a password to perform a
restore. Click the Help button for more information. Click
Next to continue.
13. The final screen of the Wizard Mode will show a short
summary of your chosen settings. Click Start Now to start
the backup.
Using Retrospect 23
510934.qxd
10/28/2005
12:13 PM
TOC
Page 24
INDEX
14. The software will first scan all the data to be backed up
and then start the burn process. See section 1F for a
description of the actual robotic burn and print backup
process.
While the backup is executing the Activity Monitor is
displayed. If any errors are encountered click the Events
Tab to view the event log. See section 4H for more
information on event log errors.
24 Using Retrospect
510934.qxd
10/28/2005
12:13 PM
Page 25
TOC
INDEX
B. RESTORING A BACKUP
In the event that you need to restore a backup follow these
steps:
1.
Locate all of backup discs in a backup set. Discs will be
titled according to the following example. If you have 5
discs in your backup set the title of each will be 1-My
Backup, 2-My Backup, 3-My Backup, 4-My Backup and 5My Backup. The final disc in the backup set may already
be in the recorder drive. If you store your backup discs
offsite load them into the left bin of the backup device in
this order:
4-My Backup
3-My Backup
2-My Backup
1-My Backup
5-My Backup or the last disc in the backup set should be
placed in the recorder drive of the Optivault.
Note: Whenever you move or remove media follow the reloading
procedure in section 2D.
2.
Open the Software. Choose Restore from the navigation
menu on the left.
Using Retrospect 25
510934.qxd
10/28/2005
12:13 PM
Page 26
TOC
INDEX
3.
Click Next past the introduction screen.
4.
You will be presented with a list of recently performed
backups from which you can restore. Select one and
click Next.
5.
If you have chosen to progressively backup files you will
have several snapshots or time points to restore to. Choose
one. Click Next.
26 Using Retrospect
510934.qxd
10/28/2005
TOC
12:13 PM
Page 27
INDEX
6.
Choose the location you would like to restore to on your
hard drive or network. The most common choice here
would be Original Location. Click Next.
7.
Choose Restore Files and Folders to choose the files you
would like to restore. Choose Restore everything… to
restore all files. This option will cause the next step to be
skipped. In this example we will choose Restore Files and
Folders. Click Next.
Using Retrospect 27
510934.qxd
10/28/2005
12:13 PM
TOC
Page 28
INDEX
8.
Choose the files and folders you would like to restore.
Click Next.
9.
Choose whether you would like to replace matching files.
Click Next.
10. The final screen before you start the restore summarizes
your restore settings. Click back to edit any settings.
Click Start to start the restore.
28 Using Retrospect
510934.qxd
10/28/2005
12:13 PM
Page 29
TOC
INDEX
C. USING BACKUP SCRIPTS
Using Backup Scripts is an easy way to save all the settings
associated with several different backup jobs. Use this feature
if you would like to schedule backups on several different
volumes on a regular basis.
1.
Choose Manage Scripts from the left navigation menu.
2.
Choose to edit an existing script or create a new one. For
this example we will choose to create a new script.
Using Retrospect 29
510934.qxd
10/28/2005
12:13 PM
Page 30
INDEX
TOC
3.
Choose the type of script you would like to create. For this
example we will choose a standard backup script.
4.
Type the name of the script.
5.
At this point you are brought to a standard backup
window in advanced mode. Switch to Wizard mode and
use the steps in section 4A to complete the backup or setup
your backup job in Advanced Mode.
30 Using Retrospect
510934.qxd
10/28/2005
TOC
12:13 PM
Page 31
INDEX
To edit your backup script, click Manage Scripts, select the
name of the script and click Edit.
D. PERFORMING AN EXCHANGE SERVER BACKUP
The Optivault is especially useful for backing up Exchange.
Below are the steps necessary to perform this function.
Before setting up the Exchange backup make sure that you
have the necessary Exchange backup license installed. Go to
the Window Menu – choose License Manager.
Using Retrospect 31
510934.qxd
10/28/2005
12:13 PM
Page 32
INDEX
TOC
Make sure the Exchange Database/Mailbox Backup license
shows 0 used, 1 available.
If you do not have the license installed click Add and enter
code provided in section 2D.
1.
Install the client software on the Exchange server using the
instructions in section 4F. You will need it to add the client
in Step 5.
2.
Make sure the user logged into Retrospect has necessary
rights to the Exchange server. The server may not appear
as an available source unless the user has rights to the
server.
3.
Add the Exchange Server as a client. Open Configure on
the left navigation menu. Choose Clients. Click Add on the
screen below:
32 Using Retrospect
510934.qxd
10/28/2005
12:13 PM
Page 33
INDEX
TOC
4.
Retrospect will automatically display the clients with the
client software installed. If you do not see the client see
section 4F for instruction on how to directly add the client.
5.
Highlight the Exchange server client and choose Add. You
will be prompted for a password.
6.
Go to the Automate menu – choose Manage Scripts.
7.
Click the New button to add a script.
Using Retrospect 33
510934.qxd
10/28/2005
12:13 PM
Page 34
TOC
8.
Choose Backup as the script type.
9.
Name your backup script.
INDEX
10. Switch to Advanced Mode if you are in Wizard Mode.
Click Sources.
34 Using Retrospect
510934.qxd
10/28/2005
TOC
12:13 PM
Page 35
INDEX
11. You may back up the Exchange Server and the Exchange
Mailboxes. In order to backup mailboxes you must add
them to the Mailbox list. To add specific Mailboxes
Highlight the Exchange Mailbox and click Mailboxes…
Note: While Mailbox data is contained in the backed up Server database, it
is recommended that you back up specific Mailboxes in addition to
the server. This makes it much easier to restore specific mailbox items
if they are accidentally deleted by the user.
12. All available Mailboxes will be displayed. Highlight one or
several and click Define.
Using Retrospect 35
510934.qxd
10/28/2005
12:13 PM
TOC
Page 36
INDEX
13. You may also backup items within the specific user
mailbox. In this example only the Administrator Mailbox
was defined. Highlight the specific mailbox and choose
Subvolume…
14. Highlight the items in the Mailbox you would like to
backup. Choose Define.
36 Using Retrospect
510934.qxd
10/28/2005
TOC
12:13 PM
Page 37
INDEX
15. After you have defined all mailboxes and subvolumes,
you are ready to add them as Sources. Highlight (Control
Left Click) each of the items you would like included as
sources. Click OK.
16. Set the Destination, Selecting and Options as described in
section 4A. Set the schedule according to the suggested
backup strategies described in section 4E.
Using Retrospect 37
510934.qxd
10/28/2005
12:13 PM
Page 38
INDEX
TOC
E. BACKUP STRATEGIES
Often it is beneficial to develop a backup strategy to backup
important files. Below are a several strategies well suited to
the OptiVault.
E1. Hard Drive to Hard Drive to Optical Disc (DVD)
This strategy involves two scripts. The first script "Hard
Drive" will backup information from any source to a hard
drive on your network. It is recommended that you dedicate a
large, fast hard drive for this purpose.
The second script "Optical Disc" will backup selected or filtered
information to a permanent place. In this example we filtered
all documents except MS Word documents. Schedule the hard
drive backup five times a week and the Optical disc backup
once a week. The backup strategy allows you to keep all data
instantly accessible and important data safely stored on
permanent transportable media.
Follow these steps to implement this strategy:
1.
Setup the "Hard Drive" script according to the instructions
in 4C except for one difference. Set the destination Backup
Media to Disk instead of CD/DVD.
38 Using Retrospect
510934.qxd
10/28/2005
TOC
12:13 PM
Page 39
INDEX
2.
Name your backup set destination and select the hard
drive by clicking the Select button.
3.
Choose what you want to do when the hard drive becomes
full. Choose "Keep according to Retrospect's defined
policy" to delete old files only as it becomes necessary to
do so.
Using Retrospect 39
510934.qxd
10/28/2005
12:13 PM
TOC
Page 40
INDEX
4.
Schedule this script to run Monday through Friday.
5.
To create the second script go to the Automate menu choose Manage Scripts. Click New.
6.
Choose "Transfer Backup Sets" as the type of script.
40 Using Retrospect
510934.qxd
10/28/2005
12:13 PM
Page 41
TOC
INDEX
7.
Name your script
8.
Select the Source by clicking the Source button.
9.
Select which backup set you would like as your source.
Choose the backup set you designated as your destination
in steps 1-4.
Using Retrospect 41
510934.qxd
10/28/2005
12:13 PM
TOC
Page 42
INDEX
10. Create a new backup set as your Optical Disc backup set.
Select it as your destination.
11. You may want to filter out certain file types such as mp3 or
video files. You may also want to include only certain file
types such as word documents. This can reduce the size of
your optical disc backup set. In this example only word
documents were included in the transfer. Click Selecting
to filter out or include certain file types or locations.
42 Using Retrospect
510934.qxd
10/28/2005
12:13 PM
Page 43
TOC
INDEX
12. Finally, schedule this script to run once a week on a Friday.
All but the last disc in this backup set can be stored offsite.
E2. Rotating onsite and offsite
This strategy involves two scripts. The first script "Week 1"
will back up information from your source to optical disc
backup set named "Week 1". This script will be scheduled to
run Monday through Friday every other week.
The second script "Week 2" will back up information from the
same source to a different optical disc backup set named "Week
2". This script will be scheduled to run Monday through
Friday every other week starting the next week. "Week 1" and
"Week 2" would rotate backing up the same data every week.
Using this strategy you can take the "Week 1" backup set of
discs to secure offsite storage during "Week 2" backups and
vice versa for the "Week 2" backup set when "Week 1" is
running. During the first run each week the backup set will
catch up to the last one using progressive backup technology.
Using Retrospect 43
510934.qxd
10/28/2005
12:13 PM
Page 44
TOC
INDEX
Follow these steps to implement this strategy:
1.
Setup both backup scripts using the instructions in section
4C. The source for each set will be the same. The
destination will be different.
2.
Set the first week to run Monday through Friday starting
on a specific Monday. Set the weeks to "2" so that the
backup occurs every other week.
3.
Set the second week to run Monday through Friday
starting one week later. Set the weeks to "2" so that the
backup occurs every other alternate week.
44 Using Retrospect
510934.qxd
10/28/2005
12:13 PM
Page 45
INDEX
TOC
E3. Progressive daily - New weekly
This strategy involves one script. This script will backup
information from your source to your backup set. Schedule a
normal progressive backup Monday through Thursday.
Schedule the same script for a Full backup every Friday. Each
will have separate names. If the backup set is named My
Documents, the new Full backup will be named My
Documents-001. Each full backup will add a number after the
name - My Documents-001, My Documents-002, etc. You may
extend this schedule so that a full backup only occurs once a
month or at whatever time you want. This strategy is useful to
reduce the size of your backup set. Once the full backup
occurs, the progressive backup starting Monday will use full
backup as starting point. In other words you can take the
previous Friday - Thursday set offsite because they are no
longer needed in the new set.
Follow these steps to implement this strategy:
1.
Setup a backup script using the instructions in Section 4C.
2.
Schedule the script to run Monday through Thursday as
shown below. Set the Action to Normal (default).
Using Retrospect 45
510934.qxd
10/28/2005
12:13 PM
TOC
Page 46
INDEX
3.
Add another schedule to the same script by clicking the
Add button. Set this script to run on Friday. Set the Action
to New Backup Set.
4.
Your final schedule should look like the screen below:
46 Using Retrospect
510934.qxd
10/28/2005
12:13 PM
Page 47
INDEX
TOC
F. ADDING CLIENTS
After you register with EMC Dantz you will be provided a
license code to unlock two free clients for use with desktop
computers. Once you receive the license code, open the
Retrospect software. Go to the Window Menu - choose
License Manager.
Click Add… on the License Manager Window
Using Retrospect 47
510934.qxd
10/28/2005
12:13 PM
Page 48
TOC
INDEX
Enter your license code and click OK to add the license.
NOTE: It is possible to backup specific shared files and folders on desktop
computers connected to your network without installing clients.
However, without backup clients, it is not possible to backup the
system state necessary for a complete operating system restore.
To install clients on a PC
Insert the installation disc. Choose Custom Install from the
main installer window. Choose Install Retrospect 7.0. From
the Retrospect install windows choose Install Retrospect
Client.
During the install you will be asked to choose a password.
Remember it, you will need it to backup the client.
48 Using Retrospect
510934.qxd
10/28/2005
12:13 PM
Page 49
TOC
INDEX
To install clients on a Macintosh
Go to the EMC Dantz website. www.emcdantz.com Browse to
the Support area - choose Updates - Choose the Mac client.
Download and install the client.
During the install you will be asked to choose a password.
Remember it, you will need it to backup the client.
Note: This client installation can be installed on as many desktop or server
computers as you would like included in a backup. The installer is
the same for servers or desktops. However, the Retrospect software
license manager will only allow you to backup to two of the installed
desktop clients. To purchase additional desktop client or server client
licenses, contact your reseller or EMC Dantz.
Using Retrospect 49
510934.qxd
10/28/2005
12:13 PM
Page 50
TOC
INDEX
Add the Client to the Backup Client List
1.
Before you can backup a client you need to add the client
to the Backup Client List. Open Configure on the left
navigation menu. Choose Clients. Click Add on the screen
below:
2.
Retrospect will automatically display the clients with the
client software installed.
50 Using Retrospect
510934.qxd
10/28/2005
TOC
12:13 PM
Page 51
INDEX
3.
Highlight the client and choose Add. You will be prompted
for a password.
4.
If you do not see the client on the list click the
Advanced button.
5.
Now click on Direct. Type in the IP address or DNS of the
client computer. Click Add.
Using Retrospect 51
510934.qxd
10/28/2005
12:13 PM
Page 52
TOC
INDEX
6.
If Retrospect finds the client, you will be prompted for a
password. You will be asked to confirm the name of the
client. Client properties will be displayed. Click Done.
7.
You will now see clients you added in the Backup Client
List in the sources window.
G. PROGRESSIVE BACKUP
Progressive
When Retrospect performs a backup for the first time
everything selected from the source is backed up to the Backup
Set. Progressive Backup means that every time you backup
after the first time, Retrospect intelligently copies only files that
are new or have changed since the previous backup to a
Backup Set. You don't have to specify whether you want a
"full" or "incremental" backup. Retrospect, by default, copies
any and all the files it hasn't already backed up. For this
reason the last disc written to in the backup set is left in the
recorder. If not many files have been added or changed and if
the backup is performed frequently, it is very likely that the
last disc will stay in the recorder through several backups
cycles of this set.
52 Using Retrospect
510934.qxd
10/28/2005
12:13 PM
Page 53
TOC
INDEX
H. VIEWING SYSTEM ERRORS
If Retrospect ever encounters a problem in the backup process
the error is recorded in the event log. During a backup, the
activity monitor is displayed. To view the event log click on
the Events Tab at the top of the Activity Monitor.
In this example the cover on the Optivault's front cover is
open. Notice the red X next to the error.
You can
easily scan the event log for this error symbol to find the
reason your backup job has not completed.
If you suspect that the software is not communicating with the
Optivault, you can check the Optivault status by clicking on
Devices under Configure on the left navigation menu. If the
Optivault is communicating correctly, Primera Optivault will
be displayed with the drive model shown underneath.
Using Retrospect 53
510934.qxd
10/28/2005
12:13 PM
TOC
Page 54
INDEX
If the media request dialog appears on top of the activity
monitor during a job (see screen capture below) and you are
sure the media asked for is in the OptiVault, use the procedure
in section 2D, step 3 and 4 to Initialize Elements. This will
cause the OptiVault to immediately search for the media and
continue the backup job.
54 Using Retrospect
510934.qxd
10/28/2005
12:13 PM
Page 55
INDEX
TOC
Section 5:
Interpreting the
Optivault's Indicator Lights
The Power and Busy LED indicator lights located on the top of
the Optivault can tell you a lot about what is happening inside
the Optivault. To accurately interpret what it means when these
lights are on, off, or flashing, please refer to the following:
Power LED
Ink Cartridge
LED
Optivault
on solid
off
Cover is open
on solid
on solid
Is ready to receive job.
both lights are blinking
alternately with one another
Waiting for a cartridge to
be installed and the lid to
be closed. (See section 2-E).
on solid
flashing rapidly
The printer tray or ink
cartridge carrier has
stalled. Open and close the
cover to retry the operation.
flashing rapidly
on solid
The Optivault has a cartridge
problem. Check to make
certain that the cartridges are
installed correctly and that the
bar code labels on the
underside of the cartridge are
not damaged.
repeating pattern of both lights
flashing in unison, then one
light momentarily on solid.
This indicates low ink warning.
If the left light stays solid after
the flash, the Color cartridge is
low. If the right light stays on
after the flash, the Black
Monochrome cartridge should
be replaced.
Interpreting the OptiVault’s Indicator Lights 55
510934.qxd
10/28/2005
12:13 PM
Page 56
INDEX
TOC
Section 6:
Maintenance and
Troubleshooting
The Optivault is designed to operate for extended periods of
time with very little attention. In fact, no regular maintenance is
recommended other than cleaning the outside case.
NOTE: Do NOT attempt to oil or grease the Optivault's Robotic Arm shaft or
other components. You will likely cause more harm than good! Any
moving parts are designed to operate for the life of the machine with no
additional lubrication required.
A. CLEANING THE OPTIVAULT
Use a clean, lint-free rag with a small amount of ammonia
window cleaner to clean the Optivault's outside case and trays.
This type of cleaner is very effective on inks that may
accumulate on the printer tray. Stronger cleaning solutions are
NOT recommended because they may damage the paint and
plastic materials from which the parts are manufactured.
Always disconnect your Optivault’s power cords before
cleaning. Resume operation only after the surfaces are
completely dry.
B. PERFORMING A ROBOTIC SELF-TEST
To ensure that everything is working properly, a Self-Test feature
is built in to your Optivault. In this mode, the Robotic Disc
Transporter will go through the motions of picking and placing
a disc to ensure proper working order. This test may be
performed without connecting the Optivault to the computer.
Perform the test by doing the following steps:
•
•
•
•
Load some discs into the Input Bin
The cover must be closed for this operation to complete.
However, in order to access the buttons you must open the
cover. To get around this problem simulate closing the cover
by activating the cover lock sensor. You may do this by
putting an object such as a folded piece of paper in the slot
where the lock would normally be located.
With the Optivault turned on, press the Cartridge Button
While holding the Cartridge Button, press the
Power Button
until the robotics start to move.
56 Maintenance and Troubleshooting
510934.qxd
10/28/2005
12:13 PM
Page 57
INDEX
TOC
•
•
Release both buttons
To stop the test, wait until the disc has moved to the Output
Bin and press the Power Button.
C. CLEANING THE INK CARTRIDGES
It may be necessary to clean the ink cartridge nozzles if you
notice reduced print quality, or if you suspect an cartridge
nozzle has become slightly dried out or clogged. Remove the
cartridges and blot the nozzles on a wet paper towel until you
start to see all three colors evenly appearing on the paper towel.
D. TECHNICAL SUPPORT
If you have difficulties in operating the Optivault use the
procedures in this manual and the additional resource listed
below:
Technical Support Additional Resources
Source
Location
Primera Knowledge Base
www.primera.com/knowledgebase.html
SureThing Software Help files
Open the software. Click on the Help
Menu - Contents
Retrospect Software Help File
Open the software. Click on the Help
Menu - Contents
Retrospect Manual (pdf)
Installation CD
Retrospect Knowledge Base
Open the software. Click on the Help
Menu - Online Knowledgebase
Email Support
www.primera.com/contact_tech_support.cfm
Chat Support
www.primera.com/knowledgebase.html
Primera Level 1
Phone Support
763-475-6676 (Mon - Fri 8 a.m. - 6 p.m CST)
Dantz Level 2
Phone Support
888-777-5664 (Mon-Fri 8 a.m. -6 p.m.)
Retrospect Only - Cost involved.
Maintenance and Troubleshooting 57
510934.qxd
10/28/2005
12:13 PM
Page 58
INDEX
TOC
Section 7: Technical Specifications
Model
Optivault
Printing Method
Ink-Jet
Printing Resolution
4800 x 1200 dpi, 2400 x 1200 dpi,
1200 x 1200 dpi, 600 x 600 dpi
Ink Types
Dual Cartridges: One 3-color (CMY)
cartridge, and one Black
Monochrome (K)
Media Types (Retrospect)
DVD+R media recommended by
Primera
Maximum print width
4.724" (120mm)
Minimum System
(Restrospect)
Pentium IV Processor, Windows 2000,
XP, Server 2000, Server 2003, 512 MB
RAM, USB 2.0, Macintosh support for
clients only.
Disc Capacity
25 discs total for input and output
combined.
Interface
USB 2.0 port
Power Requirement
100-240 VAC, 50/60 Hz, 60 watts
Weight
25 lbs. (11.34kg)
Dimensions
17"W x 7.72"H x 16.65"D
(432mmW x 197mmH x423mmD)
Certifications
Emissions: FCC Class B, CE
Safety
UL, UL-C, CE
Warranty
One year return-to-depot
58 Technical Specifications
510934.qxd
10/28/2005
12:13 PM
Page 59
TOC
Index
Activity Monitor.................................................................................24, 53
Advanced Mode .......................................................................................18
Alignment Calibration.............................................................................16
Backup Client List ...........................................................................................50
Exchange Server ................................................................................31
Performing .........................................................................................17
Progressive .........................................................................................52
Restoring ............................................................................................25
Schedule .......................................................................................21, 45
Scripts .................................................................................................29
Strategies ............................................................................................38
Cartridge Type ..........................................................................................15
Clients..................................................................................... 47, 48, 49, 50
Connections, Rear Panel............................................................................3
Controls, Front Panel .................................................................................2
Enable Ink Low Warning ........................................................................15
Identifying the Parts ..................................................................................2
Incremental................................................................................................52
Ink Levels and Cartridge Maintenance ................................................15
Ink Saturation ...........................................................................................15
Input/Output Bin ......................................................................................3
LED Status Lights.......................................................................................2
License Manager ................................................................................31, 47
Loading Media ...........................................................................................8
Overview of Robotic Operation...............................................................4
Power Input.................................................................................................3
Printer Driver............................................................................................14
Reloading Media ......................................................................................12
Resolution..................................................................................................14
Restore ......................................................................................................25
Specifications ............................................................................................58
System Requirements ................................................................................4
Technical Support.....................................................................................57
Troubleshooting........................................................................................56
Wizard Mode ............................................................................................18
Index 59
510934.qxd
10/28/2005
12:13 PM
Page 60
Printed in the United States of America
P/N 510934