1
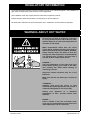
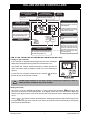
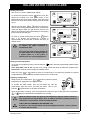
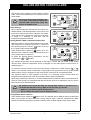
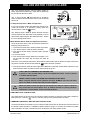
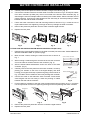
MC-100V & BC-100V
Operation / Installation Manual
A guide on how to use and install Rinnai deluxe water controllers
This guide is for the use and installation of
Rinnai Deluxe water controller models
MC-100V and BC-100V.
These water controllers are compatible only
with the Rinnai water heater and other water
controller models shown.
Compatible Rinnai water heater models:
Infinity XR32
HD-200
Infinity XR26
HD-200i
Infinity XR24
HD-250
Infinity XR20
HD-250i
Infinity XR18
Infinity XR16
Infinity XR26i
Infinity XRPlus 26
Infinity XRPlus 20
Efficiency 24
Refer to the table located on page 1 of this
manual to confirm the maximum number and
combination of controllers that can be fitted to
your Rinnai water heater model.
Compatible Rinnai water controller:
Universal wired controller
MC-91
Wireless controller
MC502S
These instructions must be used in conjunction
with the Rinnai Water Heater Operation /
Installation Manual supplied with Rinnai water
heaters.
This appliance shall be installed in accordance with:
• Manufacturer’s Installation Instructions
• Current AS/NZS 3000, AS/NZS 3500 & NZS 5261
• Local Regulations and Municipal Building Codes
This appliance must be installed, serviced and removed by an Authorised Person.
REGULATORY INFORMATION
Controllers and water heaters must be installed correctly by an authorised person. The installation of
gas, water, and electricity must conform to local regulations.
The installation must also comply with the instructions supplied by Rinnai.
Please keep this instruction booklet in a safe place for future reference.
All dimensions referred to in these instructions are in millimetres, unless otherwise specified.
WARNING ABOUT HOT WATER
Excessively hot water is dangerous, especially
for young children and the infirm. Rinnai water
heaters allow you to control the temperature of
hot water to safe levels.
Water temperatures above 55°C can cause
severe burns instantly and may even result in
death. Those most at risk are children, disabled,
elderly and the infirm. Hot water at 65°C (the
average hot water temperature in New Zealand)
can severely burn a child in less than half a
second. At 55°C it takes half a minute.
ALWAYS......
Test the temperature of the water with your
elbow before placing your child in the bath,
also carefully feel water before bathing or
showering yourself.
Supervise children whenever they are in the
bathroom.
Make sure that the hot water tap is turned off
tightly.
CONSIDER.....
Installing child proof tap covers or child
resistant taps (both approaches will prevent a
small hand being able to turn on the tap).
Setting your appliance at a maximum
temperature of 55°C (Contact Rinnai New
Zealand).
NEVER…..
Leave a toddler in the care of another child.
They may not understand the need to have the
water temperature set at a safe level.
Rinnai New Zealand
i
Operation Manual:01-07
OPERATION MANUAL
REGULATORY INFORMATION...................................................................................i
WARNING ABOUT HOT WATER ................................................................................i
GENERAL WATER CONTROLLER INFORMATION .................................................1
DELUXE WATER CONTROLLERS ............................................................................2
ABOUT THE DELUXE KITCHEN WATER CONTROLLER (MC-100V) ....................................... 2
HOW TO USE THE DELUXE KITCHEN WATER CONTROLLER (MC-100V) ............................ 2
ABOUT THE DELUXE BATHROOM WATER CONTROLLER (BC-100V) .................................. 4
HOW TO USE THE DELUXE BATHROOM WATER CONTROLLER (BC-100V)........................ 4
OPERATING THE SHOWER SAVER / BATH FILL FUNCTION.................................................. 6
USING MULTIPLE CONTROLLERS............................................................................................ 7
COMBINING UNIVERSAL AND DELUXE CONTROLLERS........................................................ 7
WATER CONTROLLER INSTALLATION...................................................................8
WATER CONTROLLERS............................................................................................................. 8
POSITIONING OF WATER CONTROLLERS .............................................................................. 8
WATER CONTROLLER CABLES ................................................................................................ 8
FITTING THE ‘DELUXE KITCHEN’ WATER CONTROLLER (MC-100V).................................... 8
FITTING THE ‘DELUXE BATHROOM’ WATER CONTROLLER (BC-100V) ............................... 9
CONTACT INFORMATION .......................................................................................13
Rinnai New Zealand
ii
Operation Manual:01-07
GENERAL WATER CONTROLLER INFORMATION
Temperature water controllers allow precise temperature control by the user. When used correctly,
the hot water unit will deliver the selected temperature, even when the water flow is varied, or more
than one tap is in use. Each water controller can be individually programmed, however the water
heater can only deliver one set temperature at any time. The available temperatures (°C) are as
follows:
Kitchen Controller:
37, 38, 39, 40, 41, 42, 43, 44, 45, 46, 48, 50, 55°C* (60°C, 65°C, 75°C HD models only )
Bathroom Controller:
Hot Water Delivery: 37, 38, 39, 40, 41, 42, 43, 44, 45, 46, 48, 50°C
Bath fill Delivery: 37, 38, 39, 40, 41, 42, 43, 44, 45, 46, 47, 48°C
Whilst hot water outlets are open the set temperature may be lowered. However the set temperature
cannot then be raised above 43°C. In addition transfer of 'priority' between controllers is not possible.
These are safety features.
Suggested temperatures are:
Kitchen 50°C ~ 55°C* Shower 37°C ~ 43°C, Bath fill 39°C ~ 45°C
* Temperature may not be available on all installations. Rinnai water heaters can be programmed to deliver higher temperatures
via the kitchen controller. Contact Rinnai for more details.
These temperatures are suggestions only. You may find higher or lower temperatures more
comfortable. Maintaining lower temperatures helps save energy. To obtain water temperatures lower
than 37°C simply add cold water.
Water controllers are an optional extra. 'Universal' and 'Deluxe' water controllers can be fitted.
Universal Controllers allow temperature selection only. Deluxe controllers allow temperature
selection, bath fill and have a clock function.
Water controllers allow the water temperature to be set from the various locations where they are
installed. The temperature selected will be available to all outlets.
Universal (MC-91-2A) and Deluxe (MC-100V & BC-100V) Controllers - available configuration:
A maximum of 4 water controllers can be fitted. Any combination of the deluxe, universal and wireless
controllers can be used with the following limitations.
Only ONE master controller can be installed. This can be MC-100V, a MC-91 (when programmed as
a master controller) or a MC502S (wireless) controller.
Up to TWO BC-100V water controllers can be installed.
The FOURTH water controller in any installation MUST BE a MC502S (wireless) or a MC-91.
Rinnai New Zealand
1
Operation Manual:01-07
DELUXE WATER CONTROLLERS
ABOUT THE DELUXE KITCHEN WATER CONTROLLER (MC-100V)
WATER TEMPERATURE
INDICATOR
Indicates the selected hot water
temperature.
SHOWER SAVER /
BATH FILL INDICATOR
DIGITAL
MONITOR
Indicates that the Shower Saver /
Bath Fill function is operating.
UP AND DOWN BUTTONS
WATER HEATER
'In Use' INDICATOR
When in Normal mode these
buttons are used to select the
water temperature.
Indicates that the water heater is in
operation and delivering hot water.
In 'Setup' mode these buttons are
used to adjust the voice prompt
volume and to set the clock.
CLOCK
12 Hour AM / PM clock display.
MODE BUTTON
In the event of a fault, codes for
error messages will flash here.
Used to swith the controller
between Normal, Voice or Clock
modes.
SPEAKER
TRANSFER BUTTON
Used to transfer control priority
between the temperature
controllers. The controller with
priority has command of the hot
water delivery temperature. This
button is illuminated when this
controller has priority.
ON/OFF BUTTON
Used to switch the water heater on and
off. This button is illuminated when the
hot water heating system is on.
HOW TO USE THE DELUXE KITCHEN WATER CONTROLLER (MC-100V)
Turning on the Controller
If the controller is switched off (No digits other than the clock digits
displayed in the digital monitor) press the On/Off button once.
The On/Off and Transfer buttons illuminate to indicate that the hot
water unit will be ready to supply hot water once a hot water tap is
opened.
If more than one controller is fitted press the ‘Transfer’
transfer priority to the desired controller.
button to
The MC-100V controller is not water resistant, avoid direct exposure to water or
steam as these conditions may cause damage.
NOTE
Setting The Clock
The clock is a 12 hour AM/PM style display. To set the time press the 'Mode'
button twice, this
places the controller into clock setting mode, in the digital monitor the word ‘Clock’ will be displayed
and the clock digits will flash, if this is the first time the clock has been set the starting time will be AM
12:00.
Use the
or
buttons to select the desired time, holding these buttons down continuously cycles
the digits. When you get close to the time you wish to set, press the button intermittently to avoid going
further than the desired time.
Rinnai New Zealand
2
Operation Manual:01-07
DELUXE WATER CONTROLLERS
To return to normal mode press the 'Mode'
button once,if no buttons are pressed for a period of
approximately 10 seconds the controller will return to normal mode.
The time is always displayed regardless of whether the Water Controller is turned
ON or OFF.
NOTE
The clock may need reseting if power to the water heater unit is disrupted due to
a power failure or if the power is switched off over a prolonged period.
Setting The Sound Options
To set the sound options press the 'Mode'
Use the
or
button once to place the controller into ‘Voice’ mode.
buttons to select the desired audible setting as follows:
Voice High, Med, Low or Off, sets the voice prompt volume but does not affect the audible tones.
Sound Off, mutes all voice prompts and audible tones.
To return to normal mode press the 'Mode'
button once, if no buttons are pressed for a period of
approximately 10 seconds the controller will return to normal mode.
Voice prompts only available when Deluxe Bathroom water controller(s) are
installed.
NOTE
Adjusting Temperature
Simply press the 'hot water temp'
or
buttons until the
required temperature is displayed on the Digital Monitor.
ON!
COLD
To operate the water heater, open any hot water tap. This will
automatically light the burner, providing hot water. The ‘In Use’
indicator
will illuminate on the Water Controller.
HOT
Once the hot water is running, if the set temperature is either too hot or cold press the
buttons until the desired temperature is reached.
NOTE
CAUTION
or
Whilst hot water outlets are open the set temperature may be lowered. However
they cannot then be raised above 43°C. In addition transfer of 'priority' between
controllers is not possible. These are safety features.
CHECK WATER TEMPERATURE BEFORE USE.
A parent or carer should always check the temperature before a child is placed
in contact with hot water.
Rinnai New Zealand
3
Operation Manual:01-07
DELUXE WATER CONTROLLERS
ABOUT THE DELUXE BATHROOM WATER CONTROLLER (BC-100V)
WATER TEMPERATURE
INDICATOR
Indicates the selected hot water
temperature.
WATER HEATER
'In Use' INDICATOR
Indicates that the water heater is in
operation and delivering hot water.
TRANSFER BUTTON
Used to transfer control priority between
the temperature controllers. The
controller with priority has command of
the hot water delivery temperature. This
button is illuminated when this controller
has priority.
WATER VOLUME INDICATOR
Indicates Shower Saver / Bath Fill
volume selected.
SHOWER SAVER /
BATH FILL INDICATOR
Indicates that the Shower Saver / Bath
Fill function has been selected and that
a shower is running or the bath is filling.
SHOWER SAVER
/ BATH FILL BUTTON
Used to select Shower Saver / Bath Fill
function. This button is illuminated when
the Shower Saver / Bath Fill function is
selected.
ON/OFF BUTTON
Used to switch the water heater on and
off. This button is illuminated when the
hot water heating system is on.
DIGITAL
MONITOR
SPEAKER
WATER VOLUME BUTTONS
CLOCK & REMAINING WATER
VOLUME INDICATOR
12 Hour AM / PM clock display.
Indicates how much water still needs to
flow for the selected Shower Saver /
Bath Fill volume, decreasing while
shower runs or bath fills.
TEMPERATURE BUTTONS
In Normal and Bath Fill / Shower Saver
modes these buttons are used to select
the water temperature.
In 'Clock' mode these button are used to
set the clock.
Used to select Shower Saver / Bath Fill
volumes.
CLOCK SETTING BUTTON
Used select clock setting mode.
SOUND VOLUME BUTTON
Used to select the voice and audible tone
options.
In the event of a fault, error message
codes will flash here.
HOW TO USE THE DELUXE BATHROOM Water CONTROLLER (BC-100V)
Turning on the Controller
If the controller is switched off (No digits other than the
clock digits displayed in the digital monitor) press the
On/Off button once.
The On/Off and Transfer buttons illuminate to indicate
that the hot water unit will be ready to supply hot water
once a hot water tap is opened.
If more than one controller is fitted press the ‘Transfer’
button to transfer priority to the desired controller.
Refer to page 1 to confirm the maximum number and combination of water
controllers that can be fitted to your Water Heater model.
NOTE
Avoid getting water directly in the speaker as this may cause damage.
Rinnai New Zealand
4
Operation Manual:01-07
DELUXE WATER CONTROLLERS
Setting The Clock
The clock is a 12 hour AM/PM style display.
To set the time press the 'Clock'
button once, this
places the controller into clock setting mode, in the
digital monitor the clock digits will flash, if this is the first
time the clock has been set the starting time will be AM
12:00.
Use the ‘Temperature’
or
buttons to select the
desired time, holding these buttons down continuously
cycles the digits. When you get close to the time you
wish to set, press the button intermittently to avoid going
further than the desired time.
To return to normal mode press the 'Clock'
button
once, if no buttons are pressed for a period of
approximately 60 seconds the controller will return to
normal mode.
NOTE
The time is always displayed regardless
of whether the Water Controller is
turned ON or OFF.
The clock may need reseting if power to
the water heater unit is disrupted due to
a power failure or if the power is
switched off over a prolonged period.
Setting The Sound Options
To set the sound options press the 'Sound Volume'
button and select the desired audible setting
as follows:
Voice High, Med, Low or Off, sets the voice prompt volume but does not affect the audible tones.
Sound OFF, mutes all voice prompts and audible tones.
Press any of the
or
buttons to return to normal mode, if no buttons are pressed for a period
of approximately 10 seconds the controller will return to normal mode.
Adjusting Temperature
Simply press the 'Temperature'
or
buttons until the required
temperature is displayed on the digital monitor.
To operate the water heater, open any hot water tap. This will
automatically light the burner, providing hot water. The ‘In Use’
indicator
will illuminate on all Water Controllers.
ON!
COLD
HOT
Once the hot water is running, if the set temperature is either too hot or cold press the 'Temperature'
or
buttons until the desired temperature is reached.
NOTE
CAUTION
Whilst hot water outlets are open the set temperature may be lowered. However
they cannot then be raised above 43°C. In addition transfer of 'priority' between
controllers is not possible. These are safety features.
CHECK WATER TEMPERATURE BEFORE USE.
A parent or carer should always check the temperature before a child is placed
in contact with hot water.
Rinnai New Zealand
5
Operation Manual:01-07
DELUXE WATER CONTROLLERS
OPERATING THE SHOWER SAVER / BATH FILL FUNCTION
The 'Shower Saver / Bath Fill' function allows a preset
water volume and temperature to be selected and run
automatically.
NOTE
No voice prompts will be available if the
‘Voice OFF’ or ‘Sound OFF’ options are
selected. With ‘Sound OFF’ there will
also be no audible tones.
Initial Settings
When a deluxe bathroom controller is first turned on, the
default shower / bath fill temperature is set to 40°C and
the shower / bath volume is set to 100 litres. The shower
/ bath volume can be lowered to a minimum of 30 litres
or raised to a maximum of 400 litres and the
temperature adjusted as desired.
Setting Shower / Bath Temperature and Volume
With the system on, select a Deluxe Bathroom controller
and ensure that it currently has priority. If it does not
have priority press the ‘Transfer’
button once and
the ‘Transfer’ button will illuminate.
Press 'Shower Saver / Bath Fill'
button once. The
'Shower Saver / Bath fill' button will illuminate and a
voice prompt and tone will sound.
To select the desired delivery temperature use the
'Temperature'
or
buttons.
The selected temperature will be displayed on the digital monitor and will remain as the default
'Shower Saver / Bath Fill' temperature until it is changed or if the mains power is turned off for an
extended period.
To select the volume of water to be used in the shower / bath use the 'Water Volume'
or
buttons. The selected volume is displayed in large digits to the right and will remain as the default
'Water Volume' until it is changed or if the mains power is turned off for an extended period.
The selected volume is also repeated in the form of a remaining volume counter below the
temperature and replaces the clock during 'Shower Saver / Bath Fill' operations.
When filling a bath for the first time, it is recommended that a low bath fill volume such as 60 litres or
lower be used. During any subsequent bath fills the volume can then be adjusted to suit your known
bath volume and or desired fill level.
Be careful not to overfill the bath, an average bath volume is 160 litres. It is
recommended that when filling a bath for the first time you should:
NOTE
• Remain by the bath during the filling process.
• Use a low bath fill volume such as 60 litres or less.
Using Shower Saver / Bath Fill
Press 'Shower Saver / Bath Fill'
button once. The 'Shower Saver / Bath fill' button will illuminate
and a voice prompt and tone will sound. During 'Shower Saver / Bath Fill' operations the 'Bath'
indicator will also be displayed in the deluxe kitchen water controller digital monitor (when fitted).
Rinnai New Zealand
6
Operation Manual:01-07
DELUXE WATER CONTROLLERS
The voice prompt will say "The hot water system is
ready. Open the hot water tap”. Open the hot water tap
for the relevant shower or bath.
ON!
COLD
The ‘In Use’ indicator
will illuminate on all deluxe
water controllers and the shower will run or the bath will
start to fill.
HOT
To Stop Shower Saver / Bath Fill Operation
If you wish to stop the water flow whilst the shower saver
/ bath fill function is in operation, simply press the
'Shower Saver / Bath fill'
button.
The 'Shower Saver / Bath fill' button will flash and the
voice prompt will say "Hot water is not available, Turn off
all hot water taps and push the 'Bath fill' button". Follow
the voice prompt instructions.
When Shower Saver / Bath Fill Operations Finishes
Once the shower saver / bath fill operation finishes the
following events will occur:
OFF!
COLD
1. The flow from the shower / bath hot water tap ceases.
2. The 'Shower Saver / Bath fill' button will flash.
3. The deluxe kitchen water controller 'Bath' indicator
will flash.
4. A tone will sound.
HOT
5. The voice prompt will say "Bath fill is complete. Turn
off the bath hot water tap and push the bath fill
button."
Follow the voice prompts instructions. Note that the water heater will not allow hot water to flow from
any fixture until the 'Shower Saver/ Bath fill'
button has been pressed.
6. The 'Shower Saver / Bath fill' button light on the Bathroom Controller and the 'Bath' indicator on the
deluxe kitchen water controller monitor (when fitted) will go out.
CAUTION
CHECK WATER TEMPERATURE BEFORE USE.
A parent or carer should always check the temperature before a child is placed
in contact with hot water.
NEVER LEAVE YOUNG CHILDREN UNATTENDED IN THE BATH.
When using the 'Shower saver / Bath fill' function, ALWAYS close the hot water
tap for the bath or shower after the flow has stopped.
NOTE
Whilst hot water outlets are open the set temperature may be lowered. However
they cannot then be raised above 43°C. In addition transfer of 'priority' between
controllers is not possible. These are safety features.
USING MULTIPLE CONTROLLERS
The water heater can be turned on and off at any water controller. If more than one water controller is
fitted press the ‘Transfer’
button to transfer priority to the desired water controller.
COMBINING UNIVERSAL AND DELUXE CONTROLLERS
Universal and Deluxe Controllers can be combined and will function as described in other sections of
the Water Heater Operation / Installation Manual. Refer to page 1 to confirm the maximum number
and combination of water controllers that can be fitted to your water heater model.
Rinnai New Zealand
7
Operation Manual:01-07
WATER CONTROLLER INSTALLATION
WATER CONTROLLERS
Water Controllers are available as an optional extra. Universal and Deluxe Controller can be used
together and will function as described in the Operation Section of this manual. Please refer to page 1
to confirm the maximum number and combination of controllers that can be fitted.
NOTE
Other manufacturers water controllers are NOT compatible with Rinnai water
heaters. These water controllers must not be used with any Solar Boost water
heater.
Rinnai water controllers brought in from other countries are not compatible with
Rinnai appliances sold in New Zealand.
POSITIONING OF WATER CONTROLLERS
Water controllers must be installed in shaded and clean locations. They should be fitted out of reach
of children (suggested height from floor to be at least 1500 mm). BC-100V water controllers are water
resistant, however, durability is improved when positioned outside the shower recess. All deluxe water
controllers must be installed at least 400 mm above the highest part of a sink, basin or bath.
• Do not install water controllers near a heat source, such as a cook top, stove
or oven. Heat, steam, smoke and hot oil may cause damage.
NOTE
• Do not install water controllers in direct sunlight.
• The MC-100V water contoller MUST NOT be installed in a bathroom.
• Do not install water controllers outdoors unless protection from dust ingress
and sunlight are provided.
• Do not install water controllers against a metal wall unless the wall is earthed
in accordance with AS/NZS3000.
• Water controllers MUST NOT be installed where chemicals such as benzine,
alcohol, turpentine or other similar chemicals are in use.
POSITIONING CONSIDERATIONS FOR THE MC-100V WATER CONTROLLER.
The MC-100V uses a Liquid Crystal Display (LCD) for the digital
monitor. Light reflections can make the LCD difficult to see at
direct eye level.
For best results when Installing the MC-100V mount the water
controller lower than your eye-level to avoid these light
reflections.
WATER CONTROLLER CABLES
Water controllers operate at extra low voltage (12 Volts DC) which is supplied from the water heater.
Controllers come supplied with 15 m of electrical cable. The appliance end of the controller cables are
fitted with spade terminals. Extension cabling is available from Rinnai.
NOTE
Alternatively two core sheathed (double insulated) flex with minimum crosssectional area of 0.5 mm² may be used. Maximum individual cable runs should
not exceed 50 m.
Use the wall mounting bracket as a template to mark and drill 3
holes, locating the cable access hole as shown in Fig. 1.
3.
Fix the mounting bracket to the wall using the approriate fixings.
4.
Run the water controller cable through the hole in the wall.
Rinnai New Zealand
8
120
2.
Ø20 Cable Access
Determine the most suitable position for the water controller (see
note under “POSITIONING OF CONTROLLERS” on previous page).
Screw Securing Points
1.
Outline of Water Controller
FITTING THE ‘DELUXE KITCHEN’ WATER CONTROLLER (MC-100V)
128
Fig.1
Installation Manual:01-07
WATER CONTROLLER INSTALLATION
5.
Carefully remove face plate from water controller, using a screw driver. (Fig. 2)
6.
Connect the controller cable to the kitchen water controller as shown in Fig 3. At this point cables
from other controllers (if fitted) may also be connected to the kitchen water terminals (Fig. 4)
eliminating the need for multiple cable runs directly to the water heater. Water controllers are not
polarity sensitive. Feed excess cable lengths into the wall cavity to avoid the pinching of cables
between the wall and the water controllers.
7.
Fasten the water controllers to the wall mounting bracket as shown in Fig. 5. Avoid the use of
impact drills and the over-tightening of fixings as this may damage the water controllers.
8.
Remove the protective plastic film from the water controller digital monitor.
9.
Replace the face plate.
Fig. 2
Fig. 3
Fig. 4
Fig. 5
FITTING THE ‘DELUXE BATHROOM’ WATER CONTROLLER (BC-100V)
1.
Determine the most suitable position for the water controller (see note under “POSITIONING OF
WATER CONTROLLERS” on previous page).
2.
Mark and drill 3 holes, locating the cable access hole as shown in
Fig. 1.
3.
When running a cable through the access hole ensure the connector
end of the cable is located nearest to the controller. (Fig. 2)
4.
Affix the double sided self-adhesive seal to the back of the water
controller. (Fig. 3)
5.
Carefully remove the face plate from the water controller, do this by
placing your thumbs on the front of the digital display and while
hooking your fingers behind top of plate and gently push as shown in
Fig. 4, DO NOT use a screwdriver as this may damage the controller.
6.
7.
Outline of Water Controller
Securing
Screw
104
181
Ø20 Cable Access
202
Fig. 1
Water Controller Cable
Connect the cable to the bathroom water controller. Feed excess
cable lengths into the wall cavity to avoid the pinching of cables
between the wall and the controller.
Connector
Fig. 2
Fix the bathroom controller to the wall using the approriate fixings as shown in Fig. 5, avoid the
use of impact drills and the over-tightening of fixings as this may damage the water controller.
Backing Seal
Remove
to expose
self-adhesive
8.
Fig. 3
Fig. 4
Fig. 5
Remove the protective plastic film from the controller’s digital monitor.
9.
Replace the face plate.
Rinnai New Zealand
9
Installation Manual:01-07
WATER CONTROLLER INSTALLATION
CONNECTING COMMUNICATION CABLES TO THE WATER HEATER
Communication cables connect the water heater to water controllers and operate at an extra low
voltage (12 Volts DC) which is supplied from the water heater. Communication cables are supplied
with the water controllers (15m) and are fitted with spade terminals for connection to water heater. Up
to two cables can be connected directly to the cable connector at the water heater. Extension cables
are available from Rinnai. Alternatively, two core sheathed (double insulated) flex with minimum cross
sectional area of 0.5mm² may be used. Cable lengths must not exceed 20 metres.
CAUTION
DO NOT attempt to connect cables to the cable connector at the water heater unless
the electric power to the water heater is switched ‘off’ otherwise damage to electrical
components may occur.
To connect up to two cables to the cable connector
1. Isolate the electric power supply by switching the power point off and removing the power plug of
the water heater from the electric power socket.
2. Remove the retaining screw
A
of the cable connector at the base of the appliance.
3. Swing the cable connector door open and thread the cable through the weather seal of the cable
access hole B in the direction shown allowing sufficient cable length so that the sheath of the
cable can be secured with cable clamp C supplied with the transceiver.
4. Loosen screw terminals D and E and connect the cable spade connectors to these terminals
and re-tighten. Polarity is not important, either wire colour can be connected to either terminal.
5. Return the cable connector to the original position taking care not to damage cable wires in the
process and replace the retaining screw A .
A
A
B
B
D
C
E
The cable connector for water heater models:
INFINITY XR26, XR24, XR20, XR18, XR16 and HD200
The cable connector for water heater models:
INFINITY XR32, XR26i, HD250, HD250i, HD200i, and Efficiency24
F
Connecting Three or Four Controllers
F
F
Repeat steps 1, 2 and 3 above.
To connect three or four cables, seperate all the cables to be fitted into
pairs. Cut off the existing spade connectors from each pair and reterminate each pair into a new spade connector (available from your
local electrical component retailer) F so that there are only two sets
of spade connectors (4 spade connectors in total) to be terminated.
Repeat steps 4 and 5 above.
Rinnai New Zealand
10
Three
Cables
Four
Cables
Installation Manual:01-7
NOTES
Rinnai New Zealand
11
Installation Manual:01-07
NOTES
Rinnai New Zealand
12
Installation Manual:01-7
CONTACT INFORMATION
Customer Contacts
Consumer Enquiries: 0800 746624
Installer Enquiries: 0800 86746624
(0800 RINNAI)
(0800 TORINNAI)
Rinnai New Zealand Limited
691 Mt. Albert Road,
PO Box 24068 Royal Oak, Auckland
Email: [email protected]
www.rinnai.co.nz
U220-1149(00)
2008.01
13
RA TSD Issue 27/12/07