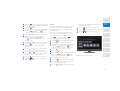
1
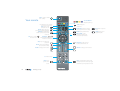
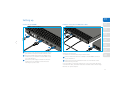
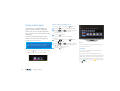
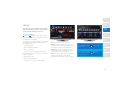
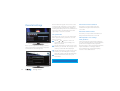
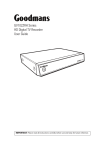
More than a digital TV recorder
BV21R050W
BV21R100W
Smart Digital TV Recorder
User Manual
Welcome
We think simplicity and focus are the hallmarks of remarkable
technology. Our View21® products are designed in the UK and
Australia, for Australia – providing relevant smart features in an
attractive package that’s easy to use and brilliantly capable.
More than a digital TV recorder
This product is capable of receiving
and decoding Dolby Digital Plus.
Manufactured under license from
Dolby Laboratories. Dolby and the
double-D symbol are trademarks
of Dolby Laboratories.
2
Welcome
Note: Use of any electrical
equipment should be undertaken
with care. Please read the warnings
on page 48 before using your
digital box. This digital box is
for household use only.
Getting set up
01
Getting started
02
Advanced box features
03
Settings menu
04
Software updates
05
Troubleshooting
06
Specifications
07
Safety information
08
3
Warranty
Bush Australia Pty Ltd guarantees this product for a period of 12 months from the date of purchase. To claim warranty on this product the consumer must
provide proof of purchase.
Bush Australia goods come with guarantees that cannot be excluded under the Australian Consumer Law. You are entitled to a replacement or refund for a
major failure and for compensation for any other reasonably foreseeable loss or damage. You are also entitled to have the goods repaired or replaced if the
goods fail to be of acceptable quality and the failure does not amount to a major failure.
TERMS AND CONDITIONS OF WARRANTY
Subject to the under mentioned conditions and exemptions Bush Australia Pty Ltd. warrants all products to be free from defects in material or workmanship for
the specified warranty period as stated below from the date of its original purchase. The benefits given in this warranty are in addition to all other rights and
remedies, which the purchaser has under the Trade Practices Act and similar State and Territory laws.
Bush Australia Pty Ltd. will, at its option either repair or replace free of charge any part which is at its sole absolute discretion determined to be defective as a
result only of faulty material or workmanship in manufacture.
Warranty does not cover:
Any damage, malfunction or failure which in the opinion of Bush Australia Pty Ltd. may have resulted from accident, misuse, neglect, abuse, improper
installation, maladjustment, use on incorrect voltage, fluctuations in electric current, outside interference, thunderstorm activity, failure to observe or failure to
carry out manufacturer’s recommendations or tampering by unauthorized persons.
The product must be correctly installed and operated in accordance with the instructions contained in the instruction manual.
The product must be used solely for domestic purpose.
The warranty will be rendered invalid if the product is resold or has been damaged by an unauthorised repair person.
Customer Service Ph 1300 055 518
Bush Australia Pty Ltd
9/4 Avenue of Americas
Newington, NSW, 2127 Australia
Ph 1300 055 518
www.bushaustralia.com.au
4
Welcome
01
02
03
04
05
06
07
08
5
Full contents
01 Getting set up
What’s in the box
8
Your View21 box
9
Your remote
10
Setting up
11
Easy install
12
Connecting to the Internet via WiFi
13
Advanced install
14
02 Getting started
6
Using your View21 box
Selecting channels
Changing the volume
Mute
Pausing live TV
Recording
Using the Guide
Using the Library
Other remote control buttons
16
16
16
17
17
17
18
18
18
Using online apps
Select and run an application
Flickr
YouTube
Twitter
20
20
20
20
21
Full contents
View21 companion apps
Use of the app requires
Using the View21 Play app (iPad/iPhone)
Watch live TV
View a recording
Make a recording before you view it
Browse the programme guide
Set a reminder
View21 Photo app
22
22
22
22
22
23
23
23
23
03 Advanced box features
Main Menu
Opening a function
24
24
Programme guide
Guide
Guide structure
Guide format options
Programme information
Set the default Guide format
Change the Guide format
Set the time window
Navigate to and watch a programme
Navigate to a Genre list
Record the programme you are watching
Cancel a recording
Record a future programme
Cancel a future recording
24
24
25
25
25
26
26
26
26
26
26
27
27
27
Resolving recording conflicts
Setting a reminder
Cancel a reminder
28
28
28
Library
Access the Library
Playing a recording
Pausing and resuming play
Play a recording ‘Resume play’
and ‘Play from start’ options
Play a recording using the
‘Play from time’ option
Protecting a recording
Stopping play
Deleting a recording
Playback (or rewind) at higher speeds
Sorting Library contacts
Invert the sort order
Preview a recording
Library quick key buttons
29
29
30
30
30
30
30
31
31
31
31
31
31
32
01
04 Settings menu
Display and audio settings
Navigate and edit the System menu
HDMI video output
Audio output
Screen size
Default programme guide view
Default Library view
Menu transparency
Menu timeout
Lip-sync
12/24 hour clock
34
34
34
34
34
34
34
34
35
35
35
Parental settings
Set system PIN
Allow First Time Installation
Allow hard drive format
PIN required for recordings
with guidance
36
36
36
36
Recording settings
Default recording mode
Series link mode
Timeshift amount
Add to end of recording
37
37
37
37
37
36
Skip forwards time
Skip backwards time
Automatic hard drive space management
Format hard disk drive
37
37
37
38
System settings
First Time Installation
Channel retune
Internet connection setup
WiFi setup
Auto standby
Network change notification
System information
Revert to default settings
Manual retune
38
38
38
39
39
39
39
39
39
39
05 Software updates
Manual software update
View21 box specifications
46
08 Safety information
Warnings
Safety Tips
Note
View21 disclaimer
48
48
48
49
02
03
04
05
06
42
06 Troubleshooting
Troubleshooting help
07 Specifications
44
07
08
7
01 Getting set up
What’s in the box
To access online smart services
• Quick Start Guide • User Guide
View21 box
Power supply
Not included with this product
HDMI cable
Router
Ethernet cable
You will also need
Broadband connected router: Connecting to the internet enables you
to use smart services. To use online apps and features like the View21 Play
app, you will need to connect your View21 box to an internet connected
router, either via WiFi or using an Ethernet cable.
RF cable
Remote control
2 x AAA batteries
You will also need
• Rooftop aerial: It is recommended that you use a wideband rooftop
aerial for your Veiw21 box to work properly.
• TV: A TV equipped with an HDMI socket.
8
Getting set up
If you want to use View21 companion apps your router must be WiFi
enabled.
Ethernet cable: If you are not using WiFi, you will need an Ethernet
cable to connect your View21 box to a router.
01
02
Your View21 box
03
Power/Standby
04
05
06
USB
NETWORK
RF OUT
(Aerial Output)
S/PDIF
DC IN
07
08
RF IN
(Aerial Input)
HDMI
9
Your remote
Power: Switch the View21
box to standby
Coloured Buttons:
Navigation quick keys
These buttons are not used with
this version of the product.
Exit: Exit the menu
and return to live TV
Library: Display a library of
previously recorded programming
Rewind: (1) Fast Rewind at
variable speeds (2) Step through
menu bars
OK: Press to confirm
current selection
Navigation:
Navigate up/down/left/right in
menus/on screen displays
Stop: Stops recording or live
paused TV
Record: (1) Record a programme
(2) Set a future recording
Volume: Changes your TV volume
Online: Display the
online menu
Information: Display information
about programmes and recordings
Back: Return to previous
menu
Menu: Display the Main Menu
Guide: Display the TV
programme guide
Fast Forward: (1) Fast
Forward at variable speeds
(2) Step through menu bars
Play/Pause: Toggle action for
recordings and Live Pause TV
Channels: Changes your TV channels
0 – 9: Numerical keys
Mute: Turns
your TV sound
on/off
10
Getting set up
Swap: (1) Swap between previous and
currently watched TV channels (2) Toggle
Show/Hide of quick key buttons in menus
01
Setting up
Connecting via HDMI
02
Internet connection via Ethernet cable
03
1
04
1
05
2
2
06
3
07
1 Connect the aerial cable between the RF IN socket on
your View21 box and your external aerial wall socket.
2
3
Connect the HDMI cable between the HDMI socket
on the back of your View21 box and an HDMI socket
on your HD Ready TV.
Connect the power supply to the DC IN connection
on the back of your View21 box and connect the
3 Pin Plug to a power socket.
If you plan to connect to the internet via WiFi, skip this step and continue with
setting up your View21 box.
To connect to an internet router using an Ethernet cable:
08
1 Connect an Ethernet cable (not included) to the NETWORK connection
on your View21 box.
2 Connect the other end of the Ethernet cable to a free Ethernet socket
on the back of your router.
If you are unable to connect the View21 box to your router using either WiFi
or an Ethernet cable, alternative methods are available such as Home Plugs/
Ethernet over power adaptors.
11
Easy install (recommended)
When you first connect your View21 box
to a TV and turn it on, the ‘First Time
Installation’ screen will be displayed.
1
If ‘Easy’ is not already selected, press
on your remote control to select it.
2
Press the
button to begin. The ‘Easy
Setup’ screen will be displayed with the ‘TV
Setup’ function selected. How your View21
box is connected to your TV will also
be shown.
3
Press the
button. The ‘Set PIN’ function
will be selected.
4
You can choose a new PIN using the number
keys, press OK to confirm your selection.
Alternatively press the
button to skip
this stage, the PIN can be set later.
5
The ‘Tuning’ function will be selected,
showing the number of TV and Radio
channels currently stored in the View21 box.
On your first setup, these will both be 0.
6
Press the
button. The system scans for TV
and Radio channels and updates the number
of channels found. During this time a progress
bar advances until complete (100%). This step
takes about 8 minutes.
7
When scanning has finished, the screen
displays ‘Installation complete’.
8
Press the
button to begin watching
the first TV channel stored.
Easy install is the recommended option as
it will attempt to find the optimal settings
for your TV and View21 box.
‘First Time Installation’ will scan for TV
and Radio channels and store the results
on the View21 box. This process will take
approximately 8-10 minutes to complete.
Tip: Remember to make a note of your PIN for later
use. The default PIN setting is 0000, if you choose
to skip the ‘Set PIN’ stage, this will remain the
Parental PIN number until changed.
If you change your PIN, write it here.
12
button
You can press
at any time to return
to the previous step.
If multiple TV regions are available in your
area, you will be prompted to choose a region
during the installation process.
Easy install may not always provide the optimum
setting level for your TV. If you know the screen
size (aspect ratio) of your display you can set this
manually by following the Advanced install set
up process.
Connecting to the Internet via WiFi
01
02
03
04
05
Once you have finished setting up your View21 box, you can connect to the
internet via WiFi if required.
7
Press the
8
button.
Use the
and
buttons to select your WiFi router
from the displayed list of WiFi connections.
To connect to an internet router using WiFi, make sure your router, View21 box
and TV are switched on.
9
Press the
To connect via WiFi:
10
If your WiFi is password-protected, enter the password.
11
To accept the WiFi connection details, press the
button. Or press the
button to exit the function
without applying any changes.
1
Press the
button to display the Main Menu.
2
Repeatedly press the
bar.
3
Press the
4
Repeatedly press the
Settings bar.
5
Press the
6
Use the
and
‘WiFi setup’.
button or
button to select ‘Settings’ in the
button.
button or
button.
buttons to select
button to select ‘System’ in the
button.
You are now connected to the internet via your WiFi router.
You will only need to re-enter your password if it changes,
or if you re-run the install process for your View21 box.
06
07
08
Note: If ‘WiFi setup’ is not displayed on your screen, the
network adaptor may not be functioning correctly. Please
consult a technician.
13
Advanced install
The Easy install is the recommended
installation option.
However you may want to choose the
‘Advanced’ option to manually select the
specific aspect ratio or display resolution
of your screen.
2
Press the
button. The ‘Advanced Setup’
screen will be displayed with the ‘TV Setup’
function selected. How your View21 box is
connected to your TV will also be shown.
3
Press the
button.
Tip: You can re-run the install process at any
time, see page 38.
To perform an ‘Advanced’ installation
1
If ‘Advanced’ is not already selected, press .
4
14
Getting set up
Repeatedly press the button until the screen
size (aspect ratio) of your TV appears in the
highlighted panel.
5
Press the button to select the resolution
of your TV.
6
Repeatedly press the button until the
resolution of your TV appears in the
highlighted panel.
01
7
Press the
button. The ‘Set PIN’ function
will be selected.
8
Press the
02
button. The PIN can be set later.
03
04
05
10
9
The ‘Tuning’ function will be selected,
showing the number of TV and Radio channels
currently stored in the View21 box. On your
first setup, these will both be 0.
11
Press the
button. The system scans for TV
and Radio channels and updates the number
of channels found. During this time a progress
bar advances until complete (100%). This step
takes about 8 minutes.
When scanning has finished, the screen
displays ‘Installation complete’.
12
Press the
button to set up your WiFi
connection, or the
button to begin
watching the first TV channel stored.
06
07
08
15
02 Getting started
Using your View21 box
Selecting channels
Your View21 box has some functions you
will use every day, and others that you only
use occasionally.
• Directly from the numerical keypad
on the remote control
You can find commonly used functions in this
section so you can get your digital box up and
running as quickly as possible.
We suggest you read this section carefully,
then use other sections when you need extra
information or guidance for settings.
This can be done in several ways:
• Using the
and
the remote control.
buttons on
• Using the Guide
Using the numerical keypad:
1
Enter the channel number using the numerical
keys on the remote control. As they are entered
they are displayed in the top right of the screen.
2
To enter ‘13’ for example, enter 1 and then
soon after, enter 3.
3
The TV will switch to channel 13.
If the delay between pressing 1 and 3 is too
long, then the digits will not be read as 13.
Using the channel change buttons:
Press the
button to change to
the next channel.
Press the
button to change to
the previous channel.
16
Getting started
Changing the volume
You can change the volume using the V+ and
V- buttons on the remote control.
1
Press the
button to increase the volume.
2
Press the
button to decrease the volume.
A symbol will be displayed in the top right of the
screen to indicate the volume level is being changed.
01
Pausing live TV
You can pause the TV channel you are watching
and resume watching it from the paused position
(provided you have not changed to another
channel during this time). You can Fast Forward
(up to the current time) and Rewind to any time
from the time you started viewing the channel.
The amount you can Rewind can be set with
the ‘Timeshift Amount’ option in the ‘View21’
menu, see page 37.
To pause a live TV programme:
Mute
To turn off the sound:
1
2
• Press the
freeze.
button. The TV picture will
To Fast Forward a paused TV programme:
1
2
03
Press the
button to resume playback at
normal speed.
04
Recording
The
button is used to record programmes
while watching Live TV or from the Guide.
1
While watching live TV, press the
button.
To resume play of the TV programme:
2
• Press the
button to resume playback
from the paused time.
If the programme you are watching is not part
of a series, the programme will start to record.
3
To restore the sound at its previous level,
press the
button again.
To Rewind a paused TV programme:
If the programme you are watching is an episode
of a series, then a message box will be displayed:
• Record once
• Record series
4
Use the
5
Press
2
Repeatedly press the
button until
the desired Rewind speed is displayed
in the bottom left of screen.
Press the
button to resume playback at
normal speed. The Rewind time relative to live
TV will be shown in the bottom left corner.
Each press of the
or
button steps
through the preset speeds: x2, x4, x8, x16, x32,
x64.
05
To record a programme:
Press the
button on the remote control.
The mute symbol will be displayed in the top
right of the screen and the sound will be
turned off.
1
02
Repeatedly press the
button until the
desired forward speed is displayed in the
bottom left of screen. Each press of the
or
button steps through the preset
speeds: x2, x4, x8, x16, x32, x64.
or
buttons to select an option.
06
07
08
to start recording.
Future programmes can be scheduled for recording
in the Guide. For more information see page 27.
Conflict Management, see page 28.
17
Using the Guide
Using the Library
Other remote control buttons
The Guide lets you view information about current
and scheduled TV and Radio programmes. Here
you can select a programme to watch or listen to.
When you open the Guide, the current channel is
displayed at the top of the list with the programme
being watched highlighted.
The Library lists the recordings you have made and
stored on the View21 box. The recordings can be
selected and played from here.
Exit
1
Press the
2
Use the
and
to browse.
3
Use the and buttons to move along the
channel row to select the desired programme.
1
Press the
button on the remote
control to open the Library.
2
Use the
and
buttons to select
the recording you wish to play.
3
Press the
or
remote control.
button to display the Guide.
buttons to select a channel
Available options for the programme selected will
be displayed as well as a brief description.
Pressing the
button multiple times expands
or minimises the guide.
18
Playing a recording:
Getting started
button on the
The recording will start to play from the beginning.
Press the
button at any time to exit a menu
and return to live TV.
01
Swap
Back
The
button has two functions:
Swap and Hide/Show.
Press the
button at any time to return
to the previous menu.
This button can be used as a toggle to swap
between channels.
Info button
1
Press this button to change to the previously
watched channel.
2
Press again to return to the last channel you
were watching.
In the menus, the
button is used to toggle
the quick key buttons along the bottom of the
screen On or Off. This is known as Hide and Show.
1
Press the
button to hide the quick
key buttons if displayed.
2
Press the
button again to show
the quick key buttons.
Displays information about the programme
you are watching.
To display programme information:
1
Press the
button while watching a
programme. Information about the channel,
programme name, and broadcast times for
the next two programmes is displayed along
the bottom of the screen.
2
Press the
button again to display a
programme descriptor panel. The descriptor
panel contains:
• A synopsis of the programme
• Programme start and finish times
• Genre
• Output features such as HD
This information stays on the screen for about
60 seconds. To remove the information before
this time has elapsed:
• Press the
button a third time. The
information will be removed immediately.
Press the
button while you are in the Guide
or the Library, to display a descriptor panel in
the Guide or Library containing similar information
to the above. Press the
button again to hide
this information.
02
03
04
05
06
07
08
19
Using online apps
Your View21 box is supplied with three
applications built-in: Flickr, YouTube and
Twitter. This section of the User Guide will
show you how to access each website via the
online apps.
You’ll need your Flickr and Twitter login
details, like your username and password,
to fully access those services.
Make sure your View21 box is connected
to a broadband router via WiFi or an Ethernet
cable to access online apps, see page 11.
Applications can be accessed by:
• Pressing the
button on the remote control
• Using the Quick Access Bar in the Guide
Select and run an application
To access an application using the
button:
1
Press the
button to display the App Bar.
2
Use the
and
or navigation buttons
to step along the App Bar and select
the application.
3
Press the
button.
To access an application using the Quick
Access Bar:
1
Press the
or the
2
Use the
and
or navigation buttons
( , , or ) to step along the Quick Access
Bar and select the application.
3
Press the
button, or the
button
button.
button
Flickr
This is an image hosting website allowing you to
upload and view photos.
YouTube
This is a video sharing website which lets users
share and view videos.
Once you access the YouTube application, the
Home page is displayed. A menu bar is shown in the
middle of the screen and a slideshow bar below it.
There are three buttons along the bottom of the
screen,
button (Sign In),
button (Search)
and
(Select).
20
Getting started
01
1
Press the
button to display the Sign In box.
2
Use the
3
Press the
4
Using the on-screen keyboard with the navigation
buttons ( , , or ) and the
button,
enter your username and then select ‘Use’.
and
buttons to select ‘Username’.
button.
5
Use the
6
Using the on-screen keyboard with the
navigation buttons ( , , or ) and
the
button, enter your password and
then select ‘Use’.
7
Use the
8
Press the
button. You will be signed in
and the ‘Sign In’ box will be removed from
the screen.
9
Use the
and
buttons to switch between
the YouTube bar and the slideshow bar.
10
and
and
buttons to select ‘Password’.
buttons to select ‘Confirm’.
Use the
buttons or the navigation
and
buttons to step along the selected menu bar
to select the item you want to view.
11
Press the
12
Press the
button to exit the application
and return to live TV.
button to view the selection.
buttons to step along the bar and select the
item you want to view.
Twitter
This is a microblogging service that enables users
to read text-based posts up to 140 characters.
Posting new messages is not possible through
your View21 box.
Once you access the Twitter application, the
minimal Home page is displayed (single tweet).
11
Press the
button to view the selection.
12
Press the
button when you want to sign out.
13
Press the
Press the
2
Use the
3
Using the on-screen keyboard with the navigation
buttons ( , , or ) and the
button,
enter your username and then select ‘Use’.
4
Use the
5
Press the
6
Using the on-screen keyboard with the navigation
buttons ( , , or ) and the
button,
enter your password and then select ‘Use’.
03
button to return to live TV.
04
There are three buttons along the bottom of the
screen,
button (Pause/Resume),
button
(Sign In) and
button (More/Less).
1
02
05
button to display the Sign In box.
button to select ‘Username’.
06
07
button to select ‘Password’.
button.
7
Use the
8
Press the
9
Press the
button to show the Twitter bar
across the top of the screen.
10
Use the
Note: This is a Youtube screen.
08
button to select ‘OK’.
button to validate your details.
and
buttons or the navigation
21
View21 companion apps
View21 features downloadable companion
iPad and iPhone* apps. The apps can be used
with the View21 box to watch live TV and
recorded programmes. You can also set
recordings and view photos.
You can view the Programme Guide and
Schedule Recordings using the View21 Play app
or view pictures stored on your iPad to your
TV with the View21 Photo app. Apps can be
downloaded from the Apple App Store.
• Your View21 box to be connected to a wireless
router using an Ethernet cable or the built in
wireless connection
Using the View21 Play app (iPad/iPhone)
1
Download and install the View21 Play app
from the App Store.
2
Open the View21 Play app on your iPad or
iPhone.
3
The iPad or iPhone will connect to the router
using WiFi, displaying the View21 control panel.
This page has three sections. These are:
1
• The iPad or iPhone* to be connected to the
same wireless router as the View21 box
• They do not have access to the Settings function
so cannot carry out Installation for example
• Playback speed of the recordings is set at x1
22
Getting started
5
Four tabs are displayed along the bottom
of the page.
• My TV
• Guide
• Library
• Watch (not always displayed)
Watch live TV
Section 1: This section shows what is playing
on the TV (a live TV programme or a recording).
• The View21 app to be installed on the iPad
or iPhone (available from the App Store)
The View21 companion apps do not feature
all of the functions of the View21 box.
Section 3: This section displays a channel list
that can be dragged up and down.
• HD channels are not available for viewing.
4
Use of the apps requires
Section 2: This section shows the library contents
in a graphical page format that can be dragged left
and right. Each page shows the recording details.
only, however during playback you can jump to a
particular point in a recorded programme by
sliding along the duration bar when playing back
the programme.
• Touch the ‘Watch Here’ tab to view the
programme on the iPad. Or select ‘Watch
on TV’ to show the programme on your TV.
Or, to watch a different live programme:
1
Scroll through the channel list until you
see the programme you want to watch.
2
Touch the channel name you want to watch.
3
Touch the ‘Watch Here’ tab to view the
programme on the iPad. Or select ‘Watch
on TV’ to show the programme on your TV.
3
View a recording
2
1
Scroll through the pages in Section 2
until the desired recording is selected.
2
Touch the ‘Watch Here’ tab to view the
programme on the iPad. Or select ‘Watch
on TV’ to show the programme on your TV.
01
The recording will start to play full screen.
8
Repeat for any other programmes you
wish to record.
5
Repeat for any other programmes you wish
to set the reminder for.
1
Touch the ‘Library’ tab.
9
6
2
The contents of the library will be displayed
full screen in list mode.
Touch the ‘Guide’ tab again to return
to the earlier viewing.
To exit, touch the ‘Guide’ tab again to return
to the earlier viewing, or the ‘Library’ or
‘My TV’ tabs as required.
3
Scroll through the list to display the recording
you want to watch.
4
Touch the recording name.
5
Touch the ‘Watch Here’ tab to view the
programme on the iPad. Or select ‘Watch
on TV’ to show the programme on your TV.
3
Or:
6
The recording will start to play full screen.
Make a recording before you view it
Browse the programme guide
1
Touch the ‘Guide’ tab at the bottom of the screen.
2
The Guide will be displayed full screen.
3
Scroll up or down to view channels and
left or right to view programmes and their
broadcast times.
4
The top of the Guide shows information
about the programme currently selected.
5
To exit, touch the ‘Guide’ tab again to return
to the earlier viewing, or the ‘Library’ or
‘My TV’ tabs as required.
1
Touch the ‘Guide’ tab at the bottom
of the screen.
2
The Guide will be displayed full screen.
3
Scroll to find the programme you want
to record.
1
Touch the ‘Guide’ tab at the bottom of the
screen. The Guide will be displayed full screen.
4
Touch the programme name.
2
5
A dialogue box opens with information
about the selection.
Scroll to view the programme you want to set
a reminder for.
3
6
Touch the
Touch the programme name. A dialogue box
opens with information about the selection.
7
A record symbol is placed alongside
the entry in the Guide.
4
Touch the ‘Set Reminder’ button in the box.
A clock symbol will be placed alongside the
entry in the Guide.
View21 Photo app
The View21 Photo app allows you to show photos
In your iPad or iPhone photo library on your TV.
1
Download and install the View21 Photo app
from the App Store.
2
Open the app and select the photo thumbnail
you want to view on your TV.
03
04
05
06
07
Set a reminder
button in the box.
02
08
The View21 Play and View21 Photo apps are
available in the App Store.
23
03 Advanced box features
Main Menu
Opening a function
To select an option from the Main Menu bar:
The Main Menu lets you view and launch
the main functions and applications. When
the
button is pressed, these functions
will be displayed as symbols across the top
of the screen in the Main Menu bar.
In the Main Menu bar you can open the Guide,
Library, Help, Flickr, YouTube, Twitter, Channel List,
and Settings as shown in the
screen below.
Guide
Library
Help
Flickr
YouTube
Twitter
Apps Portal
Not all items in the bar are visible on screen at the
same time. Other items in the bar can be displayed
using the
buttons. Pressing these
and
buttons moves the bar to the left or right and
highlights the first item on the left.
Most functions in the Main Menu bar also
have their own buttons on the remote control:
,
and
(for access to online apps).
24
Advanced box features
1
Press the
Main Menu.
button to display the
2
Repeatedly press the
or
buttons
until the required item in the bar is selected.
3
Press the
button to open the
highlighted function.
Programme guide
Displays a guide to current and scheduled
TV and Radio programmes. This allows
you to select a programme to watch now,
set a reminder for a later event, record live
programmes or plan a future recording, and
view information about selected programmes.
Guide
To display the Guide, press the
the remote control.
button on
In the Guide you can access the Quick Access Bar,
use the
or
buttons to quickly access the
following categories: All Channels, Radio, Library,
Twitter, Flickr, YouTube, Children’s, Drama,
Education, Entertainment, Lifestyle, Movie, News,
Facts, Sport, and Unclassified.
01
Guide structure
The Guide is made up of four sections. These are:
• Header: Provides information specific to the
selected programme, including synopsis,
scheduled times and the programme name.
• Quick Access Bar: An easy way to access a range
of commonly used features and online apps.
• Guide Table: Programme names for the next
7 days organised by time and date.
The Guide also lets you view a 7-day TV guide of
current and future TV and Radio programmes.
In the Guide, you can select to:
• Footer: A quick reference of buttons and their
functions that can be used while navigating
the Guide.
The Guide can display the contents of the
following lists:
• Watch or listen now
• All channels – When selected, both TV channels
and Radio stations are displayed in the Guide.
• Set reminders for programmes you wish to be
alerted about shortly before they are broadcast
• Radio – When selected, only radio stations
are displayed.
• Mark programmes you want to record and store
• Library – Accesses the library of recorded
programmes.
• View information such as programme content
and broadcast features
• Launch the online apps
The Guide can be set to display any two-hour
window from the next 7-days.
• Genre – When selected, displays only those
channels applicable to the selected genre.
Choose from: Children’s, Drama, Education,
Entertainment, Lifestyle, Movie, News and
Facts, and Sport.
• Unclassified – When selected, displays only
those channels not categorised.
Guide format options
You can display the Guide in any of three formats:
Mini, Standard and Extended.
• Mini format displays three channels at a time
• Standard format displays seven channels
at a time
• Extended format displays eleven channels
at a time
Other channel information can be displayed in
each format by scrolling up or down the Guide
using the
and
buttons.
The Guide also displays a current-time position
in the form of a vertical line across the main Guide
Table giving a graphical representation of elapsed
time and time before the start of programmes.
Programme information
This information is displayed in the header section
located above the Quick Access Bar.
02
03
04
05
06
07
08
Programme information can be turned On and Off
using the
button.
The following information is displayed:
• Name of the programme
• Start and finish times
25
• The programme genre (e.g. Sport, Drama, News)
The Time setting and Reminder setting buttons are
displayed in a footer panel below the Guide Table:
• Output features (for example, HD and Dolby)
This panel can be toggled to Show or Hide.
Set the default Guide format
Setting the time window
To set the default Guide format:
You can jump forward or back to specific times
within the Guide:
• A brief programme synopsis
1
Press the
2
Press the
and
button to select
‘Settings’, if not already selected.
3
Press the
button. The ‘Display & Audio’
menu is displayed.
4
Press the
button until ‘Default Guide View’
is selected.
5
6
button.
Press the and
Guide format.
buttons to select the default
Press the
button to set the format and
exit the Main Menu.
Change the Guide format
To change the Guide format:
1
Press the
button to display the Guide.
2
Repeatedly press the
button until the
required format is displayed.
Press the
button repeatedly to cycle the
Guide viewing options.
26
Advanced box features
1
Press the
button to display the Guide
in its default format.
2
If necessary press the
the Footer panel.
3
To step backward 2 hours, press the
button.
4
To step forward 2 hours, press the
button.
5
To step back 24 hours, press the
6
To step forward 24 hours, press the
Navigate to a Genre list
To select a Genre:
1
Repeatedly press the
and
buttons
until the desired item on the Quick Access Bar
is selected, for example ‘Sport’.
2
Press the
3
The Guide Table changes to a two-column
format and displays only programmes for the
selected Genre in the current time window.
button to open the selected item.
button to show
button.
button.
Navigate to and watch a programme
To navigate the Guide:
1
Press the
2
Use the
button to display the Guide.
3
Use the and buttons to move along the
channel row to select a programme.
or
buttons to select a channel.
Record the programme you are watching
To record a programme:
1
While watching live TV, press the
2
If the programme you are watching is not part
of a series, the programme will start to record.
button.
01
3
If the programme you are watching is an episode
of a series, then a message box will be displayed:
7
• Record once
• Record series
4
Use the
5
Press
or
buttons to select an option.
to start recording.
If you select ‘Record once’, the programme starts
to record.
If you select ‘Record series’, the programme starts
to record and a ‘multi-R’ icon will be placed
alongside the corresponding cell in the Guide.
Cancel a recording
To cancel a recording:
1
Press the
2
If the programme has been set for ‘Record
once’, then a message box will be displayed:
button on the remote control.
• Stop recording
• Record series
3
Use the
4
If the programme has been set for ‘Record
series’, then a message box will be displayed:
or
buttons to select an option.
• Stop recording
• Stop series
5
Use the
6
Press the
8
or
If you select ‘Stop recording’, then the current
recording will stop but the next episode in the
series will be marked with the ‘multi-R’ icon and
will be recorded at the next broadcast time.
If you select ‘Stop series’, then the current
recording will stop and the record icon will be
removed from the programme cell in the Guide.
Cancel a future recording
1
Press the navigation buttons ( , , or )
to navigate to the programme set to record.
2
Press the
3
If the programme is not part of a series, the
Record icon will be removed from the cell in
the Guide Table. If the programme is part of
a series and it has been set to ‘Record Series’,
a message box will be displayed that asks
whether you want to remove the first of
the remaining recordings (Stop Recording)
or remove all recordings (Stop Series).
Recording a future programme
To record a scheduled programme:
1
Press the
button on the remote and use
the navigation buttons ( , , or ) to navigate
to the required programme in the Guide Table.
2
Press the
3
The Record icon will be placed alongside
the cell in the Guide Table.
button on the remote control.
02
To cancel a scheduled recording:
03
button on the remote control.
4
Use the
or
buttons to select the
desired option.
5
Press the
button to confirm.
The Record icon will be removed from the
cell in the Guide Table if you selected ‘Remove
Series’. The Record icon will remain for
other episodes in the series if you selected
‘Remove Once’.
04
05
06
07
08
If a programme is currently recording,
it will be immediately cancelled when
the
button is pressed.
buttons to select an option.
button to confirm your selection.
27
Resolving recording conflicts
If you try to record two programmes where the
broadcast times overlap, the ‘Conflict Management’
window will be displayed. This allows you to choose
a recording to cancel.
1
Press the
and
buttons and select the
item you wish to remove.
2
Press the or buttons to toggle the
command to ‘Cancel’.
3
Press the
1
Press the navigation buttons ( , , or )
to navigate to the desired programme in the
Guide Table.
2
Press the
3
The Reminder icon is placed alongside the
cell in the Guide.
button on the remote control.
button to confirm.
If after a minute of being notified you have not
made changes to resolve the conflict, a recording
will be cancelled automatically. A notification
message will be displayed in the ‘Conflict
Management’ window.
Setting a reminder
If you do not want to miss the start of a programme,
you can set your View21 box to let you know when
the programme is about to start. The ‘Reminder’
function lets you do this.
The ‘Reminder’ function will display a message
box reminding you a programme is about
to start.
28
Advanced box features
Cancel a reminder
1
Press the navigation buttons ( , , or ) to
navigate to the programme in the Guide.
2
Press the
3
The Reminder icon is removed from the cell
in the Guide Table.
button on the remote control.
01
Library
02
The Library lists the recordings you have made
and stored on the View21 box. The recordings
can be selected and played from here.
03
Access the Library
04
1
Press the
button on the remote control.
Alternatively, you can access the Library through
the Main Menu or the Guide.
The Library lists recorded programmes or scheduled
recordings in a four column list and shows the
following information:
• Programme Name
• Channel Number and Name
• Date of recording
• Status (In Progress, Watched and Recorded).
Using the Library tools on the bar you can sort by:
• Date order (Date)
• Alphabetically (A-Z)
05
The Library has three sections. These are:
• Header: Provides information specific to the
selected recording, including programme synopsis,
broadcast time and the programme name.
• Library list: Lists the recordings and other
relevant information and provides Library tools
on the Library bar for sorting the list.
• Footer: Provides a quick reference of buttons
and their functions that can be used for
management and playback of the recordings.
The Header panel can be toggled between
button on the
Show and Hide using the
remote control.
The Footer panel can be toggled between
Show and Hide using the
button on
the remote control.
06
07
08
• Channel number (Channel)
• Programmes set to be recorded (Schedule)
29
Playing a recording
To play a recording:
1
Press the
button on the remote
control to open the Library.
2
Use the
and
buttons to select
the recording you wish to play.
3
Press the
or
remote control.
Play a recording using ‘Resume play’
and ‘Play from start’ options
5
Press the
button. A dialogue box will
open named ‘Play from time’.
You can set a recording to play from the last
viewed position or from the start.
6
Use the numerical keypad on the remote
control to enter the start time in hours
and minutes.
7
Use the and buttons to switch between
the hours and minutes counters in the box.
8
Press the
button to begin playback
at the selected time.
1
Press the
2
Press the
and
a recording.
3
Press the
button. The ‘Options’ menu
will be displayed.
4
Use the
and
buttons to select from
’Resume play’ or ’Play from start’.
button on the
The recording will start to play from the beginning.
Pausing and resuming play
To pause and resume playback of a recording:
1
During play, press the
remote control.
button on the
2
Play will be paused and the screen display
will be ‘frozen’.
3
A progress bar will be displayed at the foot
of the screen that shows elapsed play time
and total play time.
4
Press the
button on the remote control
to resume play from the paused time.
When the programme has been set as ‘Record
series’ this is indicated by the RRR symbol
placed on the programme row.
30
Advanced box features
button to access the Library.
buttons to select
5
Press the
6
Playback of the recording will now resume
or start according to the option selected.
The time entered must be less than the
duration of the recording.
button to begin playback.
Play a recording using the `Play from
time’ option
You may know the time in a recording that you
would like to start playback from.
Protecting a recording
To prevent anyone from deleting your recordings,
you can lock the recording so that your PIN needs
to be entered before the recording can be deleted.
1
Press the
2
Press the
and
a recording.
3
Press the
button. The ‘Options’ menu
will be displayed.
button to access the Library.
button to access the Library.
buttons to select
1
Press the
2
Press the
and
a recording.
3
Press the
button. The ‘Options’ menu
will be displayed.
4
Use the
and
buttons to select
‘Protect recording’.
4
Use the
and
from time’.
5
Press the
buttons to select
buttons to select ’Play
button.
01
6
7
8
A message box will open named
‘Parental control’.
3
Use the
4
Press the
button. The recording will be
removed from the list and deleted from the
hard-drive.
Use the numerical keypad on the remote
control and enter your four-digit parental
control PIN.
After a brief delay, the box will disappear
and a locked padlock symbol will be
displayed on the programme row.
For more details on parental control and
changing your PIN see page 36.
Stopping play
During playback, press the
on the remote control.
2
Playback will stop and the Library will
be displayed.
Playback (or rewind) at higher speeds
To playback at higher speeds:
1
Press
or
is playing.
2
The recording now plays at a higher forward
or reverse speed.
3
Deleting a recording
1
Use the
and
buttons to select the
recording you wish to delete.
2
Press the
button (Delete). A message
box will open named ‘Delete Recording’.
while the recording
An information panel opens along the bottom
of the screen and now shows playback at a
speed of x2. An arrow indicates the direction:
for forward and
for reverse.
button
When you wish to permanently remove
a recording from the hard disk:
Sorting Library contents
4
Press the
or
button repeatedly to
reach the required playback speed. Each press
of the
or
button steps through the
preset speeds: x2, x4, x8, x16, x32, x64.
Press the
button twice to return to
normal playback speed in the forward
direction. The first press pauses play. The
second press resumes play at normal playback
speed.
02
To sort by Date, A-Z, Channel and Scheduled criteria:
1
Use the
and
desired sort criteria.
2
Press the
button. The Library displays all
recordings according to the selected criteria.
This action is irreversible.
This function will stop playback and close the
playback session.
1
button to select ‘Yes, delete it’.
buttons to select the
Inverting the sort order
03
04
To invert the sort order of any recording list:
1
When the Library is displayed, press the
button (Sort). The list will be mirrored
top-to-bottom.
05
2
Press the
button again to return
to the previous order.
06
Preview a recording
The Preview function lets you preview your recordings
while remaining in the Library. The recording plays
in a small preview window. The recording details
are displayed in a bar arrangement.
1
Press the
button when in the library.
2
The display will change to present a bar of
recordings in preview windows. The window
will show the Programme name, Channel
number, Channel name and Date recorded,
as in the list view.
07
08
31
3
Use the
and
buttons to select
a recording to preview.
Library quick key buttons
4
Press the
(Preview) button to preview
the recording.
• SWAP: If necessary, press the
to show the Footer panel.
5
The recording will play in the preview window.
6
Press the
(Stop preview) button when
you want to stop viewing.
• BLUE: To invert the current sort order, press
the
button.
Press the
button to display the Library:
button
• RED: To delete the currently selected recording,
press the
button.
• GREEN: To display the playback options for
the currently selected recording, press the
button.
• OK: To play the selected recording, press the
button.
• LIB: To change from the List mode to the Slideshow
mode press the
button. To return to the
List mode, press the
button again.
32
Advanced box features
01
02
03
04
05
06
07
08
33
04 Settings menu
Display and
audio settings
The Settings function lets you configure the
View21 box to your optimal viewing preferences.
Navigating and editing the System menu
Audio output
To navigate the System menu:
This sets the audio output to suit how audio will
be heard. If you have connected the View21 box
to your TV using an HDMI cable and have not
connected a surround sound system, select stereo.
1
Use the
and
the item on the bar.
buttons to select
2
Press the
button to access the function.
Associated options will be displayed.
3
Use the
and
buttons to move up
and down the menus.
4
Use the
5
To exit the System menu and display another
menu repeatedly press the
button until the
System symbol is highlighted. You can select
the
buttons to select the item on
and
the bar.
6
To exit the System menu and return to live
TV, press the
button.
and
buttons to adjust an option.
HDMI video output
The Settings function can be found on the
Main Menu bar.
To open and display the Settings bar,
34
1
Press the
2
Press the button to select the
Settings function.
button.
3
Press the
button. The Settings bar
will be displayed.
Settings menu
This is the highest quality video output on your
View21 box. The output resolution can be set
to one of four resolutions. Select the resolution
to match the best HDMI input according to
your TV’s user manual. Usually the higher
the resolution, the better the picture quality.
The available options are 576p, 720p, 1080i
and 1080p.
If you have connected the View21 box to a
surround sound system using an optical cable,
or to an AV receiver using HDMI select Bitstream.
Screen size
This allows you to set the aspect ratio output by
the View21 box to your TV. The available options
are: Letterbox 4:3, Pan and Scan 4:3, Widescreen
4:3 and Widescreen 16:9.
Default programme guide view
This sets the default Guide format. The available
options are: Mini, Standard or Extended.
Default Library view
This sets the default Library format. The available
options are: List and Slideshow.
Menu transparency
This allows you to set up the appearance of the
menus according to your personal preference.
There are two options: On and Off.
01
Menu timeout
The menus can remain on the screen until turned
off manually, or turn off automatically after a
preset time. The available options are On or Off.
02
03
Lip-sync
Sometimes the soundtrack in a broadcast is out
of sync with the video. The Lip-Sync option can
be used to correct this.
04
To adjust this option, select the Launch option and
press
to synchronise sound and video tracks.
05
12/24 hour clock
The time format used to display start and finish
times can be set to be 12 hour or 24 hour format.
06
07
08
35
Parental settings
Use the numerical keypad on the remote control
to enter the PIN. If the entry is correct, it will be
recognised and the settings will be available for
checking and editing. If the incorrect PIN has been
entered you will be notified and given another
opportunity to enter the correct PIN.
Allow First Time Installation
Set system PIN
This allows you to prevent the hard drive from
being formatted without the correct PIN.
This function lets you choose your own Parental
PIN to replace the factory set PIN. To set a new
PIN of your choice:
Before you can adjust these settings, you must
enter your parental control PIN when requested
in the Parental control dialogue box.
1
Use the
and
buttons to select ‘Set
System PIN’. A panel opens asking you to
enter your new PIN.
2
Use the numerical keys on the remote control
and enter your new PIN. The message ‘Please
confirm your new PIN’ will be displayed.
3
Use the numerical keys on the remote control
and enter your new PIN again. A message
‘New PIN confirmed’ will be displayed briefly.
4
The Parental PIN will now be set to your
new number.
The default PIN on the View21 box is 0000.
36
Settings menu
This allows you to prevent the First Time
Installation being performed without the
correct PIN.
Allow hard drive format
PIN required for recordings
with guidance
If this is selected, the Parental PIN is required to
record a programme that has a Parental guidance
symbol. This is displayed in the programme
descriptor panel to alert you that the programme
may be unsuitable for viewing by children.
The programme may contain bad language,
violence or other adult material.
01
Recording settings
Series link mode
Skip forwards time
This lets you set the default series link mode (Record
once or Record series). If you do not want to specify
in advance select ‘Always Ask’ and you will be asked
at the time of selecting the recording. The available
options are: Record Entire Series, Record Single
Event Only, Always Ask.
This sets the default time duration while fast
forwarding through Paused TV. The available
options are: 10 seconds, 30 seconds, 40 seconds
and 60 seconds.
Timeshift amount
Timeshift amount is the amount of time you wish
to reserve in order to ‘pause’ a live programme.
The available options are: 30 minutes, 60 minutes,
90 minutes and 120 minutes.
Default recording mode
This lets you set the default recording mode.
Note that high definition will use more hard drive
space than Standard Definition recordings. If you
do not want to specify in advance, Select ‘Always
Ask’ and you will be asked at the time of selecting
the recording. The available options are: High
Definition, Standard Definition and Always Ask.
Add to end of recording
This sets the time added to the end of a recording.
It is recommended that this is left set to Auto. The
available options are: Auto, 1 minute, 2 minutes,
3 minutes, 4 minutes, 5 minutes, 10 minutes and
15 minutes.
Skip backwards time
This sets the default time duration while fast
rewinding through Paused TV. The available
options are: 10 seconds, 30 seconds, 40 seconds
and 60 seconds.
02
03
04
05
Automatic hard drive space management
This sets the default ‘Hard Drive Space Management’.
When set to On, the management is performed
automatically. When your disk is full and you want to
make a new recording, the system will automatically
delete the oldest watched recording that is not
marked to be kept.
If set to Off, then manual management must be
performed by you deleting recordings yourself, to
make space for your new recordings.
06
07
08
If you don’t do this, your new recordings will fail.
37
Format hard disk drive
This lets you format the hard drive in the View21
box, deleting all data and recordings.
System settings
Formatting is permanent and cannot
be undone.
To format the drive:
1
2
3
Press the
button. The Format Hard Disk
Drive’ message box will be displayed informing
you that formatting the hard disk drive will
delete all recordings from the hard drive.
Use the and
and press the
button to select No or Yes
button.
4
If your reply at step 3 is No, the function
will be exited.
5
If your reply at step 3 is Yes, and the function in
the ‘Format Hard Drive’ option in the ‘Parental’
menu has been set to Yes then formatting
will begin.
6
7
38
Use the
and
buttons to select ‘Format
Hard Disk Drive’.
If the ‘Format Hard Drive’ option in the
‘Parental’ menu has been set to ‘No’, then
the ‘Parental control’ message box now
will ask for the Parental PIN to be entered.
To proceed, enter the PIN and press the
button. Formatting will begin.
Settings menu
Carry out a retune as follows.
1
Press the
Main Menu.
2
Repeatedly press the
button or
button to select ‘Settings’ in the bar.
3
Press the
4
Repeatedly press the
button or
button to select ‘System’ in the Settings bar.
Channel retune
Launch this function when you want to scan for
channels at any time after First Time Installation,
for example if you have moved the View21 box
to another location where the channel frequencies
are different, or to another location in the same
region but with better reception.
Accepting the new scan will overwrite the
existing channel information.
button.
5
Press the
6
Use the
and
buttons to select
‘Channel Retune’.
button.
7
Press the
8
Enter your parental control PIN (if set) in the
‘Parental Control’ window that opens using
the numerical keys on the remote control.
9
The channel scanning window opens
displaying TV and Radio channel counters.
First Time Installation
This option allows you to perform a First Time
Installation re-run.
button to display the
button.
10
Press the
11
Scanning will start and the channel counter will
increase incrementally for each channel found.
(Start Scan) button to begin.
12
The progress bar grows as the scanning proceeds
until finished (100%) and the total number of
TV and Radio channels is then displayed.
13
Press the
button (View Channels) to see
the lists of channels found.
14
Press the
button again to hide the lists.
01
Network change notification
Revert to default settings
When a network switch-over event occurs,
a notification will be broadcast that informs you
that you will need to carry out a retune. If you
want to receive this notification, select Launch.
This option allows you to return the View21 box
to the default factory settings.
Internet connection setup
System information
To allow you to set up your wired internet
connection to your router.
Manual retune
This provides system information including
Hardware and Software Versions. Have this
information available if you need to contact
the customer helpline.
This function allows you to search for a particular
channel. This may be used to scan for a channel
that should be, but is not, in your channel list. This
function is only expected to be useful for users
with knowledge of transmission frequencies.
15
To accept the channels found and overwrite
the existing channel details, press the
button. Or press the
button to exit
the function without applying any changes,
or press the
(Re-Scan) button to scan again.
WiFi setup
To set up your WiFi connection, launch the option
from the system menu. The set up wizard will
automatically search for any wireless networks that
are in range. When you select one you will be
prompted to enter the network password. Follow
the on-screen instructions to complete the set up.
Auto standby
If set to Yes, the View21 box will automatically
switch to standby mode to reduce power
consumption after 3 hours. The available
options are: Yes and No.
All settings will be reset, but files on the HDD will
not be deleted.
02
03
04
05
06
07
08
39
To perform a Manual tune, carry out the following.
40
1
Press the
Main Menu.
2
Repeatedly press the
button or
button to select ‘Settings’ in the bar.
3
Press the
4
Repeatedly press the
button or
button to select ‘System’ in the Settings bar.
9
Use the navigation buttons ( , , or )
to navigate and edit the Channel number
and Frequency for the channel you are
searching for.
10
Press the
the search.
button to display the
button.
5
Press the
6
Use the
and
‘Manual tune’.
button.
7
Press the
8
The ‘Manual search’ window is displayed.
buttons to select
button.
Settings menu
button (Start Scan) to start
01
02
03
04
05
06
07
08
41
05 Software updates
Your View21 box will display a pop-up
notification when a new, updated version of
the software is available. Installing the latest
software versions lets you use the latest
features offered for your View21 box.
This View21 product is designed to install
automatic updates when available. As long as
your View21 box is connected to the internet
it will automatically update the software as
soon as an update is available from the
manufacturer.
Note: This is an automatic feature and you do
not have to change any settings in your
View21 box.
42
Software updates
Manual software update
If your View21 box is not connected to the
internet, follow the steps below to update the
software manually:
1
Open a browser on a computer with
a USB port.
2
Download the ‘software update’ file from
the Bush website: www.bushaustralia.com.au
3
Save the downloaded file to a USB stick that
is fully formatted and empty i.e. no other files
are present.
4
With the View21 box turned on and fully
running, insert the USB stick into the USB
slot at the back of the View21 box.
5
Wait about 15 seconds. A pop up notification
should appear giving you the option to accept
the software update. Press
to continue.
6
Another pop up will appear notifying you
of the next steps to follow.
7
After several minutes your View21 box
will reboot having installed the new
software update.
The USB stick must be fully formatted before
you copy the files to it. There should also
be no other files on the USB stick, only the
View21 software update files.
Refer to the Bush website www.bushaustralia.
com.au for further details.
01
02
03
04
05
06
07
08
43
06 Troubleshooting
Please note indoor aerials are not recommended for use with this product (this includes loft aerials)
otherwise you may experience problems with reception or picture break-up on some channels.
Problem
Possible cause
What to do
Standby light not lit.
Mains adaptor unplugged.
Mains socket switched off.
Connect mains adaptor.
Switch on mains socket.
No signal found.
Aerial is disconnected.
Aerial is damaged/misaligned.
Out of digital signal area.
Connect aerial lead.
Check aerial and connections.
Ensure that you are capable of receiving
Digital TV.
No picture or sound.
HDMI cable not securely connected.
Check HDMI connections at both ends of the
cable.
Volume is set to minimum or mute.
Check volume settings.
No response to remote control.
Digital box is switched off.
Remote control not aimed correctly.
Front panel obstructed.
Remote control batteries have run out.
Plug in and turn on plug.
Aim remote control at the front panel.
Move obstructions from the front of the digital box.
Replace the remote control batteries.
Forgotten PIN code.
The default PIN is 0000.
You have moved your digital box and are no
longer able to receive digital channels.
Re-tune your digital box.
Try a signal booster or a direct feed from the aerial.
My View21 box is not playing all YouTube videos.
44
Troubleshooting
YouTube contains video in some formats that can
be played on PCs only. The video you selected is
one of these.
Select another video to view.
01
iPad/iPhone Troubleshooting
02
Problem
Possible cause
WiFi not connected.
Connection to View21 Digital Box failed.
Your Digital Box is either: In Standby or Needs to
be connected to your local network.
What to do
Go to WiFi set up in the System Menu. When
connected the WiFi icon will appear in the top left
corner of your iPad.
03
To pair the App with the View21 Digital Box you
will need to connect the Digital Box to your local
network using an Ethernet cable.
04
05
WiFi Troubleshooting
Problem
Possible cause
What to do
Low signal.
Your Digital Box is either too far from your WiFi
router, or walls or metal objects between the
Digital Box and router is causing interference.
Move the Digital Box closer to the WiFi router or
remove any obstacles between the two.
Network out of range.
Your Digital Box is either too far from your WiFi
router, or walls or metal objects between the
Digital Box and router is blocking the signal.
Move the Digital Box closer to the WiFi router or
remove any obstacles between the two.
Connecting to a different router or hotspot.
Re-run the WiFi setup (refer to page 39).
06
07
08
45
07 Specifications
Tuner and channel
• RF input connector
(IEC-TYPE, IEC169-2, female)
• RF output connector
(IEC-TYPE, IEC169-2, male)
Decoder
• Transport stream
MPEG-2/4 ISO/IEC 13818
• Profile level
MAX. 15Mbit/s
• Input rate
MPEG-2 /4 MPML
• Video format
4:3/16:9 Switchable
• Audio format
MPEG Layer I & II, 32 / 44.1 / 48KHz
• Video output
HDMI
Connection
• Power
12V Mains adapter
• Tuner
Antenna input
• Video
Twin HDMI
• Audio
Digital coaxial audio output
Power supply
• Input voltage
AC 230V ~50Hz
• Power consumption
MAX. 12W/standby <0.5W
IMPORTANT: Due to continual revision and improvements to our product design, specifications are subject
to change without notice.
• Unqualified attempts to repair this digital box will invalidate the warranty.
46
Specifications
01
02
03
04
05
06
07
08
47
08 Safety Information
Warnings
• Refer repairs to this digital box to qualified
service personnel only.
• Do not disassemble this digital box.
• There are dangerous-voltage parts inside that
may cause electric shock even after power
is disconnected.
• Only use the power adapter supplied with this
product.
• Store your digital box in a clean, dry environment.
• Unplug the digital box immediately if it gets
wet, and consult service personnel only.
• The digital box shall not be exposed to dripping
or splashing.
• No objects filled with liquids, such as vases, shall
be placed on the digital box.
• Always unplug the digital box before cleaning it.
• Wipe dust off the cabinet of the digital box
with a clean, dry and soft cloth.
• Do not place any objects on top of the digital box.
• Avoid exposing your digital box directly
to sunlight or other heat sources.
• Put your digital box in a well-ventilated area
away from high humidity.
• For stubborn stains use a damp
(not dripping) cloth.
48
Guarantee & legal
• Do not use any cleaning solutions on
this digital box.
• Do not expose this digital box to rain
or moisture.
Safety Tips
If smoke, abnormal noise or odor comes out
of this digital box, unplug from the mains supply
immediately and contact the retailer. Never try to
repair the digital box on your own. Always contact
the dealer for repairs.
Note
This User Guide contains for-reference-only
graphics and information that is subject to change
without notice.
01
View21 disclaimer for the Smart Digital
TV Recorder
Thank you for purchasing a View21 product.
This Smart Digital TV Recorder
has a number of different features and functions
which we hope you will enjoy.
To get the most out of using your purchase,
please read the User Guide that accompanies
your product.
Resolving problems
If you believe that your product is faulty or has
developed a fault, in the first instance, please
consult the troubleshooting guide in the User
Guide.
‘Smart technology’ enabling you to enjoy
third party services
This product incorporates ‘smart’ technology
which enables you to access and use web-based
services, content and applications provided by
third parties, such as YouTube, Twitter
and Flickr.
To enjoy these services you may need to create
an account with the third party service or use
additional equipment and membership fees may
apply. Your use of these services, and the content
made available through them, will be governed by
the third party provider’s terms and conditions and
privacy policy, so please make sure that you read
them. In particular, please respect the terms on
which you are allowed to use copyright materials
and the rules governing the posting of content
to those services. Please see the section below
headed “Your privacy” for information about
“cookies” stored and accessed on this product.
As we have no control over these services nor your
Internet access, we cannot guarantee the availability
of such services nor that your access to, or use of,
such services will be uninterrupted or problem-free.
We are neither responsible nor liable for any
customer service or support relating to these third
party services and any enquires should be made
directly to the respective third party service providers.
Your product contains software which enables it
to receive and display these third party services and
applications on your TV or other device connected
to your product. Sometimes, these third parties may
make changes to their Internet-based services which
may require updates to the software installed in
your product. Although we will make every effort
to make these updates during the period that the
Smart HD Digital TV Recorder comprises an active
and supported product within the ‘View21’ range,
we cannot guarantee them. Any software updates
that we do make available may be done so in a
number of different ways e.g. they may be initiated
automatically or require download and manual
installation by you.
Exclusions
In view of the above, there are certain things for
which we exclude our liability and certain things
for which we do not, as explained below.
What we don’t exclude:
• We do not exclude or limit our liability for
any of the following:
• death or personal injury caused by our
negligence, fraud or fraudulent
misrepresentation; or
• any other matter for which it would be illegal
or unlawful for us to limit, exclude or attempt
to exclude our liability.
What we do exclude:
Except as set out in the preceding paragraph,
we exclude all liability for any losses, whether
in contract or tort, for any direct, indirect,
incidental, special or consequential damages
(including any legal fees and expenses you incur
and for any lost data, opportunity, goodwill,
revenue or profits) or any other damages arising
out of or in connection with:
02
03
04
05
06
07
08
• any information or data contained in
the product;
49
• the use of the product; or
Your privacy
• any content or service accessed by you
or any third party.
We do not collect or process any of your personal
data using this product nor do we store or access
any ‘cookies’ on its hard drive.
In view of the services which are outside our
control as explained above, in particular we
exclude all liability for any losses that you may
suffer arising from any of the following:
• the availability (or unavailability), speed
and quality of the Internet connection to
your product;
• the availability (or unavailability), suspension,
removal or termination of any third party
content or service including of the language
or the features supported by that service; and
• any change to third party content or services
(including any associated APIs) that affects the
functionality of the software installed in the
product (e.g. Apps).
50
Guarantee & legal
However, the third party services that you access
using this product may collect, store and process
personal information about you and may also use
features such as cookies. Cookies are small data
files sent to your product from a web server that
are stored on your product’s hard drive and can
be read by the third party services that you access
using the product.
We strongly recommend that you read the privacy
and cookie policy of each service that you use as
it will apply to the personal information collected
and the cookies stored and accessed when you use
those services through this product. The policies
will also include details of the purposes for which
your personal information and any cookies are
used by the provider of the third party service
you access.
01
02
03
04
05
06
07
08
51
For more information and support visit:
www.bushaustralia.com.au
YOUR WARRANTY
For any Warranty Enquiries, please call:
1300 055 518
Our goods come with guarantees that cannot be excluded under the Australian Consumer Law. You are entitled to a
replacement or refund for a major failure and for compensation for any other reasonably foreseeable loss or damage. You
are also entitled to have the goods repaired or replaced if the goods fail to be of acceptable quality and the failure does not
amount to a major failure.
Model: VV107ZRH Series