1
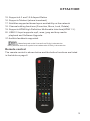
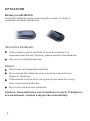
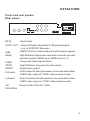
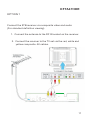
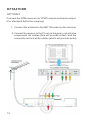
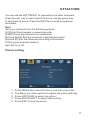
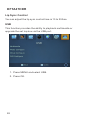
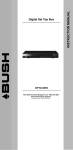
High Definition
Digital Set Top Box
DFTA47HDR
Quick Star t Infor mation:
1.Connect your aerial cable to your unit.
2.Connect Power Supply to your unit & wall outlet.
3.Connect the supplied composite & audio cable
(Yellow, Red, White) between the STB & Television
4.Insert batteries in the remote control.
5.Switch on and follow on screen instructions.
www.bushaustralia.com.au
DFTA47HDR
2
DFTA47HDR
Contents
Introduction…………………………………………...... ... 4
Main features and functions……………………............ 4
Features……………………………………………........ 4
Remote control..................................................... 5
Battery installation................................................ 8
Programming your learning remote control……....... 8
Front and rear panels……………………………............9
Rear panel............................................................9
Front panel...........................................................10
Installation…………………………………………...........10
Connecting the receiver……………………................10
Installation guide…………………………………............14
Basic operation……………………………………...........15
Program settings...................................................16
Picture setting...................................................... 17
Channel search.....................................................19
Time setting..........................................................21
Option..................................................................23
System setting......................................................24
USB.....................................................................25
Specifications………………………………………......... 34
Product warranty…………………………………........... 37
3
DFTA47HDR
Introduction
This user manual is intended to guide you through the operation
for the Bush DFTA47HDR High Definition DVBT Terrestrial
Receiver.
The password may be required when you attempt to
.modify some advanced settings. The default password is“000000”.
Main features and functions
This product is a high definition digital set top box. It fully complies
with DVB-T receiver requirement specifications. It provides users
with free to air high definition and standard definition digital terrestrial
television and radio signals being broadcast.
Features:
1. Fully compatible with DVB-T FTA digital standard
2. Fully compatible with MPEG-4 H.264/AVC High Definition
Digital TV
3. Fully compatible with MPEG-2 High Definition and
Standard Definition Output
4. Fully compatible with MPEG-1 Layer I & II, Dolby Digital Audio
5. Complies with Australian Standards and MEPS requirements
6. Universal Remote Control - capable of operating the set top box
7. Record digital television FTA program to a USB Flash Drive or an external
USB portable hard disk and playback via USB2.0 compatible.
8. VHF & UHF Input and Loop Out
9. Fully supported 7 Day Electronic Program Guide(EPG)
10. Automatic and Manual search
11. Parental Control
12. Plug and Play installation with an easy to use Menu System
13. Coaxial SPDIF Digital audio output interface
14. 576i, 576P, 720P, 1080i Video Resolution supported
4
DFTA47HDR
15. Supports 4:3 and 16:9 Aspect Ratios
16. Supports Teletext (where broadcast)
17. Subtitles supported based upon availability on the network
18. Channel editing functions (Favorites, Move, Lock, Delete)
19. Supports HDMI High Definition Multimedia Interface(HDMI 1.3 )
20. USB 2.0 Input supports mp3, wma, jpeg and bmp media
playback and Software Upgrade.
21.Audible feedback supported.
Manufactured under license from Dolby Laboratories.
Dolby and the double-D symbol are trademarks of Dolby Laboratories.
Remote control
The remote control is shown below and the button functions are listed
in the table on page 6.
5
DFTA47HDR
Key legend
Home
Power
Description
Press at any time to return to the first scanned in Channel
Switches the Set Top Box between On and Standby
Press to Mute all audio
TV/Radio
Switch between TV and Radio mode
Swap
Reverts to the previously viewed channel
Repeat
Switch between repeat off,repeat one,repeat random,repeat
the folder.
Vol + / Vol P+ /P-
Increases/Decreases the set top box volume
Changes the channel up/down
Moves the cursor up/left/right/down and scrolls through menus
OK
Press to confirm selection
Guide
Accesses Electronic Programme Guide
Back
When accessing the menu, returns to previously displayed screen
Info
Displays information of the current channel being viewed
Exit
Exits the item being viewed
Help
Press to display basic remote control function information
Text
Displays teletext (where available)
Menu
Accesses the set top box menu
ColourButtons
(red, green,
To select different options in the menu
yellow, blue)
Numbers
(0-9)
6
For direct channel input, or selection of sub menus in the menu
FAV
Press to display the list of selected favourite TV channels
SUB
Turns subtitles on or off
DFTA47HDR
REC
Press REC key to record the current program
while watching TV program
PREV/
NEXT
Previous/Next track
FR/FF
Press these keys to fast forward or rewind during playback
STOP
Press STOP key to stop recording program or stop a
program during playback
PLAY/
PAUSE
Play or pause the program during playback
GOTO
Goto select the time for multimedia playing
TIME
SHIFT
Press to start timeshifted Television.Please note you will need a
USB driver or HDD Plugged into the unit
AUDIO
Changes the audio language when available
7
DFTA47HDR
Battery inst allation
Insert the batteries while observing the correct (+) and (-)
polarities as illustrated below:
About the batteries:
If the remote control unit fails to work even when it is
operated near the set top box, please replace the batteries.
Use size 2 x (AAA) batteries.
Notes:
Do not use rechargeable batteries.
Do not place the batteries near a heat source such as a
heater or fireplace.
If the remote control unit is not going to be used for a long
time, remove the batteries.
Do not mix old and new batteries.
,
Caution: Keep batteries out of children s reach. If batteries
are swallowed, contact a physician immediately.
8
DFTA47HDR
Front and rear panels
Rear panel
Y
Pb
DFTA47HDR
Pr
High Definition Digital Set Top Box
POWER SUPPLY:AC 230V~50Hz
MAX POWER CONSUMPTION:8WATTS
SPDIF
RF IN
LOOP OUT
USB
HDMI
CVBS
R
AUDIO
L
RF IN
Aerial Input
LOOP OUT
Output of Digital Terrestrial TV Broadcast signal
- e.g. to VCR/DVD Recorder
USB
HDMI
USB 2.0 Port for media playback and firmware upgrade
High Definition Digital video and audio output for use with
televisions with a HDMI input. HDMI version 1.3
CVBS
Composite Video signal output
YPbPr
High Definition Component video output
Digital audio output
Audio Output for the right speaker, to be used when either
CVBS video output or YPbPr video output is used
S/PDIF
R (Audio)
L (Audio)
Audio Output for the left speaker, to be used when either
CVBS video output or YPbPr video output is used
AC
Power Cable: 230V AC, 50Hz
230V/50Hz
9
DFTA47HDR
Front panel
A red LED indicator on the front panel with the clock displaying the
time will indicate if the set top box is in standby mode whilst the
green LED with a channel number is an indication that the set top
box is operational.
You can access basic functions via these keys including:
Power, CH-, CH+.
Installation
Connecting the receiver
How to get good reception
If your antenna is not in good condition, you should consider
replacing it to ensure uninterrupted digital television viewing.
Viewers in areas of poor analogue reception may require a
specialist's advice about antenna requirements for digital
reception in their area.
It is recommended that viewers use quad shielded cable from
The antenna to the television.
Connections to a TV
There are several ways of connecting your STB receiver to a television.
For High Definition viewing your TV must support either 576p, 720p
or 1080i resolution. Also the connection between the STB receiver
and TV must be either YPbPr Component or HDMI.
Other connections will provide Standard Definition viewing.
Warning: Please switch OFF the mains power before plugging
or unplugging connected cables otherwise it may damage the
receiver.
10
DFTA47HDR
OPTION 1
Connect the STB receiver via composite video and audio
(For standard definition viewing)
1. Connect the antenna to the RF IN socket on the receiver.
2. Connect the receiver to the TV set via the red, white and
yellow composite AV cables.
AC 230V
~50HZ
11
DFTA47HDR
OPTION 2
Connect the STB receiver via YPbPr output and audio output
(For standard definition viewing)
1. Connect the antenna to the ANT IN socket on the receiver.
2. Connect the receiver to the TV set via the green, red and blue
component AV cables (this will provide video), and the
composite red and white cables (which will provide audio).
AC 230V
~50HZ
12
DFTA47HDR
OPTION 3
Connect the STB receiver via HDMI
(For optimum high definition viewing)
1. Connect the antenna to the ANT IN socket on the receiver.
Connect the receiver to the TV set via a HDMI cable.
2. This will provide both video and audio.
13
DFTA47HDR
Installation guide
Ensure that all connections have been made properly, turn on the
TV and make sure the receiver is connected to the Main Power.
Make sure that the on/off switch on the back panel of the set top
box is switched to on. Press the Power button on the front panel of
the receiver to switch receiver on. If you are using the receiver for
The first time or restored to Factory Default, the Installation Guide
Menu will appear on your TV screen.
1. Select the On Screen Display language (OSD Language).
Press the RIGHT/LEFT key to modify the language.
2. Select the Country. Press the RIGHT/LEFT key to select
your country of residence.
3. Select Channel Search and press RIGHT or OK key to
begin Automatic channel search.
4. Once channel tuning is complete, you are now ready to
watch TV.
14
DFTA47HDR
Basic operation
Program settings
To access the Menu,
1. Press the MENU button.
To access the program settings,
1. Select Program.
2. Press OK.
The Menu provides options to adjust the Program settings.
1. Select an option.
2. Press OK or RIGHT to adjust that setting.
3. Press the EXIT button to exit the Menu.
15
DFTA47HDR
Program Edit
To edit your program preferences (Move, Skip, Lock, Delete or
set as a Favourite), you will need to enter the Program Edit
Menu.This Menu requires a password to access. Enter the
default password '000000'.
EPG (Electronic program guide)
The EPG is an on-screen TV guide that shows scheduled programs
seven days in advance for every tuned channel (when broadcast).
Press the GUIDE button on the Remote Control to access guide Directly.
16
DFTA47HDR
You can use the LEFT/RIGHT to view what is on other channels.
Press the red key to skip forward 24 hours, and the green key
to skip back 24 hours. Press the INFO key to book programme
reminders .
Sort
Sort your channels from the following options:
[LCN] Sort the channels in ascending order
[ONID] Group the channels by broadcaster
[Service Name] Sort the channels in alphabetical order
[Service ID] Sort the channels according to the station
LCN (Logical channel number)
Set LCN on or off.
Picture setting
1.
2.
3.
4.
5.
Press MENU then select Picture, and then press OK.
The Menu provides options to adjust the video settings.
Press UP/DOWN to select an option.
Press RIGHT/LEFT to adjust that setting.
Press EXIT to exit the menu.
17
DFTA47HDR
Aspect Ratio
Set the display format to one of the following to select the best
display for your television
4:3 Full
4:3 Pan & Scan
4:3 Letter Box
16:9 Full Screen
Auto
Resolution
If the video does not appear correctly, change the setting. The
default setting is to match the most common setting for HDMI,
is 1080i.
The resolution options include 576i, 576P, 720P and 1080i.
TV Format
If the video does not appear correctly, you need to change the
settings. PAL is the standard format for Australia. NTSC is the
other settings option.
18
DFTA47HDR
Channel search
1. Press MENU and select Channel.
2. Press OK.
The Menu provides options to adjust the channel search
settings.
1. Select an option and press RIGHT/LEFT to adjust the
settings.
2. Press EXIT to exit the Menu.
Auto search
19
DFTA47HDR
This option will search and install all channels automatically.
This option overwrites all preset channels.
1. Select Auto Search and press OK or RIGHT to start
channel search.
2. To cancel channel search at any time, press EXIT.
Manual search
This option allows you to install new channels manually. This
option adds new channels without changing the current
channels list.
1. Select Manual Search then press OK or RIGHT. The channel
search screen will appear.
2. Press the RIGHT/LEFT key to select the channel frequency.
3. Press OK to start searching channels.
If a channel is found, it is saved and added to the channels list.
20
DFTA47HDR
Country
Select your country of residence in the list displayed.
Antenna power
This function allows you to enable Antenna Power if an external
active antenna is connected.
Time setting
1. Press MENU.
2. Select Time, and then press OK.
The menu provides options to adjust the time settings.
3. Press UP/DOWN to select an option.
4. Press RIGHT/LEFT to adjust the setting.
5. Press EXIT to exit the menu.
Time offset
Selecting auto will automatically set the offset based upon
the Country Region, whilst selecting manual allows the user
to customise GMT offset settings.
21
DFTA47HDR
Country region
Modify based on the region where the set top box is installed.
Time zone
May be customised when the time offset is set to manual.
Sleep
Allows the set top box to be programmed to switch off
automatically after a set period of time.
Daylight time
May be modified when the time offset is set to manual to indicate
whether the daylight saving time is active or not.
22
DFTA47HDR
Option
1. Press MENU and then select Option.
2. Press OK.
The menu provides options to adjust multiple language and
user settings.
3. Select an option and press RIGHT/LEFT to adjust the
setting.
4. Press EXIT to exit the Menu.
OSD language
This setting allows you to customise the On Screen Display
(OSD) Language from the nine languages available.
Subtitle language
If subtitles are broadcast in another language, you may
select the language used to broadcast subtitles.
Audio language
If audio is broadcast in another language, you may select the
language used to broadcast subtitles. If the language is not
available, the default program
language will be used.
23
DFTA47HDR
Digital audio
Modify the format of digital audio being output between PCM,
RAW and Off.
OSD Transparency
Customises the transparency of the on screen display
including information and the menu.
Audible Feedback
When turned on this function provides a beep via the audio
to advise the user that the set top box has received the
remote control command.
System setting
1. Press MENU and select System.
2. Press OK.
3. The menu provides options to adjust the system settings.
4. Press the UP/DOWN key to select an option.
5. Press RIGHT/LEFT to adjust the setting.
6. Press EXIT to exit the Menu.
24
DFTA47HDR
Parental Guidance
You can restrict access to channels by rating that are
unsuitable for children. To restrict/lock the channel you will
need to enter either the default password '000000' or your
own password (if you have modified it).
Set Password
1. Select this option to change the password.
2. Enter your 'old' password or the default password
'000000'.You will then be asked to enter a new password.
3. Re-enter your new password to confirm.
4. After it is confirmed, press EXIT to exit the Menu.
Restore Factory Default
This option will delete all preset channels and settings and
return the box to the initial installation screen.
To reset your Set Top Box to the default factory settings,
1. In Main Menu select [Restore Factory Default]
2. Press OK or RIGHT to select.
3. Enter your password or the default password '000000'
4. Press OK to confirm and reset the settings.
Information
Select to view model, software and hardware information.
Software Update
OAD
When set to “On”, the set top box will begin searching for
new software from over air broadcasts according to your set
time in “Start Time”.
USB Upgrade
Allows the unit to be upgraded via USB (if required).
25
DFTA47HDR
Lip Sync Control
You can adjust the lip sync control time is 10 to 200ms.
USB
This function provides the ability to playback multimedia or
upgrade the set top box via the USB port.
1. Press MENU and select USB.
2. Press OK.
26
DFTA47HDR
Multimedia
Select to play back multimedia including music ,photo,movie,PVR
files via USB.
Photo Configure
This allows the user to customise slide time, the mode that
the slides appear via, and the image aspect ratio.
27
DFTA47HDR
Movie Configure
This allows the user to customise the Subtitle Specific,
Subtitle background and Subtitle Font-colour.
28
DFTA47HDR
PVR Configure
Record Device, here you can view information of your connected
USB storage device which includes Format Type, Total and Free
space available on drive.
You can adjust the Timeshift Size from 0.5GB to 4.0GB,
step-by-step is 0.5GB.
29
DFTA47HDR
A Format hard disk function has also been provided. Formatting a
hard disk will permanently delete all the data on the hard disk. It is
strongly recommended to backup all the data before formatting
your hard disk drive.
PVR Function
The PVR function of your receiver allows you to record and
playback your favourite programs. Instant recordings, TV
program Guide recordings and timer recordings are all available.
NOTE: To use the PVR function and TIMESHIFT function,
make sure you have a USB Hard Disk Drive or a USB Flash
Drive connected to the USB port of the receiver. Please
note that due to buffer speed requirements some USB
Flash Drives may not be compatible for use with the
Timeshift function.The maximum capacity of HDD supported
by the STB is up to a size of 500GB. It supports FAT32 and
NTFS file formats.
1)Instant recording
Press the REC. key to start instant recording of the TV program
currently being viewed, the recording symbol would be displayed
in the top left of the screen. Press the INFO. key to view information
of the instant recording. Press the STOP key to stop the instant
recording.
30
DFTA47HDR
2)Electronic Program Guide Timer recording
You will never miss any of your favourite programs again with the
Electronic Program Guide recording feature.
While in TV mode, press the “GUIDE” key to access the on screen
Electronic Program Guide, select the channel and program you
wish to record. Press the “OK” key to select the desired program
to be recorded. A Schedule Event window will appear. Select
and set the correct parameters to schedule the recording.
Set the Mode option to “Record”. This program will be automatically
recorded at the scheduled time.
You can edit the set timer recording in the Schedule Event Menu
by editing the channel number, name, date, start time, and end time.
Select the option of Once, Daily, Weekly or Monthly recording as
desired.
Once the recording schedule setup has been set, you can edit the
schedule recording by pressing the “GREEN” key or delete
the scheduled recording by pressing the “BLUE” key on your remote.
After having finished the Schedule Recording setup, press the “EXIT”
key to save and exit.
31
DFTA47HDR
3)TIMESHIFT
The TIMESHIFT function allows you to pause the TV program being viewed.
Once paused the tv program is being stored on your connected USB Hard
Drive or Flash Drive.
When watching a program, press the “PAUSE” key on the remote control
to activate the function. You can now use the F.R. (Rewind function) to go
back to the point you began the TIMESHIFT function or F.F. (Fast Forward)
to catch up to live viewing. If you wish to stop the TIMESHIFT function,
press the “STOP” key.
If you press the “INFO” key, you can access the TIMESHIFT
information screen.
WARNING:
For the compatibility of HDD and USB devices with TIMESHIFT and
PVR function, please refer to the table below:
TIMESHIFTPVR RECORDFORMAT
USB devicedoesn’t workWorksFat32
3.5inch HDDWorksWorksNTFS
2.5inch HDDWorksWorksNTFS / FAT 32
1.8inch HDDdoesn’t workWorksNTFS / FAT 32
Please make sure that you are NOT using an USB device or a 1.8inch
HD for TIMESHIFT function.
32
DFTA47HDR
4)Playback of a recorded program
When you want to playback of a recorded program,follow the step
below,it can display the recorded programs.
1.Press MENU and select USB
2.Press OK
3.Select the PVR
4.Choose the HBPVR folder
Follow the help information at the bottom of the screen to preview,
playback, edit or delete the recorded programs.
33
DFTA47HDR
Specifications
Tuner
Input Connector
IEC 16902. Female
Input Frequency
Range VHF&UHF
Number of RF Inputs
1
Input impedance
75 ohm
Loop through
47-862 MHz
Demodulation
Standard
Guard interval Modes
FEC Modes Rate
ETSI EN300 744
1/32,1/16,1/8 Active Symbol duration
All modes supported including non
hierarchical
Carriers/Constellation (bypass)IEC 169-2 Male
COFDM(QPSK/QAM16/QAM64)
Demodulation
2K and 8K
Network
MFN/SFN
Channel bandwidth
7 and 8 MHz wide channel 21-68PLL
System Resources
SDRAM memory
512Mb DDR2 SDRAM
(64MB )
34
FLASH memory
4MB NOR FLASH
Display Planes
4 SEGMENTS LED
Graphic resolution
ARGB8888
DFTA47HDR
Video Decoder
Standard
ISO/IEC 13818-2 and ISO/IEC 14496-10
Transport
stream
Video
decoding
ISO/IEC 13818-1
Div
Aspect ratio
MPEG-2 SD/HD (MP@ML and MP@HL),
MPEG-4H.264/AVC SD/HD
X3.X ~ 6.X
JPEG,BMP,PNG, Motion JPEG
4:3, 16:9
Audio Decoder
Standard
ISO/IEC13818-3 TR1011154
Audio
decoding
MPEG-1 and MPEG-2 Layer I & II, Dolby Digital
Audio, Dolby D+ ,WMA and HE-AAC Digital Audio
Dolby Digital Stereo down-mixing to analog and digital
(Dolby D) audio outputs(including HDMI). For digital
outputs, L-PCM stereo encoding is provided.
Sample rate
32 kHz, 22.1 kHz, 44.1KHz,48 kHz
Subtitles & Teletext
Subtitle
DVB Subtitle
Teletext
EBU TELETEXT
Rear Panel
CVBS outputs 1 CVBS video output
Audio CINCH 2 Analog Audio L/R connectors
(White/red color)
Optical S/PDIF Digital Audio output
YPbPr outputs Analog HDTV video output
Digital HDTV video output. HDMI version 1.3
HDMI
USB
USB2.0
35
DFTA47HDR
Front Panel
IR activity LED
Bi-colored LED
4-segments LED
To display the time,channel number or/and other
information
Keys
POWER,CH+,CH-
Accessories
Remote control unit
Batteries
User Manual
Quick Start Guide
RCA cable
Remote Control
2 x AAA
1 in English
1 in English
1
Physical
Operating Temperature
Storage Temperature
Size (W x H x D) (mm)
36
+5 ~ 45 c
-10 ~ +70 c
220x141x38 mm
DFTA47HDR
Product Warranty
Keep your receipt or proof of installation as proof of purchase.
This product is warranted for any defect in materials or
workmanship for one year after the original date of purchase.
This product is for normal domestic and office use only.
This warranty does not cover damage from misuse or neglect,
accidental damage, vermin infestation, excessive voltages such
us lightning or power surges or any alternation that affects the
performance or reliability of the product.
This guarantee is subject to the following provisions:
1. It is only valid within boundaries of the country of purchase
2. The product must be correctly assembled and operated in
accordance with the instructions contained in the manual
3. This product must be used solely for domestic purposes
4. The guarantee does not cover accidental damage
5. The guarantee will be rendered invalid if the product is resold
or has been damaged by inexpert repair
6. The manufacturer disclaims any liability for incidental or
consequential damaged
PO BOX 6287
Silverwater NSW 1811
37
For more information, support and to
register your warranty visit:
www.bushaustralia.com.au
Our goods come with guarantees that cannot be excluded under the Australian
Consumer Law. You are entitled to a replacement or refund for a major failure
and for compensation for any other reasonably foreseeable loss or damage. You
are also entitled to have the goods repaired or replaced if the goods fail to be of
acceptable quality and the failure does not amount to a major failure.