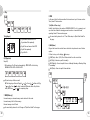
1
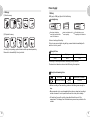
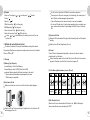
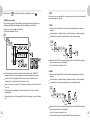
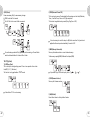
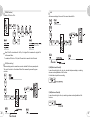
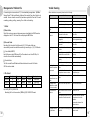
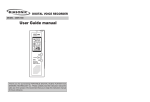
Preface
Thank you for purchasing DDR-5300 manufactured by Diasonic Technology Co., Ltd.
Please read this manual before using the product. Store this manual in a safe place
as this manual contains important information for the operation of the product.
Copyrights
DIASONIC Technology has all copyrights of this user manual. Reproduction,
distribution, and commercial use of a part of or the entire user manual without
prior consent of DIASONIC Technology are strictly prohibited by laws.
All information contained in this manual has been carefully studied and written
and is subject to change without prior notice for functional and performance
improvement. DIASONIC Technology will not take any responsibility for issues
arising due to differences between real operation and information contained in
the user manual.
Use of MP3 files is limited to the personal purposes only. Servicing or providing
MP3 files for commercial purposes will be against the copyright act of Korea.
Reproduction of files is prohibited for other than personal purposes by law.
1
FCC (Federal Communications Commission)
Safety Notes
Do not store the device in any place with following conditions:
- High temperature (60 or higher)
- Exposure to the direct sun rays or a heating device
- Inside the car with closed windows (especially, in the summer)
- Humid place such as the bathroom
When removing dust, use soft cloth in dry. Do not use organic solvents such as
thinner or benzene or wet cloth.
Do not place a debit card or a bus pass near the speakers. The magnetic
interference may occur, which will damage the card.
This equipment has been tested and found to comply with the limits for a Class B
digital device, pursuant to part 15 of the FCC Rules. These limits are designed to
provide reasonable protection against harmful interference in a residential
installation. This equipment generates, uses and can radiate radio frequency energy
and, if not installed and used in accordance with the instructions, may cause
harmful interference to radio communications.
However, there in no guarantee that interference will not occur in a particular
installation, If this equipment does cause harmful interferenceto radio or television
reception, which can be determined by turning the equipment off and on, the user
is encouraged to try to correct the interference by one or more of the following
measures.
Do not place the device near a magnet. The speakers may not be workable.
Reposition or relocate the receiving anternna.
Diasonic Technology does not take any responsible for any damage caused by
the use of this device or damage claim made by a third party.
Increase the equipment between the equipment and receiver
Diasonic Technology does not take any responsible for the loss of data caused by
other actions than repair services by Diasonic Technology.
Diasonic does not take any responsibility for the date stored or recorded in the
device, so user must be careful to manage & keep the date.
Do not repair, disassemble, or remodel the device.
Connect the equipment into an outlet on a circuit different from that to which
the receiver is connected
Consult the dealer or an experienced radio/TV technician for help.
Modifications not expressly approved by the manufacturer could void the user’s
authority to operated the equipment.
Do not use the product in a place where use of electronic devices is prohibited.
Do not use this device while driving.
Do not heat up or short the main body or the battery.
When using an auxiliary device, leave a gap between the auxiliary device and
the main device.
Incorrect use of the product by the user or a third party or static electricity or
electric shock loaded on the product may cause loss of or change in the data
saved in the product during repair services or replacement of the battery.
Keep the voice recorder out of reach of children.
2
3
Main Features
I. Record
Time Machine Rec. (Only Applicable in Recording Pause)
Restart recording just after the paused point after checking what was the last
recorded by playing back the previous recorded content for a specific time.
Adding Rec.
Adding additional content(s) at a desired point by recording something at the
file in playback
Rec. Monitoring while recording
Timer Rec. (10 Presets)
Start recording at a setting time
Rec. Pause
Automatic Folder Advance with Time & Date stamping (A/B/C/D Folder)
Security Rec.: LCD Off while recording
1. Voice Recording
Rec. Quality Selectable(PCM/HQ/SP/LP)
PCM format: 1:1 recording quality for the best recording quality (similar to
Natural Sound Quality)
Internal Microphone Sensitivity Selectable(High/Low)
ARS Mode(Automatic Recording System)
- A Mode: ARS displayed. All sequent recording contents are recorded in 1
Index file.
- B Mode: ARS-B displayed. Each recorded contents is made into independent
file.
2. Direct encoding
External Audio Source Recording thru Line-in Cable
Audio Sync: By detecting the point of the end & the start of a music,
automatically make new file.
Additional Stereo External Microphone Applicable for capturing Stereo Sound
FM Radio Rec.
Telephone Conversation Rec.
Cellular Phone Conversation Rec.
Rec. Quality Selectable(SHQ/HQ/SP/LP)
4
Main Features
II. Play
Various Alarm Setting: Specific Date/Daily/Weekly/Specific Time
Various Play Mode: Normal One/Repeat One/Normal All/Repeat All/Shuffle
Section Repeat
Intro Play
Various Equalizer: NORMAL/ROCK/POP/CLASSIC/JAZZ
Resume Play: Play the file from a stopped point when turn-on again.
III. FM Radio
Worldwide, European or Japanese Frequency
10 Presets
III. Other Features
Huge Memory Capacity available
Internal Memory: Flesh Memory
External Memory: MICRO SD, MICRO SDHC (Up to 16GB)
Free Copying file(s) between SD card and Internal Memory
Speaker On/Off
Alarm-On at a setting time
Time Clock
Folder: A/B/C/D/EN(Encoding)/MP3/FM
Remaining Memory Space Display
Firmware Upgradeable easily
Plug & Play: No required any additional installation driver
Various Power-off Modes: Automatic off/Sleeping off
Hold On/Off for preventing from unexpected operation
External Speaker(0.3W/0.8ohm)
USB 2.0
Compatible PC O/S: Windows ME, 2000, XP, and Vista, More than MAC OS X 10.2
IV. Enhanced File Editing in the device
- Dividing File
- Adding a recording contents in a current file
- Overwriting a new content over a current file
- Erasing a file or All
- Copy file(s) between SD card and Internal memory
5
Table of Contents
Table of Contents
9
Component and LCD Display
1. Set
2. LCD
Power Supply
11
1. Battery
2. AC/DC Adaptor
3. USB Connection
Quick Start
14
1. Power On/Off
2. Basic Key Operation
3. Recording
4. Playing
5. FM Radio Reception
6. Storage
7. Time & Date Setup
8. Menu Tree
STOP Mode
STOP Mode
23
STOP Mode
(3) Various Recording Methods
Voice Recording thru Internal Mic.
Voice Recording thru External Mic.
Voice Recording thru Telephone
adaptor(Optional Accessory)
Recording FM Radio(Optional
Feature)
31
Record Mode
(1) Preparation of recording
Connection & Setup
How to operate
33
PLAY
4. FM(FM Radio Reception)
34
23
Function & operation in Menu
REC/PAUSE key
Intro SCAN
Setup Menu
PLAY Mode
6
PLAY
3. MP3 (MP3 Folder)
1. VOICE
(1) Key Function
(2) How to operate
Play a file repeatedly in a section (A B)
File Repeat
Volume Up & Down
26
(1) Key Function
(2) Preparation of recording
Select Folder
Set up current Date & Time
Select recording format
Select External Microphone
Mic Sensitivity
Resume Recording
ARS
SECU(Security Recording)
2. Encoding Mode(EN Folder)
Function & operation Each Folder
(1) Key Function
(2) How to operate in STOP mode
Check date & day
Power Off
Folder Selection
Volume Up & Down
Record Mode
25
Play Speed Control
Setup EQ
1. Mode
1) Recording format & quality
2) Operation
35
2. LINE
1) Operation
36
3. SENS(Input Sensitivity)
1) Input Sensitivity Level
2) Operation
7) BEEP(Beep Sound)
36
4. ARS(Automatic Recording System)
1) ARS Mode
2) Operation
37
7
Table of Contents
8
Component and LCD Display
5. RES(Resume Recording)
37
6. Play
1) Rep(Repeat)
2) EQ(Equalizer)
38
7. MEM(Memory)
38
8.TIME
1) Set(Date & Time setup)
2) ARM(Alarm)
39
9. FILE
1) COPY
2) MOVE
3) ERS (Erase)
41
10. SYS(System)
1) SLEP(Sleep Timer)
2) POFF(Automatic Power Off)
3) INFO(Memory Information)
4) SOFt(Firmware Version)
5) dEFt(Default)
6) FMt(Format)
42
11. AdV(Advanced Functions)
1) EdIt(File Editing)
CUT
COMb(Combine)
OVEr(Overwriting)
Add
2) VLC (Voice Level Control)
3) LLC (Line Level Control)
4) Sync
5) SECU(Security Recording)
44
1. Set
Earphone Jack
Internal Speaker
Strap Holder
micro SD card slot
External Microphone
Rec/Pause
Internal Micrphone
Volume Key
Recording Indicator(LED)
Hold Key
LCD Display
USB Jack
Operating Keys
Battery Compartment
2. LCD
Upgrading Firmware
49
Management of Folder & File
50
Trouble Shooting
51
General Specification
53
Product Warranty
54
Folder & FM Radio mode
Section Repeat
Current Selected Memory
Play Option
File Index
ARS
Recording Quality & Format
Operating Status Indicator
Time/Date/FM Frequency
Battery Level Indicator
Alram/Timer Recording
Hold On
9
Power Supply
3. Package
(1) Basic Accessory
1. Battery
LR03 type (or UM4 type) 2pcs of AAA size Battery.
Inserting Battery
(2) Optional Accessory
Press down the battery
cover lightly and then slide
cover to the direction.
Insert two batteries with
correct polarity.
Close the battery cover
completely to the direction.
It does not recharge the battery.
If there is some unusual while using battery, remove batteries immediately with
careful not to hurt yourself.
According to the package, optional items should be purchased separately.
Please call or ask availability to buy to retailer.
Battery Life Time
Recording
Playing
Radio Reception
20hrs
20hrs
17hrs
The battery life time may be different according to setup condition.
The above time is based on volume at mid & listening thru earphone.
Battery Power Remaining Status
Full Charge
Power almost drained
Some Power Consumed
No Power
Before recording or Timer recording, make sure the battery power enough to
keep.
We recommend not to use rechargeable battery when an important recording is
carried on because it loses its power level down at a certain point suddenly.
If it would not be used for a while, please take the batteries out of the
compartment. The leakage from the batteries may cause serious problem to the
recorder.
10
11
2. AC/DC Adaptor
When plugging AC/DC Adaptor, Full Battery mark displays on the LCD.
Before plugging AC/DC adaptor, please make sure its electrical rate(DC 4.5V
300mA) correct.
While connecting it to PC, it is not workable. If returning to the normal
operation, it must be disconnected from the PC.
It does not support older than Window ME.
(2) Disconnecting from PC
Before removing the voice recorder, disconnect the cable following to the below
procedure first. Otherwise, the data may be lost or damaged.
Close all files. When a file or folder is open, the voice recorder will not be
properly removed from the PC.
Left-click on the icon displayed on the lower-right corner of the screen.
AC/DC adaptor is basically optional accessory, so it may be purchased separately.
Please call or ask availability to buy to reseller.
When the following message appears, separate the voice recorder from the PC.
3. USB Connection
(1) Connecting to PC
Connect the USB cable to the USB port at the side of the voice recorder.
Connect the other end of the USB cable to the PC.
PC operating system (Windows ME, 2000, XP and Vista, More than MAX OS X
10.2) automatically detects the voice recorder.
When connecting to PC thru USB cable, USB displays on the LCD.
12
13
Quick Start
3. Recording
Note: Term Explanation
Short Key: Press & Hold button for less than 1 second
Long Key: Press & Hold button for more than 2 seconds
(1) Select Folder
Press M with short key to move to a desired folder to store file in recording or
play a file(s).
1. Power On/Off
Turn On
Press
with long key.
Turn Off
Press
with long key.
If powering off automatically just after display appears, please check below
things.
Not enough power to keep on.
Hold on
No memory space
File Index Full
2. Basic Key Operation
Shot Key
Select or Pause
Long Key
Power On
Change folder(A/B/C/D/EN/MP3) or FM Radio Enter into Mode
Move to previous mode / option / file /
frequency in step
Fast move to previous mode / option /
file / Auto frequency Searching
Move to next
mode/option/file/frequency in step
Fast move to the next mode / option /
file / Auto frequency Searching
Check Date/Time/Day
Return to main display
Power Off
Recording or Pause in Recording
Recording or Pause in Recording
Volume Up or down(Level 0-20)
Successively Volume Up or Down
Hold
14
LCD Display
Description
Folder Name: Voice Folder
Recording file in voice thru int. mic, Ext. Mic, Telephone
adaptor is stored to A, B, C, or D according to current
selected folder.
Max. file: 256files each folder
Folder Name: Encoding Folder
Recording file thru Line-in, FM is stored.
Max. files: 256files
Folder Name: MP3 Folder
User can store any file(s) from PC.
Max. files: 999files
FM Radio Mode (Option)
To get the best recording quality for each mode, a proper option should be set
up.
Factory default for recording method is set up thru internal mic.
Audio-in, Ext. Mic or Telephone adaptor should be selected at the mode if
recording thru one of those.
(2) Voice Recording thru Internal Mic.
Make sure the folder (A. B, C, or D) to store recorded file.
Press REC/PAUSE to start recording.
Press REC/PAUSE once again to pause recording.
Press
to stop recording.
If there is no connection of an external devices thru Audio cable after External
Mic or Telephone Adaptor is selected, automatically it is recorded thru internal
mic. in mono.
It does not save the file recorded 3 secends or less.
Confirm the battery indictor before starting recording. While recording, the
recorded file can not be saved when power is off.
X
15
(3) Voice Recording thru External Mic.
Setup
Press
with long key and then move to LINE by
or
.
Press
to enter into lower option and move to EMIC by
or
.
Press
to select External Mic. and select Mono mic.(MO) or Stereo mic.(St)
by
or
and then Press
to complete.
to Main display.
Press
Start Recording
Make sure the folder (A. B, C, or D) to store recorded file.
Connect External Mic.(Mono or Stereo) to Mic. Jack on the top of the voice
recorder.
Press REC/PAUSE to start recording.
Press REC/PAUSE once again to pause recording.
Start Recording
Make sure to select EN folder to store recorded file.
Connect the other audio player to Mic. Jack on the top of the voice recorder with
Audio cable.
Press REC/PAUSE to start recording.
Play the other player.
It prevents from making a missing part of content to play external audio player
later than press REC in Voice Recorder.
Press REC/PAUSE once again to pause recording
A file thru Line -in is recorded in stereo and stored at EN (Encoding folder).
(6) Recording FM Radio(Optional Feature)
Setup
Connect Wired FM Antenna(or earphone) to earphone jack on the top of the
voice recorder.
with short key.
Move to FM by pressing
Select a desired radio station to record by
or
.
Start Recording
Press REC/PAUSE to start recording.
Press REC/PAUSE once again to pause recording.
A file is recorded in stereo and stored at EN (Encoding folder).
(4) Voice Recording thru Telephone adaptor(Optional Accessory)
Setup
Press
with long key and then move to LINE by or
.
Press
to enter into lower option and move to tEL (Telephone Adaptor)
by
or
.
Press
to select Telephone adaptor then Press
to complete.
to Main display.
Press
Start Recording
Make sure the folder (A. B, C, or D) to store recorded file.
Connect Telephone Adaptor to Mic. Jack on the top of the voice recorder.
Press REC/PAUSE to start recording.
Press REC/PAUSE once again to pause recording.
A file thru telephone adaptor is recorded in stereo.
(5) Creating Audio file from another audio player with Line -in
Setup
Press
with long key and then move to LINE by
or
.
to enter into lower option and move to AUd (Line -in) by
Press
Press
to select Line -in then Press
to complete.
Press
to Main display.
16
or
4. Playing
(1) Select Folder
with short key to move to desired folder to contain file to play back.
Press
LCD Display
.
Description
Folder Name: Voice Folder
Storing file(s) to be recorded thru Internal Mic.,
External Mic., Audio-in or Telephone Adaptor.
Folder Name: Encoding Folder
Storing file(s) to be recorded thru Line-in, FM
Radio.
Folder Name: MP3 Folder
File(s) downloaded from PC.
17
(2) Playback
Move to a file to play by
or
and then press
to select.
Stop by
Pause by
FF(Fast Forward) by
with long key
REW(Rewind) by
with long key
Move to the next file by
with short key
Move to the previous file by
with short key
In stop,
or
is performed only for moving to the next file or the
previous file.
5. FM Radio Reception (Optional Feature)
Do not insert or extract micro SD Card in the recorder s power-on.
If inserting micro SD card in wrong way or inclined angle, the contact part of
micro SD card could be damaged or jammed inside.
If micro SD card may not be inserted correctly, it may not be readable.
Do not eject SD card when it is performing operations such as recording, copy,
move, erase and file combine. It may dameage the DATA. Be sure to back up
files.
(3) Eject micro SD Card
Push micro SD Card inward with finger quickly & smoothly, and it will be ejected
partially.
Hold the micro SD Card straight and pull it out.
The feature is optional, so it may not be available according to the model.
Plug external FM antenna or earphone to earphone jack on the top of the device.
(4) Format
Move to FM by M .
If micro SD card is brand-new(unformatted) or used one for the other devices,
please format it on this device.
Before formatting, make sure the stored file(s) in micro SD card is not necessary
anymore. Otherwise, store the file(s) to the other storage or PC.
6. Storage
(1) Memory Type & Capacity
Internal Memory : Built-in Flash Memory
External Memory: micro SD, SDHC Card (Up to 16GB)
Internal Memory Capacity is different according to the model.
External memory should be purchased separately at a shop.
SDHC memory is compatible.
(5) Select Memory(Internal memory or micro SD card)
(2) Insert micro SD card
Make sure its direction to insert to micro SD card slot as below diagram.
Long Key
or
or Short Key
or
Short Key
Short Key
(6) No SD card in the slot
Hold micro SD card s face up and insert it straightly to the slot until micro SD
card stopping with a click.
18
When micro SD card is selected without SD card in real, NOSD is blinking for
3seconds and then shows up the display with INT .
19
7. Time & Date Setup
8. Menu Tree
Step
PLAY
Display
Key Operation
M with
Long key
or
with
short key
with
short key
REPEAT
with
short key
Setting Date(Year->Month->Day)
Y (Year) will be in blinking.
Up or Down figure by
or
.
Confirm a desired figure and then move to the next by
NORMAL
ROCK
POP
CLASSIC
JAZZ
EQ
RECORD
.
Set Time(Hour->Minute->Second)
H (Hour) will be in blinking.
Up or Down figure by
or
.
Confirm a desired figure and then move to the next by
NORMAL 1 FILE
REPEAT ONE FILE
NORMAL ALL FILE
REPEAT ALL FILE
REPEAT SHUFFLE
.
MODE
PCM
HQ
SP
LP
LINE
MIC SENS
AUDIO
TELEPHONE
EXT-MIC
HI
LO
ARS
RESUME REC
OFF
ARS
ARS-B
OFF
ON
MO
STEREO
FILE
COPY
NO
YES
MOVE
NO
YES
ERASE
ONE
ALL
NO
YES
MEMORY
INT
SD
FM
WORD
20
EUROPE
JAPAN
21
Functions & Operation according to Each Folder
1. Voice (A/B/C/D Folder)
TIME
STOP Mode
DATE SET
ALRAM
15M, 30M, 45M, 60M
AFTER
DIARY
DAY SET
TIME SET
OFF
ON
(1) Key Function
Key
Operation
TIME SET
WEEKLY
TIME SET
MON-SAT
MON-FRI, MON,
TUE, WED, THU,
FRI, SAT, SUN
DATE
FF
REW
TIME SET
DAY SET
PLAY/PAUSE
STOP
DATE
DATE SET
CHENNAL
1~10
OFF
ON
TIME SET
WEEKLY
MON-SAT
MON-FRI, MON,
TUE, WED, THU,
FRI, SAT, SUN
DAY SET
DATE
TIME SET
MENU
VOLUME +
TIME SET
VOLUME REC/PAUSE
SYSTEM
Description
SHORT
Play a current selected file
LONG
Play the beginning part of a file shortly(Intro Scan)
SHORT
Move to the next file
LONG
Move to the next file up sequentially until taking the key off
SHORT
Move to the previous file
LONG
Move to the previous file down sequentially until taking off
SHORT
Display Date
LONG
Power Off
SHORT
Change folder & Mode(A, B, C, D, EN, MP3, FM)
LONG
Enter into Menu
SHORT
Volume up
LONG
Volume up sequentially until taking the key off
SHORT
Volume down
LONG
Volume down sequentially until taking off
SHORT
Start recording or Pause in recording
LONG
SLEEP
3M, 5M,
7M, 10M,
OFF
POWER
OFF
INFOR
MATION
30M, 1H,
1H30M,
2H, OFF
MEMORY
CAPACITY
REMAIN
MEMORY
VER
SION
DEFAULT
FORMAT
BEEP
HOLD
X
Hold On/Off
(2) How to operate in STOP mode
NO
YES
NO
YES
OFF
ON
Check date & day
Press
with Short key. LCD display changes Time->Date->Day Sequentially
whenever pressing
.
Time
Date
Day
ADVENCE
OVER
ADD
VOICE
LEVEL
CONTROL
OFF
ON
OFF
ON
0, 1, 2, 3,
4, 5, 6, 7
EDIT
SPLIT
22
NO
YES
COMBINE
NO
YES
LINE
LEVEL
CONTROL
-5, -4, -3,
-1, 0, 1, 2
, 3, 4, 5
SYNC
TIME
CONTROL
1, 2, 3,
4, 5
SECURITY
REC
OFF
ON
Sunday
Thursday
Power Off
Press
with Long key.
Monday
Tuesday
Friday
Saturday
Wednesday
23
Folder Selection
Press M key with short key until showing up a desired folder.(A->B->C->D->EN>MP3->FM)
FM is not folder.If desiring to listen to FM radio, please select FM.
Volume Up & Down
Press Volume key for sound level up or down.
REC/PAUSE key
Press REC/PAUSE with short key.
A. Start the recording
PLAY Mode
(1) Key Function
Key
Operation
PLAY/PAUSE
SHORT
Play a current selected file
LONG
Play the beginning part of a file shortly(Intro Scan)
FF
REW
B. Stop=>Rec.=>Stop
STOP
MENU
VOLUME +
B. Stop=>Rec.=>Pause=>Rec.=>Stop
VOLUME REC/PAUSE
Description
SHORT
Move to the next file
LONG
Play file fast forward
SHORT
Move to the previous file
LONG
Play file fast backward
SHORT
Stop playing
LONG
Power Off
SHORT
Section Repeat On/Off (A B)
LONG
Enter into Menu
SHORT
Volume Up
LONG
Volume Up sequentially until taking the key off
SHORT
Volume down
LONG
Volume down until taking the key off
SHORT
Select EQ(Normal->Rock->Pop->Classic->Jazz)
LONG
Selecting Play Speed(Slow->Fast->Normal)
HOLD
Hold On/Off
(2) How to operate
Recording starts with red LED on as the gray circle.
While Pausing, LED keeps in Red with recording time blinking.
If pressing STOP , stop the recording in recoding or pausing.
Intro SCAN
Press
with long key.
The Beginning part of file in 10sec. plays with SCAN and then Stop.(Intro
Scan)
While scanning a file, FF or REW works to play a next file or a previous
file with index No. up or down(ex.001->002->003).
24
Setup Menu
Press
with long key for setting other options in detail.
key works for selecting a current menu or enter into lower menu. After
selecting with
, it returns to a previous step.
If returning to main display, press
or
at anytime.
&
are for moving to a previous or a next menu in same level.
Play a file repeatedly in a section (A B)
with short key at the point of start, then A B is blinking.
Press
Press
with short key at the point of end, then A B is displayed without
blinking.
with short key once again, then A B
If desiring to release A B , press
is disappeared.
File Repeat
with long key=> Move to Play by
or
=> Press
=>Move to REP by
or
=> Press
=> Select a desired repeat option then Press
=>
for completing setup.
Volume Up & Down
Volume level can be adjustable from 0 to 20 .
25
Play Speed Control
While playing a file, play speed can be changeable by REC/PAUSE with long
key.
Slow(70%)->Fast(130%)->Normal(100%)
Select Folder
with short key.
Select a desired fold to record file(
) by pressing
Recording file at voice mode thru int. mic, external mic, Telephone adaptor is
stored to A, B, C, or D.
Each folder can store 256files in Max. and if number of recorded file is over than
limitation(256pcs), automatically, move to the next folder and record.
Record Mode
(1) Key Function
Key
Operation
PLAY/PAUSE
SHORT
Description
Display Remaining Time to be able to record
LONG
X
Set up current Date & Time
Select recording format
Press M with long key => Press
for selection of recording
format(PCM/HQ/SP/LP) at
=> Current selected format is blinking then press
or
for moving to desired format.=> Press
at a desired format.
PCM format provides with high quality equivalent to CD in recording, so when
recording quality is more considerable other than recording time, PCM is
preferable.
FF
SHORT
File Index up
LONG
File Index up
REW
SHORT
STOP
SHORT
Stop the recording
LONG
Stop the recording
MENU
SHORT
X
LONG
Change the recording sensitivity
HQ, SP or LP is in same file size even if it records thru stereo.
VOLUME +
SHORT
Volume Up
The above recording time may be different according to recording condition.
LONG
Volume Up sequentially until taking the key off
X
LONG
VOLUME REC/PAUSE
X
Format
PCM(mono)
HQ
SP
LP
Rec. Rate
44.1kHz/16bit
64Kbps
32Kbps
16Kbps
Rec. Time(1GB)
3.1hrs
34.8hrs
69.5hrs
139hrs
This table is based on mono recording, so when recording thru Stereo, PCM
recording time should be in half of the time.
SHORT
Volume down
Select External Microphone
LONG
Volume down until taking the key off
SHORT
Pause
The recorder has a built-in mic.(Mono) in default and user can plug external
mic.(Mono or Stereo) for better recording quality or special purpose.
LONG
Pause
This setup is for recording thru external mic. or external devices.
Hold On/Off
Even if this option is selected at the external mic. but if any external mic.(or any
other external device) is not plugged in real, the built-in mic.(mono) works
regardless of the setup.
HOLD
(2) Preparation of recording
It can start recording by pressing REC/PAUSE at anytime without setting the
next steps, but these may offer better condition to obtain the best recording
quality.
Press
Move to
with long key => Move to
then press
and then press
26
=> Select
by
or
and then Press
(Mono) or
(Stereo) by
=>
or
.
27
Mic Sensitivity
It is applicable for the recording thru internal, external mic or telephone adaptor.
B-1. Restart the recording(Normal Recording)
Automatically control recording level to average sound level by
detecting average sound level with ALC(Automatic Level Control)
High technology. This is proper for the recoding in conference room or
meeting room, so that all recorded sound may be in similar level
despite of distance from original sound source.
Low
Recording at original sound level.
This is proper for the recording in near area from the sound source.
Resume Recording (Time Machine Recording)
When the recording restarts after pausing, first, replay a previous file for
30seconds and then record from the end of the paused point. This is good for
making sure what the content was in previous recoding.
Ask restarting the
recording in normal or
resume with RES on
the display when
pressing REC again.
Restart the recording
immediately just after a
previous paused point by
pressing REC .
Stop recording by
pressing
.
RED LED blinking.
B-2. Restart the recording(Resume Recording)
Setup
M with long key => Move to RES by
or
On by
or “ and then select On by
=> press
.
=> Move to
How to operate
A. Record and then Pause
Ask restarting the
recording in normal or
resume with RES on
the display when
pressing REC again.
RED LED blinking.
Start Recording with
RED LED On by
pressing REC/PAUSE .
28
Keep Recording.
RED LED is keeping On.
Press Pause .
Recorded time and RED
LED are blinking.
With
, play a
previous recorded contents
in 30sec before the paused
point and after 30sec of
playback, restart recording
from the paused point(RED
LED On again).
Stop the recording by
pressing
.
ARS(Auto Recording System)
This is the feature to start recording automatically by recognizing sound and if
no sound, pause( or Stop) recording. According to sound or no sound, repeatedly
record and pause(or Stop).
With this feature, memory space, battery time can be saved by stopping or
pausing.
SECU(Security Recording)
While recording, LCD display & Red LED disappear, so that the others can t
recognize it is recording. Additionally, it can save battery life as well.
Press
in security recording. REC displayed.
29
Voice Recording thru Telephone adaptor(Optional Accessory)
Key operation while recording in security mode.
Press M with long key for setup.
- AUD: Recording thru Audio-in(Refer to
Encoding Mode)
Start recording with disappearing
of LCD & LED blinking.
- Tel: Recording thru Telephone adaptor
- EMIC: Recording thru Ext. Mic
- MO: Mono Mic in Ext. mic
- St: Stereo Mic in Ext. mic
Pause recording.
Restart recording without no LCD
display & LED.
Change Input sensitivity.
If pressing
with long key,
REC is in blinking until pressing
with long key, but without
LED blinking.
Stop recording and display
appears.
Whenever pressing this button,
new file is created.
Press
with long key => Move to Adv by
or
=> Press
=> Select ON and then press
to SECU => Press
(3) Various Recording Methods
=> Move
Recording FM Radio(Optional Feature)
Refer to # 3. recording in Quick Start Guide on page of ~ about setup & how
to operate.
Voice Recording thru Internal Mic.(Factory default)
Voice Recording thru External Mic.
2. Encoding Mode(EN Folder)
This is for creating music file(s) in PCM or MP3 format, which
is recorded in connection of external audio device such as
MP3 player, audio component or CD, etc. and FM Radio.
A created file is automatically stored at EN folder.
30
31
A created file in this mode is in stereo & higher(or equal) quality than a file
recorded thru internal mic.
Format
PCM
HQ
SP
LP
Rec. Rate
44.1kHz/16bit
128 Kbps
96 Kbps
64 Kbps
Rec. Time(1GB)
1.5 hrs
17.4 hrs
23.2 hrs
34.8 hrs
PCM: Stereo
HQ, SP & LP: MP3 format & stereo
STOP Mode
Press REC button on the voice recorder and then play another audio player.
Stop or pause Audio Player and then stop or pause the voice recorder.
If Sync Time(Refer to the setup of Advance ) & ARS are set up in advance,
automatically create each audio file by detecting the end & start of the file.
In case of recording FM Radio, All operations & setup procedures are in same as
Voice recording excepting recording format & quality. Please refer to #1. Voice
Mode.
All operations & setup procedures in STOP are in same as Voice Mode.
PLAY
All operations & setup procedures in PLAY are in same as Voice Mode.
Record Mode
(4) Preparation of recording
3. MP3 (MP3 Folder)
Connection & Setup
Select Audio-in
Press M =>Move to Line by
or
or
=> Press
Move to Line by
This folder is only for downloading files from the PC, so user may
find out MP3 files easily to play back.
=> Press
=>
Before operating, we recommend to set up a recording format & quality (PCM
or MP3), ARS Mode, Sync. Time and Resume recording(RES) All operations &
setup procedures in REC. are same as doing in Voice Mode.
How to operate
Connect with line-in cable to earphone jack on another audio player and to
external mic. jack on the voice recorder.
STOP Mode
All operations & setup procedures in STOP are in same as Voice Mode. Please refer
to #1. Voice Mode.
PLAY
All operations & setup procedures in PLAY are in same as Voice Mode excepting
setting up EQ as below. Please refer to #1. Voice Mode.
32
33
Functions & Operation in Menu
4. FM(FM Radio Reception) (Optional Feature)
This is not a folder like A, B, C, D, EN or MP3, but one of main features to listen to
radio program.
(1) FM Radio
Plug external FM antenna or earphone to earphone jack on the top of the device.
Move to FM by M .
Select a desired radio station by
or
.
or
with short key: Increasing or decreasing frequency by a frequency step.
or
with long key: Automatically searching radio station.
1. Mode
This menu is for selection of recording quality(PCM, HQ, SP or LP) in the recording.
1) Recording format & quality
Voice Mode(A/B/C/D)
Format
PCM
44.1kHz/16bit
HQ
SP
LP
64Kbps
32Kbps
16Kbps
Input method(mono/default): Int. Mic, Ext. Mic, Telephone Adaptor
If using Stereo Mic, recording time of PCM will be in half than mono mic
recording.
However, recording time of HQ, SP, LP will be in same as mono recording.
Encoding Mode(EN)
=> Move
(3) Preset
10 radio stations can be preset in advance.
Press
with long key at a desired radio station to preset.
If so, preset no.01 will be in blinking with displaying a current preset radio station
at #01.
or
and then select by
.
Move to a desired preset # by
If going to a preset radio station, press
with short key and then move to
a desired preset #.
34
In addition, user may enjoy enhanced file editing features on the voice recorder
itself without special editing program on the PC.
Rec. Rate
(2) Selecting band
User can select the band. USA, EU or JAPAN.
- USA: 87.5MHz-108.0MHz(100 step)
- EU: 87.5MHz-108.0MHz( 50step)
- Japan: 76.0MHz-108.0MHz( 100step)
While listening to Radio, Press M with long key. => FM => Press
to a desired band by
or
=> Select Band by pressing
In this section, user can learn more detail of setup for each mode(Voice, Encoding,
MP3 and FM) and the voice recorder thru Menu(Press M button with long key.)
Format
PCM
HQ
SP
LP
Rec. Rate
44.1kHz/16bit
128Kbps
96Kbps
64Kbps
Input method(Stereo/default): Audio-in cable
2) Operation
Mode => Press
=> A current format(PCM, HQ, SP or LP) is blinking => Move
to a desired format by
or
=> Press
for selection => Press
to
complete setup.
35
2. LINE
(7) ARS(Automatic Recording System)
This menu is for selection of input method(Audio-in, Telephone adaptor, Ext. Mic).
Default input method is internal mic., so if there is no connection of external input
method in spite that one of those methods is selected, recording quality is in mono
thru int. mic.
This is the feature to start recording automatically by recognizing sound and if no
sound, pause( or Stop) the recording. According to sound or no sound, repeatedly
record and pause(or Stop). With this feature, memory space, battery time can be
saved by stopping or pausing.
If each external input method is connected, proper option must be selected for
better recording quality in this menu.
The ARS functionality works in voice recording as well as Line-in recording.(external
Audio device thru Line-in cable)
1) ARS Mode
OFF
A MODE
1) Operation
Line => Press
=> Move to a connected ext. input method by
or
=>
for selection => Press
to complete setup(If selecting EMIC Press
Press
and then select mono or stereo by
or
).
Pause the recording if
there is no sound for a
certain time and then
restart the recording if
sound comes again.
Each recorded contents is
recorded into one file.
Each recorded contents is
created into each individual file
name.
No sound detection interval can be set up at Sync.
B MODE
3. SENS(Input Sensitivity)
2) Operation
This menu is to set up an input recording sensitivity in internal mic, external mic or
telephone adaptor.
=> Press
Press M => Move to ARS => Press
desired option(ARS Off -> ARS -> ARS-B -> ARS off
pressing
=> Complete setup by pressing
.
1) Input Sensitivity Level
High: Automatically control recording level to average sound level by detecting
average sound level thru ALC(Automatic Level Control) technology. Input
sensitivity is higher than the others.
Low: Recording at original sound level.
=> Move to a desired Sensitivity(High, Low) by
SENS => Press
Press
for selection => Press
to complete setup.
or
until displaying a
) => Select a desired ARS by
While setting, each option(ARS or ARS-B) is in blinking, but if completing setup,
a selected option is displayed without blinking.
5. RES(Resume Recording)
2) Operation
or
=>
When the recording restarts after pausing, first, replay a previous file for 30seconds
and then record from the end of the paused point. This is good for making sure
what the content was in previous recoding.
If resume recording is set up, whenever pressing REC button it always proceeds
in resume recording steps, so it may interrupt prompt recording in a urgent case,
so we recommend to set it off after completing the recording in this mode.
For more detail, please refer to
in Each Folder
36
Simply Record & Stop by REC
& Stop button.
ARS Off
Resume Recording in Functions & Operation
37
6. Play
8.TIME
In this menu, Date, the features related to time can be set up in this menu such as
Time, Alarm & Timer recorder.
1) Set(Date & Time setup)
Initially, time & date on the recorder is 00:00:00 & 08:01:01, so it is necessary to set
up current time & date for stamping an exact record on a recorded file and
operating Alarm & Timer recorder proper.
1) Rep(Repeat)
Play a selected file and then STOP
For more detail, please refer to 7. Time & Date setup in Quick Start Guide on
the page.
Play a selected file repeatedly.
Play all files one time and then STOP
2) ARM(Alarm)
Play all files repeatedly
Ring a cricket sound at a certain time or date to be set up based on one of below
options.
Play in Shuffle
2) EQ(Equalizer)
Setup EQ
While playing a file, EQ can be changeable by REC/PAUSE with short key.
NORMAL->ROCK->POP->CLASSIC->JAZZ
If Alarm is set up, on the display,
shows up.
tIME(Time) : Alarm 15, 30, 45 or 60 minute later from the current time.
dLY(Daily) : Alarm at a specific time daily.
WLY(Weekly) : Alarm at a specific time on a Monday-Saturday or Monday- Friday
or weekday.
dAtE(Date) : Alarm at a specific time and date.
EQ can be set up at Menu as well.
M with long key=> Move to Play by
or
=> Press
=>Move to EQ by
or
=> Press
=> Select a desired EQ(Normal->Rock->Pop->Classic=>
for competing setup.
>Jazz) then Press
7. MEN(Memory)
Internal memory or external memory can be selected in this mode.
Internal memory: Built-in flash memory
External memory: micro SD card
For more detail, please refer to 6. Storage in Quick Start Guide on the page.
38
39
When it alarms,
is blinking until making it stopped by pressing
.
3) tMR(Timer Recording)
Start recording at specific time period(set up starting and ending point) today, a
weekday, weekly(Monday-Saturday or Monday-Friday) or a specific date.
If timer is set up, there is
on the display.
10 Timers are available to set up.
9. FILE
In this menu, user can manage files to copy, move or erase from internal memory to
external memory or in reverse.
1) COPY
Copy a current selected file to another memory storage(Internal or External
memory).
Internal memory -> External memory or External memory -> Internal memory
A selected file is copied into same directory in the targeted storage.
When selected Yes , the targeted storage will be in blinking. While copying, it
shows how much copy is in proceeding.
Only one file can be copied at a time.
If the ending time or date is same as the starting time or date, SUPt NO
message shows up and then goes back to the starting display of the time set.
In case of Timer is overlapped with the others in time, the fastest timer at
starting time is in priority and the others won t work.
Even if the recorder is in power off, it powers on and starts recording at the time
to set up.
2) MOVE
Move a current selected file to another memory storage(Internal or External
memory).
Internal memory -> External memory or External memory -> Internal memory
A selected file is moved into same directory in the targeted storage.
After ending the recording at the ending time to set up, it stops recording
automatically.
If necessary to power off automatically after Timer recording, set up Auto Power
Off.
40
When selected Yes , the targeted storage will be in blinking. While moving, it
shows how much move is in proceeding.
Only one file can be moved at a time.
After completing move, file number(index) will be decreased by one.
41
3) ERS (Erase)
2) POFF(Automatic Power Off)
Erase unnecessary file(s) to save memory storage.
ONE: A selected file is erased.
ALL: All files in the current folder are erased.
This is a setup to power off automatically after passing a certain time (30minute,
1hour, 1 and half hour, 2hours or Off) by compulsion.
The function is applicable at any mode.(Stop, Play, Rec. or FM)
It is not necessary to revert the setup to Off after execution. Only one time is
applicable after setup and automatically it reverts to Off.
3) INFO(Memory Information)
To avoid erasing undesired file(s) by mistake, before erasing, a file and folder
must be checked whether it is desired file or folder.
Show up information about a current selected memory.
Total memory capacity(MEM) & Remain Free Space(REM)
10. SYS(System)
1) SLEP(Sleep Timer)
This is a setup for saving battery power if there is no operation for a certain
time(OFF, 3, 5, 7, 10minutes)
The function is only applicable at STOP mode.
It is possible to go to the next step by either
or
or
.
4) SOFt(Firmware Version)
Show up the firmware version.
It should be off if it is not necessary.
5) dEFt(Default)
Revert all set values to factory default values.
42
43
6) FMt(Format)
Any set value in this mode is retrieved to factory default when turn-off.
Format a selected memory storage.
Before formatting,
Check whether the selected memory storage is correct to be formatted.
Back up the datum to other storage, all datum in the storage will be removed
and not be able to recover if formatting.
1) EdIt(File Editing)
It is possible to edit a recorded file in the voice recorder just after recording.
Voice file(in A/B/C/D) & Encoding file(in EN) are applicable.
Please back up an original file befor editing to prevent the file from damage or
modification.
While editing, do not remove micro SD card or power off not to make any
damage to the file.
Cut(Cut)
Divide a file into 2 files.
7) BEEP(Beep Sound)
Set up sound On or Off when pressing button. Each button has different sound to
recognize operation easily for a handicapped person or operating under any
though environment not to take a look at the display.
11. AdV(Advanced Functions)
With this menu, user may perform an
advanced task rather than doing with
normal voice recorder.
44
45
COMb(Combine)
Combine 2 files into 1file.
Add
Add new recording at the end of the current selected file.
Even if 2nd file is combined to 1st file, 1st original file is remained in original file
in the same folder.
To combine 2 files into 1 file, both file must be in same bit rate & format.
OVEr(Overwriting)
New recording content overwrites a current selected file from a paused point.
The rest of contents in the selected file will be removed by overwriting new
contents.
2) VLC(Voice Level Control)
In case of recording thru int. mic, ext. mic and telephone adaptor, recording
volume can be adjustable at this function.
It should be set up before recording.
3) LLC(Line Level Control)
In case of recording thru line-in, recording volume can be adjustable at this
function.
46
47
Upgrading Firmware
4) Sync
It is for detecting time in no sound interval when creating new track in recording
thru int. mic, ext. mic, telephone adaptor & line-in.
Default time in no sound is 3seconds.(1,2,3,4,5 seconds)
When recording in ARS, it should be set up before starting the recording to detect
no sound interval.
By upgrading the firmware, the user can improve performance of the voice
recorder and correct errors in the recorder.
The user can download free firmware upgrade files from the web site of Diasonic
Technology or an indicated website.
How to upgrade
Access to the website and check the latest firmware version.
Download the firmware to PC (or voice recorder if it is connected).
Copy the firmware to root directory in the voice recorder.
5) SECU(Security Recording)
While recording, LCD display & Red LED disappear, so that the others can t
recognize it is recording. Additionally, it can save battery life as well.
Disconnect USB cable.
Power off(If the battery remains in the voice recorder.) and On again.
The latest firmware is upgraded automatically.
Check the firmware version. (Press M with long key=>Sys=>SOFt)
Before upgrading the firmware, we recommend to back up the data in the voice
recorder.
48
49
Management of Folder & File
Trouble Shooting
If connecting the voice recorder to PC, it is automatically recognized as USB Mess
Storage Device . Music and Reorder folders will be created if any other folder is not
created. User can transfer a music file(s) and store any data file from the PC as well
as making, reading, writing, removing file or folder or formatting.
When a breakdown is suspected, please check the following:
1. Folder
Symptom
The power is off.
The player suddenly
stops.
(1) Music Folder
Music file can store as many as the memory space is available, but 999 files can be
displayed on the LCD. The stored file can be played at MP3 folder.
Voice Folder(A/B/C/D)
Recording is not
made.
Each folder can create 256files and if the file number is over than 256 files, it is
stored to the next folder automatically.
Encode Folder
File Index
Date
Time
Recording format
Voice File
VA
000
000000
000000
PCM(or MP3)
Audio File
VL
000
000000
000000
PCM(or MP3)
FM File
VF
000
000000
000000
PCM(or MP3)
Ex) VA001_080712_081223.PCM
Recording file thru Voice recorder_2008/July/12_08:12:23.PCM format
Replace the battery.
Check the battery Polarity.
Check the polarity of the battery.
Remove the battery.
Insert the battery again.
Correctly connect the adapter to
the outlet.
Connect the adapter to an outlet
with designated voltage.
Check if DC port is correctly
connected.
Correctly connect the DC port to
the outlet.
Check if the hold switch is in On
position.
Move the hold switch to Off
switch.
Check if there are already 256
recorded files in each folder.
Delete unnecessary files after
back-up.
Check the remaining memory
capacity.
Delete unnecessary files.
Recording from an
external microphone
is not made.
Check if EMIC is set up at Line-in
menu.
EMIC should be selected.
Check whether the external
microphone is mono or stereo.
Set proper the external
microphone type.
Recording from an
external device is not
made.
Check if Audio is set up at Line-in
menu.
Audio should be selected.
Recording from a
telephone or mobile
phone is not made.
Check if TEL is set up at Line-in.
TEL should be selected.
The ARS does not
function.
Check if the ARS is set Yes in the
menu.
Set the ARS Yes.
When the audio volume is to low,
the audio will not be recorded.
Move the internal or external
microphones close to the
recorder.
2. File Format
Folder(Mode)
Check the battery state.
Check the remaining battery state. Replace the battery.
The file recorded from FM radio and External devices is stored at this folder.
256 files can be created.
Trouble Shooting
Move the hold switch to Off .
The adapter does not Check if the adapter is correctly
connected to the outlet.
function.
Check if the suitable input power
is supplied.
(2) Recorder Folder
Recording file is stored at this folder and A, B, C, D & Encode folder are
automatically created as a subfolder according to recording to A, B, C, D & Encode.
Check Point
Check if the hold switch is On.
Increase the volume of the
external device.
The player does not
play the audio.
50
Check if there is a recording file or Check the number of files in the
current mode.
music file.
51
General Specification
Check Point
Trouble Shooting
MODEL
Linear PCM Voice Recorder
The speakers do not
generate sound.
Check whether the earphones are
connected.
Disconnect the earphones.
MP3 bit rate
16,24,32,44.1,48KHz(16-320KBPS)
WMA bit rate
48KHz(10-320KBPS), 44.1KHz(10-320KBPS)
The earphones do
not generate sound.
Check whether the earphones are
connected.
Connect the earphones.
Symptom
The player does not
receive radio
broadcasting.
Automatic
connection is not
made to the PC.
Files recorded in the
PC are not played.
The device and the earphones
function as antennas. Move the
device and earphones for better
reception.
Check if the USB cable is correctly
connected to the player.
Correctly connect the USB cable
to the player.
100dB
Distortion
Install Windows Media Player or
another player.
Music and Record
folder disappeared
on the PC
Over Entry q’ty
Remove unnecessary file on the
root directory.
“Full” “F” is
displayed.
Over the Max. file q’ty in current
folder
Remove unnecessary file in the
folder.
“Full” “D” is
displayed.
Full the memory capacity.
Remove unnecessary file or data.
The function does not work in a
current selected mode.
Change Mode.
Impossible to set up Timer or
Alarm time setup.
There is an overlapped time
setup.
File is not combined.
Both files are in different quality.
“NOSD”
Check if SD card is inserted.
Insert SD card properly.
“bAtt” “LO”
Check Battery Status(Low Battery)
Change Battery.
0.2
1.0%
Frequency
20Hz ~ 20KHz (-6dB)
Earphone Output
4mW
Speaker Output
300mW
MP3
Format
PCM
MP3
Mode
PCM
HQ
SP
LP
Quality
44.1K 16BIT
MONO
64KBPS MONO
32KBPS MONO
16KBPS MONO
Format
Mode
MP3
MP3
PCM
SP
PCM
HQ
44.1K 16BIT
128KBPS STEREO 96KBPS STEREO
STEREO
VOICE
Recording
Check if audio player is installed.
“SUPt” “NO”
52
The FM radio reception is poor in
the frequency shadow areas,
inside the building, in the subway,
and on a moving vehicle.
S/N ratio
Audio
Recording
Quality
FM Radio
Interface
PC
Interface
OS
MP3
MP3
LP
64KBPS STEREO
World wide : 87.5 ~ 108MHz/EU:87.5 ~ 108MHz/Japan wide : 76 ~
108MHz
USB 2.0
Windows ME, Windows 2000 , windows XP ,
Windows Vista, More than MAC OS X 10.2
AC/DC Adaptor
DC4.5/300mA
Battery
AAA Alkaline Battery(2pcs) 3V
Size
H 100 x W 31 x D 14
53
Warranty Card
Product Warranty
Warranty (Service Policy)
Free repair services will be provided in compliance with the free repair policy of
DIASONIC Technology. If a breakdown occurs during the warranty period, bring
the product with the warranty card to the sales agency or the service center of
DIASONIC Technology. Free repair service will be provided only when the
purchase date and the name of the sales agency appear on the warranty card.
Please check all information is written when purchasing the product from the
sale agency. The warranty card is not issued again, so we recommend you keep
it safe.
Product: Voice Recorder
Model: DDR-5300
Warranty Period: One Year
Purchase Date: ____ _______, _________
Name
Purchaser
Address
Telephone
(Free Repair Policy)
1. This product has passed strict quality control and inspection.
2. Breakdowns occurring under normal operating conditions described in the user
manual within the warranty period will be subject to free repair services.
3. For the following cases, some service fees will be charged:
1) When the customer fails to submit the warranty card
2) When information is missing in the warranty card purchase date or the
name of the sales agency
3) When the product is damaged or broken down due to user s mishandling
4) When the product is damaged or broken down due to user s repair or
remodeling
5) When the product is damaged or broken down due to fires, pollution,
earthquakes, and other natural disasters
6) When the product is damaged or broken down due to leakage of the battery
7) When the consumable parts such as a battery need to be replaced
4. This warranty card is valid only for the service in Korea.
Name
Seller
Address
Telephone
Please contact the sales agency or customer center of DIASONIC Technology Co.,
Ltd. for breakdown of the product.
Exchange, (charged or free) repair services, refund, and part-keeping periods
comply with regulations of the customer protection act.
For questions or more information about the product, contact the customer
center of DIASONIC Technology Co., Ltd.
Diasonic Technology Co., Ltd
Address: 321-43, Seoksu-dong, Manan-gu, Anyang-si, Gyeonggi-do (430-040), South Korea
(Request for Mailing)
Please beware of the following when sending the product by mail:
1. Please enclose the warranty card with the product when mailing during the
warranty period.
2. Please wrap in shock-absorbing materials and put the product in a box to
prevent damage during transportation. Mailing fees and wrapping costs are to
be born by customers.
3. To prevent loss, please send the product for repair services by registered mail.
54
The warranty card is only valid in Korea. Please keep this card for free repair services.
55
MEMO