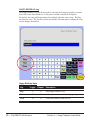
1
Poly TABLET
withPersona
ZYGO Industries, Inc.
PO Box 1008
Portland, OR 97207-1008, U.S.A.
TEL: +1 (503) 684-6006
FAX: +1 (503) 684-6011
U.S.A. / Canada : (800) 234-6006
E-mail: [email protected]
http://www.zygo-usa.com
A
TYPING —
SCANNING —
TALKING —
communication aid
OPERATION
MANUAL
070-0077-00
First Edition
First Printing:
22 FEB 2007
Published by:
ZYGO Industries, Inc.
PO Box 1008
Portland, OR 97207-1008, U.S.A.
TEL: (503) 684-6006
FAX: (503) 684-6011
E-mail: [email protected]
Web: http://www.zygo-usa.com
COPYRIGHT:
©2006 By ZYGO Industries, Inc.
OCT 2006
All rights reserved. No part of this publication may be reproduced
without prior permission of ZYGO Industries, Inc.
Trademark Notices:
The following are trademarks of ZYGO Industries, Inc.
ZYGO®
PolyTablet
Polyana
Persona
AbEx
SpEx
DECtalk is a trademark of Fonix Corporation.
Windows and Pocket Word are registered trademarks of
Microsoft Corporation.
Patent Notice:
Some characteristics of the scanning techniques used in Persona
are protected by U.S. Patent Number 4,558,315 issued to ZYGO
Industries, Inc.
NOTICE:
ZYGO Industries, Inc. reserves the right to make improvements or
changes in the product described in this manual at any time without
notice.
2 — PolyTABLET with Persona
Contents
Table of Contents ................................................................................. 3
INTRODUCTION
INCLUDED ITEMS .................................................................................... 7
REGISTRATION ........................................................................................ 7
ICON REFERENCE .................................................................................... 8
SECTION 1 GETTING STARTED
UNPACKING ............................................................................................ 9
DT RESEARCH COMPUTER ................................................................... 9
CONTROLS AND JACKS ....................................................................... 10
SOUND OUTPUT VOLUME CONTROL .................................................... 10
SECTION 2 USING THE POLYTABLET
POLYANA’S MEMORY RESOURCES ........................................................... 11
MEMORY DESCRIPTION ...................................................................... 11
MEMORY MANAGEMENT ..................................................................... 12
MEMORY CLEAR ................................................................................ 13
BATTERY INDICATORS ......................................................................... 14
BATTERY AND MEMORY INDICATORS (PREFERENCES) .............................. 15
SECTION 3 USING PERSONA IN KEYBOARD MODE
KEYBOARD MODE SCREEN LAYOUT ......................................................... 17
KEYBOARD COMMANDS .......................................................................... 18
EDIT ............................................................................................... 18
SELECTION ....................................................................................... 18
MOVEMENT ...................................................................................... 18
MISCELLANEOUS COMMANDS .............................................................. 19
MENUS ............................................................................................... 21
FILE ............................................................................................... 21
EXIT (THE PERSONA PROGRAM) ........................................................ 22
EDIT MENU ...................................................................................... 23
SPEAK BUTTON ................................................................................. 24
INSTANT SPEAK ................................................................................. 24
VOLUME (LOUDNESS) .................................................................... 25
STICKY KEYS INDICATOR ..................................................................... 26
SELECTION MODE ............................................................................. 27
USING PHRASES ................................................................................... 29
CREATING PHRASES ........................................................................... 30
CHANGING PHRASES .......................................................................... 31
DELETING PHRASES ........................................................................... 32
COPYING PHRASES ............................................................................ 32
Table of Contents
3
USING ABBREVIATION-EXPANSIONS (ABEX) .............................................. 33
CREATING ABEX ............................................................................... 33
CHANGING ABEX .............................................................................. 36
DELETING ABEX ............................................................................... 36
USING SPEECH EXCEPTIONS (SPEX) ....................................................... 37
CREATING SPEX ................................................................................ 37
CHANGING SPEX .............................................................................. 39
DELETING SPEX ............................................................................... 39
PRINTING ............................................................................................. 41
USING THE ON SCREEN KEYBOARD (OSK) ..................................................
SECTION 3 USING PERSONA IN SCAN MODE
SCAN MODE ....................................................................................... 43
SCREEN LAYOUT ................................................................................ 41
CONNECTING SWITCHES ..................................................................... 44
STANDARD KEYBOARDS ....................................................................... 45
OPTIMIZED (FREQUENCY OF USE) ................................................... 45
ALPHABETICAL (A E I O U) ........................................................... 46
QWERTY ................................................................................... 47
KEY DESCRIPTIONS ............................................................................... 49
OFF KEY ........................................................................................ 52
VOLUME (LOUDNESS) ............................................................................ 55
SELECTION MODES ............................................................................... 57
USER SCAN ADJUST MODE .................................................................... 59
OPENING AND SAVING DOCUMENTS ......................................................... 61
PHRASES .............................................................................................. 63
ABBREVIATION-EXPANSIONS (ABEX) ........................................................ 65
SPEECH EXCEPTIONS (SPEX).................................................................. 67
LIST BOXES .......................................................................................... 69
HAPPY BIRTHDAY SONG ......................................................................... 70
PRINTING ............................................................................................. 71
KEYBOARD COMMANDS .......................................................................... 73
SECTION 5 PREFERENCES
RESTORE FACTORY DEFAULTS ................................................................. 75
INPUT OPTIONS .................................................................................... 76
INPUT OPTIONS—KEYBOARD MODE ........................................................ 76
ON-SCREEN KEYBOARD (OSK) ........................................................... 76
INPUT OPTIONS—SCAN MODE ............................................................... 76
CUSTOMIZING ON-SCREEN KEYBOARDS ................................................. 77
[KEY CAPTIONS] TAB ....................................................................... 78
4 — PolyTABLET with Persona
SCAN COLOR .................................................................................... 80
SCANNING METHODS ......................................................................... 80
SCAN ACCEPTANCE STYLES ................................................................. 81
SCAN TIMING .................................................................................... 81
START DELAY ................................................................................ 81
SCAN RATE ................................................................................... 81
ACCEPTANCE DELAY ....................................................................... 81
ADVANCED SCAN OPTIONS ..................................................................... 82
LONG HOLD ..................................................................................... 83
ALARM ........................................................................................ 83
ADJUST SCAN RATE ....................................................................... 83
DISABLE ....................................................................................... 83
HOLD TIME .................................................................................. 83
AUTO OFF ....................................................................................... 84
AUDITORY PROMPT ............................................................................ 84
ENABLED ...................................................................................... 85
EARPHONE .................................................................................... 85
LOUDNESS .................................................................................... 85
SPEECH OPTIONS .................................................................................. 87
VOICE SETTINGS ............................................................................... 87
AUTO-SPEAK .................................................................................... 88
GENERAL OPTIONS ................................................................................ 89
AUTO FUNCTIONS ............................................................................. 89
WORD PREDICTION AND WORD COMPLETION ....................................... 90
WORD PREDICTION / WORD COMPLETION FEATURES ............................ 91
UTILITY ........................................................................................ 92
BACKUP/RESTORE .......................................................................... 92
PRINT SETUP ................................................................................ 93
PRINT TO USB FLASH DRIVE ...................................................... 93
PRINT TO COMPACT FLASH CARD ................................................. 93
CUSTOM PRINTING ..................................................................... 93
APPEARANCE OPTIONS ........................................................................... 95
SECTION 6 SOFTWARE UPGRADES
UPGRADING PERSONA FROM A COMPACT FLASH (CF) CARD ..................... 97
SECTION 7 SOLVING PROBLEMS
REINSTALLING PERSONA ........................................................................ 99
TROUBLE SHOOTING ............................................................................ 101
ERROR MESSAGES ........................................................................... 101
RESETTING THE POLYTABLET ........................................................... 102
SECTION 8
MAINTENANCE
Table of Contents
5
6 — PolyTABLET with Persona
IMPORTANT:
READ THIS FIRST
The PolyTABLET with Persona is shipped from ZYGO Industries, Inc. complete with
the following items:
• PolyTABLET >DT Research Computer modified by ZYGO
• Includes:
> Persona Software, installed
> AC Adapter/Battery Charger
•
•
•
•
CM-40 Lolly Switch with Cable
Slip on Pouch
Accessory Pouch
Mini-Keyboard
262-0540-00
016-0027-00
016-0021-00
018-0078-00
• 061-0010-04
• 070-0077-00
ZYGO’s Warranty Registration Card
PolyTABLET with Persona Operation Manual
Optional accessories and replacement parts are available from ZYGO Industries, Inc.
To assure full warranty of the ZYGO PolyTABLET with Persona, please review the
ZYGO WARRANTY REGISTRATION CARD procedures and return the mail-back
section to ZYGO Industries, Inc. TODAY!
Introduction
7
ICON REFERENCE
The following icons may appear on the Polyana’s labels.
Icon
Meaning
Indicates that the units bearing this mark have met the European Community’s
Declaration of Conformity.
Indicates that the units bearing this mark meet the Medical Device Directives for
electrical equipment.
Indicates a CAUTION to a General Hazard condition.
Indicates that the port is NOT to be used for telephones.
Notation for a data port such as an RS-232C Serial Communications connector.
Notation for Direct Current (DC).
Indicates an item that can, and should be recycled.
Power Switch to ON position.
Power Switch to OFF position.
The following icons appear in this manual.
Icon
Meaning
!
,
*
Indicates a notation about a CAUTIOUS situation.
8 — PolyTABLET with Persona
Indicates IMPORTANT information that should be read and understood.
Unpacking
DT Research Tablet Computer
The PolyTABLET is a DT Research tablet computer that has been modified to function
as an augmentative communication device. The modification consists of the addition of
an amplifier package behind the unit. In most respects, the characteristics of the tablet
computer are intact.
The PolyTABLET is shipped from ZYGO Industries, Inc. with the battery installed and
fully charged.
For assistance, consult ZYGO’s Customer Service Department or your local dealer or
agent.
ZYGO CUSTOMER SERVICE
Toll Free (U.S.A./Canada):
TEL:
FAX:
E-mail:
(800) 234-6006
+1 (503) 684-6006
+1 (503) 684-6011
[email protected]
Section 1 — Getting Started
9
Controls and Jacks
Sound Output Volume Control
PolyTABLET’s amplifier module has a slider volume control. The slider volume control
is the standard mechanical volume adjustment. Slide the control to the left to increase
loudness, or slide it to the right for decreased loudness.
Reset Button
Storage Card
Scan Switch
Reset Button
USB Port
Scan Switch
Jack
10 — PolyTABLET with Persona
Volume Control
Earphone Jack
External Speaker
Jack
PolyTABLET’s Memory Resources
PolyTABLET is the name given to the physical package that includes the tablet computer
and the amplifier module.
Memory Description
PolyTABLET is a Windows CE device. Windows CE devices have limited amounts of
internal memory available for storing and running programs.
There are 2 types of memory used in the PolyTABLET:
RAM (Dynamic Memory) The PolyTABLETcomes with 128 MB of battery-backed
memory, which means if the battery is allowed to drain completely, the contents of this
memory will be lost.
Flash (Flash Disk) There is 10.5 MB of Flash memory in the PolyTABLET. Unlike the
RAM, this memory does not lose it’s contents when the battery is depleted. You can add
more Flash memory by purchasing Compact Flash (CF) cards.
Please know that Persona program files are stored on the Flash memory in the folder
“\Internal Storage\Persona Backup”.
Section 2 — Using the PolyTABLET 11
Memory Management
The PolyTABLETships with 128 MB of internal System RAM. This memory is used for
program storage space and is used by programs that are running. At least 40 MB should
be reserved for use with Persona in order for it to function properly.
Adjust the slider so the allocated Program Memory is at least 40,000 KB (40 MB).
If you intend to install other software applications onto the PolyTABLET, try installing
them to an external CF card instead of “Program Files.” “Program Files” is part of the
dynamic RAM that the operating system and Persona uses.
If the dynamic RAM is allowed to become full, there will be no more room to add new
applications, and the loss of memory space could adversely impact the performance of
Persona. should the memory become full, files will need to be removed.
• Clear the Recycle Bin.
• Use the Settings/Control Panel/Remove Programs to remove unwanted
programs.
• If you are knowledgeable, use the Windows Explorer to look for programs and
files that can be removed. If you are unsure of the process, call ZYGO’s
Customer Service or your local dealer for help.
Please ensure there are no other programs running prior to starting Persona or while
Persona is running. If other programs are running, Persona’s performance may be
degraded.
To see if other programs are running, press Alt+Tab to bring up the Task Manager. Press
End Task to close everything except for Persona.
12 — PolyTABLET with Persona
Memory Clear
If Persona is left running for a long period of time (weeks or months) without being
exited from, there is a chance of it running out of memory and not performing properly.
In such instances, Persona will force an exit and restart of the program. By doing so, the
memory resources are restored.
If Persona needs to do a memory clear, a message box, like to one shown above, will be
displayed. Tap the OK button to continue. The current document will automatically be
backed up and restored when Persona restarts. As Persona exits, you will be given an
opportunity to save learned prediction words.
Refer to Memory Management in this Section for information about increasing the
available memory.
Section 2 — Using the PolyTABLET 13
Battery Indicator (Keyboard and Scan modes)
The Battery Indicator shows the remaining charge of the battery. When it drops to about
20% capacity, the system will post messages about it being time to recharge the device.
Battery Indicator
Keyboard Mode
Battery Indicator
Scan Mode
14 — PolyTABLET with Persona
Battery and Memory Indicators (Preferences)
This Battery Indicator is functionally the same as the ones in Scan and Keyboard modes,
except that it shows the value in text.
The Memory Indicator shows how much System RAM is being used while Persona is
running. The ideal value should be less than 70% in order for Persona to have enough
memory resources. If the number is greater than 70% then you should adjust the Memory
Slider in the Control Panel/System Properties. Move the slider to the left to make more
room for Persona while it is running.
NOTE:
If other applications are running at the same time as Persona, please end
them. This will free up memory and may improve the performance of
Persona.
Memory and
Battery Indicators
in
Preferences
Section 2 — Using the PolyTABLET 15
16 — PolyTABLET with Persona
Keyboard Mode
Keyboard Mode Screen Layout
Phrase Button
SpeakButton
File & Edit
Menus
Instant Speak
Button
Battery Indicator
Volume Control
Sticky Keys
Indicator
Selection Mode
Indicator
Number Mode
On/Off
______________
Word Prediction/
Word Completion
List
___________
Main Text Box
______________
On-screen
Keyboard View
Section 3 — Using Persona in Keyboard Mode 17
KEYBOARD COMMANDS
*
NOTE: If Persona is already in Scan Mode and needs to be changed to Keyboard Mode,
press Ctrl + P at the same time, and release to enter Preferences. Select
Keyboard from the Input Mode choices.
All commands are accessible through the keyboard. The display does not need to be
touched. Use the Tab key to move to each button, or the Alt key to access the menus.
EDIT
Ctrl
Ctrl
Ctrl
Ctrl
+
+
+
+
C
X
V
U
=
=
=
=
Ctrl +
A
+ Del
SELECTION
Ctrl + L
Ctrl + W
Ctrl + S
Ctrl + P
Ctrl + A
=
=
=
=
=
Copy selected text
Cut selected text
Paste copied text at caret position
Undo, redo (press once to undo, press again to redo)
= Clear text box
Letter
Word
Sentence
Paragraph
All
Letters, Words, Sentences and Paragraphs can be highlighted. Use the Arrow keys to
move the highlight around the text.
Toggle the Selection modes on or off by consecutive presses of the Control key
combinations.
Note: When ALL is selected, pressing the Delete key will clear the text box.
MOVEMENT
Left Arrow
Right Arrow
Up/Down Arrows
= Move caret left in increments determined by selection
keys. When Selection mode is inactive, the default
increment is letter.
= Move caret right in increments determined by selection
keys. When Selection mode is inactive, the default
increment is letter.
= Move caret to the next line above or below
Ctrl + Tab
= Tab in text box
Ctrl + B
= Move Caret to Beginning of document
Ctrl + E
= Move Caret to End of document
18 — PolyTABLET with Persona
MISCELLANEOUS COMMANDS
Alt = File/Edit Menu
Esc = Speak (while text box or AbEx, SpEx, Phrase list box has focus)
Esc = Stop speaking (while speaking)
Esc = Return to text box (when focus is not in a text box), escape from
dialog boxes
Shift + Esc = Spell highlighted text
Tab = move the focus from control to control
Shift + Tab = reverses the focus direction
Number Keys 1 - 6 select words from the Word Prediction/Word Completion list when
Word Prediction is enabled, there is a word associated with a number, and the “Numbers
Select” checkbox is checked. If no word is associated with a number, or Word Prediction
is disabled, or the “Numbers Select” checkbox is unchecked, then numbers will be entered
into the text.
Without
Numbers Select
With
Numbers Select
Section 3 — Using Persona in Keyboard Mode 19
Space Bar, when the caret is not in a text box, the Space Bar selects or toggles the values
of most controls such as command buttons and list boxes.
Ctrl + N
= Enable or disable the use of number keys for selecting Word
Prediction words.
Ctrl + K
= Show keyboard commands
Ctrl + T
= Show current time and date
Ctrl + O
= Sing Happy Birthday song
The Happy Birthday song is accessed by pressing the Ctrl key
and the O key at the same time. If a person’s name is already in the
Speech Exceptions, the name will be pronounced accordingly when
the song is sung.
20 — PolyTABLET with Persona
MENUS
There are 2 drop-down menus on the display, File and Edit. Press the Alt key (or touch
the File button on the display) to open the File Menu. Then use the right-arrow key (or
touch the Edit button on the display) to open the Edit Menu. Use the arrow keys to
navigate through the menu items, or use direct touch to the display.
File Menu
New
Starts a new document. You should save your current document first (if wanted) because
the text will be replaced. However, the action can be undone by selecting Undo
immediately following the creation of a new document.
Open
Opens a saved document.
Save
Saves the current document to the “Persona Documents” folder located on the internal
“Flash Disk” memory. It is possible to choose a different location to save a document, but
the Backup/Restore function will only backup and restore documents to and from the
“Persona Documents” folder.
Section 3 — Using Persona in Keyboard Mode 21
Print
Prints the current document. Refer to Printing in this Section and Printer Setup in the
Preferences Section for more details.
Preferences
Go to Preferences to make changes to the settings or to go to Scan mode.
Help
Go to Keyboard help.
Exit
End and exit the Persona program.
*
NOTE: The File menu is disabled while in ISpk and when adding or changing
Phrases, AbEx, or SpEx.
22 — PolyTABLET with Persona
Edit Menu
Undo (Redo)
Undoes or Redoes the last word or action (Back Space, Cut, Delete, Paste, AbEx, Word
Prediction insert).
Cut
Removes the selected (highlighted) text and copies it to the Clipboard.
Copy
Copies the selected (highlighted) text to the Clipboard.
Paste
Inserts Clipboard text into text box at the caret position.
Clear
Clears all text within the textbox. This action can be immediately undone by selecting
Undo.
AbEx
Goes to Add Abbreviation Expansion screen.
SpEx
Goes to Add Speech Exception screen.
Section 3 — Using Persona in Keyboard Mode 23
Speak Button
Press the Speak button when you want to speak. Pressing the Esc key on the keyboard
produces the same results as the Speak button.
When the Speak button has been pressed (or when text is automatically spoken at the end
of a sentence or paragraph), the caption of the button changes to “Stop”. If you press the
button or the Esc key while the caption says Stop, Persona will stop speaking.
If there is no highlighted text when the Speak button is pressed, the sentence where the
text caret is located is spoken.
If a portion of text is highlighted, the highlighted portion of text is spoken.
If a portion of text is highlighted and the Shift key is engaged, the highlighted text is
spelled.
Instant Speak (ISpk)
Tap on the ISpk button to open Instant Speak. Instant Speak provides a communication
alternative for those occasions when the Main text box is being used for typing a
document. For example: You are writing a letter and someone enters the room and asks a
question. Instead of using the Main text box for your reply, you can use the Instant Speak
text box instead. What’s typed in Instant Speak cannot be saved except by copying and
pasting it to the Main text box first.
By default, the Instant Speak text box automatically clears the text when you begin a new
sentence. In order for this to work, the preceding sentence must end with a period,
exclamation point, question mark or Enter. This behavior is also available in the Main
text box when the Clear Text Box option is enabled (Preferences/General Options).
24 — PolyTABLET with Persona
VOLUME (Loudness)
The loudness of the voice can be adjusted by selecting the – or + buttons.
-
decreases the loudness
+
increases the loudness
When the value is set to 0 the speech output is disabled.
The Loudness buttons can be accessed in 2 ways.
1) Press the on-screen buttons with a finger or stylus
2) Use the Tab key to navigate to them. Once selected, use the Space key
to change values. The Space key can be held down to automatically
step through the values. Once the Space key is released, the focus is
automatically returned to the text box.
The Loudness settings are saved should you exit the program and return.
Remember, there is also a volume slide-control on the amplifier backpack of the
PolyTABLET. The settings shown above are affected by the position of the volume slide
control. Adjust both for optimum sound level.
Section 3 — Using Persona in Keyboard Mode 25
Sticky Keys Indicator
This indicator shows whether or not the Shift, Control or Caps keys are engaged. The
Caps key is technically not a StickyKey but it merits being displayed within the same
group.
When the StickyKeys option is enabled (Preferences/General Options), there are 3
possible states that the Shift and Ctrl keys can be in as represented by the StickyKeys
Indicator.
Normal, not active and has no
effect upon text being typed.
Momentarily active. It is only
active for the next key press
and then returns to the normal
state afterwards.
Locked and stays locked until
the next time that the Ctrl, Shift
or Caps key is pressed.
When the StickyKeys option is disabled, the StickyKeys Indicator still shows the status of
the Caps, Shift and Ctrl keys but only uses the black back color to indicate active and no
back color to indicate inactive.
26 — PolyTABLET with Persona
Selection Mode
The Selection Mode provides a flexible means of highlighting portions of text for the
purposes of speaking, copying or deleting, when used in conjunction with the arrow keys.
This is especially useful when you want to control the flow of spoken text, such as:
speaking sentence-by-sentence or paragraph-by-paragraph. Or, perhaps you want to
repeat a portion of text that someone did not understand.
Letters, Words, Sentences, Paragraphs and All can be highlighted with the use of the Ctrl
key plus letter (L, W, S, P, A) combination or by tapping on the selection indicators
shown on the display. .
Ctrl + L
Highlight letter (highlight each
character, space and
punctuation)
Ctrl + W
Highlight word (a word
boundary can be a space,
comma, period, exclamation
point, question mark, or Enter key)
Ctrl + S
Highlight sentence (a sentence
boundary can be a period,
exclamation point, question
mark or Enter key)
Ctrl + P
Highlight paragraph (a
paragraph boundary is the Enter
key)
Section 3 — Using Persona in Keyboard Mode 27
Ctrl + A
Highlight all
Selection Indicator
The Selection Indicator shows whether or not the Selection mode is active, and whether
the text is going to be highlighted by Letter, Word, Sentence, Paragraph or All. When the
Selection mode is active, use the arrow keys to move the highlight left, right, up or down.
To speak the highlighted text, press the Speak button or the Esc key. Similarly, to delete
the highlighted text, press the Del key. Or, select Cut/Copy/Paste from the Edit menu to
perform edit operations on the highlighted text.
To disengage the Selection mode, press the Ctrl key plus the letter (L, W, S, P, A) that is
highlighted in the Selection Indicator. For example:
Press the Ctrl and the L key to engage the select-by-letter mode.
Press the Ctrl and the L key again to disengage the selection mode.
The selection modes can be changed without having to first disengage Selection Mode.
Just press the Ctrl + letter combination to select the desired mode. Selection modes also
can be changed by tapping on the Selection Indicator.
28 — PolyTABLET with Persona
Using PHRASEs
Selected Phrase
List Separator
Phrase List
Add, Change, Delete,
Copy Phrase
__________
Find Window
Phrases are used for storing commonly spoken passages of text.
Select a phrase by choosing the Phrase button from the main screen. This opens the
Phrase List. Once the list is open, start by typing the first letter of the phrase. Notice the
list highlight moves to the alphabetical list separator that matches the letter just typed. If
there is a phrase in the alphabetical group, type the next letter of the phrase and the
highlight will move to the next matching phrase. Continue typing the first few letters of
the phrase until you reach the phrase you want to speak. Once the phrase is selected,
press the Space, Esc or Enter keys to speak the phrase.
The Find window is provided for additional visual feedback. It shows the letters that have
been typed. After the first letter, if the next letter(s) typed does not match an existing
phrase the letter will be rejected. Either type the correct next letter or press the
Backspace key to remove letters from the Find window.
Other keys that can be used to navigate the list are: arrow keys, PgUp, PgDn, Home and End.
Section 3 — Using Persona in Keyboard Mode 29
Creating a Phrase
Create a new phrase by choosing the Phrase button from the main screen. This opens the
Phrase List. Choose the New button to open the Add Phrase text box.
Type the phrase and then choose the Accept button when done, or choose Cancel if you
decide not to keep the new phrase. The Test button called Test is provided so you can
hear how the phrase will sound before deciding to keep it.
Each phrase can contain up to 250 characters.
30 — PolyTABLET with Persona
Changing a Phrase
Change a phrase by opening the Phrase List. Select the phrase you want to change
(alphabetical list separators cannot be changed). Choose the Change button to show the
Change Phrase text box.
The phrase needing to be changed will be shown in the text box. Make your changes and
choose Accept to keep the changes or choose Cancel if you change your mind.
Section 3 — Using Persona in Keyboard Mode 31
Deleting a Phrase
Delete a phrase by opening the Phrase List. Select the phrase that you want to delete
(alphabetical list separators cannot be deleted). Choose the Delete button or press the
Delete key to delete the selected phrase.
Copying a Phrase
A phrase can be copied and pasted into the main text or pasted into other text boxes such
as Add Phrase when you want to create a similar phrase.
Copy a phrase by opening the Phrase List. Select the phrase you want to copy
(alphabetical list separators cannot be copied). Choose the Copy button to copy the phrase
to the clipboard. Now go to the text box you want the phrase copied to and choose Paste
from the Edit menu or Ctrl + V from the keyboard.
32 — PolyTABLET with Persona
Using Abbreviation-Expansion (AbEx)
Abbreviation-Expansion significantly reduces the amount of typing required for
commonly typed passages of text. It can also be used to automatically capitalize proper
names.
As you’re typing and you want to use an existing AbEx, just type the abbreviation
followed by a space, comma, period, exclamation point, question mark, or Enter to see it
expand. When an AbEx is used, it is remembered and stored in the Word Prediction list
so that the next time that it is needed, it can be optionally selected from the Word
Prediction list.
Abbreviation as typed……and then……expanded when followed by a space, punctuation, or Enter
*
NOTE:
It is important not to use actual words for the abbreviation, the expansion
would occur whenever the word was typed for normal use.
Creating an Abbreviation-Expansion (AbEx)
Create a new AbEx by selecting the Edit menu and then choosing the AbEx menu item.
This will open the Add Abbreviation-Expansion text box.
Before opening the Add Abbreviation-Expansion as just described, consider the
following:
If you know what the abbreviation is going to be, type it in the Main
text box before opening the Add Abbreviation-Expansion text box, and
the abbreviation will automatically be pasted into the Abbreviation text
box.
If you just typed a passage of text that you feel should be saved as an
Abbreviation-Expansion, highlight it first and then open the Add
Abbreviation Expansion text box, and it will automatically be pasted
into the Expansion text box.
Section 3 — Using Persona in Keyboard Mode 33
Once the Add Abbreviation-Expansion text box is open, edit the text as desired and
choose the Accept button to keep the AbEx, or choose Close to cancel the operation.
The Abbreviation text box will only accept letters and numbers (so long as the number is
not the first character). The Expansion text box can accept up to 250 characters.
34 — PolyTABLET with Persona
If you want to modify an AbEx or view all of them, choose the Edit List button to open
the AbEx List.
Selected AbEx
Abbreviations
Expansions
Add, Change,
Delete AbEx
___________
Find Window
When the AbEx List is open, you can select an AbEx by typing the first letter of the
abbreviation. Notice that the list highlight moves to the first abbreviation that matches the
letter just typed. If there is more than one abbreviation that begins with the same letter,
then type the next few letters until the desired AbEx has been highlighted. Once
highlighted, choose the New, Change or Delete button. You can also press the Space, Esc
or Enter keys to speak the AbEx.
Section 3 — Using Persona in Keyboard Mode 35
The Find window is provided for additional visual feedback. It shows the letters that have
been typed. If the letter typed does not match an existing AbEx, the letter will be rejected.
Either type the correct letter or press the Backspace key to remove letters from the Find
window.
Other keys that can be used to navigate the list are: arrow keys, PgUp, PgDn, Home and
End.
Changing an Abbreviation-Expansion
Change an AbEx by selecting it from the AbEx list and then choosing the Change button
to open the Change Abbreviation text box. Make your changes and choose Accept to
keep the changes, or choose Cancel to disregard the changes.
Deleting an Abbreviation-Expansion
Delete an AbEx by selecting it from the AbEx list and then choose the Delete button or
press the Delete key to delete the selected AbEx.
36 — PolyTABLET with Persona
Section 3 — Using Polyana in Keyboard Mode
Using Speech-Exceptions (SpEx)
Speech Exceptions are created when you want to change how Persona pronounces certain
words, such as people’s names and places.
Creating a Speech-Exception (SpEx)
As you’re typing, if you want to change the way a word is pronounced, select the Edit
menu and choose the SpEx menu item to open the Add Speech Exception text box.
Before opening the Add Speech Exception text box as just described, consider the following:
If you want to change the word that was just typed, follow the steps
described above.
If you have gone past the word, move the text caret so that it is located
within the word before following the steps above.
Once the Add Speech Exception text box is open, edit the text and choose the Test button
to hear how the SpEx sounds. You will need to experiment with different spellings in
order to get the word to speak as desired. Once satisfied, choose the Accept button to
keep the SpEx, or choose Close to cancel the operation.
The Correct Spelling text box will only accept letters and numbers (so long as the number is
not the first character). The Correct Pronunciation text box can contain up to 50 characters.
Section 3 — Using Persona in Keyboard Mode 37
If you want to modify a SpEx, or view them all, choose the Edit List button to open the
SpEx List.
Selected SpEx
Correctly Spelled Words
Exceptions
Add, Change, Delete SpEx
__________
Find Window
When the SpEx List is open, select a SpEx by typing the first letter of the word as it is
correctly spelled. Notice that the list highlight moves to the first SpEx that matches the
letter just typed. If there is more than one SpEx that begins with the same letter, then type
the next few letters until the desired SpEx has been highlighted. Once highlighted, choose
the New, Change or Delete button. You can also press the Space, Esc or Enter keys to
speak the SpEx.
The Find window is provided for additional visual feedback. It shows the letters that have
been typed. If the letter typed does not match an existing SpEx, the letter will be rejected.
Either type the correct letter, or press the Backspace key to remove the letters from the
Find window.
Other keys that can be used to navigate the list are: arrow keys, PgUp, PgDn, Home and
End.
38 — PolyTABLET with Persona
Changing a Speech-Exception
Change a SpEx by selecting it from the SpEx list and then choose the Change button to
open the Change Speech Exception text box. Make your changes and choose the Test
button to hear how the changes sound. Once satisfied, choose Accept to keep the
changes, or choose Cancel to disregard the changes.
Deleting a Speech-Exception
Delete a SpEx by selecting it from the SpEx list and choose the Delete button, or press the
Delete key to delete the selected SpEx.
Section 3 — Using Persona in Keyboard Mode 39
40 — PolyTABLET with Persona
PRINTING
Persona features three (3) print options to choose from in Preferences/Print Setup.
Print to USB Flash Drive
This option allows a document to be saved to a USB Flash Drive. The drive is transferred
to a PC for printing.
Print to Compact Flash (CF) Card
This option allows a document to be saved to a Compact Flash (CF) Card. The CF card is
transferred to a PC for printing.
Custom
This option exposes all of the printer settings. It is up to the facilitator to determine the
correct settings for a particular printer.
Please make sure you have selected a printer from Print Setup in Preferences and that it is
set up and ready before printing.
For more information regarding printing, see Print Help in Preferences.
Section 3 — Using Persona in Keyboard Mode 41
This message will be displayed if there was an error.
Check to make sure that the printer is set up correctly, that there is enough paper and ink,
and that the printer and Polyana are less than 5 feet apart. Also, make sure that the
appropriate printer has been selected in Preferences.
42 — PolyTABLET with Persona
Scan Mode
Scan Mode Screen Layout
Battery Indicator
______________
Word Prediction/
Word Completion
List
*
Main Text Box
_________
Speak Key
_________
On-screen
Keyboard
Note: If Persona is already in Keyboard mode and you want to change to Scan Mode, select Preferences and
change the Input mode from Keyboard to Scan.
Section 4 — Using Persona in Scan Mode 43
Connecting Switches
Single switches are connected to the PolyTABLET through a mini-phone jack in the back
of the amplifier module.
Scan Switch
Reset Button
Scan Switch Jack
Earphone Jack
44 — PolyTABLET with Persona
Standard Keyboards
Optimized Keyboard—KB1
Persona ships with 3 standard on-screen
keyboard layouts: Optimized,
Alphabetical and Q W E R T Y.
Optimized, a frequency-of-use layout, is
the most efficient.
Each keyboard consists of 3 keyboard
layouts, KB1, KB2, and KB3. KB1 and
KB2 are the primary layouts providing
upper and lower case letters and
common editing commands. KB3 offers
numbers, special characters and system
functions.
Persona provides a Keyboard Edit
function to allow on-screen keyboards
to be customized.
Optimized Keyboard—KB2
Optimized Keyboard—KB3
Section 4 — Using Persona in Scan Mode 45
Notice that the Alphabetical keyboard
uses the versatile A E I O U layout in
the first column. It allows easy
verbalization of the rows and columns
by listeners. This is useful for direct
interaction without using the electronic
system.
Alphabetical Keyboard—KB1
Alphabetical Keyboard—KB2
Alphabetical Keyboard—KB3
46 — PolyTABLET with Persona
Although not as efficient as the
Optimized keyboard layout, the
Q W E R T Y layout is helpful for those
who have experience with computer
keyboards and are more comfortable
with it.
QWERTY Keyboard—KB1
QWERTY Keyboard—KB2
QWERTY Keyboard—KB3
Section 4 — Using Persona in Scan Mode 47
48 — PolyTABLET with Persona
KEY DESCRIPTIONS
Toggle = The key caption changes according to the function selected.
Repeat = The key’s function can be repeated by holding the switch closed.
Key
Toggle
Repeat
Description
Clear
N
N
Clears entire document.
BS
N
Y
Backspace. Deletes one character at a time from
right to left. Hold the switch closed to Backspace
multiple times.
Cut
N
Y
If a portion of text is highlighted before single
tapping the scan switch, that portion of text is
deleted and copied to the clipboard.
If no text is highlighted and the scan switch is held
down, the caret will move from right to left
highlighting the text as it goes. When the switch is
let go the highlighted portion of text is deleted and
copied to the clipboard.
Copy
N
Y
If a portion of text is highlighted before single
tapping the scan switch, that portion of text is copied
to the clipboard.
If no text is highlighted and the scan switch is held
down, the caret will move from right to left
highlighting the text as it goes. When the switch is
let go the highlighted portion of text is copied to the
clipboard.
Paste
N
N
If a portion of text is highlighted before tapping the
scan switch, that portion of text is replaced by the
contents of the clipboard.
If no text is highlighted then the contents of the
clipboard are pasted at the caret position.
Undo
Y
N
Undoes last operation. Key becomes Redo until the
next operation occurs.
Section 4 — Using Persona in Scan Mode 49
KEY DESCRIPTIONS (Continued)
Key
Toggle
Repeat
Sel N
Y
N
Description
Sel N means that text will not be highlighted in
conjunction with the Left, Right, Up, or Down keys.
Sel Y means that text will be highlighted in
conjunction with the Left, Right, Up, and Down
keys.
Letter
(Selection
Key)
N
N
There are 5 possible modes:
Letter
Word
Sentence
Paragraph
All
Each mode determines the step size that occurs when
the Left, Right, Up and Down keys are used.
Word Prediction keys are replaced by Selectionrelated functions.
Left
N
Y
If Sel N is set, only the caret moves left in
increments determined by the Selection key.
If Sel Y is set, the caret and highlighted text move
left in increments determined by the Selection Key.
If Sel Y is set and the switch is closed briefly (single
tap), then the caret/highlight moves left and the
highlighted portion of text is spoken.
Right
N
Y
If Sel N is set, only the caret moves right in
increments determined by the Selection key.
If Sel Y is set, the caret and highlighted text moves
right in increments determined by the Selection Key.
If Sel Y is set and the switch is closed briefly (single
tap) then the caret/highlight moves right and the
highlighted portion of text is spoken.
Up
N
Y
A single tap of the scan switch moves the caret to the
next line above.
A long hold continues to move up one line at a time.
50 — PolyTABLET with Persona
KEY DESCRIPTIONS (Continued)
Key
Toggle
Repeat
Down
N
Y
Description
A single tap of the scan switch moves the caret to
the next line below.
A long hold continues to move down one line at a
time.
Home
N
N
Moves the caret to the beginning of the text box.
End
N
N
Moves the caret to the end of the text box.
Speak
Y
N
If a portion of text is highlighted, it will be spoken
when the switch is pressed.
If no text is highlighted, the sentence where the
caret is located will be spoken.
The key caption is renamed to “Stop” while
speaking. When done speaking the caption returns
to “Speak”.
Speaking can be stopped by selecting Stop.
Phrase
N
N
Opens the Phrase List and Edit mode.
Word Prediction keys are replaced by Phrase
related functions.
Ispk
N
N
Opens the auxiliary text box.
AbEx
N
N
Opens the Add Abbreviation text boxes.
If a portion of text is highlighted before selecting
AbEx, the text is copied to the Expansion text box.
Otherwise, the word preceding the caret is copied
to the Abbreviation text box.
Word Prediction keys are replaced by AbEx-related
functions.
SpEx
N
N
Opens the Add Speech Exception text boxes.
If a portion of text is highlighted before selecting
SpEx, the text is copied to the Exception text box.
Otherwise, the word preceding the caret is copied
to the Spelling text box.
Word Prediction keys are replaced by SpEx-related
functions.
Section 4 — Using Persona in Scan Mode 51
KEY DESCRIPTIONS (Continued)
Key
Toggle
Repeat
KB1,
KB2,
KB3
N
N
Description
Opens one of three keyboard layouts.
KB1 is the primary layout with lower case
letters.
KB2 provides upper case letters.
KB3 contains numbers, special characters and
miscellaneous functions.
Open
N
N
Opens a list of documents that can be brought into
the Main text box.
Word Prediction keys are replaced by Open-related
functions.
Save
N
N
A text box appears for entering the name of the
document to be saved.
Word Prediction keys are replaced by Save-related
functions.
Print
N
N
A dialog box appears asking if you are sure that
you want to print. If you do want to print, you are
expected to have your printer setup and ready.
Word Prediction keys are replaced by Print related
functions.
SRate
N
N
Opens the Scan Adjust mode.
Word Prediction keys are replaced by Scan-related
functions.
Off
52 — PolyTABLET with Persona
N
N
Puts device into Suspend mode for conserving
power when it is not going to be used for several
minutes, hours or days. Press the Scan Switch to
wake it up.
KEY DESCRIPTIONS (Continued)
Key
Vol M
Toggle
Repeat
N
N
Description
VOL M key has 4 possible states.
VOL O = Off
No speech output
VOL L = Low
Low volume
VOL M = Medium Medium volume
VOL H = High
Full volume
Word Prediction keys are replaced by Volumerelated functions.
Try different settings in conjunction with the
Volume Slider in the front of Polyana.
Song
N
N
Happy Birthday Song mode.
Word Prediction keys are replaced by Song-related
functions.
Section 4 — Using Persona in Scan Mode 53
54 — PolyTABLET with Persona
VOLUME (Loudness)
The user can adjust the volume by selecting the VOL M key. The VOL M key has 4
possible states.
VOL O
VOL L
VOL M
VOL H
=
=
=
=
Off
Low
Medium
High
No speech output
Low volume
Medium volume
Full volume
When the Vol M key is selected, the Word Prediction keys are replaced by the volume
settings.
There is also a volume slider on the amplifier backpack of the PolyTABLET. The
settings shown above are affected by the position of the slider. Adjust both for optimum
sound level.
Section 4 — Using Persona in Scan Mode 55
56 — PolyTABLET with Persona
SELECTION MODES
The selection modes provide a means of selecting (highlighting) letters, words,
sentences, paragraphs or all of the text. Portions of text can be highlighted for the
purpose of speaking, deleting or copying. The keys that are responsible for this mode are
as follows.
Sel N
This key has 2 possible states (Sel N and Sel Y).
Sel N means that text will not be highlighted when used in conjunction with the Left and
Right keys. The Left and Right keys move the caret in increments based upon the value
of the Letter key.
Sel Y means that text will be highlighted when used in conjunction with the Left and Right
keys. The Left and Right keys move the caret and the highlight in increments based upon
the value of the Letter key.
Letter Key
Select N Key
Section 4 — Using Persona in Scan Mode 57
Letter
This key has 5 possible states that can be selected.
Letter
Word
Sent
Para
All
=
=
=
=
=
move caret from letter to letter
move caret from word to word
move caret from sentence to sentence
move caret from paragraph to paragraph
select all (the Sel Y does not have to be selected)
When the Letter key is pressed, the Word Prediction keys are replaced by the selection
keys (Letter, Word, Sentence, etc.) as shown in the table.
Word Select is
shown in the
example
The default state when Persona begins is Letter. This means that the Left and Right keys
will move the caret one letter (character) at a time. When the other modes are selected,
the caret will move accordingly. For example, if Para is selected and the Left key is
selected, the caret will move one paragraph to the left.
If the scan switch is held down while selecting the Left, Right, Up or Down keys, the caret
(and highlight) will continue to move until the switch is released.
Press the switch once to move the caret (and highlight) once.
58 — PolyTABLET with Persona
USER SCAN ADJUST MODE
Users can adjust the scan rate themselves by entering the
Scan Adjust mode. There are 2 ways to enter the Scan Adjust mode.
SRate
*
Note:
This option is
only valid if it has been
enabled in Preferences/
Scan/Advanced Scan
Options.
Select this key to open the Scan Adjust window.
Hold Switch for the Hold Time to open the Scan Adjust window. This option is
provided as a fail-safe means of gaining access to the Scan Adjust mode when the
Scan Rate has been set too fast. The Scan Rate is automatically set to a slow speed
(1.5 seconds/step) so that the user can make adjustments. The Hold Time can be
set from 5 to 60 seconds (see Preferences/Advanced Scan Options/Hold Time).
When the Scan Adjust window is open, there is a numeric readout and a visual sample to
indicate the adjusted Scan Rate. The adjusted scan rate does not affect the actual scan
rate until it has been accepted.
Use the Faster and Slower keys to adjust the speed. The Faster and Slower keys can be
held down in order to repeat the selection. When satisfied, choose Accept or Close to end
operation.
NOTE:
When the Accept key is selected, the new value is saved. The Scan Rate
can also be adjusted from the Preferences where there are more scan options.
Section 4 — Using Persona in Scan Mode 59
Scan Rate Keys
Key
Toggle
Repeat
Faster
N
Y
Increase the Scan Rate.
Slower
N
Y
Decrease the Scan Rate.
Accept
N
N
Save changes and return to the Main text box using
the modified Scan Rate.
Close
N
N
Don’t save changes and return to the Main text box.
60 — PolyTABLET with Persona
Description
OPENING and SAVING DOCUMENTS
Open Keys
Key
Toggle
Repeat
Description
Open
N
N
Open the selected document.
Delete
N
N
Delete the selected document.
Close
N
N
Close and return to Main text box.
Section 4 — Using Persona in Scan Mode 61
Save Keys
Key
Toggle
Repeat
Save
N
N
Save document as shown in text box.
Close
N
N
Close and return to Main text box.
62 — PolyTABLET with Persona
Description
PHRASES
Phrase List Keys
Key
Toggle
Repeat
Description
New
N
N
Opens the New Phrase text box which is used for
adding new Phrases.
Change
N
N
Opens the Change Phrase text box which is used
for modifying an existing Phrase.
Delete
N
N
Deletes selected Phrase.
Copy
N
N
Copies the selected Phrase to the clipboard so that
it can be pasted to the Main or ISpk text boxes.
Speak
N
N
Speak the selected Phrase.
Close
N
N
Close the Phrase List and return to Main text box.
Section 4 — Using Persona in Scan Mode 63
Phrase New/Change Keys
Key
Toggle
Repeat
List
N
N
Return to Phrase List.
Accept
N
N
Accept new or changed Phrase and return to the
Main text box.
Close
N
N
Don’t accept and return to Main text box.
64 — PolyTABLET with Persona
Description
ABBREVIATION-EXPANSION (AbEx)
AbEx List Keys
Key
Toggle
Repeat
Description
New
N
N
Opens the New Abbreviation Expansion text box
which is used for adding new Abbreviation
Expansions.
Change
N
N
Opens the Change Abbreviation Expansion text box
which is used for modifying an existing
Abbreviation Expansion.
Delete
N
N
Deletes selected Abbreviation Expansion.
Close
N
N
Close AbEx List box and return to Main text box.
Section 4 — Using Persona in Scan Mode 65
AbEx New/Change Keys
Key
Toggle
Repeat
Abbreviation
N
N
Move caret to the Abbreviation text box.
Expansion
N
N
Move the caret to the Expansion text box.
List
N
N
Show the AbEx List.
Accept
N
N
Accept the proposed Abbreviation Expansion and
return to the Main text box.
Close
N
N
Don’t accept and return to Main text box
66 — PolyTABLET with Persona
Description
SPEECH EXCEPTIONS (SpEx)
SpEx List Keys
Key
Toggle
Repeat
Description
New
N
N
Opens the New Speech Exception text box which is
used for adding new Speech Exceptions.
Change
N
N
Opens the Change Speech Exceptions text box
which is used for modifying an existing Speech
Exception.
Delete
N
N
Deletes the selected Speech Exception.
Speak
N
N
Speak the selected Speech Exception.
Close
N
N
Close SpEx List and return to Main text box.
Section 4 — Using Persona in Scan Mode 67
SpEx New/Change Keys
Key
Toggle
Repeat
Spelling
N
N
Move caret to the Spelling text box.
Pronunciation
N
N
Move caret to the Pronunciation text box.
Test
N
N
Speak the proposed Speech Exception.
List
N
N
Show the SpEx List.
Accept
N
N
Accept the proposed Speech Exception and return
to the Main text box.
Close
N
N
Don’t accept and return to the Main text box.
68 — PolyTABLET with Persona
Description
LIST BOXES
Use these keys to interact with list boxes (Phrases, AbEx, SpEx, Open)
Key
Toggle
Repeat
A–Z
N
N
Description
Select a letter that matches the 1st letter of a list item
that you are looking for. If there is a match, that list
item will be highlighted and will come into view.
The Find window shows the search string.
If the 1st list item that matches is not the one you
want, you can select more letters to refine your
search.
BS
N
N
Removes the last letter from the search string as
shown in the Find window.
Clear
N
N
Clears the search string and Find window.
Up
N
Y
Move up through the list items. A single tap selects
the next list item above.
A long hold moves the highlight continuously up the
list.
Down
N
Y
Move down through the list items. A single tap
selects the next list item below.
A long hold moves the highlight continuously down
the list.
Home
N
N
Selects the top list item.
End
N
N
Selects the bottom list item.
Section 4 — Using Persona in Scan Mode 69
HAPPY BIRTHDAY Song
The Happy Birthday song can be accessed by selecting the Song key from the on-screen
keyboard if it has been added to it. If the person’s name is already in the Speech
Exceptions, the name will be pronounced accordingly when the song is sung. The Sing
key starts the song. The Test key lets the user listen to the name prior to singing the song
in case changes are needed.
Happy Birthday Keys
Key
Toggle
Repeat
Sing
Y
N
Sing Happy Birthday song.
Test
N
N
Listen to person’s name before singing song
Close
N
N
Cancel and return to main text box
70 — PolyTABLET with Persona
Description
Section 4 — Using Polyana in Scan Mode
PRINTING
Persona features three (3) print options to choose from in Preferences/Print Setup.
Print to USB Flash Drive
This option allows a document to be saved to a USB Flash Drive. The drive is transferred
to a PC for printing.
Print to Compact Flash (CF) Card
This option allows a document to be saved to a Compact Flash (CF) Card. The CF card is
transferred to a PC for printing.
Custom
This option exposes all of the printer settings. It is up to the facilitator to determine the
correct settings for a particular printer.
Please make sure you have selected a printer from Print Setup in Preferences and that it is
set up and ready before printing.
Select the Print key from the on-screen keyboard when you are ready to print.
The scan switch is temporarily disabled while printing and control is returned to the
switch when printing is finished.
For more information regarding printing, see the Print Help in Preferences.
When you are ready to print, select the Print key from the on-screen keyboard.
During printing, the following messages will be seen.
The first message simply let’s you know that printing is about to begin. Make sure that
the printer is ready before selecting the Yes button, or select the No button if you decide
not to print.
Section 4 — Using Polyana in Scan Mode 71
This message informs you that the scan switch is going to be inoperable during printing.
The message will disappear after a few seconds, or it can be made to disappear by
actuating the scan switch. After the message goes away, the scan switch will be
inoperative until the print job is finished or a print error has been encountered. At that
time, the scan switch will become operable again.
This message reports the status of the print job.
If you see this message, there was a print error.
Check that the printer is set up correctly, that there is enough paper and ink, and that the
appropriate printer has been selected in Preferences.
The last message states that it is okay to use the scan switch again. At this point, you can
tap on the scan switch to clear the message or wait a few seconds for it to go away.
72 — PolyTABLET with Persona
KEYBOARD COMMANDS
Ctrl + Q = Quit program (scan mode)
Ctrl + P = Show Preferences
Ctrl + S = Show Scan Mode Help
Esc
= Scan from keyboard without using an external switch. In order for
this function to work properly, the Enable Character Repeat check
box must be unchecked. The check box is located in the Control
Panel/Keyboard properties.
Section 4 — Using Persona in Scan Mode 73
74 — PolyTABLET with Persona
Preferences
Preferences is where you set up the program to suite an individual’s needs. Settings are
saved and Persona uses them each time it is started.
RESTORE FACTORY DEFAULTS
In Preferences, press (and hold) Ctrl + R R R to gain access to the Restore Factory
Defaults window. This utility is provided for the purpose of restoring your settings or
libraries to their original factory condition.
Please be advised that once an item has been restored, the action cannot be reversed.
Section 5 — Preferences 75
INPUT OPTIONS—Keyboard Mode
There only one keyboard option: “Use On-Screen Keyboard.” When this option is
selected, an on-screen keyboard is displayed across the lower half of the display. A user
taps on the on-screen keys instead of typing on an external keyboard. Note that this onscreen keyboard is not the same as the one used in Scan mode.
INPUT OPTIONS—Scan Mode
Customizing On-screen Keyboards
The On-Screen Keyboard combo box lets you choose a scanning keyboard. Persona
comes with 3 keyboards (aeiou, optimized, qwerty). The optimized arrangement is
recommended because it’s the most efficient.
76 — PolyTABLET with Persona
Customizing On-screen Keyboards
The 3 keyboard layouts provided with Persona can be modified to suit an individual’s
needs.
1) In Preferences, tap on the Input
tab. Tap on the Scan option
button so that the Scan Options
are visible.
2) From the drop-down keyboard
list, select the keyboard that
you want to modify.
3) Tap on the Edit button to begin
the editing process.
The keyboard edit functions are shown above the keyboard. The functions include:
choosing a key caption, fore-color, back-color and keyboard layout (KB1, KB2 and
KB3).
There’s also a button called New KB that lets you create a keyboard from scratch.
Section 5 — Preferences 77
Select a key by touching it on the display with your finger or stylus. A selected key has a
highlighted border to indicate that it is selected. Any editing you do now will only affect
the key that is highlighted. Only one key can be edited at a time.
By default, KB1 layout is displayed whenever scan mode is started. So, any keyboard
created should include KB1.
It’s possible to make a simple keyboard that consists of a single keyboard layout which
just has letters and a few other functions. A single layout keyboard should always be KB1
so that it will be displayed. Keyboards can have up to 3 layouts.
Each keyboard that ships with Persona includes 3 layouts. KB1 is used for lower case
letters and common editing functions. KB2 is used for upper case letters and common
editing functions. KB3 is used for numbers, special characters and less-common
functions.
Key Captions
The function of the keys is determined by their captions. Select captions from the
Caption list located in the top left area of the screen. Some keys are considered to be
mandatory from the standpoint of providing a minimum level of communication. At the
very least, every keyboard should include: each letter of the alphabet, a space, punctuation
and a speak button.
Following is a list of the keyboard captions and their functions:
“ a ” through “ z ”
“ A ” through “ Z ”
“ 0 ” through “ 9 ”
“ ”
“.”
“!”
“?”
“,”
“‘“
“$”
“@”
“#”
“%”
“(“
“)”
“[“
“]”
78 — PolyTABLET with Persona
Lower case letters
Upper case letters
Numbers
Space (first character in the list)
Period
Exclamation mark
Question mark
Comma
Apostrophe, used in place of letters (I’m) and in
DECtalk syntax
Dollar (Money)
@
#
Percent
Can be used in DECtalk syntax
Can be used in DECtalk syntax
Begin DECtalk syntax
End DECtalk syntax
Section 5 — Preferences
“<“
“>”
“-”
“+”
“*”
“/”
“=”
“:”
Can be used in DECtalk syntax
Can be used in DECtalk syntax
+
*
Can be used in DECtalk syntax
=
Can be used in DECtalk syntax
“ AbEx ”
“ SpEx ”
“ Phras ”
“ ISpk ”
“ SRate ”
“ Vol M ”
“ Open ”
“ Save ”
“ Print ”
Open Abbreviation Expansions
Open Speech Exceptions
Open Phrases
Open Instant Speech
Adjust scan rate
Adjust volume
Open a saved document
Save the current document
Print the current document
“ KB1 ”
“ KB2 ”
“ KB3 ”
“ Off ”
Show KB1 layout
Show KB2 layout
Show KB3 layout
Go into Suspend mode
“ Up ”
“ Down ”
“ Left ”
“ Right ”
“ Home ”
“ End ”
“ Enter ”
“ Letter ”
Move caret up one line
Move caret down one line
Move caret left
Move caret right
Move caret to the beginning of document
Move caret to the end of document
Begin a new paragraph
Change Selection type (Letter, Word, Sentence,
Paragraph or All)
Changes the Selection mode (Sel Y or Sel N)
Backspace
Clears current document
Clear selected text and hold it in the clipboard
Copies the selected text to the clipboard
Paste the contents of the clipboard into document
Undo/Redo last action
Sing Happy Birthday song
Blank key (blank keys are not scanned)
“ Sel N ”
“ BS ”
“ Clear ”
“ Cut ”
“ Copy ”
“ Paste ”
“ Undo ”
“ Song ”
“ XXXX ”
Section 5 — Preferences 79
Scan Color
Tap on the “COLOR” label to change the Scan Color. This also changes the highlight
color used in conjunction with tabbing from control to control in the Keyboard mode and
Preferences.
NOTE:
The highlight color used for menus and list boxes is not affected by the
Scan Color. Menu and List box highlight colors can be changed from the
Control Panel/Display/Appearance.
Scanning Methods
Row and Column
Scan rows from top to bottom and columns from left to right.
1) Press the switch to start the row scan
2) Press the switch again to start the column scan
3) Press the switch again to accept the selection
4) Press the switch again, before the acceptance period has elapsed, to cancel the
selection
Linear
Scan each key from top to bottom, left to right.
1) Press the switch to start the linear scan
2) Press the switch again to accept the selection
3) Press the switch again, before the acceptance period has elapsed, to cancel the
selection
In both scan methods...
Scanning begins at a rate that is slower than the actual Scan Rate. This gives the
user time to adjust to the change in scan activity (ZYGO Patent #4,558,315).
Rows and columns are scanned 3 times before stopping. Press the switch again
to restart the scan.
80 — PolyTABLET with Persona
Section 5 — Preferences
Scan Acceptance Styles
Percentage
The selected key is highlighted progressively from left to right. This provides a visual
indication of remaining time before the key is accepted. If the switch is pressed before
the key has been fully highlighted, the selection will be cancelled and scanning will begin
again.
The Acceptance Delay determines the amount of time taken to complete the selection.
Blink
The selected key outline blinks to indicate that it is selected.
If the switch is pressed before the final blink, the selection will be cancelled and scanning
will begin again.
The Acceptance Delay determines the amount of time taken to complete the selection.
Scan Timing
Start Delay
Start Delay determines how long the switch must be closed before it will be accepted as a
valid switch closure.
Scan Rate
Scan Rate determines the amount of time it takes to move from row to row or key to key.
Initially, each time the switch is closed, the Scan Rate begins slower than the actual Scan
Rate and gradually reaches the Scan Rate after a few scan steps have occurred (ZYGO
Patent #4,558,315).
Acceptance Delay
The Acceptance Delay determines how long the scan highlight will wait at the selected
key before it is accepted.
Section 5 — Preferences 81
Advanced Scan Options
Tap on the “Advanced” button to
access the Advanced Scan Options.
82 — PolyTABLET with Persona
Section 5 — Preferences
Long Hold
The Long Hold function can be used to activate an alarm or adjust the scan rate. The
function is initiated by holding the external scan switch closed for a specified period of
time.
Alarm
Use the alarm to get someone’s attention.
Adjust Scan Rate
If the Scan Rate is set too fast or too slow, the user can adjust it by holding the switch
closed until the Scan Rate window appears.
Disable
Choose this option when the Long Hold function is not wanted.
Hold Time
The Hold Time slider determines how long the switch must be held closed in order to
activate the Long Hold function. It can be adjusted from 5 to 60 seconds.
Section 5 — Preferences 83
Auto Off
The Auto Off feature automatically turns off (suspends) the PolyTablet when Persona is
in Scan Mode.
The Auto Off feature senses when the unit is not being used and shuts it down after a
period of time in order to conserve battery power. The device can be turned on again by
pressing the Scan Switch.
Check the Enable checkbox to enable the Auto Off or uncheck it to disable it.
The amount of time that the device needs to be inactive before shutting down is
determined by the “Turn Off After” slider. The slider can be adjusted from 1 to 15
minutes.
Auditory Prompt
Key captions and rows are spoken in a soft voice to help reinforce the scan/selection
process. Rows are spoken as “Row 1” through “Row 6”. Keep in mind that scanning can
be faster than the time it takes DECtalk to speak, and as a result, some captions will not
speak completely. Best results are achieved when the scan rate is greater than 0.75
second.
84 — PolyTABLET with Persona
Enabled
The Auditory Prompt features have been enhanced to take advantage of the separate (left
and right) audio channels on the new PolyTablet, thus providing a separate audio path for
the user (earphone) and a separate audio path for the listener (loudspeaker).
The Auditory Prompt features are only
available when the Input mode is set for
Scan. To show the Auditory Prompt options,
click on the Advanced button within the Scan
Options.
There are 3 Auditory Prompt controls.
Section 5 — Preferences 85
Enabled checkbox
If the Enabled checkbox is checked, auditory prompting will occur when the Scan Rate is
0.5 seconds or longer.
Earphone checkbox
If the Earphone checkbox is checked, the auditory prompts will be heard only through the
earphone. Spoken system messages will also be routed through the earphone.
,
!
CAUTION:
Please be advised that the Polyana can produce very loud sounds through
the earphone. Normally this is not an issue when it is speaking text, but
the system beeps, message box sounds and alarms can be very loud.
The system sounds can be eliminated by going to the Control Panel and
changing the settings of the Volume & Sounds Properties. Uncheck
everything except for Applications (program specific…).
When the Earphone checkbox is unchecked, auditory prompts are routed to the
loudspeaker built into the chassis below the Polyana, or to the External Speaker if it’s
connected.
Loudness
This controls the loudness of the auditory prompts.
*
NOTE for Facilitator:
Test the sound level in the headphone yourself so as not to offend the user’s hearing.
86 — PolyTABLET with Persona
Section 5 — Preferences
SPEECH OPTIONS
The Speech Options provide a means of adjusting the characteristics of the voice.
Voice Settings
Personality:
There are 9 personalities to choose from.
Speech Rate:
Speech Rate determines the speaking rate. 180 WPM (words per minute) is the default.
Loudness:
The Loudness control sets the loudness of the voice. It works in parallel with the
Loudness control on the Main screen (Typing mode) or the Volume key (Scan mode). So,
changing it in either place will affect the other. Setting the Loudness value to 0 silences
the voice.
Pitch:
There are 11 possible settings. 0 is the default.
Test
Tap on the Test button to hear how the new voice settings will sound.
Section 5 — Preferences 87
Auto-Speak
Character
When enabled, each letter will be spoken as it is typed.
Word
When enabled, each word will be spoken as it is completed. A word is considered
complete if it is terminated by a space, comma, period, question mark or exclamation
point.
The last word of a sentence is not spoken if Speak Sentence is enabled. Instead the entire
sentence is spoken.
Sentence
When enabled, the entire sentence is spoken when a period, question mark or exclamation
point is typed. To speak the sentence again, tap on the Speak button (Typing mode) or
Speak key (Scan mode).
Paragraph
When enabled, the paragraph is spoken when the Enter key is pressed. To speak the
paragraph again, tap on the Speak button (Typing mode) or Speak key (Scan mode).
System Msgs
When enabled, Message Boxes are spoken. Message boxes provide important
information or ask for confirmation before changes are made to settings.
NOTE:
Message boxes that do not require a response disappear after a few
seconds.
In Scanning mode, Message Boxes that do require a response from the user, are scan
enabled. The scan rate of the Message boxes is half that of the scan rate setting.
88 — PolyTABLET with Persona
Section 5 — Preferences
GENERAL OPTIONS
Auto Functions
Auto Space
Auto Space automatically adds a space after a comma, period, exclamation mark or
question mark. Auto Space is ignored when typing numbers or DECtalk syntax.
Auto Caps
Auto Caps automatically capitalizes the first letter of the text box and/or the first letter of
each new sentence. The first letter of a sentence must be preceded by a punctuation
(period, exclamation mark or question mark) followed by a space.
Auto Caps also capitalizes the words “i”, “i’ll”, “i’m”,and “i’d”.
Auto Caps preserves the case of the first letter of a partial word when it is completed by a
predicted word.
Auto Clear
Auto Clear clears the entire text box when the first letter of a new sentence (following a
period, exclamation mark or question mark, plus space) is typed. This option is useful if
the main text box is to be used primarily for communication purposes.
Section 5 — Preferences 89
The Instant Speak (ISpk) text box always clears itself in the manner described. It serves
the purpose of providing instant communication when the Main text box is being used for
typing a document.
StickyKeys
StickyKeys enable the Shift and Control keys to remain “pressed” without having to hold
them down. This feature facilitates making combination key presses that otherwise
require having to press and hold two keys at the same time.
Persona’s main screen (Typing mode) has an indicator that shows the status of the Shift
and Control locks. Each time that the Shift and Control keys are pressed, they cycle
through 3 possible states of operation:
Shift or Control Key
Status Color
Function
No key press (normal)
No background
Not locked
1 key press
Medium background
2 key presses
Black background
Temporarily locked. Will
return to normal (nonlocked) upon next key press.
Locked. Will stay locked
until the Shift or Control key
is pressed again.
Word Prediction and Word Completion
Word Prediction greatly reduces the amount of time and effort required to create words
and sentences. Word Prediction is comprised of 2 parts, Word Completion and Word
Prediction.
Word Completion
Word Completion is active when 1 or more letters have been typed and before the
word has been completed by typing a space, comma, period, exclamation point,
question mark or Enter. Word Completion suggests words that begin with the letters
which have been typed thus far. If the word the user wants to type is displayed, it can
be selected and the partially typed word will be completed.
Word Prediction
When a word has been completed by typing a space, comma, period, exclamation
point, question mark or Enter, Word Prediction words will be displayed, if there are
any. The words that appear are words which have been previously used and have
previously followed the word which was just typed.
90 — PolyTABLET with Persona
Section 5 — Preferences
In Scan mode, Word Prediction is only available in the Main and InstSpk text boxes.
However, Word Completion is available in all of the Scan text boxes (except for AbEx
Abbreviation and SpEx Spelling text boxes).
Word Prediction is not available in all text boxes because special modes (AbEx, SpEx,
Phrase, etc.) have special keys which share the Word Prediction keys and are shown
when there are no Word Completion words to display or when a word is completed.
Learning new words
Persona’s Word Prediction engine remembers the words that are typed. The words are also
prioritized. If a word is used frequently, it will move towards the top of the list so that the
most frequently used words are the easiest to access. Less frequently used words will be
bumped down and will eventually disappear. This is good to know because, if a word was
typed by mistake, it will eventually be removed from the list. However, it may be a good
idea to disable Learn New Words when first using the program, thereby preventing
misspelled words from being saved.
Word Prediction / Word Completion Features
Enable Prediction
When enabled, Word Prediction suggests words that may be used to complete a partially
typed word or suggest words that may follow a completed word. The Word Prediction
library can contain up to 2,000 words.
Learn New Words
When Learn New Words is enabled, words that have not been used before are automatically
added to the Word Prediction library so that they will become available the next time they
are needed.
Auto Save Words
When enabled, new words are saved to Persona’s internal memory after 15 minutes of
inactivity (typing or scanning). If you choose to end the program before new words have
been saved, you will be prompted to save them.
Section 5 — Preferences 91
Utility
Backup/Restore
The Backup/Restore utility
provides a means of backing
up precious user files in the
unlikely event that the
PolyTABLET was lost,
stolen or damaged. It can
also be used to transfer the
files to and from another
PolyTABLET or PC.
Simply check the items you
want to backup or restore
and click the appropriate
button or choose Close to
cancel.
92 — PolyTABLET with Persona
Print Setup
Persona features three (3) print options.
Print to USB Hard (Flash) Drive
This option allows documents to be saved to a USB Hard (Flash) Drive. The USB Hard
Drive can be inserted into any available USB port on the PolyTABLET. However, not all
USB drives will work and it can take several minutes for the PolyTABLET to recognize
them.
After the document has been saved to the USB drive, the drive can be removed from the
PolyTABLET and inserted into a PC where the printing will be performed. Documents
are saved as “PrintJob.txt.”
The following USB Flash Drives have been approved for use with the PolyTABLET.
MANUFACTURER
MODEL
CAPACITY
SanDisk
PQI
Kingston
PNY
Mini Cruzer
Traveling Disk (U250)
Data Traveler
Attache
512 MB
512 MB
512 MB
256 MB
Print to Compact Flash (CF) Card
Printing (saving) to a Compact Flash (CF) card is the easiest way to transfer a document
from the PolyTABLET to a PC. A card reader needs to be connected to the PC.
Optionally, a PCMCIA/CF card adapter can also be used with notebook computers.
The CF card is inserted into the CF card slot on the top right corner of the PolyTABLET.
After the document has been saved to the CF card, the card can be removed from the
PolyTABLET and inserted into the card reader that is connected to the PC. Documents
are saved as “Printjob.txt.”
Custom
This option exposes all of
the printer settings. It is up
to the facilitator to determine
the correct settings for a
particular printer.
The HP PCL Printer
selection ensures
compatibility with printers
that support PCL3. ZYGO
Industries, Inc. has tested a
Desk Jet 970 Cxi with the
following settings:
Printer: HP PCL
Port: LPT1 (uses USB as
a printer port)
Section 5 — Preferences 93
94 — PolyTABLET with Persona
APPEARANCE OPTIONS
The Appearance Options provide the means for adjusting the look of the program to suite
an individual’s needs.
Text
All textboxes are affected by the following settings:
Font Style:
Choose from a variety of font styles.
Size:
Font Size adjusts the size of the text. The smaller textboxes used in AbEx, SpEx,
Phrases and Scanning are limited to a maximum font size of 25 pt so that text will fit
properly. Font sizes larger than 25 pt only affect the Main text box and the Instant
Speak text box.
Color
Tap on the Color button to change the background color of the text boxes as well as
the text (font) color.
Section 5 — Preferences 95
Background Color
Tap on the Color button to change the background color of the Main and Scanning
screens.
96 — PolyTABLET with Persona
SETUP / Upgrading Persona
Using a Compact Flash (CF) Card
A CF card and a CF card Reader/Writer are required. The CF card Reader/Writer is a
separately purchased device that attaches to a PC. The CF card will appear as another
drive. Another option is a PCMCIA to CF adapter, which allows CF cards to be inserted
into most notebook computers.
1.
Request a Persona Upgrade from ZYGO’s Customer Service Department. Provide
an e-mail address to which an upgrade file can be sent.
2.
After the file has been received, use Windows Explorer to copy it to the CF card.
3.
Insert the CF card into the Polyana, use My Handheld PC to find the file, and
double-click on it to begin the upgrade process.
Section 6 — Software Upgrades 97
98 — PolyTABLET with Persona
Reinstalling Persona
Persona software will need to be reinstalled if the battery loses its charge, requires a Hard
Reset or the Persona software is upgraded.
1) Attach an external USB keyboard or use the built-in, on-screen keyboard.
2) Press the Power button momentarily to turn on the
Polyana. If the Polyana does not turn on after about
1 minute, momentarily press the Reset button on the
rear of the unit.
3) There should be an input box on the display titled,
“Unidentified USB Device.” Do not enter anything
at this time. Do not close the input box. Just move
ahead to the next instruction.
4) Run the “PERSONA2.1.CAB” file located in the “Do Not Delete” folder on the
Storage Card.
5) Answer “OK” or “Yes to All” for each step.
6) Reurn to the Windows Desktop where the “Unidentified USB Device” window is
showing and, in the “Driver Name” input field, type: “FTDI_SER.DLL” (without
the quotation marks). Click OK when done.
7) Run Persona by tapping on the “Persona” menu item located on the Start/
Programs menu.
Here are few key items that you should restore manually…
Persona Icon on Desktop
CAUTION: This is a very simple task but it is possible for a non-computerliterate person to make a mistake and cause Persona to become
non-functional. If there is any doubt about one’s computer skills,
ask someone who can follow instructions or is comfortable with the
Windows operating system to do this task.
To create a Persona Desktop icon…
a)
Double-tap the “My Computer” in the top left corner of the Desktop.
b) Tap on the “Program Files” folder.
c)
Tap on the “Persona” folder.
d) Tap on “Persona.vb” file to highlight it.
e)
Select the menu item “Edit” and then “Copy”.
Section 7 — Solving Problems 99
f)
Return to the Windows Desktop.
g) Press and hold the “Alt” key and tap on the blank portion of the screen.
h) Select “Paste Shortcut” from the pop-up menu.
Auto-hide Taskbar
a)
Tap on the “Start” button.
b) Tap on “Settings” menu item.
c)
Tap on “Taskbar and Start Menu” menu item.
d) Place a check mark in the “Auto hide” check box.
e)
Tap on the OK button.
Other settings may require changing or restoring in the Control Panel, such as:
• Display
• Power
• System
Refer to other sections of this user manual for instructions regarding memory settings.
100 — PolyTABLET with Persona
Trouble-shooting
Error Messages
“Out of Memory” This means there is not enough memory to run Persona. Tap on the
OK button to clear the error message. Adjust the System memory so that there is more
memory available for running programs.
Refer to Section 2, Memory Management, for more details.
Unit Does Not Turn On
“Low Battery Charge” A small amount of battery power is used to retain installed
software and settings when the Polyana is turned off and is not connected to the charger.
Over time, the Polyana battery will lose its charge unless it is regularly charged. If the
batteries are allowed to run too low, programs will need to be reinstalled.
To restore the Polyana from a dead battery:
1) Connect the AC Adapter/Battery Charger to
the Polyana.
2) Momentarily press the Reset Button on the
rear of the unit.
3) Follow the Reinstalling Persona instructions
on Page 99.
For additional assistance, consult ZYGO’s Customer Service Department or your local
dealer or agent.
ZYGO CUSTOMER SERVICE
Toll Free (U.S.A./Canada):
TEL:
FAX:
E-mail:
(800) 234-6006
+1 (503) 684-6006
+1 (503) 684-6011
[email protected]
Section 7 — Solving Problems 101
Resetting the PolyTABLET
Occasionally, the PolyTABLET needs to be reset when a glitch in software or operating
system occurs.
There are 2 types of reset; Soft Reset and Hard Reset.
A Soft Reset should be tried before a Hard Reset when a problem with software has
occurred. If possible, save your work before performing a reset. Any changes to open
files will be lost. Files in Internal Storage will always be safe.
Performing a Soft Reset
1) Tap on the “Start” button
2) Tap on the “Run” menu item
3) Type “SoftResetARM” and tap the “OK” button
A Hard Reset should be tried as a last resort to solve a software problem. All of the
installed applications, including Persona, will be lost and will need to be reinstalled.
Persona user documents, learned prediction words, phrases, etc., will be kept safe in the
Internal Storage.
Performing a Hard Reset
1) Use an opened paper clip or a thin object to press and
hold down the Reset button for about 5 seconds—until
the display goes dim. Then release the button.
2) Press the Reset button momentarily a 2nd time to turn
the unit back on.
3) Reinstall Persona as described in the Reinstalling
Persona section of this manual.
102 — PolyTABLET with Persona
Maintenance
Section 8 — Maintenance 103
ZYGO Industries, Inc.
PO Box 1008
Portland, OR 97207-1008, U.S.A.
TEL: +1 (503) 684-6006
FAX: +1 (503) 684-6011
U.S.A. / Canada : (800) 234-6006
E-mail: [email protected]
http://www.zygo-usa.com
104 — PolyTABLET with Persona