1
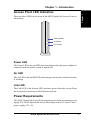
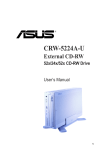
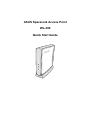
ASUS SpaceLink Access Point
WL-300
Quick Start Guide
Copyright Information
No part of this manual, including the products and software described in it,
may be reproduced, transmitted, transcribed, stored in a retrieval system,
or translated into any language in any form or by any means, except
documentation kept by the purchaser for backup purposes, without the
express written permission of ASUSTeK COMPUTER INC. (“ASUS”).
ASUS PROVIDES THIS MANUAL “AS IS” WITHOUT WARRANTY
OF ANY KIND, EITHER EXPRESS OR IMPLIED, INCLUDING BUT
NOT LIMITED TO THE IMPLIED WARRANTIES OR CONDITIONS
OF MERCHANTABILITY OR FITNESS FOR A PARTICULAR
PURPOSE. IN NO EVENT SHALL ASUS, ITS DIRECTORS, OFFICERS,
EMPLOYEES OR AGENTS BE LIABLE FOR ANY INDIRECT,
SPECIAL, INCIDENTAL, OR CONSEQUENTIAL DAMAGES
(INCLUDING DAMAGES FOR LOSS OF PROFITS, LOSS OF
BUSINESS, LOSS OF USE OR DATA, INTERRUPTION OF BUSINESS
AND THE LIKE), EVEN IF ASUS HAS BEEN ADVISED OF THE
POSSIBILITY OF SUCH DAMAGES ARISING FROM ANY DEFECT
OR ERROR IN THIS MANUAL OR PRODUCT.
Product warranty or service will not be extended if: (1) the product is
repaired, modified or altered, unless such repair, modification of alteration
is authorized in writing by ASUS; or (2) the serial number of the product is
defaced or missing.
Products and corporate names appearing in this manual may or may not be
registered trademarks or copyrights of their respective companies, and are
used only for identification or explanation and to the owners’ benefit, without
intent to infringe.
SPECIFICATIONS AND INFORMATION CONTAINED IN THIS
MANUAL ARE FURNISHED FOR INFORMATIONAL USE ONLY, AND
ARE SUBJECT TO CHANGE AT ANY TIME WITHOUT NOTICE, AND
SHOULD NOT BE CONSTRUED AS A COMMITMENT BY ASUS. ASUS
ASSUMES NO RESPONSIBILITY OR LIABILITY FOR ANY ERRORS
OR INACCURACIES THAT MAY APPEAR IN THIS MANUAL,
INCLUDING THE PRODUCTS AND SOFTWARE DESCRIBED IN IT.
Copyright © 2002 ASUSTeK COMPUTER INC. All Rights Reserved.
Product Name:
Manual Revision:
Release Date:
2
ASUS SpaceLink Access Point (WL-300)
1.00 E1020
May 2002
ASUS SpaceLink Access Point
Copyright Information
ASUSTeK COMPUTER INC. (Asia-Pacific)
Address:
General Tel:
General Fax:
General Email:
150 Li-Te Road, Peitou, Taipei, Taiwan 112
+886-2-2894-3447
+886-2-2894-3449
[email protected]
Technical Support
MB/Others (Tel):
+886-2-2890-7121 (English)
Notebook (Tel):
+886-2-2890-7122 (English)
Desktop/Server (Tel): +886-2-2890-7123 (English)
Support Fax:
+886-2-2890-7698
Support Email:
[email protected]
Web Site:
www.asus.com.tw
Newsgroup:
cscnews.asus.com.tw
ASUS COMPUTER INTERNATIONAL (America)
Address:
General Fax:
General Email:
6737 Mowry Avenue, Mowry Business Center,
Building 2, Newark, CA 94560, USA
+1-510-608-4555
[email protected]
Technical Support
Support Fax:
+1-510-608-4555
Notebook (Tel):
1-877-918-ASUS (2787)
Web Site:
www.asus.com
Support Email:
[email protected]
ASUS COMPUTER GmbH (Europe)
Address:
General Fax:
General Email:
Harkortstr. 25, 40880 Ratingen, BRD, Germany
+49-2102-442066
[email protected] (for marketing requests only)
Technical Support
Support Hotline:
MB/Others: +49-2102-9599-0
Notebook (Tel):
+49-2102-9599-10
Support Fax:
+49-2102-9599-11
Support (Email):
www.asuscom.de/de/support (for online support)
Web Site:
www.asuscom.de
ASUS SpaceLink Access Point
3
Chapter 1 - Introduction
1. Introduction
Chapter 1
Thank you for choosing the ASUS SpaceLink Access Point, a member of
ASUS’ SpaceLink wireless infrastructure family. The ASUS SpaceLink
Access Point complies with the IEEE 802.11b wireless standard to provide
wireless mobile clients with network connectivity at data rates of up to 11
Mbps. The stand-alone ASUS SpaceLink Access Point connects to a small
Ethernet network to provide wireless access for wireless mobile clients.
System Requirements
To begin using the ASUS SpaceLink Access Point, you must have the
following minimum requirements:
• An Ethernet (10Base-T or 10/100Base-TX) LAN switch or hub
• At least one 802.11b wireless adapter for a wireless mobile client
Note: The ASUS SpaceLink Access Point only supports 10Base-T,
therefore it cannot be connected to pure 100Base-TX networks. The
network must be either 10-Base or 10/100Base-TX.
Wireless Operation
The ASUS SpaceLink Access Point supports three modes of operation:
•
Access Point: The Access Point operates as a stand-alone device to
provide network access to wireless mobile clients.
• Access Point Client: The Access Point partners with another Access
Point to provide network access to wireless mobile clients.
• Wireless Bridge: The Access Point communicates only with other
Access Points that are set to Wireless Bridge Mode. (Access Points set
to Wireless Bridge mode cannot support wireless mobile clients.)
By default, the SpaceLink Access Point operates in Access Point mode.
4
ASUS SpaceLink Access Point
Chapter 1 - Introduction
Chapter 1
Access Point LED Indicators
There are three LEDs on the front of the ASUS SpaceLink Access Point, as
shown here.
Power (Amber)
Air (Green)
Link (Green)
Power LED
The Power LED is the top LED and turns amber when the power adapter is
connected and the power switch is turned ON.
Air LED
The Air LED is the middle LED and turns green when the wireless function
is working.
Link LED
The Link LED is the bottom LED and turns green when the Access Point
has a physical connection to the Ethernet network.
Power Requirements
The ASUS SpaceLink Access Point requires power from an external power
supply. The ASUS SpaceLink Access Point ships with a UL listed, Class 2
power supply (5V, 1A).
ASUS SpaceLink Access Point
5
Chapter 2 - Installation
2. Installation
This chapter describes the installation procedure for the ASUS SpaceLink
Access Point and includes a description of the LEDs found on the unit.
Installation Procedure
Follow these steps to install the ASUS SpaceLink Access Point.
Chapter 2
1. Determine the best location for the ASUS SpaceLink Access Point. Keep
in mind the following considerations:
• The length of the Ethernet cable that connects the Access Point to
the network must not exceed 100 meters.
• For standard placement, try to place the Access Point on a flat, sturdy
surface as far from the ground as possible, such as on top of a desk
or bookcase, keeping clear of metal obstructions and away from
direct sunlight.
• For external antenna mounting, install the external antennas so that
they are clear of obstructions; refer to the documentation that came
with the antennas for mounting and installation instructions.
• Try to centrally locate the Access Point or its antennas so that it will
provide coverage to all of the mobile devices in the area.
• Use only the power supply that came with this unit. Other power
supplies may fit but the voltage and power may not be compatible.
It is the responsibility of the installer and users of the ASUS
SpaceLink Access Point to guarantee that the antenna is operated
at least 20 centimeters from any person. This is necessary to insure that the product is operated in accordance with the RF Guidelines for Human Exposure which have been adopted by the Federal
Communications Commission.
2. Place the Access Point in the desired location. Wall mounting is also
possible for the Access Point. Refer to the section entitled “Wall Mounting Option” on the next page for details.
3. Attach one end of an RJ-45 Ethernet cable to the Access Point and
attach the other end to the RJ-45 10Base-T port of a network hub, switch,
router, or patch panel (possibly on a wall).
The ASUS SpaceLink Access Point does not support 100Base-TX;
it only supports 10Base-T. Hubs or switches that supports both
10Base-T and 100Base-TX may be used.
6
ASUS SpaceLink Access Point
Chapter 2 - Installation
Chapter 2
4. Attach one end of the AC power adapter, included in the product package, to the back of the Access Point and the other end to a power outlet.
Note: Use the Access Point only with the power adapter supplied
by ASUS in the product package. Using another power supply may
damage the Access Point.
The Power LED on the front of the Access Point will light up when the unit
is powered ON. In addition, the green Link LED will turn ON to indicate
that the Access Point has a physical Ethernet network connection.
Wall Mounting Option
Out of the box, the ASUS SpaceLink Access Point is designed to sit on a
raised flat surface like a file cabinet or book shelf. The unit may also be
converted for mounting to a wall or ceiling.
Follow these steps to mount the Access Point to a wall:
1.
2.
3.
4.
5.
6.
Remove the base by pressing the tab and sliding the base.
Remove the side cover to expose the mounting hooks.
Locate the screws provided with the Access Point.
Mark two holes in a flat surface using the provided hole template.
Tighten the two provided screws until only 1/4” is showing.
Latch the Access Point onto the two screws.
Note: Readjust the screws if you cannot latch the Access Point onto
the screws or if it is too loose.
ASUS SpaceLink Access Point
7
Chapter 2 - Installation
Step 1
Before:
After:
Chapter 2
1
2
Step 2
Before:
After:
Note: Mounting brackets are provided for you to hang the Access
Point on an office partition or office ceiling.
8
ASUS SpaceLink Access Point
Chapter 3 - Access Point Manager
3. Access Point Manager
This chapter describes how to access the ASUS Access Point Manager,
which is used to configure ASUS SpaceLink Access Points.
Installing the Access Point Manager
Follow these steps to install the ASUS Access Point Manager in Windows:
Chapter 3
1. Insert the support CD and click on 2. Click Next after reading the WelInstall ASUS WLAN AP Utilities.
come message.
3. Click Next to accept the default di- 4. Click Next to use the default prorectory or browse to another locagram folder or enter another folder.
tion.
ASUS SpaceLink Access Point
9
Chapter 3 - Access Point Manager
Installing the Access Point Manager (Cont.)
5. Click Next after reading the set- 6. When setup is complete, click Fintings.
ish to exit the setup wizard.
Chapter 3
7. Launch ASUS AP Manager
through “Start | Programs”.
10
ASUS SpaceLink Access Point
Chapter 3 - Access Point Manager
Connecting to SpaceLink Access Points
Wired Ethernet Cable
Besides using a network hub, you can also connect a LAN cable from your
computer’s network card to the Access Point using either a straight or
crossover cable because the ASUS SpaceLink Access Point RJ-45 port has
auto-crossover capability.
Wireless Connection
If you are using a Notebook PC with a wireless adapter, you can connect to
the ASUS SpaceLink Access Point using the ASUS Access Point Manager
without a wired Ethernet connection.
Across Gateways
The ASUS Access Point Manager can connect to any ASUS SpaceLink
Access Point using its IP address even across gateways. The gateway settings
of the ASUS SpaceLink Access Point and your computer must be set
correctly according to the network environment.
Chapter 3
Searching for SpaceLink Access Points
The computer running the ASUS Access Point Manager must be on the
same IP subnet as the ASUS SpaceLink Access Point.
1. When you open the ASUS Access
Point Manager, it automatically
searches for ASUS SpaceLink Access Points on the same subnet.
You will not be able to see or configure settings until the IP address is
changed so that the subnet matches
that of your computer running the
ASUS Access Point Manager.
ASUS SpaceLink Access Point
11
Chapter 3 - Access Point Manager
Searching for SpaceLink Access Points (Cont.)
2. Click the IP Config tab and change
the IP address and subnet mask.
By default, the ASUS Access Point
Manager shows correct settings of
ASUS SpaceLink Access Points on
the same subnet. For example, if
your ASUS Access Point Manager
software is running on IP address
192.168.8.8 subnet mask
255.255.255.0, you can enter IP address 192.168.8.9 (assuming that
it is not already assigned to another
network device), subnet mask
255.255.255.0. Usually, you should
use the same subnet mask as your
computer.
Note: In some situations, the ASUS Access Point Manager cannot retrieve the MAC address of your ASUS SpaceLink Access
Point. In this case, you should key it in manually. You can see
the MAC address on the sticker after removing the base of the
ASUS SpaceLink Access Point.
Chapter 3
3. Enter the default password asus
(lower case) and click OK.
The password is required to make
setting changes.
Note: If you cannot find any ASUS SpaceLink Access Points due to
a problem in the IP settings, push and hold the “Reset to Defaults”
over five seconds to restore factory default settings.
When using the ASUS Access Point manager through a wireless connection, set your IP to 192.168.39.X (X being any number 1-254 that
is not assigned to another device) if you still cannot connect to any
ASUS SpaceLink Access Points after using “Reset to Defaults”.
12
ASUS SpaceLink Access Point