1
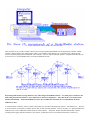
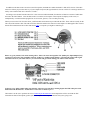
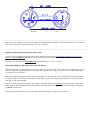
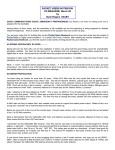
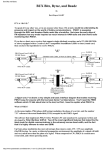
Serving HAM Radio since 1959, On the Web Since 1995
Order Toll Free Monday through Friday, 9 am to 4 pm, 1 800 726 2919 or 1 866 300 1969, Saturday 9 AM to 2 PM ALL Times, Eastern
NO MINIMUM ORDERS, Same Day Shipping, except Sunday and Holidays Please DO NOT call Order Lines with technical questions. Our order
lines are managed by sales personnel, and cannot transfer to tech support. BUXCOMM Tech Support is by expert ARO's, Technicians and Engineers.
*Tech Support; Email; [email protected]
We accept:
PACKET RADIO; The Easy Way !
(a PacketRadio primer) By Buck Rogers K4ABT © G. E. "Buck" Rogers Sr., 1985/2006
When I first wrote PacketRadio: The Easy Way! in 1985, I felt that somehow the new or prospective Packeteer would not feel
comfortable with an attempt at setting up his or her Packet station without some means of tutorial. That was when I decided to write
this tutorial. I had to give the ham who might be willing to give Packet Radio a try, a head start by taking them around the pitfalls that
I had experienced when I set up my first Packet station. When I began my Packet Radio hobby, there were no neighbor Packeteers, no
Packet books, no tutorials, and no PacketRadio page on the internet to provide guidance for a beginning Packeteer. Having said that;...
Here then, is a brief and common-sense guide for the first time PacketRadio operator.
WHAT EQUIPMENT IS NEEDED TO BEGIN OPERATING PACKET?
The equipment needed to get on the air is a VHF transceiver
(without the microphone), AND
a computer or terminal, and a terminal node controller (TNC).
There is packet activity on HF, but VHF is the best place to begin operating PacketRadio. The Terminal Node Controller or TNC
contains a modem similar to the modem used to connect your computer to this internet page, except that it also contains special
firmware especially designed for PacketRadio. This "firmware" converts computer data into "packets" of digital information that can
be sent (error free, via PacketRadio nodes) across the PacketRadio network.
Keyboarding with friends over long distances is easy when using a PacketRadio Network. Very little power is needed, as the
nodes along the network perform as "store and forward" devices for this purpose. The nodes do the "store and forward"
function automatically. All the PacketRadio user has to do is establish the connection, the rest is handled by the nodes
WHAT IS A TNC?
A "Terminal Node Controller" (TNC) is similar to the modem you use when connecting to the internet. One difference is; The TNC
is used to interface our terminal or computer into the "RF" or radio (wireless) medium. There is one other, very significant difference;
Inside the TNC we have added some internal firmware called a "PAD." The pad or "Packet assembler/disassembler" captures
incoming and out-going data and assembles it into "packets" of data that can be sent to and from a data radio or transceiver.
In addition to the data stream conversion to and from packets, the PAD also enables the Push-To-Talk (PTT) circuits of the radio
transceiver. When you press the enter key of your computer keyboard, the typed in data is sent out over the air to the target station or a
nearby "store-and-forward" device known as a "node."
Incoming (received) data from the transceiver is also converted within the PAD, from Packets of data into a stream of usable data
and sent to the TNC/modem. Here the data stream is sent to the serial comport of the computer for display on the screen, or
manipulated by a resident terminal program into on-screen text, pictures, or save-to-disk processing.
When you remove the TNC from the carton, you'll find cables and connectors provided with the TNC. These cable are usually for the
TNC end of the interface cable. The other end of the cables that attach to the transceiver and computer are not supplied. The reason is
that the TNC manufacturer has no idea what kind of radio or computer you might be connecting to.
Before we go any further, look at the drawing above; This is one of the most popular TNC (Radio port, Input/Output (I/O))
connectors in use today. This 5 pin DIN connector is almost a ''standard of the industry.'' Knowing the names of the signal
and control wires for your TNC will save you a lot of time and grief when making your radio to TNC interface.
So that we cover other popular radio port interface connector types, the above drawing depicts the VHF radio port of the
Kantronics KPC/KAM series. ''NOTE that no connections are made to pin 7!''
The burden is on the user to purchase the correct connector for the transceiver and computer that will be used with the TNC.
Determine the kind of microphone, speaker jack, and computer serial comport connectors that you're going to use.
The drawing shown above, is an example of a typical microphone I/O employed on many pre-1997 VHF
transceivers. This drawing is shown for reference only. The numbers identified on the MIC connector are to
assist the user to identify the pin number sequence of a typical eight (8) pin microphone connector.
In some cases the TNC manufacturer furnishes only the connector for the TNC. This means that you must also furnish the cable that
connects the TNC to your computer or terminal.
In most cases, a 25 pin RS-232 serial cable is used between the TNC and computer. The later models employ a 9 pin serial
connector, thus you will need a 9 pin connector/cable. This may vary depending on the type and make of computer terminal being
used. Check the serial comport of your computer to be sure of the type connector that you will need. DO THIS BEFORE GOING TO
THE PARTS SUPPLY HOUSE!
In most cases the computer will have either a 9 pin male connector, or a 25 pin male connector as the RS-232 serial comport. If this is
the case, you will have to supply the female connector for the computer end of the cable. Be sure to note the number of pins on the
computer/terminal connector (and the gender).
The operating manuals supplied with most TNC provide adequate directions for use of various computers. Look for the computer to
terminal node controller (TNC) interface section in the TNC manual. In most applications the cable for your TNC to computer may be
purchased ready-made for many computer vendors.
When all else fails read the manual and set up procedures for your TNC very carefully. The manual that is supplied with your TNC
may have information that is specific to the personality of your TNC.
When you have everything connected together, turn on the computer, load a terminal program. There are lots of terminal programs
available for use with Packet radio.
An example of how the transceiver(s) are interfaced to the TNC is shown in the illustration below.
RADIO ................................................... TNC
Many more interface drawings are included in the FREE Packet handbook described below. The drawing shown here is for illustration
only. I am not responsible for damage resulting from errors, or omissions.
TERMINAL PROGRAMS FOR PACKET OPERATION:
If you have a PC or compatible computer but do not have a Packet terminal program, CLICK HERE to DOWNLOAD the 2004-6
version 2.7 of BUXTERM.EXE The ZIPped file also contains the text version of BUXTERM documentation.
If you prefer, you may download BUXTERM.EXE (it is FREEWARE, give a copy to a friend)
WITH THE TERMINAL PROGRAM "BOOTED" WE BEGIN:
Switch the VHF transceiver ON and turn the volume up a quarter turn or just above the "9:00 o'clock position." Make sure the squelch
is not set too tight. The squelch should be set to a position where the transceiver is quite. The squelch is set in a similar manner that
you would use for voice operation.
There are two communication speeds that are used in Packet Radio. It is necessary that each new Packeteer be aware of the meaning
of each speed, and the relationship to his/her Packet station. The first speed is the terminal to TNC baudrate. The second speed is the
“ON-AIR” or radio (VHF) baudrate.
Since we are about to begin operating in the VHF region we will begin with an on-air HBAUD speed of 1200 baud’s. ABAUD refers
to the terminal to TNC, and HBAUD refers to the RADIO or ON-AIR baudrate (data speed). Most computer and TNCs will operate at
an ABAUD of 9600 baud’s.
As shown in the illustration below, there are three main ingredients that make up a Packet station. They are:
LET'S BEGIN HAVING FUN:
Before we get too deep into the setup and operation of our Packet station, I have one small recommendation. DO NOT.. set a radio on
top of a TNC, and DO NOT set a TNC on top of your radio. Many years ago we found that CPU noise will often inhibit the receive
capability of our transceivers and thus prevent our being able to link to distant nodes or other Packet stations.
CPU noise is a product of poor shielding or radiation from the central processing unit within the TNCees and KPCees. This noise can
be subliminal or low in level, but the CPU noise threshold can be destructive to certain receive components within our transceivers..
enough so, that it will prevent our TNC from decoding some data Packets.
Where possible, locate your Radio and Node side beside, but with at minimum of 4 inches between them... horizontally spaced. DO
NOT PLACE THE TNC ATOP THE TRANSCEIVER, or vice-versa.
If you have followed the setup procedures outlined in the manual that comes with your TNC, then you are ready to take the plunge
into the wonderful world of operating Packet. Verify that all control, signal and ground wires (PTT, RECEIVE, AFSK, and SIGNAL
GROUND) are connected to the correct connector pins.
TURN ON THE TNC!
When you first turn on the TNC you may see garbled text on the screen. This is usually because the terminal to TNC baudrate is not
set to the same parameters. Some TNCs will do a "search" mode to find the setting that you have your terminal program set to/for. If at
first you see garbage on the screen then clear text begins to appear, you should follow the instructions that appear on the screen. If you
are unable to establish communications with the TNC, then review the TNC manual for further instructions. The baudrate of the TNC
has to match the baud rate used by your computer terminal program and serial comport configuration. The comport speed (ABAUD)
is easy to adjust. When the terminal to TNC parameters are correct, a message will appear on the screen showing the TNC
manufacturer's name, firmware (EPROM) version, and date of program manufacture.
Perform a "control C" (press Ctrl and the letter C at the same time); this places the TNC into command (cmd:) mode. This is where all
commands are issued from you to the TNC. Any command that is typed while in the "cmd: mode is received by the TNC as a direct
order.
Once in the command mode, you can press the [Enter] key and each time you press the [Enter] key a "cmd:" prompt should appear on
the screen. This is an indication that you have control (command) of the TNC.
The next step will be to set our callsign into the TNC. To put our call sign into the TNC, at the cmd: prompt, we type and [Enter] the
following:
MY (your call)
I send my call sign to my TNC in the following manner. Type and [Enter] to the keyboard/TNC: (the [Enter] simply means I pressed
the Enter key).
MYcall K4ABT [Enter]
You may now test the TNC to see if your call sign is indeed set into the TNC. To do so, type:
MY [Enter]
The screen should display a response from the TNC with:
MYCALL [Yourcall]
If I enter:
MY [Enter] and the TNC should respond with:
MYCALL K4ABT
This tells us that the computer and TNC are communicating properly.
Now that you have entered your call sign as we have just described, followed by a carriage return, (CR or [Enter], we are ready to set
other commands into our TNC. If there is no response when you type MY, then try typing:
ECHO ON [Enter]
The :cmd:" should appear on the screen again, with a message similar to the following:
ECHO was OFF
NOTE; If you are seeing double letters (i.e.; MMYY CCAALLLL) displayed when you type, this indicates that the ECHO command
should be turned OFF. Type the following :
ECHO OFF
The TNC may respond with:
ECHO was ON
Here are some other commands that we should make active; Type them in as I have shown them below:
MON ON
MCOM ON
MCON OFF
MRPT ON
If you’ve wired the RS-232 interface cable using the RTS, CTS, Txd, Rxd, and Signal Ground leads, then set the XFLO command
OFF. If you did NOT use the RTS, and CTS signals, then make sure the XFLO command is ON.
THE MOMENT OF TRUTH:
There are many frequencies that are set aside for PacketRadio use. The following is a list of VHF, and UHF Packet Radio simplex
frequencies that are a part of the SEDAN Packet Radio bandplan (In Mhz):
144.91, 144.93, 144.95, 144.97, 144.99, 145.010 145.03, 145.05, 145.07, 145.09,
145.51, 145.53, 145.55, 145.57, 145.59, 145.61, 145.63, 145.65, 145.67, 145.69,
145.71, 145.73, 145.75, 145.77, 145.79.
Included in the ARRL future band plans are several simplex (64 kB), 100 kHz backbone frequencies within the 219 to 220 (FCC
approved 16 March 1995 with restrictions, see CQ Magazine PUN June 1995) Mhz UHF band;
As I mentioned earlier, make sure the MONITOR command is ON, then watch the screen. If you have tuned to one of the Packet
frequencies mentioned above and you are not yet seeing data appear on the screen, then try the SEDAN 1200 baud access Packet
frequency of 145.770.
When all else fails call a Packet friend and ask them to connect to your call. If you are using an *SSID of your call, be sure to include
this in the information that you give the friend. While you are about it, ask if he/she uses an SSID.
*WHAT IS AN *SSID ?
Now that I have you wondering; "What is an SSID?" Here is a brief explanation; The term: "Secondary Station IDentification" or
(SSID) is explained as follows:
In Packet Radio you can have up to 15 Secondary Station IDentifiers (SSID's), an example is K4ABT-1 through K4ABT-15.
K4ABT without an SSID extension, is considered the 0 (zero) SSID, thus we could have sixteen different stations/calls on the air at
the same time using our single call sign. That's where the numbers in the call sign come into play. The added dash numbers (-1 etc...)
numbers are used to distinguish the various station(s) or node(s). Your personal mailbox (MYM or MYP) is almost always set into
your TNC as -1 SSID. eg; my mailbox is K4ABT-1 To connect to a station or node which uses an SSID, it is important that we know
what the SSID is before attempting a connect to that station. To try connecting to a station or node without having the appropriate
SSID included in the connect sequence would be like trying to place a long-distance telephone call without using an area code. A
crude analogy, but you get my drift.
You are about to embark upon one of the most fun filled facets of the Ham Radio Hobby. If you are looking for a TNC free
environment, you may try Sound Card to Transceiver, Packet, PSK31, RTTY, and SSTV, using the RASCAL Mark V Transceiver
to PC interface.
NOW, do Packet Radio using your PC sound card and software. CLICK HERE
NOW! we are having fun already! 73 de BucK4ABT