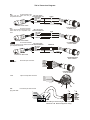
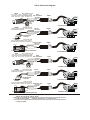
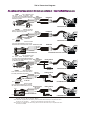
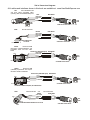
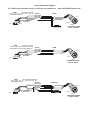
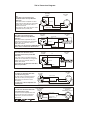
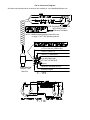
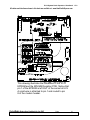
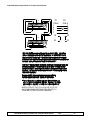
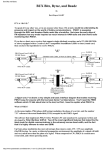
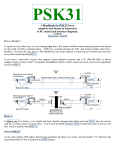
1
ALL cables and interfaces shown in this book are available at:
www.HamRadioExpress.com
PacketRadio
©
This Handbook is dedicated to the PacketRadio System Node Operator (SNO)
by
Buck Rogers, K4ABT
A Guide to PacketRadio operating and X-1J4 TheNET Node implementation.
This manual will serve as a multi-function handbook that supports digital networking and communications. As a PacketRadio
handbook, this manual can provide a “heads-up” for the new PacketRadio user with a wealth of information that applies directly to
the interfacing, installation, and operation of a PacketRadio station, and the implementation of the X-1J4 TheNET node.
This handbook will become a ready-reference in your day-to-day, PacketRadio operations. It is my intent to provide the this
manual as a final gesture of friendship to my many friends of the SEDAN. I hope these documents and tools serve you well, and
may God smile on you as you continue to experience the fun within this wonderful, fun-filled facet of Amateur Radio.
Buck Rogers
E-Mail
[email protected]
K4ABT
PacketRadio Editor, CQ Magazine
Copyrights 1999-2007 BUX CommCo; 115 Luenburg Drive; Evington, Virginia 24550-1702 - 800 726 2919
This Digital Radio Handbook is FREE and is to be freely distributed without any commercial association.
A PacketRadio Primer !
By
Buck Rogers K4ABT
Digital Editor; CQ Magazine
When you first turn on the TNC you may see garbled text on the screen. This is usually because the terminal to TNC
baudrate is not set to the same parameters. Some TNCs will do a "search" mode to find the setting that you have your
terminal program set to/for. If at first you see garbage on the screen then clear text begins to appear, you should follow the
instructions that appear on the screen. If you are unable to establish communications with the TNC, then review the TNC
manual for further instructions. The baud rate of the TNC must match the baud rate used by your computer terminal program
and is easily adjusted. When the terminal to TNC parameters are correct, a message will appear on the screen showing the
TNC manufacturer's name, firmware version, and date of EPROM program.
Perform a "control C" (press Ctrl and the letter C at the same time); this places the TNC into command (cmd:) mode. This
is where all commands are issued from you to the TNC. Any command that is typed while in the "cmd: mode is received by
the TNC as a direct order.
Once in the command mode, you can press the [Enter] key and each time you press the [Enter] key a "cmd:" prompt should
appear on the screen. This is an indication that you have control (command) of the TNC.
The next step will be to set our callsign into the TNC. To put our call sign into the TNC, at the cmd: prompt, we type and
[Enter] the following:
MY (my call) or (your call)
I send my call sign to my TNC in the following manner. Type and [Enter] to the keyboard/TNC: (the [Enter] simply means I
pressed the Enter key).
MY K4ABT [Enter]
You may now test the TNC to see if your call sign is indeed set into the TNC. To do so, type:
MY [Enter] and the TNC should respond with:
MYCALL K4ABT
This lets us know that the computer and TNC are communicating.
Now that you have entered your call sign as we have just described, followed by a carriage return, (CR or [Enter], we are
ready to set other commands into our TNC. If there is no response when you type MY, then try typing:
ECHO ON [Enter]
The :cmd:" should appear on the screen again, with a message similar to the following:
ECHO was OFF
NOTE; If you are seeing double letters (i.e.; MMYY CCAALLLL) displayed when you type, this indicates that the ECHO
command should be turned OFF. Type the following :
ECHO OFF
The TNC may respond with:
ECHO was ON
ALL cables and interfaces shown in this book are available at: www.HamRadioExpress.com
This Packet Radio Handbook is FREE and is to be freely distributed without any commercial association.
Here are some other commands that we should make active; Type them in as I have shown them below:
MON ON
MCOM ON
MCON OFF
MRPT ON
The comport connector to TNC (RS-232 interface) cable should be wired using the RTS, CTS, Txd, Rxd, and Signal Ground leads, then
set the XFLO command OFF. When using the PicturePacket program, you should turn XFLO and FLO OFF.
THE MOMENT OF TRUTH:
The most used frequency for VHF Packet Radio operation is 145.010 MHz; However there are many other frequencies that
are set aside for Packet Radio use. For PicturePacket Picture, and/or Audio transfers, select one of the PacketRadio
frequencies not often used in your area. For best results, use the highest baudrate that your transceiver and TNC are capable
of.
The following is a list of other VHF, and UHF Packet Radio simplex frequencies (In Mhz):
144.91, 144.93, 144.95, 144.97, 144.99, 145.01, 145.03, 145.05, 145.07, 145.09, 145.51, 145.53, 145.55, 145.57, 145.59, 145.61,
145.63, 145.65, 145.67, 145.69, 145.71, 145.73, 145.75, 145.779
Included in the ARRL future band plans are several simplex (64 kB), 100 kHz backbone frequencies within the 219 > 220
Mhz UHF band, (FCC approved 16 March 1995 with restrictions, see CQ Magazine PUN June 1995)
Below are a few frequencies that are set aside for Packet Radio use in the 420 > 450 Mhz band. These are good frequencies to use 9600 bauds in.
430.050, 430.150, 430.250, 430.350, 430.450, 430.550, 430.650, 430.850, 430.950, 440.975, 441.000, 441.025, 441.050, 441.075.
Included in the ARRL future band plans are several simplex (64 kB), 100 kHz backbone frequencies within the 219 to 220
(FCC approved 16 March 1995 with restrictions, see CQ Magazine Packet User’s Notebook, June 1995 and October
1997) Mhz UHF band;
As I mentioned earlier, make sure the MONITOR command is ON, then watch the screen. If you have tuned to one of the
Packet frequencies mentioned above and you are not yet seeing data appear on the screen, then try the SEDAN 1200 baud
access Packet frequency of 145.770.
When all else fails call a Packet friend and ask them to connect to your call. If you are using an *SSID of your call, be sure to
include this in the information that you give the friend. While you are about it, ask if he/she uses an SSID.
AWW SSID !
Now that I have you wondering; "What is an SSID?" Here is a brief explanation for the “Secondary Station IDentification”
(SSID). In Packet Radio you can have up to 15 Secondary Station IDentifiers (SSID's), an example is K4ABT-1 through
K4ABT-15. K4ABT without an SSID extension, is considered the 0 (zero) SSID, thus we could have sixteen different
stations/calls on the air at the same time using our single call sign. That's where the numbers in the call sign come into play.
The added dash numbers (-1 etc...) numbers are used to distinguish the various station(s) or node(s).
To connect to a station or node which uses an SSID, it is important that we know what the SSID is before attempting a
connect to that station. To try connecting to a station or node without having the appropriate SSID included in the connect
sequence would be like trying to place a long-distance telephone call without using an area code. A crude analogy, but you
get my drift.
You are about to embark upon the most fun filled facet of Ham Radio. Give it a try.
ALL cables and interfaces shown in this book are available at: www.HamRadioExpress.com
This Packet Radio Handbook is FREE and is to be freely distributed without any commercial association.
The Fun Is Only Beginning:
This PacketRadio Primer is only a starting point. I’ve written several handbooks for both the new PacketRadio user and the
seasoned veteran. After you have your station assembled, and working, you may wish to learn about the more advanced
levels of Packet operating.
There are books that provide detailed information for the advanced levels of Packet operating and projects for the more
advanced levels of operating. Books for the advanced Packet operator are:
1)
2)
3)
PACKET RADIO OPERATOR'S
PACKET RADIO OPERATOR'S
PacketRadio with Sound and Pictures
HANDBOOK (MFJ Publications)
MANUAL (CQ Publications)
CD ROM from BUX Comm Consultants
Be sure to visit the PacketRadio Networks Home page(s) at:
http: //www.packetradio.com
or
http: //www.packetradio.org
Advanced levels of Packet include transmitting and receiving high resolution color pictures and audio in varing levels of
fidelity, including stereo! All these are sent and received in the error free, PacketRadio AX.25 environment. PacketRadio
digital transmissions are not limited to picture and audio only. The PicturePacket program also supports large ASCII and
binary files.
Included in the books just mentioned, is information on many other uses and applications for digital communications.
YAPP is a protocol that is universally used to transfer binary files to and from the BBS system, and is supported in
PicturePacket™.
This Packet Radio Handbook is FREE and is to be freely distributed without any commercial association.
A PacketRadio FREQUENCY GUIDE FOR THE PACKET OPERATOR:
This guide is for information purposes only, and is subject to change. Some changes in future band-plans may cause changes
in the application of certain Packet frequencies. A possible change in the 219.050 to 219.950 is one example of Packet
frequency changes. The 219 Mhz band is allocated for future trunks and backbone "only." Some frequencies are used for
specific Packet modes. Note that frequencies are in MHz:
80 Meters
3.606 Packet
3.630 Packet
3.642 Packet
144.910 through 144.950 Mhz used for NOS operations.
144.970, 144.990, 145.030, 145.070 145.530, 145.550,
145.570, 145.590, 145.610, 145.630, 145.650, 145.670,
145.690, 145.730, and 145.750 Mhz are used as Local
Area Network (LAN's) and often ported into high-speed
backbones and trunks.
40 Meters
7.090-7.100 Packet
30 Meters
145.010, & 145.050 is most often used as BBS
forwarding and local BBS connects.
145.090, 145.510, & 145.710 are primarily used as DX
spotting nets.
10.145-10.150 Packet
20 Meters
14.101-14.110 Packet
14.230 SSTV
17 Meters
145.770 Nationwide Keyboard to keyboard and
emergency Packet communications only. Some areas use
145.770 Mhz for emergency communications in addition
to keyboard to keyboard communications.
In some east coast areas 145.790 Mhz is used with
Automatic Packet Reporting Systems (APRS), and as a
DXCluster or DX spotting network frequency.
18.100-18.110 Packet
15 Meters
21.099-21.105 Packet
10 Meters
28.099-28.105 Packet
28.150 -28.190 1200 baud Packet
6 Meters
50.60-51.78 Packet
50.62 Packet calling freq
51.12 9600 baud “backbone only”
2 Meters
144.910-145.090 Packet (every 20 kHz)
145.510-145.790 Packet (every 20 kHz)
222 MHz
223.52-223.64 Packet
This Packet Radio Handbook is FREE and is to be freely distributed without any commercial association.
Computer to TNC ComPort
Interfacing
This DB25 to DB25 interface cable illustrates the 5 signals
required for TNC to Computer Comport Hardware
Handshaking.
TECHNICAL NOTES & ILLUSTRATIONS:
Comport 2
DB-25 to DB-25 COMport signals required for PicturePacket
Comport 1
This Computer to TNC interface represents the method to interface TNCs with 9 pin (DE9) Comports.
Clear-To-Send (CTS)
Signal Ground
Ready-To-Send (RTS)
RxData
TxData
7
5 4 3 2
BucK4ABT
Signal Ground
TxData
RxData
5
TNC WITH
9 PIN (DE9)
COMPORT
3 2
8 7
BucK4ABT
Clear-To-Send (CTS)
Ready-To-Send (RTS)
TNC to Transceiver Diagrams
080:
for most Yaesu 8-pin
MFJ-TNC/1278/B
radios and any radios that are pin PK12/96/900/DSP-232
compatible with them.
YAESU
8
7
6
1 MIC AUDIO
2 GROUND
3 PTT
4 REC AUDIO
5 SQUELCH
NC
5-PIN DIN TO TNC/1278/B
084:
8-PIN MICROPHONE
PLUG TO RADIO
for most Icom 8-pin
radios, except 25A and 255A, and any
radios that are pin compatible with
them.
MFJ-TNC/1278/B
PK12/96/900/DSP-232
ICOM
1 MIC AUDIO
2 GROUND
3 PTT
4 REC AUDIO
5 SQUELCH
1
7
5
8
NC
5-PIN DIN TO TNC/1278/B
for most Kenwood/Al-
8-PIN MICROPHONE
PLUG TO RADIO
MFJ-TNC/1278/B
inco 8-pin radios and any radios that are PK12/96/900/DSP-232
pin compatible with them.
KENWOOD
1
7,8
2
1 MIC AUDIO
2 GROUND
3 PTT
4 REC AUDIO
5 SQUELCH
NC
5-PIN DIN TO TNC/1278/B
8-PIN MICROPHONE
PLUG TO RADIO
with cables.
Pre-wired 8-pin connector
1-WHITE
2-BLACK
3-BLUE
4-RED
5-GREEN
6-YELLOW
7-SHIELD
8-BROWN
8-PIN MICROPHONE
PLUG TO RADIO
205:
Open end 5-pin Din connector.
Pin 1
Pin 2
Pin 3
Pin 4
Pin 5
1
3
5
4
268:
Pre-wired 8-pin radio module
plug with cable.
8
7
6
5
4
3
2
1
2
*A
8-WHITE
7-ORANGE
6-BLACK
5-RED
4-GREEN
3-YELLOW
2-BROWN
1-BLUE
* The cable you receive may be color coded as
listed in A or B. Please verify before using.
*B
8-WHITE
7-ORANGE
6-BLACK
5-RED
4-GREEN
3-YELLOW
2-BLUE
1-BROWN
TNC to Transceiver Diagrams
022:
for all Standard
and most Alinco Hts and those
radios that are pin compatible with
them.
MFJ-TNC-2/1278/B
.22 uF
1 MIC AUDIO
2 GROUND
3 PTT
4 REC AUDIO 22 K
5 SQUELCH
Standard / Alinco
SM. TIP
SLEEVES
NC
LG. TIP
NC
SM. RING
5-PIN DIN TO TNC/1278/B
024B:
for most Icom,
Yaesu, and Radio Shack Hts and
those radios that are pin compatible
with them.
PK12/96/900/DSP-232
.22 uF
1 MIC AUDIO
2 GROUND
3 PTT
2.2 K
4 REC AUDIO
5 SQUELCH
MICROPHONE
PLUG
TO HT
Standard / Alinco
SM. TIP
SLEEVES
NC
LG. TIP
NC
SM. RING
5-PIN DIN TO PK12/96/900/DSP-232
024:
for most Icom, Yaesu,
and Radio Shack Hts and those radios MFJ-TNC-2/1278/B*
that are pin compatible with them.
1 MIC AUDIO
2 GROUND
3 PTT
4 REC AUDIO
5 SQUELCH
SM. TIP
SLEEVES
NC
LG. TIP
NC
SM. RING
* For MFJ-1278 Install JMP L for Radio Port 1 and JMP K
for Radio Port 2
MICROPHONE
PLUG
* For MFJ TNC-2 Install JMP K
5-PIN DIN TO TNC
026:
for most Kenwood Hts,
except 2500, and those radios that are pin MFJ-TNC-2/1278/B
TO HT
PK12/96/900/DSP-232
KENWOOD
1 MIC AUDIO
2 GROUND
3 PTT
4 REC AUDIO
5 SQUELCH
LG. RING
SM. SLEEVE
LG. SLEEVE
SM. TIP
NC
MICROPHONE
PLUG
TO HT
5-PIN DIN TO TNC
224:
Open end Ht plug/cable
for most Icom/Yaesu/Radio Shack/Alinco
560 Hts and those radios that are pin
Open end Ht plug/cable
226:
for most Kenwood Hts, except 2500, and
those radios that are pin compatible with
them.
222:
Open end Ht
plug/cable for most Hts with split
connectors, including Alinco DJ160.
MICROPHONE
PLUG
TO HT
ICOM / YAESU
Radio Shack
SM. TIP
LG. & SM. SLEEVE
LG. TIP(UNSWITCH)
SM. RING
MICROPHONE
PLUG
TO HT
LG. RING
SM. SLEEVE
LG. SLEEVE
SM. TIP
LG. TIP(NO CONNECTION)
RED-SM. TIP
BLUE-SM. RING
MICROPHONE
PLUG
TO HT
SMALL PLUG
SHIELD-SM. SLEEVE
WHITE-LG. TIP
SHIELD-LG. SLEEVE
LARGE PLUG
TNC to Transceiver Diagrams
T- 101
MFJ-TNC
KENWOOD
1 MIC AUDIO
2 GROUND
3 PTT
4 REC AUDIO
5 SQUELCH
LG. RING
SM. SLEEVE
LG. SLEEVE
SM. TIP
NC
5-PIN DIN TO TNC
MICROPHONE
PLUG
TO HT
T- 102
MFJ-TNC
ICOM
1 TX AUDIO
Install capacitor *
SLEEVES
2 GROUND
INSTALL resistor* SM. TIP
3 PTT
LG. TIP
4 REC AUDIO
NC
5 SQUELCH
*See HT Keying Circuit on page 2
5-PIN DIN TO TNC
T- 103
MICROPHONE
PLUG
TO HT
MFJ-TNC
YAESU
Install capacitor *
1 TX AUDIO
SLEEVES
2 GROUND
INSTALL resistor* SM. TIP
3 PTT
LG. TIP
4 REC AUDIO
NC
5 SQUELCH
*See HT Keying Circuit on page 2
5-PIN DIN TO TNC
MICROPHONE
PLUG
TO HT
TNC to Transceiver Diagrams
T-104
MFJ-TNC
YAESU
1 MIC AUDIO
2 GROUND
3 PTT
4 REC AUDIO
5 SQUELCH
2
1
3
To Ext. Radio Speaker
NC
5-PIN DIN TO MFJ-1271
4-PIN MICROPHONE
PLUG TO RADIO
T-105
MFJ-TNC
1
2
3
4
5
MIC AUDIO
GROUND
PTT
REC AUDIO
SQUELCH
KENWOOD
1
3,4
2
To Ext. Radio Speaker
NC
5-PIN DIN TO MFJ-1271
4-PIN MICROPHONE
PLUG TO RADIO
T-106
MFJ-TNC
1
2
3
4
5
MIC AUDIO
GROUND
PTT
REC AUDIO
SQUELCH
ICOM
1
4
2
To Ext. Radio Speaker
NC
5-PIN DIN TO MFJ-1271
4-PIN MICROPHONE
PLUG TO RADIO
TNC to Transceiver Diagrams
080M:
MFJ TNC/Multi-mode
and other TAPR compatible TNCs
TNC-2
(including AEA PK12/PK96/PK900/DSP and compatibles
-232) and most Yaesu RJ-45S 8-pin
1
2
3
4
MIC AUDIO
GROUND
PTT
REC AUDIO
YAESU
8
7
6
5
4
3
2
1
4
5
3
2
END
VIEW
5-PIN DIN TO TNC
8-PIN MODULAR PLUG TO RADIO
1 4 2 5 3
080MX:
AEA PK-232 Multi-
mode controller and most Yaesu RJ-45S
8-pin Modular plug radios.
PK-232
1
2
4
5
REC AUDIO
MIC AUDIO
GROUND
PTT
YAESU
5-PIN CONNECTOR
TO PK-232
Pin 1
8-PIN MODULAR PLUG TO RADIO
Pin 5
080MYV:
Kantronics KAM
(VHF port)/KPC3/KP9612 and compatible TNCs and most Yaesu RJ-45S 8-pin
Kantronics VHF
1
6
3
5
Pin 1
MIC AUDIO
GROUND
PTT
REC AUDIO
YAESU
084M:
8
7
6
5
4
3
2
1
4
5
3
2
Pin 5
Pin 9 9-PIN DB CONNECTOR
Pin 6
8
7
6
5
4
3
2
1
2
4
5
3
8-PIN MODULAR PLUG TO RADIO
MFJ TNC/Multi-mode
and other TAPR compatible TNCs
(including AEA PK12/PK96/PK900/DSP
TNC-2
-232) and most Icom RJ-45S 8-pin and compatibles
1
2
3
4
5-PIN DIN TO TNC
MIC AUDIO
GROUND
PTT
REC AUDIO
ICOM
1
2
3
4
5
6
7
8
6
5
4
3
END
VIEW
8-PIN MODULAR PLUG TO RADIO
1 4 2 5 3
084MX:
AEA PK-232 Multi-
mode controller and most Icom RJ-45S 8pin Modular plug radios.
PK-232
1
2
4
5
REC AUDIO
MIC AUDIO
GROUND
PTT
ICOM
5-PIN CONNECTOR
TO PK-232
Pin 1
8-PIN MODULAR PLUG TO RADIO
Pin 5
084MYV:
Kantronics KAM
(VHF port)/KPC3/KP9612 and compatible TNCs and most Icom RJ-45S 8-pin Kantronics VHF
Pin 1
Pin 6
1
2
3
4
5
6
7
8
3
6
5
4
1
6
3
5
MIC AUDIO
GROUND
PTT
REC AUDIO
Pin 5
Pin 9 9-PIN DB CONNECTOR
1
2
3
4
5
6
7
8
ICOM
6
5
4
3
8-PIN MODULAR PLUG TO RADIO
* Kenwood cables are compatible with the following radios and those radios that are pin compatible with them :
TM-732A, TM-741A, TM-742, TM-641A, TM-942
* ICOM cables are compatible with the following radios and those radios that are pin compatible with them :
IC-2340, IC-281H, IC-2000H
NOTE: Not compatible with D -100H and IC-2700H
* Yaesu cables are compatible with the following radios and those radios that are pin compatible with them :
FT-2400H, FT-2500M
TNC to Transceiver Diagrams
ALL cables and interfaces shown in this book are available at: www.HamRadioExpress.com
086M:
MFJ TNC/Multi-mode
and other TAPR compatible TNCs
TNC-2
(including AEA PK12/PK96/PK900/DSP
-232) and most Kenwood RJ-45S 8-pin and compatibles
1 MIC AUDIO
Modular plug radios.
2 GROUND
3 PTT
4 REC AUDIO
KENWOOD
8
7
6
5
4
3
2
1
6
5
4
7
END
VIEW
5-PIN DIN TO TNC
8-PIN MODULAR PLUG TO RADIO
1 4 2 5 3
5086MX:
AEA PK-232 Multi-
mode controller and most Kenwood RJ45S 8-pin Modular plug radios.
PK-232
1 REC AUDIO
2 MIC AUDIO
4 GROUND
5 PTT
KENWOOD
8
7
6
5
4
3
2
1
7
6
5
4
5-PIN CONNECTOR
TO PK-232
Pin 1
Pin 5
086MYV:
8-PIN MODULAR PLUG TO RADIO
Kantronics KAM
(VHF port)/KPC3/KP9612 and compatible TNCs and most Kenwood RJ-45S 8-
Kantronics VHF
KENWOOD
1 MIC AUDIO
6 GROUND
3 PTT
5 REC AUDIO
6
5
4
7
Pin 1
Pin 5
Pin 6
Pin 9
088M:
9-PIN DB CONNECTOR
8-PIN MODULAR PLUG TO RADIO
MFJ TNC/Multi-mode
and other TAPR compatible TNCs
(including AEA PK12/PK96/PK900/DSP
TNC-2
-232) and most Radio Shack RJ-45S 8- and compatibles
pin Modular plug radios.
1 MIC AUDIO
2 GROUND
3 PTT
4 REC AUDIO
RADIO SHACK
1
2
3
4
5
6
7
8
5
2
6
END
VIEW
5-PIN DIN TO TNC
3.5 mm Plug
1 4 2 5 3
088MX:
8
7
6
5
4
3
2
1
8-PIN MODULAR PLUG TO RADIO
AEA PK-232 Multi-
mode controller and most Radio Shack
RJ-45S 8-pin Modular plug radios.
PK-232
2 MIC AUDIO
4 GROUND
5 PTT
1 RECORD AUDIO
RADIO SHACK
1
2
3
4
5
6
7
8
5
2
6
5-PIN CONNECTOR
TO PK-232
Pin 1
Pin 5
088MYV:
3.5 mm Plug
8-PIN MODULAR PLUG TO RADIO
Kantronics KAM
(VHF port)/KPC3/KP9612 and compatible TNCs and most Radio Shack RJ-45S
Pin 1
Pin 5
Kantronics VHF
RADIO SHACK
1 MIC AUDIO
6 GROUND
3 PTT
5 REC AUDIO
5
2
6
9-PIN DB CONNECTOR
Pin 6
Pin 9
8-PIN MODULAR PLUG TO RADIO
3.5 mm Plug
* Kenwood cables are compatible with the following radios and those radios that are pin compatible with them :
TM-732A, TM-741A, TM-742, TM-641A, TM-942
* Icom cables are compatible with the following radios and those radios that are pin compatible with them :
IC-2340, IC-281, IC-2000H
NOTE: Not compatible with D-100H and IC-2700H.
* Yaesu cables are compatible with the following radios and those radios that are pin compatible with them :
FT-2400H, FT-2500M
1
2
3
4
5
6
7
8
TNC to Transceiver Diagrams
ALL cables and interfaces shown in this book are available at: www.HamRadioExpress.com
100:
MFJ TNC/Multi-mode
and other TAPR compatible TNCs
(including AEA PK12/PK96/PK900) and
TNC
1 MIC AUDIO
2 GROUND
3 PTT
4 REC AUDIO
Data Radio
1
2
3
4
END
VIEW
END
VIEW
5-PIN DIN TO TNC
5-PIN DIN TO Data Radio
1 4 2 5 3
1 4 2 5 3
100X:
AEA PK-232 MultiPK-232
1 REC AUDIO
2 MIC AUDIO
4 GROUND
5 PTT
Data Radio
4
1
2
3
END
VIEW
5-PIN CONNECTOR
TO PK-232
5-PIN DIN TO Data Radio
1 4 2 5 3
Pin 5
Pin 1
100YV:
Kantronics KAM
(VHF/1200 port)/KPC3/KP9612 and
compatible TNCs and MFJ Data
Radio.
Kantronics (VHF/1200 port) Data Radio
1
2
3
4
1 MIC AUDIO
6 GROUND
3 PTT
5 REC AUDIO
Pin 1
END
VIEW
9-PIN DB CONNECTOR (Male) TO KANTRONICS
Pin 5
Pin 6
1 4 2 5 3
Pin 9
5-PIN DIN TO Data Radio
100YH:
Kantronics KAM
(HF/9600 port)/KP9612 and compatible TNCs and MFJ Data Radio.
Kantronics (VHF/9600 port) Data Radio
3
4
1
2
1 PTT
2 REC AUDIO
3 MIC AUDIO
11 GROUND
Pin 1
END
VIEW
Pin 8
Pin 9
1 4 2 5 3
Pin 15
5-PIN DIN TO Data Radio
15-PIN DB CONNECTOR (Male) TO KANTRONICS
100Z:
AEA PK-88 TNC
and
PK-88
2 MIC AUDIO
1 GROUND
3 PTT
8 REC AUDIO
Pin 7
MFJ-Data Radio.
Data Radio
1
2
3
4
END
VIEW
Pin 1
8-PIN MICROPHONE CONNECTOR TO PK-88
Pin 8
5-PIN DIN TO Data Radio
1 4 2 5 3
TNC to Transceiver Diagrams
ALL cables and interfaces shown in this book are available at: www.HamRadioExpress.com
080X:
for most Yaesu 8-pin
radios and any radios that are pin PK-232
compatible with them.
1 REC AUDIO
2 MIC AUDIO
4 GROUND
5 PTT
YAESU
Pin 1
8
7
6
5-PIN CONNECTOR
TO PK-232
Pin 1
Pin 7
Pin 5
Pin 8
3.5 mm Plug
084X:
for most Icom 8-pin
radios, except 25A and 255A, and any
radios that are pin compatible with them.
PK-232
1 REC AUDIO
2 MIC AUDIO
4 GROUND
5 PTT
ICOM
8
1
7
5
5-PIN CONNECTOR
TO PK-232
Pin 1
8-PIN MICROPHONE
PLUG TO RADIO
Pin 1
Pin 7
Pin 5
Pin 8
8-PIN MICROPHONE
PLUG TO RADIO
086X:
for most Kenwood/Alinco
8-pin radios and any radios that are pin
compatible with them.
PK-232
Pin 1
5-PIN CONNECTOR
TO PK-232
Pin 5
1 REC AUDIO
2 MIC AUDIO
GROUND (SHIELD)
4 GROUND
5 PTT
SHIELD
KENWOOD
Pin 1
1
7
8
2
Pin 7
3.5 mm Plug
Pin 8
8-PIN MICROPHONE
PLUG TO RADIO
TNC to Transceiver Diagrams
ALL cables and interfaces shown in this book are available at: www.HamRadioExpress.com
022X:
for all Standard
and most Alinco Hts and those
radios that are pin compatible with
them.
PK-232
.22 uF
1 REC AUDIO
2 MIC AUDIO
4 GROUND
5 PTT
22 K
Pin 1
Standard / Alinco
LG. TIP
SM. TIP
LG. SLEEVE
SM. SLEEVE
SM. RING
Pin 5
5-PIN CONNECTOR
TO PK-232
MICROPHONE
PLUG
TO HT
024X:
for most Icom, Yaesu,
and Radio Shack Hts and those radios that
are pin compatible with them.
PK-232
.33 uF
1 REC AUDIO
2 MIC AUDIO
4 GROUND
5 PTT
YAESU / ICOM
RADIO SHACK
LG. TIP
SM. TIP
SLEEVES
SM. RING
1K
Pin 1
Pin 5
MICROPHONE
PLUG
TO HT
5-PIN CONNECTOR
TO PK-232
026X:
for most Kenwood Hts,
except 2500, and those radios that are pin
compatible with them.
PK-232
1 REC AUDIO
2 MIC AUDIO
4 GROUND
5 PTT
KENWOOD
SM. TIP
LG. RING
SM. SLEEVE
LG. SLEEVE
5-PIN CONNECTOR
TO PK-232
Pin 1
Pin 5
MICROPHONE
PLUG
TO HT
TNC to Transceiver Diagrams
All cables and interfaces shown in this book are available at: www.HamRadioExpress.com
028YV:
for KAM VHF port to all
Standard and most Alinco Hts, and any radios
that are pin compatible with them.
KAM
.22 uF
Pin 1
22 K
Pin 5
1 MIC AUDIO
3 PTT
5 REC AUDIO
6 GROUND
RADIO SHACK
SM. TIP
LG. SLEEVE
LG. TIP
SM. SLEEVE
SM. RING
9-PIN DB CONNECTOR
Pin 6
Pin 9 TO KANTRONICS KAM
MICROPHONE
PLUG
TO HT
024YV:
for KAM VHF port to most
Icom, Yaesu, or Radio Shack Hts and any radios
that are pin compatible with them.
.22 uF
Pin 1
2.2 K
Pin 5
KAM
1 MIC AUDIO
3 PTT
5 REC AUDIO
6 GROUND
YAESU / ICOM
Radio Shack
SM. TIP
LG. SLEEVE
LG. TIP
SM. SLEEVE
MICROPHONE
PLUG
TO HT
9-PIN DB CONNECTOR
Pin 9 TO KANTRONICS KAM
Pin 6
for KAM VHF port to most
026YV:
Kenwood Hts, except 2500, and any radios that
are pin compatible with them.
KAM
Pin 1
Pin 5
1 MIC AUDIO
3 PTT
5 REC AUDIO
6 GROUND
KENWOOD
LG. RING
LG. SLEEVE
SM. TIP
SM. SLEEVE
9-PIN DB CONNECTOR
Pin 9 TO KANTRONICS KAM
Pin 6
for KAM VHF port to most
080YV:
Yaesu 8-pin radios, and any radios that are pin
compatible with them.
KAM
Pin 1
Pin 5
Pin 6
1 MIC AUDIO
3 PTT
5 REC AUDIO
6 GROUND
MICROPHONE
PLUG
TO HT
YAESU
8
6
Pin 1
7
9-PIN DB CONNECTOR
Pin 9 TO KANTRONICS KAM
Pin 7
3.5 mm Plug
Pin 8
084YV:
for KAM VHF port to most
Icom 8-pin radios (except 25A and 255A), and
any radios that are pin compatible with them.
KAM
Pin 1
Pin 5
Pin 6
1 MIC AUDIO
3 PTT
5 REC AUDIO
6 GROUND
9-PIN DB CONNECTOR
Pin 9 TO KANTRONICS KAM
8-PIN MICROPHONE
PLUG TO RADIO
ICOM
1
5
8
7
Pin 1
Pin 7
Pin 8
8-PIN MICROPHONE
PLUG TO RADIO
TNC to Transceiver Diagrams
All cables and interfaces shown in this book are available at: www.HamRadioExpress.com
086YV:
for KAM VHF port to most
Kenwood / Alinco 8-pin radios, and those radios
that are pin compatible with them.
KAM
YAESU
1 MIC AUDIO
3 PTT
5 REC AUDIO
6 GROUND
Pin 1
Pin 5
1
2
7
8
Pin 1
9-PIN DB CONNECTOR
Pin 6
Pin 7
Pin 9 TO KANTRONICS KAM
3.5 mm Plug
Pin 8
8-PIN MICROPHONE
PLUG TO RADIO
080YH:
for KAM HF port to most
Yaesu 8-pin radios, and those radios that are
pin compatible with them.
KAM
1 MIC AUDIO
2 GROUND
3 PTT
6 REC AUDIO
6
8-PIN DIN TO TNC
YAESU
8
7
6
Pin 1
8
7
END
1
Pin 7
3 VIEW
3.5 mm Plug
5
4
Pin 8
2
8-PIN MICROPHONE
PLUG TO RADIO
084YH:
for KAM HF port to most
Icom 8-pin radios, except 25A and 255A, and
those radios that are pin compatible with them.
KAM
1 MIC AUDIO
2 GROUND
3 PTT
6 REC AUDIO
ICOM
1
7
5
8
Pin 1
8
6
8-PIN DIN TO TNC
7
1
3
END
VIEW
Pin 7
5
4
Pin 8
2
8-PIN MICROPHONE
PLUG TO RADIO
086YH:
for KAM HF port to most
Kenwood / Alinco 8-pin radios, and any radios
that are pin compatible with them.
KAM
1 MIC AUDIO
2 GROUND
3 PTT
6 REC AUDIO
YAESU
1
8
2
7
Pin 1
8
6
8-PIN DIN TO TNC
7
1
3
4
5
2
END
VIEW
Pin 7
3.5 mm Plug
Pin 8
8-PIN MICROPHONE
PLUG TO RADIO
TNC to Transceiver Diagrams
All cables and interfaces shown in this book are available at: www.HamRadioExpress.com
025B THIS CABLE NORMALLY USED FOR MFJ TNC TO MFJ DataRadio
Description: Shielded 5-pin Din male-to-male cable
Cable connections as follows:
5-Pin Din Male to 5-Pin Din Male
1 4 2 5 3
FRONT VIEW OF 5-PIN DIN
Wire Color
Pin 1
Pin 1
Black
Pin 2
Pin 2
Green
Pin 3
Pin 3
Red
Pin 4
Pin 4
Yellow
Pin 5
Pin 5
White
Shell
Shell
Shield
LENGTH (INCLUDING CONNECTORS)
Approx. 6 feet
Note: Cable must have shield wires connected to the shell of both connectors.
TNC to Transceiver Diagrams
6-Pin Mini DIN Male
(Pin Side)
RADIO
60
5-Pin DIN Male
(Pin Side)
TNC
Receive Audio
This cable is for Kenwood, Yaesu,
and Azden radios with 6-pin Mini DIN
Data Ports.
This cable could be compatible with other
radios with the same Data port configuration.
Please check your Kenwood, Yaesu, or
Azden radio manual.
This cable is for MFJ TNCs and other TNC2
compatibles with 5-pin DIN ports.
5
6
3
2
Ground
Transmit Audio
PTT
This cable is for Kenwood, Yaesu,
and Azden radios with 6-pin Mini DIN
Data Ports.
This cable could be compatible with other
5
radios with the same Data port configuration.
3
Please check your Kenwood, Yaesu, or
Azden radio manual.
This cable is for the Kantronics KAM/KAM+ VHF,
KPC-3, KPC4, and KPC-9612 1200 baud Port
DB-9 Pin Male
(Pin Side)
TNC
Receive Audio
PTT
6
1
Cable Shell
4
1
2
6
3
7
5
4
8
9
2
Ground
Transmit Audio
6-Pin Mini DIN Male
(Pin Side)
RADIO
YQ
This cable is for Kenwood, Yaesu,
and Azden radios with 6-pin Mini DIN
Data Ports.
5
4
2
6-Pin Mini DIN Male
(Pin Side)
RADIO
60YV
3
1
Cable Shell
4
1
PTT
DB-15-Pin Male
(Pin Side)
TNC
Receive Audio
This cable could be compatible with other
radios with the same Data port configuration.
Please check your Kenwood, Yaesu, or
Azden radio manual.
This cable is for the Kantronics KPC-9612,
9600 baud port ONLY.
5
6
3
Cable Shell
4
1
2
Ground
Transmit Audio
66
This cable is for Kenwood radios with
13-pin DIN accessory ports.
This cable could be compatible with other
radios with the same port configuration.
Please check your Kenwood or other
radio manual.
This cable is for TNC2 compatibles with
5-pin DIN ports.
66YH
This cable is for Kenwood radios with
13-pin DIN accessory ports.
This cable could be compatible with other
radios with the same port configuration.
Please check your Kenwood or other
radio manual.
5-Pin DIN Male
(Pin Side)
TNC
13-Pin DIN Male
(Pin Side)
RADIO
Receive Audio
1
3
2
4
5
6
7
8
9
10
11
12
1
Transmit Audio
13
Cable Shell
3
4
5
2
Ground
PTT
13-Pin DIN Male
(Pin Side)
RADIO
8-Pin DIN Male
(Pin Side)
KAM/KAM+ HF Port
Receive Audio
1
2
3
4
5
6
7
8
9
10
11
12
7
6
1
Transmit Audio
13
Cable Shell
Ground
PTT
8
4
3
5
2
TNC to Transceiver Diagrams
All cables and interfaces shown in this book are available at: www.HamRadioExpress.com
106
Pre-Wired Open ended 6-Pin Mini DIN cable
Always check continuity between wire
colors and cable pins using an ohmmeter.
Pin 1; Orange
Pin 2; Yellow
Pin 3; Red
Pin 4; Green
Pin 5; Brown
Pin 6; Black
Shell; Bare
6-Pin Mini DIN Male
( Pin Side )
BUX
5
6
3
4
2
1
Pin 1; Black
205
Pin 2; Bare
Pre-Wired open ended 5-pin DIN cable
Pin 3; White
Always check continuity between wire
colors and cable pins with an ohmmeter.
5-Pin DIN Male
( Pin Side )
BUX
Pin 4; Yellow
Pin 5; Red
3
1
Shell; Green
4
5
2
208
Always check continuity between wire
colors and cable pins with an ohmmeter.
Pin 1;
Pin 2;
Pin 3;
Pin 4;
Pin 5;
Pin 6;
Pin 7;
Pin 8;
Yellow
Red
Black
Green
Blue
Bare
White
Brown
8-Pin DIN Male
( Pin Side )
BUX
6
7
1
8
3
4
5
2
213
Pre-Wired open ended 13-pin DIN cable
Always check continuity between wire
colors and cable pins with an ohmmeter.
Pin 1; Lt. Green
Pin 2; Lt. Blue
Pin 3; Pink
Pin 4; Black
Pin 5; White
Pin 6; Gray
Pin 7; Violet
Pin 8; Blue
Pin 9; Green
Pin 10; Yellow
Pin 11; Orange
Pin 12; Red
Pin 13; Brown
Shell; Shield
13-Pin DIN Male
( Pin Side )
BUX
1
5
2
6
3 4
7 8
9 10 11 12
13
020
This cable is for Yaesu hand-held radios
with the single pin microphone connector
similar to the FT-50R and FT-50RD.
RING2
This cable could be compatible with other
TIP
radios with the same port configuration.
Please check your Yaesu or other radio manual.
Sleeve
This cable is for MFJ TNCs and other TNC2
compatibles with 5-pin DIN ports.
5-Pin DIN Male
( Pin Side )
PTT; Pin 3
UX
Transmit Audio; Pin 1
Receive Audio; Pin 4
Ground; Pin 2
Cable Shell
020
This cable is for Yaesu hand-held radios
with the single pin microphone connector
RING2
similar to the FT-50R and FT-50RD.
This cable could be compatible with other
radios with the same port configuration.
Please check your Yaesu or other radio manual. TIP
This cable is for the Kantronics KAM/KAM+ VHF,
KPC-3, KPC4, and KPC-9612 1200 baud Port Sleeve
220
Pre-wired open ended single pin mic cable
Always check continuity between wire
colors and cable pins with an ohmmeter.
Transmit Audio; Pin 1
PTT; Pin 3
DB-9 Pin Male
( Pin Side )
.22 uF
2.2 K Ohm
1
2
6
Receive Audio; Pin 5
Ground; Pin 6 and 9
Tip; Blue
Ring1; Green
Ring2; Red
Sleeve; Shield
3
7
5
4
8
9
TNC to Transceiver Diagrams
All cables and interfaces shown in this book are available at: www.HamRadioExpress.com
This cable is for the following
ICOM Radios:
IC-725, 726, 728, 729, 735, 736, 737,
737A, 738, 756, 761, 765, 775DSP, 781
8-Pin DIN Male
( Pin Side )
RADIO
6
This cable configuration could be
compatible with other radios with the
same Accessory Port configuration.
Please check your ICOM Radio manual.
1
3
Receive Audio
5
4
3
5
4
2
2
Transmit Audio
Shell
Ground
PTT
8-Pin DIN Male
( Pin Side )
KAM+/KAM HF
8-Pin DIN Male
( Pin Side )
RADIO
6
Receive Audio
7
8
1
This cable configuration could be
compatible with other radios with the
same Accessory Port configuration.
Please check your ICOM Radio manual.
This cable configuration uses the 8-Pin
DIN Accessory Port, NOT the MIC.
This cable is for the following ICOM
VHF transceivers:
IC-275. 375, 475, 575, 1275, 820H, 821H
8
1
This cable configuration could be
compatible with other radios with
the same Accessory Port configuration.
Please check your ICOM Radio manual.
This cable configuration uses the 8-Pin
DIN Accessory Port, NOT the MIC.
This cable is for the following
ICOM Radios:
IC-725, 726, 728, 729, 735, 736, 737,
737A, 738, 756, 761, 765, 775DSP, 781
7
3
5
4
2
Ground
PTT
Transmit Audio
8-Pin DIN Male
( Pin Side )
RADIO
5-Pin DIN Male
( Pin Side )
TNC
7
6
8
1
3
Receive Audio
5
4
2
PTT
This cable configuration uses the 8-Pin
DIN Accessory Port, NOT the MIC.
This cable is for the following ICOM
VHF transceivers:
IC-275. 375, 475, 575, 1275, 820H, 821H
This cable configuration could be
compatible with other radios with the
same Accessory Port configuration.
Please check your ICOM Radio manual.
Ground
8-Pin DIN Male
( Pin Side )
RADIO
DB-9-Pin Male
( Pin Side )
KAM+/KAM/KPC-3, 4 VHF Port
PTT
6
7
8
1
5
4
1
3
Receive Audio
2
This cable configuration uses the 8-Pin
DIN Accessory Port, NOT the MIC.
This cable is also compatible with the
KPC-9612 1200 Baud Port.
Cable Shell
Transmit Audio
Ground
Transmit Audio
2
6
3
7
5
4
8
9
TNC to Transceiver Diagrams
6-Pin Mini DIN Male
(Pin Side)
RADIO
60
5-Pin DIN Male
(Pin Side)
TNC
Receive Audio
This cable is for Kenwood, Yaesu,
and Azden radios with 6-pin Mini DIN
Data Ports.
This cable could be compatible with other
radios with the same Data port configuration.
Please check your Kenwood, Yaesu, or
Azden radio manual.
This cable is for MFJ TNCs and other TNC2
compatibles with 5-pin DIN ports.
5
6
3
2
Ground
Transmit Audio
PTT
This cable is for Kenwood, Yaesu,
and Azden radios with 6-pin Mini DIN
Data Ports.
This cable could be compatible with other
5
radios with the same Data port configuration.
3
Please check your Kenwood, Yaesu, or
Azden radio manual.
This cable is for the Kantronics KAM/KAM+ VHF,
KPC-3, KPC4, and KPC-9612 1200 baud Port
DB-9 Pin Male
(Pin Side)
TNC
Receive Audio
PTT
6
1
1
Cable Shell
4
3
2
6
7
5
4
8
9
2
Ground
Transmit Audio
6-Pin Mini DIN Male
(Pin Side)
RADIO
YQ
This cable is for Kenwood, Yaesu,
and Azden radios with 6-pin Mini DIN
Data Ports.
5
4
2
6-Pin Mini DIN Male
(Pin Side)
RADIO
60YV
3
1
Cable Shell
4
1
PTT
DB-15-Pin Male
(Pin Side)
TNC
Receive Audio
This cable could be compatible with other
radios with the same Data port configuration.
Please check your Kenwood, Yaesu, or
Azden radio manual.
This cable is for the Kantronics KPC-9612,
9600 baud port ONLY.
5
6
3
Cable Shell
4
1
2
Ground
Transmit Audio
66
This cable is for Kenwood radios with
13-pin DIN accessory ports.
This cable could be compatible with other
radios with the same port configuration.
Please check your Kenwood or other
radio manual.
This cable is for TNC2 compatibles with
5-pin DIN ports.
66YH
This cable is for Kenwood radios with
13-pin DIN accessory ports.
This cable could be compatible with other
radios with the same port configuration.
Please check your Kenwood or other
radio manual.
5-Pin DIN Male
(Pin Side)
TNC
13-Pin DIN Male
(Pin Side)
RADIO
Receive Audio
1
3
2
4
5
6
7
8
9
10
11
12
1
Transmit Audio
13
Cable Shell
3
4
5
2
Ground
PTT
13-Pin DIN Male
(Pin Side)
RADIO
8-Pin DIN Male
(Pin Side)
KAM/KAM+ HF Port
Receive Audio
1
2
3
4
5
6
7
8
9
10
11
12
7
6
1
Transmit Audio
13
Cable Shell
Ground
PTT
8
4
3
5
2
TNC to Transceiver Diagrams
All cables and interfaces shown in this book are available at: www.HamRadioExpress.com
YAESU FT-747 TO KANTRONICS KAM HF PORT.
T - 107
YAESU FT-757 GTX-II TO KANTRONICS KAM HF PORT
T - 108
YAESU FT-757 GXII
T - 109
TAPR TNC2
TNC to Transceiver Diagrams
This interface is for use at 1200 bps only.
Special modifications must be made for use
at 9600 bauds. See OPERATING MANUAL Pg 46
Connector numbered
viewing solder pins
on connector.
PTT/Mic Ground
YAESU FT-2500M
2 Meter Transceiver
5 PIN DIN (MALE) CONNECTOR
MFJ-1270CQ Turbo
T - 110
5 PIN DIN (MALE) CONNECTOR
MFJ-1270CQ Turbo
9600 baud TNC/Node
Connector numbered
viewing solder pins
on connector.
NOTE: 1200/9600 baudrate seletcion at menu 48
6 PIN MINI-DIN on rear of late
model YAESU FT-3000M.
A F S K Det Out (1200 b/s Rx)
Push-To-Talk (PTT)
Data IN (Tx Data input)
6 pin Mini-DIN at rear
of YAESU FT-3000M
Ground
GMSK Det Out (9600 b/s Rx)
6 PIN "MINI DIN"
YAESU FT-3000M
Data Port
Squelched Signal
T - 111
TNC to Transceiver Diagrams
All cables and interfaces shown in this book are available at: www.HamRadioExpress.com
TNC standard 5 pin DIN
MFJ-1270/PK-96/PacComm etc...
YAESU FT-51R
Hand-Held
Dual-Band Transceiver
T - 112
2200 OHMS
MIC & PTT
4 uF
GROUND
RING 1
NOT USED
Special 4 circuit 3.5 mm plug
YAESU PN # P1090896
BucK4ABT
RECEIVE AF
GND
TNC standard 5 pin DIN
MFJ-1270/PK-96/PacComm etc...
T - 113
Disable battery saver when
operating Packet.
YAESU FT-10R (VHF)
and FT-40R (UHF)
Hand-Held Transceivers
TNC to Transceiver Diagrams
All cables and interfaces shown in this book are available at: www.HamRadioExpress.com
Connector numbered
viewing solder pins
on connector.
5 PIN DIN (MALE) CONNECTOR
MFJ-1270CQ Turbo
9600 baud TNC/Node
NOTE: For 1200/9600 baud switching, see page 18
of OPERATING MANUAL.
6 PIN MINI-DIN on rear of late
model YAESU FT-8100R.
BucK4ABT
A F S K Det Out (1200 b/s Rx)
Push-To-Talk (PTT)
Data IN (Tx Data input)
BucK4ABT
6 pin Mini-DIN at rear
of YAESU FT-8100R
Ground
6 PIN "MINI DIN"
GMSK Det Out (9600 b/s Rx)
YAESU FT-8100R
Data Port
Squelched Signal
T - 114
TNC to Transceiver Diagrams
All cables and interfaces shown in this book are available at: www.HamRadioExpress.com
5 PIN DIN (MALE) CONNECTOR
MFJ-1270CQ Turbo
9600 baud TNC/Node
NOTE: 1200/9600 baud switching instructions are
on page 17 of FT-847 operating manual.
A F S K Det Out (1200 b/s Rx)
Push-To-Talk (PTT)
Data IN (Tx Data input)
6 pin Mini-DIN at rear
of FT-847 HF/VHF/UHF
Ground
6 PIN "MINI DIN"
YAESU FT-847
Data Port
GMSK Det Out (9600 b/s Rx)
Squelched Signal
T - 115
T - 116
An RF Probe for the Technician and the System Node Operator
The “SNIFFER”
Often referred to as an RF probe, the “sniffer” is a simple RF demodulator or diode detector built into a small
cylinder (the one I use resembles the metal casing of a pocket flashlite I saw at a nearby, “dollar-store), or metal
tube. In the drawing below, I’ve illustrated the component values and the simplicity of its construction.
This valuable tool can be built in less time than it takes to think about it, and as you will soon discover, it will
become one of your most valued service tools. The “sniffer” is plugged into your digital volt-meter or if you are so
lucky; into an old fashioned vacuum tube volt meter (VTVM).
Now the next time you begin tuning a radio that you’ve just installed new rocks into, or moved the frequency
across most of the visible light spectrum, you can find those missing watts. Whoops… better make that the
missing “milliwatts.” For in the beginning, when you begin looking for the power that is NOT there, you’ll need to
begin looking around the first stages of RF. This is where the RF probe comes into play.
Actually the first place you want to look for any sign of RF is at the output of the crystal oscillator. Once you have
power there, move to the next stage, whether it is a buffer stage or a stage in the FM multiplier chain. It won’t
take long to find that you have the perfect tool to begin the tune-up of both the transmitter and receiver crystal
oscillator stages. Tune for optimum power out of each stage and then move to the next stage.
Moving always away from the crystal oscillator stage towards the PA section. It won’t be long before you see RF
power showing up on your watt meter. You know, the watt meter that you have connected to the coax connector
at the radio output. Oh, you know, the one that connects the radio into the “DUMMY” load.
The sniffer will also prevent lots of cracked ferrite bobbins and coil slugs by helping you find RF before you’ve
cracked every bead in the exciter.
The RF probe I use is one that my son Glynn WB4RHO built about 20 years ago. It uses the old 1N34 diode,
however the sniffer can be built with just about any of the 1N914’ or 1N4148’s from your local Radio Shack or
Tech America store. If you are fortunate enough to get your hands on the old 1N34, it seems to be more sensitive
to RF detection than the “fast-switching” diodes like the 1N4148’s.
The lead from the meter into the RF sniffer is a piece of small coaxial cable. I think Glynn used a piece of small
phono shielded cable at both the goes-inntance and the comes-outtance of the probe. The comes-outtance part
of the shield is ONLY the shield. The tip is made from a one inch piece of number 14 tinned (solid) wire. The
shield is bonded to the inside of the metal case of the sniffer. I have a short (3 inch) piece of the flexible shield
extending from the probe (tip) end of the sniffer. Attached to the shield is a small alligator clip for easy attaching
to a ground near the area where I’m tuning.
If you happen to have a D’arsonval (meter with the pointer/needle) try the sniffer with it. If you have only the
digital volt meter, then you are on your own, as here you will have to interpolate the readings high and peak to
meter low or signal digress.
I picked up a Radio Shack meter, an AutoRange VOM model 22-216 for under 50 dollars. Not only is this meter
useful as a all purpose bench VOM, it also works very well with my sniffer.
X1J4 System Node Operator’s Handbook (C)1999-2008
The System Node Operator’s Networking Handbook
(c) 1999-2000 BCC
™
This publication is a composite of the documentation required to build, configure and operate
the X1J4 nodeware.
Visit
the
PacketRadio
Network
pages
at:
http://www.packetradio.com
In this manual we will cover several topics about Packet Radio networking and the X1
nodeware. These topics will cover both the technical and the operating levels of of the
X1 node implementation and configuration. Therefore this journal will be of interest to
both the Packet user, and system node operator (SNO). The X1's extended support for
all areas of Packet Radio from the Local Area Networks, Wide Area Networks,
Backbones, Trunks, Emergency Networks, up to and including TCP/IP, has indeed
provided a full-service node capability for every facet of digital communications that
relate to the AX.25 protocol.
Take the time to read and understand the QUICK Reference. Then study the MODE and PARAMETER
commands of the X-1 system.
My thanks to Dave Roberts G8KBB and Neville Pattinson G0JVU of the Suffolk Data Group for the enjoyment they have afforded the
users of this outstanding networking tool. The foundation for the X-1J code comes from the Nord><Link group. To these authors
we owe a debt of gratitude for theNet and theNet X1J4 Plus.
EDITOR: Buck Rogers K4ABT
X1J4 System Node Operator’s Handbook 1999
Page _____________ 29
X1J4 System Node Operator’s Handbook 1999
INTRODUCING the X-1J4 Network Node
TheNet X-1J extends TheNet X-1H with a number of
additions as detailed below. The main change, however,
is support for a simple deviation meter that shows each
station's deviation in kilohertz in the heard list, by
measuring the receive audio level with an A-D converter
at the end of each packet.
The other changes are: Control of slime trails; The
information text in RAM has been doubled in size; The
info, ctext and btext messages may be multiple lines;
Nodes broadcasts occur 60 seconds after power up;
Optional reconnect to the node following remote
disconnect; PARMS, MODE etc. parameters may be
changed by specifying parameter number and value;
Digi up and downlinks may be selectively en/disabled;
Level 4 retries ( min ) has been reduced to 1 and an
MTU command has been introduced to set MTU data.
The handling of node aliases may be made case
sensitive and TALK may be configured to pass 8 bit
data. The bug in RESET has been found ( finally ) and
corrected.
TheNet X-1H did not extend the functionality of X-1G,
but fixed 3 bugs. In addition, the ARP digi bug patch
released earlier this year has been included in X-1J, as
has another bug in the IP checksum routine.
A menu driven windowing patch utility with context
sensitive help is also included.
The previous releases introduced the following :
•
•
•
•
•
•
•
•
•
•
•
•
A complete IP router,
The ability to remotely set the node's alias,
The ability to listen for 3 extra aliases & invoke BBS
etc,
Selective node broadcast control for 'hash' nodes,
A UI command to send arbitrary UI commands,
Access control list capabilities,
Multi-user conferencing ( the 'TALK' command ),
A CWID keyer,
Better SYSOP authentication,
MHeard list showing callsigns, packets heard & time
since last heard,
MHeard list shows whether a station is a node and /
or TCPIP station.
A CLOSEDOWN command to remotely shut the
node down
X1J4 System Node Operator’s Handbook 1999
•
•
•
•
•
•
•
•
•
•
•
•
•
•
•
•
•
•
•
•
•
•
•
•
•
•
•
•
•
A DXCluster command that operates like the BBS &
Host commands.
A Btext command to set the node's beacon text
message
A Ctext command to set an optional alias connect
text message
The ability to enable or disable any command,
Improved command prompting with only valid
commands shown,
Routes show optionally as alias:callsign or callsign
alone,
Additional control over system reset,
KISS as an alternative to the crosslink protocol,
Hardware handshake controlled host mode
operation,
MODE command for configuring additional
parameters,
BBS command to auto connect to a remote BBS,
HOST command to auto connect to another BBS or
Host,
BYE or QUIT commands to disconnect,
STATS command to display internal statistics,
MANAGER command for system manager access,
AUDIT command to set system audit levels,
Bug fixes ( e.g. info messages too long ),
Changes to the NODES command,
An improved nodes broadcast algorithm for the
crosslink port
Split port nodes broadcast intervals,
Ability to enable & disable nodes broadcasts
selectively on each port.
CQ apologizes nicely if disabled.
Most Escape commands have been replaced with
MODE parameters.
BEACON messages may be digi'd
CALIBRATE command for remote checking of Tx
deviation
LINKS command to show current level 2 links
Configuration of the beacon period
Auto routing of 'connect' to either BBS, DXCluster
or HOST
Remote dump of entire neighbor lists for all nodes
Page _____________ 30
X1J4 System Node Operator’s Handbook 1999
All cables and interfaces shown in this book are available at: www.HamRadioExpress.com
MFJ-1270 version "B"
This drawing illustrates the installation of the X1J4
EPROM and the MFJ52B Deviation PCB. Notice that
pin 1 of the EPROM is left OUT of the socket at U23.
A small wire is attached to pin 1 and routed to pin
8 of the modem header.
PacketRadio Networking Handbook for the SNO
Page _____________ 31
X1J4 System Node Operator’s Handbook 1999
____________________________________________________________________________
All cables and interfaces shown in this book are available at: www.HamRadioExpress.com
BANKSWITCHING FOR TheNet X1
What follows is two versions of how to do the bankswitching. Saying things in two different ways is a
neat way of making sure that ambiguities are exposed, so here goes.
For the reduced TNC2 version, the instructions are simply as follows :
1.
Bend out pin 1 of the EPROM so that when inserted into the socket it will not contact pin 1 of
the socket or any other pin.
2.
Connect a wire from the SIO-0 DTRA pin ( pin 16 ) to the bent out pin ( pin 1 ) of the eprom.
The DTRA signal should also appear on pin 8 of the TAPR modem disconnect header.
The status led will flicker as it now shows the state of the bankswitch signal.
One word of caution - if you can, just check the signal on pin 1 of the eprom - make sure it switches fast
and cleanly - I suspect that if it does not, errors will occur.
PacketRadio Networking Handbook for the SNO
Page _____________ 32
X1J4 System Node Operator’s Handbook 1999
____________________________________________________________________________
The following drawing illustrates the BANKSWITCH connections in the TNC2 or clone.
MFJ-1270 version "B"
This drawing illustrates the installation of the X1J4
EPROM and the MFJ52B Deviation PCB. Notice that
pin 1 of the EPROM is left OUT of the socket at U23.
A small wire is attached to pin 1 and routed to pin
8 of the modem header.
The TNC/Node shown here is the MFJ-1270C, revision 10. The 1270C, revision 11 uses jumpers
to make the EPROM pin one connection. Thus no soldering is required with MFJ-1270C Rev 11.
PacketRadio Networking Handbook for the SNO
Page _____________ 33
X1J4 System Node Operator’s Handbook 1999
____________________________________________________________________________
PacketRadio Networking Handbook for the SNO
Page _____________ 34
PacketRadio Networking Handbook for the SNO
____________________________________________________________________________
Installation and modification of the MFJ-9600 to make the MFJ-1270 into the MFJ-1270CQ Turbo,
9600 baud TNC/X1J4 node.
PacketRadio Networking Handbook for the SNO
Page _____________ 35
PacketRadio Networking Handbook for the SNO
TheNet X-1J
CONFIGURATION OF THE EPROM IMAGE
All cables and interfaces shown in this book are available at: www.HamRadioExpress.com
1. INTRODUCTION
This document describes the build process for creating a ROM image for TheNet X-1J. This
process differs from the previous versions of TheNet-X in that it is delivered as two files rather
than three. This is in response to a number of requests for a simpler process. In addition the
patcher has been considerably changed and utilities for hex conversion are included.
2. Files.
The ROM image comes as two files,
THENET1.X1J
THENET2.X1J
These two files are loaded into memory as described below.
Before loading them however, both should be configured as described in section 3.
In addition, the following files are provided :
PATCH.EXE
INTEL.EXE
INTEL.C
PATCH.EXE is the windowing patch utility for the ROM images. INTEL.EXE are utilities that are
designed to convert binary files into hex notation, in the Intel Intellec and Motorola S formats.
The ROM image consists of two halves, one for the lower half of a 512K EPROM, and one for
the upper half. The files are loaded as shown :
FILENAME
LOAD beginning at HEX address
THENET1.X1J
0000
THENET2.X1J
8000
No information on how to load the files into a programmer is presented as all are different.
Typical scenarios are however given in section 5.
3. CONFIGURATION
Each of the two halves of the ROM image contains two different parts, a common set of drivers
& interrupt routines and part of the functionality of the node. Part 1 contains the level 2, 3 and 4
software. Part 2 contains the switch. Each must be patched in an identical way to reflect the
desired operation as each part contains an identical section at the start of the file for
configuration data. This patching may be done manually or it may be done with the patcher.
The first part of the ROM images is identical to TheNet 1.01 in its configuration. These
parameters are followed by additional ones for the extended version as shown :
PacketRadio Networking Handbook for the SNO
Page _____________ 36
PacketRadio Networking Handbook for the SNO
The PATCH utility
The patch utility will not assist in changing the help text. That text is positioned at the end of
THENET2.X1J. It is a null terminated string of characters. Newlines are represented by the
value 0xd ( decimal 13 ). It can be as long or as short as you like, but don't forget that it causes
the node to be a source of data and if very long could crash the node. ( Not likely in this version
given the space available!).
The patch utility is designed to help configure the two ROM images in a manner that is not as
user hostile as hand crafting a binary image. It is invoked as follows :
PATCH [ file1 file2 ]
If no parameters are given, it will look for files THENET1.X1J and THENET2.X1J in the current
directory. It will stop if it cannot load them. If the images are renamed, they may be given as
parameters. If this is done, both files must be given, with file1 corresponding to part 1 and file2
corresponding to part 2. The program is menu driven, with extensive help provided on the
operation of the program and each parameter. It also tries to make sure that only valid data is
entered.
The program may also be instructed to load and save textual representations of the parameters.
These consist of ASCII files, with one parameter per line. Each parameter consists of the name
of the parameter, and equals sign, and the value for that parameter. The values are mainly
numeric, with the obvious exceptions of things like the callsign, alias, password, info message
etc. To get an example of the format, use the patcher to dump a file and look at it. The idea of
this is not simply to load and dump whole images, but to load partial configurations such as
passwords & info messages only or parameters only. The file may be edited to remove or add
lines as desired. Note that each parameter MUST only occupy one line. For the information
message, whitespace before the first printable character is ignored by the program, and if a
newline is to be included, it is denoted by the sequence \m ( i.e. backslash followed by the letter
m ). Similarly, to include the backslash character itself, a double backslash must be entered, i.e.
\\.
5. Programming examples
There are two utilities included to facilitate conversion to hex for use in programming eproms.
The source of both is also included if anyone wants a different file type. The programs have
been compiled with Turbo C++. Each has the same method of invocation,
INTEL infile outfile [
address ]
These create INTELLEC or S1 type records respectively. Each reads an input binary file and
outputs a hex version. The starting address assumed for the file will be 0000 unless specified
otherwise in the command line.
5.1 Intel format, loading as two halves
1. Use the patch program to create the desired image.
2. execute :
INTEL TheNet1.x1j part1
INTEL TheNet2.x1j part2
3. load part1 into the programmer and program the lower half of the ROM.
load part2 into the upper half.
PacketRadio Networking Handbook for the SNO
Page _____________ 37
PacketRadio Networking Handbook for the SNO
TheNet X1J4
OVERVIEW OF OPERATION
1. INTRODUCTION
This section introduces the main features of TheNet X-1J. This is an update to the previous
paper on version X-1H, and includes a number of changes including the following :
•
•
•
•
•
•
•
•
•
•
•
•
Support for a simple receive signal deviation meter
Control over 'slime trailing'
Info, BText and CText messages may span several lines
Nodes broadcasts occur 60 seconds after power-up
An optional 'reconnect to node' following remote disconnect is supported
PARMS, MODE etc may be changed with offset & new value instead of '* * * 'etc
Optional control over digi uplink & downlink is supported
Transport retries ( min ) has been dropped to 1
An MTU command has been added to allow easy changes to MTU sizes for IP users
Information Messages in RAM may be up to 160 bytes long
Tke TALK command may be set to pass 8 bit data instead of clearing bit 8
Node aliases, at the switch, may be made case sensitive
The software is a derivative of TheNet 1.01 by NORD><LINK. Additional commands and bug
fixes have been included in the release.If your reaction is 'What I really want is ......', then please
read on anyway, especially section 6.
2. STRUCTURE
One of the problems to extending TheNet is the 32 K EPROM limitation imposed by the
architecture of TNC2 clones. The solution to this is to implement bankswitching. For the
MFJ1270B TNC and similar TNC2 clones, this can be achieved by the addition of a single wire
as detailed in the bankswitch modification file. This is at the expense of the HIGH and LOW
commands. The other version that was previously available with HIGH and LOW in it is no
longer supported as it is incompatible with the deviation meter.
PacketRadio Networking Handbook for the SNO
Page _____________ 38
PacketRadio Networking Handbook for the SNO
3. NEW COMMANDS
The following commands have been added to the release
BYE
HOST
MHEARD
MANAGER
TALK
LINKS
CLOSEDOWN
DXCLUSTER
CTEXT
BBSALIAS
DXCALIAS
IPROUTE
IPSTATS
IPBROADCAST
MTU
BBS
STATS
MODE
AUDIT
CALIBRATE
ACL
BTEXT
HELP
ALIAS
HOSTALIAS
QUIT
ARP
IPADDRESS
UI
METER
The following commands have been changed
CQ
NODES
RESET
the <escape> commands
SYSOP
The following features have been added to the code
An Internet Router
Ability to respond to three additional aliases
A CWID keyer
The command processor has been extended
KISS mode operation on the RS232 port
HOST mode support on the RS232 port
Remote configuration of all parameters
Additional textual help messages
Support for a 4 channel ADC used for measuring RX deviation
Other changes as detailed herein.
In addition, a number of small changes have been implemented to satisfy the needs of
specialist situations such as the ability to digi beacon packets.
Network management in this context does not just mean 'setting parameters remotely'. It means
the ability to set, read and interpret various monitors and diagnostic tools. Version X-1C
included the first part of the network management, the MANAGER privilege and the AUDIT
process. Version X-1D extends the auditing and statistics significantly including internal CPU
monitors.
PacketRadio Networking Handbook for the SNO
Page _____________ 39
South East Digital Association Networks SEDAN
____________________________________________________________________________
Version X-1E includes most of the additions that are planned, and version 2 will complete the
functions. No other release before version 2 was planned, but the need to produce a version
with an IP router has prompted this release. The opportunity to experiment with additional
features was therefore taken. The next version was intended to include significant changes
attributable to Hayden Bate G8AMD, but again due to other requirements, another interim
version has been produced ( the main driver being the need locally for the Deviation Meter ).
3.1 BYE or QUIT
There are no parameters to these commands. When entered, they terminate the session. Both
commands do the same thing.
3.2 BBS
The syntax of the command is :
BBS [ * | ? | callsign ]
With no parameter, the command connects to a station previously specified by the sysop.
Setting the BBS destination is done by the use of the BBS command with a callsign as a second
parameter. Setting the BBS to allow this may only be done by a sysop. The '*' option may also
only be executed by the sysop, this command clears a previously specified BBS.
The '?' option ( or any text if not sysop ), prints out the current BBS station setting.
If no BBS is set, the command issues an error message if it is invoked with no other
parameters.
The idea of this command is that, like with the 'BBS' command of the 'BPQ software, a user
may connect to the local BBS from the node.
3.3 HOST
The syntax of the command is :
HOST [ * | ? | callsign ]
This command is very similar to the 'BBS' command. It allows connection to a local host, BBS or
other server. The difference however, is that as long as the TNC is not in 'crosslink' mode ( ie
pin 23 on the RS232 port is high ), and if a callsign is not set, the 'host' command connects to
the local port.
The idea of this command is that, like with the 'BBS' command of the 'BPQ software, a user
may connect to the local BBS, another node or server from this node. For example, if a print
server were connected to the node in 'host' mode, this command would allow connection to it (
like the 'connect' command with no other parameter ). In KISS mode, setting a callsign or node
alias allows connection to another system.
PacketRadio Networking Handbook for the SNO
Page _____________ 40
PacketRadio Networking Handbook for the SNO
3.4 STATS
The STATS command has no parameters. It prints a number of internal TNC statistics. In this
version, this is limited to the level 1 stats of the radio channel and the internal clocks, the level 2
( AX.25 ), 3 and 4 statistics, and the CPU health checks.
For level 1, six pairs of numbers are printed, corresponding to the percentage of time the
transmitter was on followed by the percentage of time the receiver DCD was on, for each of the
last six 10 minute periods. The data is presented most recent period first. Two pairs of numbers
are then displayed showing the transmitter underrun and receiver overrun. These are formatted
as per the level 2 stats with port 0 followed by port 1 for the current hour followed by the totals
for the previous hour. In the case of the RS232 port, underruns are not possible, and an
additional error ( framing ) is included. The RX overrun includes overruns and framing errors.
For level 2, the following are displayed :
Frame checksum errors
Total packets received by the node ( ie sent to it )
Total receiver not ready packets sent
Total receiver not ready packets received
Total number of link timeouts
For each of the level 2 statistics, four
numbers are shown. The first two are
cumulative totals over the period of one
hour, incrementing in real time. The last
two are the totals for the previous hour.
Each pair of numbers is the total for the
radio port followed by the total for the
RS232 ( crosslink ) port.
For checksum errors, port 0 shows
CRC errors and port 1 shows ( when in
'crosslink' protocol mode only ),
checksum errors. As HDLC errors can
be triggered by noise, acceptance of
CRC errors is conditioned by the state
of the DCD line. If DCD is on and an
error is signalled, it will be added to the
count. This reduces the false counts,
but does not eliminate them. Distant
stations that keep the squelch open (
just ) without being properly heard will
result in lots of apparent errors.
For level 3, the number of level 4
frames gatewayed between nodes is
displayed.
Total packets heard
Total packets sent by the node
Total reject packets sent
Total reject packets received
For level 3 and 4 statistics, two
numbers are shown. The first is the
number of frames accumulating for this
hour, and the second number is the
total number of frames for the previous
hour.
For CPU health checking, two statistics
are shown, the CPU loading and the
buffer usage. Each looks like the level 1
stats with 6 numbers corresponding to
the last six 10 minute periods.
The CPU loading shows the number of
times, divided by 100, that the CPU
makes it around its basic internal
scheduler. For a node just switched on,
receiving nothing, this will be about 470
ish for a 4.9 MHz clock. With lots of
nodes, a heard list of 20 stations and
70-80% activity on the radio channel for
it to listen to, this can drop to about
350ish. If it drops to double figures,
worry, as the CPU is beginning to
thrash. At low double figures, the CPU
is pretty much working flatout. Time to
up its clock rate !.
For level 4, the number of transport
frames sent and received by the node
are shown.
PacketRadio Networking Handbook for the SNO
Page _____________ 41
PacketRadio Networking Handbook for the SNO
The BUFFERS statistic shows the
minimum number of free buffers that
the software had available to it during
the last six 10 minute period. This
indicates whether the TNC is failing to
deliver data passed to it for onwards
transmission, as well as how much data
is backed up waiting.
Additional stats needed to analyse this
properly are not yet being collected.
The display also shows the elapsed
time since the last warmstart followed
by the running time since the last
coldstart. Each number is the number
of hours of operation.
3.5 MODE
This command is similar to the PARMS command, and includes the new syntax described in
section 3.32.
It allows a number of other features of the software to be configured remotely. It removes the
need for most of the host mode <escape> commands.
The following parameters may be configured :
The host mode
The CWID send period
The CWID keyer speed
The port nodes broadcast control
The crosslink / kiss control
The Tx delay
The full duplex flag
The RS232 port node broadcast interval
The node broadcast algorithm
The beacon period
The 'connect' redirector
The 'help message enable' flags, case sensitivity & TALK 8 bit flag
The 'hash' node broadcast
port control
Whether the node will listen for the extra aliases
Whether remote disconnect causes reconnection to the switch
Control over 'slime trails'
Control over digipeating up/down links
In operation, it behaves just like the PARMS command.
The mode parameters are as follows :
3.5.1 Host mode control
This parameter controls the 'host' mode. This is the mode of operation of the RS232 port when
pin 23 is 'high'
The valid values are 0 or 1.
In mode 0, the port operates as per the standard node specification. Mode 1 is designed to
allow connection to hosts or modems or similar equipment that expects a 'CD' type of signal to
signify that an incoming / outgoing connection is called for.
PacketRadio Networking Handbook for the SNO
Page _____________ 42
PacketRadio Networking Handbook for the SNO
All cables and interfaces shown in this book are available at: www.HamRadioExpress.com
In mode 1, the <escape> C and <escape> D commands are disabled and the other <escape>
commands do not operate when connected. Instead, hardware handshakes are used to control
connections to and from the TNC.
The TNC monitors pin 20 to determine the state of the host, and signals state changes to the
host with pin 5. When an incoming connect request is received ( by the 'c' command with no
parameters or by the 'host' command ), the TNC raises pin 5 to signal the connection and
expects pin 20 to change state in response.
When the host wishes to connect to the TNC, it signals on pin 20 and the TNC responds with by
changing the state of pin 5.
It handles disconnects in a similar manner. Either the node or the host may initiate disconnects.
This mode is experimental, changes may be made to its operation. It is designed for modems,
print servers or hosts such as UNIX system TTY login drivers.
3.5.2 CWID control
The next two parameters control the CWID keyer.
The first parameter is the CWID repeat period in seconds. Valid values are 0 to 3600. 0 disables
it but do not set it below 120 apart from to disable it.
The second parameter controls the keyer speed. Specifically, it sets the number of 10
millisecond periods per dot and per inter symbol delay.
The speed of sending is 120/n, so setting n to 6 gives 20 wpm. Valid values are 4 to 10,
corresponding to speeds of 30 and 12 wpm respectively.
3.5.3 Node broadcast control
This parameter allows control to be exercised over which ports nodes broadcasts are sent.
Valid settings are 0 - 3.
Value 0 disables node broadcasts. Value 3 ( the default ) works as normal. A value of 1 enables
broadcasts on the HDLC port only whilst a value of 2 enables broadcasts on the crosslink port
only.
3.5.4 Crosslink / kiss
This parameter is used to set the communications protocol used on the crosslink port when pin
23 is tied low.
The valid values are 0, 1, 2 or 3
Mode 0 - standard crosslink protocol enabled
Mode 1,2,3 - use KISS instead of crosslink.
In mode 1, KISS simply replaces the crosslink protocol In mode 2, packets received from the
radio part that are not intended for the node are copied to the RS232 port in KISS mode.
Similarly packets received on the RS232 port that are not intended for the node are sent to the
radio port.
PacketRadio Networking Handbook for the SNO
Page _____________ 43
PacketRadio Networking Handbook for the SNO
All cables and interfaces shown in this book are available at: www.HamRadioExpress.com
In mode 3, all packets received on one port are copied to the other port as well as being
analysed by the node. These modes are not simply KISS implementations that replace the
node, they run with the node.
Mode 2 is designed to allow a KISS application and a node to share a radio without interference
with each other. The point is that the PC TCP/IP system can be switched off whilst leaving the
node running to allow others to use it.
Mode 3 is a debugging mode. One problem when faultfinding on a node is that it is impossible
to see what the node is seeing on the channel without replacing the ROM. By setting this mode,
it is possible to connect a KISS application to the RS232 port and observe what the node is
seeing.
Mode 3 is also designed to allow a PC running AXSTATS to be connected to the RS232 port to
allow logging and analysis of channel performance from the node itself. Note that packets
initiated by the node for one port will not get copied to the other.
3.5.5 Tx keyup delay
This parameter sets the TX keyup delay in 10's of milliseconds. This was previously done using
an escape command.
3.5.6 Full Duplex
This parameter sets or clears the full duplex control flag. This was previously done using an
escape command.
3.5.7 RS232 nodes broadcast interval
When a crosslinked TNC is reset, it takes some time to learn about the nodes that the other
TNCs can hear. Also, nodes heard by one TNC can take an hour to be notified to the others.
In order to improve this, this parameter may be used to change the frequency of nodes
broadcasts on the RS232 port. When set to 0, the node operates as normal. When set to a non
zero value, it will broadcast the nodes on the RS232 port at that interval. Hence setting it to 600
would cause nodes broadcasts at 10 minute periods.
The nodes broadcasts on the radio port will continue to occur at the basic rate set by the
PARMS setting. The obsolescence count will be decremented at the basic rate, not at the faster
RS232 rate.
3.5.8 Node broadcast algorithm
This value controls the algorithm used. Bits within the value set have significance as shown
below. There is a problem with the nodes broadcast algorithm when many TNCs are
crosslinked on RS232. In order to address this a variation to the algorithm has been
implemented for experimental purposes. Feedback on its use is requested. Bit zero affects the
HDLC port and bit 1 affects the RS232 port. When a bit is set to 1, the node broadcast algorithm
is modified so that it will not rebroadcast on the same port a node heard on that port when the
best quality neighbour is on that port. It makes little sense to use it on the HDLC port but what
the heck, it is implemented for completeness. The only settings therefore that make sense are 0
and 2. These correspond to 'normal' and 'modified on the RS232 port' respectively. Setting it to
1 or 3 will result in some pretty weird effects.
PacketRadio Networking Handbook for the SNO
Page _____________ 44
PacketRadio Networking Handbook for the SNO
3.5.9 Beacon period
All cables and interfaces shown in this book are available at: www.HamRadioExpress.com
This parameter sets the beacon interval in seconds. In TheNet 1.01, this was fixed at 10
minutes ( 600 seconds ). In this version, this parameter may be used to change it according the
the prevailing license conditions.
3.5.10 'Connect' redirector
In TheNet 1.01, when 'connect' is given with no destination callsign, the node attempted to
connect to the local host port.
In a crosslinked system, this vanished down a black hole. In previous versions of this code, the
node attempted to connect to the station set by the HOST command, only trying the local host
port if no destination was set by HOST. With this version, the node may be configured to
connect to the station set by the BBS, DXCLUSTER or the HOST command depending on this
parameter. When zero, connect attempts will go to the HOST station, when set to '1', it will
attempt to connect to the BBS callsign. When set to 2 it will attempt to connect to the
DXCLUSTER callsign.
3.5.11 'help message enable' flags
This word controls the sending of help messages, with each bit of the word controlling a
separate function. Currently, only 6 bits are effective, these being as follows :
BIT
FUNCTION
=========================
0
Whether the 'please wait, trying xxxx' operates
1
Whether all commands appear in help for sysop
2
Whether the 'goodbye' message is given
3
Whether a welcome message is enabled ( CTEXT )
4
Whether nodes are shown as 'alias:callsign'
5
If set, TALK data is passed as 8 bit data rather than clearing the most
significant bit
6
If set, node aliases are deemed to be case sensitive
When bit 0 is set, and the BBS, HOST or DXcluster commands are given, then a message is
sent from the node telling the user that a connect attempt is being made. This does not affect
the 'connect' command itself, unless the command is given with no parameter as this is then
equivalent of the BBS or HOST command.
When bit 1 is set, and if a sysop gives an incorrect command, the help screen shows all
commands possible, including those currently disabled ( as by definition they are not disabled
for the sysop ! ).
When bit 2 is set, then the use of the 'bye' command will solicit a 'goodbye' message from the
node.
Bit 3 switches on and off the 'CTEXT' message. When enabled, and when a CTEXT message
is set, then whenever someone uplinks to the node alias, the ctext message is sent immediately
on connect.
Bit 4 switches the way in which nodes are shown when the ROUTES command is used. When
set to '1', nodes are shown as 'alias:callsign'. When set to 0, they are shown only as 'callsign'.
PacketRadio Networking Handbook for the SNO
Page _____________ 45
PacketRadio Networking Handbook for the SNO
Bit 5 controls only the passing of data in TALK mode. Normally, all data sent to the node has its
most significant bit cleared, to eliminate parity or similar problems. This is not ideal for those
countries that use the extended character set. When this bit is set, and only when in TALK, data
is passed as 8 bit data. Note that this does not apply to an initial message sent on the same line
as the TALK command.
Bit 6 makes node handing case sensitive. Normally, node aliases are forced to upper case for
searching in the table and for user 'connect requests'. If this bit is set, these operations will
become case sensitive. This could be very confusing for users unless they are aware of it and
expect it. It allows node aliases to be entered as lower case, for example in setting the node
alias and in forcing routes. Don't set this bit unless it is actually needed !.
3.5.12 'hash' node port control
In certain networks ( notably the American ), there is a need to restrict the propagation of local
nodes. This is done by using node aliases that start with a hash character ( # ) and instructing
specific nodes not to broadcast routes to nodes that start with this character. This parameter
does this by enabling each port to be individually enabled or disabled in respect to 'hash' node
broadcasts. Bit 0 controls the radio port and bit 1 controls the RS232 port. When one of these
bits is set, hash nodes will never be broadcast on that port.
3.5.13 Extra aliases
If this is set to '1', then the node will listen for ( and accept uplinks to ) the aliases set in
HOSTALIAS, DXCALIAS and BBSALIAS if they are set. If this parameter is set to '0', or if the
respective aliases are not set, it will do nothing. If you do not use the aliases, set it to 0 to avoid
wasting processor time.
3.5.14 Reconnect to Switch
If this parameter is set to 0, the node operates as normally. If set to a non zero value ( i.e. set to
'1' ), it operates in 'reconnect' mode. When a station connects to the switch, then uses the BBS,
HOST, DXCluster or Connect commands to connect to another station, and then causes that
remote station to disconnect them, then they are automatically reconnected to the node with a
'welcome back' message.
3.5.15 NoSlime
This parameter controls 'slime trails'. A 'slime trail' is caused when a remote node, whose
identity is not known to the node, sends a transport connect request to the node. Subject to the
settings of the port qualities, the node may make an entry in the node table in order to reply to
them. Such entries are typified by having no alias associated with them.
Each bit in the NoSlime parameter controls a different function. Bit 0, if set, causes any stations
without aliases to be 'hidden' when a nodes command is given. Bit 1. if set, causes the node to
refuse to make slime trail entries in the node table. Before you use this feature, be careful to
make sure that you understand the implications of doing so, as without fixed entries the node
will refuse to accept level 4 connections from a station until it has heard their node broadcast.
PacketRadio Networking Handbook for the SNO
Page _____________ 46
PacketRadio Networking Handbook for the SNO
3.5.16 NoDigi
This parameter controls the node's willingness to accept digipeated level 2 connections or to
allow digipeated downlinks from the node. Each bit of the parameter controls a different
function, as shown below :
BIT
FUNCTION
==============================
0
If set, do not allow digipeated connections to the node
1
If set, do not allow digipeated downlinks from the node switch
3.6 MHEARD
before the buffers used are freed. To
accelerate this process, set the size to
1, wait until it has heard a station ( any
one will do ) then set it to zero. This will
free up all but one buffer immediately.
The TNC can be instructed to keep a
list of the last 'nn' stations heard, where
'nn' is an integer between 1 and 100. It
can also be disabled. The syntax of the
command is :
The heard list is the user interface to
the receive deviation meter. Its
operation is explained in section 3.31. If
enabled ( ie if the METER parameter is
not set to 0 ), then an additional column
will be displayed in the heard list that
will show the received deviation in
kilohertz ( as nn.n ). It must be
remembered that this is derived by
measuring the received signal audio
level, and will not be correct in the case
of a badly distorted signal.
MHEARD [ nn ]
The parameter is optional and only
operates for the sysop. It sets the
maximum length of the list. Setting to
zero disables the function.
The heard list uses free buffers for the
list, so a large setting means less RAM
for the node software.
The list is maintained as linked list, with
the most recently heard station first.
The display shows the number of
packets heard from that station and the
time since it was last heard, in hours
minutes and seconds. In addition, it
shows the port on which the station
was heard together with an indication
as to whether the station is a node and
/ or a TCP/IP station. It does this by
examining the PID byte.
Every hour the list is checked for
stations that have not been heard for
12 hours, and any such stations are
removed from the list.
To disable the internal updating of the
list ( and thereby stop the CPU
expending effort on the function ), set
the size to zero rather than just
disabling the command as described in
3.8. Note though that the node will not
clear the list as updates have been
disabled, so it will be up to 12 hours
PacketRadio Networking Handbook for the SNO
3.7 CQ
When CQ is disabled, the command
now reports apologetically rather than
simply ignoring the request.
3.8 ALL COMMANDS
There is often a requirement to be able
to disable the connect command whilst
allowing level 3 relaying. This is
achieved
by the use of a command qualifier, the
syntax of which is :
CONNECT [ + | - ]
If '-' is entered by the sysop, then the
connect command will politely refuse to
work. This can be reversed by the '+'
command.
Page _____________ 47
PacketRadio Networking Handbook for the SNO
All cables and interfaces shown in this book are available at: www.HamRadioExpress.com
This has no effect of layer 3 relaying.
(dumping a large number of node
Also, the BBS and HOST commands
details can consume hundreds of
will still allow connections to be made if
buffers !!! ).
they are enabled and set.
Further, the syntax is valid for ALL
commands, for example the CQ
command can also be disabled in the
same way. Be careful though. The
command is only accepted from the
sysop, so if you disable the sysop and
manager commands you will lock out
remote management !.
It is quite possible that used
indiscriminately, it could cause a
warmstart of the node. Be careful.
3.10 RESET
The syntax of the command is now
RESET [ anything-else ]
3.9 NODES
When information on a node that is not
known is requested, the program prints
out an error message rather than giving
the names of all known nodes.
Entering the reset command alone will
do a warmstart. If any other parameter
is entered, a coldstart is performed.
3.11 MANAGER
When a node entry is made by the
sysop, callsign checking is forced ON
rather than being determined by the
callsign checking parameter.
Don't forget that node alias handling
may be case sensitive - see section
3.5.11.
The entire contents of the node table
routes may be obtained by the sysop or
manager by the command
NODES * *
This will dump info on all nodes, one
node per line, with the following format:
Alias:call
route1 route2 route3
where route1, route2 and route3
comprise the quality, obsolescense
count and port followed by the
neighbour callsign for each of the 3
route entries for that node. If any of the
routes are in use, a chevron will be
shown by that route.
The extended command is only for
sysop use as it, like auditing and
conferencing, causes the node to be a
source of a significant amount of data
PacketRadio Networking Handbook for the SNO
The MANAGER command gives the
user extra privileges. In this version,
this amounts to the ability to receive
audit messages from the node. The
level of auditing is set by the AUDIT
command.
The privilege remains in force until
cleared by a command that affects the
user state. Specifically, these are,
entering the TALK state, executing the
SYSOP
command,
entering
the
MANAGER command and getting the
password wrong, or disconnecting from
the node. Failing to get the second
password right when using the
closedown command will also remove
the manager privilege.
If the MANAGER command is executed
by a user who connected to the node
by a level 4 circuit rather than by a level
2 circuit, and if the level 2 timeout is
less than the no activity timeout, the
connection will never timeout as the
clearing and reconnecting of the level 2
circuit will keep the process alive
provided level 2 auditing is enabled.
This allows the operation of the node to
be logged remotely and continuously.
Page _____________ 48
PacketRadio Networking Handbook for the SNO
All cables and interfaces shown in this book are available at: www.HamRadioExpress.com
The syntax of the audit command is :
Alternatively, if the level 4 timeout is
greater than 10 minutes, level 1 or CPU
AUDIT [ new-value ]
auditing will keep it alive if level 2 is
switched off. NOTE : I have a nasty
where new value is an integer value. If
feeling that there is something not quite
no value is given, or the user does not
right here - the link sometimes dies !.
have SYSOP status, the current mask
value is displayed. Otherwise, the mask
A user with MANAGER privilege also
is updated and the new value
has SYSOP privilige.
displayed.
3.12 AUDIT
The mask controls the auditing of various events in the node. Not all values are used yet, but
those that are, are :
BIT
USE
==========================
Level 1 statistics on 10 minute pdates
1
Level 2 connects & disconnects
2
reserved for future use
3
Level 4 connects & disconnects
4
Level 7 limited events ( use of sysop )
5
Full level 7 auditing
6
CPU auditing messages ( 10 minute updates )
It is suggested that the usual settings can simply be 0 or 255.
For level 1, messages are sent every 10 minutes showing the percentage of time that the
receiver detected carrier and the percentage of time that the transmitter was on.
At level 2 & 4, the messages are of all connects and disconnects, shown in 4 different
ways :
C
CA
D
DA
Connect message received by node
Connect message sent / Acknowledge received
Disconnect message received by node
Disconnect message sent / Acknowledge received
In each case, 2 callsigns are shown. At level 2 these are the source and destination of the
AX.25 link. At level 4, it is the remote node callsign and user callsign. Each message is
preceded by an indication of the source of the message, such as "L2" or "L4".
At level 7, with bit 4 set and bit 5 clear, the only event currently audited is the use of the Sysop
command, either directly or via the manager command. If bit 5 is set, then all commands given
to the switch are audited, preceded by the callsign of the user who entered the command.
Bit 6 controls CPU health check auditing. If set, then whenever the internal CPU statistics are
updated, messages are sent showing the CPU processor loading total and the minimum buffers
level ( see STATS for more information ).
The audit mask value should be set to 0 when not actually being used. Do not leave it set to
another value as this wastes processor time. Note also that full auditing on a busy node makes
things worse. Treat it as a debugging feature !.
PacketRadio Networking Handbook for the SNO
Page _____________ 49
PacketRadio Networking Handbook for the SNO
IN THE TEXT THAT FOLLOWS WE WILL LEARN THE USE OF A NEW
FEATURE WITHIN THE X-1J NODE. HOWEVER GOOD OR BAD OUR
NETWORKS PERFORM, MAY RELY ON THE INFORMATION THAT
YOU ARE ABOUT TO ACQUIRE!
THE "TALK" MODE IS A GOOD FEATURE WHEN USED AS AN ADJUNCT TO WEATHER-WATCH
NETS OR ROUNDTABLES. IT ALSO PROVIDES A MEANS WHEREBY "ARES" AND OTHER NETS
MAY CONDUCT TRAFFIC HANDLING OR HAVE ROLL CALL, ETC...
As a supporter of reliable packet communications, I must point out to the prospective sysop the major
difficulty that may occur when activating the "talk" mode in your node(s). This applies to those nodes
that are part of a high traffic lan or network. Just as I've written in my books and articles in the past, i'm
again repeating here;
All cables and interfaces shown in this book are available at: www.HamRadioExpress.com
"A CONFERENCE OR CONVERSE TYPE NODE CAN, AND WILL BRING A NETWORK TO ITS
KNEES."
The SYSOP may disable the "TALK" feature by entering the remote sysop
password, and type TALK - The minus sign disables, and plus enables.
WHEN MORE THAN FOUR USERS ARE CONNECTED INTO THE "TALK" MODE OF THE X-1
NODE, THE NETWORK BECOMES VIRTUALLY USELESS TO THROUGHPUT TRAFFIC.
PLEASE REMEMBER ! For every connected station into the "TALK" mode, each station receives each
packet from every connected station. In addition each connected station issues an ACKnowledgement
for each packet it receives.
Have fun de BucK4ABT
All cables and interfaces shown in this book are available at: www.HamRadioExpress.com
3.13 TALK
Talk is a conferencing command. It allows a number of stations to hold a simultaneous
conference ( a bit like the CONFERENCE command of a DX cluster ). There is only one
conference, and stations may connect to it by connecting to the node and issuing the TALK
command. It may be exited by disconnecting or issuing the command '/EXIT' at the start of a
line. ( /EXIT may be abbreviated to /EX, and it is not case sensitive ).
Each line sent by a user is copied to all other users in the conference, preceded by the callsign
of the user. The data will be sent as 7 bit data ( ie the most significant bit will be cleared ) unless
the appropriate bit is set in the help flags ( see section 3.5.11 ).
Whenever a new station enters the conference, or a station leaves the conference using the
'/EXIT' command, the other conference users get a message informing them of the event.
These status messages are sent with the callsign of the node rather than the user.
PacketRadio Networking Handbook for the SNO
Page _____________ 50
PacketRadio Networking Handbook for the SNO
Finally, when entering the TALK command, a message may be sent to all those users who are
connected to the node but not otherwise doing anything. For example if Rick, KD4JKX
connects to a X1 node that I'm connected to and enters the line
TALK Hello Buck, can I have a chat, type 'TALK'
Then all other stations connected to the node, present in the USER list but idle, get the
message
KD4JKX >> Hello Buck, can I have a chat, PSE type 'TALK'
is displayed on their terminal.
Note that merely connecting to the node does not consitute being connected to the switch.
Stations connected to the switch appear in the USER list.
CALIBRATE period [ toggle ]
3.14 SYSOP
The SYSOP command has been
enhanced to increase the level of
security offered. One problem of the old
system is that the password is easily
visible unless the user repeats the
SYSOP command a number of times.
Even
then,
correlation
between
passwords is easy, so the password
needs frequent changing. To reduce
the change period, and make it harder
to discover, the node will accept a
string of characters and scan it for the
password. Hence a response of, say,
30 or 40 characters can be sent, with a
random number of random characters
preceding the actual data and a
random number following it. This does
not eliminate such attacks, but if used
carefully, it makes it quite a bit harder
to attack.
The period ( 1 to 60 seconds ), is the
time for which the transmitter will key
up for with constant tone. It is
undefined as to which tone will be sent.
If the second parameter is given, the
node will toggle between the tones
every [toggle] seconds. The toggle
must be between 1 and [period]
seconds. If a period is not given, the
user is not sysop or manager, or if it is
out of range, the command is ignored.
If the tone generator is busy because it
is about to send a CWID sequence, a
'busy' message is returned. Note - quite
often it can appear that the node has
locked up having failed to transmit the
full calibrate period. In fact, this is
usually the hardware PTT watchdog in
the TNC. The node thinks it is still
sending but the hardware timer has
removed the PTT signal.
3.15 LINKS
This command shows the current level
2 links to the node. Displayed one per
line, the two callsigns are shown
followed by the link state, port number
and current retry count.
3.16 CALIBRATE
This
command
allows
remote
calibration checks of the transmitter
deviation. Its syntax is:
PacketRadio Networking Handbook for the SNO
Page _____________ 51
PacketRadio Networking Handbook for the SNO
3.19 CTEXT
3.17 DXCLUSTER
The DXCLUSTER command operates
just like the BBS command in that it
may be used to effect a connection to a
DXcluster (assuming there is one
nearby). It should be disabled if it is not
intended to be used to access a cluster.
The CTEXT command sets or displays
a message sent to a user who connects
to the node by uplinking to the node's
alias.
The syntax of the command is :
CTEXT [ * | message ]
The syntax of the command is :
DXCLUSTER [* | ? | callsign]
With no parameter, the command
connects to a station previously
specified by the use of the
DXCLUSTER command with a callsign
as a second parameter. Setting the
DXCLUSTER to allow this may only be
done by a sysop. The '*' option may
also only be executed by the sysop,
this command clears a previously
specified DXCLUSTER.
The '?' option ( or any text if not sysop
), prints out the current DXCLUSTER
station setting.
If no DXCLUSTER is set, the command
issues an error message if it is invoked
with no other parameters.
The idea of this command is that, like
with the 'bbs' command of the 'BPQ
software, a user may connect to the
local DXCLUSTER from the node.
With no parameter, the current
message is displayed. If the user is
also a sysop, and if text follows the
command, that text is added to the
current connect text.
If the message starts with a '*', the
connect text message is deleted.
Hence, to clear the message, type the
command 'ctext *'. This is a change in
version X-1J from previous versions.
For further information, see section
3.33
A message is only sent if there is a
ctext message set and if the relevant bit
is set in the mode command parameter
as described in section 3.5.11.
3.20 BTEXT
The BTEXT command sets or displays
the additional beacon text sent along
with the beacon packets.
The syntax of the command is :
BTEXT [ * | message ]
3.18 HELP
The HELP command gives a message
from the ROM. In general, it is
expected that the message will be
designed to assist new users in
understanding
the
operation
or
configuration of the node.
The message may span many lines,
and may be changed when the ROM is
programmed. As delivered, it contains a
brief help screen detailing the main (
user ) changes to the code.
PacketRadio Networking Handbook for the SNO
With no parameter,
message is displayed.
the
current
If the user is also a sysop, and if text
follows the command, that text is added
to the current beacon text. If the
message starts with a '*', the beacon
text message is deleted. Hence, to
clear the message, type the command
'btext *'. This is a change in version X1J from previous versions. For further
information, see section 3.33
Page _____________ 52
PacketRadio Networking Handbook for the SNO
Normally, beacon packets are UI
frames that contain the node callsign
and alias. If a beacon message is set,
the text of the message follows the
alias in the same packet. It is strongly
suggested that beacon packets be kept
brief !!!.
3.21 ACL
This is probably the most complex
additonal command in the program. It
should be used with care, and only
when you really understand its
operation - mistakes can result in the
need to go out to a remote site (
probably when it is cold and wet ) to
reconfigure the node.
The ACL command allows selective
control, based on callsign, of a list of
different events. The ACL contains two
types of entry, a default value and zero
or more callsigns, each of which are
associated with a value.
When one of the controlled events
occurs ( such as an incoming level 2
connection or a nodes broadcast ), the
ACL is scanned for an entry that
matches the callsign of the sender. If a
match is found ( but see below ), the
value associated with that callsign is
used to determine the action the node
will take. If no match is found, the
default value is used.
Each bit of the value controls a different function, as shown below :
BIT
OPERATION
========================
0 bar incoming level 2 connection
1 bar outgoing level 2 connection ( downlink )
2 ignore nodes broadcasts from this station
3 bar gatewaying at level 3 to/from this station
4 bar incoming level 4 connections
5 bar outgoing level 4 connections
6 ignore SSID in matching an entry
So if for example an entry exists for a callsign WB11XXX of 6, then the node will not allow
outgoing level 2 connections to the node ( downlinks ), and will ignore node broadcasts from
that station. Note that these commands only operate on the events themselves - if WB11XXX
creates a level 2 connection, the node will quite happily use it itself.
The 'ignore ssid' bit is used to match a callsign without regard to its SSID. This makes life
interesting when finding a match, so the list is scanned twice, once for an exact match, and then
for a match ignoring SSID if an exact match is not found. There can only be one exact match,
but when searching for a match without using SSID, the first entry found will be used.
The syntax of the command is as follows ( 3 versions )
ACL * value
ACL callsign + value
ACL callsign If you are not sysop, or if ACL is given on its own, the current contents of the ACL are shown.
The first form of the command changes the default value, the second form makes an entry in
the list, the last form removes an entry from the list. It complains about syntax errors.
PacketRadio Networking Handbook for the SNO
Page _____________ 53
PacketRadio Networking Handbook for the SNO
Here is another caveat to be dealt with when you are the sysop of an X-1 node(s). NOTICE in
the following paragraph, the distinct possibility that a sysop can in fact; lock him/herself out of
his/her own node.
HAVE FUN de BucK4ABT
A few moments thought will show that the sequence of commands
Connect To Node
Execute Sysop Or Manager Command
Type the command ACL * 127
(If you like to travel, and you feel macho) DISCONNECT!
You have just performed a step that IS QUITE CATASTROPHIC!
You will not be able to get back in again
apart from via the host port and noone
will be able to connect to or from the
node. If you intend to experiment with
the command, you should start by
entering your own callsign with a value
of zero to ensure that you can get back
in again !!!.
The list can be used as an 'accept' or
'reject' list by judicious use of the
default. To create a list that excludes
specific calls, put them into the list with
the required bits set in the value. The
default should be zero. To create an
'accept' list, put entries in with the
required bits zero and set the
corresponding bits in the default.
Individual bits may be used to create
accept or reject lists for each function.
The command steals buffers at a rate
of one buffer per four entries in the
ACL. Also, a long ACL will slow the
node down nicely - so think before you
enter a long list.
This command is for experimental
purposes - if you find any bugs, let me
know please ( I have not fully tested the
gateway bit for example ). Also, it is not
intended for malicious use but to allow
fine control to be exercised over
backbone networks. If I get lots of
PacketRadio Networking Handbook for the SNO
negative
responses
command will go !
back,
the
3.22 CLOSEDOWN
The closedown command is used to
shut down the node remotely. If
successfully executed, the node will
effectively stop operating until it is reset
( eg by a power up ). The node's
configuration ( routes, messages etc )
are not destroyed - the node simply hits
a HALT instruction. You must be sysop
to execute the command.
The syntax of the command is:
CLOSEDOWN A
The node will respond with 5 numbers
just as for when the sysop or manager
command was executed. Yes, you
guessed, the node expects another
password. Give it correctly and the
node closes down completely. Get it
wrong and you lose your sysop status.
This obtuse and awkward syntax is
designed to make sure it is not
accidentally executed.
Page _____________ 54
PacketRadio Networking Handbook for the SNO
3.23 ALIAS
The ALIAS command allows the node's
alias to be changed. The syntax is :
ALIAS [ * | new-alias ]
If no parameter is given, or if the user is
not SYSOP or MANAGER, the current
alias is displayed.
If the alias is deemed to be a valid
alias, the node's alias is changed to the
new one entered.
Note that the algorithm that checks for
the alias structure is a bit queer. It is
however, the original algorithm of
TheNet and I am loth to change it for
fear of side effects. Note too that the
companion CALLSIGN command is
NOT included - chaos is not something
I crave. If the sysop gives the
parameter of '*', the node's alias is
cleared.
3.24 BBSALIAS HOSTALIAS DXCALIAS
These commands are used to enable
the node to respond to up to three
additional aliases.
The syntax of each is the same, and by
way of example the BBSALIAS syntax
is :
BBSALIAS [ * | new-alias ]
If not sysop, if no new alias is specified,
or if it does not pass the weird alias
syntax checker ( see 3.23 ) then the
current alias is displayed. If not, the
alias is changed. If '*' is given, the alias
is cleared.
The aliases so entered are nothing to
do with the node's identity. If a BBS
alias is set, for example to MXMBBS,
then the node will listen for level 2
connects to that alias. It will respond to
them and will automatically invoke the
BBS command.
PacketRadio Networking Handbook for the SNO
The use will also get the optional
welcome (ctext) message and 'trying to
connect to ....' messages if enabled by
the appropriate 'mode' parameter.
The idea is that where a node sits on a
channel that does not have access to
the local host, BBS or cluster, the
normal aliases of those stations may be
enabled in the node to allow consistent
access to the local services. Note that
the three stations do not have to be a
BBS, Host and cluster, it could be three
BBSes or any other combination.
3.25 IPSTATS
The IPstats command has the same
basic syntax as the PARMS and MODE
commands. When invoked without
parameters, it displays the current
stats. Each statistic may also be altered
by sysop, as defined in section 3.32.
In addition to the standard IP MIB,
there is an additional parameter used to
set the level 2 default modes, and the
first entry in the MIB is used to enable
or disable the router.
The complete set of IP MIB stats are
included for compatibility with other IP
systems, but several are not used.
Also, the stats are 16 bit counters not
32 bit counters as in NOS.
Like NOS however, the stats do not
reset every hour, they must be cleared
by the sysop. They will however wrap
around at zero.
The entries are:
1 Port default modes
2 Enable / Disable the IP router
fuctions
3 Default IP Time To Live
4 IP Received frames
5 IP Header Errors
6 IP Input Address Errors
7 IP Forwarded Datagrams
8 IP Unknown Protocols
9 IP input frames Discarded
Page _____________ 55
PacketRadio Networking Handbook for the SNO
10
11
12
13
14
15
16
17
18
19
20
IP Input frames Delivered
IP Output Requests
IP Output Discards
IP Output No Routes errors
IP Reassembly Timeout errors
IP Reassembly Required errors
IP Reassembly OKs
IP Reassembly Fails
IP Fragmentations completed OK
IP Fragmentation Failures
IP Fragmentation Creates
3.26 IPADDRESS & IPBROADCAST
These commands are used to set or
display the IP addresses used by the
node. The syntax of each is (by way of
example):
IPADDRESS [ ipaddress ]
where ipaddress is in the form
nnn.nnn.nnn.nnn
The default mode word may be set to 0,
1, 2 or 3. Each bit controls a port, with
bit 0 controlling port 0 ( radio port) and
bit 1 controlling port 1 ( RS232 port ).
When set to 1, the default mode for that
port when sending on a level 2
connection will be Datagram. When set
to 0 it will be by Virtual Circuit.
The default mode is used when no
other information is given, either by the
ARP table or by the TOS bits in the IP
header.
The enable / disable word may be set
to 0 or 1. When set to 0, the operation
of the router is stopped, when set to 1
the router functions.
The IP Time To Live ( TTL ) word is
used to set the number of routers
through which an IP frame may pass
before it is discarded. It is similar to the
node layer 3 TTL word. It may be set to
any value up to 255, but values below 2
make no sense and are therefore not
permitted.
The IP fragmentation reassembly
timeout counter is not used as the node
is just a router. It is left set to 30
seconds just to show which one it is !
The rest are just statistics. The patient
user can have hours of fun working out
which ones are not used ( or just think
about it for a second or two ).
PacketRadio Networking Handbook for the SNO
where nnn is an integer in the range
0..255
So to set the node IP broadcast
address to that used over here,the
command would be:
IPBROADCAST 44.131.0.0
The IPADDRESS is the address that
the node will respond to. It is used only
as detailed in section 7. The IP
broadcast address is the one used to
denote broadcast packets that will be
largely ignored. Note that port
addressing is NOT currently supported.
.
3.27 IPROUTE
This is one of the two main databases
used by the node. The IP Route table is
used to tell the router where to send a
frame for a specific detination. It maps
addresses or address ranges to a
gateway IP address and to sub-network
ports.
The ARP database then tells the node
what station corresponds to that
address and protocol. The node
supports two subnet protocols, AX25
and Net/Rom.
The database is stored in an ordered
list, in decreasing order of the number
of relevant bits. This is to permit
searching of the database when trying
to find a specific destination. Given an
address, it scans addresses with
decreasing numbers of bits until it finds
a match.
Page _____________ 56
PacketRadio Networking Handbook for the SNO
The syntax of the command is as follows :
IPROUTE [address [ / bits ][ + port [gateway [metric]]]]
or
IPROUTE [address [/bits][-]]
In the first form, it makes an entry in the table, in the second it deletes one. Only sysop or
manager may effect such a change.
e parameters are as follows :
Address
bits
port
gateway
metric
The amprnet address in the form nnn.nnn.nnn.nnn
The number of significant bits (eg 44.131.0.0 / 16)
The port, either 0 or 1 for AX25 or n for Net/Rom
The optional gateway for this dest. nnn.nnn.nnn.nnn
Currently not used, a numeric value
When an entry is made with a specific number of bits, the address is 'masked off' to that many
bits, so enter an address of 44.131.16.31 / 24 and it will get entered as 44.131.16.0. The valid
range for the number of bits is 1 - 32.
3.28 ARP
The ARP table maps a pair of address+port to hardware address+subnetwork mode. The
address is either a destination or a gateway in the form nnn.nnn.nnn.nnn. The protocol is either
Net/Rom or ax25. The hardware_address is a callsign and the subnetwork mode is DG or VC (
only has significance for level 2 links ).
The syntax of the command is :
ARP [ destination [ + [P] protocol callsign [mode ]]]
or
ARP [ destination [ - protocol ] ]
In the first form an entry is made in the table, in the second an entry is deleted. This is only
permitted for sysop or manager.
The parameters are :
destination
P
protocol
callsign
mode
An address of the form nnn.nnn.nnn.nnn
If present, marks the entry as 'published'
AX25 or Net/Rom
A valid amateur callsign, e.g. G8KBB-5
DG or VC
If 'P' is entered, then the node will publish the address. Specifically, if an ARP request is seen
by the node for a station with the address given, it will send a response advising the caller of the
callsign to be used.
More details on the operation of the router are contained in section 7.
All cables and interfaces shown in this book are available at: www.HamRadioExpress.com
PacketRadio Networking Handbook for the SNO
Page _____________ 57
PacketRadio Networking Handbook for the SNO
3.17 DXCLUSTER
The DXCLUSTER command operates
just like the BBS command in that it
may be used to effect a connection to a
DXcluster (assuming there is one
nearby). It should be disabled if it is not
intended to be used to access a cluster.
The syntax of the command is :
DXCLUSTER [* | ? | callsign]
With no parameter, the command
connects to a station previously
specified by the use of the
DXCLUSTER command with a callsign
as a second parameter. Setting the
DXCLUSTER to allow this may only be
done by a sysop. The '*' option may
also only be executed by the sysop,
this command clears a previously
specified DXCLUSTER.
The '?' option ( or any text if not sysop
), prints out the current DXCLUSTER
station setting.
If no DXCLUSTER is set, the command
issues an error message if it is invoked
with no other parameters.
The idea of this command is that, like
with the 'bbs' command of the 'BPQ
software, a user may connect to the
local DXCLUSTER from the node.
3.19 CTEXT
The CTEXT command sets or displays
a message sent to a user who connects
to the node by uplinking to the node's
alias.
The syntax of the command is :
CTEXT [ * | message ]
With no parameter, the current
message is displayed. If the user is
also a sysop, and if text follows the
command, that text is added to the
current connect text.
If the message starts with a '*', the
connect text message is deleted.
Hence, to clear the message, type the
command 'ctext *'. This is a change in
version X-1J from previous versions.
For further information, see section
3.33
A message is only sent if there is a
ctext message set and if the relevant bit
is set in the mode command parameter
as described in section 3.5.11.
3.20 BTEXT
The BTEXT command sets or displays
the additional beacon text sent along
with the beacon packets.
The syntax of the command is :
3.18 HELP
The HELP command gives a message
from the ROM. In general, it is
expected that the message will be
designed to assist new users in
understanding
the
operation
or
configuration of the node.
The message may span many lines,
and may be changed when the ROM is
programmed. As delivered, it contains a
brief help screen detailing the main (
user ) changes to the code.
BTEXT [ * | message ]
With no parameter,
message is displayed.
the
current
If the user is also a sysop, and if text
follows the command, that text is added
to the current beacon text. If the
message starts with a '*', the beacon
text message is deleted. Hence, to
clear the message, type the command
'btext *'. This is a change in version X1J from previous versions. For further
information, see section 3.33
All cables and interfaces shown in this book are available at: www.HamRadioExpress.com
PacketRadio Networking Handbook for the SNO
Page _____________ 52
PacketRadio Networking Handbook for the SNO
3.31 METER command
The Meter command is used to control
the ADC functions of the software. In
this version, this is limited to the
Deviation meter, but future releases
may extend this, for example to
configure a signal level meter.
The syntax is as for the PARMS and
MODE commands, as defined in
section 3.32. It currently has only one
parameter.
When set to 0, the deviation meter is
disabled.
When set to a value in the range 1 255, the meter is enabled and the value
is used as a scaling factor. The ADC is
an 8 bit device, so it will give a
response in the range 0 - 255,
corresponding to an ADC input voltage
in the range 0 - 3 volts DC.
If optimally configured, this corresponds
to the maximum audio level possible for
the given receiver discriminator.
The ADC reading ( 0 - 255 ) is
multiplied by the meter parameter value
( 1 - 255 ) to give an answer in the
range 0 to 65 KHz ( approx ). This is
the value displayed in the mheard list.
Hence, if, for example, a DC voltage of
2 volts at the input to the ADC
corresponds to 3.4 KHz deviation, the
ADC reading will be 171 ( +- a few )
and the Meter parameter will need
setting to 20 ( ie to 3400 / 171 ).
If the ADC reading is 254 or higher,
then in order to indicate an overrange,
the symbol '>' will precede the
corresponding deviation entry in the
heard list.
3.32 PARM, MODE, MTU, METER & IPSTATS command syntax
The syntax of these commands has changed.
All use the same syntax, which may be either of two types, the original TheNet 1.01 syntax ( as
used in versions previous to X-1J ) or an 'offset & value' type.
The original syntax was, by way of example,
PARM { [ * | new_value ] [ * | new_value ] .......... }
so to set the 10th PARM ( the L4 retries ) to 1, the syntax would be :
PARM * * * * * * * * * 1
The equivalent new syntax command would be :
PARM /10 1
The '/' command signifies that what follows is the parameter number followed by the new value.
As for the old command syntax, the complete list of parameters is displayed. Setting the
parameters may only be done by a Sysop. Note that BOTH command syntaxes are supported you can use whichever you prefer.
All cables and interfaces shown in this book are available at: www.HamRadioExpress.com
PacketRadio Networking Handbook for the SNO
Page _____________ 59
PacketRadio Networking Handbook for the SNO
In section 3.33 that follows you will learn how to easily set text into your X1J4 node from a remote
location. The "INFO" text can be used to identify the node and its location, sysop, elevation, geographic
coordinates etc...
CText may be used to give specific instructions to enter for other services; ie; BBS, HOST, DXCluster or
other announcements. The CText is displayed when the node is connected to by local users.
BText may be used to make area announcements. The Beacon Text may be set to broadcast at
various times. Normally the sysop sets the beacon broadcast period to 3600 equals one hour. The text
may announce a club meeting, event or the date of an up-coming hamfest.
Have fun de BucK4ABT
3.33 BTEXT, INFO AND CTEXT COMMAND SYNTAX
In Version X-1J, the syntax of these commands changed. In addition, the Info message was
doubled in size to 160 bytes.
If someone who is not Sysop uses the command, the current settings are displayed.
If a Sysop uses it without any additional parameters, the current setting is displayed.
If a Sysop enters one of the commands followed by a parameter of '*', the current message is
deleted.
If a Sysop enters a string of text, that text is added to the current message, followed by a
newline.
It is therefore possible to build up multiple line messages. If you wish to start a message with a
blank line, enter a message with a non display ( or innocuous display ) character such as
control-A. It will get entered followed by a newline. On most systems this will not display. On
some systems such as PCs running NOS, it will display as a smiley face.
All cables and interfaces shown in this book are available at: www.HamRadioExpress.com
PacketRadio Networking Handbook for the SNO
Page _____________ 60
PacketRadio Networking Handbook for the System Node Operator
4. OTHER CHANGES
This section covers the other
miscellaneous changes to the software.
4.1 Command Processor
This is nominally sent at 20 wpm once
every 30 minutes, but the speed and
period can be changed remotely.
The command processor has been
altered. In general, but not in all cases,
commands only appear on the 'help'
menu when they are enabled, so for
example the 'BBS' command will not be
shown unless it has been enabled with
the 'BBS +' command. The exception is
the sysop commands, like MODE,
LINKS and PARMS, which are never
shown to users but are of interest to
them. If the appropriate bit is set
however in the MODE command ( see
3.5.11 ), then for the sysop or manager,
all commands appear in the help
prompt - EVEN IF DISABLED.
The help screen now shows commands
in a combination of upper and lower
case characters.
4.2 Beacon digi
It is possible to set a digi in the address
used for beacon packets. Details of
how to do this are contained in the
configuration guide. Note that this is
provided for those rare occasions when
there is a genuine need. This is rarely
the case and should not be done
unless really necessary.
4.3 Nodes Broadcasts after power-up
The node will now broadcast its node
table 60 seconds after power-up. This
is to ensure that the network is back to
an operational state as soon as
possible following a node reset. The
reason for the short delay is to cater for
the situation where the Sysop switches
on the node before the radio.
After a delay of 30 minutes, the callsign
is sent appended to the end of the next
data packet that is sent over the air.
There is a 500 ms delay after the end
of the data packet before the call is
sent.
The program prefers to send CWIDs
appended to ordinary data packets.
However, if one minute after the CWID
has supposed to be sent it is still
pending because no data packets have
been sent, it will key up the transmitter
anyway. Persist, TxDelay and other
parameters are honored, but the
process involves changing the SIO
mode and this will have an annoying
effect on any packets being received in
full duplex mode.
6. Version X-2.
X-1 was the first release of this code.
The objective is to get some practical
feedback and test the code before the
full release, version X-2, which I hope
will be very similar to this release ( X-1J
). I have been saying this for some time
now, but things keep getting added.
The next version will hopefully be a
significant change with extensions from
G8AMD, but this may be some time off
yet...
Version X-1A added the escape-N
command and the change to the
connect, nodes and reset commands.
The timers were also added to the stats
command.
5. CWID keyer.
The CWID keyer sends the station
callsign in CW by alternating between
the two modem tones.
PacketRadio Networking Handbook for the SNO
Version X-1B removed all the escape
commands apart from C,D and P. It
also added the MODE command and
extended the + and - command
qualifiers to all commands.
Page _____________ 61
PacketRadio Networking Handbook for the System Node Operator
Version X-1C added TALK, MANAGER
and AUDIT. The SYSOP command
was enhanced and the INFO command
was altered to limit the length of a
message ( a bug in the original version
of TheNet ). The help screen was
changed to display commands in a
combination of upper and lower case.
Version X-1D extended the auditing
and statistics to cover auditing
everything but level 3, and statistics of
the CPU, Level 1, Level 2 and timers.
Version X-1E added beacon timer
control, the connect redirector, the
nodes dump facility, level 3 & 4
statistics
and
the
LINKS
and
CALIBRATE commands.
Version
X-1F
added
the
CLOSEDOWN, DXCLUSTER, ACL,
CTEXT, HELP and BTEXT commands.
Another parameter was added to the
MODE command to control textual
messages. The mod suggested by
DF2AU to correct the DCD latchup was
included. Additional statistics were
added covering CRC errors, receiver
overrun, transmitter underrun and
framing errors.
Version X-1G added mainly the IP
router, with the following commands to
control it - IPROUTE, ARP, IPSTATS,
IPADDRESS,
IPBROADCAST.
In
addition, the ALIAS, BBSALIAS,
HOSTALIAS
and
DXCALIAS
commands crept in, as did QUIT as an
alternative to BYE. The help messages
extended to enable nodes in the routes
list to appear as alias:callsign, and an
extra byte on the MODE command
allowed '#' nodes to be selectively NOT
broadcast. The order of HELP and
HOST commands changed so that 'h'
on its own gave help not host. The
code was optimised with some time
critical parts being recoded in
assembler and a peephole optimiser
being used for additonal improvements.
Version X-1J added the deviation meter
support with the Meter command and
Mheard changes. In addition,
parameters were added to the MODE
command for slime trail control, control
of digipeating and reconnection to
node. The command syntax of Info,
Btext and Ctext was changed to
support multiple lines and the Info
message space was doubled to 160
bytes. Nodes broadcasts now occur 60
seconds after power up and the ARP
Digi bug fix was included. The level 4
minimum retries was dropped to 1 and
the PARM, MODE, IPSTATS, METER
and MTU command syntax was
extended to support 'offset & value'
type operation. An MTU command was
added to allow IP MTU limits to be
changed under software control. The
node alias case sentivity bit and TALK
8 bit data bits were added.
7. The IP router
The IP router co-exists in the node with
the other software. It is connected to
the L2 and L3(Net/Rom) protocol
machines, and is managed from the L7
switch. It will accept data from L2
Datagrams, L2 Virtual Circuits or NOS
protocol extended Net/Rom frames. It
will output to these 3 depending on the
setting of the IProute and ARP tables.
The router supports the IP options of
NOS and also does IP fragmentation.
Level 2 segmentation is not supported.
In addition, ICMP is implemented in so
far as it is needed to respond to errors
or PINGs. No higher layer support is
provided, i.e. TCP is not implemented,
ip_send() and ip_receive are only
implemented in so far as they are
needed for ICMP. You can therefore
PING it but anything else will solicit an
ICMP error message.
It will respond to ARP & REV_ARP
requests but will never initiate them.
All cables and interfaces shown in this book are available at: www.HamRadioExpress.com
Version X-1H fixed 3 bugs in X-1G.
PacketRadio Networking Handbook for the System Node Operator
Page _____________ 62
PacketRadio Networking Handbook for the System Node Operator
The ARP table may indicate
DG or VC. In this case, that
mode is taken. If there is no
DG or VC entry, the TOS bits
are examined. If the delay bit is
set, a datagram mode is
selected. If not, and the
reliability bit is set a virtual
circuit is selected. If neither bit
is set, the default mode for that
port is used to select a mode (
see IPstats command, first
parameter ).
The default MTU is 256 for AX.25 and
236 for Net/Rom. It will accept longer
datagrams than this and fragment the
output but it is not recommended as it
merely wastes RAM. The MTU
command may be used to change this.
It is possible to be creative in the use of
L2 datagram and virtual circuits by use
of the port default settings and the ARP
table. The algorithm used is :
When a frame is to be sent, the
ARP table is scanned for the
appropriate entry. The entry
tells it what callsign to use. For
Net/Rom encapsulation, it is
send to the Net/Rom protocol
handler.
For AX.25 encapsulation the
following applies.
Port addressing is not supported at the
moment.
The IP router is manually controlled no rspf or rip, or even ARP requests.
This is because 32K of RAM does not
allow such niceties as queuing frames
while waiting for address resolution.
PacketRadio Networking Handbook for the System Node Operator
Page _____________ 63
PacketRadio Networking Handbook for the System Node Operator
X-1J4 REMOTE SNO'S PARAMETERS & DEFINITIONS
All cables and interfaces shown in this book are available at: www.HamRadioExpress.com
Parameter 1
DESTINATION LIST LENGTH
Limits the maximum number of nodes, both hidden and non-hidden, that will accumulate
in the ROUTES table. This table contains an alphabetical listing by alias of distant
(destination) nodes picked up during neighbor node(s) broadcasts. This is the same
listing a user sees in response to a NODES command. The term "Destination" implies
a user is able to make a single connect to any of the nodes listed in the 'destination table'.
With each node listed, the amount of "free buffers" within the node's memory space is
reduced by 36 bytes. Depending upon the number of nodes in the table, the node's
memory could become temporarily depleted. Should this happen, the response to
certain commands will be "Node busy". The number of free buffers is shown in
parenthesis during the USERS command response.
Free buffer depletion is not normally a problem with the typical node when the maximum
table size is limited to 100. If the Minimum Quality for Update, parameter 1, is sized
to limit the number of nodes to those that are "connectable", the NODES table will
normally contain far fewer than100 limit.
Suggested value is "30".
Range: 1-400)
Parameter 2
MINIMUM QUALITY FOR UPDATE
Sets the minimum path quality value of other nodes that will be accepted
into the routing table. Nodes included in the broadcasts will be limited to
those with path quality values equal or greater than this parameter. If the
value is set low, distant nodes with lower path values (poorer probability
of connect) will be allowed into the tables. Higher values will improve the
probabilities of a successful connection. A setting of "0" disables the
automatic update function and does not allow ANY nodes to be recognized (not
recommended). The value selected will depend on several factors. These
include the purpose of the node, network type and size.
A suggested value for a multi-user simplex configured node is "64."
(Range: 0-255)
Parameter 3
HDLC CHANNEL QUALITY
HDLC is an OSI level 2 function and is what the AX.25 protocol is based
upon. Here, the term is synonymous with RADIO PATH QUALITY. Certain types
of packet networks (wire links, HF/VHF/UHF radio with varying user access)
are more efficient than others. The most ideal packet link is a full duplex
wire line between two TNCs.
PacketRadio Networking Handbook for the System Node Operator
Page _____________ 64
PacketRadio Networking Handbook for the System Node Operator
This is because there is no outside interference to corrupt the circuit. Least ideal is a
multi-user accessed HF link subject to interference and changing propagation conditions
between the two TNCs. Through observations and studies the following conventions
were established:
TYPE OF PATH BETWEEN TNCs
PATH QUALITY RELIABILITY
RS-232 wire line (2 port)
Satellite link
RS-232 wire line (3 port) link
UHF radio non-user radio link
VHF radio non-user radio link
VHF/UHF user accessed radio link
TEN Meter (1200 B/S) user link
HF user accessed radio link
255
252
248
240
224
192
188
128
99
98
97
94
88
75
70
50
It should be remembered these path quality values are for ideal situations.
Path congestion and propagation conditions will lower the values accordingly.
But by convention, the above values will be used in parameters 2 and 3
throughout the system. The above chart explains why it is undesirable to allow
user access to backbone trunks. By doing so, the path quality is degraded.
Recommended default for a 1200 baud VHF/UHF user accessed simplex radio link
is 100. A reliable neighbor should be locked to 192.
(Range: 0-255)
Parameter 4
RS-232 CHANNEL QUALITY
Describes the path (or port) via the RS-232 connector (DB-25 or DB-9) at
the rear of the TNC. If configured for multi-node operation, this connector
ordinarily attaches to either another TNC/node, or to a diode matrix connecting
three or more TNC/nodes. As indicated in the above chart, the probability of
a successful connection in highest for two TNCs RS-232 connected. Therefore,
the highest path quality value is assigned to this configuration. Diode matrix
connected TNC's have a lower probability of connect. This is because any one
given TNC may be held off while an active packet is in process to another TNC
on the matrix. Thus throughput over diode matrixed TNCs is not as high as
two direct connected TNCs. Path quality values for this parameter ordinarily
are set at 255 for two nodes, and perhaps as low as 245 for several diode
matrixed nodes.
•
•
•
•
NOTE: SYSOPing the existing value of Parms 2 and 3 to a different value on
active nodes showing in the ROUTES will not be immediately shown. If these
nodes decrement fail and later come back, they will reappear with the new
SYSOPed Path Quality value assigned to them.
PacketRadio Networking Handbook for the System Node Operator
Page _____________ 65
PacketRadio Networking Handbook for the System Node Operator
A procedure to get the new value to quickly go into effect without a reset of the node, would be
to lock the routes. The following illustrates how HDLC (radio) CHANNEL QUALITY and RS-232
CHANNEL QUALITY are displayed in response to a (R)outes command:
AGA:AA4UA-7} Routes:
0 MLJ:WB4ILR-5 150 16
1 BLY:AA4UA-5 255 15
1 UA96:AA4UA-9 255 15
The 0 and 1's seen in the left column correspond to the port identifiers listed in parameters
2 and 3.
The 0 means it is a radio port and the 1 is an RS-232 TNC port. The 3rd column is the
default settings
in this example for parameters 2 and 3. Here we note the NodeOp has determined the radio
path to MLJ is not a good "standard" 192 quality path. Therefore he has assigned it a value
of 150. If a neighbor node had a good quality path, parameter 2 would be set for 192. Then
the ROUTES locking technique would be used to set MLJ to the 150 value. In this
example, the NodeOp has assigned RS-232 CHANNEL QUALITY values of 255 to both the
BLY and UA96 nodes. The last column indicates the number of destination routes via the
path shown.
(Range: 0-255)
Parameter 5
OBS COUNT INITIAL VALUE
The initial value for the NODES obsolescence counter. This counter displays how
current a path is to a destination node. The node keeps track time-wise of all nodes
heard during neighbor broadcasts. By convention, this counter is normally defaulted
to "6." If for some reason a known node isn't heard upon receipt if the next neighbor
broadcast, the obsolescence value for that node will decrement to "5." If not heard at
the next broadcast, it goes to "4," etc. Once the value goes to "0," knowledge of that
node is removed from the routing table. If the node IS heard before the value falls to "0,"
it automatically is reassigned a "6." By comparing the broadcast timer value in parameter
6 against the obsolescence count, one can calculate how "fresh" a path is.
The purpose of the obsolescence counter is to purge failed nodes from the routing
tables. With half hour broadcast cycle (1800 seconds), an initial value of "6" will allow
a failed node to remain in the routing tables of immediate neighbors for up to 3 hours.
Depending upon the parameters of more distant nodes, the failed node may appear
within the network for a longer period before finally being decremented out.
Nodes configured as HF gateways are subject to variable and sometimes sudden,
propagation shifts. An initial obsolescence counter value of "5" on the HF node and
on adjacent RS-232 connected VHF/UHF nodes will hasten the purging of stale nodes
from the system.
(Range: 0-255)
All cables and interfaces shown in this book are available at: www.HamRadioExpress.com
PacketRadio Networking Handbook for the System Node Operator
Page _____________ 66
PacketRadio Networking Handbook for the System Node Operator
Parameter 6
OBSOLESENCE COUNT MINIMUM FOR NODE BROADCAST
Sets a limit on the minimum obsolescence value associated with other nodes
to be included in the NODES broadcast. For instance, if a neighbor has not
heard the RVNC:K4000-7 node for 2 or 3 broadcast periods, the likelihood is
high RVNC has failed. Thus it is good network practice to avoid sending out
useless node data. By setting parameter 6 to a value of one less than that of
parameter 5, freshly failed nodes will not be included in the forthcoming
broadcast. Knowledge of the missed node will remain until decremented out by
parameter 5. Therefore, if the broadcast was simply missed due to QRM, distant
users would still be able to connect to that node.
If parameter 6 is set to a value higher than parameter 5, the NODES destination table
will include only itself. (Range: 1-255)
Parameter 7
NODES BROADCAST INTERVAL
The NODES broadcast interval controls the "heart" of TheNet's dynamic
routing process. It is this timer that sets the frequency of broadcasts that
includes node aliases, callsigns, routing, and obsolescence information. The
broadcast timer also initiates action to systematically decrement failed nodes
from the routing tables. For proper synchronization of network actions, it's
recommended the value selected for the broadcast interval be the same on all
nodes in the system. Short intervals will insure greater network routing
reliability but at the expense of increased network overhead. Longer intervals
decrease overhead but yields poorer routing reliability.
The suggested value of 1800 seconds (30 minutes) achieves a reasonable balance.
A 30 minute interval will cause failed nodes to be decremented out of neighbor
routes tables within 3 hours or less. A setting of "0" will disable the timer and is
not recommended.
(Range: 0-65535)
Parameter 8
TIME-TO-LIVE INITIALIZER (Level 3)
Routing paths may exist in a network that will route frames in an endless
loop. To prevent this, it's desirable to set a maximum limit on the number of
nodes a frame can be directly routed through. The time-to-live parameter
limits the number of hops that network layer frames originating from this node
will travel before being terminated. The function of this parameter is to
reduce network congestion should a connect request to a distant node get caught
in a routing loop.
PacketRadio Networking Handbook for the System Node Operator
Page _____________ 67
PacketRadio Networking Handbook for the System Node Operator
Connect requests directed to destination nodes beyond the
number of hops allowed, will be quietly ignored. The value selected should be
several hops longer than the longest "direct connect" in the system. A
Suggested value is 64.
(Range: 0-255)
Parameter 9
TRANSPORT TIMEOUT (Level 4)
Sets the time period for acknowledgement failure prior to sending a level 4
transport layer retry. As an example, assume a user is connected hop-by-hop
through a moderately busy system to a destination node 20 hops away. With each
connect, level 4 transport information frames are exchanged between the user
and the current destination node. Every information frame requires a level 4
ack. As the circuit grows longer, so does the time for the acknowledgement to
arrive.
Should the transport timeout be set too short, there is danger of creating
excessive information frame retries and corresponding increase in circuit
congestion. Set too long, throughput could suffer while waiting for the
retry, if a frame is abandoned somewhere along the circuit.
Suggested values that help prevent congestion are 180 - 240 seconds.
(Range: 5-600)
Parameter 10
TRANSPORT MAXIMUM RETRIES (Level 4)
Establishes the maximum number of times the transport layer will be tried
before a circuit failure response is given. The value selected will cause the
node on the sourcing side of the failed circuit to try for a number of times
equal to the product of the values set in parameters 9 (link maximum tries) and
19 (transport maximum tries). If the number of transport tries is set high,
link congestion results.
Suggested value is "2".
(Range: 2-127)
All cables and interfaces shown in this book are available at: www.HamRadioExpress.com
PacketRadio Networking Handbook for the System Node Operator
Page _____________ 68
PacketRadio Networking Handbook for the System Node Operator
Parameter 11
TRANSPORT ACKNOWLEDGE DELAY (seconds)
Sets the number of seconds the end-to-end level 4 transport circuit has in
sending an acknowledgement to an information frame. If the delay is too
short, the node will key-up on every ack. If set too long, delay in throughput
could be noticeable. Finding just the "right delay" is a function of network
type, circuit length, circuit loading, and baud rates. Some delay is an advantage
as it reduces the node's key-up cycle by permitting transport acks to ride
along with outgoing information frames.
Suggested values are from 3 seconds.
(Range: 1-60)
Parameter 12
TRANSPORT BUSY DELAY (seconds)
Limits the number of seconds an incoming level 4 frame shall be held if
its choke flag is set. When the circuit isn't cleared within the allocated
time, the frame is discarded. The purpose of the transport busy delay is to
act as a fail-safe timer to prevent circuit lockups. If the delay is too long,
the circuit will be slow to respond to route failures. If too short,
unnecessary L4 information frame retries may be sent causing congested circuit
conditions. The delay should be somewhat longer than the worst node-to-node
round trip time in the network.
Suggested value is 180 seconds.
(Range: 1-1000)
Parameter 13
TRANSPORT WINDOW "FRAME" SIZE (Level 4)
Transport window size (TRANSPORT LAYER (level 4) MAXFRAME) performs two functions.
It limits the number of non-acknowledged level 4 information frames heading toward the
destination node. It also sets a limit to the number of incoming out-of-sequence
information frames that will be temporarily buffered. If this limit is exceeded, a circuit
choke response is sent toward the sourcing node. A small window size requires a short
acknowledgement timer, parameter 20. A larger window size would benefit from longer
ack delay times by reducing the number of overhead frames sent through the network.
Too low of a value will increase the node's key-up cycle and, a high value impacts thruput.
MAXFRAME [buffer] size of 4 is suggested. (Range: 1-127)
PacketRadio Networking Handbook for the System Node Operator
Page _____________ 69
PacketRadio Networking Handbook for the System Node Operator
Parameter 14
CONGESTION CONTROL THRESHOLD "Frames" (Level 4)
The congestion control threshold also performs two functions. It limits the number of
level 2 link layer frames that will be held before issuing a Receive Not Ready (RNR)
response. It also sets the maximum number of transport layer frames (in sequence
or not) that will be accepted before sending a circuit choke response toward the
source node. Too low of a value can delay LAN throughput if the backbone is moderately
busy. This buffer should be set to agree with parameter 13.
Suggested value is 4 frames. (Range: 1-127)
Parameter 15
NO-ACTIVITY TIMEOUT (Level 7) "seconds"
The no-activity timeout timer performs several missions. The node monitors activity on
either of level 2 and level 4 circuits. If no activity is detected during the period the timer
is set for, the circuit is disconnected. In conjunction with circuit activity, the timer sets
the life of the "activity arrow" seen on the ROUTES response. It also sets the
maximum period a CQ command can be observed in the USERS response.
Setting the timeout to zero disables the timer (not recommended).
Suggested value is 900 seconds (15minutes) (Range: 0-65535)
Parameter 16
P-PERSISTENCE THRESHOLD
Parameters 25 and 26 work together to set up a random delay determining when the
node will key up following a DCD decision that the channel is clear. This is an
anti-collision technique. When the node is ready to transmit, a number between 0
and 255 is internally generated. If this number is equal or less than the value set by
Parameter 25, the node keys immediately upon sensing a clear channel. If the internally
generated number is greater than the value of parameter 25, the node waits for a period of
time equal to the slot time and then internally generates a new number, etc.
A value of 64 is 25% of 255 and thus sets the percentage of time the node will
immediately key-up when a clear channel is sensed.
Protected trunking nodes would have faster throughput if random key-up delays
were eliminated. Set parameter 16 to a value of 255 will accomplish this.
Suggested setting is 64. (Range: 0-255)
All cables and interfaces shown in this book are available at: www.HamRadioExpress.com
PacketRadio Networking Handbook for the System Node Operator
Page _____________ 70
PacketRadio Networking Handbook for the System Node Operator
Parameter 17
PERSISTANCE "SLOT TIME" DELAY (In 10 millisecond increments)
The slot time interval is adjusted in consonance with P-Persistance to establish
a variable delay node key-up algorithm designed to prevent collisions. Since
the variable key-up delay algorithm only impacts WHEN the node is keyed, it has
no relationship to either node or user TXDs. On single transmitter channels,
slot time is disabled when P-Persist is set to 255.
In multiple transmitter environments and with P-Persist set to 64, a slot time of
10 (100 milliseconds) is suggested. (Range: 0-127)
Parameter 18
LINK T1 TIMEOUT "FRACK" (seconds)
Specifies the time in seconds a point-to-point level 2 frame retry will be sent to a
node or a user if a previous frame isn't acknowledged. The value chosen will
vary with the type of service the node performs. Small values may unnecessarily
increase the node key-up cycle in multi-user environments. Large values on single
transmitter links will slow throughput. Suggested value(s) for multi-user service are
"4" and, "2" for single/dual transmitter links.
(Range: 1-15)
Parameter 19
LINK LEVEL 2 WINDOW SIZE "MAXFRAME" (frames)
Specifies the maximum number of point-to-point level 2 frames that can be
sent to a node or a user without acknowledgement. Small values on busy highspeed links will dramatically increase the node key-up cycle due to increased
frame acknowledgement requirements. Larger values on solid links will allow
improved throughput efficiency. If SEDAN keyboard operators are being prematurely
disconnected on access nodes, over-aggressive server TNC parameters may be at
fault.
Suggested value is 6 frames. (Range: 1-7)
Parameter 20
LINK MAXIMUM TRIES
Sets the number of attempts a point-to-point level 2 circuit will be tried
between a user or a node before a failure is reported. When level 4 transport
end-to-end circuits are involved, the number of times the node transmitter is
keyed on a failed link is the product of the values for parameters 9 and 19.
Suggested value is 7 tries. (Range: 0-127)
All cables and interfaces shown in this book are available at:
PacketRadio Networking Handbook for the System Node Operator
www.HamRadioExpress.com
Page _____________ 71
PacketRadio Networking Handbook for the System Node Operator
Parameter 21
LINK T2 TIMEOUT
Link T2 timeout is the node's equivalent to a TNC's RESPONSE TIME
parameter. It sets the amount of delay following receipt of a level 2 info
frame before an acknowledgement is sent. A little delay is desirable as it
gives a chance for the ack to ride along on the next info frame. Too much
delay will slow throughput.
Suggested value is "100" (1 second). (Range: 0-6000)
Parameter 22
LINK T3 TIMEOUT (In 10 millisecond increments)
Link T3 timeout is the node's equivalent to a TNC's CHECK parameter. Its purpose is to
send out a level 2 "check packet" following a specified period of inactivity, to verify the link
layer is still connected. If a response isn't received prior to completion of the retry
sequence, the circuit is disconnected. Should the timer value (10 ms increments) be
set too short, the check packets add unnecessarily to link congestion. This command is also
used to break link lockups.
Suggested value is "18000" (timer disabled).
(Range: 0 - 65535)
Parameter 23
DIGIPEAT
Digipeating
YES = 1
NO = 0
Parameter 24
VALIDATE CALLSIGNS
Determines if incoming callsigns will be verified against the internal callsign validation
routine. It's to both user and NodeOp's advantage to implement callsign validation.
If not enabled, a distant user mistyping a node alias, may have to wait a considerable
length of time before receiving an appropriate node response. If the Node Sysop is
desiring to allow user downlinks to KA-node aliases, possibly these alias could be
selected to satisfy the callsign verification.
Suggested default is "1."
(Range: 0-1)
All cables and interfaces shown in this book are available at:
PacketRadio Networking Handbook for the System Node Operator
www.HamRadioExpress.com
Page _____________ 72
PacketRadio Networking Handbook for the System Node Operator
Parameter 25
STATION ID (BEACONS)
Defines whether the node transmits an ID beacon.
The following options are available:
0 = OFF, Disabled (ID's OFF)
1 = CONDITIONAL, Used (ID's every 10 minutes when the frequency is in use)
2 = ON, Enabled (ID's broadcast every 10 minutes)
ID beacons contribute to network poop. (See beacon period in MODES table).
On backbone & trunks frequencies they can be turned off.
On user/LAN nodes, ID's are useful for MHeard support.
Suggested value is "1".
(Range: 0-2)
Parameter 26
CQ BROADCASTS ENABLE FLAG
Controls whether or not the UNPROTO text sent by a CQ user will be broadcast
from the node. This parameter does not affect the listing seen in response to
a USERS command should someone be inviting a CQ contact.
0 = Disabled (no UNPROTO broadcasts)
1 = Enabled (UNPROTO broadcasts allowed)
Suggested value is "1".
(Range: 0-1)
PacketRadio Networking Handbook for the System Node Operator
Page _____________ 73
PacketRadio Networking Handbook for the System Node Operator
TheNET X-1J4 QUICK REFERENCE GUIDE
SWITCH COMMANDS
⇒ ACL
[{ CALLSIGN + VALUE } | { CALLSIGN - VALUE } | { * VALUE }]
⇒ ALIAS [ * | NEW_ALIAS ]
⇒ ARP
[ipaddr [{ - ptcl } | [ + [ P ] ptcl callsign [ DG | VC ]]]
⇒ AUDIT [ NUMBER_FROM_0_TO_255 ]
⇒ BBS
[ CALLSIGN | * | ? ]
⇒ BBSALIAS [ * | NEW_ALIAS ]
⇒ BTEXT [ * | BEACON_MESSAGE_TEXT ] (see note 6)
⇒ BYE
⇒ CALIBRATE [ PERIOD_VALUE_FROM_1_TO_60 [ TOGGLE_VALUE_1_TO_PERIOD ] ]
⇒ CLOSEDOWN A
⇒ CONNECT [ CALLSIGN [ [V] DIGILIST ... ]
⇒ CQ
[ MESSAGE_FOR_CQ_PACKET ]
⇒ CTEXT [ * | CONNECT_MESSAGE_TEXT ] (see note 6)
⇒ DXCLUSTER [ CALLSIGN | * | ? ]
⇒ DXCALIAS [ * | NEW_ALIAS ]
⇒ HELP
⇒ HOST
[ CALLSIGN | * | ? ]
⇒ HOSTALIAS [ * | NEW_ALIAS ]
⇒ INFO
[ SYSOP_SET_MESSAGE ] (see note 6)
⇒ IPADDRESS [ NEW_IP_ADDRESS ]
⇒ IPBROADCAST [ NEW_IP_ADDRESS ]
⇒ IPROUTE [ipaddr [ /bits ] [ - | { + port [ ipgateway [ metric ] ]]]
⇒ IPSTATS [ { NEWPARAM | * } { NEWPARAM | * } ..... ] (see note 5)
⇒ LINKS
⇒ MANAGER
⇒ METER [ new_value ] (see note 5)
⇒ MHEARD [ NUMBER_FROM_1_TO_100 ]
⇒ MODE
[ { NEWPARAM | * } { NEWPARAM | * } ..... ] (see note 5)
⇒ MTU
[ list_of_parameters ] (see note 5)
⇒ NODES [* [*] | NODECALL {+|-} IDENT QUAL COUNT PORT NEIGHBOUR [DIGIS]]
⇒ PARMS [ { NEWPARAM | * } { NEWPARAM | * } ..... ] (see note 5)
⇒ QUIT
⇒ RESET [ ANY_CHARACTER ]
⇒ ROUTES [ PORT NODECALL [ DIGILIST ... ] { + | - } PATHQUALITY ]
⇒ STATS
⇒ SYSOP
⇒ TALK
[ STRING ]
⇒ UI
DEST STRING_OF_TEXT_TO_BE_SENT_IN_UI_FRAME
⇒ USERS
Note 1 Any command may be enabled or disabled by the use of the '+' or '-' modifier, as shown below:
ANY_COMMAND [ + | - | THAT_COMMANDS_PARAMETERS ]
Note 2 IP addresses are of the form nnn.nnn.nnn.nnn
where nnn is a number 0..255
Note 3 IProute port paramter takes the form 0 or 1 for radio or rs232 AX.25 or Net/Rom for Net/Rom ( May be
abbreviated )
Note 4 ARP ptcl parameter is AX.25 or Net/Rom ( may be abbreviated )
Note 5 The commands will accept the 'old' syntax of '* * * value...' or the new offset & value syntax of '/
parameter_number value'
All cables and interfaces shown in this book are available at: www.HamRadioExpress.com
PacketRadio Networking Handbook for the System Node Operator
Page _____________ 74
PacketRadio Networking Handbook for the System Node Operator
HOST 'ESCAPE' COMMANDS
<escape> C
<escape> D
<escape> P [ NEW_PASSWORD ]
UNDERSTANDING ACL VALUES
|
UNDERSTANDING AUDIT BITS
Bit Function
| Bit Function
_______________________________________________________________________________________
0 Bar all incoming L2 connects | 0 Issue L1 stats every 10minutes
1 Bar outgoing L2 downlinks | 1 Audit L2 connects & disconnects
2 Ignore nodes broadcasts
| 2 unused
3 Bar gatewaying at level 3 | 3 Audit L4 connects & disconnects
4 Bar incoming L4 connects | 4 Audit L7 use of sysop command
5 Bar outgoing L4 connects | 5 Audit all L7 switch commands
6 ignore SSID in searching | 6 Issue CPU stats every 10minutes
7 unused
| 7 unused
PARMS PARAMETERS
Number Min Max Function
1
1 400 Maximum number of destination nodes
2
0 255 Minimum quality for auto update
3
0 255 HDLC ( radio, port 0 ) default quality
4
0 255 RS232 ( crosslink, port 1 ) default quality
5
0 255 Initial value for obsolescence counter
6
1 255 Minimum obsolescence for node broadcast
7
0 65535 Auto update broadcast interval ( seconds )
8
0 255 Level 3 ( network ) Time To Live Initialiser
9
5 600 Level 4 ( transport ) timeout ( seconds )
10
1 127 Level 4 ( transport ) retries
11
1 60 Level 4 ( transport ) acknowledge delay (seconds)
12
1 1000 Level 4 ( transport ) busy delay ( seconds )
13
1 127 Level 4 ( transport ) window size ( frames )
14
1 127 Level 4 ( transport ) congestion control threshold
15
0 65535 Level 7 ( switch ) inactivity timeout ( seconds )
16
0 255 Persistance for transmit delay
17
0 127 Persistance slottime delay (10's of milliseconds)
18
1 15 Level 2 ( link ) T1 timeout, ie FRACK ( seconds )
19
1
7 Level 2 ( link ) window size ( packets )
20
0 127 Level 2 ( link ) retries
21
0 6000 Level 2 ( link ) T2 timeout (10's of milliseconds)
22
0 65535 Level 2 ( link ) T3 timeout (10's of milliseconds)
23
0
1 Level 2 ( link ) digipeat enable flag
24
0
1 Callsign validation flag
25
0
2 Node beacon control (0=off, 1=if active,2=always)
26
0
1 CQ broadcasts enable flag
All cables and interfaces shown in this book are available at: www.HamRadioExpress.com
PacketRadio Networking Handbook for the System Node Operator
Page _____________ 75
PacketRadio Networking Handbook for the System Node Operator All cables and interfaces shown in this book are available at: www.HamR
NO.
1
2
3
4
5
6
7
8
9
10
11
12
13
14
15
16
17
MIN
MAX
MODE PARAMETERS
0
1 Hardware handshake host control mode flag
0 3600 CWID repeat period ( seconds )
4 10 CWID speed ( 10's msecs per dot )
0
3 Nodes broadcast channel enable flags where
0=none, 1=HDLC only, 2=RS232 only, 3=Both ports
0
3 Crosslink protocol selection
0=crosslink, 1=KISS,
2=KISS+selcopy, 3=KISS+allcopy
0 255 TX keyup delay ( 10's of milliseconds )
0
1 Full duplex enable flag
0 65535 RS232 ( port 1 ) node broadcast period ( secs )
0
3 Node broadcast algorithm control flags
0=off, 2=RS232 port, 1 & 3 not normally used
600 3600 Beacon interval ( seconds )
0
2 Connect redirection to BBS flag
0 127 Help messages enable flags, 8 bit TALK & case
0
3 Hash node broadcast disable ( one bit per port )
0
1 Enable extra aliases monitoring if set
0
1 Enable auto reconnection to node after remote dis
0
3 Slime trail control. Each bit controls a function,
Bit 0 if set hides slime trails in nodes listing
Bit 1 if set causes slime trails to be ignored
0
3 Digipeat control. Each bit controls a function...
Bit 0 set causes node to refuse digi'd L2 uplinks
Bit 1 set, node refuses to allow digi downlinks
IPSTAT PARAMETERS
Number Min Max Function ( Those marked '*' are not used )
1
0
3 ip L2 AX.25 Modes ( 1 bit per port, 1=DG )
2
0
1 ip Forwarding, 1=enable router, 0=disable
3
2 255 ip Default TTL
4
0
0 ip In Receives
5
0
0 ip In Header Errors
6* 0
0 ip In Address Errors
7
0
0 ip Forwarded Datagrams
8
0
0 ip In Unknown Protocols
9* 0
0 ip In Discards ( TTL exceeded )
10 * 0
0 ip In Delivers
11
0
0 ip Output Requests
12 * 0
0 ip Output Discards
13
0
0 ip Output No Routes
14 * 1 30 ip Reasm Timeout
15 * 0
0 ip Reasm Requireds
16 * 0
0 ip Reasm OKs
17 * 0
0 ip Reasm Fails
18
0
0 ip Frag OKs
19 * 0
0 ip Frag Fails
20
0
0 ip Frag Creates
All cables and interfaces shown in this book are available at: www.HamRadioExpress.com
Page ___ 76
PacketRadio Networking Handbook for the System Node Operator All cables and interfaces shown in this book are available at: www.HamR
Number Min Max Function
1
64 1024 IP Port 0 ( Radio Port ) Level 2 AX.25 MTU
2
64 1024 IP Port 1 ( RS232 Port ) Level 2 AX.25 MTU
3
64 236 IP Net/Rom port MTU
4 257 1025 Level 2 Max data bytes in a packet before error
5 328 1096 Level 2 Total max packet size in bytes
All cables and interfaces shown in this book are available at: www.HamRadioExpress.com Page ____ 77
PacketRadio Networking Handbook for the System Node Operator
USER GUIDE FOR TheNet X-1J4
This brief note is intended for users of TheNet X-1J, and explains the basic commands. Configuration and sysop
features are not covered fully.
TheNet X-1J is an extension of TheNet 1, and provides a number of new features.
The switch provides the following user commands :
♠
♠
♠
♠
♠
♠
♠
♠
♠
♠
♠
♠
♠
♠
♠
Connect
Info
Nodes
Routes
Users
Talk
CQ
BBS
Host
MHeard
Bye
DXcluster
IProute
ARP
QUIT
Not all commands may be available on every node as certain commands might have been disabled. If a command
has been enabled, it will be displayed when you type an invalid command such as '?'. In addition, there are some
commands that are available but are not displayed. The main ones of interest are :
♠
♠
♠
♠
♠
♠
♠
♠
♠
Links
Mode
Parms
Stats
IPAddress
DXCAlias
BBSAlias
HostAlias
MTU
In general, commands take parameters, for example to connect to GB7MXM, the command to be entered is
CONNECT GB7MXM followed by return. Usually, commands are not case sensitive ( although node aliases may
be ), and commands may be abbreviated.
Connect
If the connect command is given on its own, then assuming that the sysop has set it up correctly, you will
get connected to the local BBS.
If you give another callsign, either of a local station or a node, the node will attempt to connect you to that
station either by a level 4 connection or by downlinking. If you are downlinking, you may also specify
digipeaters.
In either case, you get either a connected message or a message telling you of the failure to connect. If you
enter any other command at this stage, the connection attempt will be aborted.
If you attempt to downlink with digipeating, or attempt to downlink to an invalid callsign such as a node alias
with an SSID, you may get an error message depending on how the Sysop has configured the node.
PacketRadio Networking Handbook for the System Node Operator
Page _____________ 78
PacketRadio Networking Handbook for the System Node Operator
Finally, if you connect to the node, then connect to another station, and that station disconnects you ( e.g.
connect to a BBS and use the 'Bye' command of the BBS ), you will either get reconnected to the node or
disconnected completely depending on the configuration of the node.
If you enter a node alias and get an 'invalid call' message, it can either be because the node is not
recognised or it can be because the Sysop has made node aliases case sensitive.
Info
This command gives information about the node as a combination of a message stored in the EPROM and
a message entered by the Sysop.
Nodes
This command gives information about the distant nodes that this node thinks it can get to. With no
parameter, it shows the alias and callsign of all the nodes except those staring with a '#' character. If a
parameter of '*' is given, those 'hidden' nodes will also be shown.
If a callsign or alias is given that the node does not know, it gives an error message. If the callsign or alias
of a known node is given, the node gives details of the routes it knows about that lead to that destination.
The display shows one option per line, each of which consists of the path quality, obsolescence count and
port followed by the callsign of the neighbour. If any route is in use, a chevron is shown against the
appropriate entry.
If so configured by the Sysop, 'Slime trails' i.e. nodes without aliases that have not been the subject of a
valid node broadcast, may be omitted from the nodes list.
Routes
This command gives information about the neighbouring nodes that can be heard. For each neighbour, the
display shows the port number, the callsign, the path quality and the number of nodes accessible through
this neighbour. If a route has been 'locked' by the sysop, then a '!' character is shown after an entry. The
sysop may have configured the node to display nodes as callsign or as alias:callsign. If so configured, then
if a node is shown as a callsign alone it means that is it not currently reachable as its node broadcasts are
not being received.
Users
This shows who is using the node. It does not show other nodes that are using the node as a level 3 relay,
nor does it show those users who have connected to the node but otherwise have done nothing.
The display shows the through connections, followed by those users who are connected to the switch and
'idle'. It also shows those users who are connected to the conferencing facility. The latter stations are
shown connected to a destination called 'Talk', whilst in the case of connections, the two endpoints are
shown.
For connections, two symbols are used, '<-->' and '<..>'. The former is used for established connections
whilst the latter is used for connections being established.
Talk
The Talk command allows a group of users to hold a conference call. It also allows a user to send a
message to another user of the node provided that user is connected to the switch but is not patched
through to another station and is not currently trying to connect to another station.
A user enters the conference by giving the command 'talk'. He/she gets a message informing them of this
and reminding them that the command to escape from the talk command is '/exit'. Any other users currently
in the conference get a message from the node telling them of the callsign of the user who has joined them.
At this point, every line sent by a user in the conference is copied to all other users in the conference,
preceded by their callsign.
PacketRadio Networking Handbook for the System Node Operator
Page _____________ 79
PacketRadio Networking Handbook for the System Node Operator
To exit from the conference, the command '/exit' is used. This causes a response message to be sent to
the user, and at the same time all of those left in the conference get a message from the node telling them
of the station who has left the conference. If you force a disconnect, the other stations are not told of your
departure.
A string of text may be entered on the same line as the talk command when the command is given. If this is
done, before the user is connected to the conference, that string of text is sent to all the other users of the
node who appear in the 'user' list but are not connected to anything else. For example if GxABC were to
type :
TALK GyXYZ, Hello fred can I have a chat - type TALK
then other users of the node ( including presumably Fred, would get the message :
GxABC>> GyXYZ. Hello fred can I have a chat - type TALK
on their screens. The only exception to this is that sysops are not sent the message.
Note that the TALK command will pass 8 bit data if set to by the Sysop.
CQ
This command is used to broadcast a CQ message. In addition, the fact that you are calling CQ is indicated
in the USER list. The callsign will be your own with a different SSID, and anyone else can connect to you
by connecting to the callsign with the appropriate SSID.
The CQ remains 'primed' for a while, and if any other command is given to the node the CQ will be
cancelled.
BBS
When you issue the BBS command, assuming that the sysop has configured it, you will be connected to
the local BBS.
If you enter the command 'BBS ?', then the current setting of the BBS will be displayed.
Host
The HOST command operates just like the BBS command. It may have been disabled by the sysop, it may
have been set to connect to the same station as the BBS, or it may have been set to connect to another
host system. If you enter the command 'HOST ?', then the current setting of the HOST will be displayed.
MHeard
If enabled, the heard list shows the last few stations heard. The number of entries is limited and set by the
sysop so any stations not heard for a while may get pushed out of the list by others heard. Assuming that a
station is not pushed out in this manner, the display shows the number of packets heard from that station
since it appeared in the list and the time since it was last heard. The time is hours, minutes and seconds.
The list also shows the port on which the station was heard ( port 0 is the radio port ), and if it hears IP
frames or Net/Rom frames, it adds a note to show that the station is a node and/or a TCP/IP station.
If the list is long enough so that a station is not heard for 12 hours, it will get deleted anyway.
The list may also show a column headed 'Dev.'. This will only be present where the sysop has added to the
node a small hardware add-on that measures the received signal audio level. Specifically, it gives an
indication of the peak audio level. By means of a software configuration control and prior calibration, this
gets converted into an indication of the transmitting station's signal deviation. It does this by sampling the
audio level after every valid packet.
Care must be taken over its interpretation. It does not measure independently the two tone levels - it is
assumed that whatever local standards that relate to pre-emphasis ( i.e. use it or not ) have been
implemented.
All cables and interfaces shown in this book are available at: www.HamRadioExpress.com
PacketRadio Networking Handbook for the System Node Operator
Page _____________ 80
PacketRadio Networking Handbook for the System Node Operator
Often, packet stations are set up, and the audio level tweaked until it appears to work reasonably error free.
The idea of this add-on is that, having done that, you then connect to the node and display the heard list to
see an indication of your actual deviation. It may then be fine tuned to set it correctly. Local advice must be
taken over the correct setting as it depends on the channel spacing being used ( e.g. 12.5, 25 or other KHz
).
The meter will give the wrong answer on the following conditions :
•
•
•
•
A badly distorted audio signal
Badly off frequency
Incorrect adherence to local pre-emphasis standards
A noisy signal
If you connect, then correct your deviation to the correct display then find performance has deteriorated, it
indicates one of the above problems. It is not that the meter doesn't work, it is an indication of a fault
elsewhere.
It is in your own interest for those around you to use the correct deviation. The list also allows you to see
the deviation of others - so apply peer pressure if someone over or under deviates. Remember it is NOT a
case of the higher or the lower the better - it is having the setting RIGHT.
The system may also be used to migrate users towards a lower deviation in advance of moving to narrower
channel spacing.
Links
The LINKS command shows the level 2 connections to the node. This is usually of academic interest, but I
use it in testing. The display shows the links, one per line, with the two callsigns, the link state, the port
number and the current number of retries.
PacketRadio Networking Handbook for the System Node Operator
Page _____________ 81
PacketRadio Networking Handbook for the System Node Operator
Mode
The MODE command is a bit like the PARMS command. It shows a number of additional parameters.
These are as follows as shown by example :
MODE
THENET:G8KBB-5> 0 1800 6 3 2 20 0 600 2 900 1 31 0 1 1 0 0
with the following meanings :
0
1800
6
3
2
30
0
600
2
900
1
31
0
1
1
0
0
Host mode protocol ( 0 = standard, 1 = DCD mode )
CWID period. Delay in seconds between CWID
CWID speed 10's of msec per dot. 6 equals 20 wpm
Enable / disable nodes broadcasts mask.
RS232 protocol, 0 = crosslink, 1,2 or 3 are KISS
TxDelay in 10's of milliseconds ( Centiseconds ?? )
Full duplex control. 0 equals simplex
RS232 port nodes broadcast interval in seconds
Nodes broadcast algorithm port mask
Beacon period in seconds
'connect' redirector. 0 is to HOST, 1 is to BBS
Each bit controls one of the 'user' help messages, 8 bit TALK & case sensitivity
This byte controls the broadcasting of 'hash' nodes
This byte enables / disables the extra alias operation
If set to '1', a remote disconnect on a circuit will cause a node reconnection
The bits of this controls the operation of the node with regard to 'slime trails'
The bits of this control whether digi uplinks and downlinks are permitted
If you want additional details, ask the sysop for a copy of the overview guide.
Parms
This shows the node parameters as per TheNet 1.01 ( See ADDENDUM "A" of this manual ).
Bye and Quit
These commands disconnects you from the node, closing the link. It says goodbye before disconnecting
you if it has been so configured by the sysop. Quit does just the same as Bye does.
DXcluster
If there is a local DXcluster, this command may have been configured by the sysop to connect you to it. It
therefore operates in a manner very similar to the BBS command.
Stats
The stats command gives lots of data about the node operation. A full description of the information is
contained in the overview document.
IProute
This command is used by the sysop to configure the IP route table. It may also be used to display the
router table.
Arp
This command is similar to the IProute command, but shows the Arp table. The Arp table provides a
translation from Ip address to callsign.
IPaddress
This command is used to set or display the current node IP address.
PacketRadio Networking Handbook for the System Node Operator
Page _____________ 82
PacketRadio Networking Handbook for the System Node Operator
BBSAlias
HostAlias
DXCAlias
These commands are used to set additional aliases for the node. It can be configured by the sysop to
accept connect requests ( uplinks ) to the node callsign, the node alias, or the 3 aliases shown by these
commands. When the node accepts a connection to one of these aliases, it will immediately invoke the
BBS, DXC or HOST commands for you. The way this would normally be used is as follows. Suppose your
local ( for example ) BBS was not accessible on the frequency that the node operates on. The BBS alias
can be configured to provide easy access across other nodes to the BBS. Hence in the case of the Ipswich
nodes, GB7MXM does not have a port on 144.650, but the node IPS2 on 144.650 can get to it by means of
another node and a 9600 baud link. If IPS2 is set to accept the extra aliases, and if BBSAlias is set to
MXMBBS, then anyone who tries to uplink to MXMBBS in the Ipswich area would be automatically
connected to GB7MXM. It goes without saying that if GB7MXM had a port on 144.650 itself, then chaos
would ensue.
MTU
This command allows configuration of the MTUs for IP users. The parameters have the following meanings
:
Parameter
Default
Controls
=============================================================
1
256
The MTU for the radio port, AX.25 encapsulation
2
256
The MTU for the RS232 port, AX.25 encapsulation
3
236
The MTU for the Net/Rom encapsulation
4
257
The maximum number of data bytes in a received L2 frame
5
328
The maximum number of bytes in a received L2 frame
For more details on the IP router, consult the 'overview' is the first section of this manual.
All cables and interfaces shown in this book are available at: www.HamRadioExpress.com
All cables and interfaces shown in this book are available at: www.HamRadioExpress.com
Thank you, es 73 de BucK4ABT
G. E. “Buck” Rogers Sr.
PacketRadio Networking Handbook for the System Node Operator
Page _____________ 83
PacketRadio Networking Handbook for the System Node Operator
ALL DIODES ARE
1N914.
BucK4ABT
2 3
7
5 20 10 23
2 3
7
5 20 10 23
2 3
7
5 20 10 23
2 3 7
5 20 10 23
When more than two X-1 nodes are linked to gateway
from band to band, or from 1200 to 9600 bauds, use this
diode matrix to interface the RS-232 ports together.
An unused port will not affect other ports that are in use.
PacketRadio Networking Handbook for the System Node Operator
Page _____________ 84
PacketRadio Networking Handbook for the System Node Operator
P1
13
10
7
3
2
1
14
25
23
REAR VIEW, DB25 MALE
P1
PIN #
1
2
3
7
10
P2
PIN #
1
2
3
7
10
P2
7
13
3
2
1
10
23
23
14
25
23
REAR VIEW, DB25 MALE
MODIFICATION OF TNC2 TO ALLOW USE OF 27C512
AND ENABLE BANK-SWITCHING FOR USE WITH X-1
TheNet MULTI-FUNCTION NODE FIRMWARE.
PacketRadio Networking Handbook for the System Node Operator
Page _____________ 85
PacketRadio Networking Handbook for the System Node Operator
TNC 1, PIN 3 (TxData) to TNC 2, PIN 2 (RxData)
TNC 1, PIN 2 (RxData) to TNC 2, PIN 3 (TxData)
TNC 1, PIN 5 (GND) to TNC 2, PIN5 (GND)
(DCD)
(DCD)
5
1
9
6
"JUMPER"
PIN 1 TO PIN9
5
1
9
6
PORT CONNECTOR.
"JUMPER"
PIN 1 TO PIN 9
PORT CONNECTOR.
BucK4ABT
BucK4ABT
TO PIN 9 (SELECT)
TO PIN 9 (SELECT)
This drawing illustrates the interface cable used with TNC's having DE9
serial ports. The X1 nodes having DB25 connectors can easily be interfaced
to the X1 nodes having DE9 connectors. Observe the correct signal line
connections when intermixing DE9 to DB25 X1 serial ports.
X1 BankSwitch Modification
1) Bend pin 1 of 27C512 so that it will not enter socket U2.
Insert X1 EPROM into socket U2.
2) Solder one end of a 5-inch piece of small wire to pin 1 of EPROM.
3) Solder the other end to pin 16 of SIO at U4. Pin 16 remains in socket.
PacketRadio Networking Handbook for the System Node Operator
Page _____________ 86
All cables and interfaces shown in this book are available at: www.HamRadioExpress.com
NOTES:
ALINCO
AZDEN
ICOM
KDK
KENWOOD
MIDLAND
PacketRadio Networking Handbook for the System Node Operator
Page _____________ 87