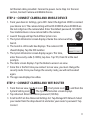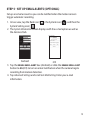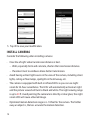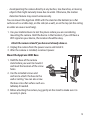
1
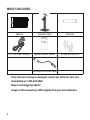
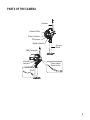
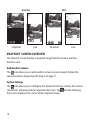
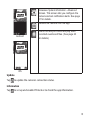
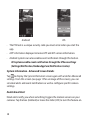
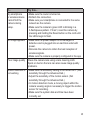
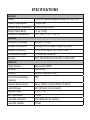
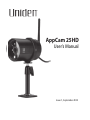
AppCam 25HD
User’s Manual
Issue 1, September 2014
CUSTOMER CARE
At Uniden®, we care about you!
If you need assistance, please do NOT return this product to your place of
purchase. Our customer care specialists are available to serve you.
Please keep your sales receipt as it is your proof of warranty.
Quickly find answers to your questions by:
1. Reading this owner’s manual.
2. Visiting our customer support website at www.uniden.com.
3. Calling our customer care specialists at 1-800-658-8068.
Images in this manual may differ slightly from your actual product.
CONTENTS
CUSTOMER CARE.................................................2
PLEASE READ BEFORE YOU START............. 4
WIRELESS DEVICES OPERATING RANGE....4
IMPORTANT SAFETY PRECAUTIONS............4
OVERVIEW.................................................... 6
FEATURES................................................................6
System..................................................................6
AppCam 25HD Indoor/
Outdoor Camera ......................................7
Uniden’s AppCam App...................................7
WHAT’S INCLUDED.............................................8
PARTS OF THE CAMERA....................................9
NETWORK SETUP AND CAMERA
INSTALLATION....................................... 10
OVERVIEW............................................................ 10
PREREQUISITES.................................................. 10
STEP 1 – SET UP CAMERA AND
SMARTPHONE/TABLET................................ 10
STEP 2 – CONNECT CAMERA AND
MOBILE DEVICE.............................................. 11
STEP 3 – CONNECT CAMERA AND
WIFI ROUTER.................................................... 11
STEP 4 - SET TIME ZONE/DAYLIGHT
SAVINGS TIME................................................. 12
STEP 5 - SET UP EMAIL ALERTS
(OPTIONAL)...................................................... 13
INSTALL CAMERAS........................................... 14
Mount the AppCam 25HD Base............... 15
Attach the AppCam 25HD Camera......... 15
USING THE APP.......................................... 17
ACCESSING YOUR CAMERAS....................... 17
SNAPSHOT VS LIVE VIDEO SCREEN........... 17
SNAPSHOT SCREEN OVERVIEW.................. 18
Add Another Camera................................... 18
System Settings............................................. 18
Update.............................................................. 19
Information..................................................... 19
System Information - Advanced
Screen Details......................................... 20
Delete Camera Connection ...................... 23
Event List Details........................................... 23
LIVE VIDEO SCREEN OVERVIEW.................. 24
TURN OFF THE APP.......................................... 25
COMMON OPERATIONS................................. 26
MAINTAINING YOUR SYSTEM................... 27
TAKING CARE OF YOUR CAMERA............... 27
MANAGING RECORDED FILES..................... 27
Copying Files from the microSD
Card to Your Computer....................... 27
TROUBLESHOOTING.................................. 28
HOW TO IMPROVE THE WIRELESS
SIGNAL QUALITY............................................ 28
SPECIFICATIONS........................................ 31
MICROSD CARD APPROXIMATE
RECORDING TIME.......................................... 32
FCC COMPLIANCE ..................................... 33
IC COMPLIANCE INFORMATION............... 34
CE COMPLIANCE INFORMATION.............. 34
ONE-YEAR LIMITED WARRANTY............... 34
Uniden surveillance products are not manufactured and/or sold with the intent to be used for illegal purposes.
Uniden expects consumer’s use of these products to be in compliance with all local, state and federal law. For further
information on video surveillance and audio recording legal requirements, please consult your local, state and federal
law.
© 2014. All rights allowed by law are hereby reserved.
PLEASE READ BEFORE YOU START
WIRELESS DEVICES OPERATING RANGE
Ensure the signal reception is acceptable between the camera(s) and the WiFi
router. If necessary, reduce the distance between them to improve overall
system performance.
Because local internet environments may vary, your device may indicate that
the camera is disconnected or may display a black screen. If this occurs, refresh
the app.
Item
Requirement/Recommendation
Internet Bandwidth
Network Requirement
Memory Card
Device Processor
1 Mbps upload/download speed
WiFi or 4G (optimize download speed)
microSD, CLASS10, up to 32GB
1.5GHz dual core processor or equivalent
IMPORTANT SAFETY PRECAUTIONS
Damages caused by non-compliance with this operating manual will void the
warranty! We will not assume any liability for damages to items or persons
caused by improper handling or non-compliance with the safety notices! Any
warranty claim will be null and void in such cases.
••
Do not drop, puncture or disassemble the camera; otherwise the warranty
will be voided.
••
Never tug on the power cords. Use the plug to unplug it from the outlet.
••
o not expose the camera to high temperature or leave it in direct sunlight.
D
Doing so may damage the camera or cause temporary camera malfunction.
••
Use the devices with care. Avoid pressing hard on the camera body.
4
••
F or your own safety, avoid using the camera or power off the camera when
there is a storm or lightning.
••
Disconnect the power adapter during long periods between usage.
••
Use only the accessories and power adapters supplied by Uniden.
5
OVERVIEW
Uniden’s AppCam 25HD system works with your smartphone or wireless device
to create a powerful home security network. No PC interface is needed to view
video on your smartphone or wireless devices. Connect your mobile device to
your camera, setup the network on your mobile device, and install the cameras;
your network is up and running. The wireless AppCam 25HD offers superior
quality video with true color. It is suitable for day or nighttime use.
The AppCam 25HD camera is an indoor/outdoor camera that is waterproof
and has an IP66 weather rating. Water can be sprayed on it and it will still work;
however, the camera cannot be submerged underwater.
Although this camera can be exposed directly to the rain, it is recommended
that, if it is used outdoors, it be mounted under some type of cover like a patio
overhang or eave. As rainwater drops start to dry on the camera glass, it can
create spots that will reflect the light from the infrared LEDs used for night
vision, thus causing lower quality video.
Also, as dust, grime, and cobwebs accumulate on the camera glass, they can
reflect light from the infrared LED and might lower video quality. Periodically
clean the lens glass with a soft cloth.
FEATURES
System
••
No PC required
••
Direct connection to router
••
WiFi connection to router
••
P2P connection
6
••
Records VGA up to 30fps
••
Records HD720P up to 20fps
••
Manual/motion recording to microSD (not included)
••
Supports up to 32GB microSD (not included)
••
High quality H.264 video
••
Audio reception
AppCam 25HD Indoor/Outdoor Camera
••
IP66 weather-rated
••
IR cut filter switch
••
Compact design
••
Night vision range – 40 feet
••
Built-in microphone
••
microSD card slot (microSD card not included)
Uniden’s AppCam App
••
Multiple camera viewing and management from single app
••
Remote access to recorded video
••
Remote snapshot & recording control
••
Event notification/email alert
7
WHAT’S INCLUDED
Camera
Camera Stand
Antenna
QUICK
CONNEC
T
GUIDE
5V/1.5A Power Adapter
Quick Connect Guide
Screws and Anchors
MicroUSB/Ethernet cable
If any items are missing or damaged, contact our Customer Care Line
immediately at 1-800-658-8068.
Never use damaged products!
Images in this manual may differ slightly from your actual product.
8
PARTS OF THE CAMERA
Antenna
Infrared LEDs
Power Indicator
PIR sensor
Signal indicator
Camera
Stand
SMA Connector
microSD
card slot
microUSB to
RJ45
Power cable/
Reset button
9
NETWORK SETUP AND CAMERA INSTALLATION
OVERVIEW
There are two methods of connecting the AppCam 25HD cameras to your
mobile device. One method is wireless and the other method has the camera
connected directly to the router using the provided microSD to Ethernet cable.
The add camera procedures themselves are identical. In the setup procedures
that follow, the wired connection instructions are noted where applicable.
PREREQUISITES
••
Your router must support WEP/WPA/WPA2 security and it must be turned
on.
••
You must have an available WiFi-enabled mobile device (Android or iOS
smartphone/tablet).
••
The AppCam 25HD and your mobile device must connect to the same Wi-Fi
router for setup.
STEP 1 – SET UP CAMERA AND SMARTPHONE/TABLET
1. Download the Uniden® AppCam™ app from the Apple iTunes
store (iOS) or Google Play (Android) onto your device.
2. Connect the antenna to the camera. You can attach the camera
stand to the camera as well but it is not necessary. Procedures for mounting
the AppCam 25HD stand and attaching the camera are provided later.
3. Wireless Setup - Connect the camera to power After about 45 seconds,
the red LED is steady on and the green LED begins to flash (3-flash/pause
pattern), indicating that the camera is in Pairing mode.
Wired Setup - Connect the camera to your router using the microUSB
10
to Ethernet cable, provided. Connect to power. Go to Step 2 in the next
section, Connect Camera and Mobile Device.
STEP 2 – CONNECT CAMERA AND MOBILE DEVICE
1. From your device’s Settings, go to WiFi. Select the AppCam 25HD to connect
your device to it. The camera listing will be HD-XXXXXX where XXXXXX are
the last 6 digits on the camera label. Enter the default password, 12345678.
Your mobile device is now connected to the camera.
2. Launch the app and tap the Add New System icon.
3. The System Information screen displays. Name the camera and tap
Search.
4. The Search in LAN results box displays. The camera’s DID
should display. Tap the DID number.
5. The System Information screen displays again. This time,
enter the security code (123456); tap Save. Tap YES, then OK at the next
prompts.
6. The Globe screen displays. Tap the Globe to access Live view.
7. Since this is the first time you connect to Live view, you must change the
security code. Once you change the security code, you will not be asked
again.
8. The app now displays live video.
STEP 3 – CONNECT CAMERA AND WIFI ROUTER
1. From the Live view, tap Back icon (
), the System icon (
), and then the
System Setting icon (
). The System Information screen displays.
2. Tap Advanced. Enter the Admin password (123456).
3. Scroll to WiFi on the Advanced Settings list. Tap Manage WiFi Network. Select
your router from the drop-down list and enter your router’s password. Tap
Connect.
11
Your camera will reboot and reconnect to the router. If using the wired
set up process, unplug the Ethernet cable from the router and camera
during the reboot process. Wait 2 - 3 minutes until the camera’s LEDs
both return to the steady on state to continue.
4. The camera screen indicates that it is disconnected. Tap the System icon
and then the Refresh icon. The camera refreshes and reconnects to the
router you chose. The app displays a snapshot of the video image.
At this point, both the red and green LEDs are steady on.
STEP 4 - SET TIME ZONE/DAYLIGHT SAVINGS TIME
It is important to set the correct time zone and daylight savings time indication
on your camera to ensure correct date/time stamp on the video files.
1. Access the Advanced Settings list (see Connect Camera and WiFi Router,
described previously.
2. From the Advancd Settings list, scroll to Time Zone.
3. Select your time zone. The most commonly used time zones are:
ͳͳ GMT-05:00 - Eastern Standard
ͳͳ
GMT-06:00 - Central Standard
ͳͳ
GMT-07:00 - Mountain Standard
ͳͳ
GMT-08:00 - Pacific Standard
ͳͳ
GMT-09:00 - Yukon Standard
GMT-10:00 - Alaska-Hawaii Standard
4. Set the Daylight Savings Time indicator.
5. Tap Back, and exit the Advanced Settings list.
ͳͳ
12
STEP 5 - SET UP EMAIL ALERTS (OPTIONAL)
Set up an email account so you can be notified when the motion sensors
trigger automatic recording.
1. In Live view, tap the Back icon (
), the System icon (
), and then the
System Setting icon (
).
2. The System Information screen displays with the e-mail option as well as
the Advanced tab.
Android
iOS
3. Tap the ENABLE EMAIL ALERT box (Android) or slide the ENABLE EMAIL ALERT
button to ON (iOS) to turn on email notification when the camera begins
recording from motion detection.
4. Tap Advanced Settings and scroll to E-Mail Setting. Enter your e-mail
information.
13
5. Tap OK to save your modification.
INSTALL CAMERAS
Consider the following when installing cameras:
••
Clear line of sight video transmission distance is best.
——
Walls, especially brick and concrete, shorten the transmission distance.
——
Placement next to windows allows better transmission.
••
Avoid having a direct light source in the view of the camera, including street
lights, ceiling or floor lamps, spotlights in the driveway, etc.
••
The camera is equipped with built-in infrared LEDs so you can use night
vision for 24-hour surveillance. The LEDs will automatically activate at night
and the picture viewed will turn to black and white. The night viewing range
is up to 40 ft. Avoid pointing the camera lens directly at clear glass; the night
vision LEDs will cause a blurred image.
••
Optimized motion detection range is 6 - 18 feet for the camera. The farther
away an object is, the less accurate the motion detection.
14
Avoid pointing the camera directly at any bushes, tree branches, or moving
objects that might naturally move due to winds. Otherwise, the motion
detection feature may record unnecessarily.
You can mount the AppCam 25HD with the stand on the bottom (on a flat
surface such as a table-top), on the side (on a wall), or on the top (on the ceiling
or under an eave or overhang).
••
1. Use your mobile device to test the places where you are considering
mounting the camera. Hold the device in that location; if you still have a
WiFi signal on your device, the location should be okay.
Attach the camera stand if you have not already done so.
2. Unplug the camera from the power source and install it.
3. After the camera is installed, reconnect power.
Mount the AppCam 25HD Base
1. Hold the base of the camera
stand where you want to mount it
and mark the location of the screw
holes.
2. Use the included screws and
anchors to attach the base to the
wall or ceiling. You can also screw
the base into a flat surface such as a
tabletop if needed.
3. Before attaching the camera, tug gently on the stand to make sure it is
securely in place.
15
Attach the AppCam 25HD Camera
Attach the camera
1 to the mounting
the brace against
1. For each AppCam 25HD, attach the 2 Tighten
the camera to
screw and turn it
secure it
to the desired
camera bracket to the mounting
in place.
direction.
screw. You can attach the stand to
the top or the bottom of the
3
AppCam 25HD as needed. Tighten Loosen the
wingnut to
it a few turns, then turn the
Adjust the post to
unlock the
AppCam 25HD to face the
4 the correct angle,
mounting
then tighten the
post.
direction you want.
wingnut to lock the
post into place.
2. Tighten the camera brace up
against the AppCam 25HD to
secure it into place.
3. Unlock the mounting post by
turning the wingnut to the left a few turns.
4. Set the mounting post to the correct angle, then tighten the wingnut until
the post is locked into place.
5. After the AppCam 25HD camera is installed, reconnect power.
16
USING THE APP
After you’ve set up your system, use the Uniden AppCam app to manage your
AppCam 25HD operations and to take snapshots and remotely view live or
recorded video on your smart phone or tablet device. You can have up to 4
independant AppCam 25HD cameras on the network.
ACCESSING YOUR CAMERAS
1. Run the Uniden AppCam app.
2. The Globe screen displays for each camera set up on the app. Review the
names for each camera and tap the globe for the camera you want to view.
3. The Snapshot screen displays for that camera. See page 18 for actions
available from the Snapshot screen. Tap the screen image.
4. Live video displays. See page 24 for actions available from the Live Video
screen. Tap
to return to the Snapshot screen.
If only one camera is set up on your system, the app displays the Globe
screen momentarily and then displays the Snapshot screen for your
camera.
SNAPSHOT VS LIVE VIDEO SCREEN
The Snapshot and Live Video screens control operations. The Snapshot screen
lets you add more cameras, configure advanced settings, access and manage
recorded files, update the camera connection status, and check app version.
The Live Video screen lets you take snapshots and record live video. You can
also control the sound.
17
Android
Snapshot
iOS
Live
Snapshot
Live
SNAPSHOT SCREEN OVERVIEW
The Snapshot screen displays a snapshot image from the camera and four
function icons.
Add Another Camera
The
icon allows you to add another camera to your network. Follow the
same procedures beginning with Step 2 on page 11.
System Settings
The
icon allows you to configure the advanced settings, remove the camera
connection, and play back the recorded video clips. Tap
and the following
three icons display in the center of the snapshot image:
18
Accesses System Information - Advanced
Screen. This screen lets you configure the
camera and set notification alerts. See page
21 for details.
Deletes the camera from the app.
Android
Event List lets you check and play back
recorded events and files. (See page 23
for details.)
iOS
Update
Tap
to update the camera’s connection status.
Information
Tap
to set up and enable PIN lock or to check the app information.
19
Android
iOS
••
The PIN lock is a unique security code you must enter when you start the
app.
••
APP information displayed includes APP and API version information.
••
Android systems can also enable event notification through this button.
iOS systems enable event notification through the iPhone settings
(Settings/Notification/UnidenAppCam/Notification Center).
System Information - Advanced Screen Details
Tap
to display the System Information screen again with a tab for Advanced
settings. From this screen (see page 13 for an image of this screen), you can
set email alerts and event notifications as well as configure specific camera
settings.
Enable Email Alert
Email alerts notify you when something triggers the motion sensors on your
cameras. Tap the box (Android) or move the slider (iOS) to turn this feature on.
20
Enable Event notify
The system generates event notifications when something triggers the motion
sensors on your cameras. Tap the box to turn this feature on.
Advanced
Tap the Advanced tab to configure various settings in your device, such as the
time zone, device password, and video setting. These settings are displayed
in a list of fields, each field contained in its own block. Scroll down to find the
field you want to set. You can also format the microSD card or check the device
information here.
The Advanced field blocks are:
••
Admin Password: The security code for your advanced settings. The default
Admin Password is 123456. Change the default password to one you set
yourself.
••
Time Zone: Turns daylight savings time on and off and sets up the time zone
for your system. The most commonly used time zones for this system are:
••
——
GMT-05:00 - Eastern Standard
——
GMT-06:00 - Central Standard
——
GMT-07:00 - Mountain Standard
——
GMT-08:00 - Pacific Standard
——
GMT-09:00 - Yukon Standard
——
GMT-10:00 - Alaska-Hawaii Standard
Device security code: Change the default password (12345678) to a security
code of your choosing for your camera.
21
••
Video Setting:
——
Video Quality
Better
Streaming
(VGA)
Live View
(Video Quality)
Record
(SD Card)
VGA 25fps
256kbps
HD 20fps
1.5Mbps
——
Screen Orientation
——
Environment Mode
——
Low Light Enhancement
Record FPS
Better Image
(VGA)
VGA 20fps
768kbps
HD 20fps
1.5Mbps
HD Normal
(720P)
HD 5fps
1Mbps
HD 5fps
1Mbps
HD Better
(720P)
HD 10fps
1Mbps
HD 10fps
1Mbps
••
WiFi Setting: Set up your WiFi connection.
••
Sensitivity Setting: Set the motion detection sensitivity level.
••
Email Setting: Allows you to configure the email environment, email account,
and password. You can also set up encryption for data transmission.
••
SDCard Setting: Lets you reformat the SD card and enable/disable the ability
to overwrite the microSD card as space is needed.
••
Profile Setting: Allows you to save the profile of one camera to apply it to
future cameras. You can then customize additional camera using this profile
as a base.
••
Device Information: Check the model, camera’s firmware version, and storage
status.
Unless stated otherwise, the screen returns to the main list of Advanced
setting fields after you enter the requested information in a specific field.
22
Delete Camera Connection
Tap the Delete icon (
) to remove a camera from your system. Tap NO to
keep the camera connection or YES to delete it. A confirmation screen displays.
Event List Details
Android
1. Tap the Event List icon (
) to select a date range of recorded files to
display. View a list of recorded video files.
2. Tap the start date and end dates to set the date range. A list of files displays.
When you set a filter, be sure the Time Zone feature is set accurately in
the Advanced fields to reflect the current time zone for the camera, not
the time zone where you are. See page 21for details.
3. Tap the file you want to view and it begins to play.
•• Tap the pencil icon to select recorded files to delete. Tap the box on the
right side of the entry to select it for deletion.
••
Tap on SEARCH (magnifying glass icon) to set up a date range filter. You can
use this to change date ranges.
23
iOS
1. Tap the Event List icon (
) and then tap the Search icon to set a date
range of recorded files to display.
2. Tap the start date and end dates to set the date range. A list of files displays.
3. Tap the file you want to view and it begins to play.
—— Tap DELETE ALL to delete all of the recorded files
——
Tap DELETE ONE to delete a single file.
——
You can also set a filter to display all files recorded within the past hour,
past 6 hours, etc. Tap SEARCH to display the filter selections.
When you set a filter, be sure the Time Zone feature is set accurately in
the Advanced fields to reflect the current time zone for the camera, not
the time zone where you are. See page 21 for details.
LIVE VIDEO SCREEN OVERVIEW
The Live Video screen lets you take snapshots, record video, and turn the sound
from the live video on and off.
24
Tap this icon to take a snapshot of the
current image. Snapshots are saved in
your mobile device.
Turn the audio on and off when you’re
viewing live video.
Tap this icon to begin recording live
video.
Once recording begins, the app
continues recording for 1 minute.
You cannot stop recording
during this period.
Android
When the system starts recording,
the video clips will be saved into your
camera’s memory card. Please make
sure the microSD card has been
correctly inserted.
Return to the Snapshot screen.
iOS
TURN OFF THE APP
1. Tap your device’s MENU button. The EXIT button displays.
2. Tap EXIT. The app closes and returns to the device’s main screen.
For the iPhone, press the HOME button.
25
COMMON OPERATIONS
To Do This ...
Start Recording
View Live Video
View Recorded Files
Do This:
From the Live Video screen, tap
. The
camera will record for 1 minute.
Tap the image on the Snapshot screen.
1. From the Snapshot screen, tap
.
2. Tap
from the three icons displayed on the
snapshot image.
3. Select a time range of videos to view.
4. Tap your selection from the list of recorded
files that now displays. The recorded video
begins playing.
Delete Recorded Files
1. From the Snapshot screen, tap
.
2. Tap
from the three icons displayed on
the snapshot image. A list of recorded videos
displays.
3. Android - Tap the pencil icon at the bottom
of your list of recorded files. You can now tap
the X to select a file to delete.
iOS - Tap DELETE ALL or DELETE ONE from the
icons along the bottom of the event list.
Take a Snapshot
1. From the Live Video screen, tap
.
2. The snapshot is saved on your mobile device.
Your snapshots are named with a time stamp
and saved into the Photo gallery/Snapshot folder
on your mobile device.
View Snapshots
26
MAINTAINING YOUR SYSTEM
TAKING CARE OF YOUR CAMERA
When dust and grime builds up on the camera lens and glass, it affects night
vision capability. The infrared light reflects off of the dust and grime, limiting
the camera’s “vision.” Use a microfiber cloth to regularly clean the cameras or
when night vision video is cloudy or unclear.
MANAGING RECORDED FILES
Over time, your microSD card will fill up with recorded files. If there are files you
need to keep, transfer them to your computer for storage and remote viewing.
Otherwise, reformat your microSD card every 4 to 6 weeks (see page 26).
Copying Files from the microSD Card to Your Computer
1. Remove the microSD card from the camera.
2. Insert it into your computer’s SD card slot. Use an adapter if necessary.
3. Navigate to the microSD card and locate your files.
4. Copy them to the computer. These files can now be deleted from the
microSD card or the microSD card can be formatted (see page 26).
27
TROUBLESHOOTING
Before going through these troubleshooting procedures, verify that you have
the most current version of this manual. Go to www.uniden.com and select
Owner’s Manuals from the Support tab’s drag-down list. Navigate to your
model’s manual and open it. Check the issue and date on the front cover.
HOW TO IMPROVE THE WIRELESS SIGNAL QUALITY
If possible, remove obstacles in between camera and receiver that might reflect
the signal. These could include furniture, cabinets, and walls. If the wireless
signal is not improved, relocate the camera closer to the receiver.
If...
Try this...
The app cannot find •Make sure your network supports DHCP protocol.
the camera
•Make sure that the DHCP option is turned on.
•Make sure the camera and your mobile device connect
to the same WiFi router.
•Make sure the WiFi router is activated.
•Make sure the camera is properly powered on.
•Use the “ADD CAMERA” function to manually add the
camera.
The camera does
•Make sure you selected the correct router in the Manage
WiFi Network box.
not find the router
to connect to
•Make sure you entered the correct password for the
router you selected in the Manage WiFi Network box.
28
If...
My smartphone
or wireless device
cannot find the
camera during
setup.
No image appears
Poor image quality
Motion detection is
not working
Try this...
•Make sure the router is turned on.
•Refresh the connection.
•Make sure your smartphone is connected to the same
network as the camera.
•Make sure the camera’s green LED is blinking in a
3-flash/pause pattern. If it isn’t, reset the camera by
pressing and holding the Reset button on the cord until
the LEDs begin to flash.
•Make sure the power adaptor is not damaged or
defective and is plugged into an electrical outlet with
power.
•Relocate the camera to obtain the best reception of
wireless signals.
•Make sure the camera is properly configured in the app.
Clean the camera lens using a lens cleaning cloth.
Spots or dust on the lens can also cause image quality
problems.
•Make sure the sensitivity setting is not turned OFF. (Set
sensitivity through the Advanced tab.)
•Adjust the sensitivity of the motion sensor. (Set
sensitivity through the Advanced tab.)
•In motion detection mode, a moving object within the
camera viewing angle is necessary to trigger the motion
sensor for recording.
•Make sure the system date and time have been
correctly set.
29
If...
Bright white spots
appear at nighttime
Try this...
The camera’s infrared LEDs produce invisible light that
reflects off surfaces such as glass. Install the camera on
the other side of windows or place the lens flush against
the surface to improve the night vision.
Please check the environment rating (Ingress) of
the camera(s) before installing outdoors.
Memory card error
Make sure the memory card is correctly inserted and
formatted.
Please backup the data before formatting. This
Format function will erase all data on the memory
card.
Wrong date and
time are shown
Router signal
strength is weak
Limited internet
bandwidth
30
•Make sure you’ve selected the correct time zone.
Unexpected date and time can result in an incorrect
recording schedule. (See page 21)
•Confirm the system date/time of the mobile device to
ensure correct operation.
•Change router/camera relative position.
•Use the Ethernet cable to physically connect the
AppCam 25HD camera to your router.
•Use a Wi-Fi repeater/extender to maximize the service
range of your Wi-Fi router.
•Switch your router to 11b/11g mode in order to improve
router service range.
•Avoid more than two users accessing the AppCam
25HD at a time.
SPECIFICATIONS
General
Power
Power Consumption
Camera Body Dimension
Weight (Main Body)
Operating Temperature
Network
Wireless Technology
Network Connection
Network Protocols
Simultaneous Views
Security
Cameras
Image Sensor
Antenna
Housing
Environmental Rating
(Ingress)
Camera Environment
Local Storage
Viewing Angle
Min. Illumination
Low-light resolution
Low-light visibility
100~240V switching power supply DC 5V/1.5A
750mA max
96mm x 48mm diam.
7.3 oz (210g)
14° ~ 122°F (-10° ~ 50°C)
IEEE 802.11 b/g/n
Ethernet (10/100 Base-T/Base -TX); WiFi
TCP/IP, UDP, SMTP, NTP, DHCP, ARP
3 Concurrent sessions
WPA /WPA2/WPA2-PSK (TKIP, 128 bit AES)
Mega pixel CMOS
3dBi Dipole
Weather resistant metal
IP66
Indoor (50Hz), Indoor (60Hz), Outdoor
microSD card (not included)
H: 50° V: 30°
1~8 lux
6 IR LEDs with IR switcher
40 feet
Min. Upload Bandwidth
Requirements
Audio/Video
Image Compression
Image Resolution
768 kbps per VGA resolution (per camera)
H.264
HD 1280x720
Recording Frame Rate
720P@20FPS
Supported Mobile Internet Device
Android Requirement
Android 4.1x or above
iOS Requirement
iPhone 4s, iPad Mini, iPad 2with iOS 6.0 or above
Hardware Requirement
•1.5GHz dual core or above
•1GB or above internal memory
MICROSD CARD APPROXIMATE RECORDING TIME
••
4GB = 250 minutes
••
8GB = 5000 minutes
••
16GB = 1000 minutes
••
32GB = 2000 minutes
••
Recycling and Disposal Information
••
Do not dispose of electronic devices or any of their components (especially
batteries and LCD displays) in your municipal trash collection.
••
Consult your local waste management authority or a recycling organization like
Earth911.com to find an electronics recycling facility in your area.
32
FCC COMPLIANCE
Part 15 Compliance Statement
This device complies with Part 15 of the FCC Rules. Operation is subjected to the
following two conditions: (1) this device may not cause harmful interference, and (2)
this device must accept any interference received, including interference that may
cause undesired operation.
This equipment has been tested and found to comply with limits for a Class B digital
device, pursuant to Part 15 of the FCC rules and ETSI (EN) 300328. These limits are
designed to provide reasonable protection against harmful interference in residential
installations. This equipment generates, uses, and can radiate radio frequency energy,
and if not installed and used in accordance with the instructions, may cause harmful
interference to radio communications.
However, there is no guarantee that interference will not occur in a particular
installation. If this equipment does cause interference to radio or television equipment
reception, which can be determined by turning the equipment off and on, the user
is encouraged to try to correct the interference by one or more of the following
measures:
••
Reorient or relocate the receiving antenna.
••
Move the equipment away from the monitor.
••
Plug the equipment into an outlet on a circuit different from that to which the
monitor is connected.
••
Consult the dealer or an experienced radio/television technician for additional
suggestions.
CAUTION! Any changes or modifications to this equipment not expressly
approved by the party responsible for compliance could void your authority to
operate the equipment.
33
RF Exposure Information
The antenna used for this transmitter must be installed to provide a separation
distance of at least 20 cm (7.9”) from all persons and must not be collocated or
operating in conjunction with any other antenna or transmitter.
IC COMPLIANCE INFORMATION
Radio Equipment Notice
The term “IC:” before the radio certification number only signifies that Industry
Canada technical specifications were met. Operation is subject to the following two
conditions: (1) this device may not cause interference, and (2) this device must accept
any interference, including interference that may cause undesired operation of the
device. “Privacy of communications may not be ensured when using this device”.
CE COMPLIANCE INFORMATION
Products with CE Marking comply with EMC Directive (2004/108/EC); Low Voltage
Directive (73/23/EEC); R&TTE(1999/5/EC) issued by the Commission of the European
Community. Compliance with these directives implies conformity to the following
European Norms:
••
EMC: EN 301 489
••
LVD: EN 60950
••
Radio: EN 300 328
ONE-YEAR LIMITED WARRANTY
Important: Keep your sales receipt for this equipment. Evidence of original
purchase is required for warranty service.
WARRANTOR: Uniden America Corporation (“Uniden”) ELEMENTS OF WARRANTY:
Uniden warrants, for one year, to the original retail owner, this Uniden Product to be
free from defects in materials & craftsmanship with only the limitations or exclusions
set out below.
34
WARRANTY DURATION: This warranty to the original user shall terminate & be of
no further effect 12 months after the date of original retail sale. The warranty is
invalid if the Product is (A) damaged or not maintained as reasonable or necessary,
(B) modified, altered, or used as part of any conversion kits, subassemblies, or any
configurations not sold by Uniden, (C) improperly installed, (D) serviced or repaired by
someone other than an authorized Uniden service center for a defect or malfunction
covered by this warranty, (E) used in any conjunction with equipment or parts or as
part of any system not manufactured by Uniden, or (F) installed or programmed by
anyone other than as detailed by the owner’s manual for this product.
STATEMENT OF REMEDY: In the event that the product does not conform to this
warranty at any time while this warranty is in effect, warrantor will either, at its
option, repair or replace the defective unit & return it to you without charge for parts,
service, or any other cost (except shipping & handling) incurred by warrantor or its
representatives in connection with the performance of this warranty. Warrantor, at its
option, may replace the unit with a new or refurbished unit.
THE LIMITED WARRANTY SET FORTH ABOVE IS THE SOLE & ENTIRE WARRANTY
PERTAINING TO THE PRODUCT & IS IN LIEU OF & EXCLUDES ALL OTHER WARRANTIES
OF ANY NATURE WHATSOEVER, WHETHER EXPRESS, IMPLIED OR ARISING BY
OPERATION OF LAW, INCLUDING, BUT NOT LIMITED TO ANY IMPLIED WARRANTIES OF
MERCHANTABILITY OR FITNESS FOR A PARTICULAR PURPOSE. THIS WARRANTY DOES
NOT COVER OR PROVIDE FOR THE REIMBURSEMENT OR PAYMENT OF INCIDENTAL
OR CONSEQUENTIAL DAMAGES. Some states do not allow this exclusion or limitation
of incidental or consequential damages so the above limitation or exclusion may not
apply to you.
LEGAL REMEDIES: This warranty gives you specific legal rights, & you may also have
other rights which vary from state to state. This warranty is void outside the United
States of America & Canada.
PROCEDURE FOR OBTAINING PERFORMANCE OF WARRANTY: If, after following the
instructions in the owner’s manual you are certain that the Product is defective, pack
the Product carefully (preferably in its original packaging). The Product should include
all parts & accessories originally packaged with the Product. Include evidence of
35
original purchase & a note describing the defect that has caused you to return it. The
Product should be shipped freight prepaid, by traceable means, to warrantor at:
Uniden America Service
C/O Saddle Creek
743 Henrietta Creek Rd., Suite 100
Roanoke, TX 76262
(800) 658-8068, 8 a.m. to 4:30 p.m., Central, Monday through Friday
36
© 2014 Uniden America Corporation
All rights reserved