1
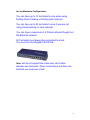
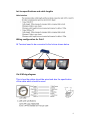
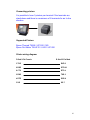
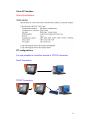
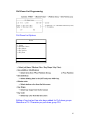
Training manual
QT-6000
Smart Touch Terminal
October 2004
QT-6000 Training Manual
Chapter 1
Hardware and Cable Specifications
Chapter 2
Loading the IPL Via CF Card and PC
& Setting up the In-line network
Chapter 3
Initialising the Terminal
Chapter 4
Memory Allocation
Chapter 5
Function Keys
Chapter 6
Setting up shared check tracking
Chapter 7
Setting up floating clerk interrupt
Chapter 8
Setting up printing & shared printing
Chapter 9
Setting up RF Communications
Chapter 10
New functions and features and Memory
Chapter 11
New Check Tracking & Interrupt functions
Chapter 12
Other new functions
Chapter 13
Customer File and Invoice number
Chapter 14
Downloading graphic logo’s bitmaps and sounds
2
CHAPTER 1
HARDWARE CONFIGURATION
General Configuration Front View
General Configuration Back View
3
QT-6000 Hardware Specification
QT-6000 Standard RAM is 32mb (16mb usable)
Flash Memory used for IPL data is 16mb
The In-Line system used is Ethernet
The Ethernet communications Board comes as standard when
purchasing the QT-6000 terminal
You can connect up to three external printers per terminal
You can connect up to two drawers
4
Layout of Com ports on the QT-6000
As you can see from the diagram above there are 6 Com ports
These are used for the following tasks
Com Port 1 = PC / Modem
Com Port 2 = Scanner
Com Port 3 = Remote display
Com Port 4 = My Printer 1
Com Port 5 = My Printer 2
Com Port 6 = My Printer 3
In addition to the Com ports you can also find
Ethernet In-Line connector
Volume control switch
Two drawer connectors
An External Microphone connector
An External Speaker connector
5
QT-6000 Optional extra’s
Card Swipe
Rear display
Dallas keys and lock
6
QT-6000 In-Line (Ethernet)
Configuration 1
Terminal to Terminal (You must use a Hub)
Configuration 2
Multiple Terminals 10 BASE-T
Configuration 3
Multiple Terminals 100 BASE-T
7
In-Line Maximum Configurations
You can have up to 12 terminals In-Line when using
floating check tracking or floating clerk interrupt.
You can have up to 32 terminals In-Line if you are not
using check tracking or clerk interrupt.
You can have a maximum of 8 Printers shared thought out
the Ethernet network.
All Terminals must always be connected to a hub
You must use the Netgear FS108 hub.
Note: will do not support the cross over cat-5 cable
between two terminals. When connecting more than one
terminal you must use a Hub.
8
In-Line specifications and cable lengths
Wiring configuration for Cat-5
All Terminal need to be connected to the hub as shown below
Cat-5 Wiring diagram
This is how the cables should be wired and also the specification
of the cable which should be used
9
Connecting printers
It is possible to have 3 printers per terminal if the terminals are
stand-alone and there is a maximum of 8 terminals for an In-line
situation
Supported Printers
Epson Thermal TM-88 / UP-350 / 360
Epson Dot Matrix TM-U210 / U-220 / UP-250
Printer wiring diagram
D Sub 9 Pin Female
D Sub 25 Pin Male
3 TXD
RXD 3
6 DSR
DTR 20
8 CTS
RTS 4
2 RXD
TXD 2
4 DTR
DSR 6
5 SG
SG 7
10
Casio PC Interface
Online Specifications
PC configurations
It is now possible to use either a serial or TCP/IP connection
Serial Connection
TCP/IP Connection
11
QT-6000 to Modem wiring diagram
(2)
(3)
QT-6000 to PC wiring diagram
12
CHAPTER 2
LOADING THE IPL Via CF CARD / PC
& Setting up the Ethernet network (TCP/IP)
Required equipment: A PC or a CF card
A PRL-CB2 (RS232 / Laplink cable/Cat-5 cable and hub)
Auto Load via CF card
Copy the IPL data to the route directory of the San Disk CF card
via PC
1.
Insert the CF card in to the CF card reader of the PC
2.
Copy the IPL data to the CF card
13
Follow the procedure below to load the IPL data to the QT-6000
(1) Insert the CF card into the top of the terminal
(2) Switch the terminal off and hold down the INIT switch the
terminal will then will ask you to push the INIT Switch again
to start the load of the IPL
(3) Press the INIT Switch and the IPL will start to load
(4) After the IPL has loaded the QT-6000 will ask for a Mac/Init
code enter 10000 for UK and then press “ok”
After you have entered 10000 the QT-6000 will come up with
the TCP/IP network screen. This screen is shown below
14
Master Terminal Settings
1. Select terminal ID 1
2. This will automatically make this terminal the DHCP server
3. Select yes to confirm your options
The DHCP server issues the IP addresses to all the other
terminals in the In-line network provided that you select auto
Settings for all other terminals in the In-Line network
Terminal 2
Enter the terminal numbers in sequential order
Set IP Address to Auto and select yes
15
Terminal 3
Enter the terminal numbers in sequential order
Set IP Address to Auto and select yes
This will give the following IP Address’s to the QT-6000’s
Master
Terminal 2
Terminal 3
192.168.000.001
192.168.000.050
192.168.000.051
After this TCP/IP selection the Mac screen will now be displayed
16
Loading the IPL via PC
Install CV-10 to your PC
Plug your PRL-CB2 (RS-232 standard lap link cable) in to Com 1
Copy the QT-6000 IPL file to the CVW folder
Go in to the CVW folder and double click on C_comw Icon
Double click on C_Comw Icon
17
You should see this screen
Tasks On the PC
(1) Set the Com direction to IPL
(2) Set Communication line to online
(3) Select profile name QT-6000.INI
(4) Select the dos file name to Qt-6000.IPL
(5) Press the add key the screen should look the same as the
above
18
On the cash register
(1) Initialise the Terminal with 44449999 Sub-Total
(2) Select IPL Com Port 1
(3) Select speed 115200
(4) Select Start
19
You should now see the following on the screen of the terminal
IPL : COM1 PORT
115200 bps
Waiting for IPL
Now select “OK” from the PC
The IPL will now be loaded to your terminal
After the IPL has loaded you will see the Mac screen
The next chapter of this manual will guide you though the Mac
procedure for the QT-6000
20
CHAPTER 3
INITIALISING THE TERMINAL (Mac)
Enter 10000 for the UK Mac
21
Mac Screen
Setting the time
Setting the date
Setting the ID Character
22
Check tracking type selection
Explanation of Check Tracking Types
Master
This terminal controls all of the other Satellite terminals on the
network as far as check tracking and clerk interrupt is concerned.
Please note you can only have one master per check tracking
cluster.
Backup Master
This type of terminal is a mirror image of the master as far as
check tracking and clerk interrupt data is concerned.
The back up master can take over the master’s job if a fault occurs
on the master terminal.
Please note you can only have one backup master per check
tracking cluster.
Satellite Terminal
This type of terminal relies on the master for handling of Checks
and Clerk interrupt buffers.
Each time you open a check or clerk interrupt buffer the satellite
asks the master whether he can open the check or if the check /
Clerk is already being used by another terminal.
Selfmaster
This type of terminal works independently from the network as far
as check tracking and clerk interrupt, but allows the facilities of
sharing printer’s thought out the network, In-line readings and auto
program transfer.
23
Printer type selection
Slip printer selection
Final Confirmation
The terminal will now set up the Initial Casio program keyboard
and memory allocation.
24
Casio QT-6000 standard keyboard layout
After the Mac procedure has finished the restore menu will be
displayed
This menu allows you the option to restore a program that has
previously been backed up to a CF card, or receive a program
from another terminal in the In-line network
CF Card
Note:
By selecting option 1 the standard Casio program will be loaded
25
To Restore the program In-line
Flag Clear / INIT 2 Operation
These operations are used to clear terminal lock up’s and clear
sales figures for installation
26
CHAPTER 4
MEMORY ALLOCATION
Where ever possible please allocate the memory using the main
Daily and Program option. Go to PGM 5 via the mode key and
select option1 this will take you to the daily and program option.
Programming options
27
Daily and Program Explanation of files and rules
Memory Allocation rules
Always allocate the main memory allocation from the Daily and
Program option (1) and not individual files wherever possible.
When allocating memory in the Daily and Program area there are
lots of files that will change with out you knowing
The size of printer buffers and registration buffers are decided by
what you allocate in this area.
If you are changing the number of tables or the number of items
per table or the number of item blocks you must kill the number of
table / items per table / number of item blocks then reallocate them
in sequence.
If you are linking terminals together In-line or you are connecting to
a PC you must allocate consolidation and work files for PLU’s and
Non PLU’s in the 2rd option of memory allocation
(periodic and work area).
Selection 2 Periodic and work area’s
Please be careful after you have flag Maced not to reallocate the
periodic area’s as the periodic sales totals will be lost
28
Please be very careful when allocating or re-allocating any files in
the individual file section of programming.
These files will have to be allocated in Individual files section
New Memory Allocation Files
File 037 Customer File
File 042 Customer Group
File 050 Intelligent Electronic Journal
File 650 Intelligent Electronic Journal Collection
File 085 Menu level Character
File 087 Character Conversion for the CF card
File 701-710 Sound files
File 910 Bitmap file
File 115 Check Number Windows
File 116 Clerk Windows
File 123 Customer Title
File 174 Touch Screen Key table
File 274 Character Key Table
File 899 Wireless LAN Control
File 900 TCP/IP Control
File 907 Keyboard definition
File 908 Keyboard Themes
29
Original QT-6000 Files Allocated in individual area
File 027 if you are using more than 10 Dallas Keys
File 030 Clerk Detail file (Set to 10 records as standard)
File 038, 138, 238, 338, 438 Arrangement files
File 047 External Graphic Logo file
File 062 Scheduler file
Memory Allocation Files on Daily and program area
Cashier / Clerks (File 007)
Input the number of Cashiers or Clerks you require on the system.
Note
When changing the number of checks, items per check and
number of Item blocks you must set all three files to zero them
before reallocating the files.
Check tracking tables (File 015)
Input the number of tables you have + the number of Clerks on
interrupt.
Number of Items per check (File 060)
Input the number of items per Table or Clerk Interrupt transaction.
Number of Item blocks
Item blocks are used to increase the number of items available per
table.
Item blocks work by being able to take extra records from file 15
every record allocated is equal to one record of file number 15
For example 100 tables, 80 lines per table, 4 item block
This means you could have a table with 320 lines but then you will
only be able to open 96 checks because the extra records from file
15 (check index file) are being used by the check just opened
30
Table Analysis (File 18)
This file allows you to take a report of tables that have been served
and cashed off. It provides information such as the amount of
money taken on a table or range of tables in an evening.
PLU (File 004)
Input the number of PLU’s required
PLU 2@ price (File 054)
Input the number of half pints or doubles required
Shift PLU (File 055)
This file allows you to have up to 8 prices for each PLU
Input the number of shift PLU’s required
Scanning PLU link (File 016)
This is the index file for scanning PLU’s
Input the number of scanning PLU’s required
Pulldown Groups (File 026)
This file allows you to have up to 20 PLU’s with in a pulldown
group. The lists can be accessed via a list or list# function keys
Input the number of pulldown lists required
Set Menu Table (File 028)
This file allows you to link PLU’S or Pulldown groups together for
set menu reasons. For example you can link a starter pulldown
group to a mains pulldown group to a dessert pulldown group this
will make up your 3 course set menu. Please note this type of set
menu must have a preset price you cannot use the plu prices.
Input the number of set menus you require
Sub-Department (File 003)
Sub departments give you a third level of linking after groups and
departments. Input the number of sub-departments required
31
Departments (File005)
Input the number of departments required
Groups (File 006)
Input the number of groups required
Receipt / Slip Msg (File 32)
This file is allocated as standard so you do not need to allocate
anything
Text recall (File 039)
This file allows you to pre program text for messages which can be
accessed via a text recall function key
Order Character Link (File 065)
This file allows you to sort your kitchen printer orders by order
character group so it is possible to sort the kitchen printer order by
starters, mains, desserts Act
Input the number of order character groups you require.
Free Function Keys (File 002)
Input the number of free function keys
Time Zone (File 800)
If you are planning to use the time and attendance specification
allocate this file to 24 records
Hourly Production (File 014)
If you are using fast food specification please allocate 96 records
Hourly Labour (File 14)
If you are using fast food specification please allocate 96 records
32
Employee File (File 19)
Enter the number of employees, which will have to clock in and out
Job Code (File 802)
Input the number of different jobs, which can be specified when
clocking in.
IDC Link (File 804)
This file must be at least 5 times bigger than IDC 1, IDC 2 and IDC
3.
IDC 1 (File 057)
Enter the number of IDC lines you require
IDC 2 (File 058)
Enter the number of IDC lines you require
IDC 3 (File 059)
Enter the number of IDC lines you require
33
CHAPTER 5
ASSIGNING FREE FUNCTION KEYS
How to assign function keys
Using the mode key go to PGM 4
Key assign to specified menu level
PGM4 - 1.Keyboard - 1.Key assign
nn000 <YES> --> Continue normal key assign operation
(1) "nn" is menu level number 01 to 15.
(2) If nn=00, it means current ver1.10 style.
(Specify all menu level)
nn000 <YES> --> <ESC>
: Menu level nn is released.
nn000 <YES> --> mm000 <YES> :
34
Specify new menu level mm.
FILE002 empty record search
When assigning a key or a free function record which is linked to
more than 2 keys is not over written.
Ex) Menu level 1 <CASH> links FILE002 REC#040
Menu level 2 <CASH> links FILE002 REC#040
Menu level 3 <CASH> links FILE002 REC#040
Then assign <NB> key to the position of menu level 3
<CASH>.
(Current spec QT-2100)
Menu level 1 <CASH> links FILE002 REC#040 --->
over written by NB key
Menu level 2 <CASH> links FILE002 REC#040 --->
over written by NB key
Menu level 3 <NB> links FILE002 REC#040 --->
over written by NB key.
(New spec)
Menu level 1 <CASH> links FILE002 REC#040 --->
No change
Menu level 2 <CASH> links FILE002 REC#040 --->
No change
Menu level 3 <NB> links FILE002 REC#??? --->
Use empty record
35
Explanation of Free Function Keys
Original function keys for pubs and Restaurants
Add Check (94)
This function allows two open checks to be added together
Arrangement key (44)
This function allows you to program sequences of buttons and
function for example you can program a cash key to have a preset
price for automatic change calculation
Clerk Number key (72)
This function allows you to sign clerks on and off the cash register
You can use one key or multiple keys
Clerk transfer Key (13)
This Function allows you to transfer a balance from one clerk to
another
Operation
Sign on clerk
Enter Clerk number you want to transfer from and hit the clerk
trans key
Enter the clerk number you want to transfer to and hit the operator
number key
Press the clerk transfer key
Customer number key (43)
This function allows you to enter the number of covers seating on
a table
36
Discount Key
This function allow you to give a % discount off an individual item
or multiple items
You can also give a 100% discount for buy one get one free
Dutch Account (140)
This function allows you to split the bill in to the number of people
you would like after finalisation.
Operation
Finalise the transaction
Enter the number of people who would like a receipt
Press the Dutch account key
EJ Display Key (207)
This function allows you to review the transactions, which have
already taken place. It also allows you to take guest receipts of
previously registered transactions
Operation
Press the EJ Key
Scroll though the transactions till you find the one you were looking
for
Press the guest receipt key
Error correct / Void (34)
This function allows you to make corrections to a check, tab or
registration
This Function can also be linked to void reason, which allows you
to monitor why items have been voided
37
House Bon (114)
This allows you to sell PLU’s at zero unit prices
This function could be used for staff or complimentary
Operation
Press the house bon key
Register PLU’s
To return to normal registration press 0 house bon
Ketten Bon (113)
This function allows you to produce individual stubs for each
customer
It is used mostly in entrance machines
To use this function the PLU’s must be set to go to an order printer
List / List # (136/137)
This function is used to display a group of items
List # allows you to view multiple list via one function key
Menu key (64)
This function allows you to shift between the 15 menu levels
available on this terminal. It is also possible to lock the menu levels
via the status programming of each individual key
New Balance (06)
This function is used to temporally finalise or hold a transaction
New check key (91)
This Function enables you to open new checks
Please note this function is needed when you want to use the table
share function
New / Old Check (93)
This function is used to open and recall Checks / Tables
38
#/NS (041)
Used to open the drawer and for cash declaration for UK pub
operation.
Operator Number Key (078)
This key is used when transferring from one clerk to another it is
used to tell the operator number you are transferring to.
Please see the clerk transfer operation for more detail.
Post Entry (115)
This function is used to suspend and resume when using set
Menu’s.
Operation
Enter set menu register starter then main course and then press
post entry for the dessert then press the NB key.
Call the transaction back line down to the post entry line and press
the post entry function it will then display the dessert menu and
allow you to make your selection.
Receipt (038)
This function allows you to produce post and guest receipts
It is also possible to select via the status of the key which printer
the receipt should be printed to.
Second @ Price (070)
This function allows you to you a second price for PLU’s.
This is usually used for half pints and doubles.
Shift PLU (65)
This function allows 8 price levels per PLU. Please note to use this
function you must have the file set up in memory allocation
This function does not support second unit prices.
39
Table Number Key (58)
This function is a table reference number
It can be possible in some applications that you are using check
number 123456 but setting at table number 1
Table transfer (014)
This function allows you to transfer from one table to another.
If you program the status bit (1000000) to the function key it will
allow you to add to a check that is already open.
This function can also be used to transfer sub-total balances for
simple hotel specifications
Text Recall (010)
This function allows you to register pre-determined text
Tray Total (074)
This function allows you to get a sub-total of each tray that has
been registered in a canteen type application
Function Keys for Scanning
OBR key (103)
This function allows you to enter a bar code manually
40
New Functions
Customer # Key (148)
This function is used for our customer accounts system
There is a maximum of 200 accounts
Operation
1 customer number (Or push the customer No and select)
Register some items
Press the table transfer key if you have set up auto check transfer.
If not press the number of the table you wish to transfer to then
check transfer if you have not set up auto check transfer.
Call the customer back via the customer # function
Press the payment key to finalise at any time
Then select the customer you would like to finalise you will then
see the detail of the account. Press one of the finalise keys
After finalisation the terminal will ask you whether you would like to
reset the customers details or not (This is programmable)
Location Key (260)
This function can only be used in the clerk and check windows
These keys are used to navigate around such as previous, next,
back, forward.
Mode Key (124)
This function key allows you to select which mode you would like
to be in.
Order Character Change function (252)
This allows you to change the order character printing destination
of an items to the kitchen
For example you would like to send a starter to the kitchen as a
main course you could redirect the item from the starters to main
courses on the kitchen printer.
41
Payment key (149)
This function is used in conjunction with the customer accounts
system please see the Cust # key on the pervious page to see a
full description of how the customer accounts work.
Search function (246)
This function allows you to search the PLU file by character.
This functionality is also available by using the PLU key.
Separate Check (095)
This function is used to split a bill in to the number of people sitting
at a table or the amount of people paying for the meal. Each Item
of the bill can be separated in to another temporary check/table for
payment. On this model it is also possible to separate to multiple
check at the same time in order to do this you must set the option
multi sep check in the check tracking area of program 3.
Table Share (261)
This function allows you to sit several people around the same
table but each person has there own check number.This can be
done by splitting the main check in to sub checks.
For example
4 people are sharing table 1 the first person who sits at the table
will be assigned check number 1.
The second person who sits down will be assigned check number
1-1 the third person will be assigned 1-2 the forth person 1-3.
42
Memory Allocation General Notes
If you want to use clerk interrupt please make sure you have a NB
key allocated in the free function file.
If you want to use a Slip printer please make sure you have a Slip
print key allocated in the free function file.
If you are using the table share function you must have a new
check key in the free function file
Location keys can only be assigned to the check and clerk window
screens
The post entry function must be assigned to the keyboard
It can’t be used in a pull down function list
43
CHAPTER 6
SETTING UP SHARED CHECK TRACKING
Setting up the network to use shared check tracking
Master
IP Address
192.168.000.001
Back-up
Master
IP Address
192.168.000.050
Satellite
IP Address
192.168.000.051
System Connection Table for Master
MC#01
* 1 020101000000
MC#02
2 010202000000
MC#03
3 010000000000
44
Note
The Back-up master and satellite terminals should have the same
connection tables apart from their own terminal will have the *
symbol and the first two digits of their own terminal will be 02
Methods of clearing the check file
There are two methods of check tracking they are as follows
Check tracking method
Table tracking method
Please note most businesses will use the table number method
45
CHAPTER 7
SETTING UP FLOATING CLERK INTERRUPT
Setting up the network to use floating clerk interrupt
Master
IP Address
192.168.000.001
Back-up
Master
IP Address
192.168.000.050
Satellite
IP Address
192.168.000.051
System Connection Table for Master
MC#01
* 1 020101000000
MC#02
2 010202000000
MC#03
3 010000000000
46
Note
The Back-up master and satellite terminals should have the same
connection tables apart from their own terminal will have the *
symbol and the first two digits of their own terminal will be 02
Clerk Programming
In the clerk program please make sure that the clerk interrupt
operators have been assigned clerk interrupt buffers
Clerk Interrupt programming
Please make sure you have a New Balance key allocated in the
free function file.
47
CHAPTER 8
SETTING UP PRINTING AND SHARED PRINTING
Stand-Alone printing
Shared printing
Method 1
Set up at mac stage
When you initialise the QT-6000 if the printer is connected and
switched on the Terminal will automatically see the printer and set
up the relevant I/O parameters for you.
Receipt and Journal printing will be set for my printer
48
Method 2
Setting up after the Mac/Init stage
Printer 1 (Linked to Com port 4)
Printer 2 (Linked to Com port 5)
49
Printer 3 (Linked to Com port 6)
Setting up the printer connection table
To keep continuity in the programming side I would suggest that all
Multi terminal sites are programmed as RS232 printer in all
terminals.
50
CHAPTER 9
SETTING UP RF COMMUNICATIONS
Access Point that must be used
54 Mbps Wireless Access Point WG602
Wireless Card that must be used
32 – Bit Wireless PC Card SMC2835W Version 2
The communication between terminals is Ethernet with TCP/IP
The speed is 10/100Base-T/Tx for a wired Configuration
And .11g for RF communications the speed is 54Mbps
Please note the above access point and wireless card are the only
ones that can be used with the QT-6000 system.
Casio do not recommend or support any other type of equipment.
51
Wiring Configuration 1 (wired and RF)
Netgear FS108
WG-511
WG-511
Wiring configuration 2 RF only
WG-511
WG-511
WG-511
52
Setting up the PC (TCP/IP) and the Access point
PC SETTINGS
Changing the TCP/IP settings on your PC
(Can be found in the control panel)
Instructions for Windows XP
Go to your control panel
Go to Network settings
Double click on network connections
Double click on local area connection
Double click on properties
53
Double click on Internet protocol (TCP/IP)
Click on “use the following IP address”
Enter the IP address 192.168.0.226
Enter the subnet mask to 255.255.255.0
Connect the access point to the Ethernet board of the PC and read
the follow pages of how to set up the access point.
54
Access point settings
The standard IP address of the Access point is 192.168.0.227
Standard IP address and access point name
In order to see the access point software settings firstly click on the
Internet explorer icon
At the command line type
http://192.168.0.227 You should now see the following software
You must at this point log on with a user name and password
55
The following screen will be displayed
The user name is admin
The password is password
Click Ok after entering the correct user name and password
The QT-6000 default setting’s for ID and WEP address are
SSID:
CQ6KNG
Please set these settings in the option below
56
Wireless settings
The WEP Code is set to: 43434852443230303400000000
Delete and enter the new code here
Make sure this is set to 128 bit
These setting will make the access point compatible with the
QT-6000’as far as the SSID and WEP encryption code
If the firmware version in the access point is older than 3.2rc6,
Please download the updated firmware from the Netgear web site.
57
Note:
The ID and encryption code is recommended to be unique for each
site for security reason.
ESSID: Up to 32 characters can be programmed.
WEP: Encryption: up to 26 digits
(WIRED EQUIVALENT PRIVACY)
When looking at the overall settings they should look like this
Access Point Information
58
Step by Step installation for wiring configuration1
(Wired and RF Network)
1.
2.
3.
4.
5.
6.
7.
Connect the first terminal to the Hub
Connect the access point to the Hub
Initialise the first terminal with 10000
Enter the terminal number as 1
You should see the screen on the next page
Select yes at the bottom of the screen.
This will set up the first terminal as the DHCP Server
(Dynamic Host Configuration Protocol)
Configuration set up so far
Netgear FS108
59
Step 2
Add a second terminal to the configuration
Install the wireless card in to the PCMCIA slot at the top of the
QT-6000.
Initialise the terminal with 10000
Enter the terminal number as 2
You should see the screen below select yes at the bottom of the
Screen
This will automatically give terminal number 2 the IP Address of
192.168.000.050 Via the access point
The configuration set up so far
Netgear FS108
WG-511
60
Step 3
Add a third terminal to the configuration
Install the wireless card in to the PCMCIA slot at the top of the
QT-6000.
Initialise the terminal with 10000
Enter the terminal number as 3
You should see the screen below select yes at the bottom of the
Screen
This will automatically give terminal number 2 the IP Address of
192.168.000.051 Via the access point
This will automatically give terminal number 3 the IP Address of
192.168.000.051 Via the access point
61
The Final configuration
Netgear FS108
WG-511
WG-511
How to remove the Netgear RF card from the terminal
1. Change the I/O Parameter Settings
2. Perform flag clear operation
3. Power OFF
4. Pull out the WG511 from QT6000
5. Power ON
62
Changing the WEP address
For security reasons you should change the WEP address please
follow the sequence below to change the WEP
1. Use AP with QT6000 default ID and key.
2. Init ECR#1 with DHCP server ON
Init #2 onward as we did it
3. Change ECRs ESSID and WEP key at master.
Send ESSID and key information to other terminal via inline(via
RF in this case).
Note: New ESSID and WEP becomes effective AFTER flag clear.
4. Set Access Point with new ESSID and key
5. Perform flag clear ONE BY ONE
Start from terminal #1, terminal #2 should then perform a flag clear
when Terminal #1 has completed the flag clear process continue
the procedure until you have completed all terminals
6. If for some reason a new terminal is added to the network,
Please enter the IP address manually.
You should start straight away by changing ESSID and the key for
Access Point.
By using the above sequence you can prove that all hardware
(access point and RF cards) are working correctly
This will also prove that the network is set up correctly and that the
network is working under the default settings for Wep or ID.
63
CHAPTER 10
New Memory Allocation and functions keys
New Memory Allocation Files
64
The new functions keys are shown in yellow
65
The new function keys are as follows
1
2
3
4
5
6
7
Customer ID (function code 148)
Item Search (function code 246)
Location Change (function code 260)
Mode Key (Function code 124)
Order Character Change (Function Code 252)
Payment (Function Code 149)
Table Share (Function Code 261)
All these function keys are explained in detail in chapter 5 of this
manual.
Eliminated Function Keys
1 X/Z Mode (Function Code 122)
2 Reverse Display (Function Code 206)
66
New General Machine features
0005-022 Page 131
67
00622-022 Code Page 132
68
69
0015-022 Code Page 138
70
0019-022 Code Page 142
0026-022 Code Page 145
71
72
0027-022 Code Page 146
73
0028-022 Code Page 146
0039-02 Code
Page 148
74
0042-022 Code Page 148
75
CHAPTER 11
New Functionality
Check Tracking / Clerk interrupt
Pull-down groups / keyboard features
New Functionality
Check Screens (Table layouts) and Dummy Check Screens
It is now possible to link a clerk to an area Layout of a restaurant
or bar.
Please note if you would like to see the table layout as soon as
you sign on you must program compulsory check number.
The above option is not available when you enable clerk interrupt.
Option 1 Dummy Check/Tab area
It is possible to have a dummy check/tab area
This area is normally used when paying by credit card
(accumulating bill/check) or for a round of drinks at the bar before
sitting at a table.
Select number 1 which is labelled “select check/table number”
CHK Window
1. Select Check/Table Number
2. Table Area 1
3. Table Area 2
4. Table Area 3
5. Table Area 4
6. Table Area 5
76
You Can Change the description of the dummy check/table
window to whatever you like to call it
After changing the description select the “yes” option
Select Check/Table number
1. CHK# Range
2. Key Shape
Option 1: The Check Range for dummy check area
Option 2: Key Shape type for dummy check Icons
77
Option 1 CHK# Range
CHK Window
CHK# Range
Enter Start Range
End Range
000001
000050
Ok
YES
Enter the start and end range for the Dummy check/table Area
This number should be the same as the number set in auto check
range, and different to the check numbers used on a every day
basis
Option 2 key shapes
Before using this option delete an area on the keyboard where the
new key shapes will be positioned
Please note in order to change the shape of the relevant keys you
must first kill all the positions on the keyboard. This is done via the
key delete option in program 4.
Select the shape you would like to use and press the relevant key
78
Setting up Check Area’s 1 to 9 (Table Layouts)
Setting up Table Layouts
Edit the description if you wish to and select yes
CHK Window
1. Select Check/Table Number
2. Table Area 1
3. Table Area 2
4. Table Area 3
5. Table Area 4
6. Table Area 5
Enter table number Table Area 1 – 9 (Options 2 -10)
Select option 1 CHK/Table
Select Check/Table number
1. CHK/Table
2. Key Attribute
3. Key Delete
79
When selected the QT-6000 will display enter Check/Table
number
Enter the table number you wish to designate to this area and then
hit the table Icons
Selection 2
Select the key shape or picture Icon you would like to put to the
PLU or Function key
Selection 3
Key Delete
This is used to delete the keys on the keyboard in order to change
the shape and colour of a key
80
Check windows
Static check window
This is when you program a clerk to automatically display a table
layout via making the clerk input a compulsory check number
See programming on the next page.
Static checks display all programmed check numbers
- Up to 9 check windows
- Up to 24 checks display per one check window
<Operation>
[REG] sign on clerk
Dynamic check window
- Up to 9 check windows
- Up to 24 checks display per one check window
<Operations>
[REG] Press “New/Old CHK” key for check window
81
In order to automatically call a Table/Check Layout via a clerk you
must program compulsory check number input
Programming
Please note this option is not available when you enable clerk
Interrupt.
Check Window Programming
[PGM3] 1.Machine Feature - 24.Check Window – Select Job
Select Check / Table No., CHK# range, Key shape, Key attribute,
Key assign, Key delete
Colours of Checks during operation
Green:
Yellow:
Blue:
Red:
Purple:
White:
After NB operation
After NB and guest receipt issuing operation
After the finalized operation but before guest receipt
Busy status for the check
Table sharing/Separate Check operation
Check is not opened
82
Programming of Display detail when using check tracking
windows
It is possible to program what to display when using check
windows and check icons
The example below shows the sub-total of the check
It is also possible to show the clerk / Time of last order or Time
opened
Programming
Select ST/Clerk/Time last ordered/Time of opening
83
Clerk Static and dynamic windows
Static clerk window
To display all programmed clerk numbers in the clerk window
- Up to 9 clerks windows
- Up to 24 clerks display per one clerk window
Dynamic clerk window
To display only clerks that have signed on in the clerk windows
- Up to 9 clerks windows
- Up to 24 clerks display per one clerk window
Dynamic Clerk/Check window programming
84
Receipt key programming
It is now possible to program the receipt key to automatically bring
the check window to allow issuing of guest receipts for tables very
easy
Set this option to yes
85
Table Transfer programming for check windows
It is now possible to program the table transfer key to transfer to
the dummy check area (section 0) or table layout 1-9
New Option
Hotel Functions
Table transfer key status setting
D7 = 4 “ST transfer”
D8 = 1 “Transfer time and clerk”
D8 = 2 “Transfer detail registration”
86
Option 11 Keyboard
This where you program your location keys
Select option 11 keyboard
CHK Window
6. Table Area 5
7. Table Area 6
8. Table Area 7
9. Table Area 8
10. Table Area 9
11. Keyboard
This is a close-up of check window
image after initialized,
Location Keys
PREV: move to previous page (function code is 221)
NEXT: move to next page (function code is 220)
ESC: You can delete but not possible to reprogram it again by the
QT-6000 terminal you have to use a PC utility.
CHK: Select CHK for active checks
TBL: Select “TBL” it will show the table layout
87
Colours and styles
You can select from two default colour keyboard patterns
Style-1: Colour keyboard with the Casio Colour bar
Style-2: Colour keyboard without the Casio colour bar
88
Touch Screen Themes
Touch screen themes
“User define = 0, Theme 1 = 1 or Theme 2 = 2” – YES – ESC
These theme’s were designed for different light conditions
Theme 1 = Outside or a very bright environment
Theme 2 = Inside artificial light environment (Default)
89
New Program 4 Key Attributes
Key Attributes
1. Key Shapes
90
2. Key Colour Selection
3. Key Text
91
4. Pictures
92
Pull-Down List Programming
Pull-Down List Options
List01
1. Items
2. Window Colour
3. Key Shape
4. Key Colour
5. Key Text
Editing of key top text has also been added for Pull-down groups
Maximum of 16 Character per pull-down group PLU
93
Separate Check Function
Graphical Single Separate Check
94
New Multiple Separate Check
It is now possible to split a check graphically to 9 other checks
Multiple Separate Check Screen
Programming for multiple check
Set the multiple separate check option to yes
95
Table share Function
Application
This function allows the facility for a number of people to share the
same table and manage the check tracking system at the same
time.
Programming for table share function
Firstly you must make sure you have an Old/New Check key in file
number 2 (Free Function File)
Assign the table share key in program 4
Function code for table share is 261
Enable table share in general features
Registration
[REG] (Check no) <New/OLD CHK> <Table share>….<NB>
96
CHAPTER 12
Other New functions
Memory Free Functions
This function has been designed for two reasons
Reason One: You need more functions but there is not enough
space on the keyboard.
Reason Two: To allow function key status programming for
Menu Level keys, Clerk and Check windows
Character item search function
Application
Quick searching facility to find registration PLU items quickly by
character this can reduce registration time in some applications.
Programming
Function code for character search Is function 246 or 48 (PLU KEY)
Operation
[REG] <Item search> “Alphabet Entry”
97
Order character change function
Application
To change the order character information before the designated
PLU items are transferred to the kitchen. To change a starter to a
main course
Programming
Function code for order character change Is 252
Order character change status/stay down programming
Operation
[REG] Press Order character change
Press PLU with order character link Programmed
98
Monitoring function
Application
To watch the registration procedure of another terminal
The person using the terminal will not know that the terminal is
being monitored.
Operation
To start Monitoring
[Manager] 99990000nn <ST> (nn…ID number)
To stop Monitoring
[Manager] <ESC> <ESC>
Removing the quantity for preparation and condiment items
It is now possible to program not to print the quantity of a
condiment or preparation when the quantity is 1
Programming
99
New CF card features
Application
To save the sales data of each terminal by the CF card and load
the data in to a PC
Programming
Batch report programming
0001-029 (Batch report 1) 10001112141700000000
“D20 = 1 (Save X report data to CF card)”
0002-029(Batch report 2) 20001112141700000000
“D20 = 2 (Save Z report data to CF card)”
Report data format programming
CF card format
Data saving directory
CASIO\QT6000\XZ\DDMMYY\xxxx.txt
xxxx.txt
[X or Z][File No.][T][Machine No.][A,B,…Z].TXT
100
Free function and PLU keys colour settings
Display area colour definition (File 906)
Memory allocation
[PGM5] 3. Individual File – FILE 906 – 99 – YES - ESC
Seat No Colour #
0010-906 - “Seat 1-3 colour program” – YES
0011-906 - “Seat 4-6 colour program” – YES – ESC
101
Free function keys that can have their own colour
RF, Coupon, Coupon2, %+, %-, Text recall, Text print
0012-906 – “Colour code setting” – YES ….
Colour code link setting for free function keys
PGM manual 85, 88, 90
[PGM3] 3.Key Feature – 7.Function Key
Colour link “12-99” – YES – YES
102
CHAPTER 13
Customer file and invoice numbers
When using the customer accounts system the check tracking files
are used to store the details of the customer accounts these files
are
File 15 (Check Index)
File 60 (Check detail)
After customer payment operation, the finalized and discounted
amount are accumulated in the totalizer area of File 37 (Customer
file) and File 42 (Customer group file)
Customer number entry can be done by entering a customer
number manually or by swiping a card using the Magnetic card
reader
Programming
Assign a Customer # key and a Payment key
Function code for Customer Number Is 148
Function code for Payment key Is 149
Customer control – “Allow to create new customer” - YES – ESC
103
Registration
[REG] <CUST #> (New customer) “Swipe the card” or “Input
customer number”
Input “Name”, ”Title” , “Address” , “Phone no” , “Customer GP”
– YES…. Press the <Table trans> key
Payment operation
[REG] <Payment> <CUST #> (New customer) “Swipe the card” or
“Input customer number”
Press a finalise key or <CASH>
Loyalty discount function (ST, Selective item ST)
Application
The discount level can be applied only for specific customers this
is control according to the group number the customer is
programmed to.
<Programming>
PGM manual page 62
ST discount
[PGM3] -1.Machine Feature - 26.Customer Group – “Group name”
– “Group01” - YES –
“ST (%)” – 10 (%) – YES -ESC
Selective item ST discount
[PGM3] -1.Machine Feature - 26.Customer Group - “Group name”
- “Group01” - YES –
“Selective item 1 (%) ” - 10 (%) - YES -ESC
Selective item status programming
PGM manual page 78
[PGM3] -3.Key Feature – 1. PLU – (Select PLU item) – Selective
item 1 - YES - ESC
104
<X/Z report function>
[X/Z] 1.Daily X/Z – 5.Customer account – 1. Customer – 4. All
Information
Invoice number function
Application
To print the invoice number only for real registration operations
Programming
Invoice number programming
“Invoice number for std fin.” - YES
“Invoice number for clerk int.” - YES
“Invoice number for check tracking” - YES - ESC
105
CHAPTER 14
Picture And Sound Files
BMP Files
Application
To display the picture data for the QT-6000
Free function keys
PLU items
Check windows
Clerk windows
Programming
BMP:FILE910 (Bitmap image file for graphical keys)
Memory allocation
PGM manual page 13,17.
[PGM5] 1.Memory allocation - 3.Individual File – File910 – 20000 YES – ESC
106
Make the Bit Map data using the sizes below
Copy the bmp file converter and the wav file converter from the
dealer CD. These files can be found in QT-6000/pctools
Copy the Bit map files to the same directory as the two utilities
above
Convert the BMP files to file 910 PGM data using the Casio
BMP file conversion software.
107
How to convert the Data using the Casio utilities
Double click on the BBMPCHG Icon
You should see the following screen
Drag and drop the bitmap to positions 1 to 99
Press the convert key
108
The utility should now say normal end and a file 910 will be made
in the data directory
Data Folder
Touch screen File
Copy file 910 PGM data to the following directory of the CF card.
CASIO\QT6000\AUTPPGM\FILE910P.910
109
[Notes]
1) Supported BMP files: Windows bitmap, 24 bit colour
2) Number of bitmap image: Maximum of 100 single key images
can be stored.
When the double size key is specified, it will be occupied two
single keys memory space.
If the quadruple size key is specified, it will be occupied four single
keys memory space.
FILE910 PGM data transfer via CF card
REF manual page 118
[CF card] - 2.Data Restore – Select “FILE910P.910” – YES – YES
BMP file Key assignment
PGM manual page 22
[PGM4] 1.Keyboard - 3.Key attribute – Picture – “Select picture” –
“Press assign key” - ESC
110
Sound Files
Programming
WAV:FILE701-710 (Bitmap image file for graphical keys)
Memory allocation
[PGM5] 1.Memory allocation - 3.Individual File – File701-710 –
32000 - YES – ESC
Casio WAV conversion utility
Double click the WAV conversion Icon
You should see the following screen
Press convert
111
The file should say Normal end and create the relevant sound file
in the data folder
Go to the data folder
Data Folder
Touch screen File
Transfer the sound data to a CF card
CASIO\QT6000\AUTPPGM\FILE701P.701
FILE701 PGM data transfer via CF card
Load the Data to the QT-6000 Terminal
[CF card] - 2.Data Restore – Select “FILE710P.701” – YES – YES
112