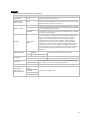
1
Two Manual Organs Masterpiece and A648 / A658 / A678 OWNER’S GUIDE Copyright ©2011 Rodgers Instruments Corporation Safety Instructions INSTRUCTIONS PERTAINING TO A RISK OF FIRE, ELECTRIC SHOCK OR INJURY TO PERSONS IMPORTANT SAFETY INSTRUCTIONS WARNING: WHEN USING THIS INSTRUMENT, ALWAYS FOLLOW BASIC SAFETY PRECAUTIONS, INCLUDING THE FOLLOWING: 1. Read these instructions. 2. Keep these instructions. 3. Heed all warnings. 4. Follow all instructions. 5. Do not use this apparatus near water. 6. Clean only with dry cloth. 7. Do not block any ventilation openings. Install in accordance with the manufacturer's instructions. 8. Do not install near any heat sources such as radiators, heat registers, stoves, or other apparatus (including amplifiers) that produce heat. 9. Do not defeat the safety purpose of the polarized or grounding-type plug. A polarized plug has two blades with one wider than the other. A grounding type plug has two blades and a third grounding prong. The wide blade or the third prong is provided for your safety. If the provided plug does not fit into your outlet, consult an electrician for replacement of the obsolete outlet. 10. Protect the power cord from being walked on or pinched particularly at plugs, convenience receptacles, and the point where they exit from the apparatus 11. Only use attachments/accessories specified by the manufacturer. 12. Unplug this apparatus during lightning storms or when unused for long periods of time. 13. Refer all servicing to qualified service personnel. Servicing is required when the apparatus has been damaged in any way, such as powersupply cord or plug is damaged, liquid has been spilled or objects have fallen into the apparatus, the apparatus has been exposed to rain or moisture, does not operate normally, or has been dropped. 14. To reduce the risk of injury, supervise children closely when they are around the instrument. 15. Use of this instrument, either alone or in combination with an amplifier and headphones or speakers, may be capable of producing sound levels that could cause permanent hearing loss. DO NOT operate for a long period of time at a high volume level or at a level that is uncomfortable. If you experience any hearing loss or ringing in the ears, you should consult an audiologist. 16. Protect the instrument from dust as much as possible. 17. Connect the instrument to a power source only of the type described in the operating instructions or as marked on the instrument. 18. Turning off the instrument at the main power switch does not ensure that the instrument is completely powered off. To completely power off the instrument, unplug the power cord of the instrument from the power source. The power cord should be readily accessible to allow easy disconnect of the instrument power cord from the power source. Do not pull the cord to unplug. Hold the plug when unplugging from the power source. 19. When setting up with other instruments or peripherals, follow the procedures in accordance with Rodgers’ owner’s manual. 20. Use only the attached power supply cord. Also, the supplied power cord must not be used with any other device. 21. Speaker wiring must be installed by professional or service personnel. 2 CONTENTS Lithium battery warning ................................................................................................................. 5 FCC Notice....................................................................................................................................... 6 Radio and Television Interference .................................................................................................. 6 RECYCLING NOTICE ......................................................................................................................... 7 Notice to Users................................................................................................................................ 9 Introduction .................................................................................................................................. 10 Two-manual console basic overview (may vary depending on model)........................................ 11 Turn On/Turn Off .......................................................................................................................... 12 Turning on: .............................................................................................................................. 12 Turning off:.............................................................................................................................. 12 Manuals and Pedalboard .............................................................................................................. 12 Stops.............................................................................................................................................. 12 What is a stop? ....................................................................................................................... 12 How to turn on/off a stop ....................................................................................................... 13 Tremulants .............................................................................................................................. 13 Couplers ........................................................................................................................................ 13 Intermanual Couplers.............................................................................................................. 14 Intramanual Couplers ............................................................................................................. 14 MIDI Couplers.......................................................................................................................... 15 Pistons........................................................................................................................................... 15 General Pistons ....................................................................................................................... 16 Divisional Pistons .................................................................................................................... 16 How to Set a Piston ................................................................................................................. 16 General and Divisional Cancel................................................................................................. 16 Memory Levels ........................................................................................................................ 17 Additional piston functions that may be present on your organ (depending on model) ............ 17 All Swells (or ALL EXPR SW)..................................................................................................... 17 Festival Trumpet Enclosed (FFF Reeds Enclosed) .................................................................... 18 3 Tutti (or Full Organ) ................................................................................................................ 18 Melody Coupler (MEL SW) ..................................................................................................... 18 Bass Coupler (BASS) ................................................................................................................ 18 Zimbelstern ............................................................................................................................. 19 Alternate Crescendo................................................................................................................ 19 Console Displays, Indicators, and Menus ..................................................................................... 19 Changing the Time (Console Clock) .............................................................................................. 20 Locking a Combination Memory................................................................................................... 21 Unlocking a Combination Memory............................................................................................... 22 Restoring Factory Combination Settings ...................................................................................... 23 Reversibles .................................................................................................................................... 24 Expression Shoes and Controls ..................................................................................................... 24 Crescendo Shoe and Controls....................................................................................................... 24 Transposer .................................................................................................................................... 24 Tremulants .................................................................................................................................... 25 APPENDIX A – A DESCRIPTION OF STOPS ..................................................................................... 26 Organ stops are grouped into four main families................................................................... 26 Other Families of Stops ........................................................................................................... 27 The number on the stop shows its pitch. ................................................................................ 27 Fraction? It’s a “Mutation” stop. ............................................................................................ 27 Roman Numeral? It’s a “Mixture” stop................................................................................... 28 Céleste stops ........................................................................................................................... 28 The “Amens/Alleluias” stop .................................................................................................... 29 APPENDIX B – MENUS IN THE DISPLAY WINDOW ........................................................................ 30 APPENDIX C – ABOUT THE PERFORMANCE TOUCH KEYBOARDS................................................. 41 LIMITED WARRANTY ..................................................................................................................... 42 INDEX ............................................................................................................................................ 43 4 Lithium battery warning Caution: Danger of explosion if lithium battery is incorrectly replaced. Replace only with same or equivalent type. Manually operated main power switch Caution: The main power switch does not completely disconnect this equipment from the main power when the switch is in the off position. Remove power cord from main outlet when servicing equipment. You must GROUND instruments equipped with a TYPE AC, 3 WIRE GROUNDED PLUG. This apparatus with Class I construction shall be connected only to main socket outlet with a protective earthing connection. WARNING: EXTERNAL SPEAKER WIRING TO BE INSTALLED ONLY BY PROFESSIONAL OR SERVICE PERSONNEL. WARNING ATTENTION: RISQUE DE CHOC ELECTRIQUE NE PAS OUVRIR CAUTION: TO REDUCE THE RISK OF ELECTRICAL SHOCK: DO NOT REMOVE COVER OR BACK. NO USER-SERVICEABLE PARTS INSIDE. REFER SERVICING TO QUALIFIED SERVICE PERSONNEL. TO REDUCE THE RISK OF FIRE OR ELECTRIC SHOCK, DO NOT EXPOSE THIS APPLIANCE TO RAIN OR MOISTURE PATENTS G.B. 1312161 F.R.G. 22 02 658 CANADIAN 951550 The lightning flash with arrowhead symbol, within an equilateral triangle, is intended to alert the user to the presence of uninsulated “dangerous voltage” with the product’s enclosure that may be of sufficient magnitude to constitute a risk of electrical shock to persons. The exclamation point within the equilateral triangle is intended to alert the user to the presence of important operating instructions in the literature accompanying the product. 5 FCC NOTICE Radio and Television Interference Rodgers organs use and generate small amounts of radio-frequency (RF) energy. The instrument complies with the limits set for Class B computing devices. FCC Rules, Part 15, Subpart J define the limits for radio and television interference in a residential installation. Follow the installation and the use instruction in the manual, or the instrument could potentially cause interference with some radio or television reception. In the unlikely event this occurs, we encourage the user to try the following corrective measures: 9 Turn the instrument OFF to see if it is the actual source of the interference. 9 Disconnect the peripheral devices and their input/output cables one at a time. If the interference stops, the peripheral device or its I/O cable is the cause. 9 Coil and uncoil the instrument’s power cord in different ways. 9 Connect the instrument’s power cord to a power outlet on a different circuit. 9 Move the instrument further away from the radio or television receiver. 9 Turn the radio or television receiver until the interference stops. 9 Connect the radio or television receiver to a different power circuit. 9 Reorient or move the receiver antenna further away from the instrument. 9 Consider installing a rooftop antenna with coaxial cable lead-in between the antenna and receiver. 9 Consult the nearest Rodgers dealer for more information if the above corrective measures don’t remove the interference. SAVE THESE INSTRUCTIONS About the GPL/LGPL Software Used In This Product This product is using some GNU General Public License (GPL) / GNU Lesser General Public License (LGPL) software. You have the right to acquire, modify and distribute the source code for this GPL/LGPL software. You can obtain the GPL/LGPL source code used in this product by downloading it from the following website: http://www.roland.com/support/gpl/ 6 RECYCLING NOTICE For EU Countries UK DE FR IT ES PT NL DK NO SE FI HU PL CZ SK EE LT LV SI GR 7 CHINESE NOTIFICATION 8 NOTICE TO USERS Information in this document is subject to change without notice. No part of this manual may be translated into any language, stored in a retrieval system, reproduced or transmitted in any form or by any means, electronic or mechanical, including photocopying and recording, for any purpose without the express written permission of Rodgers Instruments Corporation. RODGERS INSTRUMENTS CORPORATION 1300 N.E. 25th Avenue Hillsboro, Oregon 97124 (503) 648-4181 www.rodgersinstruments.com RODGERS IN CANADA 5480 Parkwood Way Richmond, B.C. V6V 2M4 Toll Free (877) 676-5263 www.rodgersinstruments.ca Rodgers instruments are manufactured and protected under one or more of the following U.S. patents: 4,622,878, 5,060,179, 5,087,798, 5,091,613, 5,225,619, 5,262,581, 5,508,472, 6,369,310, 6,399,868 ©Copyright 2011, Rodgers Instruments Corporation, a member of the Roland Group, All rights reserved. Printed in the United States of America. QuickMenu™, Rodgers®, Rodgers Classic Organs®, Digital Dynamic Wind™, Dimensional Sound Modeling®, Parallel Digital Imaging®, Voice Palette™, DVM™, PDI™, TrueChimes™, PerformanceTouch™ are trademarks or registered trademarks of Rodgers Instruments Corporation, Hillsboro, Oregon. RSS® is a registered trademark of the Roland Corporation. 9 INTRODUCTION Grand, glorious sound is the hallmark of the Rodgers organ. Providing a rich and spacious ensemble sound complemented by crystal-clear definition, the Rodgers organ will take you to new musical heights, while sustaining the tradition of quality, craftsmanship and innovation you’ve come to expect from Rodgers. Dimensional Sound Modeling® is the 21st century standard in the art of digital organ building. This technology ushers in a new era of choice and control to create authentic pipe organ sound and room acoustics as never before possible. Dimensional Sound Modeling technology takes you from virtual to reality. With unmatched user control over every major facet of the organ, you can create a sound and an acoustical environment modeled to your taste and musical needs. Rodgers’ exclusive Voice Palette™ system allows you to easily access numerous additional sounds. These voices, available as alternate selections behind many stops, greatly expand the tonal resources of the instrument. Each selection can be easily stored in the organ’s memory system, allowing you to authentically recreate virtually any musical style or individual performance desired with the push of a button. With remarkable flexibility, superior sound and the option of adding real pipes at any time, the Rodgers organ is a perfect choice for any home, concert or worship setting. Built entirely in Oregon by dedicated, expert craftsmen, our consoles are meticulously handcrafted of hardwoods and veneers, and are designed to the exacting standards of the American Guild of Organists. This manual will help with the exploration of the expansive capabilities and the variety of features and functions offered by this instrument. As highly sophisticated as the Rodgers organ is, the features are easy to use and easy to access, creating a most satisfying musical experience for the player and listener alike. To keep abreast of the latest news and other items of interest, visit the Rodgers website at: www.rodgersinstruments.com. Two operational guides are included with the Rodgers organ: • Owner’s Guide Use this guide to familiarize yourself with the basic operation and functions of the instrument. • Advanced Features Reference Guide (referred to in this guide as the AG) This guide provides in-depth descriptions and explanations of the many advanced controls and features of the Rodgers organ. 2 You’ll also find helpful hints and additional details in italics like this. 10 Two-manual console basic overview (may vary depending on model) 1. Power switch 2. Headphone jack 3. QUICK MENU thumb piston 4. SET thumb piston 5. General thumb pistons 6. General toe pistons 7. Pedal stops 8. Swell stops 9. Console display 10. Great stops 11. 12. 13. 14. 15. 16. 17. 18. Expression and Crescendo shoe level indicators USB port Select knob Alpha Dial General cancel thumb piston (engraved “0”) Divisional thumb pistons (Swell, Great) Pedal division toe pistons Expression (volume) shoes and Crescendo shoe: Great-Pedal | Swell | Crescendo 11 Turn On/Turn Off On Off • Turning on: Depending on model, press and hold the top of the On/Off rocker switch for approximately 2 seconds and release or press the top of the On/Off switch labeled (―) until it locks into place. The instrument identification message appears in the display window. The organ then performs a diagnostic test of its systems over the next few seconds. When completed, the display window reads TRANSPOSER O. The organ is ready to play. • Turning off: Press and hold the bottom of the On/Off rocker switch for no more than 1-2 seconds and release, or press the bottom of the On/Off switch labeled (O) until it locks into place. Should you need to turn the power on just after you turned it off, wait about 20 seconds before turning the power on again. 2 Depending on model, the organ may be equipped with an Automatic Shutdown feature. See the AG. Manuals and Pedalboard The organ has keyboards played by the hands, commonly referred to as manuals. Each manual plays an assortment of stops, known as a division. The keyboard played by the feet is referred to as the pedalboard, and stops played by the pedalboard make up the Pedal division. Two manual organs contain, in order from bottom to top, the Great Manual, and the Swell Manual. Stops • What is a stop? 12 The term stop is used to describe a single voice on an organ. Stops are activated by Rocker Tablets (tabs) and/or Drawknobs. Depending on model, a stop may also be activated by a piston (i.e. chimes). The stop will sound if it is activated and any keys or pedals that control that division are pressed. 2 • For a description of stops and their character of sound, refer to Appendix A. How to turn on/off a stop To activate a stop or control, pull the drawknob or press the bottom of the tab, and release. To deactivate a stop or control, push the drawknob or press the top of the tab, and release. All stops can be cleared quickly by pressing the General Cancel piston, (labeled ‘0’) located on the right-hand side under the bottom keyboard. Simply press and release this piston to cancel a registration. 2 Many stops have more than one voice to choose from. This is referred to as the Rodgers Voice Palette™. See the AG (Advanced User’s Guide) • Tremulants If your organ has no stops on but you turn on a Tremulant and play a key, you will hear nothing. Tremulants create a “wavy” sound to organ stops already turned on. Actually, tremulants change the pitch (sharp and flat), amplitude (volume) and timbre (tone quality). The use of the tremulant adds warmth and expressiveness to solo or small ensemble combinations. It is not common to use tremulants in larger classical ensembles. In some romantic ensembles, tremulants are used judiciously. In some gospel and evangelical musical traditions, tremulants with a wider and deeper excursion are frequently used. There are two types of tremulant controls. Divisional tremulants affect only the stops in their respective division. Divisional tremulants are drawknobs or tabs located among the stops per division, labeled TREMULANT or they may be thumb pistons labeled SW TREM or GT TREM. General tremulants affect all divisions. General tremulants usually are thumb pistons labeled FLUTE TREM II, MAIN TREM II, FLUTE TREM ALT, or MAIN TREM ALT. Couplers If your organ has no stops on but you turn on a coupler and play a key, you will hear nothing. A Coupler is a control which allows stops from a division of the organ to be played on a different manual. For example, by activating the Swell to Great coupler, you could play stops in the 13 Swell division on the Great manual. (“Swell to Great” literally means, “connect the Swell division to the Great manual”). Couplers allow you to control a larger portion of the organ from one manual or the pedalboard and are useful in achieving larger or more varied registrations. • Intermanual Couplers An Intermanual Coupler is a control that allows a division of the organ to be played from a different manual or the pedalboard. They most often function from tabs located above the Swell manual (also called the tab rail). The pitch designation (16, 8 , 4) specifies the pitch at which the division is to be coupled. 8’ is concert pitch in organ nomenclature; when using an 8’ coupler, the division is coupled at its normal pitch. 4’ pitch is an octave above 8’ pitch. When a 4’ coupler is used, the division is coupled an octave higher than normal. This nomenclature is similar to the pitch designation used in organ stops. 8’ intermanual couplers are commonly used when building large ensemble registrations, whereas 4’ couplers are usually not employed. 4’ couplers are often used with celeste stops in more gentle registrations; they effectively increase the number of notes that are sounding and increase the warmth and breadth of the ensemble. • Intramanual Couplers Intramanual couplers are different from intermanual couplers in that they operate within a single organ division. These couplers allow you to play stops of the organ at a different pitch level on the same manual where the stop is located. These couplers are often referred to as Sub Couplers and Super Couplers. For example, by activating the Swell to Swell 16’ coupler (Sub), the stops selected in the Swell division will sound one octave lower than the key played on the Swell manual. An exception is the first octave where the lowest 12 notes will only sound at unison pitch. With the Swell to Swell 4’ coupler (Super) activated, the stops selected in the Swell division will sound one octave higher than the key played on the Swell manual. An exception is the last octave where the highest 12 notes will not play if the selected stop is 2' or shorter. 14 Another example of intramanual couplers is UNISON OFF. The SWELL UNISON OFF coupler silences notes at concert or unison pitch (hence, the name) on the swell manual. For example, selecting the SWELL UNISON OFF coupler would cause activated stops in the Swell division to be silent even when notes are played on the Swell manual. The Unison Off couplers are useful when you want to couple a division somewhere else without having it sound on its assigned manual (i.e., you want to couple stops in Swell division to the Great but don’t want them to play from the Swell manual). • MIDI Couplers MIDI and MIDI/ORCH couplers are located under their respective manuals on thumb pistons. The couplers labeled MIDI SW A and MIDI SW B for the Swell Manual, MIDI GT A and MIDI GT B for the Great Manual and MIDI PED A and MIDI PED B for the pedals allow sounds from an external sound module to be played from different divisions of the organ. Depending on model, some organs feature as many as 52 internal orchestral voices. If the instrument has internal orchestral voices the MIDI couplers will be labeled MIDI/ORCH SW A and MIDI/ORCH SW B for the Swell Manual, MIDI/ORCH GT A and MIDI/ORCH GT B for the Great Manual and MIDI/ORCH PED A and MIDI/ORCH PED B for the pedals. To assign internal sounds on instruments with MIDI/ORCH pistons: 1. Press and hold the SET piston, located on the left-hand side under the Great manual. While holding SET press the MIDI/ORCH piston to where the sound is to be assigned (MIDI/ORCH SW A, MIDI/ORCH GT A, etc.) and release both pistons. The selected MIDI piston will light. 2. In the display, the word “Tones” will be highlighted. 3. Press QUICK MENU. 4. Turn the Alpha Dial to select the desired sound. 5. Press STOP to exit this mode. The selected sound is now stored on the selected MIDI/ORCH piston. 6. This instrument will remember the selected sounds the next time the organ is turned on ONLY if you save your MIDI/ORCH sounds into a general or divisional combination piston. 2 For assigning sounds from an external sound module see the AG (Advanced User’s Guide). Pistons Pistons are the “buttons” on the organ. These pistons are located beneath the manuals of the organ or adjacent to the expression shoes. Pressing a piston will cause its stored registration to be recalled instantly. Each of the available pistons in the Rodgers combination action can be 15 easily changed to suit your particular needs and tastes. The Rodgers organ has two different types of combination action pistons, general and divisional pistons. • General Pistons General pistons affect the entire organ. Up to 12 General pistons are available, depending on model. They are located on thumb pistons under the left-hand side of the Great and Swell manuals. In addition, they are duplicated on toe pistons adjacent to the expression shoes. To recall a registration stored on a general piston, you could press either the corresponding thumb piston or toe piston; in other words, to select general piston 3, you could either press thumb piston 3 under the Swell manual or toe piston 3. The duplication of pistons allows you to use either your hand or foot to recall the same registration, depending on what is most convenient. • Divisional Pistons Divisional pistons affect a single division. There are up to six divisional pistons for the Great and Swell; these pistons are either numbered from one to as many as six or one to five with the sixth labeled O for the divisional cancel depending on model. These pistons are located under the corresponding manual. For example, Great divisional pistons are located underneath the Great manual near the middle of the keyboard. Swell divisional pistons are below the Swell manual. Some Rodgers models feature Pedal divisional pistons. They are located on the toe pistons to the right of the expression shoes or under the Great manual to the far left. • How to Set a Piston The Rodgers organ is equipped with factory registrations, each of which can be used for a wide variety of musical effects. However, the contents of any piston can be easily changed to suit your particular needs. To set a new registration on a piston: 1. Select the desired stops, couplers and/or MIDI settings. 2. Press and hold the SET piston. While continuing to hold SET, press the piston (General or Divisional) to be programmed. 3. Release both pistons. The new registration is now stored. 2 A memory level must be unlocked before a piston can be changed. See page 22. • General and Divisional Cancel When TRANSPOSER is displayed in the window, ALL stops, couplers and MIDI settings can be cleared by pressing the General Cancel piston, (O) located under the Great manual at the right-hand side of the keyboard. Depending on model, 16 stops can be cleared in a particular division by pressing a Divisional Cancel piston (O) located to the right of the #5 divisional combination action pistons. • Memory Levels Rodgers advanced combination action system has up to 100 memory levels depending on model. This effectively multiplies the number of available combination pistons by up to 100. Combinations stored one memory level don’t affect those stored on other memory levels; each of the memories is independent. Many organists keep regularly used registrations, such as those used for hymns, on one memory and use other memory levels for preludes, postludes and choral accompaniments, which may change week to week.* *Note: A variety of useful registrations have already been stored when the organ arrives from the factory. Memory Levels can be selected by pressing the corresponding piston M1, M2, M3, etc. or the pistons labeled M+, M-, or MEM UP, MEM DOWN, depending on model. When a memory level is selected, the memory level appears in the display window. To select a memory level: Press the corresponding memory piston (M1, M2, M3, etc.) or press the M- or M+ (or MEM DOWN, MEM UP) piston until the desired level (0 thru 99 depending on model) is displayed in the window. M1 is automatically selected when the organ is turned on. 2 With Rodgers USB data port, unlimited memory levels are available. See the AG (Advanced User’s Guide) Additional piston functions that may be present on your organ (depending on model) • All Swells (or ALL EXPR SW) There are times when it is desirable to use a single expression shoe to control all divisions under expression. When the ALL SWELLS (or ALL EXPR SW) piston is lit, the Swell, Great and Pedal divisions are all assigned to the Swell expression shoe, allowing you to easily control the volume of every enclosed division. 2 If ALL SWELLS and FEST TR ENCL (FFF REEDS ENCL) are all activated, the entire organ is enclosed and can be expressed by the Swell expression shoe. 17 • Festival Trumpet Enclosed (FFF Reeds Enclosed) The Festival Trumpet 8’ and solo reeds (FFF) are normally unenclosed; that is, not affected by the expression shoes. However, when the FEST TR ENCL (may be labeled FFF REEDS ENCL) piston or tab is activated, the Festival Trumpet 8’ and the other FFF reeds stop are enclosed and will be expressed by the appropriate divisional shoe. • Tutti (or Full Organ) There are times when a full organ registration is needed immediately. A Tutti (or Full Organ) control allows you to engage full organ quickly without canceling your set registration. Some models will have a TUTTI I and a TUTTI II. Activate the control by pressing the TUTTI I or TUTTI II thumb piston or toe stud; press again to turn off Tutti and return to the current registration. When Tutti is activated, the Tutti indicator located directly above the Crescendo indicator is lit. Pressing General Cancel will also cancel Tutti. TUTTI comes programmed from the Rodgers factory. 2 Tutti can be reprogrammed, if desired. See the AG (Advanced User’s Guide) • Melody Coupler (MEL SW) One of the most popular organ registrations utilizes a melody voice on one manual and accompaniment on another manual. Sometimes, however, it is difficult to separate the hands on two manuals. For this reason, the Rodgers Melody coupler was devised. When a Melody coupler is activated, the highest note played on the Great manual uses a registration from another manual. This allows you to have both an accompaniment and solo registration, even though you’re playing on one manual. The couplers is located on thumb pistons under the Great manual, labeled MEL SW. The piston lights when activated. When the Melody from Swell is activated (MEL SW is lit), any selected stop or MIDI voice in the Swell division sounds from the highest key being played on the Great manual. In its default setting, the Melody Coupler operates when the top note (the melody note) is between keys 25 and 61 on the Great manual. However, the lower end of its range is programmable and may be extended down to key 13 or up to key 49. See AG (Advanced User’s Guide). 2 Melody Couplers can be set only in General combination pistons. • Bass Coupler (BASS) The Bass coupler is much like the Melody coupler described above, except that it adds the Pedal registration to the lowest note played on the Great manual. This allows you to easily add a Pedal part to anything played on the Great manual. 18 The BASS coupler is located on a thumb piston beneath the Great manual. When activated, the piston lights, and any selected registration in the Pedal division will sound from the lowest key being played on the Great manual. This provides a pedal bass sound without actually playing the pedalboard. In the default setting, the Bass Coupler affects keys 1 through 24 of the Great manual, but its range can extend up to key 32 (top of the pedalboard range). See AG (Advanced User’s Guide). 2 The Bass Coupler can be set only in General combination pistons. • Zimbelstern Depending on model, the organ may have a digital Zimbelstern (translated “bell star”). This percussive device is most often used in bright music of the Baroque period. The Zimbelstern is activated by a lighted reversible piston (“ZIMBEL”). Press the piston to activate the Zimbelstern; press it again to turn it off. The digital Zimbelstern’s rate and random settings can be adjusted to suit your particular needs. See AG (Advanced User’s Guide). • Alternate Crescendo All Rodgers organs are equipped with a Standard Crescendo that is classical in nature. Depending on model, an Alternate Crescendo may also be available. The Standard Crescendo is active when the organ is first turned on, and anytime the ALT CRESC piston is unlit. Pressing the ALT CRESC reversible piston engages the Alternate Crescendo. 2 The Standard and Alternate Crescendo can each be user-reprogrammed to use a different sequence of stops. See the AG (Advanced User’s Guide) Console Displays, Indicators, and Menus Masterpiece Organ series display Allegiant Organ series display The Rodgers organ is equipped with an informative display for many of the console functions described in this section. The Console Display normally indicates the active memory level, the current time and the Transposer setting, however, it can also display Voice Palette selections or various menus to adjust parameters and preferences including MIDI settings, Dimensional Sound Modeling parameters, Tremulant rate and depth, and many others. Two controls are used to select and modify the features found in the Console Display. The smaller knob is the Select knob; it is used to select the menu item to be changed. The larger dial 19 is called the Alpha Dial; it is used to change the settings in a selected menu. Most of the features that can be modified in the Console display will follow this pattern: Select Knob – (the smaller knob) selects (highlights) a menu item Alpha Dial – (the larger dial) changes the selected item’s value Depending on model, the Select knob and Alpha Dial may be configured as: 2 For a comprehensive list of menu items, refer to Appendix B. Changing the Time (Console Clock) Normally the console clock will not need adjusting; the clock should automatically adjust to Standard Time or Daylight Savings Time. However, sometimes the clock time may drift a few minutes due to certain circumstances. To adjust the time: 1. Press and release the QUICK MENU piston 2. Turn the Select Knob clockwise until Console appears in the display 3. Press and release the QUICK MENU piston 4. Turn the Select Knob clockwise until Set Clock appears in the display 5. Press and release the QUICK MENU piston 6. The value for hour is highlighted. Rotate the Alpha Dial to change it. 7. Rotate the Select knob to highlight the value for minutes, seconds, am/pm, year, month, or day. Rotate the Alpha Dial to change each value. 8. Press and hold SET, then press 0 (Cancel) to save it to the organ. 9. Repeatedly press 0 (Cancel) to exit the menu so Transposer 0 is displayed. 20 Locking a Combination Memory When shipped from the Rodgers factory, all memory levels are unlocked so that pistons can be easily changed. If desired, each memory level can be locked individually so that it cannot be changed. On instruments with combination action pistons M1, M2, etc., any memory level can be locked using the following procedure: 1. Press and hold the memory piston (M1, M2, M3, etc.) corresponding to the memory level you want to lock until the memory bank screen appears. Internal or Memory Card and (#) Unlocked or (#) Locked appears in the display. 2. If (#) Unlocked appears, go to step 3. If (#) Locked appears, the memory level is already locked. 3. Turn the Select knob to highlight Unlocked. 4. Rotate the Alpha Dial to select Locked. The memory is now locked and that memory level cannot be changed. On instruments with the M+ and M- pistons, memory level may be locked using the one of the following procedures: 1. Use M+ or M- pistons to select the memory level to be locked. 2. Press and hold SET then press and release M+. 3. Turn the Select knob to highlight Unlocked. 4. Rotate the Alpha Dial to highlight Locked. OR, depending on model 1. Use M+ or M- pistons to select the memory level to be locked. 2. Press the QUICK MENU piston. Use the Select knob next to the display to scroll down until Console appears in the display. 3. Press the QUICK MENU piston. Use the Select knob to scroll down until MemoryLevel Lock appears in the display. 4. Press the QUICK MENU piston. 5. Turn the Alpha Dial until Locked appears in the display. 6. Press the STOP piston three times to exit this mode. 21 Unlocking a Combination Memory ● On instruments with memory level pistons M1, M2, etc., any memory level can be locked using the following procedure: 1. Press and hold the memory piston (M1, M2, M3, etc.) corresponding to the memory level you want to lock until the Memory Bank screen appears. Internal or Memory Card and (#) Unlocked or (#) Locked appears in the display. 2. If (#) Locked appears, go to step 3. If (#) Unlocked appears, the memory level is already unlocked. 3. Turn the Select knob to highlight Locked. 4. Rotate the Alpha Dial to select Unlocked. The memory is now unlocked and that piston can be changed. ● On instruments with the M+ and M- pistons, memory level may be unlocked using the one of the following procedures: 1. Use M+ or M- pistons to select the memory level to be unlocked. 2. Press and hold SET then press and release M+. 3. Turn the Select knob to highlight Locked. 4. Rotate the Alpha Dial to highlight Unlocked. OR, depending on model: 1. Use M+ or M- pistons to select the memory level to be locked. 2. Press and release the QUICK MENU piston. Use the Select knob next to the display to scroll down until Console appears in the display. 3. Press the QUICK MENU piston. Use the Select knob to scroll down until MemoryLevel Lock appears in the display. 4. Press the QUICK MENU piston. 5. Turn the Alpha Dial until Unlocked appears in the display. 6. Press the STOP piston three times to exit this mode. 22 Restoring Factory Combination Settings If the original factory settings have been overwritten or erased, and you would like to restore them, use the following procedure: 1. Press and hold the memory piston to be restored (M1, M2, or M3) until the Memory Bank screen appears. The display shows Memory Bank and Unlocked or Locked (if locked, see the unlocking procedure in the previous section). 2. Turn the Select knob until Restore Factory appears in the display. 3. Press and release SET. 4. Turn the Select knob highlight No. 5. Rotate the Alpha Dial to highlight Yes. 6. Press and release SET. 7. Press and hold Cancel (O) until Transposer O appears in the display. 8. Power the instrument off and on. The selected memory has been restored to factory defaults. To restore the default setting using the M+ and M-, use one of the following procedures: 1. Use M+ or M- pistons to select the memory level to be unlocked. 2. Press and hold SET and press M+. The display shows Memory Bank and Unlocked or Locked (if locked, see the unlocking procedure in the previous section). 3. Turn the Select knob until Restore Factory appears in the display. 4. Press and release SET. 5. Turn the Select knob highlight No. 6. Rotate the Alpha Dial to highlight Yes. 7. Press and release SET. 8. Press and hold Cancel (O) until Transposer O appears in the display. 9. Power the instrument off and on. The selected memory has been restored to factory defaults. OR, depending on model 1. Press and hold SET and press M+. The display shows Locked or Unlocked. 2. Select Unlocked. 3. Press and hold SET and press M+ again for several seconds until the display reads Press Set + 0 to load factory default. Factory defaults loaded will appear in the display. The memory has been returned to factory defaults. 2 Each memory must be individually restored, by performing the above procedure. 23 Reversibles Rodgers organs are equipped with a number of reversible controls, so named because pressing them once will activate the function, pressing them again will deactivate the function. These reversibles, located on thumb and toe pistons, are especially useful in a performance when you want to quickly activate or remove a single coupler, stop or other setting. Press the thumb or toe piston to turn on, and press again to turn off. All reversible thumb pistons light when activated. Expression Shoes and Controls Rodgers three manual organs have two Expression Shoes and a Crescendo Shoe that are used to control the volume and registration of the organ. The left shoe normally controls the volume of the Great division and the middle shoe controls the volume of the Swell division. When the expression shoe is pressed forward, the volume of the division is increased. When the shoe is drawn back, the volume of the division decreases. The positions of the two expression shoes are displayed on two expression indicators, located on the right-hand side of the coupler rail or on the display. Crescendo Shoe and Controls The slightly raised shoe on the right is the Crescendo shoe. This shoe gradually adds a predetermined selection of stops as it is pressed forward. It does not affect the stops already in use on the organ but merely adds to them as the Crescendo is activated. Closing the Crescendo shoe subtracts the stops in reverse order. Stops added by the Crescendo shoe do not indicate they are activated. A Crescendo indicator, which shows the position of the Crescendo shoe, is located on the right-hand side of the coupler rail next to the two expression indicators or in the display. Transposer The Transposer allows you to change the key of music played. Commonly, this is used to accommodate a soloist or instrumentalist who prefers accompaniment in a different key than what is written or to easily raise or lower the pitch of a hymn. The Transposer position is normally shown in the Console Display. If another screen appears in the display (i.e., while 24 programming a specific parameter), you can easily return to the Transposer by pressing the General Cancel (O) or STOP thumb piston until TRANSPOSER appears in the display. Turning the Select knob while TRANSPOSER 0 is displayed lowers or raises the pitch of the organ. Rotating the Select knob clockwise raises the pitch of the organ by semitones; rotating counter-clockwise lowers the pitch by semitones. Pressing General Cancel returns the Transposer to O, (no transposition). Tremulants Tremulants create a change in pitch (sharp and flat), amplitude (volume) and timbre (tone quality). The use of the tremulant adds warmth and expressiveness to solo or small ensemble combinations. It is not common to use tremulants in larger classical ensembles. In some romantic ensembles, tremulants are used judiciously. In some gospel and evangelical musical traditions, tremulants with a wider and deeper excursion are frequently used. There are two types of tremulant controls available on Rodgers organs, divisional tremulants that affect only the stops in their respective division and general tremulants that affect all divisions. Some models also feature up to two additional general tremulants, Main Tremulant II and Flute Tremulant II. They will be located on thumb pistons labeled MAIN TREM II and FLUTE TREM II. Both of these tremulants find their best use in gospel, theatre and evangelical music; the Main tremulant affects Principal, String and Reed voices whereas the Flute tremulant affects Flute voices. Divisional tremulants can be stored with registrations in both general and corresponding divisional pistons; general tremulants can only be stored on general pistons. 2 Each tremulant can be modified easily to suit your tastes and needs. See the AG (Advanced User’s Guide) 25 APPENDIX A – A DESCRIPTION OF STOPS • Organ stops are grouped into four main families: Principals, Flutes, Strings and Reeds. o The Principal family is the group of stops which are unique to the organ, they aren’t imitative of other instruments. Principals are often referred to as the “backbone” of the organ and play a strong role in hymn accompaniments and as the foundation of many chorus registrations. Examples of stops belonging to the Principal family are: Gravissima Principal Diapason Open Diapason Montre Praestant Prinzipal Geigen Octave Super Octave Fifteenth Choral Bass Quint, Quinte Sesquialtera Terz Nasat, Nazat Fourniture Mixtur, Mixture Cymbale, Zimbel Scharf, Scharff Rauschquint Plein Jeu Seventeenth Twenty-Second Fugara Tenth Harmonics Major Bass Contrebass Open Wood Oktav Doublette o The Flute family consists of stops which are generally imitative of orchestral flutes and recorders. This is an extremely diverse group of stops which function in a myriad of ways, from acting as a solo color to serving as the basis of ensemble registrations, either by themselves or in combination with other stops. Examples of stops belonging to the Flute family are: Bourdon Flute Spitzflöte Doppelflöte Flûte Harmonique Stopped Diapason Holzgedeckt Gedeckt, Gedackt Bourdon Doux Chimney Flute Rohrflöte Cor de Nuit Concert Flute Cornet Nazard Tierce Flauto Traverso Clarabella Waldflöte Hohlflöte Spillflöte Nachthorn Orchestral Flute Concert Flute Koppelflöte Larigot Fife Piccolo Tibia Lieblich Gedeckt Quintade, Quintaton Subbass o String stops do exactly what you would imagine — they imitate the sound of orchestral strings. These ranks are smaller in scale than most other ranks and usually have a lot of upper harmonics and a “clean” or “silvery” timbre. This characteristic makes them well suited to accompaniment and softer ensembles. String stops include: Gamba, Gambe Viole, Viola, Viol Violone Dulcet, Dulcett Vox Celeste Salicional Viola Pomposa Violincello Muted Viols Erzahler Gemshorn Dulciana o Members of the Reed family are also very diverse and are used for everything from solo colors to the fiery crown in a full organ registration. These stops are often imitative of orchestral reeds and brass. Examples of reed stops are: Basset Horn Basson Bombarde Festival Trumpet Chamade Trumpet Musette Clarinet Oboe Regal Chalumeau Tromba 26 Clairon, Clarion Cornopean Cremona, Cromorne English Horn Fagot, Fagotto • Tuba French Horn Kinura Vox Humana Voix Humaine Hautbois Posaune Post Horn Rankett Rohrschalmei Trombone Trompette Krummhorn Schalmei Zink Other Families of Stops o Percussion The Percussion family includes voices such as the Chimes, Handbells, Harp, Celesta and Harpsichord. These stops have a percussive attack and gradually grow softer as you hold the note. The Zimbelstern is also a member of the Percussion family. o Orchestral Examples of Orchestral voices include the Strings, Slow Strings, Orchestral Oboe and Brass Ensemble. o Choral Examples of Choral voices include the Soprano Ah, SATB Ah, SATB Oo, Boychoir, and Amens/Alleluias. • The number on the stop shows its pitch. The stops and couplers on the organ each have a pitch designation listed in feet (8’, 4’, 16’, etc.). 8’ refers to concert pitch; a key played on an 8’ stop will have an identical pitch as the same key played on a piano. 16’ represents an octave below concert pitch; a key played on a 16’ stop will sound an octave below an 8’ stop. This system of designating pitches represents the approximate length of open organ pipes; the largest pipe in an 8’ rank is approximately eight feet long; the largest pipe in a 16’ rank is about sixteen feet long. Other footages and their relationship to concert pitch are listed in the table below: • Pitch Relationship to concert pitch 32’ two octaves below 16’ one octave below 8’ equal to concert pitch (also known as ‘Unison’) 4’ one octave above 2’ two octaves above 1’ three octaves above Fraction? It’s a “Mutation” stop. Mutation stops have fractions in their pitch designations. This means that their pitch falls somewhere other than on the octave. (Refer to the table below). 27 Mutation Common name Relationship to concert pitch 2-2/3’ Nazard one octave and a fifth above 1-3/5’ Tierce two octaves and a third above 1-1/3’ Larigot two octaves and a fifth above Mutations are most commonly from the flute family and are often used with other flute stops in registrations or ensembles for early organ music. Because mutations often appear in divisions with a number of other flute stops, a great diversity of solo color can be achieved by using various combinations of stops. See the following table for common solo registrations utilizing mutations. Common Registrations for a Solo Melody Using Flute Stops and Mutation Stops Flutes 8’ + 4’ + 2-2/3’ + 2’ + 1-3/5’ Flutes 8’ + 2-2/3’ + 1-3/5’ Flutes 8’ + 4’ + 2-2/3’ Flutes 8’ + 4’ + 2-2/3’ Flutes 8’ + 4’ + 2-2/3’ + 2’ Flutes 8’ + 4’ + 1-1/3’ Larger organs may have one or two mutation stops from the principal family. In most cases, these ranks are used to add color to the principal chorus. • Roman Numeral? It’s a “Mixture” stop. Mixture stops are easily identified because of a Roman numeral. Mixtures consist of multiple Principal ranks; the Roman numeral following the name denotes the number of ranks contained in the mixture. For example, a Mixture IV stop contains four ranks of Principal pipes. (A “rank” is a distinct set of pipes. Most stops consist of one rank of 61 pipes = one pipe per keyboard note. A four-rank mixture would have 4 pipes playing on each note.) Common mixture stop names include: Mixtur, Mixture Fourniture Plein Jeu • Cymbale Zimbel Scharf, Scharff Chorus Mixture Grave Mixture Rauschquint Grand Fourniture Harmonics Acuta Céleste stops Célestes are unique among organ stops in that they are intentionally tuned sharp or flat in relation to the rest of the instrument, thereby producing an undulating (or “wavy”) effect. Célestes are paired with a partner stop (often called a “unison”) which is similar in color to the céleste stop but is in tune with the balance of the organ. When the unison and céleste are drawn together, the tuning discrepancy between the two stops creates a beautiful undulating quality suitable for lush, romantic textures. Célestes are either from the string or flute family, with the latter usually being the quieter of the two. Some Céleste stops have a “II” (Roman 28 numeral) designating the unison and céleste stops are paired and are activated at the same time. Examples of céleste stops include: Flûte Céleste II Erzähler Céleste II Viole Céleste II Unda Maris II Gambe Céleste II Principal Céleste II Vox Céleste Schwebung Violoncello Céleste Dulciana Céleste II Dulcett III Muted Viols II TRY THIS: Listen to each stop on your organ individually. Hold a chord or a key and turn on and off each stop, one by one. Listen for its character (identify to which family it belongs); listen for its strength (loud/soft); listen for its pitch. Most importantly, learn and remember which stops are the softest and the loudest. ! • The “Amens/Alleluias” stop Depending on model, your Rodgers organ may contain a very unique stop called Amens/Alleluias. This stop is quite different from a regular organ stop. Unlike a pipe organ stop where all 61 keys play the same sound at a different pitch, this stop is comprised of four groups of recordings of a choir singing Amen or Alleluia chants. As a key is pressed, the choir is heard. This stop may be most useful for meditative improvisations. The improvisation could be as simple and elegant as playing middle C on the Chimes, then playing one of the Amen recordings (by depressing a C key). Or, the stop could be used more extensively in a more elaborate improvisation. The chart below shows the four groups of Amen or Alleluia recordings. If you play the “C” key as shown in the chart, you will hear the choir singing the Amen or Alleluia as shown in the bottom music staff. Each recording is grouped in a range of 12 notes, from G to F#. The Amen or Alleluia chant is heard in the corresponding key of the note you depress. Hold the note down until the sound finishes. You may be tempted to move your fingers to a different note as you hear changes in notes or harmonies on the recording. However, keep your finger depressed on that key to the end of the sound. Play only one key at a time. Amen (chant) Amen (major) As you hold this note, 3 A - men. A Alleluia (chant) you hear this: Amen (minor) - men. A - men. Al - le - lu - ia. 29 APPENDIX B – MENUS IN THE DISPLAY WINDOW • Depending on organ model, the console display window may appear as: Allegiant Organ series display Masterpiece Organ series display • Here’s how to adjust settings using the menus: 1. Press and release the QUICK MENU thumb piston to access a menu or submenu. (Menus are listed on the next page.) 2. Turn the Select Knob to select a menu item. 3. Press and release the QUICK MENU thumb piston to enter the item. 4. Rotate the Alpha Dial to change the item’s setting. Select Knob – (the smaller knob) selects (highlights) a menu item Masterpiece consoles Alpha Dial – (the larger dial) changes the selected item’s value On Allegiant models, the Select Knob and Alpha Dial appear as: Allegiant consoles Note: to return to the previous menu, press and release 0 (Cancel). To exit the menus and return to the Transposer 0 screen, press 0 repeatedly. The ` symbol denotes that pressing the QUICK MENU thumb piston will navigate to a sub-menu. 30 USB Memory ` This menu appears only if your USB memory drive is inserted. Menu item Value Explanation Folder a-z Use Alpha Dial to select Folder a-z Folder empty M: No memory levels have been saved to the USB drive 1-100 This indicates how many memory levels have been saved on the active folder This indicates if Tutti 1, Tutti2, Standard Crescendo, or Alternate Crescendo settings have been saved to the active folder. T1 T2 SC AC Record / Play ` Record a song, play back a song, save, name, rename, delete, and metronome functions. Detailed information is found in the Advanced Guide. Menu item Record ` Value Explanation o: Proceed Press the Record thumb piston 0: exit Press the Cancel piston to exit the recording function. The organ’s internal memory has no available song, and/or the USB drive is not inserted or it contains no songs. Displays song names saved to your USB device. Select songs via rotating the Alpha No songs available Play ` to proceed. (Refer to AG.) [Song name] Dial. Press Metronome ` Rename ` (If USB is not inserted): (depending on model) Chain Play ` to play (or pause) the song. Press to stop the song. Off, on, Use the Alpha Dial to select whether the metronome is heard all the time, only Setting while recording, or off. rec Use the Alpha Dial to select your desired tempo Tempo 10-500 2/2, 0/4, 2/4, 3/4, 4/4, 5/4, Use the Alpha Dial to select your desired meter Meter 6/4, 7/4, 3/8, 6/8, 9/8, 12/8 (USB drive must be Select file to rename; rename using the Alpha Dial to select characters and the Select Knob to advance the cursor to the next position. inserted) No files for playing. Canceling player. Rotate the Select knob to highlight the song name. Rotate the Alpha Dial to choose the desired song. Press to play. Continuous play Song name is displayed. or of all song files resident on the USB memory until pressed, or the organ is powered off. Song files will play in alphabetical order beginning with the selected song. Move to trash ` (USB drive must be inserted) Select file to move to the trash of the USB drive. Recover trash ` (USB drive must be inserted) Select the file to recover from the USB drive’s trash. Empty trash ` (USB drive must be inserted) Empty the trash of the USB drive. (If USB is inserted): is MIDI Couplers ` • • • Select and adjust sounds available from the “A” and “B” controls. Depending on model, the organ may have a library of ORCH internal sounds available MIDI sounds are available only if an external sound module is connected to the organ, i.e. the Rodgers MX-200. Menu item Value Coupler ` GTA, GTB, SWA, SWB, PDA, PDB 31 • This menu also appears if you hold SET and press one of the MIDI A/B pistons (or an ORCH/MIDI A/B tab): Menu item Tone ` Value Explanation [Sound name] Select by sound name PGM Program (Off, 1 128) MSB Most Significant Byte (Off, 0 127) LSB Least Significant Byte (Off, 0 127) MIDI channel Channel ` 1 16 Octave ` Velocity ` (only for orchestral sounds, not organ sounds) DN2, DN1, NORM, UP1, UP2 Ch 1: GT A (Ch 1 is standard but channels 1-16 can be selected on GT A only) Ch 2: SW A Ch 3: PD A Ch 4: CH A Ch 5: GT B Ch 6: SW B Ch 7: PD B Ch 8: CH B Ch 9: SO Select the octave shift of the sound Expr The expression shoe’s position will determine the velocity setting Kbd The keyboard’s velocity will be determined by the force of the finger on the key 1 127 The specified value will determine the velocity Pan ` -64 +63 Foot Switch ` Off, Sust, Sost, Soft Determines the sound’s stereo balance: -64 is extremely Left, +63 is extremely Right, 0 is center. Select the value for the Foot Switch located on the left side of the left-most expression shoe Reverb ` 0 127 Select the reverb depth for the sound Chorus ` 0 127 Select the chorusing (detuning) for the sound Expression ` Vol, Exp, Off Select the loudness of the sound, expressive by the division’s expression shoe. The setting of “Off” will make the sound a fixed volume (usually loud!) unexpressive. Volume ` 0 127 Select the volume of the sound Tone Names ` SC8820, PR300, MX200, GM, None Select the tone name library of the MIDI sound module 32 MIDI Settings ` Global MIDI settings which affect the entire instrument. Menu item Value Explanation Multitrack ` On, Off (Default setting is Off.) Master Channel ` Pedal Great Swell Choir Solo Off Send Recv Send/Recv Registrations ` Send Recv None Stops Pistons Stops/Pistons Send program change Bank Select ` Receive program change Seq Update ` On, Off (Default setting is On.) Local ` On, Off (Default setting is On.) Kbd Velocity ` Light, Normal, Heavy Device ID ` 1 32 Tone Names ` Metronome ` For advanced MIDI users, this allows the creation of a “multitrack” or layered sequence using an external MIDI sequencer and sound module. It optimizes the console for layering of MIDI instruments – no organ stop or piston data is recorded. The transmission of note and volume data on all Master Channels is disabled. MIDI Update is turned off. MIDI couplers do not send program changes when there is a MIDI Start command. (This menu appears only when Multitrack is Off.) This allows the organ stop data and from the selected divisions and note data played from the keyboards to be sent and/or received to/from the sequencer. Great Master Channel = 12 Swell Master Channel = 13 Pedal Master Channel = 14 Choir Master Channel = 15 Solo Master Channel = 16 System exclusive MIDI data sent/received to/from the device connected to the console’s SEQ IN and SEQ OUT MIDI ports: an external sequencer, or a separate Rodgers organ or a remote MIDI keyboard. If “Pistons” is selected, Program Changes are transmitted to communicate which pistons are engaged, not the status of individual stops and couplers. This is often useful when controlling the organ from a remote MIDI keyboard or another Rodgers organ. Caution: if “Stops/Pistons” is selected for both “Send” and “Recv”, confusing data messages may result in undesirable organ registrations. Default selections are Send: Stops, Recv: Stops/Pistons. Select “and mem. Level” if (a) you create a sequence in which you change Memory Levels during the sequence or Only / (b) you have another Rodgers organ or remote keyboard and mem. level connected AND your “Send” menu above is set to “Pistons;” the Memory Level number will be sent. Select “and mem. Level” if (a) you play back a sequence in which you changed Memory Levels during the Only / sequence or (b) you have another Rodgers organ or remote keyboard connected AND your “Recv” menu and mem. level above is set to “Pistons;” the Memory Level number will be received. For advanced MIDI users, when set to “Off” the organ does not respond to Start, Stop and Continue messages. For advanced MIDI users, when set to “Off” the stops and keying data are disconnected from the internal (“Local”) sounds of the organ. The organ still transmits MIDI data which can be sequenced or used to control a separate Rodgers organ. This feature can be used to silence the Master console when one Rodgers organ controls another Rodgers console. For MIDI sounds affected by velocity sensitivity, this determines the keyboard touch sensitivity of all manuals – how much pressure is needed to achieve a high velocity value. To save this value, hold SET and press 0 (Cancel) momentarily, then release both. A “MIDI Save” message will appear in the display. Default is 17. In most cases this should not be changed. When multiple consoles are controlled via MIDI, each can use a different ID number, thereby allowing independent control of each console’s registration. Note: the device ID reverts to 17 when the organ is powered off. SC8820, PR300, MX200, GM, None Select the tone name library of the MIDI sound module Affects only the active A or B MIDI coupler or all A/B couplers Per coupler, all couplers Off, on, Use the Alpha Dial to select whether the metronome is heard all the time, only Setting while recording, or off. rec Use the Alpha Dial to select your desired tempo Tempo 10-500 2/2, 0/4, 2/4, 3/4, 4/4, 5/4, 6/4, 7/4, 3/8, 6/8, 9/8, 12/8 Meter Use the Alpha Dial to select your desired meter 33 Audio Control ` Normally you do not need to make any changes to these audio menus. Menu item Master Volume ` Rotate the Select Knob Aux Inputs ` Value Explanation Change the volume of the entire organ. Caution: this value is set by your Rodgers technician. Changing this value to a higher number may result in distortion. Note: if the console has controls engraved MAIN OFF, ANT ON, ALT AUDIO A, or ALT AUDIO Off, -31.25 +6.25 B and they are active (illuminated), the Master Volume setting may change per active control. Changes the main volume of the device connected to the Aux Inputs Off, -31.25 of the console. Caution: this value is set by your Rodgers technician. Main Volume +6.25 Changing this value to a higher number may result in distortion. Determines the stereo balance. -10 is extremely left, 0 is center, +10 Main Balance -10 +10 is extremely right. If Antiphonal speakers are installed, this changes the antiphonal Off, -31.25 volume of the device connected to the Aux Inputs of the console. Ant Volume Caution: this value is set by your Rodgers technician. Changing this +6.25 value to a higher number may result in distortion. Determines the stereo balance. -10 is extremely left, 0 is center, +10 Ant Balance -10 +10 is extremely right. The treble EQ of the device connected to the Aux Inputs of the Treble -14 +14 console. The treble EQ of the device connected to the Aux Inputs of the Bass -14 +14 console. Changes the Ambience Level (sensitivity to the organ’s Room Off, -31.25 Modeling settings) of the device connected to the Aux Inputs of the Amb Lvl +6.25 console. Changes the Gain Boost of the device connected to the Aux Inputs of the console. Caution: this value is set by your Rodgers technician. Gain Boost 0 +18.5 Changing this value to a higher number may result in distortion. SW GT CH (FL) SO Send to ASN ANT AMB RVB Yes, No Yes, No Yes, No Yes, No Yes, No Yes, No Yes, No Yes, No Sends the audio of the Aux In device to the Swell speakers.* Sends the audio of the Aux In device to the Great speakers.* Sends the audio of the Aux In device to the Choir speakers.* Sends the audio of the Aux In device to the Solo speakers, if installed.* Sends the audio of the Aux In device to the Assignable speakers, if installed.* Sends the audio of the Aux In device to the Antiphonal speakers, if installed.* Sends the audio of the Aux In device to the Ambient speakers, if installed.* Sends the audio of the Aux In device to the Room Modeling parameter.* * Note: if the console has controls engraved MAIN OFF, ANT ON, ALT AUDIO A, or ALT AUDIO B and they are active (illuminated), this setting may change per active control. Line Out ` Gain Boost 0 +18.5 Affects the Line Out L/R audio signal Mode Stereo, Mono Affects the Line Out L/R audio signal 34 • If headphones are in use, the Audio Control menu appears as: Menu item Value Explanation Master Volume ` Off, -31.25 +6.25 Change the volume of the entire organ. Rotate the Select Knob Aux Inputs ` Main Volume Off, -31.25 +6.25 Main Balance -10 +10 Treble -14 +14 Bass -14 +14 Off, -31.25 +6.25 Amb Lvl Gain Boost • 0 18.5 The main volume of the device connected to the Aux Inputs of the console. The stereo balance of the device connected to the Aux Inputs of the console. -10 is extremely left, 0 is center, +10 is extremely right. The treble EQ of the device connected to the Aux Inputs of the console. The bass EQ of the device connected to the Aux Inputs of the console. The ambience level (sensitivity to the organ’s Room Modeling settings) of the device connected to the Aux Inputs of the console. The gain boost of the device connected to the Aux Inputs of the console. To save any headphone settings, hold SET and press 0 (Cancel) momentarily, then release both. An “Audio Save” message will appear in the display. 35 Pipe Modeling ` Settings that emulate pipe organ characteristics and temperaments. Menu item Temperament ` Value Explanation Historical styles of music such as baroque can be played in the tunings that were used during that time. Temperament selections cannot be saved into a General or Divisional piston. At the conclusion of a performance, pressing 0 (Cancel) will not return the temperament to default. To save any temperament settings as power-on default, hold SET and press 0 (Cancel) momentarily, then release both. A “User Settings Saved” message will appear in the display. The modern standard which divides the octave into 12 equal intervals, allowing performance in all keys successfully. Unlimited modulation from key to key is Equal possible. Each of the intervals of a fifth is slightly contracted to generate a major third. Major thirds and in-tune fifths are slightly narrow, and the differences between Mean-Tone the major and minor seconds are smoothed out. A system of tuning attributed to the philosopher Pythagoras, in which the fourth Pythagorean and fifth intervals are pure. Chords including the third will not sound smooth. Johann Philipp Kirnberger was a composer and a pupil of Bach. His temperament Kirnberger favored pure fifths but performance was improved in many keys. Werckmeister I Andreas Werckmeister further refined the Mean-Tone temperament. Werckmeister III Four tones are practically tuned identically to Equal temperament (C, D#, F# and A). Young I Young II Young temperaments offer further refinements to the Mean-Tone model, except with slightly higher pitched sharps. A part of Dimensional Sound Modeling, Rodgers’ exclusive Digital Dynamic Wind™ emulates the behavior of pipe organ wind regulating devices and the response of pipes to an unsteady wind supply. Each stop is programmed to respond to wind variations, just as in a pipe organ. Flexible Wind Supply ` Weak* Normal Varying degrees of “wind sag” or unsteadiness of the initial pitch. * Allegiant models have all 5 values. Strong* Fixed The minimum volume of each division when its Expression Shoe is closed can be adjusted to suit specific needs or personal tastes. As the thickness of pipe organ shutters increase, the volume of the division decreases when the shutters (Expression Shoe) are closed. Shutters ` PD, GT, SW, CH, SO, Loud reeds (Chamades, Tuba, Festival Trumpet, etc) pp, ppp, pppp, Unenclosed Although the tremulants are carefully factory-set and adjusted when the organ is voiced, each may be modified for rate and depth by the organist to meet a particular musical need or to suit an individual taste. Tremulants ` Depending on model: GT Main, GT Main II, GT Spare, GT Flute, GT Flute II SW Main, SW Main II, SW Vox, SW Tibia, SW Flute, SW Flute II CH Main, CH Main II, CH Tibia, CH Flute, CH Flute II SO Main, SO Main II, SO Tibia, SO Eng Horn, SO Flute, SO Flute II, GT ZIMB Trem Rate: 0 255 Trem Depth: 0 255 36 Voice Palette ` • • • • Selectable alternate voices greatly increase the tonal colors at your disposal. All Voice Palette stops are available for access. Stops with Voice Palette alternates (depending on model) are denoted with a dot (‘●’) engraved on the stop face for easy identification. Depending on model, two shortcuts are available to select a Voice Palette sound: 1. Turn on the stop and the display immediately shows the active Voice Palette selection, or 2. Hold SET and turn on the stop, then the display shows the active Voice Palette selection. Menu item Stop ` Value Explanation Select from list using the Alpha Dial. The voice may be played as it is selected. The selection may be saved to a General or Divisional piston for easy recall. However, Voice Palette selections listed on a particular stop are not simultaneously available, i.e. if a stop may list “Diapason 8, Principal 8, Prinzipal 8, Montre 8,” only one selection of the four is available at a time for that stop. Default Voice Palette selections are denoted with a ‘*’ in the display. Voice Palette selections may be set as default while the Voice Palette menu appears in the display by holding SET and pressing 0 (Cancel) momentarily. A “User Settings Saved” message will appear in the display. Room Modeling ` • • • • A component of Dimensional Sound Modeling, Rodgers Sound Modeling™ system allows you to specify the acoustic you desire. Room Modeling uses leading-edge technology to go beyond three-dimensional sound and create a sense of distance, shape and ambience to the organ sound in the room. You can preview the changes by playing the organ while adjusting the setting. The default settings will return when the organ is powered on. For a church installation, it is best not to save a new default selection which was set by the Rodgers technician at installation. Menu item Room Size ` Wall Type ` Ambience Level ` Value Room Stage Small Hall Medium Hall Small Church Medium Church Large Church Cathedral Drapery Carpet Acoustical Tile Wood Brick Plaster Concrete Marble Off, -26.25 +6.25 Explanation The size of the Room appropriately affects the sound of the ambience. The Wall Type appropriately affects the sound of the ambience. The amount of acoustic treatment heard in the room. Caution: dialing this to a high setting may cause distortion. Note: if the console has controls engraved MAIN OFF, ANT ON, ALT AUDIO A, or ALT AUDIO B and they are active (illuminated), this setting may change per active control. 37 Crescendo Sequence ` • • • • • Depending on model, the organ may have one or two Crescendo sequences, set by the Rodgers factory or by a Rodgers technician at installation. Either or both Crescendo sequences may be customized (changed) to suit your needs for musical performance. The customized Crescendo sequence(s) will be saved to the internal memory of the organ unless your USB drive is inserted, then it will save to active memory folder on the USB drive. The Crescendo sequence(s) are automatically locked when you exit the Crescendo Sequence menu. The second Crescendo sequence is engaged and available for customization if the thumb piston engraved ALT CRESC (or CRESC II or ORCH CRESC, depending on model) is active (illuminated). Menu item Value Explanation Crescendo Set ` Stage Lock Sequence ` Locked, Unlocked 1-63 Delete ` The process to set a Crescendo sequence. Refer to AG (Advanced Guide). Standard or Alternate Crescendo Push SET to delete. Reverts to factory Perform delete [no, yes] setting. Tutti Lock ` • • • • Depending on model, the organ may have one or two Tuttis (may be engraved FULL ORGAN, or SFZ depending on model), set by the Rodgers factory or by a Rodgers technician at installation. Either or both Tuttis may be customized (changed) to suit your needs for musical performance. The customized Tutti(s) will be saved to the internal memory of the organ unless your USB drive is inserted (then it will save to active memory folder on the USB drive). The Tutti(s) are automatically locked when you exit the Tutti Lock menu. Menu item Lock / Unlock ` Value Locked, Unlocked Tutti 1, 2, 3 Explanation Delete ` Perform delete [no, yes] Select which Tutti to lock/unlock Push SET to delete. Reverts to factory setting. Reset Tutti to the Factory settings: 1. Unlock memory 2. Press and hold [SET] 3. Press and release [0] 4. Release [SET] 5. Display indicates "Delete?" 6. Rotate alpha dial to select "YES" 7. Press [SET] 8. Restart the organ to verify the operation. 38 Console ` Access various console functions for adjustment. Menu item Value Explanation Lamp Level ` 1 16 Pedal to Great Piston Coupler ` Off, on A dimmer affecting the brightness of the music rack, pedal light, and (depending on model) stops and tabs, but not pistons. The value of “on” will couple the Great divisional pistons with the Pedal divisional pistons. This causes a Pedal divisional piston to activate when the same-numbered Great divisional piston is activated, and vice-versa. Locked A = 440 Master Tuning ` Manual only Adjustable Blinds ` Soloing Couplers ` blind, operate, visible Coupler Note Tuning is locked at standard concert pitch (A=440.0 Hz). Tuning is manually adjusted via the Alpha Dial. External MIDI devices (i.e. MX-200) do not receive the tuning data messages. Tuning is adjusted via the Alpha Dial or automatically adjusted via the Automatic Pipe Tuner (if it is installed in a pipe interface). External MIDI devices (i.e. MX-200) receive the tuning data messages. This control affects the Tutti(s) and Crescendo sequence(s), when operated. “Blind” is a pipe-organ term that means the stops and couplers do not light up (or move, if the console has mechanical controls) when a Tutti or Crescendo is engaged. “Visible” means the appropriate controls will light up (on lighted consoles only) when a Tutti or Crescendo is engaged. “Operate” means the appropriate controls will physically move and turn on (on moving drawknob consoles) when a Tutti or Crescendo is engaged. The organist can then “operate” or manually turn off any of the controls which were engaged from the Tutti or Crescendo. Caution: the “operate” mode will cause the currently active registration to immediately change to the registration of the Crescendo stages or the Tutti registration. Bass, Mel SW, Mel CH, Mel SO C13 C49 This programs the keyboard range of the coupler. Hour : Minute : Second : am/pm Sets the clock time. Sets the date. (This appears if USB is inserted): Year Month Day Country City 0 31 [name of folder] Trash ` All trash ` External Storage ` Erase other ` Set Clock ` Time Zone ` Set Contrast ` Sets the appropriate time zone for the locale. The time will automatically change at the seasonal shift to Standard Time or Daylight Savings Time. Adjusts the contrast level of the display window. Follow prompts in display window Format (all) ` 39 (This appears if USB is not inserted): unlocked SET Memory to Seq Rotate the Alpha Dial to select the desired memory level. Rotate the Select Knob clockwise to select [unlocked]. Rotate the Alpha Dial to change the value to [locked]. Press SET to send this Memory Bank data to an external sequencer connected to the organ. Copy ` From 1 to 0 (Folder int.) (int.) Press SET+0 to copy Restore ` 1 1 (folder internal) Memory Banks ` Rotate Alpha Dial to select memory level. Restore memory? No SET to Restore. Rotate Alpha Dial to select memory level. Rotate Select Knob to highlight [No]. Rotate Alpha Dial to change value to [Yes] (This appears if USB is inserted): 1 (folder a) unlocked SET Memory to Seq Copy ` Delete ` The currently active folder on the USB memory is shown. Rotate the Alpha Dial to select the desired memory level. Rotate the Select Knob clockwise to select [unlocked]. Rotate the Alpha Dial to change the value to [locked]. Press SET to send this Memory Bank data to an external sequencer connected to the organ. From 1 to 0 (Folder A) (int.) Rotate Alpha Dial to select memory level. Press SET+0 to copy Rotate Alpha Dial to select memory level. 1 Delete memory? No Rotate Select Knob to highlight [No]. SET to Delete. Rotate Alpha Dial to change value to [Yes] MIDI Demo ` This accesses the built-in demo songs, depending on model. A shortcut to this menu is to hold 0 (Cancel) and press QUICK MENU, then release both pistons. [song name] SET to load SET: start or pause 0: stop or end Rotate the Select Knob to access these menus: Volume Tempo Room Size Wall Type Ambience Level Changes the volume for this demo song Changes the tempo of this demo song Changes the Ambience parameter for this demo song 40 APPENDIX C – ABOUT THE PERFORMANCE TOUCH KEYBOARDS For generations, organ key tops were made from the best materials – ivory (for white keys) and ebony (for black keys). The Performance Touch keyboards use the latest technologies to reproduce the touch and feel of these materials. ● Surfaces incorporate stripes of moisture-absorbing material for improved touch and playability. ● Keys feature a subtle gloss and understated coloring, enhancing the look and elegance. ● White keys are finished with a slight yellowish tinge for the look of real ivory. Note: — To Ensure Usage in Optimal Conditions — Handling… ● Do not write on the keyboard with any pen or other implement, and do not stamp or place any marking on the instrument. Ink will seep into the surface lines and become unremovable. ● Do not affix stickers on the keyboard. You may be unable to remove stickers that use strong adhesives, and the adhesive may cause discoloration. Care and Maintenance… Please note the following points. Failure to do so may result in scratches on the surface finish, damaged gloss, or other discoloration or deformation. ● Gently wipe dirt and grime with soft cloth; do not rub the surfaces forcefully. ● To remove more serious grime, use a commercial keyboard cleaner not containing abrasives. ● Do not use benzene, paint thinner, or alcohol on the keys. 41 LIMITED WARRANTY Online warranty registration is available at www.rodgersinstruments.com/warranty Rodgers Instruments Corporation Musical Instrument, Speaker and Amplifier Parts Warranty Rodgers Instruments Corporation warrants only to the original Purchaser of this product that all the parts contained in this product will be free from defects in materials and/or workmanship for a period of ten (10) years from the date of purchase. Any repaired or replaced parts in your product will be warranted for the unexpired portion of this parts warranty. All transportation and freight charges shall be paid by Purchaser. Rodgers Instruments Corporation is not responsible for any labor for this product. Conditions, Limitations and Restrictions of this Warranty The Warranty for this product does not apply to the following: A. Any product that was not purchased directly from an Authorized Rodgers Dealer; B. Any defects or damage that occurred as a result of abuse or misuse, neglect or abnormal service or handling; C. Any defects or damage that was caused by installation, repairs or service, including the use of improper parts, provided or attempted by anyone who is not authorized by Rodgers Instruments Corporation; D. Any defects or damage that may have been caused, either directly or indirectly, by the use of another product; E. Any defects or damage that occurred because the product has been altered or modified in any way; F. Any defects or damages which may have been caused by an Act of God, such as fire, flood, earthquake, lightning, rain, wind, hurricane, etc., which are beyond the control of Rodgers Instruments Corporation; G. Any defects or damages which may have occurred by ordinary wear and tear; H. Any and all accessories, peripheral products or other equipment. I. Any defects or damage that resulted from commercial use of the product. IN NO EVENT SHALL RODGERS INSTRUMENTS CORPORATION BE LIABLE FOR ANY DIRECT, INCIDENTAL, COLLATERAL, EXEMPLARY, PUNITIVE, CONSEQUENTIAL OR SPECIAL DAMAGES OR LOSSES ARISING OUT OF YOUR PURCHASE OF THIS PRODUCT AND/OR OUT OF THIS WARRANTY, INCLUDING WITHOUT LIMITATION, LOSS OF USE, PROFITS, GOODWILL OR SAVINGS OR LOSS OF DATA, MUSIC, ELECTRONIC FILES, OR PROGRAMS THAT MAY HAVE BEEN STORED BY A USER OF THIS PRODUCT EVEN IF RODGERS INSTRUMENTS CORPORATION HAS BEEN ADVISED OF THE POSSIBILITY OF SUCH DAMAGES OR CLAIMS. SOME STATES DO NOT ALLOW THE EXCLUSION OR LIMITATION OF INCIDENTAL, PUNITIVE OR CONSEQUENTIAL DAMAGES, SO THE ABOVE LIMITATION OR EXCLUSION MAY NOT APPLY TO YOU. Where applicable, if you qualify as a “consumer” under the Magnuson-Moss Warranty Act, then you shall be entitled to any implied warranties allowed by law for the period of the Limited Warranty as set forth above. Some states do not allow limitations on how long an implied warranty lasts, so the above limitation may not apply to you. EXCEPT AS STATED ABOVE, THE FOREGOING WARRANTIES ARE IN LIEU OF ALL OTHER CONDITIONS OR WARRANTIES, EXPRESS, IMPLIED OR STATUTORY INCLUDING WITHOUT LIMITATION, AN IMPLIED CONDITION OR WARRANTY OF MERCHANTABILITY OR FITNESS FOR A PARTICULAR PURPOSE AND OF ANY OTHER WARRANTY OBLIGATION ON THE PART OF RODGERS INSTRUMENTS CORPORATION. RODGERS INSTRUMENTS CORPORATION DOES NOT ASSUME OR AUTHORIZE ASSUMPTION OF LIABILITY FOR IT OR ANY OTHER WARRANTY, EITHER EXPRESS OR IMPLIED. THIS LIMITED WARRANTY GIVES U.S. PURCHASERS SPECIFIC LEGAL RIGHTS AND YOU MAY ALSO HAVE OTHER RIGHTS WHICH VARY FROM STATE TO STATE. 42 INDEX Activate a Stop, 13 All Swells, 17 Alpha Dial, 15, 20, 21, 22, 23, 30, 31, 33, 37 Alternate Crescendo, 19, 31, 38 Ambience Level, 34, 37, 40 Amens/Alleluias” Stop, 29 Aux Inputs, 34, 35 Bass Coupler, 18, 19 Care and Maintenance, 41 Céleste Stops, 28 Changing the Time, 20 Choral, 26, 27 Combination Pistons, 17, 18, 19 Concert Pitch, 14, 27 Console Clock, 20 Console Display, 19, 20, 24 Console Display Window, 30 Console Functions, 19, 39 Console Menus, 19 Copyright, 9 Couplers, 13, 14, 15, 18, 31, 39 Crescendo Sequences, 38 Crescendo Shoe, 24 Dimensional Sound Modeling, 10 Divisional Cancel piston, 17 Divisional Pistons, 16 Expression Shoes, 24 Factory Settings, 23 FCC Notice, 6 Festival Trumpet Enclosed, 18 Flutes, 26, 28 General Cancel Piston, 13, 16 General Pistons, 16 Great Manual, 12, 15 Handling, 41 Headphone Settings, 35 Improvisation, 29 Radio and TV Interference, 6 Intermanual Coupler, 14 Intramanual Couplers, 14 Keyboards, 12, 33 Limited Warranty, 42 Line Out, 34 Locking a Combination Memory, 21 Mains Power Switch, 5 Master Volume, 34, 35 Meditative Improvisations, 29 Melody Couplers, 18 Memory Banks, 40 Memory Levels, 17, 21, 31, 33 Metronome, 31, 33 MIDI, 15, 16, 18, 19, 31, 32, 33, 39, 40 MIDI Settings, 19 Mixture Stops, 28 Modifying Features, 20 Mutation Stops, 27 ORCH Piston, 15 Orchestral, 26, 27 Orchestral Crescendo, 19 Parts Warranty, 42 Pedal Division, 12, 19 Pedal Divisional, 16, 39 Pedalboard, 12, 14, 19 Percussion, 27 Performance Touch Keyboards, 41 Pipe Organ Characteristics, 36 Pipes, 10 Pistons, 15, 16, 33 Pitch, 13, 14, 15, 24, 25, 27, 28, 29, 36, 39 Pitch Designation, 14, 27 Play Back a Song, 31 Power On, 12 Principals, 26 Quick Menu, 15, 20, 21, 22, 30, 40 Record a Song, 31 Reeds, 18, 26 Registrations, 14, 16, 17, 18, 25, 26, 28, 33 Restoring Factory Combination Settings, 23 Reversible Pistons, 24 Reversibles, 24 Room Size, 37, 40 Safety, 2, 5 43 Select Knob, 19, 20, 21, 22, 23, 25, 31 Set a Piston, 16 SET Piston, 15, 16 Sound Modeling, 9, 10, 19, 36, 37 Standard Crescendo, 19 Stops, 12, 13, 24, 27, 28, 33, 37 Strings, 26, 27 Sub Couplers, 14 Super Couplers, 14 Swell Manual, 12, 15 Swell to Swell, 14 Temperament, 36 Toe Pistons, 24 Transposer, 19, 24 Tremulants, 13, 25, 36 Tutti, 18, 31, 38, 39 Unenclosed, 18 Unison Off, 15 Unlocking a Combination Memory, 22 USB Data Port, 17 USB Memory Drive, 31 Voice Palette, 9, 10, 13, 19, 37 Wall Type, 37, 40 Zimbelstern, 19, 27 44 P/N 1905870B 45