1
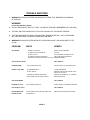
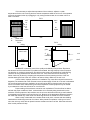
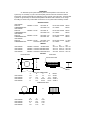
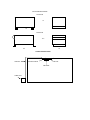
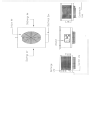
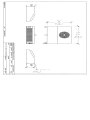
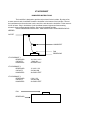
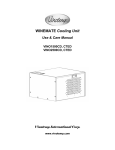
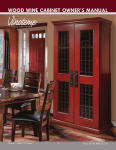
VINOTEMP
INTERNATIONAL
17631 SOUTH SUSANA ROAD
RANCHO DOMINGUEZ,CA 90221
(800)777.8466 FAX (310)886-3310
WINEMATE COOLING SYSTEMS
DIGITAL DISPLAY INSTRUCTIONS
WARNING:
PLEASE DO NOT PLAY WITH THE DIGITAL DISPLAY
DO NOT PRESS ANY BUTTON FOR MORE THAN 60 SECONDS, IT WILL SHUT DOWN THE
UNIT OR GO INTO SLEEP MODE.
1
The green LED indicates the
compressor is on and running
2
Alarm signal: Indicates the alarm is on
3
Defrost in progress:LED will light when
unit is in defrost mode
4
Digital Display:LED will display the
tempature .
Codes will display on when pressed
5
LED button is to modify the tempatures
or activates/deactivates continuous cycle
Moves from one parameter to the next
Increases the value of the parameter
6
Set Point:
Silence the alarm
You will access the menu (if pressed for more than five seconds)
Blinking indicates that controller is waiting for a time delay to expired
7
LED button is to modify the tempatures
Moves from one parameter to the next
Decreases the value of the parameter
DURING NORMAL WORKING CONDITIONS,THE DISPLAY SHOWS THE VALUE MEASURED
BY THE AIR.IN CASEOF AN ACTIVE ALARM, THE TEMPERATURE FLASHES
ALTERNATELY TO THE CODE.
PAGE 1
DEACTIVATE THE ALARM
Pressing the
button silences the buzzer and de-energizes the relay, while the alarm code
and the red
LED go off only when the cause of the alarm no longer exist.
The alarm codes are shown below:
ALARMS AND SIGNALS
E0
E1
IA
EE
d8
HI
ERROR- PLEASE CALL or EMAIL VINOTEMP
ERROR- PLEASE CALL or EMAIL VINOTEMP
ERROR- PLEASE CALL or EMAIL VINOTEMP
ERROR- PLEASE CALL or EMAIL VINOTEMP
Alarm bypass time after defrost/door open
FLASHING -HIGH TEMPERATURE ALARM -The unit has read high tempature which is higher than the set point.
The alarm will automatically reset when the tempature returns within the set limit
LO
FLASHING- LOW TEMPERATURE ALARM- The unit has read a low tempature which is lower than the set point
The alarm will automatically reset when the tempature returns within the set limit
SETTING THE SET POINT
1
Press the
button for one second to display the set-point value
2
After a few seconds , the set value blinks
3
Press up
or down
4
Press the
once/ more to confirm the new value
to increase or decrease the set point value
MAIN SINALS
dF - Defrost in progress
This is not a alarm signal, but rather an indication that the unit is in defrost mode
It will go into defrost mode every day for half an hour
Manual Defrost
Besides the automatic defrost, it is possible to activate a manual defrost by pressing
button for more than 5 seconds .
ps - Indicates the password
PAGE 2
TROUBLE SHOOTING
1
WINEMATE COOLING SYSTEMS ARE SEALED SYSTEMS THAT REQUIREDS A MINIMUM
OF SERVICE.
WARNING:
UNPLUG UNIT BEFORE CLEANING
2
CLEAN THE EXHAUST GRILL AT LEAST 3-4 TIMES A YEAR.(RECOMMENDED WITH VACUUM)
3
THE UNIT MAY RUN CONSTANTLY OR CYCLE ON AND OFF FOR SHORT PERIODS.
4
THE TIME REQUIRED TO REACH THE DESIRED TEMPERATURE WILL VARY, DEPENDING
ON THE ENCLOSURE CONSTRUCTIONS AND CONTENTS.
5
WINEMATE COOLING SYSTEM ARE NOT FOR USE BELOW 50F. AND WORK BEST AT 55F
TO 60F
PROBLEM
NOT RUNING
CHECK
REMEDY
POWER TO OUTLET
RESET CIRCUIT BREAKER
IS WINE CELLAR PLUGGED IN
PLUG IN
IS UNIT PLUG IN
PLUG IN INSIDE OF WINE CELLAR
IS THERE DF DISPLAY ON DIGITAL
UNIT IN DEFROST 30 MIN MAX
CHECK FOR 15 MIN.& SEE IF UNIT ITS CYCLE WORKING NORMAL
STILL DOES NOT START
CALL SERVICE
RUNNING WARM
UNIT TURNS ON ON OFF
ADJUST DIGITAL TO COLDER STTING
RUNS ALL THE TIME
IS CONDESOR DIRTY
CLEAN CONDENSOR
IS UNIT ICED UP
DEFROST AND CHECK FOR AIR FLOW
OR ITS SET TO COLD
PROPER CLEARANCE FROM WALL
EXHAUST 6" FROM WALL ALL AROUND
CHECK WINE CELLAR FOR AIR LEAKS
REPAIR AIR LEAKS
STILL RUNS WARM
RUNNING TO COLD
CALL SERVICE
UNIT TURNS ON AND OFF
STILL RUNS TO COLD
ADJUST DIGITAL TO WARMER SETTING
CALL SERVICE
EXCESS MOISTURE
CHECK WINE CELLAR FOR AIR LEAKS AND
IN WINE CELLAR
DOORS SEALS
PAGE 3
REPAIR AIR LEAKS OR SEAL DOORS
WINEMATE
WWW.WINE-MATE.COM
VINO-CD MODEL COOLING UNITS
INSTALLATION INSTRUCTIONS
WINEMATE cooling units are designed to, when installed in a properly constructed
cabinet or closet, provide a constant, selectable, temperature between 52-62F while maintaining
55-70% humidity. Products requiring these storage conditions include wine, furs, pastries,
tobacco, chocolates and documents. WINEMATE cooling units are not intended to cool service
cabinets which are maintained at lower temperatures and are opened frequently.
Before installing the unit in the enclosure, place it on a table and plug it into a properly
grounded outlet. The thermostat has no off position, therefor it will run as soon as it is plugged in.
allow it to run for approximately 15 minutes. There should be a flow of cool air from the bottom
opening and warm air from the back. If you have any problems contact your dealer.
If your installation cannot be performed in accordance with these instructions contact
your dealer. WINEMATE cooling units are not designed to have duct systems on ether the exhaust
or cold sides. Do not drill any holes into the cooling unit, it may damage the unit and will void the
warranty.
INSTALLATION
Select a place to mount the unit where the exhaust air flow is unobstructed for a minimum
of 3 feet. The area into which the unit exhausts must be well ventilated. If it is not heat exhausted by
the unit will build up and the unit will not operate properly. Additionally, cold air from the bottom
opening must remain unobstructed. The unit must be mounted near the ceiling and as close to
equal distance from each end of the wall as possible.
Make a hole in the wall as illustrated in fig. 2. The dimensions of the hole should be
1/4 inch larger than the width and height of the unit. Construct a shelf as shown in fig. 3. This
shelf must be capable of supporting the weight of the unit. Cut a 4 inch wide by 7 inch long hole
for the cool air outlet. Place the unit on the shelf with the exhausted flush with the outside of the
wall. Attach the exhaust grille to the wall with screws. Seal the opening with high quality weather
stripping and cover with appropriate molding. Attach the molding to the wall not the unit.
Plug the unit into a properly grounded outlet of adequate capacity.
Because of potential safety hazards under a certain condition we strongly recommend
against the use of an extension cord. However, if you still elect to use an extension cord, it is
absolutely necessary that it is a UL LISTED 3-wire grounding type appliance extension cord
having a 3-blade grounding plug and a 3-slot receptacle that will plug into the appliance. The
marked rating of the extension cord should be 115v, 15a. Or equivalent.
SPECIFICATIONS
CAPACITY BTUH
DIMENSIONS IN.
ELECTRICAL
WEIGHT
WINEMATE
VINO-1500CD
1500 BUTH
18 X 10.5 X 16.5
115V 60HZ 1PH 4A 50 LBS.
2500 BTUH
18 X 10.5 X 16.5
115V 60HZ 1PH 5A 55 LBS.
VINO-2500CD
19.875 X 12.5
GRILL
On initial start-up the unit will reduce the temperature of the enclosure slowly. The
unit may run constantly or cycle on and off for short periods. The time required to reach the desired
temperature will vary, depending on the enclosure construction and contents. The thermostat is set
for approximately 55f . Unless the temperature falls below that which is desired, do not change the
thermostat for at least 3 days. After initial cool down, the on-off cycle should be relatively constant.
The percentage of off time will depend on enclosure construction, contents and surrounding
temperature.
FIG 1
left side
back
front
thermostat
exhaust
fresh air
in
FIG 2
exhaust
cool air
3 brackets here
cool air
out
cool air
in
FIG 3
ceiling of cabinet
thermostat
outside
grille
inside of cabinet
4-6"
clearance
from the
wall
bracket
inside of cabinet
WINEMATE is extremely proud of the quality and reliability of its products. Experience
has shown that of the small number of problems encountered, the large majority is due to improper
unit selection or enclosure construction. Should the cooling system be suspected of malfunctioning,
check the air being exhausted from the back of the unit. If it is warm then the unit is working. A
further check may be done by comparing the temperature of the air entering the front of the unit
with that leaving the bottom of the unit. If there is at least a 10 deg. difference, the unit is ok.
In some cases, improper placement or installation may cause the units performance to be
degraded. The exhaust side of the unit must have a constant supply of fresh air. If the unit is exhausted
into a confined space with poor ventilation, the unit will not be able to reject the heat it is removing
from the enclosure and a malfunctioning unit will be suspected. Similar symptoms may be caused
by an obstruction to the free air flow into or out of the unit.
Proper sealing of the enclosure cannot be over emphasized. The unit will not be able to
maintain the proper conditions if fresh, moisture laden air is constantly being introduced in to the
enclosure. Some symptoms of this condition are, the unit runs all the time with only a small reduction
in temperature and or water over flows from the unit. Because of the temperature difference between
the inside and outside very small cracks can allow large amounts of outside air into the enclosure.
Often a newly constructed room contains fresh wood, paint, concrete and other building
materials that contain large amounts of moisture. When placed into operation in this type of enviroment, the unit may not be able to reject this excess moisture and can over flow. When the enclosure
dries out this problem will stop.
WINEMATE
WWW.WINE-MATE.COM
LIMITED WARRANTY
C AND HZ MODEL UNITS
WINEMATE warrants its products to be free from defects due to workmanship or materials
under normal use and service, for twelve months after the initial sale. If the product is defective due
to workmanship or materials, is removed within twelve (12) months of the initial sale and is returned
to WINEMATE, in the original shipping carton, shipping prepaid, WINEMATE will at its option,
repair or replace the product free of charge. Additionally WINEMATE warrants all parts to be
free from defects for a period of sixty (60) months after initial sale.
This warranty constitutes the entire warranty of the WINEMATE COMPANY with respect
to its products and is in lieu of all other warranties, express or implied, including any of fitness for
a particular purpose. In no event shall WINEMATE COMPANY be responsible for any consequential
damages what so ever. Any modification or unauthorized repair of WINEMATE products shall void
this warranty.
SERVICE UNDER WARRANTY
This service is provided to customers within the continental UNITED STATES only.
WINEMATE cooling units are warranted to produce the stated number of BTUH. While
every effort has been made to provide accurate guidelines, WINEMATE can not warranty its units
to cool a particular enclosure.
In case of failure, WINEMATE cooling units must be repaired by the factory or its
authorized agent. Repairs or modifications made by anyone else will void the warranty.
Should a WINEMATE cooling unit fail, contact the dealer for instructions. Do not return
the unit to the factory without authorization from WINEMATE. If the unit requires repair, re-pack it in
the original shipping carton and return it to the factory, shipping prepaid. WINEMATE will not accept
COD shipments. If the unit is determined to be faulty and is within the twelve (12) month warranty
period, WINEMATE will, at its discretion, repair or replace the unit and return it free of charge to the
original retail customer. Additionally WINEMATE will, at standard shipping rates, reimburse the
cost of returning the unit to the factory. If the unit is found to be in good working order, or beyond the
initial twelve (12) month period, it will be returned freight collect.
Purchaser understands and acknowledges that the goods sold here are wine cellars, cigar
humidors, and/or other similar units which house wine or cigars. Purchaser assumes all risk of using
these units, including risk of spoilage, humidity variations, temperature variations, leaks, fire, water
damage, mold, mildew, dryness and similar and any other perils that might occur.
LIMITATION OF IMPLIED WARRANTY
WINEMATE'S SOLE LIABILITY FOR ANY DEFECTIVE PRODUCT IS LIMITED TO,
AT OUR OPTION, THE REPAIR OR REPLACEMENT OF UNIT.
WINEMATE SHALL NOT BE LIABLE FOR:
DAMAGE TO OTHER PROPERTY CAUSED BY ANY DEFECTS IN THE UNIT,
DAMAGES BASED UPON INCONVENIENCE, LOSS OF USE OF THE UNIT, LOSS OF
TIME OR COMMERCIAL LOSS.
ANY OUTER DAMAGES, WHETHER INCIDENTAL, CONSEQUENTIAL OR OTHERWISE.
THIS WARRANTY IS EXCLUSIVE AND IS IN LIEU OF ALL OTHER WARRANTIES,
EXPRESSED OR IMPLIED, INCLUDING BUT NOT LIMITED TO, IMPLIED WARRANTIES OF
MERCHANTABILITY OR FITNESS FOR A PARTICULAR PURPOSE.
While great effort has been made to provide accurate guidelines WINEMATE cannot
warrant its units to properly cool a particular enclosure. Customers are cautioned that enclosure
construction, unit location and many other factors can affect the operation and performance of
the unit. There for suitability of the unit for a specific enclosure or application must be determined by
the customer and cannot be warranted by WINEMATE.
VINOTEMP
WWW.VINOTEMP.COM
INSTRUCTIONS FOR WINE CELLAR INSTALLATION
Check shipping carton for any exterior damage before acceptance. Note any damage on
the shipping document before signing. The trucking company's insurance covers damage by them.
Remove shipping carton and packing material (except pallet). Open the door and remove
the plastic bag containing the casters/levelers. Tilt the cellar toward the back slightly and screw the
front casters all the way in, then tilt the cellar toward the front and screw the back casters all the way
in.
Remove the wooden pallet used for shipping (we recommend this be done with two
people). If needed, adjust cellar by screwing casters back out as necessary to align the doors.
Move the cellar to the desired location. Leave at least 6" between the back of the
cellar and the wall. 3" for top exhaust units. These wine cellars are free standing units
and are not designed to be built in. The cellar is ready to plug into a 115v grounded outlet. We
recommend a dedicated circuit but it is not essential. Extension cords are not recommended.
After plugging cellar in, open door to make sure the cooling unit is working. The
cooling unit may not start if the room is below 65F. The duration of on and off periods will vary by
the temperature and conditions of your environment . If you have any problems see the TROUBLE
SHOOTING CHART. IMPORTANT! do not attempt to open the cooling unit, any tampering
with the cooling unit will void the warranty.
The cooling unit is factory set for approximately 55F. The recommended aging temperature
for both red and white wine is 53-57F. Close the door and allow the unit to run for 24 hours. If the
temperature is too cold, turn the adjusting screw counter clock wise to make the unit warmer. If
the temperature is too warm turn the screw clock wise to make it cooler. Make very small adjustments.
Allow several hours for the unit to adapt after making a adjustment. DO NOT TURN UNIT ALL THE
WAY TO THE COLDEST POSITION, AS THIS WILL CAUSE THE UNIT TO ICE UP AND STOP
COOLING.
WINEMATE cooling units use the latest technology, which provides the maximum
efficiency of cooling unit operation. WINEMATE units also use ENVIRONMENTALLY SAFE R134A.
LOADING; The wine cellar works most efficiently when loaded to capacity. The bottles
act as a thermal mass, which stabilizes the temperature. To minimize handling and movement,
we recommend you keep your most valuable wines in the double depth locations (close to the
back wall). Begin loading your wines into the cellar starting from the bottom and moving up. The
stacking space above the rack is for additional wine storage plus odd and large size bottles. do not
place any bottles directly under the cold airflow from the cooling unit. As this could cause the unit
to ice up.
VINOTEMP INTERNATIONAL
P.O. BOX 6107
COMPTON CA, 90221
PHONE; (310) 886-3332
FAX; (310) 886-3310
WINEMATE
WWW.WINE-MATE.COM
VINO1500 - 4500 HZD MODEL COOLING UNITS
INSTALLATION INSTRUCTIONS
WINEMATE cooling units are designed to, when installed in a properly constructed
enclosure or closet, provide a constant, selectable, temperature between 52-62F while maintaining
55-70% humidity. Products requiring these storage conditions include wine, furs, pastries,
tobacco, chocolates and documents. WINEMATE cooling units are not intended to cool service
cabinets which are maintained at lower temperatures and are opened frequently.
Before installing the unit in the enclosure, place it on a table and plug it into a properly
grounded outlet. The thermostat has no off position, therefor it will run as soon as it is plugged in.
allow it to run for approximately 15 minutes. There should be a flow of cool air from the front
opening and warm air from the back.
any problems contact your dealer.
If your installation cannot be performed in accordance with these instructions contact
your dealer. WINEMATE cooling units are not designed to have duct systems on ether the exhaust
or cold sides. Do not drill any holes into the cooling unit, it may damage the unit and will void the
warranty.
INSTALLATION
Select a place to mount the unit where the exhaust air flow is unobstructed for a minimum
of 3 feet. The area into which the unit exhausts must be well ventilated. If it is not heat exhausted by
the unit it will build up and the unit will not operate properly. Additionally, cold air from the front
opening must remain unobstructed. The unit should be mounted near the ceiling and as close to
equal distance from each end of the wall as possible.
Make a hole in the wall as illustrated in fig. 2. The dimensions of the hole should be
1/4 inch larger than the width and height of the unit. Construct a shelf as shown in fig. 3. The
shelf must be capable of supporting the weight of the unit. Place the unit on the shelf with the back of
unit flush with the outside of the wall. Attach the grille to the outside wall with screws. Seal the inside
with a high quality weather stripping and cover with molding. Attach the molding to the wall not the
unit. Plug the unit into a properly grounded outlet of adequate capacity.
Because of potential safety hazards under a certain condition we strongly recommend
against the use of an extension cord. However, if you still elect to use an extension cord, it is
absolutely necessary that it is a UL LISTED 3-wire grounding type appliance extension cord
having a 3-blade grounding plug and a 3-slot receptacle that will plug into the appliance. The
marked rating of the extension cord should be 115v, 15a. Or equivalent.
WINEMATE
VINO-1500 HZD
VINO-2500 HZD
VINO-3500 HZD
VINO-4500HZD
GRILL
GRILL
CAPACITY BTUH
1500 BTU
2500 BTU
3500 BTU
4500 BTU
15-2500 HZ
35-4500 HZ
SPECIFICATIONS
DIMENSIONS IN.
14.25 X13.25 X 16
14.25 X13.25 X 16
14.25 X 19.75 X 21.25
14.25 X 19.75 X 21.25
15.625 X 14.625
16.375 X 21.25
ELECTRICAL
115V 60HZ 1PH 4A
115V 60HZ 1PH 5A
115V 60HZ 1PH 6A
115V 60HZ 1PH 8A
WEIGHT
50 LBS.
55 LBS.
90 LBS.
90 LBS.
OPERATION
On initial start-up the unit will reduce the temperature of the enclosure slowly. The
unit may run constantly or cycle on and off for short periods. The time required to reach the desired
temperature will vary, depending on the enclosure construction and contents. The thermostat is set
for approximately 55f . Unless the temperature falls below that which is desired, do not change the
thermostat for at least 3 days. After initial cool down, the on-off cycle should be relatively constant.
The percentage of off time will depend on enclosure construction, contents and surrounding
temperature.
If it is necessary to adjust the temperature of the enclosure, adjust to a colder
temperature wile the unit is running and to a warmer temperature while the unit is off. If the operation
of the unit is stopped, ether by unplugging it or by turning the thermostat, do not restart unit for at
least 10 minutes.
FIG 1
cool
warm
air
air
A
B
air
air
intake
intake
A
B
front
power cord
thermostat
FIG 2
ceiling
studs
side
back
outside
FIG 3
ceiling
studs
inside
grille
hole in wall
3'
clearance
shelf
wall
studs
studs
WINEMATE is extremely proud of the quality and reliability of its products. Experience
has shown that of the small number of problems encountered, the large majority is due to improper
unit selection or enclosure construction. Should the cooling system be suspected of malfunctioning,
check the air being exhausted from the back of the unit. If it is warm then the unit is working. A
further check may be done by comparing the temperature of the air entering the front of the unit
with that leaving the front of the unit. If there is at least a 10 deg. difference, the unit is ok.
In some cases, improper placement or installation may cause the units performance to be
degraded. The exhaust side of the unit must have a constant supply of fresh air. If the unit is exhausted
into a confined space with poor ventilation, the unit will not be able to reject the heat it is removing
from the enclosure and a malfunctioning unit will be suspected. Similar symptoms may be caused
by an obstruction to the free air flow into or out of the unit.
Proper sealing of the enclosure cannot be over emphasized. The unit will not be able to
maintain the proper conditions if fresh, moisture laden air is constantly being introduced in to the
enclosure. Some symptoms of this condition are, the unit runs all the time with only a small reduction
in temperature and or water over flows from the unit. Because of the temperature difference between
the inside and outside very small cracks can allow large amounts of outside air into the enclosure.
Often a newly constructed room contains fresh wood, paint, concrete and other building
materials that contain large amounts of moisture. When placed into operation in this type of enviroment, the unit may not be able to reject this excess moisture and can over flow. When the enclosure
dries out this problem will stop.
unit
shelf
WINEMATE
WWW.WINE-MATE.COMM
SPLIT SYSTEM
VINO-2500SS- V8500SS
INSTALLATION INSTRUCTIONS
Thank you for choosing WINEMATE for your cooling needs. Our cooling systems are
designed to give years of trouble-free service, When properly installed. All WINEMATE cooling
systems use ENVIRONMENTALLY FRIENDLY R134A.
WINEMATE cooling systems will provide a constant cooling temperature between 50f
and 62f wile reducing excess moisture when installed in a properly constructed enclosure.
The system does not add moisture, and the system does not include heating.
Please take time to thoroughly read the instructions before installing the cooling system.
WARNING
Federal law requires that WINEMATE split cooling systems be installed by a EPA
certified refrigeration technician.
NOTE
Before removing the cooling system from the box, inspect for damage which might have
occurred during shipping. If any damage is found, notify the shipper immediately and file a claim.
INSTALLATION
WINEMATE split systems are shipped as components and are ready for use only
after a certified refrigeration technician has properly installed and tested the system. Proper
installation is critical. WINEMATE can only warrant the quality of the components.
The installation and proper operation of the system must be warranted by the installer.
Installation of the system must be done in accordance with all state and local building
codes. If your installation cannot be performed in accordance with these instructions contact your
dealer.
WINEMATE cooling systems must be installed in the upright position and are not
designed to have duct systems attached to them. Do not drill any holes into the unit. This
may damage the unit, and WILL VOID THE WARRANTY.
WINEMATE split cooling systems are shipped as components, and are ready for use
only after being properly installed and tested by a certified refrigeration technician.
The system consists of 2 parts, the FAN-COIL, and the CONDENSING UNIT.
The FAN-COIL includes the evaporator coil, thermal expansion valve, thermostat,
liquid line solenoid, mounting brackets, drain line fitting, and fans.
The CONDENSING UNIT includes the condenser coil, compressor, low pressure
control, service valves, and fans.
The FAN-COIL and CONDENSING UNIT are connected by a liquid line and a insulated
suction line. Supplied by the installer. These lines must be properly sized for the distance between
the units. Because of the control system we use there is no need for wiring between the units.
The FAN-COIL should be mounted against the ceiling of the enclosure using the bracket
provided. The best location is centered in the enclosure. Be sure that the location is capable of
supporting the weight of the unit. Air flow from the unit should be unobstructed for at least 1 foot.
Provisions must be made for passing the line set threw the wall to the CONDENSING UNIT.
The CONDENSING UNIT should be placed on a solid foundation with at least 1 foot
clearance on all sides and 3 feet for exhaust air. Unit should be elevated to avoid possible flooding
and shaded from direct sun. location should not be exposed to temperatures higher than 125f or
lower than 20f. Unit must be wired in accordance with all state and local codes.
After the units and the lines are installed. The system must be pressure tested. If no
leaks are found, evacuate the system. We recommend that the system be triple evacuated.
using proper charging methods, charge system with R134A. Amount will vary depending on
the length of line set.
MAINTENANCE
WINEMATE split systems require very little maintenance. The FAN-COIL should be
KEPT clean. The CONDENSING UNIT should be inspected 3 to 4 times a year and the condenser
cleaned as needed. Clean condenser by using a vacuum cleaner with a brush attachment, or use
compressed air to blow dirt out of the unit.
If the condenser becomes blocked this will obstruct air flow, the unit will over heat causing
a loss in cooling efficiency, and will result in compressor failure not covered by warranty.
OPERATION
On initial start-up the system will slowly reduce the temperature of the enclosure. The
system may run constantly or cycle on and off frequently until the enclosure reaches the desired
temperature. The time needed will very depending on size, contents, and construction. The thermostat
is preset for approximately 55f. Unless the temperature falls below what is desired, do not change
the setting for at least 3 days. After initial cool down the on-off cycle should be relatively constant.
SPECIFICATIONS
VINO-2500SS
FAN COIL
CONDENSING UNIT
VINO-4500SS
FAN COIL
CONDENSING UNIT
VINO-6500SS
FAN COIL
CONDENSING UNIT
VINO-8500SS
FAN COIL
CONDENSING UNIT
VINO-2500SS
VINO-4500SS
VINO-6500SS
VINO-8500SS
2500BTU R-134A
115V 60HZ 1A
115V 60HZ 5.7A
ETL & NSF LISTED
UL LISTED
35LBS
40LBS
4500BTU R134A
115V 60HZ 1A
115V 60HZ 6.9A
ETL & NSF LISTED
UL LISTED
40LBS
46LBS
6500BTU R134A
115V 60HZ 1.5A
115V 60HZ 12A
ETL & NSF LISTED
UL LISTED
90LBS
66LBS
115V 60HZ 5.2A
8500BTU R134A
208-230V 60HZ 1PH 7.3A
LINE SET
ETL & NSF LISTED
UL LISTED
115 LBS.
95LBS
2500BTU
4500BTU
6500BTU
8500BTU
BOTTOM VIEW
25'
500CUFT 900 BOTTLES
3/8 X 1/2
3/8 X 1/2
1000CUFT 4500 BOTTLES
3/8 X 1/2
1500CUFT 6000 BOTTLES
3/8 X 5/8
2000CUFT 10000 BOTTLES
FAN COIL
SIDE VIEW
50'
3/8 X 1/2
3/8 X 1/2
3/8 X 5/8
3/8 X 5/8
100'
3/8 X 1/2
3/8 X 5/8
3/8 X 5/8
3/8 x 7/8
ELECTRICAL BOX
C
D
FAN
B
DRAIN
A
A
17.5
17.5
21
21
VINO-2500SS
VINO-4500SS
VINO-6500SS
VINO-8500SS
FAN COIL DIMENSIONS
B
C
D
7.5
20
21.5
10.5
20
21.5
11.75
29.875
30.375
13.5
29.875
30.375
CONDENSING UNIT
DRAIN
3/8 OD
3/8 OD
3/4 MPT
3/4 MPT
H
D
VINO-2500SS
VINO-4500SS
VINO-6500SS
VINO-8500SS
W
W
10.75
10.75
13
14.6
H
9.43
9.43
10.88
13.75
D
15.08
15.08
17.25
18.5
OUT DOOR ENCLOSURE
25-4500 SS
12
14
18
65-8500 SS
14.5
18
24"
TYPICAL INSTALLATION
LINE SET
ELECTRICAL BOX
FAN COIL
AIR FLOW
COND UNIT
WINEMATE
WWW.WINE-MATE.COMM
VINO-1500 SS & 1900 SS SPLIT SYSTEMS
INSTALLATION INSTRUCTIONS
Thank you for choosing WINEMATE for your cooling needs. Our cooling systems are
designed to give years of trouble-free service, When properly installed. All WINEMATE cooling
systems use ENVIRONMENTALLY FRIENDLY R134A.
WINEMATE cooling systems will provide a constant cooling temperature between 50f
and 62f while reducing excess moisture when installed in a properly constructed enclosure.
The system does not add moisture, and the system does not include heating.
Please take time to thoroughly read the instructions before installing the cooling system.
WARNING
Federal law requires that WINEMATE split cooling systems be installed by a EPA
certified refrigeration technician.
NOTE
Before removing the cooling system from the box, inspect for damage which might have
occurred during shipping. If any damage is found, notify the shipper immediately and file a claim.
INSTALLATION
WINEMATE split systems are shipped as components and are ready for use only
after a certified refrigeration technician has properly installed and tested the system. Proper
installation is critical. WINEMATE can only warrant the quality of the components.
The installation and proper operation of the system must be warranted by the installer.
Installation of the system must be done in accordance with all state and local building
codes. If your installation cannot be performed in accordance with these instructions contact your
dealer.
WINEMATE cooling systems must be installed in the upright position and are not
designed to have duct systems attached to them. Do not drill any holes into the unit. This
may damage the unit, and WILL VOID THE WARRANTY.
WINEMATE split cooling systems are shipped as components, and are ready for use
only after being properly installed and tested by a certified refrigeration technician.
The system consists of 2 parts, the FAN-COIL, and the CONDENSING UNIT.
The FAN-COIL includes the evaporator coil, thermal expansion valve, thermostat,
liquid line solenoid, mounting brackets, drain line fitting, and fans.
The CONDENSING UNIT includes the condenser coil, compressor, low pressure
control, service valves, and fans.
The FAN-COIL and CONDENSING UNIT are connected by a liquid line and a insulated
suction line. Supplied by the installer. These lines must be properly sized for the distance between
the units. Because of the control system we use there is no need for wiring between the units.
The FAN-COIL should be mounted inside of the enclosure using the bracket
provided. The best location is centered in the enclosure. Be sure that the location is capable of
supporting the weight of the unit. Air flow from the unit should be unobstructed for at least 1 foot.
Provisions must be made for passing the line set threw the wall to the CONDENSING UNIT.
The CONDENSING UNIT should be placed on a solid foundation with at least 1 foot
clearance on all sides and 3 feet for exhaust air. Unit should be elevated to avoid possible flooding
and shaded from direct sun. location should not be exposed to temperatures higher than 125f or
lower than 20f. Unit must be wired in accordance with all state and local codes.
After the units and the lines are installed. The system must be pressure tested. If no
leaks are found, evacuate the system. We recommend that the system be triple evacuated.
using proper charging methods, charge system with R134A. Amount will vary depending on
the length of line set.
MAINTENANCE
WINEMATE split systems require very little maintenance. The FAN-COIL should be
KEPT clean. The CONDENSING UNIT should be inspected 3 to 4 times a year and the condenser
cleaned as needed. Clean condenser by using a vacuum cleaner with a brush attachment, or use
compressed air to blow dirt out of the unit.
If the condenser becomes blocked this will obstruct air flow, the unit will over heat causing
a loss in cooling efficiency, and will result in compressor failure not covered by warranty.
OPERATION
On initial start-up the system will slowly reduce the temperature of the enclosure. The
system may run constantly or cycle on and off frequently until the enclosure reaches the desired
temperature. The time needed will very depending on size, contents, and construction. The thermostat
is preset for approximately 55f. Unless the temperature falls below what is desired, do not change
the setting for at least 3 days. After initial cool down the on-off cycle should be relatively constant.
SPECIFICATIONS
VINO-1500SS
FANCOIL
COND UNIT
150CUFT CELING MOUNTED
1500BTU R134A 115V 60HZ .73A
115V 60HZ 3.1A
ETL & NSF LISTED
UL LISTED
15 LBS.
30 LBS.
VINO-1900 SS
FANCOIL
COND UNIT
150CUFT WALL MOUNTED
1900 BTU R-134A 115V 60HZ 2.2A
115V 60HZ 3.1A
ETL & NSF LISTED
UL LISTED
20 LBS.
30 LBS.
25'
3/8 X 1/2
3/8 X 1/2
100'
3/8 X 1/2
3/8 X 1/2
LINE SET
VINO-1500 SS
VINO-1900SS
50'
3/8 X 1/2
3/8 X 1/2
FAN COIL
VINO-1500SS
16 3/4
4 3/4
15
AIR
FLOW
VINO-1900SS
20"
18"
MOUNTING
PLATE
ELECTRICAL BOX
7"
12.5"
THERMOSTAT
DRAIN LINE
3/8 OD
CONDENSING UNIT
H
D
W
W
10.75
VINO-1900 SS
H
9.43
D
15.08
OUT DOOR ENCLOSURE
12
18
14
TYPICAL INSTALLATION
AIR OUT
AIR IN
AIR OUT
LINE SET
LINE SET
AIR IN
COND UNIT
COND UNIT
VINO-1900 SS
VINO 1500SS
WINEMATE
WWW.WINE-MATE.COM
LIMITED WARRANTY
VINO-SS COOLING SYSTEMS
WINEMATE warrants this product to be free from defects in material and workmanship
and agrees to replace any component found defective under these terms and conditions.
This warranty may be enforced only by the original retail customer and is not transferable. All
components used in this unit are warranted for ONE YEAR from the original retail purchase date.
Alteration, repair or attempted repair of the components by anyone not authorized by
WINEMATE will void this warranty.
WINEMATE will cover the following:
During the first 12 months WINEMATE will pay for materials to replace the
unit/components.
During the first 12 months WINEMATE will at the customers request, ship to the
customer any replacement component with a deposit, charged at the value of the component,
plus the freight. When the original component is returned in a condition that allows testing of the
component and if that component is found to be defective, WINEMATE will refund the cost of the
component and the freight.
To obtain warranty parts, WINEMATE may require you to provide the original bill
of sale or receipt as proof of purchase. Please retain any such proof of purchase.
If a problem is suspected with a WINEMATE cooling unit contact your dealer. Do not
return a unit/component without authorization from WINEMATE.
Should it be necessary to return a unit/component for warranty parts, it must be
packaged in the original packaging or similar packaging providing an equal degree of protection.
Any freight charges must be prepaid, WINEMATE will not accept collect shipments.
ITEMS NOT COVERED BY WARRANTY:
Any unit on which the serial number has been removed, modified or defaced.
Damage, deterioration or malfunction resulting from but not limited to:
Any shipment of the unit, claims for shipping damage must be presented
to the shipper.
Installation or removal of the unit/component.
Installation into an enclosure of inadequate design that does not follow
the minimum guide lines of the installation instructions.
Inadequate ventilation for the supply and exhausting condensers air that does
not follow minimum guide lines of the installation instructions.
Accident, misuse, abuse, neglect, fire, water, lightning or other acts of
nature, improper storage, unauthorized modification, electrical power surges, or
failure to follow instructions supplied with unit.
Exposure to corrosive environments such as, but not limited to, marine air,
pool chemicals, cleaning solvents, gasoline and petroleum products.
Burial or coverage by, but not limited to, dirt, snow, mud, storage shelves,
fabric products, plants, and children's toys.
Any cause which does not relate to product defect.
WINEMATE WILL NOT PAY FOR:
Installation or removal of the unit/component.
Handling or packaging of the unit/component.
Component repairs performed by anyone outer than a WINEMATE
Contents of enclosure
Any other damages, weather incidental, consequential or otherwise.
DIMENSIONS OF COOLING UNITS
VINO-1500CD
18Wx10.5Hx16D
115V
60HZ
4 AMPS
1/6HP
1500BTU
R134A
150CUFT MAX
VINO-2500CD
18Wx10.5Hx16D
115V
60HZ
5 AMPS
1/5 HP
2500BTU
R134A
250 CUFT MAX
VINO-2520CD
18Wx10.5Hx16D
220V
50HZ
4 AMPS
1/5 HP
1800BTU
R134A
200CUFT MAX
VINO-2500HZD
14.25Wx13.25Hx16D
115V
60HZ
5 AMPS
1/5 HP
2500BTU
R134A
250 CUFT MAX
VINO-2520HZD
14.25Wx13.25Hx16D
220V
50HZ
4 AMPS
1/5 HP
1800BTU
R134A
200CUFT MAX
VINO-3500HZD
VINO-4500HZD
14.25Wx19.75Hx21.2514.25Wx19.75Hx21.25D
115V
115V
60HZ
60HZ
8 AMPS
9 AMPS
1/4 HP
1/3 HP
3500BTU
4500 BTU
R134A
R134A
650 CUFT MAX
1000 CUFT MAX
VINO-4520HZD
VINO-6500HZD
14.25Wx19.75Hx21.25D17Wx22Hx28D
220V
115V
50HZ
60HZ
5 AMPS
14.2 AMPS
1/3 HP
1/2 HP
3800BTU
6500BTU
R134A
R134A
850 CUFT MAX
1500 CUFT MAX
VINO-1500HZD
14.25Wx12.25Hx16D
115V
60HZ
4 AMPS
1/6HP
1500BTU
R134A
150 CUFT MAX
VINO-8500HZD
17Wx22Hx28D
115V
60HZ
16 AMPS
3/4HP
8500BTU
R134A
2000 CUFT MAX
All CD and HZD cooling units use the Omni-Stat programmable controller features:
Red light display
Adjustable Tempature
Adjustable Differantial
High and Low Tempature alarms
Adjust defrost
Time delay on stat
SPLIT SYSTEMS
VINO-1500SS
FAN COIL
CELING MOUNTED
16.75Wx4.75Hx15D
115V 60HZ 73 AMPS
ETL AND NSF LISTED
CONDENSING UNIT
14Wx12Hx18D
115V 60HZ 3.1 AMPS
1500BTU R134A
150 CUFT MAX
UL LISTED
FAN COIL
WALL MOUNTED
18Wx12.5Hx4.5D
115V 60HZ 2.2 AMPS
ETL AND NSF LISTED
CONDENSING UNIT
14Wx12Hx18D
115V 60HZ 3.1 AMPS
1500BTU R134A
150 CUFT MAX
UL LISTED
FAN COIL
CEILING MOUNTED
22Wx6Hx19.5D
115V 60HZ 1 AMP
ETL AND NSF LISTED
CONDENSING UNIT
14Wx12Hx18D
115V 60HZ 3.1 AMPS
2500BTU R134A
500CUFT MAX
UL LISTED
FAN COIL
CEILING MOUNTED
22Wx9Hx19.5D
115V 60HZ 1 AMPS
ETL AND NSF LISTED
CONDENSING UNIT
14Wx12Hx18D
115V 60HZ 6.9 AMPS
4500BTU R134A
1000 CUFT MAX
UL LISTED
FAN COIL
CEILING MOUNTED
30.75Wx11.75Hx23D
115V 60HZ 1.5 AMPS
ETL AND NSF LISTED
CONDENSING UNIT
18Wx14.5Hx24D
115V 60HZ 9.3 AMPS
6500BTU R134A
UL LISTED
VINO-1900SSD
VINO-2500SSD
VINO-4500SSD
VINO-6500SSD
1500 CUFT MAX
VINO-8500SSD
FAN COIL
CEILING MOUNTED
30.75Wx15.25Hx23D
115V 60HZ 5.2 AMPS
ETL AND NSF LISTED
CONDENSING UNIT
18Wx14.5Hx24D
UL LISTED
208.230V 60HZ 1PH 7.3 AMPS
8500BTU R134A
2000 CUFT MAX
All SSD unit use a mechanical thermostat adjustable from 45F TO 65F.
All SSD cooling system use the uni-stat electronics thermostat and timer features:
Green remote LED display
Adjustable Tempature
Adjustable differantial
Adjustable defrost
Time delay on start
VT-HYDROMIST
HUMIDIFIER INSTRUCTIONS
The humidifier is designed to provide cool moist air for the humidor. By using a fan,
a water reservoir and a humidistat. Install the humidifier in the bottom of the humidor. Connect
the humidistat to the fan and mount it at the end of the wire above the humidifer. Fill the reservoir
3/4 full of water. Plug in humidistat. Cycle humidistat between highest and lowest setting
at least 3 times to ensure proper function. Set control for desired humidity.
CHECK RESERVOIR REGULARLY. ADD WATER AND CLEAN RESERVOIR AS
NEEDED.
OUTLET
HUMIDISTAT
FAN
RESERVOIR
VT-HYDROMIST 1
RESERVOIR
CAPACITY
HUMIDIFIES
16.5 X 6.5 X 5.5
1 GALLON
90 CUBIC FEET
VT-HYDROMIST 2
RESERVOIR
CAPACITY
HUMIDIFIES
12 X 6.5 X 5.5
3/4 GALLON
48 CUBIC FEET
VT-HYDROMIST 3
RESERVOIR
CAPACITY
HUMIDIFIES
6 X 6 X 5.5
3/8 GALLON
26 CUBIC FEET
FAN
RESERVOIR