1
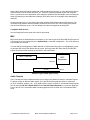
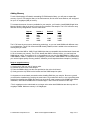
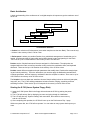
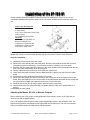
®ÂØ|ÅÎ S-760 ® digital sampler Supplemental manual SN29 ©1995 Roland Corporation U.S. Ro land S-760 D igital Sample r Supplemental M anual Table of Contents Introduction..........................................................................................1 Connections with External Equipment........................................1 SCSI ..........................................................................................1 MIDI ............................................................................................2 Audio Outputs ............................................................................2 Adding Memory ..........................................................................3 Basic Architecture ..............................................................................4 Operations of the Sampler from the Front Panel ............................4 Starting the S-760 (from a System Floppy disk) ........................4 Saving the System to a Hard Drive ............................................5 Loading Sounds (using the Preview Disc)..................................5 Creating Your Own Performance ................................................6 Saving Performances..................................................................6 Volume Dump to FD ..................................................................7 Quick Sampling ..........................................................................7 Quick Editing ..............................................................................9 Looping ......................................................................................9 Performance EQ ........................................................................9 Deleting Sounds........................................................................10 Listen Delete ............................................................................10 Convert Load Akai™ and Roland S-550/W-30 data ..................10 Corrections to the S-760 Manual ....................................................10 Installation of the OP-760-01 ............................................................11 Attaching the Mouse, RC-100 and Monitor Outputs......................12 A Quick Tour of the S-760 with a Mouse and CRT ........................13 Naming Performances..............................................................15 Solo / Mute ..............................................................................15 Part Map ..................................................................................15 Quick Sampling ........................................................................15 Using the Mouse and CRT with the Waveform Display ..........16 Editing Loops using a Monitor and Mouse ..............................19 CD Player ................................................................................20 © 1995 Roland Corporation U.S. SN29 S-760 Supplemental Manual Table of Contents S -76 0 S up p le m e nt al M anual Introduction Thank you for purchasing the Roland S-760 Digital Sampler. The Roland S-760 is a single rack space, stereo, multitimbral, 16-bit digital sampler that has the power and flexibility of Roland’s well known 700 series digital samplers. The S-760 is able to sample and edit complex waveforms, as well as play back samples from Roland’s unique, high-quality Sample Archive CD-ROMs. You will need a compatible CD-ROM player to utilize the Preview CD-ROM Disc that came with your S-760. With the addition of the OP-760-1 Option board, DA-400 Output Expander, SIMM memory, an external monitor and external SCSI storage devices, you can increase the performance of the S-760 by adding capabilities found on professional studio samplers like Roland’s S-770/750 Digital Samplers. Connections with External Equipment SCSI “SCSI” stands for Small Computer Serial Interface, which is the type of interface that the S-760 uses to interact with external storage devices, such as hard drives and CD-ROM players. Since digital samples can quickly fill-up a standard floppy disk, digital samplers need to take advantage of large storage devices to speed-up retrieval of sounds and to help organize the sounds in a sample library. You can use floppy disks as well. However, you’ll find it tedious to use save a 16MB Performance on multiple floppy disks. Software Version 2.0 allows you to save sound parameters onto a floppy disk without having to save the actual samples (See Volume Dump to FD). S-760 (internally termination) 25N to 50 pin SCSI cable 50N to 50 pin SCSI cable External Fixed or Removeable drive (no termination) CD-ROM Player (external termination) Example of a typical SCSI system setup Setting-up the S-760 Digital Sampler with a hard drive or any kind of SCSI device requires some basic steps. The first step is to assign a specific SCSI “ID” (similar to MIDI channels) to each device in the SCSI chain. You can think of the SCSI ID as the SCSI “channel.” The S-760 is normally set to ID #7. If you’re using several external drives with the S-760, such as a Syquest removable drive and a CD-ROM player, you will need to set a separate ID for each device. Most SCSI devices have external switches to change their ID number. See the manual that came with your drive to determine how its SCSI ID number can be changed. An important factor to consider when using an external hard drive is SCSI termination. The devices on each end of a SCSI chain must have either internal or external termination. An external terminator is © 1995 Roland Corporation U.S. SN29 S-760 Supplemental Manual Page 1 of 17 either a block that plugs into the cables that connect between the devices, or a plug that inserts into the open SCSI port on a CD-ROM, hard drive, etc. These are generally available at your local computer store. If your devices aren’t terminated, you’ll experience problems with the sampler, such as locking-up when first powering-up and difficulties locating a SCSI device from the Load page when attempting to load files. Another important rule is to use short, high-quality shielded SCSI cables between SCSI devices. The combined length between devices shouldn’t exceed ten feet overall. Also, never unplug SCSI cables from devices while they are on. You can damage your data and equipment by doing this! Compatible SCSI devices See the Peripheral Devices chart at the end of this manual. MIDI MIDI connections are standard with one exception. If you want to use the S-760’s MIDI Out/Thru port as a Thru port, be sure to change this in the System Mode, in the MIDI configuration. The S-760 starts-up with the MIDI Out selected. You can change the assignment of MIDI channels in Performance Play page 1 by highlighting the channel number next to the Patch Name with the cursor, and using either the value knob or the INC/DEC buttons to select the MIDI channel for the Patch in the Performance. MIDI Out MIDI In MIDI Controller MIDI Sequencer MIDI Out S-760 MIDI In Example of typical MIDI system setup Audio Outputs The S-760 has two stereo outputs that allow you to assign your patches to stereo or individual outputs. To assign a Patch to different audio outputs, go to the Performance page and select a ‘stereo pair’ (A–D) or ‘individual’ outputs (1–8). If you want to have a total of 4 stereo, or 8 individual analog outputs, you will need the OP-760-1 Option Board and the DA-400 Output Expander to convert the digital outputs on the OP-760-1 expansion board to analog signals that can be used with a conventional audio mixer. © 1995 Roland Corporation U.S. SN29 S-760 Supplemental Manual Page 2 of 17 Adding Memory To take full advantage of Roland’s outstanding CD-ROM sample library, you will want to expand the memory of your S-760 sampler. Many of the Performances, and in some cases Patches, are configured for up to 16 megabytes (MB) of memory. To increase the amount of memory available for your sampler, you’ll need to install SIMM (Single Inline Memory Module) chips in the slots on the main circuit board of the sampler. The S-760 can have many different memory configurations. See the chart below: Internal 2MB 2MB 2MB 2MB n/a* Socket 1 8MB 16MB 8MB 16MB Socket 2 16MB 16MB Total 2MB 10MB 18MB 24MB 32MB The S-760 uses the new memory Interleaving technology, so you can install SIMMs with different memory configurations. The S-760 comes with 2MB already installed, which is added to the total amount of memory that you install.* You can use either 8MB or 16MB 72-pin SIMM chips that are compatible with the Macintosh Centris and LC-III to increase your memory. The S-760 already has 2MB of memory built-in, you can install one SIMM chip at a time. To upgrade to 10 or 18 megabytes, you can use one 8MB SIMM for 10MB, or one 16MB SIMM to 18MB. To expand to 32* megabytes, you’ll need two 16MB SIMMs. We recommend that you use the highest quality memory possible, otherwise you will experience data corruption (“crackling”). Steps to upgrade memory: 1) 2) 3) 4) Unplug the S-760 from the AC power outlet. Remove the outer case of the sampler. Place the SIMMs chip(s) into the slots provided on the main circuit board. Gently press the chip back into the latches until the SIMM snaps into place. It’s important to use anti-static precautions when installing RAM into your sampler. Be sure to ground yourself before installation by touching the metal case of a grounded AC device or use a grounding wrist strap before installing the SIMMs. Be careful not to touch the metal contacts of the SIMMs chips before installation, and hold the SIMMs from the outside edges—don’t touch the modules on the chip. *The 2 megabytes on the main board are no longer active when both SIMM slots are taken-up with 16 megabyte SIMMs. Maximum memory is 32 Megabytes. © 1995 Roland Corporation U.S. SN29 S-760 Supplemental Manual Page 3 of 17 Basic Architecture A basic understanding of the architecture of our digital samplers is important to get the maximum use of the S-760. Volume...1 Performance 1 Patch 1 Partial 1 Sample Performance 2...64 Patch 2...128 Partial 2...256 Sample 2...512 S-760 Internal Structure A Volume is a collection of Performances (some other samplers use the term Bank). There can be only 1 Volume in the memory of the S-760 at a time. A Performance is where you combine Patches for a multitimbral arrangement of sounds that you’ve loaded. A Performance has 32 parts which assign MIDI channel, output, and panning for the Patch. There can be up to 64 Performances in the memory of the S-760 at a time. Patches are the “finished instruments” that are assigned in a Performance. The split points are assigned within the Patch, as well as controller routing such as the modulation wheel, and keyboard aftertouch. There can be up to 128 Patches in the memory of the S-760 at a time. Partials contain different samples and synth parameters that modify them. Partials allow sample layering and velocity switching. This is the area where you can also apply the Multimode resonant filters, envelope generators, and low frequency oscillators to alter the samples in realtime. There can be up to 255 Partials in the memory of the S-760 at a time. The Sample is the most basic raw waveform element. Sample editing is done on this level (start point, loop point, etc.). The S-760’s editing parameters include truncation, looping, smoothing, and time stretching functions. There can be up to 512 samples in the memory of the S-760 at a time. Starting the S-760 (from a System Floppy Disk) 1) Insert the S-760 System Disk in the floppy drive and start the S-760 by pushing the power switch. 2) The S-760 will start-up first by displaying its name and going through its initialization. 3) The LCD will then say “System Loading” and count-down, then check its wave memory and do a SCSI scan. 4) After completing this operation, the S-760 will come-up on the Performance Play 1 page. Without a system disk, the S-760 will not operate. You can make as many system back-ups as you want. © 1995 Roland Corporation U.S. SN29 S-760 Supplemental Manual Page 4 of 17 Saving the System to a Hard Drive For faster start-ups when booting the S-760, you can start the S-760 from a hard drive, Syquest removable drive or a Magneto-Optical drive. To do this, use the following steps to put the operating system on a drive. 1) From Performance Play press Mode, move the cursor down to F5 Disk and press S1. 2) You will be in the Disk Mode. Press the Value/Menu knob and move the cursor to (6) Save System and press S1. 3) You will now be on the Save System page. Select the drive you want to save the system on by pressing the S1 button. There will be a display showing what drives are available on your SCSI chain. Select the drive by highlighting it with the cursor up and down buttons and pressing the S1 button. You will come back to the Save System page. Press F3 and “Now Working” will be displayed. When this is completed, remove the System floppy disk from the drive. When you restart the S-760 it will now start from the device that you saved the system on. Loading Sounds (Using the Preview CD-ROM disc) First, you must have a CD-ROM drive connected to the S-760. These next steps assume that the S-760 has only 2MB of RAM. 1) 2) 3) 4) From the Performance Play page, press the Shift button, then the Jump button. Move the cursor down with the arrow down button to (2) Disk load. Press the S1/DEC button. You are now on the Disk Load page. Here, you can determine from which drive you want to load, and what type of file you want to load. Initially, your cursor will be on Target Volume TG (Volm), for the time being we’ll leave this here. 5) Move the cursor using the arrow right button over to the current drive CD to set it to the SCSI ID (see SCSI setup) that you set for your CD-ROM player. To change this, highlight CD and press S1/DEC. You will come to a list on the Select Drive page that will show the SCSI IDs and the drives that are assigned to them. You should be able to see the CDROM drive on this list. You can use the arrow up and down buttons to see all the IDs on the list. If you don’t, you may have a SCSI problem. Go back and scan the drives by pressing F3, if the scan locks-up, check your SCSI cables and make sure you have configured the SCSI drives correctly. To select the drive, highlight the ID you want and press the S1/DEC button. 6) After you’ve selected the drive, you’ll come back to the Disk Load page. You will now see the drive you selected next to CD. Below that, you’ll see a listing of Volume files on the CD-ROM disc. Move your cursor using the arrow down button to Volume # 58– FX: Industrial and press the Load F3 button. At this point the Volume file will start loading. Your MIDI/SCAN light will start flashing and “Now Working” will be displayed on the LCD. 7) Once the file is loaded, press the Shift button, then the Jump button and move the cursor to select Performance Play. Press the S1 button. You will come to the Performance Play page, there will be several patches listed under Patch Name. You can also load other kinds of target files from the Disk Load page, such as Performances, Patches, Partials, and Samples. You can load several Patches from the disk and create your own Performance. In the Disk Load page, change the Target to Patch by highlighting the current target listed next to TG and press the S1 button. You will come to a list of different targets that you can select. Move your cursor to Patch and highlight it and press S1. You will come back to the Disk Load page. © 1995 Roland Corporation U.S. SN29 S-760 Supplemental Manual Page 5 of 17 If you’re looking for a specific kind of instrument, you can search for that group of instruments by using the Volume ID select. Move your cursor to the ID (ALL) location and press the S1 button. You then can use the three letter ID system to show all the types of a particular instrument. For instance, if you’re looking for a bass patch, you can use the “BS” ID to show all the Bass patches on the the disk. Move your cursor to BS and press S1. The disk load page will come-up and display just the patches that use the “BS” ID. To reset for ALL, go back to select the Volume ID and press F2 (ALL). Move your cursor down the list and highlight the Patch or Patches that you want to select for loading. After you highlight the Patch press the S1 button to select it. There will be a check mark next to the name showing you that it is selected for loading. If you want to deselect it, press the S1 button again. After selecting the Patches that you want to load, press the F3 / Load button. The Patches will load from the drive into the memory of the S-760. Make sure that you have enough time available (available RAM) to load the patches, otherwise you’ll be given a Memory Full error. Creating your own Performance Once your Patches are loaded you can create your own Performance. Use the Jump page by pressing the Shift + Jump button. Move your cursor to the first position and press S1. You will come to the Performance Play page 1. You can start from an empty Performance by highlighting the number next to Performance name and pressing S2. Move your cursor down and highlight the first ———-Off———space under Patch Name and press S1. A list will be displayed of the Patches that you loaded into memory. Move your cursor to a Patch that you want to use and highlight it, then press S1. You will come back to the Performance Play page 1 and the Patch that you selected will be in the first Part. Once you’ve set-up your own Performance you can save it to disk and retain all the parameters that you have set-up, such as Volume, Pan, Output, MIDI Channel, etc. The S-760 can load from several different types of SCSI devices. Saving Performances 1) 2) 3) 4) From the Performance Play page, press the Shift button, then the Jump button. Move the cursor down with the arrow down button to (3) Disk Save. Press S1. Move the cursor to select the Target, (Performance), and Current Drive (CD). After you set the Target and location, move your cursor down to the list of files that are in memory and mark the ones you want to save by highlighting and pressing the S1 button to mark them. Once you’ve marked the file(s), press the F3 Save button, and the S-760 will start saving the marked file(s) to the SCSI device or floppy disk. Volume Dump to FD The S-760 can save a Volume onto a floppy disk without having to save the actual sample data. If you’re using a CD-ROM player, but don’t have a hard drive, you can save your customized Volumes, Performances, Patches and Partials onto a floppy disk. When you reload from the floppy, the samples are loaded from a CD-ROM disc, etc. after the upper parameters are loaded from the floppy disk. 1) Using the directions from Loading Sounds (Using the Preview CD-ROM Disc), load and create a custom Performance from a Volume 2) Jump to the System Volume ID page. Press Shift + Jump and move the cursor to 4) Sys Volume ID and press S1. 3) Name the Volume by pressing S2 and use the S-760 ASCII keyboard to create your Volume Name by selecting the letter with your cursor and pressing S1 for each letter. © 1995 Roland Corporation U.S. SN29 S-760 Supplemental Manual Page 6 of 17 4) Go to the Disk Mode by pressing the Mode button. Highlight Disk and press S1. Press the Value/Menu knob and move the cursor to 9) VolumeDumpFD and press S1. 5) You will now be on the VolumeDumpFD page. Put a 3.5 inch formatted disk in the disk drive. Press F1/Save and the S-760 will start saving the Volume (“Now Working”) onto the floppy disk in the drive. If the disk in the drive is unformatted you will be prompted to format the disk. Press F1 to format the disk. After formatting the disk, a display will show several blank locations to save the Volume Dump. Highlight the first position and press F1 Save. “Now Working” will be shown on the LCD display and a count-down will be displayed on the lower right corner of the screen. To Retrieve the Volume from a Floppy Disk: 1) Go to the VolumeDumpFD in the Disk Mode as in step 4 above. Make sure the appropriate CD-ROM or cartridge is in the drive from which the sample data will be retrieved. 2) You will see the file you created. Highlight it and press F3 Load. 3) You will get a confirmation message asking if you want to lose the Current Sound Data. This clears the internal memory. 4) Press F1 Yes to clear the memory. “Now Working” will be displayed on the screen and a count-down will be displayed in the lower right corner of the screen. 5) Go to the Performance Play page 1 by pressing Shift then Jump, move the cursor to (1) Performance Play 1 and press S1. The Performance Play page will show the Performance that you created. Quick Sampling The S-760 can automatically create many parameters during sampling which can be set-up from Quick Sampling Mode in the Performance, Patch, Partial, and Sample modes. 1) From the Performance Play page, press the F1 Quick Sampling. 2) Press F1 Smpling 3) You’ll now be on the Sampling page. Here you can configure the way you want to sample from your source. If you already have samples loaded into memory, move the cursor to the number by the Performance name and highlight it. Press S2 until you get to a blank location. 4) Move your cursor down arrow, and highlight the parameter you wish to change with the Value Dial. Sampling Parameters Orig Key – sets the original pitch location of the sample. Sampling Mode – Stereo or Mono Freq – Selectable from 16–48Khz Time – Selectable according to available memory, from 0–363.8 seconds. Pressing the arrow down keys will take you into the next sampling setup page where you can add Digital EQ on the input stage. You’ll also notice that there is a level indicator so you can monitor the incoming signal. As you continue to cursor down the page, you’ll come to the next parameters to set-up the S-760 for sampling. Input – Analog or Digital (if you have the OP-760 option board installed). Digital ATT – Can attenuate both digital and analog signals. Normalize – Automatically increases the overall level of a sample without affecting it in any other way. This is helpful when a sample has not been recorded at full gain. © 1995 Roland Corporation U.S. SN29 S-760 Supplemental Manual Page 7 of 17 The last page as you scroll down, has the Sampling Trigger parameters. If you set the trigger type to Auto, the following parameters need to be set: Level – This sets an audio threshold to initiate sampling. You will need to set a threshold level for the sampler to know when to start sampling. (Recommended range between 5–10) Pre-Trigger – Allows you to record signals before the threshold is reached. (Recommended range .01–.02) Once you’ve set-up your sampling configuration you are ready to sample. (See steps 1–4 above). 5) Press F1-New. You will see a temporary name appear at the top of the page. 1) New: Unnamed. You can name the sample by moving the cursor and highlighting it and pressing S2., which places you on the ASCII keyboard page. Move the cursor to the letter you want and press the S1 button to select it. 6) Press F3-MonOn to monitor the incoming audio signal. 7) Press F3-Ready. This takes you to the Sampling page. 8) To begin sampling, press F1-Start. A message will come-up saying Start Cancel = Exit. Play the input source that you are sampling. You’ll see the box on the left fill up, as the sampling is going on. After you record the sample, press Stop to stop the sampling process. You will see arrows turning around saying “Now Working” after the sample is taken. When this is done, a waveform of the sample will be displayed. You should be able to play the keyboard or push the Preview button and hear the sample on the key that you set as the original key. If you are satisfied with the results, press Exit. If not, press F2Retry. 9) You’ll then come to the Split page. This page is for setting the key or keys that you want the sample assigned to. Press Shift and press F2 < Kbd which will set the range for 88 notes. You won’t hear the sample until you press the F3-Set button, which sets the key range you’ve determined. At this point, you’ve created a Sample, a Partial, and a Patch. You can exit to the Performance Play page and you’ll see your sample assigned to the first Patch, with a temporary name ie: NEW Unnamed, or whatever name you’ve given the sample. Quick Editing With the Quick Editing feature you can change some basic parameters of the sounds in your Performance. 1) From the Performance Play page, press Shift then Jump, then scroll down with the cursor arrow keys to 17) Quick Edit. 2) Press S1 and you will come to the Quick Edit page. You can determine which Partial you are editing by turning your data dial until you find the Partial you want to edit. Move your cursor to each of the following parameters and highlight the parameter you want to change. You change the values with the Value/Menu knob. Pitch 1) KF, determines the keyfollow parameters. 2) Cor, adjusts the coarse tuning of the sample. 3) Fin, adjusts the fine tuning of the sample. © 1995 Roland Corporation U.S. SN29 S-760 Supplemental Manual Page 8 of 17 TVF (filter) 1) Fil, selects between LPF (Low Pass filter), BPF (Band Pass Filter), or a HPF (High Pass Filter. 2) Cut, sets the cutoff frequency. 3) Res, sets the resonance of the filter you’re using. TVA (Envelope) 1) Lev, affects the volume for the Partial. As you lower it, you’ll notice that the amount of dynamic response set to the velocity will decrease. 2) Rel is the release time for the envelope. As you increase the value you’ll notice an increase in the length of time of the sample sustains after you release the key. 3) Vel, is the velocity response. This will change the keyboard response of the Velocity curve that is assigned to the sample. You will see a small display next to the curve you selected. Looping 1) You can select the Loop Type at the bottom of the screen with the function buttons. By pressing the F1 button you can select 1Shot, Forward+1Shot, Alternating (forward and reverse) RevOne, Rev, Fwd or Fwd+R. 2) By pressing the Shift button, then F3, you can go to the Loop parameter page and change the sample, loop start and end parameters. Performance EQ Performance EQ allows you to boost or diminish selected bands of frequencies on a specific Patch in a Performance. You can assign the EQ to be routed to a specific output or stereo pair, depending on your output configuration. There are eight channels of 2–band EQ. 1) From the Performance Play page press Shift, then press Jump. 2) Scroll down with the cursor arrow to 20) Perform EQ, then press S1. You will come to the Perform EQ page. 3) Highlight the space above the EQ parameters and select the Patch by turning the Value/Menu knob. 4) After selecting the Patch, you can choose whether or not the EQ is assigned in stereo or individual modes. By pressing the F1 button, you can select between the two modes. 5) Move your cursor to the output that affects your Patch. If you set-up the Patch on the Performance Play page to stereo output A, then you should change your output to “A” on the Performance EQ page. 6) Select with your cursor either H.F. (High Frequency) or L.F. (Low Frequency) and then select the particular frequency band you wish to change by turning the Value/Menu knob. 7) Move the cursor to either H.G or L.G., depending on whether you picked H.F. or L.F. beforehand. You can now change the emphasis of the EQ affecting your Patch with your Value/Menu knob. To hear the effect of the EQ, switch between EQ On and Bypass. Deleting Sounds You can delete Volumes, Performances, Patches, Partials, and Samples from the internal memory by selecting Delete in the Command function within most of the modes on the S-760. After highlighting Delete press S1. Choose the Target (TG), press S1. Select a target from the menu that will appear and press S1 to mark the target(s) you wish to delete. Press F3 to execute. Deleting sounds from RAM deletes the data from memory, then reorganizes the remaining sounds in memory. Depending on the location and size of the file being deleted, this may take some time to perform. © 1995 Roland Corporation U.S. SN29 S-760 Supplemental Manual Page 9 of 17 Listen Delete Listen Delete is a feature that allows you to shrink your patches so they use less of the internal memory of your sampler. After you use Listen Delete, save your optimized Performance to disk, and reload it to your S-760. For this example, let’s use a drum kit from the Preview Disc that comes along with your sampler. Load the Performance file KIT:TR-909 KIT (see loading sounds) and go to the Performance Play page. Play some of the sounds, noting the location of the hi hat, kick drum and snare drum. 1) From the Performance Play page, press the Shift button, then Jump. 2) Move the cursor down using the down arrow button to 7: Listen Delete and press the S1 button. 3) You will now come to the Listen Delete page. Turn the Value/Menu knob to determine which Patch you are going to edit. 4) Press F3-Start, the bottom of the screen will read “Wait for note on”. At this point, play the hi hat, kick and snare and any other sounds you like. Once you have played all the notes you want to keep in your Patch, press F3 again. 5) The bottom of the screen will have three options. F1-Go On, F2-Cancel, or F3- Exec. If you’ve completed playing the samples you wanted to keep, press F3-Exec. 6) Press F2-Sounded. You will go back to the first Listen Delete screen. Now, play your keyboard. The keys that weren’t played will have no samples assigned to them. Your Performance is now modified and more efficient. Save the Performance to disk, clear the memory, then reload the new Performance. This will reduce the amount of memory consumed by this modified Patch. Convert Load The S-760 is capable of reading the older Roland Sampler libraries (S-550 and W-30), as well as the Akai™ S-1000/ S-1100 Sampler libraries. This is done with the Convert Load feature. 1) 2) 3) 4) Press Mode. Move the cursor to F5 Disk and press S1. Press the Value/Menu button. Scroll down the page with the cursor down arrows to 8: Convert Load, and press the S1 button 5) You will be on the Convert Load page. For a W-30 or S-550 Sampler disk, you will see (TG) Pach, which is switchable between Patch or Tone. (AR) is for Area Number on the disk. (CD) is for Current drive. The Akai™ S-1000 library can be loaded using the Convert Load feature as well (through SCSI only). Use the above steps 1–4. When you come to the Convert Load page you will see the drive parameter Part. (_) Select between partitions A–I. To switch between Volumes, move the cursor to Volm (_) and select the Volume area. After locating the specific Volumes or Programs (Patches), mark the targets with the S1 button, and press F3/ConvLD. Note: Convert loading of Akai Programs will take approximately 8 times longer than native Roland files. © 1995 Roland Corporation U.S. SN29 S-760 Supplemental Manual Page 10 of 17 Installation of the OP-760-01 Please carefully follow the installation instructions below to install the OP-760-01. If you are not comfortable installing the Expansion board, be sure to have a qualified service technician install it for you. Parts in the OP-760-01 Kit 1 OP-760-01 Main Sheet 2 Video Board 3 OP-760-01 Expansion Cover Plate 4 MU-1 Mouse 5 2.0 Operating System disk Hardware A M 3X6mm S-Tight Bind Cm B Boss Nut M3/M3 L22 C M3X6mm B-Tight Bind BC D M3X8mm P-Tight Bind BC E M2 6X5 S-TIGHT Bind Carefully open the OP-760’s container and remove the contents. Be sure to work in a uncluttered, well lighted area. Check to see that all the contents from box are present. Use the check list above: Steps for Installation. 1) Unplug the S-760 from the AC power outlet. 2) Remove the outer case and the rear blank panel. Be sure to set aside the screws that you have removed from the rear blank plate, you will need them later to install the new cover plate. 3) Place the OP-760 Video board (#2 in picture) in the empty location inside the sampler with the outputs of the Video board facing out of the rear panel. 4) Use the 4 Boss Nuts (B in picture) to screw down the Video board. 5) Gently insert the plastic connector from the Main board (#1 in picture) into the slot on the Video board. 6) Screw down the Main board with 3X6 screws (A in picture). 7) Remove the two screws (E in picture) that secure the mouse jack on the rear panel of the Video board. Place the Expansion cover over the ports on the Video board and install the two screws that you just removed to attach the expansion board cover to the mouse port. 8) Install the 3X8 screw (D in picture) to tighten down the option board cover. 9) Use the screws that you removed in step 2 to tighten down the sides of the option board (C in picture). 10) Reattach the outer casing. Attaching the Mouse, RC-100, & Monitor Outputs Before restarting the S-760, plug-in all the peripherals (video monitor, mouse, or RC-100) that you intend to use with the digital sampler. The S-760 supports several types of video output, Digital RGB, S-Video, and composite video. The highest video resolution is supported by the Digital RGB and S-Video ports. The most common and easy to find RGB monitors are made by the Atari Corporation. © 1995 Roland Corporation U.S. SN29 S-760 Supplemental Manual Page 11 of 17 S-Video is a video format that has recently become popular on TV monitors and VCRs. If you don’t have either of these types of video formats available, you can use the regular Video input on your TV or VCR to display the composite video output. Once you have all the Peripherals attached, power-up the S-760 while holding down the Mode button, this will take you to the Setup Menu. Move the LCD cursor with Cursor up and down buttons to 3. Controller and use the Value knob to select Mouse+CRT, or RC-100+CRT, depending on which external controller you wish to use with the S-760. After changing the parameters on the Setup Mode, press the Exit button, and the S-760 will display “EEPRM Renewing.....” and the S-760 will come to the Performance Play Page 1 on your external monitor, the LCD display will show “>>Please See Your CRT<<”. At this point you should be able to move your mouse and see the cursor move across the screen. If you are using a RC-100, and the cursor does not move when you move the mouse, press the reset button on the back of the RC-100. The lights on the RC-100 will scan and the mouse should now become active. A Q ui c k t o ur o f t h e S - 7 6 0 with a Mouse and CRT After following the previous instructions, all of the S-760’s operations can now by accessed by your mouse and monitor. As you can see when first booting the S-760, you come to the Performance Play Page 1, which displays all of the Mode Menu Switches at the top of the screen. If you move your mouse cursor to the Performance, Patch, Partial, Sample and Disk mode menu switches at the top of the page and click with the mouse button on the mode name, you will be given a list of functions to select in that particular mode. This makes it easy to change modes quickly. On the line below the Mode Menu Switches, you’ll see the Mark, Jump and Command switches on the right of the screen. By clicking the Mark switch with your mouse, you can set-up a marker on any one of twenty different locations on the list that is displayed. This menu allows you to select the pages you use most often. To exit this mode, click on the blue screen outside of the Mark dialog box and then click on the Jump switch next to the Mark switch. Here, you can see the same list that you saw in the Mark box. Click on the second marked page “ Disk Load”. The S-760 display will now show the Disk Load page. To get back to the Performance Play Page, click on the Jump switch again and select the first marked page “Perform Play 1”, and you’ll be back to where you started. The Command switch to the right of the Jump switch, is where you go to use commands within a Mode. Click on the Command switch and you will see the commands available within the Performance mode. © 1995 Roland Corporation U.S. SN29 S-760 Supplemental Manual Page 12 of 17 Click on the screen outside of the dialog box to exit this list. On the screen below the Mark, Jump and Command switches you can see the Performance Page layout screen. Initially you can see a blank Performance with all the Parameters at their initial settings. There several pages within the Performance Play screen. To access the different pages click in the blank squares on the scroll bar below the Master Level display with your mouse buttons. You will see the display change where the parameter settings are below the scroll bar. You will also notice that the Perform Play title will change from Perform Play 1 thru 6, according to where you’ve clicked on the bar. To better understand how to set-up the Performance Page, we will load some sounds from the floppy disk that is included with your S-760. 1) 2) 3) 4) 5) 6) 7) 8) Insert the S-760 sound disk into the floppy disk drive. Click with the left mouse button on the Disk mode switch at the top of the screen. Click with the left mouse button on Load. You will come to the Disk load page. Click on the Current drive CD ( —1: No Drive ) with your left mouse button. The Select Drive screen will be displayed, click with your left mouse button on FDD:-Floppy DiskYou then come back to the Disk load page and you will see a listing of volumes available on the floppy disk. Click with the left mouse button on CMB: S-760 SET. The S-760 will now start loading from the floppy disk. “Now Working will be displayed at the top of the screen. After the Volume you just selected has loaded “Complete” will be displayed at the top of the screen. Click with the mouse button on the Perform switch at the top left hand corner of the screen. You will see a Performance with a name at the top of Patch Names called (1) KEY: S-760E.Piano. Below that, you’ll see one of the parts below the Performance Name containing the Patch 1KEY:S760E. Piano that is assigned to that Performance. If you highlight the Performance name and click with your right mouse button, you can select the different Performances that were loaded with the Volume that you chose from the Disk load page. To audition the patches in the sample,r move your mouse cursor to the keyboard that is located below the Display title. Initially this will be set to OmniOn. —(————-). You can take the mouse and click with the right mouse button to hear the Patch that’s listed above on the Display title. You will see a red outline around the keyboard and will see a MIDI note number displayed in the right hand corner as you are playing the keys with your mouse. You can change the Patch to be triggered by the mouse by clicking with your right mouse button on the Part next to the display to select the Patch that is set to a Part. If the part you select doesn’t have a MIDI channel assigned to it, you will not be able to audition it from a connected MIDI keyboard. If you want to be able to display more Patch titles on the Performance Play Page, click on the KbdOn switch at the bottom left side of the Performance Play page. You will be able to display 16 Patches at a time. To view more Patches on the Performance Play Page highlight the Part numbers with your mouse and hold down the right mouse button. © 1995 Roland Corporation U.S. SN29 S-760 Supplemental Manual Page 13 of 17 The Parts will scroll upward as you’re holding down the mouse button. To go back to the top, hold down the left mouse button the page will scroll downward. To assign a Patch that’s already loaded into the S-760’s memory to a specific part, you can highlight the file icon next to the part number and click with your left mouse button. You will come to a screen that lists all the Patches that are in the memory of the sampler. Highlight the Patch you want and click with your left mouse button. The screen will jump back to the Performance Play Page and the Patch will be displayed in the part that you selected. Naming Performances If you want to name a Patch in a Performance, highlight the blue outlined file icon on the left of the Performance name and click with your right mouse button on the icon. You will come to the ASCII Keyboard screen. Here, you can select the characters with your left mouse button for the Patch name. Follow these directions to name any type of file in the S-760 on any of the modes that contain the icon next to the name. Solo / Mute This feature is similar to a common mixing board function that allows you to isolate parts in a performance. By clicking on the Solo/Mute switch at the bottom of the Performance Play Page you can select whether or not a particular part is muted or soloed. If you move your cursor to a part listed on the Solo/Mute screen, the Patch name on that part will be shown on the Part display . Placing your cursor on the Part number and clicking on the box next to S (solo) or M (mute) will solo or mute the part. You can also mute the row affecting the parts by clicking the left mouse button on the All button below each row. Part Map The PartMap switch allows you to check and modify the Patch parameters that affect each Patch in a Performance. You can set the Program change numbers for the Patches in the Performance in the Part Map page as well as select the other Performance settings to view and change the parts. Quick S am p ling The Quick Sampling switch allows you to access the sampling functions from the Performance, Patch and Partial modes for quick, on-the-fly sampling. 1) From the Performance Play screen click with either the right or left mouse button on the Quick Sampling switch (Q-Samp). 2) You will come to Performance Q-Sampling page, click with your right or left mouse button on the Sampling (Smpling) switch. You will now come to the Sampling page. Make sure you are on a blank Patch location otherwise you will be creating samples to be used in a existing patch. You can deter- © 1995 Roland Corporation U.S. SN29 S-760 Supplemental Manual Page 14 of 17 mine this by checking to see if there is name listed by the number at the top of the page. To select a blank patch location, click with your left mouse button on the file icon next to the number for the patch name. You will come to a screen listing the Patches in memory. Click with your left mouse buttom on a blank location on the list. After you do this, the screen will revert back to the Performance Quick-Sampling page. Note: The OP-760-01 Option board allows you to sample from a digital source ie: DAT machine or Audio CD player with digital outputs. 1) Once you have set-up your Sampling parameters, click on Ready. 2) You will get the confirmation screen asking if you want to use the default name. If you haven’t already set a name for the sample you are about to record, the S-760 will give you a temporary namesuch as NEW: Unnamed. If this is Ok, click with your left mouse button on Yes. 3) You are now on the Sampling screen. Click with your left mouse button on Start to initiate sampling if you selected Manual Trigger. 4) You will see the Thermometer on the screen start to fill-up as the sampling time is being consumed. The level meters will respond to signal input. To stop the sampling process, click with your right mouse button. 5) When the sampling stops, you will come to a screen showing the waveform of the sample that you recorded. 6) You can audition the sample by placing the cursor on thewaveform and holding down the left mouse button on the waveform. You can hear the loop that was automatically made by the S-760 by changing the mode type at the top-right of the screen from 1-shot to Forward by clicking the mouse on the mode type. 7) You can retry recording the sample by clicking Retry and the you will come back to the sampling screen. This will overwrite the sample you just made. 8) After you have recorded your sample and are satisfied with the results, you can go to edit the loop points in the loop mode. Click with your left mouse button on the Loop switch at the bottom of the page. This will take you to the Sampling Loop page. Loop and Smoothing The Loop and Smoothing page displays the waveform and the parameter information for setting the loop points. To audition and scrub the waveform, place the mouse cursor in the thin rectangular box just above the graphic of the waveform and hold down the left mouse button. You will see a red line move across the screen and you will hear the sample. You can adjust the speed of the playback by moving the cursor in the box right and left. You can also reverse the playback at various speeds by moving the cursor towards the left side of the box. With some practice with using your mouse movements you can become adept at “scrubbing” the waveform. On the right side of the graphic screen, there will be a percentage number and an arrow indicating which direction the sample is playing back. To lock the sample to continually playback its sound, you can click with the right mouse button in the same thin rectangular box above the graphic. The sample will continue to play until you click the right mouse button again in the box. You can change the playback speed by clicking with your left mouse button in the same box to change the playback speed or play the sample in reverse. This type of playback does not represent the actual loop points that are set. To playback the sample with the loop points that you have set, make sure that you put the loop mode at the upper right part of the screen at Forward, FWD+R, FWD+One, Alt, or Rev to playback the actual loop points. © 1995 Roland Corporation U.S. SN29 S-760 Supplemental Manual Page 15 of 17 Click with your right mouse button in the thin vertical box on the left of the waveform display. This will start playing your sample with the prescribed loop points. You can also change the direction and playback speed of the sample by clicking and dragging with your left mouse button on the thin rectangular box above the waveform display. If you want to get closeups of sections of the waveform, hold down both of your mouse buttons and drag the mouse cursor across the waveform graphic. The area around the waveform graphic will invert and when you release the mouse buttons, the section that you selected will be displayed on the lower screen. You can also scrub this waveform by using the same mouse movements in the rectangular box above this new graphic. You can also lock on the waveform to constantly play back by clicking the right mouse button in the same thin rectangular box. Editing Loops using a Monitor and Mouse. With the ability to scrub and get close-ups of waveforms, you can now easily determine where you’ll want to set the start and loop points of your samples. The S-760 allows you change your loop points in realtime, meaning that you can either hold down a key on your keyboard or lock on your loop and change the loop points with your mouse and hear the results as you change the points with the mouse. Changing the Loop points in realtime. 1) Make sure you have a loop mode selected, either Forward, FWD+R, FWD+One, Alt, or Rev at the upper right part of the page. 2) You will see a light blue outline in the rectangular box above a thin rectangular box where you scrubbed the waveform. This outline shows the current loop point settings that are now set for the waveform. 3) Place your mouse cursor on either end of the blue outline and hold down the left mouse button and drag the mouse right or left. The outline’s edges will move to new locations as you drag the mouse. As you’re dragging the mouse, you can see the parameters for either the Loop or End points change as well. 4) If you hold down a key on your keyboard that is connected via MIDI to your S-760, you can change the loop pararmeters as you’re listening to your sample. You can also lock-on your loop by clicking on the thin vertical box on the right of the waveform display. Change the parameters for your loop points of the sample as it’s playing with the mouse. © 1995 Roland Corporation U.S. SN29 S-760 Supplemental Manual Page 16 of 17 C D P l a ye r F un ct i o n The CD-Player function of the S-760 allows you to control and play audio compact discs in the CD-ROM drive that is connected to the S-760. This is useful for auditioning the Composer Series CD-ROM audio tracks, as well as cueing up tracks for sampling. This function now supports mulitiple types of CD-ROM drives. Please see the supplemental notes for instructions on how to set up CD audio driver for your sampler. Steps for operation 1) From the Performance Play Screen place your cursor over the Command switch (COM) and click with either mouse button. 2) Click on the CD Player switch with your left mouse button. 3) The CD-Player menu will pop-up on the screen. The CD Player function will choose the last drive that was accessed in the Disk mode. If the screen states its on a drive other than a CDROM that is supported with the software it will show “_____________ Not Supported. Please change current Drive” Click Ok, and move your cursor to the name of the device that is shown and click with your left mouse button the name. You will come to the Select Drive page. Move your mouse cursor to the correct type of drive, in this case CD-ROM. You will come back to the CD-Player software. the correct drive name will be displayed at the top of the CD Player screen. 4) To select the track you want to play click on the two right arrow button with your left mouse button. You will see the track number indicator change its number as you click on the button. 5) To play the track click with your left mouse button on the Stop button. It will change to Play. You will see the Indicators that show A-Time and P-Time move. If you have audio connectors comming out of your CD-ROM audio jack going to a mixer, you should be hearing audio comming from your disc. 6) To move to other tracks on the disc, click on either the forward (two right arrows) button or reverse (two left arrows) button. 7) To reset to the beginning of the disc, click on the 1Trk button. If you want to Sample from audio output of your CD-ROM Player. Start the track on the CD Player and Click on the Q-Samp switch with your mouse on the Performance Play screen at the bottom of the page. You can now go to the Sampling page and sample from the track thats now playing. Use the steps listed in the Quick Sampling Mode. Make sure you have the audio outputs of the CD-ROM player coming into the sampling inputs of the S-760, and that your sampling using the analog inputs. Compatibilty Guide Please see the Digital Sampler Compatibilty Guide for a reference of drives, memory, monitors and other perpherals for the S-760 Digital Sampler © 1995 Roland Corporation U.S. SN29 S-760 Supplemental Manual Page 17 of 17