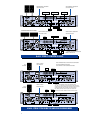
1
28
1v
20
26
24
22
2v
SIG
1&2
–
–
SPEAKER OUTPUTS
+
2
1
+
CH
CH
HOT
CH STATUS
NORM
–3
–6
–9
– 20
OL
(MONO BRIDGE)
800 WATTS
4 OHM LOAD MIN.
400 WATTS CH
2 OHMS LOAD MIN.
1.23v (+4dBu)
MONO
BRIDGE
SENSITIVITY
6
12
14
18
3v
GAIN/dB
16
–3
–6
–9
– 20
OL
3v
BAL/UNBAL
INPUT
28
1v
20
2v
26
24
22
1.23v (+4dBu)
18
1 CHANNEL
SENSITIVITY
6
12
14
GAIN/dB
16
0
0
CH
1
0
0
THRU
120 VAC 60 Hz
1500 WATTS
2
CH
FULL SYMMETRY DUAL DIFFERENTIAL HIGH CURRENT DESIGN
OFF
100 Hz
STAGE
MONITOR
170 Hz
TYPICAL
35 Hz
LOW CUT
FILTER
2k Hz
AIR EQ
6k Hz
4.5k Hz
TYPICAL
OFF ON
CONSTANT DIRECTIVITY
HORN EQ /AIR EQ
TYPICAL
STEREO MONO BRIDGE
AMP MODE
CAUTION
RISK OF ELECTRIC SHOCK
DO NOT OPEN
WARNING:
TO REDUCE THE RISK OF FIRE OR ELECTRIC SHOCK, DO NOT
EXPOSE THIS EQUIPMENT TO RAIN OR MOISTURE. DO NOT REMOVE COVER.
NO USER SERVICEABLE PARTS INSIDE. REFER SERVICING TO QUALIFIED PERSONNEL.
AVIS: RISQUE DE CHOC ELECTRIQUE — NE PAS OUVRIR
SERIAL NUMBER
TYPICAL
OFF ON
LIMITER
TYPICAL
OFF ON
2k Hz
AIR EQ
6k Hz
4.5k Hz
CONSTANT DIRECTIVITY
HORN EQ /AIR EQ
OFF
100 Hz
STAGE
MONITOR
170 Hz
TYPICAL
35 Hz
LOW CUT
FILTER
THRU
BAL/UNBAL
CHANNEL
INPUT
2
MANUFACTURING DATE
OFF
ON
THE FOLLOWING ARE TRADEMARKS/REGISTERED TRADEMARKS OF MACKIE DESIGN INC.: "MACKIE", "FR SERIES", & THE "RUNNING MAN" FIGURE
CONCEIVED, DESIGNED, AND MANUFACTURED BY MACKIE DESIGNS INC • WOODINVILLE
WA • 98072 • USA • MADE IN USA • PATENTS PENDING • COPYRIGHT ©1999
POWER
PROFESSIONAL POWER AMPLIFIER
M•800
OWNER’S MANUAL
AND WARRANTY REGISTRATION
™
HIGH-CURRENT POWER AMPLIFIER
CAUTION
AVIS
RISK OF ELECTRIC SHOCK
DO NOT OPEN
RISQUE DE CHOC ELECTRIQUE
NE PAS OUVRIR
CAUTION: TO REDUCE THE RISK OF ELECTRIC SHOCK
DO NOT REMOVE COVER (OR BACK)
NO USER-SERVICEABLE PARTS INSIDE
REFER SERVICING TO QUALIFIED PERSONNEL
ATTENTION: POUR EVITER LES RISQUES DE CHOC
ELECTRIQUE, NE PAS ENLEVER LE COUVERCLE. AUCUN
ENTRETIEN DE PIECES INTERIEURES PAR L'USAGER. CONFIER
L'ENTRETIEN AU PERSONNEL QUALIFIE.
AVIS: POUR EVITER LES RISQUES D'INCENDIE OU
D'ELECTROCUTION, N'EXPOSEZ PAS CET ARTICLE
A LA PLUIE OU A L'HUMIDITE
The lightning flash with arrowhead symbol within an equilateral
triangle is intended to alert the user to the presence of uninsulated
"dangerous voltage" within the product's enclosure, that may be
of sufficient magnitude to constitute a risk of electric shock to persons.
Le symbole éclair avec point de flèche à l'intérieur d'un triangle
équilatéral est utilisé pour alerter l'utilisateur de la présence à
l'intérieur du coffret de "voltage dangereux" non isolé d'ampleur
suffisante pour constituer un risque d'éléctrocution.
The exclamation point within an equilateral triangle is intended to
alert the user of the presence of important operating and maintenance
(servicing) instructions in the literature accompanying the appliance.
Le point d'exclamation à l'intérieur d'un triangle équilatéral est
employé pour alerter les utilisateurs de la présence d'instructions
importantes pour le fonctionnement et l'entretien (service) dans le
livret d'instruction accompagnant l'appareil.
SAFETY INSTRUCTIONS
1. Read Instructions — All the safety and operation instructions
should be read before this Mackie product is operated.
2. Retain Instructions — The safety and operating instructions
should be kept for future reference.
3. Heed Warnings — All warnings on this Mackie product and in
these operating instructions should be followed.
4. Follow Instructions — All operating and other instructions
should be followed.
5. Water and Moisture — This Mackie product should not be used
near water – for example, near a bathtub, washbowl, kitchen sink,
laundry tub, in a wet basement, near a swimming pool, swamp or
salivating St. Bernard dog, etc.
6. Ventilation — This Mackie product should be situated so
that its location or position does not interfere with its proper
ventilation. For example, the Component should not be situated
on a bed, sofa, rug, or similar surface that may block any
ventilation openings, or placed in a built-in installation such as a
bookcase or cabinet that may impede the flow of air through
ventilation openings.
PORTABLE CART WARNING
Carts and stands - The
Component should be used
only with a cart or stand
that is recommended by
the manufacturer.
A Component and cart
combination should be
moved with care. Quick
stops, excessive force, and
uneven surfaces may cause
the Component and cart
combination to overturn.
7. Heat — This Mackie product should be situated away from heat
sources such as radiators, or other devices which produce heat.
8. Power Sources — This Mackie product should be connected to a
power supply only of the type described in these operation
instructions or as marked on this Mackie product.
9. Power Cord Protection — Power supply cords should be routed
so that they are not likely to be walked upon or pinched by items
placed upon or against them, paying particular attention to cords at
plugs, convenience receptacles, and the point where they exit this
Mackie product.
10. Object and Liquid Entry — Care should be taken so that
objects do not fall into and liquids are not spilled into this Mackie
product.
11. Damage Requiring Service — This Mackie product should be
serviced only by qualified service personnel when:
A. The power-supply cord or the plug has been
damaged; or
B. Objects have fallen, or liquid has spilled into this
Mackie product; or
C. This Mackie product has been exposed to rain; or
D. This Mackie product does not appear to operate
normally or exhibits a marked change in performance;
or
E. This Mackie product has been dropped, or its chassis
damaged.
12. Servicing — The user should not attempt to service this
Mackie product beyond those means described in this operating
manual. All other servicing should be referred to the Mackie Service
Department.
13. To prevent electric shock, do not use this polarized plug with an
extension cord, receptacle or other outlet unless the blades can be
fully inserted to prevent blade exposure.
Pour préevenir les chocs électriques ne pas utiliser cette fiche
polariseé avec un prolongateur, un prise de courant ou une autre
sortie de courant, sauf si les lames peuvent être insérées à fond
sans laisser aucune pariie à découvert.
14. Grounding or Polarization — Precautions should be taken so
that the grounding or polarization means of this Mackie product is
not defeated.
15. This apparatus does not exceed the Class A/Class B (whichever
is applicable) limits for radio noise emissions from digital apparatus
as set out in the radio interference regulations of the Canadian
Department of Communications.
ATTENTION —Le présent appareil numérique n’émet pas de bruits
radioélectriques dépassant las limites applicables aux appareils
numériques de class A/de class B (selon le cas) prescrites dans le
règlement sur le brouillage radioélectrique édicté par les ministere
des communications du Canada.
WARNING — To reduce the risk of fire or electric shock, do
not expose this appliance to rain or moisture.
Lend Me Your Ears
Exposure to extremely high
noise levels may cause permanent hearing loss.
Individuals vary considerably
in susceptibility to noise-induced hearing loss, but
nearly everyone will lose some hearing if exposed
to sufficiently
Duration Per Day Sound Level dBA,
In Hours
Slow Response
intense
8
90
noise for a
6
92
period of
4
95
time. The
3
97
U.S.
2
100
Government’s
1.5
102
Occupa1
105
0.5
110
tional
0.25 or less
115
Safety and
Health Administration (OSHA) has specified the permissible
noise level exposures shown in this chart.
According to OSHA, any exposure in excess of
these permissible limits could result in some hearing loss. To ensure against potentially dangerous
exposure to high sound pressure levels, it is recommended that all persons exposed to equipment
capable of producing high sound pressure levels
(such as this
amplification
Typical
Example
system) use
Duo in small club
hearing protectors while this
Subway Train
unit is in operation. Ear
Very loud classical music
plugs or proPatrice screaming about deadlines tectors in the
ear canals or
Loudest parts at a rock concert
over the ears
must be worn
when operating this amplification system in order
to prevent a permanent hearing loss if exposure is
in excess of the limits set forth here.
INTRODUCTION
Thank you for choosing a Mackie Designs
power amplifier! We appreciate your vote of
confidence for the folks in Woodinville who
specialize in awesome and affordable audio.
The Mackie Designs M•800 power amplifier is
designed to fulfill the amplification needs of almost any type of application. It boasts a wealth
of features you’d expect to pay extra for — like
low cut filtering, constant directivity equalization, speaker-protecting limiter, and
ultra-clean power, to name a few.
Perhaps the most important feature of the
FR Series™ power amplifiers is the attention
to detail in every aspect of the design. At Mackie,
we know what it takes to be roadworthy. After
all, our equipment has traveled all over the
world under the worst of conditions, and we’ve
applied what we’ve learned to the mechanical
design of our amplifiers.
Roadworthiness is only part of the picture.
We know that reliability is paramount to sound
reinforcement. That’s why we use double-sided
thru-hole-plated fiberglass printed circuit boards.
That’s why our engineers have subjected the amplifier to the most rigorous and fiendish tests
imaginable, to fine-tune the design and extend
its limits beyond those of ordinary amplifiers.
Fast Recovery — where the “FR” comes
from — is more than a buzzword. It is based on
real, proven design principles. The result is an
amplifier that performs better than conventional
designs when presented with adverse conditions.
One of the most difficult things for a power
amplifier to handle is clipping. Conventional
designs use lots of negative feedback to provide
stability and lower distortion. When clipping
occurs, this “feedback” causes high-frequency
sticking, keeping the amplifier “latched” in the
clipping state longer than necessary. This results in painfully audible distortion. Our Fast
Recovery design eliminates this high-frequency
sticking and allows the amplifier to remain
stable when powering highly reactive loads at
high volume levels.
You may wonder why a power amp even
needs an owner’s manual. After all, you just
plug in a few cables and power it up. Well, it’s
almost that simple. There’s just a few things
that we’d like you to be aware of, and we’ll discuss those right away — please see the Quick
Start on the next page.
Then go ahead and read the entire manual. The
M•800 amplifier has a wealth of useful features,
and each of them is explained in loving detail.
Please write your serial number here for
future reference (i.e., insurance claims, tech
support, return authorization, etc.):
Purchased at:
Date of purchase:
Part No. 820-079-00 Rev. B 3/2000
©2000 Mackie Designs Inc., All Rights Reserved. Printed in the U.S.A.
3
QUICK START
INSTALLATION
You can mount the M•800
amp in any standard rack
system (see page 18), or
place it horizontally on a
floor or table.
Note: 4 ohms is the minimum impedance you
should connect to the amplifier in BRIDGE mode
and 2 ohms is the minimum per side for STEREO.
If you connect lower impedance speakers, the
amplifier may overheat and shutdown.
DO NOT BLOCK THE VENTILATION PORTS.
The M•800 draws its ventilation air in from the
front and out through the side panels. It needs
plenty of fresh air to stay cool.
CONNECTIONS AND SETTINGS
1. Be sure the POWER
switch is off before
making connections.
controls fully down
2. Turn the GAIN
(counterclockwise) for now.
controls to
3. Set both LOW CUT FILTER
their TYPICAL marks (35Hz).
4. Set both CONSTANT DIRECTIVITY
switches OFF (unless you’re using constant
directivity horns with compression drivers).
switch ON to provide
5. Turn the LIMITER
protection against clipping.
FULL SYMMETRY DUAL DIFFERENTIAL HIGH CURRENT DESIGN
GAIN/dB
16
GAIN/dB
SIG
3v
18
20
2v
14
22
12
24
26
0
0
6
SENSITIVITY
28
1v
1.23v (+4dBu)
OL
OL
–3
–6
–9
– 20
–3
–6
–9
– 20
NORM
HOT
4
CH
20
ON
2v
14
22
12
24
OFF
26
6
CH STATUS
1&2
18
PROFESSIONAL POWER AMPLIFIER
2
3v
16
0
0
CH
1
6. Determine which AMP MODE
is best
for your application:
• STEREO mode (separate left and right
inputs, separate left and right outputs) is the
typical setup for amplifying stereo signals.
• MONO mode (sometimes called DualMono mode — one or two inputs, two
mono outputs) is for sending the same
signal to two different speakers, with
separately-adjustable level controls.
• BRIDGE mode (sometimes called
Bridged-Mono — one or two inputs, one
mono output) uses both sides of the amp to
power one speaker. An M•800 power
amplifier in BRIDGE mode delivers 800
watts (into 4 ohms).
7. In STEREO mode, connect line-level cables
from your mixer or preamplifier to the
INPUT
jacks, either XLR or TRS:
• The balanced XLR inputs are wired
pin 2 = hot (+)
pin 3 = cold (–)
pin 1 = shield (ground).
• The 1/4" TRS inputs are wired
tip = hot (+)
ring = cold (–)
sleeve = shield (ground)
They can accept either balanced (TRS) or
unbalanced (TS) cables.
• The XLR and TRS inputs for each
channel are internally wired in parallel.
8. In BRIDGE mode, connect an input cable
to CH 1 or CH 2 INPUT or both.
SENSITIVITY
28
1v
1.23v (+4dBu)
POWER
9. In STEREO and MONO, connect speaker
cables to the SPEAKER OUTPUTS ,
either binding post or 1/4" TS:
• The binding posts are wired
red = positive (+) and black = negative (–)
• The 1/4" TS connectors are wired
tip = positive (+) and sleeve = negative (–)
10. In BRIDGE mode, using a single speaker:
• The speaker positive (+) connects to
CH 1’s red binding post.
• The speaker negative (–) connects to
CH 2’s red binding post.
• Plug nothing into the black posts or the
1/4" speaker output jacks.
11. Plug the amp’s power cord into the IEC
and the other end into a
receptacle
3-prong AC outlet capable of delivering at
least 12 amps (US model).
12. Make sure the signal source feeding the
M•800’s inputs is powered up and delivering signals to the amp.
switch on
13. Turn the M•800’s POWER
and verify that the NORM
Channel
Status LED is on.
14. Slowly turn both GAIN controls up:
You should now hear the lovely music.
15. If the topmost LEDs (named OL, for
OverLoad) are flashing, turn down either
the GAIN controls on the amp or the source
signal’s level controls (e.g., master faders).
The point is: The OL LEDs should not light
continuously in normal use.
(MONO BRIDGE)
800 WATTS
4 OHM LOAD MIN.
400 WATTS CH
2 OHMS LOAD MIN.
16. For quieter listening, it is preferable to
adjust the amp’s GAIN controls rather
than the source signal’s output level
(unless you have the source’s control all
the way up!)
Things to Remember:
• Never connect the
amplifier speaker outputs
into anything except
speakers (unless you have
an outboard box specifically designed to handle speaker-level
signals).
Read and follow all the safety information shown on page 2 before using the
amplifier.
Turn the amplifier off before making any
connections, reconfiguring cables or
setting the rear panel switches.
When you shut down your sound system,
turn off the amplifiers first.
When powering up your system, turn on
the amplifiers last.
Keep the load above 2 ohms for stereo
and 4 ohms for bridge operation.
ON for most
Keep the LIMITER
appliciations.
Make sure the OL lights do not come on
very often. Turn down the amplifier or
mixer/preamp gain if they do. Failure to
do this may lead to the amplifier overheating, speaker distortion and damage.
Save the shipping boxes! You may need
them someday, and you probably don’t
want to have to pay for them again.
•
•
•
•
•
•
•
•
CAUTION
RISK OF ELECTRIC SHOCK
DO NOT OPEN
120 VAC 60 Hz
1500 WATTS
WARNING: TO REDUCE THE RISK OF FIRE OR ELECTRIC SHOCK, DO NOT
EXPOSE THIS EQUIPMENT TO RAIN OR MOISTURE. DO NOT REMOVE COVER.
NO USER SERVICEABLE PARTS INSIDE. REFER SERVICING TO QUALIFIED PERSONNEL.
SERIAL NUMBER
MANUFACTURING DATE
AVIS: RISQUE DE CHOC ELECTRIQUE — NE PAS OUVRIR
CONCEIVED, DESIGNED, AND MANUFACTURED BY MACKIE DESIGNS INC • WOODINVILLE
WA • 98072 • USA • MADE IN USA • PATENTS PENDING • COPYRIGHT ©1999
THE FOLLOWING ARE TRADEMARKS/REGISTERED TRADEMARKS OF MACKIE DESIGN INC.: "MACKIE", "FR SERIES", & THE "RUNNING MAN" FIGURE
MONO
BRIDGE
CH
CH
1
2
+
+
–
–
1 CHANNEL
CHANNEL
CONSTANT DIRECTIVITY
HORN EQ /AIR EQ
LOW CUT
FILTER
INPUT
TYPICAL
35 Hz
STAGE
MONITOR
BAL/UNBAL
OFF
170 Hz
LIMITER
CONSTANT DIRECTIVITY
HORN EQ /AIR EQ
4.5k Hz
4.5k Hz
100 Hz
OFF ON
2k Hz
STEREO MONO BRIDGE
OFF ON
TYPICAL
STAGE
MONITOR
100 Hz
2k Hz
AIR EQ
TYPICAL
TYPICAL
35 Hz
2
INPUT
LOW CUT
FILTER
OFF ON
6k Hz
TYPICAL
SPEAKER OUTPUTS
AMP MODE
6k Hz
AIR EQ
OFF
170 Hz
BAL/UNBAL
TYPICAL
THRU
THRU
5
CONTENTS
ABOUT THIS MANUAL
QUICK START ............................................................... 4
APPLICATION DIAGRAMS .............................................. 7
FEATURE DESCRIPTIONS .............................................. 10
GAIN ............................................................. 10
METERS ......................................................... 11
CHANNEL STATUS ............................................ 11
POWER ......................................................... 11
SPEAKER OUTPUTS ......................................... 12
POWER CORD ................................................ 12
INPUT ........................................................... 13
THRU ............................................................ 13
LOW CUT FILTER ............................................. 14
CD FREQUENCY ............................................... 15
CONSTANT DIRECTIVITY .................................. 15
AMP MODE .................................................... 16
STEREO ......................................................... 16
MONO .......................................................... 16
BRIDGE ......................................................... 16
LIMITER ......................................................... 17
GENERAL PRECAUTIONS .............................................. 18
RACK MOUNTING ................................................ 18
THERMAL CONSIDERATIONS .................................. 18
AC POWER CONSIDERATIONS ................................ 18
INPUT WIRING .................................................... 19
OUTPUT WIRING .................................................. 19
APPENDIX A: Service Info ............................................ 20
WARRANTY SERVICE ............................................ 20
TROUBLESHOOTING ............................................. 20
REPAIR ............................................................... 21
APPENDIX B: Technical Information ................................ 22
OHMS ................................................................. 22
SPECIFICATIONS ................................................... 23
BLOCK DIAGRAM ................................................. 25
APPENDIX C: Bi-amping and Tri-amping .......................... 26
M•800 LIMITED WARRANTY ........................................ 27
PRODUCT REGISTRATION CARD
Attached to back cover
APPLICATION DIAGRAMS
Mackie’s gang of oppressed illustrator droids
have created easy-to-understand diagrams of
popular studio and live-sound setups.
FEATURE DESCRIPTIONS:
Each and every knob, switch, and connector
on the M•800 power amplifier is explained in
depth here. Important and interesting points
are noted using these two icons:
This icon marks information that
is critically important or unique
to the M•800.
This icon leads you to further explanations of features and some
practical tips.
GENERAL PRECAUTIONS
This section discusses important things to
keep in mind when installing and using the
M•800, including rack mounting, AC power,
and wiring.
SERVICE INFORMATION
Appendix A provides some troubleshooting
ideas and service details.
TECHNICAL INFORMATION
Appendix B is for you tech-heads who like to
use a calculator and read specifications.
BI-AMPING AND TRI-AMPING
Appendix C shows how two or three amplifiers can be used in a sound system, with each
playing a different frequency range.
LIMITED WARRANTY
Don’t forget to visit our website: www.mackie.com
for more information about this and other Mackie products.
6
Read this to understand the terms of the
factory warranty.
FROM MIXING
CONSOLE
LEFT MAIN OUT
FROM MIXING
CONSOLE
RIGHT MAIN OUT
TYPICAL 35Hz
(MONO BRIDGE)
800 WATTS
4 OHM LOAD MIN.
400 WATTS CH
2 OHMS LOAD MIN.
STEREO/TYPICAL
TYPICAL 35Hz
CAUTION
RISK OF ELECTRIC SHOCK
DO NOT OPEN
120 VAC 60 Hz
1500 WATTS
WARNING:
TO REDUCE THE RISK OF FIRE OR ELECTRIC SHOCK, DO NOT
EXPOSE THIS EQUIPMENT TO RAIN OR MOISTURE. DO NOT REMOVE COVER.
NO USER SERVICEABLE PARTS INSIDE. REFER SERVICING TO QUALIFIED PERSONNEL.
SERIAL NUMBER
MANUFACTURING DATE
AVIS: RISQUE DE CHOC ELECTRIQUE — NE PAS OUVRIR
CONCEIVED, DESIGNED, AND MANUFACTURED BY MACKIE DESIGNS INC • WOODINVILLE
WA • 98072 • USA • MADE IN USA • PATENTS PENDING • COPYRIGHT ©1999
THE FOLLOWING ARE TRADEMARKS/REGISTERED TRADEMARKS OF MACKIE DESIGN INC.: "MACKIE", "FR SERIES", & THE "RUNNING MAN" FIGURE
MONO
BRIDGE
CH
CH
1
2
+
+
–
–
1 CHANNEL
CHANNEL
CONSTANT DIRECTIVITY
HORN EQ /AIR EQ
LOW CUT
FILTER
INPUT
TYPICAL
35 Hz
STAGE
MONITOR
OFF
170 Hz
OFF ON
2k Hz
STEREO MONO BRIDGE
OFF ON
TYPICAL
35 Hz
TYPICAL
TYPICAL
STAGE
MONITOR
100 Hz
2k Hz
AIR EQ
2
INPUT
LOW CUT
FILTER
OFF ON
6k Hz
TYPICAL
SPEAKER OUTPUTS
CONSTANT DIRECTIVITY
HORN EQ /AIR EQ
LIMITER
4.5k Hz
100 Hz
BAL/UNBAL
AMP MODE
4.5k Hz
6k Hz
AIR EQ
OFF
170 Hz
BAL/UNBAL
TYPICAL
THRU
THRU
LIMITER ON
CD OFF
CD OFF
FROM MIXING
CONSOLE
AUX 1 OUT
FROM MIXING
CONSOLE
AUX 2 OUT
STEREO/TYPICAL
STAGE MONITOR 100Hz
(MONO BRIDGE)
800 WATTS
4 OHM LOAD MIN.
400 WATTS CH
2 OHMS LOAD MIN.
STAGE MONITOR 100Hz
CAUTION
RISK OF ELECTRIC SHOCK
DO NOT OPEN
120 VAC 60 Hz
1500 WATTS
WARNING:
TO REDUCE THE RISK OF FIRE OR ELECTRIC SHOCK, DO NOT
EXPOSE THIS EQUIPMENT TO RAIN OR MOISTURE. DO NOT REMOVE COVER.
NO USER SERVICEABLE PARTS INSIDE. REFER SERVICING TO QUALIFIED PERSONNEL.
SERIAL NUMBER
MANUFACTURING DATE
AVIS: RISQUE DE CHOC ELECTRIQUE — NE PAS OUVRIR
CONCEIVED, DESIGNED, AND MANUFACTURED BY MACKIE DESIGNS INC • WOODINVILLE
WA • 98072 • USA • MADE IN USA • PATENTS PENDING • COPYRIGHT ©1999
THE FOLLOWING ARE TRADEMARKS/REGISTERED TRADEMARKS OF MACKIE DESIGN INC.: "MACKIE", "FR SERIES", & THE "RUNNING MAN" FIGURE
MONO
BRIDGE
CH
CH
1
2
+
1 CHANNEL
CHANNEL
CONSTANT DIRECTIVITY
HORN EQ /AIR EQ
LOW CUT
FILTER
INPUT
+
TYPICAL
35 Hz
STAGE
MONITOR
CONSTANT DIRECTIVITY
HORN EQ /AIR EQ
LIMITER
OFF ON
STEREO MONO BRIDGE
OFF ON
TYPICAL
35 Hz
2
INPUT
LOW CUT
FILTER
4.5k Hz
4.5k Hz
100 Hz
–
AMP MODE
STAGE
MONITOR
100 Hz
OFF ON
–
BAL/UNBAL
OFF
170 Hz
2k Hz
2k Hz
6k Hz
AIR EQ
TYPICAL
SPEAKER OUTPUTS
TYPICAL
TYPICAL
6k Hz
AIR EQ
OFF
170 Hz
BAL/UNBAL
TYPICAL
THRU
THRU
LIMITER ON
CD OFF
CD OFF
M•800: MAIN SPEAKERS AND STAGE MONITORS
FROM MIXING
CONSOLE
MONITOR OUT
NOTE: IN MONO, CH 1 AND CH 2 INPUT SIGNALS ARE SUMMED,
SO YOU CAN USE EITHER INPUT OR BOTH.
SET THE CD OR LOW CUT FILTER CORRECTLY ON
EACH INPUT YOU USE.
MONO
STAGE MONITOR 100Hz
(MONO BRIDGE)
800 WATTS
4 OHM LOAD MIN.
400 WATTS CH
2 OHMS LOAD MIN.
STAGE MONITOR 100Hz
CAUTION
RISK OF ELECTRIC SHOCK
DO NOT OPEN
120 VAC 60 Hz
1500 WATTS
FROM MIXING
CONSOLE
MONITOR OUT
WARNING: TO REDUCE THE RISK OF FIRE OR ELECTRIC SHOCK, DO NOT
EXPOSE THIS EQUIPMENT TO RAIN OR MOISTURE. DO NOT REMOVE COVER.
NO USER SERVICEABLE PARTS INSIDE. REFER SERVICING TO QUALIFIED PERSONNEL.
SERIAL NUMBER
MANUFACTURING DATE
AVIS: RISQUE DE CHOC ELECTRIQUE — NE PAS OUVRIR
CONCEIVED, DESIGNED, AND MANUFACTURED BY MACKIE DESIGNS INC • WOODINVILLE
WA • 98072 • USA • MADE IN USA • PATENTS PENDING • COPYRIGHT ©1999
THE FOLLOWING ARE TRADEMARKS/REGISTERED TRADEMARKS OF MACKIE DESIGN INC.: "MACKIE", "FR SERIES", & THE "RUNNING MAN" FIGURE
MONO
BRIDGE
CH
CH
1
2
+
+
–
–
1 CHANNEL
CHANNEL
CONSTANT DIRECTIVITY
HORN EQ /AIR EQ
LOW CUT
FILTER
INPUT
TYPICAL
35 Hz
STAGE
MONITOR
OFF
170 Hz
OFF ON
2k Hz
STEREO MONO BRIDGE
OFF ON
TYPICAL
STAGE
MONITOR
100 Hz
2k Hz
AIR EQ
TYPICAL
TYPICAL
35 Hz
2
INPUT
LOW CUT
FILTER
OFF ON
6k Hz
TYPICAL
SPEAKER OUTPUTS
CONSTANT DIRECTIVITY
HORN EQ /AIR EQ
LIMITER
4.5k Hz
100 Hz
BAL/UNBAL
AMP MODE
4.5k Hz
6k Hz
AIR EQ
OFF
170 Hz
BAL/UNBAL
TYPICAL
THRU
THRU
LIMITER ON
CD OFF
CD OFF
M•800: MONO OPERATION
7
FROM EXTERNAL CROSSOVER
LOW PASS OUTPUT
FROM EXTERNAL CROSSOVER
LOW PASS OUTPUT
TYPICAL 35Hz
(MONO BRIDGE)
800 WATTS
4 OHM LOAD MIN.
400 WATTS CH
2 OHMS LOAD MIN.
STEREO/TYPICAL
TYPICAL 35Hz
CAUTION
RISK OF ELECTRIC SHOCK
DO NOT OPEN
120 VAC 60 Hz
1500 WATTS
WARNING: TO REDUCE THE RISK OF FIRE OR ELECTRIC SHOCK, DO NOT
EXPOSE THIS EQUIPMENT TO RAIN OR MOISTURE. DO NOT REMOVE COVER.
NO USER SERVICEABLE PARTS INSIDE. REFER SERVICING TO QUALIFIED PERSONNEL.
SERIAL NUMBER
MANUFACTURING DATE
AVIS: RISQUE DE CHOC ELECTRIQUE — NE PAS OUVRIR
CONCEIVED, DESIGNED, AND MANUFACTURED BY MACKIE DESIGNS INC • WOODINVILLE
WA • 98072 • USA • MADE IN USA • PATENTS PENDING • COPYRIGHT ©1999
THE FOLLOWING ARE TRADEMARKS/REGISTERED TRADEMARKS OF MACKIE DESIGN INC.: "MACKIE", "FR SERIES", & THE "RUNNING MAN" FIGURE
MONO
BRIDGE
CH
CH
1
1 CHANNEL
2
+
+
–
–
TYPICAL
35 Hz
STAGE
MONITOR
OFF
170 Hz
AMP MODE
CONSTANT DIRECTIVITY
HORN EQ /AIR EQ
LIMITER
OFF ON
2k Hz
STEREO MONO BRIDGE
OFF ON
TYPICAL
35 Hz
2k Hz
AIR EQ
TYPICAL
TYPICAL
TYPICAL
STAGE
MONITOR
100 Hz
OFF ON
6k Hz
INPUT
LOW CUT
FILTER
4.5k Hz
4.5k Hz
100 Hz
BAL/UNBAL
SPEAKER OUTPUTS
2
CHANNEL
CONSTANT DIRECTIVITY
HORN EQ /AIR EQ
LOW CUT
FILTER
INPUT
6k Hz
AIR EQ
OFF
170 Hz
BAL/UNBAL
TYPICAL
THRU
THRU
LIMITER ON
CD OFF
CD OFF
CONSTANT DIRECTIVITY HORNS
FROM EXTERNAL CROSSOVER
HIGH PASS OUTPUT
FROM EXTERNAL CROSSOVER
HIGH PASS OUTPUT
STEREO/TYPICAL
170Hz
(MONO BRIDGE)
800 WATTS
4 OHM LOAD MIN.
400 WATTS CH
2 OHMS LOAD MIN.
170Hz
CAUTION
RISK OF ELECTRIC SHOCK
DO NOT OPEN
120 VAC 60 Hz
1500 WATTS
WARNING: TO REDUCE THE RISK OF FIRE OR ELECTRIC SHOCK, DO NOT
EXPOSE THIS EQUIPMENT TO RAIN OR MOISTURE. DO NOT REMOVE COVER.
NO USER SERVICEABLE PARTS INSIDE. REFER SERVICING TO QUALIFIED PERSONNEL.
SERIAL NUMBER
MANUFACTURING DATE
AVIS: RISQUE DE CHOC ELECTRIQUE — NE PAS OUVRIR
CONCEIVED, DESIGNED, AND MANUFACTURED BY MACKIE DESIGNS INC • WOODINVILLE
WA • 98072 • USA • MADE IN USA • PATENTS PENDING • COPYRIGHT ©1999
THE FOLLOWING ARE TRADEMARKS/REGISTERED TRADEMARKS OF MACKIE DESIGN INC.: "MACKIE", "FR SERIES", & THE "RUNNING MAN" FIGURE
MONO
BRIDGE
CH
CH
1
2
+
1 CHANNEL
+
TYPICAL
35 Hz
STAGE
MONITOR
AMP MODE
CONSTANT DIRECTIVITY
HORN EQ /AIR EQ
LIMITER
OFF ON
STEREO MONO BRIDGE
OFF ON
INPUT
LOW CUT
FILTER
TYPICAL
35 Hz
4.5k Hz
4.5k Hz
100 Hz
–
2
CHANNEL
CONSTANT DIRECTIVITY
HORN EQ /AIR EQ
LOW CUT
FILTER
INPUT
STAGE
MONITOR
100 Hz
OFF ON
–
BAL/UNBAL
OFF
170 Hz
2k Hz
2k Hz
6k Hz
AIR EQ
TYPICAL
SPEAKER OUTPUTS
TYPICAL
TYPICAL
6k Hz
AIR EQ
OFF
170 Hz
BAL/UNBAL
TYPICAL
THRU
THRU
*
LIMITER ON
CD ON
*
CD ON
*CD HORN EQ SETTING DEPENDS ON
YOUR CD HORN SPECS
M•800: STEREO SYSTEM WITH CD HORNS
NOTE: IN BRIDGE MODE, EACH SPEAKER IS CONNECTED
TO THE RED BINDING POSTS ONLY.
ONLY CHANNEL 1'S GAIN CONTROL WILL WORK.
FROM CONSOLE
LEFT MAIN OUT
LEFT
SPEAKER
35Hz
+
BRIDGE
–
(MONO BRIDGE)
800 WATTS
4 OHM LOAD MIN.
400 WATTS CH
2 OHMS LOAD MIN.
CAUTION
RISK OF ELECTRIC SHOCK
DO NOT OPEN
120 VAC 60 Hz
1500 WATTS
WARNING: TO REDUCE THE RISK OF FIRE OR ELECTRIC SHOCK, DO NOT
EXPOSE THIS EQUIPMENT TO RAIN OR MOISTURE. DO NOT REMOVE COVER.
NO USER SERVICEABLE PARTS INSIDE. REFER SERVICING TO QUALIFIED PERSONNEL.
SERIAL NUMBER
MANUFACTURING DATE
AVIS: RISQUE DE CHOC ELECTRIQUE — NE PAS OUVRIR
CONCEIVED, DESIGNED, AND MANUFACTURED BY MACKIE DESIGNS INC • WOODINVILLE
WA • 98072 • USA • MADE IN USA • PATENTS PENDING • COPYRIGHT ©1999
THE FOLLOWING ARE TRADEMARKS/REGISTERED TRADEMARKS OF MACKIE DESIGN INC.: "MACKIE", "FR SERIES", & THE "RUNNING MAN" FIGURE
MONO
BRIDGE
CH
CH
1
2
+
1 CHANNEL
CHANNEL
CONSTANT DIRECTIVITY
HORN EQ /AIR EQ
LOW CUT
FILTER
INPUT
+
TYPICAL
35 Hz
STAGE
MONITOR
CONSTANT DIRECTIVITY
HORN EQ /AIR EQ
LIMITER
4.5k Hz
4.5k Hz
100 Hz
–
AMP MODE
OFF ON
STEREO MONO BRIDGE
OFF ON
TYPICAL
35 Hz
2
INPUT
LOW CUT
FILTER
STAGE
MONITOR
100 Hz
OFF ON
–
BAL/UNBAL
OFF
170 Hz
2k Hz
2k Hz
6k Hz
AIR EQ
TYPICAL
SPEAKER OUTPUTS
TYPICAL
6k Hz
AIR EQ
OFF
170 Hz
LIMITER ON
FROM CONSOLE
RIGHT MAIN OUT
RIGHT
SPEAKER
BAL/UNBAL
TYPICAL
THRU
CD OFF
BRIDGE
35Hz
+
TYPICAL
THRU
NOTE 2: THE AMPLIFIER CAN ACCEPT SIGNALS INTO
CH. 1 OR CH. 2, OR BOTH. IF YOU USE BOTH, THE TWO INPUT
SIGNALS WILL BE SUMMED AND THE RESULT SENT TO YOUR
SINGLE SPEAKER. ONLY CHANNEL 1'S GAIN CONTROL
WILL WORK, BUT YOU MUST ADJUST THE CD-EQ AND
THE LOW-CUT FILTER CORRECTLY ON EACH INPUT USED.
–
(MONO BRIDGE)
800 WATTS
4 OHM LOAD MIN.
400 WATTS CH
2 OHMS LOAD MIN.
CAUTION
RISK OF ELECTRIC SHOCK
DO NOT OPEN
120 VAC 60 Hz
1500 WATTS
WARNING: TO REDUCE THE RISK OF FIRE OR ELECTRIC SHOCK, DO NOT
EXPOSE THIS EQUIPMENT TO RAIN OR MOISTURE. DO NOT REMOVE COVER.
NO USER SERVICEABLE PARTS INSIDE. REFER SERVICING TO QUALIFIED PERSONNEL.
SERIAL NUMBER
MANUFACTURING DATE
AVIS: RISQUE DE CHOC ELECTRIQUE — NE PAS OUVRIR
CONCEIVED, DESIGNED, AND MANUFACTURED BY MACKIE DESIGNS INC • WOODINVILLE
WA • 98072 • USA • MADE IN USA • PATENTS PENDING • COPYRIGHT ©1999
THE FOLLOWING ARE TRADEMARKS/REGISTERED TRADEMARKS OF MACKIE DESIGN INC.: "MACKIE", "FR SERIES", & THE "RUNNING MAN" FIGURE
MONO
BRIDGE
CH
CH
1
2
+
+
–
–
1 CHANNEL
CHANNEL
CONSTANT DIRECTIVITY
HORN EQ /AIR EQ
LOW CUT
FILTER
INPUT
TYPICAL
35 Hz
STAGE
MONITOR
OFF
170 Hz
CONSTANT DIRECTIVITY
HORN EQ /AIR EQ
4.5k Hz
OFF ON
2k Hz
STEREO MONO BRIDGE
OFF ON
TYPICAL
TYPICAL
STAGE
MONITOR
100 Hz
2k Hz
AIR EQ
THRU
TYPICAL
35 Hz
6k Hz
AIR EQ
OFF
170 Hz
BAL/UNBAL
TYPICAL
THRU
CD OFF
LIMITER ON
M•800: STEREO SYSTEM USING TWO AMPLIFIERS IN BRIDGED MODE
8
2
INPUT
LOW CUT
FILTER
OFF ON
6k Hz
TYPICAL
SPEAKER OUTPUTS
LIMITER
4.5k Hz
100 Hz
BAL/UNBAL
AMP MODE
APPLICATION DIAGRAMS
LINE LEVEL OUTPUTS
CH 1
CH 2
INPUT
GUITAR PREAMPLIFIER/
EFFECTS PROCESSOR
WITH STEREO OUTPUTS
GOOCH
GOOCH
TYPICAL 35Hz
STEREO/TYPICAL
TYPICAL 35Hz
CAUTION
WARNING:
TO REDUCE THE RISK OF FIRE OR ELECTRIC SHOCK, DO NOT
EXPOSE THIS EQUIPMENT TO RAIN OR MOISTURE. DO NOT REMOVE COVER.
NO USER SERVICEABLE PARTS INSIDE. REFER SERVICING TO QUALIFIED PERSONNEL.
RISK OF ELECTRIC SHOCK
DO NOT OPEN
120 VAC 60 Hz
1500 WATTS
SERIAL NUMBER
MANUFACTURING DATE
AVIS: RISQUE DE CHOC ELECTRIQUE — NE PAS OUVRIR
CONCEIVED, DESIGNED, AND MANUFACTURED BY MACKIE DESIGNS INC • WOODINVILLE
WA • 98072 • USA • MADE IN USA • PATENTS PENDING • COPYRIGHT ©1999
THE FOLLOWING ARE TRADEMARKS/REGISTERED TRADEMARKS OF MACKIE DESIGN INC.: "MACKIE", "FR SERIES", & THE "RUNNING MAN" FIGURE
MONO
BRIDGE
CH
CH
1
2
+
+
–
–
1 CHANNEL
TYPICAL
35 Hz
STAGE
MONITOR
170 Hz
OFF
CONSTANT DIRECTIVITY
HORN EQ /AIR EQ
LIMITER
AMP MODE
OFF ON
2k Hz
STEREO MONO BRIDGE
OFF ON
TYPICAL
35 Hz
2k Hz
AIR EQ
TYPICAL
TYPICAL
STAGE
MONITOR
100 Hz
OFF ON
6k Hz
TYPICAL
INPUT
LOW CUT
FILTER
4.5k Hz
4.5k Hz
100 Hz
BAL/UNBAL
SPEAKER OUTPUTS
2
CHANNEL
CONSTANT DIRECTIVITY
HORN EQ /AIR EQ
LOW CUT
FILTER
INPUT
6k Hz
AIR EQ
170 Hz
OFF
BAL/UNBAL
TYPICAL
THRU
THRU
LIMITER ON
CD OFF
CD OFF
M•800 IN STEREO MODE WITH A GUITAR PREAMPLIFIER/PROCESSOR
GUITAR PREAMPLIFIER
WITH MONO OUTPUT
LINE LEVEL OUTPUTS
CH 1
MONO
INPUT
CH 2
THE SPEAKER IS CONNECTED TO
THE RED BINDING POSTS ONLY.
YOU CAN USE EITHER CH 1 AND
CH 2 INPUTS (BUT CH 2'S GAIN
CONTROL HAS NO EFFECT).
GOOCH
+
35Hz
–
BRIDGE
CAUTION
RISK OF ELECTRIC SHOCK
DO NOT OPEN
120 VAC 60 Hz
1500 WATTS
WARNING:
TO REDUCE THE RISK OF FIRE OR ELECTRIC SHOCK, DO NOT
EXPOSE THIS EQUIPMENT TO RAIN OR MOISTURE. DO NOT REMOVE COVER.
NO USER SERVICEABLE PARTS INSIDE. REFER SERVICING TO QUALIFIED PERSONNEL.
SERIAL NUMBER
MANUFACTURING DATE
AVIS: RISQUE DE CHOC ELECTRIQUE — NE PAS OUVRIR
CONCEIVED, DESIGNED, AND MANUFACTURED BY MACKIE DESIGNS INC • WOODINVILLE
WA • 98072 • USA • MADE IN USA • PATENTS PENDING • COPYRIGHT ©1999
THE FOLLOWING ARE TRADEMARKS/REGISTERED TRADEMARKS OF MACKIE DESIGN INC.: "MACKIE", "FR SERIES", & THE "RUNNING MAN" FIGURE
CH
CH
1
2
+
+
–
–
1 CHANNEL
CHANNEL
CONSTANT DIRECTIVITY
HORN EQ /AIR EQ
LOW CUT
FILTER
INPUT
TYPICAL
35 Hz
STAGE
MONITOR
OFF
170 Hz
OFF ON
2k Hz
CONSTANT DIRECTIVITY
HORN EQ /AIR EQ
STEREO MONO BRIDGE
OFF ON
TYPICAL
TYPICAL
STAGE
MONITOR
100 Hz
2k Hz
AIR EQ
THRU
TYPICAL
35 Hz
2
INPUT
LOW CUT
FILTER
OFF ON
6k Hz
TYPICAL
SPEAKER OUTPUTS
LIMITER
4.5k Hz
100 Hz
BAL/UNBAL
AMP MODE
4.5k Hz
6k Hz
AIR EQ
OFF
170 Hz
BAL/UNBAL
TYPICAL
THRU
CD OFF
LIMITER ON
M•800 IN BRIDGE MODE WITH A BASS GUITAR PREAMPLIFIER
9
FEATURE DESCRIPTIONS
LET’S TWIST A GAIN
GAIN/dB
These are completely independent volume
controls for each channel. Instead of having an
arbitary scale, they are carefully calibrated:
• The inner ring graphic is labeled in dB,
though this indicates the amplifier’s voltage gain,
think of it as increasing decibels from off to 28.
• The outer ring shows the input sensitivity
in volts. This is the amount of voltage required
from a mixer to drive the amp to it’s rated power
output (225 watts into 4 ohms). With the control fully clockwise, it will require an input level
of 1.23 volts rms to reach rated power. This is
equivalent to putting in a signal level of +4 dBu.
If you have the knob set at 3v, it will require
3 volts from your mixer to reach full power.
This will rob the mixer of headroom, because it
takes extra voltage to drive the amp. Rotating
the knob to 2v means you will need 2 volts from
your mixer, which improves the mixer headroom. Rotating the GAIN control all the way
clockwise provides the best mixer headroom
under normal operation.
Note: The calibration marks only apply to
stereo or mono operation using speakers of
4 ohms impedance.
Like all amplifier controls, you’ll typically
determine the optimal settings during installation or sound check, then leave them alone,
using your signal source (mixer/preamp) to
control listening levels as you work. Or play.
You may wonder why we didn’t use just one
stereo control to control both sides. That’s in
case your application requires a left/right imbalance (due to an irregularly shaped room),
an irregularly shaped friend, or if you’re using
the two sides for completely different purposes
(such as monitor in CH 1 and side-fill in CH 2).
3v
18
20
2v
14
22
12
24
26
6
0
0
28
1v
1.23v (+4dBu)
FULL SYMMETRY DUAL DIFFERENTIAL HIGH CURRENT DESIGN
CH
GAIN/dB
1
16
GAIN/dB
SIG
3v
18
20
2v
14
22
12
24
26
6
0
0
SENSITIVITY
SENSITIVITY
OL
OL
–3
–6
–9
– 20
–3
–6
–9
– 20
1&2
10
NORM
HOT
CH
20
ON
2v
14
22
12
24
OFF
26
6
CH STATUS
28
1v
1.23v (+4dBu)
18
PROFESSIONAL POWER AMPLIFIER
2
3v
16
0
0
16
Here are some more examples of how you
might use the GAIN controls:
• When you are in a small room where loud
volume is not required, having the amp gain
controls turned fully clockwise would require
you to keep the mixer faders down exceptionally
low. In this case, first set the mixer faders to
unity gain, adjust the mixer’s input trim controls
to optimum, then rotate each M•800 GAIN control until the desired volume is obtained.
• If you have high efficiency speakers and a
high gain preamp, you may hear “hiss” in your
speakers. This can be fixed by turning the
GAIN controls down a few notches.
• If you are not blessed with a mixer or
preamp, it is possible to connect a source component directly to the amplifier. For example,
you can connect a CD player directly to the inputs. You MUST make sure that the amplifier
GAIN controls are turned down before you
start the CD, then bring them up to a nice
level. This direct connection only applies to
line-level components. It does not apply to
turntables, microphones, or instruments, as
these need preamplification and equalization.
The GAIN controls differ in operation between stereo, dual mono, and bridged modes:
STEREO and MONO:
Each control is independent;
CH 1 GAIN only changes CH 1,
CH 2 GAIN only changes CH 2.
BRIDGE:
Only the CH 1 GAIN control will work
because the CH 2 control is bypassed
internally.
SENSITIVITY
28
1v
1.23v (+4dBu)
POWER
METERS
The meters indicate the output level in
decibels referenced to the clipping point of the
amplifier.
The top LED is labeled
OL
OL
OL (short for Overload).
If this comes on, the
–3
–3
amplifier will start to dis–6
–6
tort, and the audio signals
–9
–9
may “clip”.
Ideally, the –20, –9,
– 20
– 20
–6, and –3 LEDs will light
CH STATUS
at normal signal levels,
1&2
while the OL LED may
NORM
HOT
blink occasionally during
peak moments.
If the OL (Overload) LED is blinking frequently or continuously, turn down the source
signal (e.g. the mixer’s master faders or the
preamp gain). If this is not done, you may overheat the amplifier and upset the neighbors.
DO NOT BLOCK THE
VENTILATION PORTS.
The amplifier fan draws
air from the front and out
through the side panels.
The amp needs plenty of
fresh air to stay cool.
The heaviest load the M•800 can tolerate is
2 ohms per channel (4 ohms in bridged mode).
If you have a set of speakers wired in parallel, be
sure the load isn’t adding up to less than 2 ohms.
Anything below 2 ohms can trigger the protection circuits.
The NORM and HOT LEDs are only affected
by the temperature, not by any other fault.
POWER
To make the amp operate, push the top half
of the POWER switch. It clicks into place and a
soothing green light adjacent to it glows. To
turn the amp off, push the lower half. It’ll click
again and the green light will extinguish.
CHANNEL STATUS
During normal operation, the NORM LED
remains lit, indicating that temperatures
within the M•800 are at a safe level. The internal 2-speed cooling fan will run at slow speed.
If the internal temperature of the amplifier
rises to 60°C, the fan kicks into high speed,
moving more air through the amplifier to cool
the output transistors.
If the temperature rises to an unsafe level
(85°C), the HOT LED lights and both outputs of
the overheated amplifier will mute. The fan will
remain running at high speed until the internal
temperature drops to 60°C. When this occurs,
the NORM LED lights, and the amplifier speaker
outputs become active again.
Be Aware: If the HOT LED
comes on frequently, something is overworking the
M•800 or it’s not properly
ventilated. Look at each of
the conditions below and
determine what is causing the amplifier to
overheat.
• Improper ventilation
• High ambient temperatures
• Overdriving the amplifier into clipping
• Driving hard into low impedance loads
• Frayed or partially shorted speaker
cables
• Defective or internally shorted speakers
When you turn on the
M•800, a built-in delay circuit prevents any pops or
thumps from being transmitted to the speakers.
Although the delay will
help, you should still follow these precautions:
• When powering up your system, turn on
the amplifiers last.
• When turning off your system, turn off
the amplifiers first.
• Make sure that you turn down your signal
source, mixer or preamp before you turn
on the amplifier.
• If you have multiple amps, you should
turn them on one at a time. This will prevent blowing a circuit breaker if they all
come on at the same time.
11
POWER CORD
The M•800 is supplied with a detachable
power cord. Make sure the power switch is off
before firmly attaching the cord to the amplifier. Fit the other end into an AC outlet
properly configured for the type of plug on the
power cord and for the voltage rating of the
amplifier.
For current-delivery purposes, the M•800’s
voltage source (wall outlet, extension cords, or
power strips) must be capable of continuously
delivering 12 amps (US model). And for safety
reasons, that source must be a “3-prong” outlet
with hot, neutral, and ground terminals. We’re
dealing with some big-time electricity here —
don’t mess with it. See “AC Power Considerations” on page 18.
SPEAKER OUTPUTS
To use the binding post outputs, you can
terminate your speaker cables with single or
dual banana plugs, or bare wire.
To use banana plugs:
First pull off the small
plastic end caps from
each of the binding posts
to reveal the holes. It is
important to handtighten each post before
plugging in the bananas.
G
N
D
To use bare wire:
Unscrew the amp’s binding posts, insert your
stripped wires (stripped
about 3/8" back) into the
side holes and retighten
the posts (finger tight is fine — do not use a
wrench!). Be careful that no wire strands
touch the chassis or other terminals.
(MONO BRIDGE)
800 WATTS
4 OHM LOAD MIN.
400 WATTS CH
2 OHMS LOAD MIN.
The red posts are labeled “+,” which means
positive, and the black posts are labeled “–” for
negative. The amplifier is “common grounded,”
that is, both black posts are connected internally to ground.
Use high-quality speaker cable (16 gauge or
thicker) to connect the positive outputs of the
M•800 to the speaker’s positive inputs, and the
negative outputs to the speaker’s negative inputs. You probably know the importance of
getting these connections correct — if one
side is hooked up “out of phase,” this will cause
a reduction in the bass output and your pay.
If you’re using the M•800 in BRIDGE mode,
the speaker connects across the red posts only
(see page 16 for details).
In addition to the binding posts, the M•800
has 1/4" TS (tip-sleeve ) outputs, so you can use
speaker cables with 1/4" TS plugs. The tip is
positive (+) and the sleeve is negative (–).
They’re wired in parallel with the binding posts
and behave exactly the same (except they can’t
be used in BRIDGE mode).
You can use both the 1/4" jacks and the
binding posts simultaneously. Just remember
that doing so creates two parallel loads.
Be Aware: Should you
choose to terminate your
speaker cables with 1/4"
TS plugs, make sure nobody confuses these
cables with line-level
cables, (i.e., guitar cords). Guitar cords are
not designed to handle the high current output of power amplifiers.
Furthermore, line-level inputs (like the signal input on a mixer) are not designed to
handle speaker-level voltages. The results are
not pretty, and can ruin a mixer technician’s
whole day.
CAUTION
RISK OF ELECTRIC SHOCK
DO NOT OPEN
120 VAC 60 Hz
1500 WATTS
WARNING: TO REDUCE THE RISK OF FIRE OR ELECTRIC SHOCK, DO NOT
EXPOSE THIS EQUIPMENT TO RAIN OR MOISTURE. DO NOT REMOVE COVER.
NO USER SERVICEABLE PARTS INSIDE. REFER SERVICING TO QUALIFIED PERSONNEL.
SERIAL NUMBER
MANUFACTURING DATE
AVIS: RISQUE DE CHOC ELECTRIQUE — NE PAS OUVRIR
CONCEIVED, DESIGNED, AND MANUFACTURED BY MACKIE DESIGNS INC • WOODINVILLE
WA • 98072 • USA • MADE IN USA • PATENTS PENDING • COPYRIGHT ©1999
THE FOLLOWING ARE TRADEMARKS/REGISTERED TRADEMARKS OF MACKIE DESIGN INC.: "MACKIE", "FR SERIES", & THE "RUNNING MAN" FIGURE
MONO
BRIDGE
CH
CH
1
2
+
+
–
–
1 CHANNEL
CHANNEL
CONSTANT DIRECTIVITY
HORN EQ /AIR EQ
LOW CUT
FILTER
INPUT
TYPICAL
35 Hz
STAGE
MONITOR
BAL/UNBAL
OFF
170 Hz
12
CONSTANT DIRECTIVITY
HORN EQ /AIR EQ
4.5k Hz
OFF ON
2k Hz
STEREO MONO BRIDGE
OFF ON
TYPICAL
STAGE
MONITOR
100 Hz
2k Hz
AIR EQ
TYPICAL
TYPICAL
35 Hz
2
INPUT
LOW CUT
FILTER
OFF ON
6k Hz
TYPICAL
THRU
LIMITER
4.5k Hz
100 Hz
SPEAKER OUTPUTS
AMP MODE
6k Hz
AIR EQ
OFF
170 Hz
BAL/UNBAL
TYPICAL
THRU
If you’re using low impedance loads at high power
levels, we recommend that
you use the binding post
speaker outputs rather
than the 1/4" TS jacks. Although 1/4" jacks and plugs are convenient and
easy to use, they are not designed to handle
high-level currents.
Make sure that the amplifier is off before
making connections or reconfiguring the signal
routing.
INPUT
The M•800 gives you a choice of inputs — it
has XLR as well as 1/4" TRS (Tip-Ring-Sleeve)
input jacks. Sonically (and electrically) they’re
identical, so choose either one. Since these two
inputs are in parallel, don’t use both at the same
time.
The amplifier expects to see a nominal signal level anywhere between the –10 dBV
“semipro” and +4 dBu “pro” standards, meaning almost any line-level mixer or other device
can be plugged into the amp’s INPUTs. Use the
GAIN controls to adjust the gain of the amplifier to match the signal level you’re using.
Each type of input can be used with either
balanced or unbalanced signals.
Balanced
Use the balanced connections if your source
has balanced outputs. This will greatly reduce
any noise picked up in your system.
When connecting a balanced signal using
the XLR or 1/4" jacks, they’re wired thusly, per
AES (Audio Engineering Society) standards:
Hot (+)
Cold (–)
Shield (Ground)
XLR
Pin 2
Pin 3
Pin 1
TRS
Tip
Ring
Sleeve
2
SHIELD
HOT
COLD
SHIELD
COLD 3
HOT
1
3
1
3
1
2
SHIELD
COLD
2
HOT
Balanced XLR Plug (prior to Lunar orbit insertion)
RING SLEEVE
SLEEVE RING TIP
TIP
RING (COLD)
TIP (HOT)
SLEEVE (SHIELD)
Balanced 1⁄4" TRS Plug
Unbalanced
Unbalanced TS (Tip-Sleeve) lines can be
accommodated via the TRS jack. Make sure
the cord terminates with a TS plug (like a guitar plug), or if it’s a TRS plug (like a
headphone plug), make sure the ring is tied to
the shield, preferably at the source end.
SLEEVE
SLEEVE
TIP
TIP
RING (COLD)
TIP (HOT)
SLEEVE (SHIELD)
Unbalanced 1/4" TS Plug
THRU
The THRU jacks allow you to feed the input
signal to the inputs of other amplifiers. In this
way, multiple amplifiers can receive an input
signal from your single mixer or preamp. This
is accomplished as follows:
• Make sure all your equipment is turned
off before making any connections.
• Plug the signal source outputs into the
first amp’s INPUTs.
• Patch from that amp’s THRU jacks to the
next amp’s INPUT, and so on, daisy-chaining to
other amps in your system (assuming your
mixer has low impedance outputs).
To prevent excessive loading
of your source, a general rule
of thumb is to maintain a
load impedance 10 times or
more than the source impedance . If your console has an
output impedance of 100 ohms, then you can
daisy-chain up to twenty M•800 amplifiers,
which presents a load of 1000 ohms to the console (input impedance of 20 kohms divided by
20 amplifiers = 1000 ohms).
The THRU jacks can also be used to relay
the input signals on to other devices such as a
DAT or cassette recorder. They are wired in
parallel with the XLR and TRS INPUTs, so the
signals coming out of the THRU jacks are exactly the same as the signals going into the
amp, unaffected by any of the amp’s switches
and controls.
13
You can use the THRU jack
as an input, if necessary,
since it’s wired in parallel
with the other input connectors.
You can also use the
1/4" TRS INPUT jacks as THRU jacks. Simply
connect the 1/4" TRS INPUT jacks on the first
amplifier to the TRS 1/4" INPUT jacks on the
second amplifier using 3-conductor shielded
cables with TRS plugs on both ends.
Warning: If you are using a
balanced input to the first
amp, do not use TS unbalanced connections to feed
other amplifiers. This will
unbalance the input connections of your first amp by grounding pin 3.
In order to match the output bandwidth with
your particular speaker system, the M•800 amplifier has a tunable LOW CUT FILTER. The
frequencies are clearly marked along the knob’s
travel:
• Fully counterclockwise, the frequency is below 10Hz, effectively bypassing the filter.
• Center detent is 35Hz, labeled TYPICAL,
since few woofers actually go below that.
• 3/4 of the way up is labeled STAGE
MONITOR, 100Hz, perfect for, well,
stage monitors (they seldom reproduce
below 100Hz; besides, it prevents low frequency “leakage” into the house).
• Fully clockwise is labeled 170Hz.
LOW CUT
FILTER
LOW CUT FILTER
Every woofer has frequency response specifications. It’s usually expressed in Hertz (or
cycles per second), like “40Hz–300Hz.” The
“40Hz” refers to the low-frequency point (usually, but not always) where the speaker’s
output drops by 3 dB, and will “roll off” completely as the frequency goes down. There is no
point in sending a woofer any frequencies it
can’t reproduce — you can’t hear it, and worse
yet, it’s a waste of amplifier power that can be
better used reproducing frequencies you can hear.
Level, dB
5dB
0dB
–5dB
–10dB
–15dB
1Hz
L
10Hz
C
100Hz
1kHz
10kHz 20kHz
Frequency, Hz
Fil
Low Cut Filter Frequency Response
(MONO BRIDGE)
800 WATTS
4 OHM LOAD MIN.
400 WATTS CH
2 OHMS LOAD MIN.
TYPICAL
35 Hz
STAGE
MONITOR
100 Hz
170 Hz
OFF
So, grab your woofer’s spec sheet and find
the low roll-off spec. Then set the M•800’s
LOW CUT FILTER at the same frequency.
If you do this correctly (and make sure the
meters are happy), you’ll never again see your
woofer moving sporadically without audible
signal. Your system will play louder and
cleaner, and you may never blow another
woofer again!
CAUTION
RISK OF ELECTRIC SHOCK
DO NOT OPEN
120 VAC 60 Hz
1500 WATTS
WARNING: TO REDUCE THE RISK OF FIRE OR ELECTRIC SHOCK, DO NOT
EXPOSE THIS EQUIPMENT TO RAIN OR MOISTURE. DO NOT REMOVE COVER.
NO USER SERVICEABLE PARTS INSIDE. REFER SERVICING TO QUALIFIED PERSONNEL.
SERIAL NUMBER
MANUFACTURING DATE
AVIS: RISQUE DE CHOC ELECTRIQUE — NE PAS OUVRIR
CONCEIVED, DESIGNED, AND MANUFACTURED BY MACKIE DESIGNS INC • WOODINVILLE
WA • 98072 • USA • MADE IN USA • PATENTS PENDING • COPYRIGHT ©1999
THE FOLLOWING ARE TRADEMARKS/REGISTERED TRADEMARKS OF MACKIE DESIGN INC.: "MACKIE", "FR SERIES", & THE "RUNNING MAN" FIGURE
MONO
BRIDGE
CH
CH
1
2
+
+
–
–
1 CHANNEL
CHANNEL
CONSTANT DIRECTIVITY
HORN EQ /AIR EQ
LOW CUT
FILTER
INPUT
TYPICAL
35 Hz
STAGE
MONITOR
BAL/UNBAL
OFF
170 Hz
14
CONSTANT DIRECTIVITY
HORN EQ /AIR EQ
4.5k Hz
OFF ON
2k Hz
STEREO MONO BRIDGE
OFF ON
TYPICAL
STAGE
MONITOR
100 Hz
2k Hz
AIR EQ
TYPICAL
TYPICAL
35 Hz
2
INPUT
LOW CUT
FILTER
OFF ON
6k Hz
TYPICAL
THRU
LIMITER
4.5k Hz
100 Hz
SPEAKER OUTPUTS
AMP MODE
6k Hz
AIR EQ
OFF
170 Hz
BAL/UNBAL
TYPICAL
THRU
CONSTANT DIRECTIVITY SWITCH
If you don’t have constant directivity horns,
you can leave this switch OFF.
Compression drivers mounted on constantdirectivity horns require compensation in the
form of a high-frequency boost, with its “knee”
set somewhere between 2kHz and 6kHz. Until
now, you’d have to resort to external crossovers
or worse yet, graphic EQ modules. Both of
these are fraught with limitations, not to mention adding cost, rack space requirements, and
complexity to your system.
The M•800 power amplifier eliminates the
need for any of these external devices — it has
the compensation circuitry already built in,
and using it is a breeze.
CD FREQUENCY
Your compression drivers’ spec sheet should
have a suggested frequency for compensation
boost. If so, just turn the CONSTANT DIRECTIVITY switch ON and set its knob to match
that frequency. If your spec sheet doesn’t have
that information, you can simply adjust the
frequency knob by ear, preferably using the
same music as the actual performance (3.5kHz
is a good place to start).
15dB
10dB
5dB
CONSTANT DIRECTIVITY
HORN EQ /AIR EQ
4.5k Hz
OFF ON
2k Hz
6k Hz
AIR EQ
TYPICAL
More on Constant
Directivity Horns
All high-frequency compression drivers have an inherent
roll-off of about 6 dB per octave above about 3kHz. The
exact frequency at which the roll-off occurs
(called the mass breakpoint) depends on the materials used, the mass of the moving parts
(diaphragm and voice coil) and the strength of
the magnet. The CONSTANT DIRECTIVITY
HORN EQ control on the M•800 compensates for
this natural roll-off in the power response of the
compression driver coupled to a CD horn, with
the end result of flat-frequency response (constant) over a wide coverage angle (directivity).
0dB
–5dB
20Hz
100Hz
1kHz
10k Hz 20k Hz
Constant Directivity EQ
Even if you don’t have CD horns, you can
use the CONSTANT DIRECTIVITY feature to
enhance your EQ curve. By setting the frequency knob fully clockwise, you introduce a
very high-frequency boost to the signal (above
6kHz). And in Mackie-land, this gentle boost
has a name: AIR, as seen on our SR series of
consoles. By boosting these high frequencies,
AIR will breathe life into your mix, making
cymbals brighter and vocals silkier.
Speaking of Mackie SR consoles: If you use
the AIR feature on an SR console as well as the
AIR feature just described on the M•800, you
may be overdoing it. You won’t hyper-ventilate
or anything, but it might cause your audience
to experience ear fatigue from too much highfrequency content. Too much of a good thing,
perhaps.
15
AMP MODE
This three-way switch determines what kind
of amplifier you want the M•800 to be (or not
to be — what was the question?)
The switch alters the input signal routing
within the amplifier. Shipped from the factory, it
is set to STEREO, correct for about 90% of applications (hence the TYPICAL indicator near it).
The switch should only be configured when
the amplifer is turned off.
STEREO
This is the typical setup for amplifying stereo signals. There are separate left and right
inputs, and separate left and right outputs. The
two channels are independent of each other.
MONO
This mode (also known as Dual-Mono) is
used to send the same signal to each speaker.
• There are one or two inputs and two
mono outputs.
• You can feed either channel or both.
• The inputs are summed (before the
GAIN controls) and the mix sent to both
amplifier channels.
• The GAIN controls are still independent.
• The speakers are connected as for
normal stereo use.
BRIDGE
Some examples of using the BRIDGE mode:
• Two M•800s can be used to create a
powerful stereo system, each driving one
speaker.
• You can use one amp to power a mono
system, such a center speaker or PA.
• Multiple M•800s can be used in theater
surround systems, each driving one
speaker.
To use the M•800 in BRIDGE mode:
1. Turn off the power.
2. Set the AMP MODE switch to BRIDGE.
3. Connect the positive side of the speaker
cable to the CH 1 red (+) binding post.
4. Connect the negative side of the speaker
cable to the CH 2 red (+) binding post.
5. Use only the CH 1 GAIN control.
6. The M•800 black binding posts are unused.
WARNING: In BRIDGE
mode, both connections to
your speaker are live; that
is, neither is grounded
through the chassis (because the M•800 black
binding posts are not used).
Take great care to read and follow all safety
instructions. The M•800 is capable of up to
85V AC across the speaker terminals.
Note: The calibration scales of the GAIN
control only apply when using 4 ohm speakers.
In BRIDGE mode (also known as BridgedMono) the two channels of the M•800 are
combined internally and can deliver up to 800
watts into a single 4 ohm speaker.
• There are one or two inputs and one
mono output.
• You can feed either channel or both.
• CH 2’s GAIN control will have no effect.
• The amplifier channels are internally
combined in series.
• Only one speaker is used and it is
connected in a special way. Read on.
(MONO BRIDGE)
800 WATTS
4 OHM LOAD MIN.
400 WATTS CH
2 OHMS LOAD MIN.
CAUTION
RISK OF ELECTRIC SHOCK
DO NOT OPEN
120 VAC 60 Hz
1500 WATTS
WARNING: TO REDUCE THE RISK OF FIRE OR ELECTRIC SHOCK, DO NOT
EXPOSE THIS EQUIPMENT TO RAIN OR MOISTURE. DO NOT REMOVE COVER.
NO USER SERVICEABLE PARTS INSIDE. REFER SERVICING TO QUALIFIED PERSONNEL.
SERIAL NUMBER
MANUFACTURING DATE
AVIS: RISQUE DE CHOC ELECTRIQUE — NE PAS OUVRIR
CONCEIVED, DESIGNED, AND MANUFACTURED BY MACKIE DESIGNS INC • WOODINVILLE
WA • 98072 • USA • MADE IN USA • PATENTS PENDING • COPYRIGHT ©1999
THE FOLLOWING ARE TRADEMARKS/REGISTERED TRADEMARKS OF MACKIE DESIGN INC.: "MACKIE", "FR SERIES", & THE "RUNNING MAN" FIGURE
MONO
BRIDGE
1 CHANNEL
CH
CH
1
2
+
+
–
–
CHANNEL
CONSTANT DIRECTIVITY
HORN EQ /AIR EQ
LOW CUT
FILTER
INPUT
TYPICAL
35 Hz
STAGE
MONITOR
BAL/UNBAL
OFF
170 Hz
16
CONSTANT DIRECTIVITY
HORN EQ /AIR EQ
4.5k Hz
OFF ON
2k Hz
STEREO MONO BRIDGE
OFF ON
TYPICAL
STAGE
MONITOR
100 Hz
2k Hz
AIR EQ
TYPICAL
TYPICAL
35 Hz
2
INPUT
LOW CUT
FILTER
OFF ON
6k Hz
TYPICAL
THRU
LIMITER
4.5k Hz
100 Hz
SPEAKER OUTPUTS
AMP MODE
6k Hz
AIR EQ
OFF
170 Hz
BAL/UNBAL
TYPICAL
THRU
LIMITER
LIMITER ON (TYPICAL). This is the normal
configuration with protective limiting.
LIMITER OFF is without protective limiting.
The limiter is not designed to alter your
sound — it’s just there to protect your speakers
from the effects of clipping. Its effect is virtually
transparent, meaning you probably won’t even
notice any audible difference. We recommend
that you leave it engaged, hence the TYPICAL
label below it.
If you’re working at quiet levels all the time,
or you’ve already placed a compressor/limiter
in the signal path, or if you just hate compression, you can leave the limiter out of the
circuit. By design, the limiter is out of circuit
when not called upon.
The limiter works independently on each
channel. It senses when the amplifier channel
is about to be overdriven and attenuates the
overall level just enough to keep the signal
from clipping. Clipping occurs when the output
voltage no longer linearly follows the input
voltage and simply stops. This causes a sine
wave to “square off,” and the average power going into the speaker is roughly double that of a
sine wave. Square waves sound awful, and
could possibly damage your speakers and/or
your reputation.
AC volts
Sample Audio signal
As the amplifier output voltage increases, it will
eventually run into the internal DC power supplies and
start to flatten out. The flat
tops represent a DC voltage
reaching your speakers, which interrupts the
natural movement of the speaker’s voice coil.
High frequency harmonics are also produced
which can play havoc with your tweeters.
Speakers are designed to handle good clean
continuous signals, but give them a clipped
signal and even high powered speakers can be
damaged. For example, a 100 watt amplifier
that is clipping, can damage speakers that are
rated at 400 watts.
The limiter is especially handy when you’re
working with loud output levels. Having the
signal spikes (kick drum, for instance) attenuated a bit can actually increase the apparent
loudness of the overall mix without diminishing the “power” behind the spikes.
It is also a useful protection device for those
unexpected moments, such as a mike stand
falling over, dropping the tone arm, or an
attack of killer feedback.
Be Forewarned: With the
limiter engaged, you can
still overdrive the amplifier
into clipping and cause
distortion. It just takes a
stronger signal to do it. So
even with the LIMITER turned on, you must pay
attention to the OL LEDs.
time
Clipped Audio signal
AC volts
V+
0
V–
time
Clipped 'do
17
GENERAL PRECAUTIONS
RACK MOUNTING
The M•800 amp requires two rack space
units (2U = 3.5"). It also requires 16.25" depth
inside the rack, including the rear supports.
When designing your rack, put the heavier
items at the bottom and the lighter items toward the top.
Secure the front panel of the amplifier to
the front of the rack using four screws with soft
washers to prevent scratching the panel. In addition, because of the weight of the amplifier,
you must secure the rear support brackets of
the amplifier to the back of the rack. You could
use a support rail or shelf across the back of
the rack, or angle brackets attached between
the rear support brackets and the rear rails of
the rack. This is recommended for all components mounted in a rack that is going to be
moved frequently .
THERMAL CONSIDERATIONS
The M•800 amp is fan-cooled and brings air
in through the front and out through the sides.
Make sure that cool air is available at the front
of the amplifier, and that there is room on each
side for the warm air to exit from the amplifier
and dissipate. If rack-mounted, make sure
there is room for the warm air to circulate
around the side and out through the rear of the
rack. In a typical rack, there will be a space of
1 to 2 inches on either side of the amplifier.
This is adequate to allow the warm air to exit
from the amplifier.
AC POWER CONSIDERATIONS
Be sure the M•800 is plugged into an outlet
that is able to supply the correct voltage specified for your model. If the voltage should drop
below 97% of line voltage, the M•800 will no
longer be able to supply rated power. (It will
continue to operate down to 65% of the rated
voltage, but it won’t be able to reach full rated
power). The amplifier will mute if the voltage
drops below 65% of the rated voltage. This
could happen if you use a long extension cord,
reproducing music with large peaks.
Be sure the AC outlet can supply enough current to allow full power operation of all the
amplifiers plugged into it. The outlet should be a
three-prong socket that matches the power cord.
18
WARNING: Bypassing the
plug’s ground pin can be dangerous. NEVER do it!
The AC current demand of an amplifier varies depending on several factors, including the
crest factor and the duty cycle of the program
material. Under typical conditions reproducing
rock music where musical peaks are just below
clipping, the M•800 requires the following
average currents (@120VAC, 60 Hz):
Amplifier Loading
2 ohms per side or 4 ohms bridged
4 ohms per side or 8 ohms bridged
8 ohms per side or 16 ohms bridged
Average
Current
Required
7A
4.5 A
3A
Peak
Current
Required
16 A
11 A
6.5 A
It is recommended that a stiff supply of AC
power be used because the amplifier places high
current demands on the AC line. The more power
that is available on the line, the louder the amplifier will play and the more peak output power
will be available for cleaner, punchier bass.
Under typical conditions, reproducing rock
music where musical peaks are just below the
clipping point, you can safely connect more
than one amplifier to a 15A service as shown:
Amplifier Loading
2 ohms per side or 4 ohms bridged
4 ohms per side or 8 ohms bridged
8 ohms per side or 16 ohms bridged
Maximum Number
of Amplifiers
on a 15A Service
2
3
4
Due to in-rush current, however, you should
avoid turning them all on at the same time.
Rather, sequence them on, one at a time, to
prevent popping the circuit breaker.
The extension cord used to supply power to
the “amp rack” should have a third wire safety
ground to avoid presenting a safety hazard. We
also recommend using a cord that has conductors large enough to avoid severely limiting the
amplifier’s ability to supply high currents on
transients. With this in mind, we recommend
using the following for a fully loaded 15A service:
Extension Cord Length Wire Gauge
25 feet
14 AWG
50 feet
12 AWG
100 feet
10 AWG
AC Power Distribution
The majority of AC outlets
encountered in homes and
clubs are served by a 240VAC
center-tapped service entrance transformer. This
provides two phases of AC power on either side
of the center tap at 120V each.
In order to minimize ground loops, the safety
grounds for all the outlets should be connected
to a common (“star”) grounding point, and the
distance between the outlets and the common
grounding point should be as short as possible.
If lighting is used in a show, it is preferable
to power the lights from one leg of the service,
and power the audio equipment from the other
leg. This will help minimize noise from the
lights coupling into the audio (particularly if
SCRs are used).
When setting up for a show, oftentimes you
are plugging into an AC power distribution system you know nothing about. You may even be
faced with 2-wire outlets that are missing the
third safety ground pin. It’s a good idea to have
a three-wire AC outlet tester in your toolbox so
you can check the outlets yourself to make
sure they are wired correctly. These testers will
tell you if the polarity of the hot and neutral
wires is reversed and if the safety ground is disconnected. Don’t use an outlet if it is wired
improperly! This is to protect yourself as well
as your equipment.
If you find that you must plug into a twowire outlet, you will need to use a two-wire to
three-wire adapter (cheater plug). These come
with a metal tab that you put underneath the
center screw that holds the AC outlet faceplate
in place. This center screw should be grounded.
You can check it by connecting the adapter to
the outlet and then plugging in your AC outlet
tester.
INPUT WIRING
Use a high-quality 3-conductor shielded
cable to connect the signal between the signal
source (mixing console, equalizer, etc.) and
the balanced inputs to the amplifier. If you’re
using the unbalanced inputs, use a high-quality
2-conductor shielded cable. Your Mackie
Dealer can recommend a suitable cable for
your application.
OUTPUT WIRING
Use heavy gauge, stranded wire for connecting speakers to the M•800 amplifier’s
SPEAKER OUTPUT terminals. As the distance
between the amplifier and the speakers increases, the thickness of the wire should also
increase. Speaker wire has resistance, and
when electricity passes through a resistor,
power is lost. The thicker the wire, the less
resistance it offers, and the more power actually
gets to the speakers.
The thickness of wire is rated in gauges.
Use the chart below to determine the correct
gauge of wire to use according to the distance
between the speakers and the amplifier, and
the impedance of the load the amplifier is driving. This ensures that the power lost across the
speaker wire is less than 0.5 dB.
Wire Length
Load
Impedance
Gauge of
Wire
Up to 25 ft.
2Ω
4Ω
8Ω
14 gauge
16 gauge
18 gauge
Up to 40 ft.
2Ω
4Ω
8Ω
12 gauge
14 gauge
18 gauge
Up to 60 ft.
2Ω
4Ω
8Ω
10 gauge
12 gauge
16 gauge
Up to 100 ft.
2Ω
4Ω
8Ω
8 gauge
10 gauge
14 gauge
Up to 150 ft.
2Ω
4Ω
8Ω
6 gauge
8 gauge
12 gauge
Up to 250 ft.
2Ω
4Ω
8Ω
4 gauge
6 gauge
10 gauge
HIGH VOLTAGE POWER LINE
120V
PRIMARY
WINDING
240V
120V
TRANSFORMER
240V Center-Tapped Secondary
EARTH
GROUND
(NEUTRAL)
SECONDARY
WINDING
19
APPENDIX A: Service Information
WARRANTY SERVICE
Details concerning Warranty Service are
spelled out in the Warranty section on page 27.
If you think your amplifier has a problem,
please do everything you can to confirm it before calling for service, including reading
through the following Troubleshooting section.
Doing so might save you from the deprivation
of your Mackie amplifier and the associated
suffering.
Of all Mackie products returned for service
(which is hardly any at all), roughly 50% are
coded “CND” — Could Not Duplicate, which
usually means the problem lay somewhere else
in the system. These may sound obvious to you,
but here are some things you can check:
• Turn the POWER off, check the speaker
connections and make sure that there are
no strands of wire shorting across the
speaker terminals.
• Is the HOT LED lit? Make sure there is
cool air available at the front of the
amplifier. Make sure there is room at the
sides of the amplifier for warm air to exit.
Allow the amplifier to cool off.
• Are there fuses in the speaker or in-line
fuses in the speaker wire? Check ’em to see
if they’re blown.
• Make sure the speakers are working
properly.
One side is way louder than the other!
TROUBLESHOOTING
No power!
• Our favorite question: Is it plugged in?
Make sure the AC outlet is live (check with
a tester or lamp).
• Our next favorite question: Is the POWER
switch on? If not, try turning it on.
• Is the green light next to the power switch
illuminated? If not, make sure the AC
outlet is live. If so, refer to “No Sound”
below.
• The AC line fuse inside the cabinet is
blown. This is not a user-serviceable part.
Refer to “Repair” on the next page to find
out how to proceed.
No sound!
• Are the GAIN controls turned all the way
down? Slowly turn them up and see if you
hear anything.
• Is the signal source turned up? Make sure
the signal level from the mixing console (or
whatever device immediately precedes the
amplifier) is high enough to produce sound
in the amplifier.
• Make sure the preamp or mixer does not
have a Mute on, or a Tape or Processor loop
engaged. If you find something like this,
make sure the volume/gain is turned down
before disengaging the offending switch.
• If the speakers are wired for BRIDGE mode,
make sure the AMP MODE switch is set to
BRIDGE .
20
• Do the M•800’s meters read the same on
both sides? If not, your source signal may
be delivering an out-of-balance stereo
signal.
• Are both GAIN knobs set to the same
position?
• Are the speaker(s) impedances
matched? (See page 22)
• Try swapping sides: Turn off the amp,
swap the speaker cables at the amp, turn
the amp back on. If the same side is still
louder, the problem is with your speakers or speaker cabling. If the other side
is louder now, the problem is with the
mixer, the amp, or the line-level cabling.
Poor bass performance
• Check the polarity of the speaker cable
connections. You may have your positive
and negative connections reversed at
one end of one speaker cable. This will
make the two speakers out-of-phase and
cause a bass reduction.
• Check that the LOW CUT FILTERs are
not turned up higher than the range you
want to hear.
• Your bass player may need more lessons.
As soon as the music gets loud, the amp
shuts down!
• Check the M•800’s meters. Be sure that OL
is not lighting up frequently or continuously.
• Can the amp breathe? The M•800 amps
draw their ventilation air in from the front
and out through the side panels. They
need plenty of fresh air to stay cool.
Do not block the ventilation ports.
• There may be a dead short somewhere in
your speaker setup, or the total impedance
of the load is too low. Turn the amp off and
rectify that right away.
Something’s missing in the mid and high
frequencies!
• If you’re using horns with compression
drivers, please read the CONSTANT
DIRECTIVITY section on page 15.
It hurts when I touch my arm, or my leg, or
even my head!
• You have a broken finger.
Bad sound!
• Is it loud and distorted? Turn down the
signal coming from the mixer or signal source.
• Is the input connector plugged completely
into the jack? Check the speaker connections and verify that all connections are
tight and that there are no stray strands of
wire shorting across the speaker terminals.
• If possible, listen to the signal source with
headphones plugged into the console. If it
sounds bad there, the problem’s not in the
amplifier.
Noise/Hum
• Check the signal cable between the mixer
and the amplifier. Make sure all connections
are good and sound.
• Make sure the signal cables are not routed
near AC cables, power transformers, or
other EMI-inducing device.
• Is there a light dimmer or other SCR-based
device on the same AC circuit as the
monitor? Use an AC line filter or plug the
amplifier into a different AC circuit.
• If possible, listen to the signal source with
headphones plugged into the console. If it
sounds noisy there, the problem’s not in the
amplifier.
REPAIR
Service for the M•800 amplifier is available
only from one of our authorized domestic service stations or at the factory, located in sunny
Woodinville, Washington. (Service for Mackie
amplifiers living outside the United States can
be obtained through local dealers or distributors.) If your amplifier needs service, follow
these instructions:
1. Review the preceding troubleshooting
suggestions. Please.
2. Call Tech Support at 1-800-258-6883, 8am
to 5pm PST, to explain the problem and
request an RA (Return Authorization)
number. Have your amplifier’s serial
number ready. You must have an RA
number before you can obtain service at
the factory or an authorized service center.
3. Keep this owner’s manual. We don’t need it
to repair the amplifier.
4. Pack the amplifier in its original package,
including endcaps and box. This is very
important. When you call for the RA
number, please let Tech Support know if
you need new packaging. Mackie is not
responsible for any damage that occurs
due to non-factory packaging.
5. Include a legible note stating your name,
shipping address (no P.O. boxes), daytime
phone number, RA number, and a detailed
description of the problem, including how
we can duplicate it.
6. Write the RA number in BIG PRINT on top
of the box.
7. Ship the amplifier to us. We recommend
United Parcel Service (UPS). We suggest
insurance for all forms of cartage. Ship to
this address:
Mackie Designs
SERVICE DEPARTMENT
16140 Wood-Red Rd. NE Ste 5
Woodinville, WA 98072
8. We’ll try to fix the amplifier within three
business days. Ask Tech Support for
current turn-around times when you call
for your RA number. We normally send
everything back prepaid using UPS BLUE
(Second Day Air). However, if you rush
your amplifier to us by Next Day Air, we’ll
ship it back to you UPS RED (Next Day Air).
This paragraph does not necessarily apply to
non-warranty service.
21
APPENDIX B: Technical Information
SPEAKER IMPEDANCES
A speaker’s impedance varies with frequency. For example, it may be 4 ohms at
500Hz, and 6 ohms at 120Hz. What you need to
know is the average (or nominal) impedance
across the speaker’s frequency range. This will
be printed somewhere on the cabinet, or in the
specification section of the missing manual.
If you’re just dealing with one speaker per
channel, then make sure that the average impedance is greater than or equal to 2 ohms.
In BRIDGE mode, make sure that your
speaker is greater than or equal to 4 ohms.
If you’re driving an assortment of speakers,
you have to make sure that the total impedance does not go below these same levels.
There are two basic ways of linking multiple
speakers: series and parallel. The following sections show how to make the connections and
how to work out the total impedance.
SERIES
“Series” means that the positive amp output
connects to the first speaker’s positive terminal, the first speaker’s negative terminal
connects to the second speaker’s positive terminal, the second speaker’s negative terminal
goes to the amp’s negative output. Series connections are not normally used in PA
applications because it ruins the amplifier’s
ability to damp (control) the speakers. The
other snag: if one speaker goes out, they all do.
Doing load calculations with series configurations is easy — just add the loads. For
instance, two 4-ohm speakers, connected in series, will equal 8 ohms (4 + 4 = 8).
PARALLEL
“Parallel” means that the positive amp output connects to the positive terminals of all the
speakers, and the negative amp output connects to the negative terminals of all the
speakers. If one speaker opens in a parallel
configuration, the others will still work, but the
load will change. That lets you breathe a little
easier (the show will go on), except that you
may have a dead speaker and not even know it.
Calculating parallel loads is also easy, as long
as each speaker has the same value — just
divide the value by the number of speakers.
22
For example, four 8-ohm speakers, connected in parallel, will equal a 2 ohm load
(8 / 4 = 2).
If the parallel loads aren’t all the same,
things gets a little more complicated, but nothing that you can’t do with a simple calculator. The
total impedance (ZT) is given by the following
formula, where Z1, Z2 and Z3 are the impedances of your speakers.
ZT =
1
1 + 1 + 1 +
...
Z1
Z2
Z3
There are other, more complicated configurations, like series-parallel (using a combination
of series and parallel links to arrive at a desired load) and parallel configurations of
unmatched loads (usually not recommended).
But rather than get too deep into this, let’s just
summarize the basics, as they apply to you and
your M•800:
• The lower the speaker impedance, the
more power can be put out by the amplifier.
• Driving lower impedance speakers makes
the amplifier work harder and heat up quicker.
• Do not connect a total impedance of
under 2 ohms per channel in STEREO and
MONO modes.
• Do not connect a total impedance of
under 4 ohms in BRIDGE mode.
• Connecting speakers in series or parallel
can drastically alter their frequency response.
• Consider using multiple amplifiers rather
than overloading one.
• Reduce the low-frequency output by setting the LOW CUT FILTER to match the
speaker’s specifications.
• Never plug the amplifier outputs into anything except speakers (unless you have an
outboard box designed to accept speaker level
levels).
• Be careful in BRIDGE mode as both
speaker wires are live. In this mode, do not
connect the speaker wires to any external device which is grounded.
M•800 SPECIFICATIONS
Damping Factor:
Maximum Power:
175 watts per channel into 8 ohms
275 watts per channel into 4 ohms
400 watts per channel into 2 ohms
550 watts into 8 ohms bridged
800 watts into 4 ohms bridged
Note: Power ratings are specified at 120VAC line voltages.
The M•800 power amplifier draws large amounts of current from the AC line with continuous sine wave testing.
Accurate measurement of power requires a steady and
stable AC supply. This means the line impedance must
be very low to insure that the peak AC line voltage does
not sag to less than 97% of its value.
> 250 from 10 to 400Hz
Input Impedance:
20kΩ balanced
Input Sensitivity:
1.23 volts (+4 dBu) for rated power into 4 ohms
Voltage Gain:
28.0 dB
Maximum Input Level:
If driving highly reactive loads, we recommend that the
limiter circuit be engaged.
9.75 volts (+22 dBu)
Continuous Sine Wave Average Output Power,
both channels driven:
< 5µs
150 watts per channel into 8 ohms from 40Hz to 20kHz,
with no more than 0.025 % THD
Rise Time:
Slew Rate:
Voltage Slew Rate
> 40V/µs
> 80V/µs bridged
225 watts per channel into 4 ohms from 40Hz to 20kHz,
with no more than 0.05 % THD
Current Slew Rate > 20A/µs at 2Ω
280 watts per channel into 2 ohms from 40Hz to 20kHz,
with no more than 0.1 % THD
CMRR:
> 40 dB, 20Hz to 20kHz
Bridged mono operation:
450 watts into 8 ohms from 40Hz to 20kHz, with no more
than 0.05 % THD
Load Angle:
560 watts into 4 ohms from 40Hz to 20kHz, with no more
than 0.1 THD
8(±jx) time independent at 8Ω
4(±jx) time dependent, T > 6 min. at 4Ω
2(1±jx) time dependent, T > 2 min. at 2Ω
Power Bandwidth:
Transient Recovery:
20Hz to 70kHz (+0, –3 dB)
< 1µs for 20 dB overdrive @ 1kHz
Frequency Response:
High Frequency Overload and Latching:
20Hz to 40kHz (+0, –1 dB)
10Hz to 70kHz (+0, –3 dB)
No latch up at any frequency or level.
Distortion:
Unconditionally stable driving any reactive or capacitive
load.
High Frequency Stability:
THD, SMPTE IMD, TIM (at rated power)
< 0.025% @ 8Ω
< 0.05% @ 4Ω
< 0.1% @ 2Ω
Signal-to-Noise Ratio:
> 104 dB below rated power into 4 ohms
Channel Separation:
> 70 dB @ 1kHz
Turn On Delay:
3-4 seconds
Variable Low-Cut Filter:
10Hz (Off) to 170Hz, 2nd Order Bessel
Constant Directivity High Frequency Boost:
2kHz to 5.5kHz (+3 dB points)
6 dB/octave high-frequency shelving filter,
(shelving occurs at approximately 30kHz)
23
Limiter Section:
Physical:
Complementary Positive and Negative Peak Detecting
Height
Width
Depth
Overall Depth
Weight
Indicators:
5 meter LEDs per channel
–20dB, –9dB, –6dB, –3dB, OL (Overload)
TEMP STATUS
NORMAL/HOT LEDs
Power Consumption:
55 watts at idle
400 watts with musical program fully loaded
(4 ohms per side, or 8 ohms bridged)
600 watts with musical program fully loaded
(2 ohms per side, or 4 ohms bridged)
550 watts at rated power into 8 ohms
(continuous sine wave)
950 watts at rated power into 4 ohms
(continuous sine wave)
1500 watts at rated power into 2 ohms
(continuous sine wave)
3.5 inches (89mm)
19.0 inches (483mm)
15.25 inches (387mm)
16.25 inches (413mm)
28 pounds (12.7kg)
Disclaimer:
Since we are always striving to make our products
better by incorporating new and improved materials,
components, and manufacturing methods, we reserve
the right to change these specifications at any time
without notice.
“Mackie,” “The Running Man,” and “FR Series” are trademarks or registered trademarks of Mackie Designs Inc.
All other brand names mentioned are trademarks or
registered trademarks of their respective holders, and are
hereby acknowledged.
©2000 Mackie Designs Inc.
All Rights Reserved.
Printed in the U.S.A.
AC Drop-out Voltage:
At approximately 65% of rated line voltage
15.25" (38.7cm)
M•800
WEIGHT
28 lbs.
12.7 kg)
3.50"
(8.9cm)
2U
16.25" (41.3cm)
17.25" (43.8cm)
19.00" (48.3cm)
24
CH 2
BALANCED
LINE INPUT
(TRS)
THRU
(XLR-M)
CH 2
BALANCED
LINE INPUT
(XLR-F)
CH 1
BALANCED
LINE INPUT
(TRS)
THRU
(XLR-M)
CH 1
BALANCED
LINE INPUT
(XLR-F)
FUSE
25
MUTE
LAMP
POWER
SWITCH
LOW CUT
FILTER
FREQ
LOW CUT
FILTER
FREQ
THERMAL
PROTECT
TOROIDAL POWER
TRANSFORMER
OFF
ON
CD EQ
FREQ
OFF
ON
CD EQ
FREQ
+
64 VDC
–
TEMP
SENSOR
(ON HEATSINK)
STEREO
MONO
BRIDGE
MONO
BRIDGE
STEREO
MONO
BRIDGE
STEREO
+
74 VDC
–
NORM
LED
4 SEC DELAY
(TURN-ON)
LO DCV
FAN
SPEED
CONTROL
DC OFFSET
PROTECT
DC OFFSET
PROTECT
HI DCV
OR
–74VDC
AMP
MUTE
AND
MUTE
CONTROL
60ºC
DETECTOR
HOT
LED
80ºC MUTE
55ºC UNMUTE
MUTE
+74VDC
+64VDC
LIMITER
DETECTION
–64VDC
ON
LIMITER
SWITCH
–74VDC
AMP
–64VDC
MUTE
LIMITER
DETECTION
ON
LIMITER
OFF
OFF
LIMITER
CH 1 AMP OUT
CH 2 AMP OUT
PROGRAM
DETECT
CH 2
GAIN
INVERTING
UNITY GAIN
AMPLIFIER
CH 1
GAIN
+74VDC
+64VDC
OL
–3
–6
–9
–20
TO HUSKY
STADIUM
CH 2
SPEAKER
OUT
METER
DRIVE
FAN
OL
–3
–6
–9
–20
CH 1
SPEAKER
OUT
METER
DRIVE
M•800 BLOCK DIAGRAM
APPENDIX C: Bi-amping and Tri-amping
Most speaker systems in use today are of the
two-way or three-way variety. Cone speakers
are good at reproducing low and mid-range frequencies, but not high frequencies. Likewise,
compression drivers are good at reproducing
high frequencies, but definitely not low frequencies. This is why two-way, three-way, and
even four-way speaker systems were developed
— to improve the efficiency of each individual
driver by requiring it to reproduce only the frequencies that it reproduces best.
One method of accomplishing this is
through the use of a passive crossover network
between the amplifier and the speaker(s).
Often the passive crossover is built into the
cabinet along with the various drivers. The
crossover divides the high-level speaker signal
into frequency bands, which are then directed
to the appropriate driver. There are some
drawbacks to this method, however. The passive crossover adds reactance to the load that
the amplifier sees, which can affect the damping. Power is wasted as heat across the
resistors in the crossover, reducing the amount
of amplifier power available to the drivers
themselves.
Biamplified and triamplified systems use
separate power amplifiers to power each individual low-frequency and high-frequency
driver. An electronic crossover (a.k.a. active
crossover) is located between the signal source
and the power amplifier. The advantages of
this method include 1) increased headroom
available from each amplifier, since they’re amplifying only a portion of the entire audio
spectrum; 2) improved damping factor because the amplifier output is connected
directly to the driver; 3) improved efficiency
because there are no passive resistors to dissipate heat; and 4) flexibility to choose the
optimum crossover frequency and crossover
slope for the individual drivers in the system.
TWO-WAY SPEAKER CABINET
HIGH-LEVEL
PASSIVE
CROSSOVER
FR SERIES
POWER AMPLIFIER
(STEREO MODE)
FROM SIGNAL SOURCE
(MACKIE MIXING CONSOLE)
CH 1
IN
CH 1
OUT
+
FROM SIGNAL SOURCE
(MACKIE MIXING CONSOLE)
CH 2
IN
CH 2
OUT
–
HIGH FREQUENCIES
TO TWEETER
LOW FREQUENCIES
TO WOOFER
–
TWO-WAY SPEAKER CABINET
+
HIGH-LEVEL
PASSIVE
CROSSOVER
HIGH FREQUENCIES
TO TWEETER
LOW FREQUENCIES
TO WOOFER
Passive Crossover System
FR SERIES
POWER AMPLIFIER
(STEREO MODE)
FROM SIGNAL SOURCE
(MACKIE MIXING CONSOLE)
LOW-LEVEL
3-WAY ACTIVE
CROSSOVER
TO HIGH-FREQUENCY
AMPLIFIER
CH 1
INPUT
TO MID-FREQUENCY
AMPLIFIER
CH 2
INPUT
CH 1
OUT
CH 2
OUT
+
TWEET
–
–
+
MID
FR SERIES
POWER AMPLIFIER
(BRIDGE MODE)
TO LOW-FREQUENCY
AMPLIFIER
FR SERIES
POWER AMPLIFIER
(STEREO MODE)
FROM SIGNAL SOURCE
(MACKIE MIXING CONSOLE)
LOW-LEVEL
2-WAY ACTIVE
CROSSOVER
TO HIGH-FREQUENCY
AMPLIFIER
CH 1
INPUT
TO LOW-FREQUENCY
AMPLIFIER
CH 2
INPUT
CH 1
OUT
CH 2
OUT
+
26
+
–
–
WOOF
+
TWEET
Triamplified System with Active Crossover
–
Biamplified System with Active Crossover
CH 1
OUT
CH 2
OUT
–
+
CH 1
INPUT
WOOF
M•800 LIMITED WARRANTY
Please keep your sales receipt in a safe place.
A. Mackie warrants all materials, workmanship and
proper operation of this FR Series product for a
period of three years from the original date of
purchase. If you complete the optional questionnaire portion of the Product Registration Card, the
warranty will be extended for an additional two
years. If any defects are found in the materials or
workmanship or if the product fails to function
properly during the applicable warranty period,
Mackie, at its option, will repair or replace the
product. This warranty applies only to equipment
sold and delivered within the U.S. by Mackie or
its authorized dealers.
B. Failure to return the card will not void the 3-year
warranty.
C. Service and repairs of Mackie products are to be
performed only at the factory (see D below) OR at an
Authorized Mackie Service Center (see E below).
Unauthorized service, repairs, or modification will
void this warranty.
D. To obtain factory service:
1. Call Mackie at 800/258-6883, 8AM to 5PM
Monday through Friday (Pacific Time) to get a
Return Authorization (RA). Products returned
without an RA number will be refused.
2. Pack the FR Series product in its original
shipping carton. If you do not have the carton,
just ask for one when you get your RA number,
and we’ll send a shipping carton out promptly.
More information on packing can be found in
the Service section of the appropriate manual.
Also include a note explaining exactly how to
duplicate the problem, a copy of the sales receipt
with price and date showing, and your return
street address (no P.O. boxes or route numbers,
please!). If we cannot duplicate the problem at
the Mackie Factory or establish the starting date
of your Limited Warranty, we may, at our
option, charge for service time.
3. Ship the product in its original shipping
carton, freight prepaid to:
Mackie Designs Inc.
SERVICE DEPARTMENT
16140 Wood-Red Road NE Ste 5
Woodinville, WA, 98072, USA
IMPORTANT: Make sure that the RA number is
plainly written on the shipping carton.
E. To obtain service from an Authorized Mackie Service
Center:
1. Call Mackie at 800/258-6883, 8AM to 5PM
Monday through Friday (Pacific Time) to get 1)
The name and address of your nearest Mackie
Authorized Service Center and 2) A return
authorization (RA). You must have an RA number
before taking your unit to a service center.
2. Make sure that you have a copy of your FR
Series sales receipt from the store where you
bought the product. It is necessary to establish
purchase date and thus determine whether or not
your FR Series product is still under warranty. If
you can't find it, the Authorized Service Center
may charge you for repairs even if your FR Series
product is still covered by Mackie's 3-Year Limited
Warranty.
3. Make sure that the problem can be duplicated. If you bring your FR Series product to an
Authorized Service Center and they can't find
anything wrong with it, you may be charged a
service fee.
4. If the Mackie Authorized Service Center is
located in another city, pack the FR Series
product in its original shipping carton. More
information on packing can be found in the
Service section of the appropriate manual.
5. Contact the Mackie Authorized Service Center
to arrange service or bring the FR Series product
to them.
F. Mackie and Mackie Authorized Service Centers
reserve the right to inspect any products that may
be the subject of any warranty claims before repair
or replacement is carried out. Mackie and Mackie
Authorized Service Centers may, at their option,
require proof of the original date of purchase in the
form of a dated copy of the original dealer’s invoice
or sales receipt. Final determination of warranty
coverage lies solely with Mackie Designs Inc. or its
Authorized Service Centers.
G. Mackie FR Series products returned to Mackie
and deemed eligible for repair or replacement
under the terms of this warranty will be repaired or
replaced within thirty days of receipt by Mackie at
our rainforest factory complex. Products returned to
Mackie that do not meet the terms of this Warranty
will be repaired and returned C.O.D. with billing
for labor, materials, return freight, and insurance.
Products repaired under warranty at Mackie's
factory will be returned freight prepaid by Mackie
to any location within the boundaries of the USA.
H. Mackie assumes no responsibility for the quality
or timeliness of repairs performed by Mackie
Authorized Service Centers.
I. This warranty is extended to the original
purchaser and to anyone who may subsequently
purchase this product within the applicable
warranty period.
J. This is your sole warranty. Mackie does not
authorize any third party, including any dealer or
sales representative, to assume any liability on
behalf of Mackie Designs or to make any warranty
for Mackie Designs.
K. THE WARRANTY GIVEN ON THIS PAGE IS THE
SOLE WARRANTY GIVEN BY MACKIE AND IS IN
LIEU OF ALL OTHER WARRANTIES, EXPRESS
AND IMPLIED, INCLUDING THE WARRANTIES
OF MERCHANTABILITY AND FITNESS FOR A
PARTICULAR PURPOSE. THE WARRANTY GIVEN
ON THIS PAGE SHALL BE STRICTLY LIMITED IN
DURATION TO THREE YEARS FROM THE DATE
OF ORIGINAL PURCHASE FROM AN AUTHORIZED
MACKIE DEALER. UPON EXPIRATION OF THE
APPLICABLE WARRANTY PERIOD, MACKIE
SHALL HAVE NO FURTHER WARRANTY OBLIGATION OF ANY KIND. MACKIE SHALL NOT BE
LIABLE FOR ANY INCIDENTAL, SPECIAL, OR
CONSEQUENTIAL DAMAGES THAT MAY RESULT
FROM ANY DEFECT IN THE MACKIE PRODUCT
OR ANY WARRANTY CLAIM. Some states do not
allow exclusion or limitation of incidental, special,
or consequential damages or a limitation on how
long warranties last, so some of the above limitations and exclusions may not apply to you. This
warranty provides specific legal rights and you may
have other rights which vary from state to state.
27