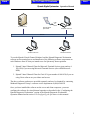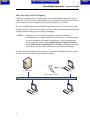
1
Go To Table Of Contents OPERATION / SERVICE MANUAL Part Number: 3-100-1025 Revision 8.0 2007 Brentwood Medical Technology Corp. Style B Next Back Go To Table Of Contents Next Next Back IQmark Digital Spirometer Operation Manual TABLE OF CONTENTS FOREWORD ...........................................................................................................................iv A WORD OF THANKS ........................................................................................................ IV COMPUTER DATE INFORMATION ....................................................................................... V Device Labeling Information...................................................................................................vi INDICATIONS FOR USE ...................................................................................................... VI Intended Use ......................................................................................................... vi I. General Information ..............................................................................................................1 A. DESCRIPTION ...............................................................................................................1 B. NECESSARY COMPUTER SKILLS ...................................................................................1 C. CONFIGURATION ..........................................................................................................1 Thin Client Configurations .................................................................................. 2 D. SYSTEM SPECIFICATIONS .............................................................................................6 II. System Installation.............................................................................................................7 A. HARDWARE AND SOFTWARE REQUIREMENTS .............................................................7 B. HARDWARE INSTALLATION..........................................................................................7 C. SOFTWARE INSTALLATION ...........................................................................................8 Updating from older Brentwood Diagnostic Workstation versions................. 9 Installing the IQmark Digital Spirometer (and Diagnostic Workstation)...... 9 D. CONFIGURING THE SPIROMETER ...............................................................................10 Spirometry Settings............................................................................................. 10 Com Port Spirometer – Auto Detect .................................................................. 12 USB Spirometer – Auto Detect........................................................................... 12 Thin Client Channel Setting ............................................................................... 13 Configuration Profile.......................................................................................... 13 Reports Tab .......................................................................................................... 15 Cover Page Settings Tab..................................................................................... 18 Interpretation Tab............................................................................................... 20 Primary Care Practitioner (PCP) Mode............................................................ 21 Measurements Tab............................................................................................... 22 Incentive/Miscellaneous Tab .............................................................................. 24 Trending Tab........................................................................................................ 25 Ethnic Adjustments Tab ...................................................................................... 26 E. CALIBRATION .............................................................................................................27 Starting a New Calibration ................................................................................ 29 Social Security Disability – 3 Flow Calibration............................................... 31 OSHA Regulations............................................................................................... 31 F. SPIROMETER HANDLE ................................................................................................32 III. Operation .........................................................................................................................33 A. INTRODUCTORY NOTES .............................................................................................33 Prescription Device............................................................................................. 33 B. PATIENT PREPARATION..............................................................................................33 C. STARTING THE PROGRAM ..........................................................................................34 D. OPENING SCREEN ......................................................................................................34 i Next Back IQmark Digital Spirometer Operation Manual E. TESTING A NEW PATIENT.......................................................................................... 36 Vital Signs Tab .....................................................................................................38 Medications tab; History tab..............................................................................40 Contact Info tab; Risk Factors tab.....................................................................40 Smoking History tab ............................................................................................40 F. INSTRUCTIONS FOR PERFORMING A SPIROMETRY TEST ............................................ 41 FVC or FVC Loop.................................................................................................42 Acceptability Statements .....................................................................................45 Flow Volume Loops – Why Inhale?.....................................................................46 Post-Bronchodilator Tests ..................................................................................47 VC or SVC.............................................................................................................48 MVV .......................................................................................................................48 G. REVIEWING PATIENT REPORTS ................................................................................. 49 H. REVIEW SPIROMETRY REPORTS ................................................................................ 49 I. PRINTED SPIROMETRY REPORTS – ANALYSIS OF RESULTS ...................................... 51 COPD Risk Assessment........................................................................................51 Lung Age ...............................................................................................................51 J. REVIEWING DATA FOR OTHER PATIENTS.................................................................. 51 K. TRENDING.................................................................................................................. 53 Selecting Reports to Trend..................................................................................54 Volume Parameters ..............................................................................................55 Flow and Percentage Parameters .......................................................................55 Report Selection ...................................................................................................56 Default F/V Display..............................................................................................57 Trend Display Screen...........................................................................................57 Side by Side F/V Loops ........................................................................................59 Overlay F/V Loops................................................................................................60 IV. Appendix ........................................................................................................................ 61 A. SCREEN SUMMARY.................................................................................................... 61 B. TROUBLESHOOTING ................................................................................................... 63 C. MAINTENANCE AND STORAGE .................................................................................. 65 Cleaning................................................................................................................65 D. SAFETY AND INTERNATIONAL SYMBOLS .................................................................. 66 E. INTERPRETATION – ATS............................................................................................ 67 Lower Limit of Normal (LLN) .............................................................................68 F. INTERPRETATION – NHANES III.............................................................................. 68 G. REFERENCE VALUES - ADULT ................................................................................... 69 Crapo - Adult ........................................................................................................70 Knudson - Adult....................................................................................................72 European Community For Coal And Steel (ECCS) - Adult ..............................74 NHANES III (Hankinson, NLHEP) - Adult ........................................................75 Morris - Adult .......................................................................................................77 Roca - Adult ..........................................................................................................78 H. REFERENCE VALUES - PEDIATRIC............................................................................. 79 Knudson – Pediatric ............................................................................................80 ii Next Back IQmark Digital Spirometer Operation Manual Polgar – Pediatric ............................................................................................... 82 Hsu – Pediatric .................................................................................................... 83 NHANES III (Hankinson, NLHEP) – Pediatric................................................ 84 Zapletal – Pediatric............................................................................................. 86 Eigen – Pediatric................................................................................................. 86 I. ADJUSTMENTS TO REFERENCE VALUES EQUATIONS .................................................88 J. SPIROMETRY MEASUREMENT PARAMETERS DEFINED ..............................................89 K. REFERENCES ..............................................................................................................91 L. TECHNICAL SERVICE MANUAL ...................................................................................93 Service Manual Introduction ............................................................................. 93 Theory of Operation............................................................................................ 94 System Maintenance and Obtaining Service .................................................... 95 M. SPIROMETRY TESTING AT A GLANCE ........................................................................98 N. PERFORMING AN FVC TEST - QUICK REFERENCE USER’S GUIDE ............................99 O. PERFORMING A PRE/POST FVC TEST - QUICK REFERENCE USER’S GUIDE ...........100 TESTING ONE PATIENT AT A TIME ............................................................. 100 P. PERFORMING A PRE/POST FVC TEST – QUICK REFERENCE USER’S GUIDE ...........101 TESTING MULTIPLE PATIENTS.................................................................... 101 Q. GLOSSARY ...............................................................................................................102 R. CUSTOMER SERVICE AND CONTACT INFORMATION ................................................105 Warranty............................................................................................................. 105 Return Goods Authorization ............................................................................ 105 GUIDANCE AND MANUFACTURER’S DECLARATION – ELECTROMAGNETIC EMISSIONS ............2 EMISSIONS TEST ..................................................................................................................2 COMPLIANCE........................................................................................................................2 ELECTROMAGNETIC ENVIRONMENT – GUIDANCE ..................................................................2 GUIDANCE AND MANUFACTURER’S DECLARATION – ELECTROMAGNETIC IMMUNITY .............3 IMMUNITY TEST .......................................................................................................................3 IEC 60601 TEST LEVEL ............................................................................................................3 GUIDANCE AND MANUFACTURER’S DECLARATION – ELECTROMAGNETIC IMMUNITY .............4 IMMUNITY TEST .......................................................................................................................4 IEC 60601 TEST LEVEL ............................................................................................................4 RECOMMENDED SEPARATION DISTANCE .........................................................................................4 RECOMMENDED SEPARATION DISTANCES BETWEEN PORTABLE AND MOBILE RF COMMUNICATIONS EQUIPMENT AND THE IQMARK DIGITAL SPIROMETER..............................5 W .............................................................................................................................. 5 80 MHz to 800 MHz ................................................................................................. 5 800 MHz to 2.5 GHz ................................................................................................ 5 iii Go To Table Of Contents Back IQmark Digital Spirometer Operation Manual IQmark is a registered trademark of Midmark. Windows is a registered trademark of Microsoft Corporation. Pentium is a registered trademark of Intel Corporation. Physician’s Responsibility The IQmark Digital Spirometer can provide test interpretations if the user enables the Auto Interpretation feature. These interpretations are for the exclusive use of licensed physicians or personnel under their direct supervision. The suggested interpretation and the numerical and graphical results should be examined with respect to the patient’s overall clinical condition. Final analysis should always be determined and verified by a physician. Spirometry is an effort dependent test. Proper administration of the test is the physician’s responsibility, as is making a diagnosis, obtaining expert opinions on the results, and implementing the correct treatment, if indicated. FOREWORD A Word of Thanks Thank you for purchasing the IQmark Digital Spirometer and IQmark Diagnostic Workstation. Midmark Diagnostics Group has used the latest microelectronic and computer software technology to develop a fast, efficient, and accurate Spirometry system. We trust our product will enable you to use office-based Spirometry tests to diagnose and enhance your patient’s pulmonary health. Midmark Diagnostics Group provides a range of diagnostic products, including ECG and Holter, which are accessed using the Diagnostic Workstation program. We believe you will be pleased with the user-friendly operation of our product and with your results. As your partner in patient care, we look forward to working with you in the coming years as we develop even more sophisticated diagnostic technology for the medical field. Your thoughts, questions and comments about our product and direction are welcomed. Midmark Diagnostics Group PH (800) 624-8950. www.midmarkdiagnostics.com iv Next Back Go To Table Of Contents Next IQmark Digital Spirometer Operation Manual Computer Date Information The IQmark Digital Spirometer uses the current date from the computer and the patient’s birth date (entered by the user) to calculate the patient’s age. Since the Spirometer’s equations and interpretive analysis use the patient’s age to produce appropriate diagnostic statements, it is important that your computer’s current date is accurate. Contact your system administrator if your computer’s date is incorrect. Notice The information in this operation manual is subject to change without notice. Brentwood Medical Technology Corp. (dba Midmark Diagnostics Group) shall not be liable for technical or editorial omissions made herein, nor for incidental or consequential damages resulting from the furnishing, performance, or use of information in this operation manual. This document contains proprietary information protected by copyright. No part of this document may be photocopied or reproduced in any form without prior written consent from Brentwood Medical Technology Corp. v Go To Table Of Contents Back IQmark Digital Spirometer Operation Manual Device Labeling Information Indications For Use The IQmark Digital Spirometer is indicated for use with male/female adult patients and male/female pediatric patients to evaluate, assess, describe, measure, or monitor the status of pulmonary health, diseases, or conditions. Intended Use The IQmark Digital Spirometer is intended for use as a prescription-use-only clinical diagnostic Spirometer for pulmonary function evaluation and data management. The Spirometer is for use in hospitals or physician/clinician offices. Contraindications The Disposable Pneumotach Mouthpieces are clean but not sterile and should not be placed over open wounds that are prone to infection. There are no other known medical contraindications other than the physical limitations of the patient. Warnings To ensure accurate patient testing, you must replace the Midmark Diagnostics Group accessories used with this device with accessories manufactured by Midmark Diagnostics Group. The American Thoracic Society (ATS) Standardization of Spirometry recommends the use of rubber gloves when replacing Disposable Pneumotach Mouthpieces (DPM), and hand washing after touching DPMs. Precautions Read and observe the following precautions to ensure the proper operation of this device. 1. Familiarize yourself thoroughly with the operational procedures of the device prior to use. It is recommended that the user be trained in the methods of administrating Spirometry tests to a patient by an organization that is certified by a recognized agency. 2. Installation location and maintenance of the device. a) Avoid installing the device in direct sunlight. Install and keep the device away from splashing fluids. b) Do not install the device where it may be affected by significant or extreme changes in humidity, ventilation, airborne particles containing dust, salt, sulfur, etc. 3. Prepare the device for operation according to instructions in this operation manual. 4. Precaution while using device - Observe the patient closely. If any abnormality is observed, proper action, which may include stopping the test, should be taken immediately. 5. Precaution after using device - The software turns off the device power according to programmed procedures. Keep the device clean at all times to ensure trouble-free operation. 6. In case of a malfunction, call Customer Service and precisely describe the problem. 7. Perform routine inspection on the device. Keep all items in a clean environment. 8. Do not make any modifications to the device; any modifications made will void the warranty. vi Next Go To Table Of Contents Back Next IQmark Digital Spirometer Operation Manual 9. Do not open the device handle. Refer servicing to qualified service personnel. Adverse Reactions The IQmark Digital Spirometer is a non-invasive device and is safe in both construction and use. This has been confirmed by the performance of Verification and Validation Testing, Biocompatibility Testing, Risk Assessment Analysis, and ATS testing. The following minor complications can occur with all diagnostic Spirometers: 1. Infection or injury due to the use of a non-sterile mouthpiece over open wounds 2. Skin or mucous membrane abrasion caused by prolonged rubbing or excessive use of the mouthpiece (not related to biocompatibility issues) 3. Nasal, oral, or dental pain 4. Drying of oral or pharyngeal mucosa 5. Congestion or irritation of Eustachian tubes 6. Gastric distention or flatulence from ingested air 7. Slight discomfort during test procedures 8. Decreased secretion clearance during test procedures 9. Aspiration of secretions 10. Hyperventilation and possible dizziness Patients may become light-headed, dizzy, or even faint during a test maneuver. Be sure to watch the patient closely and place a chair behind the patient before beginning any procedure. Electrical, Safety, Biocompatibility Standards This Spirometer has been tested to comply with the following standards: UL STD 2601-1 CAN/CSA STD C22.2 601.1-M90 IEC 601-1 (Electrical) IEC 60601-1-1 (Safety) EN 60601-1-2 (EMC, 2nd Ed. 2001) ISO 10993-5 (Cytotoxicity) ISO 10993-10 (Irritation and Sensitization) vii Back Go To Table Of Contents Next Go To Table Of Contents Back Next IQmark Digital Spirometer Operation Manual I. General Information A. Description The IQmark Digital Spirometer is a portable device that converts a Microsoft Windowsbased personal computer (PC), be it desktop, laptop, notebook, or pen-based, to a fully functional diagnostic Spirometer with interpretive capability. The device is electronically isolated from the PC and connects to it through the serial port (USB or RS232). Together with the Diagnostic Workstation, the Spirometer makes it easy to record Spirometry efforts, interpret them, and archive them for future reference. B. Necessary Computer Skills This manual assumes that you are already capable of using Windows-based applications, that you have some understanding of how a PC works, and that you are familiar with the basic operations of Windows. If this is true, you will have no problem using the product. However, in the event that you have any technical questions or problems, please refer to the Troubleshooting Guide (Appendix B) or the Technical Service Manual (Appendix L) of this manual for immediate troubleshooting assistance. Customer Service contact information is listed in Appendix R. C. Configuration Block Diagram The block diagram below illustrates the configuration of the system. The primary components are a Windows-based PC, a printer, and the IQmark Digital Spirometer handle. A portable computer is recommended if mobility is a consideration. Figure 1.0 Block Diagram for the IQmark Digital Spirometry system 1 Go To Table Of Contents Back IQmark Digital Spirometer Operation Manual Thin Client Configurations If you have a thin client environment, you can install the software on the Terminal Server and operate the IQmark Digital Spirometer through a thin client terminal. There are two thin client configurations. The IQmark Virtual Channel Solution is appropriate when using Microsoft Windows based PCs as clients. In this configuration, you can use either the USB or serial port versions of the IQmark Digital Spirometer product in high latency, limited bandwidth network configurations. The following section describes the virtual channel solution. The second possible configuration is to use the serial port version of the IQmark Digital Spirometer product and connect it to client devices via COM port mapping. This configuration is appropriate when using nonWindows thin client devices on low latency high-speed networks. The section entitled Thin Client Using COM Port Mapping discusses this solution. Setting up any application on a network environment typically requires special access rights and knowledge of the network. Please have your network administrator install and setup the software to fit your office environment. Thin Client Using the IQmark Virtual Channel Solution The IQmark Thin Client Virtual Channel software provides the following advantages over COM port mapping. 1. Operation over high latency, low bandwidth, high loss networks. For Microsoft Terminal Services, the virtual channel provides a 10 to 1 improvement in performance in latency tolerance over COM port mapping. For Citrix ICA the performance improvement is approximately 40 to 1 in latency tolerance. 2. No COM port mapping is required. 3. It is possible to use the USB versions of the Spirometer module. 4. Improved device auto-configuration and diagnostics. NOTE: The IQmark Virtual Channel Solution has specific requirements for computer hardware, software and network performance. System administrators must read the document entitled Application Note: Using the IQmark Thin Client Virtual Channel Software before installing, configuring and using this software in a thin client environment. The following block diagram describes the IQmark Virtual Channel Solution. In this thin client environment, the client computers must be running Windows XP SP2 or Windows Vista. 2 Next Go To Table Of Contents Back Next IQmark Digital Spirometer Operation Manual USB Or Serial Terminal Server IQmark Digital Spirometer Windows Client PC Network Windows Client PC Windows Client PC To use the IQmark Virtual Channel Solution, load the IQmark Diagnostic Workstation software on the terminal server and install one of the following software components on each Windows client PC that you intend to use for Spirometry data acquisition. 1. IQmark Virtual Channel Client for Microsoft Terminal Services (part number 4100-1420) if you are using Microsoft Terminal Services (also called Microsoft RDP). 2. IQmark Virtual Channel Client for Citrix ICA (part number 4-100-1430) if you are using Citrix software on your clients and servers. The above software products are provided separately and may be obtained by contacting Midmark Diagnostic Group’s customer service department at (800) 624-8950. Once you have installed the software on the server and client computers, you must configure the software for virtual channel operation as described in the “Configuring the IQmark Diagnostic Workstation” section of the IQmark Diagnostic Workstation Operation Manual and in section II-D Configuring the Spirometer in this manual. 3 Go To Table Of Contents Back Next IQmark Digital Spirometer Operation Manual Thin Client Using COM Port Mapping COM port mapping refers to a configuration in which the Midmark Spirometer devices connect to a serial port of the client and the server is configured so that logical COM ports on the terminal server are mapped to the physical COM ports of the client. If you are using non-Windows based thin client terminal devices on a low-latency, highspeed network you must use the serial port versions of the IQmark Digital Spirometer and configure the thin client server for COM port mapping. NOTE: In order to use the COM port mapping solution in a thin client environment, the computer hardware and software as well as the network must meet stringent performance requirements. System administrators must read the document entitled Application Note: IQmark Products Over Thin Client Environments before installing, configuring and using this software in a thin client environment using COM port mapping. The following block diagram illustrates the use of the IQmark Digital Spirometer product in a thin client environment using COM port mapping. Serial Term inal Server Client IQmark Digital Spirometer Network Client 4 Client Back Go To Table Of Contents Next IQmark Digital Spirometer Operation Manual To use the IQmark products in this configuration, install the IQmark Diagnostic Workstation on the terminal server and configure the server to map to the COM port on the client terminal. System administrators should configure the terminal server for COM port mapping as described in the document entitled Application Note: IQmark Products Over Thin Client Environments. 5 Go To Table Of Contents Back IQmark Digital Spirometer Operation Manual D. System Specifications The following are the physical and performance specifications for the Spirometer. Spirometer Specifications Performance Specifications Category Intended Use Physical Characteristics (Handle) Anatomical Sites Patient Contact Safety Parameters Spirometry Acquisition Ranges Environmental Conditions (temperature and humidity) BTPS Analysis & Measurement Parameters Measured Reference Values Sets Interpretations Printer Paper 6 Specification To provide diagnostic Spirometry results that a licensed practitioner can use to interpret the current condition of a patient’s lungs. Approximately 7” (178mm) x 2 1/4” (57mm) x 1.5” (38mm) (HxWxD) RS232 (serial) USB (serial) Weight – 10 oz. (w/batteries) 8.5 oz. Batteries – Two 1.5V AAA alkaline N/A Plugs into standard serial port USB DB9 or DB25 w/adapter Non-invasive device Disposable Pneumotach Mouthpiece (DPM) Double insulated handle Fleisch Pneumotach – differential pressure reading of flow with a DPM Volume determined by flow integration +/- 14 L/s – Flow +/- 8 L – Volume 30 s – Maximum Measuring Time 15C to 40C 10% to 90% Humidity, non-condensing Automatic BTPS Correction Automatic Back Extrapolation calculation Automatic Spirometry parameter calculation Automatic comparison to published Spirometry Predicted Equations (Reference Values) Automatic interpretation of test results See Appendix J See Appendix G & H ATS (1991) - Appendix E NHANES III (NLHEP 1999) - Appendix F Windows supported ink jet or laser printer 8.5” x 11” (Letter size) or 210mm x 297mm (A4 size) Next Go To Table Of Contents Back Next IQmark Digital Spirometer Operation Manual II. System Installation A. Hardware and Software Requirements Both the Diagnostic Workstation and the IQmark Digital Spirometer are 32-bit Windowsbased software. The software will occupy 90 megabytes (MB) of disk space. Additional disk space is required if you choose to store the results of the Spirometry tests performed. Storing the data is optional. This software shall run on a personal computer using a Pentium 500 MHz or faster processor, running Windows 2000, Windows XP or Windows Vista. For each operating system listed, the Spirometry program will run on the minimum RAM requirements as recommended by Microsoft: Windows 2000 Windows XP Windows Vista 128 MB of RAM 256 MB of RAM 512 MB of RAM In order to install and successfully use the Spirometer, your computer must meet the following minimum requirements: 1. Windows-based PC with Windows 2000, Windows XP or Windows Vista. Precaution: The Workstation and Spirometer have been tested for proper function with the Off-The-Shelf (OTS) Operating Systems (OS) specified in this manual. Do not operate the Workstation and Spirometer with an operating system other than the OTS OS specified. Future releases of currently approved operating systems should not be used until Midmark Diagnostics Group has had an opportunity to test the Spirometer with them. Before updating your operating system, contact Midmark Diagnostics Group for the latest OTS OS information. 2. Keyboard, mouse, and a CD-ROM drive. 3. VGA display accommodating 800x600, 1024x768, 1280x1024, or higher resolution. Minimum 256 colors (16-bit color recommended). 4. One (1) serial port (RS232C port, usually COM1 or COM2) or a USB port (use a USB to Serial Port adapter for the Spirometer handle with the 9-pin connector). B. Hardware Installation 1. Remove the items from the packaging and verify that you have the following: IQmark Digital Spirometry software installation CD (Diagnostic Workstation software is included on CD) IQmark Digital Spirometer Handle with built-in serial cable (USB or 9-pin) 10 Single Patient Use, Disposable Pneumotach Mouthpieces and nose clips Four (4) AAA alkaline batteries (Spirometers provided with a USB connector do not require batteries, so none are supplied). 7 Go To Table Of Contents Back IQmark Digital Spirometer Operation Manual 2. For 9-pin (COM) port handles, hold the handle upside down (so that the cable is aiming upward); push the battery compartment cover from the middle of the device towards the edge until the cover slides approximately ¼ of an inch. Remove your finger from the cover, the cover will pop upward when released. Insert two (2) AAA batteries into the battery holder, negative end in first, making sure to follow the battery polarity diagram (negative end towards the top) located on the lower side of the handle. Close the battery compartment cover. 3. For COM port handles, attach the female end of the 9-pin communication cable to an available PC serial port. You may also use a 9-pin-to-25-pin adapter as necessary (see note below). Secure the connections with the thumbscrews. Do not over-tighten. If using a 25-pin serial port (e.g., COM 2), connect the 25-pin (female) -to- 9-pin (male) adapter to the port on back of the computer. Then connect the female end of the 9-pin connector on the communication cable to the 9-pin port on the adapter. 4. If you received a USB Spirometer, no batteries are needed. DO NOT plug the USB Spirometer in to the computer until the Workstation and Spirometry software has been installed. Once the software is installed, simply plug the USB connector into any available USB port and the software will automatically detect the Spirometer. NOTE: For IQmark Holter and ECG users only: If one of these IQmark programs is already installed and its security key on the same PC, you will not need to adjust the security key. C. Software Installation Before installing the IQmark Digital Spirometry software on your computer, it is important that you understand and carry out the following tasks appropriately. Windows Taskbar The Diagnostic Workstation is designed to run as a full-screen program. For best results, the Windows Taskbar should be set to Auto hide to provide maximum display area. To do so, position the mouse pointer on the gray portion of the Taskbar on bottom of the screen. Press on the right mouse button and select Properties. Make sure the Auto hide box is checked. Click OK. Screen Saver If screen saver or any energy saving feature is enabled on the computer, disable it. Refer to your computer or software manual to find and change these settings. 8 Next Go To Table Of Contents Back Next IQmark Digital Spirometer Operation Manual Updating from older Brentwood Diagnostic Workstation versions If you are updating from a version of Brentwood Diagnostic Workstation earlier than version 4.0 and have ECG or Holter records that you would like to retain and transfer to the new version, you must first archive those records. Then you must uninstall the old Diagnostic Workstation version, install this new version and restore the archived records. Refer to the Diagnostic Workstation Operation Manual for instructions on updating. Installing the IQmark Digital Spirometer (and Diagnostic Workstation) Close all Windows programs before running this software installation. Once the installation program is initiated, it should not be interrupted until completed. The approximate installation time is five minutes. 1. Insert the Midmark Diagnostics Group software CD into the CD-ROM drive. 2. Follow the instructions on the screen. Refer to the Diagnostic Workstation Operation Manual if you have any questions. The installation CD will install both Workstation and Spirometry software. You can access the online IQmark Digital Spirometer Operation Manual from the Windows Task Bar through the following sequence: Start Programs Midmark Diagnostics IQmark Spirometry Manual 3. The installation program adds at least three shortcuts to your Windows desktop: one for the IQmark Workstation; one for the IQmark Configuration; one for the Spirometry Calibration. You can use the IQmark Configuration or the Spirometry Calibration program to set the communications port that the Spirometer uses or to set up your network database. If you installed the Adobe Reader, this icon is also added to your Windows desktop. NOTES: The IQmark Digital Spirometer application uses the IQmark Diagnostic Workstation to manage patient records. When you install or upgrade the Spirometer, the IQmark Diagnostic Workstation is automatically installed or upgraded accordingly. You may also access other Midmark Diagnostics Group PC-based products, such as the Holter or ECG, from the IQmark Diagnostic Workstation, if the product is installed on the same computer. Call Midmark Diagnostics Group for the latest information on additional PC-based diagnostic products. The IQmark Diagnostic Workstation is called the Diagnostic Workstation or Workstation for the remainder of this manual. 9 Go To Table Of Contents Back IQmark Digital Spirometer Operation Manual D. Configuring The Spirometer The Diagnostic Workstation can be configured to meet your individual needs. Refer to the Diagnostic Workstation Operation Manual for Workstation configuration questions. Spirometry Settings Within the Spirometry application program, a configuration program is installed that enables you to individualize the Spirometer for your operation. To open this box, click on the Settings button. The Settings button can be found in several locations. It can be accessed through the Spirometry Calibration icon, IQmark Configuration icon, the New Test screen, and the Spirometry Review and Edit screen within the Workstation program. Click the Settings button to display the following configuration menu. Spirometry Settings – Configuration Tab 10 Next Back Go To Table Of Contents Next IQmark Digital Spirometer Operation Manual If the profile listed in the Configuration Profile box is Default, highlight Default and click Add New. Create a new name for the profile and click OK. The Default profile cannot be modified. Global settings (Institution Name, etc) must be set in Workstation. 11 Go To Table Of Contents Back IQmark Digital Spirometer Operation Manual Com Port Spirometer – Auto Detect NOTE: The default Communications Port is COM 1. If you have connected the COM port Spirometry handle to COM 1 on the computer, as is the case for most Laptop or Notebook users, you will not need to change the port setting through the IQmark Configuration program. If COM1 is not available, you can use Auto Detect to locate the Spirometer. Click the Auto Detect button to find the port that the Spirometry handle is connected to. To use Auto Detect, you must have the Spirometry Module connected to an available serial port on the computer and then click the Auto Detect button. If Auto Detect cannot find the Spirometer, the following screen will appear: Auto Detect Screen Check the items listed and click OK. When the software finds the Spirometry handle, click OK to select the correct port. USB Spirometer – Auto Detect If you ordered a Spirometer with a USB connector, the Auto Detect button will not display. The USB driver for the Spirometer is installed when the software is installed. The software will detect the USB Spirometer automatically when it is connected. DO NOT connect the USB Spirometer until the Workstation and Spirometry software is successfully installed. The software must be installed before the Spirometer is connected. USB Spirometer Connected 12 Next Go To Table Of Contents Back Next IQmark Digital Spirometer Operation Manual Thin Client Channel Setting The Thin Client Channel setting applies only if you are using the IQmark Diagnostic Workstation in a thin client environment. This setting is ignored when the software is not running in a thin client environment. The drop down combo box contains the following selections. 1. COM port mapping (default) 2. Microsoft RDP 3. Citrix Select “COM port mapping” if you are using the IQmark Diagnostic Workstation product in a thin client and are not using the IQmark Virtual Channel Solution. If you are using the IQmark Virtual Channel Solution, select Microsoft RDP if your clients and servers are using Microsoft Terminal Services or select Citrix if your clients and servers are using Citrix software. Please refer to the document entitled “Application Note: Using the IQmark Thin client Virtual Channel Software” for more information. Configuration Profile Click the Add New button in the Configuration Profile area of this tab. Assign a name, e.g. My Config, and click OK. You can now modify the selections in the setup menu. Changing the Institution Name and Institution Address will change the header of your reports. Both fields are optional. NOTE: The original configuration profile may be set to Default. The Default profile cannot be changed. You must click the Add New button to create a new profile to change these settings. Once a new profile is added, you can change the settings on the other tabs. Other preset profiles are shipped with the instrument. Any of the other profiles can be modified or deleted. 13 Go To Table Of Contents Back IQmark Digital Spirometer Operation Manual Manage Lists The Manage Lists button enables you to modify the Indications List and the Bronchodilator List. You can add or delete items from either list. To add to a list, click the Add button under the appropriate list and type a new item. To delete an item, highlight the item you wish to delete and click the Delete button. Managed Lists Dialog Box For example, if a doctor uses only Albuterol for a bronchodilator, this list can be modified so that Albuterol is the only selection available. The list always appears in alphabetical order. 14 Next Go To Table Of Contents Back Next IQmark Digital Spirometer Operation Manual Reports Tab From this tab, you can select which reports to print whenever Print is selected. For each additional check box selected in any one of the Reports areas, the printed the report will include an additional page. In the Reports Tab shown below, the Cover Page box is selected and three report boxes are selected (Best 3 Pre-BD FVC; Pre and Post BD FVC; Pre and Post BD MVV). If a test session only contains Pre-BD FVC tests, clicking on Print will print a three page report. The first page is the Cover Page, the second page is the Best 3 Pre-BD FVC tests performed and the third page is the best Pre-BD test. If the Cover Page box is selected and no boxes within the Reports area are selected, only a one-page report will print because no additional Reports boxes are selected. Spirometry Settings – Reports Tab If the patient has Pre- and Post-Bronchodilator, FVC, VC and MVV tests saved, all applicable selected reports will print when the Print button is clicked. 15 Go To Table Of Contents Back IQmark Digital Spirometer Operation Manual Cover Page, Best 3 Pre and Best 3 Post Selected Another feature of this tab enables you to select the Calibration Report. If this option is selected, every time you print a patient’s report, the calibration that was performed prior to that test is printed with the report. This is helpful if proof of calibration is required. There are five options at the bottom left of this tab. Four of these selections – Vol/Time Predicted Curve, Flow/Vol Predicted Curve, Use ATS Graph Scales, Print Using Color, affect all reports, including the cover page. Print Test Quality Statements only affect the reports selected in the Report areas – they do not affect the cover page. For example, if the Predicted Curve boxes are selected, the predicted Volume/Time and predicted Flow/Volume graphs for the patient are printed on the secondary report pages and will also print on the cover page graphs. The Cover Page Settings tab has separate selections for Smoking History, COPD Risk, Lung Age and Test Quality Statements. Please see the Cover Page Settings tab section for additional information about the cover page. 16 Next Back Go To Table Of Contents Next IQmark Digital Spirometer Operation Manual ATS Recommended Graph Size The ATS recommends that a Volume Time graph be at least 20 mm per second and 10 mm per liter when hand measurements are required. Some government agencies and insurance carriers require this for reimbursement. In order to create a one page report, all cover page graphs will not print to this scale size. However, all reports from the Reports tab will if Use ATS Graph Scales is selected here. These graphs will print on the pages following the cover page. Please use this setting if requested from your carrier or for government agencies. Enable ATS Graph Scales 17 Go To Table Of Contents Back IQmark Digital Spirometer Operation Manual Cover Page Settings Tab This tab enables you to customize your cover page. Selections on this tab only change the look of the cover page: they do not affect additional report pages. The first selection determines whether the volume-time and flow-volume graphs are printed on this page. The Pre and Post BD Table Format selections determine whether the report includes only the Best Pre and Best Post BD test or the Best 3 Pre and Best 3 Post BD tests. This option is available when both Pre and Post BD tests have been saved. If the patient has performed only Pre or only Post BD tests, the Pre Or Post BD Table Format selections will take effect. The check box selections at the bottom of this page (Print Smoking History; Print COPD Risk; Print Lung Age: Print Test Quality Statements) determine what additional information appears in the patient demographics field and graph section of the cover page. These selections do not affect any of the additional report pages. Spirometry Settings – Cover Page Settings Tab 18 Next Back Go To Table Of Contents Next IQmark Digital Spirometer Operation Manual 19 Go To Table Of Contents Back IQmark Digital Spirometer Operation Manual Interpretation Tab From this tab, you can select which Reference Equations set to use as the default for Adults and Pediatrics. Not every Spirometry measurement (FVC, FEV1, etc) are calculated by every Reference Equation. The Secondary reference equations can be used to “fill in” missing measurements. For example, if your primary reference equation does not have an equation for FEF25, you can select a secondary reference equation that does to “fill in” your report. Spirometry Settings – Interpretation Tab You can also turn on or off the Auto. Interpretation feature. If the Auto. Interpretation box is selected, you can select the ATS Logic or the NHANES III logic. If you do not wish to have the software automatically interpret the Spirometry tests, clear the Auto. Interpretation box. The Primary Care Practitioner (PCP) Mode overrides Reference Equation and Interpretation selection. It is discussed on the next page. 20 Next Go To Table Of Contents Back Next IQmark Digital Spirometer Operation Manual The third area on this tab, FVC Settings, enables you to define the acceptable length of test required. Reducing this number will affect the length of test acceptability error code. The ATS recommends that the minimum length of test be set to 6 seconds. Primary Care Practitioner (PCP) Mode The PCP Mode automatically selects the NHANES III reference equations and interpretation logic. It also modifies the test acquisition screen, the test review screen and the printed reports. To set the Spirometer into the PCP Mode, the user selects PCP Mode from the pull-down list in the Configuration Profile box and clicks OK. As recommended by the National Lung Health Education Program (NLHEP), this mode simplifies the test procedure, measurements displayed and report options. For the test procedure, it eliminates the inhalation side of the flow volume loop and stops the test at 6 seconds of exhalation. It also eliminates the VC and MVV test selection. For the measurements and reports, it only displays values for FEV1, FEV6 and FEV1/FEV6 and limits the number of digits displayed to two (FEV1 and FEV6 is displayed as X.X Liters and FEV1/FEV6 is displayed as YY %). Any measured values that fall below the Lower Limit of Normal (LLN) will be displayed in red (bold in black and white). After each test maneuver is performed, the software will grade the test session. The quality control grade displayed will be A, B, C, D, or F. A test session must be graded A, B, or C to generate an interpretation and the results of Pre-FVC and Post-FVC tests are only compared if both the Pre and Post sessions are graded A, B, or C. To have the software display “Good Test Session”, you must acquire two acceptable tests that match according to the criteria listed here. QC Grade A B C D F Criteria At least two acceptable maneuvers with the largest FEV1 values matching within 100 ml and the largest two FEV6 values matching within 100 ml. At least two acceptable maneuvers with FEV1 measurements that match between 101 and 150 ml. At least two acceptable maneuvers with FEV1 measurements that match between 151 and 200 ml. Only one acceptable maneuver or more than one acceptable maneuver, but the FEV1 values don’t match within 200 ml. No acceptable maneuvers If the FVC maneuver is less than 6 seconds (because the operator ended the test) but the end of test volume is less than 100 ml during the last 0.5 seconds, then the software will set the FEV6 value equal to the FVC value (if the FVC measurement is valid). 21 Go To Table Of Contents Back IQmark Digital Spirometer Operation Manual Placing a check mark in the Primary Care Practitioner (PCP) Mode box with another profile selected (not PCP Mode) will enable test grading, remove VC and MVV from the test screen but will not limit the measurement parameters displayed. This allows you to customize the report if desired. To remain in the PCP Mode without customization, simply select the PCP Mode from the Configuration Profile box. Measurements Tab This tab enables you to customize which measurements you want to appear on the cover page, the test screen and the review screen. You must select at least one measurement. If you have selected the Tables and Graphs setting for your Cover Page, the cover page report displays only the first 9 measurements selected. If Table Only is selected, the cover page displays up to 28 measurements. Spirometry Settings – Measurement Tab You can place the measurements in any order you wish by using the Add, Insert, and Remove buttons. Highlight the measurement with your mouse and then choose the desired function. Choose the Add button to place the newly selected Available Measurements at the bottom of the Selected Measurements list. Choose the Insert button to place the newly selected Available Measurements above the currently highlighted item in the Selected Measurements list. 22 Next Back Go To Table Of Contents Next IQmark Digital Spirometer Operation Manual Choose the Remove button to remove an item from the Selected Measurements list. To use the Delete button, highlight a measurement from the Selected Measurements list and click the Delete button. The measurement will return to the Available Measurements list. 23 Go To Table Of Contents Back IQmark Digital Spirometer Operation Manual Incentive/Miscellaneous Tab This tab enables you to customize the incentive that the patient will see when performing a test. Since Spirometry is a patient effort dependant test, these incentives can help some patients perform the test properly and complete their exhalation. Spirometry Settings – Incentive/Miscellaneous Tab The user can select from the following choices: Thermometer Tree and Leaves Tree, Leaves and Monkeys Tree, Leaves and Pinwheel Candles 24 Next Go To Table Of Contents Back Next IQmark Digital Spirometer Operation Manual Trending Tab This tab enables you to customize the Trending report. You can select which volume, flow and/or percent parameters to display. For additional information on this feature, please refer to the section on Trending. Spirometry Settings – Trending Tab 25 Go To Table Of Contents Back IQmark Digital Spirometer Operation Manual Ethnic Adjustments Tab This tab enables you to customize the percentages that the predicted value equations are adjusted when testing a specific ethnic code. These percentages can only be adjusted if the Use Default Settings box in not selected, as show below. When this box is selected, the program will set the percentages as stated in the Adjustments to Reference Values Equations set in the Appendix. It is highly recommended that you use the default ethnic settings for testing. Spirometry Settings – Ethnic Adjustments Tab Additional information on these percentages is discussed in the Adjustments To Reference Values Equations appendix. 26 Next Go To Table Of Contents Back Next IQmark Digital Spirometer Operation Manual E. Calibration The ATS recommends daily calibration of any Spirometer. The IQmark Digital Spirometer automates this process for quick and accurate preparation of the instrument. Calibrating the Spirometer requires a 3-Liter syringe. Midmark Diagnostics Group strongly recommends a Midmark Diagnostics Group 3-Liter syringe with the Midmark Diagnostics Group Calibration Adapter. NOTE: The Spirometer handle must be calibrated with a Disposable Pneumotach Mouthpiece (DPM). The DPM must be calibrated with a Calibration Adapter that fits OVER the outside diameter of the mouthpiece. Never calibrate the device with a syringe that fits within the DPM. You can access the Calibration program from the Windows Task Bar through the following sequence: Start Programs Diagnostic Workstation Spirometry Calibration or Double-click the Spirometry Calibration icon: The following screen is displayed. Click the handle icon in the upper left corner to start calibration. Clicking OK will close this screen and return to the desktop. It is recommended that you place the DPM into the handle before you enter the Calibration or Test screen. Spirometry Calibration Utility Screen 27 Go To Table Of Contents Back IQmark Digital Spirometer Operation Manual Clicking on the handle will display the following calibration screen. Calibration Screen Check to see if Sensor: Ready is displayed in the upper right hand corner of the graph window. If you are using a Spirometer with a COM connector (DB9) with a model/serial number beginning with 51xxxx, you must place the DPM in the handle to turn it on. Please note that the handle will remain on whenever the DPM is inserted. Be sure to remove the DPM after calibration or testing to conserve the life of your batteries. Barometric Pressure The Pressure must be set prior to the first time you calibrate the system. It must be changed only if you change the location of the instrument and the altitude changes. Click the Settings button to open Spirometry Settings. Select the Calibration tab and enter the Barometric Pressure in the Default Barometric Pressure box. If you do not know the barometric pressure, you can select Calculate Barometric Pressure From Altitude and enter your altitude. The software will automatically calculate and store the usual barometric pressure for that altitude. NOTE: 28 The proper Barometric Pressure or altitude MUST be entered to assure a proper calibration. Next Go To Table Of Contents Back Next IQmark Digital Spirometer Operation Manual Spirometry Settings – Calibration Tab Select the Calibration Reminder box to remind the user when the Spirometer has not been calibrated for the interval set in the Calibration Expiration Interval box. Starting a New Calibration Click New Cal on the Calibration screen to begin a new calibration. Attach the 3-liter syringe to the Calibration Adapter, and then attach the adapter to the mouthpiece. Check that the mouthpiece is properly attached to the handle. The first time you calibrate your Spirometry handle, you must type your name in the Performed by box, the Syringe SN (serial number) and Spirometer SN (handle serial number) in the appropriate boxes. Click Start Cal. The sensor will zero itself and then the following screen appears. 29 Go To Table Of Contents Back IQmark Digital Spirometer Operation Manual Calibration Pump Window Follow the instructions displayed. Use the red dotted line and/or the blue timer arrow as a target flow rate. Try to inject the air from the syringe at a rate close to that of the red line. Remember that the syringe handle attached to the plunger must be pulled all the way out before you inject. Once the handle is all the way out, inject the air from the syringe until the handle is all the way in. PUSH THE HANDLE IN AND DRAW THE HANDLE OUT SMOOTHLY – TRY NOT TO “BANG” THE PLUNGER AS YOU PERFORM THE MANEUVER. “Banging” the plunger can cause the timer arrow to start to count. If it does, just wait for the timer to reset and inject the plunger. This will not affect the calibration results. If the pump is performed correctly, the program will prompt you to begin a second injection. Repeat the process, injecting all of the air in the syringe. If the injection is not performed correctly, the system will discard the attempt and prompt you to inject again. After three correctly performed injections, the system will automatically calculate a correction factor and prompt you to perform a verification pump. ALWAYS VERIFY YOUR CALIBRATION. After a verification injection, the software will display the measured volume and the percentage difference from 3.0 Liters. The ATS recommends that the verified volume should be between 2.91 and 3.09 (+/- 3.0 %) to be accepted. Be sure to check these numbers before accepting the verification. The verification acceptance dialog box will display those numbers for quick and easy comparison. Click Yes if the verification flow is within the recommended parameters. If the flow is not within the parameters, click No and repeat the verification flow. Verification Acceptance Dialog Box After you accept the verification, the system automatically saves the calibration. To print the calibration report, click Print and select PRINT from the menu. To view the calibration report, click Print and select PRINT PREVIEW from the menu. 30 Next Go To Table Of Contents Back Next IQmark Digital Spirometer Operation Manual After you have printed or reviewed the calibration report, click Exit to start testing. Social Security Disability – 3 Flow Calibration SSD and OSHA require a calibration at three different flow rates. Midmark Diagnostics Group has incorporated a feature that requires calibration at 0.5 L/s, 1.5 L/s and 3.0 L/s. On the Calibration Tab of Spirometry Settings, there is a check box for Multi-Flow Calibration. If this box is selected, you must calibrate at three different flow rates. The program will display the Multi-Flow Calibration window and will measure the flow rates as the user injects the 3 liters. If the flow is too fast, the program will reject the injection and ask the user to try again with a slower injection. If the flow is too slow, the program will reject the injection and ask the user to try again with a faster injection. When injecting the 3 liters, try to keep the graph on the left hand side in line with the dotted red line, or, on the right hand side, try to keep the bar moving at the same speed as the blue arrow. Multi-Flow Calibration Window OSHA Regulations OSHA Regulations are outlined in the Recommended Standardized Procedures for Pulmonary Function Testing published in the Federal Register. At a minimum, OSHA requires: Calibrate with both Spirometer and syringe at the same temperature. Proper calibration of the Spirometer daily. (three different flow rates) Calibrate for volume and time or flow and time (we provide volume and time). Calibrate before each shift. Calibrate whenever the Spirometer is transported. Calibrate after every thirty tests or sooner (2-3 hours) under field test conditions. 31 Go To Table Of Contents Back IQmark Digital Spirometer Operation Manual Please refer to the Federal Register or your OSHA representative for additional details about occupational testing. F. Spirometer Handle There are different versions of the Spirometer handle available. Midmark Diagnostics Group offers USB and COM port versions of the handle. The USB handle is designed to operate with a computer. There are two versions of the COM port handle (COM port handles have a DB9 female connector). One version is designed to operate with a Pocket PC device (like a Compaq/HP iPAQ) and the other version is designed to operate with a computer. The model/serial number is listed on the label on the top of the Spirometer handle (under the DPM). This should be used to identify the version of the handle. The model/serial number defines the handle as follows: 03xxx COM port handle for use with a desktop or laptop computer 50xxxx COM port handle for use with a desktop or laptop computer 51xxxx COM port handle for use with a Pocket PC, hand-held device 52xxxx USB port handle for use with a desktop or laptop computer NOTE: 51xxxx handles are switched on when the DPM is in place. To conserve the life of your batteries, be sure to remove the DPM after calibration or testing. In addition, place the DPM in the handle BEFORE entering the test or calibration screen. This will turn the handle on and allow the software to detect the handle. Please contact Midmark Diagnostics Group Customer Service at 800-624-8950, if you have any questions about which handle you have. 32 Next Go To Table Of Contents Back Next IQmark Digital Spirometer Operation Manual III. Operation NOTICE This Spirometer has been designed and tested to meet the appropriate sections of IEC 60601-1-1, IEC 601-1, IEC 60601-1-2, UL 2601-1 and ETL (CSA and UL). A. Introductory Notes This manual describes how to use the various features and the operational sequence most users will follow when operating the IQmark Digital Spirometer. However, you are not restricted to follow this particular sequence. The bottom or right side of each screen has a menu bar that lists other screens that may be accessed. To visit any of these screens, simply click the appropriate button. Of course, certain sequences must always be followed, such as entering a patient’s demographics and medical data prior to performing a Spirometry test. For your convenience, a condensed guide to the operation of the Spirometer with new patients is listed in the Appendix under Spirometry Testing at a Glance. Use this guide until you become more familiar with the use and operation of the program. Appendix N, O, and P can be used for more advanced users and for Pre/Post testing. Pulmonary Function Test or PFT is another term widely used for Spirometry. You may hear people refer to this device as a PFT machine. Technically, a Spirometer is a device used by a patient to perform a PFT. In this manual, the words Spirometer or Spirometry are used when referring to the Midmark Diagnostics Group device and its operation. Prescription Device “Caution: Federal law restricts this device to sale by or on the order of a medical practitioner licensed by the law of the state in which that person practices.” B. Patient Preparation NOTE: The ATS recommends daily calibration of Spirometers using a 3-liter syringe. See Calibration in the Installation section for instructions. Each patient must be prepared for the Spirometer test procedure. It is essential that you comply with the following instructions on patient preparation as closely as possible. Otherwise, the integrity of the Spirometry data may be compromised. Show every patient the proper way to perform a test. It is recommended that the user perform at least one forced expiratory maneuver to demonstrate the procedure to the patient. This test does not have to be performed on this Spirometer but it should be 33 Go To Table Of Contents Back IQmark Digital Spirometer Operation Manual performed using a mouthpiece. Remember that Spirometry depends on patient effort – the coaching and enthusiasm displayed towards the patient should emphasize the importance of good performance during the test. C. Starting The Program The application that you will use to start the Spirometer is called the IQmark Diagnostic Workstation and is located on your Windows desktop as a shortcut icon. Double click on this icon to start the Diagnostic Workstation program. OR Starting from the Windows Task Bar, go through the following sequence: Start Programs Midmark Diagnostics IQmark Workstation D. Opening Screen When you start the Diagnostic Workstation application, an opening screen appears. The IQmark Products Available will list the products installed on your computer. Hardware modules are required for operation of each product. Call Midmark Diagnostics Group Sales for information about available add-on products. IQmark Diagnostic Workstation Opening Screen 34 Next Back Go To Table Of Contents Next IQmark Digital Spirometer Operation Manual 35 Go To Table Of Contents Back IQmark Digital Spirometer Operation Manual There are six choices on the opening screen: STAT ECG – Please see the IQmark Digital ECG Operation Manual for information on this feature. It is not part of the IQmark Digital Spirometer program. New Patient – Enables you to register and proceed with Spirometry or other installed medical testing for a new patient. Patient List – Enables you to view a list of patients previously tested or previously entered into the database. Selecting a patient from the list enables you to access that patient’s records and data from previous tests. Configuration – Displays what database is currently selected and enables the user to configure the program to meet their needs. See Configuring The Spirometer and Configuration in the Diagnostic Workstation manual. Help – Provides on-line assistance regarding the use, operation and troubleshooting of the IQmark Diagnostic Workstation and other products. Return to Windows – Exits the program and returns you to the Windows desktop. E. Testing A New Patient For a new patient, click the New Patient button in the opening screen. This opens the Patient Data Entry screen. The Patient Data screen enables you to enter the data that is specific to your patient. Some of this data is of diagnostic value and is used by the Spirometer’s interpretive program when the program analyzes the patient's data. 36 Next Go To Table Of Contents Back Next IQmark Digital Spirometer Operation Manual Patient Data Screen Each of the data fields on this screen can be accessed by clicking in it with the mouse or pressing the tab key. Although some of this information is not essential for Spirometry, it is important to complete each of these fields as accurately as possible. The accuracy of, Date of Birth, Sex, Height, and Race, is essential since this data is used by the Spirometer interpretive analysis program to produce predicted measurements and preliminary diagnostic statements. All four digits of the year must be entered for the Date of Birth. The Height is located on the Vital Signs tab. The following table provides a brief description of the function for each field. Fields that play a diagnostic role in the interpretive program are noted. Patient Data Fields Field Last Name First Name Middle Initial ID Diagnostic Role Description Used for identification. Providing complete information facilitates easier retrieval of patient data at later dates. Letters and/or numbers may be used. Used for identification. Letters and/or numbers may be used. 37 Go To Table Of Contents Back Next IQmark Digital Spirometer Operation Manual Patient Data Fields – Required for Spirometry Field Race Diagnostic Role Yes Description Used for information and diagnostic analysis in Reference Values equations if ethnic reductions are enabled. Select one of several pre-labeled choices from the list. If the patient’s race is not listed, if you do not know the patient’s race, or if the patient is of multiracial origin, use Appendix I for assistance. Date of Birth Yes (age) Enter using a month/day/year format (this order may be changed in IQmark Configuration settings). Enter 2 digits each for month and day and all four digits for the year. The Spirometer interpretive program uses this data to calculate the age of the patient. ( mm/dd/yyyy i.e. 02/14/1961 ) Sex Used for information and diagnostic analysis in Reference Values equations. Yes Used for information and diagnostic analysis in Reference Values equations. Select the appropriate gender. Height Yes Used for information and diagnostic analysis in Reference Values equations (in Vital Signs tab). Use only numbers. Data may be entered in either English or Metric units, depending on which option is selected in the IQmark Configuration Settings. Vital Signs Tab The Vital Signs tab displays on top when the Patient Data screen is opened. This tab enables the user to enter and track the patient’s vital signs over time. The user can enter the vital signs when entering new patient information. After the patient has been saved, the user can enter additional vital signs by clicking on the New Vital Signs button. This clears the BP, Pulse, Temperature and SpO2 and enables you to enter new vital signs readings. After vital sign measurements are entered, click the Review Vital Signs button to display all previously entered vital signs. These measurements will be display in a table as well as on a user defined graph. The following table provides a brief description of the function for each field. Fields that play a diagnostic role in the interpretive program are noted. Additional information about the Vital Signs tab can be found in the Diagnostic Workstation Operation Manual. 38 Go To Table Of Contents Back Next IQmark Digital Spirometer Operation Manual Vital Signs Tab Fields Field Weight Diagnostic Role * Description *Used for information and as a diagnostic tool by a physician in some cases. Use only numbers. Data may be entered in either English or Metric units, depending on which option is selected in the IQmark Configuration Settings. Height Yes Used for information and diagnostic analysis in Reference Values equations. BMI * Body Mass Index. Automatically calculated from Height and Weight. Refer to the Workstation Operation Manual for additional information. BP (Blood Pressure) * *Used for information and is used as a diagnostic tool by a physician in some cases. Enter numbers only. Pulse * *Used for information and is used as a diagnostic tool by a physician in some cases. Enter numbers only. Temp. * *Used for information and is used as a diagnostic tool by a physician in some cases. Enter numbers only. SpO2 (Pulse Oximetry) * *Used for information and is used as a diagnostic tool by a physician in some cases. Enter numbers only. Vital Signs tab 39 Go To Table Of Contents Back IQmark Digital Spirometer Operation Manual Medications tab; History tab Clicking the Medication tab displays a screen that gives you the option of adding, editing or deleting a medication from the patient’s profile. Clicking the History tab displays a screen that gives you the option of adding, editing or deleting medical history from the patient’s profile. Additional information about these tabs can be found in the Diagnostic Workstation Operation Manual. Contact Info tab; Risk Factors tab Clicking the Contact Info tab displays a screen that gives you the option of adding, editing or deleting the patient’s contact information (Address and Phone Number). Clicking the Risk Factors tab displays a screen that gives you the option of selecting risk factors for the patient (does not effect Spirometry results). Additional information about this tab can be found in the Diagnostic Workstation Operation Manual. Smoking History tab Clicking the Smoking History tab displays a screen that gives you the option of adding the smoking history to the patient’s profile. To add this information, select the Smoker box and then enter the number of cigarettes the patient smokes per day and the number of years they have been smoking. Smoking History tab If the patient used to smoke and has since quit, select Smoker as above and then select the Quit box and enter the number of years since they quit. 40 Next Go To Table Of Contents Back Next IQmark Digital Spirometer Operation Manual F. Instructions for Performing a Spirometry Test To prepare a patient for any Spirometry test, you must explain to the patient the entire procedure for the type of test you want them to perform. Then you should demonstrate for the patient the correct procedure for performing that test. The American Thoracic Society (ATS) states in their Standardization of Spirometry 1994 Update: “Perhaps the most important component in successful Spirometry is a well-motivated, enthusiastic technician.” Coaching and encouraging the patient with body language and with verbal language like “blast out hard and fast”, “continue to blast out”, and “squeeze the air out” will help to ensure a good FVC maneuver with reproducible results. Throughout of this manual, the user or technician refers to the person instructing the patient and operating the Spirometer. The Disposable Pneumotach Mouthpiece (DPM) is designed for a single patient use. Multiple tests can be performed on one patient during one testing session. Use new DPM for each future test session on the same patient. Do not attempt to sterilize or disinfect the DPM. Any such attempts would have a high chance of affecting the results of a Spirometry test. Do not attempt to re-use the DPM. NOTE: PHYSICIAN’S RESPONSIBILITY: It is the physician’s responsibility to ensure that the test is properly administered, evaluated and interpreted. The technician administrating the test should be trained in Spirometry by completing a certified Spirometry Training course. The instructions listed here are only a guide and should not be used to train a technician. Prepare by requiring the patient to: Loosen any tight clothing that might constrict lung function. Remove any foreign objects from the mouth, including dentures if they are likely to become dislodged. Select a new DPM and place it in the Spirometer handle. Once you are both ready to perform a test, require the patient to: Place the lips and teeth around the DPM (not near the end), using their lips to seal their mouth to the DPM prior to performing any Spirometry test. Be careful not to block the flow tube with the tongue. Follow the instructions of the technician. Allow the patient to place the mouthpiece in their mouth and breathe through it before performing a test. This will help reduce the anxiety of catching their breath and show them there is no resistance when breathing through the DPM. This Spirometer enables you to choose among FVC, VC, and MVV tests in both the PreBronchodilator (Pre-BD) and Post-Bronchodilator (Post-BD) modes. Remember, if the 41 Go To Table Of Contents Back IQmark Digital Spirometer Operation Manual PCP Mode is selected as the configuration profile, only the FVC test is available (see Configuring The Spirometer). FVC or FVC Loop The Forced Vital Capacity (FVC) test is usually the first Spirometry test prescribed. Traditionally, the FVC test measures expiratory flow only and the FVC Loop is a FVC test with the inspiratory portion of the test included. However, a full expiratory and inspiratory loop is often referred to as a Flow Volume Loop, an FVC Loop or occasionally as an FVC test. On this Spirometer, the user can perform a FVC or FVC Loop by simply selecting FVC. To start a test, click New Test from the Patient Data screen. Click on the lungs icon next to Spirometry. If desired, enter the Technician’s name and the Physician’s name or select them from the list. The reason for testing the patient can also be selected from the Indication list as shown in the New Test Selection Screen below. The Spirometry Profile section is used to select different Configuration Profiles, if desired. For example, if the practice has physicians that required different measurement parameters on their report, a different Configuration Profile can be created and name for each physician. New Test Selection Screen Click on OK to open the test acquisition screen. The Spirometry data acquisition, or test, screen appears. 42 Next Back Go To Table Of Contents Next IQmark Digital Spirometer Operation Manual Spirometry Data Acquisition Screen (Test Screen) By default, the FVC button will be selected. For a Pre-BD test, make sure the words PreBronchodilator appear in the blue box in the middle of the screen. Also notice that the Pre and FVC buttons are bold. Do not click the Start New Test button until the patient is ready. Once the patient is prepared, you must explain the full procedure of the test. Tell the patient to take 2 or 3 normal tidal breaths and then to inspire as deeply as possible. After a complete inhalation, tell the patient to place the mouthpiece in their mouth (as described earlier) and enthusiastically encourage them to blast out the air quickly and completely. Continue to encourage with voice and body language until a visible plateau is evident on the Flow-Volume scale or until the program indicates that no additional flow is being measured (displays: Inhale Now). If a full loop is required, instruct the patient to breathe in quickly and fully to take in as much air as possible. Demonstrate this procedure for the patient. Let the patient see the effort required for a good test. The technician should carefully watch the entire maneuver ensuring: Maximal inhalation before starting Forced expiration - Quick, strong and without hesitation Continued expiration – Encourage the patient to blow out as long as possible 43 Go To Table Of Contents Back IQmark Digital Spirometer Operation Manual Inhalation – If a flow volume loop is required, ensure that the patient keeps the DPM in their mouth and takes a maximal inhalation at the end of the forced expiration. Have the patient hold the handle next to their cheek, not in front of their mouth. To start the test, click the Start New Test button. The device will “zero” itself. BE SURE THAT NO AIR IS TRAVELING THROUGH THE MOUTHPIECE DURING ZEROING. The following box will appear while the Spirometer is zeroing. Zeroing The Sensor Once this is done, the following incentive display appears (or the one selected by the user). Have the patient, inhale fully, move the handle sideways towards their mouth, insert the mouthpiece into their mouth and start the test. Thermometer Incentive Display For this incentive, note that the color of the “mercury” in the thermometer changes with the percentage of the patient’s predicted FVC value. It will remain red from 0 to 49%, yellow from 51% to 79%, green from 80% to 100% and bright green above 100%. The percentage of their predicted value is also displayed above the thermometer. After the 44 Next Go To Table Of Contents Back Next IQmark Digital Spirometer Operation Manual numbers have stopped rising, instruct the patient to inhale maximally or click the Stop button or press the Enter key to complete the test. Both actions will end the test. The program automatically “grades” the test according to ATS criteria. Test Accepted Dialog Box After each completed test, the Test Accepted dialog box appears. The acceptability statement is also displayed with Yes or No automatically selected. IMPORTANT – The acceptability statements are to be used as recommendations or guidelines and do not mean that a test must be accepted or rejected. It is up to you to decide if the effort performed is acceptable. You can override the software selection and choose Accept if you determine the effort is good. After deciding to accept or reject a test, click Yes to perform another test or No to stop testing. These acceptability statements are based on the recommendations of the ATS. Acceptability Statements The following table lists the acceptability statements you might see during FVC testing. Please remember, these are recommendations and not requirements. Please use your own judgment when deciding to accept or reject a test. ATS Acceptability Statement Criteria Comment Displayed Good test Meets all the criteria listed below. Extrapolated volume > 5% of FVC, or greater than 0.150 liters, whichever is greater. Good test! Test did not last at least X seconds from start of expiration Blow out longer Hesitating start Test too short Hesitation detected: Blast out faster; blast out harder 45 Go To Table Of Contents Back Next IQmark Digital Spirometer Operation Manual Poor effort Interrupted flow Abrupt stop Inhalation volume is greater than the Exhalation Volume Exhalation volume is greater than the Inhalation Volume This acceptability statement was added by Midmark Diagnostics Group where X is the Minimum FVC Length configuration setting (default is 6 sec.) PEF not reached within 120 ms. Poor effort: Blast out faster; blast out harder Cough or interruption detected. Blast out smoothly No plateau of duration of at least one second in which there is less than 0.050 liters of volume change. Inhale > 1.1 * exhalation if inhalation performed. Exhale > 1.1 * inhalation if inhalation performed. Volume less than 0.50 Liters Blast out completely Inhale deeper before starting the test. Inhale completely at the end of the test. Volume Too Low After the patient has completed the number of tests you require, click the Save Review button in the lower right corner of the test screen. This will automatically save the test session and display the review screen. See section G, Reviewing Patient Reports, later in this manual for more information about the View Report screen. If a patient’s FVC is below expectations or if you suspect airway obstruction, you might require the patient to perform a slow vital capacity (SVC) or VC test. Flow Volume Loops – Why Inhale? Diagnostic Reasons The inhalation side of the flow volume loop can be used to determine if an Upper Airway Obstruction (UAO) is fixed or dynamic (variable). A fixed UAO decreases rates in both expiratory flow and inspiratory flow. A variable UAO decreases rates in expiratory flow or inspiratory flow, not both. Extrathoracic (outside the chest area, i.e. in the throat) airway obstruction decreases rates in the inspiratory flow. Intrathoracic (inside the chest area, i.e. in the airway tubes leading directly to the lungs) airway obstruction decreases rates in the expiratory flow. Typically a patient will present with stridor (crowing or wheezing breathing sounds) and/or dyspnea (shortness of breath) on exertion. The common causes are vocal cord paralysis, swelling of the upper airway or voice box, enlarged thyroid gland or goiter, a 46 Go To Table Of Contents Back Next IQmark Digital Spirometer Operation Manual tumor, or an injury due to an accident or intubation or tracheotomy. These are all examples of an extrathoracic airway obstruction. If the flow volume loop shows signs of UAO, the obstruction should be assessed and located using flexible bronchoscopy (to view the obstruction) Quality of Test Results If you do not have the patient inhale at the end of the test, how can you be assured that the patient expired fully or that the patient inhaled fully before they started the test? If a patient performs a flow volume loop, the results of their expiratory volume and their inspiratory volume should be within 10% of each other. If they are not, the appropriate acceptability statement will display after the test is completed. Post-Bronchodilator Tests The following instructions assume you have already performed the Pre-BD test on the patient and have administrated the bronchodilator. Testing one patient at a time From the View Report screen, you can select a bronchodilator from a list and then click Post-BD to perform tests. Selecting Post-BD returns you to the testing screen. Post-BD FVC tests are performed the same way as Pre-BD FVC tests. See Appendixes P and Q. Testing more than one patient at a time Select a patient from the patient list. Click New Test. Select Spirometry and click OK. If you have performed a Pre-BD test on this patient, the program will display a list of test type selections. To attach a Post-BD test to the existing Pre-BD test, use the default setting (select the first choice) and click OK. This will open the testing screen. Post-BD FVC tests are performed the same way as a Pre-BD FVC tests. See Appendix O. Existing Pre-Bronchodilator Test Dialog Box 47 Go To Table Of Contents Back IQmark Digital Spirometer Operation Manual Once the required number of Post-BD tests is performed, click the Save Review button to display the Pre/Post comparison. VC or SVC This test can determine if a patient’s lungs are trapping air during a forced maneuver (FVC test). Air trapping can be an indication of airway obstruction and is also sometimes seen in older patients. This is a very slow and deliberate test. The patient takes 2 or 3 normal tidal breaths and then a slow, deep breath, and then a slow, full exhale. Click the VC button. The VC button appears bold. If this is a Pre-BD test, make sure the Pre message is displayed in the blue box in the middle of the test screen. Do not click the Start New Test button until the patient is ready to perform the test. To perform a VC test, the patient must perform the test according to the following instructions: Inhale completely before placing the flow sensor mouthpiece into the mouth. Insert the mouthpiece just past the front teeth and seal the mouth to the flow sensor mouthpiece with the lips. Take 3 or 4 tidal breaths with the mouthpiece in the mouth. Inhale as deeply as possible, until the technician observes a plateau at the bottom of the graph. Blow out slowly and evenly until the technician observes a plateau at the top of the graph or the device signals that the end of test criteria has been met. The technician should stop the test with the mouse or the ENTER key. Remove the mouthpiece from their mouth when instructed by the technician. The patient must exhale at a faster rate during the “Blow out” phase than during the tidal breaths. After the patient has completed the number of tests you require, click the Save Review button and click Yes to save the test efforts. MVV The Maximum Voluntary Ventilation, or MVV, is the measurement of a patient’s breathing when the patient inhales and exhales maximally and rapidly for 12 to 15 seconds. The software takes this result and extrapolates the results for a period of one minute. MVV is expressed in liters per minute (L/min). This is a very demanding test and patients must be allowed to rest between efforts. The MVV test is required to qualify some patients for Social Security Disability benefits. Click the MVV button. The MVV button now appears bold. For a Pre-BD test, make sure the Pre message is displayed in the blue box in the middle of the test screen. Do not click the Start New Test button until the patient is ready to perform the test. 48 Next Back Go To Table Of Contents Next IQmark Digital Spirometer Operation Manual To perform the MVV test, the patient must perform the test according to the following instructions: Correctly place the mouthpiece in their mouth. Take at least 3 normal tidal breaths. Inhale and exhale maximally as quickly as possible. Coach and encourage the patient until the test time exceeds 12 seconds. Have the patient remove the mouthpiece from their mouth and allow them to rest. After the patient has completed the number of tests you require, click the Save Review button and click Yes to save the test efforts. G. Reviewing Patient Reports The Diagnostic Workstation software allows for the storage of additional patient diagnostic tests including ECG and Holter data (only if you have purchased these options). Please refer to the appropriate manual for these procedures. H. Review Spirometry Reports Once you have completed the Spirometry session and exited the test area, View Report screen appears. The test results are displayed in the middle of the display area with other useful information displayed in the upper sections as shown in the Spirometry View Report Screens on the following page. The name of attending technician should be entered in this screen if they have not previously been entered. Entering the Reviewed By information will CONFIRM this report. Until the Reviewed By is entered, the report is unconfirmed. To edit or review a report, display the desired view by clicking the Summary, FVC Graphs, MVV Graphs, or VC Graphs tab. These tabs display the tests performed in the session under review. You can edit (Technician and Reviewed By), review and print the Spirometry reports. Clicking the Settings button (upper right) enables you to select which reports to print. Remember that every report checked will print when you click the Print button and select Print. Click the Print button and click Print Preview to display reports before they are printed. In addition to the test results, the Summary tab includes the following information: Patient’s Age, Lung Age, Sex, Height, Race, Smoking History and COPD Risk. Pre and Post FVC test session statement (Attemped, Accepted, Matches). 49 Go To Table Of Contents Back IQmark Digital Spirometer Operation Manual Spirometry View Report Screen - Summary Click on the Summary, FVC Graphs, MVV Graphs,or VC Graphs tab to view other data for this patient. Remember that only the information stored is available for viewing, i.e., if no VC tests were performed, no VC tests are available for viewing. Spirometry View Report Screen – FVC Graphs 50 Next Go To Table Of Contents Back Next IQmark Digital Spirometer Operation Manual I. Printed Spirometry Reports – Analysis of results The printed reports display patient demographics, test date and time, measurements, graphs, interpretations, and additional analysis of the Spirometry test results. COPD Risk Assessment The Chronic Obstructive Pulmonary Disease (COPD) Risk Assessment uses the Tecumseh Index. It is helpful in smoking cessation programs. If the patient is a current smoker and that fact is entered into the Patient Data screen, the printed report will indicate the curent COPD Risk and the reduced COPD risk to the patient if they quit smoking. The COPD Risk statements are: Low, Moderate, High, Risk is very high, COPD may exist. Lung Age The program automatically calculates the Lung Age of the patient. The Lung Age is calculated from the patient’s Sex, Height and FEV1. This estimate is also useful in smoking cessation programs. Lung Age is calculated only for patients from 20 to 84. J. Reviewing Data for Other Patients Patient reports can be effectively managed with the Diagnostic Workstation. You can access other patients test data by selecting the Patient List from the Patient Data screen and then clicking on Go To Report List Screen. For additional information on the Report List screen and patient data management, refer to the Diagnostic Workstation Operation Manual. 51 Go To Table Of Contents Back IQmark Digital Spirometer Operation Manual Multi-Patient Report List Screen This screen lists the patients and tests performed at your facility through the Diagnostic Workstation. It provides ID numbers, the report type, the date of each test, as well as other useful information. Use the horizontal scroll bar to view information about additional reports. The Filter Reports section enables you to select reports by date and type. In the Show Range area, select Show All to display tests from the earliest report to the current date. Select Show Today to display only those reports prepared on the current date according to the computer calendar. You can also indicate a range of dates using the From and To fields. The default setting is Show All. NOTE: The From box will not accept dates before 01/01/97. The Show Reports area enables you to select one or more of the following reports for display: ECG, RR Variability, Holter, and Spirometry. Selecting Show All will display all available types of reports. For example, remove the check box from ECG, RR Variability and Holter to display Spirometry tests only. When the selection is completed, the Report List screen is updated with the new data and selection ranges. 52 Next Go To Table Of Contents Back Next IQmark Digital Spirometer Operation Manual K. Trending Trending enables you to compare the best test measurements from two or more Spirometry sessions. Trending - Main Screen Trending enables you to compare different Spirometry measurements over time so that changes in a patient’s condition can be easily seen in graphical and tabular form. The following features are standard in the Trending software: Select one to ten different Spirometry measurements to trend at one time. Select the length of time to compare, from a minimum of two sessions, to any number of sessions, to all test sessions stored for a patient. Provide comparison between two individual tests, e.g., the best test in one session against the best test in another session. Provide comparison between actual and predicted measurements. Provide changes over a selected period of time, e.g., the oldest test session against the latest test session. Choose Pre-Bronchodilator tests only or Post-Bronchodilator tests only. Provide tabular and graphical displays for easy comparison. Provide color-coded graphic displays for easy identification. Print and display trend measurement in tabular format. Print and display graphical Flow/Volume (F/V) reports in overlay or side-by-side formats. 53 Go To Table Of Contents Back IQmark Digital Spirometer Operation Manual Selecting Reports to Trend The Spirometry Trend Selection dialog box appears when you click the Trending button when viewing Spirometry reports from the View Report screen. Spirometry Trend Selection Dialog Box The default settings are All Reports, Pre-Bronchodilator Tests, and View Report. Report Selection Select which reports to trend. First select All Reports or Select From List. Select All Reports to view all the reports in the list. This is the default selection. Select Select From List to select individual reports. If this option is selected, you can pick and choose which sessions to trend. Test Selection Select the type of tests to trend. You can trend Pre test results against Pre test results or Post test results against Post test results. Pre-Bronchodilator – If checked, all trended values are taken from the best Pre-BD test of the session. Post-Bronchodilator – If checked, all trended values are taken from the best Post-BD test of the session. Action This selection tells the program what to do with the trend after the above selections are chosen and the OK button is clicked. 54 Next Go To Table Of Contents Back Next IQmark Digital Spirometer Operation Manual View Report – Select to display the Trending screen. You can then choose to print the trending reports from the Trending screen. Print Report – Select to print the trending report to the default printer when you click the OK button. The Trending screen displays briefly and then returns you to the View Report screen. The Trending tab in Spirometry Settings enables you to select the parameters to trend, the type of Flow Volume Loop report to print and the default Flow Volume Loop to display. The left axis and right axis scales are independent of each other. The left axis always displays volume parameters in liters. The right axis displays either percentage parameters or flow parameters. Spirometry Settings - Trending Volume Parameters Measurements – Lists volume measurements selected for the left axis. Predicted – Lists predicted values for volume measurements for the left axis. Flow and Percentage Parameters None – Disables the right axis trend. Flow – If selected, the right axis is for trending flow measurements. Percent – If selected, the right axis is for trending percentage measurements. 55 Go To Table Of Contents Back IQmark Digital Spirometer Operation Manual Measurements – Lists flow or percentage measurements selected for the right axis. Predicted – Lists predicted values for flow or percentage measurements for the right axis. Selecting Parameters to Trend This dialog box enables you to select which parameters to trend. There are six possible sets of parameters. They are: 1. 2. 3. 4. 5. 6. Volume measurements Volume predicted values Percentage measurements Percentage predicted values Flow measurements Flow predicted values Spirometry Trend Parameter Selection From the Trending tab in Spirometry Settings, click the Select button. The Spirometry Trend Parameters box displays. To add an item to the Selected box, select the item in the Available box and click the Add button. This will place the new item at the bottom of the list. To insert an item between or above items in the Selected box, select the item in the Selected box above which want to place a new item, select an item from the Available box, and click the Insert button. To remove an item from the Selected box, select the item to be removed and click the Remove button. To start a new list with no items selected, click the Clear List button. Report Selection On the Trending Tab, select which type of Flow Volume Loops you want to print when the trend report is printed. 56 Next Go To Table Of Contents Back Next IQmark Digital Spirometer Operation Manual Side By Side F/V Loops – If checked, the F/V Loops are displayed and printed side-byside. Overlay F/V Loops – If checked, the F/V Loops are displayed and printed overlaid. Default F/V Display On the Trending Tab, select which type of Flow Volume Loops you want to see when the trend report is displayed. Side By Side – If selected, the Side By Side F/V Loop screen is displayed as the default when you click on the View F/V Loops button in the Trending screen. Overlay – If selected, the Overlay F/V Loop screen is displayed as the default when you click on the View F/V Loops button in the Trending screen. Total Selected – Indicates the total number of parameters selected for printing. Maximum Allowed – Displays the maximum number of parameters allowed. Trend Display Screen The Trending screen is the main screen of the Spirometry trending control. It consists of a graphical trending chart, a tabular measurement grid, and trending button bar. The graphical chart plots volume parameters on the left axis. The right axis is optional and can display either percentage parameters or flow parameters, depending on the settings. The horizontal axis represents time, spanning from the earliest session to the latest session. Each parameter trended is a data series and is built from the values from the best Pre-BD or best Post-BD test of the Spirometry sessions selected. The graph created for each parameter is represented by a different color line. A vertical marker on the display moves left or right as you move the cursor from left to right. The software automatically scrolls the grid and highlights the report to which the current marker points. Also, if you click on a grid row, the software moves the vertical marker to the data corresponding to the selected report. Trending Buttons Save To File – Click to open the File Save dialog box. If a valid filename is entered and the OK button is clicked, the software saves the information in the grid to a file in Microsoft Excel file format (*.xls). Print – Click to print the trend report to the currently selected printer. Trending Button Bar 57 Go To Table Of Contents Back IQmark Digital Spirometer Operation Manual Print Setup – Click to display the Windows printer setup box. Select Reports – Click to close this screen and return to the Spirometry Trend Selection Screen. Select Items To Trend – Click to display the Trending tab from Spirometry Settings. View F/V Loops – Click to display the Flow/Volume loops using the default screen format or the last screen format used. View Patient Info – Click to display the patient’s information for the current highlighted test. Patient Information Help – Click to open the Help file. Review/Exit – Click to exit this screen and return to the View Report screen. 58 Next Go To Table Of Contents Back Next IQmark Digital Spirometer Operation Manual Side by Side F/V Loops From the Trending screen, click View Side by Side. This screen shows three F/V loops at a time, with the loop to the left representing the oldest and each newer test to the right and then below. Note that the View Side by Side button will change to View Overlay. Side By Side Screen Immediately below the display are buttons that provide fast navigation: First – Display the first, second, and third F/V loops. Previous – Shift the display to show the previous series of F/V loops. Next – Shift the display to show the next series of F/V loops. Last – Display the last F/V loops. Click the View Overlay button to display the F/V loops in an overlay format. 59 Go To Table Of Contents Back IQmark Digital Spirometer Operation Manual Overlay F/V Loops The Overlay F/V Loop screen consists of a single F/V graphical display of the best FVC loop from each trended session, a chart showing the trended plots, and a tabular grid showing the parameters trended. Overlay Screen The F/V loops are displayed in up to ten different colors. If the number of F/V loops exceeds ten, the control reuses colors. The same color scheme is used in the grid control, showing the session number and report date in the color that matches the associated F/V loop. When you move the vertical marker to a date or select a point in the grid, the software highlights the F/V loop corresponding to that report (if one exists) by drawing the loop in a darker color. The loop returns to its previous color when you select another report. 60 Next Go To Table Of Contents Back Next IQmark Digital Spirometer Operation Manual IV. Appendix A. Screen Summary Summary of Screens Summary of Screens Screen Name Opening Screen Screen Summary Enables you to access the main functions of the Diagnostic Workstation. Patient Data Entry screen Contains data fields for patient information including name, ID, vital signs, medications, smoking and medical history. Patient List screen Shows a list of all patients in the database. Main Functions Access New Patient screen. Access Patient List screen. Access online Help. Exit to Windows desktop. Enter essential patient data. Edit data for an existing patient. Initiate test for a new patient. Update patient data for selected patient. Register a new patient. Search for specific patient using their name, ID and other criteria. Delete selected patient records. Restore archived reports. 61 Go To Table Of Contents Back Next IQmark Digital Spirometer Operation Manual Summary of Screens Screen Name Report List screen Screen Summary Shows a list of all reports for all patients. Spirometry Test Screen Used to acquire Spirometry tests. Also used to accept or reject tests and assign the best test of a session Spirometry Review Screen Shows the interpretation for the best Pre-FVC test. Allows the user to confirm the test interpretation. 62 Main Functions Select report to review. Print one or more selected reports. Restore and archive reports. Search for a patient using name or ID. The File button enables you to: o Delete currently viewed report. o Restore (retrieve) archived reports. o Archive reports. o Send currently viewed report by email. Acquires FVC, VC and MVV tests. Automatically “grades” tests based on the ATS recommendations. Compares accepted tests for reproducibility. Enables the user to change the settings for the Spirometer. View and analyze the Spirometry test numeric and graphic results. Enables the user to print preview the test report. Enables the user to edit the interpretation. Enables the user to change the settings for the Spirometer. Go To Table Of Contents Back Next IQmark Digital Spirometer Operation Manual B. Troubleshooting This Troubleshooting Guide provides a list of solutions or recommendations to problems that you may encounter with the Diagnostic Workstation. Before calling Midmark Diagnostics Group for Customer Service, please refer to the following table for help. Error messages are displayed at the center or at the bottom right corner of the screen. Troubleshooting Guide Troubleshooting Guide Error Message or Problem View Report screen does not work Solution or Recommendation 1. Exit Diagnostic Workstation. 2. Start MS-DOS Prompt (command). 3. Change directory to c:\windows\system 4. Type regsvr32 msflxgrd.ocx and press Enter 5. Type regsvr32 oleaut32.dll and press Enter 6. Exit MS-DOS Prompt and re-start Workstation. MODULE NOT RESPONDING! Or SENSOR NOT RESPONDING! Message appears after starting New Test. No waveform is displayed on the screen. IQmark Digital Spirometer cannot communicate with the computer because the handle is not connected to the computer, the handle is connected to the wrong serial port, or the batteries are completely dead or installed incorrectly. Verify the cable is connected to a serial port and that it is the correct serial port (COM1 or COM2). Check battery orientation or install new batteries. FAILED TO CREATE EMPTY DOCUMENT All Windows programs must be closed before the installation of Diagnostic Workstation. Message appears immediately after initial software installation and after each attempt to start the Diagnostic Workstation. Uninstall the Diagnostic Workstation; restart computer and reinstall the Diagnostic Workstation (refer to the Diagnostic Workstation Operation Manual). Incorrect diagnostic interpretation. Check Patient’s Date of Birth, Height, Sex, and other demographics to ensure the information is accurately entered. Check which Pre-FVC test is selected as the best test. Check which Interpretation logic is selected. 63 Go To Table Of Contents Back IQmark Digital Spirometer Operation Manual The [test] report dated [test date] for [patient name] is in use by [network computer name] Message appears when trying to open a specific test report. This Report Locking feature prevents more than one user from accessing the same report at the same time, specifically in a LAN environment where different workstations are sharing the central database. Report Locking can also be caused by improperly exiting the patient report from any workstation. Close the desired test report for the specific patient at the [network computer name] workstation using the Review Exit button This patient’s record is in use by: [network computer name] Message appears when trying to open a specific Patient Data screen. This Record Locking feature prevents more than one user from accessing the same patient record at the same time, specifically in a LAN environment where different workstations are sharing the central database. Record Locking can also be caused by improperly exiting the Patient Data screen from any workstation. Close the specific Patient Data screen at the [network computer name] workstation using the Opening Screen button. Unable to create big button Message appears when attempting to launch/start Diagnostic Workstation. Click on the ‘X’ close button on the top right corner to exit Diagnostic Workstation. Start MS-DOS Prompt. Change directory to c:\windows\system Type regsvr32 threed32.ocx and press Enter Exit MS-DOS Prompt and start Diagnostic Workstation. Predicted FEV1/FVC is not available or valid. Check patient demographics. Race, Age, Sex, and Height (R.A.S.H.) must be entered to calculate a Predicted Value. Other operation problems… Please refer to the online help by clicking on the Help button at any screen. Contact Midmark Diagnostics Group Customer Service. See contact information at the end of this manual. Additional Troubleshooting Guide is included in the Technical Service Manual appendix at the end of that manual. . 64 Next Go To Table Of Contents Back Next IQmark Digital Spirometer Operation Manual C. Maintenance and Storage Cleaning CAUTION Do not use aromatic hydrocarbons, rubbing alcohol, or solvents for cleaning the Spirometer. Preventative Cleaning Clean the outside of the Spirometer handle with a mild solution of detergent and water on a soft cloth. Do not use an excessive amount of solution. Be sure not to wet the connectors on the top or the battery compartment at the bottom. If necessary, use a mild sterilizing detergent with low alcohol content generally used in hospitals. Verify that all equipment, including accessories, is completely dry before using. Preventative Inspection A preventative inspection should be done prior to each use. This is done to verify that there is no visible damage to the unit that may cause it to malfunction. Visual inspection should include the handle and the cable for signs of damage and deterioration, including but not limited to cracks, cuts, discoloration, or oxidation. If a cable or other accessory exhibits any of these symptoms, call Midmark Diagnostics Group Customer Service. Storage To prevent damage to the Spirometry Module due to battery leakage or oxidation, remove all batteries if the Spirometry Module is not to be used or is to be stored for long period of time. Avoid extreme humidity and heat during storage. Radio and Television Interference This equipment does not generate or use radio frequency energy. It will not cause interference to radio or television reception. This equipment has been tested and proved to be in compliance with the limits for a medical device in accordance with the IEC 60601 rules, which are designed to provide reasonable protection against such interference in a medical or hospital environment. 65 Go To Table Of Contents Back IQmark Digital Spirometer Operation Manual D. Safety and International Symbols The following symbols are used on Midmark Diagnostics Group products. Refer to this directory for details concerning the symbols used on equipment. Symbol ! Description ATTENTION – Refer to manual for instructions. Year manufactured. 2000 Do Not Use For More Than One Patient – Single Patient Use Only, but multiple tests can be performed on the same patient with a single mouthpiece. IEC 601-1 Medical Electric Equipment - Type BF Equipment Equipment displaying this symbol provides the patient protection by providing isolation from earthed parts and other accessible parts of the equipment. Battery orientation, battery type, and power requirements. ETL Listing Mark Equipment displaying this symbol has been tested to comply with the following safety standards: UL STD 2601-1; CAN/CSA STD C22.2 601.1-M90 CE Mark. Equipment displaying this symbol has passed specific safety tests and adheres to international quality standards originated from the European Community. 66 Next Go To Table Of Contents Back Next IQmark Digital Spirometer Operation Manual E. Interpretation – ATS The American Thoracic Society (ATS) created recommendations for the interpretation of Spirometry tests. Measurements are compared to the Lower Limit of Normal (LLN). The IQmark Digital Spirometer software displays the statement "Normal Spirometry" if the FVC and the FEV1/FVC ratio are within the normal range (i.e., above the LLN). Airway Obstruction - If the FEV1/FVC ratio is below the LLN, the software displays one of the following statements regarding obstruction. Statement Obstruction may be a physiological variant. Mild obstruction. Moderate obstruction. Moderately severe obstruction. Severe obstruction. Very severe obstruction. Criteria FEV1 >= 100% Pred. FEV1 70% Pred. FEV1 <= FEV1 < 100% Pred. FEV1 60% Pred. FEV1 <= FEV1 < 70% Pred. FEV1 50% Pred. FEV1 <= FEV1 < 60% Pred. FEV1 34% Pred. FEV1 <= FEV1 < 50% Pred. FEV1 FEV1 < 34% Pred. FEV1 If the FVC is below the LLN, the software will add, "with low vital capacity" to the above obstruction statements. Lung Restriction - If there is no suggested airway obstruction, the program displays one of the following statements pertaining to lung restriction. Statement Mild restriction. Moderate restriction. Moderately severe restriction. Severe restriction. Very severe restriction. Criteria 70% Pred. FVC <= FVC < LLN 60% Pred. FVC <= FVC < 70% Pred. FVC 50% Pred. FVC <= FVC < 60% Pred. FVC 34% Pred. FVC <= FVC < 50% Pred. FVC FVC < 34% Pred. FVC Pre/Post Bronchodilator Comparison - If both pre and post bronchodilator tests have been performed, the software performs and reports automatic interpretation for both sets of test data. Statement Markedly improved Improved Not clearly improved Not improved Ratio of Post-BD / Pre-BD (Post/Pre) Post FVC/Pre FVC Or Post FEV1/Pre FEV1 >= 1.25 >= 1.25 1.15 to 1.24 1.12 to 1.24 1.05 to 1.14 1.05 to 1.11 < 1.05 < 1.05 67 Go To Table Of Contents Back Next IQmark Digital Spirometer Operation Manual Lower Limit of Normal (LLN) The LLN for FVC, FEV1 and FEV1/FVC is calculated as follows: LLN Value pred CI 95% The Valuepred is the predicted value provided by the reference equations. The CI95% is the 95% confidence interval for the predicted value. If the CI95% is not reported for the predicted value, and the Standard Error of the Estimate (SEE) is, then the CI95% shall be calculated as follows: CI 95% 1.645 x SEE If the SEE is not reported and the SD% (Standard Deviation of the error) is, then the software shall calculate the LLN as follows: 2 SD% x LLN Value 1 100 pred F. Interpretation – NHANES III The 3rd National Health And Nutrition Examination Survey (NHANES III) created a number of medical recommendations including some directed at Spirometry. A new set of predicted equations as well as new calculations for LLN (lower limit of normal) were developed from data collected and we have labeled these equations as NHANES III. The National Lung Health Education Program (NLHEP www.nlhep.org) published an Interpretation table using NHANES III. We have labeled this interpretation logic as NHANES III (or by selecting PCP Mode as the Configuration Profile, see Configuring The Spirometer). It determines results as follows: The software displays a statement that reads "Normal Spirometry" if the FEV1 and the FEV1/FEV6 ratio are within the normal range (i.e. above the LLN). If the FEV1/FEV6 ratio and the FEV1 are below the LLN, the software will display one of the following statements regarding obstruction. Statement Mild obstruction. Moderate obstruction. Severe obstruction. Criteria FEV1 >= 60% Pred. FEV1 40% Pred. FEV1 <= FEV1 < 60% Pred. FEV1 FEV1 < 40% Pred. FEV1 In addition, if the FEV1/FEV6 ratio is above the LLN but the FEV6 measurement is below the LLN, the software will output the following statement: "Low vital capacity, perhaps due to restriction of lung volumes" 68 Go To Table Of Contents Back Next IQmark Digital Spirometer Operation Manual G. Reference Values - Adult The IQmark Digital Spirometer software provides the following sets of reference equations for adult patients. 1. 2. 3. 4. 5. 6. Crapo (Crapo/Knudson compilation, aka ITS, ATS) Knudson (1976 & 1983 compilation) European Community For Coal And Steel (ECCS) (1993) NHANES III (aka NLHEP, Hankinson) Morris Roca 69 Go To Table Of Contents Back Next IQmark Digital Spirometer Operation Manual Crapo - Adult H = Height in centimeters. A = Age in years. Parameter VC M/F W Age Range All FVC M F W W 15–91 15–91 0.06H - 0.0214A - 4.650 0.0491H - 0.0216A - 3.590 0.644 0.393 1.115 0.676 Ref. 4 Ref. 4 FEV0.5 M F W W 15–91 15–91 0.0327H - 0.0152A - 1.914 0.0238H - 0.0185A - 0.809 0.414 0.294 0.708 0.506 Ref. 4 Ref. 4 FEV1 M F W W 15–91 15–91 0.0414H - 0.0244A - 2.190 0.0342H - 0.0255A - 1.578 0.486 0.326 0.842 0.561 Ref. 4 Ref. 4 FEV3 M F W W 15–91 15–91 0.0535H - 0.0271A - 3.512 0.0442H - 0.0257A - 2.745 0.587 0.360 1.017 0.620 Ref. 4 Ref. 4 FEV1/FVC% M F W W 15–91 15–91 -0.13H - 0.152A + 110.49 -0.202H - 0.252A + 126.58 4.78 5.26 8.28 9.06 Ref. 4 Ref. 4 FEV3/FVC% M F W W 15–91 15–91 -0.0627 - 0.145A + 112.09 -0.0937H - 0.163A + 118.16 2.68 3.11 4.64 5.36 Ref. 4 Ref. 4 FEF25-75% M F W W 15–91 15–91 0.0204H - 0.038A + 2.133 0.0154H - 0.046A + 2.683 0.962 0.792 1.666 1.363 Ref. 4 Ref. 4 70 Sex Race Predicted Equation SEE CI95% Source Predicted VC = Predicted FVC Go To Table Of Contents Back Next IQmark Digital Spirometer Operation Manual Crapo – Adult, continued Parameter Sex PEF FEF25% (MEF75%) FEF50% (MEF50%) FEF75% (MEF25%) MVV Predicted Equation SEE CI95% Source M M F Race Age Range W 18-25 W 25-85 W 20-87 0.0780H + 0.1660A - 8.060 0.0940H - 0.0350A - 5.993 0.0490H - 0.0250A - 0.735 1.653 2.078 1.605 2.72 3.42 2.64 Ref. 14 “ “ M W 18-25 0.0700H + 0.1470A - 7.054 1.530 2.52 Ref. 14 M F W W 25-85 20-87 0.0880H - 0.0350A - 5.618 0.0430H - 0.0250A - 0.132 2.012 1.53 3.31 2.52 “ “ M W 18-24 0.0543H + 0.1150A - 6.3851 1.1196 1.184 Ref. 13 M F F W W W 25-85 20-70 70-87 0.0684H - 0.0366A - 5.5409 0.0321H - 0.0240A - 0.4371 0.0118H - 0.0755A + 6.2402 1.2915 0.9778 0.7569 2.12 1.61 1.25 “ “ “ M W 18-25 0.0397H - 0.0057A - 4.2421 0.7551 1.24 Ref. 13 M F F W W W 25-85 20-70 70-90 0.0310H - 0.0230A - 2.4827 0.0174H - 0.0254A - 0.1822 -0.0172A + 1.8894 0.6917 0.6612 0.2409 1.14 1.09 0.396 “ “ “ M M F W W W 18-25 25-85 20-87 1.840H + 1.800A - 192.3 2.080H - 1.0800A - 168.1 1.090H - 0.840A - 31.8 Sex Male Female Age Range 15 – 91 17 – 84 Height Range (cm) Height Range (in) 157 – 194 146 – 178 62 – 76 57 – 70 K3 K3 K3 71 Go To Table Of Contents Back Next IQmark Digital Spirometer Operation Manual Knudson - Adult Parameter Sex Race VC M/F W Age Predicted Equation Range All Predicted VC = Predicted FVC SEE CI95% Source FVC M M F F W W W W 18-25 25-85 20-70 70-90 0.0590H + 0.0739A - 6.8865 0.0844H - 0.0298A – 8.7818 0.0444H - 0.0169A – 3.1947 0.0313H – 0.0296A –0.1889 0.4708 0.6384 0.4831 0.5745 0.775 1.05 0.795 0.945 Ref. 13 “ “ “ FEV0.5 M M F W W W 18-25 25-85 20-87 0.030H + 0.043A – 3.0540 0.037H – 0.017A – 2.746 0.019H – 0.014A – 0.406 0.425 0.474 0.388 0.699 0.779 0.638 Ref. 14 “ “ FEV1 M M F F W W W W 18-25 25-85 20-70 70-90 0.0519H + 0.0636H - 6.1181 0.0665H - 0.0292A - 6.5147 0.0332H - 0.0190A - 1.8210 0.143H – 0.0397A + 2.6539 0.4458 0.5241 0.3903 0.3758 0.734 0.862 0.642 0.618 Ref. 13 “ “ “ FEV3 M M F W W W 18-25 25-85 20-87 0.052H + 0.066A – 5.531 0.063H – 0.031A – 5.245 0.035H – 0.023A – 1.633 0.589 0.575 0.496 0.969 0.946 0.816 Ref. 14 “ “ FEV1/FVC% M M F W W W 18-25 25-85 20-89 -0.0813H + 100.4389 -0.105A + 86.6862 -0.1852H - 0.1896A + 121.6777 6.5752 6.2691 7.5702 10.82 10.31 12.45 Ref. 13 “ “ FEF25-75% M M F F W W W W 18-25 25-85 20-70 70-90 0.0539H + 0.0749A - 6.1990 0.0579H - 0.0363A - 4.5175 0.0300H - 0.0309A - 0.4057 -0.0615A + 6.3706 0.9861 1.0825 0.8539 0.7210 1.62 1.78 1.40 1.19 Ref. 14 “ “ “ PEF M M F W W W 18-25 25-85 20-87 0.0780H + 0.1660A - 8.060 0.0940H - 0.0350A - 5.993 0.0490H - 0.0250A - 0.735 1.653 2.078 1.605 2.72 3.42 2.64 Ref. 14 “ “ 72 Go To Table Of Contents Back Next IQmark Digital Spirometer Operation Manual Knudson – Adult, continued FEF25% (MEF75%) FEF50% (MEF50%) FEF75% (MEF25%) MVV M W 18-25 0.0700H + 0.1470A - 7.054 1.530 2.52 Ref. 14 M F W W 25-85 20-87 0.0880H - 0.0350A - 5.618 0.0430H - 0.0250A - 0.132 2.012 1.53 3.31 2.52 “ “ M W 18-24 0.0543H + 0.1150A - 6.3851 1.1196 1.184 Ref. 13 M F F W W W 25-85 20-70 70-87 0.0684H - 0.0366A - 5.5409 0.0321H - 0.0240A - 0.4371 0.0118H - 0.0755A + 6.2402 1.2915 0.9778 0.7569 2.12 1.61 1.25 “ “ “ M W 18-25 0.0397H - 0.0057A - 4.2421 0.7551 1.24 Ref. 13 M F F W W W 25-85 20-70 70-90 0.0310H - 0.0230A - 2.4827 0.0174H - 0.0254A - 0.1822 -0.0172A + 1.8894 0.6917 0.6612 0.2409 1.14 1.09 0.396 “ “ “ M M F W W W 18-25 25-85 20-87 1.840H + 1.800A - 192.3 2.080H - 1.0800A - 168.1 1.090H - 0.840A - 31.8 K3 K3 K3 Notes: 1. CI 95% calculated using the equation CI 95% = 1.645 * SEE. 2. Race: W = white. Sex: M = male, F = female. 3. A = age in years. H = height in centimeters. 4. Height ranges are as follows Sex Male Male Female Female Age Range 18-25 25-85 20-70 70-90 Height Range (cm) Height Range (in) 139.7-195.6 157.5-195.6 147.3-180.3 147.3-167.3 55-77 62-77 58-71 58-66 73 Go To Table Of Contents Back Next IQmark Digital Spirometer Operation Manual European Community For Coal And Steel (ECCS) - Adult H = Height in meters. Parameter Sex A = Age in years. Race Age Predicted Equation RSD CI95% See Note 2 See Note 1 VC M F W W 18-70 18-70 6.10H - 0.028A - 4.65 4.66H - 0.026A - 3.28 0.56 0.42 0.92 0.69 FVC M F W W 18-70 18-70 5.76H - 0.026A - 4.34 4.43H - 0.026A - 2.89 0.61 0.43 1.00 0.707 FEV1 M F W W 18-70 18-70 4.30H - 0.029A - 2.49 3.95H - 0.025A - 2.60 0.51 0.38 0.839 0.625 FEV1/VC% M F W W 18-70 18-70 -0.18A + 87.21 -0.192A + 89.10 7.17 6.51 11.79 10.7 FEF25-75% M F W W 18-70 18-70 1.94H - 0.043A + 2.70 1.25H - 0.034A + 2.92 1.04 0.85 1.71 1.398 PEF M F W W 18-70 18-70 6.14H - 0.043A + 0.15 5.50H - 0.030A - 1.11 1.21 0.90 1.99 1.48 FEF25% (MEF75%) M F W W 18-70 18-70 5.46H - 0.029A - 0.470 3.22H - 0.025A + 1.60 1.71 1.35 2.81 2.22 FEF50% (MEF50%) M F W W 18-70 18-70 3.79H - 0.031A - 0.35 2.45H - 0.025A + 1.16 1.32 1.10 2.17 1.81 FEF75% (MEF25%) M F W W 18-70 18-70 2.61H - 0.026A - 1.34 1.050H - 0.025A + 1.11 0.78 0.69 1.28 1.14 MVV M F W W 18-70 18-70 1.34H x 100 - 1.26A - 21.40 0.807H x 100 - 0.57A - 5.50 Kory Lindall Notes: 1. If the patient age is between 18 and 25, the program shall use the equation for age = 25. 2. CI 95% calculated using the equation CI 95% = 1.645 * RSD. 74 Go To Table Of Contents Back Next IQmark Digital Spirometer Operation Manual NHANES III (Hankinson, NLHEP) - Adult Male age range : Female age range: Parameter Sex >= 18 years >= 20 years Age b1 0.00064 -0.01821 -0.00891 0.01870 0.00536 0.00307 Age2 b2 -0.000269 0 -0.000182 -0.000382 -0.000265 -0.000237 Htprd (cm)2 b3 0.00018642 0.00016643 0.00017823 0.00014815 0.00013606 0.00014246 Htlln (cm)2 b3 0.00015695 0.00013670 0.00014947 0.00012198 0.00010916 0.00011570 FVC M M M F F F Race Intercept b0 W -0.1933 B -0.1517 H 0.2376 W -0.3560 B -0.3039 H 0.1210 FEV1 M M M F F F W B H W B H 0.5536 0.3411 0.6306 0.4333 0.3433 0.4529 -0.01303 -0.02309 -0.02928 -0.00361 -0.01283 -0.01178 -0.000172 0 0 -0.000194 -0.000097 -0.000113 0.00014098 0.00013194 0.00015104 0.00011496 0.00010846 0.00012154 0.00011607 0.00010561 0.00012670 0.00009283 0.00008546 0.00009890 FEV6 M M M F F F W B H W B H 0.1102 -0.0547 0.5757 -0.1373 -0.1981 0.2033 -0.00842 -0.02144 -0.02860 0.01317 0.00047 0.00020 -0.000223 0 0 -0.000352 -0.000230 -0.000232 0.00018188 0.00016429 0.00017840 0.00014395 0.00013497 0.00014106 0.00015323 0.00013499 0.00015029 0.00011827 0.00010848 0.00011480 PEF M M M F F F W B H W B H 1.0523 2.2257 0.0870 0.9267 1.3597 0.2401 0.08272 -0.04082 0.06580 0.06929 0.03458 0.06174 -0.001301 0 -0.001195 -0.001031 -0.00847 -0.001023 0.00024962 0.00027333 0.00030243 0.00018623 0.00019746 0.00022203 0.00017635 0.00018938 0.00021833 0.00012148 0.00012160 0.00014611 FEF25-75 M M M F F F W B H W B H 2.7006 2.1477 1.7503 2.3670 2.0828 1.7456 -0.04995 -0.04238 -0.05018 -0.01904 -0.03793 -0.01195 0 0 0 -0.000200 0 -0.000291 0.00010345 0.00010461 0.00014473 0.00006982 0.00008572 0.00009610 0.00005294 0.00004819 0.00009020 0.00002302 0.00003380 0.00004594 75 Go To Table Of Contents Back Next IQmark Digital Spirometer Operation Manual Use the following equation to calculate the predicted value for a lung function parameter (LFP). LFP b0 b1 * Age b2 * Age 2 b3 * Height2 Height is in centimeters and age is in years. Use b3 coefficient from the Htprd column for the predicted value calculation. Use the b3 coefficient from the Htlln column to calculate the LLN. The following table presents the predicted values for FEV1.0/FEV6.0 % and FEV1.0/FVC % Parameter Sex Race FEV1.0/FEV6.0 % M M M F F F W B H W B H Interceptprd B0 87.340 88.841 89.388 90.107 91.229 91.664 FEV1/FVC % M M M F F F W B H W B H 88.066 89.239 90.024 90.809 91.655 92.360 Age b1 -0.1382 -0.1305 -0.1534 -0.1563 -0.1558 -0.1670 Interceptlln b0 78.372 78.979 80.810 81.307 81.396 83.034 -0.2066 -0.1828 -0.2186 -0.2125 -0.2039 -0.2248 78.388 78.822 80.925 81.015 80.978 83.044 Use the following equation to calculate the lung function parameter (LFP). LFP b0 b1 * Age Use the b1 coefficient from the Interceptprd column to calculate the predicted value. Use the b1 coefficient from the Interceptlln column to calculate the lower limit of normal. 76 Go To Table Of Contents Back Next IQmark Digital Spirometer Operation Manual Morris - Adult Parameter Sex Race FVC M FEV1 FEF25-75% W Age Range 20-84 Predicted Equation SEE CI95% .0583H – 0.025A – 4.24 0.74 1.22 F W 20-84 .0453H – 0.024A – 2.85 0.52 0.855 M W 20-84 .0362H – 0.032A – 1.265 0.55 0.905 F W 20-84 .0350H – 0.025A – 1.93 0.47 0.773 M W 20-84 0.0185H – 0.045A + 2.513 1.12 1.84 F W 20-84 0.0236H – 0.030A + 0.551 0.80 1.316 Source Ref. 12 Ref. 12 Ref. 12 Ref. 12 Ref. 12 Ref. 12 Notes: 1. The height ranges are as follows: Sex Male Female Age Range 20-84 20-84 Height Range (cm) Height Range (in) 147.3-203.2 142.2-182.9 58-80 56-72 77 Go To Table Of Contents Back Next IQmark Digital Spirometer Operation Manual Roca - Adult Parameter Sex Race W W Age Range 20-69 20-69 FVC M F FEV1 FEV1/ FVC% 0.0678H – 0.0147A – 6.0548 0.0454H – 0.0211A – 2.8253 0.53 0.403 0.872 0.663 M F W W 20-69 20-69 0.0499H – 0.0211A – 3.837 0.0317H – 0.025A – 1.2324 0.44 0.307 0.724 0.505 M W 20-69 -0.1902A + 85.58 5.36 8.82 F W 20-69 -0.224A – 0.1126W + 94.88 5.31 8.73 FEF25-75% M F W W 20-69 20-69 0.0392H – 0.043A – 1.1574 0.023H – 0.0456A + 1.1055 1.0 0.68 1.645 1.12 PEF M F W W 20-69 20-69 0.0945H – 0.0209A – 5.7732 0.0448H – 0.0304A + 0.3496 1.47 1.04 2.42 1.71 FEF75% M W 20-69 0.146 0.240 FEF75% F W 20-69 MEF75% = ALOG(2.113Log(H) – 0.01A – 4.136) MEF75% = ALOG(1.209Log(H) – 0.006A – 0.001W – 2.003) - 1 0.073 0.120 FEF50% (MEF50%) M F W W 20-69 20-69 0.0517H – 0.0397A – 2.4 0.0242H – 0.0418A + 1.6151 1.3 0.925 2.14 1.52 78 Predicted Equation SEE CI95% Go To Table Of Contents Back Next IQmark Digital Spirometer Operation Manual H. Reference Values - Pediatric The IQmark Digital Spirometer software provides the following sets of reference equations for pediatric patients. 1. 2. 3. 4. 5. 6. Knudson (1976 & 1983 compilation) Polgar (1971) Hsu NHANES III Zapletal Eigen 79 Go To Table Of Contents Back Next IQmark Digital Spirometer Operation Manual Knudson – Pediatric Parameter VC M/F W Age Range All FVC M M F F W W W W 6 - 12 12 - 18 6 - 11 11- 20 0.0409H - 3.3756 0.0590H + 0.0739A - 6.8865 0.0430H - 3.7486 0.0416H + 0.0699A - 4.4470 0.3503 0.4708 0.3728 0.4973 0.576 0.774 0.613 0.818 Ref. 13 “ “ “ FEV0.5 M F W W 6 - 18 6 - 18 0.030H + 0.043A –3.054 0.019H + 0.061A – 1.738 0.425 0.364 0.699 0.599 Ref. 14 “ FEV1 M M F F 6 - 12 12 - 18 6 - 11 11 - 20 0.0348H - 2.8142 0.0519H + 0.0636A - 6.1181 0.0336H - 2.7578 0.0351H + 0.0694A - 3.7622 0.2734 0.4458 0.2697 0.4223 0.449 0.733 0.444 0.695 Ref. 13 “ “ “ FEV1/FVC% M F 6 - 18 6 - 20 -0.0813H + 100.4389 -0.1909H + 0.6655A + 109.9739 6.5752 7.8385 10.82 12.89 Ref. 13 “ FEF25-75% M M F F 6 - 12 12 - 18 6 - 11 11 - 20 0.0338H - 2.3197 0.0539H + 0.0749A - 6.1990 0.0220H - 0.8119 0.0279H + 0.1275A - 2.8007 0.6263 0.9861 0.6568 0.8653 1.03 1.62 1.08 1.42 Ref. 13 “ “ “ PEF M F 6 - 18 6 - 20 0.078H + 0.1660A - 8.060 0.0490H + 0.157A - 3.916 1.653 1.339 2.72 2.20 Ref. 14 “ FEF25% (MEF75%) M 6 - 18 0.0700H + 0.1470A - 7.054 1.530 2.52 Ref. 14 F 6 - 20 0.0440H + 0.1440A - 3.365 1.290 2.12 “ M 6 - 12 0.0378H - 2.5454 0.6538 1.08 Ref. 13 M F F 12 - 18 6 - 11 11 - 20 0.0543H + 0.1150A - 6.3851 0.1846A + 0.7362 0.0288H + 0.1111A - 2.3040 1.1196 0.6689 0.9585 1.84 1.10 1.58 “ “ “ FEF50% (MEF50%) 80 Sex Race Predicted Equation Predicted VC = Predicted FVC SEE CI95% Source Go To Table Of Contents Back Next IQmark Digital Spirometer Operation Manual FEF75% (MEF25%) MVV M 6 - 12 0.0171H - 1.0149 0.5037 0.829 Ref. 13 M F F 12 - 18 6 - 11 11 - 20 0.0397H - 0.0057A - 4.2421 0.0109H - 0.1657 0.0243H + 0.2923A - 4.4009 0.0075A2 0.7551 0.4999 0.7202 1.24 0.822 1.18 “ “ “ M F 6 - 18 6 - 19 1.840H + 1.800A - 192.3 1.090H + 3.40A - 108.1 K3 K3 Notes: 1. Height ranges are as follows: Sex Male Male Female Female Age Range 6-12 12-18 6-11 11-20 Height Range (cm) Height Range (in) 111.8-154.9 139.7-193.0 106.7-147.3 132.1-182.9 44.01 – 60.98 55.00 – 75.98 42.00 – 57.99 52.00 – 72.00 81 Go To Table Of Contents Back Next IQmark Digital Spirometer Operation Manual Polgar – Pediatric H = Height in centimeters. Parameter Sex Race W W Age Range 4-17 4-17 FVC M F FEV1.0 0.0000044 x H2.67 0.0000033 x H2.72 M F W W 4-17 4-17 0.0000021 x H2.80 0.0000021 x H2.80 FEV3.0 M F W W 4-17 4-17 FVCpred * 0.98 FVCpred * 0.98 FEV1/FVC % M F W W 4-17 4-17 47.73 x H0.13 63.63 x H0.08 FEF25-75% M F W W 4-17 4-17 0.0437 x H – 3.4616 0.0437 x H – 3.4616 PEF (L/s) M F W W 4-17 4-17 0.08738 * H – 7.0929 0.08738 * H – 7.0929 MVV (L/min) M F W W 4-17 4-17 1.276 * H – 99.507 1.276 * H – 99.507 See Reference 19. 82 Predicted Equation SEE CI95% Go To Table Of Contents Back Next IQmark Digital Spirometer Operation Manual Hsu – Pediatric Parameter W Age Range 7-20 3.58 x 10⁻⁷ x H3.18 13 M M F F F B H W B H 7-20 7-20 7-20 7-20 7-20 1.07 x 10⁻⁶ x H2.93 1.06 x 10⁻⁶ x H2.97 2.57 x 10⁻⁶ x H2.78 8.34 x 10⁻⁷ x H2.98 1.25 x 10⁻⁶ x H2.92 17 13 14 15 14 Ref. 15 “ “ “ “ “ FEV1 M M M F F F W B H W B H 7-20 7-20 7-20 7-20 7-20 7-20 7.74 x 10⁻⁷ x H3.00 1.03 x 10⁻⁶ x H2.92 1.73 x 10⁻⁶ x H2.85 3.79 x 10⁻⁶ x H2.68 1.14 x 10⁻⁶ x H2.89 1.61 x 10⁻⁶ x H2.85 13 17 13 14 15 14 “ “ “ “ “ “ FEF25-75% M M M F F F W B H W B H 7-20 7-20 7-20 7-20 7-20 7-20 7.98 x 10⁻⁷ x H2.46 3.61 x 10⁻⁷ x H2.60 9.13 x 10⁻⁷ x H2.45 3.79 x 10⁻⁶ x H2.16 1.45 x 10⁻⁶ x H2.34 1.20 x 10⁻⁶ x H2.40 26 36 25 28 30 24 “ “ “ “ “ “ PEF M M M F F F W B H W B H 7-20 7-20 7-20 7-20 7-20 7-20 3.35 x 10⁻⁷ x H2.79 1.74 x 10⁻⁷ x H2.92 7.69 x 10⁻⁷ x H2.63 2.58 x 10⁻⁶ x H2.37 5.51 x 10⁻⁷ x H2.68 6.97 x 10⁻⁷ x H2.64 18 22 17 18 20 18 “ “ “ “ “ “ FVC Sex Race M Predicted Equation SD% Source Notes: 1. Race: W = white, B = black, H = Hispanic or Mexican-American 2. The original equations provide volume in milliliters and flow in milliliters per second. The above equations are a modification of the original equations and provide volume in liters and flow in liters per second. 3. Height (H) range is from 110.0 to 190.0 cm for male and 110.0 to 180.0 for female. 83 Go To Table Of Contents Back Next IQmark Digital Spirometer Operation Manual NHANES III (Hankinson, NLHEP) – Pediatric M M M F F F Race Intercept b0 W -0.2584 B -0.4971 H -0.7571 W -1.2082 B -0.6166 H -1.2507 Age b1 -0.20415 -0.15497 -0.09520 0.05916 -0.04687 0.07501 Age2 b2 0.010133 0.007701 0.006619 0 0.003602 0 Htprd (cm)2 b3 0.00018642 0.00016643 0.00017823 0.00014815 0.00013606 0.00014246 Htlln (cm)2 b3 0.00015695 0.00013670 0.00014947 0.00012198 0.00010916 0.00011570 FEV1.0 M M M F F F W B H W B H -0.7453 -0.7048 -0.8218 -0.8710 -0.9630 -0.9641 -0.04106 -0.05711 -0.04248 0.06537 0.05799 0.06490 0.004477 0.004316 0.004291 0 0 0 0.00014098 0.00013194 0.00015104 0.00011496 0.00010846 0.00012154 0.00011607 0.00010561 0.00012670 0.00009283 0.00008546 0.00009890 FEV6.0 M M M F F F W B H W B H -0.3119 -0.5525 -0.6646 -1.1925 -0.6370 -1.2410 -0.18612 -0.14107 -0.11270 0.06544 -0.04243 0.07625 0.009717 0.007241 0.007306 0 0.003508 0 0.00018188 0.00016429 0.00017840 0.00014395 0.00013497 0.00014106 0.00015323 0.00013499 0.00015029 0.00011827 0.00010848 0.00011480 PEF M M M F F F W B H W B H -0.5962 -0.2684 -0.9537 -3.6181 -1.2398 -3.2549 -0.12357 -0.08016 -0.19602 0.60644 0.16375 0.47495 0.013135 0.018202 0.014497 -0.016846 0 -0.013193 0.00024962 0.00027333 0.00030243 0.00018623 0.00019746 0.00022203 0.00017635 0.00018938 0.00021833 0.00012148 0.00012160 0.00014611 FEF25-75 M M M F F F W B H W B H -1.0863 -1.1627 -1.3592 -2.5284 -2.5379 -2.1825 0.13939 0.12314 0.10529 0.52490 0.43755 0.42451 0 0 0 -0.015309 -0.012154 -0.012415 0.00010345 0.00010461 0.00014473 0.00006982 0.00008572 0.00009610 0.00005294 0.00004819 0.00009020 0.00002302 0.00003380 0.00004594 Parameter Sex FVC 84 Go To Table Of Contents Back Next IQmark Digital Spirometer Operation Manual Use the following equation to calculate the predicted value for a lung function parameter (LFP). LFP b0 b1 * Age b2 * Age 2 b3 * Height2 Height is in centimeters and age is in years. Use b3 coefficient from the Htprd column for the predicted value calculation. Use the b3 coefficient from the Htlln column to calculate the lower limit of normal. The following table presents the predicted values for FEV1.0/FEV6.0 % and FEV1.0/FVC % Parameter FEV1.0/ FEV6.0 % FEV1.0/ FVC % Sex Race W Interceptprd B0 87.340 M Age b1 Interceptlln -0.1382 b0 78.372 M M F F F B H W B H 88.841 89.388 90.107 91.229 91.664 -0.1305 -0.1534 -0.1563 -0.1558 -0.1670 78.979 80.810 81.307 81.396 83.034 M W 88.066 -0.2066 78.388 M M F F F B H W B H 89.239 90.024 90.809 91.655 92.360 -0.1828 -0.2186 -0.2125 -0.2039 -0.2248 78.822 80.925 81.015 80.978 83.044 Use the following equation to calculate the lung function parameter (LFP). LFP b0 b1 * Age Use the b1 coefficient from the Interceptprd column to calculate the predicted value. Use the b1 coefficient from the Interceptlln column to calculate the lower limit of normal. 85 Go To Table Of Contents Back Next IQmark Digital Spirometer Operation Manual Zapletal – Pediatric Age range is from 6 to 18 years. H = Height in centimeters. Parameter FVC Sex M F Race W W Predicted Equation 7.9942 – 0.12509 x H + 0.000605 x H2 0.1694 – 0.01217 x H + 0.000605 x H2 FEV1.0 M F W W 6.6314 – 0.10261 x H + 0.000499 x H2 -3.0378 + 0.03640 x H FEF25% M F W W -2.3069 + 0.02817 x H -1.8576 + 0.02483 x H FEF50% M F W W -4.5848 + 0.05430 x H -3.3655 + 0.04477 x H FEF75% M F W W -6.822 + 0.07811 x H -5.1934 + 0.06367 x H PEF M F W W -6.9865 + 0.08060 x H -5.3794 + 0.06594 x H SEE CI95% Eigen – Pediatric The age range is from 3-6 years and the height range is 87-127 cm (34.3 to 50 inches). Parameter Intercept (α) Slope (β) SEE CI95% FVC -13.63 2.95 0.1167 0.192 FEV1 -12.26 2.63 0.1124 0.185 FEF25-75 -8.13 1.81 0.2393 0.394 FEV1/FVC 1.37 -0.31 0.0608 10.0 (see Note 1) (see Note 2) PEF -10.99 2.54 0.1509 0.248 Notes: 1. The FEV1/FVC predicted equation generates a fraction instead of a percentage so the software must convert this number to a percentage. 2. The FEV1/FVC predicted equation generates a fraction instead of a percentage so the CI95% value has been converted to a percentage value Patient gender was not considered in the regression analysis. The Knudson Pediatric predicted equations will not be used for missing parameters because that study does not cover children less than 6 years old. In addition, the Eigen equations should not be used as the default pediatric equations because of the limited age range. 86 Back Go To Table Of Contents Next IQmark Digital Spirometer Operation Manual 87 Go To Table Of Contents Back IQmark Digital Spirometer Operation Manual I. Adjustments to Reference Values Equations According to the ATS recommendations specified in Reference 2 and studies cited by Enright (Reference 23), Black and Asian adults have FVC and FEV1 values that are approximately 15% below that of Caucasians. Black children have FVC and FEV1 values that are approximately 12% lower than Caucasian children’s values. The software makes the following adjustments to the reference values for Asian and Black patients if the reference equations are only for a white patient population. Correction Of Reference Values For Blacks And Asians Measurement FEV1 FVC FEV1/FVC % Scale Factor 0.85 0.85 None Correction Of Reference Values For Black Children Measurement FEV1 FVC FEV1/FVC % Scale Factor 0.88 0.88 None The software does not use the above correction factors if the reference equations in use include the patient’s race, e.g., Hankinson. Not all race scale factors have been documented. At the time of this printing, many races have had some published recommendations. The latest recommendations are as follows: 1.00 - American Indian, Caucasian, Eskimo, European-American, Hawaiian, Hispanic, Indian, Italian, Iranian, Jordanian, Polynesian, Saudi Arabian, South American, Spanish, White 0.85 - Asian, African, African-American, Black, Cambodian, Chinese, East Indian Pakistani, Filipino, Jamaican, Japanese, Korean, Laotian, Vietnamese However, a recent paper by Korotzer et al (Am. J. Respir. Crit. Care Med. 2000 161: 11011108) suggests a 0.93 correction for Asian-American. 88 Next Go To Table Of Contents Back Next IQmark Digital Spirometer Operation Manual J. Spirometry Measurement Parameters Defined FVC FEV0.5 FEV1.0 FEV25% FEV50% FEV75% PEF FIVC FIV0.5 MTV RR AT Unless otherwise noted: FEV3.0 FEV6.0 FEV1.0/FVC FEV3.0/FVC FEV1.0/FEV6.0 FEV25-75% FEV75-85% FEV200-1200 FEV0.5/FIV0.5 FIF50% PIF Exp Time V ext. MVV AT% VC ERV IRV TV Volumes (capacity) are expressed in Liters BTPS (L) Flows are expressed in Liters per second BTPS (L/s) AT – Air Trapping – Calculated if an accepted FVC and an accepted VC test is saved in the same session. Displayed in Liters, it is the difference of the VC and the FVC. AT% – Air Trapping Percentage – Calculated if an accepted FVC and an accepted VC test is saved in the same session. Displayed as a percentage it is the difference of the VC and the FVC divided by the VC. FVC – Forced Vital Capacity – The total volume of air exhaled during a forced expiration (maximally forced effort) starting from a position of full inspiration and ending at complete expiration. Expiration must be made as forcefully and completely as possible. A decrease in FVC is common to restrictive disorders and severe obstructive disease. FEVX – Forced Expiratory Volume at X (0.5, 1.0, 3.0, 6.0) second(s) – The volume of air exhaled during a set value of time. The FEV at the first second of the FVC maneuver is the most common. Back extrapolation is used to determine the beginning of the FVC maneuver. A decrease in the FEV1 value is common in obstruction of large to mid-sized airways. FEV1.0 / FVC – Ratio of the volume of air expired in one second to the total volume of air expired during the FVC test. An obstruction can cause a decrease in this ratio. FEV3.0 / FVC – Ratio of the volume of air expired in three seconds to the total volume of air expired during the FVC test. FEV1.0 / FEV6.0 – Ratio of the volume of air expired in one second to the total volume of air expired in six seconds during the FVC test. FEFXX% – Forced Expiratory Flow where XX could be 25, 50 or 75. This is the expiratory flow rate at a certain percentage of the total FVC. FEF25-75% – Forced Expiratory Flow from 25% of expiration to 75% of expiration, the middle half of the FVC. Also known as the MMEF (maximal mid-expiratory flow). Decreases can be an indicator of early stages of lung disease. FEF75-85% – Forced Expiratory Flow from 75% of expiration to 85% of expiration. FEF200-1200 – Forced Expiratory Flow from 200 ml of expiration to 1200 ml of expiration. Mostly used in the European Union. 89 Go To Table Of Contents Back IQmark Digital Spirometer Operation Manual FEV0.5 / FIV0.5 – Ratio of the volume of air expired in one-half second to the total volume of air inspired in one-half second during the FV loop test. PEF - Peak Expiratory Flow – Largest expiratory flow achieved with a maximally forced effort from a position of maximal inspiration. Also known at PEFR (Rate) in Spirometry or just PF (Peak Flow) in monitoring devices. FIVC – Forced Inspiratory Vital Capacity – The volume of air inhaled from a position of full expiration to full inspiration. FIV0.5 – Forced Inspiratory Volume at one-half second after the start of inspiration. FIF50% – Forced Inspiratory Flow at 50 percent of inspiration. PIF – Peak Inspiratory Flow – The maximum inspiratory flow rate measured during the force inspiratory portion of the FV Loop. Exp time – Total expiratory time for the forced expiratory maneuver. V ext – Volume of air from the beginning of expiration to the zero point of the FVC due to back extrapolation. MVV – Maximal Voluntary Ventilation – The volume of air expired with continual maximal expiration and inspiration measured over a 12 second duration. Volumes are then extrapolated to one minute. MTV – Mean Tidal Volume – The mean volume of air expired within the tidal breath during the continual maximal expiration and inspiration measured over a 12 second duration. Expressed in Liters/Breath. RR – Respiration Rate – The respiration frequency (Breath/Minute) measured during a MVV maneuver. VC – Vital Capacity – The maximum volume of air exhaled from the point of maximal inhalation or the maximal volume of air inhaled from a point of maximal exhalation can be measured with a slow exhalation or inhalation, respectively. It is the volume change at the mouth between the positions of full inspiration and complete expiration. Previously called the “slow” vital capacity (SVC). ERV – Expiration Reserve Volume – The volume of air that can be expired by a forceful expiration after the end of a normal tidal expiration. IRV – Inspiration Reserve Volume – The volume of air that can be inspired by a forceful inspiration after the end of a full expiration. TV – Tidal Volume – The volume of air inspired and expired with each normal breath. 90 Next Go To Table Of Contents Back Next IQmark Digital Spirometer Operation Manual K. References 1. American Thoracic Society. Standardization Of Spirometry - 1994 Update. Am J Respir Crit Car Med, Vol 152, pp. 1107-1136, 1995 2. American Thoracic Society. Lung Function Testing: Selection Of Reference Values And Interpretative Strategies. Am Rev Respir Dis 1991; 144;1202-1218. 3. American Association for Respiratory Care (AARC). AARC Clinical Practice Guideline Spirometry, 1996 Update. Respir Card 1996; 41(7);629-636. 4. Clinical Pulmonary Function Testing - A Manual Of Uniform Laboratory Procedures, Second Edition, 1984. Intermountain Thoracic Society. Salt Lake City, Utah. 5. Wanger, J., “Pulmonary Function Testing, A Practical Approach”, 2nd ed., 1996, Williams & Wilkins, Baltimore. 6. Spiroscan 4000 Operator’s Manual. Brentwood Medical Technology Corp. 7. Spiroscan 5000 Operator’s Manual. Brentwood Medical Technology Corp. 8. Reichl, PH. Brentwood Diagnostic Workstation Product Requirements Specification. 9. Reichl, PH. Brentwood Diagnostic Workstation User Interface Design Document. 10. Reichl, PH. Preliminary Spirometer Serial Port Communications Protocol. 11. Siafakas, N., et al. Optimal Assessment And Management Of Chronic Obstructive Pulmonary Disease (COPD); A Consensus Statement of the European Respiratory Society (ERS), European Respiratory Journal, ISSN 0903-1936, 1995. 12. Morris, J.F., Koski, Al, Johnson L.C. Spirometric Standards For Healthy Nonsmoking Adults, American Review Of Respiratory Disease. Volume 103,1971. Pages 57-67. 13. Knudson, R. J., Lebowitz M.D., Holberg, C. J., Burrows, B., Changes in the Normal Maximal Flow-Volume Curve With Growth And Aging, AM REV RESPIR DIS 1983; 127;725-734. 14. Knudson, R. J., Slatin R. C., Lebowitz, M. D., Burrows, B., The Maximal Expiratory Flow-Volume Curve – Normal Standards, Variability, and Effects of Age, AM REV RESPIR DIS, 1976 113;587-600. 91 Go To Table Of Contents Back IQmark Digital Spirometer Operation Manual 15. Hsu, K. H. K., Jenkins, D. E., Hsi, B. P., Bourhofer, E., et al., Ventilatory Function of Normal Children And Young Adults – Mexican-American, White and Black, Spirometry, Journal Of Pediatrics, July 1979, Vol. 95, No. 1, pp. 14-23. 16. “Lung Volumes And Forced Ventilatory Flows – Report Working Party – Standardization of Lung Function Tests – European Community For Coal And Steel – Official Statement Of The European Respiratory Society”, European Respiratory Journal, ISBN:87-16-15024-4, 1993. 17. “Guide To Pulmonary Function Studies Under The Social Security Disability Programs”, Social Security Administration Office Of Disability, SSA Pub. No. 64-055, ICN 953760, June 1999. 18. Hankinson, J.L., Odencrantz, J.R., Fedan, K.B. Spirometric Reference Values From a Sample of the General U.S. Population, Am J Respir. Crit. Care Med., Vol. 159. pp. 179187, 1999. 19. Polgar G., Promadhat, V. Pulmonary Function Testing In Children: Techniques and Standards, W.B. Saunders Co., Philadelphia, 1971. 20. Zapletal, A., Motoyama E.K., Van de Woestijne, K.P., Hunt, V.R., Bouhuys, A. Maximum Expiratory Flow-Volume Curves and Airway Conductance in Children And Adolescents, Journal of Applied Physiology, Vol. 26, No. 3, March 1969. 21. Ferguson, G.T., Enright P.L., Buist, A.S., Higgins, M.W. Office Spirometry For Lung Health Assessment in Adults: A Consensus Statement from the National Lung Health Education Program, unpublished draft of Aug. 17, 1999. 22. Morris, L.F., Temple, W., Spirometric “Lung Age” Estimation For Motivating Smoking Cessation, Preventative Medicine, 0091-7435/85, 1985. 23. Enright, P. L., Hyatt, E. H., A Practical Guide to the Selection and Use Of Spirometers. 24. A 66-Year-Old Woman with Longstanding Dyspnea on Exertion; Niranjan Seshadri MD and Atul C Mehta MD, Department of Pulmonary and Critical Care Medicine, The Cleveland Clinic Foundation, Cleveland, Ohio, Dec 1999. 92 Next Go To Table Of Contents Back Next IQmark Digital Spirometer Operation Manual L. Technical Service Manual Service Manual Introduction The IQmark Digital Spirometer is a PC based diagnostic instrument that converts an Windows based personal computer to a diagnostic Spirometer with interpretative and data storage capabilities. A complete IQmark Digital Spirometry system usually consists of the Spirometer data acquisition module (handle), the PC system, which includes a monitor and a printer, one of the Microsoft Windows operating systems (Windows 2000, Windows XP or Windows Vista), and the IQmark Workstation software program. Additional testing modalities such as the IQmark Digital ECG and Vital Statistics acquisition devices can be incorporated simultaneously utilizing the IQmark Diagnostic Workstation software. This section is provided to assist with the troubleshooting of some commonly experienced problems and service of the IQmark Digital Spirometer data acquisition module. For information regarding the service and operation of the PC system you have selected, consult the documents provided by your PC manufacturer. Flow Sensor / Mouth Piece Diff Amp Handle Orientation Compensation Ckt. IC Pressure Transducer 16 Bit A/D Temperature Sensing Circuit Temp Sensor Battery In Power Supply +5, +5 Ref, +2.5 Ref Low Battery Sensor Ckt. Micro Controller Power On / Off To Com Port Serial Port Controller Serial Data Out Block Diagram 93 Go To Table Of Contents Back IQmark Digital Spirometer Operation Manual Theory of Operation The IQmark Digital Spirometer Handle or data acquisition module is a self contained module for the acquisition and digitalization of pressure data acquired via the DPM. The IQmark Digital Spirometer operating principals are that of the Fleisch Pneumotach. The Disposable Pneumotach Mouthpiece The Pneumotach, also known as the flow sensor, mouthpiece or DPM, is a single piece low cost disposable device. Its primary components are the pressure ports, mouthpiece and laminar flow element (LFE). During pulmonary function testing (PFT) air is expelled and travels through the LFE. The LFE smoothes the airflow and provides a consistent resistance in the path of the air. Two pressure ports sense pressure changes on either side of the LFE. The pressure ports are connected to a precision differential pressure transducer. The differential pressure signal is digitized and sent via the serial port to the Spirometry program running on the PC. The Spirometry program computes flow using the pressure data then calculates volume by integrating flow data over time. IC Pressure Transducer A precision piezio electric transducer takes differential pressure measurements from the disposable pneumotach mouthpiece. Differential measurements produce more accurate results as opposed to comparing a single measurement to estimated ambient air pressure. Handle Orientation Compensation Circuit An orientation compensation circuit stabilizes the Spirometer during PFT testing. This circuit eliminates artifacts generated by motion in the X, Y and Z axis as well as allowing a short enclosed hose path from the pneumotach to the transducer. 16 bit A/D The A/D converter used is a programmable 2 channel Sigma Delta 16 bit A/D converter. The A/D converter provides the 12Hz low pass filtering for the Spirometry pressure signal. The effective sampling rate is 48 Hz. The digitized pressure signal is sent serially to the micro controller. Temperature Sensor An LM34 temperature sensor relays ambient temperature information to the Spirometer program. Ambient temperature is utilized to produce more accurate BTPS calculations. The A/D converter converts the temperature signal when the Spirometer handle is powered up and then passes it along to the Spirometer program through the micro controller and serial interface. Micro controller The micro controller is a PIC16C66 chip produced by Microchip Technology. The micro controller receives the digitized data from the A/D converter, temperature sensor, low battery 94 Next Back Go To Table Of Contents Next IQmark Digital Spirometer Operation Manual detection circuit, and identification device and encodes the data with packets and sends it to the PC through the RS232 interface circuit. Serial port controller The serial signal sent out by the PIC micro controller is relayed to the system through the MAX3232CSE RS-232 transceiver. To provide the maximum safety for the patient the Spirometer hardware and the PC are isolated via double insulation. Power Supply The IQmark Digital Spirometer uses two AAA batteries for power. A step up DC-DC converter is used to provide a 6.2 V power source. Two 5.0 V regulators are used to provide power sources for the analog and digital circuits. A 2.5 V reference voltage is derived with a voltage divider and current amplifier to provide the Spirometer’s pressure signal baseline and A/D reference voltage. The IQmark Digital Spirometer’s power is switched ON or OFF by software control via the DTR bit of the RS232 port. Low Battery Sensor Circuit The low battery detection circuit monitors the battery voltage and alerts the micro controller when the energy in the batteries is low. The micro controller causes the LED in the handle to glow RED and sends a LOW BATTERY message that is displayed on the screen by the Spirometer software. The user can complete the current testing session with confidence but should replace the batteries before starting a new test session. System Maintenance and Obtaining Service The IQmark Digital Spirometer is a battery powered, portable device, which requires little maintenance and contains no user adjustable or serviceable components inside. There are no fuses in the Spirometer handle. In the event that the Spirometer hardware does not appear to function correctly and the remedies offered in the troubleshooting guide do not correct the problem, contact Midmark Diagnostics Group Customer Service. In the event that Repairs are required our staff will provide complete instructions on returning the Spirometer. DO NOT send your Spirometer without first contacting a Customer Service representative. A return authorization is required prior to the return of the device. Help us to service you better and minimize your down time. Obtain a Return Materials Authorization (RMA) number prior to returning your Spirometer. Midmark Diagnostics Group 1125 W. 190th Street Gardena, CA 90248 Tel: (800) 624-8950 www.midmarkdiagnostics.com To obtain optimum benefits and to ensure the best performance of this device, the user should read and understand all information offered in this Operation Manual. 95 Go To Table Of Contents Back IQmark Digital Spirometer Operation Manual (1) For the greatest accuracy, calibrate the Spirometer frequently. Daily calibration is recommended by the ATS. (2) DO NOT RE-USE Disposable Pneumotach Mouthpieces. (3) Replace the batteries when the device LED turns Red or the computer screen displays the “low battery” indication. (4) Inspect the Spirometer periodically for accuracy. Contact Midmark Diagnostics Group for your annual calibration certifications. Troubleshooting Problem Volume numbers appear too high or too low FVC Test Starts for no apparent reason 96 Cause 1. Ambient air pressure or temperature has changed since the last calibration. 2. The current lot of pneumotach is slightly different from the last lot. 3. The “Use Dry Air Conditions” option was checked. 1. The minimum flow required to start a test has been exceeded. Solution 1. Calibrate the Spirometer. 2. Calibrate the Spirometer. 3. De-select the “Use Dry Air Conditions” option when performing patient tests. This option disables the BTPS corrections. 1. Instruct the patient not to move the handle abruptly, which can cause air to flow through the pneumotach and start a test. Turn off fans or close heating and air conditioning vents near the test area. Close doors or windows. Delay pressing the “Start New Test” button until just prior to beginning the 2. Excessive electromagnetic maneuver. interference is affecting 2. Select a different location the instrument. or find and correct the source of the interference. Contact Midmark Diagnostics Group Customer Service for additional assistance. Next Go To Table Of Contents Back Next IQmark Digital Spirometer Operation Manual Can Not Zero Spirometer handle LED on handle glows or flashes Red LED on handle glows or flashes Red even after new batteries have been installed LED on handle will not turn on. LED will not turn ON, unit functions correctly. LED on handle will not turn OFF but unit functions correctly otherwise. Battery door will not close Can not install Pneumotach into Spirometer 1. Air is flowing through the pneumotach while the software is attempting to zero the Spirometer. 1. Instruct patient to hold handle next to their cheek prior to starting the test. Instruct them to blow after zeroing is complete. 2. Excessive electromagnetic interference is affecting the instrument. 2. Select a different location or find and correct the source of the interference. Contact Customer Service. 1. Replace with new batteries. 1. Batteries are low 1. The Com port is not 1. Configure the Com port. communicating. 2. The Com port can not drive the Spirometer. 2. Repair computer Com port 3. The Spirometer is defective. 3. Call for RMA. Repair Spirometer. 1. No batteries in the handle. 1. Install new batteries 2. The handle is not plugged into an available Com port 2. Plug Spirometer into an 3. The Com port is not talking available Com port. with the handle. 3. Configure the Com port. 4. If after steps 1-3, LED does 4. Call Midmark Diagnostics not turn on, Spirometer is Group for RMA, Repair defective Spirometer. 1. Defective LED 1. Call for RMA, Repair Spirometer. 1. Com port is defective. 1. Repair Com port 2. Com port not compatible 2. Install USB Com Port. with Spirometer. Contact Midmark Diagnostics Group 3. Installed USB to Serial port Customer Service converter is not compatible 3. Install different USB to with the Spirometer. Serial Port converter. Contact Midmark Diagnostics Group Customer Service. 1. Battery contact damaged. 1. Call Midmark Diagnostics Group for RMA, Repair Spirometer. 1. Leur fitting (pressure port) 1. Carefully remove plastic plugged with plastic from from Leur fitting. last pneumotach. 97 Go To Table Of Contents Back IQmark Digital Spirometer Operation Manual M. Spirometry Testing at a Glance A condensed guide to using the IQmark Digital Spirometer with new patients. The ATS recommends that calibration be performed daily before testing is started. 1) Start the Diagnostic Workstation program. 2) Select New Patient from the opening screen. 3) Complete the Name, Date of Birth, Weight, Height, Sex, and Race fields on the screen. 4) When the Patient Data screen is complete, select New Test 5) Select Spirometry and then click OK. 6) Prepare the patient for the Spirometry test. Select a new disposable mouthpiece. 7) The type of test currently selected is displayed in bold in the upper right corner of the screen. If this is not the type of test required, select the required test by clicking the appropriate button – FVC, VC, MVV, and either Pre or Post. 8) When the patient is ready, click Start New Test. 9) Wait while the sensor automatically zeros the sensor – DO NOT ALLOW AIRFLOW TO PASS THROUGH THE SENSOR DURING THIS PROCESS. 10) When the incentive box displays “Start When Ready” instruct the patient to begin the test. 11) Encourage the patient with verbal and body language to perform the test properly. For an FVC test, you can ask them to blast out fast and blow out long. 12) Click the Stop button to conclude the test and review the current data. 13) Repeat steps 7 through 12 until you have acquired the number of tests desired. 14) Click on Save/Review to save tests and review or print the data. 15) Discard the used mouthpiece after all tests are completed. 98 Next Back Go To Table Of Contents Next IQmark Digital Spirometer Operation Manual N. Performing an FVC Test - Quick Reference User’s Guide 1) Start the Diagnostic Workstation program – double-click the Workstation icon. 2) Select the patient. Either click New Patient and enter the appropriate information or click Patient File (for an existing patient) and double-click the appropriate patient name. 3) Check the patient data fields on the screen. Remember that the R.A.S.H. (Race; Age; Sex; Height) must be entered for each patient to obtain predicted values and interpretations. 4) When the Patient Data screen is complete, click New Test. 5) Select Spirometry and then click OK to enter the test screen. 6) Prepare the patient for the Spirometry test. a) Explain the procedure to the patient b) Demonstrate the procedure to the patient c) Instruct the patient to select a new disposable mouthpiece and to insert it into the handle d) Instruct the patient to place the mouthpiece on top of their tongue, with their teeth and lips around the mouthpiece. The patient must seal the outer part of the mouthpiece with their lips. Let the patient get used to the feeling of breathing with the mouthpiece in their mouth. 7) When the patient is ready, instruct the patient to hold the handle close to but not in front of their mouth. Be sure that the patient is not breathing through the mouthpiece when you start the test. 8) Click Start New Test - wait for the zeroing process – DO NOT ALLOW AIRFLOW TO PASS THROUGH THE MOUTHPIECE DURING THIS PROCESS. 9) When the incentive box displays “Start When Ready” instruct the patient to perform a full inspiration and then to place the mouthpiece in their mouth. Instruct the patient to Blast out the air. Encourage the patient with verbal and body language to blast out fast and blast out long. Ask the patient to continue to blow out until a plateau is reached on the volume-time curve. If a flow volume loop is required, have the patient inhale at the end of the expiration. 10) Click the Stop button or press the ENTER key to conclude the test. Accept or Reject the test based on the patient’s effort. Repeat steps 7 through 9 until the appropriate number of tests has been performed. Performing more than 8 forced vital capacity tests in one sitting will usually return diminished results. 11) Click the Save/Review button to save the efforts. Use the review screen to review, edit and/or print the results. 12) Instruct the patient to remove and discard the used mouthpiece after all tests are completed. 99 Go To Table Of Contents Back IQmark Digital Spirometer Operation Manual O. Performing a Pre/Post FVC Test - Quick Reference User’s Guide TESTING ONE PATIENT AT A TIME 1) Start the Diagnostic Workstation program – double-click the Workstation icon. 2) Select the patient and check the patient data fields on the screen or add a new patient. Remember that R.A.S.H. (Race; Age; Sex; Height) must be entered to obtain predicted values and interpretations. 3) Click New Test. 4) Click Spirometry and then click OK to enter the test screen. 5) Prepare the patient for the Spirometry test. 6) When the patient is ready, click on Start New Test. 7) Wait for the zeroing process and instruct the patient to perform the test. 8) Click the Stop button or press the ENTER key to conclude the test. Accept or Reject the test based on the patient’s effort. Repeat steps 6 and 7 until the appropriate number of tests has been performed. 9) Click the Save/Review button to save the efforts. Use the review screen to review, edit and/or print the results. 10) Administer the bronchodilator (BD). Wait the appropriate amount of time for the BD to take effect. 11) Select the correct BD from the Bronchodilator list and click the Perform Post-BD button. Click on Yes to save the addition of the BD to the report. 12) Repeat steps 5 through 9. 13) Instruct the patient to remove and discard the used mouthpiece after all tests are completed. 14) Review the Interpretation, edit if desired, then click Print and choose Print. 100 Next Back Go To Table Of Contents Next IQmark Digital Spirometer Operation Manual P. Performing a Pre/Post FVC Test – Quick Reference User’s Guide TESTING MULTIPLE PATIENTS 1) Start the Diagnostic Workstation program – double-click the Workstation icon. 2) Select a patient and check the patient data fields on the screen or add a new patient. Remember that R.A.S.H. (Race; Age; Sex; Height) must be entered to obtain predicted values and interpretations. 3) Click the New Test button. 4) Select Spirometry and then click OK to enter the test screen. 5) Prepare the patient for the Spirometry test. 6) When the patient is ready, click Start New Test. 7) Wait for the zeroing process to finish and then instruct the patient to perform the test. 8) Click the Stop button or press the ENTER key to conclude the test. Accept or Reject the test based on the patient’s effort. Repeat steps 6 and 7 until the appropriate number of tests has been performed. 9) Click the Save/Review button to save the efforts. Use the review screen to review, edit and/or print the results. 10) Administer the bronchodilator (BD). Wait the appropriate amount of time for the BD to take effect. Instruct the patient to remove the mouthpiece and to hold on to it until after all tests are completed. 11) Click the Patient List button. Select the next patient. Click Yes to save modifications. 12) Repeat steps 2 through 10 for the next patient. 13) Select the first patient from the Patient List and click the View Report button. 14) Select a BD from the Bronchodilator list and click the Perform Post-BD button. 15) Have the patient place the mouthpiece in the Spirometry handle. Repeat steps 5 through 9. 16) Instruct the patient to remove and discard the used mouthpiece after all tests are completed. Review the Interpretation, edit if desired, then click Print and choose Print. 17) Repeat steps 11 through 16 for the next patient. 101 Go To Table Of Contents Back IQmark Digital Spirometer Operation Manual Q. Glossary ARCHIVING Placing data into storage where it cannot be damaged or altered. Archived data, such as Spirometer reports, can be retrieved at a later date for review. IQMARK DIAGNOSTIC WORKSTATION (DIAGNOSTIC WORKSTATION) The name of the software application you install on your personal computer in order to use the Spirometer. BTPS Body conditions; normal body Temperature (37°C); ambient Pressure; Saturated with water vapor. CLICK In this manual, Click refers to tapping a mouse button once – quickly and firmly. For example, if you want to pull down the Medications list, you will click on the list name. Double Click refers to performing this task twice, and is generally used to start programs. DATABASE A collection of data arranged into methodically organized categories. In this manual, the term refers to the collection of reports that the Diagnostic Workstation stores on your hard drive. DESKTOP The background that appears on your computer screen behind the application windows. DIALOG BOX An on-screen form you complete to provide the Diagnostic Workstation with information that it needs to accomplish a task, such as the Medications window. ECG See electrocardiogram. ELECTROCARDIOGRAM A graphic recording that displays the electrical activities of the heart. Contact Midmark Diagnostics Group for additional information. F OLDER Folders, which function like the drawers in a filing cabinet, are used by Windows to organize files and applications. The Diagnostic Workstation application resides in a folder named “Brentwood”, which is located in your hard drive. 102 Next Go To Table Of Contents Back Next IQmark Digital Spirometer Operation Manual MY COMPUTER A Windows icon that appears on the desktop in the form of a stylized computer. Clicking on My Computer enables you to explore your computer’s disks, printers, Control Panel, etc. PORT A place where data is passed in and out of a computer. Personal computers typically have several ports located on the back panels of the computer. The Spirometer communicates the data it collects from patients through a serial port. PREDICTED VALUES Also known as Reference Values or Predicted Equations Sets. A value for a parameter is calculated and estimated as “normal” for the age, height, sex, and sometimes the ethnic background of the patient. These values are compared to a patient’s actual values to evaluate a patient’s lung condition. SERIAL P ORT A 9- or 25- pin port that is used by a computer to communicate serial data, typically labeled COM1 or COM2. The Spirometer connects to a 9-pin serial port or a 25-pin serial port if an adapter is used. Consult your computer owner's manual for more information on configuration and capability. SHORTCUT ICON Generally appearing on the desktop, shortcut icons enable you to open a document, application, or folder simply by double clicking on them. SPIROMETER Midmark Diagnostics Group’s Module for converting a personal computer into a Spirometer with interpretive capability. The Spirometer is operated using the Diagnostic Workstation software application. START BUTTON Appears at the left end of the Windows Taskbar, and enables you to start applications, open files, get to the Control Panel and exit Windows. Consult your Windows owners’ manual for more information. TASKBAR A gray bar that typically appears at the bottom of the screen. In Windows, the Taskbar provides rapid access to the Start Button and open applications. The Diagnostic Workstation requires the taskbar be set to Auto hide in order for the Workstation to display properly. TEXT BOX A box where you type in text relative to an application or task. Select the text box by clicking in it and start typing. 103 Go To Table Of Contents Back IQmark Digital Spirometer Operation Manual USB 104 Universal Serial Bus. An alternate type of serial connection that can be used to connect your Spirometer to your computer. Next Go To Table Of Contents Back Next IQmark Digital Spirometer Operation Manual R. Customer Service and Contact Information For help in diagnosing problems with this product, refer to the online help for immediate assistance. You can also contact Midmark Diagnostics Group Customer Service at (800) 6248950. Office hours are 8:00 AM- 5:00 PM, Pacific Standard Time (PST). Warranty All Midmark Diagnostics Group Products are warranted free from manufacturing and material defects for 12 months from the date of purchase. Any misuse or abuse of the product voids all warranties. Return Goods Authorization To return any product for repair, an RMA (Return Materials Authorization) number must be obtained from Midmark Diagnostics Group Customer Service. This number should be referenced on the package(s) containing the items to be returned and in any correspondence regarding the return. Shipping Before shipping any unit to Midmark Diagnostics Group, be certain that an RMA (Return Materials Authorization) number has been issued and that all guidelines regarding this authorization are followed. We highly recommend that you follow all guidelines for the shipment of a medical product set forth by the shipping company of your choice. If a question should arise regarding an appropriate method of shipment, please feel free to ask when calling for your Return Goods Authorization Number. It is ultimately the responsibility of the customer when shipping a product to ensure that all packages and their contents get to Midmark Diagnostics Group safely. Midmark Diagnostics Group will not assume any responsibility for damage due to improper packaging, shipment or use of a product. Such actions will result in all warranties being void. It is the customer’s responsibility to ensure proper packaging and shipment of the product. Packaging and shipping costs associated with the return of the product to Midmark Diagnostics Group are also the customer’s responsibility. Midmark Diagnostics Group 1125 W. 190th Street Gardena, California, USA 90248 PH 800-624-8950 105 Go To Table Of Contents Back Brentwood Medical Technology Corp. Addendum – EMC Requirements Next IQmark Digital Spirometer Instructions for Use Addendum EMC Requirements for the IQmark Digital Spirometer Medical electrical equipment needs special precautions regarding EMC and needs to be installed and put into service according to the EMC information provided in this Addendum. Portable and mobile RF communications equipment can affect the operation of medical electrical equipment. The IQmark Digital Spirometer is medical electrical equipment. The following is a list of the IQmark Digital Spirometer cables and other accessories that are used as part of the IQmark Digital Spirometer that comply with sections 36.201 and 36.202 of the EMC Standard EIC60601-1-2 (E): Hand piece, Model number(s): IQmark Digital Spirometer Use of cables, cable extensions or accessories other than those specified, with the exception of cables and accessories sold by the manufacturer of the IQmark Digital Spirometer as replacement parts for internal components, may result in increased EMISSIONS or decreased IMMUNITY of the IQmark Digital Spirometer. Table 1 – Guidance and manufacturer’s declaration – electromagnetic emissions – for the IQmark Digital Spirometer Guidance and manufacturer’s declaration – electromagnetic emissions The IQmark Digital Spirometer is intended for use in the electromagnetic environment specified below. The customer or the user of the IQmark Digital Spirometer should assure that it is used in such an environment. Compliance Electromagnetic environment – guidance RF emissions CISPR 11 Group 1 RF emissions CISPR 11 Class B Not applicable The IQmark Digital Spirometer uses RF energy only for its internal function. Therefore, its RF emissions are very low and are not likely to cause any interference in nearby electronic environment. IQmark Digital Spirometer is suitable for use in all establishments, including domestic establishments and those directly connected to the public low-voltage power supply network that supplies buildings used for domestic purposes. Battery operated device Not applicable Battery operated device Emissions Test Harmonic Emissions IEC 61000-3-2 Voltage fluctuations / flicker emissions IEC 61000-3-3 Addendum to 3-100-1025 Revision 8.0 Page 2 of 4 Go To Table Of Contents Back Brentwood Medical Technology Corp. Addendum – EMC Requirements Next IQmark Digital Spirometer Instructions for Use Table 2 – Guidance and manufacturer’s declaration – electromagnetic immunity – for the IQmark Digital Spirometer Guidance and manufacturer’s declaration – electromagnetic immunity The IQmark Digital Spirometer is intended for use in the electromagnetic environment specified below. The customer or the user of the IQmark Digital Spirometer should assure that it is used in such an environment. Immunity test Electrostatic discharge (ESD) IEC 60601 test level Compliance level ±6 kV contact ±6 kV contact ±8 kV air ±8 kV air IEC 61000-4-2 Electrical fast transient/burst IEC 61000-4-4 Surge ±2 kV for power supply lines N/A ±1 kV for input/output lines ±1 kV differential mode Electromagnetic environment – guidance Floors should be wood, concrete or ceramic tile. If floors are covered with synthetic materials, the relative humidity should be at least 30%. Battery operated device ±1 kV for input/output lines N/A Battery operated device N/A Battery operated device IEC 61000-4-5 <5% UT (<95% dip in UT) for 0.5 cycle Voltage dips, short interruptions and voltage variations on power supply input lines IEC 61000-4-11 40% UT (60% dip in UT) for 5 cycles 70% UT (30% dip in UT) for 25 cycles <5% UT (<95% dip in UT) for 5 sec Power frequency (50/60 Hz) magnetic field 3 A/m 3 A/m Power frequency magnetic fields should be at levels characteristic of a typical location in a typical commercial or hospital environment. IEC 61000-4-8 NOTE: UT is the A.C. mains voltage prior to application of the test level. Addendum to 3-100-1025 Revision 8.0 Page 3 of 4 Go To Table Of Contents Back Brentwood Medical Technology Corp. Addendum – EMC Requirements Next IQmark Digital Spirometer Instructions for Use Table 3 – Guidance and manufacturer’s declaration – electromagnetic immunity – for the IQmark Digital Spirometer Guidance and manufacturer’s declaration – electromagnetic immunity The IQmark Digital Spirometer is intended for use in the electromagnetic environment specified below. The customer or the user of the IQmark Digital Spirometer should assure that it is used in such an environment. Immunity test IEC 60601 test level Compliance level Electromagnetic environment – guidance Portable and mobile RF Communications equipment should be used no closer to any part of the IQmark Digital Spirometer, including cables, than the recommended separation distance calculated from the equation applicable to the frequency of the transmitter. Conducted RF 3 Vrms IEC 61000-4-6 150 kHz to 80 MHz Radiated RF 3 V/m IEC 61000-4-3 80 MHz to 2.5 GHz 3 Vrms Recommended separation distance d = 1.2 √ P 3 V/m d = 1.2 √ P 80 MHz to 800 MHz d = 1.2 √ P 800 MHz to 2.5 GHz where P is the maximum output power rating of the transmitter in watts (W) according to the transmitter manufacturer and d is the recommended separation distance in meters (m). Field strengths from the fixed RF transmitters, as determined by an electromagnetic site survey, a should be less than the compliance level in each frequency range. b Interference may occur in the vicinity of equipment marked with the following symbol: NOTE 1 At 80 MHz and 800 MHz, the higher frequency range applies. NOTE 2 These guidelines may not apply in all situations. Electromagnetic propagation is affected by absorption and reflection from structures, objects and people. a Field strengths from fixed transmitters, such as base stations for radio (cellular/cordless) telephones and land mobile radios, amateur radio, AM and FM radio broadcast and TV broadcast cannot be predicted theoretically with accuracy. To assess the electromagnetic environment due to fixed RF transmitters, an electromagnetic site survey should be considered. If the measured field strength in the location in which the IQmark Digital Spirometer is used exceeds the applicable RF Compliance level above, the IQmark Digital Spirometer should be observed to verify normal operation. If abnormal performance is observed, additional measures may be necessary, such as reorientating or relocating the IQmark Digital Spirometer. b Over the frequency range 150 kHz to 80 MHz, field strengths should be less than 3 V/m. Addendum to 3-100-1025 Revision 8.0 Page 4 of 4 Go To Table Of Contents Back Brentwood Medical Technology Corp. Addendum – EMC Requirements IQmark Digital Spirometer Instructions for Use Table 4 – Recommended separation distances between portable and mobile RF communications and the IQmark Digital Spirometer Recommended separation distances between Portable and mobile RF communications equipment and the IQmark Digital Spirometer The IQmark Digital Spirometer is intended for use in an electromagnetic environment in which radiated RF disturbances are controlled. The customer or the user of the IQmark Digital Spirometer can help prevent electromagnetic interference by maintaining a minimum distance between portable and mobile RF communications equipment (transmitters) and the IQmark Digital Spirometer as recommended below, according to the maximum output power of the communications equipment. Rated maximum output power of transmitter W Separation distance according to frequency of transmitter m 150 kHz to 80 MHz 80 MHz to 800 MHz d = 1.2 √ P d = 1.2 √ P 800 MHz to 2.5 GHz d = 2.3 √ P 0.01 0.12 0.12 0.23 0.1 0.38 0.38 0.73 1 1.2 1.2 2.3 10 3.8 3.8 7.3 100 12 12 23 For transmitters rated at a maximum output power not listed above, the recommended separation distance d in meters (m) can be estimated using the equation applicable to the frequency of the transmitter, where P is the maximum output power rating of the transmitter in watts (W) according to the transmitter manufacturer. NOTE 1 At 80 MHz to 800 MHz, the separation distance for the higher frequency range applies. NOTE 2 These guidelines may not apply in all situations. Electromagnetic propagation is affected by absorption and reflection from structures, objects and people. Addendum to 3-100-1025 Revision 8.0 Page 5 of 4