1
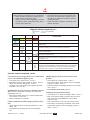
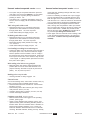
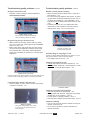
Section 3
Printer Troubleshooting Guide
Additional help
For more information on specific printer functions (print station, flip station, laminator, etc.) refer to the appropriate Tech
Note in the separate Tech Note Supplement to this Operator’s
Guide.
Contents of this Section
Unusual noises and unreported events
Image adjustment
Troubleshooting quality problems
page 3-2
page 3-4
page 3-5
Error messages
Most P640i error conditions are identified by the printer itself,
and are reported by the computer as error messages with
corrective actions. Error messages are not further described
in this section of the manual, which deals only with fault conditions that are not reported automatically. On this page are
five examples of error messages:
Most problems can be prevented by careful handling
of the media (cards, color ribbon and laminate), see
Section 2, Media Handling.
There is almost no preventative maintenance to do. Dust
and debris should be vacuumed out every 12 months, or more
frequently in adverse environments.
Most of the problems described in the following pages
are correctable by the user, but please note there is
the potential for unexpected results if the procedures
are not followed carefully. If in doubt, call for service
assistance.
980541-001 Rev. 1 12-06-04
P630i/P640i User Guide
Part 1
Section 3-1
Before calling for technician help, do the following:
• Check all cable connections, including power.
• Check that the power switch is ON.
• Unless you hear noises suggesting a card jam
condition, try power cycling: switch OFF, wait 15
seconds, then switch ON.
• Open the main cover, then look for obvious problems, such as a card where it shouldn’t be, media outages or misfeeds (color ribbon, laminate,
cleaning cassette).
• Check this section, referring if necessary to the
relevant Tech Note.
What the indicator lights tell you ...
= light flashing
= light on
READY
GREEN
YELLOW
MEDIA
ALARM
ORANGE
RED
Printer status
Ready to print
Printer busy
Laminator heating up, but not yet at operating temperature
Laminator heaters in sleep mode (when not in use, the heaters
cool at 1oF per minute)
Printhead temperature error.
No cards in magazine, color ribbon out, cleaning tape out, laminator
cassette(s) out.
Mag encoding write failure
Serious error conditions, including: MAIN COVER OPEN, Laminator
too hot, card transport stalled, card not seated properly, mag encoding
verification error, head lift failure, ribbon jam, card jam (any location),
card missing (any location), no gap between laminator patches.
Unusual noises/unreported events
Color ribbon runs for longer than 2 or 3 seconds when
cover is closed (MEDIA light stays on)
MEDIA light ON steady, but no obvious visual
problem
•
•
•
•
• Color ribbon not in ribbon sensor. Section 2
• Color ribbon supply and/or takeup cores not engaging
properly on arbors. Section 2
• Cleaning cassette not engaging properly on the takeup
drive. Section 2
• See Laminator spot check, page 3-3
Color ribbon not in ribbon sensor. Section 2
Both ribbon cores not fully engaged on arbors. Section 2
Ribbon not secured to takeup core. Section 2
No ribbon type or wrong ribbon type specified in Printer
Properties. Tech Note TN8
ALARM light stays ON after error condition is cleared
Note: There is a delay after closing the cover before the
ALARM light goes out.
• Main cover interlock switch may not have actuated when
cover closed. Tech Note TN1
• Alarm condition(s) not corrected.
Card has both front and back images printed on same
side
• Check selections made in Printing Preferences > Card
Setup. TN8
• Card failed to flip. Run Flip Test 3 to check flip action.
Completely unexpected print results
• Color ribbon out, or nearly out. Replace ribbon. Section 2
• Main cover opened during a print job. Open and close
main cover, then press RIBBON to re-sync ribbon.
Reprint last job.
• Color ribbon panels out of sync, see previous action.
• Color ribbon not advancing consistently. Color ribbon
supply and/or takeup cores not engaging properly on
arbors. Section 2
TN5
980541-001 Rev. 1 12-06-04
P630i/P640i User Guide
Part 1
Section 3-2
Unusual noises/unreported events
continued
• Front (color side) of card printed with black. Open and
close main cover, then press RIBBON to re-sync ribbon.
• Inconsistent color, very faint printing. Printhead not
pressing on ribbon. TN4
• Color ribbon torn, or jamming intermittently. Clear jam.
Pull out more from supply roll and reattach to takeup roll.
Section 2
YMC color panels stick to card
• Printhead running too hot. Can happen after head
replacement if head resistance incorrectly entered
through printer driver. TN4, Printer Adjustment
• Check ribbon takeup and supply torques. TN4
K (Black) panel sticks to card
• Printhead running too hot. Can happen after head
replacement if head resistance incorrectly entered
through printer driver. TN4, Printer Adjustment
• Black panel density and/or preheat set too high. TN4,
Unusual noises/unreported events
continued
check path from cassette(s) through feed roller, cutter
and transfer guide.
• Check for misfeeding of laminate due to poor engagement of white plastic idler on cassette with drive roller.
Mark the upper core to check that it rotates (no need to
mark the lower core - watch the notches on the laminate
core). Feed laminate by pressing the LAMINATE button.
• Laminate patch may be wrapped around the heated
roller, causing card feed problems and/or poor lamination. Turn printer OFF, allow 10 minutes for cooling, then
remove heated rollers - careful, they will still be HOT.
Remove the rogue patch. Do NOT use a metal knife or
any tool that might damage the heated rollers.
• Check upper and lower laminate sensor readings, TN64, with and without laminate present (< 20 if present, >
180 if absent - numbers valid only if transfer guides
installed).
Color Calibration
• Check ribbon takeup and supply torques. TN4
Loud rattling/screeching from card transport
• Card(s) has fallen onto truck drive belt, and is jammed at
some point. Open cover, remove all cards from hopper.
Remove jammed card if accessible. Look for card(s) in
the transport bed. Using card transport knob, hand-crank
truck to push card into one of two areas for easy removal
- under hopper, or under flip station (lift carrier for access,
then push it down again).
Brief rattling noise before every print job
• Make flip station rest position adjust parameter less
positive. (But be sure the carrier still descends to its
physical end-stop, otherwise it may fail to pick card off
platen.) TN5, Flip Station Adjustment
Rattling noise every 10 cards
• Cleaning cassette not firmly engaged. TN2
Unusual events
In all of the following cases, and all other unusual events, try
power cycling first, then investigate specific issues:
• Printhead descends before card arrives. Check horizontal offset. (see TN4)
• Printhead stays down after card has gone away. Check
card presence sensor. (see TN2)
• Laminate cutter(s) fails to operate. (see below, and TN6)
• Unusual media light indications.
Laminator spot check
Section 2 and TN6
• Make sure the transfer roller toggle is in the operating
position, pointing right.
• Upper or lower laminate feed problems: remove, then
replace transfer guides, discarding laminate patches on
transfer rollers. Check for laminate where it shouldn’t be.
Remove both laminate cassettes. If out, or nearly out,
load fresh laminate. Wind laminate back in to eliminate
overhang. Reinstall cassettes, latching securely. Visually
980541-001 Rev. 1 12-06-04
P630i/P640i User Guide
Part 1
Section 3-3
Image Adjustment
Start > Printers (or Printers and Faxes) > Right click Zebra P640i > Printing Preferences > Image Adjustment
Brightness and Contrast controls on the image Adjustment screen have same effect on the printed image as do similar
controls on typical office color printers. Click Reset to restore default conditions.
Contrast 0
Brightness 50
Contrast 25
Brightness 50
Contrast 50
Brightness 25
Contrast 50
Brightness 50
Contrast 50
Brightness 75
Contrast 75
Brightness 50
Contrast 100
Brightness 50
980541-001 Rev. 1 12-06-04
P630i/P640i User Guide
Part 1
Section 3-4
Troubleshooting quality problems
Troubleshooting quality problems
continued
Poor color registration
• Minor mis-registration of Y, M and C color passes may be
due to printhead angle adjust screw not in firm contact
with printhead frame. TN4
• For gross mis-registration of Y, M and C suspect card not
firmly against left hand pick edge of truck on one or more
passes. Spring at left end of platen may be missing or
bound up. TN2
• Check printed card for damage on corners or edges.
Example: the card may be scraping along the underside
of the hopper base molding. TN2
• Printhead pressure too light. TN4
• Printhead may be running hot. Will occur if head resistance incorrectly entered in driver software. TN4
• Toothed transport belt pulley may be slipping on drive
shaft. Tighten set screws (make sure the screws bear on
flats on the shafts).
Examples of platen surface problems
Continuous white or black stripes on card’s longer
dimension
• White stripe means blown pixel (non-functioning heating
element). One or two blown pixels in isolation may be
acceptable to some. Otherwise replace printhead. TN4
• Black stripe means non-functioning circuit(s) on printhead. If so, replace printhead, TN4, but first check that it
is not the result of an image size change not followed by
power cycling the printer.
Examples of color mis-registration
Left is the test card in the printer’s firmware.
Right is an enlargement showing fringing on process black text generated from Y, M and C
Poor color rendering
• Possible source issues - poor quality photos or graphics, card layout application settings. Isolate the problem
by printing a known image, such as Portraits.bmp,
through IDPrint Lite. TN8
• Vary brightness and contrast controls in Preferences >
Image Adjustment (preceding page). Fine tune if necessary using Contrast Adjust in Properties > Device
Settings > Color Calibration. TN4
Faint, non-uniform image
Examples of printhead failures
The white line is a sign of a blown pixel. The
adjacent black stripe is a printhead driver problem (components on the head itself). These are
independent problems, not necessarily co-located.
Random occurences of white (unprinted) spots
• Possible card quality problem. Run IDPrint Lite with
graytone.bmp on cards from a different batch. Check
platen surface for specks of debris.
• Printhead pressure too low. Adjust downward. TN4
• Printhead not pivoting freely. TN4
Gaps in image at edges and corners
See graphic at top right
• Possible de-lamination/wear of platen’s rubber surface.
Try cleaning platen. If unsuccessful, replace platen. TN2
• Possible non-uniformity of card thickness, or card
surface defects.
Possible card defects
White spots like these may be caused
by card surface imperfections.
980541-001 Rev. 1 12-06-04
P630i/P640i User Guide
Part 1
Section 3-5
Troubleshooting quality problems
Troubleshooting quality problems
continued
continued
Image not centered on card
Random colored patterns on image
• Properties > Device Settings > Printer Adjustment >
Horizontal/Vertical Offset.
• Ribbon wrinkling. Reduce takeup torque. Check printhead pressure. TN4
• Too much heat being applied to YMC panels. Try reducing gain,offset and preheat separately for each color in
the driver Device Settings > Color Calibration, TN4-5.
Typically, the set of values should be the same for each
color.
• Printhead running too hot. Can happen after head
replacement if head resistance incorrectly entered
through printer driver. TN4, Printer Adjustment
Image offset on card
Correct this by increasing horizontal (X)
offset, decreasing vertical (Y) offset.
Image missing at top or bottom of card
• Ribbon folded over at edge. Slacken ribbon by pulling
more out of supply roll, unfold edge then press RIBBON
button to re-sync. TN4
• Bottom edge and/or right hand edge of image missing
could be card layout application sending wrong image
size (should be 952 x 578 pixels). Select appropriate
image size (if available) in Preferences, or modify layout
application.
Random colored lines
Probably resulting from
excessive takeup torque.
Scratches/dings on long edges of card
Look for a narrow band of abrasion up to about 0.1" (2.5
mm) in from either or both of the long edges.
• Card hopper base set too low. TN2
Laminate not centered on card
• Vertical offset adjust (mechanical adjustment). TN6
• Horizontal offset: Properties > Device Settings > Printer
Adjustment > Laminate Station Adjust. TN6
Image loss at top of card
Could be on either edge. Almost certainly due to ribbon fold-over, but
could be a head non-pivoting problem, or an image size problem.
Consistent image defects, card after card
• Debris on platen, or platen surface not flat. Clean platen,
or replace if necessary. TN2
Laminate offset
Laminate not parallel with card edges
• Skew adjust (mechanical adjustment). TN6
• If using partial width laminate, edge guide not properly
installed (one of two positons). Section 2
• Transfer guide not properly installed. Section 2
• Laminate patch wrapped around heated roller. Page 3-3
Laminate wrinkling
Debris on platen
This gross image artifact was caused
by a tiny scrap of card less than 0.01"
(0.25 mm) thick.
980541-001 Rev. 1 12-06-04
• Can occur at end of roll. Remove cassette. If nearly out,
discard. Install fresh roll.
• If not end-of-roll problem, suspect obstructions in
laminate feed path.
P630i/P640i User Guide
Part 1
Section 3-6