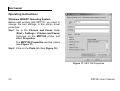
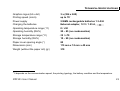
1
DISCLAIMER: While every effort has been made to ensure that the information in this manual is accurate and complete, no liability can be accepted for any errors or omissions ELTRADE reserves the right to change the specifications of the hardware and the software described in this manual without notice This document contains information proprietary to ELTRADE Ltd. Sofia, Bulgaria. No part of this publication may be reproduced, photocopied, stored on a retrieval system or transmitted, without prior written permission of ELTRADE Ltd. Sofia, Bulgaria. All products, logos, brand names, or companies are trademarks or registered trademarks of their respective owners! CONTENTS READ THIS FIRST 4 MAINTENANCE 13 Safety Precautions ........................................... 4 Changing the Paper Roll................................ 13 Warnings ........................................................... 4 Cleaning the Print Head................................. 14 Cautions ............................................................ 6 Changing the Batteries .................................. 15 Preventing Malfunctioning .............................. 7 INTRODUCTION 8 Unpacking the printer ...................................... 8 Printer Modules ................................................ 8 INSTALLATION AND OPERATION 10 Setting Up ....................................................... 10 Removing the Battery Fresh Seal Charging the Batteries 10 10 Turning the Printer On and Off ..................... 11 Self Test .......................................................... 11 LED Indication ................................................ 11 Bluetooth Connection Range........................ 12 TROUBLESHOOTING 17 Installation Instructions................................. 18 Windows 2000/XP Operating System 18 Operating Instructions................................... 20 TECHNICAL SPECIFICATIONS 22 READ THIS FIRST Safety Precautions Before using the printer, please ensure that you have read and understood the safety precautions described below. Always ensure that the printer is operated correctly. The safety precautions noted on the following pages are intended to instruct you in the safe and correct operation of the printer and its accessories to prevent injuries or damage to yourself, other persons and equipment. In the next few pages, the term "equipment" refers primarily to the printer and its power supply accessories. Warnings Do not attempt to disassemble or alter any part of the equipment that is not expressly described in this guide. Internal inspections, alterations and repairs should be conducted 4 by a qualified service personnel authorized by your printer distributor. Stop operating the equipment immediately if it emits smoke or noxious fumes. Failure to do so may result in fire or electrical shock. Immediately turn the printer's power off, remove the printer battery and unplug the power cord from the electrical outlet. Ensure that smoke or fume emissions have ceased. Please consult your printer distributor. Stop operating the equipment if it is dropped or the casing is damaged. Failure to do so may result in fire or electrical shock. Immediately turn the printer's power off, remove the printer battery and unplug the power cord from the electrical outlet. Do not allow the equipment to come into contact with, or become immersed in, water or other liquids. Do not allow liquids to enter the interior. The printer has not been waterproofed. If the exterior comes into MPP101 User Manual READ THIS FIRST contact with liquids or salt air, wipe it dry with a soft, absorbent cloth. If water or other foreign substances enter the interior, immediately turn the printer’s power off and remove the printer battery or unplug the power cord from the electrical outlet. Continued use of the equipment may result in fire or electrical shock. Do not use substances containing alcohol, benzene, thinners or other flammable substances to clean or maintain the equipment. The use of these substances may lead to fire. Remove the power cord on a regular periodic basis and wipe away the dust and dirt that collects on the plug, the exterior of the electrical outlet and the surround area. In dusty, humid or greasy environments, the dust that collects around the plug over long periods of time may become saturated with humidity and short-circuit leading to fire. MPP101 User Manual Do not cut, damage, alter or place heavy items on the power adapter cord. Any of these actions may cause an electrical short circuit, which may lead to fire or electrical shock. Replace a broken or damaged power adapter cord. Do not handle the power cord if your hands are wet. Handling it with wet hands may lead to electrical shock. Use of power sources not expressly recommended for this equipment may lead to overheating, distortion of the equipment, fire, electrical shock or other hazards. Use only the recommended power accessories. Do not place the batteries near a heat source or expose them to direct flame or heat. Such exposure may damage the batteries and lead to the leakage of corrosive liquids, fire, electrical shock, explosion or serious injury. Do not immerse the batteries in water. 5 READ THIS FIRST Do not attempt to disassemble, alter or apply heat to the batteries. There is serious risk of injury due to an explosion. Immediately flush with water any area of the body – including the eyes and mouth, or clothing – that comes into contact with the inner contents of a battery. If the eyes or mouth contact these substances, immediately flush with water and seek medical assistance. Avoid dropping or subjecting the batteries to severe impacts that could damage the casings. It could lead to leakage and injury. other materials in waste containers may lead to fire or explosions. Discard the batteries in specialized waste facilities if available in your area. Use of batteries that are not expressly recommended for this equipment may cause explosions or leaks, resulting in fire, injury and damage to the surroundings. Use only recommended batteries and accessories. Disconnect the power adapter from both the printer and electrical outlet after recharging and when the printer is not in use to avoid fire and other hazards. Continuous use over a long period of time may cause the unit to overheat and distort, resulting in fire. Do not short-circuit the battery terminals with metallic objects, such as key holders. It could lead to overheating, burns and other injuries. Use the supplied terminal cover to transport or store the battery pack. Cautions Before you discard a battery, cover the terminals with tape or other insulators to prevent direct contact with other objects. Contact with the metallic components of Avoid using, placing or storing the equipment in places subject to strong sunlight or high temperatures, such as the dashboard or trunk (boot) of a car. 6 MPP101 User Manual READ THIS FIRST Exposure to intense sunlight and heat may cause the batteries to leak, overheat or explode, resulting in fire, burns or other injuries. High temperatures may also cause deformation of the casing. Ensure that there is good ventilation when using the compact power adapter to charge the battery pack or power the printer. Do not store the equipment in humid or dusty areas. Storage in such areas could lead to fire, electrical shock or other damage. Preventing Malfunctioning Avoid Strong Magnetic Fields Never place the printer in close proximity to electric motors or other equipment generating strong electromagnetic fields. Exposure to strong magnetic fields may cause malfunctions. Avoid Condensation Related Problems Moving the equipment rapidly between hot and cold temperatures may cause condensation (water droplets) to form on its external and internal surfaces. If Condensation Forms Inside the Printer Stop using the printer immediately if you detect condensation. Continued use may damage the equipment. Remove the battery or disconnect the power adapter (if connected) from the printer and wait until the moisture evaporates completely before resuming use. MPP101 User Manual 7 INTRODUCTION Unpacking the printer 4 Remove the printer from its carton being careful not to damage the packing material so that it may be re-used if the printer is to be transported in the future. Make sure that all the components illustrated on the inside of the packing box are present and that there are no signs of damage. If any, contact Customer Service. 3 6 5 Printer Modules The MPP101 Printer main modules are: (See Figure 1 and Figure 2) 1. 2. 3. 4. 5. 6. 8 Base Cover Paper Bin Printer Unit Status Led Multifunctional Button 2 1 Figure 1. Top View MPP101 User Manual INTRODUCTION 9 7 8 Figure 2. Bottom View 7. Battery Compartment 8. Belt Clip 9. Battery Fresh Seal MPP101 User Manual 9 INSTALLATION AND OPERATION Setting Up Charging the Batteries Removing the Battery Fresh Seal To start operating the printer, pull out the battery fresh seal as shown on Figure 3. Figure 3. Removing the Battery Fresh Seal 10 Figure 4. Connect the Power Supply Adapter MPP101 User Manual INSTALLATION AND OPERATION Plug the Power Supply Adapter into the mains outlet and connect it to the MPP101 printer as shown on Figure 4. LED Indication LED status Description Make sure the temperature is within the 0 - 40°C range! Off Printer Off Blinking Red Batteries need recharging The batteries are charged 80% in 1.5 hours and completely in 3h. Blinking Red and Connection in progress Green Together It is highly recommended to avoid printing, while charging the batteries! Turning the Printer On and Off The printer is turned on by pressing the Multifunctional Button and turns automatically off if hasn’t been used for more than a minute. Lit Red Paper Out Blinking Green (Duty 10%) Printer On / Charge Finished Blinking Green (Duty 80%) Fast Charge in progress Blinking Green (Duty 40%) Fast Charge finished; Trickle Charge in progress Self Test A self test is performed by double pressing quickly the Multifunctional Button. MPP101 User Manual 11 INSTALLATION AND OPERATION Bluetooth Connection Range To establish a proper communication with the printer, it should be placed not far than 10 m from the Bluetooth antenna of the device as shown on Figure 5. ≤10 m Figure 5. Bluetooth Connection Range 12 MPP101 User Manual MAINTENANCE Changing the Paper Roll Open the Paper Bin pressing the two sides of the cover as shown on Figure 6. Figure 6. Opening the Paper Bin Figure 7. Loading the Paper Roll Remove the remaining of the used paper and insert a new paper roll into the bin as indicated on Figure 7. MPP101 User Manual Close the cover and pull out a little of the paper as displayed on Figure 8. 13 MAINTENANCE Figure 8. Pulling Out the Paper Figure 9. Cleaning the Print Head Cleaning the Print Head Disconnect the printer from the power supply adapter. Clean the heating element of the head with a cotton swab moistened with an alcohol solvent (ethanol, methanol, or IPA). Open the paper bin cover. If a paper roll is loaded, remove it. Never touch the head; oils on your skin can damage the head. Do not clean the head immediately after printing; the head may be hot. 14 Reload paper roll and close the printer cover. MPP101 User Manual MAINTENANCE Changing the Batteries Remove the belt clip as shown on Figure 10. Figure 10. Removing the Belt Clip Open the battery compartment as shown on Figure 11. Figure 11. Opening the Battery Compartment Insert the batteries as displayed on Figure 12. MPP101 User Manual 15 MAINTENANCE Figure 12. Placing the Batteries Close the battery compartment and attach the belt clip pushing it to the printer base and sliding it till a click is heard (See Figure 13). 16 Figure 13. Attaching the Belt Clip MPP101 User Manual TROUBLESHOOTING Problem Check State Action Printer does not turn on Battery fresh seal? Are the batteries in place? Batteries charge level? In place No batteries Discharged No paper Placed backward Blocked Not closed No paper indication Light, abnormal Bellow 0°C Over 40°C Not proper Not proper Excessively More than 2 hours Turned off Higher than 10 m Not correct Not correct Remove it! Install Batteries! Charge the batteries! Place a new paper roll! Install it properly! Fix it! Close it! Press the button! Charge the batteries! Ensure specified conditions! Paper roll position? Selftest does not work Cover position? Error indication? Print out? Environmental conditions? Charging does not start Charging with problems Connection cannot be established Data prints incorrectly MPP101 User Manual Power adaptor position? Power jack position? Unit heats up? Fast charge time? Printer state? Distance to the printer? Software Settings? Software settings? Fix it! Fix it! Stop charging! Possible malfunction. Turn it on! Take the printer closer! Correct the settings! Correct the settings! 17 SOFTWARE Installation Instructions Windows 2000/XP Operating System Step 1. Unzip the installation file install.zip into a folder of your choice. Step 2. Go to the Printers and Faxes folder (Start » Settings » Printers and Faxes) and select Add a printer. The Add Printer Wizard opens (see Figure 14). Step 3. Select Local Printer attached to this computer and press the Next button (Automatically detect and install my Plug and Play printer should not be checked). The following dialog box (see Figure 15) will ask you to select a printer port. Refer to your Bluetooth manager to determine, which COM port is assigned for a printer port. 18 Figure 14. Selecting Local or Network Printer Step 4. Select the respective COM port and press the Next button. The next dialog box (see Figure 16) will ask you to select a printer driver. MPP101 User Manual SOFTWARE Figure 15. Select a Printer Port Figure 16. Install Printer Software Step 5. Press the Have Disk button. Browse to the folder, where the install.zip file was unzipped (See Step 1.), select the mpp100.inf file and press the OK button. Step 6. Select MPP100 in the next dialog box and press the Next button. MPP101 User Manual If you are using Windows XP, you will be warned that the driver is not signed and will be asked to confirm the installation. 19 SOFTWARE Operating Instructions Windows 2000/XP Operating System Before start printing with MPP101 you need to change the port settings in the printer driver properties: Step 1. Go to the Printers and Faxes folder (Start » Settings » Printers and Faxes) right-click on the MPP100 printer and select Properties. The MPP100 Properties window opens (see Figure 17). Step 2. Click on the Ports tab (See Figure 18). Figure 17. MPP100 Properties 20 MPP101 User Manual SOFTWARE Step 3. Disable the bidirectional support (Enable bidirectional support should not be checked). The rest of the MPP100 properties can be set as of the other Windows printer drivers. Figure 18. Ports Properties MPP101 User Manual 21 TECHNICAL SPECIFICATIONS Print Method Thermal dot line printing Number of dots/line 384 Printing Width (mm) 48 mm Dots density (dot/mm) 8 Paper roll size (mm) W: 57 +0/-1; D: 35 Recommended paper KF50-HDA or equivalent Character fonts (dot x dot) 2 Downloadable (12 x 24) / (8 x 24) Print Styles Normal, Double Height, Double Width Number of characters/line 16, 24, 32, 48 Graphics resolution (dpi) 203 Paper end detection Photo-interrupter Communication Interface Bluetooth Bluetooth Profile supported SPP Drivers available Windows 2000/XP Baud Rates (bits/s) 115200 Print Buffer (KBytes) 8 Flash Memory (KBytes) 128 22 MPP101 User Manual TECHNICAL SPECIFICATIONS Graphics logos (bit x dot) 3 x (384 x 240) Printing speed (mm/s) up to 70* Power supply 5 NiMh rechargeable batteries 1.3 A/H Charging the batteries External adaptor, 12 V / 1.25 A, Operating temperature range (°C) 0 / +50 Operating humidity (RH%) 20 – 85 (no condensation) Storage temperature range (°C) -15 / +70 Storage humidity (RH%) 10 – 90 (no condensation) Paper cover opening angle (°) 80 Dimensions (mm) 115 mm x 74 mm x 40 mm Weight (without the paper roll) (gr) 310 * It depends on the communication speed, the printing typology, the battery condition and the temperature. MPP101 User Manual 23