1
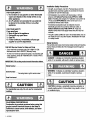
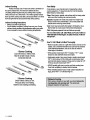
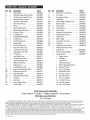
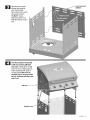
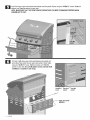
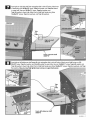
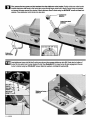
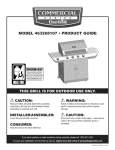
THERMOs
STAINLESS
MODEL
461262006
• PRODUCT
GUIDE
DPCl# 009-07-0225
CgHVERSIOH-REAgY
Easily
converts
from
(LP)
Gquid
propane to (NG) natural gas
purchase
your
ING)
natural gss conversion kit. Go to
www.charbroil.com
/_ CAUTION:
/_ WARNING:
Readandfollowallsafetystatements,
assembly
insb'uctions,
anduseandcaredirections
before
attempting
toassembleandcook.
Failuretofollowall manufacturer'sins_uctions
could
resultinseriouspersonal
injuryand/orproperty
damage.
INSTALLER/ASSEMBLER:
/_ CAUTION:
Leavethismanualwithconsumer.
Somepartsmaycontainsharpedges- especiallyas
notedinthemanual!Wearprotectiveglovesif
necessary.
CONSUMER:
Keepthismanualfor futurereference.
461262006• 80005671.02-15-06
FOR YOUR SAFETY
1. Do not store or use gasoline or other flammable
vapors and liquids in the vicinity of this or any
other appliance.
2. An LP cylinder not connected for use shall not
be stored in the vicinity of this or any other
appliance.
FOR YOUR SAFETY
If you smell gas:
1. Shut off gas to the appliance.
2. Extinguishany open flame.
3. Open lid.
4. If odor con6nues, immediately call your gas
supplier or your fire department.
Installation Safety Precautions
• Usegrill,as purchased,
onlywithLP(propane)
gasandthe
regulator/valve
assemblysupplied.
A conversion
kitmustbe
purchased
for usewithnaturalgas.
• Grillinstallation
mustconformwithlocalcodes,orintheir
absencewithNational FuelGas Code,NFPA541ANSI
Z223.t. Handlingandstorageof LPcylinders
mustconformto
LP GasCodeNFPA/ANS158.Grillisnotfor usein oron
recreational
vehiclesand/orboats.
Allele_ical accessories
(suchasrotisserie)
mustbe
eleckically
grounded
in accordance
withlocalcodes,or
National Elec_icalCode,ANSI/ NFPA70. Keepany
elec_calcordsand/orfuel supplyhosesaway_m anyhot
surfaces.
• Thisgrill is safetycertified
for usein theUnitedStatesonly.Do
not modifyfor usein anyotherlocation.Modificationwill result
in a safetyhazard.
Safety Symbols
Thesymbols
andboxesshownbelowexplainwhateachheading
means,Reedandfollowallofthemessages
foundthroughout
the manual.
Call Grill Service Center for Help and Parts
• Ifyouneedhelporwarrantypartscall1-888-473-1238.
Business
hours:8AM- 6PM EST,Monday-Friday.
• Toordernon-warrantyreplacementpartsoraccessories(gd//
cover,c/eaners,
pain_)call1-800-993-2677
orsenda FAXto
1-706-565-2121.
DANGER:Indicatesan imminentlyhazardoussituation
which,ifnotavoided,willresultindeathorseriousinjury.
IMPORTANT: Fill out the product record information below.
ModelNumber
SerialNumber
See ratinglabel ongrillfor serialnumber.
WARNING:Indicates
an potentially
hazardous
situation
which,ifnotavoided,couldresultindeathorserious
injury.
DatePurchased
CAUTION
For residentialuse only. Do not use for commercial
cooking.
CALIFORNIA PROPOSITION65
Combustion by-products produced when using this
product contain chemicals known to the State of
Californiato cause cancer, birth defects, and other
reproductive harm.
2 • 461262006
CAUTION
CAUTION:Indicates
a potentially
hazardoussituationor
unsafepracticewhich,if notavoided,mayresultinminor
ormoderateinjury.
ForYourSafety......................................
2
GrillServiceCenter...................................
2
ProductRecordInformation
............................
2
Installation
SafetyPrecautions
..........................
2
SafetySymbols......................................
2
LimitedWarranty
.....................................
3
UseandCare.....................................
4-11
PartsList..........................................
12
PartsDiagram
......................................
13
Assembly
.......................................
14-23
Troubleshooting
..................................
24-26
Registration
Card...................................
27
Manufacturer
warrants
totheork:Jinal
consumer-purchaser
onlythat
thisproduct
shallbefreefromdefects
inworkmanship
andmaterials
after
correctassembly
andundernormal
andreasonable
homeusefarthe
pe_ods
indicated
belowbeginning
withthedateofpurchase.
Uponproof
ofpurchase
asprovided
herein,
Manufacturer
willrepair
orreplace
the
partslisted
belowwhich
areproven
defestiva
during
theapplicable
warranty
period.Suchrepairorreplacement
shallbefreeofcharge
toyou
except
forshipping
costs.
Stainless
steelburners
• 3 years
Fireboxandlid- LimitedLifetimeagainstperforation
Electronic
ignition(excluding
battery)-3 years
Remaining
parts(excluding
battery)- I year
Thislimited
warranty
isapplicable
intheUnited
StatesandCanada
only,isonlyavailable
to theoriginal
owneroftheproduct
andisnot
transferable.
Manufacturer
requires
reasonable
proofofyourdateof
purchase.
Therefore,
youshould
retain
yoursalessliporinvoice
and
reglstsr
yournewproduct
immediately.
Defactive
partssubject
tothis
limited
warrantywillnotbereplaced
without
registration
orproof
of
purchase.
Registsr
enliceatwww.grillregis_aiton.cem
orcomplete
and
return
viamailtheProduct
Registration
Cardinduded
withthisproduct
and
retainyoursalesreceipt
farproofofpurchase..
Ifregls_tioninformation
is
notavailable,
theproofofpurchase
willberequired.
Repairorreplacement
ofdefective
partsisyourexclusive
remedy
underthetermsofthislimited
warranty.Manufacturer
willnotbe
responsible
foranyconsequential
orincidental
damages
arising
fromthe
breach
ofeither
thislimited
warrantyoranyapplicable
implied
warranty,
or
forfailureordamage
resulting
fromactsofGOd,improper
careand
maintenance,
grease
tire,accident,
alteration,
replacement
ofpartsby
anyone
otherthanManufacturer,
misuse,
transportation,
commercial
use,
abuse,hostile
environments
(inclement
weather,
actsofnature,
animal
tampering),
improper
installation
orinstallation
notinaccordance
withlocal
codes.Thislimited
warranty
doesnotcoverscratches,
dents,
corrosions
ordiscoloring
byheat,abrasive
andchemical
cleaners
oranytoolsusedin
theassembly
orinstallation
oftheappliance,
surface
rust,orthe
discoloration
ofstainless
steelsurfaces.
Thislimited
warranty
willnot
reimburse
youfarthecostofanyinconvenience,
foodreimbursement,
personal
injury
orproperty
damage.
Ifanoriginal
replacement
partisnot
available,
a comparable
replacement
partwillbesent.Youwillbe
responsible
forallshipping
charges
ofpartsreplacedundertheterms
of
thislimited
warranty.
THISLIMITED
WARRANTY
ISTHESOLEEXPRESS
WARRANTY
GIVENBYTHEMANUFACTURER.
NOPRODUCT
PERFORMANCE
SPECIFICATION
ORDESCRIPTION
WHEREVER
APPEARING
IS
WARRANTED
BYMANUFACTURER
EXCEPT
TOTHEEXTENT
SET
FORTHINTHISLIMITED
WARRANTY.
ANYIMPLIED
WARRANTY
PROTECTION
ARISING
UNDERTHELAWSOFANYSTATE,
INCLUDING
IMPLIED
WARRANTY
OFMERCHANTABILITY
ORFITNESS
FORAPARTICULAR
PURPOSE
ORUSE,ISHEREBY
LIMITED
IN
DURATION
TOTHEDURATION
OFTHISLIMITED
WARRANTY.
Neitherdealers
northeretailestablishment
selling
thisproduct
has
anyauthority
tomakeanyadditional
warranties
ortopromise
remedies
in
addition
toorinconsistent
withthosestated
above.Manufacturer's
maximum
liability,
inanyevent,shallnotexceed
thepurchase
price
ofthe
product
paidbytheoriginal
consumer.Thiswarranty
onlyapplies
tounits
purchased
fromanauthorized
retailer.
NOTE:Somestatesdonotallowanaxdusion
orlimitation
of
incidental
orconsequenital
damages,
sosomeoftheabovelimitations
or
exclusions
maynotapplytoyou.Thislimited
warranty
givesyouspedfic
legalrk:Jhts
assetfarherein.Youmayalsohaveotherrightswhich
vary
fromstatetostate.InthestateofCalifornia
only,ifrefinishing
or
replacement
oftheproduct
isnotcommercially
practicable,
theretailer
selling
thisproduct
ortheManufacturer
willrefund
thepurchase
prisepaid
fortheproduct,
leestheamount
directly
attributable
tousebytheoriginal
consumer-purcheser
prior
todiscovery
ofthenonconfarmity.
Inaddiiton,
in
thestateofCalifornia
only,youmaytaketheproduct
totheretail
establishment
selling
thisproduct
inordertoobtain
performance
under
this
limited
warranty.
Ifyouwishtoobtain
performance
ofanyoblig=ion
underthislimited
warranty,
youshould
writeto:
Consumer
WarrantyService/P.O.Box1240
Columbus,
GA 31902-1240
CHNVERSIOH-REAgY
Easily converts from (LP) liquid
propane to (NG) natural gas
Find out
how
to purchase
natural
gas
_onversion
your
(NG)
kit, Go to
www.charbroiLcom
Do not attempt to repair or alter the
hose/valve/regulatorfor any "assumed" defect, Any
modification to this assembly will void your warranty
and create the risk of a gas leak and fire, Use only
authodzed replacement parts supplied by
manufacturer,
461262006 • 3
• NEVERstorea spareLPcylinderunderor near
the applianceor in an enclosedarea.
• A disconnected
LPcylinderin LPCylinderValve,,_
storageorbeingtransported
[ _
musthavea safetycapinstalod(asshown).
Donot storean LPcylinderinenclosedspaces \",-_,_
suchasa carport,garage,porch,covered
Safety
paUoorotherbuilding.
Neverleavean LPcylinder
insidea vehiclewhichmaybecomeoverheated
Cap
bythesun.
Retainer
Strap
• Donot storean LPcylinderinan areawherechildrenplay.
LP Cylinder
• TheLP cylinderusedwithyour grillmustmeetthe
followingrequirements:
• Neverfill a cylinder beyond80%full.
• An overfilledor improperlystoredcylinderisa
hazarddueto possiblegasreleasefromthe
safetyreliefvalve. Thiscouldcausean intense
firewithriskof propertydamage,seriousinjuryor
death.
• If you see, smell or hear gas escaping,
immediately get away from the LP
cylinder/appliance and call your fire department.
LP Cylinder Removal, Transport and Storage
• TurnOFFall controlknobsand LPcylinder
valveTumcoupling
nutcounterclockwisebyhandonly- donotusetoolsto
disconnectLoosencylinder
screwbeneathbottomshelf,then
liftLPcylinderupandoutofcart.InstalsafelycapontoLP
cylindervalve.Alwaysusecapandstrapsupplied
withvalve.
Failureto usesafetycap asdirectedmay resultin eadous
peraonalinjuryand/orpropertydamage.
4 • 461262006
• UseLP cylinders
onlywiththesereqLdred
measurements:
12"
(30 5cm)(diameter)
x 18"(45.7cm)(tall)with20 Ib (9 kg)
capacitymaximum
• LPcylindersmustbeconstructed
andmarkedinaccordance
withspecifications
for LPcylinders
oftheUS Department
of
Transportation
(DOT) See LPcylindercollarformarking
• LPcylindervalvemusthave:
• Type1outletcompaUble
with
regulator
orgrill
• Safetyraliefvelve
• ULlistedOverfillProtection
OPDHandWheel
Device(OPD) ThisOPDsafely
featureisidentified
bya uniquetnengular
handwheel Use
only LPcylindersequippedwith this type ofvalve.
• LPcylindermustbearrangedforvaporwithdrawal
andinclude
collarto protectLPcylindervalveAlwayskeepLPcylinders
in
uprightposition
duringuse,transitorstorage
LP (Liquefied Petroleum Gas)
• LPgasisnontoxic,
ododess
andcolorless
whenproducedFor
Your Safety,LPgashasbeengivenanodor(similarto rotten
cabbage)sothatitcanbesmelled
• LPgasishighlyflammable
andmayigniteunexpectedly
when
mixedwithair
LP Cylinder Filling
• Useonlylicensed
andexperienced
dealers
• LPdealermustpurgenewcylinderbeforefilling
• DealershouldNEVERfillLPcylindermorethan80%ofLP
cylinder
volumeVolumeofpropaneincylinder
willvaryby
temperature
• Afrostyregulatorindicates
gasoverfillImmediately
closeLP
cylinder
valveandcalllocalLPgasdealerforassistance
• Donotreleaseliquidpropane(LP)gasintothea_osphere
Thisisa hazardous
practice
• ToremovegasfromLPcylinder,
contactan LPdealerorcalla
localfiredepar_entfor assistanceCheckthetelephone
directory
under=GasCompanies"
fornearestcertifiedLP
dealers
LP Cylinder Exchange
ConnectingRegulatorto the LP Cylinder
• Manyretailersthat sellgrillsofferyouthe optionofreplacing
youremptyLPcylinder
throughan exchange
service.Useonly
thosereputable
exchangecompanies
thatinspect,precision
fill,
tastandcertifytheircylinders.Exchangeyour cylinderonly
foran OPDsafetyfeature-equipped
cylinderasdescribed
in the"LP Cylinder"sectionof this manual,
1. LPcylindermustbe propedysecuredontogrill.(Referto
assemblysection.)
• AlwayskeepnewandexchangedLPcylinders
in upright
posiUon
duringuse,transitorstorage.
4. Removethe protectivecapfrom LPcylinder
valve.Alwaysuse
capandstrapsupplied
withvalve.
2. TurnallcontrolknobstotheOFFposition.
,
TumLP cylinder
OFFbyturninghand-wheel
clockwise
toa
full stop.
• Leak test newandexchangedLP cylindersBEFORE
connectingto grill.
LP Cylinder Leak Test
Foryoursafety
• LeaktestmustberepeatedeachtimeLPcylinderisexchanged
orrefilled.
• Donot smokeduringleaktest.
• Donot usean openflameto checkfor gasleaks.
• Grillmustbeleaktestedoutdoors
in a well-ventilated
area,
away_m ignitionsourcessuchas gasfiredor ele_ical
appliances.Duringleaktest, keepgrill awayfromopenflames
orsparks.
• Usea deanpaintbrushanda 50/50mildsoapandwater
solution.
Brushsoapysolution
ontoareasindicatedbyarrows
infigurebelow.
Donot usea POLtransportplug
(plasticpartwith externalthreads)!
Itwill defeatthe safetyfeatureof
thevalve,
• Do notusehouseholdcleaningagents.Damagetogas
traincomponentscanresult.
5. Holdregulator
and insertnippleintoLP
cylindervalve.Hand-_ghtenthe
couplingnut,holdingregulator
ina
straightlinewithLPcylinder
valveso
as notto cross-thread
theconnection.
Nipple hasto becentered
intothe LP cylindervalve.
If"growing"
bubblesappeardonot useormovetheLP
cylinder.Contactan LPgassupplieror yourfire
department!
461262006 • 5
Leak Testing Valves, Hose and Regulator
,
Tum all grill control knobs to OFF.
2. Besureregulatorislightlyconnectedto LPcylinder.
3. CompletelyopenLPcylindervalveby turninghandwheel
counterclockwise.If you heara rushingsound,turngasoff
immediately.Thereis a majorleakat the connection.Correct
beforeproceeding.
Holdcouplingnut and regulator
as shownfor properconnection
to LPcylindervalve.
4. Brushsoapysolution
ontoareascirdedbelow.
6. Turnthecouplingnut clockwise
and lightento a full stop.The
regulatorwill sealonthe back.checkfeaturein the LPcylinder
valve,resulting
in someresistance.
An additionalone-halfto
three-quartereturn is requiredto completethe
connection,Tightenby handonly- donot usetools,
NOTE:
Ifyoucannotcompletethecomection,disconnectregulatorand
repeatsteps5 and 6. If youarestill unableto completethe
connection,do not usethis regulatod
• Donotinsertanytool or foreignobjectintothevalve
outletor safetyreliefvalve.Youmaydamagethevalve
and causea leak.Leakingpropanemayresultin
explosion,fire,severepersonalinjury,or death.
• Neverattemptto attachthisgrilltothe self-contained
LPgassystemof a campertrailerormotorhome.
• Donotuse grilluntilleak-tested.
• If a leakis detectedat anytime, STOPandcallthe fire
department.
,
• If youcannotstop a gas leak,immediatelyclose
LPcylindervalveandcall LPgassupplieror yourfire
department!
,
6 • 461262006
ff "growing" bubblesappear,thereis a leak.CloseLP
cylindervalveimmediately
andretighten
connections.If leaks
cannotbestoppeddo nottry to repair.Callfor replacement
parts.Ordernewpartsbygivingtheserial,modelnumberand
nameandpartnumberofitemsneeded(seepartslist)tothe
GrillServiceCenterat 1-888-473-1238.
AlwayscloseLPcylindervalveafterperforming
leaktestby
turninghandwheelclockwise.
For Safe Use of Your Grill and to Avoid Serious
Injury:
• Do notlet childrenoperateor playneargrill.
• Keepgrillarea clearandfree frommaterials that bum
(i.e. gasoline,propane,or any otherflammableliquid
or gas).
• Do notblockholesin sidesor backof grill.
• Checkburnerflamesregularly.
• Use grillonlyinwell-ventilatedspace.NEVER usein
enclosedspace suchas carport,garage, porch,
coveredpatio,or underan overheadstructureofany
kind.
• Donotuse charcoalorceramicbriquetsin agas grill.
(Unlessbriquetsare suppliedwithyourgrill.)
• Usegrillat least 3 ft. from anywall orsurface.
Maintain10ft. clearanceto objectstha_can catchfire
or sourcesof ignitionsuchas pilotlightsonwater
heaters,liveelectricalappliances,etc..
J
f
• ApartmentDwellers:
Checkwithmanagementto learntherequirements
andfirecodesfor usingan LPgasgrillinyour
apartmentcomplex.If allowed,useoutsideonthe
groundfloorwitha three(3) footclearance
fromwalls
orrails.Donot useonorunderbalconies.
• NEVERattemptto lightburnerwithlid closed.A
buildupof non-ignitedgasinsidea closedgrillis
hazardous
• Never operate grill with LP cylinder out of correct
position specified in assembly instructions.
• Always close LP cylinder valve and remove
coupling nut before moving LP cylinder from
specified operation position.
Safety Tips
• BeforeopeningLPcylinder
valve,checkthecoupling
nutfor
tighthess.
• Whengrill is notin use,tum offallconb'olknobsand LP
cylindervalve.
• Nevermovegrillwhile in operationor stillhot.
• Use long-handledbarbecueutensilsand ovenmittsto avoid
bumsandsplatters.
• Maximumloadfor sideburnerand sideshelfis 10Ibs.
• Thegreasetray mustbe insertedintogrilland empf_edafter
eachuse. Do not removegreasetray untilgrillhas
completelycoded.
• Ifyou noticegreaseor otherhot metedaldripping_omgrill
ontovalve,hoseor regulator,turnoffgassupplyat once.
Determinethe cause,correctit, than cleanand inspectvalve,
hoseand regulatorbeforecontinuing.
Performa leaktest.
• Keepventilationopeningsin cylinderenclosure(grill cart)free
and clearof debris.
• Do not storeobjectsor materials
insidethe grill cart
enclosurethat wouldblocktheflowof combustionairto the
undersideof eitherthe cobol panelor the fireboxbowl.
• Theregulatormay makea hummingor whistlingnoiseduring
operation.Thiswill not affectsafetyor useofgrill.
• Ifyou havea gnll problemseethe "TroubleshcctingSection".
• Ifthe ragulator_ests,turnoff grill and LPcylindervalve
immediately.This indicatesa problemwith the cylinderandit
shouldnot be usedonanyproduct.Returnto supplied
CAUTION
1!I
• Puttingoutgreasefiresby closingthe lid is not
possible.Grillsare wellventilatedforsafety
reasons.
Do not use water on a grease fire. Personal injury
may result. If a grease fire develops, turn knobs
and LP cylinder off.
Do not leave grill unattended while prehesting or
buming off food residue on HI. If grill has not been
regularly cleaned, a grease fire can occur that may
damage the product.
Ignitor Lighting
• Donot leanovergrillwhilelighting.
1. Openlid duringlighting.
2. TurnONgassourceortank.
3. Toignite,turntheIGNITIONBURNERknobto IGNITE_.
4. PushandholdELECTRONICIGNITORbutton.
5. Ifignition
doesNOToccurwithin5 seconds,
tumtheburner
controlsOFF_), wait5 minutes,andrepeatlighting
procedure.
6. Igniteremaining
_mers byturningto HIGH_j), starting
with
the burnersclosestto theIGNITIONBURNERfirst.
If ignition still does not occur, follow match-lighting
instructions.
Lightinginstructionscontinuedon nextpage.
461262006 • 7
Turncontrolsand gassourceor tankOFFwhennot
in use.
CAUTION
If ignition does NOT occur in 5 seconds, turn the
burner controls OFF, wait 5 minutes and repeat the
lighting procedure. If the burner does not ignite with
the valve open, gas will con6nue to flow out of the
burner and could acddently ignite with risk of injury.
Match-Lighting
• Do notleanovergrillwhilelighting.
1. Openlid.Turnongasat LP cylinder,
2. Placelitmatchintomatchholder(hanging
fromcartside
panel),thenintolighting
holeonrightorleftsideofgrill.
3. Pushinand tom farrightorfar leftburnerknobto HIGH_j_.
Besurebumerlightsandstayslit.
4. Lightadjacentburnersin sequencebypushingknobsin and
turningtoHIGH(_j_.
Burner Flame Check
• Removecooking
g_atasandflametamers.Lightbumers,rotate
knobsfrom HIGH_ to LOW_. Youshouldseea smaller
flamein LOWpositionthanseenonHIGH.Performburner
flamecheckon sideburner,also.Alwayscheckflamepriorto
eachuse. If onlylowflameisseen referto "Suddendropor low
flame"in the Troubleshooting
Section.
Turning Grill Off
• Turnallknobsto OFF_) position.TurnLPcylinder
offby
turninghand-wheel
clockwise
to a full stop.
Ignitor Check
• Turngasoff at LP cylinder.Pressandholdelec_onicignitor
button."Click"shouldbeheardandsparkseeneachtime
betweencollectorboxorburnerandelectrode.
See
"Troubleshooting"
if no clickorspark.
Valve Check
• Important:Makesuregas isoff at LP cylinderbefore
checldngvalves. Knobslockin OFF position.
Tocheck
valves,firstpushinknobsandrelease,knobsshouldspring
back.If knobsdonotspringback,replacevalveassembly
beforeusinggdll.Turnknobsto LOWpositionthentom backto
OFF position.
Valvesshouldtom smoothly.
Hose Check
• Beforeeachuse,checkto seeif hosesarecutorworn.
Replacedamagedhosesbeforeusinggdll.Use only
valve/hosekegulator
spedfiedbymanufacturer.
Sidebumer Ignitor Lighting
• Donot leanovergrillwhilelighting.
t. Opensidebumerlid.Turnongasat LPcylinder,
2. Turnsidebumerknobto HIGH_j), pushandhold
ELECTRONICIGNITORbutton.
3. Ifsidebumer
doesNOTlight,tom knobto OFF_, wait5
minutes,
thenrepeatlighting
procedure.
Sidebumer Match Lighting
1. Opensidebumerlid.Turnongasat LPcylinder.
2. Placelitmatchnearbumer.
3. Turnsidebumerknobto HIGH_.
Besurebumerlightsand
stayslit.
General Grill Cleaning
• Do notmistakebrownorblackaccumulation
ofgreaseand
smokefor paint. Intehors
ofgasgdllsarenotpaintedatthe
factory(andshouldneverbe painted).Applya strongsolution
ofdetergent
andwaterorusea grillcleanerwithscrubbrush
oninsidesofgrilllidandbottom.Rinseandallowtocompletely
airdry.Donotapplya caus_cgrilllovencleanerto painted
surfaces.
• Plasticparts:Washwithwarmsoapywaterand wipedry.
• Donot usecitrisol,abrasivedeaners,degreasersora
concentratedgrillcleaneronplasScparts.Damagetoand
failureofpartscanresult.
• Porcelainsurfaces:Becauseofglass-like
composigon,
most
residuecanbewipedawaywithbakingsodahvatarsolu_onor
specially
formulatedcleaner,Usenonabrasive
scoudngpowder
for stubbom
stains.
• Paintedsurfaces:Washwithmilddetergentornonabrasive
cleanerandwarmsoapywater.Wipedrywitha soft
nonabrasive
cloth.
• Stainlesssteelsurfaces:Tomaintainyourgrill'shighquality
appearance,
washwithmilddetergentandwarmsoapywater
andwipedrywitha softclothaftereachuse.Baked-ongrease
deposits
mayrequiretheuseofanabrasiveplasSccleaning
pad.Useonlyindirection
of brushed
finishtoavoiddamage.
Donot useabrasivepadonareaswithgraphics.
8 • 461262006
CAUTION
|
NATURAL
HAZARD
• SPIDERS
FACT:Sometimes
spidersandothersmallinsectsclimb
intothe burnertubesattachedtotheburners.
The
spidersspinwebs,buildnestsandlayeggs.The_
websornestscanbe verysmall,butthey
areverystrongandcan blocktheflow
ofgas.Cleanburnerspriorto useafter
storing,at thebeginningofgrilling
season
oraftera periodofonemonthnotbeingused.
Spiderguardsareontheairintakesin an effortto
reducethisproblem,butitwillnoteliminate
it! An
obstruction
can resultina '_lashback"
(a fire inthe
burnertubes).Thegrillmaystilllight,buttheobstruction
doesnotallowfullgasflowtotheburners.
IF YOUEXPERIENCETHEFOLLOWING:
1. Smellgas.
2. Burner(s)willnot light.
3. Asmall yellowflamefromburner(shouldbe blue).
4. Firecomingfrom aroundorbehindcontrol knob.
STOP!
Immediately turn off gas at LP cylinded.
SOLUTION:
Waitfor grillto cool.
Followthe "CleaningtheBumerAssembljYinstructions.
Cleanburnersoften.Usea 12"pipecleanerto cleanout
theburnertubes.Youmayalsoforcea streamofwater
froma hosenozzlethrough
burnertubestocleanthem.
Storing Your Grill
• Cleancooking
grates.
• Sterein drylocation.
• WhenLPcylinder
isconnectedtogrill,storeoutdoors
ina wellver_latedspaceandoutofreachof children.
• Covergrillifstoredoutdoors.
Choosefroma varietyofgdll
coversofferedbymanufacfurar.
• SteregrillindoorsONLYifLP cylinder
isturnedoffand
disconnected,
removed_om grillandstoredoutdoors.
• Whenremoving
grillfromstorage,follow=C/eaningtheBumer
Assembly'instructions
beforestartinggdll.
Cleaningthe Burner Assembly
Followtheseinstructions
tocleanand/orreplacepartsof burner
assembly
orifyouhavetroubleigniting
grill.
1. Turngasoff at controlknobsand LPcylinder.
2, Removecookinggratesandflametamers,
3, Removescrewsandcarryovertubesfrom rearof burners,
4, Removescrewandwasherstodisengagebumerfrom
bracketonfirebox.
5. Removescrewstodetachelectrode
from burner.Electrode
shouldremaininfirebox.
6. Carefullylifteachburnerupandawayfromvalveopenings.
Wesuggestthreewaysto cleantheburnertubes.Usetheone
easiestfor you.
(A) Benda stiffwire(a lightweightcoat hangerworkswell)
intoa smallhook.Runthehookthrougheachbumer
tubeseveraltimes.
(B) Usea narrowbottlebrushwitha fle)dblehandle(donot
usea brasswirebrush),runthebrushthrougheach
burnertubeseveraltimes.
(C) Weareye protection:Useanairhoseto forceairinto
the burnertubeandouttheburnerports.Checkeach
porttomakesureaircomesouteachhole.
7. Wirebrushentireoutersurfaceofburnerte removefood
residueanddirt.
8. Cleananyblockedportswitha stiffwiresuchasanopen
paperclip.
9. Checkburnerfor damage,dueto normalwearandcorrosion
someholesmaybecomeenlarged.Ifanylargecracksor_
holesarefoundreplacebumer.
VERYIMPORTANT:Burnertubesmustreengagevalve _.
openings.See illustrationsat right.
10. Attachelecb'ode
to burner,
burnC°to.vn'ectalve
_'
11. Carefullyraplacebumers.
engagement____,
12. Attachburnersto bracketsonfirebox.
13. Repositioncarryovertubesand attach
toburners.Replaceflametamersand
_
cooking
grates.
461262006 • 9
Indirect Cooking
Poultryandlargecutsofmeatcookslowlytoperfection
on
thegrillbyindirect
heat.The heatfromselectedburners
circulates
gentlythroughoutthegrill,cookingmeetorpoul_j
withoutthetouchof a directflame.Thismethodgreatlyreduces
flare-ups
whencookingextrafattycutsbecausethereis nodirect
flameto ignitethefats andjuicesthatdripduringcooking.
Indirect Cooking Instructions
• Alwayscookwiththelidclosed.
• DuetoweathercondiUons,cookingUmesmayvary.During
coldandwindyconditionsthetemperature
se_ng mayneed
tobe increased
toinsuresufficient
cookingtemperatures.
Food Safety
Foodsafetyisa very important
partofenjoying
the outdoor
cooking
experience.
To keepfoodsafefrom harmfulbacteria,
followthesefourbasicsteps:
Clean:Washhands,utensils,and surfaces
withhotsoapywater
beforeandafterhandlingrawmeatandpoul_y.
Separate:Separaterawmeatsand poultryfrom ready-to-eat
foodstoavoidcrosscontamination.Usea dean platterand
utensilswhenremovingcookedfoods.
Cook:Cookmeatandpoul_j thoroughlyto kill bacteria.Usea
thermometertoensureproperinternalfoodtemperatures.
Chill:Refrigerate
preparedfoodsand leftovers
prompUy.
For more information call: USDA Meat and Poultry Hotiine at
1-800-535-4555 In Washington, DC (202) 720-3333, 10:00 am4:00 pm EST,
HowTo TellIf MeatIs GrilledThoroughly
1 Burner Cooking
Cookwithdirectorindirect
heat.
Bestfor smallermealsorfoods.
Consumeslessfuel.
• Meatand poulftycookedona grill oftenbrownsveryfastonthe
outside.Usea meatthermometerto besurefood hasreached
a safe internaltemperature,and cut intofood to checkfor
visualsignsof doneneas.
• Wholepoul_yshouldreach180° F; breasts,170° F.Juices
shouldrunclearend fleshshouldnot bepink.
• Hamburgersmadeofanygroundmeator poultryshouldreach
160° F,andbebrowninthe middlewithnopinkjuices.Beef,
vealandlambsteaks,roastsandchopscanbecookedto 145°
F.Allcutsofporkshouldreach160° F.
• NEVERpartiallygrill meatorpoultryandfinishcookinglater.
Cookfoodcompletelyto destroyharmfulbacteria.
• Whenreheathgtakeoutfeedsorfullycookedmeatslikehot
dogs,grill to 165° F,orunUIsteaminghoL
2 Burner Cooking
Greatindirect
cookingonlow.
Produces
slow,evenheating.
Idealfor slowroasting
andbaking.
10 • 461262006
CARE AND CLEANING
OF YOUR STAINLESS
STEEL GRILL
Routine cleaning is necessary to preserve the appearance and corrosion resistance of Stainless Steel. The perception that
many people have is that stainless steel will not rust. That is not the case in certain conditions. Rust marks are regular sttel
particles that have become attached to the surface of stainless steel. They may also occur if you are using a steel wool or
wire wool scouring pad in stead of a nylon scouring pad to clean your grill. In coastal areas, small rust pits may develop on
the surface of your grill that cannot be fully removed by a cleaner. Concentrate bleachesand other solutions containing
chlorine can also cause rust pits and should not be used.
Cooking creates smoke that may eventually coat and discolor the stainless steel surface. Grease fires will darken the
stainless steel surface, but will not affect the integrity of the steel. Periodic cleaning of the cooking surface and inside d the
grill helps decrease the risk of a fire. The methods beloware suggestionsfor cleaning stainless steel surfaces. Choose a
cleaning method appropriate for your needs. It is recommended that you use a Char-Broil® grill cover to help prolong the
life and prevent discoloration of your grill.
Routine Care
After each use, let your grill cool and then wipe the grill witha soft, damp, soapy cloth and rinse with clean water. It is
important to remove any food particles or marinade from the stainless steel surface of your grill. Most marinades are highly
acidic and damage stainless steel. DO NOT USE STEEL OR WIRE WOOL. To clean, polish and protect your stainless steel
grill on a weekly basis use Char-Broil® Stainless Steel Grill Cleaner. For quick, convenient cleaning, use Char-Broil®
Stainless Steel Grill Wipes.
Stubborn Stains and Rust
Stubborn stains, discoloration and possibly rust and rust pitting can occur from cooking, exposure to harsh outdoor
conditions, or extreme cooking temperatures. For stubborn rust stains and grease stains, you can restore your grill with the
Char-Broil Stainless Steel Restoration Kit. It is available at major retailers or you can buy it online at www_rilllovers.com.
For the latest new products and informationfor the care and cleaning of your stainless steel grill go to www.charbroiLcom.
* Always rub or wipe in the direction of the grain or polish lines in the stainless steel surface, not across them.
** Do not let stainless steel cleaners come in contact with painted or plastic surfaces as damage may occur.
ROUTINE CARE
Char-Broil® Stainless Steel
Grill Cleaner
ROUTINE CARE
Char-Broil® Stainless Steel
Grill Wipes
STUBBORN STAINS AND RUST
Char-Broil® Stainless Restoration Kit
461262006 * 11
K_e.y
Part #
Description
Firebox Bowl.................
Description
Part #
•.. 80005584
II
1
JJ
1
inner insert, Lid Assembly ..........
Lid Handle ......................
80005721
80005722
A
1
B
1
Right Side Upper Panel, Firebox•
•.. 80005585
C
1
Left Side Upper Panel, Firebox..
• 1. 80005586
KK
1
Temperature Gauge ...............
80004030
D
1
Right Side Panel, Firebox.......
•.. 80005702
LL
1
Logo Plate ......................
80005723
E
1
Left Side Panel, Firebox ........
•.. 80005701
MM
1
Lid Assembly Hardware Pack........
80004371
F
1
NN
1
G
4
Rear Panel, Firebox ...........
Bumen .........................
... 80005590
80005703
OO
4
Warming Rack ...................
Flame Tamer ....................
80004050
80003332
H
1
Electronic Ignition Kit ......
........
80005704
PP
2
I
1
Electronic Ignition Button...
........
80004341
QQ
2
Locking Caster ...................
Fixed Caster .....................
80000268
80004093
J
3
80005592
RR
1
Sideburner Cooking Grate ..........
80000638
1
CanTover Tube...........
Contol Panel ............
........
K
........
80005705
SS
1
Cooking Grate (set of 2) ............
80005724
L
1
80005740
TT
1
M
5
VaNe/Manifold/Reguhtor. •. ........
ControIKnob ....................
80004216
UU
2
Grease Tray .....................
Match Holder ....................
80003584
80005589
N
5
Control Knob Bezel .......
......
80005596
VV
1
O
I
Bottom Shelf.............
......
80005706
VWV
1
Logo Plate, Dual Fuel..............
Towel Bar .......................
80005594
80005716
P
I
Left Side Panel, Cart ......
......
80005707
XX
1
Sideburner Wind Diverter...........
80005038
Q
I
Right Side Panel, Cart .....
......
80005708
1
Replacement Flame Tamer
R
I
Lower Back Panel, Cart ....
......
80005623
S
1
......
80005624
T
1
Upper Back Panel, Car[ ....
Front Brace......................
U
1
Heat Shield, Tank .................
80005710
I
Caster Wrench
V
I
Left Rail, Grease Tray .............
80005711
W
I
Right Rail, Grease Tray ............
80005712
1
1
AA Battery
Control Knob
X
I
Control Knob Bezel
I
80005626
80005627
1
Y
Sideburner Drip Pan ...............
Sideburner Lid ...................
Z
I
Left Sideburner Shelf ..............
80005628
4
2
#8x3/8" Self-Tapping Screw
#8--32x3/8"Screw
AA
1
4mm Lock Washer
1
80005713
80004311
2
BB
Fascia, Left Sideburner Shelf ........
Sideburner Burner Kit..............
2
#10=24x3/8"Screw
CC
1
Right Side Shelf ..................
80005714
8
1/4-20x1½' Screw
DD
1
5ram Fiat Washer
EE
1
80005715
80005717
2
2
5mm Lock Washer
FF
1
Right Door ......................
80005719
18 1/4-20xl/2" Screw
GG
2
Door Hande w/Caps ..............
80005718
26 7mm Fiat Washer
HH
1
Lid Assembly ....................
80005720
26 7mm Lock Washer
Fascia, Right Side Shelf ............
Left Door. .......................
80005709
Support Pins ...................
1
1
Product Guide (English) ............
Hardware Pack ...................
W80000020
80005671
80005676
Tools required for assembly:
Caster Wrench - Provided • Phillips screwdriver- Not provided
Estimated assembly time:
30-45 minutes
Cetefied Grll Parts AndAccessortes, ChaFBr®land Des gn®,Char-Broil (Gas G_ll Briquettes)®,C har-D amonds®,Cooking Zoneand Desgn®, Diamond Flame®,Execut ve Chef®, Faststert®,Flare
Fighter@,FlavorMastsr@,Gas Grill Siloue_e and Design®. H20 Smoker@,Lava Flame®,MasterFlame®, MasterFlameP_cis®n Cooking Systsm®, PowerSpark_,Quantum®,VIP®, P_cis®nFlame anrJ
Design®,Sterm@,and TruFlarne®are re6iteeredTra_Jernarks
of the W.C. Bradley Company. Thermos®is a _egisteredtradema®of the ThermosCompanyand its affiliates.
ArUsanCollec_®nby ChaFBroil iv C3 and DesignTM, Char-Broil and DesignTM , Flame DesignTM, FlavorTentsTM, Grill 2 Go TM, GrilliffiSttskTM, Keeperof the FlarneTM, Keepersof the Flame TM, Natural Grip TM,
OutdoorCooking Collection and Design_M PatioBistroTM, Pre®®onFlameTM ,Pro-CbeckTM, QuickSet Gdlls and Design_MSmokerTen_s
_, The Big EasyTM , The MinuteGrill TM, The Edge_4 The Tuscan
CollectionTM, and The UIban GrillTM are Trademarksof the W.C. B_dley Compan_ Un®elsal Gr_llParts and Des_gnl_is a _rademarkof the Thermos Companyand its affiliates.
Protectedunder one or moreof the follow®g U.S. Patents: 4,598,692; 4,624,240;4,747,361; 4,747,361; 4,817,583;4,924,846; 4,989,579; 5,063,966; 5,076,256; 6,076,257;6,090,398; 5,109,834; 5,224,676;
5,277,106; 5,421,319;5,441,226; 6,452,707; 5,458,309; 5,566,606;5,566,606; 5,579,755; 5,562,094;5,613,486; 5,640,475; 5,706,707;5,711,663;5,765,543; 6,931,149; 6,996,573; 6,096,132;6,135,104;
6,173,644B1;6,279,566;6,397,731; 6,418,023; 6,439,222;6,523,461; D282,619;D339,714;D341,292;D343,337;D358,059; D361,466;D364,535;D372,637;D373,701;D377,735;D383,035;D307,010;
D405,643;D405,643;D406,005;D4O6,OO£;D413,043;D413,229;D413,229;D414,982; D415,388;D416,164;D416,441;D416,441;D417,587;D422,516;D423,274;D423,676;D428,303;D435,396;D436,004;
D438,059;D438,060;D438,427;D439,110;D442,506;D443,179;D443,354;D447,384;D447,385;D447,909;D448,610;D448,614;D448,615; D448,616;D448,975;D449,462;D451,759;D456,262S;D460,313,
D461,359and D504,O4thCanada:67743; 67744; 92607; 92608 and 1,316,424. Other Patents Pending.Assembly instru_ons © 2005.
12 • 461262006
¢
o,I
OD
E1
Attachthetwolockingcastersat therear
ofthebottomshelfandthetwofixed
castersatthefront.Usetheprovided
casterwrenchtofully tightencasters.
Fixedcaster_
80004093
Lockingusster-----........_
80000268
Bottomshelf_
80005706
.
Rear
Fa
Attachsidepanelstobottomshelfusingthree
1/4-20x1/2"screws,7mmlockwashers,and
7ramfiatwashersperpanel.
IMPORTANT:Panelwithlarge holemust
Be on leftsideof bottomshelf.
7mm II
Leftsidepanel----......._
(with largehole)
80005707
Makesureside panels
are pushedas far to the
rear of bottomshelfas
possiblebeforefully
tighteningscrews.
14 • 461262006
_....----RigMsidepanel
80005708
U
Place lower back panel
between side panels at
rear of bottom shelf.
80005623
Secure lower back panel to
side panels using two
1/4-20x1/2" screws,
7ram lock washers, and
7ram flat washers on each
side.
--
m
This step requires two people
to lift and position grill heed
onto cert. Carefully lowerthe grill
head onto the cart, aligning slots at
bottom of grill head with posts on
cart side panels. Make sure the
regulator hose is hanging outside
the cart, Grill head must face open
side of cart.
Grillhead_.--.-.- --.---_
Regt
461262006 • 15
D
D
Insert front brace under control panel and between cart side panels. Secure using two 1/4=20x11/2"screws, 7ram lock
washers, and 7mm fiat washers on each side.
NOTE: MAKE SURE THAT THE FRONT BRACE IS MOUNTED IN THE MOST DOWNWARD POSITION WHEN
ASSEMBLED TO CART,
On back of grill, place upper back panel between side panels and
above lower back panel. Secure upper back panel, in lower holes,
using one 1/4-20xl V2"screw, 7ram lock washer, and 7ram flat
washer on each side. Do not fully tighten screws until side shelf
installation is complete in later steps,
l/4-20xfV_" 7ramlock
screw
washer
pperback panel
80005624
_6 • 461262006
7ramflat
washer
Insert tabs on right side shelf into rectangular slots in side of firebox. Attach rear
of shelf using one 1/4-20x1/2" screw, 7mm lock washer, and 7ram fiat washer
in upper hole. Use one l/4-20xlW' screw, 7ram lock washer, and
7ram flat washer in lower hole. Attach front of shelf and fascia using three
1/4-20x1/2" screws, 7ram lock washers, and 7ram fiat washers.
Tabs
into
D
Insert tabs on left sideburner shelf assembly into rectangular slots in side of firebox. Attach rear of shelf using one 1/42gx1/2" screw, 7ram lock washer, and 7mm flat washer in upper hole. Use one l/4-20xlW' screw, 7turn lock washer, and
7ram fiat washer in lower hole. Attach front of shelf and fascia using three 1/4-20xl/2" screws, 7mm lock washers, and 7ram
fiat washers. Now you may fully tighten lower screws on upper back panel.
Tabs
into
holes
1/4-20x11/2
'' screw
/
Fascia, left sideburner shelf
80005713
461262006 • 17
First,removethetwoscrewsand lockwashemfromthesidebumervalvebracket.Posilonsideburner
valvebracket
beneathsidebumer
shelffasciasothatvalvestemcomesthroughlargercenterholeinfascia.Secureusinglockwashers
andscrewsthatwereremovedfrombracket.
Attachsidebumer
bezeltofasciausingtwo#8-32x3/8"screwsand4mmlock
washers.Presssideburner
controlknobontovalvestem.
Controlknobbezel
80005596
\
Sidebumer
valvebracket
_"_]
Insertsfidebumer
burner
intoleftshelf,making
sureburner
tubeengages
sideburner
studonbottom
of
burner
itsintocenter
holeinburner
bracketonshelf.
See illustration
Cfor
properbvalve(A).Center
urner-to-valve
engagement.
Secure
burnerto bracketusingtwo#10-24x318"
screws,5mmlockwashers,and5mmfiatwashers(B).
80004311
18 • 461262006
m
Place sidebumer wind diverter over
sidebumer. Align notch in diverter to
fit around electrode. Place burner
cap onto sideburner. Place
sidebumer cooking grate onto
sidebumer shelf, aligning grate legs
with holes on shelf.
Burnercap
Sidebumerwind
dive_er
80005038
Insideof cart, insert ends of left and right grease tray rails into slots between upper and lower back panels near grease tray
opening.Attach opposite ends of rails to bottom edge of front brace using one #8x318" self-tapping screw per rail. To the left
of the rails, repeat this procedure to install the tank heat shield. Attach heat shield to front brace using two #8x3/8" selftapping screws.
461262006 • 19
Inserthingepinonbottom
ofdoorsintoholeinbottomshelf.Press
upperhingepin in _ont brace,alignhingeholeontopof
door,
andreleasehingepininto
door.
Hingepin
on bottom
of door
Left door
80005717
[]E]
ht door
80005719
Installflametamersbyslidingoneendofeachflametamerintoslotsat frontoffireboxandrestingoppositeendonpinsin
backof firebox.
20 • 461262006
Placethe twocooking
gratesontothe
firebo_Insertthethreewireendsat rearofwarmingrackintoholesin backof
firebox.Front
wiresofwarming
rackrestonsidesoffirebox.
Assembled
warm,ngrack
rack
80004050
Cookinggrateset
80005724
LPCYLINDERIS SOLDSEPARATELY.Fillandleakcheckthecylinderbeforeattaching
togrillandregulator
(seeUse&
Caresection).Oncecylinderhasbeenfilledandleakchecked,placecylinderintoholeinbottomshelf.Makesurecylinder
valveisfacing frontof grill.Securecylinder
withcylinder
screwunderbottomshelf.Insertregulator
throughlargeholein
leftsidepanel.See Use & Care section of this manuaJ to perform the "Burner Flame Check" and for
importantsafety instructions before using.
AlwayskeepLP cylindersin uprightpositionduring
use,transport,andstorage.
Cylindervalve must face to front of cart once
tank is attached. Failure to install cylinder
correctly may allow gas hose to be damaged
in operation, resulting in the risk of fire.
_1_20_
.21
_i_
Onbackofgrill,slidegreasetray intoopeningin upperbackpanel.
CAUTION
Failureto installgreasetraywill
causehotgreaseto dripfrombottom
of grillwith riskof fireor property
damag_
_1_
Greasetray
80003584
Unscrewelectronic
Replacebutton. ignif_onbuttononfrontofcontrolpanel.InsertAAbatteryintoignitor,negalJve(--) endfirst.
ElectronicIgnitionButton
80004341
22 • 461262006
Attach towel bar to right side shelf using two 1/4=20x1/2" screws, 7ram lockwashers and 7ram fiat washers.
\
Towelbar
80005716
7rnmFiat washer
7mm Lockwasher
114.20x112"
screw
461262006 • 23
EMERGENC|IES:
if a gas leak cannot be stopped, or a fire occurs due to gas leakage, call the fire department.
Gasleakingfrom
cracked/cut/burned
hose.
, Damagedhose.
• Turnoff gas at LP cylinderor at sourceon naturalgassystems.If
anythingbutburned,replacevalve/hose/regulator.Ifburned,
discontinueuseof productuntila plumberhas investigatedcause
and correctionsare made.
Gasleakingfrom LP
cylinder.
, Mechanicalfailuredue to rustingor
mishandling.
• ReplaceLP cylinder.
Gasleakingfrom LP
cylindervalve.
, Failureof cylindervalvefrom
mishandlingor mechanicalfailure.
• Turnoff LP cyhder valve.ReturnLP cylinderto gassupplier.
Gasleakingbetween
LP cylinderand
regulatorconnection.
, Improperinstallation,connectionnot
tight,failureof rubberseal.
• Turnoff LP cylindervalve.Removeregulatorfrom cylinderand
visuallyinspectrubbersealfor damage.See LP CylinderLeakTest
and ConnectingRegulatorto the LP Cylinder.
Firecomingthrough
control panel.
. Fire in burnertubesectionof burnerdue
to blockage.
• Turnoff controlknobsand LP cylindervalve.Leavelid opento
allowflamesto die down.After fire is out and grill is cold,remove
burnerand inspectfor spidernestsor rust. See NaturalHazard
and Cleaningthe BurnerAssemblypages.
Greasefire or
continuousexcessive
flamesabovecooking
surface.
, Toomuch greasebuildupin burnerarea.
• Turnoff controlknobsand LP cylindervalve.Leavelid opento
allowflamesto die down.After cooling,cleanfood particlesand
excessgreasefrom insidefirebox area,greasetray,and other
surfaces.
Troubleshoo_ng
•
Burner(s)will not light
usingignitor.
See ElectronicIgnition
Troubeshootinga so
_
_
JJJ
GAS ISSUES:
, Tryingto lightwrongburner.
• See instructionson controlpaneland in Useand Caresection.
, Burnernot engagedwith controlvalve.
• Makesurevalvesare positionedinsideof burnertubes.
, Obstructionin burner.
• Ensureburnertubesare notobstructedwith spiderwebsor other
matter.Seecleaningsectionof Useand Care.
,No gasflow.
• Makesure LPcylinderis not emp_. If LP cylinderis not empty,
referto "Suddendrop in gasflow.
, Vaporlock at couplingnut to LP cylinder.
• Turnoff knobsand disconnectcouplingnutfrom LP cylinder.
Reconnectand retry.
,Coupling nutand LPcylindervalve not
fully connected.
• Turnthe couplingnut approximatelyone-halfto three-quarters
additionalturn untilsoh'dstop.Tightenby handonly- do not use
tools.
ELECTRICALiSSUES:
, Electrode
crackedor broken;"sparksat
crack."
• Replaceelectrode(s).
Condnuedonnext
page.
24 • 461262006
.
, Electrodetip not in properposition.
MainBurners:
• Tipof electrodeshouldbe pointingtowardgasport openingon
burner.Thedistanceshouldbe 1/8"to 1/4".Adjust if necessary.
Sideburner:
• Tipof electrodeshouldbe pointingtoward_asport openingon
burner,the distanceshouldbe 1/8 to 3/16. Adjust if necessary.
, Wireand/orelectrodecoveredwith
cookingresidue.
• Cleanwireand/orelectrodewith rubbingalcoholand cleanswab.
, Wires are looseor disconnected.
• Reconnectwires or replaceelectrode/wireassembly.
, Wires are shorting(sparking between
ignitorand electrode.
• Replaceignitorwire/electrodeassembly.
, Deadbattery.
• Replacewith a newM-size alkalinebattery.
Troubleshooting (continued)
m _(_),I[:l)
Burner(s)will not light
usingignitor.
(See ElectronicIgnition
Troubleshootingalso)
Burner(s)will not
matchlight.
ELECTRONICiGNITION:
. Nospark,no ignitionnoise.
• See SectionI of ElectronicIgnitionSystem.
. Nospark,someignitionnoise.
• See Sectionfl d ElectronicIgnitionSystem.
. Sparks,butnot at electrodeor at full
strength.
• See SectionIIIof ElectronicIgnitionSystem.
PIEZOPUSH-BUTTON
AND ROTARY:
. Push-buttonsticksat bottom.
• Replaceignitor.
. Rotaryknobrotateswithoutclicking.
• Replaceknob.
, Sparkingbetweenignitorand electrode.
• Inspectwireinsulationand properconnection.Replacewires if
insulationis broken.
, See "GAS iSSUES:" on previouspage.
, Matchwill notreach.
• Use long-stem
match(fireplacematch).
, Impropermethodd match-lighting.
• See "Match-Lighting"sectiond Useand Care.
, Out d gas.
• Checkfor gas in LP cylinder.
, Excessflow valvetripped.
• Turnoff knobs,wait 30 secondsand lightgrill,if flamesare still low,
turn off knobsand LP cylindervalve.Disconnectregulator.
Reconnectregulatorand leak-test.Turnon LP cylindervalve,wait
30 secondsand thenlight grill.
, Vaporlock at couplingnutlLPcylinder
connection.
• Turnoff knobsand LPcylindervalve.Disconnectcouplingnut from
cylinder.Reconnectand retry.
, Highor gustingwinds.
• Turnfrontof grill to face windor increaseflame height.
, Lowon LP gas.
• Refill LP cylinder.
, Excessflow valvetripped.
• Referto "Suddendrop in gasflow"above.
, Greasebuildup.
• Cleanburnersand insideof grifl/firebox.
, Excessivefat in meat.
• Trimfat from meatbeforegrilling.
, Excessivecookingtemperature.
• Adjust(lower)temperatureaccordingly.
Persistentgreasefire.
, Greasetrappedbyfood builduparound
burnersystem.
• Turnknobsto OFR Turngas off at LP cylinder.Leavelid in position
and let tire burnout. Aftergrill cools,removeand cleanaftparts.
Flashback...
(firein burnertube(s)),
, Burnerand/orburnertubes are blocked.
• Turnknobsto OFR Cleanburnerand/orburnertubes.See burner
cleaningsectionof Useand Care.
Unableto fill LP
cylinder,
, Somedealershaveolder fill nozzles
with wornthreads,
• Theworn nozzlesdon'thaveenough"bite"to engagethe valve.Try
a secondLP dealer.
Oneburnerdoesnot
lightfromother
burner(s).
, Greasebuildupor foodparticlesin
end(s)of carryovertube(s).
• Cleancarry-overtube(s)with wirebrush.
Suddendrop in gas
flow or lowflame.
Flamesblowout.
Flare-up.
461262006 • 25
Troubleshootng - Electronic ignition
SECTIONI
Nosparksappearat
any electrodeswhen
ignitionbuttonis
pushed;no noisecan
be heardfrom spark
module.
SECTIONfl
Nosparksappearat
any electrodeswhen
ignitionswitchis
pushed;noisecanbe
heardfrom spark
module.
SECTmON
fll
Sparksare present
butnot at all
electrodesand/ornot
at full strength
26 • 461262006
Batterynot installed
properly.
, Checkbatteryorientation.
* Installbattery(makesurethat "+" and "-"
connectorsare orientedcorrectly,with "+" end up
and "-" end down.)
Deadbattery.
, Has batterybeen used
previously?
* Replacebatterywith newAA-sizealkalinebattery.
Buttonassemblynot
installedproperly.
, Checkto insurethreadsare
properlyengaged.Button
shouldtravel up and down
withoutbinding.
• Unscrewbuttoncap assemblyand reinstall,making
surethreadsare alignedand engagedfully.
Faultyspark module.
, If no sparksare generated
with newbatteryandgood
wireconnections,moduleis
faulty.
• Replacesparkmoduleassembly.
Outputlead
connectionsnot
connected.
o Are outputconnectionson
and tight?
• Removeand reconnectaftoutput connectionsat
moduleand electrodes.
Outputlead
connectionsnot
connected.
, Are outputconnectionson
and tight?
* Removeand reconnectall output connectionsat
moduleand electrodes.
Arcingto grill away
from burner(s).
, If possiNe,observegriflin
darklocation.Operate
ignitionsystemand lookfor
arcingbetweenoutputwires
and gdflframe.
* If sparksare observedotherthanfrom burner(s),
wireinsulationmaybe damaged.Replacewires.
Weakbattery.
, All sparkspresentbutweak
or at slow rate.
* Replacebatterywitha newAA-sizealkalinebattery.
Electrodesare wet.
, Has moistureaccumulated
on electrodeand/orin burner
ports?
• Usepapertowelto removemoisture.
Electrodescrackedor
broken"sparksat
crack".
, Inspectelectrodesfor
cracks.
* Replacecrackedor brokenelectrodes.
Pleaseregisteryour productonlineat:
(If you registeronline,youdo notneedto send inthis registrationcard.)
PLEASEFILLOUT THISCARD AND RETURNIT WITHIN10 DAYSOF PURCHASE.FAILURETORETURNMAYAFFECTYOUR WARRANTYCOVERAGE.FOR WARRANTY
SERVICE PROOFOF PURCHASEWILL BE REQUIRED.PLEASEKEEP YOUR SALESRECEIPT. THISWARRANTYIS NON-TRANSFERABLE.
LLENEESTATARJETAY DEVUELVALADENTRODE LOS t0 DIASDE LACOMPRA.SI NO LADEVUELVE,PUEDEVERSEAFECTADASU COBERTURADE GARANTIA.
PARA EL SERVICIODE GARANTIAES NECESARIOQUE PRESENTESU COMPROBANTEDE COMPRA.CONSERVELAFACTURA.ESTA GAHANTIAES INTRANSFERIBLE.
VEUILLEZCOMPLETERCETTECARTEET LARETOURNERDANS LES10 JOURS SUP/ANTL'ACHAT.LACOUVERTUREDE VOTREGARANTIEPOURRAITEN ETRE
AFFECTEESI VOUSNE LE FAITESPAS.POUR OBTENIRLE SERVICESOUS GARANTIE,UNEPREUVED'ACHATDOlT ETREPRESENTEE.VEUILLEZCONSERVER
VOTRE FACTURE.LAPRESENTEOARANTIEWEST PASTRANSFERABLE.
FirstName/Nombre/Pr6nom
Inif_al/Iniciai/InitialeLestNameJAbellide/Nom
de famille
11111111111111111
II
III
IIII
II
IIII
I I I I I I I I I I /I
2
II
IIII
Stete/Estedo/Province
II
IIII
II
IIII
II
II
I
IIIIII
I I I I I I I I I I I I
CityiCiudedNille
II
IIII
Apt Number/N
° deapartJNed'appt.
Address(number
andslreet)/Direcci6n
(nbmero
y calle)/Adresse
(num6ro
et rue)
I I II
II
II
I I
ZipCode/C6digozip/Codepostal
I
II
I III
E.mailAddresslDirecci6nde €orteoelectr_nicolAdruseIgectmnique
_y_uvc_unta_y
pmv_de
usv_U1y_ur
emaq
ad_ y_u_iveusperm_i_n
_ uee_r _ a_m_ _ _ _ _ _t _y in_ _
Sinosinf_ma
voluntar_ente
sud_
deconeo
_,
nosdepetmiso
parausade
afindeen_ o_s q_ p_
_.
Sivous
choieisee
zdenous
f_urrdr
votre
adre_ee
_lec_ue, you8ncu_denne
z /apermiss_n
deruglberpour
vousfairepartd'_ sp_ialee
su_ce_
devou_
int_mese_
I
I
(Example:
[email protected])
(Ejempto:
sunombre@su
host.corn)
(Exemple:votrenora@votreh_tecorn)
3 PhoneNumber/N_,mem
telef6nico/Num6m
det616phone
6 DateofPurchase/Fechade €ompra/])atede I'achat
4
7 _"
II
II
IIII
II
III
IMPORTANTIlilM
PORTANTEI/IM
PORTAN'I1
WriteSerialNumberandModelNumber
inspacesbelow
Escribaenlosespacicedeabajoeln_Jmero
desedey eln_Jmero
demodelo.
Ins_vezis num_Yo
des_rieet is num_Yo
demod#/e
densles
espacesci-dessous.
I IIIIIIIII
II
Name/Idombmde Istiende/Nomdu magssin
III
9 Whichproductareyourregistering?
1. [] Male/Masculk_o/Masculk_
i,Qu6p_oducto
esbtregistrando?
Quelproduitenregistrez-vous?
1.[] GasGrill/Parrilla
a gas/Grilaugaz
2.[] Electric
Gril/Parrilla
el_tdca/Gdldlectdque
3.[] Smoker/Ahumador/Fumoir
4.[] Charcoal
Grill/Pardlla
a carbbn/Barbecue
aucharbon
5.[] Charcoal
Smoker/Ahumador
a carbbn/Fumoir
aucharbon
6.[] Outdoor
FireplacedChimenea
paraextedores/Foyer
ext_rieur
7.[] CookedFryer
/ Cocina/freidora
/ CuiseudFriteuse
8.[] OthedOtro/Autre
II
II
IIIIII
I I I
8 PurchasePrice/Pmcio
de €ompra/Pdxd'achat
$_L_
5 YourGenderlSex_/Sexe
:
I
.00
2. [] Female/Femenino/F_minin
Mail to: / Envielo a:
Consumer Warranty Service
P. O. Box 1240
Columbus, GA 31902-1240
Thankyoufar completing
this questionnaire.
Youranswers
willhelpusandothercompaniesreachyouwithoffersthatmayinterest
you.Ifyouprefernotto
receivetheseoffers,pleasecheckhere[].
Graciasporcompletarestecuestionario.
Susrespuestas
neaeyudar_n,
a nosotres
y aotrascompa_ias,a Ilegara ustedconofertasquepuedanresultarle
deinterns.
Si prefiere
norecibir
estasofertas,
porfavormarqueaquiN.
Mercid'avoirbienvouluremplircequestionnaire.
Vear6ponsesnousaideront
et aideront
d'au_escompagnies
_ vouscommuniquer
desoffressp_ciales
susceptibles
devousint6resser.
Sivouspr_f_reznepasrecevoird'informations
concernant
cesoffressp_ciales,
veuillez
cocherici[].
461262006 . 27
STOP
Should
you encounter
a problem with our product
CALL US FIRST
Do not return this product to the store.
WE CAN HELP
GRILL SERVICE CENTER
1-888=473=1238
HOURS 8AM-6PM EST Mon-Fri
Please ensure your warranty
Grillin_
registration
is complete.
Checklist
[]
Read and understand owners manual.
[]
Never overfill LP cylinder. Oveffilled cylinders may cause freeze-up of
regulator.
[]
Check tubes for spider webs. Ensure valves are correctly installed in
burner tubes.
[]
Always ensure control knobs are in OFF position and regulator is
attached to tank BEFORE opening tank valve to avoid low flames.
[]
Perform leak test regularly.
Thank You for Your Purchase!
THERMOS
STAINLESS
Char-Broil,LLC • Columbus,GA 31902. Printedin China