1
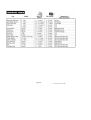
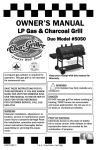
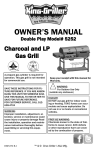
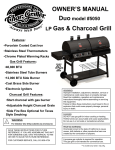
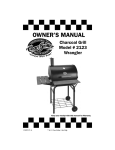
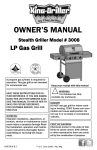
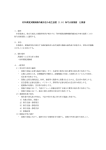
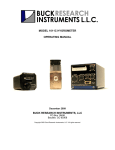
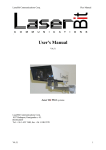
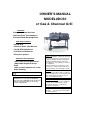
OWNER’S MANUAL
MODEL#DC50
LP Gas
& Charcoal Grill
Features:
•Porcelain Coated Cast Iron
•Stainless Steel Thermometers
•Chrome Plated Warming Racks
Gas Grill Features:
•40,800 BTU
•Stainless Steel Tube Burners
•12,000 BTU Side Burner
•Cast Brass Side Burner
•Electronic Igniters
Charcoal Grill Features:
•Start charcoal with gas burner
•Adjustable Height Charcoal
Grate
•Side Fire Box Optional for Texas
Style Smoking
!
LOW
SAVE THESE INSTRUCTIONS FOR FUTURE
REFERENCE. IF YOU ARE ASSEMBLING
THIS UNIT FOR SOMEONE ELSE, GIVE THIS
MANUAL TO HIM OR HER TO SAVE FOR
FUTURE REFERENCE.
WARNING:
Improper installation, adjustment, alteration,
service or maintenance could cause injury
or property damage Read the installation,
operation and maintenance instructions
thoroughly before assembling or servicing
this equipment.
Failure to follow these instructions could
result in fire or explosion that could cause
property damage, personal injury or death.
DANGER:
DO NOT use gas grill for indoor cooking or
heating. TOXIC fumes can accumulate and
cause asphyxiation. Do not use in or on
boats or recreational vehicles.
PROP 65 WARNING:
Chemicals known to the state of California
to cause cancer, birth defects or other
reproductive harm are created by the
combustion of propane.
A propane gas cylinder is required for
operation.
This gas grill is not intended
for commercial use.
!
DANGER
If you smell gas:
Shut off gas to the appliance.
Extinguish any open flame.
Open Lid.
If odor continues, keep away from the appliance
and immediately call your gas supplier or your fire
department.
!
WARNING
•
Do not store or use gasoline or other flammable
liquids or vapors in the vicinity of this or any
other appliance.
•
An LP cylinder not connected for use shall not
be stored in the vicinity of this or any other
appliance.
page 2
Table of Contents
Important Safety Information.………………………..page 4 - 5
Illustrated Parts List……………………………..…..page 6 – 8
Tools Required, Assembly Tips and Hardware List..…..page 9
Assembly Instructions……………………………....page 10 – 18
Operating Grill
Connecting Gas Cylinder……………………….page 19
Checking for Leaks……………………………...page 19
Lighting Grill…...…………………………………page 20
Cleaning and Care………………………………page 21
Gas Grill Troubleshooting……………………………page 22 - 23
Grill Preparation………………………………………page 24
Recipes……………………………………………..….page 25 - 27
Accessories…………………………………………….page 28 - 29
page 3
Model # DC50Owner’s Manual
WARNING
FOR YOUR SAFETY
•
DO NOT store or use gasoline or any other flammable vapors and liquids within 25 feet
(8m) of this or any other appliance.
•
When cooking with oil/grease, do not allow the oil/grease to exceed 350°F (177°C). Do not
store of use extra cooking oil in the vicinity of this or any other appliance.
•
An LP Cylinder not connected for use should be stored a minimum of 10 feet (3m) away
from this or any other appliance. Never fill the cylinder beyond 80 percent full. If the above
information not followed exactly, a fire causing death or serious injury may occur.
•
If you smell gas:
- Shut Off gas to the grill.
- Extinguish any open flame.
- Open Lid.
- If odor continues, immediately call your gas
supplier or fire department.
For Your Safety
Stop! Call us first! Do Not return product to store. This grill has been made to high quality
standards. If you have any questions not addressed in this manual or if you need parts
please call our customer service department at 0031 (0) 114 671493 or mail to
[email protected] .Monday-Friday 8am-5pm .
NOTE: The use and installation of this product must conform to local codes. In absence of local
codes, use the National Fuel Gas Code, ANSI Z223.1/NFPA 54, Natural Gas and Propane
Installation Code CSA B149.1, or Propane Storage and Handling Code, B149.2, or the
Standard for Recreational Vehicles, ANSI A119.2/NFPA 1192, and CSA Z240 RV Series,
Recreational Vehicle Code, as applicable.
Minimum distance from sides and back of unit to walls or railings is 36 inches (914mm).
Do not use under overhead construction. This appliance not intended for commercial use.
Do not locate this outdoor cooking appliance under overhead unprotected combustible
surface.
For Outdoor Use Only, If Store Indoors, Detach and Leave Cylinder Outdoors.
IMPORTANT NOTICE: read all instructions prior to assembly and use.
Read and understand all warnings and precautions prior to operating your grill.
CAUTION
•
•
This grill is for use with propane gas only (propane gas cylinder not included).
•
•
Never use charcoal or lighter fluid with the gas grill.
•
•
Do not attempt to move the grill while it is lit.
Never attempt to attach this grill to the self-contained propane system of a camper trailer,
motor home or house.
Do not use gasoline, kerosene or alcohol for lighting. The LP-gas supply cylinder must be
constructed and marked in accordance with the specifications for propane gas cylinders of
the U.S. Department of Transportation (DOT) CFR 49 or the National Standard of Canada,
CAN/CSA B339, Cylinders, Spheres and Tubes for Transportation of Dangerous Goods; and
Commission, as applicable. This grill is not intended to be used in or installed on recreation
vehicles and/or boats..
Do not use the grill unless it is completely assembled and all parts are securely fastened and
tightened.
page 4
7.
Do not use in an explosive atmosphere. Keep grill area clear and free from combustible
materials, gasoline and other flammable vapors and liquids.
8. Do not touch metal parts of grill until it has completely cooled (about 45 minutes) to avoid burns,
unless you are wearing protective gear (BBQ mittens, pot holders, etc.)
9. Do not alter this grill in any manner.
10. Clean and inspect the hose before each use. If there is evidence of abrasion, wear, cuts, or
leaks, the hose must be replaced prior to operating the appliance. The replacement hose
assembly will be that which is specified by the manufacturer.
•
•
Move gas hoses as far away as possible from hot surfaces and dripping hot grease.
•
Keep the grill’s valve compartment, burners and circulating air passages clean. Inspect the
grill before each use.
Never keep a filled container in a hot car or car trunk. Heat will cause the gas pressure to
increase, which may open the relief valve and allow gas to escape.
WARNING
•
This grill is for outside use only, and should not be used in a building, garage or any other
enclosed area.
•
The use of alcohol, prescription or non-prescription drugs may impair the operator’s ability to
properly assemble or safely operate the grill.
•
Always open grill lid slowly and carefully as heat and steam trapped within the grill can burn
you severely.
•
Always place your grill on a hard, level surface far away from combustibles. An asphalt or
blacktop surface may not be acceptable for this purpose.
•
•
•
Do not leave a lit grill unattended. Keep children and pets away from the grill at all times.
Do not place this grill on any type of tabletop surface.
Do not use the grill in high winds.
DANGER
Liquid propane (LP) gas is flammable and hazardous if handled improperly. Know its characteristics
before using any propane product.
•
Propane Characteristics: Flammable, explosive under pressure, heavier than air and settles in
pools and low areas.
•
•
•
•
•
In its natural state, propane has no odor. For your safety, an odorant has been added.
Contact with propane can cause freeze burns to skin.
This grill is shipped from the factory for propane gas use only.
Never use a propane cylinder with a damaged body, valve, collar or footing.
Dented or rusted propane cylinders may be hazardous and should be checked by your
propane gas supplier.
page 5
ILLUSTRATED PARTS LIST:
1. GAS GRILL HOOD…....1PC
2. GAS GRILL BODY……...1PC
3. GAS CHIMNEY……..2PCS
4. THERMOMETER……2 PCS
5. HOOD HANDLE……..2 SETS
6.WARMING.RACK…..2PCS
7. BURNER (with shorter wire)..2PCS
8. BURNER (with longer wire)…1PC
9. FLAME SHIELD…..3PCS
10. CHARCOAL HOOD…1PC
11. CHARCOAL BODY….1PC
12.CHARCOAL CHIMNEY...1PC
page 6
13.FIRE GRATE HANGER..2PCS
14. FIRE GRATE/ASH PAN.....1PC
15. SIDE DAMPER…....1PC
16.SIDE HANDLE………...1PC
17.CONDIMENT BASKET….1PC
18. POT STAND.…………1PC
19. SIDE BURNER / CONTROL
PANEL / HOSE & VALVE….1SET
20. ‘S’ HOOK……..…….3PCS
21. GREASE TRAY……2PCS
22. CATCH PAN……..…..1PC
23. LEG CROSS BAR….2PCS
24. LEFT LEG..…….…..2PCS
page 7
25. RIGHT LEG……..…2PCS
26. LEG BRACE….…….2PCS
27. BOTTOM SHELF……1PC
28. BASE…………………1PC
29. WHEEL……………..2PCS
30. AXEL………………….1PC
31. AXEL CAP………....2PCS
32. COOKING GRATE...6PCS
33. GRATE HOOK….....1PC
Go to next page for
the Hardware List
and Assembly
Tips.
page 8
Assembly: Requires 2 people. Get another person to help.
Tools Needed: Pliers, Phillips Head Screwdriver and a 7/16” Nut Driver.
NOTE: Do Not tighten any bolts unless instructed to do so. Tightening too soon may prohibit
parts from fitting together. All Hex Nuts should be on the inside of the grill unless stated
otherwise. Unpack all contents in a well cleared and padded area.
Estimated Assembly Time: 45 minutes
STOP! Do Not Return to Store. If you are missing parts or need assistance please email us at
[email protected] or call 0031 (0)114 671493. Do not attempt assembly if you are missing
parts.
HARDWARE:
¼-20x 1 ½” BOLT……8 PCS
¼-20x1/2” BOLT….... 43 PCS
SCREW……………….3 PCS
¼” FLAT WASHER…10 PCS
¼-20 HEX NUT……..19 PCS
¼” LOCK WASHER…35 PCS
HINGE PINS………..2 PCS
HAIR COTTER PIN….3 PCS
CENTER HINGE PIN…1 PC
page 9
Assembly Instructions
Step 1
Attach the LEFT LEGS & RIGHT LEGS to the BASE using four (4) ½” BOLTS and four (4) ¼”
LOCK WASHERS as shown. When you install the LEFT LEG & RIGHT LEG, please make sure
that the holes at the top of the LEGS are facing out.
Lock
Washer
covers
decorative
part of
AXLE
Step 2
Attach the LEG CROSSBAR to the frame as shown making sure that the holes on the
CROSSBAR are facing inward. See below.
Step 3
Attach BOTTOM SHELF to the LEGS (as shown below).
page 10
x
Step 4
Install the LEG BRACES to the LEGS using eight (8) LOCK WASHERS and eight (8) ½” BOLTS as
shown. Remember to NOT tighten the bolts until completing step 6.
1
2
3
4
Step 5
Push one AXLE CAP onto the AXLE then slide the AXLE through WHEELS and legs as shown.
Then turn cart/leg assembly on back side and push second AXLE CAP onto AXLE.
AXLE
Do NOT push AXLE CAP
more after the CAP fully
Make sure WHEEL
hub/protrusion is touching leg.
AXLE CAP
Step 6
Attach the GAS GRILL BODY and CHARCOAL GRILL BODY to the LEG CROSSBAR using eight (8)
LOCK WASHERS, eight (8) ½” BOLTS and eight (8) FLAT WASHERS in order shown. Make sure to
insert the bolt first through the lock washer then the flat washer then through the grill body as shown.
3
4
3
4
1
2
1
2
Turn grill assembly up on end as
shown and tighten ALL nuts and bolts.
page 11
Step 7
Attach the CATCH PAN to the underside of the GRILL BODIES using two (2) ½” BOLTS as
shown. Insert the BOLTS down through the GRILL BODY and then screw into the CATCH
PAN. Make sure that the side of the catch pan marked “Wheel Side” is on the side of the
grill with the wheels. From the rear of the grill, slide the GREASE TRAY into the guides/rails
under the CATCH PAN.
CORRECT
X
WRONG
Step 8
Install the SIDE BURNER and the CONTROL PANEL to the firebox. Attach with eight (8) ½”
BOLTS and eight (8) LOCK WASHERS. From inside the GAS GRILL BODY the BOLTS will
first go through the Lock Washers then GRILL BODY and then screw into the SIDE BURNER
or CONTROL PANEL. See Figures below.
X
WRONG
HOSE
LOCATION
Note: the hose should be
on the outside of the leg
brace.
page 12
Step 9
Install the BURNERS into the GAS GRILL BODY by first inserting the open end of the BURNERS
through the holes directly behind the CONTROL PANEL and then onto the VALVE tip. Make sure
the valve tip is completely inside the hole on the end of the BURNER. Install the BURNER with
the long wire on the right side of the GAS GRILL BODY. Secure the other end of the
BURNER to the GAS GRILL BODY with the SCREW provided. Again, make sure the VALVE tip
is completely inside the hole on the end of the BURNER. Now, completely tighten the CONTROL
PANEL making sure the Valve tip stays inside the burner tube.
Valve
Burner
Step 10
Insert the IGNITER WIRES, which are attached to the underside of each BURNER, through
the same hole in the GRILL BODY that the BURNER goes through and then attach the WIRE
to the backside of the ELECTRONIC IGNITER, which is attached to the back side of the
CONTROL PANEL. Any wire can go into any of the three sockets on the Electronic Igniter.
Burner
Igniter Wire
Electronic Igniter
Step 11
Install the CONDIMENT BASKET to the CHARCOAL GRILL BODY using four (4) LOCK
WASHERS and four (4) ½” BOLTS. From inside the GRILL BODY the BOLTS go through a
LOCK WASHER and then through the GRILL BODY and then screw into the CONDIMENT
BASKET.
Condiment
Basket
page 13
Step 12
Install the SIDE DAMPER to the CHARCOAL GRILL BODY using one (1) ½” BOLT. The
BOLT should first go through a FLAT WASHER then the DAMPER then the GRILL BODY
then another FLAT WAHSER then a LOCK WASHER and then secured with a HEX NUT.
See below.
Nut
Lock Washer
Flat Washer
Bolt
Step 13
Attach the SIDE HANDLE to the right side of the CHARCOAL GRILL BODY using two (2)
½” BOLTS and two (2) LOCK WASHERS as shown. From inside the GRILL BODY insert
each BOLT through a LOCK WASHER and then through the GRILL BODY and then screw
into the SIDE HANDLE. See below.
Lock Washer
Step 14
Attach the HOOD HANDLES to the GRILL HOODS with four (4) LOCK WASHERS and four
(4) WING NUTS as shown below.
Lock Washer
page 14
Step 15
Install the GAS CHIMNEY to the GAS GRILL HOOD and the CHARCOAL CHIMNEY to
the CHARCOAL GRILL HOOD. Insert the CHIMNEYS through each hole from inside the
HOOD and secure with two (2) HEX NUTS and two (2) ½” BOLTS for each CHIMNEY,
see below.
Step 16
Insert the THERMOMETERS into the GRILL HOODS and secure with two (2) WING NUTS as
shown.
Step 17
Attach HOODS to the GRILL BODIES using HINGE PINS as shown. Have your helper stand behind
the grill to hold the HOODS in place and keep them from falling. First place the GAS HOOD onto the
GRILL BODY in the closed position then screw the left HINGE PIN into place. Then place the
Charcoal HOOD in place and screw in the right HINGE PIN. Carefully and slightly open the Charcoal
HOOD and insert the center HINGE PIN from inside the charcoal grill through the HOOD then through
the Gas HOOD and Body as shown. Then insert COTTER PINS through the holes in the three HINGE
PINS.
Hinge Pin
page 15
Step 18
Before attaching WARMING RACKS you must attach the warming rack pivot BOLTS to the
GRILL HOOD and BODY. Insert the 1½” BOLTS through the holes in the sides of the HOODS
from the outside and tighten the HEX NUTS on the inside of the HOODS. Insert the 1½”
BOLTS through the holes in the sides of the GRILL BODIES from the outside and tighten the
HEX NUTS on the inside of the GRILL BODIES. Now, you can attach the warming racks to
these bolts as shown below and secure with HEX NUTS only finger tight.
Step 19
Set the POT STAND in place over the SIDE BURNER. Next install the three (3) FLAME
SHIELDS over the BURNER TUBES then hang the FIRE GRATE/ ASH PAN from the FIRE
GRATE HANGERS on the catch tabs that are welded to the inside of the CHARCOAL GRILL
BODY sides.
Fire Grate Hangers
Fire Grate/Ash Pan
Pot Stand
Flame Shields
Step 20
Install the COOKING GRATES.
page 16
Step 21
Slide the GREASE TRAY into place on the guide rails under the Side Burner as shown below.
Insure that the GREASE TRAY is centered under the burner.
Side
Burner
Housing
Grease Tray
Step 22
1. Place a standard 20 lb. Type 1 LP gas cylinder (see below, not included) into the cart
assembly and connect the cylinder with the gas hose/regulator as shown. (See page 19 for
further instructions).
2. Turn the Screw on the left side of the base panel clockwise to secure the standard 20 lb. LP
gas cylinder.
NOTE: Hose must
go under and to the
outside of the leg
brace.
Screw
page 17
Step 24
Install Igniter battery by turning the Igniter push button cap counter-clockwise until the igniter
button detaches, then install a AA battery making sure the positive(+) end is under the push
button. Then re-attach the igniter button by turning it clockwise. Press the igniter button and make
sure all 3 igniters that are attached to the burner tubes are creating a spark.
Fully Assembled
Caution: Use only the regulator provided!
If
a replacement is necessary, please call our customer service department, 912-638-4724. Do NOT use
replacement parts that are not intended for this grill.
Hint: The paper label that is affixed to the hood is more easily removed when the hood is warm. Any remaining
glue residue can be cleaned off with a spray lubricant like WD-40 . Do NOT use any other type of solvent or
cleaner because this will damage the finish/paint/coating on the grill.
page 18
Connecting Gas Cylinder:
The propane gas supply cylinder to be used must be constructed and marked in accordance with the
Specifications for propane gas Cylinders of the U.S. Department of Transportation (DOT), or the National Standard
of Canada, CAN/CSA B339, Cylinders, Spheres and Tubes for Transportation of Dangerous Goods; and
Commission, as applicable. Only cylinders with a listed overfill prevention device (OPD) and marked “propane”
may be used. Cylinders with an OPD will have valve handles with three “lobes” (prongs). Only use 20-pound
cylinders equipped with a Type 1 cylinder connection device for outdoor cooking appliances. The cylinder must
include a collar to protect the cylinder valve. The gas cylinder should not be dropped or handled roughly! If the
appliance is not in use, the gas cylinder must be disconnected. Storage of an appliance indoors is permissible
ONLY if the cylinder is disconnected and removed from the appliance. Cylinders must be stored outdoors out of
the reach of children and must not be stored in a building, garage or any other enclosed area. Your cylinder must
never be stored where temperatures can reach over 125 F. Before connection, be sure that there is no debris
caught in the head of the gas cylinder, head of the regulator valve or in the head of the burner and burner ports.
Connect regulator valve and hand-tighten firmly. Disconnect the propane cylinder from the regulator valve when
the grill is not in use. DO NOT obstruct the flow of combustion air and ventilation air to the grill. The propane
cylinder must be arranged for vapor withdrawal and equipped with a listed overfilling prevention device. For proper
vapor withdrawal, the cylinder should be used in the proper upright position (refer to illustration under step 22 of
page 17).
DANGER
Never store a spare propane cylinder near this grill. A fire causing death or serious injury may occur if the above
is not followed exactly.
X
Note: Before starting the grill, check for leaks. Make sure the regulator valve is securely fastened to
the burner and the cylinder.
To prevent fire or explosion hazard when testing for a leak:
1. Always perform the “leak test” as described below before lighting the grill or
each time the cylinder is connected for use.
2. Do not smoke or allow other sources of ignition in the area while conducting a leak
test.
3. Conduct leak test outdoors in a well-ventilated area.
4. Do not use matches, lighters or a flame to check for leaks.
5. Do not use grill until any and all leaks are corrected. If you are unable to stop a leak,
disconnect the propane supply. Call a gas appliance serviceman or your local propane gas supplier.
To Perform a Leak Test:
Make a 2-3 oz (0-90ml.) of leak solution by mixing one part liquid dishwashing soap with three parts water in a
spray bottle.
Note: Make sure control knobs are off.
Spray solution on the tank valve to regulator connection, the “Y” joint in the hose, the connection to the
manifold behind the main control panel, and the connection to the side burner valve.
Inspect the solution at the connection looking for bubbles. If NO bubbles appear, the connection is secure. If
bubbles appear, you have a leak.
Check the regulator connection as follows:
Disconnect regulator from the tank and reconnect, making sure the connection is secure.
Retest
with solution. If you continue to see bubbles, replace the cylinder.
page 19
Lighting Your Grill
Danger: Failure to open hood while igniting the grill or not waiting 5 minutes to allow the gas to
clear if the grill does not light, may result in an explosive flare-up which can cause serious
bodily injury or death.
Before cooking on this grill for the first time, operate the grill for about 15 minutes with the lid
closed and the
gas turned on “high.” This will “heat clean” the internal parts and dissipate odor from the
manufacturing
processes and painted finish.
Main Burners
1. Always open the lid before lighting the grill.
Attempting to light the burner with the lid closed may cause an explosion!
2. Make sure there are no obstructions of airflow to the gas unit. Spiders
and insects can nest within and clog the burner/venturi tube at the orifice. A clogged burner
tube can lead to a fire beneath the appliance.
3. Make sure all burner knobs are in the OFF position.
4. Open the valve on the LP gas cylinder.
5. Ignite only the burners you desire to use, using the same method for each: Push in
desired burner knob fully and rotate slowly about ¼ turn counter-clockwise to
“HIGH”. If the burner does not light immediately, return the knob to OFF, wait
Five minutes for the gas to clear and repeat the procedure. After the burner ignites,
repeat the same procedure with any other burner desired.
6. Adjust knob(s) to desired cooking setting.
OFF
After lighting, observe the burner flame, make sure all burner ports are lit.
If burner flame goes out during operation, immediately turn the gas “off” at the
control panel and at the gas cylinder and open hood/lid to let the gas clear for about 5 minutes
before re-lighting. Clean your grill after each use, DO NOT use abrasive or
flammable cleaners, as it will damage the parts of
this product and may start a fire.
HI
Side Burner
1. Open lid during lighting. Lid must be open when burner is on.
2. Burner valves must be in the “off” position.
3. Open cylinder valve.
4. Push in side burner valve knob fully and rotate slowly about ¼
turn counter-clockwise until a click is heard. If the burner does
not light, immediately turn the valve knob to OFF.
Wait 5 minutes for the gas to clear and repeat the procedure.
•
After burner ignites, adjust valve knob to desired cooking
setting.
Shutting Off Burners:
1. Always turn the valve knob(s) clockwise to the HI position, then
push in and turn to OFF. Never force the knob without
depressing it as this can damage the valve.
2. Promptly turn the gas supply OFF at the propane cylinder. Match Holder
3. Close the lid of the grill.
Lighting Burner With a Match:
1.
Place a match in the end of the match holder that is installed
on the side of Grill Housing. Once lit, immediately place the
flame through the cooking grates as shown near the burner
ports.
•
Press in knob and rotate counter-clockwise to the High
setting and burner should light immediately.
•
Adjust burners to desired cooking settings.
Observe Flame Height When Lit:
Flame should be a Blue / Yellow color.
To visually check that the burner is operating, look at the burner
flame through the flame viewing hole. The flame should be
approximately 1/2-3/4 inch long with the high setting.
LOW
Cooking
Grate
Cooking Grate
Chain
Burner
Ports
Cleaning and Care
Caution:
All cleaning and maintenance should be done when grill is cool and with the gas supply turned off at
the propane cylinder.
DO NOT clean any grill part in a self cleaning oven. The extreme heat will damage the finish.
Cleaning
Burning-off the grill after every use (approx. 15 minutes) will keep excessive food residue from
building up.
Recommended cleaning materials:
- Mild dishwashing liquid detergent
- Hot water
- Nylon cleaning pad
- Wire brush
DO NOT use cleaners that contain acid, mineral spirits or xylene.
Outside surfaces –
Use a mild dishwashing detergent and hot water solution to clean, then rinse with water.
If the inside surface of the grill lid has the appearance of peeling paint, baked on grease buildup has
turned to carbon and is flaking off. Clean thoroughly with strong solution of detergent and
hot water.
Rinse with water and allow to completely dry.
Interior of grill bottom – Remove residue using brush, scraper and/or cleaning pad, then wash with
dishwashing detergent and hot water solution. Rinse with water and let thoroughly dry.
Cooking Grids – The porcelain grates have a glass-like composition that should be handled with
care not to chip. Use mild dishwashing detergent or baking soda and hot water solution.
Non abrasive scouring powder can be used on stubborn stains, then rinse with water.
Heat Shield – Clean residue with wire brush and wash with soapy water. Then rinse with water.
Grease collector – Periodically empty the grease cup and clean with dishwashing detergent and hot
water solution.
Cleaning the burner assembly
•
•
•
•
•
•
•
•
•
Turn gas off at the control knobs and propane tank
Remove cooking grates and heat shield.
Remove grease collector.
Remove burner by unscrewing nut from beneath burner “foot” using a screwdriver and
pliers.
Lift burner up and away from gas valve orifice.
Clean inlet (venturi) of burner with small bottle brush or compressed air.
Remove all food residue and dirt on outside of burner surface.
Clean any clogged ports with a stiff wire (such as an opened paper clip)
Inspect burner for any damage (cracks or holes). If damage is found, replace with new
burner. Reinstall burner; check to insure that gas valve orifices are correctly positioned
inside burner inlet (venturi). Also check position of spark electrode.
page 21
Spark Electrode
Burner
Gas Grill Troubleshooting
Problem
Burner will not light
using knobs.
Possible Cause
Wires/or electrode covered
with cooking residue.
Prevention/Cure
Clean wire and/or electrode, with rubbing
alcohol.
Electrode and burners are
wet.
Wipe dry with cloth
Electrode cracked or broken
- sparks at crack
Replace electrode
Wire loose or disconnected
Reconnect wire or replace electrode/wire
assembly.
No gas flow.
Check if propane tank is empty. If
propane tank is not empty, refer to
“Sudden drop in gas flow or reduced
flame height”. If empty, replace or refill.
Coupling nut and regulator
not connected.
Turn the coupling nut about one-half fully
connected to three quarters additional
turn until solid stop. Tighten by hand
only – do not use tools.
Obstruction of gas flow.
Clear burner tubes.
Check for bent or kinked hose.
Dis-engagement of burner
to valve.
Re-engage burner and valve.
Spider webs or insect nest
in venture (burner insert).
Clean venturi.
Burner ports clogged or
blocked.
Clean burner ports.
Sudden drop in gas
flow or reduced flame
height.
Out of gas
Change Propane Tank
Excess flow safety device
may have been activated.
Turn off knobs, wait 30 seconds and light
grill. If flames are still too low. Reset the
excessive flow safety device by turning off
knobs and propane tank valve. Disconnect
regulator. Turn burner control knobs to
HIGH. Wait 1 minute. Turn burner control
knobs off. Reconnect regulator and leak
check connections. Turn propane tank valve
on slowly, wait 30 seconds and then light
grill.
Irregular flame
pattern, flame does
not run the full length
of burner.
Burner ports are clogged or
blocked.
Clean burner ports
Burner will not light
with match.
page 22
.
.
Gas Grill Troubleshooting, continued
Problem
Flame is yellow or
orange.
Flame blows out
Flare-up
Persistent grease fire
Possible Cause
Prevention/Cure
New burner may have
residual Manufacturing oils.
Burn grill for 15 minutes with the lid
closed.
Spider webs or insect nest
in venturi.
Clean venturi.
Food residue, grease or
seasoning salt on butter.
Clean burner.
Poor alignment of valve to
burner venturi.
Assure burner venturi is properly
engaged with valve.
High or gusting winds
Turn front of grill to face wind or increase
flame height. (We recommend not using
grill during high winds)
Low gas pressure
Change Propane Tank
Excess flow valve tripped
Refer to “Sudden drop in gas flow or
reduced flame height”
Grease buildup
Clean grill
Excessive fat in meat
Trim fat meat before grilling
Excessive cooking
Temperature
Adjust (lower) temperature accordingly
Grease trapped by food
buildup around burner
system.
Turn knobs to OFF. Turn gas off.
Leave lid in closed position and let fire
burn out. After grill cools, remove and
clean all parts.
Flashback (fire in
burner tube(s))
Burner and/or burner tubes
Clean burner and/or burner tubes.
Inside of lid appears
to be peeling
- like paint peeling
Baked on grease buildup
has turned to carbon and is
flaking off.
Clean thoroughly. The lid is stainless
steel, it is not painted.
Clean inside of lid thoroughly. The lid
is not painted on the inside.
page 23
GRILL PREPARATION & CHARCOAL GRILL OPERATING INSTRUCTIONS
PLEASE NOTE: NO RETURNS ON USED GRILLS
Read all safety warnings and instructions carefully before assembling and operating your grill.
1. Note: The interior of the grills are not painted and are coated with vegetable oil. Do not remove this vegetable
oil coating. Gas and Charcoal Grill: Cure GRILLS prior to your initial use to protect the interior and exterior finish
and to prevent unnatural flavors to your first meals. (A) Lightly coat ALL INTERIOR SURFACES (including
GRILLS, GRATES, AND INSIDE OF BARREL) with vegetable oil (spray vegetable oil is easiest but do not use
near hot coals, fire, or flame). This is in addition to the vegetable oil that is already on the interior. (B) Charcoal
Grill: Build a medium sized fire on the fire grate. (C) Charcoal Grill: After coals ash over, spread out coals,
replace cooking grates. Gas and Charcoal Grill: close lid and heat at approximately 250°F (120°C) for two
hours. You can lightly coat the exterior of both grill bodies (while warm) with vegetable oil and wipe off excess
with a rag. This will extend the life of the finish, much like waxing a car. Your GRILLS will then be ready for use.
NOTE: Grills will drip a lot of oil during this process and for several uses but will slow over time.
NEVER EXCEED 450°F (230°C) BECAUSE THIS WILL DAMAGE THE FINISH AND
CONTRIBUTE TO RUST. PAINT IS NOT WARRANTED AND WILL REQUIRE TOUCH-UP.
THIS UNIT IS NOT WARRANTED AGAINST RUST.
2. Charcoal Grill: To START FIRE –stack 50-60 briquettes in pyramid and saturate with lighter fluid (DON’T
USE GASOLINE). Light coals in several places, close lid after briquettes ash over or gray, spread them out
and start cooking. If one end burns faster, use tongs to move coals from one end to the other for even heat.
ALWAYS FOLLOW CHARCOAL AND LIGHTER FLUID MANUFACTURERS’ INSTRUCTIONS
AND WARNINGS. USE OUTDOORS ONLY ON NONCOMBUSTIBLE SURFACE – 15’ AWAY FROM WOOD AND
COMBUSTIBLE MATERIAL.
3. Charcoal Grill: Control heat with amount and type of FUEL, DUAL DAMPERS and ADJUSTABLE FIRE
GRATE. Adjust GRATE one end at a time. Wood burns hotter than coals. More airflow is more heat.
4. For less flare-ups, cook with lid in the down position.
5. Charcoal Grill: Add water soaked hardwood chips for a smoked flavor.
6. Charcoal Grill: Burn out may be rust out. Ashes left in bottom too long hold moisture and rust through any
thickness of steel.
7. This grill is made of steel and cast iron, which WILL RUST, ESPECIALLY IF NOT PROPERLY
CARED FOR.
8. Charcoal Grill: Do not use self-starting charcoal as it will give unnatural flavor. Burn lighter fluid completely
before closing lid.
9. After using, coat vegetable oil on bare metal while warm to reduce rust. On the EXTERIOR, remove rust with
wire brush and touch up with a high heat paint, available at most hardware/auto stores.
10. Make sure to empty Grease Tray after every use only after it has completely cooled.
11. HEAT GAUGES may obtain moisture, which will steam out during cooking. Gauge may be calibrated in
oven.
12. You may fill unwanted holes with Nuts & Bolts (Not Provided).
NOTE: Smoke will escape from areas other than the smokestacks. This will not affect your cooking.
page 24
GRILLING RECIPES
DIRECT METHOD
STEAK (& ALL MEATS): Cook food directly above coals/heat. Generally speaking, to grill
meats, raise fire
grate to high position (hot) and sear for one minute on each side with the lid open to seal in flavor
and juices. Then lower fire grate to medium position with lid closed and cook to desire doneness.
Control heat with dual dampers and adjustable fire grate.
BETTER BARBECUE: Place grilled meat back in the marinade for several minutes before
serving – it will become tastier and juicier. CAUTION: Boil extra marinade first to kill bacteria
remaining from the raw meat.
Tip: Cooking with a MEAT THERMOMETER ensures food is fully cooked. Insert into thickest
part not
touching bone & allow five minutes to register. Internal temperatures for BIRDS should be 170F
to 180F
and meat should be 140F for rare, 160F medium and 170F for well done.
MARINATED FLANK STEAK: Mix marinade ingredients in nonmetal dish. Let steak stand in
marinade for
no less than 4 hours in refrigerator. Brown each side for 5 minutes, but center should remain
rare. Cut
steak diagonally across the grain into thin slices before serving. Grill with fire grate in high (hot)
position
with lid open or closed.
MARINADE: 1/2 cup vegetable or olive oil, 1/3 cup soy sauce, 1/4 cup red wine vinegar, 2 tbs.
Lemon juice,
1 tsp. Dry mustard, 1 minced clove garlic, 1 small minced onion, 1/4 tsp pepper.
QUAIL OR DOVES: Cover birds in Italian dressing (Good Seasons or Kraft Zesty), marinate
overnight, pour off dressing and cover with Texas Pete Hot Sauce for 6 hours. Wrap birds in thick
bacon secured by a toothpick. *Place on grill – keep turning until bacon is black. Grill for 20
minutes. Sear with lid open and fire grate in high (hot) position for 1 min each side before
lowering grate and closing lid. *OR SMOKE by placing birds in center of GRID with fire in both
ends of FIRE BOX.
KABOBS: Alternating on skewers any combination of meat, onions, tomatoes, green peppers,
mushrooms, zucchini, circular slice of corn-on-the-cob, or pineapple. Meat could consist of
chunks of shrimp, scallops, lobster, chicken, sausage, pork, beef, etc.
Marinate the meat in refrigerator for several hours. Grill each side approximately 7 minutes
turning occasionally while
basting with marinade. Leave a small amount of room between pieces in order to cook faster.
Grill with lid up and
the fire grate in the lowest position. See marinade recipe on last page.
KABOB MARINADE: Mix 1 cup soy sauce, 1/2 cup brown sugar, 1/2 cup vinegar, 1/2 cup
pineapple juice, 2 teaspoons salt, 1/2 teaspoon garlic powder and bring to a boil. Marinate beef
in mixture a minimum of 4 hours.
HOT DOGS: Grill with lid up and fire grate in high (hot) position for approximately 6 minutes, turn
every few minutes.
HAMBURGERS: Mix in chopped onions, green peppers, salt, sear 3/4 inch patties on each side
with fire grate in high position for a few minutes. Lower fire grate to medium position and grill with
lid down to avoid flare-ups. Cook each side 3 to 7 minutes according to desired doneness. Cook
ground meat to 150 internally or until juice runs clear (free of blood) for prevention of E-coli.
Burgers can be basted with marinade when turning
and/or other ingredients can be mixed in with
page 25
the ground beef such as chili sauce or powder; or you may marinate by allowing
to stand in
™ & © 2006 Char-Griller / A&J Mfg.
marinade for 1 or 2 hours at room temperature before cooking; or let stand in covered dish in
refrigerator up to 24 hours. Bring to room temperature before cooking.
See meat marinade on page 9.
SHRIMP (Peeled) & Crayfish: Place on skewers, coat with melted butter and garlic salt. Grill 4
minutes on each side or until pink. Cocktail sauce optional.
BAKED POTATOES: Rub with butter and wrap in foil and cook on grill with lid down for 50
minutes. Turn after 25 minutes (no need to turn if smoked). Squeeze for doneness.
SWEET CORN IN HUSKS: Trim excess silk from end and soak in cold salted water 1 hour before
grilling. Grill 25 minutes – turning several times.
SWEET CORN IN FOIL: Husk and wash. Rub with butter and season with salt and pepper.
Wrap each ear in foil
and grill for 30 minutes turning several times (no need to turn if smoked).
GRILLED VEGETABLES: Slice 1/4" thick and soak in olive oil prior to grilling to prevent burning.
Grill for 9 minutes each side.
SMOKIN’ RECIPES using the Charcoal Grill side of the Duo with a WATER PAN (also called
INDIRECT METHOD).
Pan not included. Disposable bread pan is recommended. SMOKE BY COOKING SLOWLY (See
chart on page 27 for smoking times). 1) Place water/drip pan on left side of fire grate. 2) Place hot
coals on right side (damper end) of fire grate. The charcoal basket accessory helps confine coals to
one side. 3) Place meat above water pan. 4) Place fire grate in low
position. 5) Close lid & control heat with dampers & adjustable grate.
You may want to sear certain foods before smoking by placing meat directly above coals with LID open
and FIRE GRATE in high (hot) position for several minutes. Add flavor soaked wood chips to the fire
and add 1 part marinade, beer or wine to 3 parts water to the drip pan. OPENING THE SMOKING
CHAMBER WILL EXTEND COOKING TIME. Cooking with meat thermometer ensures food is fully
cooked. Insert thermometer into thickest part not touching bone, and allow five minutes to register.
Internal temperature for birds should be 170F to 180F or when leg moves easily in joint. Meat should
be cooked to internal temperature of 140F for rate, 160F for medium and 170F for well done. Check the
water level when cooking more than 4 hours or when you can’t hear the water simmering. Add water
by moving meat over and pouring water through GRILL into WATER PAN. IF THE SMOKE IS WHITE,
THE FIRE’S RIGHT. IF THE SMOKE IS BLACK, ADD SOME DRAFT.
SMOKED TURKEY: Empty cavity rinse and pat dry with paper towel, tuck wing tips under the back and
tie legs together. Place in center of cooking grid directly above foil drip pan of water. Smoke for 12
minutes per pound. Allow several extra minutes per pound if stuffed to allow for expansion. Use a meat
thermometer for best results (190F internal).
SMOKED BAKED HAM: Fully cooked canned ham or smoked and cured whole ham or shank or butt
portion.
Place fire grate in the lowest position and a drip pan under the meat. Remove rind
and score fat diagonally to give a diamond effect. Insert a whole clove in to the center of every
diamond. Place ham with fat side up in center of cooking grid directly above drip pan. Close lid. About
9 minutes per pound is suggested for fully cooked hams. Smoked or cured ham which is not fully
cooked should be cooked to an internal temperature of 160∞. Baste with ham glaze 3 or 4 times during
last 30 minutes of cooking time. Garnish with pineapple rings about 15 minutes before end of cooking
time.
HAM GLAZE: 1 cup of light brown sugar, firmly packed, 1/2 cup orange juice, 1/2 cup honey, combine
sugar, juice and honey. Let marinade sit for at least 4 hours.
SMOKED HOT DOGS STUFFED: Slit hot dogs lengthwise, within 1/4 inch of each end. Stuff hot dogs
with cheese and relish and wrap in bacon. Place on cooking grid over drip pan and smoke 15-20
minutes or until bacon is crisp.
SMOKED CHICKEN PARTS AND HALVES: Rinse pieces in cold water and pat dry with paper towels.
Brush each piece with vegetable oil and season to taste with salt and pepper. Brown pieces directly
above coals with lid open and grate in high or medium position for several minutes. Then place pieces
on cooking grate directly above drip pan. With the grate in the low position, cook with lid down for 55 to
60 minutes or until done. Do not use vegetable oil or salt and pepper if using marinade.
SMOKED VENISON: Place leg of venison in a container or "hefty bag" and marinate for 2-4 days,
turning daily. Marinate bacon overnight in its marinade. Remove roast from refrigerator at least an
hour before cooking. Season generously with seasoned salt and coarse ground black pepper. Wrap 1
lb. Bacon over the top of the roast, and smoke 20/25 minutes per pound, or until tender. Do not
overcook.
Venison Marinade: 1 cup Balsamic or wine vinegar, 1 cup olive oil, 2 oz. Worcestershire, 1/2 oz.
Tabasco, 2 tbs. Season All, 1 to 2 chopped jalapenos, 3 oz. Soy sauce. Bacon Marinade: 2 ox. Wine
vinegar, 2 oz. Worcestershire, 4 dashes Tabasco.
SMOKED SHRIMP & CRAYFISH: Mix in a foil pan 1/2 cup butter, two cloves of crushed garlic,
Tabasco, sliced green pepper, 1 tbls each of minced onions, salt and juices from one lemon. Add
shrimp and/ or crayfish and smoke 45 minutes.
SMOKED VEGETABLES: Turnips, potatoes, carrots, okra, mushrooms, peeled onions, zucchini,
page 26
squash, etc. Put in pan and cover with water and cook for several hours while cooking the meat. Or
™ & © 2006 Char-Griller / A&J Mfg.
place vegetables on grill and smoke for 50 minutes, either wrapped in foil or not.
SMOKED FISH: Marinate in brine (1/4 cup dissolved in 1 qt of water) or marinate fish in 1 cup white
wine, 1 cup soy sauce mixed with 1 cup lemon juice. Marinate overnight in covered dish in refrigerator.
Let air on rack 20 minutes before placing on Pam sprayed grill. Smoke 25 minutes.
SMOKED SPARE/BACK RIBS: Peel off tough layer of skin on back side. Rub all surfaces with
seasoning. Place ribs in center of grid above drip pan and smoke approximately 1 1/2 hours or until
meats pulls away from bone. Baste with barbecue sauce during last 30 minutes.
CHICKEN MARINADE: Combine 1/2 cup soy sauce, 1/4 cup vegetable oil, 1/4 cup red wine vinegar, 1
teaspoon oregano, 1/2 teaspoon sweet basil, 1/2 teaspoon garlic powder with parsley, 1/4 teaspoon
pepper. Pour over chicken pieces in nonmetal dish. Cover and refrigerate overnight, turning
occasionally. Use marinade to baste chicken while cooking.
MEAT MARINADE: For steaks, chops, and burgers: Combine q cup soy sauce, 2 coarsely chopped
large onions and 2 cloves garlic (halved) in an electric blender; cover, process at high speed 1 minute
or until mixture is very smooth. Stir in 1/4 cup bottle gravy coloring (Kitchen Bouquet and Gravy
Master) and 2 teaspoons Beau Monde seasoning (or substitute 1 teaspoon MSG and 1 teaspoon
seasoned salt). Allow meat to stand in marinade at room temperature for 2 hours or refrigerate up to 24
hours in a covered dish. Bring meat to room temperature before cooking.
SHISH KABOB MARINADE: Mix 1 cup soy sauce, 1/2 cup brown sugar, 1/2 cup vinegar, 1/2 cup
pineapple juice, 2 teaspoons salt, 1/2 teaspoon garlic powder and bring to a boil. Marinate beef in
mixture a minimum of 4 hours.
page 27
™ & © 2006 Char-Griller / A&J Mfg.