1
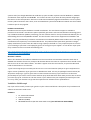
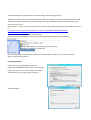
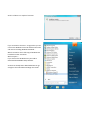
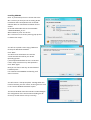
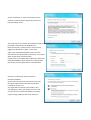
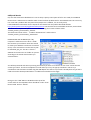
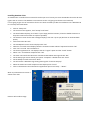
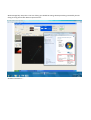
Installing Meade AS in a Win 7 XPMode environment Overview Following a request for any group members experience of installing Meades Autostar Suite and DSI camera on a PC running the Windows 7 64 bit Operating System, below is a description of my attempts. When MS introduced Vista in 2007 many user found they had serious issues running previous generation software and hardware, particularly when using the 64 bit version of the OS. Hardware was especially hit because significant effort was required to create new drivers, which were slow in coming or never arrived at all... Software didn’t suffer quite so bad because of WOW (Windows on Windows) that allowed the older software to run in an x86 emulation mode. With the introduction of Windows 7 MS seem to have learnt many of the bitter lessons of the Vista failures. In order to improve the backward compatability of Windows 7 with previous generations of software, MS have introduced a way to “virtualise” your old XP (or Vista) based applications within the 7 OS. Most importantly, a way to handle hardware drivers for old 32 bit applications is now provided within the 64 bit version of the OS. If this works it of course provides a mechanism for us to run Meade’s AS applications & DSI hardware on the latest shiny super powerful PC’s and laptops (but note the caveats listed at the end of the overview!). The software components that we use to create this virtualised environment are available, for free, to users of 1 Windows 7 Professional 2 Enterprise 3 Ultimate (see the caveat at end of section for other versions of Windows 7) In order to create the XP virtual machine (for a 64 bit OS version) two components must be downloaded from Microsoft:- Virtual PC (Note: This may be pre-installed on the full releases) “Windows® Virtual PC is a new optional component for the Windows 7 operating system that you can use to evaluate and migrate to Windows 7 while maintaining compatibility with applications that run on older versions of Windows.” The downloaded executable is named - Windows6.1-KB958559-x64_VirtualPC.msu (6.8 Mb) Windows XPMode (You can use an existing XP Pro cd instead see Windows 7 comments below) “This is a pre-packaged virtual machine (XP SP3) that is ready to go” The downloaded executable is named - WindowsXPMode_en-us.exe (472 Mb) Please note the following caveats before downloading these files to ensure you can take advantage of Windows 7 XPMode virtual machine. Hard Drive space If your the sort of geek who likes to partition your hard drive bear in mind you are creating two operating systems and if you thought Windows XP could take up space consider my base install of Windows 7, XPMode and Autostar Suite required around 15 Gb! You’ll need a lot more if you want all those powerful image apps like CS3 etc on the same partition. Also bear in mind that the Windows page file will default to 1.5x the system memory and be located on the C drive, since most Windows7 systems will START with 4GB of ram that’s 6GB of hard drive just for the page file. Hardware Virtualisation Windows Virtual PC requires hardware-assisted virtualization. The virtualization support is available in processors that include a virtualization option-specifically processors with Intel Virtualization Technology (Intel VT) or AMD Virtualization (AMD-V) technology. You are asked to check for this by the Microsoft website prior to downloading the Virtual PC\XPMode software. This CPU function must also be supported and enabled in the BIOS, I was lucky and found my hardware virtualisation was enabled by default. Most modern CPU’s will support virtualisation but importantly not all motherboards do! The problem seems particularly prevalent amongst laptop manufactures, and as most AA’s will be using a laptop in the field it’s a very important point to check. If you are looking to purchase a new laptop\PC get this in writing from your supplier! To see what a major upset Sony created over this issue check the following link:http://www.designisphilosophy.com/windows-7/sony-confirms-no-hardware-virtualization-on-vaio-computerspast-present-or-future-20090622/ Windows 7 Editions When I first looked at what editions allowed Virtual PC some online commentators seemed to think that as XPMode was stated as free to Pro, Enterprise & Ultimate editions there was an implication that it would not be able to run at all on more basic editions. This doesn’t appear to be the case however, to quote the Microsoft head of virtualisation in an interview: “If you have an app and you conclude you have to run it in a virtual machine (and you’ve got a Professional or higher version of Windows 7) you get access to Windows XP mode. This is a pre-packaged virtual machine (XP SP3) that is ready to go. If you’ve got a Home or Home Premium version of 7 you have access to the same functionality but you have to set the virtual machine up by hand. With these lower SKUs you also have to source your own copy of XP - and that can’t be the version on your old PC unless you completely uninstall it from that PC. To my mind, your best bet is to go with the Professional or Ultimate version of Windows 7” Installation Walkthrough OK, if your still here we’ll presume your good to try this! There now follows a description of my hardware and software environment used to test. Hardware 1 2 3 4 PC - ASUS motherboard Intel Core Duo CPU 4GB Ram (PC800) 80-160GB Hard Drive (IDE then SATA used to test) (You will want AT LEAST 20GB!) 5 6 7 Meade DSI Pro II Belkin (?!?) Serial -USB adapter 8800 GTX Graphics Software Used 1 2 3 4 5 6 7 8 Windows 7 RC build 7100 VirtualPC (6.8Mb) XPMode (472Mb Install of Windows XP Pro sp3) Belkin Serial USB driver Meade Autostar Suite v5.5 Envisage v7.06 .net Framework 2.0.50727.42 .net 2.0 sp2 (Comes with AutostarWebUpdate 5.5) Walkthrough (Finally!) Note: I am presuming a fresh install of Win 7 Ultimate that has internet access. You should direct your browser to the MS Virtual PC page at: http://www.microsoft.com/windows/virtual-pc/download.aspx This link also provides links to documentation for the product that I advise you to read prior to going ahead. The first thing you should do if you don’t already know for sure is check that hardware virtualisation is available. With running an Intel CPU I followed the link to the Intel site were a little app was downloaded and run on my PC giving the following screen:- Note the boxed section viewed on the “CPU Technologies” tab, We’re good to go! With that confirmed you can now download the two software components Virtual PC & XPMode from the MS website according to your Win 7 environment (64bit in this case). XPMode is quite a chunk at 472 Mb so go make a cup of tea now. Note: If this is a clean install you might want to download .net Framework 2.0.50727.42 from MS while your at it:http://www.microsoft.com/downloads/details.aspx?FamilyID=0856EACB-4362-4B0D-8EDDAAB15C5E04F5&displaylang=en as you will need it later (and note it’s x86 software). With everything downloaded and ready you should be looking at something like the following: Note: For backup I have the Autostar software on a network share, use the cd in it’s place if required. We start by installing Virtual PC Installing VirtualPC Double click on the downloaded executable “Windows6.1-KB958559-x64_VirtualPC.msu” and it will begin the install, say “Yes” to installing the software update. After the intro page accept the license: The install begins: And it’s all done in a couple of minutes: If you now look at the Start – Program bar you can click on the Windows Virtual PC folder and see the sub menus including Windows XP Mode... What?! Virtual PC and a full copy of Windows XP installed in under 2 minutes! Well not quite.... If you click on the XP Mode icon your told to download the XPMode setup software. As that has already been downloaded we can go straight to the executable and begin the install. Installing XPMode Note: If you decide (or have no choice due to the Win 7 version you have) to use an existing XP Pro installation disk instead please refer to the MS website advice on manual XP installation for this section. Go ahead and double click on the executable “WindowsXPMode_en-us” When asked say “Run” for this file Win 7 still has a lot of security warning pop ups but it’s better than Vispa... You will see a splash screen saying “Welcome to Setup for Windows XP Mode” Click “Next” You will then be asked were to install the virtual hard disk that will be your XP Pro Operating System. I just accepted the default since it is an OS and I don’t really want that on my data partitions. Click “Next” again. Now you can start to see why we need LOTS of hard disk space.... I’ve stated at least 20GB but realistically you’ll want a lot more. You will receive a “Setup Complete” message when this install is finished; just click “Finish” ensuring there is a tick in the “Launch Windows XP Mode” option. The launch XP Mode starts the new XP Pro OS and begins the configuration of the environment including the XP drivers (or virtual drivers as they are really) As this is effectively a “fresh” install of XP you are asked to accept the license by placing a tick in the box and clicking “Next” The install ask you to confirm the installation folder and password credentials for the XPMode user. Note that the user is taken from the user currently logged onto Windows 7 (“RayT” in this case). Again I just accepted the defaults since in a home environment the setup folders and security are a simple affair compared to corporate needs. Putting a tick in the “Remember credentials” option will allow the XPMode to open quicker so I would go with that unless you have good reason to do otherwise. Next you’re asked if you wish to switch on Automatic Updates. As this was just a quick test environment I turned the option off but once it becomes my de-facto installation I’ll turn it on. You might want to leave this off initially to test everything then when your happy turn it on. That way you’ll know if a Microsoft update is the likely culprit if things suddenly don’t work anymore... XP then begins setting up for your PC.... And after about 15 minutes you have your 32 bit Windows XP Professional Service Pack 3 OS running on the 64bit Windows 7, How cool is that!: USB\Serial Device Ok, once the excitements died down it’s time to setup a pretty critical piece of kit for our needs, the USBSerial Device driver. I believe mine is a Belkin which I know has been problematic for some Meade users but I must say I’ve never had a problem with this piece of kit (maybe it isn’t a Belkin, I’m not really sure!) I downloaded the latest driver for the chipset on this device from the prolific download website: http://www.prolific.com.tw/eng/downloads.asp?ID=31 note that this driver executable covers XP, Vista and W7. The driver is in a zip file that you must extract before using that creates a folder called “PL2303_Prolific_DriverInstaller_v10518” . This folder will contain 2 files :- a readme “Reasenote.txt” and the driver “PL2303_Prolific_DriverInstaller_v10518.exe” FROM WITHIN THE XP MODE open “My Computer” and browse to the drive – folder that contains your software. Note how Virtual PC treats your Windows 7 PC drives as network drives, in the screenshot it can be seen my W7 PC called W7_64_ULT. The XP C: drive is a VIRTUAL drive that exists as a folder on your PC according to the virtual drive location you selected earlier. You will be presented with security warning and asked if you wish to run the file so click “Run” and at the next screen type “Next”. The driver completes its install and may or may not pop up a balloon in W7 to say a virtualisation stub has been installed. Plug the USB adapter into the PC if you haven’t already done so (you don’t need to have the telescope switched on or indeed even attached at this stage) Now go to the “USB” Menu in XP Mode at the top of the screen and from the dropdown there should be a USB – Serial Device listed. Click on “Attach” You should see a balloon in the XP Mode to tell you the device has been found and if you didn’t see it earlier a balloon in W7 telling you a virtualisation stub has been installed. Now check the properties of this device by right clicking on “My Computer” (within the XP Mode!) and selecting “Manage” from the menu list The computer management console opens up. Click the + next to “Ports (COM & LPT)” and you should see the USB to Serial device listed with its selected Com port listed as shown in the screenshot. If you go back up to the XPMode “USB” menu and select it you should see the “Attach” has changed to “Release” The USB Serial device is now installed. We can now go ahead with the Meade software installation. Installing AutoStar Suite As stated earlier I installed from a network share but you can of course just insert the Meade cd into the cd drive (ignore the run menu in the Windows 7 environment as this is all going into the XP virtual machine) I’m not going to give a lot of screenshots for this as it looks and feels just like the installation into a Windows XP PC. The steps are listed below: Click on “Setup.exe” The License screen appears, click “Accept” and “Next” The Install Folder displays, click “Next” if your happy with the location (I’d stick to default locations to keep the virtual environment as simple as possible). The selection screen for the GSC catalogue displays, that one is up to you (but bear in mind Hard Disk Space) Click to Start the AS install The Text2Speech License screen displays Click “OK” Next the .net install screen displays Note the comment to NOT reboot if requested and click “OK” Click “Yes” to install .net Framework 1.1 The license agreement for .net displays click the “I Agree” option and the “Install” button When .net 1.1 installation completes click “OK” The suite now installs the LPI Drivers read the Do Not Reboot warning and click “OK” On the Setup Type screen choose your option “Complete” is default then click “Next” On the Ready to install screen click “Next” You will receive a Windows Logo testing warning Click “Continue Anyway” When the LPI drivers install complete screen displays Click “Finish” Click on the Autostar icon and when the application opens click “Help” – “About” With my cd the Autostar version is shown to be 3.08: Next we will install Envisage Install Envisage Once again the install procedure is as for XP so follow the steps below: On the Meade cd double click the Envisage setup file The install screen displays Click “Next” The Install Location screen displays, when your happy with the location click “Next” When the “Install Complete” screen displays click “Finish” Depending on what other applications have been installed clicking on the Envisage program icon may give the following warning “Installation Error” stating that .net Framework 2.0.50727.42 is required click “OK” to clear the splash screen Install .Net 2.0.50727.42 now if it is required (if there is no error skip the remaining Envisage section) If you do need to install .net 2.0 then click on the “dotnetfx_2.0” installer The Welcome screen displays Click “Next” When the License Manager displays select the “Accept the license” option and click “Install” When the Setup Complete screen displays click “Finish” This gives me Envisage version 5.85 Install Autostar Update Stable connectivity for the Meade DSI appeared to require a component (the .net framework probably) contained in the Meade patch\update “AutoStarSuiteWebEdition55”. To install the update take the following steps: Double click the update file When the install screen displays click “Run” A File security warning displays Click “Run” The License screen displays Click “Accept terms” On the Install Screen click “Next” On the Readme file screen click “Next” The Folder Location displays make your chose or accept the default and click “Next” Click “Next” on the following screen the update install commences The Microsoft Text2Speech Engine application screen displays Click “Yes” The Microsoft .net Support screen displays Note the Do Not Reboot warning and click “OK” The .net Framework 2.0 sp2 setup wizard displays Click “Next” The .net license screen displays Select the “I Accept” option and click “Next” Select the install type option “Complete” and click “Next” On the Ready to Install screen click “Install” The Setup Completed Wizard displays Click “Finish” The Meade LPI Setup screen displays Note the warnings and click “OK” The Meade LPI Welcome screen displays Select the “Modify” option and then click “Next” The Select Components screen displays select option “All” and click “Next” The Installation Complete screen displays Click “Finish” The Software Update Wizard (Redist) 4.5 screen displays Click “Install” When the Installation Complete screen displays click “Close” A Windows Logo Warning displays Click “Continue Anyway” The DSI Driver installed screen displays Click “OK” Autostar successfully installed screen displays Click “Finish” Firing it all up Do not connect scope or DSI yet! Click on the Autostar icon, a Windows security warning displays. Click “Unblock” on this screen to allow connectivity then click the “Help” – “About AutostarSuite” and confirm version is 5.5 Still in Autostar Suite select Image - DSI Imaging and when the Envisage application opens click the About item and confirm the version is 7.06. Close Envisage and Autostar Suite. In the XPMode virtual machine click on the USB tab and confirm the USB Serial device is attached by confirming the menu item shows “Release”, if not click on “Attach”. Switch on your Meade telescope and connect the USB to Serial cable into the RS232 port. Open the Autostar Suite and click on the Telescope menu and from the dropdown select “Communications – Serial Port Setup..”. In the dialog that opens confirm the Com port selected matches that displayed in the “Computer Management – Ports (COM & LPT)” screen and click “OK” With the port configured go back to the menu Telescope – Communications – Test Serial Port and confirm connection. Now click on “Telescope – Protocol – Autostar via Serial Port F6” and connection should be established with Autostar flashing a warning. We now come to a bit of an anomaly, if you attempt to use the mouse to select and perform a slew to on the starmap at this point the application locks up! Using “Remote Handbox F9” does allow telescope control to be attained within Autostar, however when you move the telescope via this handbox the starmap doesn’t synchronise with the movements. In order to establish full control from within Autostar Suite EACH TIME AutoStar is launched, after you have established connection via the Telescope - Protocol menu, you MUST select “Telescope – Hand Control Panel.. Alt H“ as shown right. The software Autostar II control opens.. Control is achieved and telescope movements are synchronised. You can subsequently close the Hand Control Panel display and starmap slew together with synchronisation will still work. Connecting the DSI Pro With Autostar Suite now connected we can connect the Meade camera, in my case the DSI Pro II Mono. Plug the camera in an available USB port, you will likely receive an error warning in the Windows7 environment stating “Device not successfully installed”, ignore this and stay in the XPMode screen. In the XPMode screen select the USB menu and from the dropdown select “Unknown Device – Attach”. The Found New hardware wizard screen will display, select the “No, not this time” option. In the following screen tick the “Include this location in the search” and browse to the driver location in your Meade Autostar folder the default is “C:\Program Files\Meade\AutostarSuite\Envisage\Driver\2K - XP\Update”. Click “OK” then “Next” The “Found New Hardware” Wizard runs and on recognising a Meade DSI displays the Windows Logo testing warning. Click “Continue Anyway” The Completing Wizard screen displays Click “Finish” note the failed to install driver software warning in the Windows7 environment. Click the “Finish” button Next click on the XPMode USB tab and in the dropdown should be listed the new device, in this case it is listed as “ EZ-USB FX2” Click on "Attach" for the device In XPMode a bubble will display stating Found New Hardware You will need to go through the install routine again including pointing to the driver location. When you have clicked “Finish” go to the USB tab and check both USBSerial controller and the camera are attached with the "Release" Option now showing. Open Envisage and the camera screen should display. You should now be able to connect to the telescope via the Telescope tab as shown With Envisage fully setup this is the sort of thing you should be seeing, telescope tracking successfully, drizzle doing it’s thing and all with decent response times: And there we have it..... Issues to note Use only XPMode rather than running the 32 bit app Virtual PC gives you the option to run the 32 bit XP app directly from the Windows7 Start - Programs menu but this doesn’t allow you to configure the attach devices easily Hand Control Panel only Remember to always launch the “Hand Control Panel.. Alt H” before trying to control your scope DSI camera plug\unplug After re-starting the PC then launching XPMode you will probably find that connecting the DSI requires a little patience. You need to plug in the camera, select “Attach” unknown device from the USB tab, wait 20-40 seconds then go back AGAIN to the USB tab to click “Attach” on the now recognised device (“EZ-USB FX2” in my case). The camera should now function but on occasions I have had to do this action twice over to properly recognise the camera. Screen flicker using ASIP I have suffered flickering blue lines visible in dark areas of the screen particularly when opening Autostar Suite IP, I found subsequently I had forgotten to install the latest Nvidia drivers. The moral: Windows 7 is new so keep checking for driver updates. I hope this walkthrough is of use to you Cheers Ray Tomlinson PS, if you manage to achieve images of the fabulous quality displayed by the Yahoo Meade DSI users you can use the following program to make them your logon screen: http://www.julien-manici.com/windows_7_logon_background_changer/