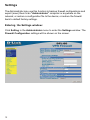
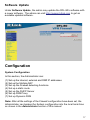
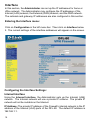
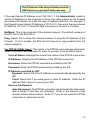
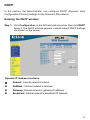
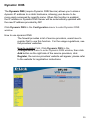
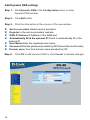
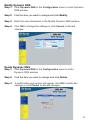
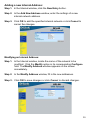
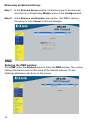
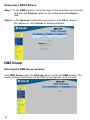
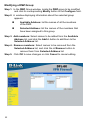
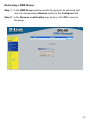
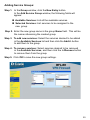
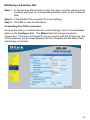
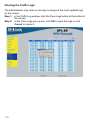
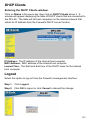
1
D-Link DFL-80
Ethernet VPN Firewall
Manual
Building Networks for People
Contents
Package Contents ................................................................................3
Introduction............................................................................................4
Software Management ..........................................................................6
Troubleshooting .................................................................................134
Technical Specifications ....................................................................142
Contacting Technical Support ............................................................144
Warranty and Registration .................................................................145
2
Package Contents
Contents of Package:
D-Link DFL-80 Firewall
Manual and Warranty on CD
Quick Installation Guide
AC power adapter (5V, 3A)
Note: Using a power supply with a different voltage rating than the one included with
the DFL-80 will cause damage and void the warranty for this product.
If any of the above items are missing, please contact your reseller.
System Requirements:
A computer with Windows, Macintosh, or Linux-based
operating system with an installed Ethernet adapter
Internet Explorer or Netscape Navigator version 6.0 or above,
with JavaScript enabled
3
Introduction
The DFL-80 provides six 10/100Mbit Ethernet network interface ports which
are (4) Internal/LAN, (1) External/WAN, and (1) DMZ port. It also provides an
easily operated software WebUI which allows users to set system parameters
or monitor network activities using a web browser.
DFL-80 security feature
Some functions that are available in the firewall are: Packet Filter, Proxy Server,
Intruder Alarm, Packet Monitor Log, Inbound/Outbound Policy, etc.
DFL-80 installation
This product is a hardware firewall. Therefore the installation is much easier
than a software firewall. First the user has to prepare four network cables,
and connect them to the internal, external and DMZ connectors respectively.
The LAN interfaces has to connect to the internal network. The external interface
has to connect with an external router, DSL modem, or Cable modem. The
DMZ interface connects to an independent HUB/Switch for the DMZ network.
DFL-80 function setting
The DFL-80 Firewall has a built-in WEBUI (Web User Interface). All
configurations and management are done through the WEBUI using an Internet
web browser.
DFL-80 monitoring function
The firewall provides monitoring functions which contains traffic log, event
log, traffic alarm, event alarm, and traffic statistics. Traffic alarm records the
packets of intruder invasions. Not only does the firewall log these attacks, it
can be set up to send E-mail alerts to the Administrator automatically for
immediate intruder’s invasion crisis management.
DFL-80 supporting protocols
The DFL-80 supports all the TCP, UDP and ICMP protocols, such as HTTP,
TELNET, SMTP, POP3, FTP, DNS, PING, etc. System Administrators can
set up proprietary protocols according to operating requirements.
4
Hardware Description
DMZ Port: Use this port to connect to the company’s server(s), which
needs direct connection to the Internet (FTP, SNMP, HTTP, DNS).
External Port (WAN): Use this port to connect to the external router, DSL
modem, or Cable modem.
Internal Ports (LAN): Use this port to connect to the internal network of
the office.
Reset: Reset the DFL-80 to the original default settings.
DC Power: connect one end of the power supply to this port, the other end
to the electrical wall outlet.
5
Software Management
DFL-80 management tool: Web User Interface
The main menu functions are located on the left-hand side of the screen, and
the display window will be on the right-hand side. The main functions include
12 items, which are: Administrator, Configuration, Address, Service, Schedule,
Policy, VPN, Virtual Server, Log, Alarm, Statistics, and Status.
6
Logging In
Connect the Administrator’s PC to the Internal (LAN) port of the DFL-80 Firewall.
Make sure there is a link light for the connection. The DFL-80 has an embedded
web server used for management and configuration. Use a web browser to
display the configurations of the firewall (such as Internet Explorer 6(or above)
or Netscape 6(or above) with full java script support). The default IP address of
the firewall is 192.168.1.1 with a subnet mask of 255.255.255.0. Therefore, the
IP address of the Administrator PC must be in the range between 192.168.1.2
/24– 192.168.1.254/24.
If the company’s internal IP Address is not in the subnet of 192.168.1.0, (i.e.
Internal IP Address is 172.16.0.1) the Administrator must change his/her PC IP
address to be within the same range of the internal subnet (i.e. 192.168.1.2).
Reboot the PC if necessary.
By default, the DFL-80 Firewall is shipped with its DHCP Server function
enabled. This means the client computers on the internal (LAN) network including
the Administrator PC can set their TCP/IP settings to automatically obtain an IP
address from the DFL-80.
The following table is a list of private IP addresses. These addresses may
not be used as an External IP address.
10.0.0.0 ~ 10.255.255.255
172.16.0.0 ~ 172.31.255.255
192.168.0.0 ~ 192.168.255.255
Once the Administrator PC has an IP address on the same network as the
DFL-80, open up an Internet web browser and type in http://192.168.1.1 in the
address bar.
A pop-up screen will appear and prompt for a username and password. A
username and password are required in order to connect to the Firewall. Enter
the default login username and password of the Administrator (see below).
Username: admin
Password: admin
7
Administration
The DFL-80 Firewall Administration and monitoring control is set by the System
Administrator. The System Administrator can add or modify System settings
and monitoring mode. The sub Administrators can only read System settings
but not modify them. In Administration, the System Administrator can:
(1) Add and change the sub Administrator’s names and passwords;
(2) Back up all Firewall settings into local files.
(3) Set up alerts for intruder invasions.
What is Administration?
“Administration” is the managing of settings such as the privileges of packets
that pass through the firewall and monitoring controls. Administrators may
manage, monitor, and configure firewall settings. All configurations are “readonly” for all users other than the Administrator; those users are not able to
change any settings for the firewall.
The three sub functions under Administrator are Wizard, Admin, Setting,
Date/Time, and Software Update.
Wizard: Includes a setup wizard to configure the Firewall quickly for Internet
access. Refer to the Quick Installion Guide to use the wizard.
Admin: has control of user access to the firewall. He/she can add/remove
users and change passwords.
Setting: The Administrator may use this function to backup firewall
configurations and export (save) them to an “Administrator” computer or
anywhere on the network; or restore a configuration file to the DFL-80; or restore
the firewall back to default factory settings. Under Setting, the Administrator
may enable e-mail alert notification. This will alert Administrator(s) automatically
whenever the firewall has experienced unauthorized access or a network hit
(intrusion or flooding). Once enabled, an IP address of a SMTP(Simple Mail
Transfer Protocol) server is required. Up to two e-mail addresses can be entered
for the alert notifications.
Date/Time: This function enables the Firewall to be synchronized either with
an Internet Time Server or with the client computer’s clock.
Software Update: Administrators may visit http://support.dlink.com to download
the latest firmware. Administrators may update the DFL-80 firmware to
maximize its performance and stay current with the latest fixes for intruding
attacks.
8
Administration (continued)
Firewall Administration setup
On the left hand menu, click on Administration, and then select Admin below
it. The current list of Administrator(s) shows up.
Settings of the Administration table:
Administrator Name: The username of Administrators for the firewall. The
user admin cannot be removed.
Privilege: The privileges of Administrators (Admin or Sub Admin)
The username of the main Administrator is Admin with read/write privilege.
Sub Admins may be created by the Admin by clicking New Sub Admin. Sub
Admins have read only privilege.
Configure: Click Modify to change the Sub Administrator’s password and click
Remove to delete a Sub Administrator.
9
Administration (continued)
Adding a new Sub Administrator:
Step 1. In the Administration window, click the New Sub Admin button
to create a new Sub Administrator.
Step 2. In the Add New Sub Administrator window:
! Sub Admin Name: Enter the username of new Sub Admin.
!
Password: Enter a password for the new Sub Admin.
!
Confirm Password: Enter the password again.
Step 3. Click OK to add the user or click Cancel to cancel the addition.
10
Administration (continued)
Changing the Sub-Administrator’s Password:
Step 1. In the Administration window, locate the Administrator name you
want to edit, and click on Modify in the Configure field.
Step 2. The Modify Administrator Password window will appear. Enter in
the required information:
! Password: enter original password.
! New Password: enter new password
! Confirm Password: enter the new password again.
Step 3. Click OK to confirm password change or click Cancel to cancel it.
Removing a Sub Administrator:
Step 1. In the Administration table, locate the Administrator name you want
to edit, and click on the Remove option in the Configure field.
Step 2. The Remove confirmation pop-up box will appear.
Step 3. Click OK to remove that Sub Admin or click Cancel to cancel.
11
Settings
The Administrator may use this function to backup firewall configurations and
export (save) them to an “Administrator” computer or anywhere on the
network; or restore a configuration file to the device; or restore the firewall
back to default factory settings.
Entering the Settings window:
Click Setting in the Administrator menu to enter the Settings window. The
Firewall Configuration settings will be shown on the screen.
12
Exporting DFL-80 Firewall settings:
Step 1. Under Firewall Configuration, click on the Download button next
to Export System Settings to Client.
Step 2. When the File Download pop-up window appears, choose the
destination place in which to save the exported file. The Administrator
may choose to rename the file if preferred.
Importing Firewall settings:
Step 1.
Under Firewall Configuration, click on the Browse button next to
Import System Settings. When the Choose File pop-up window
appears, select the file to which contains the saved firewall settings,
then click OK.
Step 2.
Click OK to import the file into the Firewall or click Cancel to cancel
importing.
13
Restoring Factory Default Settings:
Step 1. Select Reset Factory Settings under Firewall Configuration.
Step 2. Click OK at the bottom-right of the screen to restore the factory
settings.
Enabling E-mail Alert Notification:
Step 1. Select Enable E-mail Alert Notification under E-Mail Settings.
This function will enable the Firewall to send e-mail alerts to the
System Administrator when the network is being attacked by
intruders or when emergency conditions occur.
Step 2. SMTP Server IP: Enter SMTP server’s IP address.
Step 3. E-Mail Address 1: Enter the first e-mail address to receive the
alarm notification.
Step 4. E-Mail Address 2: Enter the second e-mail address to receive the
alarm notification. (Optional)
Step 5. Click OK on the bottom-right of the screen to enable E-mail alert
notification.
14
To-Firewall Packets Log
Once this function is enabled, every packet passing through the Firewall will
be recorded for the administrator to trace.
Firewall Reboot
Once this function is enabled, the firewall will be reboot.
Step 1. Click Setting in the Administration menu to enter the settings
window.
Step 2. To reboot the Firewall, Click Reboot.
Step 3. A confirmation pop-up box will appear.
Step 4. Follow the confirmation pop-up box, click OK to restart firewall or
click Cancel to discard.
15
Date/Time
Admins can configure the Firewall’s date and time by either syncing to an
Internet Network Time Server (NTP) or by syncing to your computer’s clock.
Follow these steps to sync to an Internet Time Server.
Step 1. Enable synchronization by checking the box.
Step 2. Click the down arrow to select the offset time from GMT.
Step 3. Enter the Server IP Address or Server name with which you want to
synchronize.
Step 4. Update system clock every 5 minutes You can set the interval
time to synchronize with outside servers. If you set it to 0, it means
the device will not synchronize automatically.
Follow this step to sync to your computer’s clock.
Step 1. Click on the Sync button.
Click the OK button below to apply the setting or click Cancel to discard
changes.
16
Software Update
Under Software Update, the admin may update the DFL-80’s software with
a newer software. The admin can visit http://support.dlink.com to get an
available updated software.
Configuration
System Configuration
In this section, the Administrator can:
(1) Set up the internal, external and DMZ IP addresses
(2) Set up the Multiple NAT
(3) Set up the Firewall detecting functions
(4) Set up a static route
(5) Set up the DHCP Server
(6) Set up DNS Proxy
(7) Set up Dynamic DNS
Note: After all the settings of the Firewall configuration have been set, the
Administrator can backup the System configuration into the local hard drive
as shown in the Administrator section of this manual.
17
Interface
In this section, the Administrator can set up the IP addresses for home or
office network. The Administrator may configure the IP addresses of the
Internal (LAN) network, the External (WAN) network, and the DMZ network.
The netmask and gateway IP addresses are also configured in this section.
Entering the Interface menu:
Click on Configuration in the left menu bar. Then click on Interface below
it. The current settings of the interface addresses will appear on the screen.
Configuring the Interface Settings:
Internal Interface
Using the Internal Interface, the Administrator sets up the Internal (LAN)
network. The Internal network will use a private IP scheme. The private IP
network will not be routable on the Internet.
IP Address: The private IP address of the Firewall’s internal network is the IP
address of the Internal (LAN) ports of the DFL-80. The default IP address is
192.168.1.1.
18
The IP Address of the Internal Interface and the
DMZ Interface are private IP addresses only.
If the new Internal IP Address is not 192.168.1.1, the Administrator needs to
set the IP Address on the computer to be on the same subnet as the Firewall
and restart the System to make the new IP address effective. For example, if
the Firewall’s new Internal IP Address is 172.16.0.1, then enter the new Internal
IP Address 172.16.0.1 in the URL field of browser to connect to Firewall.
NetMask: This is the netmask of the internal network. The default netmask of
the DFL-80 is 255.255.255.0.
Ping: Select this to allow the internal network to ping the IP Address of the
Firewall. If set to enable, the DFL-80 will respond to ping packets from the
internal network.
For PPPoE (ADSL User): This option is for PPPoE users who are required to
enter a username and password in order to connect, such as ADSL users.
Current Status: Displays the current line status of the PPPoE connection.
IP Address: Displays the IP Address of the PPPoE connection
Username: Enter the PPPoE username provided by the ISP.
Password: Enter the PPPoE password provided by the ISP.
IP Address provided by ISP:
Dynamic: Select this if the IP address is automatically assigned by the
ISP.
Fixed: Select this if you were given a static IP address. Enter the IP
address that is given to you by your ISP.
Service-On-Demand:
Auto Disconnect: The PPPoE connection will automatically disconnect
after a length of idle time (no activities). Enter in the amount of idle
minutes before disconnection. Enter ‘0’ if you do not want the PPPoE
connection to disconnect at all.
19
Ping: Select this to allow the external network to ping the IP Address of
the Firewall. This will allow people from the Internet to be able to ping
the Firewall. If set to enable, the DFL-80 will respond to echo request
packets from the external network.
WebUI: Select this to allow the DFL-80 WEBUI to be accessed from
the WAN network. This will allow the WebUI to be configured from a
user on the Internet. Keep in mind that the DFL-80 always requires a
username and password to enter the WebUI.
For Dynamic IP Address (Cable Modem User): This option is for users who
are automatically assigned an IP address by their ISP, such as cable modem
users. The following fields apply:
IP Address: The dynamic IP address obtained by the Firewall from the
ISP will be displayed here. This is the IP address of the WAN port of the
DFL-80.
MAC Address: This is the MAC Address of the DFL-80.
Hostname: This will be the name assign to the DFL-80. Some cable
modem ISP assign a specific hostname in order to connect to their
network. Please enter the hostname here. If not required by your ISP,
you do not have to enter a hostname.
Ping: Select this to allow the external network to ping the IP Address of
the Firewall. This will allow people from the Internet to be able to ping
the Firewall. If set to enable, the DFL-80 will respond to echo request
packets from the external network.
WebUI: Select this to allow the DFL-80 WEBUI to be accessed from
the WAN network. This will allow the WebUI to be configured from a
user on the Internet. Keep in mind that the DFL-80 always requires a
username and password to enter the WebUI.
For Static IP Address: This option is for users who are assigned a static IP
Address from their ISP. Your ISP will provide all the information needed for this
section such as IP Address, Netmask, Gateway, and DNS. Use this option
also if you have more than one public IP Address assigned to you.
IP Address: Enter the static IP address assigned to you by your ISP.
This will be the public IP address of the WAN port of the DFL-80.
Netmask: This will be the Netmask of the WAN network. (i.e.
255.255.255.0)
Default Gateway: This will be the Gateway IP address.
Domain Name Server (DNS): This is the IP Address of the DNS server.
20
Ping: Select this to allow the external network to ping the IP Address of
the Firewall. This will allow people from the Internet to be able to ping
the Firewall. If set to enable, the DFL-80 will respond to echo request
packets from the external network.
WebUI: Select this to allow the DFL-80 WEBUI to be accessed from
the WAN network. This will allow the WebUI to be configured from a
user on the Internet. Keep in mind that the DFL-80 always requires a
username and password to enter the WebUI.
DMZ Interface
The Administrator uses the DMZ Interface to set up the DMZ network. The
DMZ network consists of server computers such as FTP, SMTP, and HTTP
(web). These server computers are put in the DMZ network so they can be
isolated from the Internal (LAN) network traffic. Broadcast messages from
the Internal network will not cross over to the DMZ network to cause
congestions and slow down these servers. This allows the server
computers to work efficiently without any slowdowns.
IP Address: The private IP address of the Firewall’s DMZ interface.
This will be the IP address of the DMZ port. The IP address the
Administrator chooses will be a private IP address and cannot use
the same network as the External or Internal network.
NetMask: This will be the netmask of the DMZ network.
Ping: Select this to allow the external network to ping the IP Address of
the Firewall. This will allow people from the Internet to be able to ping
the Firewall. If set to enable, the DFL-80 will respond to echo request
packets from the external network.
WebUI: Select this to allow the DFL-80 WEBUI to be accessed from
the External (WAN) network. This will allow the WebUI to be configured
from a user on the Internet. Keep in mind that the DFL-80 always requires
a username and password to enter the WebUI.
21
Multiple NAT
Multiple NAT allows the local port to set multiple subnetworks and connect
with the internet through different external IP Addresses. For instance: the lease
line of a company applies several real IP Addresses 168.85.88.0/24, and the
company is divided into the R&D department, the service and sales department,
the procurement department, and the accounting department. The company
can distinguish each department by different subnetworks for convenient
management. The settings are as follows
1.R&D department subnetwork:192.168.1.11/24 (Internal) 168.85.88.253 (External)
2.Service department subnetwork: 192.168.2.11/24 (Internal) 168.85.88.252 (External)
3.Sales deparment subnetwork: 192.168.3.11/24 (Internal) 168.85.88.251 (External)
4.Procurement department subnetwork 192.168.4.11/24 (Internal) 168.85.88.250 (External)
5.Accounting department subnetwork 192.168.5.11/24 (Internal) 168.85.88.249(External)
The first department (the R&D department) was set while setting interface IP,
the other four have to be added in Multiple NAT after completing the settings;
each department uses a different WAN IP Address to connect to the Internet.
The settings of each department are as follows
Service IP Address:192.168.2.1
Subnet Mask: 255.255.255.0
Default Gateway: 192.168.2.11
The other departments are also set by groups, this is the function of Multiple
NAT.
22
Multiple NAT settings
Click Multiple NAT in the Configuration menu to enter Multiple NAT window.
Multiple NAT
Global port interface IP Address: Global port IP Address.
Local port interface IP Address: Local port IP Address and Subnet
Mask.
Modify: Modify the settings of Multiple NAT. Click Modify to modify the
parameters of Multiple NAT or click Delete to delete settings.
23
Add Multiple NAT
Step 1. Click Multiple NAT in the Configuration menu to enter Multiple
NAT window.
Step 2. Click the Add button below to add Multiple NAT.
Step 3. Enter the IP Address in the appropriate column of the new window.
External Interface IP: WAN IP address to be used for the Multiple
NAT session.
Alias IP of Internal Interface: LAN IP address to be used for the
Multiple NAT session.
Netmask: LAN netmask to be used for the multiple NAT session.
Step 4. Click OK to add Multiple NAT or click Cancel to discard changes.
24
Modify Multiple NAT
Step 1. Click Multiple NAT in the Configuration menu to enter Multiple
NAT window.
Step 2. Find the IP Address you want to modify and click Modify
Step 3. Enter the new IP Address in Modify Multiple NAT window.
Step 4. Click the OK button below to change the setting or click Cancel
to discard changes.
Delete Multiple NAT
Step 1. Click Multiple NAT in the Configuration menu to enter Multiple
NAT window.
Step 2. Find the IP Address you want to delete and click Delete.
Step 3.
A confirmation pop-up box will appear, click OK to delete the setting
or click Cancel to discard changes.
25
Hacker Alert
The Administrator can enable the DFL-80’s intruder alert functions in this section.
When abnormal conditions occur, the Firewall will send an e-mail alert to notify
the Administrator, and also display warning messages in the Event window of
Alarm.
Auto Detect functions:
! Detect SYN Attack: Select this option to detect TCP SYN attacks that
intruders send to server computers continuously to block or cut down
all the connections of the servers. These attacks will prevent valid
users from connecting to the servers. After enabling this function, the
System Administrator can enter the number of SYN packets per second
that is allow to enter the network/firewall. Once the SYN packets exceed
this limit, the activity will be logged in Alarm and an email alert is sent
to the Administrator. The default SYN flood threshold is set to 200
Pkts/Sec .
! Detect ICMP Flood: Select this option to detect ICMP flood attacks.
When intruders continuously send PING packets to all the
machines of the internal networks or to the Firewall, your network is
experiencing an ICMP flood attack. This can cause traffic
congestion on the network and slows the network down. After
enabling this function, the System Administrator can enter the
number of ICMP packets per second that is allowed to enter the
network/firewall. Once the ICMP packets exceed this limit, the
activity will be logged in Alarm and an email alert is sent to the
Administrator. The default ICMP flood threshold is set to 1000 Pkts/
Sec.
26
!
!
!
!
!
!
!
!
Detect UDP Flood: Select this option to detect UDP flood attacks. A
UDP flood attack is similar to an ICMP flood attack. After enabling this
function, the System Administrator can enter the number of UDP packets
per second that is allow to enter the network/firewall. Once the UDP
packets exceed this limit, the activity will be logged in Alarm and an
email alert is sent to the Administrator. The default UDP flood threshold
is set to 1000 Pkts/Sec .
Detect Ping of Death Attack: Select this option to detect the attacks of
tremendous trash data in PING packets that hackers send to cause
System malfunction This attack can cause network speed to slow down,
or even make it necessary to restart the computer to get a normal
operation.
Detect Tear Drop Attack: Select this option to detect tear drop attacks.
These are packets that are segmented to small packets with negative
length. Some Systems treat the negative value as a very large number,
and copy enormous data into the System to cause System damage,
such as a shut down or a restart.
Detect IP Spoofing Attack: Select this option to detect spoof attacks.
Hackers disguise themselves as trusted users of the network in Spoof
attacks. They use a fake identity to try to pass through the Firewall
System and invade the network.
Filter IP Source Route Option: Each IP packet can carry an optional
field that specifies the replying address that can be different from the
source address specified in packet’s header. Hackers can use this
address field on disguised packets to invade internal networks and send
internal networks’ data back to them.
Detect Port Scan Attack: Select this option to detect the port scans
hackers use to continuously scan networks on the Internet to detect
computers and vulnerable ports that are opened by those computers.
Detect Land Attack: Some Systems may shut down when receiving
packets with the same source and destination addresses, the same
source port and destination port, and when SYN on the TCP header is
marked. Enable this function to detect such abnormal packets.
Default Packet Deny: Denies all packets from passing the Firewall. A
packet can pass only when there is a policy that allows it to pass.
After enabling the needed detect functions, click OK to activate the changes.
27
Route Table
In this section, the Administrator can add static routes for the networks.
Entering the Route Table screen:
Click Configuration on the left side menu bar, then click Route Table below
it. The Route Table window appears, in which current route settings are
shown.
Route Table functions:
!
Interface: Destination network, internal or external networks.
!
Destination IP: IP address of destination network.
!
NetMask: Netmask of destination network.
!
Gateway: Gateway IP address for connecting to destination network.
!
Configure: Change settings in the route table.
28
Adding a new Static Route:
Step 1. In the Route Table window, click the New Entry button.
Step 2. In the Add New Static Route window, enter new static route
information.
Step 3. In the Interface pull-down menu, select the network to connect
(Internal, External or DMZ).
Step 4. Click OK to add the new static route or click Cancel to cancel.
Removing a Static Route:
Step 1. In the Route Table window, find the route to remove and click the
corresponding Remove option in the Configure field.
Step 2. In the Remove confirmation pop-up box, click OK to confirm
removing or click Cancel to cancel it.
29
Modifying a Static Route:
Step 1. In the Route Table menu, find the route to edit and click the
corresponding Modify option in the Configure field.
Step 2. In the Modify Static Route window, modify the necessary routing
addresses.
Step 3. Click OK to apply changes or click Cancel to cancel it.
30
DHCP
In the section, the Administrator can configure DHCP (Dynamic Host
Configuration Protocol) settings for the Internal (LAN) network.
Entering the DHCP window:
Step 1. Click Configuration on the left hand side menu bar, then click DHCP
below it. The DHCP window appears in which current DHCP settings
are shown on the screen.
Dynamic IP Address functions:
!
Subnet : Internal network’s subnet
!
NetMask : Internal network’s netmask
!
Gateway: Internal network’s gateway IP address
!
Broadcast: Internal network’s broadcast IP address
31
Enabling DHCP Support:
Step 1. In the Dynamic IP Address window, click Enable DHCP Support.
Step 2. Domain Name: The Administrator may enter the name of the
Internal network domain if preferred.
Step 3. Domain Name Server: Enter in the IP address of the DNS Server
to be assigned to the Internal network.
Step 4. Client IP Address Range 1: Enter the starting and the ending IP
address dynamically assigning to DHCP clients.
Step 5. Client IP Address Range 2: Enter the starting and the ending IP
address dynamically assigning to DHCP clients. (Optional)
Step 6. Click OK to enable DHCP support.
Step 7. Lease Time: Enter the hour for this configuration to last.
DNS-Proxy
The DFL-80’s Administrator may use the DNS Proxy function to make the
DFL-80 Firewall act as a DNS Server for the Internal and DMZ network. All
DNS requests to a specific Domain Name will be routed to the firewall’s IP
address. For example, let’s say an organization has their mail server (i.e.,
mail.dfl80.com) in the DMZ network (i.e. 192.168.10.10). The outside Internet
world may access the mail server of the organization easily by its domain
name, providing that the Administrator has set up Virtual Server or Mapped IP
settings correctly. However, for the users in the Internal network, their
external DNS server will assign them a public IP address for the mail server.
So for the Internal network to access the mail server (mail.dfl80.com), they
would have to go out to the Internet, then come back through the Firewall to
access the mail server (loopback). Essentially, the internal network is
accessing the mail server by a real public IP address, while the mail server
serves their request by a NAT address and not a real one.
This odd situation occurs when there are servers in the DMZ network and
they are binded to real IP addresses. To avoid this, set up DNS Proxy so all
the Internal network computers will use the DFL-80 as a DNS server, which
acts as the DNS Proxy.
If you want to use the DNS Proxy function of the DFL-80, the end user’s
main DNS server IP address should be the same LAN IP Address as the
DFL-80.
32
Entering the DNS Proxy window:
Click on Configuration in the menu bar, then click on DNS Proxy below it.
The DNS Proxy window will appear.
Below is the information needed for setting up the DNS Proxy:
• Domain Name: The domain name of the server
• Virtual IP Address: The virtual IP address respective to DNS Proxy
• Configure: Modify or remove each DNS Proxy policy
Adding a new DNS Proxy:
Step 1: Click on the New Entry button and the Add New DNS Proxy
window will appear.
Step 2: Fill in the appropriate settings for the domain name and virtual IP
address.
Step 3: Click OK to save the policy or Cancel to cancel.
33
Modifying a DNS Proxy:
Step 1: In the DNS Proxy window, find the policy to be modified and click
the corresponding Modify option in the Configure field.
Step 2: Make the necessary changes needed.
Step 3: Click OK to save changes or click on Cancel to cancel
modifications.
Removing a DNS Proxy:
Step 1: In the DNS Proxy window, find the policy to be removed and click
the corresponding Remove option in the Configure field.
Step 2: A confirmation pop-up box will appear, click OK to remove the DNS
Proxy or click Cancel.
34
Dynamic DNS
The Dynamic DNS (require Dynamic DNS Service) allows you to alias a
dynamic IP address to a static hostname, allowing your device to be
more easily accessed by specific name. When this function is enabled,
the IP address in Dynamic DNS Server will be automatically updated with
the new IP address provided by ISP.
Click Dynamic DNS in the Configuration menu to enter Dynamic DNS
window.
How to use dynamic DNS.
The firewall provides a list of service providers, users have to
register first to use this function. For the usage regulations, see
the providers’ websites.
How to register First, Click Dynamic DNS in the
Configuration menu to enter Dynamic DNS window, then click
Add button on the right side of the service providers, click
Register, the service providers’ website will appear, please refer
to the website for registration instructions.
35
Add Dynamic DNS settings
Step 1: Click Dynamic DNS in the Configuration menu to enter
Dynamic DNS window.
Step 2: Click Add button.
Step 3: Click the information in the column of the new window.
!
!
!
!
Service providers Select service providers.
Register to the service providers’ website.
WAN IP Address IP Address of the WAN port.
Automatically fill in the external IP Check to automatically fill in the
external IP.
! User Name Enter the registered user name.
! Password Enter the password provided by ISP(Internet Service Provider).
! Domain name Your host domain name provided by ISP.
Step 4: Click OK to add dynamic DNS or click Cancel to discard changes.
36
Modify Dynamic DNS
Step 1: Click Dynamic DNS in the Configuration menu to enter Dynamic
DNS window.
Step 2: Find the item you want to change and click Modify.
Step 3: Enter the new information in the Modify Dynamic DNS window.
Step 4: Click OK to change the settings or click Cancel to discard
changes.
Delete Dynamic DNS
Step 1: Click Dynamic DNS in the Configuration menu to enter
Dynamic DNS window.
Step 2: Find the item you want to change and click Delete.
Step 3: A confirmation pop-up box will appear, click OK to delete the
settings or click Cancel to discard changes.
37
Address
The DFL-80 Firewall allows the Administrator to set Interface addresses of the
Internal network, Internal network group, External network, External network
group, DMZ and DMZ group.
What is the Address Table?
An IP address in the Address Table can be an address of a computer or a sub
network. The Administrator can assign an easily recognized name to an IP
address. Based on the network it belongs to, an IP address can be an internal
IP address, external IP address or DMZ IP address. If the Administrator needs
to create a control policy for packets of different IP addresses, he can first add
a new group in the Internal Network Group or the External Network Group
and assign those IP addresses into the newly created group. Using group
addresses can greatly simplify the process of building control policies.
With easily recognized names of IP addresses and names of address groups
shown in the address table, the Administrator can use these names as the
source address or destination address of control policies. The address table
should be built before creating control policies, so that the Administrator can
pick the names of correct IP addresses from the address table when setting up
control policies.
Internal
Entering the Internal window:
Step 1. Click Internal under the Address menu to enter the Internal
window. The current setting information such as the name of the
internal network, IP, netmask addresses, and MAC addresses will
show on the screen.
38
Adding a new Internal Address:
Step 1. In the Internal window, click the New Entry button.
Step 2. In the Add New Address window, enter the settings of a new
internal network address.
Step 3. Click OK to add the specified internal network or click Cancel to
cancel the changes.
Modifying an Internal Address:
Step 1. In the Internal window, locate the name of the network to be
modified. Click the Modify option in its corresponding Configure
field. The Modify Address window appears on the screen
immediately.
Step 2. In the Modify Address window, fill in the new addresses.
Step 3. Click OK to save changes or click Cancel to discard changes.
39
Removing an Internal Address:
Step 1. In the Internal window, locate the name of the network to be
removed. Click the Remove option in its corresponding Configure
field.
Step 2. In the Remove confirmation pop-up box, click OK to remove the
address or click Cancel to discard changes.
Internal Group
Entering the Internal Group window:
The Internal Addresses may be combined together to become a group.
Click Internal Group under the Address menu to enter the Internal Group
window. The current setting information for the Internal network group appears
on the screen.
40
Adding an Internal Group:
Step 1. In the Internal Group window, click the New Entry button to enter the
Add New Address Group window.
Step 2. In the Add New Address Group window:
!
Available Address: list the names of all the members of the
internal network.
!
Selected Address: list the names to be assigned to the new
group.
!
Name: enter the name of the new group in the open field.
Step 3. Add members: Select names to be added in Available Address list,
and click the Add>> button to add them to the Selected Address list.
Step 4. Remove members: Select names to be removed in the Selected
Address list, and click the <<Remove button to remove these
members from Selected Address list.
Step 5. Click OK to add the new group or click Cancel to discard changes.
41
Modifying an Internal Group:
Step 1. In the Internal Group window, locate the network group desired to
be modified and click its corresponding Modify option in the
Configure field.
Step 2.
A window displaying the information of the selected group appears:
!
Available Address: list names of all members of the Internal
network.
!
Selected Address: list names of members which have been
assigned to this group.
Step 3. Add members: Select names in Available Address list, and click
the Add>> button to add them to the Selected Address list.
Step 4. Remove members: Select names in the Selected Address list,
and click the <<Remove button to remove these members from
the Selected Address list.
Step 5. Click OK to save changes or click Cancel to discard changes.
42
Removing an Internal Group:
Step 1. In the Internal Group window, locate the group to be removed and
click its corresponding Remove option in the Configure field.
Step 2. In the Remove confirmation pop-up box, click OK to remove the
group or click Cancel to discard changes.
External
Entering the External window:
Click External under the Address menu to enter the External window. The
current setting information, such as the name of the External network, IP and
Netmask addresses will show on the screen.
43
Adding a new External Address:
Step 1. In the External window, click the New Entry button.
Step 2. In the Add New Address window, enter the settings for a new
external network address.
Step 3. Click OK to add the specified external network or click Cancel
to discard changes.
Removing an External Address:
Step 1. In the External table, locate the name of the network to be removed
and click the Remove option in its corresponding
Configure field.
Step 2. In the Remove confirmation pop-up box, click OK to remove
the address or click Cancel to discard changes.
44
External Group
Entering the External Group window:
Click the External Group under the Address menu bar to enter the External
window. The current settings for the external network group(s) will appear on
the screen.
45
Adding an External Group:
Step 1. In the External Group window, click the New Entry button and
the Add New Address Group window will appear.
Step 2. In the Add New Address Group window the following fields will
appear:
! Name: enter the name of the new group.
! Available Address: List the names of all the
members of the external network.
! Selected Address: List the names to assign to
the new group.
Step 3. Add members: Select the names to be added in the Available
Address list, and click the Add>> button to add them to the
Selected Address list.
Step 4. Remove members: Select the names to be removed in the
Selected Address list, and click the <<Remove button to
remove them from the Selected Address list.
Step 5. Click OK to add the new group or click Cancel to discard
changes.
46
Editing an External Group:
Step 1. In the External Group window, locate the network group to be
modified and click its corresponding Modify button in the
Configure field.
Step 2.
A window displaying the information of the selected group
appears:
n Available Address: list the names of all the
members of the external network.
n Selected Address: list the names of the
members that have been assigned to this group.
Step 3. Add members: Select the names to be added in the Available
Address list, and click the Add>> button to add them to the
Selected Address list.
Step 4. Remove members: Select the names to be removed in the
Selected Address list, and click the <<Remove button to
remove them from the Selected Address list.
Step 5. Click OK to save changes or click Cancel to discard changes.
47
Removing an External Group:
Step 1. In the External Group window, locate the group to be removed
and click its corresponding Modify option in the Configure field.
Step 2. In the Remove confirmation pop-up box, click OK to remove
the group or click Cancel to discard changes.
DMZ
Entering the DMZ window:
Click DMZ under the Address menu to enter the DMZ window. The current
setting information such as the name of the internal network, IP, and
Netmask addresses will show on the screen.
48
Adding a new DMZ Address:
Step 1. In the DMZ window, click the New Entry button.
Step 2. In the Add New Address window, enter the settings for a new
DMZ address.
Step 3. Click OK to add the specified DMZ or click Cancel to discard
changes.
Modifying a DMZ Address:
Step 1. In the DMZ window, locate the name of the network to be modified and
click the Modify option in its corresponding Configure field.
Step 2. In the Modify Address window, fill in new addresses.
Step 3. Click OK on save the changes or click Cancel to discard changes.
49
Removing a DMZ Address:
Step 1. In the DMZ window, locate the name of the network to be removed
and click the Remove option in its corresponding Configure
field.
Step 2. In the Remove confirmation pop-up box, click OK to remove
the address or click Cancel to discard changes.
DMZ Group
Entering the DMZ Group window:
Click DMZ Group under the Address menu to enter the DMZ window. The
current settings information for the DMZ group appears on the screen.
50
Adding a DMZ Group:
Step 1. In the DMZ Group window, click the New Entry button.
Step 2. In the Add New Address Group window:
! Available Address: List names of all members of the
DMZ.
! Selected Address: list names to assign to a new group.
Step 3. Name: Enter a name for the new group.
Step 4. Add members: Select the names to be added from the Available
Address list, and click the Add>> button to add them to the
Selected Address list.
Step 5. Remove members: Select names to be removed from the
Selected Address list, and click the <<Remove button to
remove them from the Selected Address list.
Step 6. Click OK to add the new group or click Cancel to discard
changes.
51
Modifying a DMZ Group:
Step 1. In the DMZ Group window, locate the DMZ group to be modified
and click its corresponding Modify button in the Configure field.
Step 2. A window displaying information about the selected group
appears:
!
Available Address: list the names of all the members
of the DMZ.
!
Selected Address: list the names of the members that
have been assigned to this group.
Step 3. Add members: Select names to be added from the Available
Address list, and click the Add>> button to add them to the
Selected Address list.
Step 4. Remove members: Select names to be removed from the
Selected Address list, and click the <<Remove button to
remove them from Selected Address list.
Step 5. Click OK to save changes or click Cancel to cancel editing.
52
Removing a DMZ Group:
Step 1. In the DMZ Group window, locate the group to be removed and
click its corresponding Remove option in the Configure field.
Step 2. In the Remove confirmation pop-up box, click OK to remove
the group.
53
Service
In this section, network services are defined and new network services can be
added. There are three sub menus under Service which are: Pre-defined,
Custom, and Group. The Administrator can simply follow the instructions below
to define the protocols and port numbers for network communication
applications. Users then can connect to servers and other computers through
these available network services.
What is Service?
TCP and UDP protocols support varieties of services, and each service consists
of a TCP Port or UDP port number, such as TELNET(23), SMTP(25),
POP3(110),etc. The DFL-80 Firewall defines two services: pre-defined service
and custom service. The common-use services like TCP and UDP are defined
in the pre-defined service and cannot be modified or removed. In the custom
menu, users can define other TCP port and UDP port numbers that are not in
the pre-defined menu according to their needs. When defining custom services,
the client port ranges from 1024 to 65535 and the server port ranges from 0 to
1023.
How do I use Service?
The Administrator can add new service group names in the Group option under
Service menu, and assign desired services into that new group. Using service
group the Administrator can simplify the processes of setting up control policies.
For example, there are 10 different computers that want to access 5 different
services on a server, such as HTTP, FTP, SMTP, POP3, and TELNET. Without
the help of service groups, the Administrator needs to set up 50 (10x5) control
policies, but by applying all 5 services to a single group name in the service
field, it takes only one control policy to achieve the same effect as the 50 control
policies.
54
Pre-defined
Entering the Pre-defined window:
Click Service on the menu bar on the left side of the window. Click Predefined under it. A window will appear with a list of services and their
associated Port numbers. Note: This list cannot be modified.
Custom
Entering the Custom window:
Click Service on the menu bar on the left side of the window. Click Custom
under it. A window will appear with a table showing all services currently
defined by the Administrator.
55
Adding a new Service:
Step 1: In the Custom window, click the New Entry button and a new
service table appears.
Step 2:
In the new service table:
! Service Name: This will be the name referencing the new
service.
! Protocol: Enter the network protocol type to be used, such as
TCP, UDP, or Other (please enter the number for the protocol
type).
! Client Port: Enter the range of port number of new clients.
! Server Port: Enter the range of port number of new servers.
The client port ranges from 1024 to 65535 and
the server port ranges from 0 to 1023.
Step 3: Click OK to add new services, or click Cancel to cancel.
56
Modifying Custom Services:
Step 1. In the Custom table, locate the name of the service to be
modified. Click its corresponding Modify option in the
Configure field.
Step 2. A table showing the current settings of the selected service
appears on the screen
Step 3. Enter the new values.
Step 4. Click OK to accept editing; or click Cancel.
Removing Custom Services:
Step 1. In the Custom window, locate the service to be removed. Click
its corresponding Remove option in the Configure field.
Step 2. In the Remove confirmation pop-up box, click OK to remove
the selected service or click Cancel to cancel action.
57
Group
Accessing the Group window:
Click Service in the menu bar on the left hand side of the window. Click Group
under it. A window will appear with a table displaying current service group
settings set by the Administrator.
58
Adding Service Groups:
Step 1. In the Group window, click the New Entry button.
In the Add Service Group window, the following fields will
appear:
! Available Services: List all the available services.
! Selected Services: List services to be assigned to the
new group.
Step 2. Enter the new group name in the group Name field. This will be
the name referencing the created group.
Step 3. To add new services: Select the services desired to be added
in the Available Services list and then click the Add>> button
to add them to the group.
Step 4. To remove services: Select services desired to be removed
in the Available Services, and then click the <<Remove button
to remove them from the group.
Step 5. Click OK to save the new group settings.
59
Modifying Service Groups:
Step 1. In the Group window, locate the service group to be edited.
Click its corresponding Modify option in the Configure field.
Step 2. In the Mod (modify) group window the following fields are
displayed:
! Available Services: Lists all the available services.
! Selected Services: List services that have been
assigned to the selected group.
Step 3. Add new services: Select services in the Available
Services list, and then click the Add>> button to add them to
the group.
Step 4. Remove services: Select services to be removed in the
Selected Services list, and then click the <<Remove button
to remove these services from the group.
Step 5. Click OK to save editing changes.
60
Removing Service Groups:
Step 1. In the Group window, locate the service group to be removed
and click its corresponding Remove option in the Configure
field.
Step 2. In the Remove confirmation pop-up box, click OK to remove
the selected service group or click Cancel to cancel
removing.
61
Schedule
The DFL-80 Office Firewall allows the Administrator to configure a schedule
for policies to take affect. By creating a schedule, the Administrator is
allowing the Firewall policies to be used at those designated times only. Any
activities outside of the scheduled time slot will not follow the Firewall policies
therefore will likely not be permitted to pass through the Firewall. The
Administrator can configure the start time and stop time periods in a day.
For example, an organization may only want the Firewall to allow the internal
network users to access the Internet during work hours. Therefore, the
Administrator may create a schedule to allow the Firewall to work MondayFriday, 8AM-5PM only. During the non-work hours, the Firewall will not allow
Internet access.
Accessing the Schedule window:
Click on Schedule on the menu bar and the schedule window will appear
displaying the active schedules.
The following items are displayed in this window:
Name: the name assigned to the schedule
Comment: a short comment describing the schedule
Configure: modify or remove
62
Adding a new Schedule:
Step 1: Click on the New Entry button and the Add New Schedule window
will appear.
Step 2:
Schedule Name: Fill in a name for the new schedule.
Period 1: Configure the start and stop time for the days of the
week that the schedule will be active.
Step 3: Click OK to save the new schedule or click Cancel to cancel
adding the new schedule.
Modifying a Schedule:
Step 1: In the Schedule window, find the policy to be modified and click the
corresponding Modify option in the Configure field.
Step 2: Make necessary changes.
Step 3: Click OK to save changes.
63
Removing a Schedule:
Step 1: In the Schedule window, find the policy to be removed and click the
corresponding Remove option in the Configure field.
Step 2: A confirmation pop-up box will appear, click on OK to remove the
schedule.
64
Policy
This section provides the Administrator with facilities to set control policies
for packets with different source IP addresses, source ports, destination IP
addresses, and destination ports. Control policies decide whether packets
from different network objects, network services, and applications are able to
pass through the Firewall.
What is Policy?
The DFL-80 uses policies to filter packets. The policy settings are: source
address, destination address, services, permission, packet log, packet statistics,
and flow alarm. Based on its source addresses, a packet can be categorized
into:
(1).
Outgoing: A client is in the internal networks while a server is in the
external networks.
(2)
Incoming: A client is in the external networks, while a server is in the
internal networks.
(3)
To DMZ: A client is either in the internal networks or in the external
networks while, server is in DMZ.
(4)
From DMZ: A client is in DMZ while server is either in the internal networks
or in the external networks.
How do I use Policy?
The policy settings are source addresses, destination addresses, services,
permission, log, statistics, and flow alarm. Among them, source addresses,
destination addresses and IP mapping addresses have to be defined in the
Address menu in advance. Services can be used directly in setting up policies,
if they are in the Pre-defined Service menu. Custom services need to be defined
in the Custom menu before they can be used in the policy settings.
If the destination address of an incoming policy is a Mapped IP address or a
Virtual Server address, then the address has to be defined in the Virtual Server
section instead of the Address section.
Step 1.
Step 2.
Step 3.
Step 4.
In Address, set names and addresses of
source networks and destination networks.
In Service, set services.
In Virtual Server, set names and addresses
of mapped IP or virtual server (only applied to
Incoming policies).
Set control policies in Policy
65
Outgoing
This section describes steps to create policies for packets and services from
the Internal (LAN) network to the External (WAN) network.
Entering the Outgoing window:
Click Policy on the left hand side menu bar, then click Outgoing under it. A
window will appear with a table displaying currently defined Outgoing
policies.
The fields in the Outgoing window are:
!
Source: Source network addresses that are specified in the
Internal section of Address menu, or all the Internal (LAN)
network addresses.
!
Destination: Destination network addresses that are specified
in the External section of the Address menu, or all the External
(WAN) network addresses.
!
Service: Specify services provided by external network servers.
!
Action: Control actions to permit or reject/deny packets from
internal networks to external network travelling through the
Firewall.
!
Option: Specify the monitoring functions on packets from internal
networks to external networks travelling through the Firewall.
Configure: Modify settings.
Move: This sets the priority of the policies, number 1 being the
highest priority.
66
Adding a new Outgoing Policy:
Step 1: Click on the New Entry button and the Add New Policy window will
appear.
Step 2:
Source Address: Select the name of the Internal (LAN) network from the drop
down list. The drop down list contains the names of all internal networks defined
in the Internal section of the Address menu. To create a new source address,
please go to the Internal section under the Address menu.
Destination Address: Select the name of the External (WAN) network from
the drop down list. The drop down list contains the names of all external networks
defined in the External section of the Address window. To create a new
destination address, please go to the External section under the Address menu.
Service: Specified services provided by external network servers. These are
services/application that are allowed to pass from the Internal network to the
External network. Choose ANY for all services.
Action: Select Permit or Deny from the drop down list to allow or reject the
packets travelling between the source network and the destination network.
Logging: Select Enable to enable flow monitoring.
Statistics: Select Enable to enable flow statistics.
Alarm Threshold: set a maximum flow rate (in Kbytes/Sec). An alarm will be
sent if flow rates are higher than the specified value.
Step 3: Click OK to add a new outgoing policy; or click Cancel to cancel
adding a new outgoing policy.
67
Modifying an Outgoing policy:
Step 1: In the Outgoing policy section, locate the name of the policy desired
to be modified and click its corresponding Modify option under the
Configure field.
Step 2: In the Modify Policy window, fill in new settings.
Note:
To change or add selections in the drop-down list for source or
destination address, go to the section where the selections are
setup. (Source Address Internal of Address menu; Destination
Address External of Address menu; Service [Predefined],[Custom] or Group under Service).
Step 3: Click OK to do confirm modification or click Cancel to cancel it.
68
Removing the Outgoing Policy:
Step 1. In the Outgoing policy section, locate the name of the policy desired
to be removed and click its corresponding Remove option in the
Configure field.
Step 2. In the Remove confirmation dialogue box, click OK to remove the
policy or click Cancel to cancel removing.
Enabled Monitoring function:
Log: If Logging is enabled in the outgoing policy, the DFL-80 will log the traffic
and event passing through the Firewall. The Administrator can click Log on
the left menu bar to get the flow and event logs of the specified policy.
Note: System Administrator can back up and clear logs in this window. Check the
chapter entitled “Log” to get details about the log and ways to back up and clear logs.
69
Alarm: If Logging is enabled in the outgoing policy, the DFL-80 will log the traffic
alarms and event alarms passing through the Firewall. The Administrator can
click Alarm on the left menu to get the logs of flow and event alarms of the
specified policy.
Note: The Administrator can also get information on alarm logs from the Alarm
window. Please refer to the section entitled “Alarm” for more information.
Statistics: If Statistics is enabled in the outgoing policy, the DFL-80 will
display the flow statistics passing through the Firewall.
Note: The Administrator can also get flow statistics in Statistics. Please refer
to Statistics in Chapter 11 for more details.
70
Incoming
This chapter describes steps to create policies for packets and services from
the External (WAN) network to the Internal (LAN) network including Mapped IP
and Virtual Server.
Enter Incoming window:
Step 1: Click Incoming under the Policy menu to enter the Incoming window.
The Incoming table will display current defined policies from the External
(WAN) network to assigned Mapped IP or Virtual Server.
Step 2: The fields of the Incoming window are:
!
Source: Source networks which are specified in the
External section of the Address menu, or all the external
network addresses.
!
Destination: Destination networks, which are IP
Mapping addresses or Virtual server network addresses
created in Virtual Server menu.
!
Service: Services supported by Virtual Servers (or
Mapped IP).
!
Action: Control actions to permit or deny packets from
external networks to Virtual Server/Mapped IP travelling
through the DFL-80.
!
Option: Specify the monitoring functions on packets from
external networks to Virtual Server/Mapped IP travelling
through the Firewall.
!
Configure: Modify settings or remove incoming policy.
!
Move: This sets the priority of the policies, number 1
being the highest priority.
71
Adding an Incoming Policy:
Step 1: Under Incoming of the Policy menu, click the New Entry button.
Step 2:
Source Address: Select names of the external networks from the drop down
list. The drop down list contains the names of all external networks defined in
the External section of the Address menu. To create a new source address,
please go to the Internal section under the Address menu.
Destination Address: Select names of the internal networks from the drop
down list. The drop down list contains the names of IP mapping addresses
specified in the Mapped IP or the Virtual Server sections of Virtual Server
menu. To create a new destination address, please go to the Virtual Server
menu. (Please refer to Chapter 8 for Virtual Server for details)
Service: Specified services provided by internal network servers. These are
services/application that are allowed to pass from the External network to the
Internal network. Choose ANY for all services.
Action: Select Permit or Deny from the drop down list to allow or reject the
packets travelling between the specified external network and Virtual Server/
Mapped IP.
Logging: Select “Enable” to enable flow monitoring.
Statistics: Select “Enable” to enable flow statistics.
Alarm Threshold: Set a maximum flow rate (in Kbytes/Sec). An alert will be
sent if flow rates are higher than the specified value.
Step 3: Click OK to add new policy or click Cancel to cancel adding new
incoming policy.
72
Modifying Incoming Policy:
Step 1: In the Incoming window, locate the name of policy desired to be
modified and click its corresponding Modify option in the Configure
field.
Step 2: In the Modify Policy window, fill in new settings.
Step 3: Click OK to save modifications or click Cancel to cancel modifications.
Removing an Incoming Policy:
Step 1: In the Incoming window, locate the name of policy desired to be
removed and click its corresponding Remove in the Configure field.
Step 2: In the Remove confirmation window, click OK to remove the policy
or click Cancel to cancel removing.
73
External To DMZ & Internal to DMZ
This section describes steps to create policies for packets and services from
the External (WAN) networks to the DMZ networks. Please follow the same
procedures for Internal (LAN) networks to DMZ networks.
Enter “External To DMZ” or “Internal To DMZ” selection:
Click External To DMZ under Policy menu to enter the External To DMZ
window. The External To DMZ table will show up displaying currently defined
policies.
The fields in External To DMZ window:
! Source: Source networks, which are addresses specified in the
External Section of the Address menu, or all the external network
addresses.
! Destination: Destination networks, which are addresses specified in
DMZ section of the Address menu and Mapped IP addresses of the
Virtual Server menu.
! Service: Services supported by servers in DMZ network.
! Action: Control actions, to permit or deny packets from external networks
to DMZ travelling through the DFL-80.
! Option: Specify the monitoring functions of packets from external
network to DMZ network travelling through Firewall.
! Configure: Modify settings or remove policies.
74
Adding a new External To DMZ Policy:
Step 1: Click the New Entry button and the Add New Policy window will appear.
Step 2:
Source Address: Select names of the external networks from the drop down
list. The drop down list contains the names of all external networks defined in
the External section of the Address menu. To create a new source address,
please go to the Internal section under the Address menu.
Destination Address: Select the name of the DMZ network from the drop
down list. The drop down list contains the names of the DMZ network created
in the Address menu. It will also contain Mapped IP addresses from the Virtual
Server menu that were created for the DMZ network. To create a new
destination address, please go to the Virtual Server menu. (Please refer to
the sections entitled Address and Virtual Server for details)
Service: Select a service from drop down list. The drop down list will contain
services defined in the Custom or Group section under the Service menu.
These are services/application that are allowed to pass from the External
network to the DMZ network. Choose ANY for all services. To add or modify
these services, please go to the Service menu. (Please refer to the section
entitled Services for details)
Action: Select Permit or Deny from the drop down list to allow or reject the
packets travelling from the specified external network to the DMZ network.
Logging: Select Enable to enable flow monitoring.
Statistics: Select Enable to enable flow statistics.
Alarm Threshold: Set a maximum flow rate (in Kbytes/Sec). An alarm will be
send if a flow rate exceeds the specified value.
75
Modifying an External to DMZ policy:
Step 1: In the External To DMZ window, locate the name of policy desired to
be modified and click its corresponding Modify option in the Configure
field.
Step 2: In the Modify Policy window, fill in new settings.
Step 3: Click OK to do save modifications.
Removing an External To DMZ Policy:
Step 1: In the External To DMZ window, locate the name of policy desired
to be removed and click its corresponding Remove option in the
Configure field.
Step 2: In the Remove confirmation pop-up box, click OK to remove the
policy.
76
DMZ To External & DMZ To Internal
This section describes steps to create policies for packets and services from
DMZ networks to External (WAN) networks. Please follow the same procedures
for DMZ networks to Internal (LAN) networks.
Entering the DMZ To External window:
Click DMZ To External under Policy menu and the DMZ To External table
appears displaying currently defined DMZ To External policies.
The fields in the DMZ To External window are:
! Source: source network addresses which are specified in the
DMZ section of the Address window.
! Destination: destination networks, which is the external network
address
! Service: services supported by Servers of external networks.
! Action: control actions, to permit or deny packets from the DMZ
network to external networks travelling through the DFL-80.
! Option: specify the monitoring functions on packets from the
DMZ network to external networks travelling through the Firewall.
!
Configure: modify settings or remove policies
! Move: this sets the priority of the policies, number 1 being the
highest priority.
77
Adding a DMZ To External Policy:
Step 1: Click the New Entry button and the Add New Policy window will appear.
Step 2:
Source Address: Select the name of the DMZ network from the drop down
list. The drop down list will contain names of DMZ networks defined in DMZ
section of the Address menu. To add a new source address, please go to the
DMZ section under the Address menu.
Destination Address: Select the name of the external network from the drop
down list. The drop down list lists names of addresses defined in External
section of the Address menu. To add a new destination address, please go to
External section of the Address menu.
Service: Select a service from drop down list. The drop down list will contain
services defined in the Custom or Group section under the Service menu.
These are services/application that are allowed to pass from the DMZl network
to the External network. Choose ANY for all services. To add or modify these
services, please go to the Service menu.
Action: Select Permit or Deny from the drop down list to allow or reject the
packets travelling from the specified DMZ network to the external network.
Logging: Select Enable to enable flow monitoring.
Statistics: Click Enable to enable flow statistics.
Alarm Threshold: set a maximum flow rate (in Kbytes/Sec). An alarm will be
sent if the flow rate exceeds the specified value.
Step 3: Click OK to add new policy or click Cancel to cancel adding.
78
Modifying a DMZ To External policy:
Step 1: In the DMZ to External window, locate the name of policy desired to
be modified and click its corresponding Modify option in the
Configure field.
Step 2: In the Modify Policy window, fill in new settings.
Note: To change or add selections in the drop-down list, go to the section
where the selections are setup. (Source Address, go to Internal under
Address; Destination Address, go to External under Address; Service, go
to Pre-defined Service, Custom or Group under Service.)
Step 3: Click OK to save modifications or click Cancel to cancel
modifications.
79
Removing a DMZ To External Policy:
Step 1. In the DMZ To External window, locate the name of policy desired to
be removed and click its corresponding Remove option in the Configure
field.
Step 2. In the Remove confirmation dialogue box, click OK.
VPN
The DFL-80 Firewall’s VPN (Virtual Private Network) is set by the System
Administrator. The System Administrator can add, modify or remove VPN
settings.
To set up a Virtual Private Network (VPN), you do not need to configure an
Access Policy to enable encryption. Just fill in the following settings: VPN
Name, Source Subnet, Destination Gateway, Destination Subnet,
Authentication Method, Preshare key, Encapsulation and IPSec lifetime. The
firewalls on both ends must use the same Preshare key and IPSec lifetime
to make a VPN connection.
80
Autokey IKE
This chapter describes steps to create a VPN connection using Autokey IKE.
Autokey IKE (Internet Key Exchange) provides a standard method to negotiate
keys between two security gateways. For example, with two firewall devices,
IKE allows new keys to be generated after a set amount of time has passed or
a certain threshold of traffic has been exchanged.
Accessing the Autokey IKE window:
Click IPSec Autokey under the VPN menu to enter the Autokey IKE window.
The Autokey IKE table displays current configured VPNs.
The fields in the Autokey IKE window are:
! Name: The VPN name to identify the VPN tunnel definition. The name
must be different for the two sites creating the tunnel.
! Gateway IP: The external interface IP address of the remote Firewall.
! Destination Subnet: Destination network subnet.
! PSK/RSA: The IKE VPN must be defined with a Preshared Key. The Key
may be up to 128 bytes long.
! Status: Connect/Disconnect or Connecting/Disconnecting.
! Configure: Connect, Disconnect, Modify and Delete.
81
Adding the Autokey IKE:
Step 1. Click the New Entry button and the VPN Auto Keyed Tunnel
window will appear.
Step 2:
! Preshare Key: The IKE VPN must be defined with a Preshared Key. The
Key may be up to 128 bytes long.
! ESP/AH: The IP level security, AH and ESP, were originally
proposed by the Networking Group focused on IP security mechanisms,
IPSec. The term IPSec is used loosely here to refer to packets, keys, and
routes that are associated with these headers. The IP Authentication
Header (AH) is used to provide authentication. The IP Encapsulating
Security Header (ESP) is used to provide confidentially to IP datagrams.
! ESP-Encryption Algorithm: The DFL-80 auto-selects 56 bit DES-CBC or
168-bit Triple DES-CBC encryption algorithm. The default algorithm is 168bit Triple DES-CBC.
! ESP-Authentication Method: The DFL-80 auto-selects MD5 or SHA-1
authentication algorithm. The default algorithm is MD5.
! IPSec Lifetime: New keys will be generated whenever the lifetime of the
old keys is exceeded. The Administrator may enable this feature if needed
and enter the lifetime in seconds to re-key. The default is 28800 seconds
(eight hours). Selection of small values could lead to frequent re-keying,
which could affect performance.
82
Modifying an Autokey IKE:
Step 1: In the Autokey IKE window, locate the name of policy desired to be
modified and click its corresponding Modify option in the Configure
field.
Step 2: In the Modify Policy window, fill in new settings.
Step 3: Click OK to save modifications.
Connecting the VPN connection:
Once all the policy is created with the correct settings, click on the Connect
option in the Configure field. The Status field will change to indicate
Connecting. If the remote Firewall is set up correctly with the VPN active, the
VPN connection will be made between the two Firewalls and the Status field
will change to Connect.
83
Removing Autokey IKE:
Step 1. Locate the name of the Autokey IKE desired to be removed and click
its corresponding Delete option in the Configure field.
Step 2. In the Remove confirmation pop-up box, click OK to remove the
Autokey IKE or click Cancel to cancel deleting.
84
PPTP Server
Entering the PPTP Server window
Step 1.
Select VPN > PPTP Server.
! PPTP Server- Click Modify to select Enable or Disable.
! Client IP Range- 192.66.255.1-254 Displays the IP address
range for PPTP Client connection.
! User Name- Displays the PPTP Client user’s name for
authentication.
! Client IP- Displays the PPTP Client’s IP address for
authentication.
! Uptime- Displays the connection time between PPTP Server
and Client.
! Status- Displays current connection status between PPTP
Server and PPTP client.
! Configure- Click Modify to modify the PPTP Client settings
or click Remove to remove the item.
85
Modifying PPTP Server Design
Step 1. Select VPN > PPTP Server.
Step 2. Click Modify after the Client IP Range.
Step 3. In the Modify Server Design Window, enter appropriate settings.
!
!
Disable PPTP- Check to disable PPTP Server.
!
Auto-Disconnect if idle … minutes- Configure this device
to disconnect to the PPTP Server when there is no activity for
a predetermined period of time. To keep the line always
connected, set the number to 0.
!
Enable PPTP- Check to enable PPTP Server.
1. Encyption: the default is set to disabled.
2. Client IP Range Enter the IP range allocated for PPTP
Client to connect to the PPTP server.
Schedule- Click the down arrow to select the schedule,
which was pre-determined in Schedule. Refer to the
corresponding section for details.
Step 4. Click OK to save modifications or click Cancel to cancel modifications
86
Adding PPTP Server
Step 1. Select VPN > PPTP Server. Click New Entry.
Step 2.
Enter appropriate settings in the following window.
! User name: Specify the PPTP client. This should be unique.
! Password: Specify the PPTP client password.
! Remote Client
Single Machine: Check to connect to single computer.
Multi-Machine: Check to allow multiple computers connected
to the PPTP server.
:Enter the PPTP Client IP address.
IP Address:
Netmask: Enter the PPTP Client Sub net mask.
:
! Client IP assigned by:
IP Range: check to enable auto-allocating IP for PPTP client
to connect.
Fixed IP: check and enter a fixed IP for PPTP client to
connect.
Step 3.
Click OK to save modifications or click Cancel to cancel modifi
cations
87
Modifying PPTP Server
Step 1.
Step 2.
Step 3.
Step 4.
88
Select VPN > PPTP Server.
In the PPTP Server window, find the PPTP server that you want to
modify. Click Configure and click Modify.
Enter appropriate settings.
Click OK to save modifications or click Cancel to cancel modifica
tions
Removing PPTP Server
Step 1.
Select VPN > PPTP Server.
Step 2.
In the PPTP Server window, find the PPTP server that you want
to modify. Click Configure and click remove.
Step 3.
Click OK to remove the PPTP server or click Cancel to exit
without removal.
89
PPTP Client
Entering the PPTP Client window
Step 1. Select VPN > PPTP Client.
! Server Address: Displays the PPTP Server IP addresses..
! User Name: Displays the PPTP Client user’s name for
!
!
!
!
90
authentication.
Client IP: Displays the PPTP Client’s IP address for
authentication.
Uptime: Displays the connection time between PPTP Server
and Client.
Status: Displays current connection status between PPTP
Server and PPTP client.
Configure: Click Modify to modify the PPTP Client settings
or click Remove to remove the item.
Adding a PPTP Client
Step 1.
Select VPN > PPTP Client.
! User name: Specify the PPTP client. This should be unique.
! Password: Specify the PPTP client password.
! Server Address: Enter the PPTP Server’s IP address.
!
!
!
!
Remote Server:
Single Machine: Check to connect to single computer.
Multi-Machine: Check to allow multiple computers connected
to the PPTP server.
IP Address:
Enter the PPTP Client IP address.
Netmask:
Enter the PPTP Client Sub net mask.
Auto-Connect when sending packet through
the link: Check to enable the auto-connection
whenever there’s packet to transmit over the
connection.
Auto-Disconnect if idle … minutes: Configure
this device to disconnect to the PPTP Server
when there is no activity for a predetermined
period of time. To keep the line always connected,
set the number to 0.
Schedule: Click the down arrow to select the
schedule, which was pre-determined in Schedule.
Refer to the corresponding section for details.
Click OK to save modifications or click Cancel to cancel modifications.
91
Modifying PPTP Client
Step 1.
Select VPN > PPTP Client.
Step 2.
In the PPTP Client window, find the PPTP server that you want
to modify. Click Configure and click Modify.
Step 3.
Enter appropriate settings.
Step 4. Click OK to save modifications or click Cancel to cancel modifi
cations
92
Removing PPTP Client
Step 1.
Select VPN > PPTP Client.
Step 2.
In the PPTP Client window, find the PPTP client that you want to
modify. Click Configure and click remove.
Step 3.
Click OK to remove the PPTP client or click Cancel to exit
without removal.
93
Content filtering
URL Blocking
The Administrator may setup URL Blocking to prevent Internal network users
from accessing a specific website on the Internet. Any web request coming
from an Internal network computer to a blocked website will receive a
blocked message instead of the website.
Entering the URL blocking window:
Click on URL Blocking under the Configuration menu bar.
Click on New Entry.
Adding a URL Blocking policy:
Step 1: After clicking New Entry, the Add New Block String window will
appear.
Step 2: Enter the URL of the website to be blocked.
Step 3: Click OK to add the policy. Click Cancel to discard changes.
94
Modifying a URL Blocking policy:
Step 1: In the URL Blocking window, find the policy to be modified and click
the corresponding Modify option in the Configure field.
Step 2: Make the necessary changes needed.
Step 3: Click on OK to save changes or click on Cancel to cancel
modifications.
Removing a URL Blocking policy:
Step 1: In the URL Blocking window, find the policy to be removed and
click the corresponding Remove option in the Configure field.
Step 2: A confirmation pop-up box will appear, click on OK to remove the
policy or click on Cancel to discard changes.
95
Blocked URL site:
When a user from the Internal network tries to access a blocked URL, the
error below will appear.
General Blocking
To let Popups, ActiveX, Java, or Cookies in or keep them out.
Step 1: Click Content Filtering in the menu.
Step 2: General Blocking detective functions.
!
!
!
!
Popup filtering: Prevent pop-up boxes from appearing.
ActiveX filtering: Prevent ActiveX packets.
Java filtering: Prevent Java packets.
Cookie filtering: Prevent Cookie packets.
Step 3: After selecting each function, click the OK button below.
96
Virtual Server
The DFL-80 VPN Firewall separates an enterprise’s Intranet and Internet into
internal networks and external networks respectively. Generally speaking, in
order to allocate enough IP addresses for all computers, an enterprise assigns
each computer a private IP address, and converts it into a real IP address
using the Firewall’s NAT (Network Address Translation) function. If a server
which provides service to the external networks, is located in the internal
networks, outside users can’t directly connect to the server by using the server’s
private IP address.
The DFL-80 Firewall’s Virtual Server can solve this problem. A virtual server
has set the real IP address of the Firewall’s external network interface to be
the Virtual Server IP. using the virtual server feature, the Firewall translates the
virtual server’s IP address into a private IP address of the physical server in
the Internal (LAN) network. When outside users on the Internet request
connections to the virtual server, the request will be forwarded to the private
internal server.
Virtual Server includes another feature know as one-to-many mapping. This is
when one virtual server IP address on the external interface can be mapped
into 4 internal network server private IP addresses. This option is useful for
Load Balancing, which causes the virtual server to distribute data packets to
each private IP addresses (which are the real servers). By sending all data
packets to all similar servers, this increases the server’s efficiency, reduces
risks of server crashes, and enhances servers’ stability.
How to use Virtual Server and mapped IP
Virtual Server and Mapped IP are part of the IP mapping scheme. By applying
the incoming policies, Virtual Server and IP mapping work similarly. They map
real IP addresses to the physical servers’ private IP addresses (which is
opposite to NAT), but there still exists some differences:
! Virtual Server can map one real IP to several internal physical servers
while Mapped IP can only map one real IP to one internal physical
server (1-to-1 Mapping). The Virtual Servers’ load balance feature can
map a specific service request to different physical servers running
the same services.
! Virtual Server can only map one real IP to one service/port of the
internal physical servers while Mapped IP maps one real IP to all the
services offered by the physical server.
IP mapping and Virtual Server work by binding the IP address of the external
virtual server to the private internal IP address of the physical server that
supports the services. Therefore users from the external network can access
servers of the internal network by requesting the service from the IP address
provided by Virtual Server.
97
Mapped IP
Internal private IP addresses are translated through NAT (Network Address
Translation). If a server is located in the internal network, it has a private IP
address, and outside users cannot connect directly to internal servers’
private IP address. To connect to an internal network server, outside users
have to first connect to a real IP address of the external network, and the real
IP is translated to a private IP of the internal network. Mapped IP and Virtual
Server are the two methods to translate the real IP into private IP. Mapped IP
maps IP in one-to-one fashion; that means, all services of one real external
IP address is mapped to one private internal IP address.
Entering the Mapped IP window:
Click Mapped IP under the Virtual Server menu bar and the Mapped IP
configuration window will appear.
98
Adding new IP Mapping:
Step 1. In the Mapped IP window, click the New Entry button the Add New
Mapped IP window will appear.
! External IP: select the external public IP address to be mapped.
! Internal IP: enter the internal private IP address or DMZ IP address
which will be mapped 1-to-1 to the external IP address.
Step 2. Click OK to add new IP Mapping or click Cancel to cancel adding.
Modifying a Mapped IP:
Step 1. In the Mapped IP table, locate the Mapped IP desired to be modified
and click its corresponding Modify option in the Configure field.
Step 2. Enter settings in the Modify Mapped IP window.
Step 3. Click OK to save change or click Cancel to cancel.
Note: A Mapped IP cannot be modified if it has been assigned/
used as a destination address of any Incoming policies.
99
Removing a Mapped IP:
Step 1. In the Mapped IP table, locate the Mapped IP desired to be removed
and click its corresponding Remove option in the Configure field.
Step 2. In the Remove confirmation pop-up window, click OK to remove the
Mapped IP or click Cancel to cancel.
Virtual Server
Virtual server is a one-to-many mapping technique, which maps a real IP
address from the external interface to private IP addresses of the internal
network. This is done to provide services or applications defined in the
Service menu to enter into the internal network. Unlike a mapped IP which
binds an external IP to an Internal/DMZ IP, virtual server binds external IP
ports to Internal IP ports.
100
Adding a Virtual Server:
Step 1. Click an available virtual server from Virtual Server in the Virtual
Server menu bar to enter the virtual server configuration window. In
the following, Virtual Server is assumed to be the chosen option:
Step 2. Click the click here to configure button and the Add new Virtual
Server IP window appears and asks for an IP address from the
external network.
Step 3. Select an IP address from the drop-down list of available external
network IP addresses.
Step 4. Click OK to add new Virtual Server or click Cancel to cancel
adding.
101
When Disable appears in the drop-down list, no Virtual Server can be added.
102
Modifying a Virtual Server IP Address:
Step 1. Click the virtual server to be modified Virtual Server under the
Virtual Server menu bar. A new window appears displaying the IP
address and service of the specified virtual server.
Step 2. Click on the Virtual Server’s IP Address button at the top of the
screen.
Step 3. Click OK to save new IP address or click Cancel to cancel
modification.
103
Removing a Virtual Server:
Step 1. Click the virtual server to be removed in the corresponding Virtual
Server option under the Virtual Server menu bar. A new window
displaying the virtual server’s IP address and service appears on
the screen.
Step 2. Click the Virtual Server’s IP Address button at the top of the screen.
Step 3. Select Disable in the drop-down list in.
Step 4. Click OK to remove the virtual server.
Setting the Virtual Server’s services:
Step 1. For the Virtual Server which has already been set up with an IP
address, click the New Service button in the table.
Step 2. In the Virtual Server Configurations window:
! Virtual Server IP: Displays the external IP address assigned to the
Virtual Server
! Service Name (Port): Select the port number that the virtual server
will use. Changing the Service will change the port number to
match the service.
104
! External Service Port: Select the service from the pull down list
that will be provided by the Virtual Server.
Note: The services in the drop-down list are all defined in the Pre-defined
and Custom section of the Service menu.
Step 3. Enter the IP address of the internal network server(s), to which the
virtual server will be mapped. Up to four IP addresses can be
assigned at most.
Step 4. Click OK to save the settings of the Virtual Server.
105
Modifying the Virtual Server configurations:
Step 1. In the Virtual Server window’s service table, locate the name of the
service desired to be modified and click its corresponding Modify option
in the Configure field.
Step 2. In the Virtual Server Configuration window, enter the new settings.
Step 3. Click OK to save modifications or click Cancel to cancel modification.
Note: A virtual server cannot be modified or removed if it has been assigned to the
destination address of any Incoming policies.
106
Removing the Virtual Server service:
Step 1.
In the Virtual Server window’s service table, locate the name of the
service desired to be removed and click its corresponding Remove
option in the Configure field.
Step 2.
In the Remove confirmation pop-up box, click OK to remove the
service or click Cancel to cancel removing.
Log
The DFL-80 VPN Firewall supports traffic logging and event logging to monitor
and record services, connection times, and the source and destination network
address. The Administrator may also download the log files for backup purposes.
The Administrator mainly uses the Log menu to monitor the traffic passing
through the DFL-80 Firewall.
What is a Log?
Log records all connections that pass through the Firewall’s control policies.
Traffic log’s parameters are setup when setting up control policies. Traffic logs
record the details of packets such as the start and stop time of connection, the
duration of connection, the source address, the destination address and services
requested, for each control policy. Event logs record the contents of System
Configuration changes made by the Administrator such as the time of change,
settings that change, the IP address used to log on, etc.
107
How to use the Log
The Administrator can use the log data to monitor and manage the DFL-80
and the networks. The Administrator can view the logged data to evaluate
and troubleshoot the network, such as pinpointing the source of traffic
congestions.
Traffic Log
The Administrator queries the Firewall for information, such as source address,
destination address, start time, and Protocol port, of all connections.
Entering the Traffic Log window:
Click the Traffic Log option under Log menu to enter the Traffic Log window.
108
Traffic Log:
The table in the Traffic Log window displays current System statuses:
! Time: The start time of the connection.
! Source: IP address of the source network of the specific
connection.
! Destination: IP address of the destination network of the specific
connection.
! Protocol & Port: Protocol type and Port number of the specific
connection.
! Disposition: Accept or Deny.
Downloading the Traffic Logs:
The Administrator can backup the traffic logs regularly by downloading it to the
computer.
Step 1. In the Traffic Log window, click the Download Logs button at the bottom
of the screen.
Step 2. Follow the File Download pop-up window to save the traffic logs into a
specified directory on the hard drive.
109
Clearing the Traffic Logs:
The Administrator may clear on-line logs to keep just the most updated logs
on the screen.
Step 1. In the Traffic Log window, click the Clear Logs button at the bottom of
the screen.
Step 2. In the Clear Logs pop-up box, click OK to clear the logs or click
Cancel to cancel it.
110
Event Log
When the DFL-80 Firewall detects events, the Administrator can get the details,
such as time and description of the events from the Event Logs.
Entering the Event Log window:
Click the Event Log option under the Log menu and the Event Log window will
appear.
The table in the Event Log window displays the time and description of
the events.
!
Time: Time when the event occurred.
!
Event: Description of the event.
111
Downloading the Event Logs:
Step 1. In the Event Log window, click the Download Logs button at the
bottom of the screen.
Step 2. Follow the File Download pop-up window to save the event logs into
a specific directory on the hard drive.
Clearing the Event Logs:
The Administrator may clear on-line event logs to keep just the most updated
logs on the screen.
Step 1. In the Event Log window, click the Clear Logs button at the bottom of
the screen.
Step 2. In the Clear Logs pop-up box, click OK to clear the logs or click Cancel
to cancel it.
112
Log Report
The Log Report
Step 1. Click Log > Log Report.
:When the Log Mail files
! Enable Log Mail Configuration:
accumulated up to 300Kbytes, router will notify administrator
by email with the traffic log and event log.
Note: Before enabling this function, you have to enable E-mail
Alarm in Administrator.
! Enable Syslog Settings:
:If you enable this function, system
will transmit the Traffic Log and the Event Log simultaneously
to the server which supports Syslog function.
113
Enable Log Mail Support & Syslog Message
Log Mail Configuration /Enable Log Mail Support
Step 1.
First, go to Admin –Select Enable E-mail Alert Notification under
E-Mail Settings. Enter the e-mail address to receive the alarm
notification. Click OK.
Step 2.
Go to Log #Log Report. Check to enable Log Mail Support.
Click OK.
System Settings/Enable Syslog Message
Step 1.
Check to enable Syslog Message. Enter the Host IP Address and
Host Port number to receive the Syslog message.
Step 2.
Click OK, to save new changes.
Disable Log Mail Support & Syslog Message
Step 1.
Step 2.
114
Go to Log #Log Report. Uncheck to disable Log Mail
Support. Click OK.
Go to Log #Log Report. Uncheck to disable Settings
Message. Click OK.
Alarm
In this chapter, the Administrator can view traffic alarms and event alarms that
occur and the firewall has logged.
Firewall has two alarms: Traffic Alarm and Event Alarm.
Traffic alarm:
In control policies, the Administrator set the threshold value for traffic alarm.
The System regularly checks whether the traffic for a policy exceeds its threshold
value and adds a record to the traffic alarm file if it does.
Event alarm:
When Firewall detects attacks from intruders, it writes attacking data in the
event alarm file and sends an e-mail alert to the Administrator to take emergency
steps.
115
Traffic Alarm
Entering the Traffic Alarm window:
Click the Traffic Alarm option below Alarm menu to enter the Traffic Alarm
window.
The table in the Traffic Alarm window displays the current traffic alarm logs
for connections.
! Time: The start and stop time of the specific connection.
! Source: Name of the source network of the specific
connection.
! Destination: Name of the destination network of the specific
connection.
! Service: Service of the specific connection.
! Traffic: Traffic (in Kbytes/Sec) of the specific connection.
116
Clearing the Traffic Alarm Logs:
Step 1. In the Traffic Alarm window, click the Clear Logs button at the
bottom of the screen.
Step 2. In the Clear Logs pop-up box, click OK to clear the logs or click
Cancel to cancel.
Downloading the Traffic Alarm Logs:
The Administrator can back up traffic alarm logs regularly and download it to
a file on the computer.
Step 1. In the Traffic Alarm window, click the Download Logs button on the
bottom of the screen.
Step 2. Follow the File Download pop-up box to save the traffic alarm logs
into specific directory on the hard drive.
117
Event Alarm
Entering the Event Alarm window:
Click the Event Alarm option in the Alarm menu to enter the Event Alarm
window.
The table in the Event Alarm window displays current traffic alarm logs for
connections.
118
!
Time: Log time.
!
Event: Event descriptions.
Clearing Event Alarm Logs:
The Administrator may clear on-line logs to keep the most updated logs on
the screen.
Step 1. In the Event Alarm window, click the Clear Logs button at the
bottom of the screen.
Step 2. In the Clear Logs pop-up box, click OK.
Downloading the Event Alarm Logs:
The Administrator can back up event alarm logs regularly by downloading it to
a file on the computer.
Step 1. In the Event Alarm window, click the Download Logs button at
the bottom of the screen.
Step 2. Follow the File Download pop-up box to save the event alarm
logs into specific directory on the hard drive.
119
Statistics
In this chapter, the Administrator queries the DFL-80 VPN Firewall for statistics
of packets and data which passes across the Firewall. The statistics provides
the Administrator with information about network traffics and network loads.
What is Statistics
Statistics are the statistics of packets that pass through the Firewall by control
policies setup by the Administrator.
How to use Statistics
The Administrator can get the current network condition from statistics, and
use the information provided by statistics as a basis to mange networks.
Entering the Statistics window:
Step 1. The Statistics window displays the statistics of current network
connections.
120
!
Source: The name of source address.
!
Destination: The name of destination address.
!
Service: The service requested.
!
Action: Permit or deny
!
Time: Viewable by minutes, hours, or days
Status
In this section, the DFL-80 displays the status information about the Firewall.
Status will display the network information from the Configuration menu. The
Administrator may also use Status to check the DHCP lease time and MAC
addresses for computers connected to the Firewall.
Interface Status
Entering the Interface Status window:
Click on Status in the menu bar, then click Interface Status below it. A window
will appear providing information from the Configuration menu. Interface
Status will list the settings for Internal Interface, External Interface, and
the DMZ Interface
121
ARP Table
Entering the ARP Table window:
Click on Status in the menu bar, then click ARP Table below it. A window will
appear displaying a table with IP addresses and their corresponding MAC
addresses. For each computer on the Internal, External, and DMZ network
that replies to an ARP packet, the DFL-80 will list them in this ARP table.
IP Address: The IP address of the host computer
MAC Address: The MAC address of that host computer
Interface: The port that the host computer is connected to (Internal, External,
DMZ)
122
DHCP Clients
Entering the DHCP Clients window:
Click on Status in the menu bar, then click on DHCP Clients below it. A
window will appear displaying the table of DHCP clients that are connected to
the DFL-80. The table will list host computers on the Internal network that
obtain its IP address from the Firewall’s DHCP server function.
IP Address: The IP address of the internal host computer
MAC Address: MAC address of the internal host computer
Leased Time: The Start and End time of the DHCP lease for the internal
host computer
Logout
Select this option to log out from the Firewall’s management interface.
Step 1. Click Logout.
Step 2. Click OK to logout or click Cancel to discard the change.
123
Glossary
DHCP (Dynamic Host Configuration Protocol)
When a computer with no fixed IP address starts up, it asks the DHCP
server for a temporary IP address. The DHCP server allocates an IP address,
which falls within the same sub-network as the server and does not conflict
with other computers on the network, to the client.
ICMP Protocol
ICMP stands for ‘Internet Control Message Protocol’, it is a Network layer
of Internet protocol that reports errors and provides other information relevant
to IP packet processing. ICMP sends the following messages: Flow Control,
Destination Unreachable, Redirecting Routes and Echo Message. For example,
the UNIX command Ping is based on ICMP to test whether a particular computer
is connected to the Internet.
IP
IP stands for Internet Protocol. IP address uniquely identifies a host computer
connected to the Internet from other Internet hosts, for the purposes of
communication through the transfer of packets. IP has the following features:
! Defining data packet structure, packet is the basic unit of data
exchange.
! Addressing data packets.
! Moving data between Network layer and Transport layer.
! Routing packets from the sender to the destination network.
! Breaking messages into packets and reassembling the packets
into the original message.
MAC Address
Each network interface card has a unique six bytes long identification
number that has been assigned in the factory. When a data packet arrives,
the network card matches the destination address on the data packet with its
own MAC address to decides to whether receive or discard the packet.
124
Subnet Mask
Subnet Mask is used to segment a network into 2, 4, 8, etc sub-networks.
For example, take a Class B network with network number 172.16.0.0 and
subnet mask 255.255.244.0. The first two numbers represents network
number after segmentation. The first 3 bits of the third number is the Subnet
Number. There are 2^3= 8 sub networks. The remaining five bits plus the
eight bits of fourth number, thirteen bits in total, are the networks addresses
available for each sub-network. Each sub-network can have 2^13=8192
networks addresses. Example addresses are as follows:
TCP Protocol
TCP is a connection-oriented protocol, it establishes a logical connection
between two computers. Before transferring data, the two computers
exchange control messages to make sure a connection has been
established, this process is called handshaking. TCP sets up control
functions in the Flag field of the Segment Header. Compared to UDP, TCP is
a very reliable protocol, and uses PAR(Positive Acknowledgment with Retransmission) to guarantee that data from one host computer can reach the
other host computer safely and correctly.
TCP/IP Protocol
TCP/IP consists of two protocols:
! TCP, Transmission Control Protocol
! IP, Internet Protocol
TCP/IP features:
! Open communication standard, it is free and does not depend on any
Operating systems or hardware.
! Not restricted to any network hardware, Ethernet, Token Ring, Leased
Line, X.25 or Frame Relay can all be integrated and operate under TCP/
IP.
! Widely accepted addressing method. It is used to assign network
equipments a unique IP address.
! Many standardized high-level protocols provide user with wide and
consistent services
125
User Datagram Protocol (UDP Protocol)
User Datagram Protocol is a transport layer protocol in the TCP/IP protocol
stack. UDP uses application program to pack user data into packets, and IP
transfer these packets into their destination. Under UDP, applications can
exchange messages with least costs. UDP is an unreliable, connectionless
protocol. Unreliable means that this protocol has no specification to
exchange datagram with guaranteed delivery, but it does transfer data
correctly over network. UDP used source port, and destination port, in the
message header to transfer message to the right application.
DoS (Denial of Service Attack)
DoS attacks disables the servers’ abilities to serve, makes system
connections impossible, and prevents system from providing services to any
legal or illegal users. In another word, DoS’s objective is to kick the server
under attacked out of the network.
There are four popular types of DoS attacks:
Bandwidth Consumption: Attackers use wider bandwidth to flood victims’
bandwidth with garbage data. For example, using a T1 (1.511Mbps) leased line
to attack 56k or 128k leased line, or using several 56k sites to stuff a T3 (45Mbps).
Resource Exhaustion: This attack exhausts the victims’ systems resources,
such as CPU usage, memory, file system quota or other system processes.
The attack can bring down the system or slow down the system.
Defect program: Attackers use programs to generate exception condition that
can’t be handled by applications, systems, or embedded hardware to cause
system failure. In many occasions, attackers send weird (system can not
identify) packet to targeted systems to cause core dumps and attacker issue
commands that has privileges to destroy the systems in the mean time.
Router and DNS attacks: Attacker alter routing table and cause legal requests
to servers be rejected. This kind of attack redirects user requests to an
enterprise’s DNS to specific addresses or black holes, usually un-existing
addresses.
126
Firewall
The firewall has three basic functions:
1.
2.
3.
Restrict data to enter at a control point.
Restrict data to flow out at a control point.
Keep attackers away from servers.
Firewall protects:
1. Software data
2. Hardware data
3. Company’s reputation
Firewall’s standard interfaces are
1. External (WAN) network also known as Untrusted Network
2. Internal (LAN) network also known as Trusted Network
3. DMZ network also known as De-Militarized Network
Add-on values of firewall are:
1. NAT to provide company with enough IP addresses.
2. Reduce the risk of exposing server to the outside world.
3. Record Internet usages effectively
4. Alarm the administrator to take emergency step in a timely fashion
5. Encrypt sensitive data to transfer them safely across internet
Firewall has following restriction:
1. Can’t block hackers’ attacks from inside.
2. Can’t monitor connection that doesn’t pass through firewall
3. Can’t prevent new type of threats.
4. Can’t prevent virus’s attacks.
Hackers and Crackers
Hackers are those smart and aggressive programmers who actually initiate
the recent computer revolution. These programmers are crazy about
exploring new technology to solve problems and create new methodologies.
Their objectives are to construct solid networks and not to destroy other
computer systems. Crackers on the other hand are programmers who
attack private networks, but don’t steal or destroy data. Phrackers are
people who use stolen data to enter computer systems illegally to make
damage.
127
IP Spoofing
Data packets sent is from a fake source address. If the firewall’s policy does
not restrict these packets from passing through, they could be used to attack
internal servers easily.
Network Address Translation
NAT is the translation of IP addresses between internal or private networks and
the public IP addresses on the Internet. There are three IP address blocks that
have been assigned as private IP address space:
10.0.0.0 – 10.255.255.255
172.16.0.0 – 172.31.255.255
192.168.0.0 – 192.168.255.255
Through the NAT mechanism, an enterprise’s internal networks can use any IP
addresses that fall in the three private spaces. Note that, private IP addresses
can not pass through routers to their destinations.
Packet Filtering
Packet Filters check the headers of IP, TCP and ICMP packets to gather
information, such as sources addresses, source ports, destination
addresses, and destination ports. It also checks the relationships between
packets to decide whether a packet is for normal connection. In this way,
attacks can be detected and blocked.
Address
Each address in Address Table can be either an IP address or a sub-network
address. Administrators can create a name for a specific address for easier
reference. Basically, base on the networks they are located, IP address falls
into 3 categories: Internal IP addresses, external IP addresses and DMZ IP
addresses. When setting up policies, administrators choose IP addresses in
Address Table as the source/destination addresses. So Address Table has to
be constructed before setting up policies.
128
Address Group
The usual way to setup different packet IP filters for the same policy is to create
one policy for each filter. If there are 10 IP addresses then 10 policies have to
be created. Address Group is used to simplify this kind of procedures. The
administrator creates a new group name in External Groups of Address menu
and adds all the related IP addresses into that group. After the group is created,
the group name will be shown in Address Table. When creating a control policy,
group name can be specified as the source or destination address. In this way,
only one policy is needed to achieve the same effect as ten policies in the
previous example.
Alarm
There are flow alarm and event alarm. Flow alarm’s parameter is setup
before setting up policies. System checks whether the data packet flow
through each policy is higher the setup limit every 10 minutes. If it is, a
record will be added to flow alarm file. When the DFL-80 detects hacker
attacks, it records the attacking data in event alarm file, and sends E-mail to
system manger to take emergent steps.
DMZ
DMZ is the network between the firewall’s external interface and routers.
DMZ’s network number is allocated by ISPs. For example, when the network
number an ISP provides is 210.71.253.128 and subnet mask is
255.255.255.240. Machines inside DMZ can have IP addresses ranged from
210.71.253.128 to 210.71.253.140, sixteen different IP addresses. However,
only thirteen of the sixteen IP addresses ranged from 210.71.253.129 to
2210.71.253.141 are useable. 128 is the network number, 143 is the
Broadcasting Address, and 142 is used by router. Because DMZ is located
at the outside of a firewall and is not protected by firewall, it is considered to
be insecure. To fix the loophole, more firewall products provide a dedicate
DMZ interface to provide protection for DMZ connections. In the previous
example, the system manager segments the network into two sub-networks,
210.71/253.128/59 and 210.71.253.136/29 respectively. Since the route’s IP
is 210.71.253.142, the external interface’s IP must be one of 210.71.253.136/
29, and DMZ interface’s IP must belong to 210.71.253.128/29. As the
following graph shows:
129
123456789012345678901234567890121234
123456789012345678901234567890121234
123456789012345678901234567890121234
123456789012345678901234567890121234
HUB
123456789012345678901234567890121234
123456789012345678901234567890121234
123456789012345678901234567890121234
123456789012345678901234567890121234
123456789012345678901234567890121234
Net ID = 192.168.1.0/24
123456789012345678901234567890121234
123456789012345678901234567890121234
12345678901234567890123456789012123456
12345678901234567890123456789012123456
12345678901234567890123456789012123456
12345678901234567890123456789012123456
HUB
12345678901234567890123456789012123456
12345678901234567890123456789012123456
12345678901234567890123456789012123456
12345678901234567890123456789012123456
12345678901234567890123456789012123456
Net ID = 192.168.1.0/24
12345678901234567890123456789012123456
12345678901234567890123456789012123456
Firewall
Internal
192.168.1.1
External
210.71.253.128
DMZ
123456789012345678
123456789012345678
123456789012345678
123456789012345678
Router
123456789012345678
123456789012345678
123456789012345678
123456789012345678
210.71.253.142
123456789012345678
123456789012345678
123456789012345678
210.71.253.130
123456789012345678901234567890121234567
123456789012345678901234567890121234567
123456789012345678901234567890121234567
123456789012345678901234567890121234567
Net ID = 192.168.1.0/24
123456789012345678901234567890121234567
123456789012345678901234567890121234567
123456789012345678901234567890121234567
123456789012345678901234567890121234567
HUB
123456789012345678901234567890121234567
123456789012345678901234567890121234567
123456789012345678901234567890121234567
Internet
Load Balancing
Load Balancing is a function that Virtual Servers provide. It allows a Virtual
Server to be mapped to more than one physical server, which provides the
specific service at the same time. When a Virtual Server receives data packets,
it forwards the packet to the first physical server, and the next packet to the
next physical server. The DFL-80 uses Least Connection for load balancing.
Least Connection: Because each physical server has different processing
speeds, Least Connection forwards data packets to the physical server with
the least number of connections at that time. In this way, each packet can have
the least waiting time, and the number of packets a server receives is proportional
to its processing efficiency.
Log
There are flow control log and event log. Flow control log’s parameters are set
up the same time control policies are setup. It records details of data packets
of each control policy, including data packet’s start and end time, disconnect
time and length of connection, source address, destination address and service
content.
Event log records details of the firewall’s system configurations changes,
including the user who made the modification, time of change, modified
parameters, and IP address the user uses to logon, etc.
130
Mapped IP
Both Mapped IP and Virtual Server use IP mapping mechanism to allow outside
users access internal servers through the firewall. They are different in following
ways:
!
Virtual Server has Load balance feature, and Mapped IP does not.
!
Virtual Server has a one-to-many mapping relationship to physical
servers and Mapped IP is mapped to physical servers in one-to-one fashion. A
virtual server can be mapped to only one service, such as SMTP, HTTP or FTP.
A Mapped IP can be mapped to all services provided by a physical server.
Policy
The DFL-80 decides whether a data packet can pass according to values of
the policies. A policy’s parameters are source address, destination address,
service, permission, packets’ history, statistics and flow alarms. Policies can
be divided into four categories based on the packets’ source addresses.
!
Outgoing : Clients are located in internal networks and servers are in
external networks.
!
Incoming : Clients are located in external networks and servers are in
internal networks.
!
To DMZ :
!
From DMZ : Clients are in DMZ and servers are in either internal or
external networks
Packet
Direction
Source
Network
Destination
network
Client can be located in either internal or external networks
and servers are in DMZ.
Outgoing
Incoming
To DMZ
From DMZ
Internal
External
External,
DMZ
internal
External
Mapped
IP
Virtual
Server
DMZ
External,
internal
131
Schedule
Schedule is used to set up different time intervals conveying different policies.
A policy only works in specified time interval, and is automatically disabled
outside the specified time interval. A specific schedule can be set to repeat
every week or just happen once.
Service
TCP protocol and UDP protocol provided different services. Each service
has a TCP port number and a UDP port number, such as TELNET(23),
FTP(21), SMTP(25), POP3(110), etc. This system supports two kinds of
services: standard services and user defined services. The most popular
TCP and UDP services are already defined in standard services table, and
can not be modified or deleted. Users can setup their own services with
proper TCP and UDP port numbers if necessary. When setting up a user
defined service, the client’s port number range is 1024:65535, and server’s is
0:1023.
Service Group
Similar to address groups, mangers can create new service groups in [Service
Group] option of [Service] menu and assign desired services into groups.
Using address group and service group can greatly simply the policy creating
process. If there are ten different IP addresses that access five different server
services, such as HTTP, FTP, SMTP, POP3 and TELNET. Without the concept
of address group and service group, (10*5)= 50 policies are needed to be
created. However, with address group in source/destination address and service
group name in service option when setting up a policy, only one policy is needed
instead of 50.
System Configuration
The system configuration file stores system administrator’s name and password,
IP addresses of Firewall’s network interfaces, address table, service table, virtual
servers’ IP addresses and policies. When the configuration process is
completed, system administrator can download the configuration file into local
disc as a backup. System Administrators can overwrite the firewall’s
configuration file with the one stored in disc or restore the configuration to its
default factory settings.
132
Virtual Server
The Firewall separates an enterprise’s Intranet and Internet into internal networks
and external networks respectively. Generally speaking, in order to allocate
enough IP addresses for all computers, an enterprise assigns each computer
a private IP address, and converts it into a real IP address through the firewall’s
NAT (Network Address Translation) function. If a server is located in the internal
network, outside users can’t directly connect to it by specifying the server’s
private IP address. First, we set the real IP address of an external network
interface to the actual IP address of a Virtual Server. Through IP translation of
the Virtual Server, outside users can access the servers of the internal networks.
Virtual Server owns another feature - one-to-many mapping: one real IP address
on the external interface can be mapped into 4 internal virtual IP addresses.
Because of the Load Balance feature, Virtual Server can distribute data packets
evenly to each private IP address (which is the physical server) based on their
weightings. Thus increases server’s efficiency, reduces risks of server crashes,
and enhances servers’ stability.
133
Trouble-Shooting
Q:
How to upgrade the DFL-80’s software?
A:
The DFL-80’s software and system parameters are all stored in the
Flash Memory. The Flash Memory is re-writable and re-readable. Users
can contact the distributors to obtain the newest version of software.
After having the newest version of software from the distributor, please
store it in the hard disk, then connect to the firewall’s WebUI, enter
Software Update of the Administration menu, click the file name of the
newest version of software, then click OK.
The updating process won’t overwrite the system configuration, so it is
not necessary to save it before updating the software.
Q:
How to back up system configuration?
A:
To change system parameters settings without destroying the original
system configuration, the user can choose Export System Settings to
Client in Settings under the Administration menu. Users can upload the
backup system configuration from the hard disk to the firewall in Import
System setting from Client.
Q:Q : Which server can be installed in DMZ?
A:
134
The DFL-80 provides three Interface Ports to divide the networks into
internal networks, external networks, and DMZ. The internal networks
use private IP addresses, which routers can’t transfer. Therefore server’s
IP address needs to be a real IP address instead of a private one.
External Internet users can’t connect to any server with private IP
address in the internal networks directly. DMZ employs real IP
addresses. By setting the permission in DMZ policies to allow packets
to flow through, servers inside DMZ can exchange packet with any
Internet IP address. There is no restriction about which kind of server is
used in DMZ.
Q:
What is the difference in privileges of admin and sub admin?
A:
The DFL-80 sets the system administrator’s name and password to
admin. When the administrator sets up the system the first time, the
installation wizard asks administrators to change the password for
admin (user name ‘admin’ can not be changed). In the admin menu
under Administration, the admin may add or change the name and
password of sub admin. The administrator can change the firewall’s
system parameters when logged into the firewall as “admin”. The “sub
admin” can only browse the system configuration and have no privileges
to modify it. Therefore, admin has ‘read’ and ‘write’ privileges, but sub
admin has only ‘read’ privilege.
Q:
What are the default settings of the DFL-80 ?
A:
The DFL-80 has three main default settings; users need to modify them
to fit their environment to achieve optimum performance.
1. The system administrator’s name and password are both ‘admin’
(lower case). The name “admin” can’t be changed, and the
password should be modified and recorded at the time of installation.
2. The internal Interface IP address is set to 192.168.1.1 in the factory.
The system administrator needs to change it to private IP address
of the enterprise’s internal networks. Then set IP addresses of
External and DMZ interface according to the real IP addresses
allocated by ISP.
3. Internal network, external network and DMZ can’t communicate to
each other by default. So computers in the internal network can’t
access any Internet address when users connect the DFL-80 to
internal and external network. System administrator has to define
policies with proper permissions in Outgoing under the Policy menu,
such as to permit certain IP addresses in the internal network to
access some web addresses.
Q:
How to install the DFL-80 for the first time?
A:
There are six steps to follow:
Step 1: First connect the administrator’s PC and the Firewall’s internal
interface card to the same HUB or Switch, change PC’s IP
address to : 192.168.1.2 - 192.168.1.254. Then
135
restart the computer to activate new IP address. Run Browser
and enter http://192.168.1.1 in URL field to access Firewall
WebUI.
Step 2:
Browser will ask or the user’s name and password enter
‘admin’ and password.
Step 3: Then WebUI will request the user to change password. Change
it and record the new password. The user name is still ‘admin’.
Step 4: Set new Internal IP Address (enterprise’s private IP address)
and External IP Address (allocated by ISP provider).
Step 5:
If the new Internal IP Address doesn’t belong to 192.168.1.0
network, such as 172.16.0.1, the administrator needs to
change the Firewall’s IP address to 172.16.0.1,or other IP
address of the same network and restart the computer to
activate new IP address. After the new IP address is activated,
use browser to access http://172.16.0.1.
Step 6: Enter the main window of administration policies under WebUI,
click New Policy, go to Add New Policy window, click OK to
complete the installation process.
Q:
In the Outgoing menu, I set the source address to “Inside-Any”, the
destination address to “Outside-any”, the service to HTTP, and the action
to Permit. Why do the computers of the internal network still cannot
access the Internet?
A:
Usually the DNS of the clients point to the DNS server outside of the
firewall. When converting a URL to IP address, the browser sends out
DNS service packet to the external DNS server. If the firewall doesn’t
allow DNS service packet to pass, the URL cannot be mapped to the IP
address and the connection fails.
Q:
Why can’t users of external networks still store data into virtual server
when virtual server or IP mapping has been set successfully?
A:
In order to open a virtual server to external networks, Administrator needs
to make sure, in the Incoming menu, there is a policy of source address
pointing to external IP address, destination address to the virtual server
or Mapped IP and with permission to allow inward packets to pass
through.
136
Q:
Can Admin modify the internal and external interface IP addresses
anytime?
A:
No, because the names in the address table are set according to the IP
addresses of internal and external interface cards, and the source
address and destination address of policies are set according to address
table. The IP addresses of the DFL-80’s internal interface and external
interface are foundations of administration policies. If the administrator
wants to change the DFL-80’s IP address, the admin will need to clean
up all the administration policies and address table.
Q : Are there any rules to follow when setting up administration policies?
A:
When setting up policies, administrators need to follow [small to big]
principle. This means that when the source address, destination address
and service items of a policy is the subset of another policy, it is
necessary to set policy of the subset first. For example, the sequence
to set policies for individual worker, department, and every worker in the
company is:
Individual > Department > Every worker
If subset policies are defined after the main policies, policies defined by
the subset became invalid. For example, the new policy is:
Every worker > Department > Individual
The policies of departments and individuals are subsets of policies of
every worker, so policies defined by the latter two are invalid.
137
Setup Examples
Example 1: Allow the Internal network to be able to access the Internet
Example 2: The Internal network can only access Yahoo.com website
Example 3: Outside users can access the internal FTP server through Virtual
Servers
Example 4: Install a server inside the Internal network and have the Internet
(External) users access the server through IP Mapping
Example 1:
Allow the Internal network to be able to access the
Internet
Step 1. Enter the Outgoing window under the Policy menu.
Step 2. Click the New Entry button on the bottom of the screen.
Step 3. In the Add New Policy window, enter each parameter, then click OK.
Step 4. When the following screen appears, the setup is completed.
138
Example 2:
The Internal network can only access Yahoo.com
website.
Step 1. Enter the External window under the Address menu.
Step 2. Click the New Entry button.
Step 3. In the Add New Address window, enter relating parameters.
Step 4. Click OK to end the address table setup.
Step 5. Go to the Outgoing window under the Policy menu.
Step 6. Click the New Entry button.
Step 7. In the Add New Policy window, enter corresponding parameters.
Click OK.
139
Example 3:
Outside users can access the internal FTP server
through Virtual Servers
Step 1. Enter Virtual Server 1 under the Virtual Server menu.
Step 2. Click the ‘click here to configure’ button.
Step 3. Select an External IP address, then click OK.
Step 4. Click the New Service button on the bottom of the screen.
Step 5. Add the FTP service pointing to the internal server IP address.
Click OK.
Step 6. A new Virtual Service should appear.
Step 7. Go to the Incoming window under the Policy menu, then click on
the New Service button.
140
Step 8.
In the Add New Policy window, set each parameter, then
click OK.
Step 9.
An Incoming FTP policy should now be created.
Example 4:
Install a server inside the Internal network and have the
Internet (External) users access the server through IP
Mapping
Step 1. Enter the Mapped IP window under the Virtual Server menu.
Step 2. Click the New Entry button.
Step 3. In the Add New IP Mapping window, enter each parameter, and
then click OK.
141
Technical Specifications
Standards
IEEE 802.3
IEEE 802.3u
IEEE 802.3x
ANSI / IEEE 802.3
10Base-T Ethernet
100Base-TX Fast Ethernet
Flow control
NWay Auto-Negotiation
Diagnostic LED
Power
(1) COM Link / Activity - RJ-45 connector, 10/100Mbps autonegotiation, Auto-crossover cable adaptation
(1) WAN Link / Activity - RJ-45 connector, 10/100Mbps autonegotiation, Auto-crossover cable adaptation
(4) LAN Link / Activity - RJ-45 connector, 10/100Mbps autonegotiation, Auto-crossover cable adaptation
Temperature
Operating: 32o to 140oF (0o to 60oC)
Humidity:
95% maximum, non-condensing
Power Input:
External Power Supply: DC5V, 3.0A
Device Management Security:
Detection of DoS (Denial of Service)
Stateful Packet Inspection (SPI)
Intruder Attack Logging
NAT / Transparent
DMZ
Filtering
Safety & Emissions:
FCC Class B
CE-Mark
142
Technical Specifications
Physical Dimensions:
L = 9.25 inches (233 mm)
W = 6.5 inches (165 mm)
H = 1.38 inches (35 mm)
Modulation Techniques:
IP Sec
IP Authentication Header (AH)
Internet Key Exchange (IKE) authentication and
Key Management
Authentication (MD5 / SHA-1)
NULL/DES/3DES Encryption Algorithm and their
use with IPSec
IP Encapsulating Security Payload (ESP)
Internet Security Association and Key
PPTP Server / Client
Weight:
2.0 lbs. (907g)
143
Contacting Technical Support
You can find the most recent software and user documentation on the D-Link website.
D-Link provides free technical support for customers within the United States for the
duration of the warranty period on this product.
U.S. customers can contact D-Link technical support through our web site,
or by phone.
Tech Support for customers within the United States:
D-Link Technical Support over the Telephone:
(877) 453-5465
24 hours a day, seven days a week.
D-Link Technical Support over the Internet:
http://support.dlink.com
email:[email protected]
Tech Support for customers within Canada:
D-Link Technical Support over the Telephone:
(800) 361-5265
Monday to Friday 8:30am to 9:00pm EST
D-Link Technical Support over the Internet:
http://support.dlink.ca
email:[email protected]
When contacting technical support, please provide the following information:
144
•
Serial number of the unit
•
Model number or product name
•
Software type and version number
Warranty and Registration
(USA only)
Subject to the terms and conditions set forth herein, D-Link Systems, Inc. (“D-Link”) provides this Limited
warranty for its product only to the person or entity that originally purchased the product from:
•
•
D-Link or its authorized reseller or distributor and
Products purchased and delivered within the fifty states of the United States, the District of
Columbia, U.S. Possessions or Protectorates, U.S. Military Installations, addresses with an
APO or FPO.
Limited Warranty: D-Link warrants that the hardware portion of the D-Link products described
below will be free from material defects in workmanship and materials from the date of original retail
purchase of the product, for the period set forth below applicable to the product type (“Warranty
Period”), except as otherwise stated herein.
1-Year Limited Warranty for the Product(s) is defined as follows:
•
•
•
Hardware (excluding power supplies and fans) Three (1) Years
Power Supplies and Fans One (1) Year
Spare parts and spare kits Ninety (90) days
D-Link’s sole obligation shall be to repair or replace the defective Hardware during the Warranty Period
at no charge to the original owner or to refund at D-Link’s sole discretion. Such repair or replacement will
be rendered by D-Link at an Authorized D-Link Service Office. The replacement Hardware need not be
new or have an identical make, model or part. D-Link may in its sole discretion replace the defective
Hardware (or any part thereof) with any reconditioned product that D-Link reasonably determines is
substantially equivalent (or superior) in all material respects to the defective Hardware. Repaired or
replacement Hardware will be warranted for the remainder of the original Warranty Period from the date
of original retail purchase. If a material defect is incapable of correction, or if D-Link determines in its sole
discretion that it is not practical to repair or replace the defective Hardware, the price paid by the original
purchaser for the defective Hardware will be refunded by D-Link upon return to D-Link of the defective
Hardware. All Hardware (or part thereof) that is replaced by D-Link, or for which the purchase price is
refunded, shall become the property of D-Link upon replacement or refund.
Limited Software Warranty: D-Link warrants that the software portion of the product (“Software”)
will substantially conform to D-Link’s then current functional specifications for the Software, as set forth
in the applicable documentation, from the date of original retail purchase of the Software for a period of
ninety (90) days (“Warranty Period”), provided that the Software is properly installed on approved
hardware and operated as contemplated in its documentation. D-Link further warrants that, during the
Warranty Period, the magnetic media on which D-Link delivers the Software will be free of physical
defects. D-Link’s sole obligation shall be to replace the non-conforming Software (or defective media)
with software that substantially conforms to D-Link’s functional specifications for the Software or to
refund at D-Link’s sole discretion. Except as otherwise agreed by D-Link in writing, the replacement
Software is provided only to the original licensee, and is subject to the terms and conditions of the
license granted by D-Link for the Software. Software will be warranted for the remainder of the original
Warranty Period from the date or original retail purchase. If a material non-conformance is incapable of
correction, or if D-Link determines in its sole discretion that it is not practical to replace the nonconforming Software, the price paid by the original licensee for the non-conforming Software will be
refunded by D-Link; provided that the non-conforming Software (and all copies thereof) is first returned
to D-Link. The license granted respecting any Software for which a refund is given automatically
terminates.
Non-Applicability of Warranty: The Limited Warranty provided hereunder for hardware and software
of D-Link’s products will not be applied to and does not cover any refurbished product and any product
purchased through the inventory clearance or liquidation sale or other sales in which D-Link, the sellers,
or the liquidators expressly disclaim their warranty obligation pertaining to the product and in that case,
the product is being sold “As-Is” without any warranty whatsoever including, without limitation, the
Limited Warranty as described herein, notwithstanding anything stated herein to the contrary.
Submitting A Claim: The customer shall return the product to the original purchase point based on its
return policy. In case the return policy period has expired and the product is within warranty, the
customer shall submit a claim to D-Link as outlined below:
145
•
The customer must submit with the product as part of the claim a written description of the
Hardware defect or Software nonconformance in sufficient detail to allow D-Link to confirm
the same.
•
The original product owner must obtain a Return Material Authorization (“RMA”) number from
the Authorized D-Link Service Office and, if requested, provide written proof of purchase of
the product (such as a copy of the dated purchase invoice for the product) before the
warranty service is provided.
•
After an RMA number is issued, the defective product must be packaged securely in the
original or other suitable shipping package to ensure that it will not be damaged in transit, and
the RMA number must be prominently marked on the outside of the package. Do not include any
manuals or accessories in the shipping package. D-Link will only replace the defective portion
of the Product and will not ship back any accessories.
•
The customer is responsible for all in-bound shipping charges to D-Link. No Cash on Delivery
(“COD”) is allowed. Products sent COD will either be rejected by D-Link or become the
property of D-Link. Products shall be fully insured by the customer. D-Link will not be held
responsible for any packages that are lost in transit to D-Link. The repaired or replaced
packages will be shipped to the customer via UPS Ground or any common carrier selected by
D-Link, with shipping charges prepaid. Expedited shipping is available if shipping charges are
prepaid by the customer and upon request.
•
Return Merchandise Ship-To Address
USA: 53 Discovery Drive, Irvine, CA 92618
Canada: 2180 Winston Park Drive, Oakville, ON, L6H 5W1 (Visit http://www.dlink.ca for detailed
warranty information within Canada)
D-Link may reject or return any product that is not packaged and shipped in strict compliance with the
foregoing requirements, or for which an RMA number is not visible from the outside of the package. The
product owner agrees to pay D-Link’s reasonable handling and return shipping charges for any product
that is not packaged and shipped in accordance with the foregoing requirements, or that is determined
by D-Link not to be defective or non-conforming.
What Is Not Covered: This limited warranty provided by D-Link does not cover: Products, if in D-Link’s
judgment, have been subjected to abuse, accident, alteration, modification, tampering, negligence, misuse,
faulty installation, lack of reasonable care, repair or service in any way that is not contemplated in the
documentation for the product, or if the model or serial number has been altered, tampered with, defaced
or removed; Initial installation, installation and removal of the product for repair, and shipping costs;
Operational adjustments covered in the operating manual for the product, and normal maintenance;
Damage that occurs in shipment, due to act of God, failures due to power surge, and cosmetic damage;
Any hardware, software, firmware or other products or services provided by anyone other than DLink; Products that have been purchased from inventory clearance or liquidation sales or other sales in
which D-Link, the sellers, or the liquidators expressly disclaim their warranty obligation pertaining to the
product. Repair by anyone other than D-Link or an Authorized D-Link Service Office will void this
Warranty.
Disclaimer of Other Warranties: EXCEPT FOR THE LIMITED WARRANTY SPECIFIED HEREIN, THE
PRODUCT IS PROVIDED “AS-IS” WITHOUT ANY WARRANTY OF ANY KIND WHATSOEVER INCLUDING,
WITHOUT LIMITATION, ANY WARRANTY OF MERCHANTABILITY, FITNESS FOR A PARTICULAR PURPOSE
AND NON-INFRINGEMENT. IF ANY IMPLIED WARRANTY CANNOT BE DISCLAIMED IN ANY TERRITORY
WHERE A PRODUCT IS SOLD, THE DURATION OF SUCH IMPLIED WARRANTY SHALL BE LIMITED TO
NINETY (90) DAYS. EXCEPT AS EXPRESSLY COVERED UNDER THE LIMITED WARRANTY PROVIDED
HEREIN, THE ENTIRE RISK AS TO THE QUALITY, SELECTION AND PERFORMANCE OF THE PRODUCT IS
WITH THE PURCHASER OF THE PRODUCT.
Limitation of Liability: TO THE MAXIMUM EXTENT PERMITTED BY LAW, D-LINK IS NOT LIABLE
UNDER ANY CONTRACT, NEGLIGENCE, STRICT LIABILITY OR OTHER LEGAL OR EQUITABLE THEORY
FOR ANY LOSS OF USE OF THE PRODUCT, INCONVENIENCE OR DAMAGES OF ANY CHARACTER,
WHETHER DIRECT, SPECIAL, INCIDENTAL OR CONSEQUENTIAL (INCLUDING, BUT NOT LIMITED TO,
DAMAGES FOR LOSS OF GOODWILL, LOSS OF REVENUE OR PROFIT, WORK STOPPAGE, COMPUTER
FAILURE OR MALFUNCTION, FAILURE OF OTHER EQUIPMENT OR COMPUTER PROGRAMS TO WHICH DLINK’S PRODUCT IS CONNECTED WITH, LOSS OF INFORMATION OR DATA CONTAINED IN, STORED ON,
OR INTEGRATED WITH ANY PRODUCT RETURNED TO D-LINK FOR WARRANTY SERVICE) RESULTING
FROM THE USE OF THE PRODUCT, RELATING TO WARRANTY SERVICE, OR ARISING OUT OF ANY
BREACH OF THIS LIMITED WARRANTY, EVEN IF D-LINK HAS BEEN ADVISED OF THE POSSIBILITY OF
SUCH DAMAGES. THE SOLE REMEDY FOR A BREACH OF THE FOREGOING LIMITED WARRANTY IS
REPAIR, REPLACEMENT OR REFUND OF THE DEFECTIVE OR NON-CONFORMING PRODUCT. THE MAXIMUM
146
LIABILITY OF D-LINK UNDER THIS WARRANTY IS LIMITED TO THE PURCHASE PRICE OF THE PRODUCT
COVERED BY THE WARRANTY. THE FOREGOING EXPRESS WRITTEN WARRANTIES AND REMEDIES
ARE EXCLUSIVE AND ARE IN LIEU OF ANY OTHER WARRANTIES OR REMEDIES, EXPRESS, IMPLIED OR
STATUTORY.
Governing Law: This Limited Warranty shall be governed by the laws of the State of California. Some
states do not allow exclusion or limitation of incidental or consequential damages, or limitations on how
long an implied warranty lasts, so the foregoing limitations and exclusions may not apply. This limited
warranty provides specific legal rights and the product owner may also have other rights which vary
from state to state.
Trademarks: D-Link is a registered trademark of D-Link Systems, Inc. Other trademarks or registered
trademarks are the property of their respective manufacturers or owners.
Copyright Statement: No part of this publication or documentation accompanying this Product may
be reproduced in any form or by any means or used to make any derivative such as translation,
transformation, or adaptation without permission from D-Link Corporation/D-Link Systems, Inc., as
stipulated by the United States Copyright Act of 1976. Contents are subject to change without prior
notice. Copyright© 2002 by D-Link Corporation/D-Link Systems, Inc. All rights reserved.
CE Mark Warning: This is a Class B product. In a domestic environment, this product may cause radio
interference, in which case the user may be required to take adequate measures.
FCC Statement: This equipment has been tested and found to comply with the limits for a Class B
digital device, pursuant to part 15 of the FCC Rules. These limits are designed to provide reasonable
protection against harmful interference in a residential installation. This equipment generates, uses, and
can radiate radio frequency energy and, if not installed and used in accordance with the instructions,
may cause harmful interference to radio communication. However, there is no guarantee that interference
will not occur in a particular installation. If this equipment does cause harmful interference to radio or
television reception, which can be determined by turning the equipment off and on, the user is encouraged
to try to correct the interference by one or more of the following measures:
•
•
•
•
Reorient or relocate the receiving antenna.
Increase the separation between the equipment and receiver.
Connect the equipment into an outlet on a circuit different from that to which the receiver is
connected.
Consult the dealer or an experienced radio/TV technician for help.
For detailed warranty outside the United States, please contact corresponding local
D-Link office.
FCC Caution:
The manufacturer is not responsible for any radio or TV interference caused by unauthorized
modifications to this equipment; such modifications could void the user’s authority to operate the
equipment.
(1) The devices are restricted to indoor operations within the 5.15 to 5.25GHz range. (2) For this
device to operate in the 5.15 to 5.25GHz range, the devices must use integral antennas.
This device complies with Part 15 of the FCC Rules. Operation is subject to the following two
conditions: (1) This device may not cause harmful interference, and (2) this device must accept
any interference received, including interference that may cause undesired operation.
IMPORTANT NOTE:
FCC Radiation Exposure Statement:
This equipment complies with FCC radiation exposure limits set forth for an uncontrolled
environment. The antenna(s) used for this equipment must be installed to provide a separation
distance of at least eight inches (20 cm) from all persons.
This equipment must not be operated in conjunction with any other antenna.
Register your D-Link product online at http://support.dlink.com/register/
(03/28/2003)
147